There’s something genuinely romantic about half-up half-down hairstyles — they strike that perfect balance between polished and relaxed, keeping hair out of your face while still letting it flow freely down your back. When you add braids into the mix, suddenly you’ve got texture, dimension, and visual interest that feels intentional and effort-driven. And then there are the flowers — fresh blooms, dried botanicals, or delicate artificial florals that transform a simple updo into something that feels almost bridal or enchantingly bohemian.
The beauty of braided half-up half-down styles with flowers is their sheer versatility. Whether you’re getting ready for a wedding, a garden party, a music festival, or just want to feel put-together on an ordinary Tuesday, there’s a version that works for your hair type, your skill level, and your personal aesthetic. Some of these styles are quick enough to master in five minutes once you understand the technique, while others take a bit more finesse and planning. What they all share is that combination of texture, elegance, and that undeniable touch of whimsy that flowers bring to any hairstyle.
The following eighteen styles show you exactly how to weave braids and flowers into your half-up half-down hair, from simple single-braid versions to intricate multi-strand plaits adorned with everything from baby’s breath to oversized garden roses. Each style includes the specific techniques you need, tips for securing everything so it actually stays put throughout the day, and guidance on which flowers work best for different occasions and hair types.
1. Classic Three-Strand Braid With Cascading Baby’s Breath
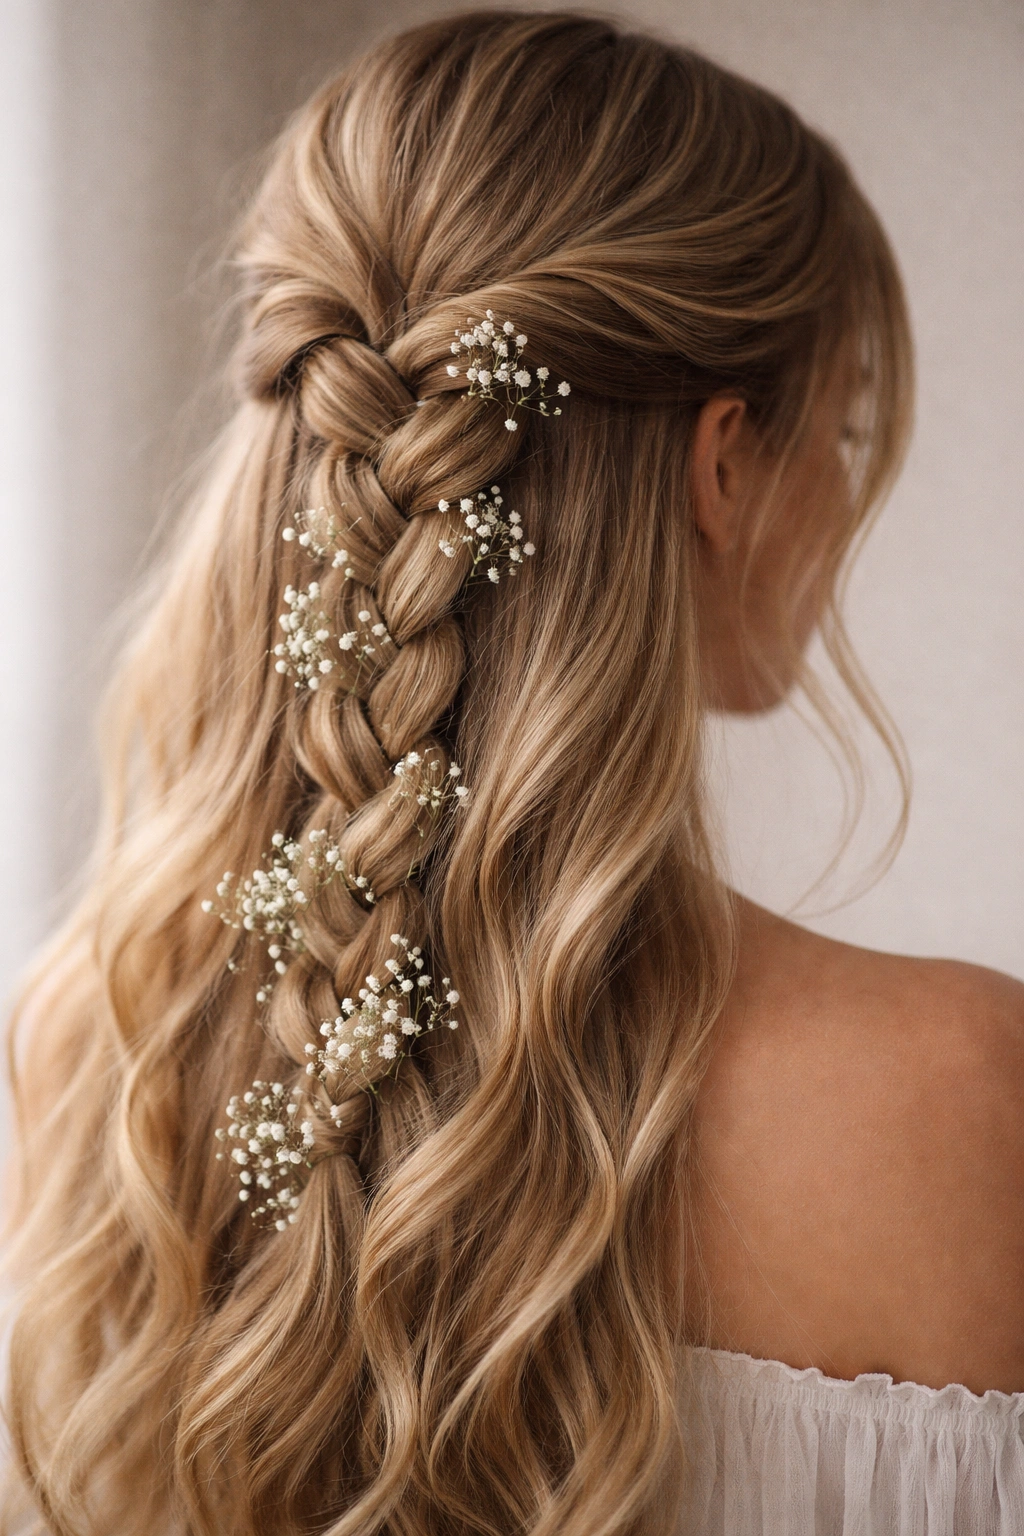
This is the style that works on virtually every hair type and occasion — clean, uncomplicated, and undeniably romantic without veering into costume territory. You’re creating a standard three-strand braid from one side of your head to the other at roughly ear level, then securing it at the back with an elastic. The half-down portion stays completely straight or gently curled, creating contrast with the textured braid above it.
Why This Style Never Goes Out of Date
Three-strand braids are the foundation of every other braid variation, so if you can do this well, everything else becomes much easier. The simplicity is actually its greatest strength — it’s forgiving enough for beginners but looks polished enough for formal events. Baby’s breath is the traditional choice here because the tiny, delicate white blooms create an ethereal quality without overwhelming the braid itself.
Making It Work Across Hair Types
- Works beautifully on straight hair, wavy hair, and even thick curly hair when you start with detangled, moisturized strands
- If your hair is very fine or slippery, apply a light texturizing spray or dry shampoo to the crown before braiding — this creates grip and prevents the braid from slipping out
- For coarse or kinky textures, use a light hold cream before braiding to help strands stay together smoothly
- The half-down section can be left completely loose, gently waved with a curling iron, or crimped for extra texture
Pro tip: Insert sprigs of baby’s breath directly into the braid as you’re creating it, weaving them in between the three strands rather than trying to attach them afterward. This keeps everything secure and looks more intentional.
2. Double Dutch Braids That Meet in the Middle
Instead of one braid running from side to side, you’re creating two separate Dutch braids (which are three-strand braids worked in the opposite direction, creating a raised, dimensional look). Each one starts at the temple on its respective side and travels backward toward the center of your head, where they meet and are secured together. The fuller half-down section frames your face beautifully on both sides.
What Makes Double Dutch Different
Dutch braids create raised texture that sits on top of the scalp rather than lying flat, making them visually bolder than traditional three-strand braids. They photograph incredibly well and feel more substantial, so if you want something that looks genuinely intentional and labor-intensive, this is the move. The two braids meeting in the middle creates a natural focal point where a large flower or flower cluster belongs perfectly.
Step-by-Step Breakdown
- Part your hair down the center from forehead to nape, then clip one side away
- Starting at one temple, begin a Dutch braid by taking three sections from that side and crossing each strand underneath the others rather than over them
- Continue braiding backward, weaving in new sections of hair from the front and sides as you travel toward the back of your head
- Repeat on the other side, so both braids meet at the nape
- Secure both braids together with one elastic, then tuck a large flower or gardenia directly into the junction where they meet
3. Halo Braid With Woven Florals
A halo braid circles your entire head like a crown, with the front and sides braided while the back remains down and flowing. This style requires a bit more patience to execute, but the result feels genuinely special and works beautifully for events where you want to feel elevated but not overly formal. Thin stems of flowers can be woven directly into the braid as you work, or delicate blooms can be tucked underneath the finished braid with bobby pins for flexibility.
Creating the Halo Effect
The key is understanding that you’re not creating one continuous braid around your head. Instead, you’re creating two separate braids that start at opposite temples, travel backward along the sides and back of your head, and meet in the center back. Think of it as two half-halos that join together rather than one complete circle. This is much easier to manage than trying to braid all the way around your own head.
Flower Placement That Stays Secure
- Use flowers with sturdy stems rather than delicate petals — ranunculus, roses, and hypericum berries all work well
- Weave thin stems directly into the braid as you create it, securing them under existing strands
- Alternatively, create the entire braid first, then use bobby pins to tuck individual flowers or small clusters underneath the braid
- Spray the entire finished style with a medium-hold hairspray to lock everything in place
4. Fishtail Braid Half-Up With Peonies
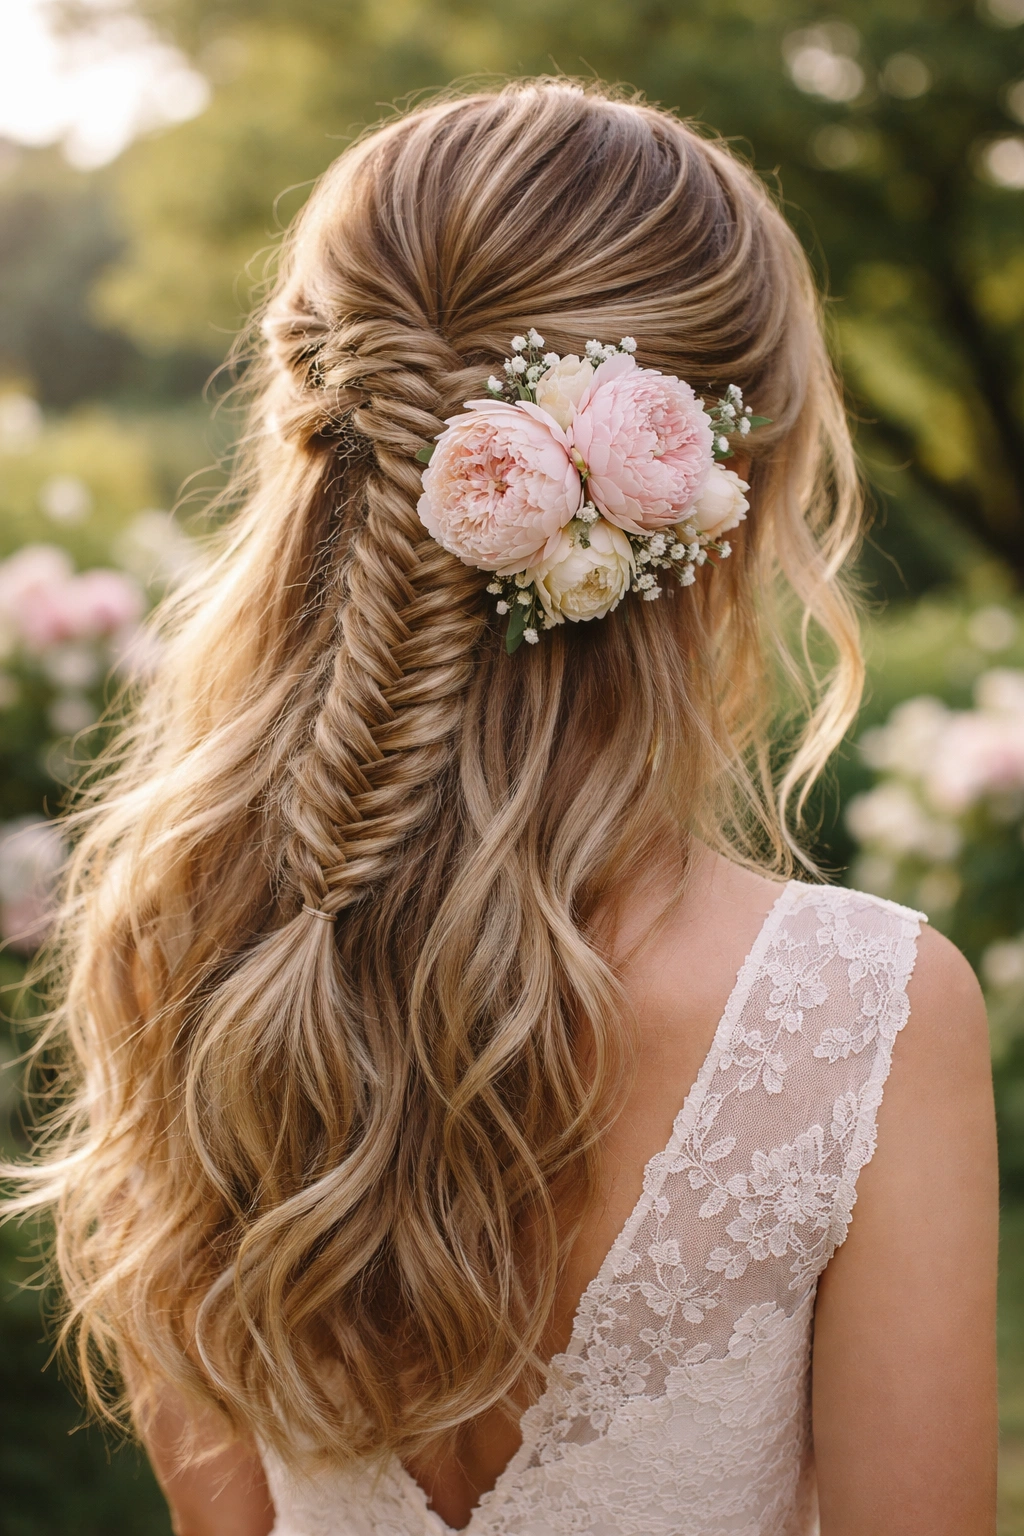
The fishtail braid is where you take just two sections instead of three and cross tiny strands alternately from the outside of each section into the middle, creating a pattern that genuinely resembles a fish’s tail. It looks intricate and time-consuming but is actually simpler than a three-strand braid once you get the rhythm. Starting from one side and braiding to the back, then securing with a large peony or peony cluster transforms this into something garden-party elegant.
Why Fishtail Works With Bold Flowers
Because the fishtail braid itself creates a lot of visual texture with its woven pattern, it pairs beautifully with large, statement flowers that have body and dimension. Peonies are perfect because they’re voluminous enough to stand out against the intricate braid without getting lost in it. The combination feels intentional and balanced rather than overcrowded.
Mastering the Fishtail Technique
- Start with two equal sections of hair held in each hand
- Take a thin strand from the outside of the right section and cross it over to join the left section
- Take a thin strand from the outside of the left section and cross it over to join the right section
- Keep alternating, pulling the strands just tight enough that the braid holds but not so tight that it damages hair
- The finished braid should have a feathery, delicate appearance with sections that fan outward slightly
Pro tip: Fishtails look best when they’re slightly loose and textured. After you finish the braid, gently pull the sides outward to make the weave appear wider and more dimensional.
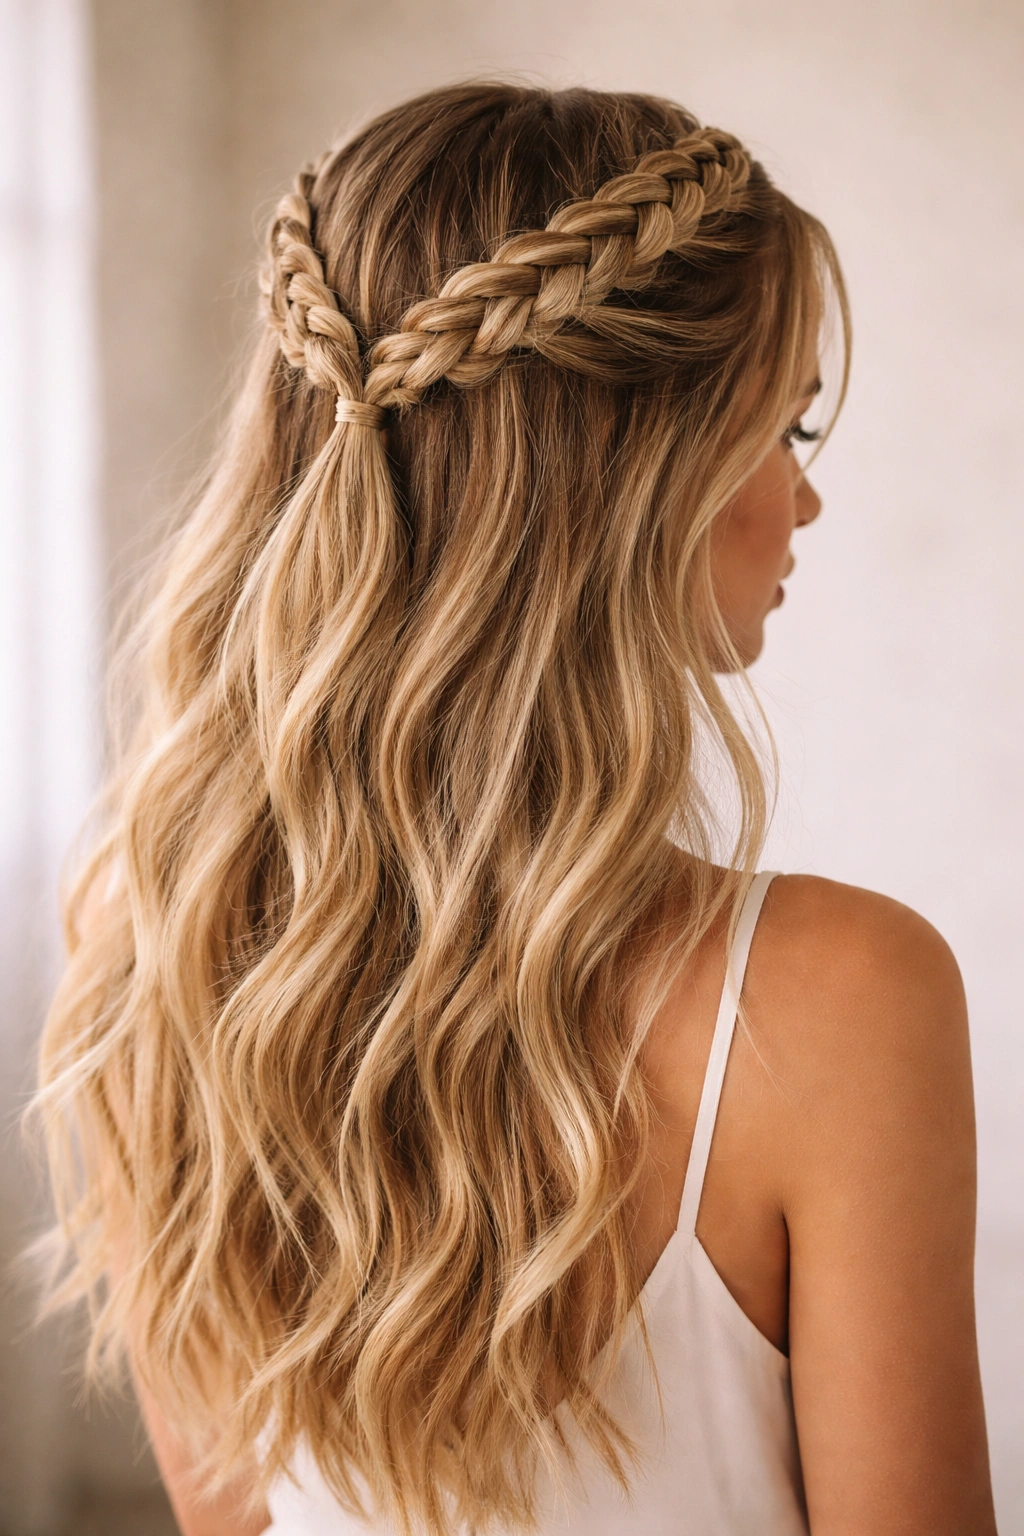
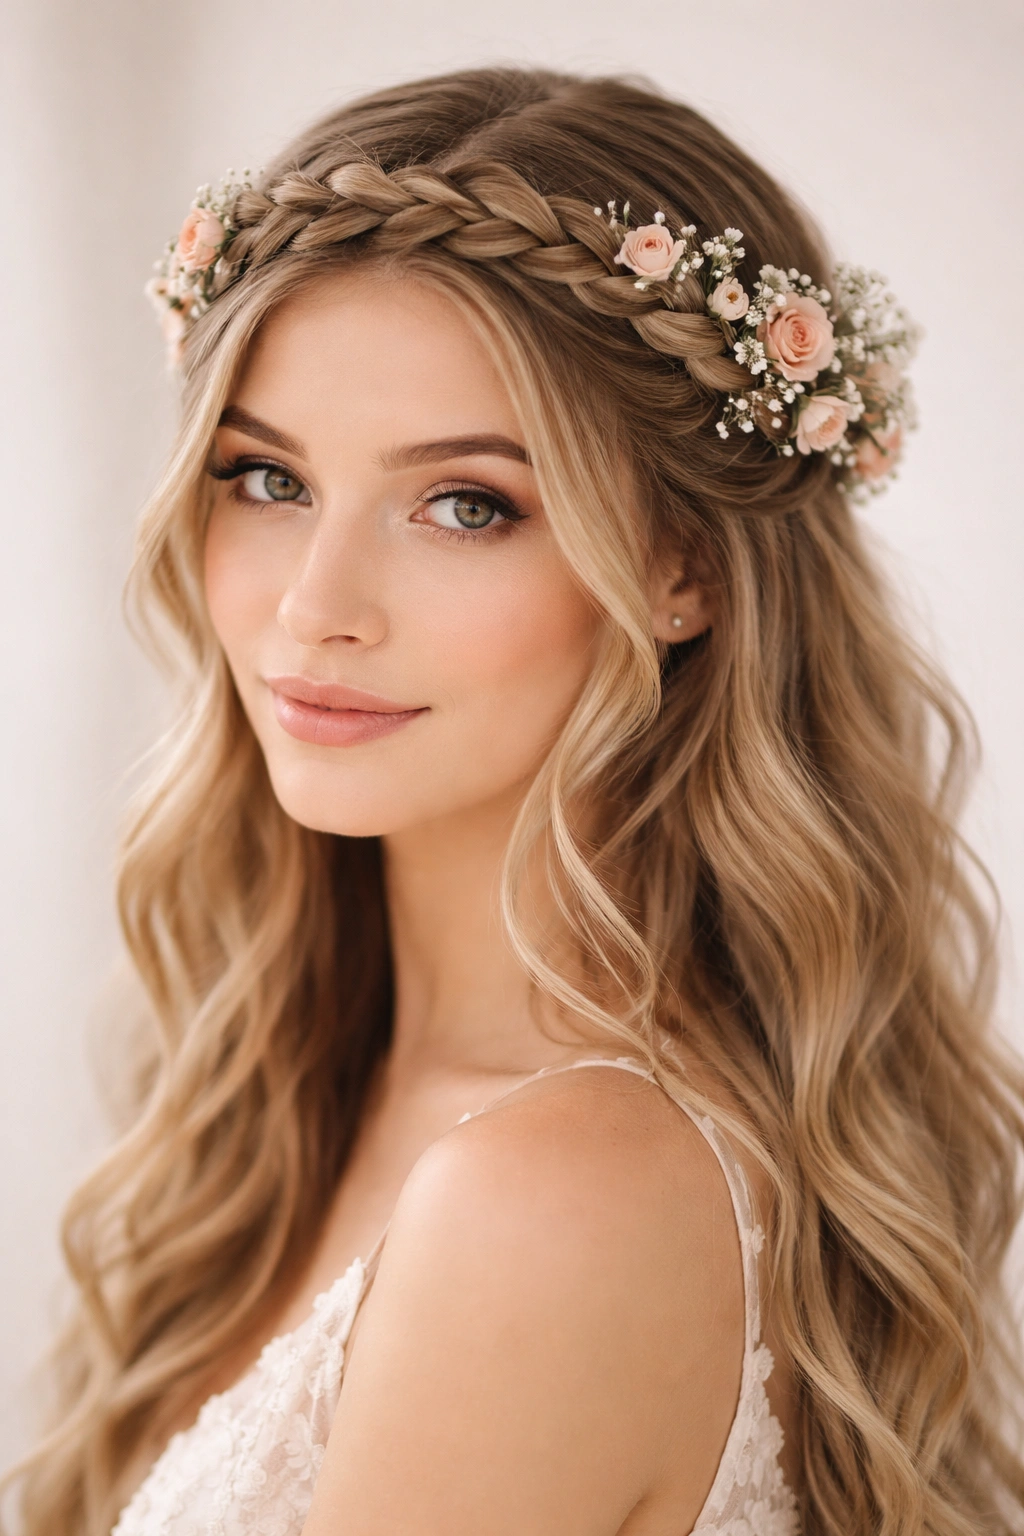
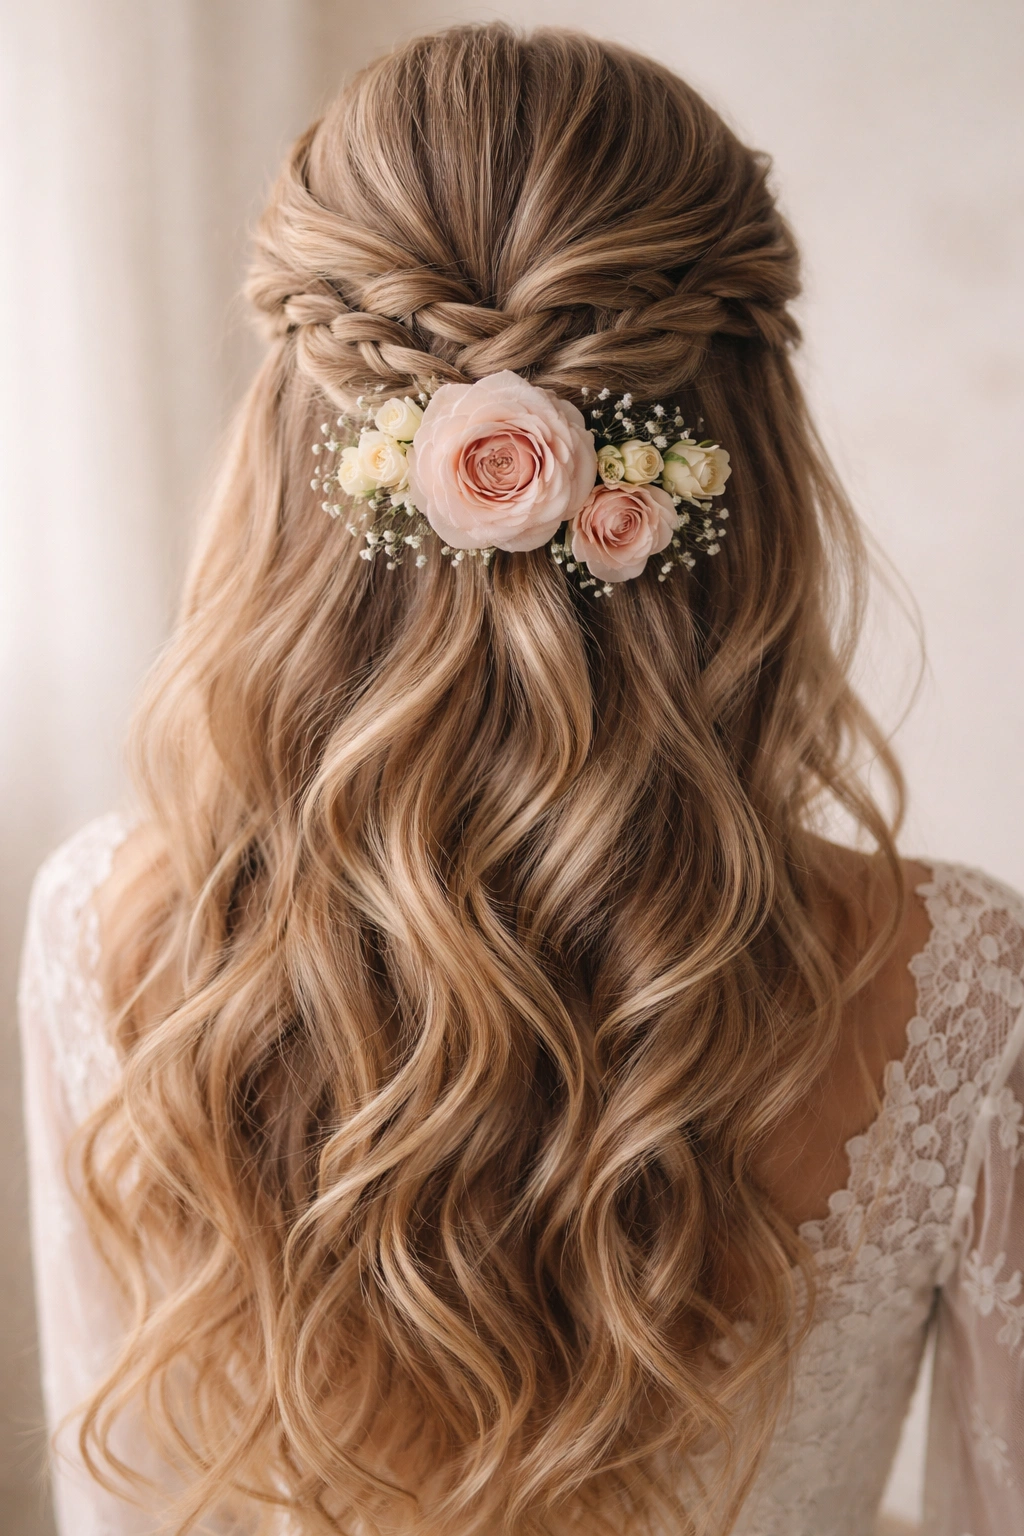
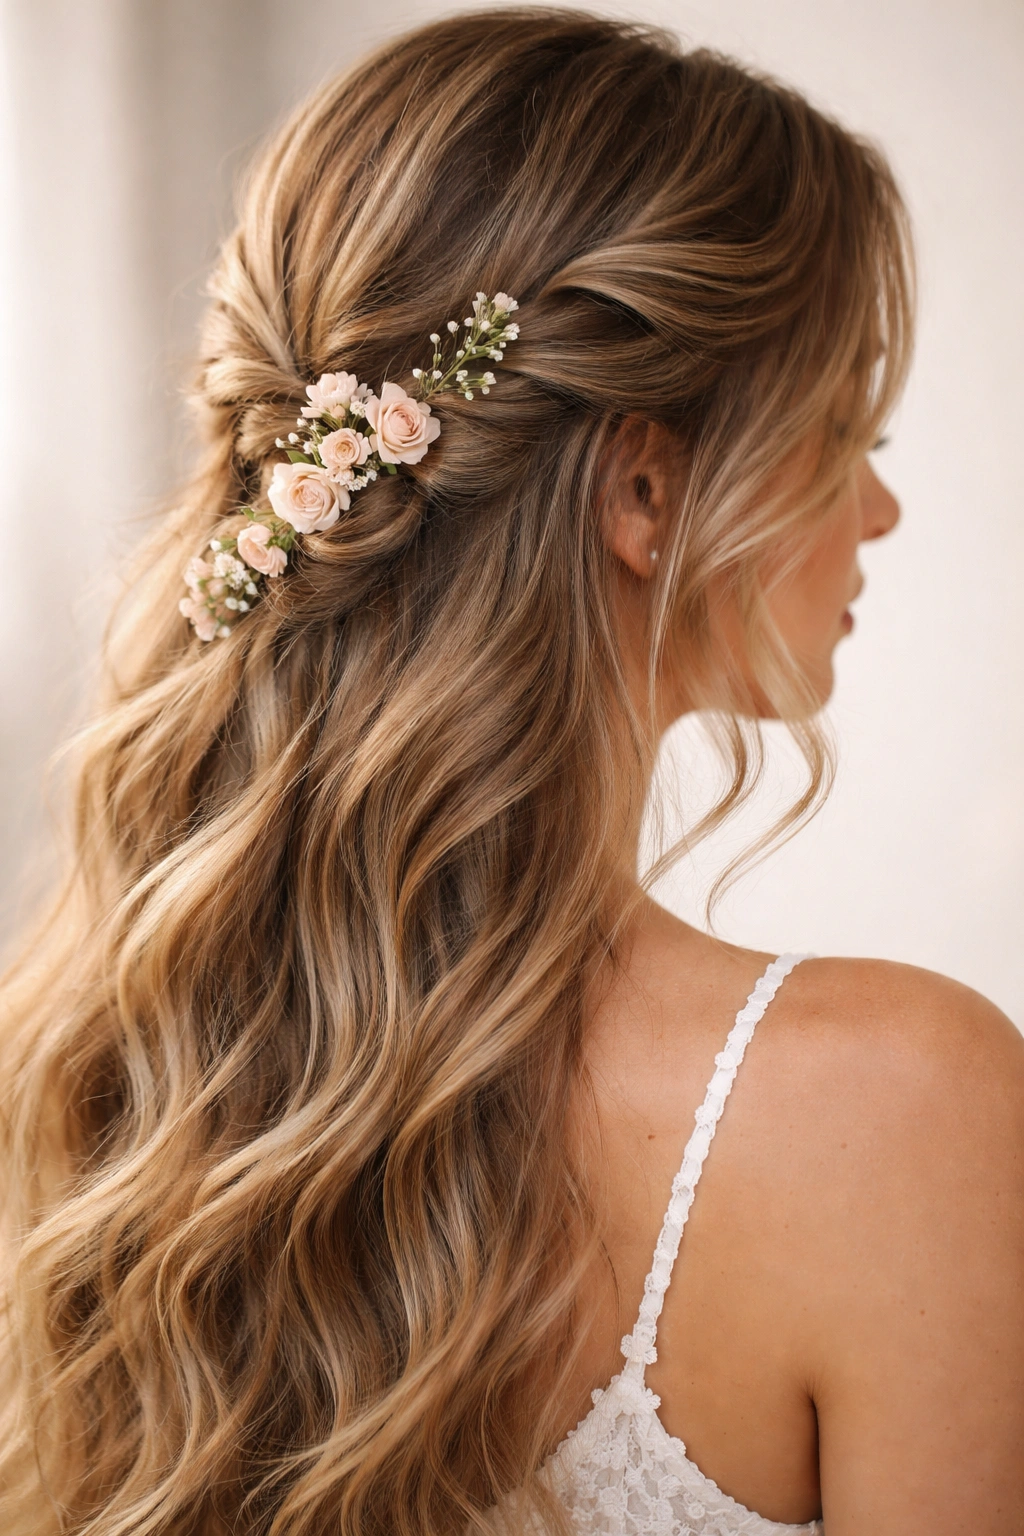
5. Crown Braid With Miniature Roses
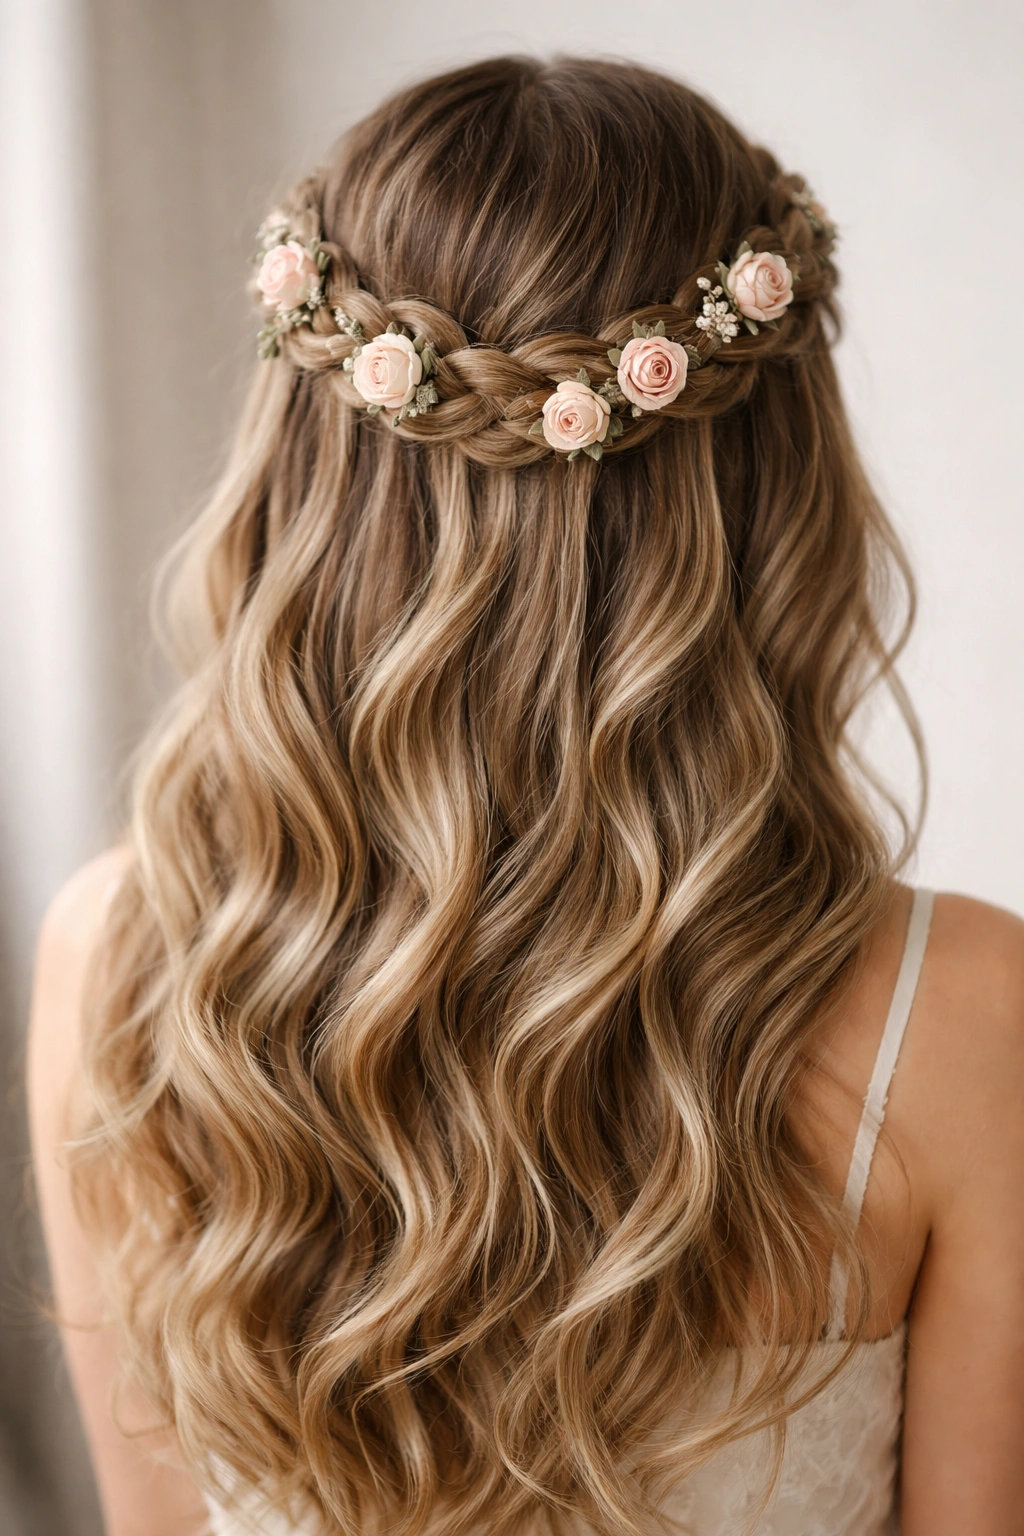
This variation is similar to the halo braid but smaller in scale — instead of braiding all the way around your head, you’re creating a single braid that curves across the crown from one side to the other, almost like a decorative band sitting on top. The rest of your hair falls completely down. Tiny garden roses or spray roses tucked throughout the braid create delicate detail.
Creating Defined Crown Placement
Start the braid at one temple (or slightly higher if you want it to sit more on the crown itself), travel backward along the crown toward the opposite temple, and secure the end there. The braid should feel like an accent that enhances your natural crown rather than an elaborate updo. This is particularly beautiful if you have long hair because it keeps most of it down while adding structure and elegance to the top.
Securing Miniature Roses
- Miniature roses have smaller stems, making them easier to tuck into a braid than larger varieties
- Insert them as you braid by laying a rose stem along one of your three sections and braiding over it, securing it within the braid itself
- Leave small stems protruding from the braid for a naturally gathered look
- Use bobby pins to anchor any roses that slip, securing them to both the braid and your hair underneath
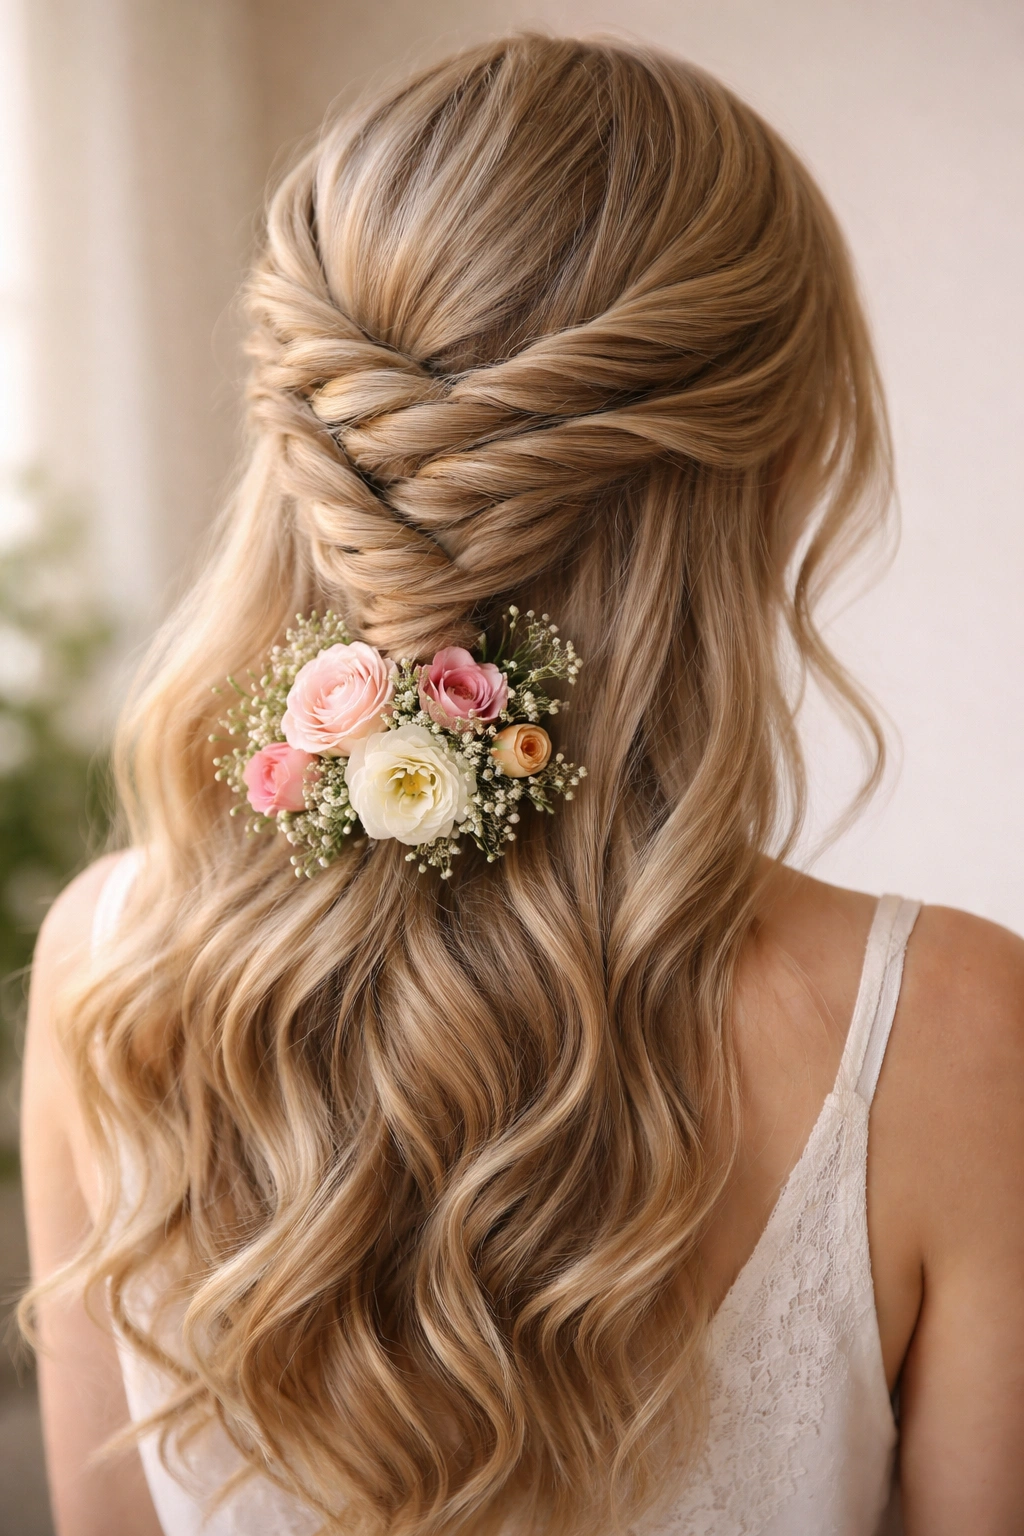
6. Twisted Half-Up With Scattered Dried Flowers
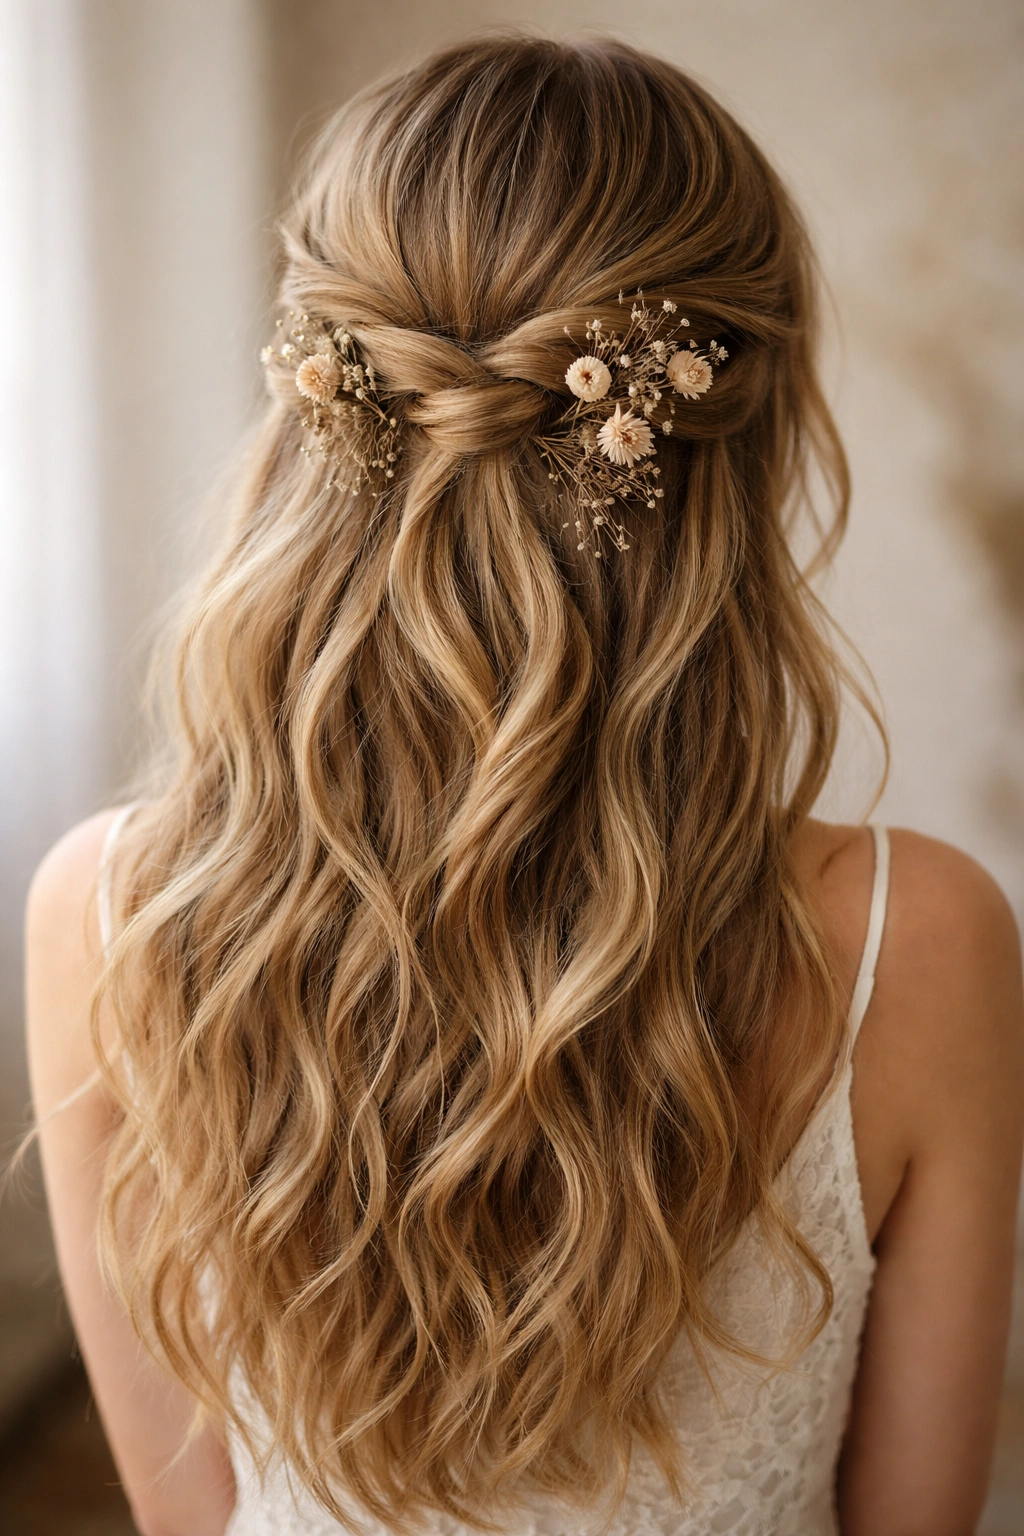
This style swaps braiding for twisting, which creates a different texture and is honestly easier to execute if you’re not comfortable with braids yet. You’re taking a section of hair from each side of your head, twisting each one separately, then bringing them to the back where they’re secured together. The beauty of using dried flowers here is their durability — they won’t wilt, they’re lighter weight, and they create an ethereal, boho aesthetic that photographs beautifully.
Why Twists Are Underrated
Twists create a smooth, rope-like texture that’s elegant and refined in a different way than braids. They take less time to master, they work beautifully on slippery fine hair where braids might slip out, and they genuinely feel less formal than braids while still looking intentional. The half-up portion creates a softer silhouette than a structured braid would.
Incorporating Dried Flowers
- Dried flowers are ideal for twists because they’re lightweight and won’t weigh down delicate hair
- Options include dried baby’s breath, dried pampas grass, dried eucalyptus, and color-preserved roses
- Tuck individual stems into the twist as you work, or after both twists are secured together at the back, arrange dried flowers in and around the base of the secured section
- Dried flowers don’t require water or special care, so they’re perfect for all-day wear
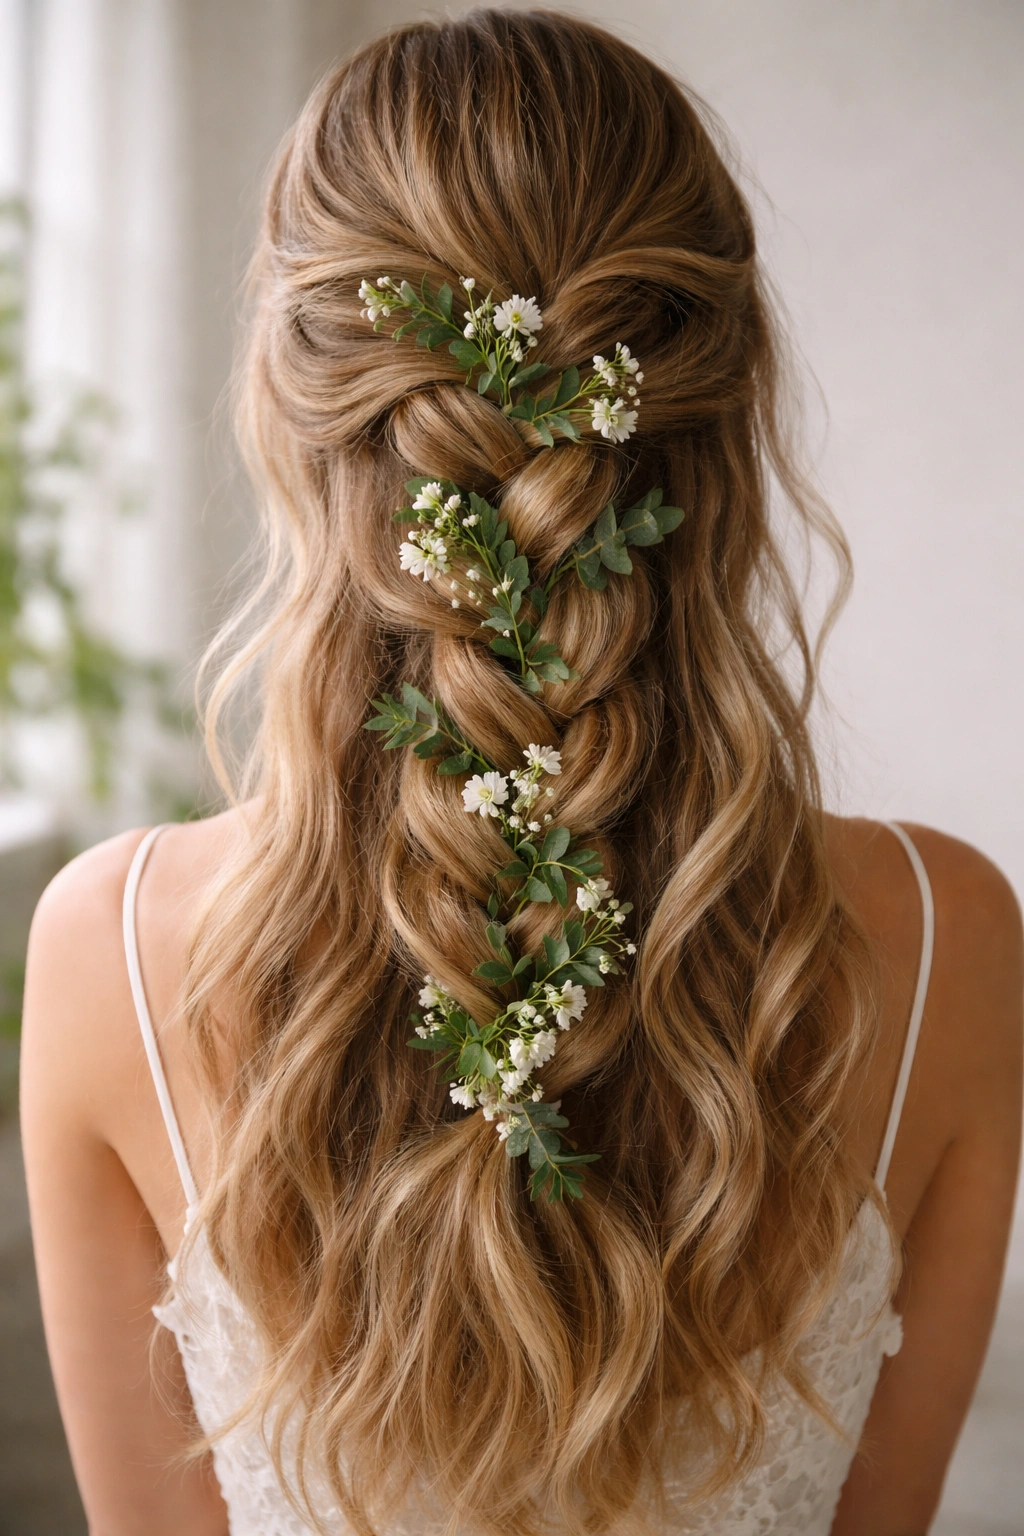
7. Four-Strand Braid With Woven Greenery and White Blooms
A four-strand braid creates a more complex, visually thicker braid than a traditional three-strand version. Instead of three sections being woven together, you’re working with four, which means the pattern is more intricate and the finished braid is noticeably more voluminous. Incorporating greenery like eucalyptus and white flowers creates a romantic, garden-inspired look that feels special without being costume-like.
Mastering Four-Strand Braiding
- Divide your hair into four equal sections
- Take the far-right strand and cross it over two strands toward the left, so it’s now second from the left
- Take the far-left strand and cross it over two strands toward the right, so it’s now second from the right
- Continue alternating, always crossing the outer strand over two sections
- This creates a pattern with a central strand that appears to run down the middle
Weaving in Greenery and Flowers Strategically
- As you braid, lay sprigs of eucalyptus or other greenery along one of your four strands and braid over it
- Add white blooms (baby’s breath, wax flower, or small roses) in the same way, distributing them evenly throughout the braid
- The finished effect should look like flowers and greenery are emerging from within the braid, not attached on top of it
8. Infinity Braid Half-Up With Garden Roses
An infinity braid (also called a figure-eight braid or twisted infinity braid) creates a looped, interlocking pattern that’s genuinely stunning and unique. It’s more complex to execute, but the visual payoff is worth the extra effort. Starting from one side and creating two looping sections that eventually meet in the middle at the back, then securing with a large garden rose, creates an undeniably romantic, statement-making style.
Understanding the Infinity Pattern
The infinity braid works by creating two intertwined loops that mirror each other. Start at one temple with a standard three-strand braid, but as you braid backward, you’ll weave the braid in a figure-eight pattern rather than a straight line. It sounds more complicated than it is once you see it in action. The key is understanding that you’re creating a continuous S-curve shape rather than a straight path backward.
Securing Statement Flowers
- Garden roses with their full, lush petals are the perfect choice for this style — the complexity of the flower matches the complexity of the braid
- Secure the finished infinity braid at the center back with a clear elastic, then use bobby pins to attach a large rose directly into the base of the secured section
- Consider adding greenery like salal leaves or eucalyptus around the rose for a finished, bridal appearance
Pro tip: Practice the infinity braid pattern on a friend or even a braid training head before attempting it on yourself. The mental map becomes clear once you see it happen, but it’s harder to execute on your own head without practice.
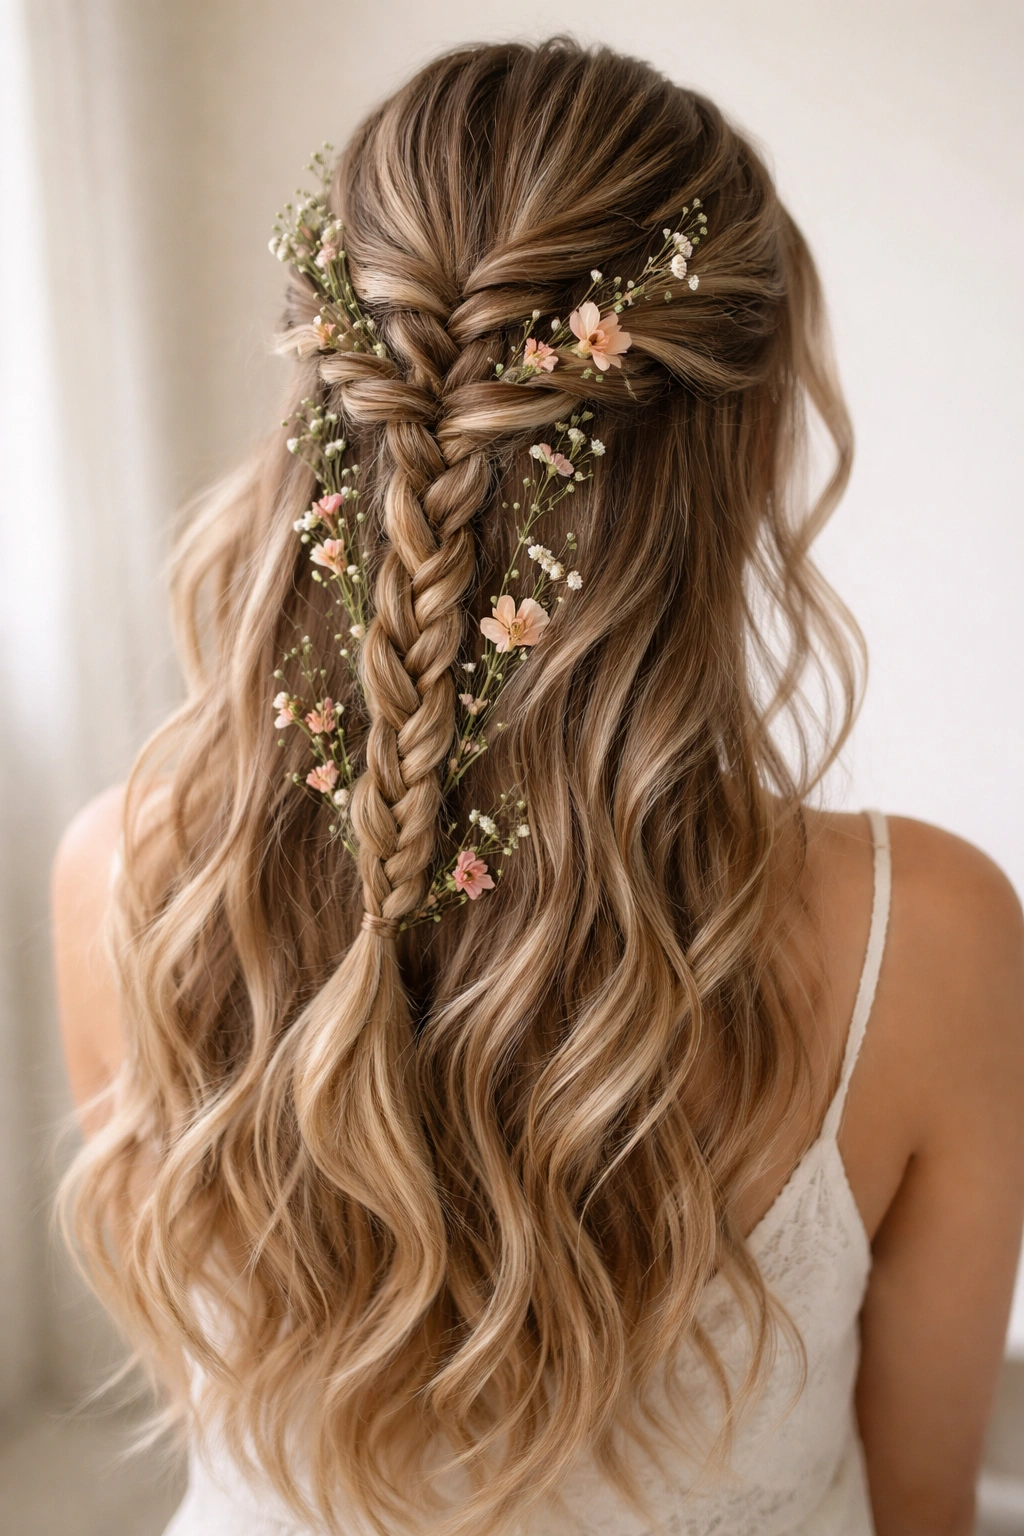
9. Waterfall Braid With Cascading Baby’s Breath

The waterfall braid creates a cascading effect where strands of hair are left to fall freely while other sections are braided, creating a literal waterfall appearance. Combined with baby’s breath or other delicate flowers, this style feels romantic and ethereal. It’s moderately complex to learn but creates a genuinely unique aesthetic that’s worth the effort.
How Waterfall Braiding Actually Works
Start with a three-strand braid, but instead of incorporating all hair into the braid as it travels backward, you periodically let sections drop out as you travel along. These dropped sections hang freely, resembling water cascading from a braid. New hair from above replaces the dropped section, so you’re continuously pulling fresh hair into the braid while releasing other sections. The result is a braid with literal strands flowing down from it.
Positioning Flowers in a Waterfall
- Baby’s breath works perfectly because you can tuck individual tiny stems into the main braid or into the cascading strands
- Alternatively, gather several of the cascading strands together partway down and tie a small piece of twine around them with a cluster of baby’s breath, creating a decorated “bunch” along the waterfall
- Repeat this every few inches down the length for a scattered, garden-like effect
10. Rope Braid Half-Up With Ranunculus
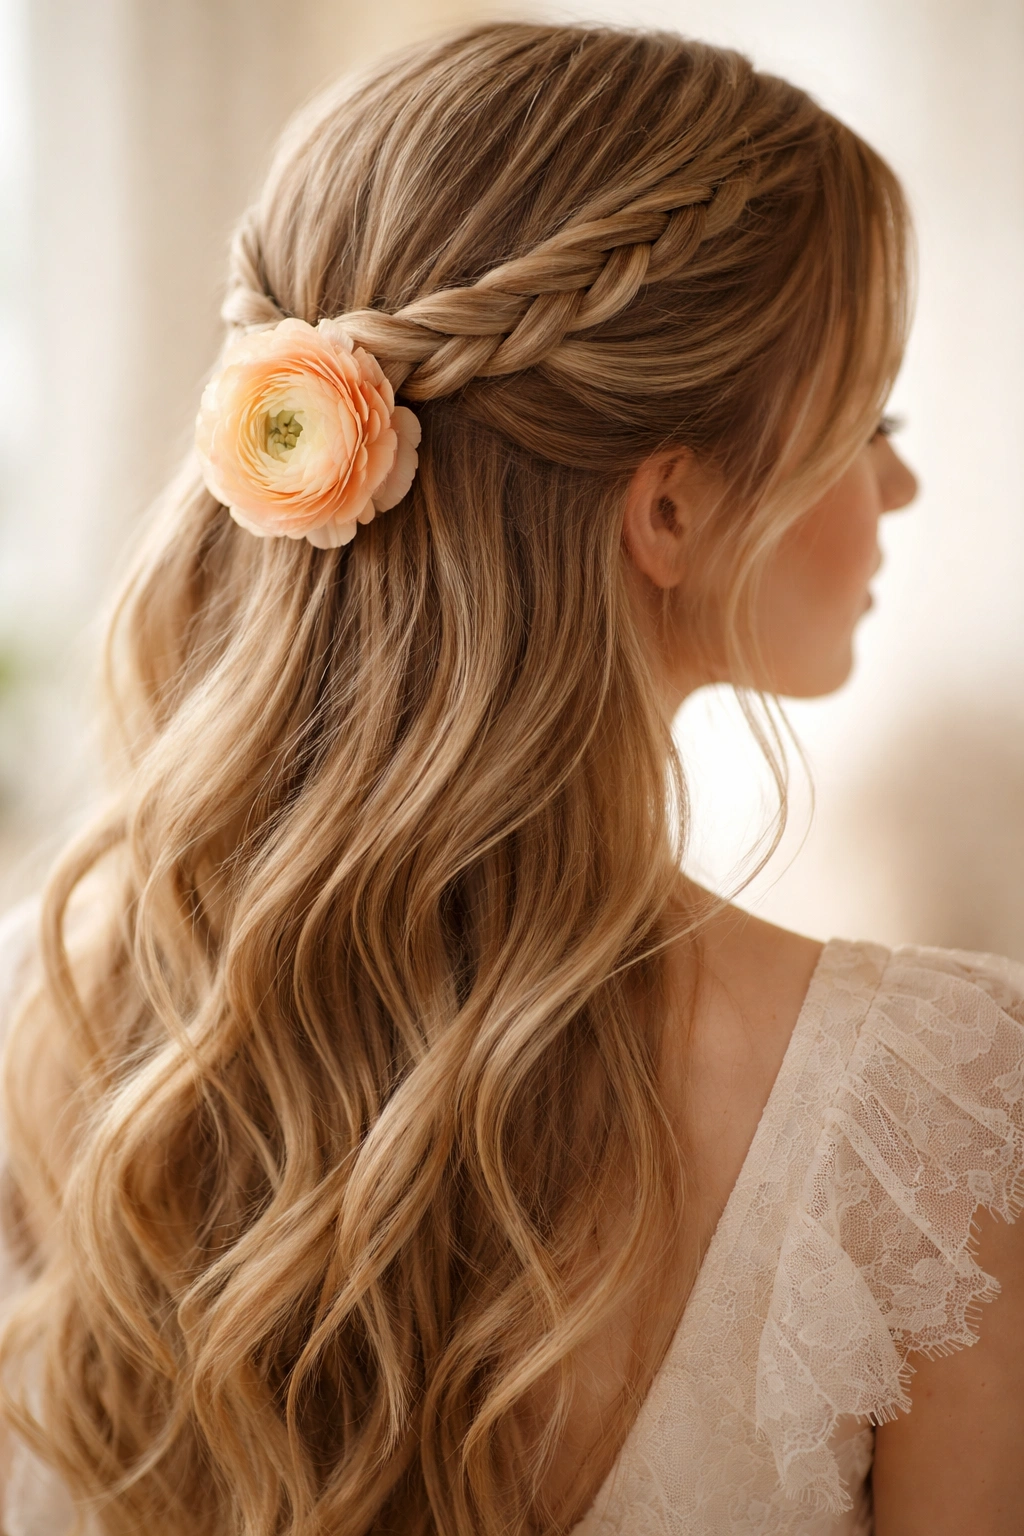
A rope braid (created by twisting two sections around each other rather than weaving them) is faster to execute than a traditional braid and creates a beautifully twisted, rope-like texture. Starting from one side of your head and traveling to the back, then securing with a full ranunculus bloom, creates a look that’s elegant without feeling overdone. This is one of the quickest styles to master, making it perfect for those mornings when you want something special but don’t have much time.
The Rope Braid Technique
- Divide your starting section into two equal pieces
- Twist one piece clockwise and the other counterclockwise, so they’re spinning in opposite directions
- Wrap the twisted sections around each other to create a rope effect
- As you work toward the back of your head, incorporate new hair into your rope braid the same way you would with a traditional braid
- The finished result is a smooth, twisted braid that’s visually distinct from standard braiding
Why Ranunculus Is Perfect Here
Ranunculus blooms are naturally gathered and layered, with dozens of delicate petals creating a full, romantic effect. Because the rope braid itself is relatively simple and smooth, a statement flower like ranunculus provides just enough visual interest and elegance. One large ranunculus tucked into the base of the braid at the back is all you need.
11. Braided Halo With Eucalyptus Strands
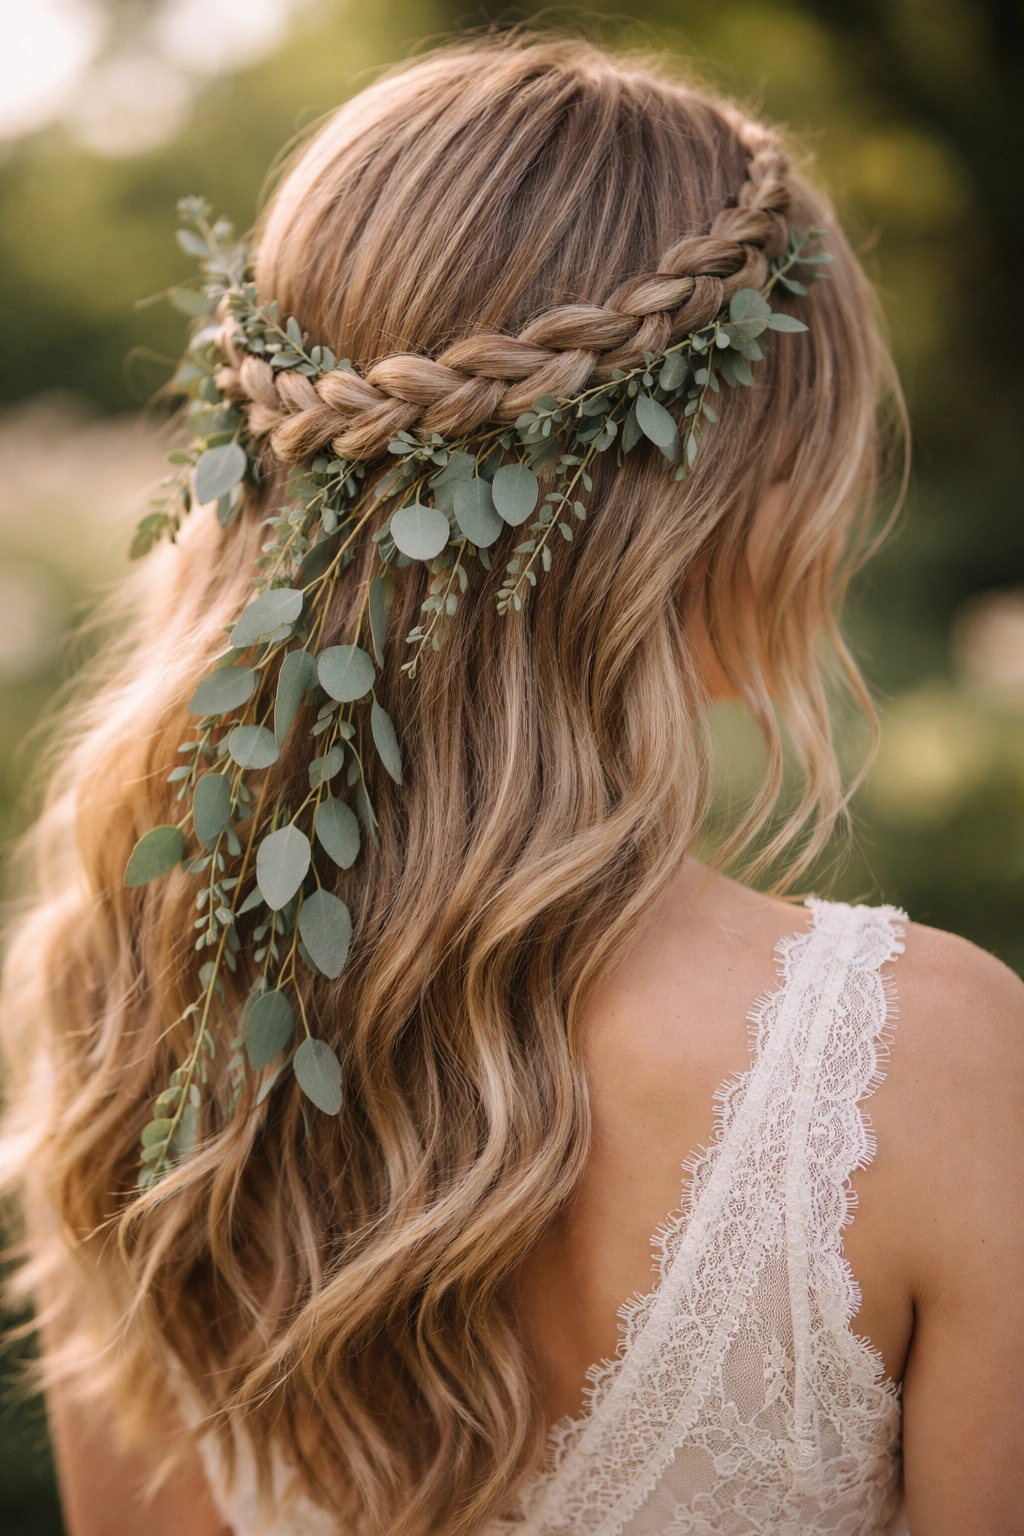
This variation on the traditional halo braid incorporates fresh eucalyptus directly into the braiding process, creating a style where greenery emerges from the braid rather than sitting on top of it. Eucalyptus has naturally long, graceful strands that drape beautifully, and its silvery-green color complements virtually every hair color. This style is perfect for outdoor events, garden weddings, or any time you want a botanical, nature-inspired aesthetic.
Incorporating Eucalyptus Into Your Braid
- Start with fresh eucalyptus stems that are pliable enough to weave (avoid branches that are too woody or brittle)
- As you create your halo braid from each temple, lay a eucalyptus strand along one of your three braiding sections and braid over it
- The stems will naturally extend beyond the braid, creating a cascading, woven effect
- Secure the finished braid and eucalyptus with bobby pins, allowing the eucalyptus to drape naturally down your back
Caring for Fresh Eucalyptus Throughout the Day
- Mist the eucalyptus lightly with water in the morning to keep it fresh and supple
- If you’re wearing this style for several hours, mist again midday
- Eucalyptus tends to dry out naturally, which actually works in your favor — it becomes even more textured and interesting as it dries slightly throughout the day
12. Dutch Braid Pigtails Half-Up With Forget-Me-Nots
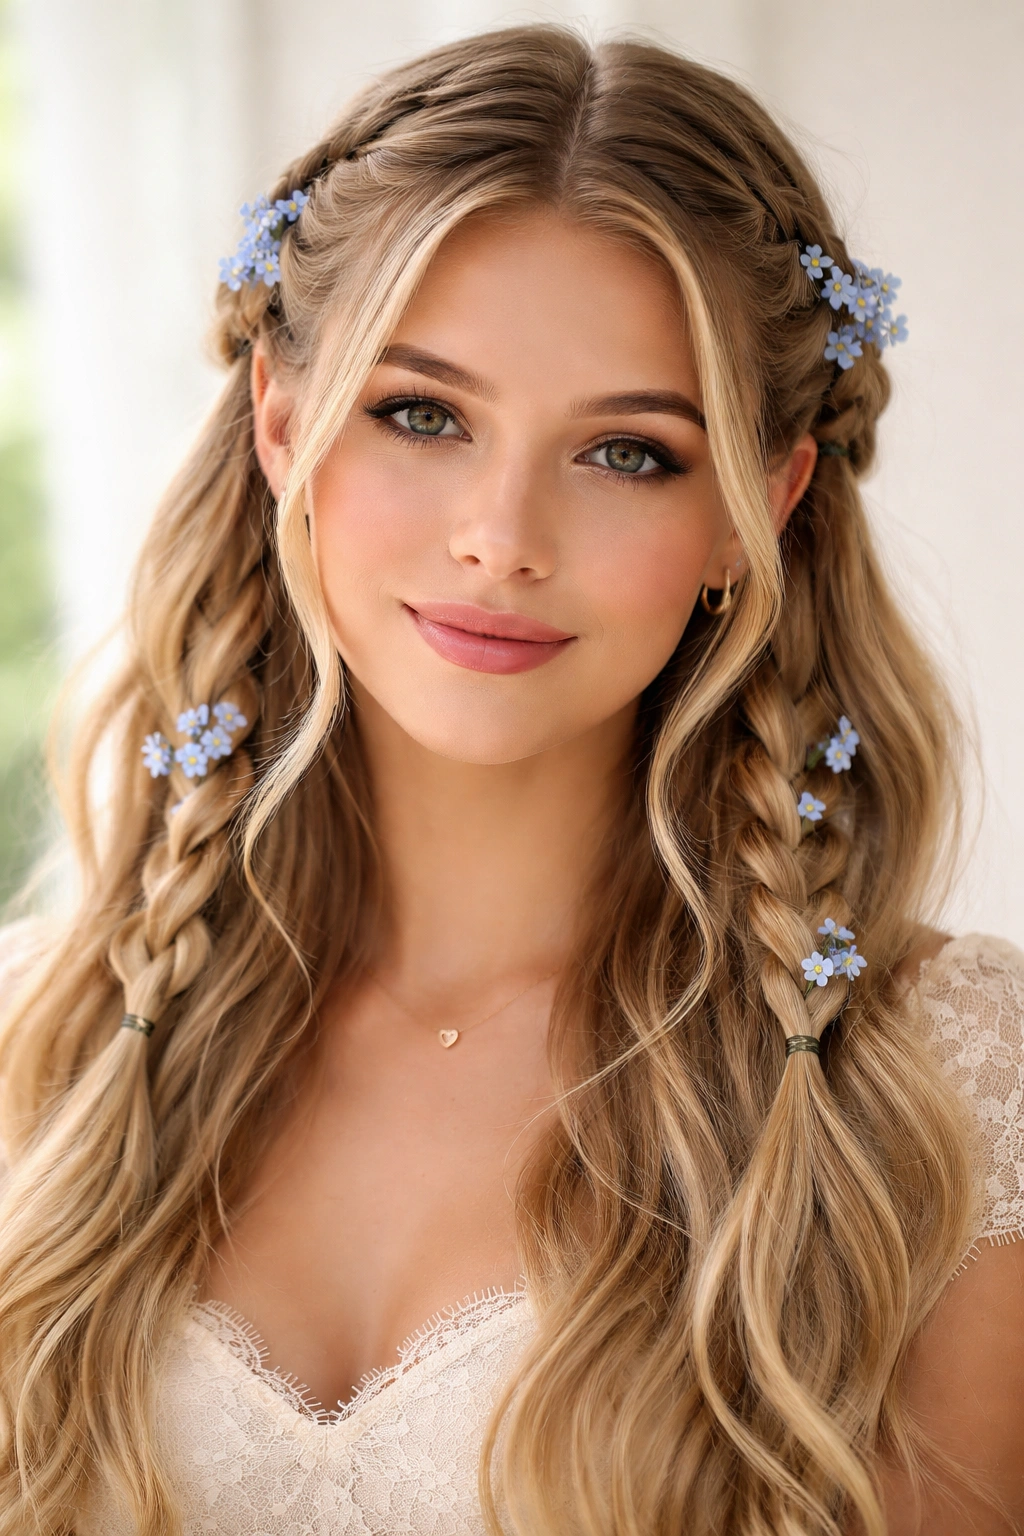
Instead of creating two braids that meet in the middle, you’re creating two Dutch braids that each remain separate, secured on either side of your head at roughly ear level. This creates a playful, youthful aesthetic that’s actually quite sophisticated when done with fine flowers like forget-me-nots. It’s the perfect style for someone who wants to feel both polished and a bit whimsical.
Executing Two Separate Dutch Braids
- Part your hair down the center from forehead to nape
- Clip one side away and, starting at the temple on the unclipped side, create a Dutch braid by crossing strands underneath rather than over
- The braid should travel from temple toward the back, but instead of continuing all the way to the center, secure it on the side at approximately ear level
- Repeat on the other side, creating a mirror image braid
- Now you have two braids, one on each side of your head
Placing Delicate Flowers
- Forget-me-nots are tiny and delicate, making them perfect for this style because they won’t overpower the playful aesthetic
- Tuck small clusters directly into the finished braids using bobby pins
- Alternatively, secure a small piece of twine around each braid and tie on a tiny bundle of forget-me-nots that dangles slightly
13. Spiral Braid Half-Up With Garden Blooms
A spiral braid creates a circular, twisted pattern by braiding one strand around another as you work upward and around. It’s a different technique from standard braiding and creates a genuinely unique visual effect. Because it’s more intricate, this is a style for when you have a bit of extra time and want to create something that really stands out. Pair it with mixed garden blooms for a lush, abundant aesthetic.
Creating a Spiral Effect
- Start at the nape of your neck and gather a section of hair
- Divide this section into two pieces
- Twist one piece around the other as you spiral upward and backward
- As you spiral, incorporate new hair from your head into the spiral braid, continuously twisting and gathering
- The finished effect should look like a spiral or twisted rope that winds upward
Arranging Mixed Garden Blooms
- Since the spiral itself is visually complex and interesting, use smaller flowers that create an abundant, gathered effect without being overwhelming
- Roses, ranunculus, waxflower, and hypericum berries all work beautifully mixed together
- Create a small bouquet or cluster and secure it at the base of the spiral braid at the back, using bobby pins and a small elastic or twine
14. Crown Twist With Braided Details and Wildflowers
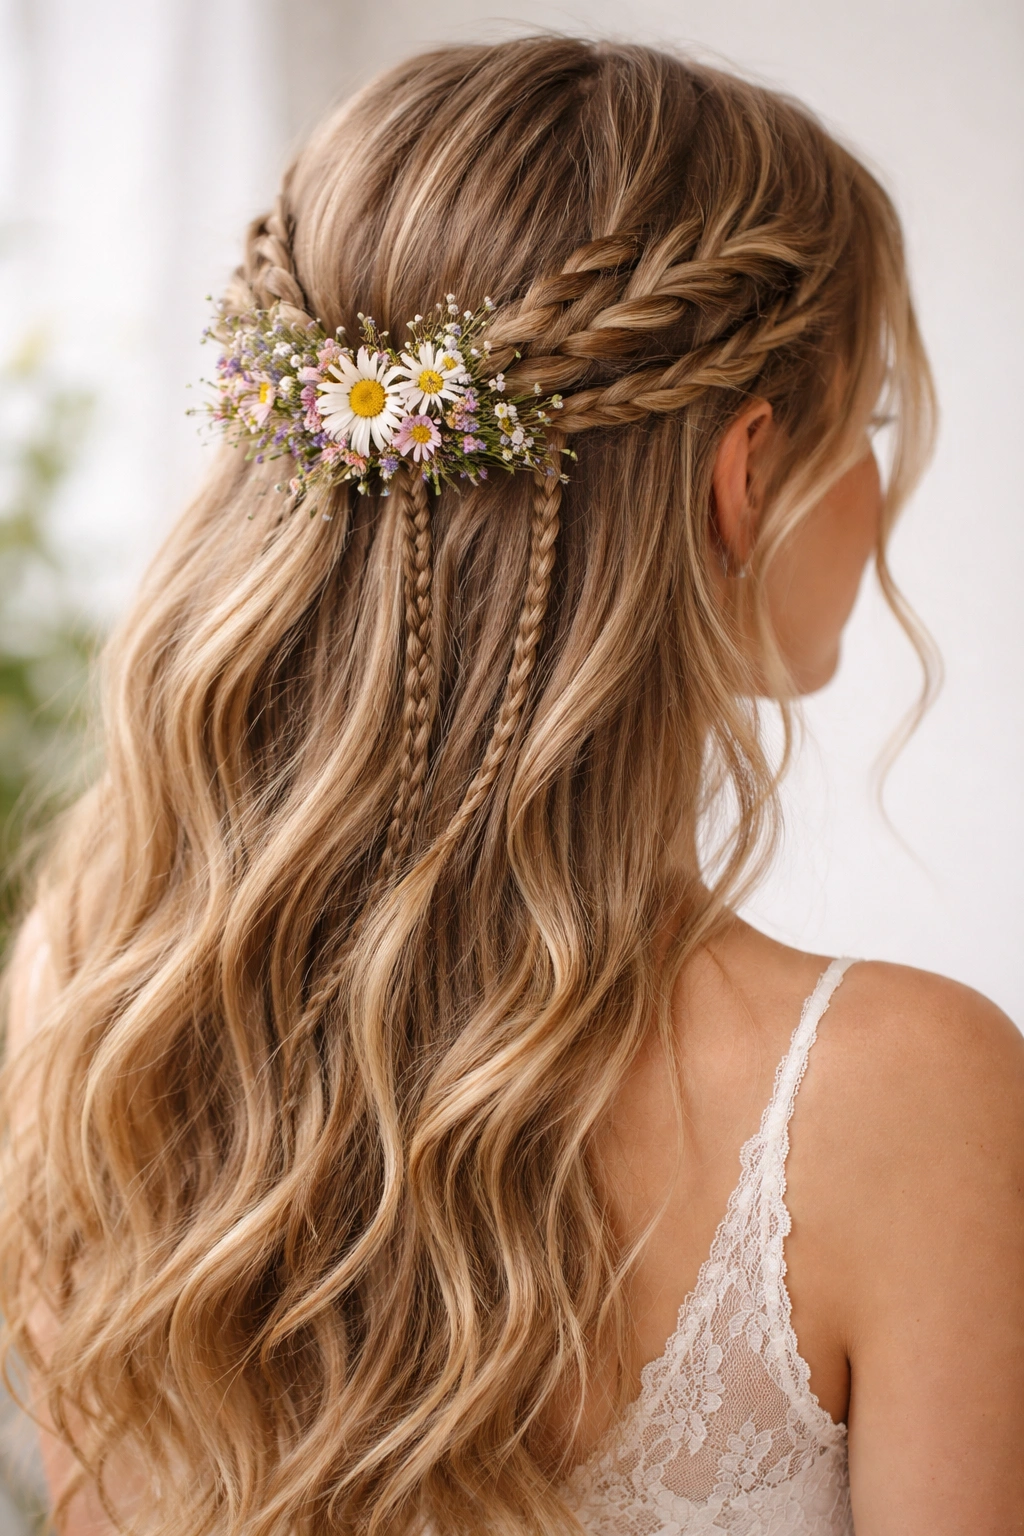
This hybrid style combines twisting with small braided accents, creating a look that’s more sophisticated than a simple twist but faster to execute than full braiding. You’re creating two twisted sections from the sides that meet at the back, but incorporating small three-strand braids within those twists for added detail. Wildflowers with their natural, unmanicured appearance feel right at home with this style.
Mixing Twists and Micro-Braids
- Start with a twisted section from one temple, but every few inches, pause and create a small three-strand braid for 3-4 inches before resuming the twist
- Continue this pattern of twisting and small braiding as you work toward the back
- The same twisted and braided pattern on the other side creates symmetry
- Secure both sides together at the back with a clear elastic
Choosing and Placing Wildflowers
- Wildflowers feel natural and authentic with this bohemian-leaning style
- Queen Anne’s lace, thistle, black-eyed Susan, or any flowers with a loose, organic structure work beautifully
- Gather several stems together and secure them at the base where the two twisted/braided sections meet
- Let the wildflowers cascade naturally without trying to create a perfectly structured arrangement
15. Braided Crown With Intertwined Silk Ribbon and Florals
This style is technically a crown braid (curving across the top of your head from one side to the other) with the added detail of weaving a silk ribbon directly into the braid as you work. The ribbon adds color, texture, and dimension, and the silk drapes beautifully. Fresh or premium artificial flowers attached to the ribbon and braid create a polished, elevated look.
Incorporating Silk Ribbon Into Your Braid
- Choose a ribbon in a color that complements your hair color and chosen flowers
- Start your crown braid at one temple, and as you braid, lay the ribbon along one of your three braiding sections
- Braid over the ribbon, incorporating it into the braid itself rather than attaching it on top
- The ribbon should weave in and out, becoming an integral part of the braid pattern
- Let the ribbon trail naturally at the end where the braid is secured
Attaching Flowers to Ribbon and Braid
- Artificial flowers work beautifully here because you can preassemble everything and not worry about water or wilting
- Use floral wire or hot glue to attach individual blooms directly to the braid
- Create small clusters along the ribbon’s length, spacing them evenly
- Consider flowers in colors that complement the ribbon — a blush ribbon with coral roses, or a sage ribbon with white and pale yellow blooms
16. Twisted Braid Hybrid With Dainty Flower Stems
This style uses both twisting and braiding techniques, creating a complex, textured look that catches light and creates dimension. A twisted section travels from one side of your head, transitions into braiding, then transitions back to twisting as it reaches the back. Individual flower stems are woven throughout, creating the appearance of small flowers emerging from the hair itself. It’s the type of style that looks complicated enough to impress but is actually manageable with practice.
Alternating Between Twists and Braids
- Start at one temple with a twisted section (two strands twisted around each other)
- After about 3-4 inches of twisting, transition into a three-strand braid
- Braid for 3-4 inches, then transition back to twisting
- Continue this alternating pattern as you work toward the back of your head
- The variety creates visual interest and makes the style feel intentional and designed
Weaving Individual Flower Stems
- Choose flowers with sturdy but flexible stems — miniature roses, waxflower, or hypericum berries work well
- As you twist or braid, lay individual flower stems along one of your sections and twist or braid over them
- The flowers will emerge from the hair at intervals, creating a naturally gathered effect
- Aim for spacing that feels balanced and organic rather than rigid and measured
17. French Braid With Interwoven Eucalyptus and White Roses
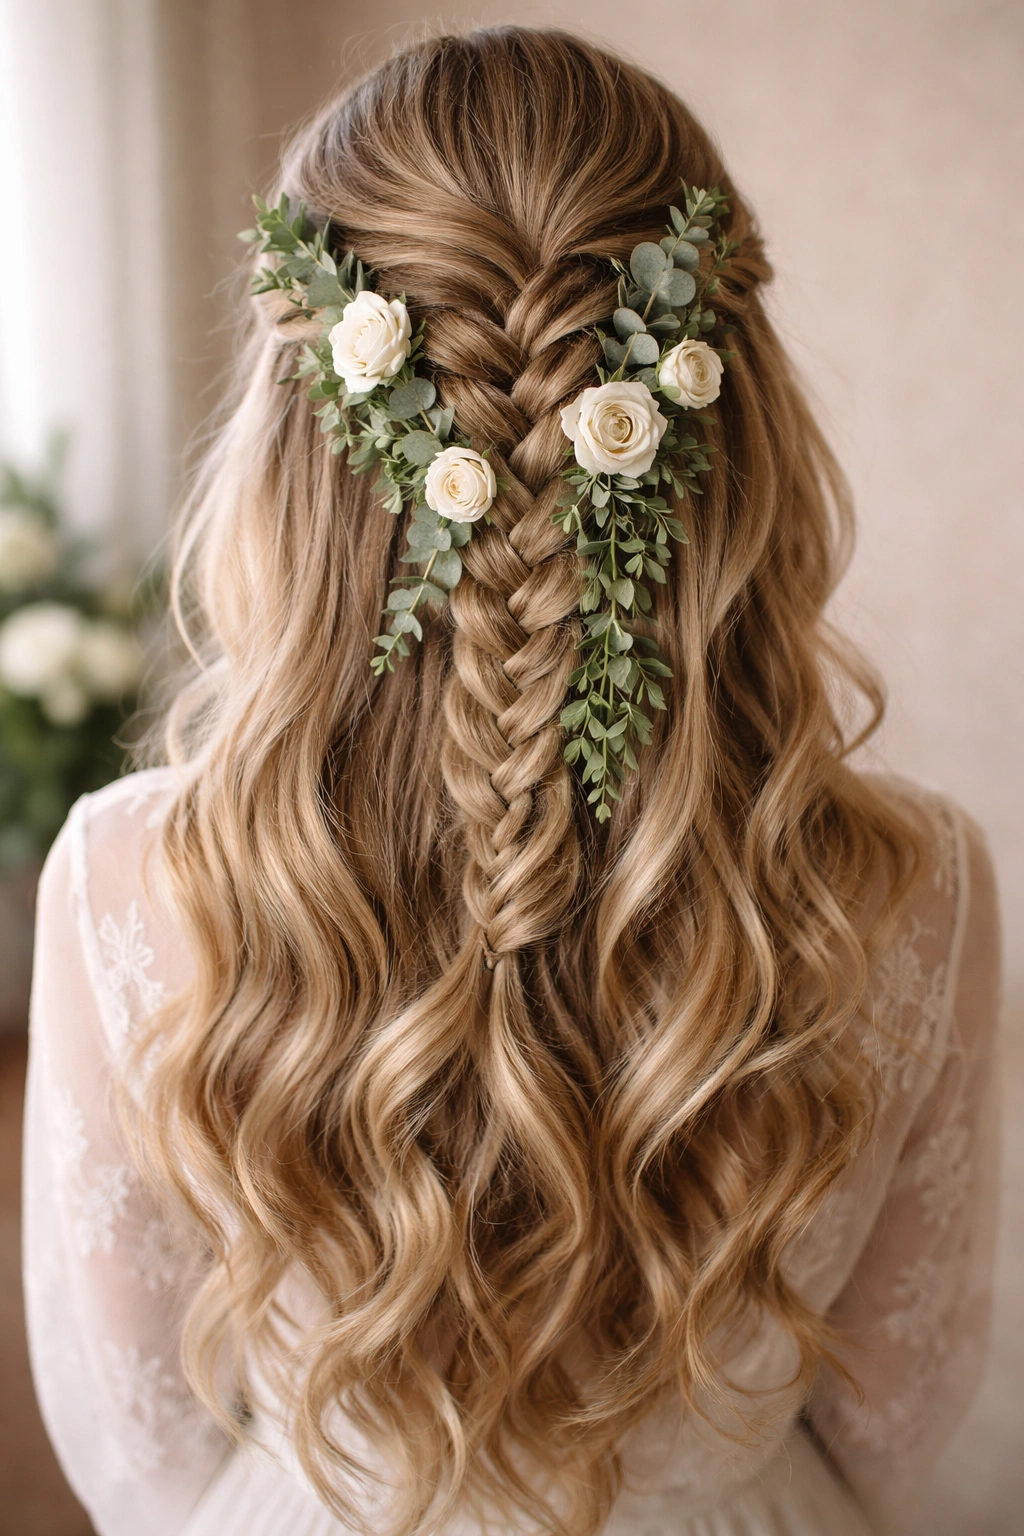
A French braid is a classic three-strand braid that starts at the crown and travels down the back, incorporating hair as it goes. When you keep this style as a half-up version (securing it partway down the back rather than all the way to the ends), and incorporate eucalyptus and white roses, you get an elegant, timeless look that works beautifully for formal occasions. This is possibly the most universally flattering braided style because it works on virtually every hair type and face shape.
Executing a Classic French Braid
- Start at the crown with three strands of hair
- Cross the right strand over the middle, then the left strand over the middle
- Continue this pattern, but as you braid, incorporate new hair from your head into each strand before crossing
- Keep braiding until you reach approximately the middle of the back of your head
- Secure with an elastic, leaving the bottom half of your hair down
Arranging Roses and Eucalyptus
- Eucalyptus adds texture and greenery that softens the classic French braid
- Tuck sprigs into the braid as you work, allowing them to emerge naturally
- Secure white roses (garden roses, David Austin roses, or standard florist roses) at the base of the braid where it’s secured with an elastic
- Consider using floral wire to secure the roses firmly so they don’t shift during the day
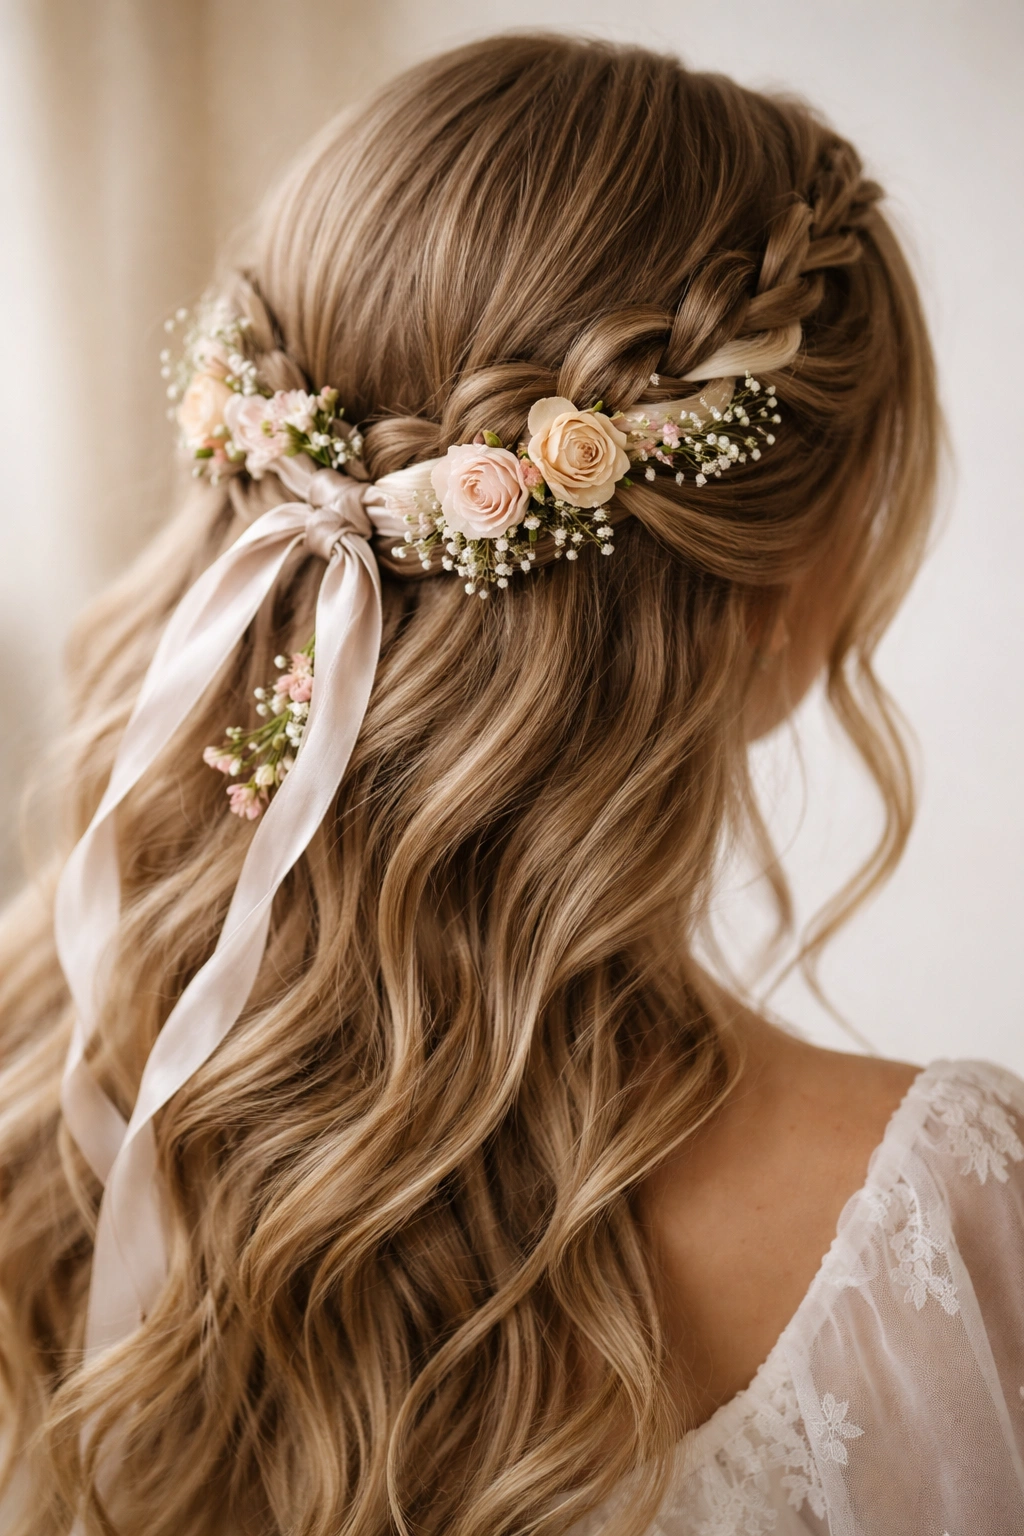
18. Knotted Half-Up With Delicate Floral Accents
For something different from traditional braiding, try a knotted half-up style where you’re taking sections of hair and tying them in actual knots (think of it like tying a rope in a knot) to create texture and detail. Starting from one side and tying two or three knots as you work toward the center back, then securing the whole thing with an elastic, creates a unique aesthetic that’s less formal than braiding but more intentional than a simple half-up ponytail. Delicate flowers tucked into the knots add the romantic finishing touch.
Creating Knots With Hair
- Take a section of hair from one side of your head and divide it into two strands
- Tie these two strands in an actual knot, pulling it snug against your scalp
- Take another section of hair just below the first knot, incorporate one of the strands from the first knot into this new section, divide into two pieces, and tie another knot
- The knots should overlap and intertwine as you work
- After creating 2-3 knots, gather all the loose hair and secure everything together with an elastic at the back
Positioning Delicate Flowers
- Small flowers like waxflower, hypericum berries, or dainty roses work best because they fit into the knots without overwhelming them
- Tuck individual stems directly into each knot using bobby pins
- Alternatively, create a small cluster of flowers and secure it at the very back where all the hair gathers together
- The combination of geometric knots with organic, delicate flowers creates an interesting contrast
Final Thoughts
The magic of braided half-up half-down styles with flowers is that they genuinely work for so many different occasions, skill levels, and hair types. Whether you’re drawn to the simplicity of a single three-strand braid with baby’s breath or the complexity of an infinity braid with garden roses, there’s a version here that speaks to you. Start with whichever style intrigues you most, practice it a few times, and then branch out.
The most important practical detail is securing everything properly so that your beautiful style lasts through the entire event or day. Use bobby pins liberally, spray with a medium-hold hairspray, and if you’re using fresh flowers, mist them lightly with water in the morning. Most of these styles can be prepped ahead of time — you can even braid your hair the night before and sleep on it gently, then simply add fresh flowers in the morning and you’re ready to go.
Don’t be afraid to adapt these styles to suit your preferences. If one flower or greenery variety isn’t available, swap it for something similar. If one braid technique feels impossible, start with a simpler one and work your way up. The goal is to have fun creating something beautiful that makes you feel confident and pretty. That’s what really matters.