Natural hair has always been a cornerstone of Yoruba culture, and the styles that emerge from this heritage are far more than just fashion statements—they’re expressions of identity, artistry, and ancestral connection. The Yoruba people, with roots in West Africa and diaspora communities across the globe, have developed an incredible array of hairstyles that work beautifully with textured, coily, and kinky hair. These styles celebrate the natural texture of the hair while showcasing intricate braiding techniques, creative use of thread and beads, and sculptural forms that have been perfected over generations. What makes Yoruba hairstyles particularly special is their versatility; they can be worn casually for everyday beauty, styled formally for celebrations and ceremonies, or adapted to suit modern aesthetic preferences while honoring their cultural roots.
If you’re looking to explore these traditional styles, you’re joining a long lineage of people who’ve understood that natural hair isn’t something to fight against—it’s something to elevate. Whether you’re reconnecting with your heritage, exploring protective styling options, or simply drawn to the artistry of these techniques, Yoruba hairstyles offer something for nearly every hair type, length, and lifestyle. Many of these styles are also protective, meaning they shield your hair from daily manipulation and environmental stressors while allowing it to thrive. The creativity involved in these styles means that no two heads look identical—your interpretation of any traditional style becomes uniquely yours, shaped by your hair texture, face shape, personal preferences, and the skill of whoever is braiding or styling your hair.
1. Gele (Yoruba Head Wrap)
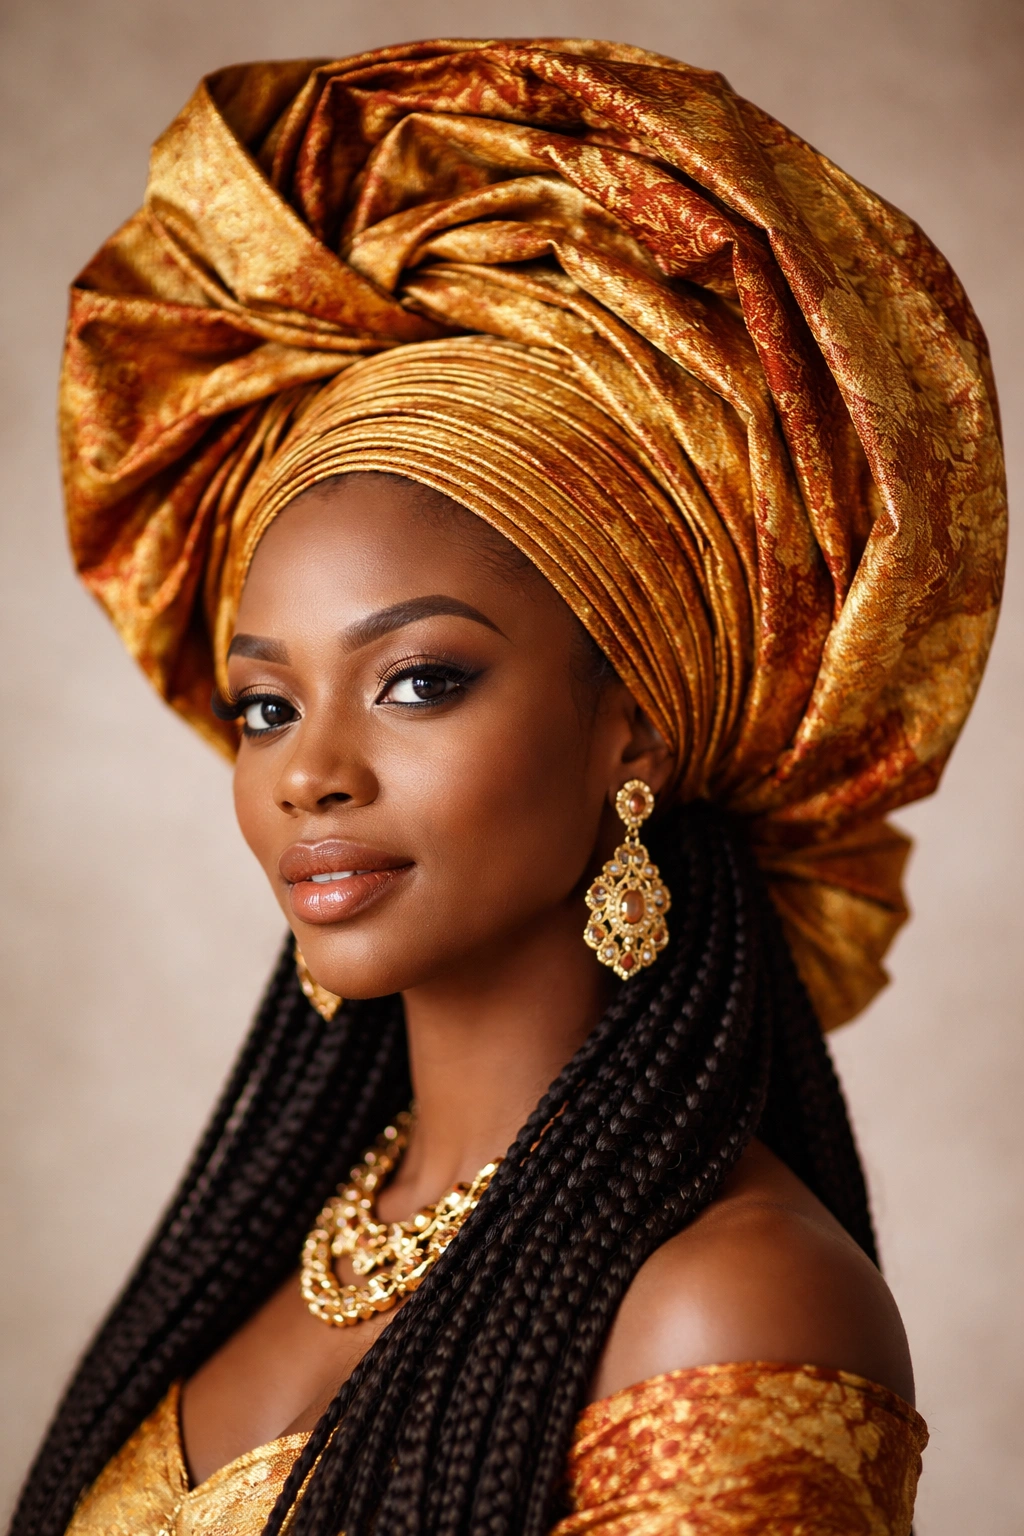
The gele is perhaps the most iconic Yoruba style—a stunning head wrap that combines fabric artistry with hair styling beneath. Rather than a hairstyle alone, the gele is a complete head covering that sits atop an arranged base of hair, usually braided or twisted close to the scalp. The wrapped portion is created from a single long piece of fabric, often a rich cotton or silk material in vibrant colors and patterns, that’s folded and secured with remarkable precision. What makes the gele exceptional is that beneath the wrap, your natural hair gets protected and contained, while the visible artistry becomes the focal point. The fabric can be styled in countless ways—towering high crowns, elegant side sweeps, dramatic sculptural shapes, or layered folds that frame the face.
Why It’s a Cultural Cornerstone
The gele holds deep significance in Yoruba tradition and is most commonly worn for special occasions, ceremonies, and celebrations. Wearing a gele communicates respect, celebration, and cultural pride—it’s the hairstyle choice for weddings, naming ceremonies, festivals, and important family gatherings. The style also serves a practical purpose; it protects your braids or twists underneath while allowing you to completely refresh your look simply by changing the wrap fabric. A single base of braids can be dressed in a different gele for multiple occasions, making it economical and sustainable.
How to Style and Maintain Your Gele
- Start with cornrows, box braids, or senegalese twists laid close to your scalp in whatever pattern you prefer
- The base typically takes 2 to 4 hours depending on your hair texture and the intricacy of the braiding
- Use high-quality fabric that holds its shape—traditional choices include ankara, kente cloth, silk, or cotton
- Secure the wrap with bobby pins placed strategically underneath, and sometimes a decorative brooch or pin on the exterior
- Your braided base underneath can last 2 to 3 weeks, giving you extended wear from a single protective styling session
2. Cornrows with Threading
Cornrows are foundational to Yoruba styling—straight lines of braids that run from the hairline toward the back of the head, and when combined with threading, they become even more striking. Threading involves wrapping thin thread, yarn, or even raffia around each cornrow as it’s being braided, creating texture, dimension, and decorative detail. The thread can match your hair color for a subtle effect or contrast dramatically—golden thread on dark hair, jewel tones for added luxury, or even metallic threads for special occasions. This technique creates a completely different visual effect from plain cornrows; the rows become textured and dimensional rather than smooth and linear.
The Art of Thread Integration
Threading isn’t just decorative—it actually changes how the cornrow functions. The wrapped thread adds structure and helps the braids hold their shape longer, meaning your style can last 3 to 4 weeks instead of the typical 2 to 3 weeks plain cornrows might last. The threading also provides a visual anchor that makes the braids feel more finished and intentional. Yoruba stylists have perfected the technique of layering different colored threads, mixing metallic with matte finishes, or even incorporating beads directly into the threading for additional embellishment.
Creating the Perfect Threaded Cornrows
- Choose thread colors based on your skin tone—warm golds and coppers for warm complexions, silvers and cool jewel tones for cool undertones
- Have your stylist braid while wrapping thread tightly but not painfully around each section—tension should be firm but comfortable
- Expect the styling session to take 3 to 5 hours depending on how many rows you’re getting and the complexity of the threading pattern
- Sleep on a satin pillowcase or bonnet to protect the rows
- The style can last 4 weeks, but you may notice some loosening around week 3
3. Box Braids with Natural Texture
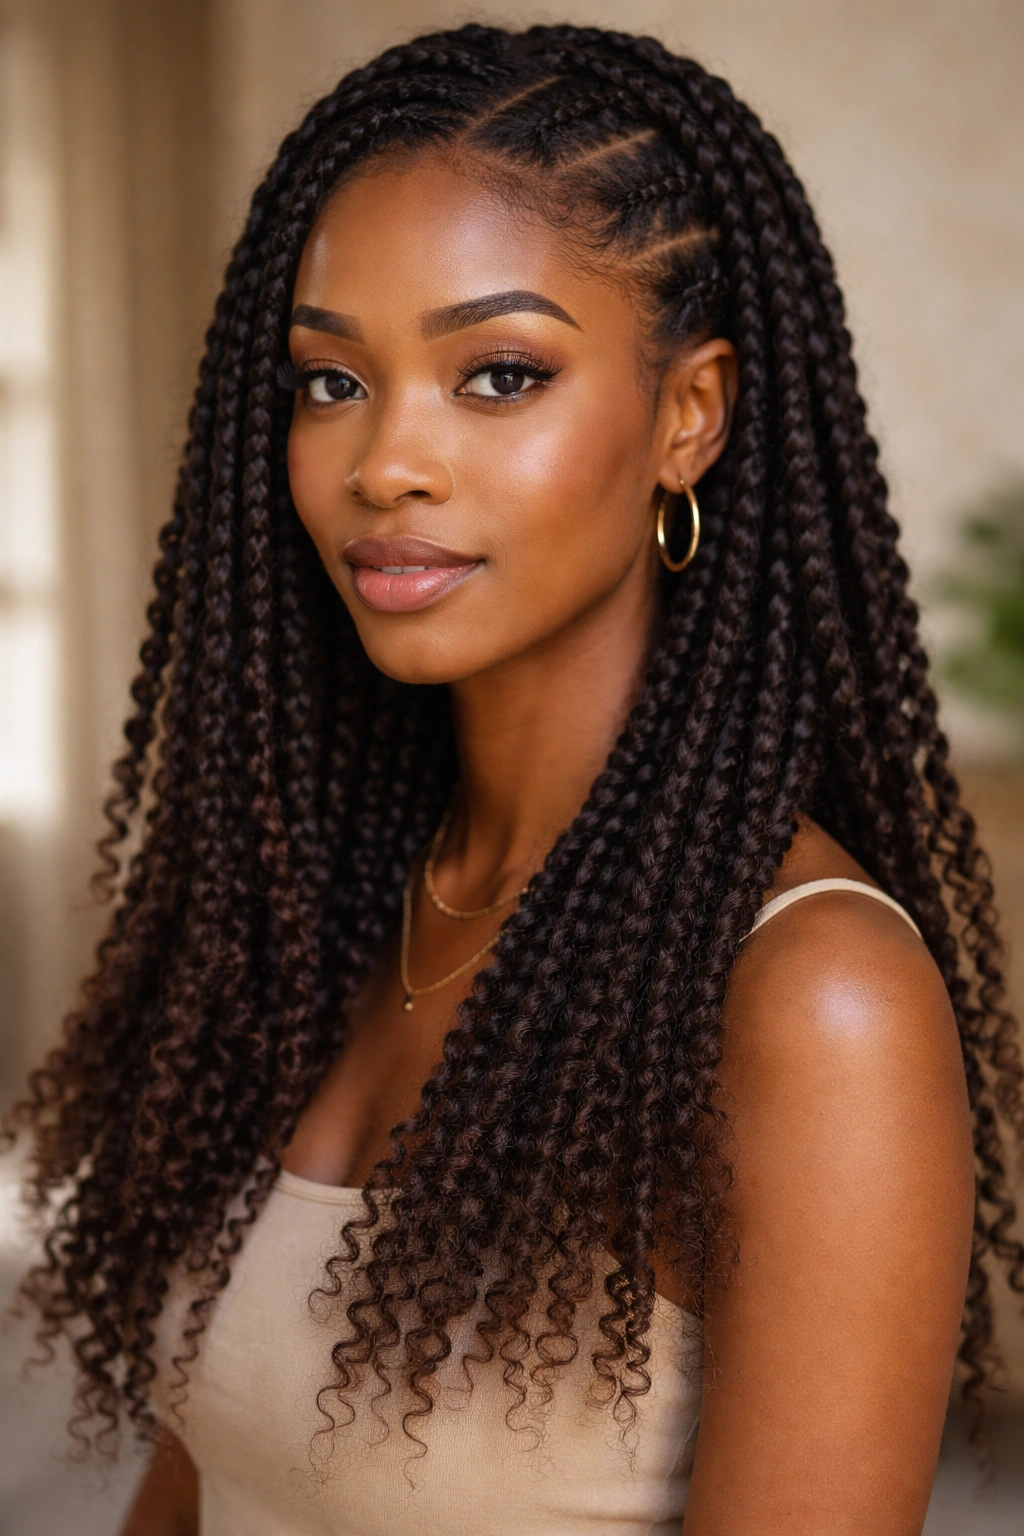
Box braids are a beloved protective style in Yoruba communities, and when created with attention to texture and dimension, they become a stunning form of self-expression. Unlike smooth, uniform box braids, Yoruba-inspired versions often incorporate the natural texture of the hair itself, leaving the ends unbraided to show your coily texture, or braiding in a way that celebrates rather than flattens the inherent movement of natural hair. Some stylists create box braids with deliberate texture variation—some sections remain smoother while others showcase the natural kink and coil. You might also see braids that incorporate the natural hair texture at the roots, creating a gradient effect where the braid takes over toward the end.
Why Texture Matters in Box Braids
When box braids simply smooth and straighten your hair, they can feel less connected to your natural beauty—but Yoruba styling often embraces the texture that makes the hair uniquely yours. This approach means your braids photograph beautifully, feel more comfortable over time because they’re working with rather than against your hair’s natural properties, and celebrate the aesthetic of textured natural hair rather than attempting to mask it. The braids also tend to last longer and feel less heavy because they’re not fighting your hair’s natural movement.
Installing and Caring for Textured Box Braids
- Start with hair that’s been cleansed, conditioned deeply, and allowed to fully dry—damp hair won’t hold braids as securely
- Your stylist should braid with a light hand, ensuring the braids sit close to the scalp but never uncomfortably tight
- Installing box braids typically takes 6 to 10 hours depending on hair volume and braid thickness
- Braid cuffs, beads, or gold foils can be added during installation or after for additional flair
- Maintain your braids with a water-based spray to keep them moisturized, and sleep on a satin pillowcase
- These can last 6 to 8 weeks, making them one of the most long-wearing protective styles
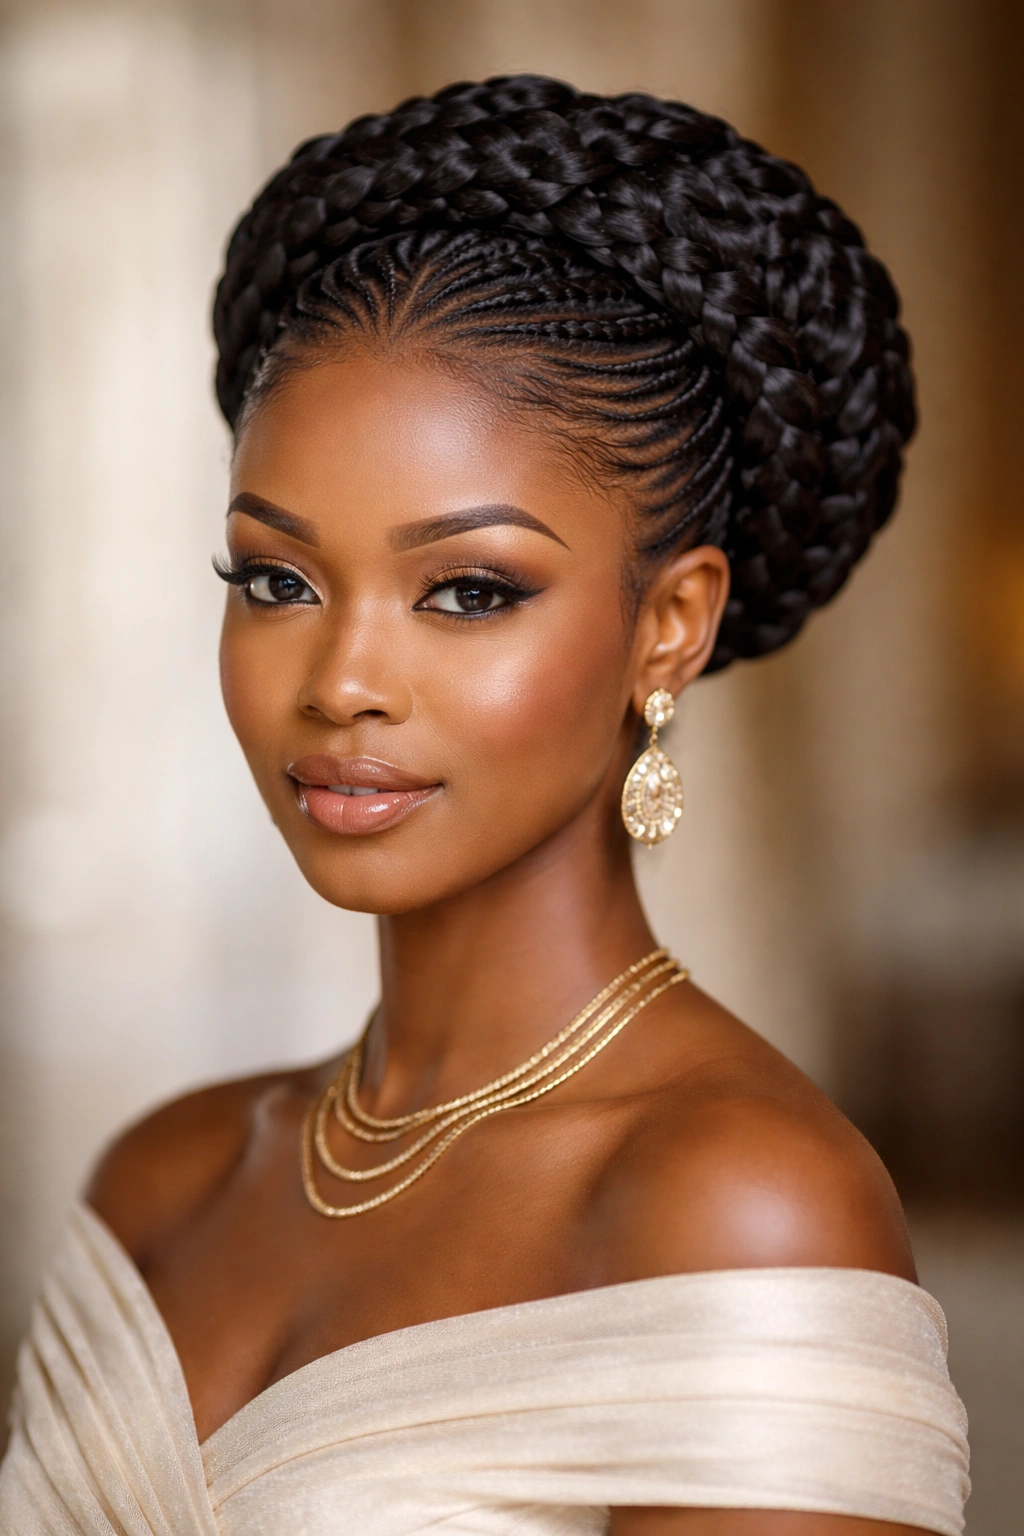
4. Shuku (High Knot Style)
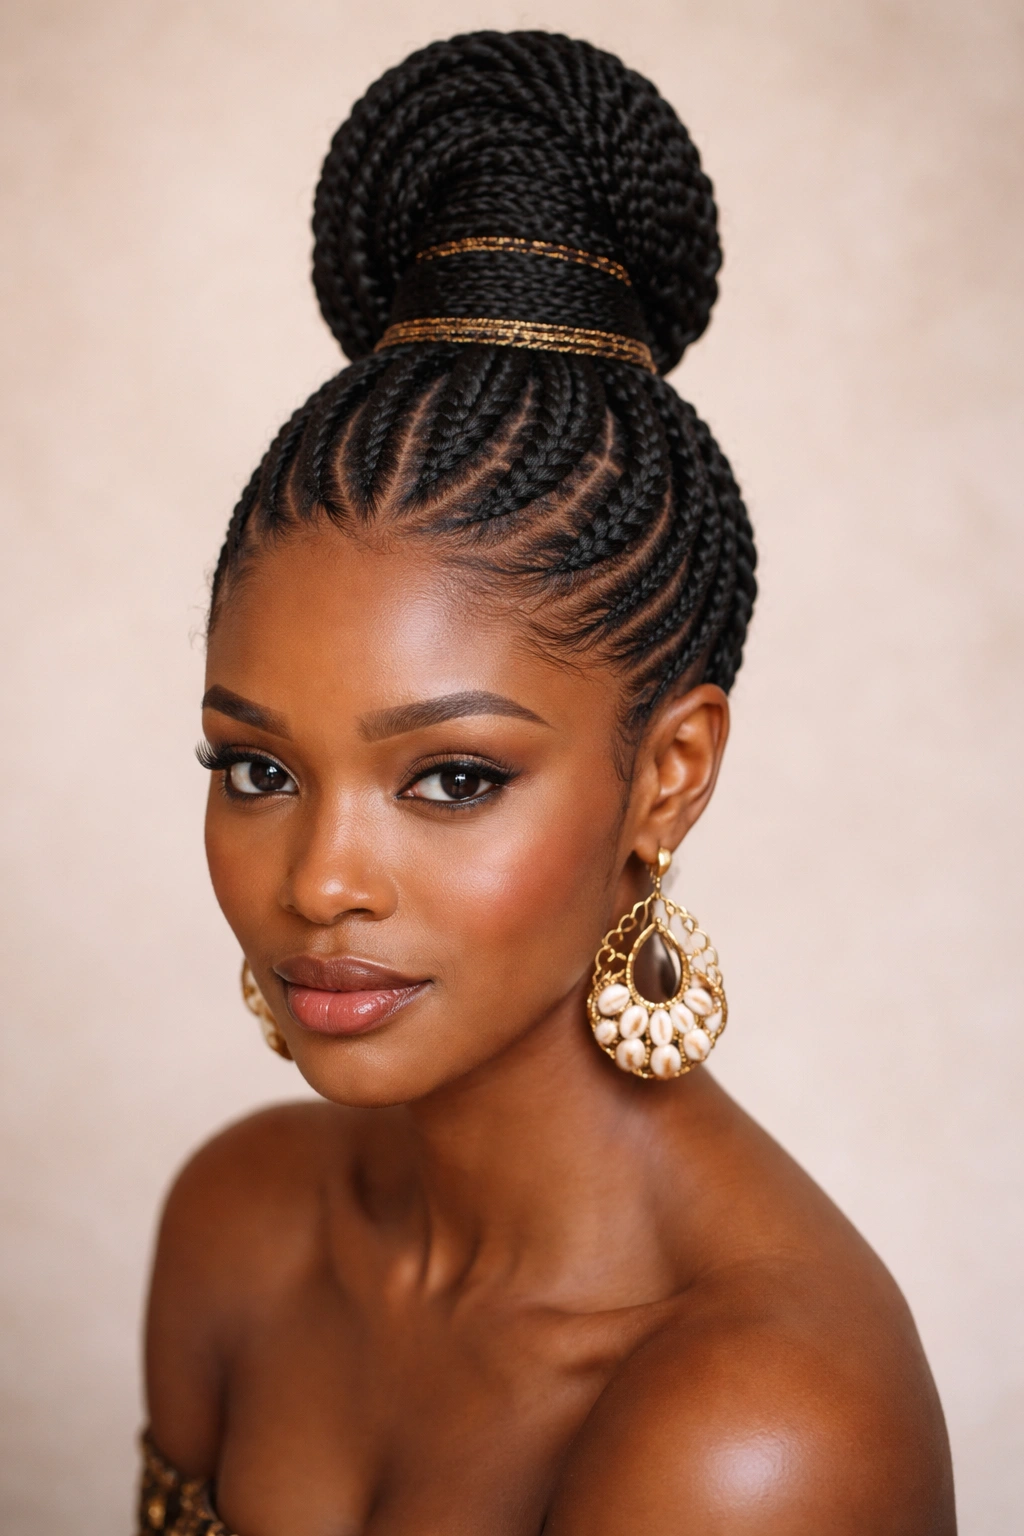
The shuku is a beloved Yoruba updo that gathers all your hair into a high, sculptural knot at the crown of your head, and it’s undeniably striking in person. The style involves twisting or braiding the hair up and away from the face and neck, then securing it tightly at the top of the head in what’s sometimes called a high bun or high knot. What distinguishes the shuku from a simple bun is the intentional shaping and often the addition of braids or twists that create geometric patterns leading up to the knot. The result is a style that elongates the face, shows off your neck and shoulders, and creates an elegant silhouette. Traditional shuku styles often incorporate thread wrapping around the braids or twists that lead up to the knot, making the style even more decorative.
The Elegance of Elevated Styling
The shuku works beautifully for special occasions, professional settings, or everyday wear depending on how you execute it. A more relaxed shuku with some softer pieces framing the face feels approachable and modern, while a tightly constructed shuku with precise braiding patterns and metallic thread feels formal and ceremonial. The style also keeps your hair completely off your face and neck, making it practical during hot weather or when you want maximum visibility and freedom of movement. Many Yoruba women wear the shuku as part of their daily styling repertoire because it’s sophisticated yet simple to maintain once installed.
Creating a Shuku That Lasts
- Begin with hair that’s at least 4 to 6 inches long for easier manipulation and a fuller knot
- Braid or twist the hair from the hairline in lines that naturally lead upward toward your crown
- Gather all the braided or twisted sections together and secure them into a tight, sculptural knot shape
- Wrap thread around the knot for additional security and decoration
- Apply a light gel or edge control only to baby hairs and hairline—avoid overloading the knot itself
- The shuku can be worn for 1 to 2 weeks before you’ll want to take it down and let your hair rest
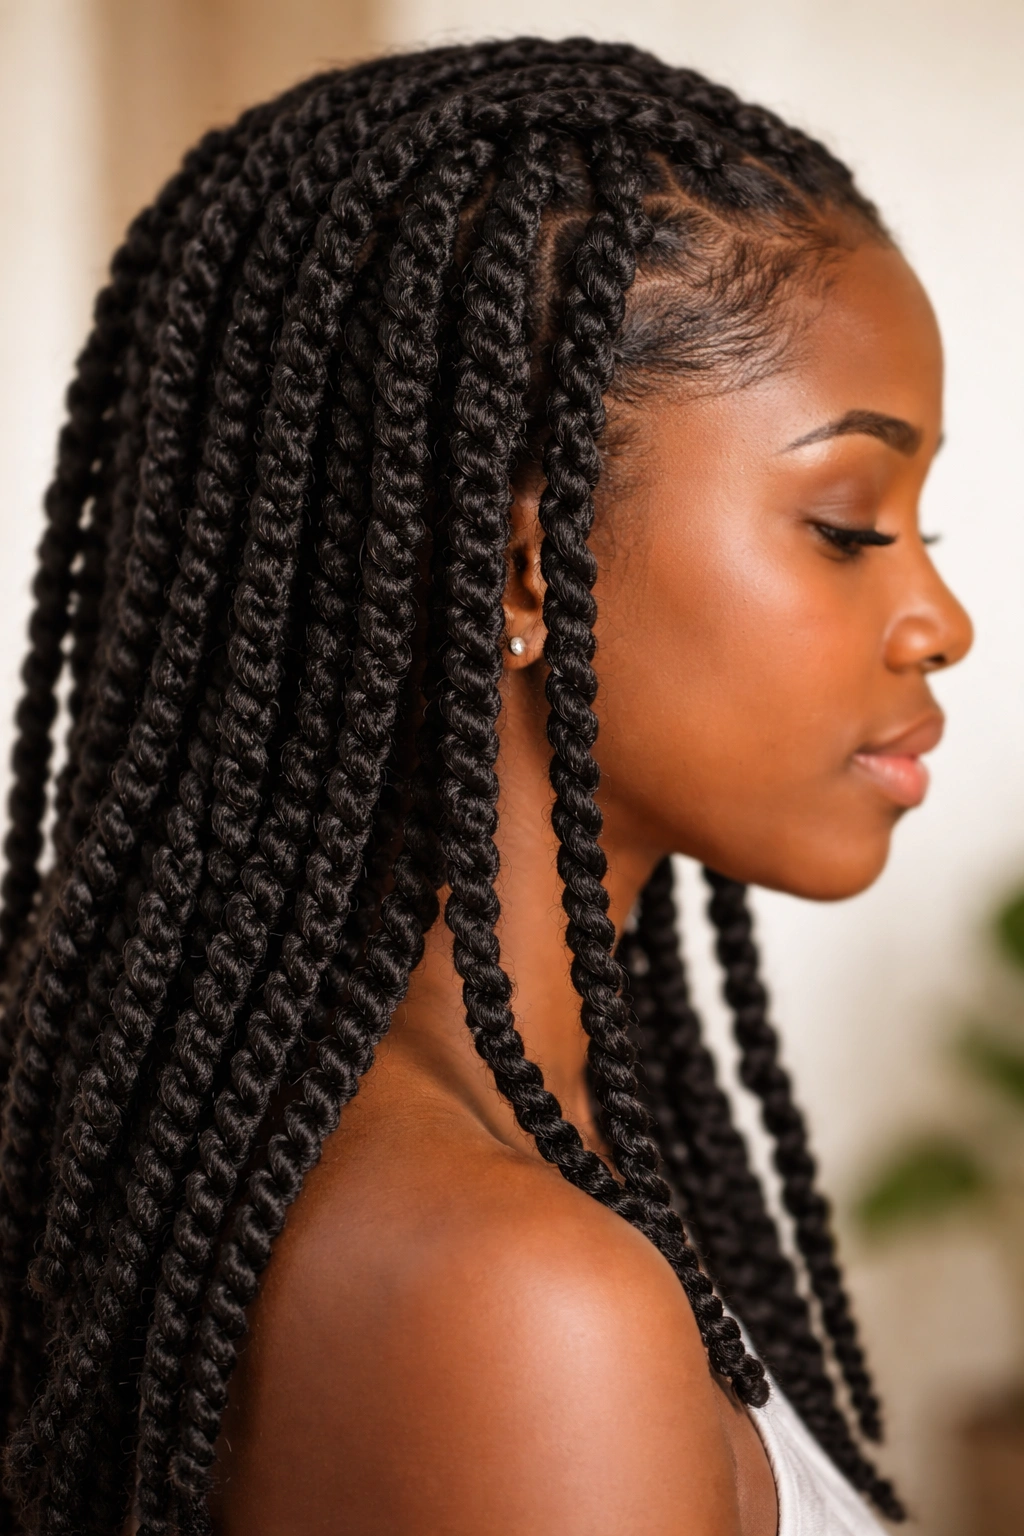
5. Kinky Twists
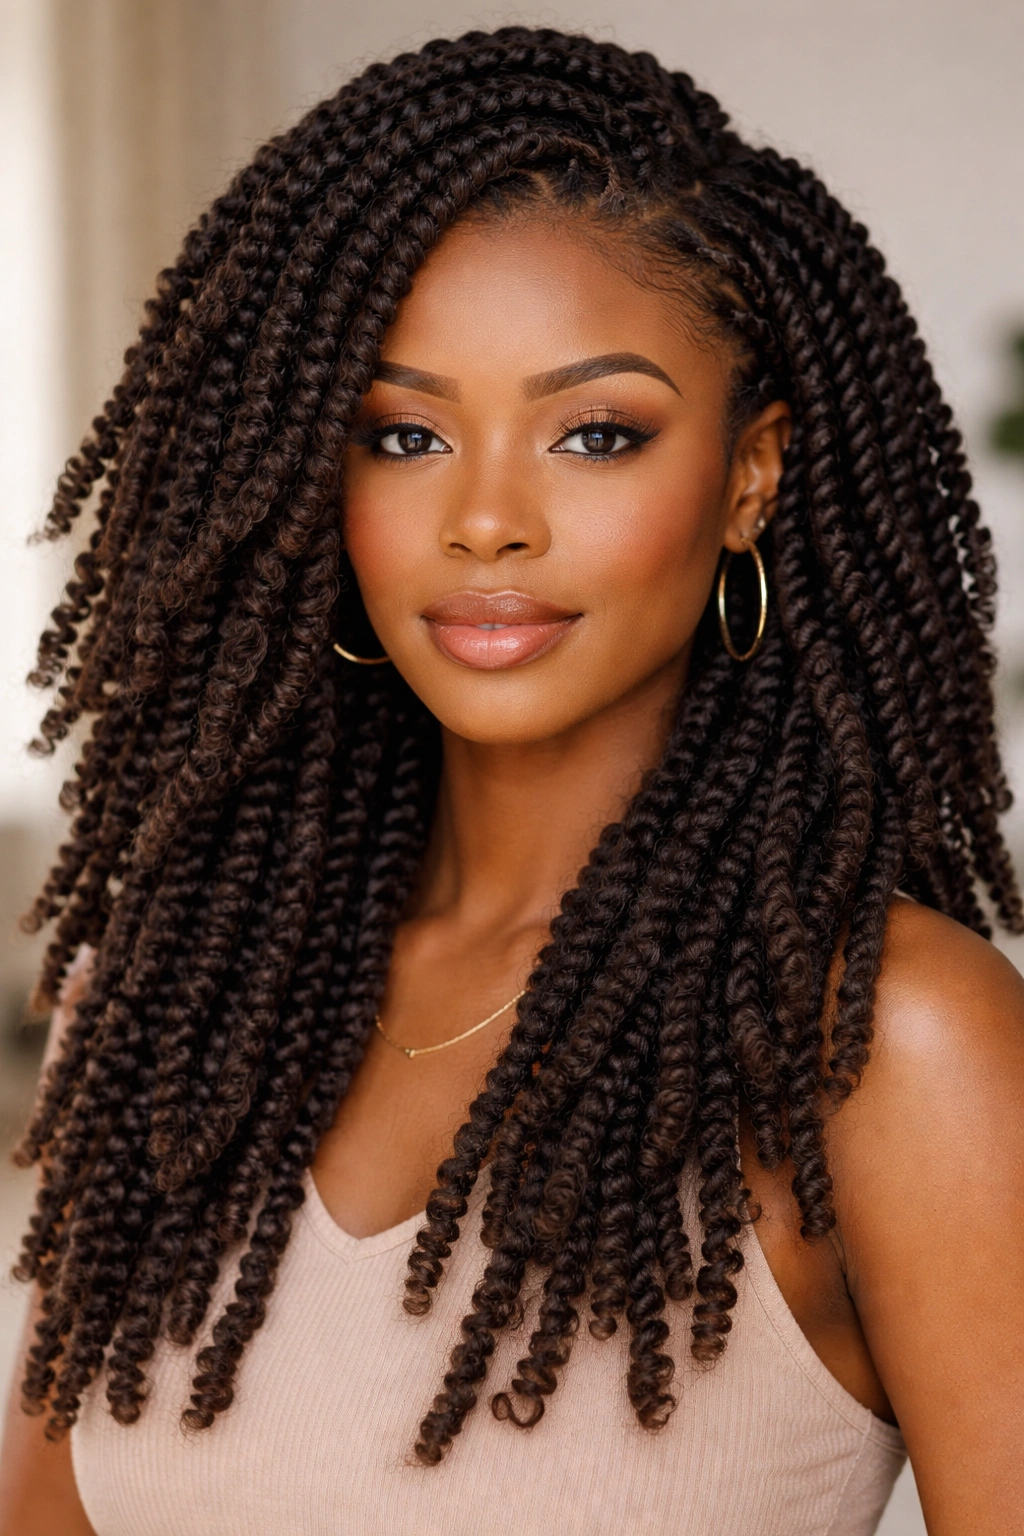
Kinky twists are a stunning protective style that celebrates the natural kink and coil pattern of textured hair by twisting sections together while maintaining their natural texture throughout. Unlike two-strand twists that create smooth spirals, kinky twists deliberately preserve the kinky, coily quality of the hair, creating a texture-on-texture effect that’s absolutely gorgeous. This style involves sectioning the hair and twisting two strands together, but in a way that highlights rather than smooths the inherent texture. The result is a style that looks fuller, feels more connected to your natural hair, and actually moves and bounces beautifully because the natural texture is working with the twist rather than being contained by it.
The Beauty of Working With Your Natural Texture
Kinky twists are particularly popular in Yoruba communities because they honor the natural state of the hair while still providing protective benefits. The style is also incredibly versatile—you can wear kinky twists down for maximum movement, sweep them up into a high puff, create a side-swept look, or even pin them into a crown around your head. Because the twists have natural texture, they look fuller and more voluminous than smoother protective styles, which is particularly beautiful for those with finer hair textures who want their style to have presence and dimension. The twists also tend to feel lighter and less heavy than some other protective styles because they’re not compressing your natural curl pattern.
Installing and Maintaining Kinky Twists
- Work with clean, conditioned, and fully dry hair for the best results
- Section your hair into squares or rectangles depending on your desired twist thickness
- Twist two sections together, moving down the length of the hair while letting the natural kink and coil show
- You can add color to your twists by incorporating dyed hair extensions if desired, or leave them completely natural
- Installation takes 4 to 6 hours depending on hair volume and desired thickness
- Kinky twists can be worn for 4 to 6 weeks, but you may want to refresh them at week 3 or 4 by re-twisting the new growth
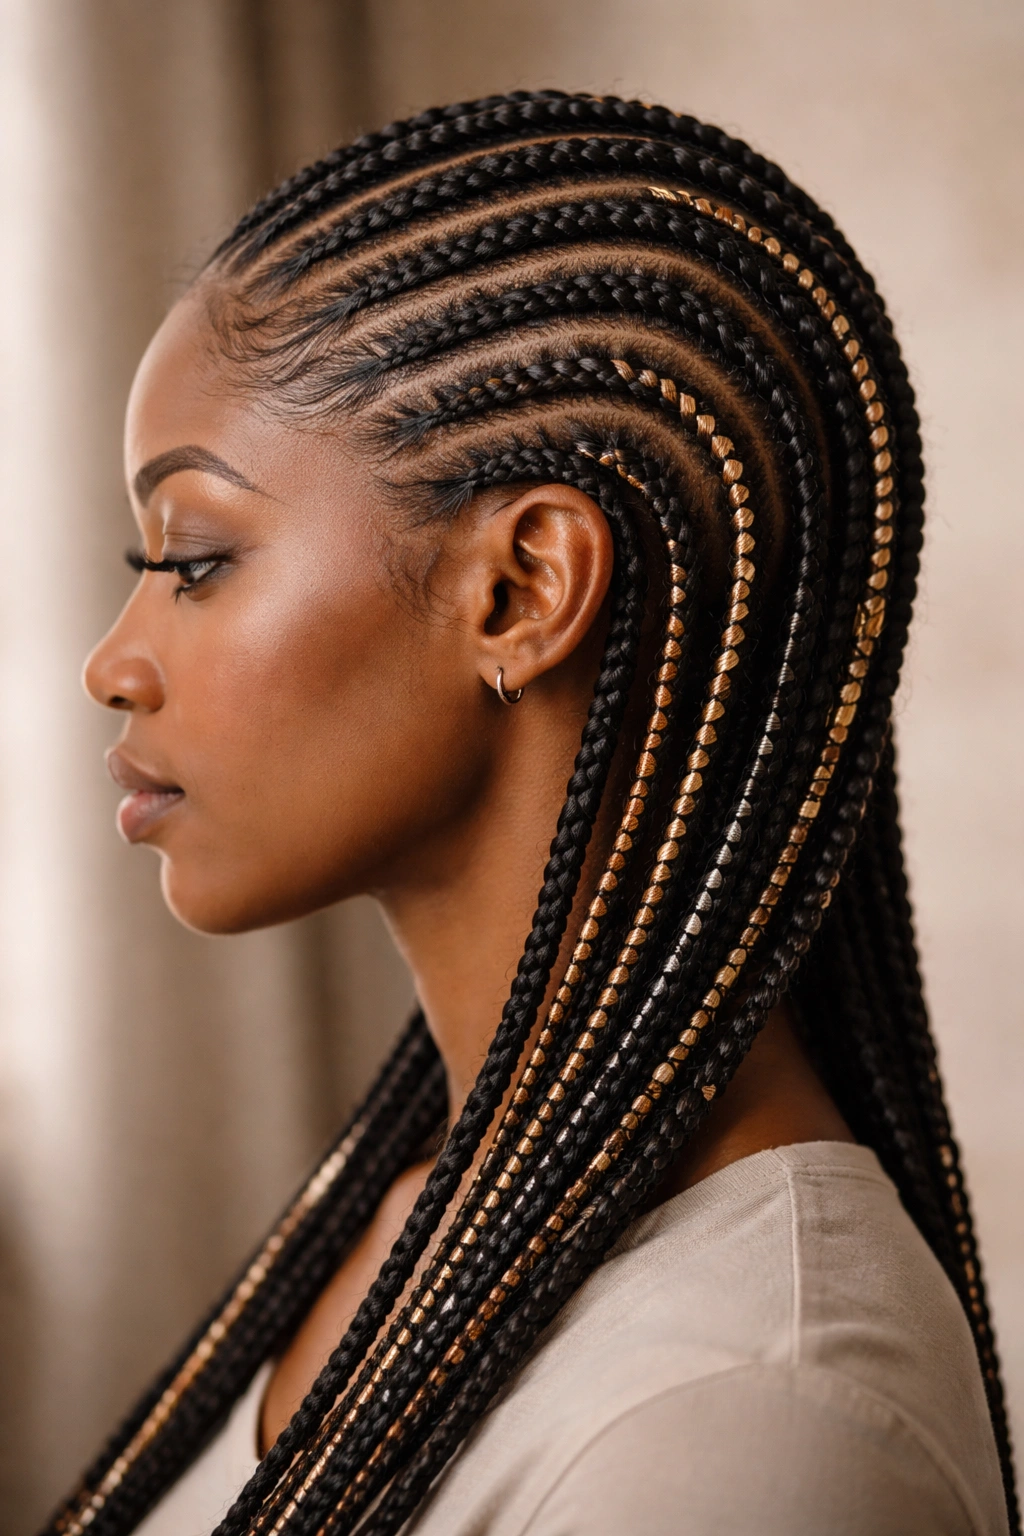
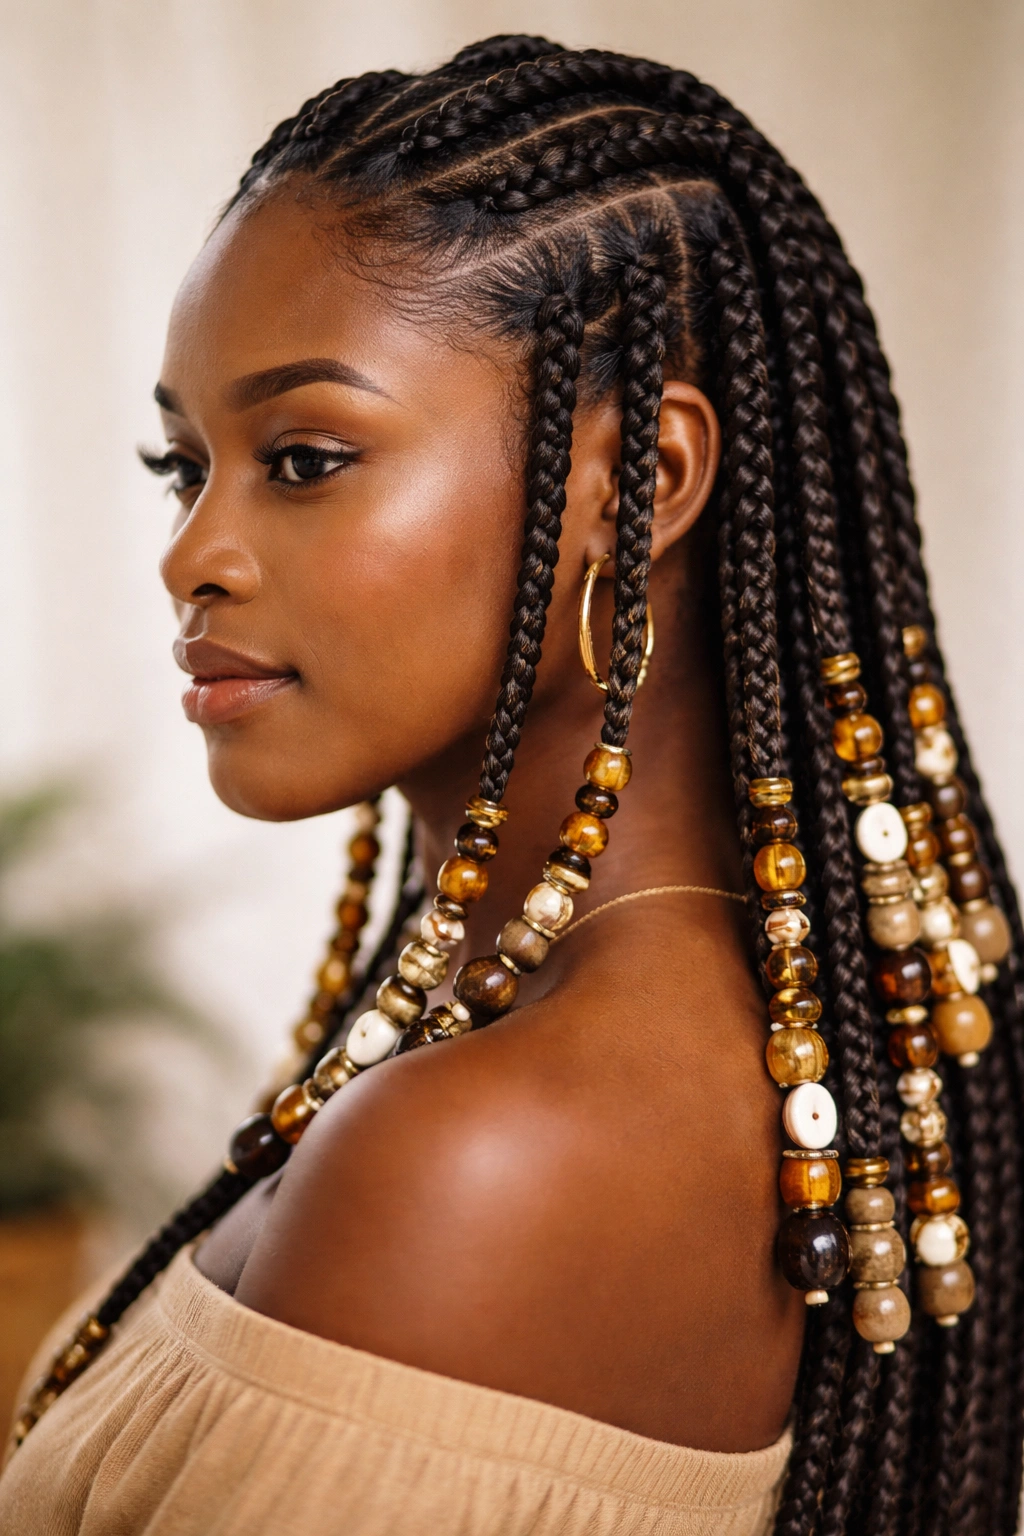
6. Fulani Braids
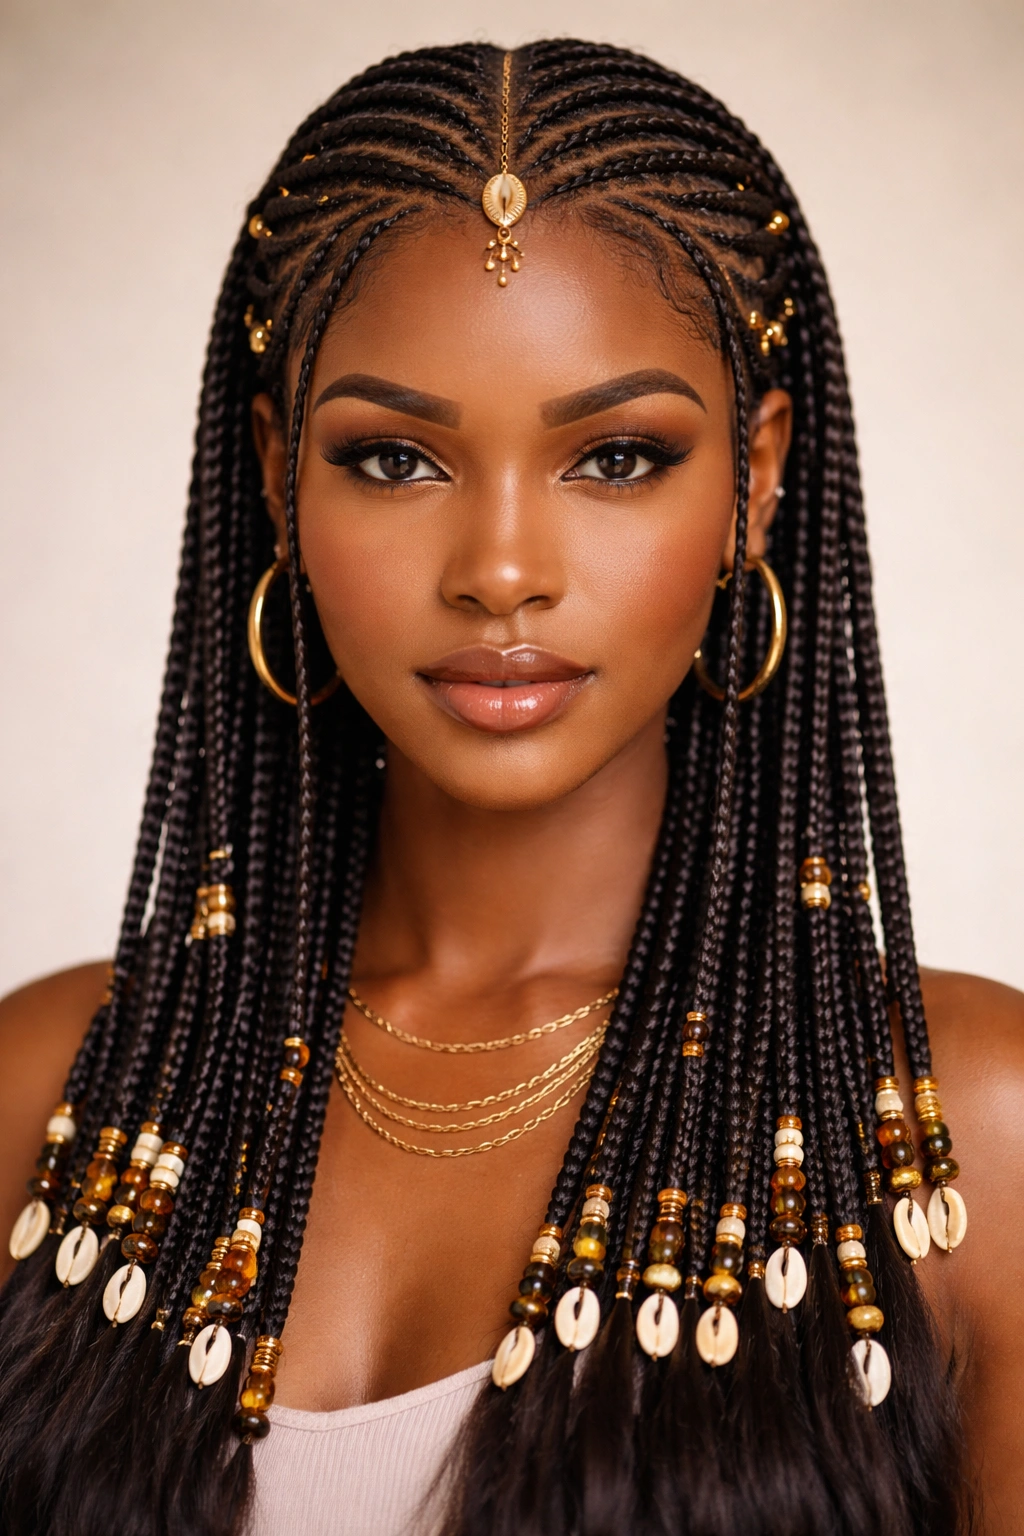
Fulani braids are a classic style that comes from the Fulani people of West Africa and has been embraced and adapted within Yoruba communities as a style of pride and cultural connection. The style features thin, intricate braids that often flow down the center and sides of the head, typically incorporating beads or other adornments at the ends. What distinguishes Fulani braids from other braiding styles is their characteristic thinness and the precision with which they’re executed—each braid is typically only a quarter to half an inch thick, creating an incredibly detailed, almost lace-like appearance across the head. The braids often feature a distinctive pattern, sometimes with a thicker braid running down the center and progressively thinner braids on either side, though the exact pattern varies based on personal preference and cultural background.
The Detailed Artistry of Fulani Braiding
Fulani braids are pure artistry—they require significant time and skill to execute well, and they showcase the incredible technical ability of the braider. The braids work beautifully with beads placed at the ends, creating a gentle clicking and clinking sound when you move, which many people find pleasing and connected to the style’s cultural roots. The thinness of the braids means they can last longer than thicker braids before you need to have them redone, and they photograph beautifully with excellent definition. This style also works well whether your natural hair is very coily, wavy, or somewhere in between—the thin braids can be executed on most hair types.
Getting Your Fulani Braids Right
- Bring reference images to your braider so they understand your desired pattern and braid placement
- Expect the styling session to take 6 to 8 hours because of the intricate detail and number of thin braids
- Plan to add beads during installation—small brass or gold-toned beads look elegant, while larger statement beads create more dramatic flair
- Prepare for the styling to be somewhat tight; Fulani braids need to be secure to last through the weeks of wear
- Sleep on a satin pillowcase and try not to manipulate the braids during the day
- These braids can last 6 to 8 weeks, making them one of the longest-lasting protective styles
7. Goddess Braids with Beads
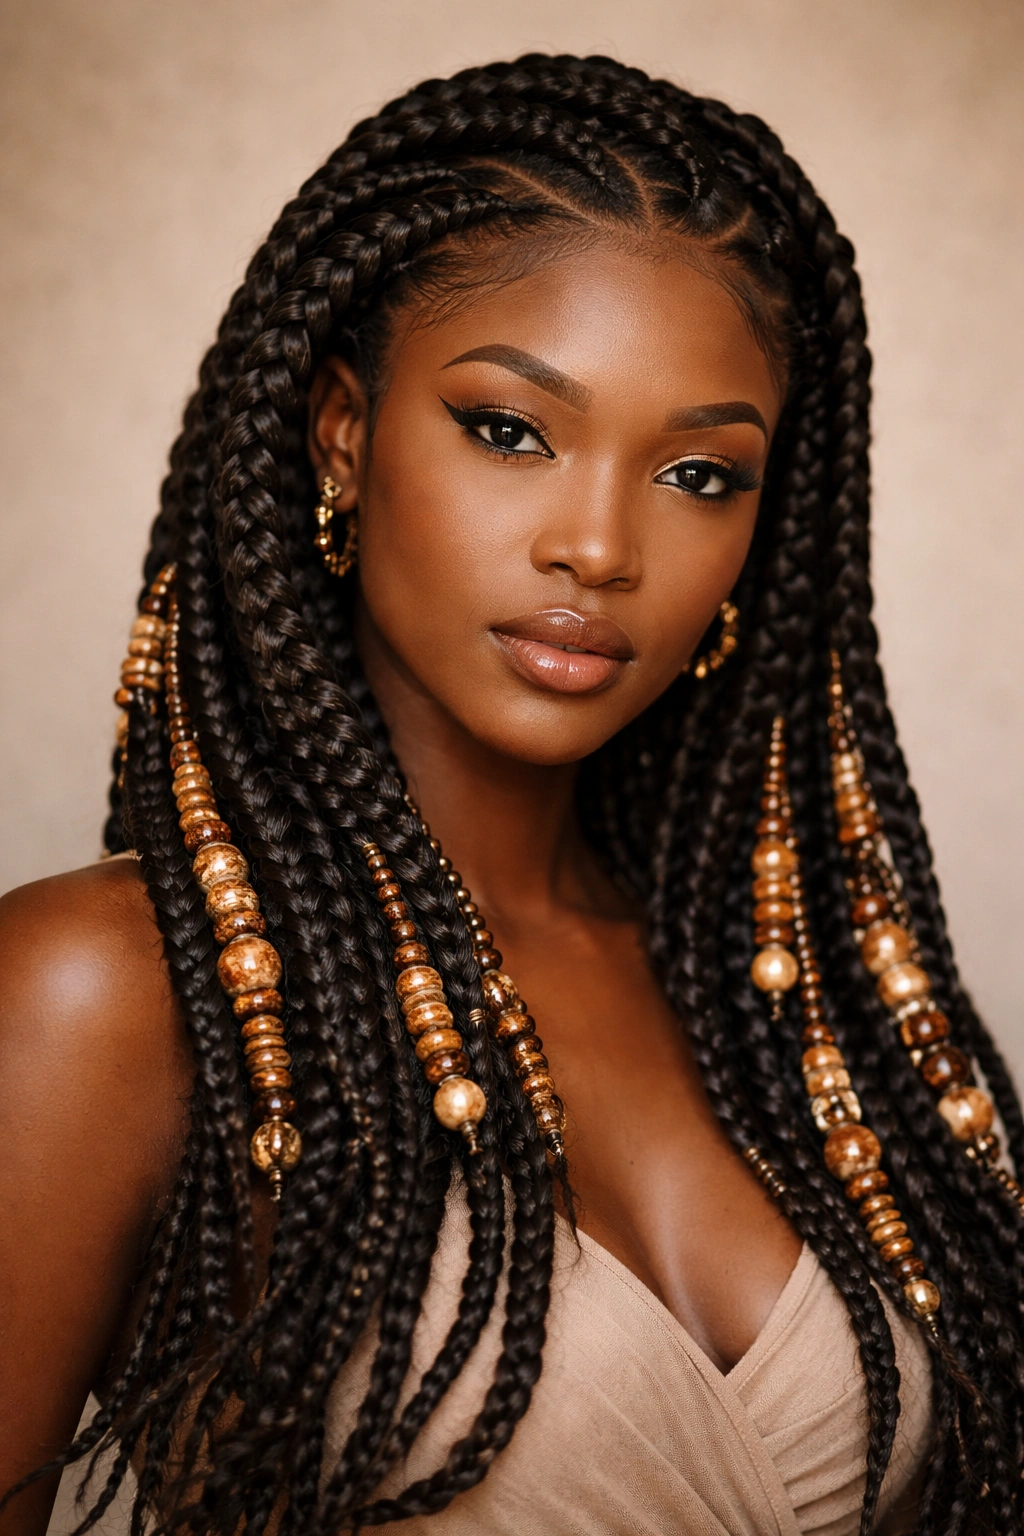
Goddess braids are a larger, more sculptural version of traditional braids that create gorgeous curved lines across the scalp, and when adorned with beads, they become a true statement style. These braids are chunky—typically an inch or more thick—and they’re often braided in curved or diagonal lines that follow the natural contours of the head rather than straight lines. The width of goddess braids means they can be completed more quickly than thinner styles, and they create a bold, unmistakable visual impact. Adding beads to goddess braids elevates the style even further; beads can be threaded directly onto the braid at installation, placed strategically throughout the braids, or clustered at the ends for maximum dramatic effect.
The Drama and Practicality Combined
Goddess braids are perfect if you want a style that makes a statement without requiring months of commitment or taking excessive time to install. The chunky braids feel secure and durable, they don’t require as much maintenance as thinner styles, and they look absolutely stunning with the right bead choices. The braids work with virtually all natural hair textures, from loose waves to very tightly coiled hair. When you add beads—whether gold-toned metal beads, colorful acrylic options, or natural wood beads—you’re creating a custom piece of wearable art. The style also allows for beautiful color combinations if you choose to incorporate dyed extensions; you might braid in extensions in a contrasting color to your natural hair, creating a striking ombré or two-tone effect.
Creating Stunning Goddess Braids
- Choose your bead colors based on your natural hair color and skin tone
- Have your stylist braid the sections in curved or diagonal lines rather than straight down the back
- Expect installation to take 3 to 5 hours depending on the number of braids and complexity of placement
- Beads can be added during installation or threaded on afterward—both methods work equally well
- Goddess braids typically last 4 to 6 weeks before needing to be taken down
- These braids are lower-maintenance than many other styles; you can spray them with water to refresh the braids periodically
8. Cane Rows
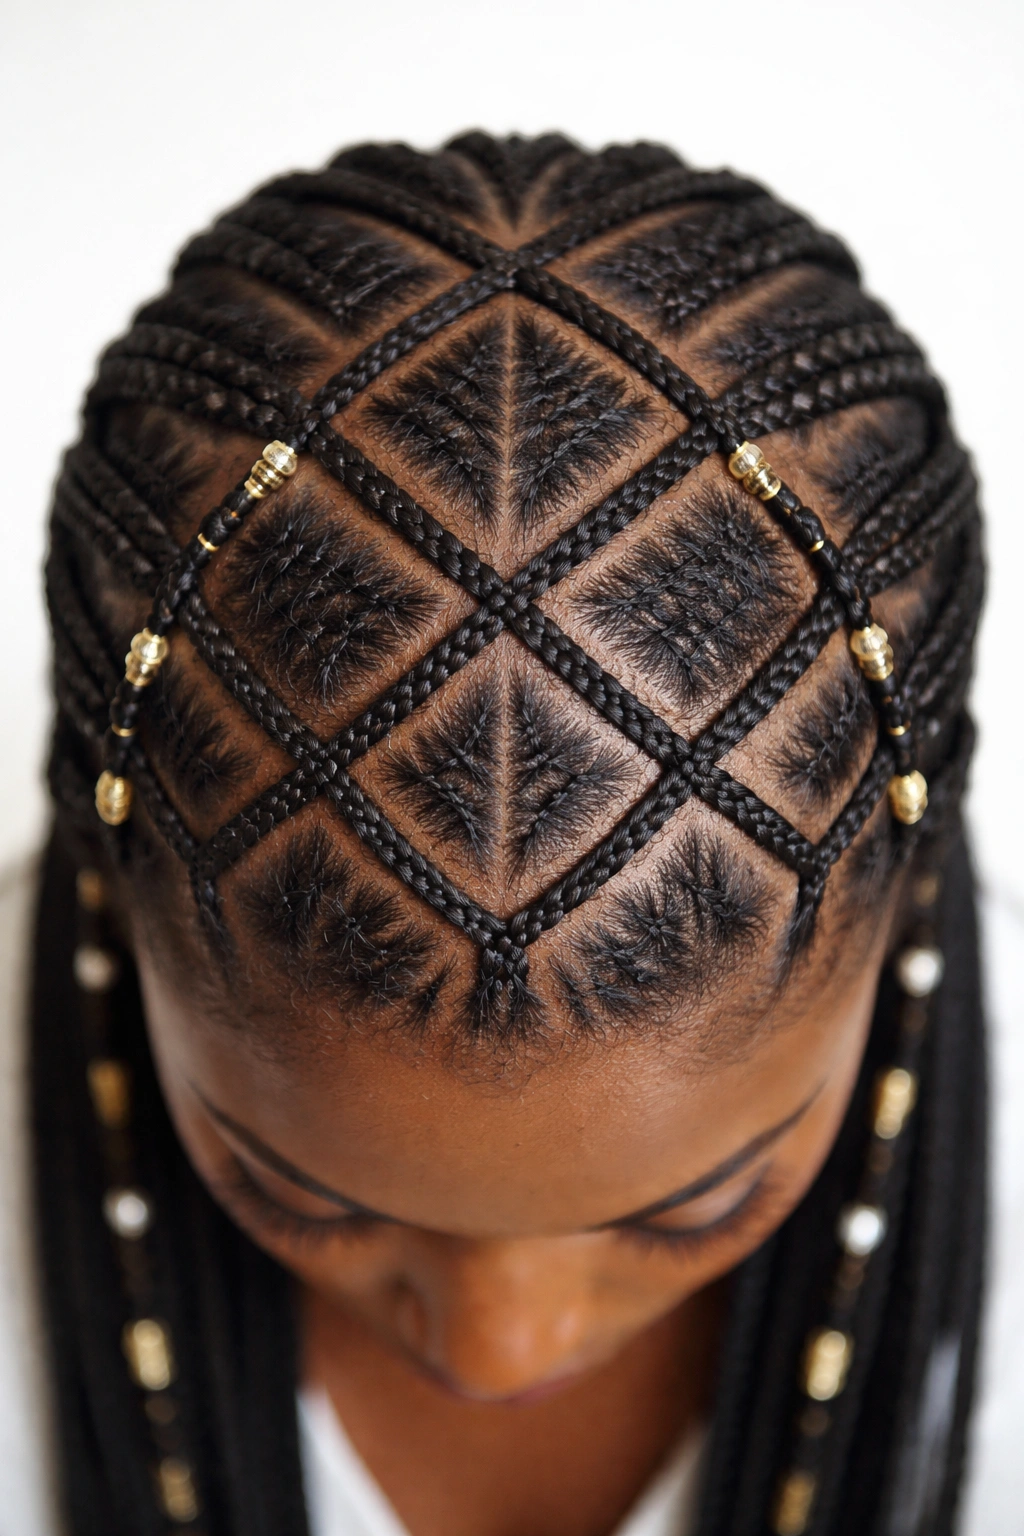
Cane rows are an intricate cornrow style that creates stunning geometric patterns across the scalp, and the name refers to the precise, architectural quality of the braiding. Unlike traditional cornrows that follow a simple linear path, cane rows involve complex braiding patterns that create squares, diamonds, or other geometric shapes when viewed from above. This style requires exceptional skill and precision—your braider needs to understand three-dimensional spatial relationships and execute dozens of individual braids that all work together as a cohesive pattern. The result is a hairstyle that’s simultaneously a technical achievement and a beautiful work of art. Cane rows are often enhanced with threading or beads, which further emphasizes the geometric patterns created by the braiding.
The Mathematical Beauty of Cane Rows
What makes cane rows so special is that they transform your head into a canvas for geometric art. The patterns aren’t random—they follow specific mathematical and cultural principles that have been refined over generations. You might see styles with a complex grid pattern, stylized diamonds, or even artistic representations of cultural symbols woven into the braiding pattern. Because of the complexity involved, cane rows take longer to install than standard cornrows, but they also tend to last longer and maintain their shape beautifully throughout the weeks of wear. This is the style to choose if you want your hair to be something people notice and comment on—cane rows inspire genuine admiration and awe.
Planning Your Cane Row Design
- Work with a braider who specializes in geometric patterns and has a portfolio you admire
- Bring clear reference images and discuss the exact pattern you want
- Consider whether you want the pattern to be symmetrical across both sides of your head or asymmetrical
- Expect installation to take 5 to 7 hours minimum, often longer for very complex patterns
- Adding thread or beads in contrasting colors will make your pattern even more visible and striking
- Cane rows can last 4 to 6 weeks, but you’ll likely want to show them off so much that you won’t mind redoing them sooner
9. Braided Crown Updo
The braided crown updo is an elegant Yoruba style that gathers your braids or twists into an upswept arrangement that sits atop your head like a crown, making it absolutely perfect for special occasions or when you want to feel particularly sophisticated. This style works beautifully whether you start with pre-existing braids that you style into an updo, or whether you have your stylist create new braids specifically designed to be pinned and swept upward. The braids might spiral around your head, wrap around in concentric circles, or flow asymmetrically to one side—the options are nearly endless. What matters is that all your hair is off your face and neck, creating an elegant silhouette that showcases your features, and the braided texture adds visual interest and dimension.
When to Wear This Regal Style
The braided crown updo is the style to wear when you want to look and feel absolutely magnificent. It’s perfect for weddings, formal dinners, important professional events, or any occasion where you want to make a sophisticated impression. The style elevates your entire appearance and conveys a sense of intention and care—you’re clearly not dressing casually, and that communicates respect for the event and everyone attending. The updo also keeps your hair completely managed and contained, meaning it won’t fall in your face or become disheveled as you move through your day. If you’re someone who loves the idea of natural hair but worries about it requiring too much attention during important events, this is the perfect solution.
Styling Your Braided Crown
- Start with cornrows, box braids, kinky twists, or Fulani braids—any protective style that’s already in your hair
- Use bobby pins, hair clips, or a combination of both to secure the braids into your desired updo shape
- Add decorative elements like a gold comb, hair fork, or decorative pins to secure the style while adding elegance
- If you’re having your stylist create the braids specifically for this updo, discuss the final look you want before they begin
- This is a style that can be worn for 1 to 2 weeks before you’ll want to change things up
- Consider using a satin bonnet or scarf when sleeping to protect the style and maintain its shape
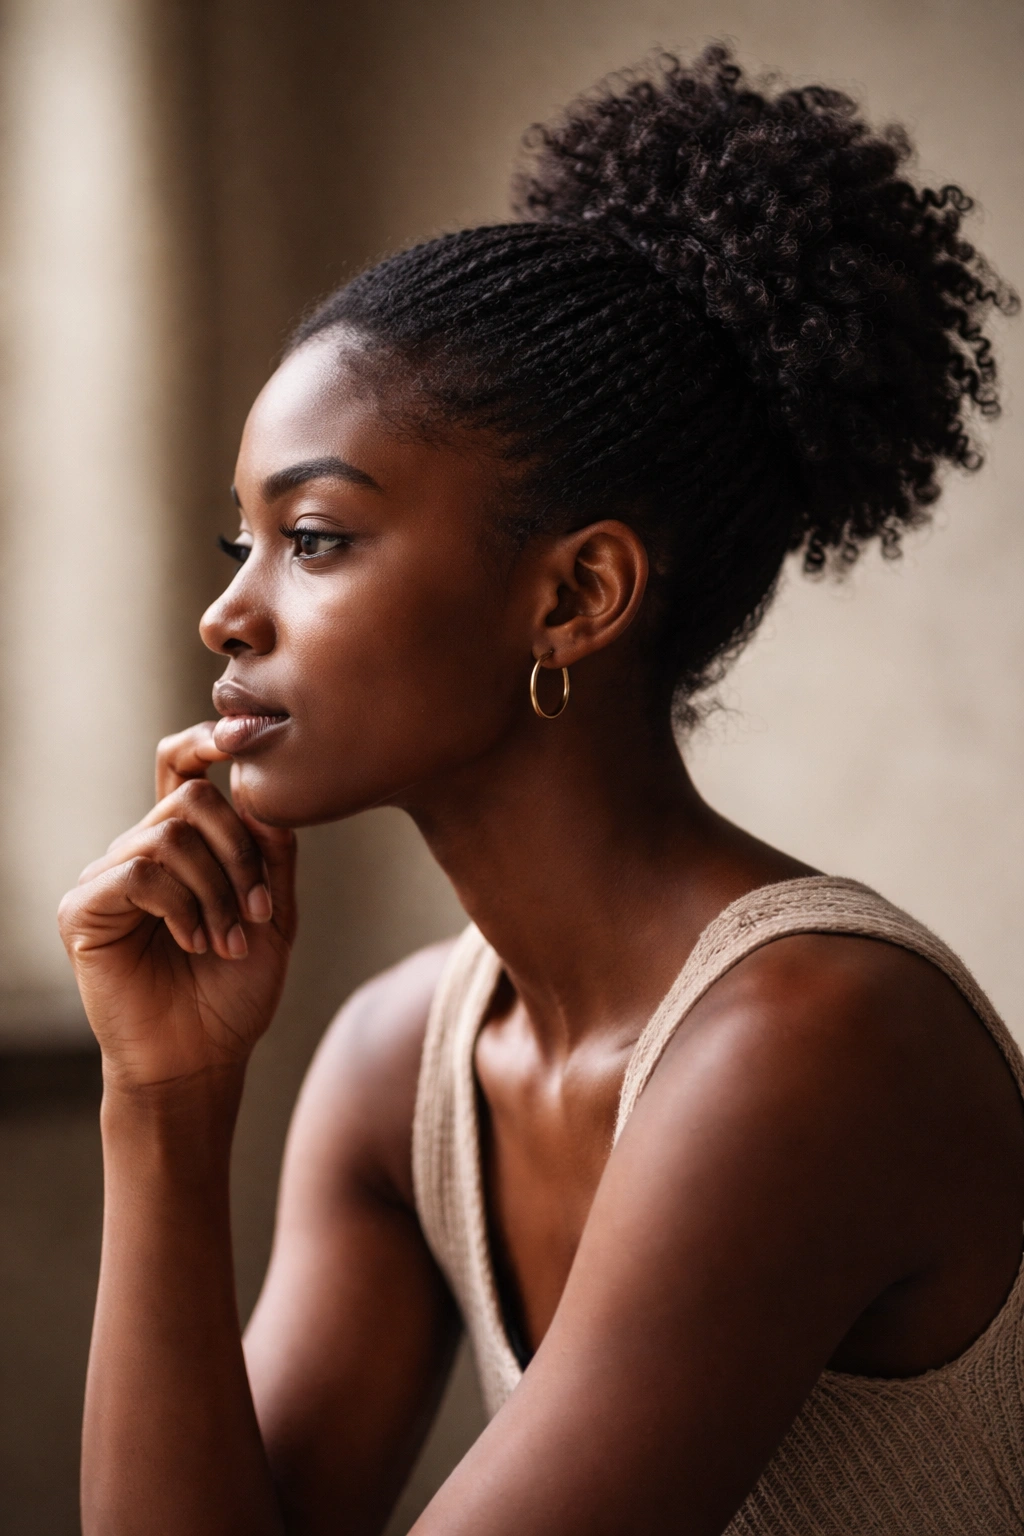
10. Twisted Bun
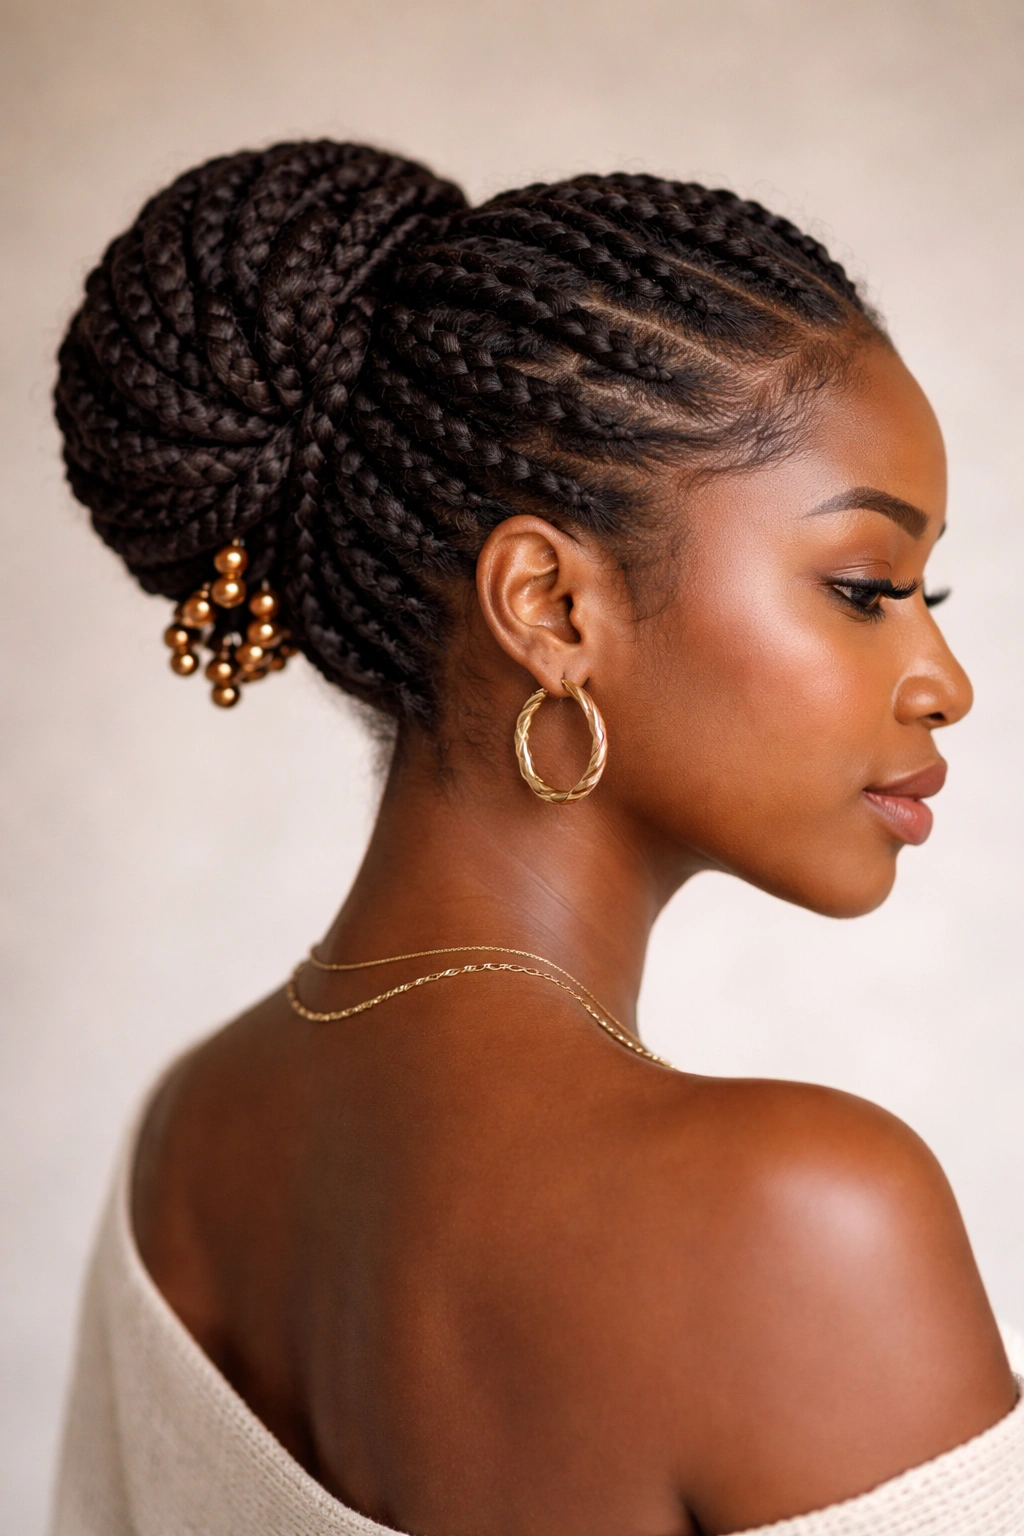
The twisted bun is a simpler yet utterly beautiful style where two-strand twists or senegalese twists are created and then wrapped or pinned into a high or low bun at the back of the head. The advantage of twists over braids in a bun is that twists have natural movement and texture, creating a bun that looks fuller and more interesting than a sleek, compacted bun might. You can create a twisted bun that’s tight and sculptural for a polished look, or one that’s slightly looser and more relaxed for an everyday aesthetic. The twists show beautifully in the bun formation, and you can wrap thread around the bun or add beads to the twist ends for additional embellishment.
Everyday Elegance in a Twisted Style
The twisted bun works wonderfully for people who want a protective style that’s quicker to install than some other options but still looks intentional and beautiful. You can wear this style for a week or two, and then untwist and re-twist the hair to create a fresh look or allow your hair a rest day. The style also works well at multiple positions—a high twisted bun feels youthful and playful, while a low twisted bun at the nape of your neck feels sophisticated and professional. You can even create multiple small twisted buns arranged across the back of your head for a more dramatic effect, or create one large, voluminous twisted bun for maximum impact.
Creating Your Twisted Bun
- Start with clean, moisturized hair that’s either naturally dried or blow-dried to your desired level of fluffiness
- Create two-strand twists or senegalese twists (thicker or thinner depending on your preference and time available)
- Once all twists are complete, gather them toward your desired bun location—high, low, or off to the side
- Wrap the twists around each other to form the bun shape, then secure with bobby pins
- Add any decorative elements like thread, beads, or a decorative comb
- This style can be worn for 5 to 7 days before you’ll likely want to take it down and give your hair a rest day
11. Locks (Locs) Styled Traditionally
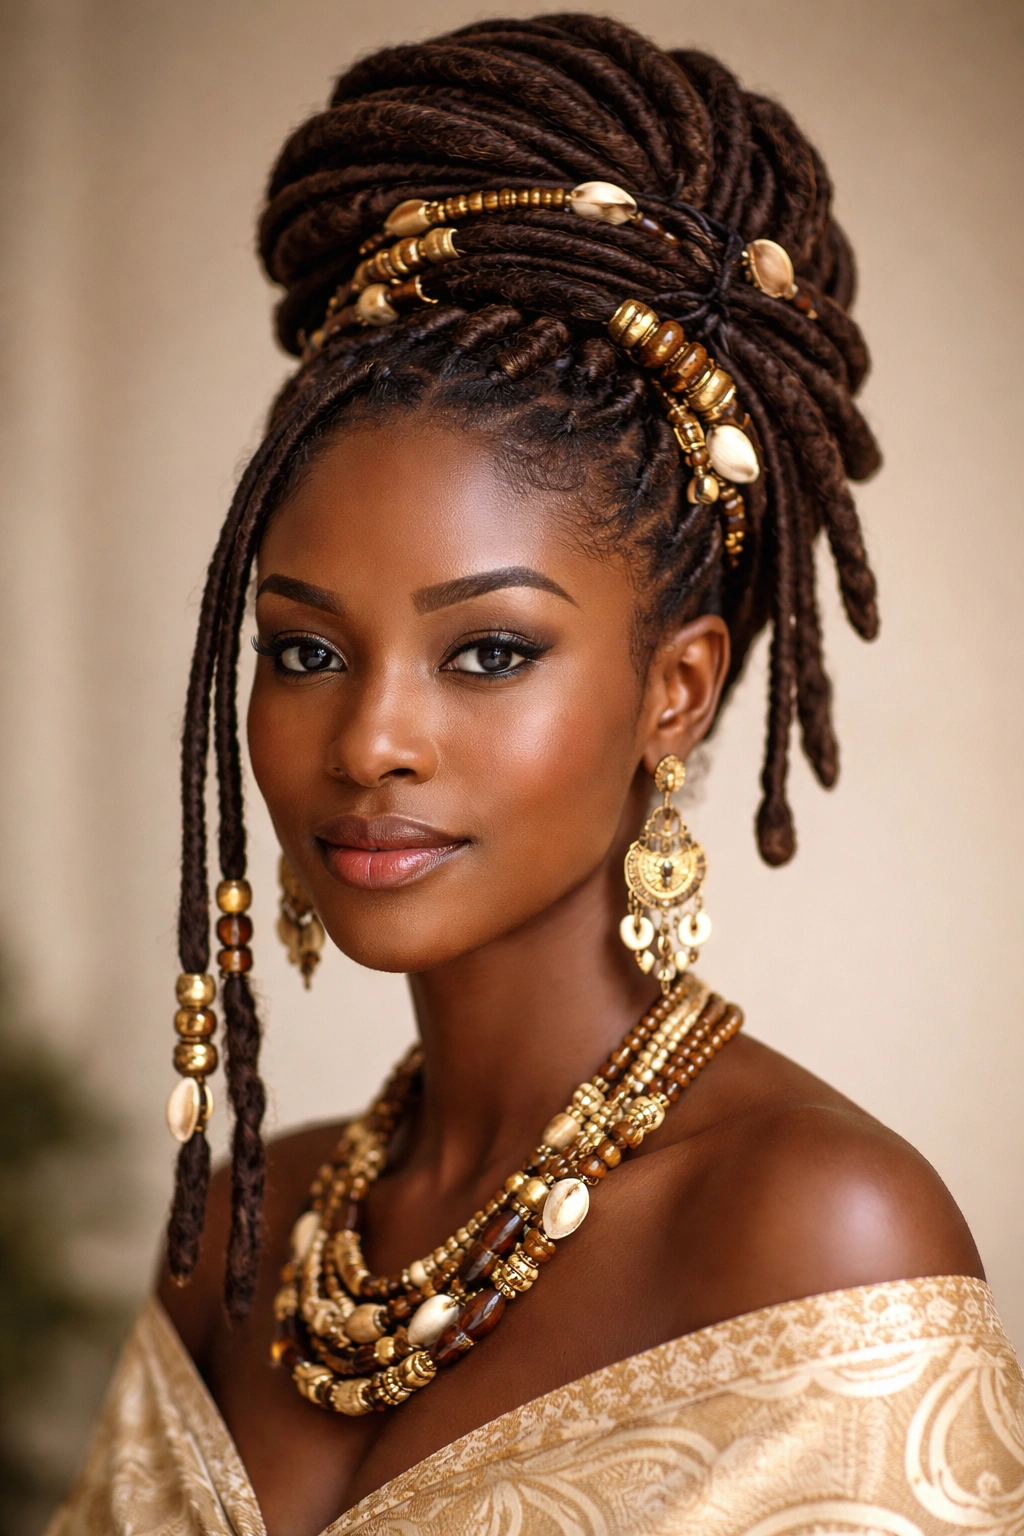
Locs, or dreadlocks, have deep cultural significance in Yoruba communities and throughout the African diaspora, representing spiritual connection, cultural pride, and a commitment to natural hair. Growing and maintaining locs is a long-term commitment—they take months to establish and years to reach their full potential—but once established, they become a beautiful, low-maintenance natural hairstyle. Locs can be styled in countless ways, and traditional Yoruba styling of locs often involves wrapping sections with thread, adorning them with beads, creating upswept styles, or fashioning them into elegant buns. The beauty of locs is that they require minimal daily manipulation once they’re mature, making them ideal for anyone seeking a truly low-maintenance natural hairstyle.
The Spiritual and Cultural Significance of Locs
Beyond the practical benefits, locs carry deep meaning in Yoruba culture and throughout the African diaspora. Many people choose locs as a spiritual practice, a connection to their heritage, or a statement of self-acceptance and natural beauty. Locs allow you to stop fighting your hair’s natural texture and instead celebrate it fully. Once your locs are established, you won’t need to worry about constant styling, frequent salon visits, or harsh treatments that damage natural hair. The locs naturally dread as they grow, eventually forming cylindrical sections that can be washed, dried, and styled like any other hair. Many people who initially viewed locs as requiring a lot of work discover that they’re actually the most maintenance-free natural hairstyle once you move past the initial growth phase.
Starting and Maintaining Healthy Locs
- Choose your starting method: freeform (no products or tools, just letting hair naturally loc), twist and rip (creating sections and locking them as you go), braids and locks (braiding sections then allowing them to loc), or salon installation
- Your locs can take 3 to 12 months to become truly established, depending on your hair texture and starting method
- During the establishing phase, plan to keep your locs in a protective style or bonneted up most of the time
- Once established, wash your locs regularly—usually once a week or every two weeks—with a loc-friendly shampoo
- Plan for regular maintenance appointments every 4 to 6 weeks to keep your locs neat and prevent excessive loose hair
- Locs will last as long as you care for them; many people maintain locs for 10+ years
12. Braided Halo Style
The braided halo style creates a crown of braids that wraps around the perimeter of your head, with the remaining hair either worn loose, twisted, or bundled at the back. This style is absolutely stunning and creates an ethereal, almost celestial quality—hence the “halo” name. The braids typically begin at one temple, travel around the crown of the head, and end at the other temple, framing your face beautifully while keeping hair off your forehead and cheeks. What makes this style particularly special is that it combines the structured elegance of braids with the freedom of wearing your hair down, creating a hybrid style that’s both protective and expressive. The loose hair beneath the halo can be worn in its natural curl pattern, twisted, or even in a half-up arrangement.
The Modern-Meets-Traditional Appeal
The braided halo works beautifully in contemporary settings while maintaining its roots in traditional Yoruba styling. It’s the perfect choice for someone who loves the idea of braids but doesn’t want to commit to a fully braided style, or who wants a style that works for everyday wear rather than special occasions exclusively. The style photographs beautifully because the face is framed so elegantly, and it works well on most face shapes. You can make the braids thicker or thinner depending on your preference, incorporate beads for additional detail, or keep them simple and refined. This is also a style that can transition from casual to formal depending on what you do with the hair underneath the halo.
Installing Your Braided Halo
- Start with clean, moisturized hair
- Create braids beginning at one temple and moving toward the back—the braids should follow the natural contour of your head
- These are typically three-strand braids or French braids, creating a clear framework around your head
- Once the braids wrap around to the other side, secure them with bobby pins tucked underneath so they’re hidden
- The remaining hair underneath can be worn down, twisted into spirals, or gently pulled into a low ponytail
- This style can be worn for 1 to 2 weeks before you’ll want to take it down
- It’s perfect for rotating with other styles—wear the halo for a week, take it down and rest your hair for a day, then create a new style
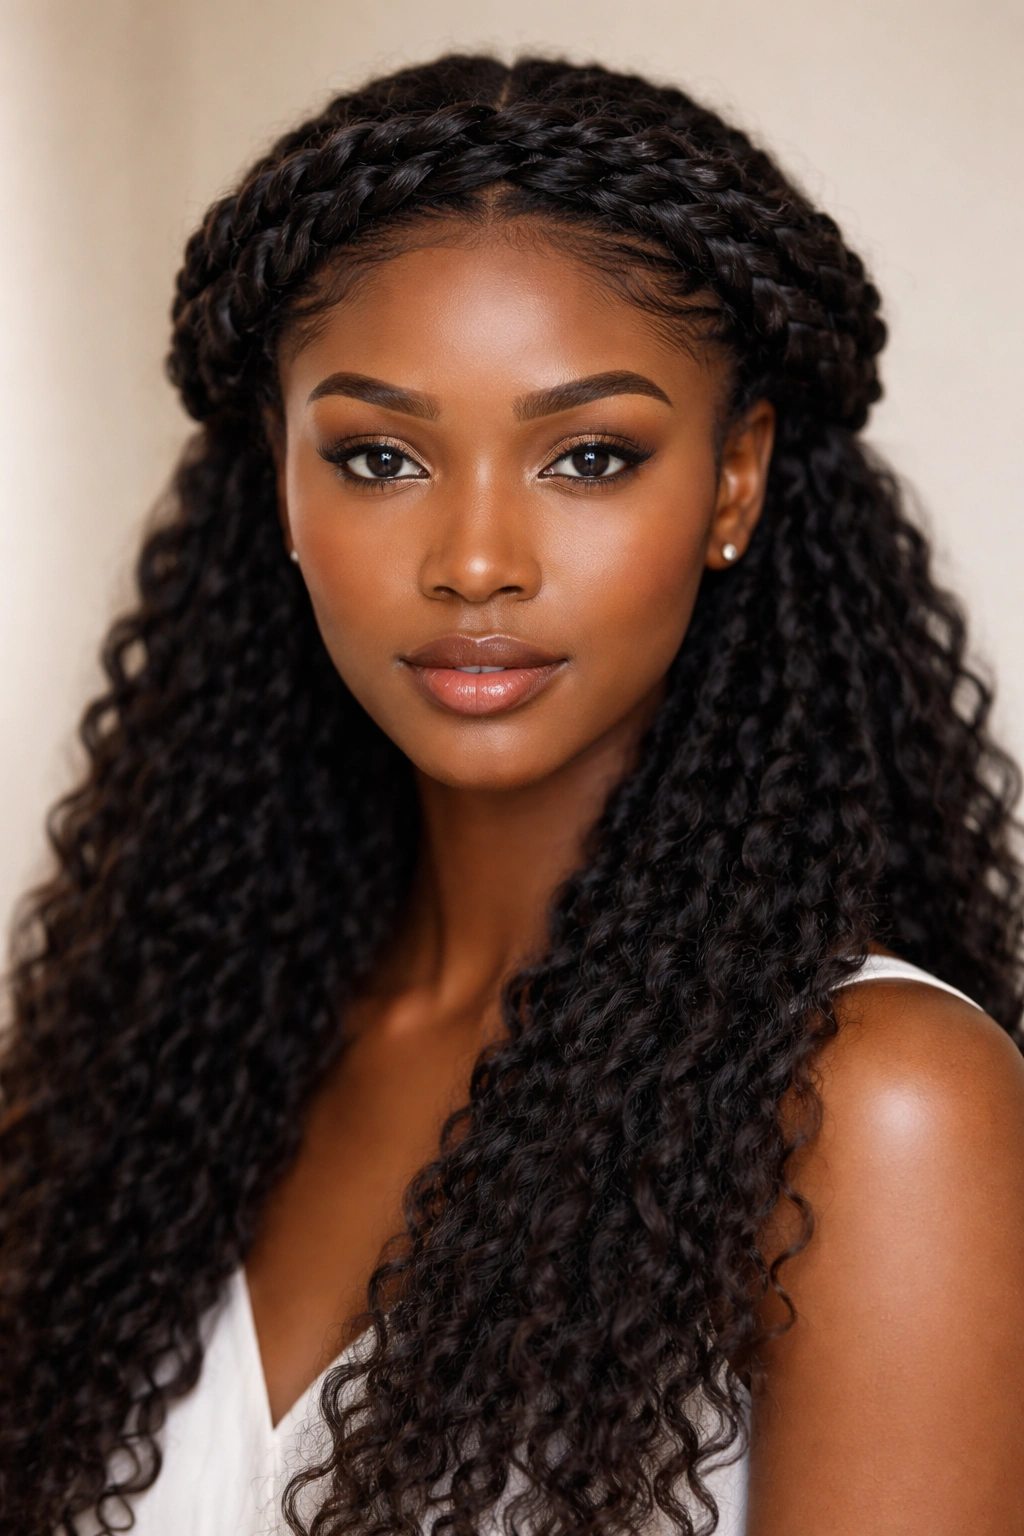
13. Two-Strand Twists
Two-strand twists are a fundamental protective style that involves twisting two sections of hair together to create a spiraled effect, and they’ve been a cornerstone of natural hair care in Yoruba communities for generations. Unlike braids that require three sections, two-strand twists need only two sections, making them quicker to install while still providing excellent protective benefits. The resulting twists have beautiful texture and movement—they’re not as sleek and compact as braids, which means they move more naturally and feel less heavy on the scalp. Two-strand twists work beautifully on virtually all hair textures, from loose waves to very tightly coiled hair, and they look equally stunning worn down or pinned up into various updos.
The Versatility of Twisted Styles
Two-strand twists are perfect if you want a protective style that can go nearly anywhere in your life. You can wear them down and bouncy for a casual, youthful look, sweep them up into a puff for more polish, pin them into a crown for elegance, or create smaller twists and arrange them into intricate patterns. The style is also efficient to install—most people can complete a full head of two-strand twists in 4 to 6 hours, making it faster than many braiding styles. Because twists have natural texture and movement, they look fuller and more voluminous than braids on the same hair, which is particularly helpful if you have thinner or finer hair texture. The twists also breathe better than some other protective styles, meaning your scalp receives more air circulation.
Creating and Caring for Two-Strand Twists
- Start with clean, conditioned hair that’s preferably blow-dried or air-dried to remove excess moisture
- Section your hair into squares or rectangles depending on your desired twist thickness
- Twist two sections together from the root to the tip, working your way down the length of the hair
- Twists can be made with your natural hair only, or you can incorporate extensions for length and thickness
- Installation takes 4 to 6 hours depending on hair volume and desired twist thickness
- Sleep on a satin pillowcase and use a satin bonnet for extra protection
- Two-strand twists last 4 to 6 weeks, but you may want to re-twist the new growth around week 2 to 3 for a neater appearance
14. Beaded Plaits
Beaded plaits combine traditional three-strand braiding with the embellishment of beads, creating a style that’s both protective and incredibly decorative. In this approach, beads are integrated directly into the braiding process—threaded onto the hair sections as the braid is created—or added afterward by threading beads onto individual braid sections. The beads add weight to the braids, which can help them hang straighter and stay in place longer, and they create a beautiful visual effect that catches light and draws attention to the detail and artistry of the braiding. Beaded plaits work beautifully in various colors and sizes of beads, allowing you to customize the style to your personal aesthetic. You might choose beads that match your natural hair color for a subtle effect, or contrast dramatically for a bold statement.
The Art and Practicality of Beaded Braids
Beaded plaits are where function meets art in natural hair styling. The beads serve a practical purpose—they help maintain the braid structure and reduce frizz—while simultaneously creating stunning visual interest. This is the style to choose if you want people to admire your hair as soon as they see you. You can create beaded plaits in virtually any size and style: thin, delicate plaits with small beads, chunky braids with large statement beads, or a mix of bead sizes throughout. The style also works beautifully across different occasions—beaded plaits can feel casual and everyday when done simply, or elegant and formal when executed with precision and paired with the right beads.
Installing Beaded Plaits
- Choose your bead colors and sizes based on your desired final look
- Have your stylist braid three-strand plaits while threading beads onto the braid sections during the braiding process, or braid first and add beads afterward
- Different braiders have different preferences for when and how to integrate beads—discuss this with your chosen stylist
- The beading process adds time to installation; expect 5 to 7 hours for a full head of beaded plaits
- Larger braids with bigger beads go faster than smaller, more delicate plaits with tiny beads
- Beaded plaits can last 5 to 7 weeks because the beads help protect the braid structure
- Be mindful when sleeping—try to keep the beaded sections protected to prevent the beads from catching on fabric
15. Natural Afro Puff with Adornments
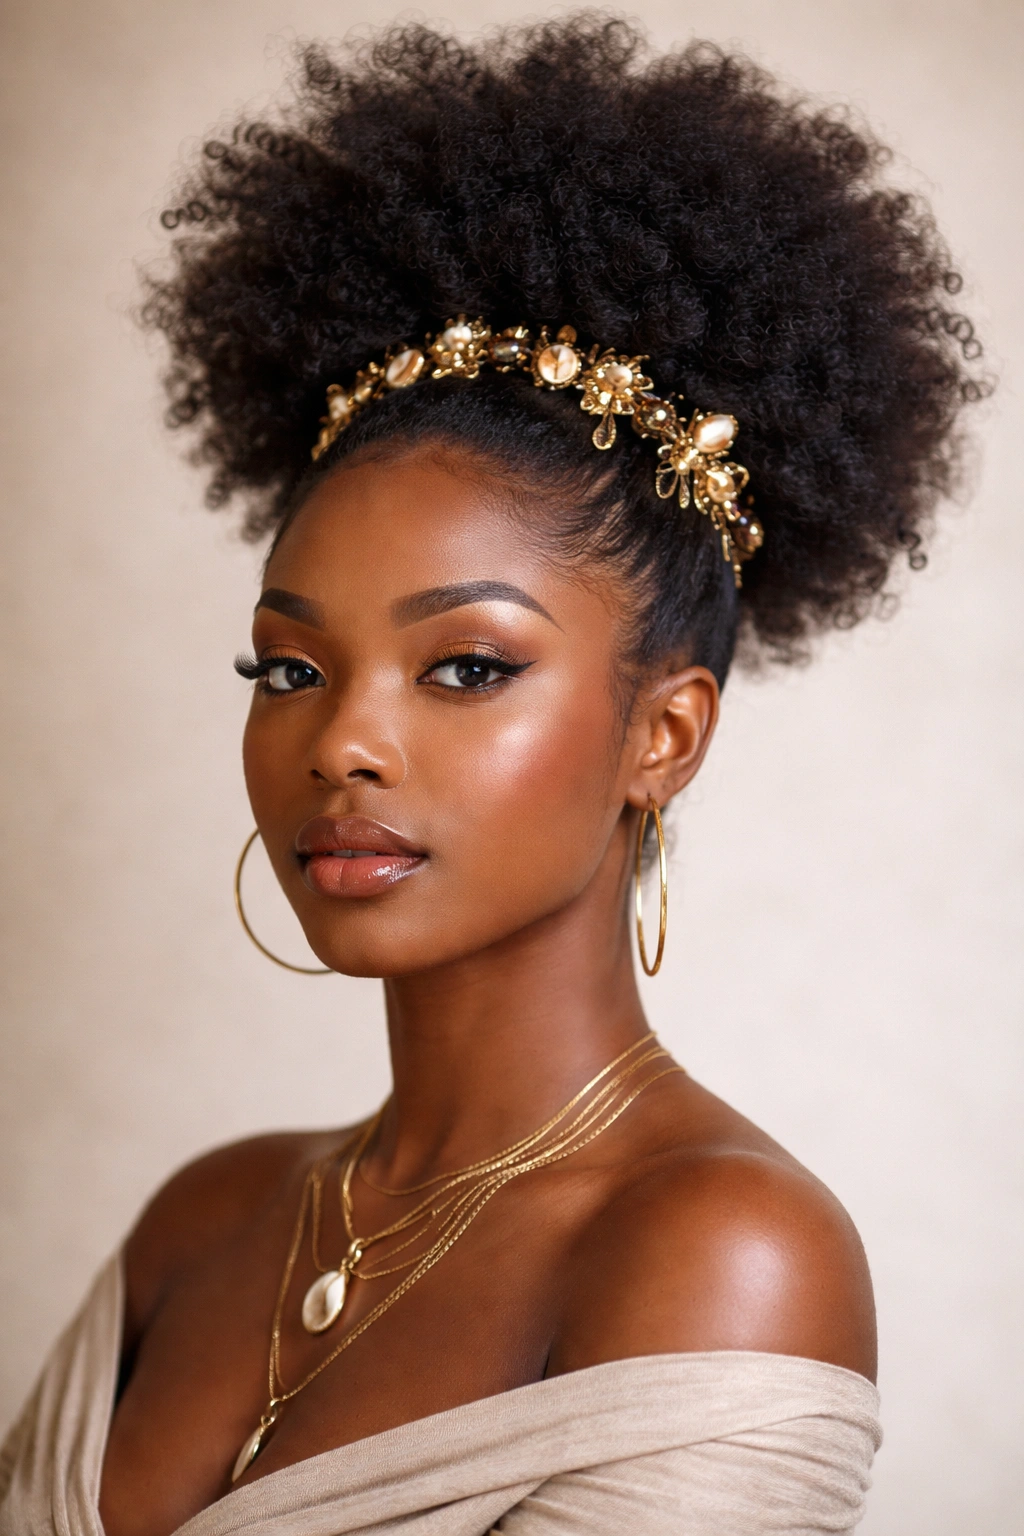
The natural afro puff is perhaps the simplest yet most powerful style—your natural hair gathered into a high puff at the crown of your head, adorned with clips, scarves, or decorative pins that celebrate your hair and heritage. This style requires no braids, no twists, and no extensions—just your own natural hair in its fullest, most authentic form. The puff works beautifully on virtually all natural hair textures and lengths, though it’s particularly striking on very textured hair that creates a full, rounded shape. The key to a beautiful natural puff is making sure your hair is moisturized and defined, creating a puff that looks healthy and intentional rather than compressed. Adorning your puff with decorative elements—colorful scarves, gold cuffs, decorative combs, or beaded pins—transforms a simple style into a statement.
Celebrating Your Natural Texture
The natural afro puff is the ultimate celebration of unmanipulated natural hair. There’s something powerful and beautiful about wearing your hair completely natural, especially adorned with elements that celebrate your culture and heritage. This style says clearly: I love my hair exactly as it grows from my head, and I’m proud to show it. The puff also has the added benefit of requiring minimal installation time—you can create a beautiful puff in 10 to 15 minutes—while still looking intentional and polished. It’s the perfect style for people who want to protect their hair while rocking it fully natural, or for those who simply love the look and feel of their hair in its most natural state.
Creating the Perfect Natural Puff
- Start with clean, moisturized hair that’s either freshly washed or refreshed with a spray moisturizer
- Apply a defining cream or gel to your hair, working it through to enhance your natural curl pattern
- Gather your hair into a high ponytail at the crown using a claw clip or elastic, smoothing it back gently
- Fluff the puff to create volume and shape, using your fingers to arrange the curls how you want them
- Secure any loose edges with a light edge control or spray
- Add decorative elements like a gold cuff, silk scarf tied around the base, decorative comb, or beaded pins
- A natural puff can be worn for 3 to 5 days before you’ll want to take it down and refresh your hair
Final Thoughts
Yoruba hairstyles represent far more than just ways to style your hair—they’re expressions of cultural pride, artistic creativity, and a deep understanding of how to work beautifully with natural texture. Whether you choose an intricate cane row with geometric patterns, a simple but striking natural afro puff with beads, or a protective style like box braids or twists that you can wear for weeks, you’re participating in a tradition that spans generations and continents. These styles celebrate who you are, honor your heritage, and showcase the incredible versatility and beauty of natural hair.
The practical benefits matter too. Many of these styles protect your hair from daily manipulation and environmental stress, allowing your natural hair to grow stronger and healthier over time. The installation time, while sometimes significant, is often a form of self-care and community—time spent with a skilled stylist who understands your hair, your preferences, and your vision. What’s more, these styles are economical; a single installation can last several weeks, providing exceptional value compared to frequent salon visits required for other styling approaches.
As you explore which Yoruba hairstyles speak to you, remember that your hair is a canvas for your own creativity and expression. You can honor these traditional styles faithfully, or adapt them to fit your personal aesthetic, your lifestyle, and your timeline. What matters most is that you’re celebrating your natural hair, embracing your heritage, and wearing your beauty confidently.