Yoruba hairstyles have been a cornerstone of West African beauty, culture, and identity for centuries. These intricate, sculptural styles communicate status, celebrate femininity, and honor ancestral traditions—and they’re absolutely stunning on 4C hair texture. If you have tightly coiled, densely textured 4C hair, you already have the perfect canvas for these bold, dimensional styles. The natural shrinkage and grip of 4C hair actually makes these styles hold better and last longer than on looser textures, and the way your hair responds to braiding, coiling, and molding creates a beautifully authentic look.
The challenge for many 4C-haired women is finding reliable instruction and inspiration specifically tailored to how 4C hair behaves. Generic hairstyle tutorials often gloss over the texture work required, the moisture balance needed, and the protective techniques that keep your edges intact. That’s where this guide comes in. These twelve Yoruba-inspired styles range from traditional arrangements that connect you directly to cultural heritage, to modern reinterpretations that blend ancestral techniques with contemporary flair. Each style works beautifully with 4C hair when you understand the specific styling method, the products and tools that work best, and how to care for your hair throughout.
What makes Yoruba hairstyles particularly magnificent on 4C hair is the way they showcase texture as a feature, not something to hide or straighten away. The density and natural grip of 4C hair means you can create intricate, multi-layered styles that might be impossible on other textures. These are styles that photograph beautifully, turn heads at cultural events and everyday life alike, and most importantly, they honor your hair’s natural state.
1. Gele (Traditional Fabric Wrap)
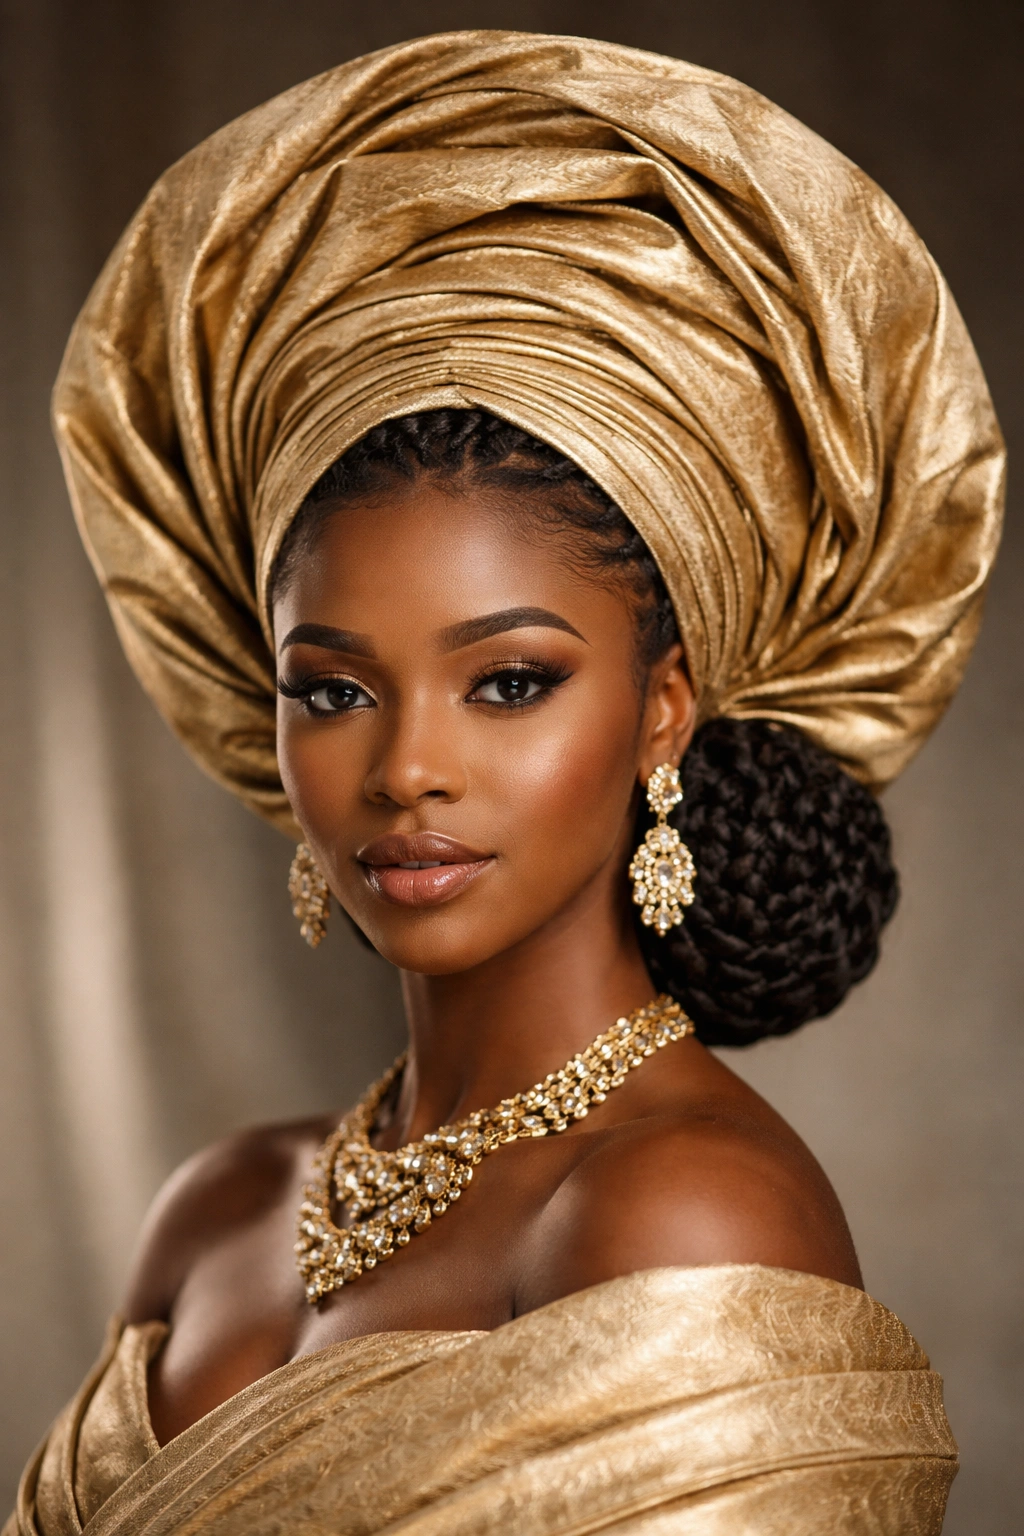
The gele is the crown jewel of Yoruba styling—an elaborate, sculptural fabric wrap that sits atop braided or twisted hair. It’s less a hairstyle and more an art form, a statement piece that transforms your entire presence. The foundation is usually an updo made from cornrows, box braids, or flat twists, and then the fabric (often a heavily starched, ornate wrapper) is artfully folded, pleated, and pinned to create a dramatic crown that can reach several inches high.
Creating the Foundation for Your Gele
Start with a solid protective base style that can withstand the weight and friction of the fabric wrap. Flat twists work beautifully on 4C hair because they’re secure, take your natural texture well, and create a smooth scalp surface for the gele to sit on. Arrange your flat twists in a circular pattern or in concentric rows, depending on the gele design you want—some styles work better with twists meeting at the crown, others with a flat-topped base. Make sure your twists are tight enough to hold the weight of the fabric but not so tight that they stress your hairline. Your scalp should be well-moisturized before installation, and you should feel confident that your braids or twists can comfortably hold the gele for 8-12 hours.
Choosing Your Gele Fabric and Mastering the Fold
The fabric you choose dramatically affects how your gele looks and how long it lasts. Authentic Yoruba geles use heavily starched wrapper fabric—the kind with intricate patterns and a crisp hand (texture). Look for fabrics with a reasonable weight, not too flimsy and not so heavy that it strains your hair or neck. The fold is where artistry comes in. There are dozens of traditional folds: the “Ikoyi wrap” with its signature side sweep, the “Lagos wrap” with a steeple crown, the “Eko wrap” with layered points. If you’re new to geles, start with simpler folds and work your way to more complex ones. YouTube tutorials specifically demonstrating gele folding on 4C hair will show you how to create lift and structure using pins, clips, and sometimes hairspray to keep your fabric crisp.
How Long You Can Wear a Gele
A well-constructed gele on a solid protective base can last 2-3 weeks if you’re careful. Sleep in it (on a silk pillowcase to minimize friction), use satin scarves as additional protection at night, and avoid excessive tugging or adjustment. Your underlying braids or twists should feel secure the entire time. When you take it down, gently unpin the fabric and loosen your protective base slowly—rushing this step can break off hair. Deep condition your hair afterward and leave the style in for at least 3-5 days before installing a new gele.
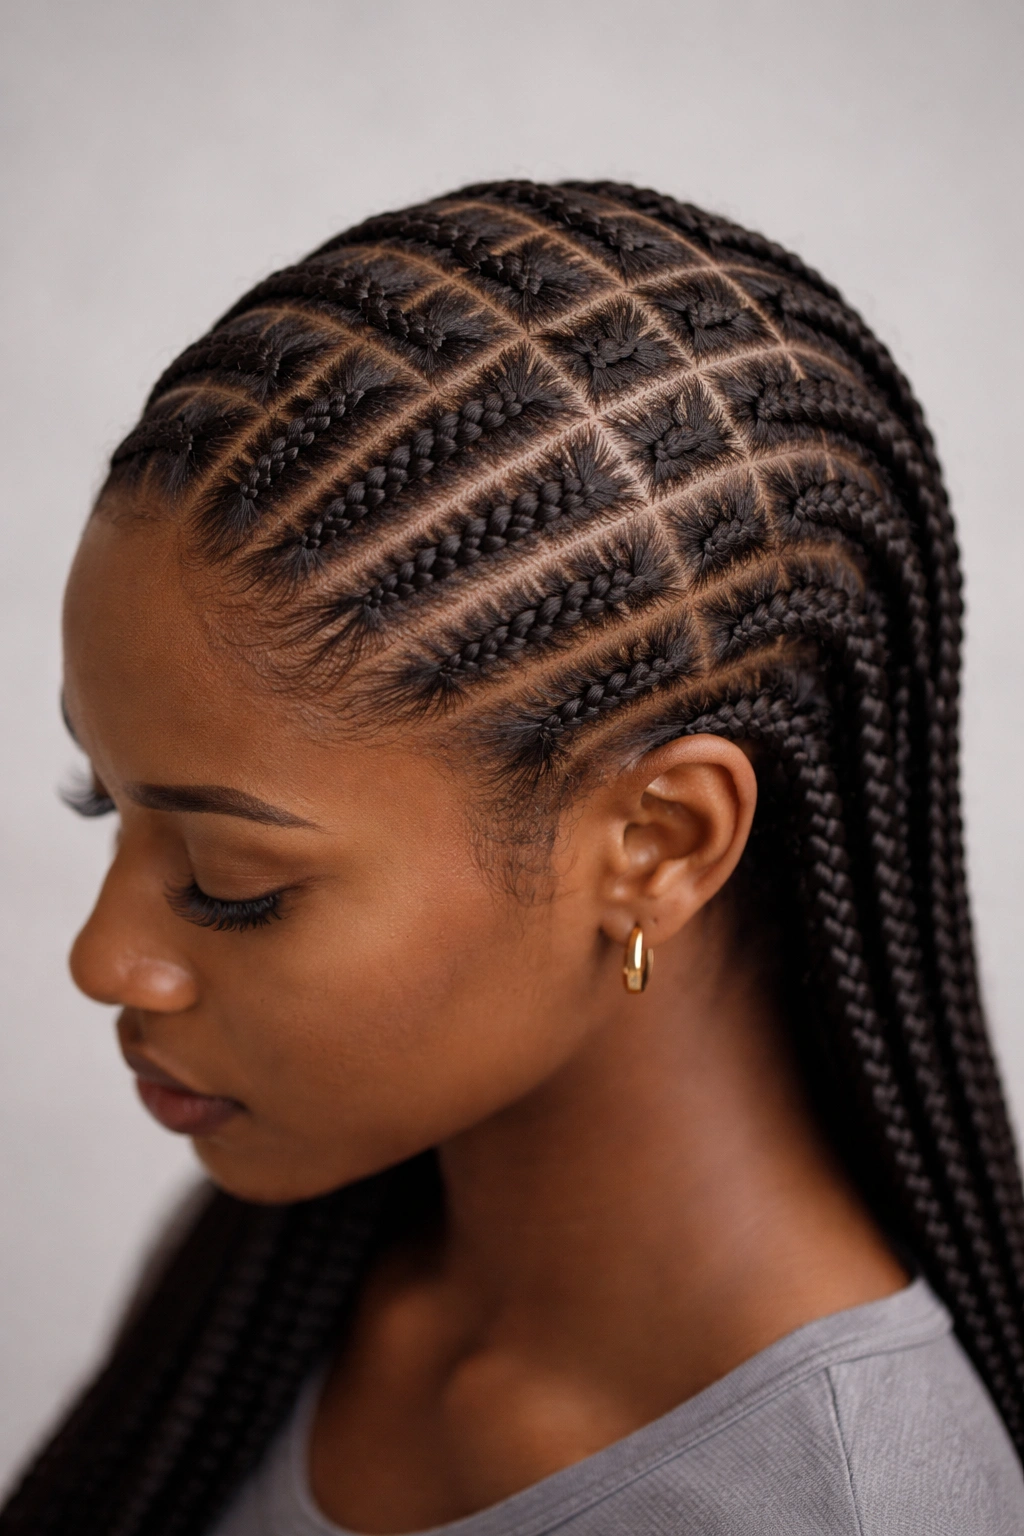
2. Cornrow Patterns with Geometric Precision
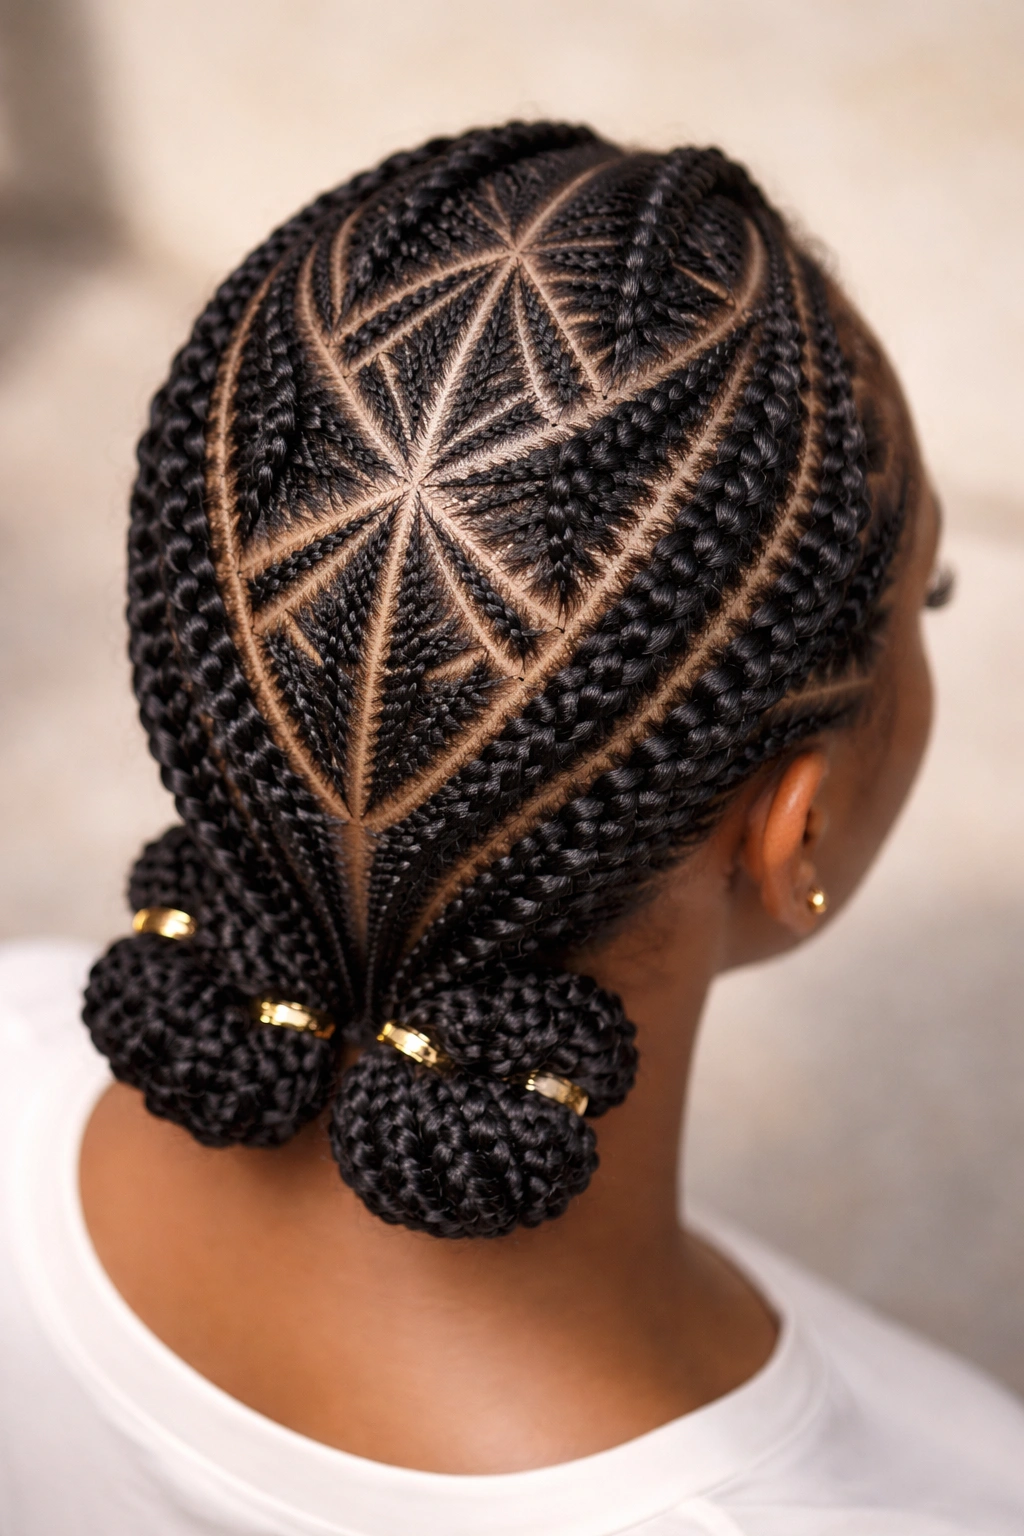
Cornrows are perhaps the most iconic protective style for 4C hair, and when arranged in precise geometric patterns, they become a stunning work of wearable art. Unlike a simple straight-back cornrow, geometric patterns use the braids as lines in a larger composition—triangles, diamonds, squares, and abstract shapes that cover the entire scalp. On 4C hair, cornrows are exceptionally clean because your natural texture creates the perfect grip and definition within each braid.
Planning Your Geometric Design
The magic starts before you even touch your hair. Sketch your design on paper or even use a bald cap template (available online) to map where each cornrow will go. Think about symmetry and how the pattern will look from different angles—top-down, side profile, and back view all matter. Common patterns include the triangle-wrap (cornrows arranged in connected triangles radiating from a center point), the diamond grid (a repeating diamond pattern across the entire scalp), and the starburst (cornrows radiating outward from the center like rays). For 4C hair, you want patterns with enough space between rows that you can comfortably braid each one without overextending your hair, and enough definition that the pattern actually reads visually.
Achieving Crisp, Defined Rows
The tension in each cornrow determines whether your pattern looks intentional and beautiful or haphazard. On 4C hair, you want consistent, medium-firm tension—tight enough that the braid is defined and holds its shape, but not so tight that you see scalp strain or feel discomfort. Use a lightweight styling gel or edge control product (something with slip, not a heavy cream) to smooth each section before braiding. Braid from your scalp outward in smooth, steady motions, keeping the braid thickness consistent from start to finish. If you’re working with natural hair on the ends (not adding extensions), make sure your braid tapers slightly toward the ends to avoid blunt, unraveling edges.
Styling Options and Longevity
With a geometric cornrow pattern, you have flexibility in how you finish the style. You can let the braids rest freely (ideal for showing off the pattern), gather them into a high ponytail at the crown, roll them into buns at the ends, or wrap them into spirals. A geometric pattern stays fresh for 2-3 weeks on 4C hair if you’re careful. Sleep with a satin scarf that covers the braids, keep your scalp moisturized between the rows using a lightweight moisturizing spray or oil, and avoid touching or playing with the braids excessively. On week three, the braids may start to fuzz slightly as new growth pushes the braid away from your scalp—this is normal and can actually add to the textured aesthetic if you prefer it.
3. Crown Braids (Circular/Wrapped Around the Head)
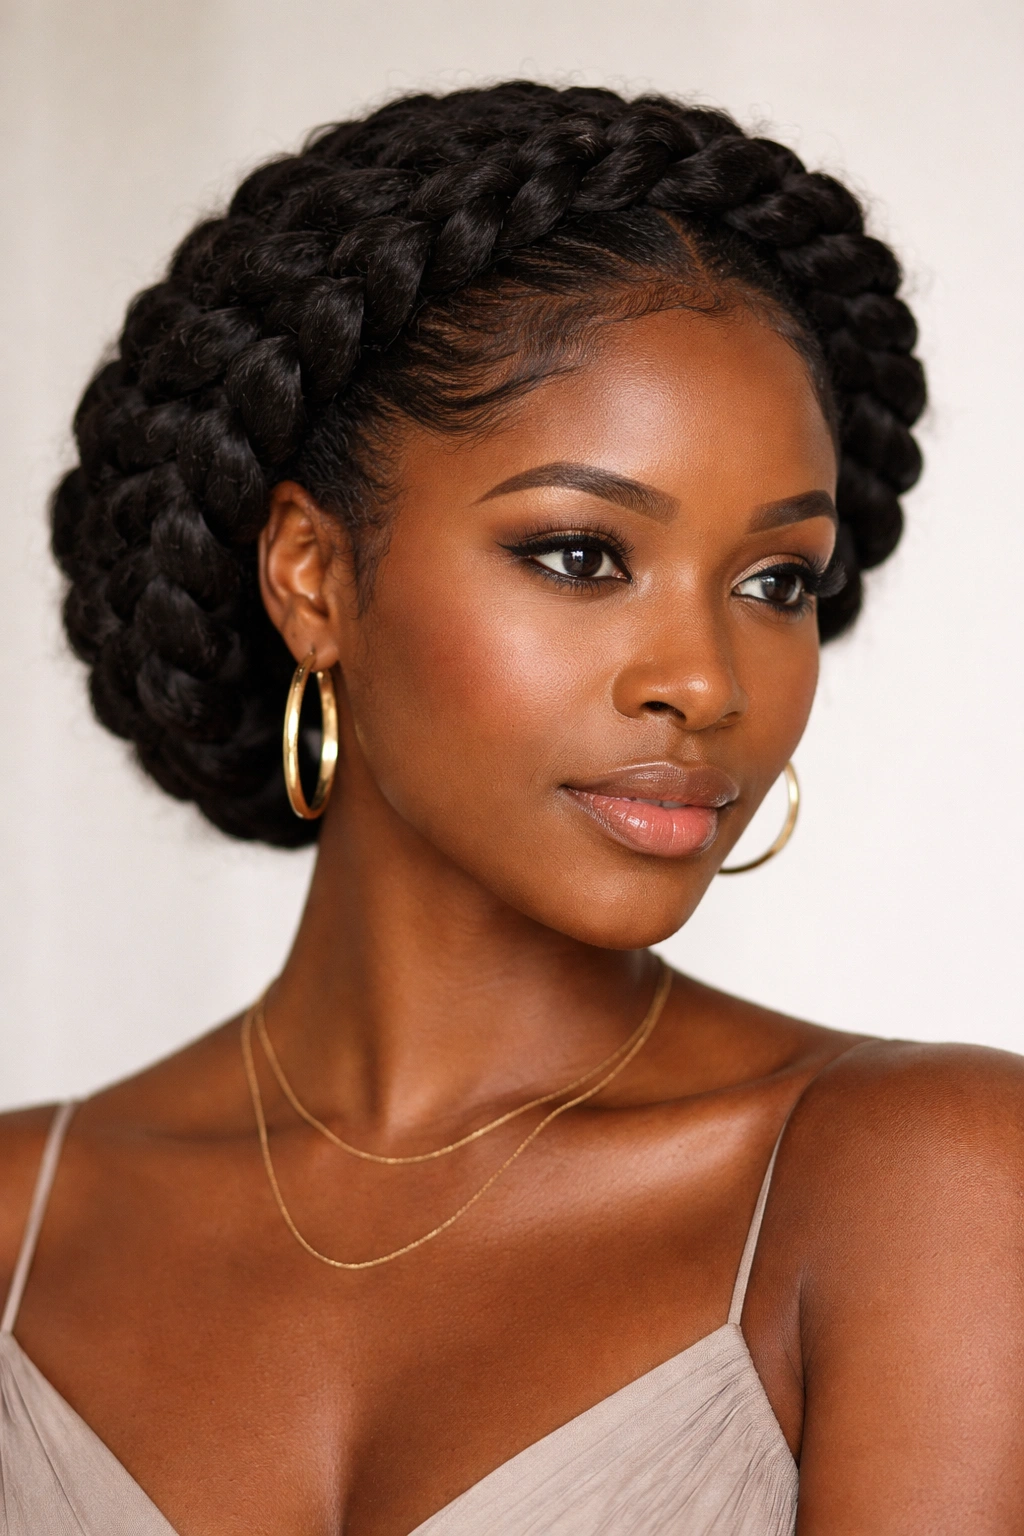
Crown braids are a softer, more romantic interpretation of traditional Yoruba styling, and they work beautifully on 4C hair because your texture naturally grabs and holds the braid securely. Two thick braids wrap around your head like a crown, meeting at the back or weaving together in an intricate pattern. This style is breathtaking when worn with the rest of your hair in a high puff or fro, creating a halo effect that frames your face and elongates your neckline.
Starting Your Crown Braid from the Right Position
Begin on one side of your head, roughly at ear level. Create a thick three-strand braid using your natural hair or with added extensions (synthetic braiding hair or human hair both work—synthetic tends to hold shape better, while human hair blends more seamlessly). Make your braid substantial enough to read as a statement—thin, delicate crown braids can get lost on 4C hair, while thick, confident braids are absolutely show-stopping. As you braid, angle the braid upward and backward, moving toward the crown area. The key is maintaining consistent tension so your braid looks even and polished, not lumpy or unraveled.
Routing the Second Braid and Creating Balance
Once your first braid reaches the back of your head (usually meeting at your nape or lower crown), start your second braid on the opposite side, mirroring the path of the first. This creates symmetry and balance. You can let both braids meet at a single point and secure them together, have them spiral around each other in a intertwined pattern, or cross them like an X at the back. Play with the positioning before securing—take photos from different angles to see what feels most flattering for your face shape and hair volume.
Securing and Accessorizing Your Crown Braids
Once both braids are in place, secure the ends using small elastic bands that match your hair color, or bobby pins tucked discreetly into the hair at the meeting point. Many women add beads or decorative clips along the braids for extra visual interest—this is particularly beautiful if you’re honoring a specific cultural occasion or event. Your crown braids will stay put for 2-3 weeks as a protective style, though the look is particularly fresh for the first week. Maintain the surrounding hair (the puff or fro) by moisturizing it regularly and sleeping with a silk scarf to reduce frizz. The braids themselves stay sleek with minimal maintenance.
4. Twisted Bun Updo with Side-Swept Twists
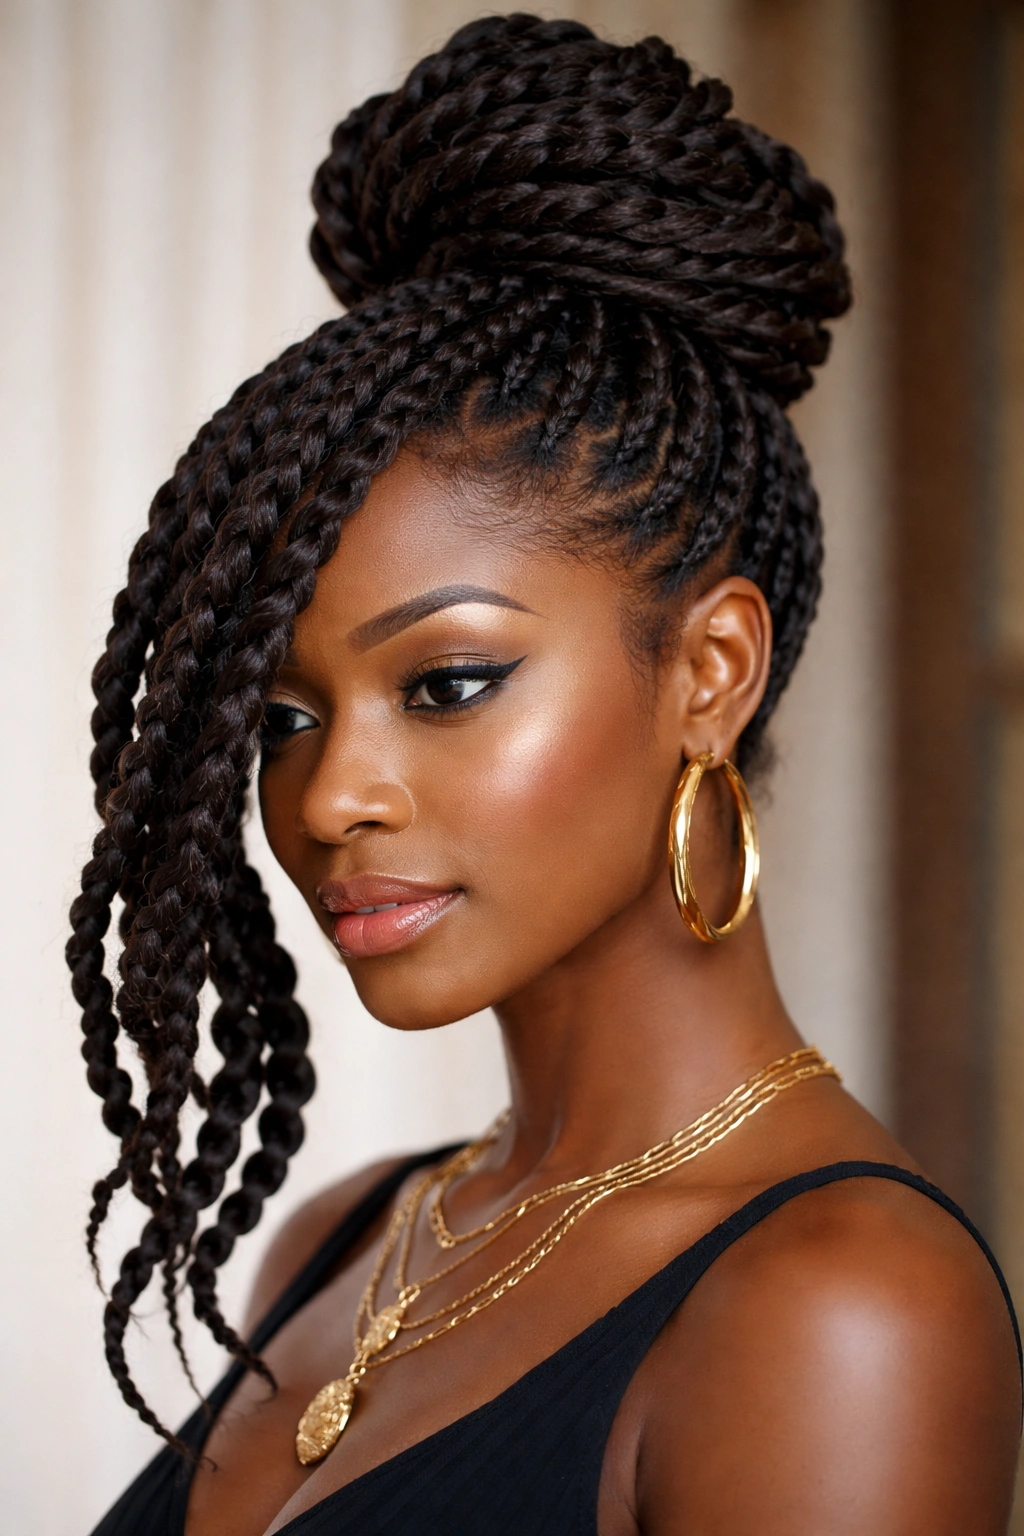
Twists are one of the most versatile and protective styling techniques for 4C hair, and when arranged into an elegant updo with side-swept sections, they create a style that’s equally suited for a boardroom meeting or a celebration. This style starts with several thick two-strand twists that are coiled and pinned at the crown, with 2-3 additional twists swept dramatically across one side of your face.
Creating Two-Strand Twists That Hold Shape
Two-strand twists thrive on 4C hair because your natural texture provides grip—the twist holds securely without needing to be braided tightly. Divide your hair into sections (thicker sections for a bolder look, thinner for more delicacy), and twist each section by rotating two strands of hair around each other from root to tip. The magic ingredient is a good twisting cream or gel with enough hold to keep the twists defined, but enough slip that you’re not tugging painfully as you twist. Apply the product section by section as you work. On 4C hair, you often don’t need to add extensions to twists—your natural texture creates beautiful definition on its own.
Arranging Twists into an Updo Structure
Once your twists are complete, gather the bulk of them at your crown and begin coiling them around each other, pinning as you go with bobby pins that match your hair color. This creates a sculptural, three-dimensional bun. Leave 2-3 twists unincorporated—these will be your side-sweep elements. Smooth one of these twists across your forehead and secure it behind your opposite ear with bobby pins or a hair stick, creating an elegant asymmetrical frame. The remaining twist can wrap around the bun for additional dimension, or fall freely down your back.
Maintaining Definition and Freshness
Two-strand twists can last 2-3 weeks on 4C hair, and they actually improve slightly over time as the twists settle and become more defined. Sleep on a satin pillowcase or with a silk scarf wrapped around your bun to reduce frizz. If individual twists start to unravel at the ends, simply re-twist the loose section—a quick 2-minute fix. Your scalp stays accessible for moisturizing, which is one reason twists are so popular as a protective style. By week three, you may have some new growth showing at the roots, which actually adds to the textured, natural aesthetic if that’s your preference.
5. Fulani Braids (Signature Center Part with Beads)
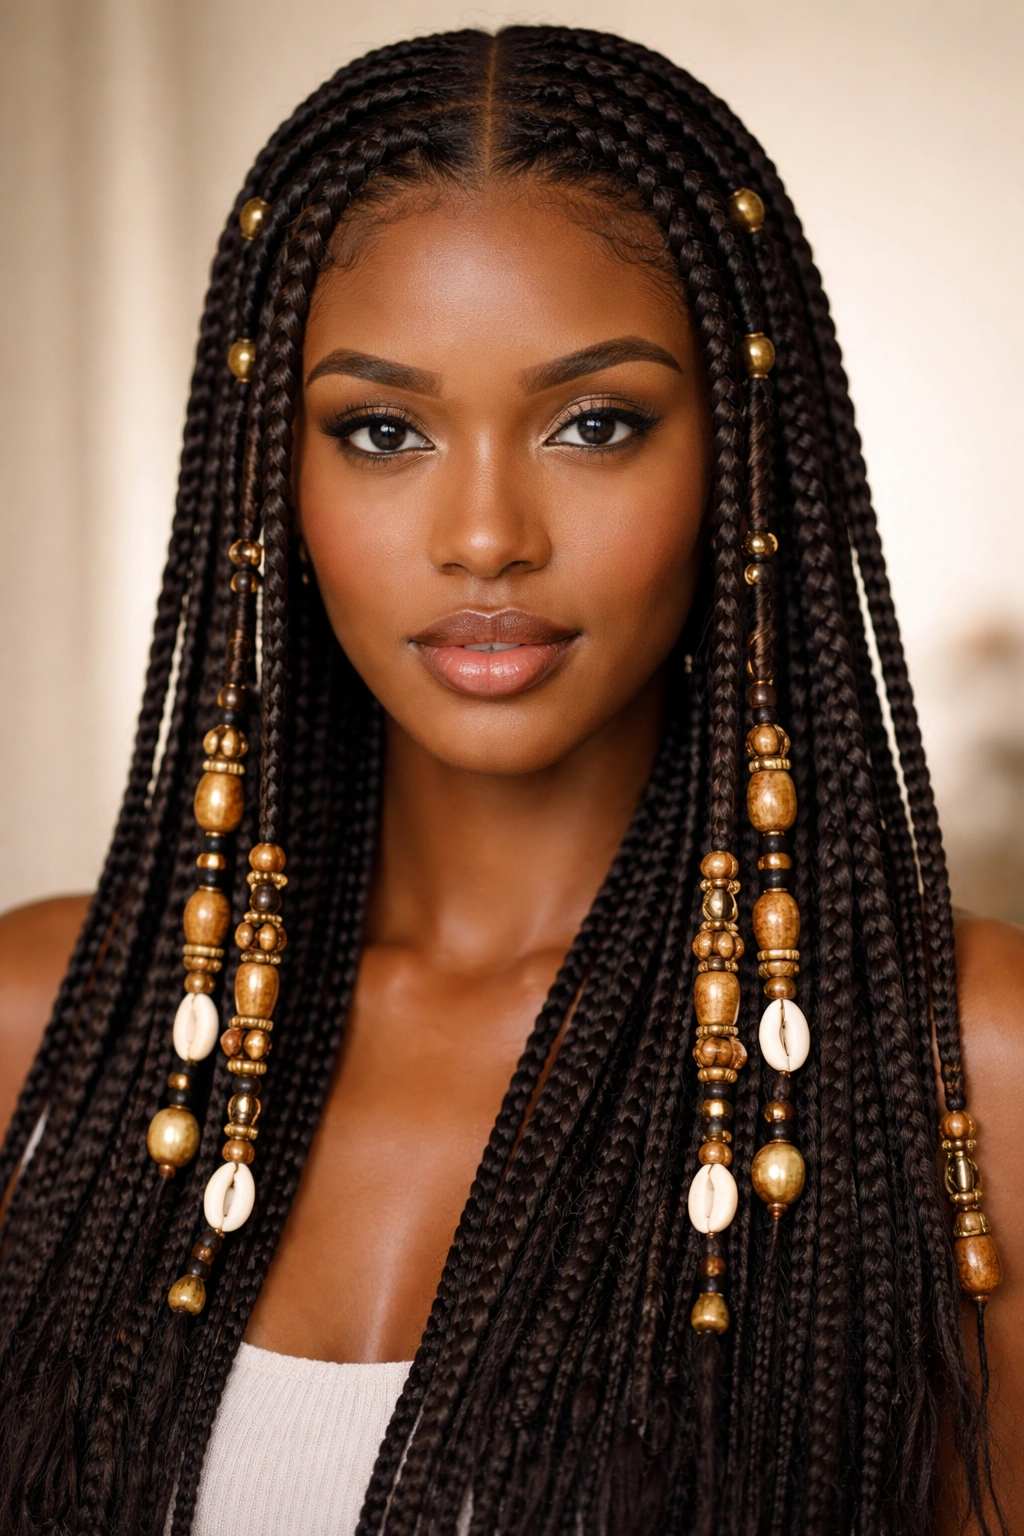
Fulani braids are instantly recognizable—they feature a central parting with two thick cornrows framing the face, and the signature Fulani touch: an abundance of beads, gold rings, or cowrie shells woven into the braids. While Fulani braids come from the Fulani people of West Africa (distinct from Yoruba tradition), they’ve become a beloved pan-African style worn across cultures, and they look absolutely stunning on 4C hair with its natural texture and grip.
Creating the Perfect Center Part
Begin with a clean, stretched scalp—you may want to do a light blow-dry or banding method the night before to reduce the natural shrinkage of 4C hair, making parting easier. Using a fine-tooth comb or rattail comb, create a perfectly straight center part from your forehead all the way to your nape. This part is the focal point of the style, so take your time and make it as straight and clean as possible. The part should be thin and precise—not so thick that it looks sloppy, but thick enough to be visible and intentional.
Braiding the Face-Framing Sections
On each side of your center part, create one thick cornrow that travels from your forehead down toward your ear and then curves back toward your nape. These face-framing braids are what define the Fulani look, so make them substantial and tidy. You can braid your natural hair, or add extensions for length and thickness. Many women add extensions just to these two face-framing braids while keeping the rest of the hair natural, creating a beautiful blend of texture and dimension. Make sure these braids are perfectly smooth and even—they’re highly visible, so any lumpiness will be noticeable.
Adding Beads and Accessories
Once your two face-framing braids are complete, the beading begins. You can add beads to just the two main cornrows, or bead throughout your entire hair if you want a more elaborate look. Beads come in countless materials—brass, wood, acrylic, glass—and you can choose colors that complement your skin tone and personal style. Thread beads onto individual braid sections or weave them throughout the length of the braid. The beads stay secure by their own weight and the friction of the braid holding them in place. Add a gold ring or two at the base of the braids near your ears for extra authenticity and glamour.
Wearing and Caring for Fulani Braids
Fulani braids last 3-4 weeks on 4C hair if properly maintained. The beads add visual interest but also extra weight, so make sure your cornrows are tight enough to handle the load without slipping. Sleep with a satin scarf or bonnet to protect the braids and reduce frizz. Your natural hair underneath the braids is protected during the style, so Fulani braids function as an excellent protective style. Wash your braids every 7-10 days using a gentle sulfate-free shampoo and diluted conditioner—work the cleanser gently between the braids without unraveling them. Dry thoroughly to prevent mildew, especially important with beads that could trap moisture.
6. Shuku (Yoruba High-Rise Bun)
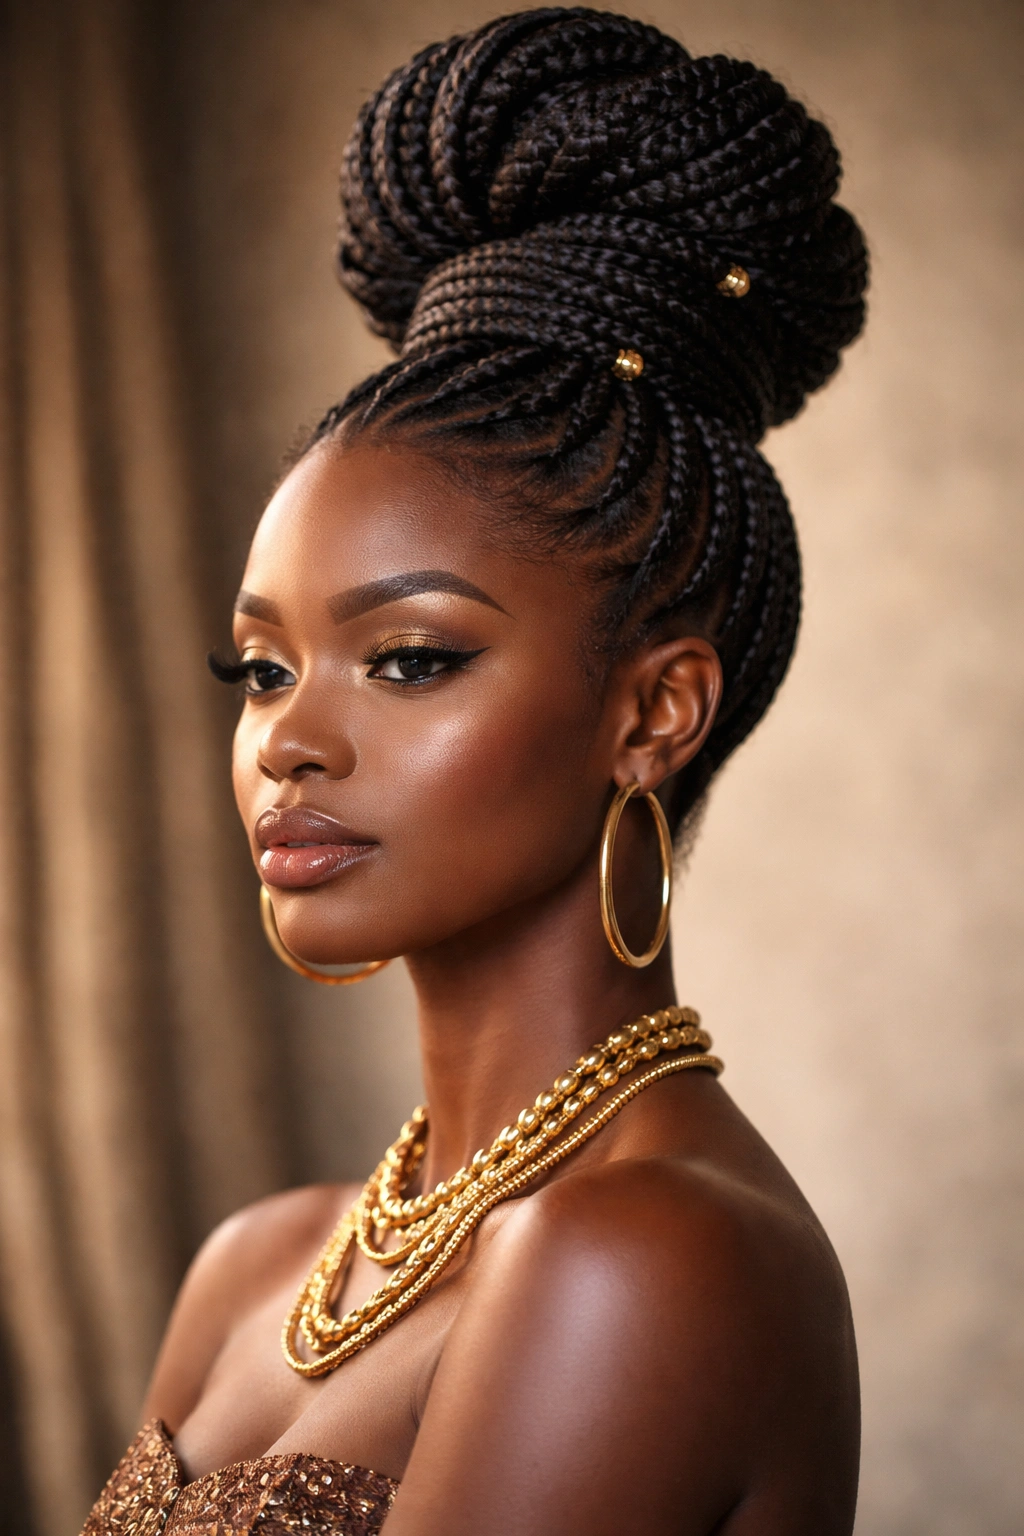
The shuku is an iconic Yoruba updo characterized by a high-rise bun that sits proudly at the crown, often adorned with gele fabric, jewelry, or ornate pins. On 4C hair, the natural texture and density create a naturally voluminous base that makes shuku styling easier and more dramatic than on looser hair textures. This is a regal, formal style that commands presence.
Building a Secure Foundation with Braids or Twists
Start by creating a protective base that will support the weight and visual impact of a high-rise bun. Many women use thick cornrows arranged in circular patterns or concentric rings, all feeding toward the crown where the bun will sit. Alternatively, use thick two-strand twists or even simple rope braids—whatever base you choose should be secure, substantial, and positioned to allow the bun to sit high without pulling uncomfortably on your hairline. With 4C hair’s natural grip, even a loosely braided base will hold better than on other textures.
Creating the Bun and Achieving Height
Once your base braids are in place, gather all of your hair at the crown and begin coiling it into a bun. Use bobby pins liberally to secure the bun in place—3-5 pins is typical, positioned at different angles through the bun to distribute the weight evenly. The height of your shuku depends on how much hair you have and how tightly you coil it. For a truly impressive shuku, many women add hair extensions directly into the bun structure, wrapping them around the base to create additional volume and height. On 4C hair, the natural curl pattern can actually be incorporated into the bun itself—instead of wringing every curl out, you can let the texture show, creating a textured, three-dimensional bun surface.
Styling with Fabric Wraps and Jewelry
Once your shuku bun is secured, this is where you customize the look. Many women top the shuku with a folded gele fabric wrap (see the Gele section for detailed instructions), which adds drama and formal elegance. Others skip the gele and instead accessorize with ornate hair sticks, decorative pins, beaded combs, or fresh flowers tucked into the bun structure. The shuku can be worn with or without a headwrap underneath—some women prefer the wrapped look for a formal occasion, while others prefer the bun to be the focal point.
Longevity and Maintenance
A shuku styled on a braided base lasts 2-3 weeks, while a shuku styled on a twists base tends to last slightly longer (up to 4 weeks) because twists provide a slightly less structured base that accommodates some shift. Sleep on a silk pillowcase and wrap a silk scarf loosely around your shuku at night to protect it from friction. You can actually wear a gele on top of your shuku day after day if you’d like—change the gele fabric while keeping the bun in place. This combination is incredibly protective and elegant.
7. Box Braids with Textured Ends and Beading
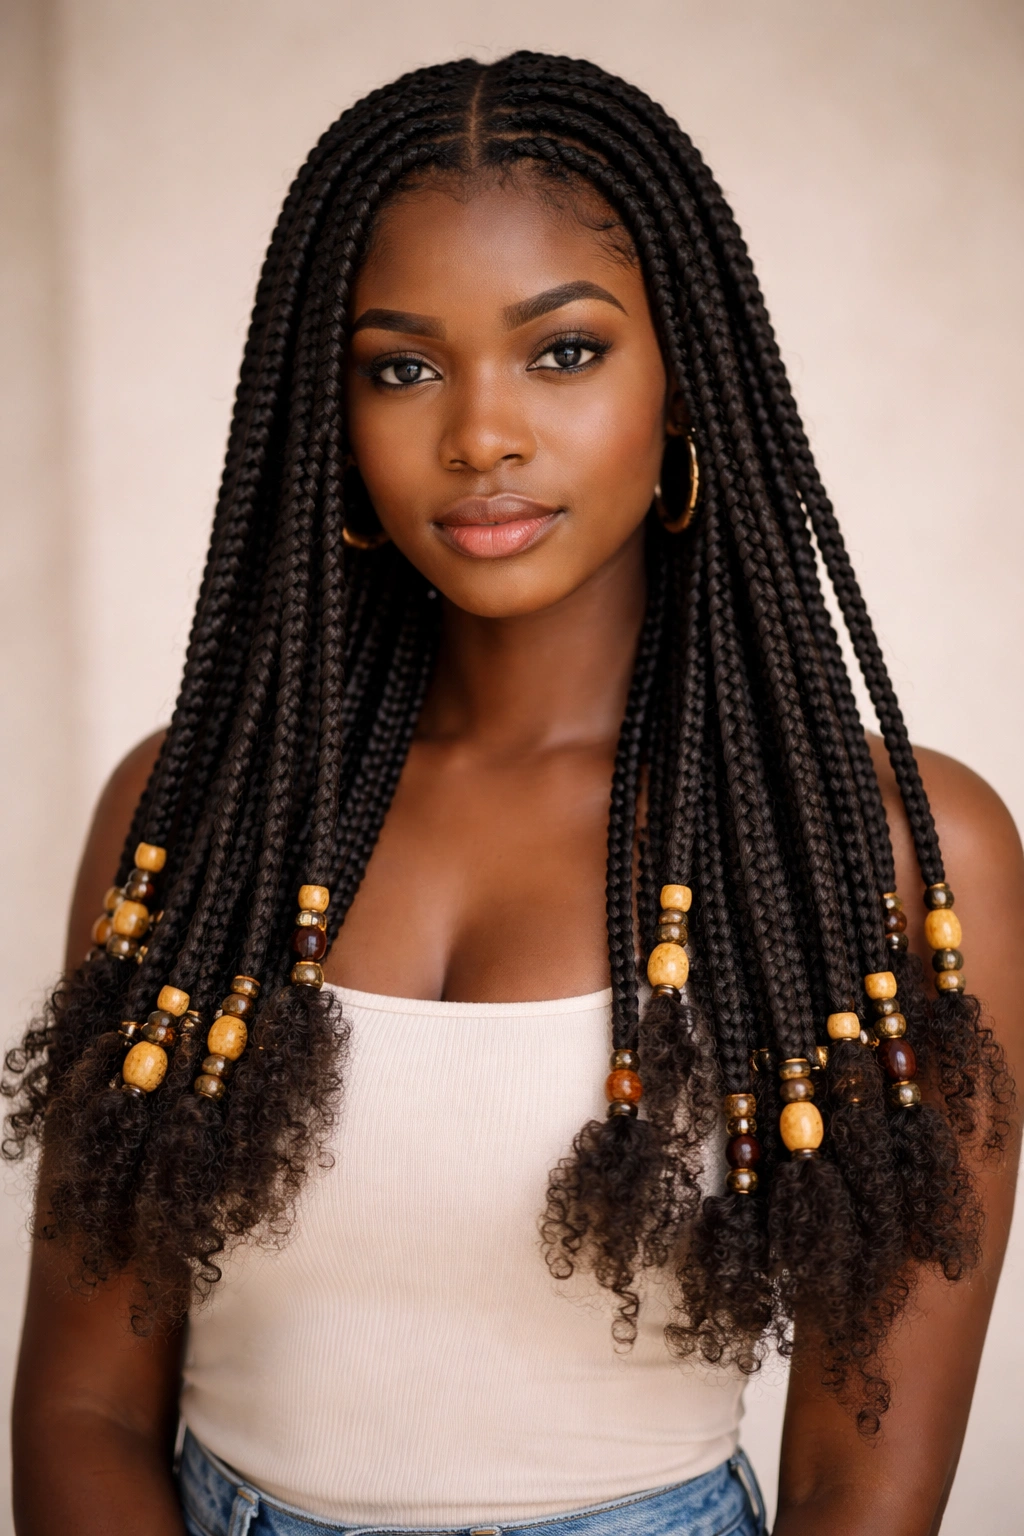
Box braids are one of the most recognizable protective styles, and on 4C hair, they look particularly striking when the ends are left textured (showing your natural hair texture) rather than tucked or burned. Box braids offer versatility—you can wear them down, in a high ponytail, in buns, or pinned into updos. They last longer than most styles and require minimal daily manipulation.
Sectioning and Sizing Your Box Braids
Box braids start with a grid of sectioned hair, each section roughly square-shaped (hence “box”). Your section size determines how many braids you’ll have and how thick or thin they are. On 4C hair, medium-sized braids (roughly the size of a pencil) are ideal—thick enough to look bold and protective, but thin enough that you can still style them into various arrangements. Mark your sections before you start braiding, using a rattail comb. For 4C hair, you can either braid your natural hair exclusively, or add synthetic or human hair extensions to each section for added length and thickness. If adding extensions, thread them into your natural hair section before you start braiding.
Braiding Technique and Achieving Defined Edges
Braid each section from the scalp to the ends in smooth, even three-strand braids. The tension should be firm but not so tight that you feel scalp pain or see red marks on your skin—this is crucial for protecting your edges and hairline. Your 4C hair will provide natural grip to the braid, so you don’t need to braid as tightly as you might on looser textures. As you braid, angle your hands slightly outward to ensure the braid stays plump and defined rather than becoming a thin, wimpy-looking rope.
Styling Your Textured Ends
Once all your box braids are complete, the ends are where you add personality. You can cut the extensions short for a blunt, cropped look; leave them long and flowing; curl the ends into spirals using a curling iron; or leave the last 1-2 inches of each braid unraveled to show your natural 4C texture. The last option is particularly stunning—it creates a unique, intentional look that celebrates natural texture and the dimension of your natural curl pattern. You can even dip the ends of your braids in hot water (if using synthetic hair) to seal and shape them into specific curl patterns.
Wearing and Maintaining Box Braids
Box braids last 6-8 weeks on 4C hair if properly maintained—longer than most styles because there’s less daily manipulation. However, longevity requires care. Wash your braids every 7-10 days with diluted shampoo and conditioner, scrubbing gently at your scalp without unraveling the braids. Sleep with a silk scarf or bonnet. After 4-5 weeks, some of your natural hair at the roots will grow out noticeably—some women prefer this natural look, while others touch up individual braids that are looking fuzzy. Avoid tight ponytails that pull on your hairline—instead, do loose, low ponytails that distribute tension evenly.
8. Senegalese Twists with Wrapped Crown Detail
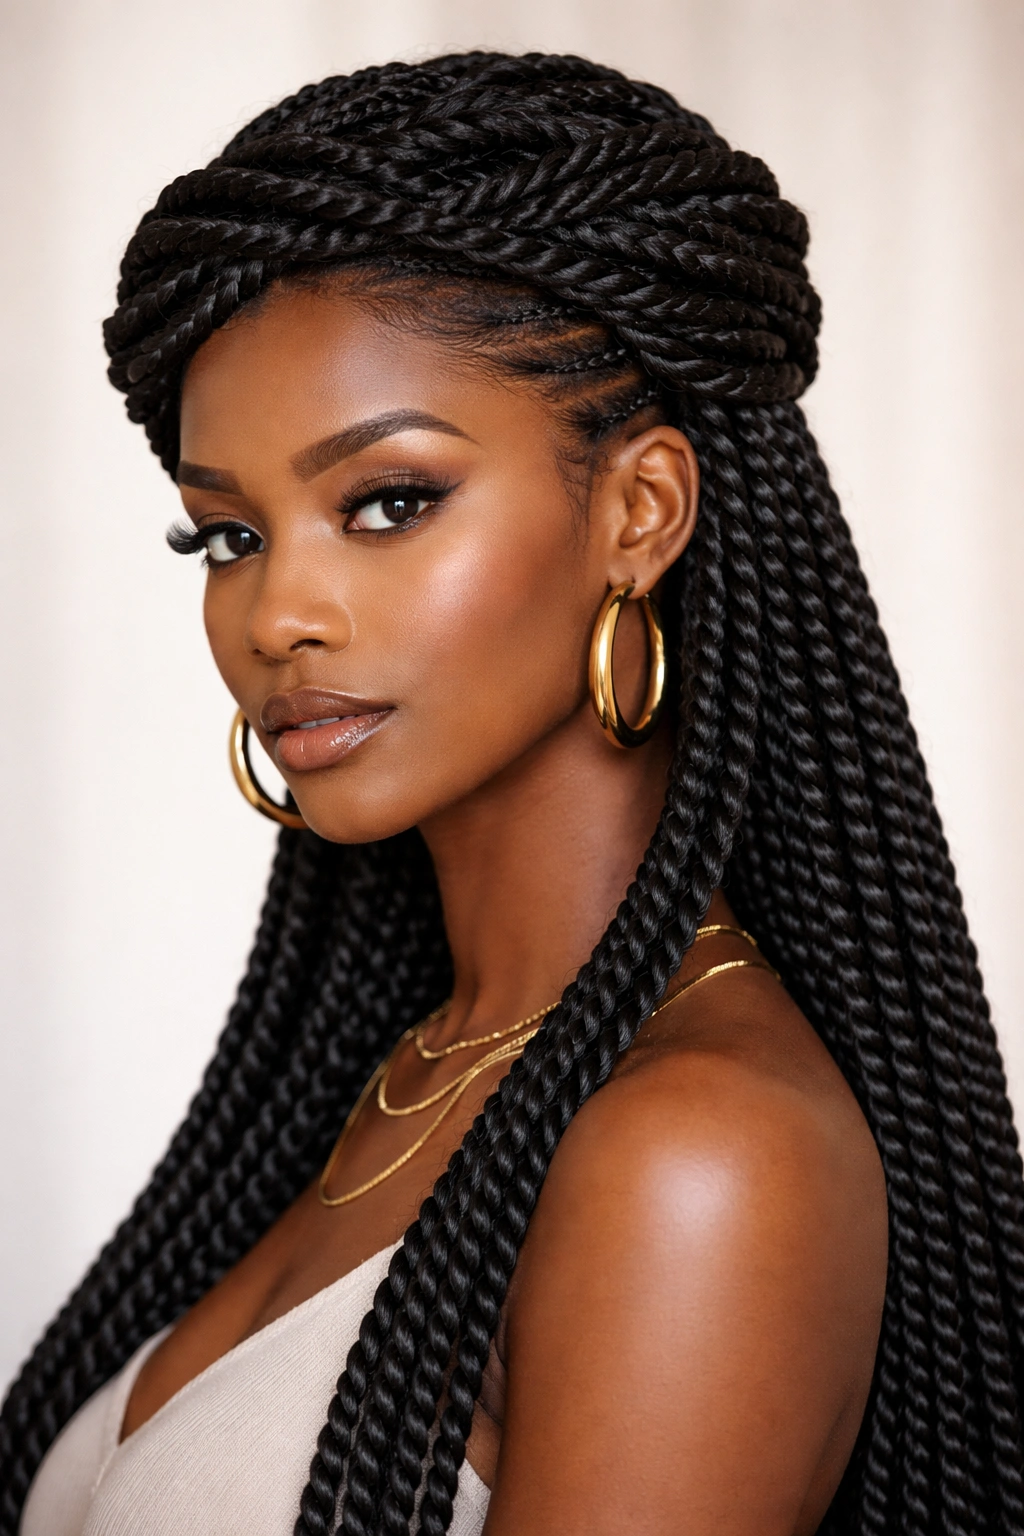
Senegalese twists are similar to two-strand twists but typically include extended hair for length, and they’re woven more tightly around each other, creating a ropelike, twisted effect rather than distinct two-strand sections. On 4C hair, Senegalese twists are exceptionally beautiful because your natural texture creates perfect definition within each twist. Adding a wrapped crown detail—where several twists are layered and wrapped around your head—elevates them from a casual protective style to an elegant statement look.
Adding Extensions and Creating Even Twists
Start by sectioning your hair into medium-to-thick sections. In each section, thread your extensions (synthetic or human hair) alongside your natural hair before you begin twisting. Twist the strands together tightly, keeping consistent tension so all your twists look uniform. On 4C hair, your natural texture does much of the work for you—the twists will look defined and polished even without extensions, but extensions add length, which many women prefer. Make sure your extension hair matches your natural texture reasonably well for a cohesive look, though some women intentionally choose silkier extension hair for contrast.
Creating the Wrapped Crown
Once all your twists are complete, select 2-4 of the thickest, best-defined twists to become your crown elements. Begin at the side of your head and wrap one twist upward and across your forehead, then secure it behind your opposite ear using bobby pins. Take a second twist and wrap it around the back of your head, parallel to the first, creating a second “crown line.” You can wrap additional twists in different directions to create a more elaborate crown, or keep it simple with just two. The wrapped twists should sit visibly on top of your hair, not hidden underneath.
Finishing Touches and Style Duration
Once your crown is in place, you can style the remaining twists however you like—gather them into a high ponytail, let them fall freely, or coil them into buns at the nape. Senegalese twists last 3-4 weeks on 4C hair. The wrapped crown detail is particularly striking in the first week or two when the twists are crisp and definition is at its peak. Sleep on a satin pillowcase to maintain the twist definition. By week three, you may notice some texture accumulation at the scalp as your natural hair grows—you can refresh this by lightly re-twisting just the root area without unraveling the entire length.
9. Wig Braids Base (for Wearing Wigs Over Braids)
While not a style you’d wear visibly, wig braids are an essential protective styling technique in Yoruba culture and essential knowledge for 4C-haired women who enjoy wearing wigs. Wig braids are tight, flat braids (usually cornrows) that serve as an anchoring base for a wig or hairpiece, keeping it secure and stable while protecting your natural hair underneath. On 4C hair, wig braids hold exceptionally well because your natural texture grips the braid securely.
Braiding Strategy and Braid Placement
For a wig base, you’ll want your cornrows arranged in a pattern that distributes the weight of the wig evenly across your head. Most women use cornrows running from the front of the hairline to the back nape in 3-5 vertical lines, with additional cornrows running horizontally across the sides or crown, depending on the wig cap design. The key is creating a secure grid pattern that won’t slip. For 4C hair, your natural texture means you can braid a bit less tightly than you might on other textures—your hair will grip the braid securely without needing bone-breaking tension.
Achieving the Right Scalp-Hugging Tightness
Your wig braids need to be tight enough that a wig sewn onto them won’t shift or slip during the day, but not so tight that you’re causing damage to your hairline or scalp. The tension should feel snug but not painful—if you feel discomfort or see red marks on your scalp, you’ve braided too tightly. Many women test their wig braids by gently tugging on them; a properly done braid will be immobile but won’t cause pain.
Creating a Smooth, Wig-Friendly Surface
Unlike decorative cornrows where some texture and frizz can add character, wig braids should be as smooth and uniform as possible. Use a good edge control or smoothing gel on each section before you braid, keeping the braid surface sleek and polished. This creates a better base for a wig to grip and sit on. Once your braids are complete, you can sew a wig cap directly onto them, attach a wig using wig glue, or simply lay a wig on top of the braided base and secure it with wig clips.
Caring for Your Braids While Wearing a Wig
Wig braids can stay in place for 4-6 weeks, making them an excellent long-term protective style. While your wig is on top of them, your natural hair is completely protected. However, you still need to care for your scalp and braids. Remove your wig at night and use your fingers or a thin rattail comb to gently reach your scalp and apply a lightweight moisturizing spray. Wash your braids every 7-10 days—you can do this while wearing the wig by carefully parting sections and applying diluted shampoo to your scalp and braids, then rinsing thoroughly. This might sound complicated, but it’s manageable and essential for scalp health.
10. Goddess Braids (Thick, Glossy, Sculpted Braids)
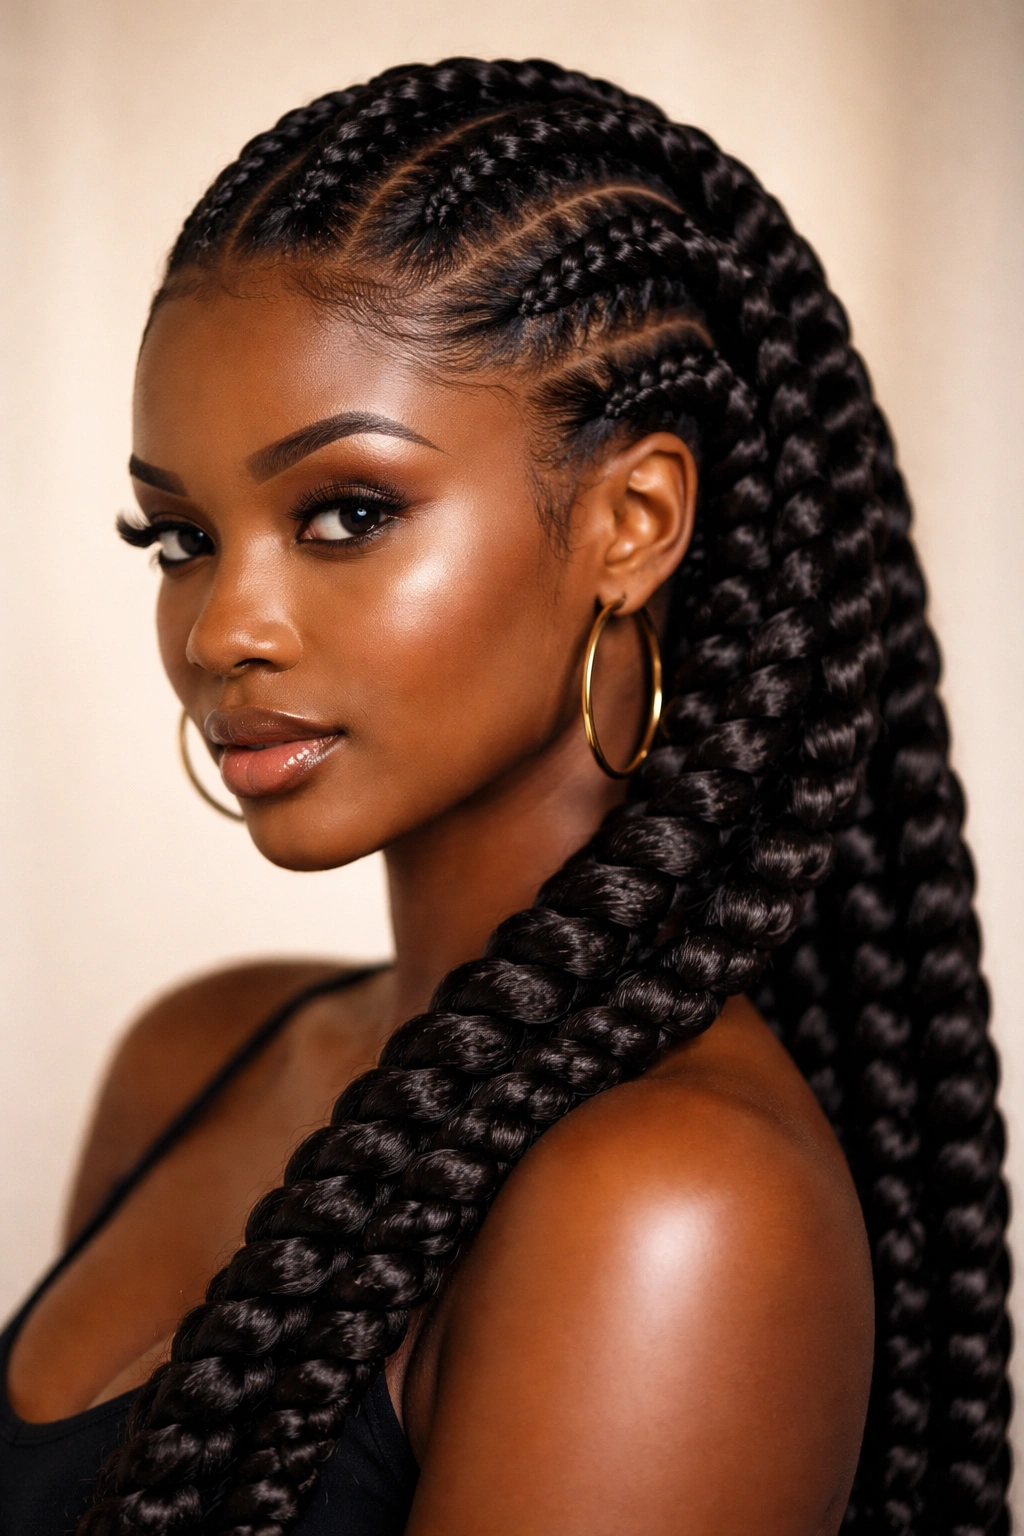
Goddess braids are the modern, glamorous cousin of classic cornrows—they’re thicker, bolder, and often have a glossy, almost sculptural appearance. The braids are typically larger (about the size of your pinky finger or thicker), and they’re arranged in curved or geometric patterns across the scalp. On 4C hair, goddess braids create an absolutely stunning high-impact look because your natural texture adds dimension and definition to the thick braids.
Adding Extensions for Thickness and Shine
Most goddess braids incorporate extensions, often synthetic hair with a silky finish or human hair for a blended look. The extensions provide the glossy appearance and added thickness that characterize goddess braids. Select extensions that either match your natural hair color or provide intentional contrast—ombré goddess braids (where the extensions are lighter than your natural hair) are particularly popular and beautiful. Begin by sectioning your hair into larger squares than you would for box braids, then thread the extensions into each section before you start braiding.
Creating the Braided Texture and Dimension
Braid each section in a loose three-strand braid—the looseness creates a slightly ruffled, textured appearance that’s more interesting than a tight, sleek braid. This ruffled texture is part of what makes goddess braids feel modern and high-fashion. On 4C hair, you can even incorporate your natural curl texture into the braids—don’t flatten it completely, but let some of your natural curl show through the braid structure. This creates a unique blend of textures that’s absolutely beautiful.
Arranging in Curves or Geometric Patterns
Unlike straight-back cornrows, goddess braids often travel in curves or geometric patterns. You might create two thick braids that curve from your temples up and around to the crown, then gather the hair at the back into a high bun. Or you might create a zig-zag pattern, or concentric circles. Sketch your pattern first to ensure it’s visually balanced. The curved or patterned arrangement is what transforms simple braids into “goddess braids”—it’s the styling intention that matters.
Duration and Maintenance for 4C Hair
Goddess braids last 4-5 weeks on 4C hair, though they begin to look most polished in weeks one and two when the braids are crisp and the extensions are glossy. After week three, some frizz will start to appear as new growth pushes the braid away from your scalp. Some women touch up the root area by re-braiding just that section, which takes about 15-30 minutes per braid. Sleep with a silk scarf or bonnet to preserve the glossy appearance and minimize frizz. Wash every 7-10 days using a gentle sulfate-free shampoo, scrubbing carefully at your scalp without unraveling the braids.
11. Braided Updo with Wraparound Elements and Pins
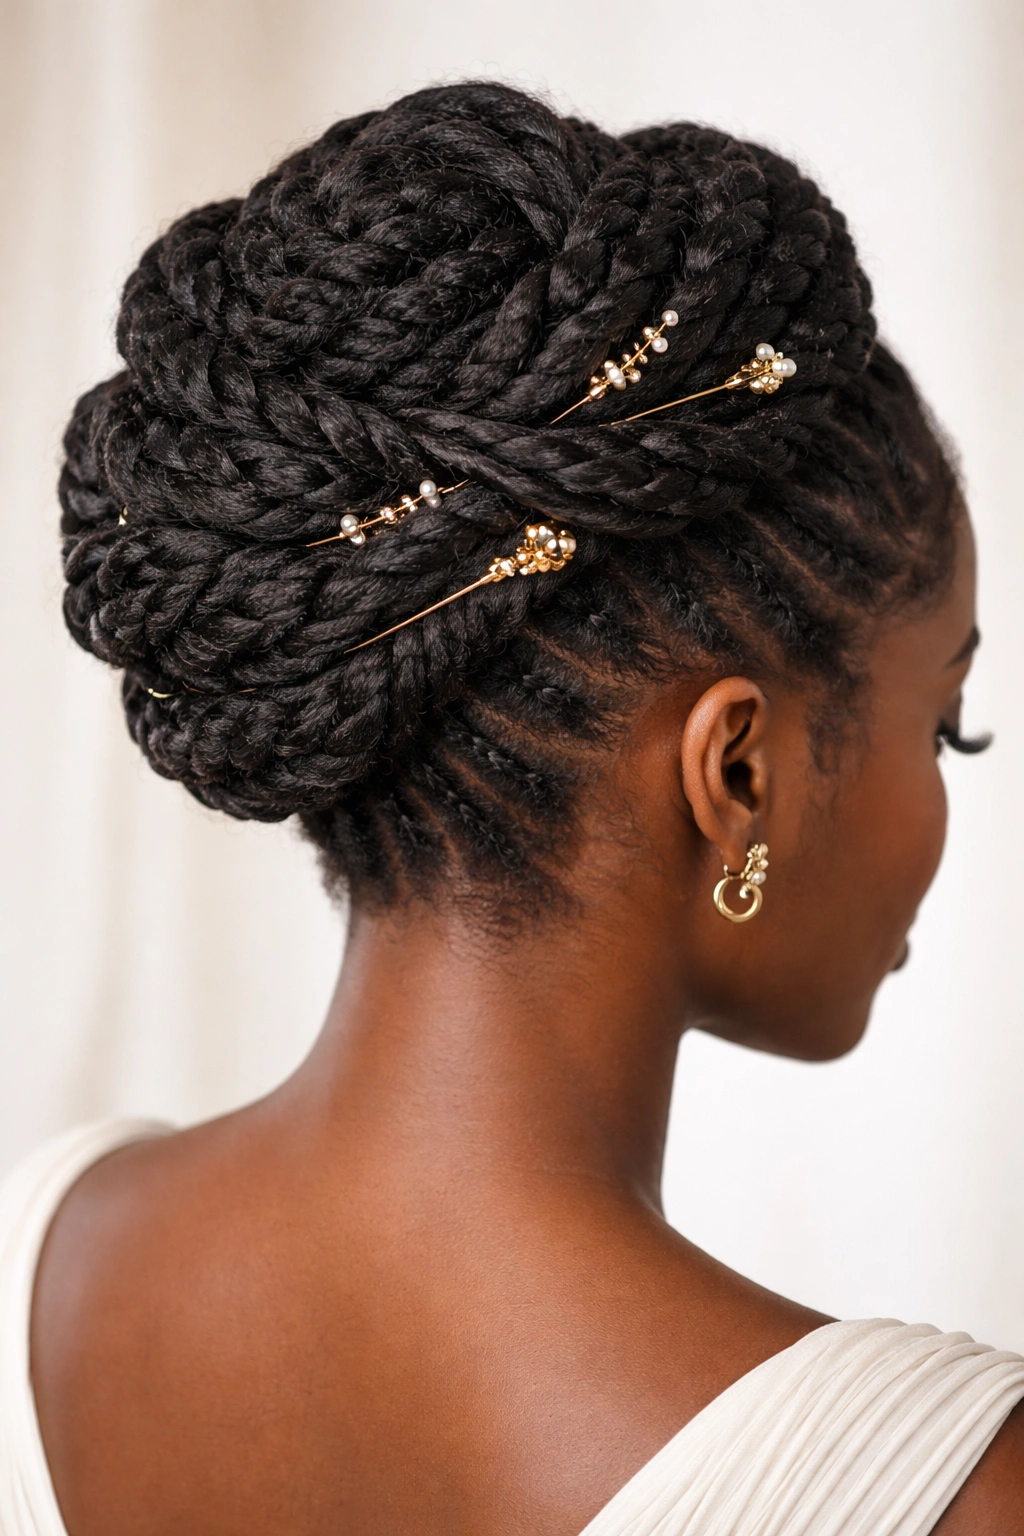
This is an elegant, formal style that combines multiple braiding techniques into a sophisticated updo. It typically features a combination of cornrows and regular braids that are swept, wrapped, and pinned into a compact, sculptural knot at the crown or back of the head. On 4C hair, the density and texture create natural volume that makes this updo look full and substantial without needing to add extra extensions.
Creating a Mixed-Braid Foundation
Start by creating 3-4 thick cornrows arranged to lead toward your intended updo location (usually the crown or low back). These cornrows serve as the structural foundation. Then create 2-3 additional thick three-strand braids using the remaining hair sections. The combination of straight cornrows and curved three-strand braids creates visual interest and complexity. On 4C hair, you can work with your natural hair exclusively and create a beautiful style without extensions, or add extensions to specific sections for additional thickness.
Wrapping and Rolling Braids into the Updo
Once all your braids are complete, take the three-strand braids and begin coiling and wrapping them around your cornrow base, pinning as you go with bobby pins. Create texture by letting some braids coil tightly while allowing others to wrap more loosely. Layer the braids so they overlap and create a three-dimensional, sculptural effect. This is where artistry comes in—you’re creating a unique shape based on your hair volume, face shape, and personal preference.
Adding Ornate Pins and Jewelry
Once your updo structure is complete and secure, this is the perfect moment to add decorative elements. Gold or silver hair sticks, ornate vintage pins, beaded hair picks, or even fresh flowers can be inserted into the updo, adding glamour and cultural significance. On 4C hair, the textured surface of your updo provides wonderful grip for pins and accessories—they’ll stay securely in place without slipping.
Wearing for Special Occasions
This style is particularly appropriate for formal events, celebrations, or cultural ceremonies. It typically lasts 1-2 weeks in great shape, with peak beauty in the first week when braids are crisp. Sleep with your head supported by a satin pillowcase, or loosely wrap a silk scarf around the updo to protect it from friction. Your scalp remains accessible for moisturizing throughout the style’s wear.
12. Loc Extensions with Wrapped and Beaded Sections
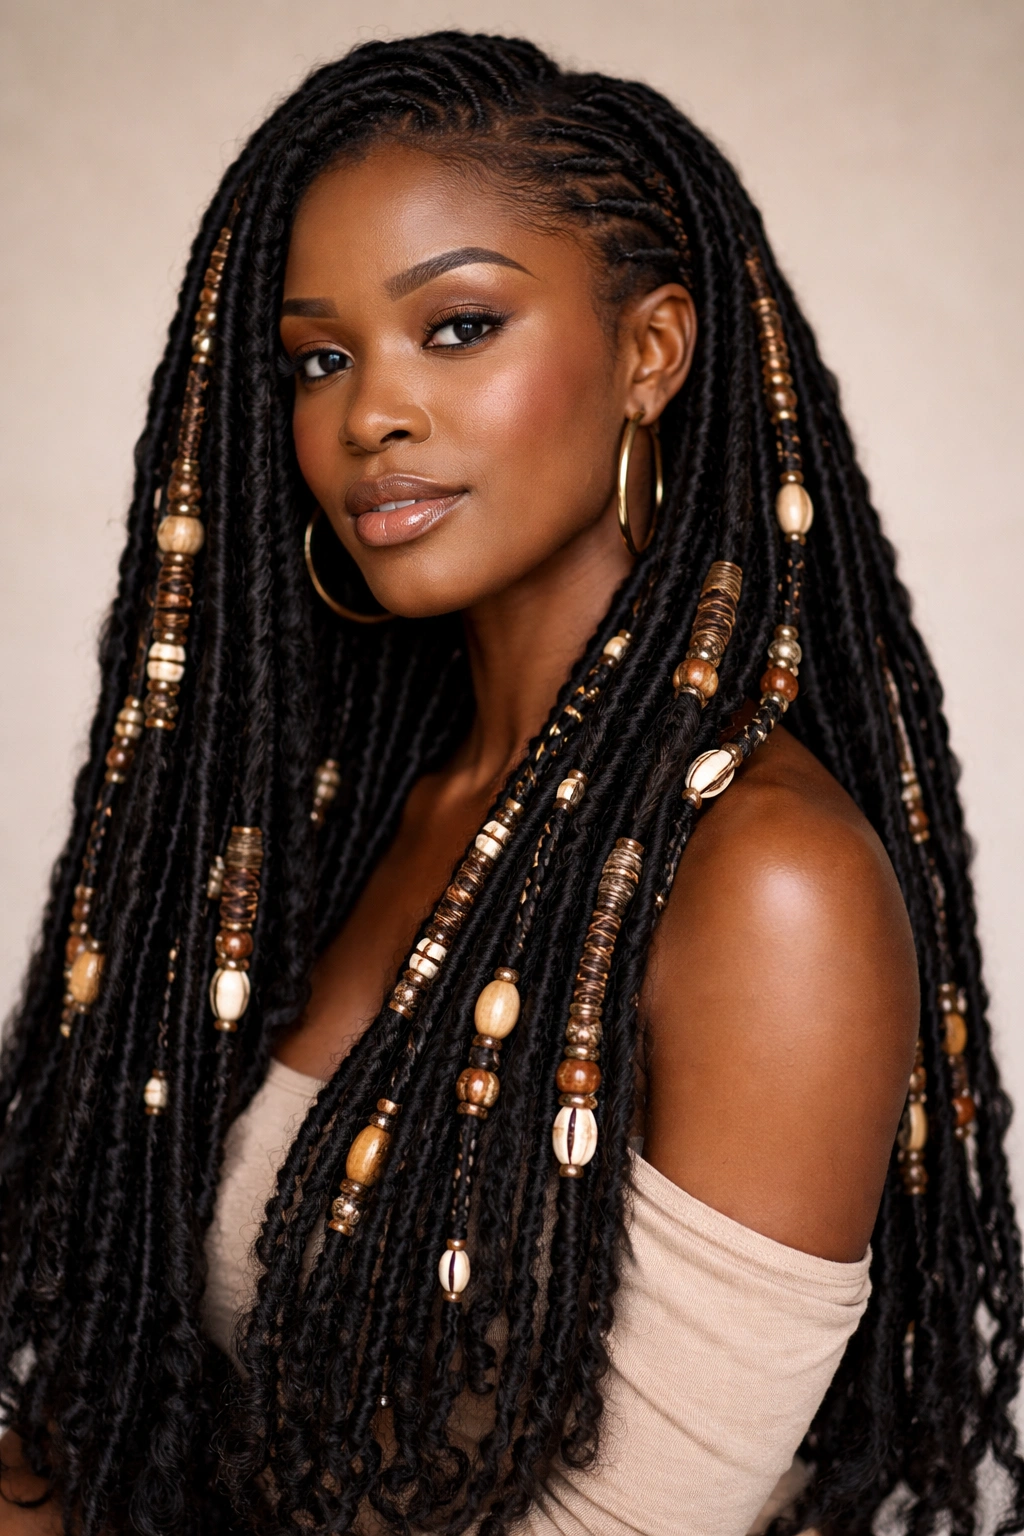
For women who want a longer-term protective style with an elegant, intentional aesthetic, loc extensions are a stunning option. Locs (also called dreads or locks) are created by sectioning hair and systematically intertwining the hair strands until they form cylindrical, rope-like structures. On 4C hair, locs develop beautifully and naturally because your texture locks and holds the form readily. Some women create permanent locs; others prefer temporary loc extensions (added hair extensions looped and braided to mimic locs) that can be removed after several weeks.
Creating Temporary Locs with Extensions
Temporary locs are created by sectioning your hair and threading synthetic or human hair through each section using a crochet hook, then braiding and twisting the combined strands until they lock together. This creates the appearance and feel of locs without the commitment of actual locs. On 4C hair, the process is straightforward because your natural texture provides the grip and definition needed for locs to form. Each temporary loc can be as thick or thin as you prefer—thicker locs (pencil-width or thicker) create a bolder look, while thinner locs create a more delicate appearance.
Wrapping and Styling Your Locs
Once your locs are created, you have endless styling options. You can wear them down and flowing, gathered into a high ponytail or bun, or wrapped and pinned into updos. Many women wrap sections of their locs using colorful thread, yarn, or fabric strips—this wrapping can be purely decorative, or it can serve to repair locs that are starting to unravel. Adding beads to your locs is also traditional and beautiful—slide beads onto individual locs or clusters of locs for visual interest and a cultural nod.
Maintenance and Longevity of Temporary Locs
Temporary loc extensions last 4-8 weeks depending on how carefully you maintain them. Wash your locs every 7-10 days using a lightweight shampoo and avoiding heavy conditioners that can cause buildup. Dry thoroughly to prevent mildew. Sleep with your locs wrapped loosely in a silk scarf or bonnet. By week 4-5, some locs may start to slightly unravel, particularly at the roots as new growth pushes them away from your scalp—re-twisting individual locs as needed takes 5-10 minutes per loc. The wrapped sections actually help prevent unraveling, so this is a smart maintenance strategy. When you’re ready to remove your locs, the process is simple: carefully unravel each loc, shampoo your hair thoroughly to remove the buildup, and deep condition for at least 2-3 weeks before your next protective style.
Final Thoughts
Yoruba hairstyles are more than aesthetics—they’re a living connection to cultural heritage, a celebration of texture and creativity, and a practical way to care for 4C hair while looking absolutely gorgeous doing it. Each of these twelve styles honors traditional techniques while remaining flexible enough for modern adaptation and personal expression. Your 4C hair is the ideal canvas for these styles; the natural grip, density, and texture make Yoruba-inspired styling not just possible but actually easier and more beautiful than on other hair types.
The investment in learning these styles—understanding how to section hair for cornrows, how to create even braids, how to accessorize with intention—pays dividends over time. These aren’t styles that require trips to a salon (though professional installation is always an option). Many of these techniques you can master yourself with practice, time, and good video tutorials. Start with the styles that feel most intuitive to you, practice on yourself or a friend, and gradually expand your repertoire. With protective styling and proper scalp care, your 4C hair grows, thrives, and showcases these beautiful cultural expressions at their absolute best.