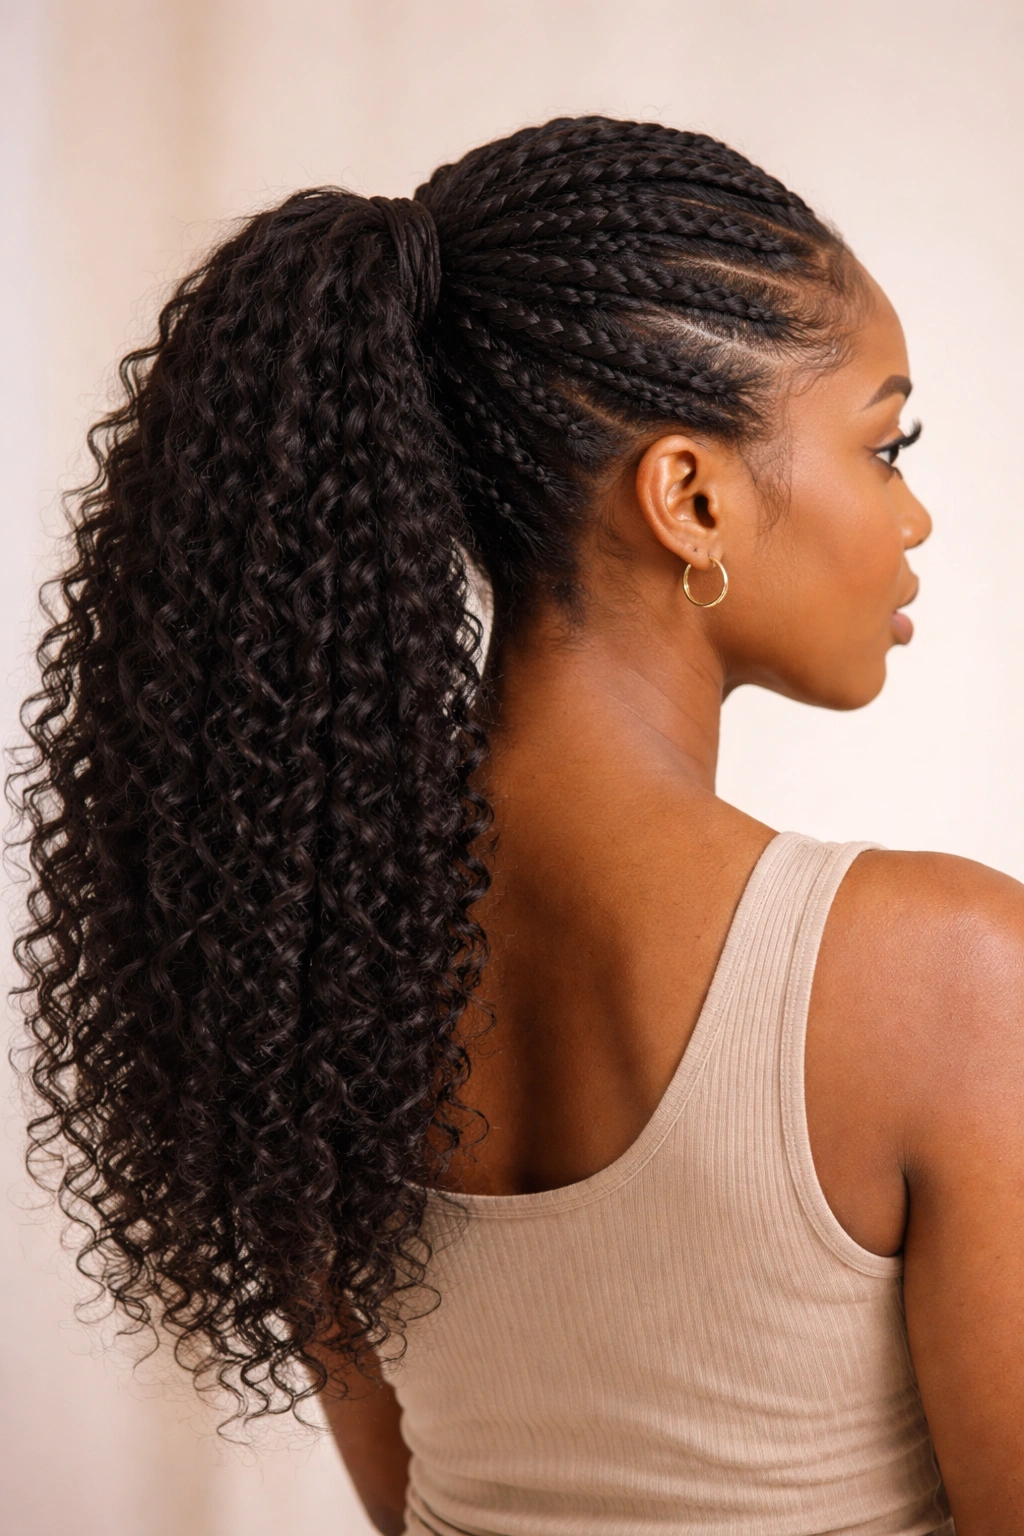
There’s something incredibly versatile about twist ponytails when you’re working with natural hair—they protect your edges, offer endless styling possibilities, and look polished enough for professional settings or casual weekends. Whether you’re dealing with coils, kinks, or waves, twist ponytails let you play with texture while keeping everything secured in a way that actually holds throughout your day. The beauty is that these styles work whether you’re wearing your hair loose, in a protective style phase, or anywhere in between.
The challenge a lot of naturals face is moving beyond the basic ponytail. You know, the one where you just gather and secure? Twists add dimension, visual interest, and that intentional, crafted look without requiring hours in a salon chair. Real talk—once you master a few different twist techniques and understand how to adapt them to your specific hair texture and length, you’ll have a rotation of styles that work for literally any occasion. Let’s walk through 15 twist ponytail styles that actually work on natural hair, with the real technical details about how to create them, which hair types they’re best suited for, and what you need to know to make them last.
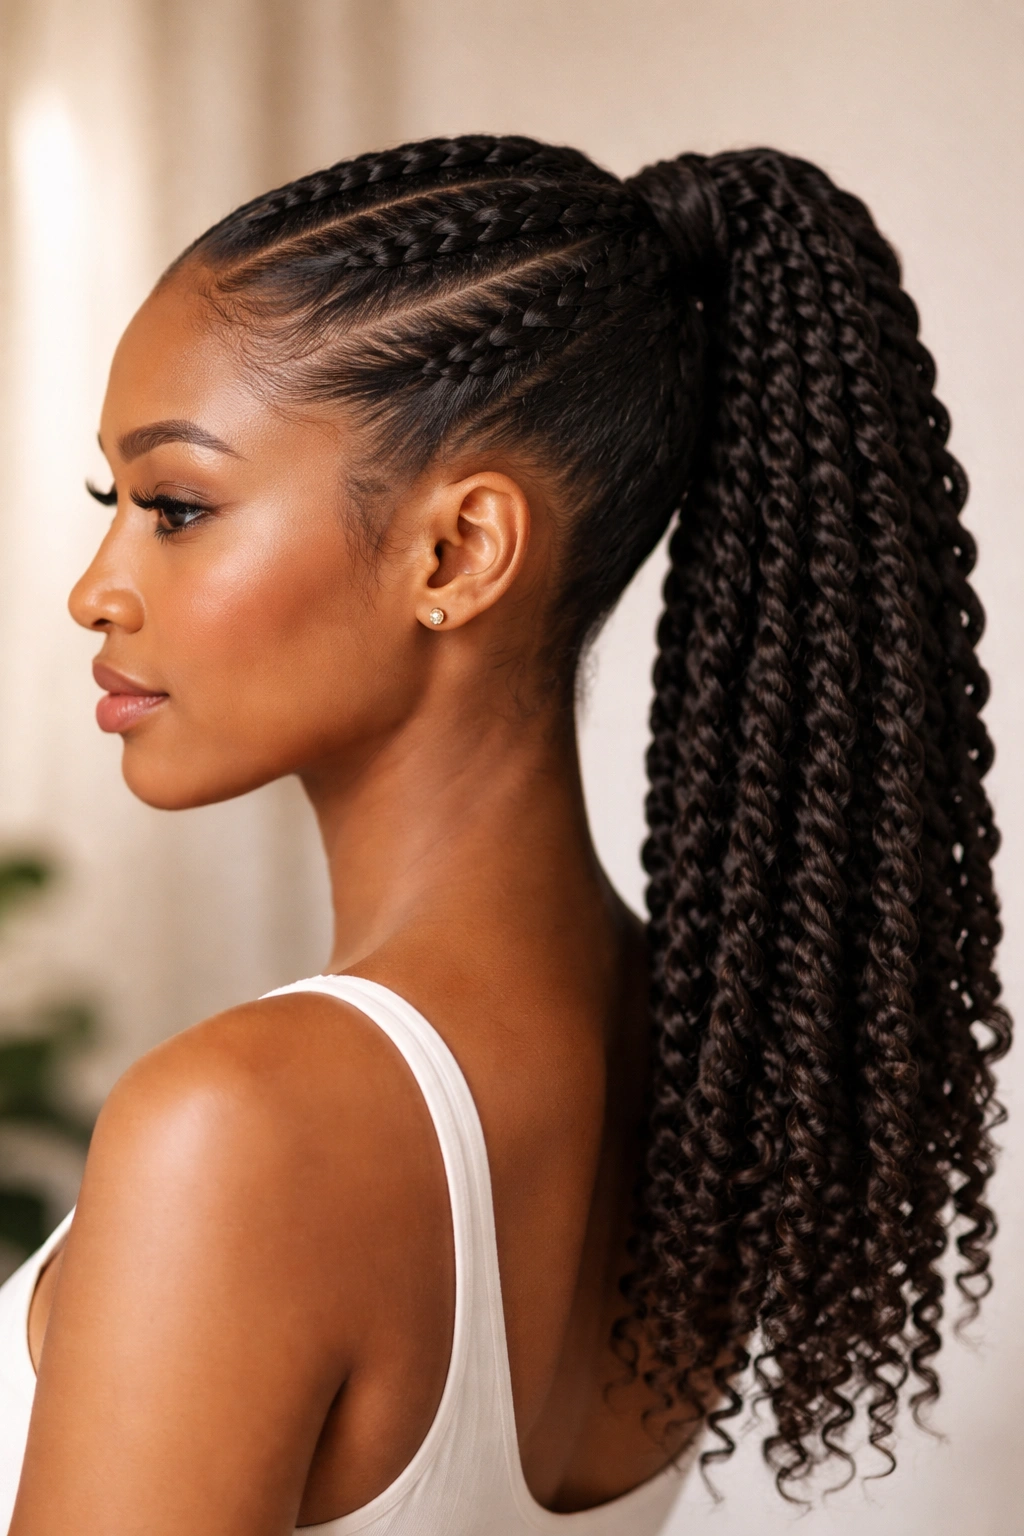
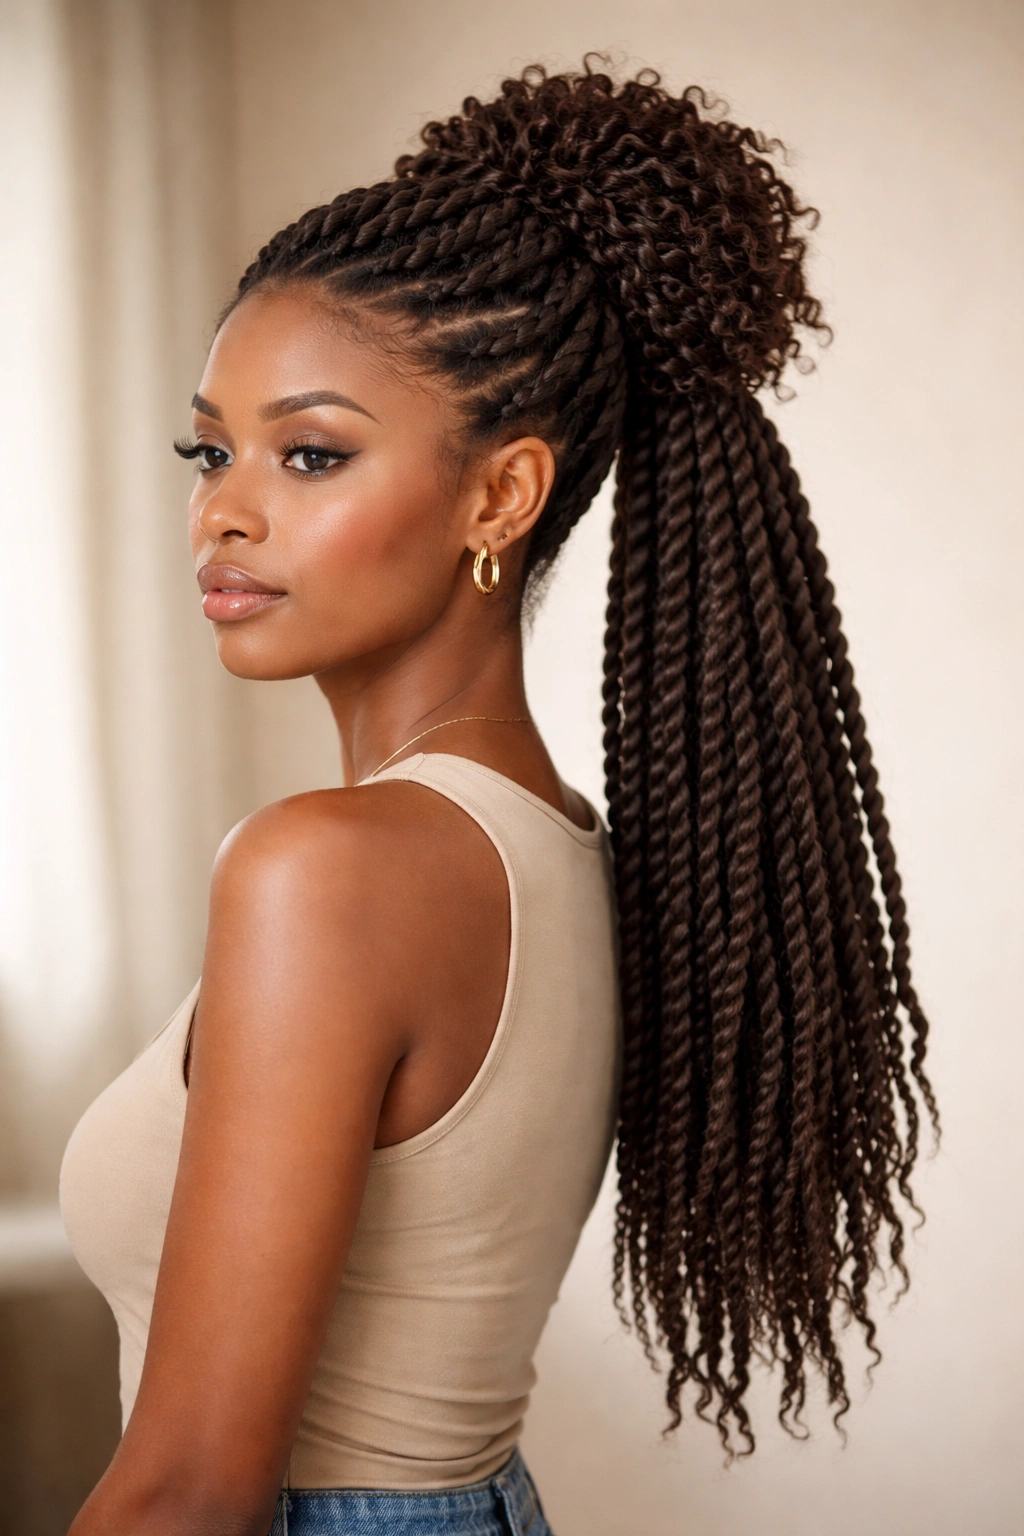
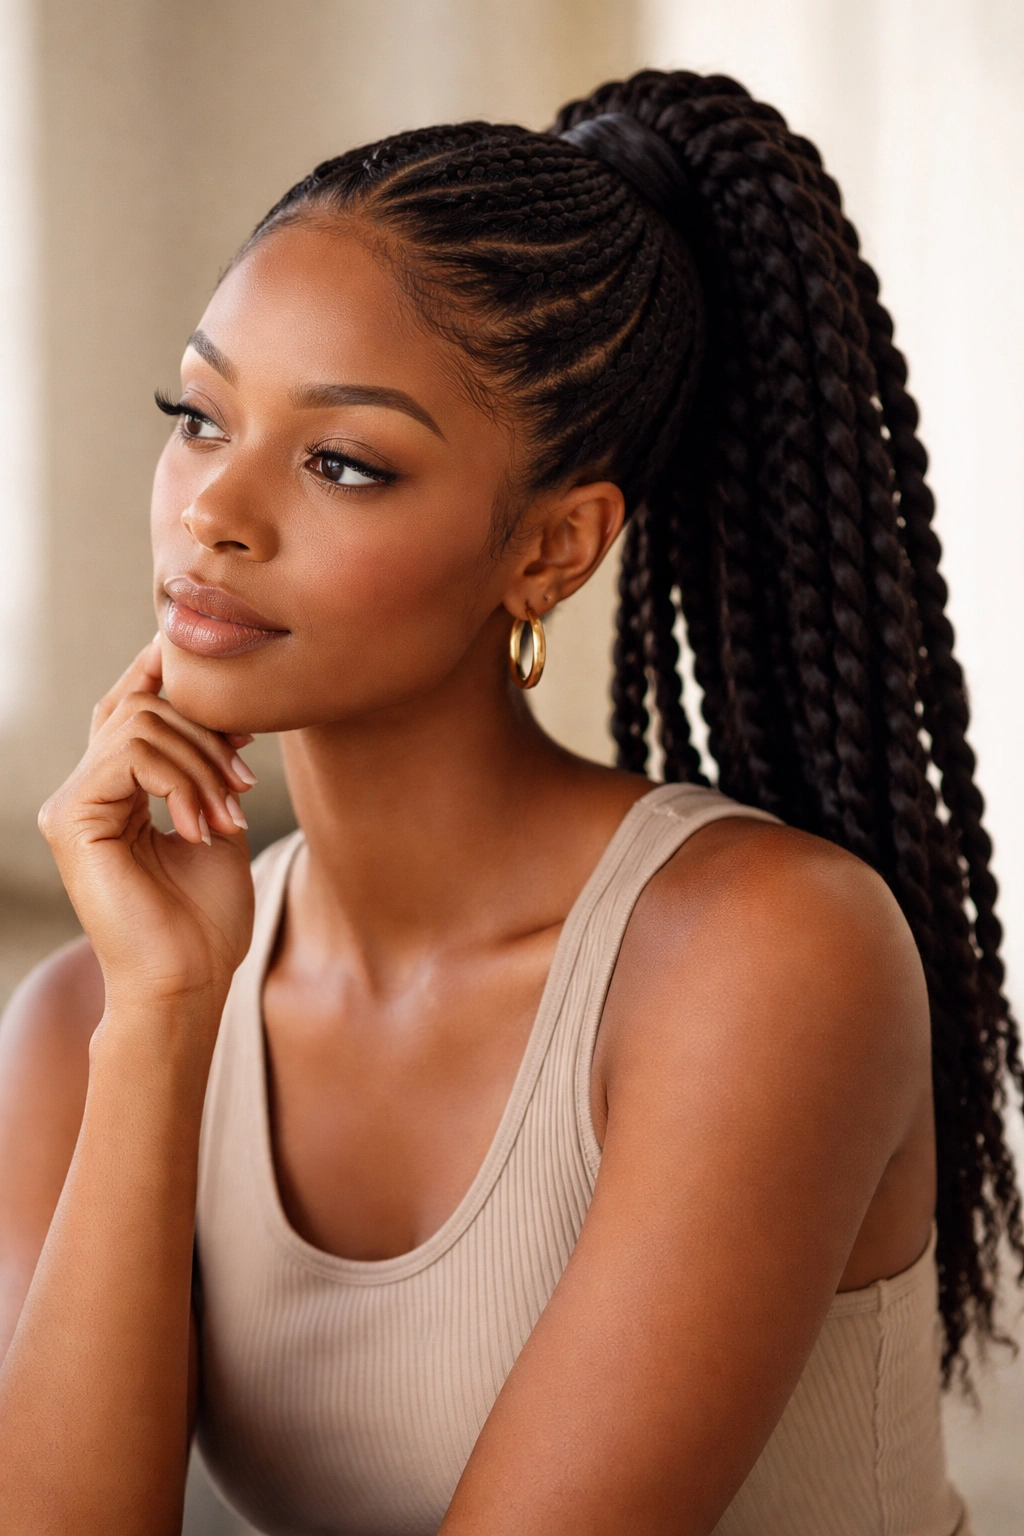
1. Classic Two-Strand Twist Ponytail
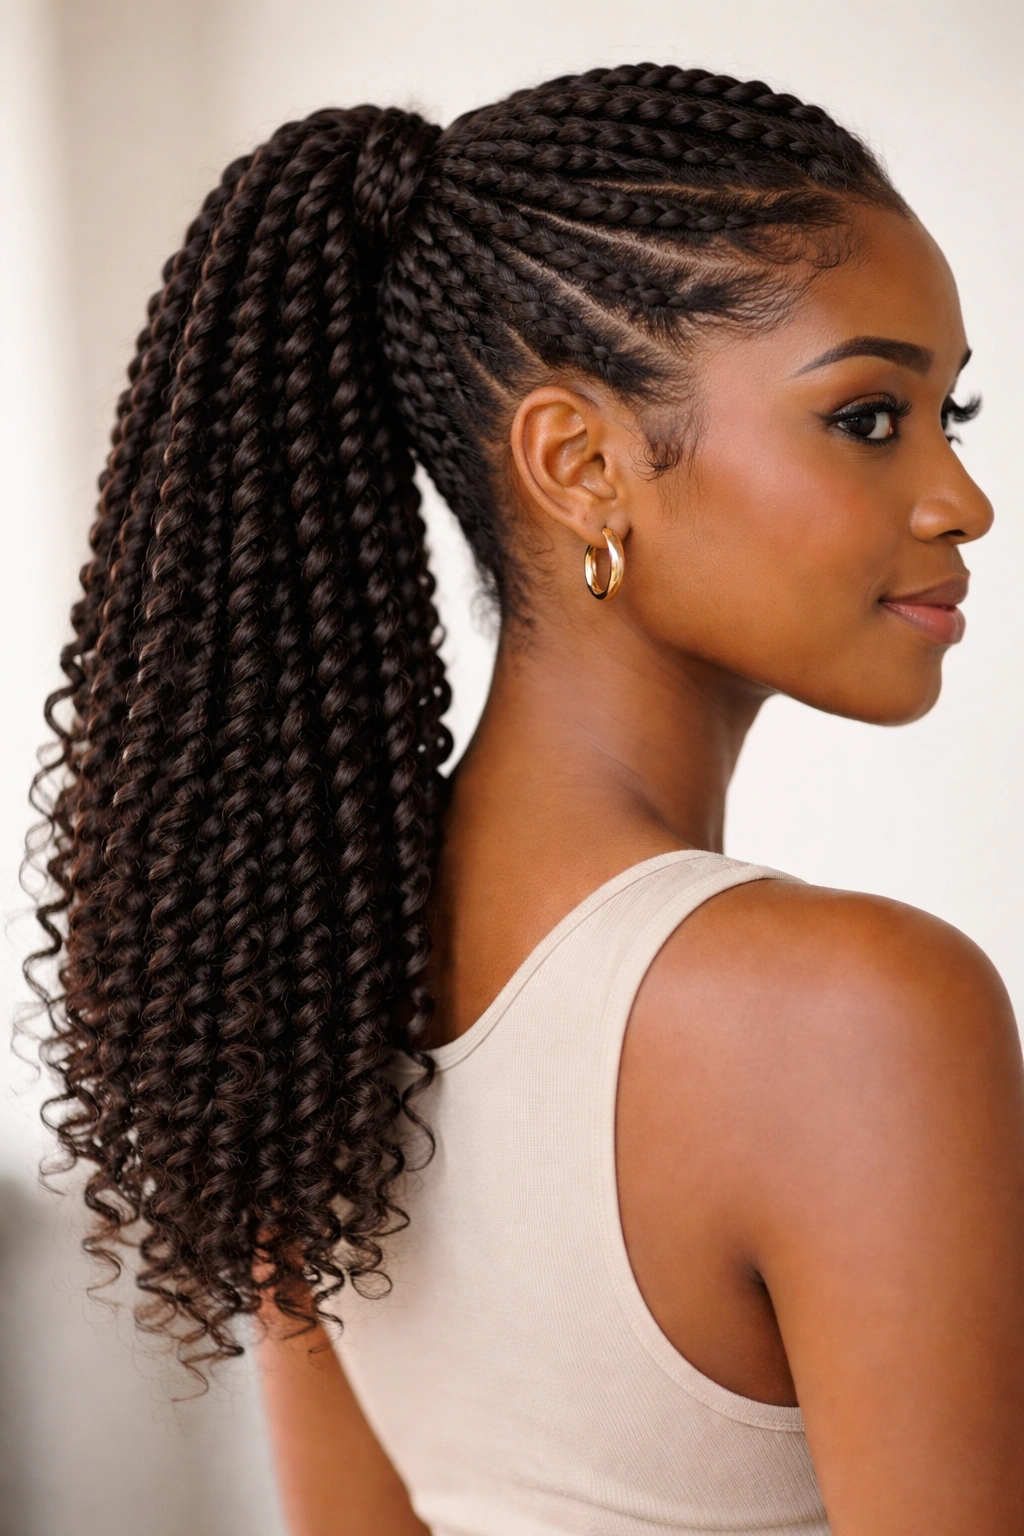
Two-strand twists are the foundation of natural hair styling, and pulling them into a ponytail elevates them from everyday protective style to something polished and intentional. The magic here is that you’re creating texture before you secure, which means the ponytail itself has built-in dimension and visual interest that a straight ponytail could never achieve.
How to Create It
Start with moisturized, detangled hair—this is non-negotiable for clean twists that won’t snag or break. Take a section of hair at the crown or from a side part, divide it into two strands, and cross one strand over the other repeatedly down the length. The key is keeping consistent tension without pulling so tightly that you’re straining your scalp. Once you’ve twisted the entire section, secure the ends with a small band or by tucking them under. Repeat this process across your entire head, creating anywhere from 8-20 twists depending on how thick you want them and how much hair you have.
What Works Best
This style works beautifully on natural hair that’s at least shoulder-length, though it’s forgiving on shorter textures too. Coily and kinky hair holds twists longer because the natural curl pattern locks them in place. Wavy textures can do two-strand twists, but you may want to retwist more frequently since the hair is slicker and the twists can slip. The ponytail itself can sit high, low, or off to one side—each placement gives a completely different vibe, so play with what feels right for your face shape and what you’re doing that day.
Pro Tips for Longevity
Twists last longest when you seal the ends with a bit of moisturizer or edge control while they’re still in your hands, before you even gather them into the ponytail. Sleep on your twists with a bonnet or silk pillowcase, and you can stretch them out another week easily. If your twists are starting to feel frizzy or unraveling at the ends, don’t reach for scissors—instead, you can carefully retwist just the last inch or two of each twist to refresh them.
Wear time: 1-2 weeks with proper maintenance
2. Side-Swept Flat Twist Ponytail
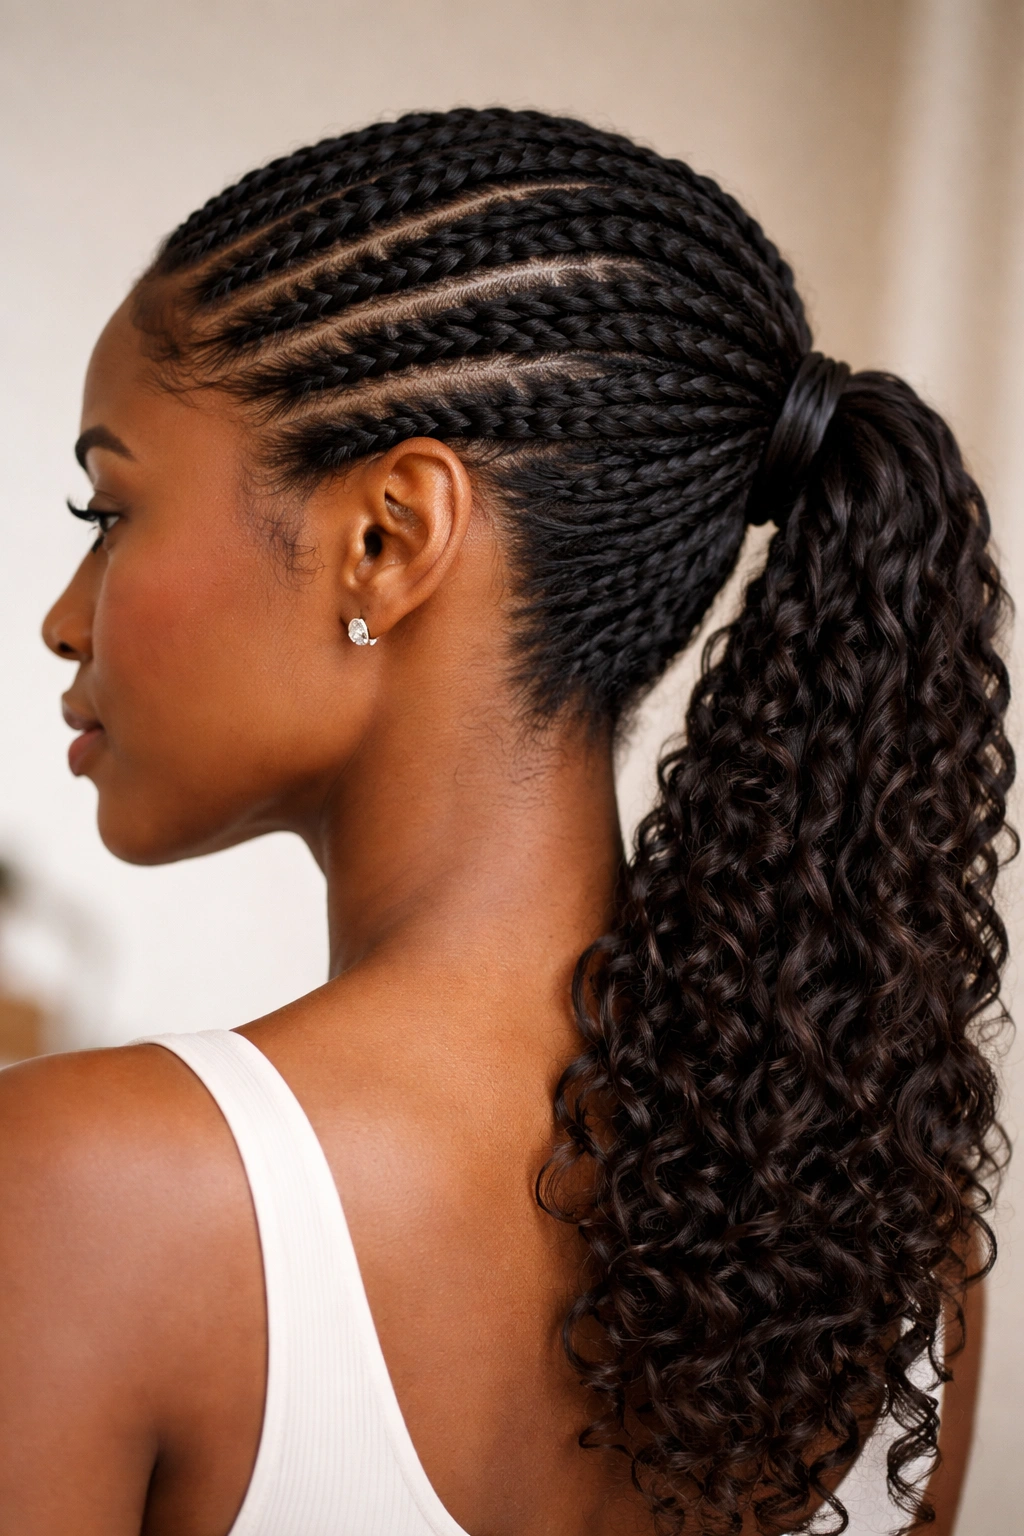
Flat twists are the sleeker, more refined cousin of two-strand twists. They sit directly against your scalp instead of standing away from it, which means you can create sculpted patterns and that intentional-looking style that photographs beautifully. Sweeping them to one side adds elegance while keeping one side of your face completely open and framed.
The Technique Breakdown
Flat twists are created by dividing your hair into two strands and twisting them over each other exactly like a two-strand twist, but as you twist, you’re continuously picking up new hair from the side—think of it like French braiding but with twists instead of three strands. Start at your hairline on one side and take a diagonal path toward the back of your head, picking up hair as you go. This creates that flat, sculpted look that hugs your head. Once you’ve created however many flat twists you want (usually 3-5 for this style), gather the ends and your loose hair into a ponytail at the nape of your neck or slightly off to one side.
Best Hair Types and Textures
Flat twists are genuinely easier on hair that has some natural texture to grip—coily and kinky hair holds them almost effortlessly. If you have looser waves, you may need to braid or twist sections overnight first to create more texture, or work with slightly damp hair so everything grips a bit better. The moisture and definition of damp hair actually helps flat twists stay cleaner longer, even if it takes a bit longer to style.
Styling Variations
You can create as many flat twists as you want—just two framing your face feels romantic and relaxed, while full coverage flat twists across your entire scalp leading into the ponytail feels more intentional and polished. Vary the thickness of each twist based on how much texture and fullness you want the final style to have. Thinner twists create a more intricate, detailed look; thicker twists are faster to do and give a bolder effect.
Wear time: 7-14 days depending on how well you maintain them
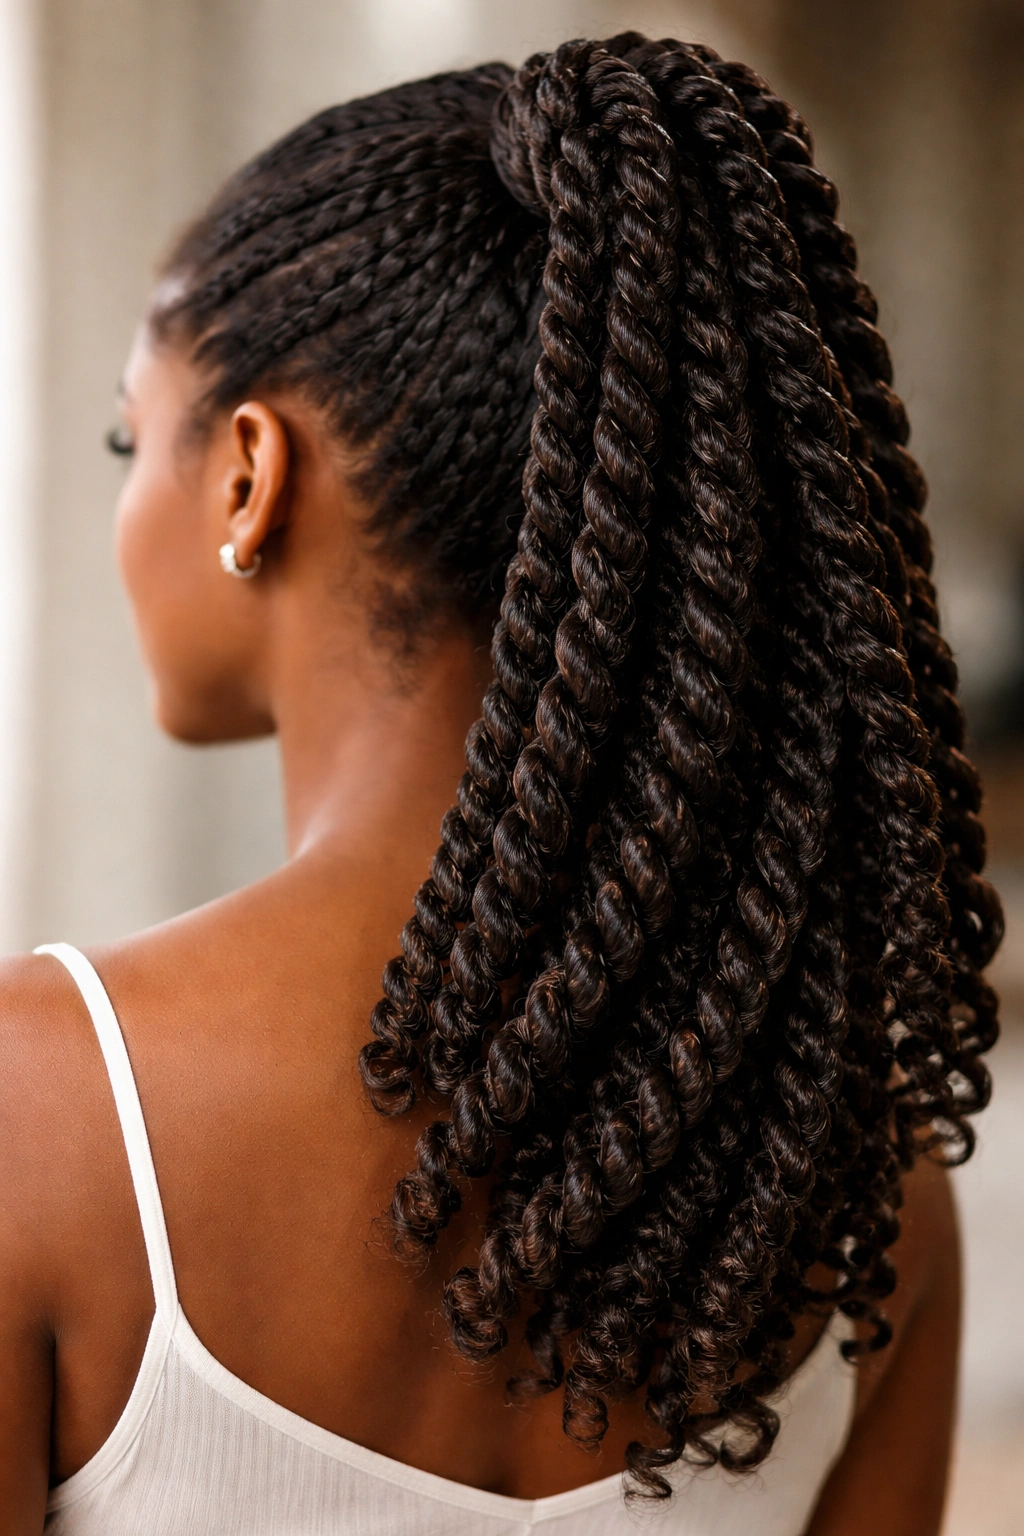
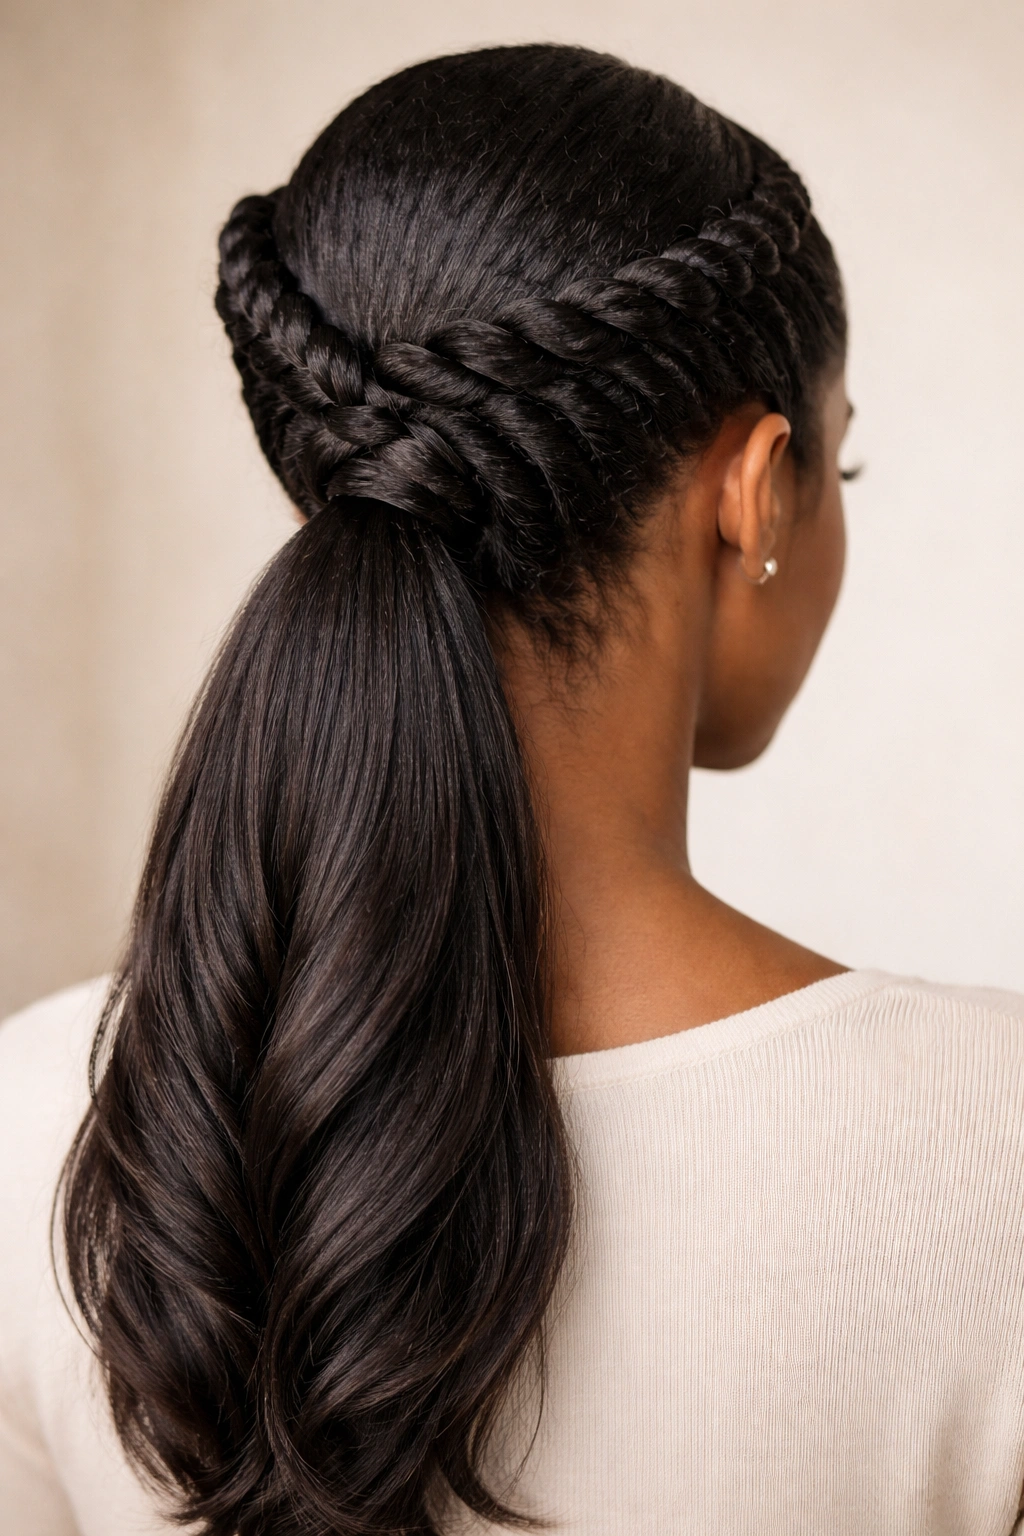
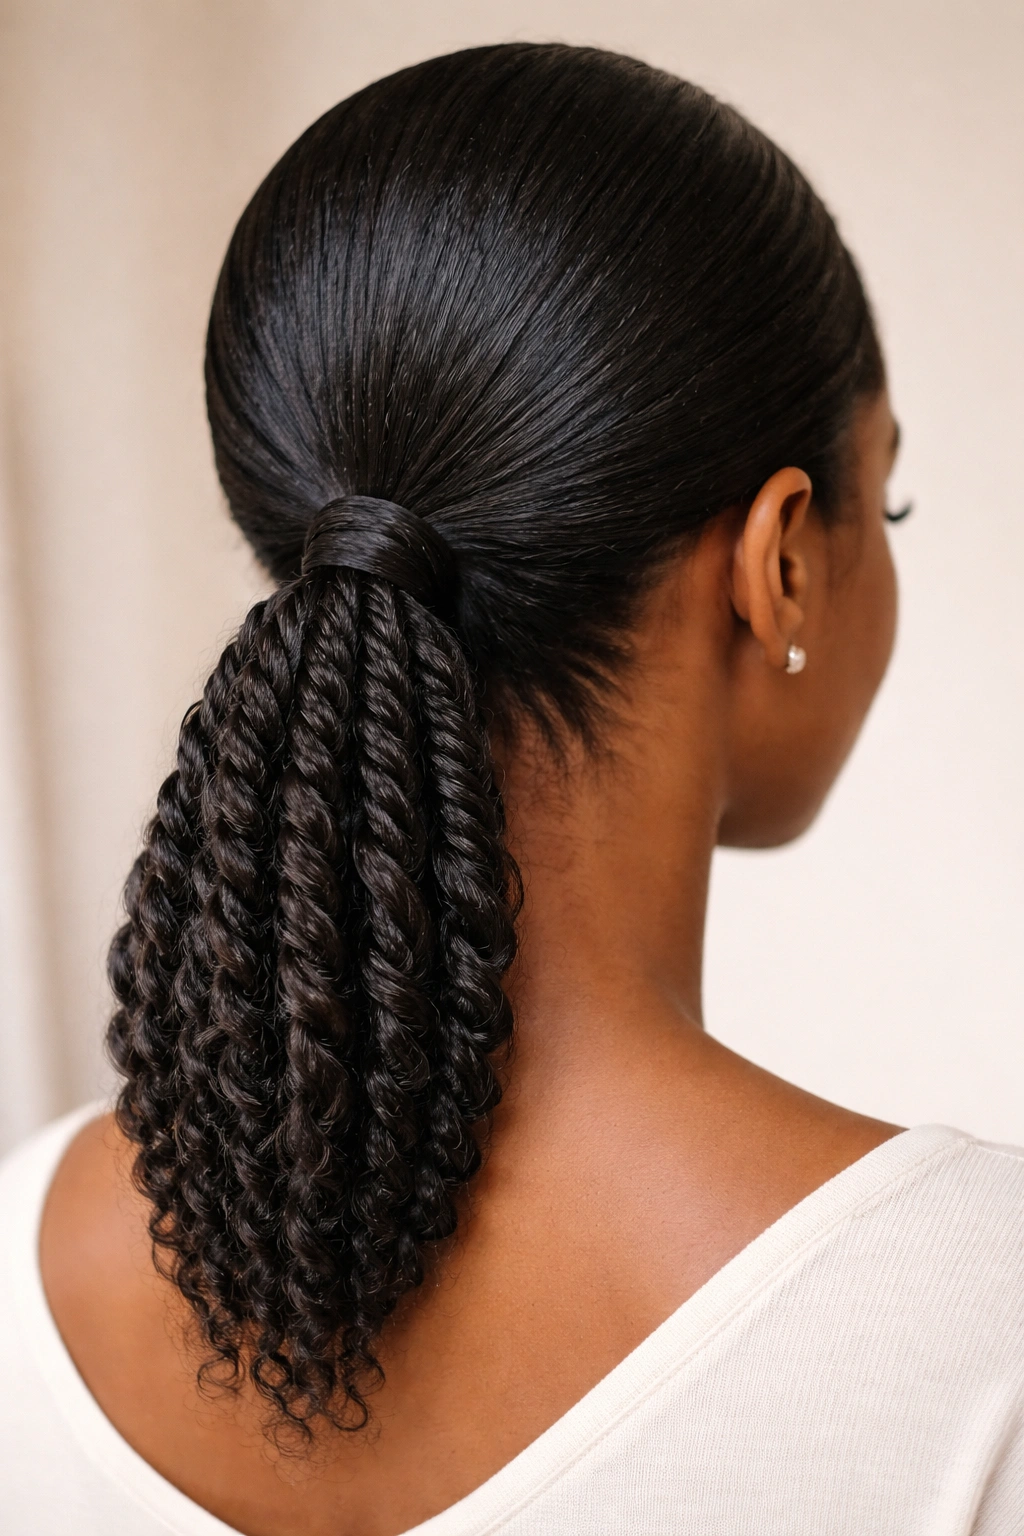
3. Rope Twist Ponytail with Wrapped Base
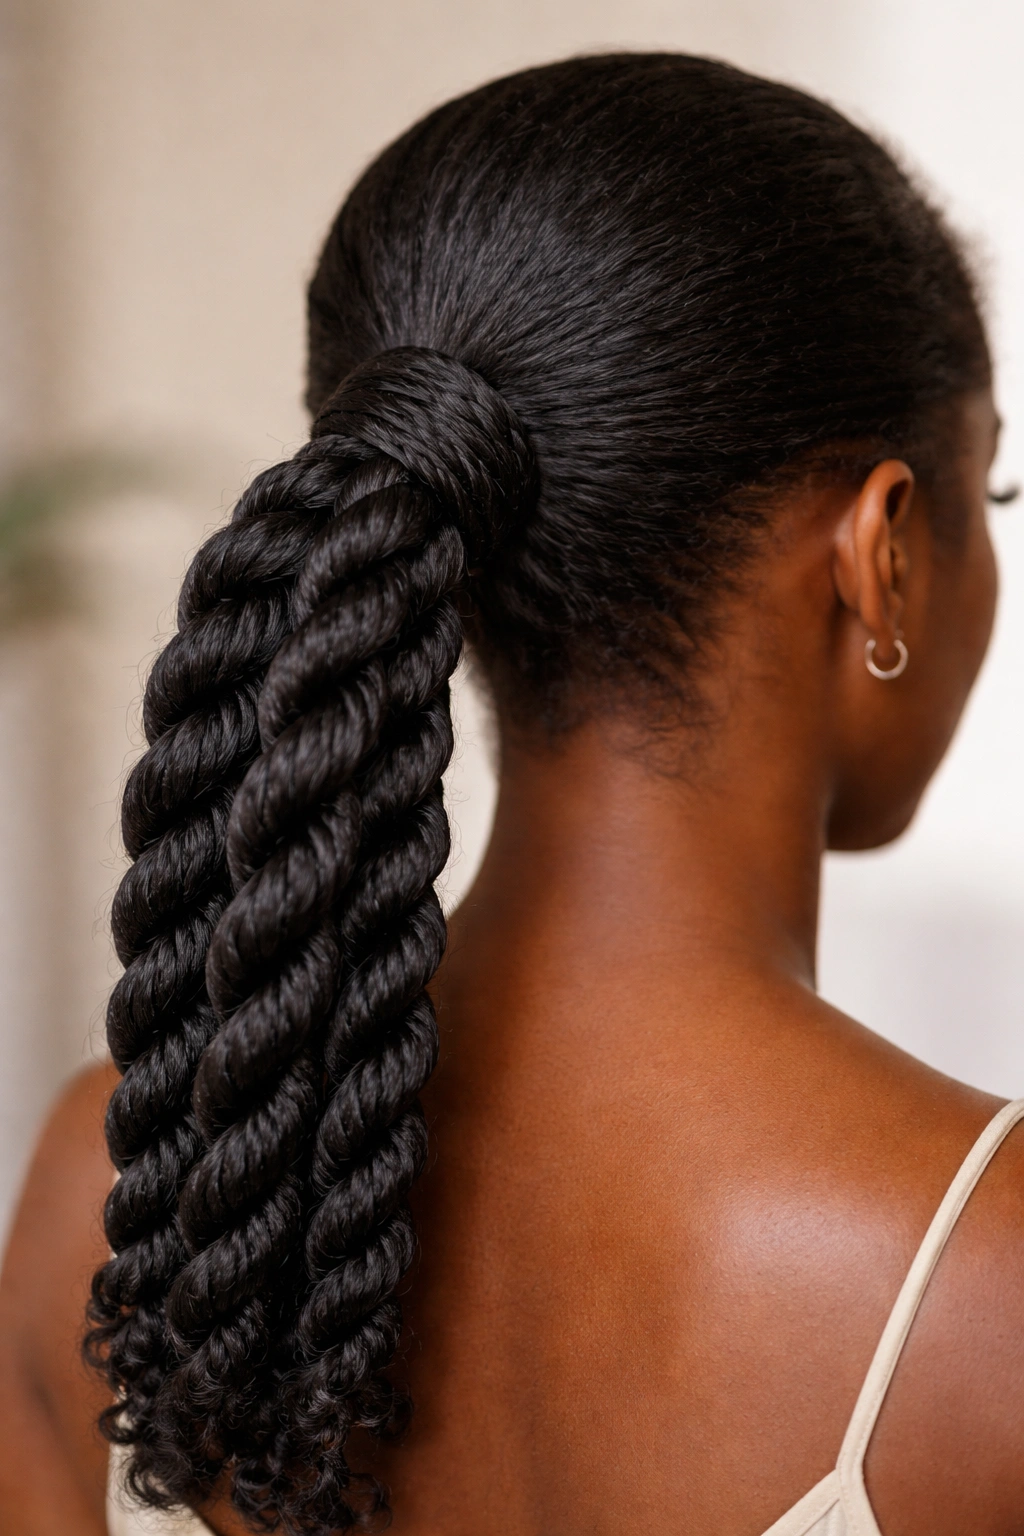
Rope twists are made differently than two-strand twists—instead of crossing strands over each other, you’re twisting them around each other in a spiral motion, which creates a thicker, ropelike texture. Wrapping one of these rope twists around the base of your ponytail creates a polished, finished look that feels intentional and protective.
Creating the Rope Twist
Take two strands of hair and twist them toward each other in the same direction (imagine both twisting clockwise) while simultaneously wrapping them around each other. This creates that rope effect—it’s thicker and textured differently than a standard two-strand twist. Rope twists work particularly well on denser hair types because you need enough hair to create that fullness. Once you’ve made a few rope twists, gather your hair into a ponytail, then take one of the rope twists and wrap it around the base of the ponytail several times, securing the end underneath or with a bobby pin.
Why the Wrapped Base Matters
Wrapping a twist around your ponytail base does two important things: it covers up the hair tie or band so everything looks seamless and polished, and it creates a visual anchor point that makes the whole style look more deliberate and styled. This wrapped base technique is actually a clever way to hide hair damage at the base of the ponytail too, if you’re dealing with any breakage or thinning there.
Maintenance and Refresh
The wrapped twist will naturally loosen as the days go by. You don’t need to re-do the entire style—just rewrap the twist, tightening as you go, and resecure. This can extend your wear time significantly. If the rope twists themselves start to feel loose or frizzy, a light spritz of water and a quick retwist while you’re wearing the ponytail can revive them.
Wear time: 10-14 days with base maintenance
4. High Topknot with Twisted Details
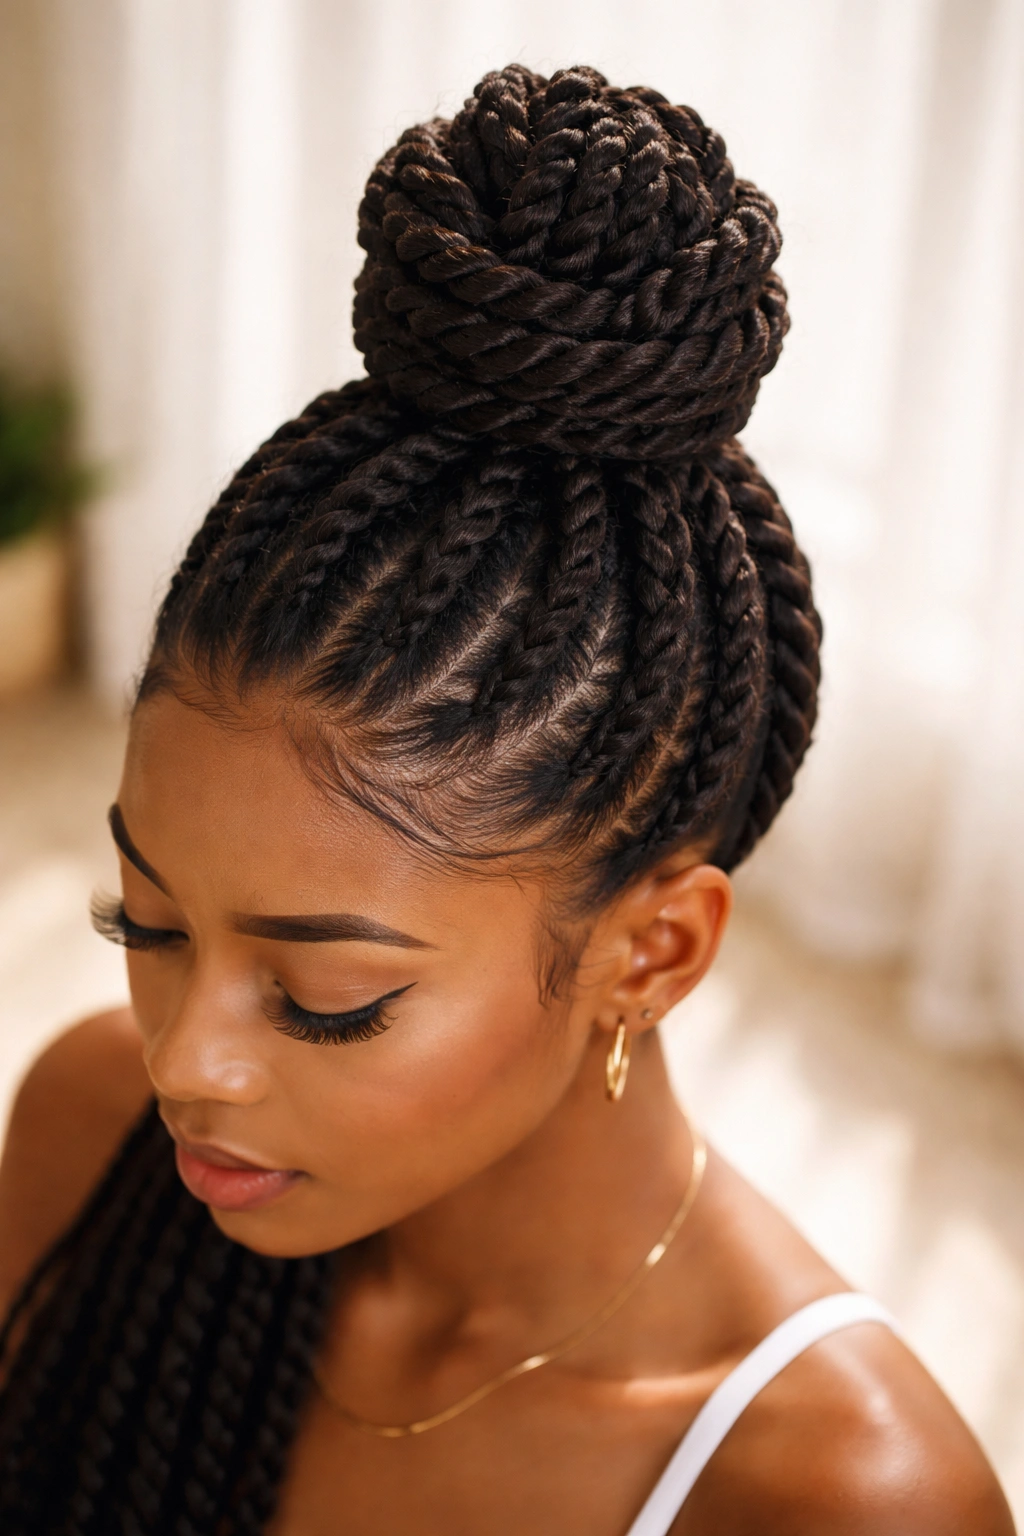
This style takes twists and turns them into a statement topknot—think of it as twist ponytails meets bun. You’re creating that high-impact look that works for both workout and date night, with the texture and detail of twists integrated throughout.
Building the Topknot
Start by creating several two-strand or rope twists across your hair, focusing on getting them as uniform as possible. Gather all your hair—both the twists and any untwisted sections—into a high ponytail at the crown of your head. Take that ponytail and twist or braid it, wrapping it around itself in a spiral to create a knot or bun shape. Secure with bobby pins tucked underneath so they’re invisible. The twists you created beforehand add texture so the final knot isn’t just a smooth ball—it has dimension and visual interest.
Who This Works Best For
High topknots look stunning on people with naturally textured hair because the texture itself adds volume and interest. If you have finer waves, you can create this look, but you might want to make thicker, fewer twists before pulling into the high ponytail so the final knot feels substantial. This style is perfect for active days—workouts, running errands, outdoor activities—because the height keeps hair completely off your face and neck.
Styling and Securing
Baby hairs and flyaways are actually part of the look here—they add softness to what could otherwise feel severe. Don’t feel like you need to gel every single hair down. Instead, use a light edge control on just your hairline and leave some texture visible around your face. The knot itself should feel secure but not strangled—you want it to last all day without causing tension headaches.
Wear time: 5-7 days as a style; about 1-2 weeks if you keep the twists in while sleeping and just redo the knot
5. Feed-In Braid to Twist Ponytail
This hybrid style combines feed-in braiding technique with twists, giving you a style that looks like you spent way more time on it than you actually did. The braiding section travels from your hairline back while incorporating new hair, then transitions into twists that get pulled into a ponytail.
The Technique
Start with a feed-in braid, which means you’re creating a braid at your hairline and adding small sections of new hair as you go, similar to a Dutch braid but with more finesse and control. Work this braid from your hairline toward the back of your head on one or both sides. Where the braid naturally ends (usually at the back of your head), transition into two-strand twists using the remaining hair. The twists then get gathered into a ponytail. This style bridges the gap between intricate braiding and twists—it has the detail of braids but the flow and ease of twists.
Hair Prep and Type Considerations
Feed-in braiding is easier when your hair has decent density and length—at least shoulders or longer. The technique requires a bit of coordination and practice, so if you’re new to styling, this one might take a few tries. Coily and kinky hair feeds beautifully because you can see the detail clearly. If you have looser waves, work in slightly damp hair or hair that’s freshly moisturized so everything grips better and the braid sits cleanly.
Protective Benefits
This style is genuinely protective because the braided section keeps new growth and fragile hairline hair secured and out of the way. Combine that with the twists, and you’ve got a style that allows your hair to thrive. You can wear this style for 7-10 days easily, and the braided section typically holds better than the twist section, so you can let the twists go a bit longer before they need refreshing.
Wear time: 7-14 days with the braided section lasting longer than the twist section
6. Spiral Twist Ponytail
Spiral twists are created by coiling your twists—literally wrapping a finished two-strand twist around itself to create a coil or spiral shape. This sounds complicated but it’s actually a smart way to create visual impact, and when you pull these spirals into a ponytail, you get something textured and dimensional that catches light beautifully.
Creating Perfect Spirals
First, create a two-strand twist in the normal way. As you finish, instead of leaving it as a straight twisted strand, take the end and wrap the entire twist around your fingers in a coil, then secure it so it stays spiraled. You can do this with small bobby pins hidden within the coil, or by tucking the end under. The spiral stays in place longer on coily and kinky hair because the natural texture helps hold the shape. On looser textures, you can set the spirals by sleeping on them and they’ll hold much better.
Building the Ponytail
Create several spirals across your head, focusing on making them relatively similar in size. Gather the spirals and remaining hair into a ponytail. The ponytail itself will be incredibly textured because you’re working with coiled twists instead of straight ones. This is a style that genuinely photographs well and feels fancy, but it’s not actually more difficult than regular twists once you understand the spiral technique.
Volume and Fullness
Spirals add serious volume compared to regular twists because you’re coiling them up. This is perfect if you want your ponytail to feel full and substantial without adding hair extensions. The downside is that spirals can feel tighter against your scalp because everything is more condensed, so if you’re sensitive to tension, space them further apart or create fewer of them.
Wear time: 7-12 days; spirals tend to hold their shape well even as they age
7. Twisted Crown Ponytail
This style creates a crown or halo effect with twists that encircle your head, then releases into a ponytail at the back. It’s romantic, sophisticated, and works for everything from casual to formal occasions.
The Crown Technique
Start at one ear and create a flat twist or regular two-strand twist that travels around your head like a crown, picking up hair as you go (if you want flat twists) or keeping it as a regular twist that curves around your head. The key is maintaining even tension and making it follow the natural line of your head. Once you’ve completed the crown and secured it, gather all remaining hair and whatever the crown-twist ends in into a ponytail at the nape or slightly off-center.
Which Approach Works for You
If you want the crown to feel sculptural and detailed, use flat twists—they create visible pattern and texture. If you want something faster and less intricate, use two-strand twists curved around your head. The difference is significant in terms of how long it takes to create but also how polished the final look feels. Flat twists look more intentional; two-strand twists feel slightly more relaxed.
Occasion Appropriate
This style genuinely reads as “I made an effort” even if it took you 20 minutes. Wear it to work, weddings, dates, family events—it works everywhere. The crown aspect frames your face beautifully and keeps hair off your forehead while still showing off length and texture in the ponytail itself.
Wear time: 5-10 days depending on whether you use flat or two-strand twists
8. Underneath Tucked Twist Ponytail
Instead of letting your twists be visible throughout, this style creates twists, then tucks them underneath a ponytail so they’re mostly hidden, creating an interesting texture and visual depth that people only notice when they look closely.
How to Hide Your Twists
Create several two-strand twists throughout your hair—the number depends on how much texture you want hidden underneath. Gather your hair into a ponytail as you normally would, but as you’re securing it, deliberately position the twist ends underneath the main body of the ponytail, tucking them in so they’re mostly concealed. The twist texture creates a subtle bumpy effect at the base that’s more interesting than a smooth ponytail, but it’s subtle enough to feel understated.
Why This Works
This is an interesting middle ground between “I have put effort into this” and “this is casual.” It looks like a regular ponytail from the front, but there’s unexpected texture and detail when you see the back. It’s particularly good for professional settings where you want to wear your hair up but don’t want anything too elaborate or attention-grabbing.
Styling Variations
You can vary how many twists you tuck—just a few creates a subtle effect, while tucking more twists creates more dramatic texture. You can also vary which twists you tuck—hide some while letting others peek out for a mixed effect. This is genuinely a style you can customize based on your mood and hair condition that day.
Wear time: 7-10 days
9. Twisted Puff with Ponytail Extension
A twisted puff is when you create multiple twists throughout your hair and puff out the texture at your crown, creating volume. Adding a ponytail extension or incorporating loose hair below creates interest and extends your style options.
Creating the Puff Effect
Make two-strand twists throughout your hair, then gather everything at the crown into a high ponytail. Take the gathered ponytail and gently fluff and shape it so the twist texture becomes visible and three-dimensional rather than smooth. Some people use their fingers to separate the twists slightly and create more surface area and volume. The key is gentle manipulation—you’re not trying to destroy the twists, just make them visible and fluffy.
Adding the Extension Element
You can wear this as-is as a beautiful puff, or you can add a ponytail extension (either braided hair or pre-made ponytail pieces) below the puff for a two-level effect. This creates an interesting contrast between the textured puff and whatever style you’re adding below. You could add a straight ponytail, another set of twists, braids, or even loose, flowing hair.
Hair Type Considerations
This style is easiest and looks best on coily and kinky hair that naturally puffs up. On looser textures, you’ll need more twists and more deliberate fluffing to create the same volume effect. If you have very fine hair, fewer, thicker twists will create a better puff than many thin twists.
Wear time: 5-10 days for the basic puff; longer if you’re wearing it with an extension below
10. Half-Up Twisted Ponytail
This style keeps half your hair down while securing the top half into a twisted ponytail. It’s the perfect balance between “I want my hair down” and “I need to get it off my neck.”
Sectioning and Creating
Take the top half of your hair from ear to ear, dividing it vertically. Create twists in this section only—you can do a few large twists or several smaller ones, depending on aesthetic preference. Gather these twisted sections into a ponytail at the back of your crown, leaving the bottom half of your hair completely down. The contrast between the twisted and secured top and the loose bottom is what makes this style interesting.
Styling Variations
You can create flat twists for a more polished look or two-strand twists for something more relaxed. You can gather the twisted section into a tight, neat ponytail or a loose, deliberately messy one. You can even wrap one of the twists around the base of the ponytail for extra detail.
When to Wear It
Half-up styles are perfect for casual settings—work, school, running errands—where you want some hair secured but not the full commitment of a complete updo. It’s also genuinely practical if you have texture in the top half that you want to style, while the bottom half can stay in whatever your natural texture is.
Wear time: 5-7 days
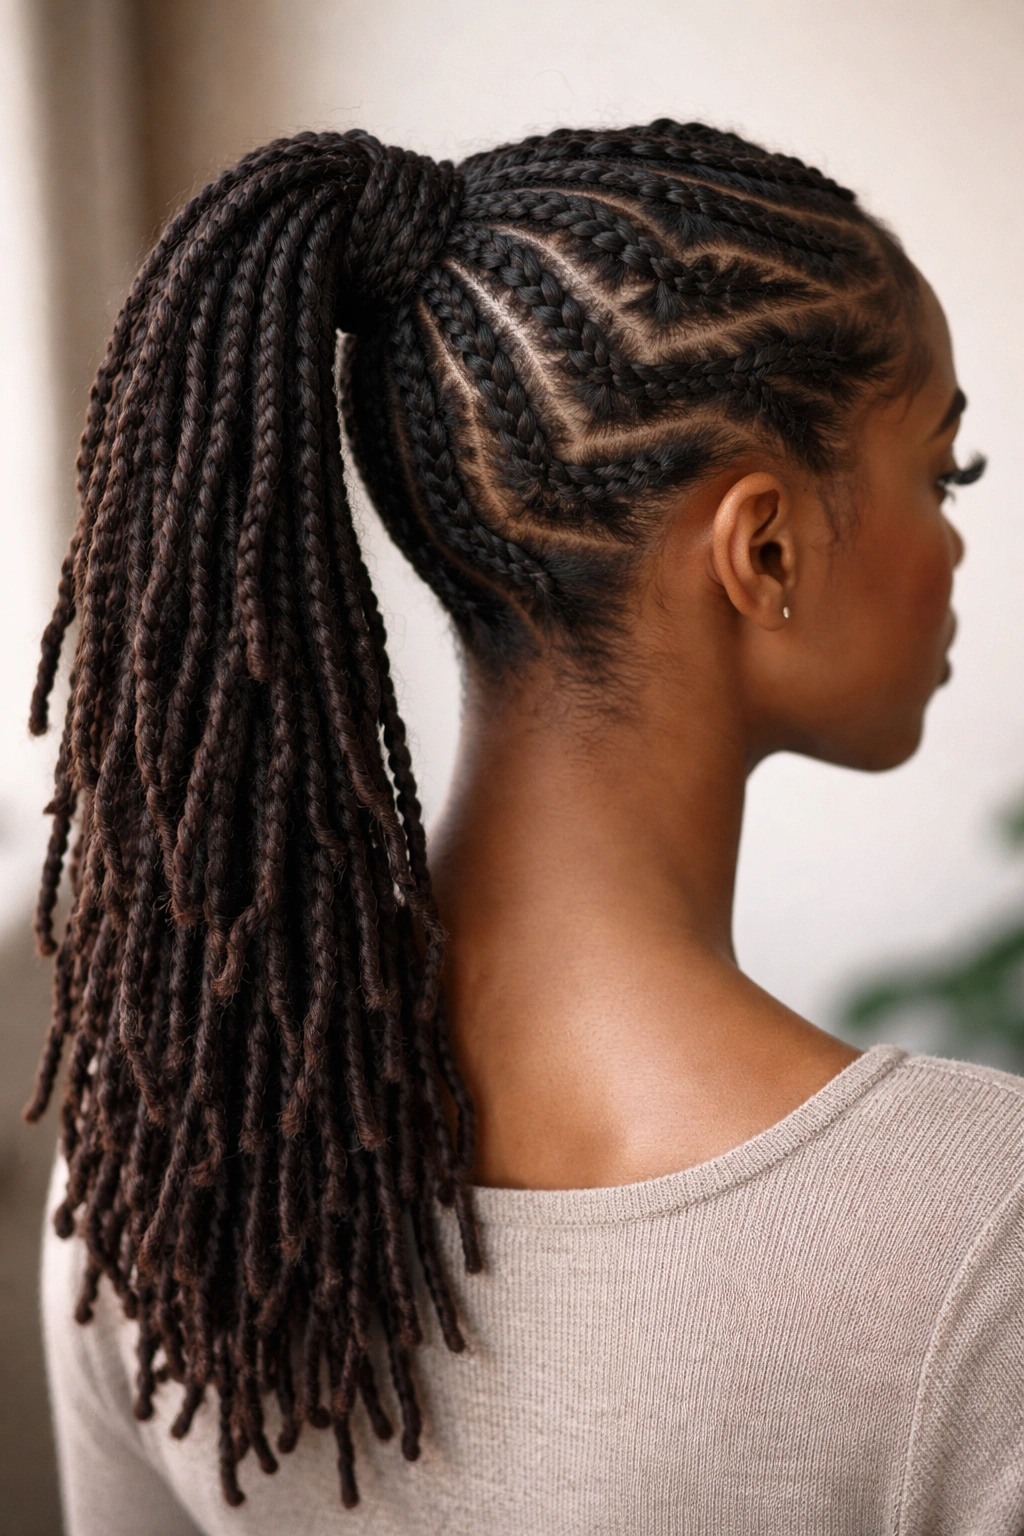
11. Zig-Zag Twisted Ponytail with Baby Locs
This advanced style creates a pattern with your twists—instead of going in one direction, you’re creating a zig-zag or angular pattern across your scalp. If you have baby locs or faux locs installed, you can incorporate them into your ponytail for extra fullness and visual drama.
Creating the Pattern
Instead of starting twists at your hairline and taking the most direct path to the back, you create twists that angle left, then right, then left again—a deliberate zig-zag pattern across your head. This requires a bit more planning than random twists, but the payoff is a style that feels intentional and sculptural. Once you’ve created your pattern, gather everything into a ponytail.
Incorporating Extensions
If you’re wearing baby locs or faux locs, you can fold them into your ponytail along with your twists. This creates incredible volume and visual impact. The contrast between the texture of twists and the defined structure of locs is visually striking. This is genuinely a “going out” style—it’s bold and requires some styling time, but it’s absolutely worth the effort.
Who This Works For
Zig-zag patterning shows best on tighter textures where each twist is distinct and visible. If you have looser waves, the pattern becomes harder to see. This style is best for people who have significant natural hair length and density to create multiple defined twists, and who want to make a statement.
Wear time: 5-10 days for the pattern; can be longer if you’re keeping locs in
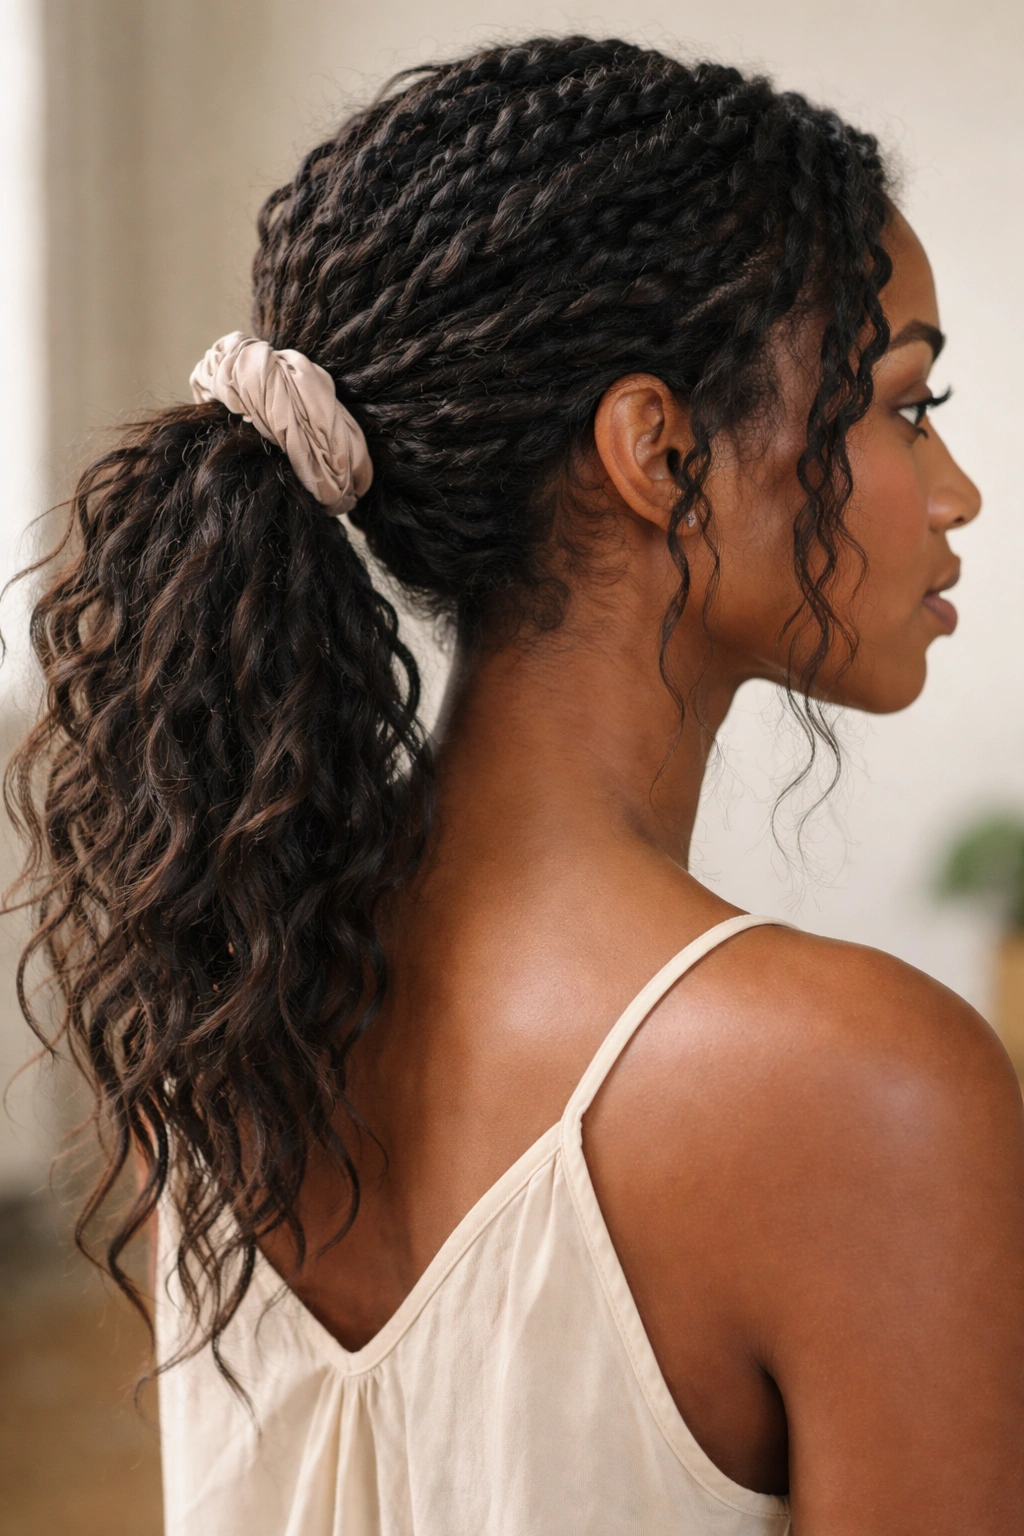
12. Twisted Messy Ponytail
The beauty of a twisted messy ponytail is that it looks intentionally undone in a way that actually requires intention. You’re creating twists, then deliberately styling them in a loose, textured way that feels casual and effortless.
The “Messy” Technique
Create twists throughout your hair, but instead of pulling your ponytail super tight, you’re creating a slightly loose gathering. Pull a few twist ends out and let them frame your face or extend slightly. Loosen the twists slightly so they have a bit of that “I didn’t try” texture. Use a fabric hair tie instead of a rubber band, which helps create that softer, less defined look. The ponytail itself shouldn’t feel tight or controlled—it should feel relaxed and slightly undone.
Why It Works
Messy styles are actually easier to maintain than tight, perfect styles because the slightly undone texture hides imperfection and age really well. You can go longer between refreshes because the looseness means you can adjust and reshape as things start to slip. This is also genuinely the most comfortable way to wear a ponytail if you’re sensitive to tension.
Professional vs. Casual Context
This style definitely skews more casual and creative. It works for casual work environments, weekends, creative fields, but probably not for very conservative professional settings where polished and controlled is expected. Know your context before committing to the deliberately messy approach.
Wear time: 7-10 days with its casual aesthetic aging more gracefully than tighter styles
13. Twisted Ponytail with Beads and Cuffs
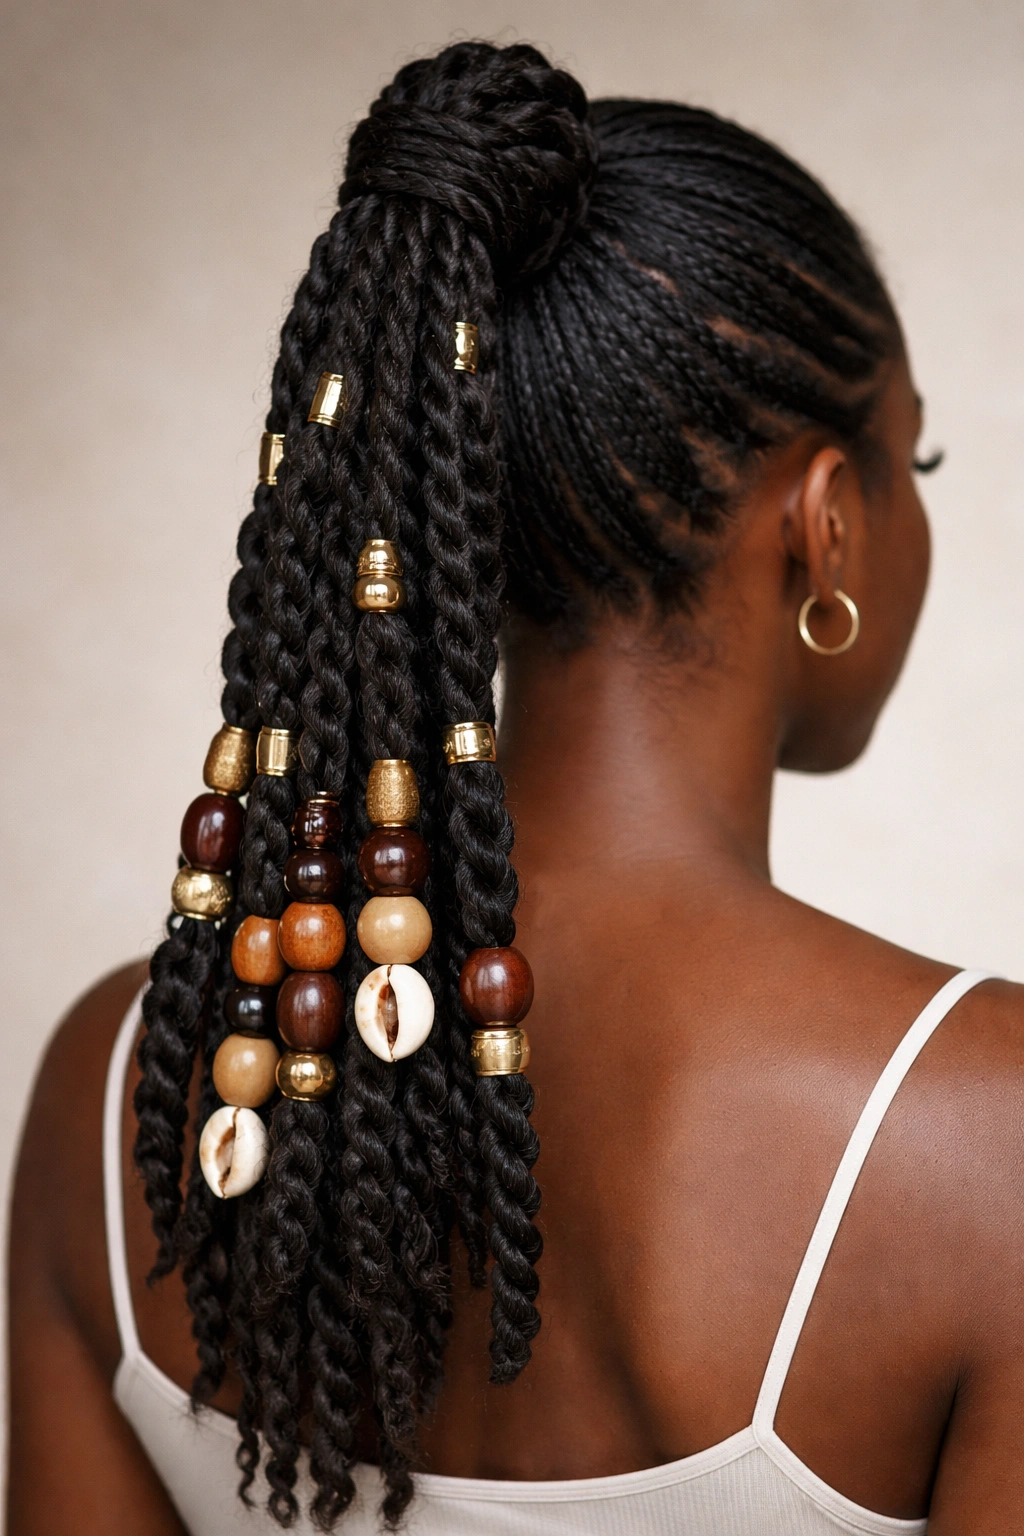
This style elevates basic twists by adding intentional adornment—beads, cuffs, rings, or metallic accessories that slide onto your twisted sections and create visual interest and personalization.
Selecting Your Embellishments
You can use wooden beads, metal cuffs, hair rings, or even decorative thread wrapped around twist sections. The key is choosing pieces that have large enough holes to actually slide onto your twists. Some people use brass cuffs, others prefer colorful beads that coordinate with their outfit. The point is turning your twists into a canvas for personal style.
Application Method
You can add beads as you’re creating the twists—slide them on as you finish each one—or you can add them after the fact by sliding them onto finished twist ends. Adding them as you go is easier because the twists are still in your hands, but adding them later gives you more flexibility to change what you add whenever you want.
Styling Impact
Even just a few beads or cuffs on the twist ends transforms a basic style into something visually interesting and intentional. You can coordinate with outfit colors, jewelry, or mood. This is genuinely fun and allows for expression and creativity in a way that plain twists don’t.
Wear time: 5-10 days; the accessories don’t affect longevity, just aesthetics
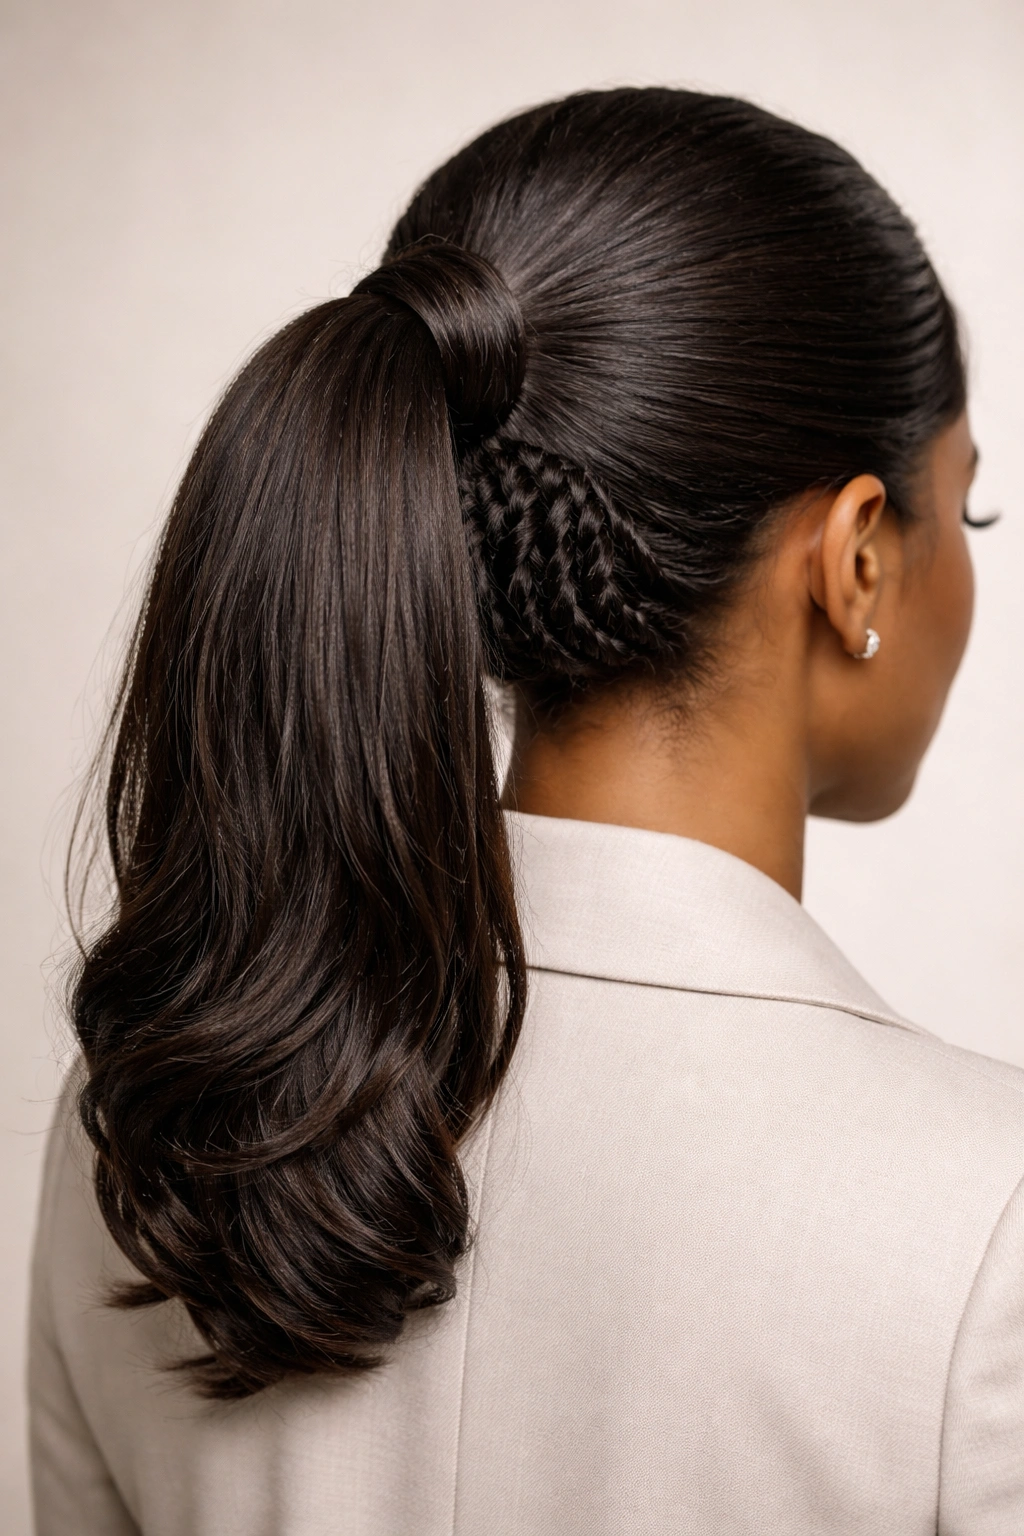
14. Twisted Low Ponytail with Nape Detail
This style keeps everything low and sleek while creating interesting texture at the nape of your neck where the ponytail sits. The detail and interest are concentrated at the very back, making it feel polished and put-together.
Building the Base
Create several two-strand or flat twists from your crown area down toward the back of your head, directing everything toward the nape. Gather all your hair into a low ponytail right at the nape of your neck—this keeps everything very neat and controlled at the crown and sides, while the twists that make up your ponytail create texture and interest at the point where everything gathers.
Why Low Ponytails Work
Low ponytails are genuinely more flattering on many face shapes than high ones, and they feel more sophisticated and mature. Adding twist texture to a low ponytail keeps it from feeling boring or severe. The texture created by the twists shows most clearly at the back of the head, which is often the angle people see when you’re moving around or turned away.
Professional Versatility
This style absolutely works for professional settings, formal events, and polished casual situations. It’s not flashy or experimental—it’s just well-executed and intentional. This is the ponytail style to choose when you need to look completely pulled together.
Wear time: 7-14 days; low ponytails tend to last longer because they experience less friction
15. Twisted Sleek Ponytail with Smooth Crown

This style creates a dramatic contrast: a smooth, gel-pressed crown and sleek sides, with textured twists making up the actual ponytail. It’s the intersection of sleek and textured, and it’s genuinely striking.
Achieving the Smooth Crown
Apply a lightweight edge control or styling gel to your crown and sides, smoothing your hair down against your head in the direction of your ponytail. You want this section to feel completely smooth and controlled. Use a fine-tooth comb and take your time—the smoother this section is, the more impact the twist texture of the ponytail has. Some people use a soft brush or toothbrush to smooth flyaways even further.
Creating the Twist Contrast
Create twists using the hair that will make up your actual ponytail. These should be as textured and undone as possible to create maximum contrast with the smooth crown. The smoothness at the top emphasizes how much texture you have in the ponytail, making both elements feel more intentional and impactful.
Styling Confidence
This is a style that reads as very intentional and “I know exactly what I’m doing with my hair.” The contrast between smooth and textured shows styling sophistication. This works for professional settings, creative fields, casual situations—basically anywhere you want to show that you’ve thought about your presentation.
Maintenance Notes
The smooth section will need reapplication of edge control every few days as your natural oils and movement break down the styling products. The twist section, meanwhile, can last longer without maintenance. You might do edge control touch-ups while leaving the twists as-is, gradually letting everything blend together as your style ages.
Wear time: 5-10 days; the smooth section needs more frequent maintenance than the textured section
Final Thoughts
Twist ponytails give you the freedom to be creative while keeping your natural hair protected and manageable. The 15 styles here are really just starting points—you can mix and match techniques, add your own embellishments, and adjust based on your specific hair texture, density, and what you’re trying to achieve that day. The common thread across all of them is that they work with your natural hair texture instead of against it, which is genuinely the key to sustainable, healthy styling.
Start with whichever style speaks to you most—two-strand twists are an excellent foundation if you’re new to these techniques, while flat twists and spirals are worth mastering once you’re comfortable with the basics. Pay attention to how long each style lasts on your hair, which techniques feel easiest for you to execute, and what actually feels comfortable against your scalp. Everyone’s hair responds slightly differently, so what works perfectly for someone else might need tweaking for your specific texture. Give yourself permission to experiment, and remember that even “failed” attempts teach you something about what works and what doesn’t for your individual hair.