There’s something undeniably romantic about a well-crafted loose ponytail at a wedding. Unlike a sleek, polished style, loose ponytails strike that perfect balance between effortless elegance and intentional glamour — they look like you woke up and accidentally became the most beautiful person in the room. Whether you’re the bride, a bridesmaid, a wedding guest, or part of the wedding party, a loose ponytail offers versatility that works across different venues, dress codes, and hair types. The beauty of this style is that it can be dressed up with delicate accessories, intricate braids, or romantic waves, or kept beautifully simple with just a silk ribbon and a few strategically placed bobby pins.
The real magic of loose ponytails for weddings is their adaptability. You can start with the same basic ponytail and transform it into a dozen different looks depending on how you section your hair, what you wrap around the base, and how much texture you tease into the strands. Some styles lean toward bohemian and whimsical, others feel polished and refined, and a few strike a bold, modern note. What they all share is that hallmark of the loose ponytail: movement, texture, and an air of sophisticated relaxation that says you’re confident enough to let your hair do its own thing.
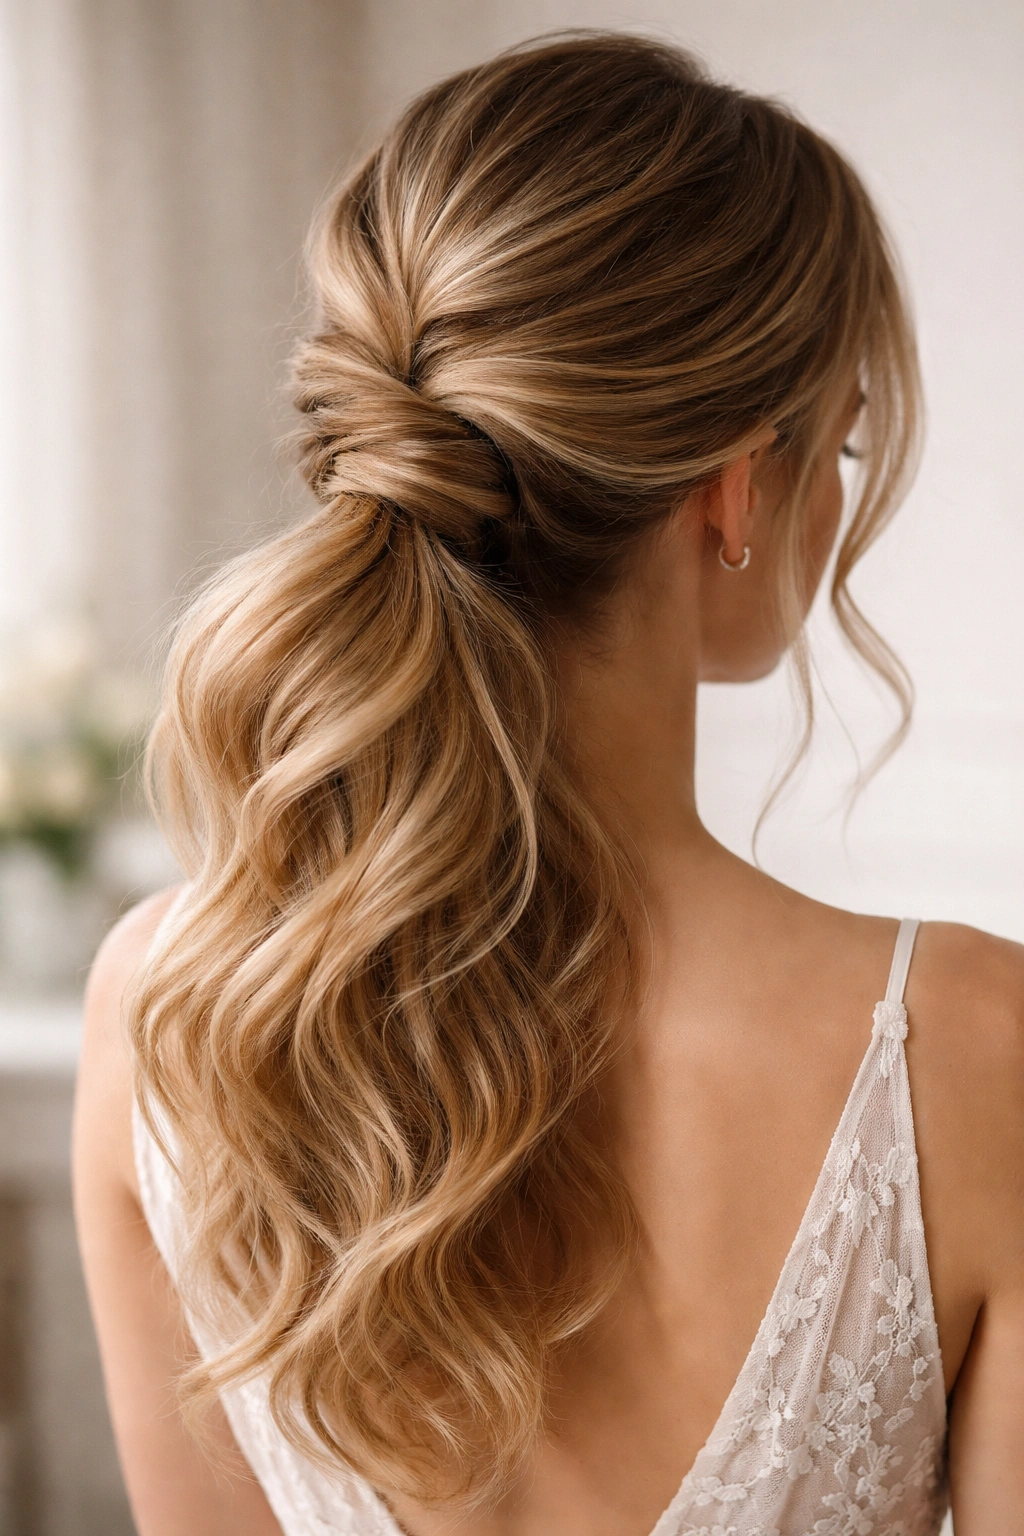
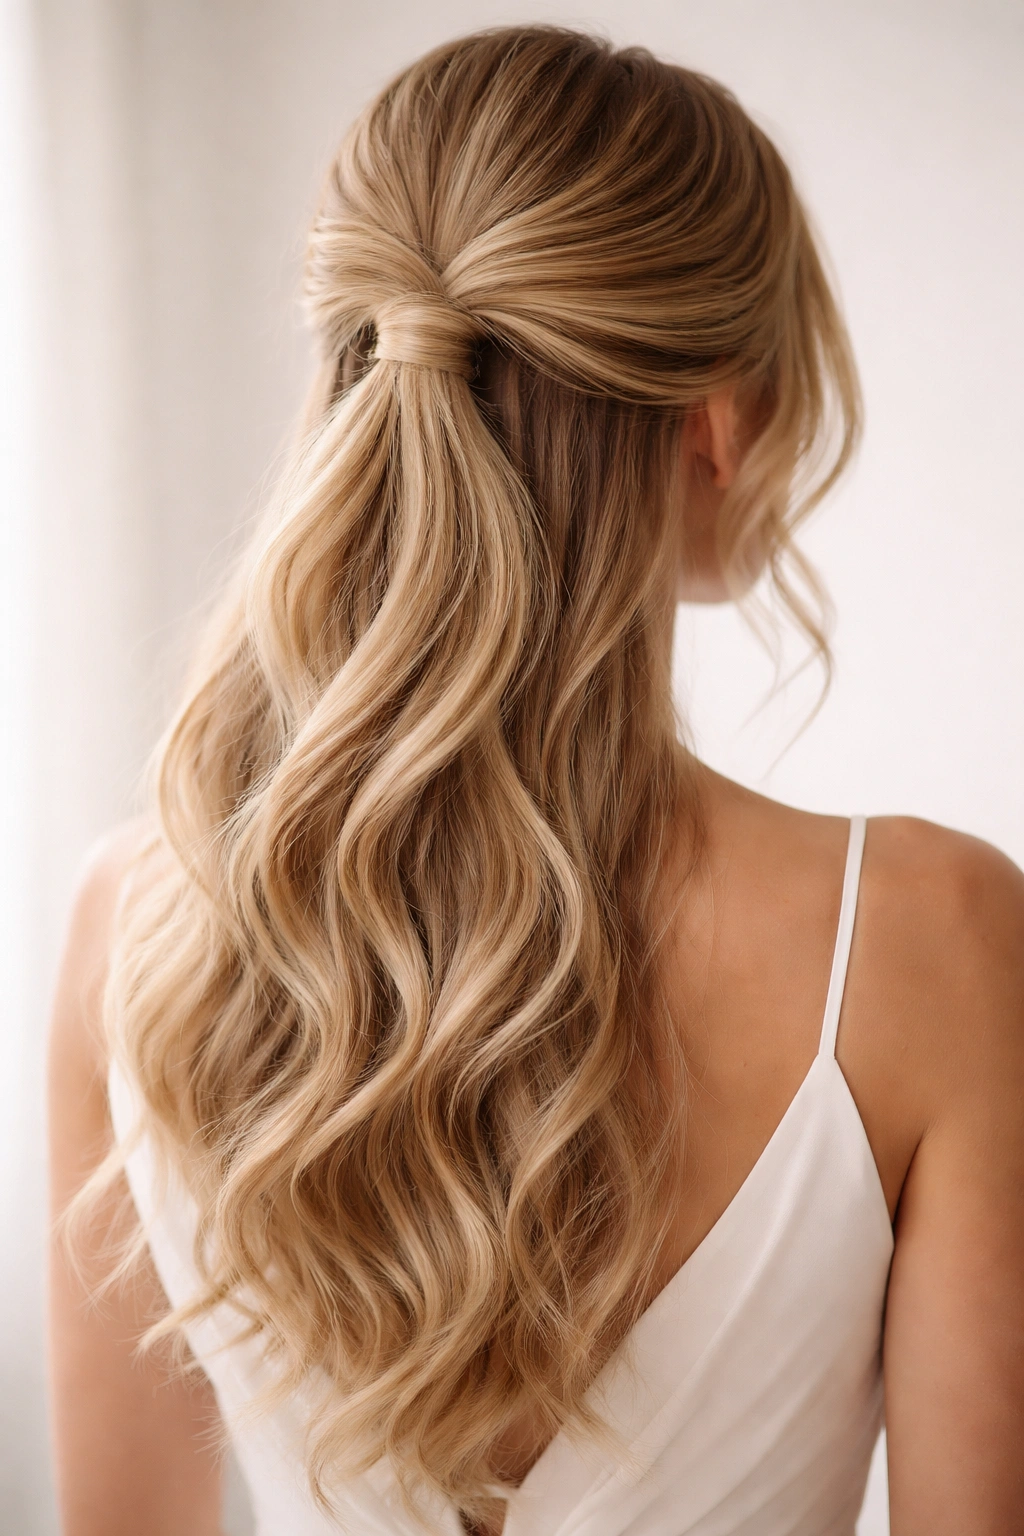
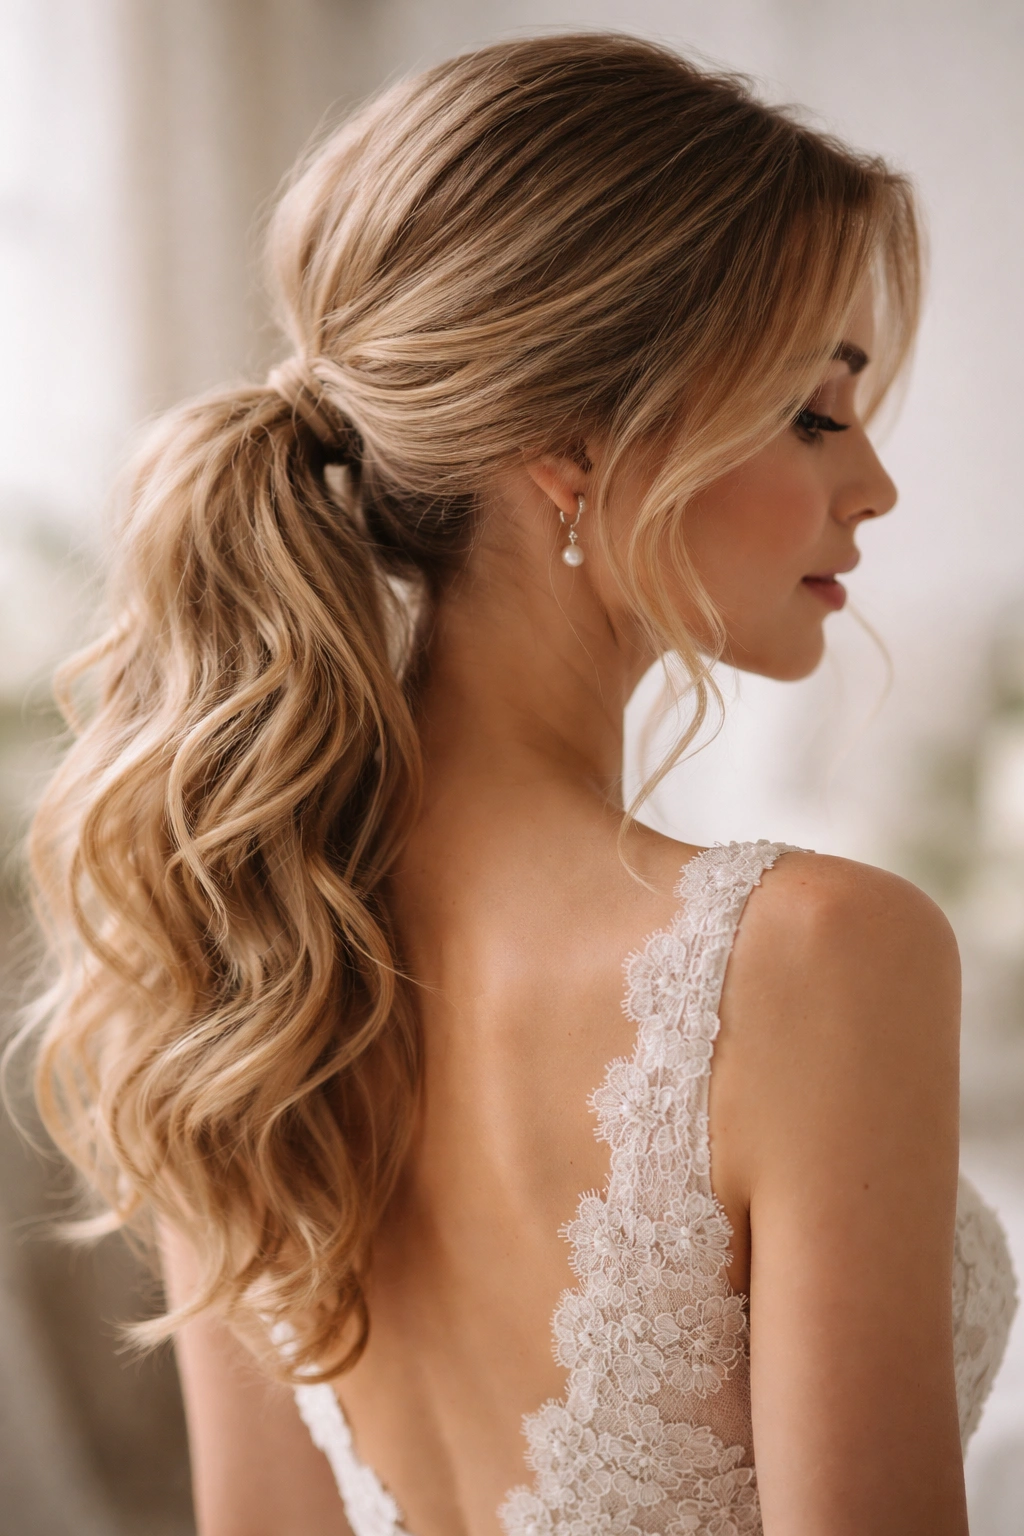
1. The Textured Low Ponytail
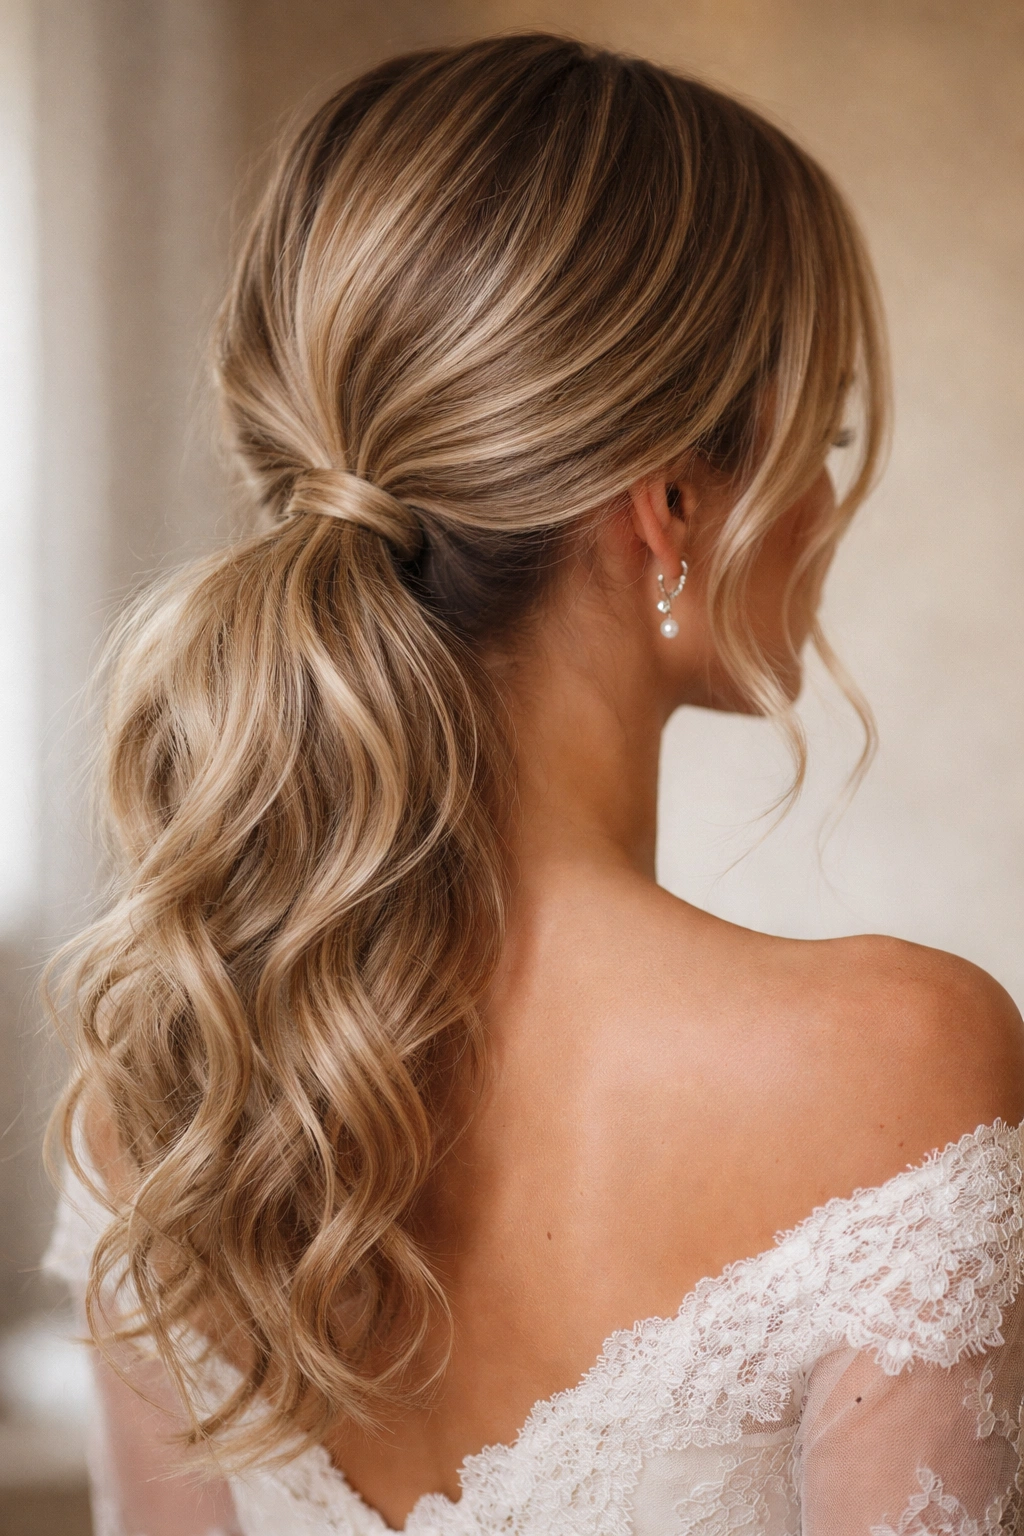
This is the everyday hero of loose ponytails for weddings — it looks effortless but actually requires intentional preparation. Start by curling or waving your hair the day before with a curling iron or overnight braids to lock in texture without the fresh-from-the-iron crispness. When you gather the hair into a low ponytail, you’re working with waves and waves, not straight strands, which immediately creates that soft, romantic appearance. The positioning matters here — gather your ponytail at the nape of your neck, roughly where a classic low bun would sit, but keep it loose by not securing the elastic too tightly.
Why This Works for Weddings
The textured low ponytail is the workhorse of wedding hairstyles because it reads as polished without requiring your hair to be perfectly smooth or symmetrical. It suits nearly every hair type, from fine and straight to thick and curly, and photographs beautifully from every angle. The loose structure allows face-framing strands to break free naturally, which softens features and creates a genuinely romantic aesthetic without looking overdone.
How to Achieve the Perfect Version
- Prep your hair with texture one full day before the wedding to allow waves to set — use a curling iron, braiding method, or sea salt spray
- On the day of, apply a light volumizing powder or texturizing spray to the roots to give your ponytail grip and bounce
- Gather hair loosely at the nape, using an elastic that matches your hair color to keep it visually seamless
- Gently backcomb or tease the ponytail base (the section right where the elastic sits) to create subtle volume and prevent the elastic from slipping
- Pull a few wisps of face-framing hair loose before securing the elastic, and soften the overall look by gently tugging at the ponytail to loosen it further
- Finish with a flexible hold hairspray that won’t stiffen the texture
Pro tip: The day before your event, sleep on damp, curled hair in a loose braid to deepen wave texture without the crunchy feel of the curling iron.
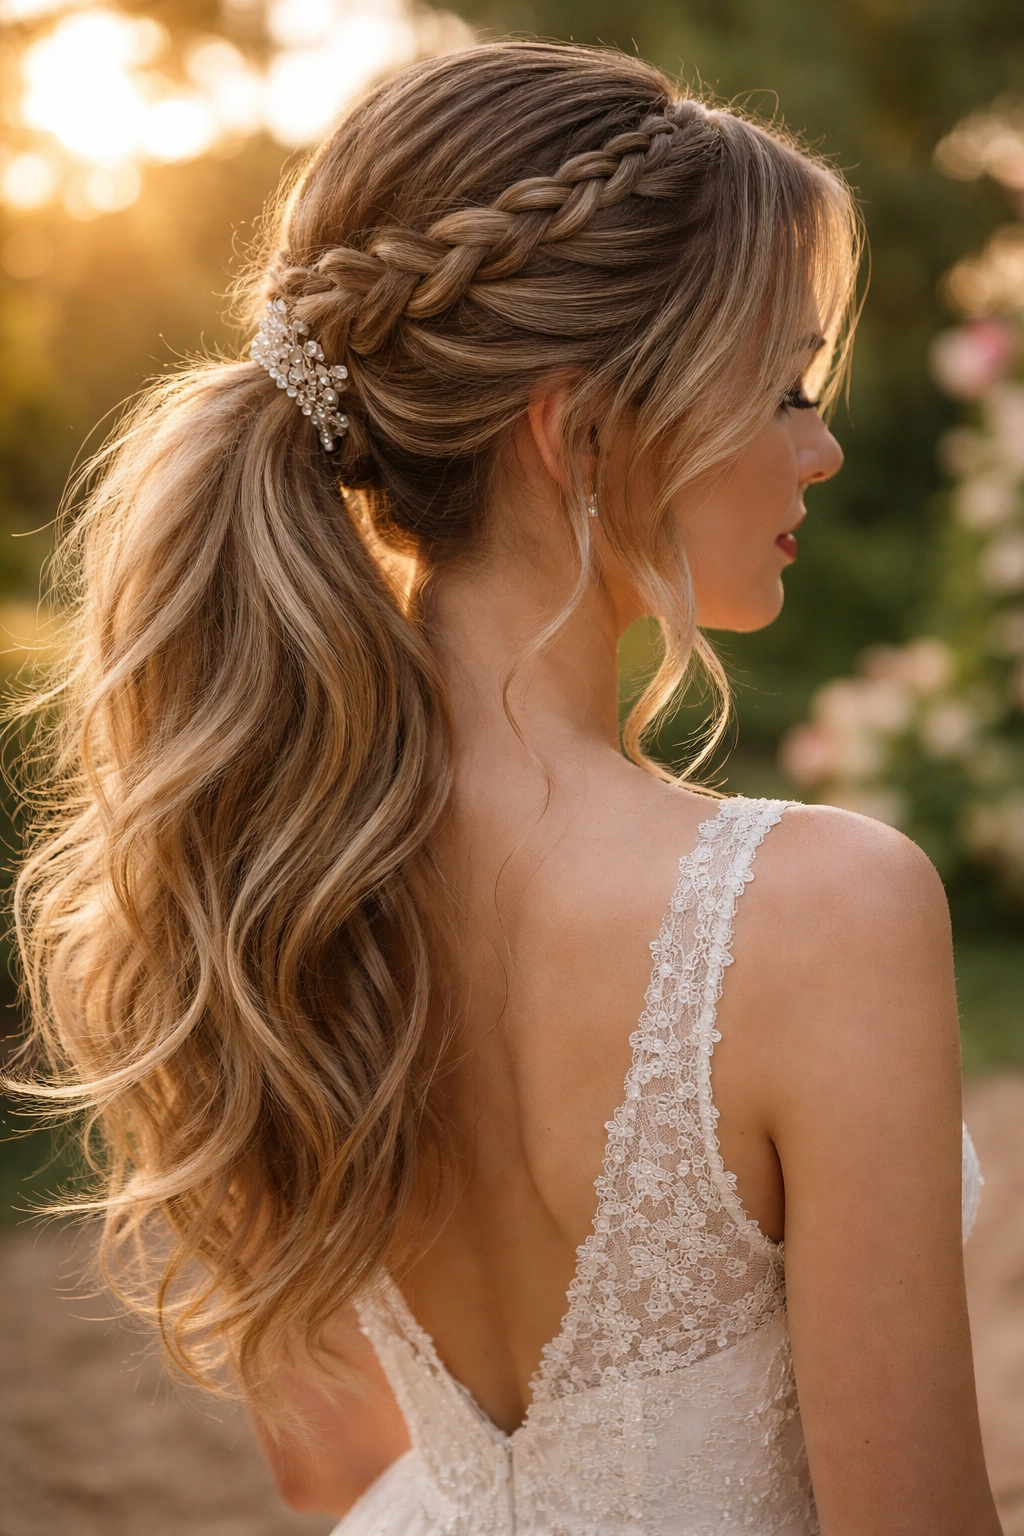
2. The Braided Base Ponytail
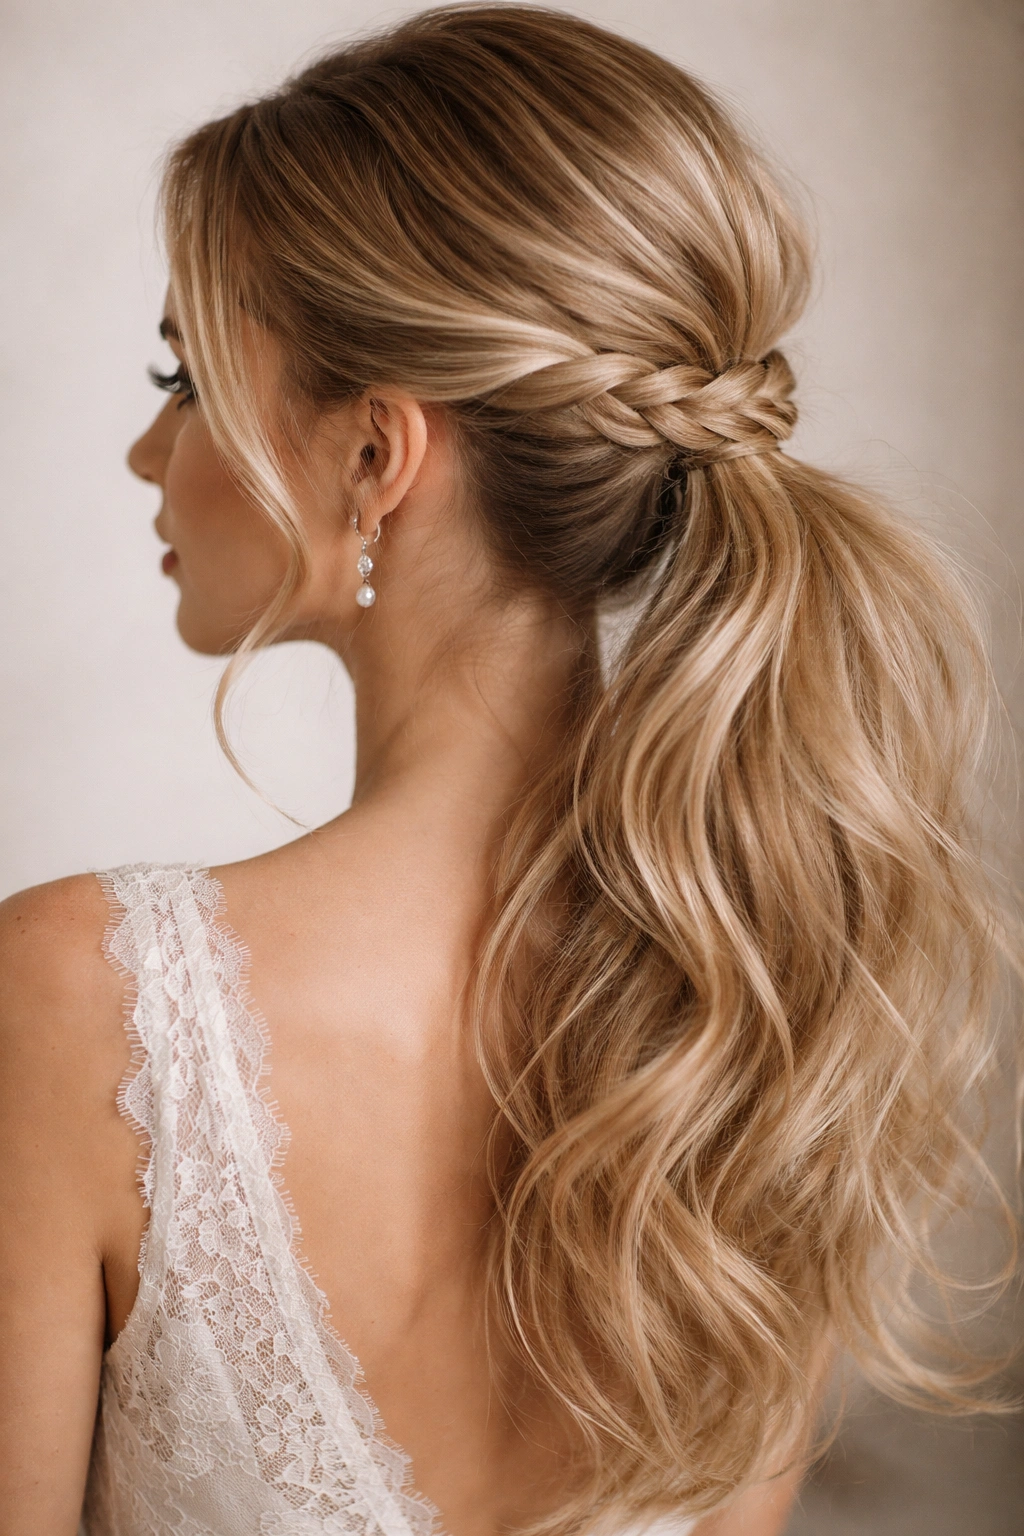
This style takes a standard loose ponytail and elevates it with a Dutch or French braid that wraps around the base, creating an intricate focal point without overwhelming the rest of your hair. Start by creating a braid from one side of your head, wrapping it around the back and securing it into a low ponytail along with your remaining hair. The braid becomes the visual anchor — a detail-oriented element that catches light and photograph flashes beautifully.
What Makes This Style Stand Out
The braided base adds craftsmanship and intention to a loose ponytail. It’s the kind of detail that wedding guests notice when they look closely but that doesn’t dominate the overall look. The intertwined strands create subtle texture and movement, and the braid itself becomes a decorative feature without requiring your entire ponytail to be braided. This works especially well if you have moderate to thick hair that can support both the braid and the fullness of a loose ponytail.
Building the Look Step by Step
- Start with textured hair (curled or waved the day before)
- Create a Dutch braid starting from one temple, weaving it toward the back of your head and ending at the nape area
- Secure the braid with a small elastic temporarily while you gather the rest of your hair
- Combine the braided section with your remaining hair into a single loose ponytail, securing everything with a matching elastic
- Gently pull the ponytail base to loosen it and create a softer, less structured appearance
- Tuck small baby’s breath or delicate flowers into the braid base for added bridal romance
- Finish with hairspray designed for flexible hold, not rigid control
Worth knowing: If your braid starts to look too neat and formal, gently finger-comb it to soften it and pull small wisps of hair through the braid strands to add a lived-in quality.
3. The Romantic Twisted Ponytail
This style creates the appearance of intricacy without the commitment of a full braid. Instead of braiding, you twist sections of hair around themselves as you move toward the base of your ponytail, creating a spiraled, elegant effect. The twist catches light differently than straight hair, adding visual interest and dimension. Because twists are simpler than braids and require less technical skill, this is an excellent option if you’re doing your own hair or working with a stylist who specializes in loose, romantic updos.
Why Twists Work So Well for Weddings
Twists create movement and visual complexity without looking stiff or overly formal. They’re forgiving — if a twist isn’t perfect, it actually adds to the romantic, slightly undone aesthetic. Twists also work beautifully with delicate accessories like pearls, ribbon, or florals tucked into them. They photograph magnificently because the twisted sections reflect light subtly, creating depth and dimension that straight hair might lack.
Creating Perfectly Soft Twists
- Begin with hair that has texture from curls, waves, or braiding
- Take a section of hair from one side of your head and twist it gently toward the back, allowing the twist to wrap loosely around itself
- As you twist, pull small wisps of hair out from the twist to soften it and prevent it from looking too structured
- Secure the twist temporarily or hold it in place while you gather the rest of your hair into a ponytail
- Repeat with sections from the other side of your head, creating symmetry
- Release all twists into a single loose ponytail, allowing them to flow and blend with the rest of your hair
- Gently separate the twisted sections to enhance their visibility and add volume
- Secure with a flexible hold hairspray that allows movement
Insider note: If you have fine hair, use dry shampoo or texturizing spray before twisting — it gives your hair grip and prevents twists from unraveling throughout the day.
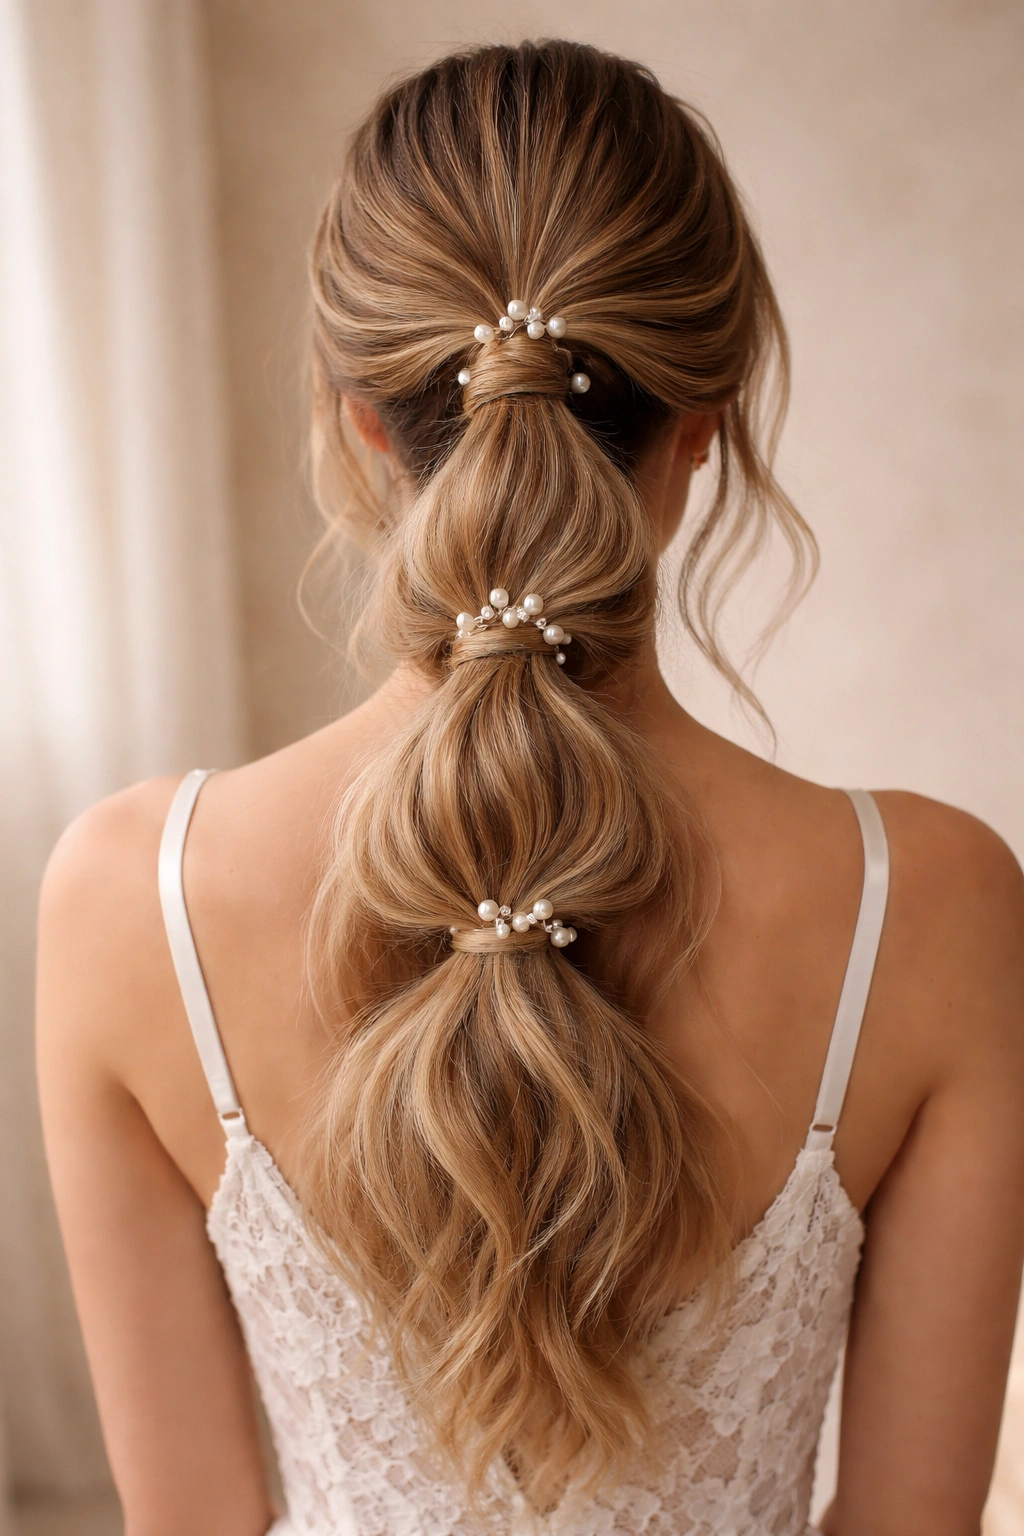
4. The Bubble Ponytail
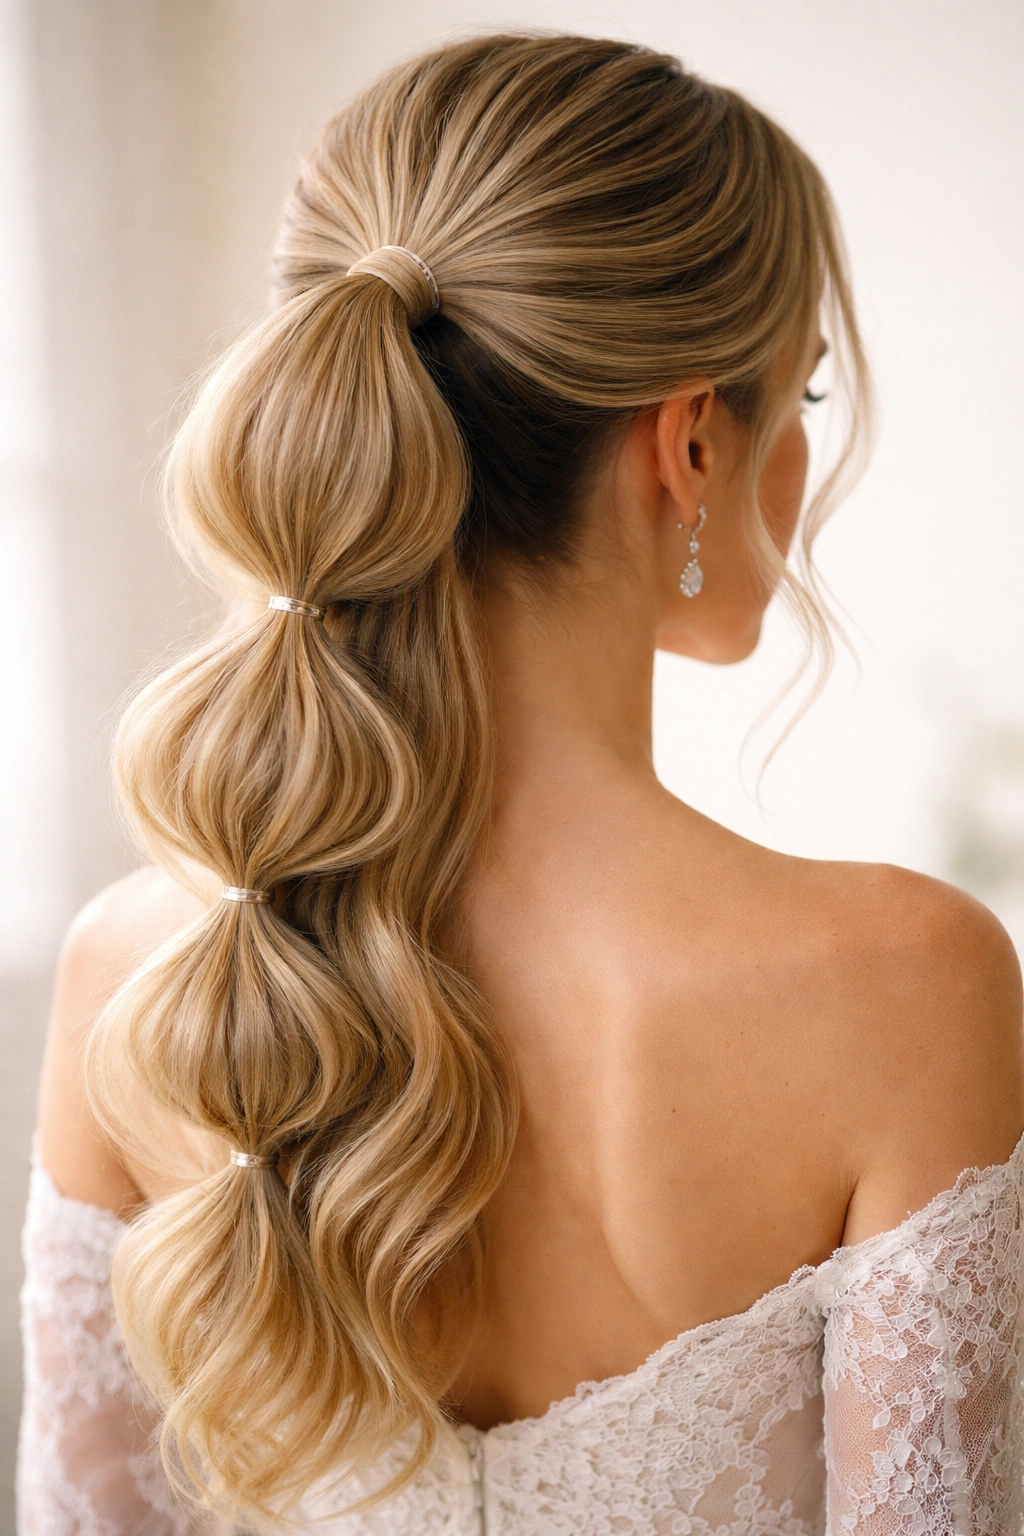
This playful yet elegant style uses multiple elastic bands spaced down the length of your ponytail, and you gently push hair up between each elastic to create bubble-like pockets of volume. It’s more modern and graphic than traditional loose ponytails, making it a fantastic choice for second weddings, destination weddings, or any celebration where you want to feel contemporary and fashion-forward rather than traditionally bridal.
How the Bubble Ponytail Reads at a Wedding
The bubble ponytail occupies an interesting space — it’s structured and intentional, but the bulges of hair between elastics create softness and movement. It’s become increasingly popular in wedding styling because it’s unexpected without being costume-y. The style works especially well for bridesmaids where you want coordinated elegance with a modern edge, or for younger wedding guests who want something photo-worthy but not overdone.
The Technical Steps to Perfect Bubbles
- Gather hair into a loose ponytail at your desired height (low, mid, or high depending on the overall vibe)
- Secure with a clear or color-matched elastic
- Divide the ponytail into 3-4 sections by placing thin elastics down the length of the ponytail, spacing them roughly 2-3 inches apart
- Between each elastic, gently gather the hair and pull it upward to create a bubble, then secure it back down with the next elastic
- Go back through and gently pull small wisps of hair from each bubble section to add texture and softness
- The bubbles should feel pillowy and rounded, not tight and controlled
- Use bobby pins hidden inside the bubbles if any start to slip or fall flat during the event
- Set with flexible hairspray to hold shape without stiffness
Pro tip: For more dramatic bubbles, backcomb the hair slightly before securing each elastic — this gives you more volume to work with and creates fuller, more visually interesting pockets.
5. The Half-Up Loose Ponytail Hybrid
This style combines the best of both worlds: a half-up section that’s gathered and secured, with the remaining bottom half left loose and flowing. It’s perfect for brides or guests who want some hair off their face but don’t want a fully secured ponytail. The half-up section can be simple or braided, can sit at the crown or lower on the head, and can be made fuller or more delicate depending on how much hair you gather.
Why This Hybrid Style Is Brilliant for Weddings
The half-up style shows your face and neck (great for displaying jewelry and feeling open and joyful) while still keeping hair organized and flattering. It’s less formal than a full ponytail but more intentional than completely down hair, making it perfect for casual ceremonies, outdoor weddings, or any setting where you want to look polished without looking like you’re attending a black-tie affair. It also photographs beautifully from both the front and back, working with every camera angle.
Building Your Half-Up Ponytail
- Brush your hair smooth or add texture depending on your desired aesthetic
- Section off the top layer of your hair (from temple to temple across the crown), leaving the bottom layers down
- Gather the top section into a ponytail at the crown or slightly lower, using a clear elastic
- Secure the base with bobby pins hidden beneath the elastic for extra stability
- Take one or two strands from the ponytail and wrap them around the elastic base to conceal it and create a finished look
- Gently tease or backcomb the base of the half-up ponytail to add volume and prevent the elastic from slipping
- Leave the bottom section loose, curled or waved for romance, or straight for a sleeker aesthetic
- Pull a few face-framing strands loose from the half-up section to soften the overall appearance
Worth knowing: If you’re worried about the half-up section slipping during dancing or movement, use a thin bobby pin or two horizontally through the elastic to anchor it firmly in place.
6. The Wrapped Ribbon Ponytail
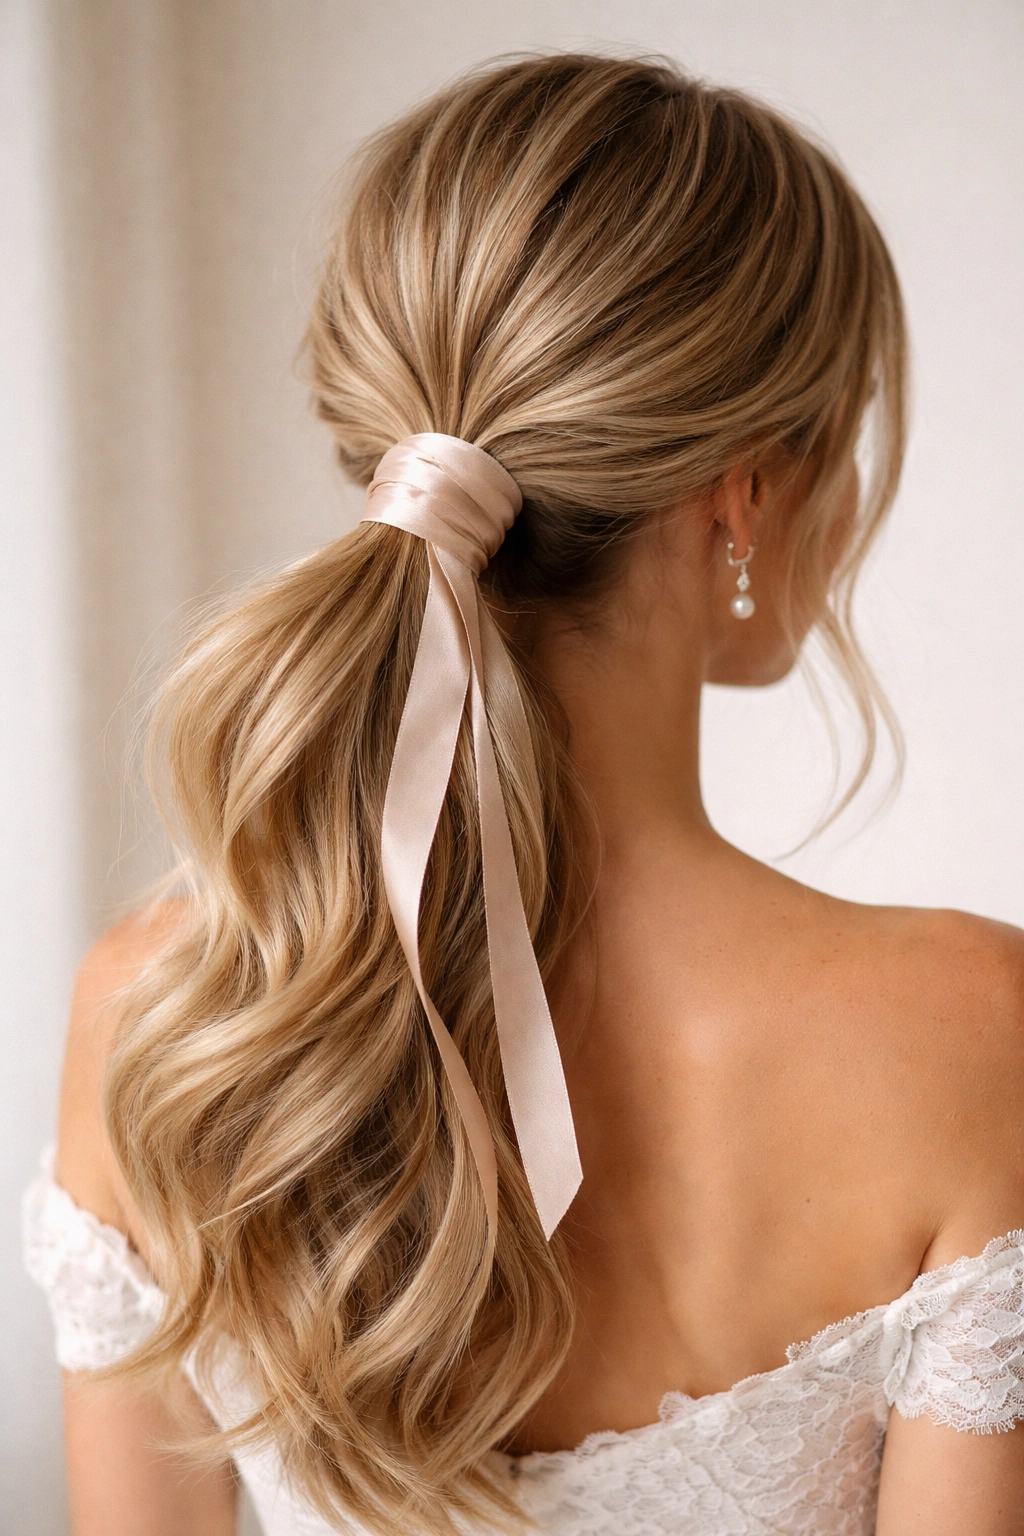
This timeless style wraps a silk ribbon, satin cord, or decorative band around the base of your ponytail, concealing the elastic and adding a touch of intentional elegance. The ribbon can match your dress, coordinate with your bouquet, or introduce a pop of color or metallic shimmer. The wrap can be simple (a single ribbon encircling the base) or more elaborate (ribbon woven through or wrapped multiple times down the length).
What Makes Ribbon-Wrapped Ponytails Wedding-Perfect
Ribbon immediately elevates a simple ponytail into something special. It adds color, texture, and a handmade quality without requiring complex styling skills. Ribbons photograph beautifully, catching light and adding visual interest from every angle. They work across every wedding aesthetic — from rustic and bohemian to modern and minimalist to classic and formal — depending on the ribbon you choose and how you style it.
Creating a Polished Ribbon-Wrapped Look
- Gather your hair into a loose ponytail at your preferred height, securing with a matching elastic
- Choose a ribbon that complements your wedding aesthetic — satin for formal elegance, silk for luxury, cotton for casual charm, or metallic for modern edge
- Wrap the ribbon around the base of the ponytail where the elastic sits, covering the elastic completely
- Tie the ribbon in a simple knot or bow at the back, or wrap it further down the ponytail for a more dramatic effect
- If wrapping the ribbon down the length of the ponytail, make shallow spirals or loose wraps rather than tight, controlled windings — loose wraps enhance the romantic, undone aesthetic
- Tuck the ribbon end into the ponytail or secure it with a bobby pin hidden from view
- Leave wispy strands around your face and throughout the ponytail base to prevent the style from looking too structured
- Trim any excess ribbon so it doesn’t hang awkwardly below the ponytail ends
Pro tip: Use a silk or satin ribbon rather than cotton — it’s gentler on your hair, doesn’t create friction that can cause breakage, and looks infinitely more luxurious and wedding-appropriate.
7. The Waterfall Braid Ponytail
This intricate style features a waterfall braid that starts at one side of your head and descends in a cascading pattern, with sections of hair “falling” freely while others are braided. The braid eventually meets your remaining hair at the back and combines into a loose ponytail. It’s romantic, bohemian, and surprisingly less complicated than it appears once you understand the cascading technique.
Why Waterfall Braids Elevate Your Entire Look
Waterfall braids create visual drama and sophistication with a free-flowing, organic aesthetic. They work beautifully for bohemian weddings, garden ceremonies, or any celebration with a relaxed, romantic vibe. The interplay between the braided sections and the falling hair creates dimension and movement that’s absolutely magical in photographs, especially with backlighting or soft golden hour lighting.
Mastering the Waterfall Braid Technique
- Start with textured hair (curled or waved the day before) for a softer, more romantic finish
- Create the waterfall braid by taking a section of hair at your temple and dividing it into three strands for a basic braid
- Braid once, then drop the bottom strand of the braid and pick up a new piece of hair from below, creating the “falling” effect
- Continue this pattern (braid, drop the bottom strand, pick up new hair) moving toward the back of your head
- The dropped strands create flowing sections that move freely while the braided portions provide structure
- Once your waterfall braid reaches the back of your head or nape, gather all remaining hair (including the braided section, the free-falling sections, and the un-braided bottom half) into a loose ponytail
- Gently pull at the braided sections to loosen them and create a softer, less rigid appearance
- Tease the ponytail base lightly to create volume and anchor the elastic
- Finish with flexible hold hairspray that allows movement and maintains softness
Worth knowing: Waterfall braids are deceptively easy once you practice a few times — the “falling” strands don’t need to be perfectly even, and any imperfection adds to the romantic, organic quality.
8. The Voluminous Crown Ponytail
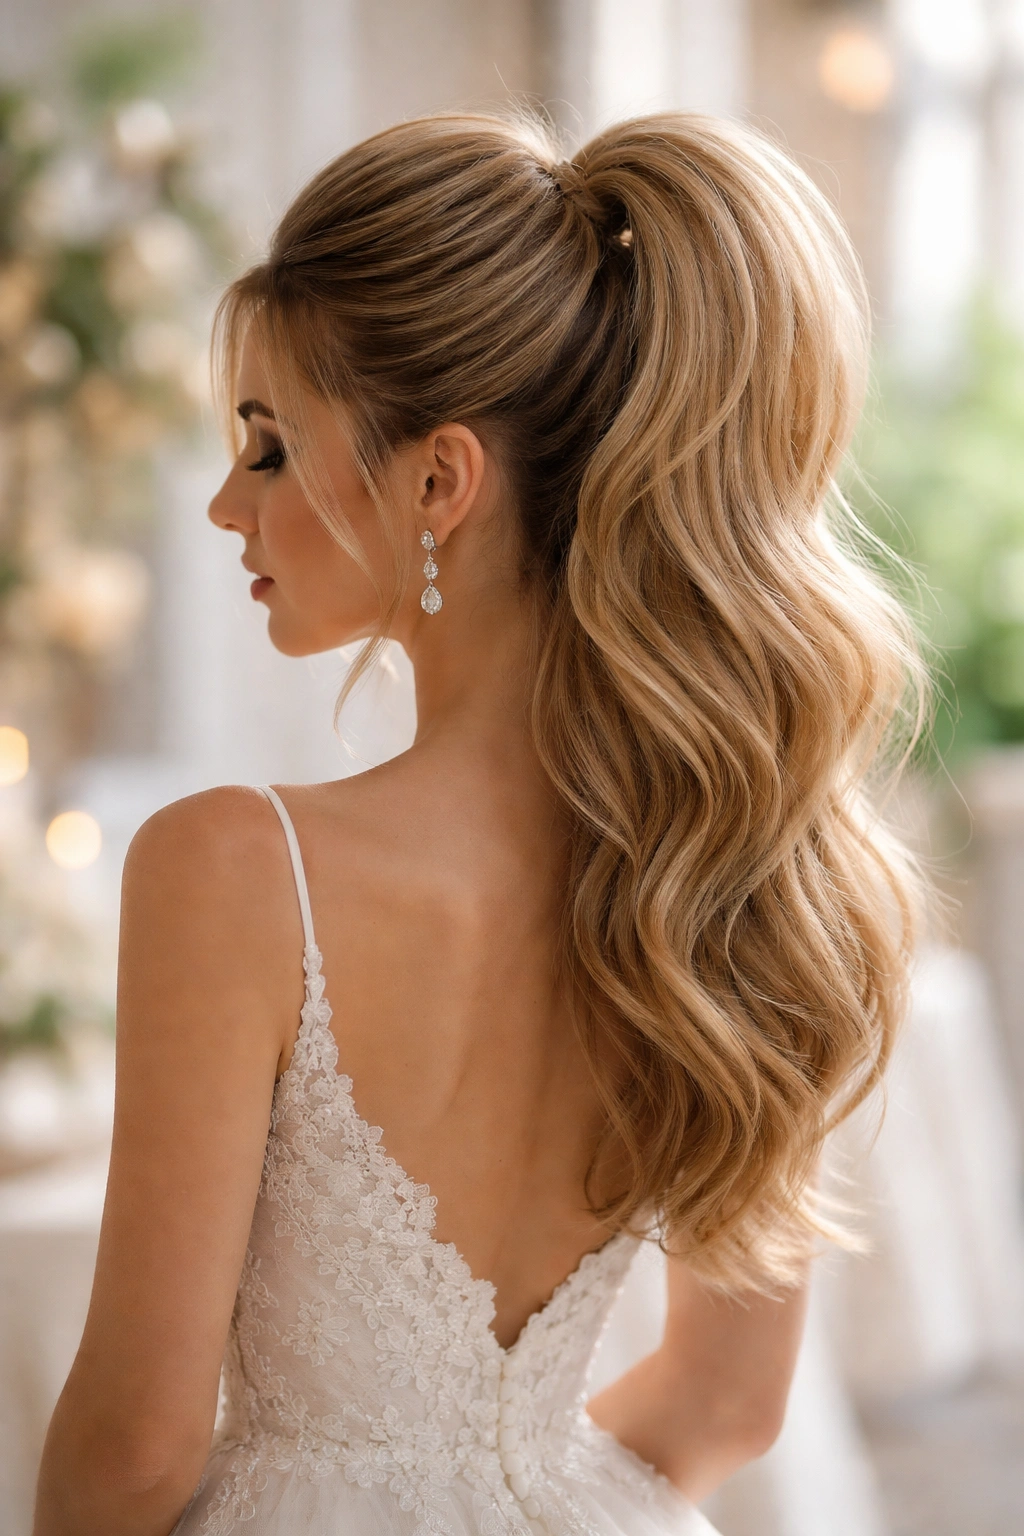
This style gathers hair at the crown or high on the head, creating dramatic volume right at the top while the rest of the ponytail flows loosely down your back. It’s the opposite of the low, delicate ponytail — instead, you’re creating a bold focal point at the crown. This works beautifully for guests with thick or medium-textured hair and for any celebration where you want to make a confident, fashion-forward statement.
What Sets Crown Ponytails Apart at Weddings
Crown ponytails are modern, polished, and dramatic. They elongate the neck and face, make your hair look fuller and more voluminous, and work especially well for guests with a larger or statuesque frame. This style photographs beautifully because the height and volume draw the eye, and the loose flow below creates movement and dimension that translates gorgeously to images. It’s an excellent choice for bridesmaids who want to stand out while remaining coordinated and wedding-appropriate.
Constructing Your Crown Ponytail
- Begin with curled or textured hair for maximum volume
- Apply a volumizing powder or mousse to your roots, focusing on the crown area
- Blow-dry your hair upside-down to boost natural volume
- Using a fine-tooth comb or teasing brush, gently backcomb the entire crown section to create a cushion of texture and lift
- Gather the top portion of your hair (from temple to temple across the top of your head) into a high ponytail, twisting the elastic a few times to create a secure hold
- Gently tease the ponytail base to amplify the volume and prevent it from looking flat or pinned-down
- Pull a few wisps of face-framing hair free to soften the style and prevent it from reading as too severe
- You can wrap a thin strand of hair or ribbon around the elastic base to conceal it
- The ponytail itself should remain loose, with curled or waved ends for movement and romance
- Use bobby pins hidden within the teased crown section to ensure the entire structure stays secure
Insider note: If your hair is fine or thin, use a volumizing mousse applied to damp roots and blown dry upside-down before you even start styling — this creates a foundation that allows you to achieve crown ponytail height without looking sparse or sparse-looking.
9. The Scarf-Woven Ponytail
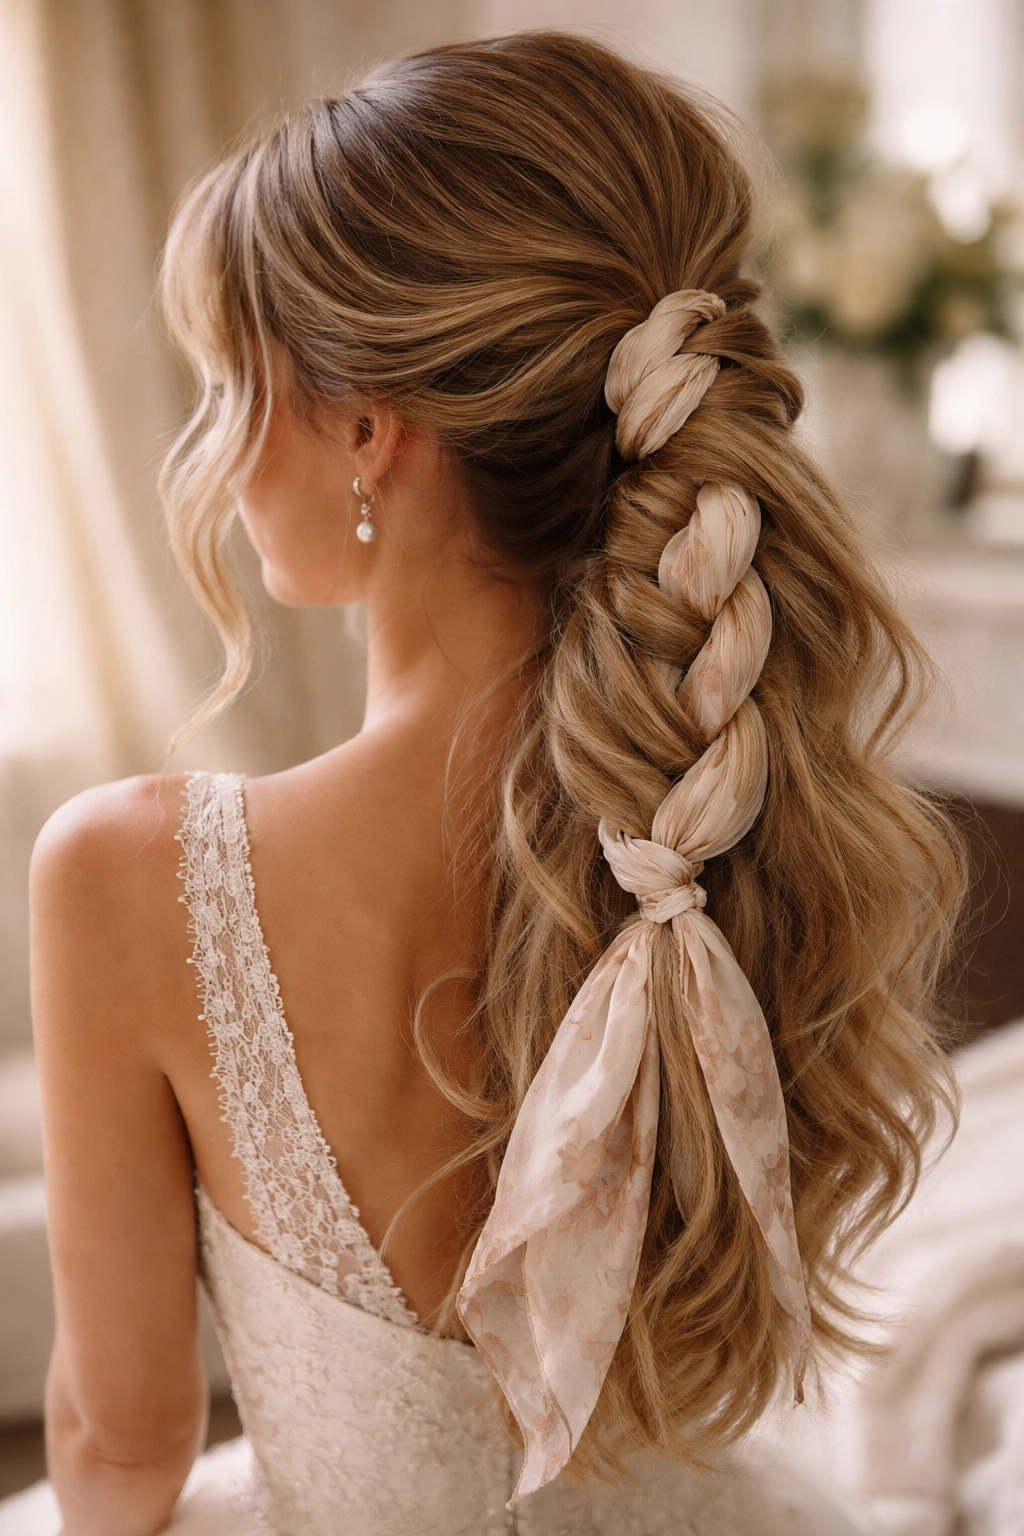
This contemporary style weaves a lightweight scarf, silk cord, or decorative fabric through your ponytail or wraps it around the base in creative ways. The scarf adds texture, color, movement, and a modern edge while maintaining the romantic loose ponytail aesthetic. This is perfect for brides and guests who want to inject personality and individuality into their look without going too far off-theme.
How Scarves Transform a Simple Ponytail
Scarves are magical for wedding hair because they immediately signal intentionality and style without requiring you to fundamentally change your hair structure. You can weave a scarf through sections of your ponytail for an intricate look, wrap it around the base for subtle elegance, or weave it through a half-up section for complexity. Scarves add texture and visual interest while being light and comfortable to wear throughout an entire day and evening of celebrations.
Styling Your Scarf-Woven Ponytail
- Gather your hair into a loose ponytail at your preferred height
- Choose a scarf that complements your aesthetic — silk for elegance, cotton for casual, lightweight synthetics for movement without weight
- If weaving the scarf through the ponytail: divide your ponytail into 2-3 sections, and weave the scarf through them in a diagonal or spiral pattern
- If wrapping the scarf around the base: start at the elastic and spiral the scarf down the length of the ponytail, securing the end with a bobby pin hidden inside the ponytail
- For a half-up variation: weave the scarf through the half-up section for added intrigue and texture
- Keep the scarf weaving loose and organic rather than tight and controlled — loose weaving enhances the romantic, free-flowing aesthetic
- Leave some length of the ponytail unwrapped or uninterwoven so the scarf doesn’t overwhelm the style
- Finish with flexible hold hairspray that preserves movement and won’t stiffen the scarf
Pro tip: Lightweight silk scarves work better than heavy cotton ones — they won’t weigh down your ponytail or create an uncomfortable amount of bulk at the back of your head.
10. The Layered Ponytail with Pearl Pins
This elegant style uses multiple sections of ponytails layered at different heights, with pearl bobby pins or decorative pins securing them together. Instead of a single elastic holding all your hair, you create 2-3 distinct ponytail sections, each secured with its own elastic, then pin them together to create a unified, multi-dimensional look. It’s sophisticated, intricate, and absolutely stunning in photographs.
Why Layered Ponytails Feel Luxury-Level Elegant
Layered ponytails create visual complexity and sophistication that reads as high-end and intentional. The use of decorative pins (especially pearls, which are classic and timeless for weddings) adds sparkle and elegance without requiring full accessories like tiaras or large pieces. The multi-layer structure creates movement, volume, and dimension that photographs beautifully from every angle, especially when the lighting catches the decorative pins.
Building Your Layered Ponytail
- Start with textured, curled hair for softness and movement
- Create your first ponytail using the upper-middle section of your hair, securing it with a clear elastic at roughly the crown or slightly lower
- Create your second ponytail using a lower section of your remaining hair, securing it with another elastic
- Gently pull and tease the base of each ponytail to create volume and anchor the elastics
- Pin the lower ponytail to the upper one using pearl bobby pins or decorative vintage-inspired pins, positioning them strategically so they’re visible and beautiful
- You can create a third, even lower ponytail if you have enough hair and want additional dimension
- Gently separate and fluff all the layered sections to create maximum volume and movement
- Leave wispy strands around your face and throughout for softness
- Finish with flexible hold hairspray
Worth knowing: The more layers you create, the fuller and more dramatic your ponytail will appear — this works beautifully for thick hair but can look overwhelming if you have fine hair, so adjust the number of layers to your hair type.
11. The Sleek-Top, Loose-Bottom Ponytail
This style keeps the crown and top section smooth and sleek, using a flat iron or smoothing cream to polish it, while allowing the ponytail base and the length below to remain textured, voluminous, and loose. It creates an interesting contrast between control and freedom, polish and romance. This is an excellent choice if you want your hair off your face but want to showcase beautiful texture and movement through the length.
What Makes This Contrast So Effective
The contrast between a sleek, controlled crown and a soft, textured ponytail creates visual interest and sophistication. It signals that you’ve put thought into your look without appearing overdone or stiff. This style photographs beautifully because the sleekness frames your face and shows your features clearly, while the loose texture below adds movement and dimension that translates gorgeously to images, especially motion shots or candid photography.
Creating Perfect Sleek-to-Loose Contrast
- Blow-dry your hair smooth using a paddle brush and a smoothing serum
- Use a flat iron to smooth the crown and upper sections of your hair, applying a smoothing product as you go for extra shine and control
- Gather the smoothed top section into a ponytail at the base of your smooth crown area, securing with a clear elastic
- The ponytail base should sit where the sleekness ends and the texture begins — roughly at the nape if you’re going for a low style
- Tease or curl the ponytail portion to create distinct texture and volume that contrasts with the sleek crown
- Gently wrap a thin strand of hair around the elastic base to conceal it and create a seamless transition from smooth to textured
- Pull a few wisps of the curled hair through the wrapped strand for additional softness
- Use bobby pins hidden within the smooth crown section to ensure the ponytail stays secure and doesn’t slip
- Finish the smooth crown with a light hairspray designed to maintain shine without creating a crunchy appearance, and use flexible hold spray on the textured portion
Pro tip: This style is especially effective if you have wavy or naturally textured hair that you normally straighten — let the texture come back in the ponytail portion for authentic, beautiful movement.
12. The Twisted Low Knot with Loose Pieces
This final style creates a low knot or bun-like structure using twisted sections, then releases some hair to fall loosely around it, combining the structure of an updo with the romance of a loose ponytail. It’s the perfect middle ground for brides who want their hair mostly up but aren’t ready to commit to a full, sculpted bun. The twists create visual interest at the back while loose pieces frame your face and add softness.
Why This Style Bridges the Gap So Beautifully
This style offers the best of both worlds: structure and organization (great for dancing, movement, and making sure your hair stays where you want it) combined with romance and softness (loose pieces, flowing sections, and an intentionally undone quality). It reads as more formal than a simple ponytail but more relaxed than a full updo, making it perfect for any celebration where you want polish without severity. It’s especially flattering for weddings where you’ll be dancing or moving around extensively because the structure keeps hair organized while the loose pieces add life and movement.
Constructing Your Twisted Low Knot
- Begin with curled or textured hair for softness and movement
- Gather your hair into a low ponytail at the nape of your neck, using a clear elastic
- Divide the ponytail into 2-3 sections
- Twist each section gently, allowing small wisps to escape the twist naturally
- Take the twisted sections and gently wrap them around the base of the ponytail, creating a low knot or bun-like structure
- Secure the knot with bobby pins hidden within the twisted sections
- Release 3-5 pieces of hair around your face and throughout the back to frame the knot and create softness
- These released pieces should fall loosely, not be pinned back — they should frame your face and add movement around the knot
- Gently finger-comb or curl the loose pieces to add texture and dimension
- The overall effect should be a low, twisted knot with pieces of hair flowing around and over it, creating a romantic, slightly undone appearance
- Set with flexible hold hairspray that allows movement while maintaining the knot structure
Worth knowing: If you have fine hair, create only 2 twisted sections instead of 3 — too many sections can overwhelm fine hair and make the knot look sparse or thin.
Final Thoughts
Loose ponytails for weddings offer remarkable versatility, whether you choose a simple textured version or an intricate style with braids, twists, and decorative elements. The common thread through all twelve styles is their celebration of movement, texture, and a softly romantic aesthetic that feels both intentional and effortlessly beautiful. Each style can be adapted to your hair type, the formality of the event, the aesthetic of your dress, and your personal comfort level with styling complexity.
The true secret to pulling off any loose ponytail for a wedding is understanding that loose doesn’t mean careless. These styles require preparation — textured hair curled the day before, strategic teasing at key points, careful placement of wisps and face-framing pieces, and flexible hold hairspray that maintains structure while allowing movement. The result, though, is worth every minute of preparation: a hairstyle that photographs beautifully, that makes you feel confident and comfortable, and that captures the essence of what makes a wedding celebration special — joy, romance, and genuine beauty that doesn’t require perfection to shine.