There’s something undeniably powerful about a well-executed ponytail. It’s been a go-to style for Black women across generations, showing up in family photos from the 1960s through the 2000s, and it’s everywhere again—because retro ponytails never really went away, they just waited for their moment. The thing about revisiting these classic styles is that they work now exactly like they worked then: they’re practical, they’re protective, they let your face shine, and when done right, they look absolutely polished and intentional. Unlike trends that feel forced or temporary, retro ponytails tap into something that’s proven its staying power through decades of real-world wear.
What makes retro ponytails special—especially the variations that have deep roots in Black hairstyling culture—is the incredible range they offer. You can go sleek and minimalist, textured and full-bodied, adorned with creative wraps, or accented with braided details. These aren’t one-note styles; they’re categories with infinite possibility. The beauty is that many of these retro looks work with multiple hair textures and lengths, and they can be dressed up for a formal event or worn casually for everyday confidence. Whether you’re drawn to the elegance of a high sleek ponytail from the ’80s or the playful energy of a bubble ponytail that dominated the 2000s, there’s a retro option that fits your vibe.
The technique matters just as much as the vision. Getting a retro ponytail right means understanding how to smooth or texture your base, where to position the tail for maximum visual impact, and whether adding accessories or wrapping the base elevates the look or distracts from it. It also means respecting your hair’s needs—protective styling done wrong creates tension and breakage, but protective styling done thoughtfully keeps your hair thriving while you look incredible. These styles are worth learning properly, because once you master them, they become go-to options you can recreate in minutes.
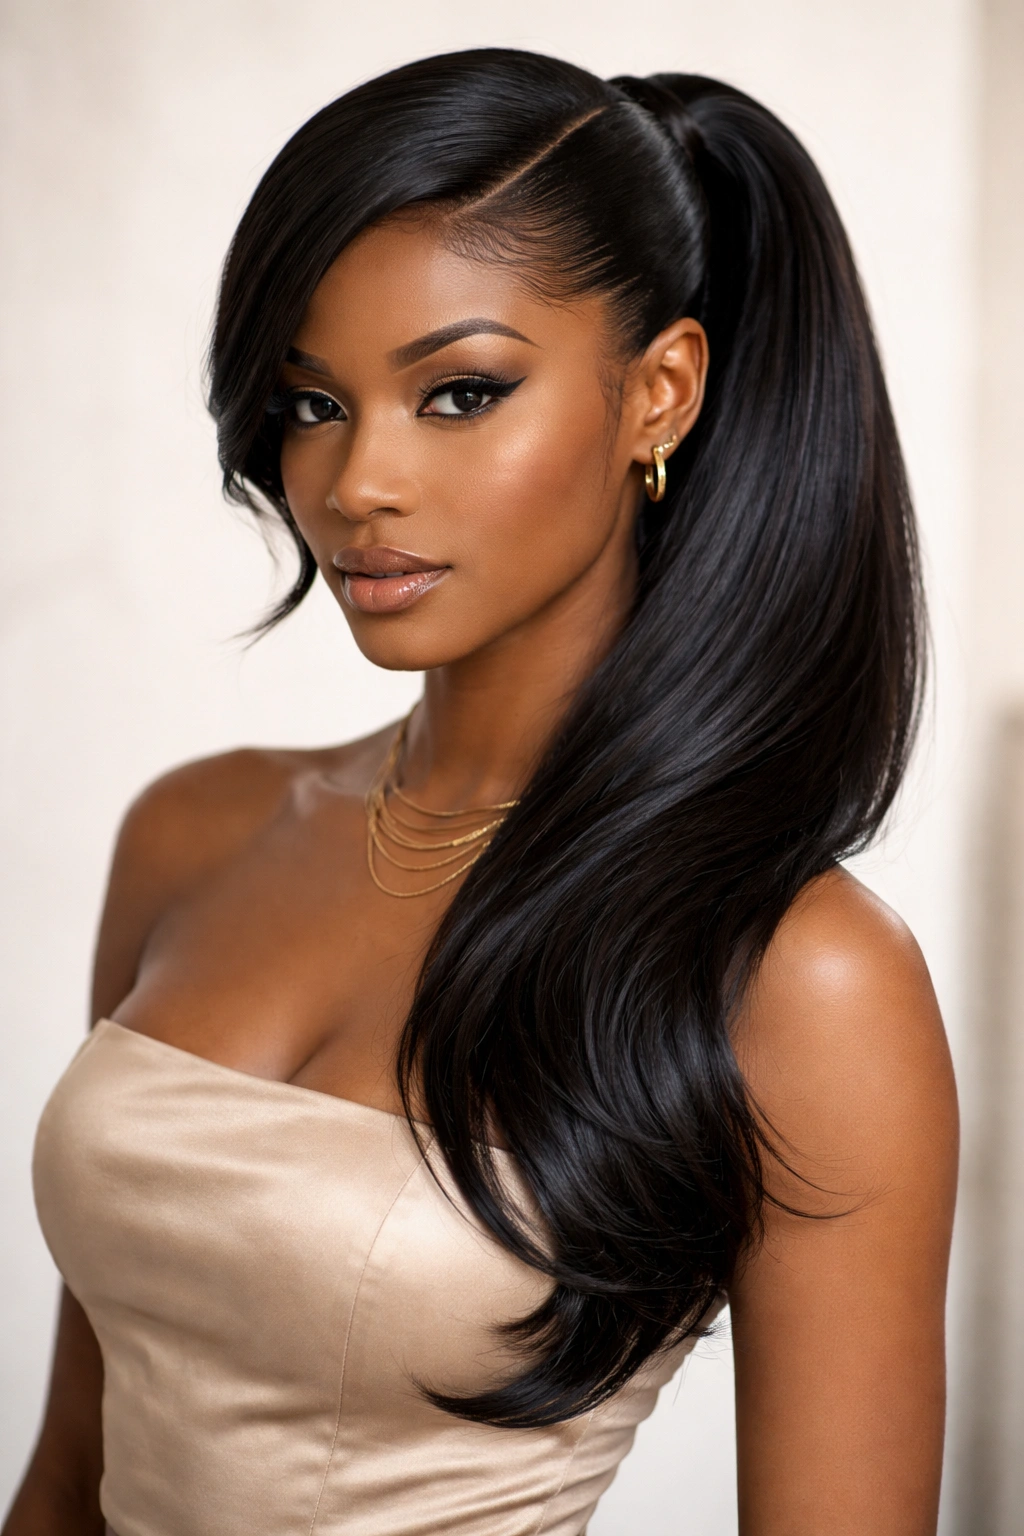
1. High Sleek Ponytail with Smooth Edges
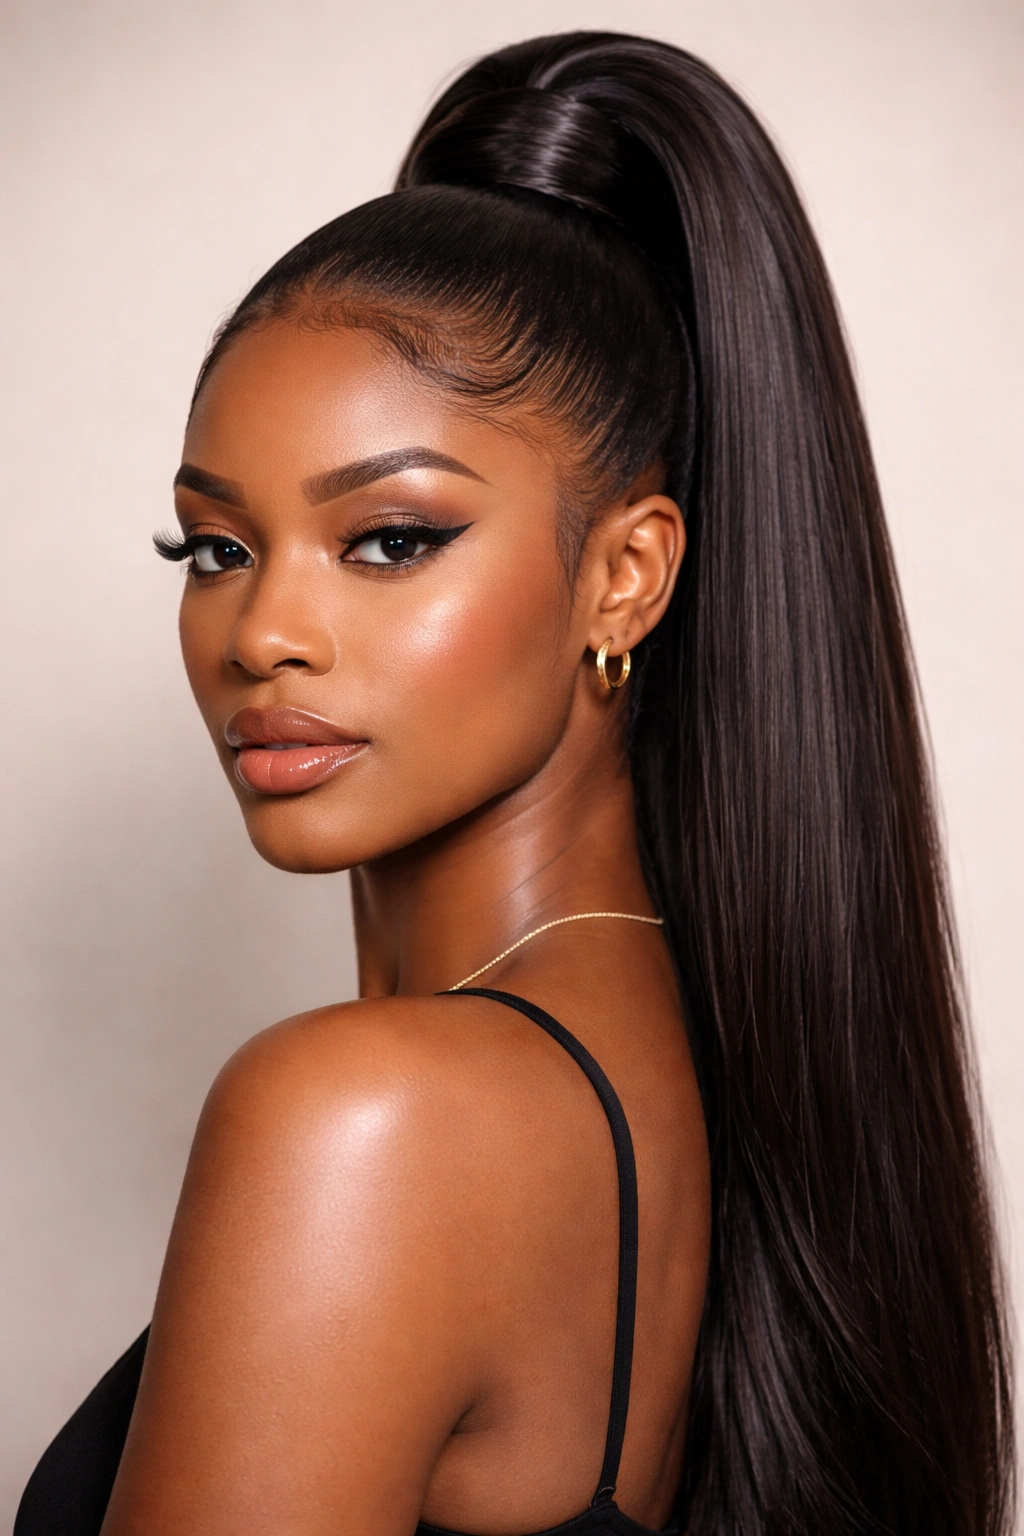
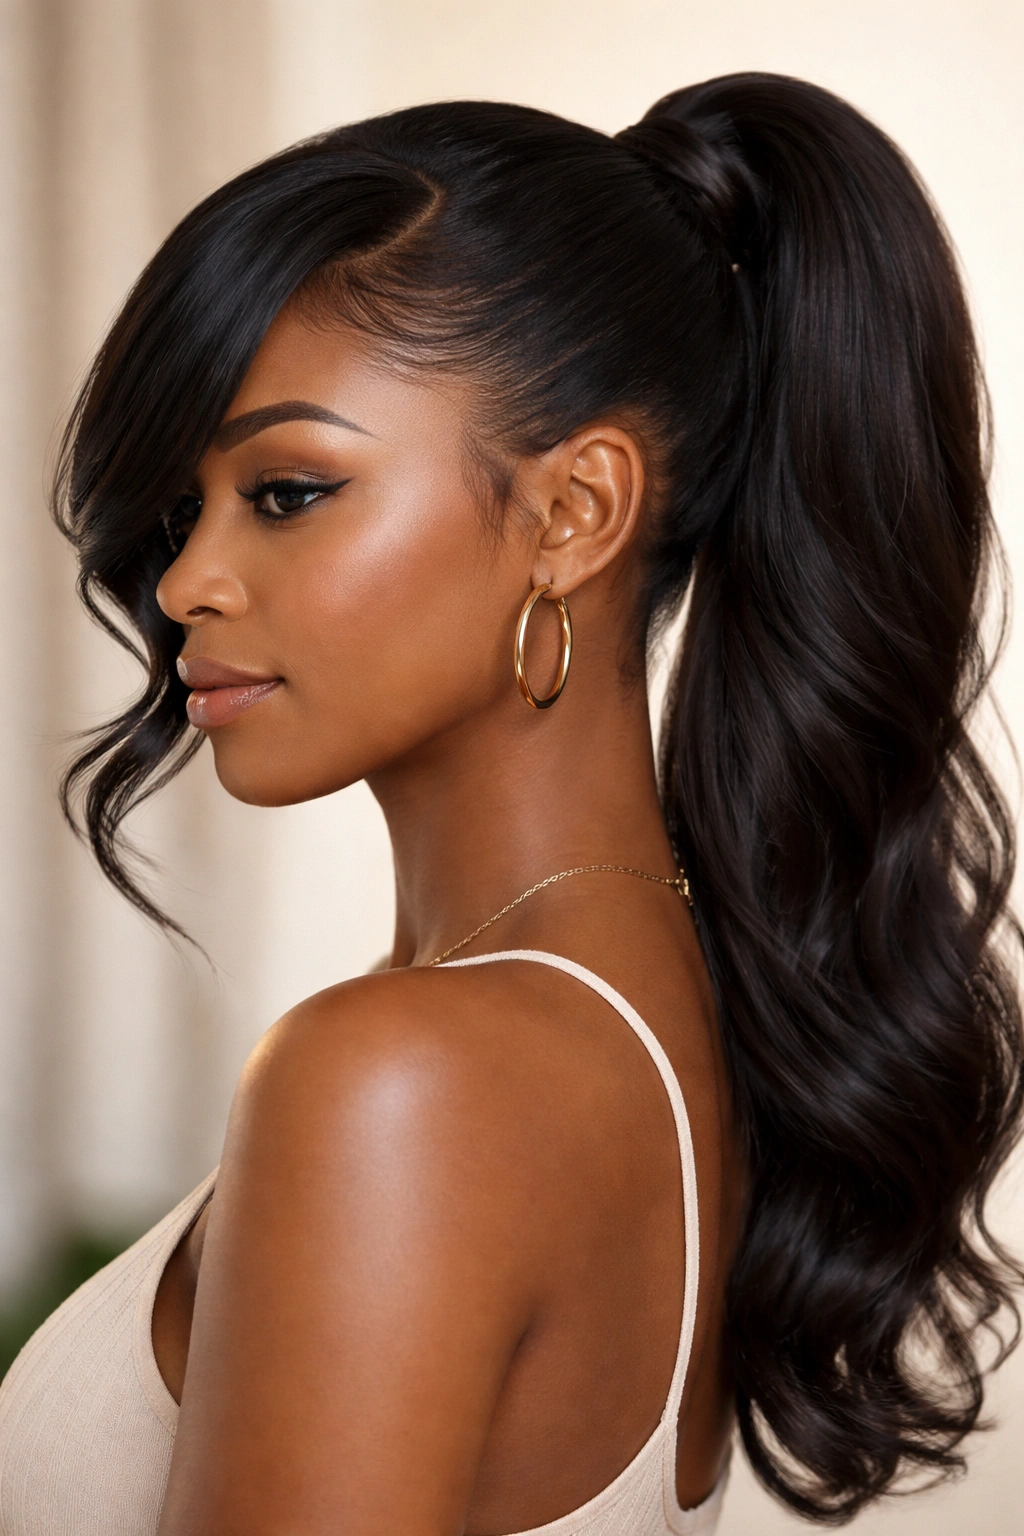
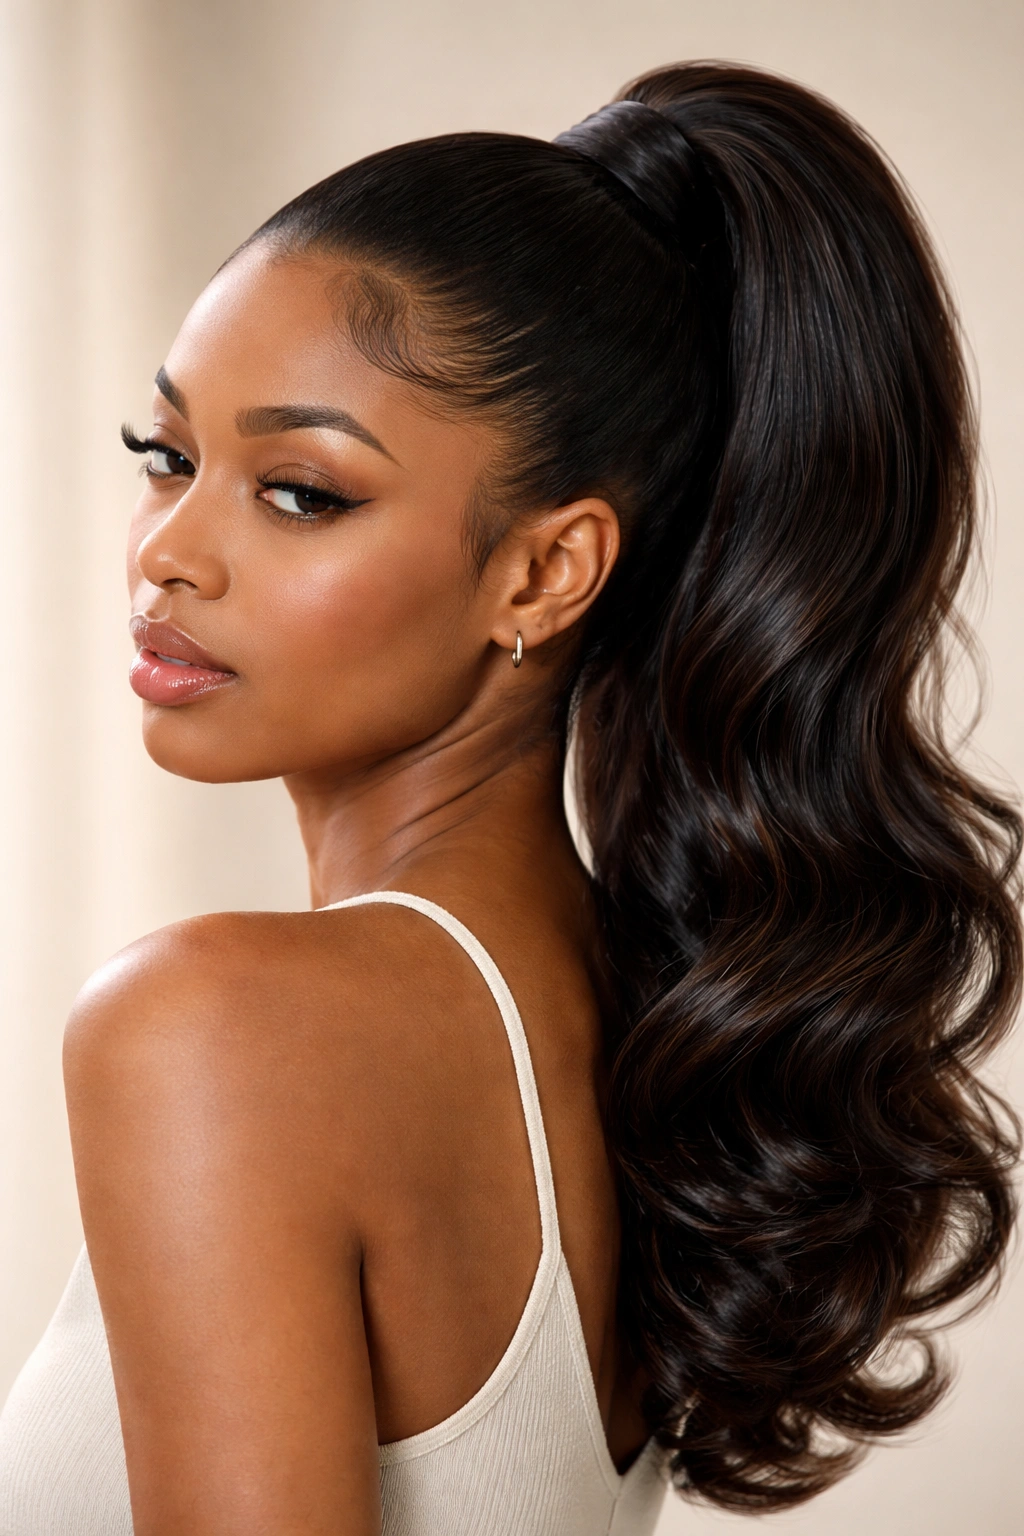
The high sleek ponytail is the epitome of polished, streamlined elegance. This style sits at the crown of the head, pulled tightly into a smooth, glossy base that hugs the scalp without texture or volume. The result is a clean, architectural line that emphasizes your facial features and neck while projecting confidence and intentionality. This particular version became iconic in the ’80s and early ’90s, worn by Black women who wanted a style that felt both powerful and refined—the kind of look that worked equally well in a professional boardroom or at an evening event.
What Makes It Work
The sleek ponytail’s power comes entirely from precision. Your edges need to be smooth and defined, your part crisp, and your ponytail tail smooth and shiny from root to tip. This requires working with a smoothing product—gel, edge control, or a lightweight pomade—applied with a fine-tooth comb or toothbrush to lay every strand in place. The tightness of the pull matters too; you want it secure enough that no strands escape, but not so aggressive that you’re creating tension on your hairline. The finish product should look like someone who has her life together, not someone straining under a too-tight elastic.
How to Create This Look
- Brush your hair back firmly using a fine-tooth comb or paddle brush, smoothing as you go
- Apply a smoothing gel or edge control to your hairline and the crown area
- Use a toothbrush to define your edges and lay down any flyaways
- Gather your hair into a high ponytail at the crown, securing with a strong elastic
- Wrap a small section of hair around the elastic base to cover it, securing with bobby pins
- Finish with a lightweight shine spray or gel to keep everything locked in place
- The ponytail tail itself should be sleek—if your ends are dry or textured, you can smooth them with product or gently straighten them for maximum polish
Pro tip: This style actually protects your hair better than you might think, as long as you’re not pulling too tight. The snug fit keeps strands from rubbing against clothing or friction-creating surfaces, reducing breakage over time—just make sure your hairline isn’t being yanked uncomfortably.
2. Bubble Ponytail with Stacked Sections
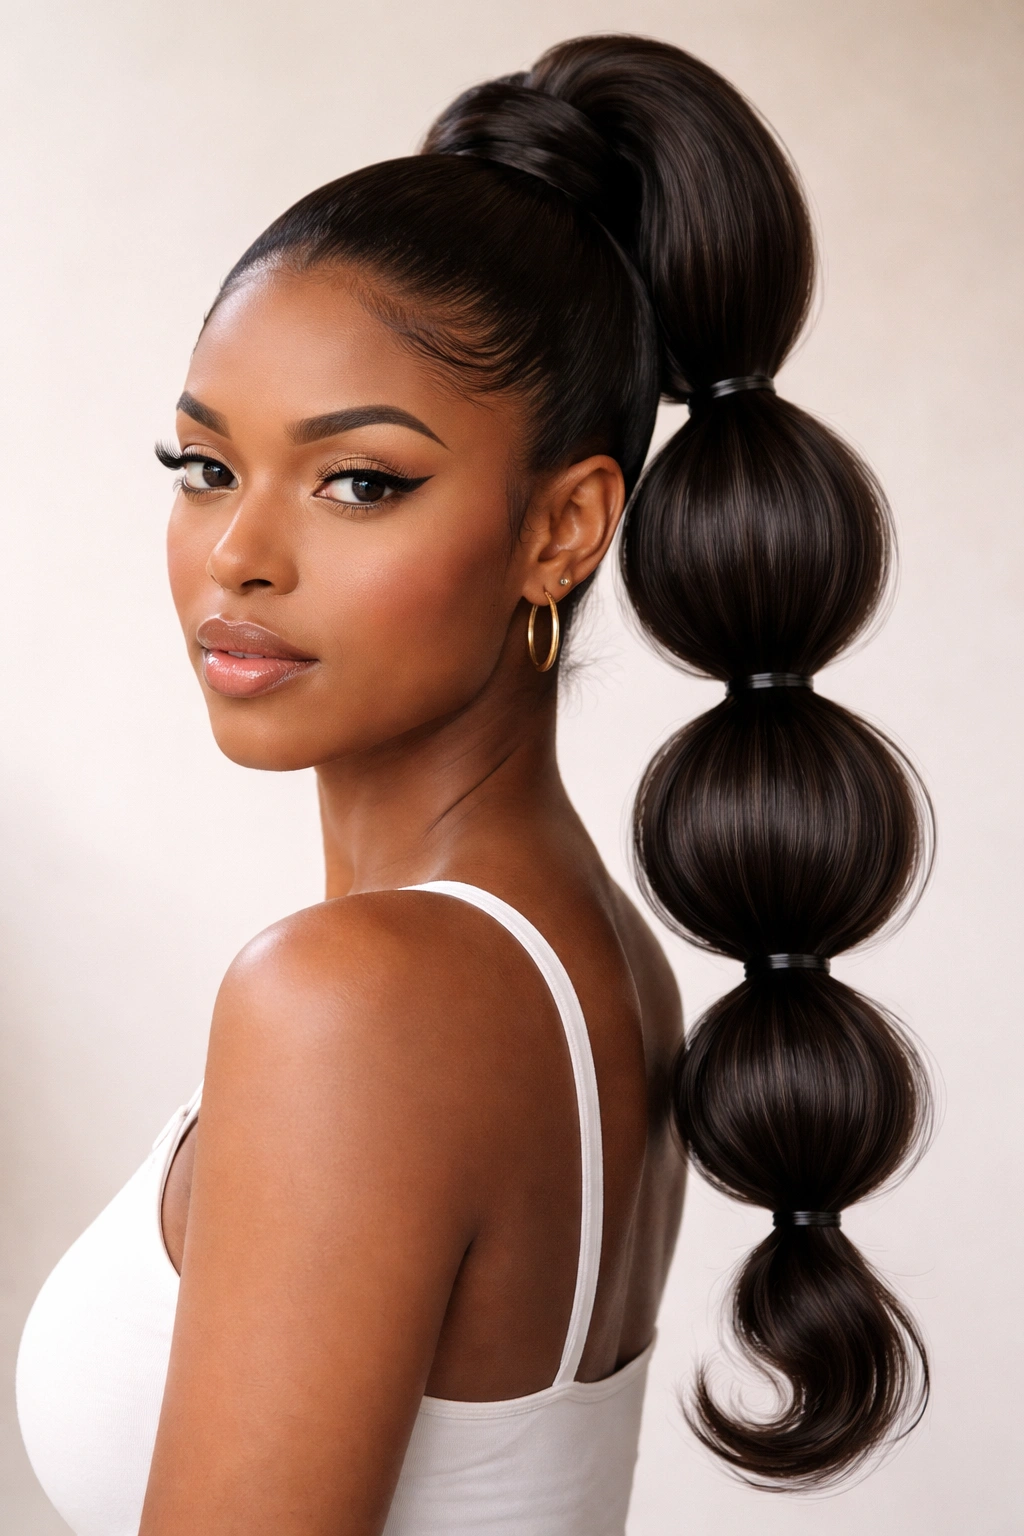
The bubble ponytail is pure playfulness wrapped in style. This look features a single high ponytail that’s divided into 3-5 distinct sections, each bumped out or “bubbled” with a smaller elastic placed below it. The effect is visually dynamic and fun—it has texture and dimension without requiring much hands-on work once it’s created. This style hit peak popularity in the 2000s and early 2010s, when it became a social media favorite for good reason: it looks impressive despite being relatively simple to execute, and it works beautifully on most hair types and lengths.
Why the Bubble Ponytail Still Works
What makes this retro style so effective is the way it plays with proportion and movement. Instead of one long, flat tail, you get visual interest from the staggered sections, and each bubble creates a natural gathering point that draws the eye downward. The style is also surprisingly wearable—it’s not so fancy that it looks out of place for a casual day, but it’s distinct enough that it reads as intentional and creative. For textured hair, the bubbles add gorgeous dimension because the hair naturally expands slightly within each section, creating a fuller, more voluminous silhouette.
Step-by-Step Technique
- Gather your hair into a high ponytail and secure it with a strong elastic
- Separate the ponytail into 5 approximately equal sections, working from the elastic downward
- Place a second elastic around the first section, positioned about 1.5 to 2 inches below the base elastic
- Gently fluff and pull out the hair between the two elastics to create the first bubble
- Place the third elastic about 1.5 to 2 inches below the second elastic
- Continue this pattern down the entire length of your ponytail, creating 4-5 bubbles total
- Fluff each section as you go, pulling the hair out slightly to create visible dimension
- If your hair is very fine, you can use smaller elastics and create more bubbles for a fuller effect
Worth knowing: The bubble ponytail actually holds better in slightly textured or second-day hair than in freshly washed, slippery hair. If your hair is freshly washed, roughing up your strands a bit with texturizing spray or light product will help the elastics grip without slipping.
3. Braided Wrap Ponytail with Woven Detail
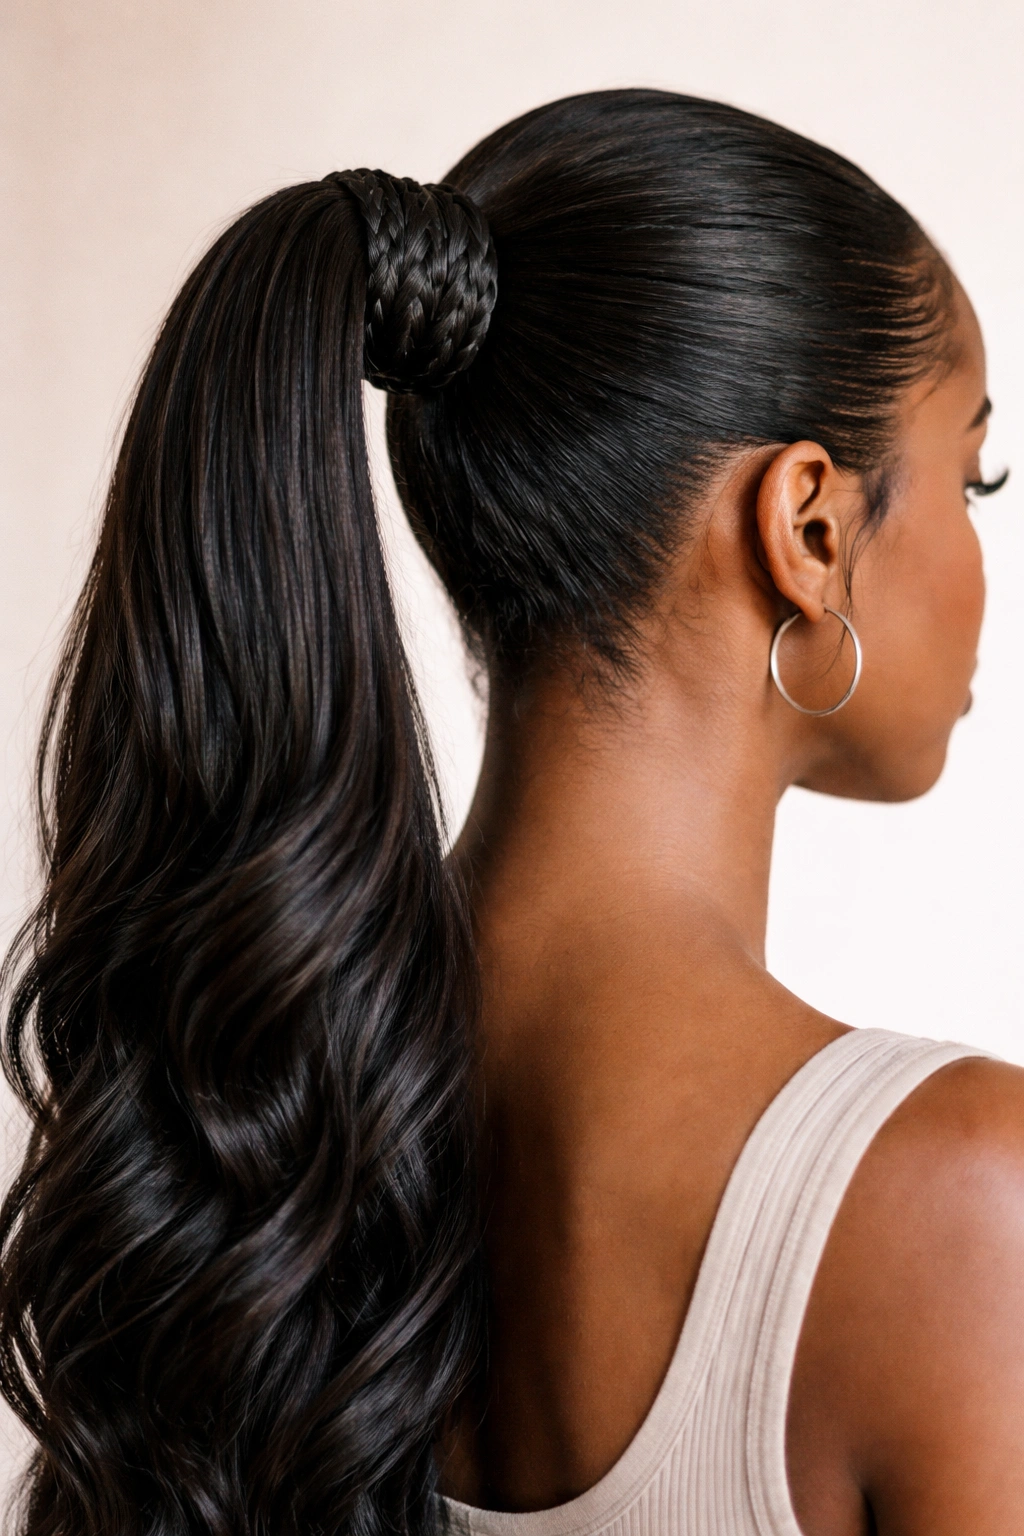
This style combines the sleekness of a classic ponytail with the artistry of braiding, creating something that looks far more intricate than it actually is. A single or double braid wraps around the base of the ponytail, acting both as a functional way to hide the elastic and as a visual accent that elevates the entire style. This variation has roots in vintage styling techniques but feels completely modern when executed with intention. The braided wrap transforms an ordinary ponytail into something that feels custom-made and thoughtfully put together.
The Visual and Practical Appeal
The braided wrap serves two purposes beautifully. Functionally, it secures the elastic and covers it completely, creating a polished finish that reads as more intentional than a bare elastic. Visually, it adds a linear detail that draws focus and can be woven tight for a refined look or left slightly loose for a more textured, relaxed vibe. You can create the braid from a thin section of your own ponytail hair, from added braiding hair, or from thread—each option creates a slightly different effect, and all of them work.
How to Build This Look
- Create a standard high or mid-height ponytail
- Take a thin section of hair from one side of the ponytail tail and begin braiding it
- Wrap the braid around the base of the ponytail, covering the elastic completely
- Secure the end of the braid by tucking it into the base and pinning with bobby pins
- For added durability, you can use a small elastic to secure the braided section to itself
- If you want a fuller wrap, you can create two braids side-by-side instead of one
- Fluff the main ponytail tail gently to soften the overall look, so the braid detail stands out without making the whole style feel stiff
Insider note: This wrap works especially well if you’re planning to wear the ponytail for an extended period—the braid wrap essentially doubles down on security and keeps everything locked in place better than a single elastic alone.
4. Two-Strand Twist Ponytail with Spiral Texture
The two-strand twist ponytail brings texture and visual interest to the crown while maintaining the clean, swept-back vibe of a traditional ponytail. Instead of a smooth, brushed base, your hair is twisted from the hairline back toward the crown, creating spiraling lines that are both beautiful to look at and remarkably easy to create. This style was everywhere in the 1990s and 2000s among Black women who wanted a protective, low-manipulation style that also looked undeniably good. The twists add movement and dimension without requiring cornrows or hours of braiding.
Why Two-Strand Twists Elevate a Ponytail
The beauty of this approach is that two-strand twists are inherently protective—your hair is twisted, not pulled straight, which distributes tension more evenly across your strands. The texture they create is also incredibly visually interesting; the spirals catch light differently than straight hair does, and they add depth to the styling that reads as intentional and polished. For natural and textured hair, twists work particularly well because they enhance the texture that’s already there rather than fighting against it.
Creating the Twisted Base
- Start by dividing your hair into 4-6 sections, depending on how thick you want each twist to be
- Take the first section at one temple and divide it into two strands
- Twist these two strands around each other, working back toward the crown
- As you twist, add small amounts of additional hair to each strand, similar to a Dutch braid, to incorporate your entire head of hair
- Continue twisting each section individually, creating multiple spirals across your head
- Gather all the twisted sections into a high ponytail at the crown
- Secure with a strong elastic, making sure all the twists are incorporated into the base
- The ponytail tail itself can be left as a regular ponytail, or you can extend the twisting down the tail for extra drama
Quick fact: Two-strand twists actually dry faster than many other protective styles, which means you can wet and style your hair quickly, and it will be ready within an hour or two rather than needing overnight drying.
5. Side-Swept Ponytail with Dramatic Angle
The side-swept ponytail is pure sophistication—your hair is gathered not at the crown, but to one side, creating an asymmetrical silhouette that emphasizes one side of your face while adding dramatic visual interest. This style was particularly popular in the 1980s and 1990s, worn by Black women who wanted something that felt a little bit daring and unconventional without being over-the-top. The angle of the sweep matters tremendously; positioned correctly, a side-swept ponytail flatters almost every face shape and can make you look taller and more elongated.
The Elegance of Asymmetry
What makes the side-swept ponytail so effective is the way it breaks the symmetry that we’re so accustomed to seeing. By placing the ponytail to the side rather than centered, you’re creating visual movement and drawing the eye along a diagonal line. This style works particularly well for formal occasions—weddings, galas, upscale dinners—because it has an inherent sense of intentional elegance. It also works beautifully for everyday wear if you want to feel a little bit special without doing something dramatic to your hair.
Positioning and Technique
- Determine which side feels most flattering—typically, placing the ponytail on your non-dominant side (left side if you’re right-handed) feels most natural
- Create a deep side part on the opposite side, sweeping the majority of your hair toward your chosen ponytail side
- Smooth your hair back with a fine-tooth comb and smoothing product, maintaining the swept direction
- Gather your hair into a ponytail positioned at the side, roughly where your ear is—not all the way to the very back
- Secure with a strong elastic
- Smooth any flyaways with edge control, particularly on the side of your head that’s exposed
- For maximum drama, you can add a second ponytail at the nape of your neck for a two-ponytail effect, or leave the tail to sweep down your back
Pro tip: If you want your hair to naturally fall to one side rather than constantly being pushed back to the other, try sleeping in a loose side-swept ponytail the night before—your hair will have a natural side-set by morning, making the style easier to achieve and more stable throughout the day.
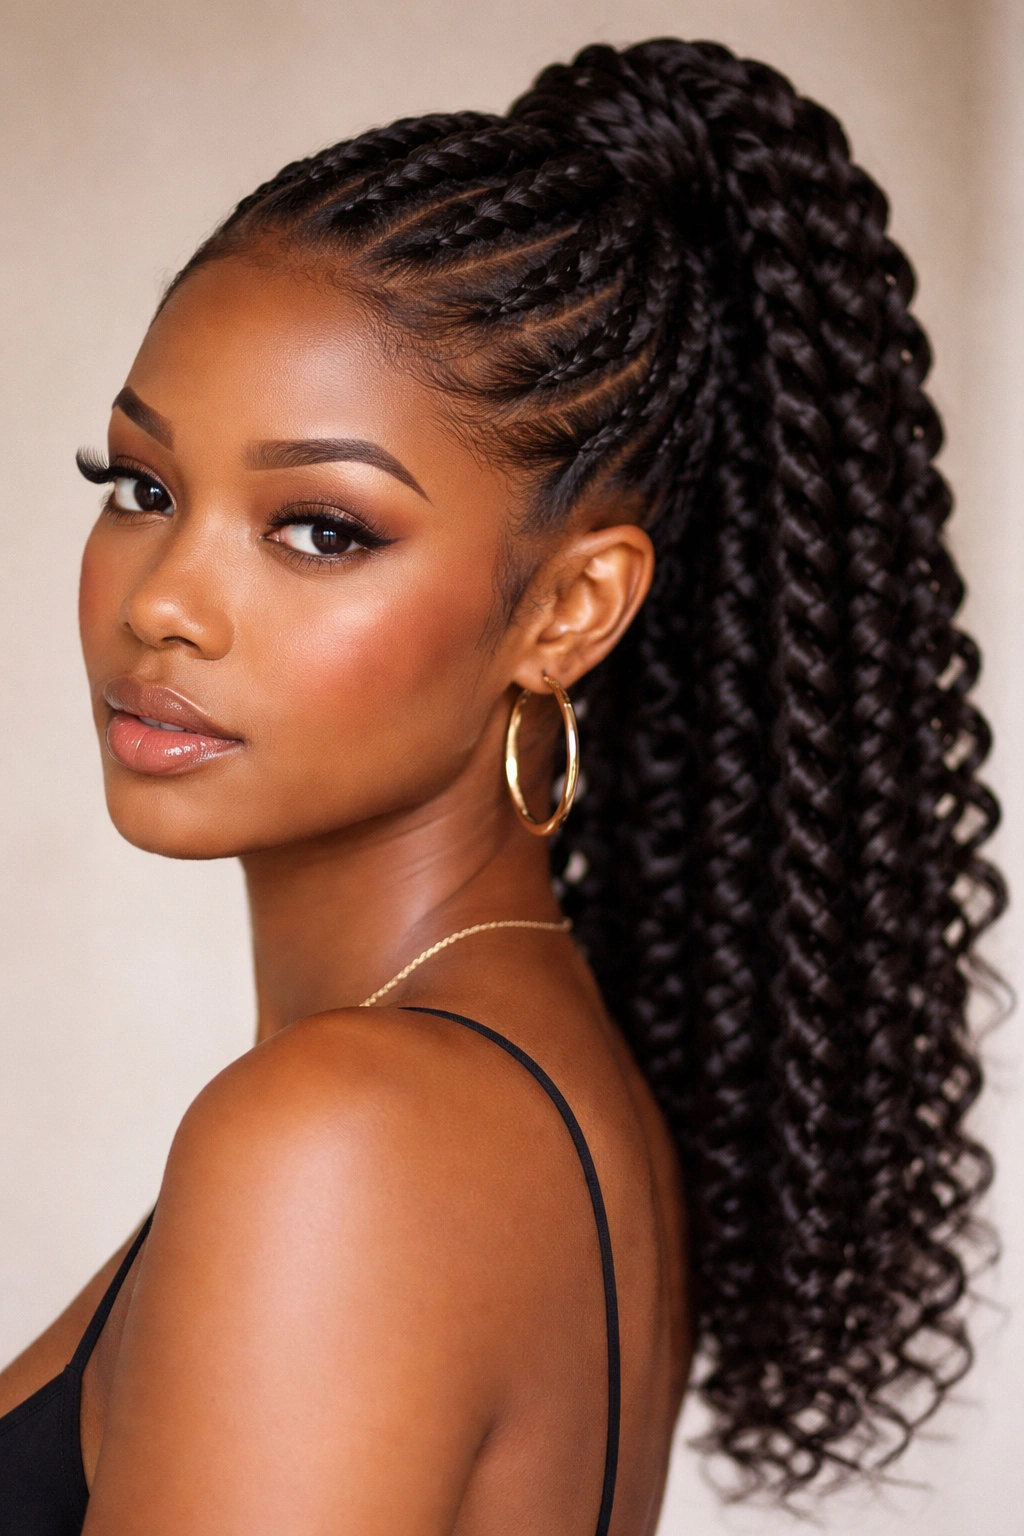
6. Cornrow Base Ponytail with Protective Braiding
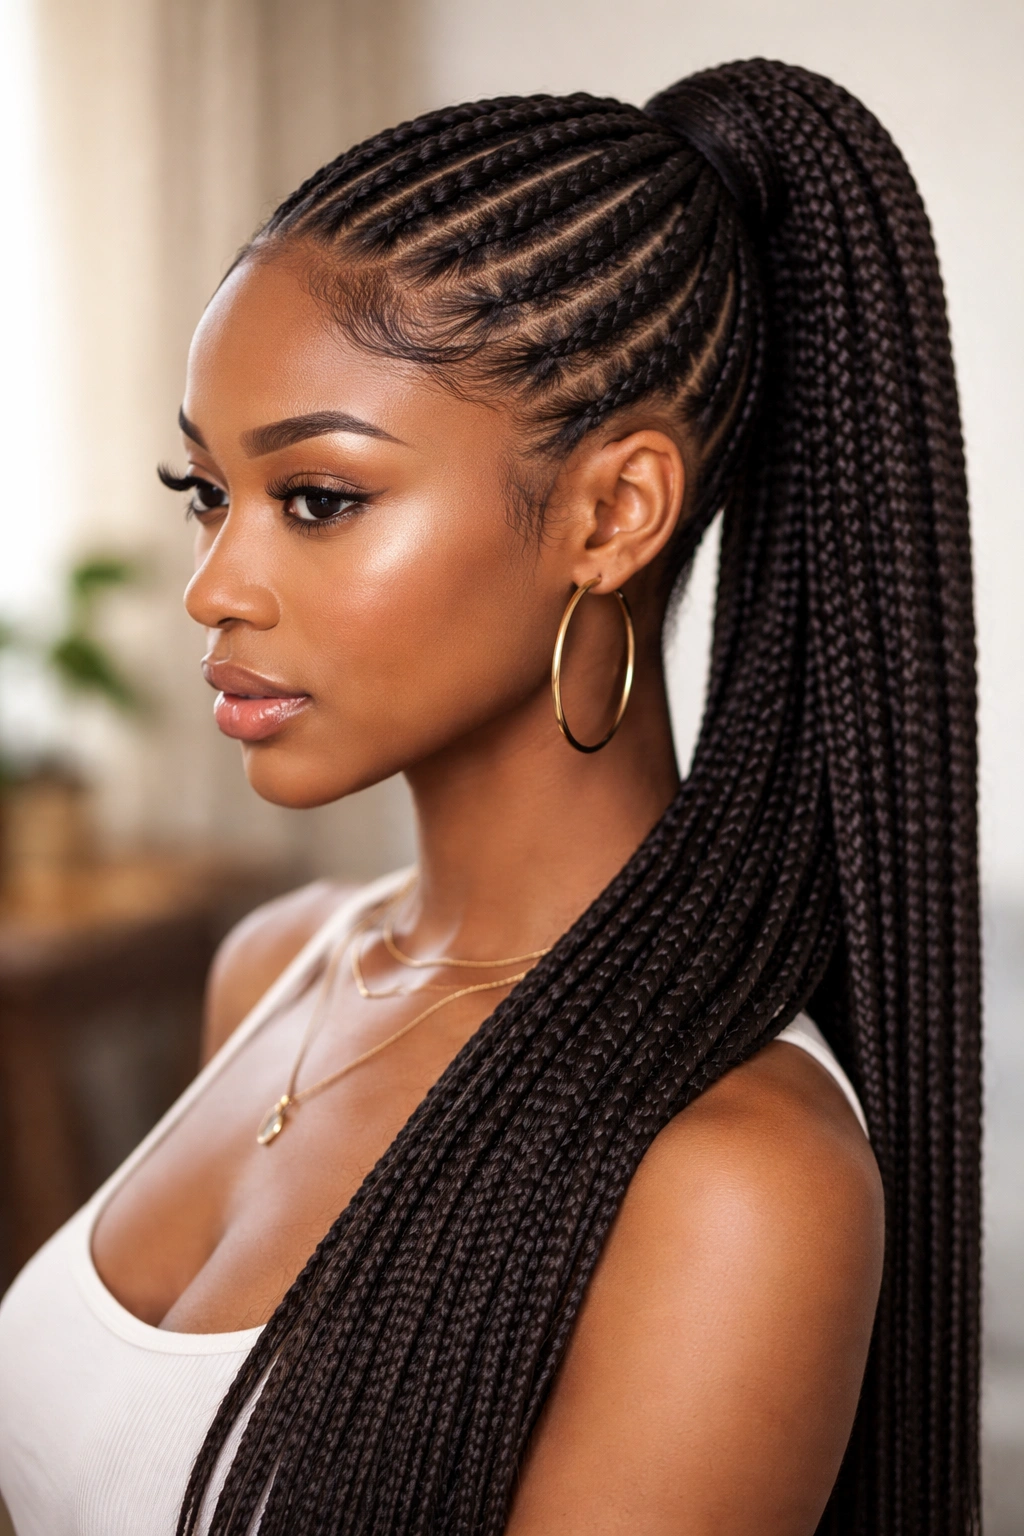
This style combines the protective benefits of cornrows with the simplicity of a ponytail, creating a hybrid that works beautifully for extended wear. Cornrows are braided from your hairline back toward the crown, then released into a single or double ponytail at the back of your head. This approach has deep roots in Black hairstyling tradition and represents one of the most protective ways to wear a ponytail, since your hair is braided rather than pulled straight, and the braided section helps distribute tension away from your hairline. This style was and is consistently popular because it works.
The Protective Benefit
Unlike a traditional ponytail, which can create tension directly on your hairline if pulled too tightly, a cornrow base distributes the weight of your hair across the braided section, reducing stress on any single area. This makes it an excellent choice if you’re concerned about maintaining your hairline or if you’re going through a phase where you want to minimize manipulation and tension. The cornrows also mean that your hair is less likely to break or shed during the day, since it’s held in a structured braid rather than being constantly exposed to friction.
How to Build This Look
- Section your hair into 3-5 sections (depending on how many cornrows you want to create)
- Cornrow each section from your hairline back toward the crown, creating clean, even braids
- At the crown, release all the cornrows and gather them into a ponytail
- Secure the ponytail with a strong elastic
- You can wrap a small section of hair around the elastic base for a finished look, or leave it as-is for a more casual vibe
- The ponytail tail itself can be straight, curled, braided, or twisted—all options work beautifully
What to know: Cornrow base ponytails typically hold for several days without needing to be redone, making them an excellent choice if you want a protective style that doesn’t require daily touch-ups. Just make sure you’re moisturizing your ends regularly and being gentle when you finally take the style down.
7. Curly Voluminous Ponytail with Textured Fullness
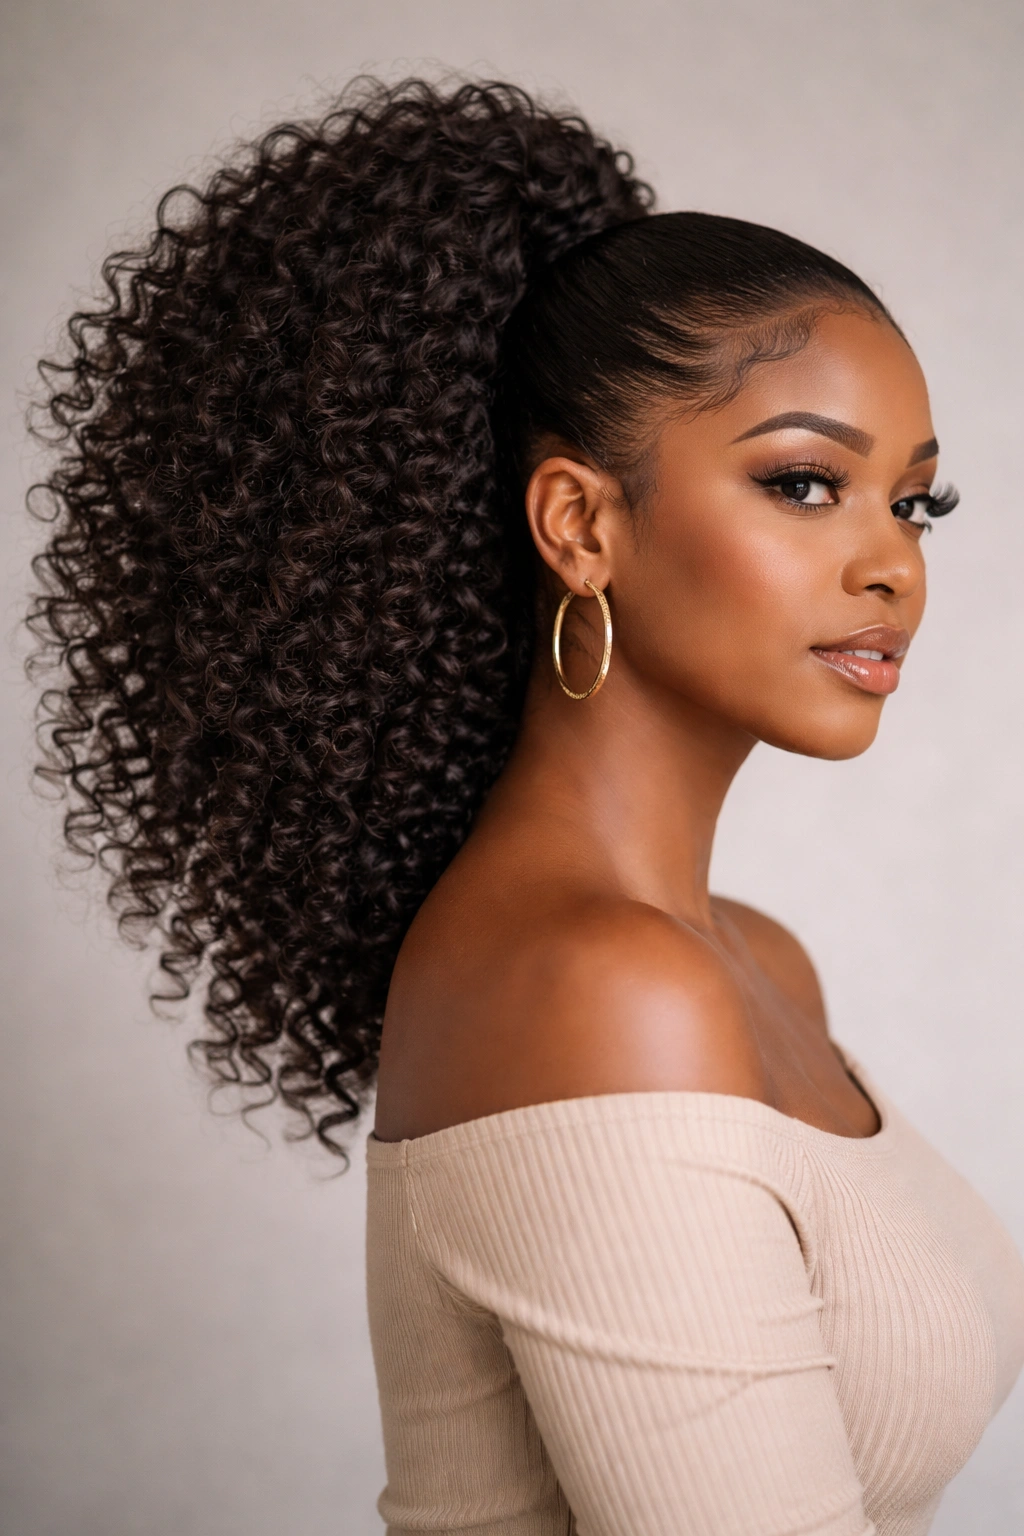
This retro style celebrates your natural texture by gathering curly or coily hair into a ponytail that remains full, bouncy, and expansive rather than sleek and tight. Instead of smoothing your hair back, you’re enhancing the curl pattern and letting it expand naturally, creating a voluminous silhouette that’s equal parts elegant and effortless-looking. This style was particularly beloved in the 1970s and 1980s among Black women who were embracing their natural hair texture, and it’s been having a resurgence in recent years as more people move toward natural styling.
The Power of Textured Volume
A curly ponytail reads completely differently than a straight one—it has movement, dimension, and a sense of joy about it. The curls catch light in different ways than straight hair does, and they naturally create visual interest without requiring you to do much of anything beyond gathering them. This style is also incredibly low-manipulation, since you’re not smoothing, braiding, or putting your hair under tension; you’re essentially just pulling your curls back and letting them do their thing.
Creating the Curly Ponytail
- Start with curls that are already defined—you can refresh your curl pattern with a spritz of water and curl cream, or start fresh by wetting and styling your hair
- Use your fingers or a wide-tooth comb to gently gather your curls at your chosen ponytail position (high, mid, or low—all work beautifully)
- Secure your curls with a soft elastic or scrunchie that won’t create dents or crimp marks
- Rather than tightening the elastic intensely, secure it gently so your curls maintain their volume and don’t compress
- You can position the ponytail centered, off to one side, or even slightly off-center for visual interest
- Let some smaller curls or pieces fall around your face if you like a softer, less “done” vibe
Insider note: Curly ponytails actually last longer without frizz if you use a satin or silk scrunchie instead of a regular elastic—the smooth texture of silk or satin won’t cause friction that leads to frizz the way a cotton elastic does.
8. Low Bun-Ponytail Hybrid with Sophisticated Twist
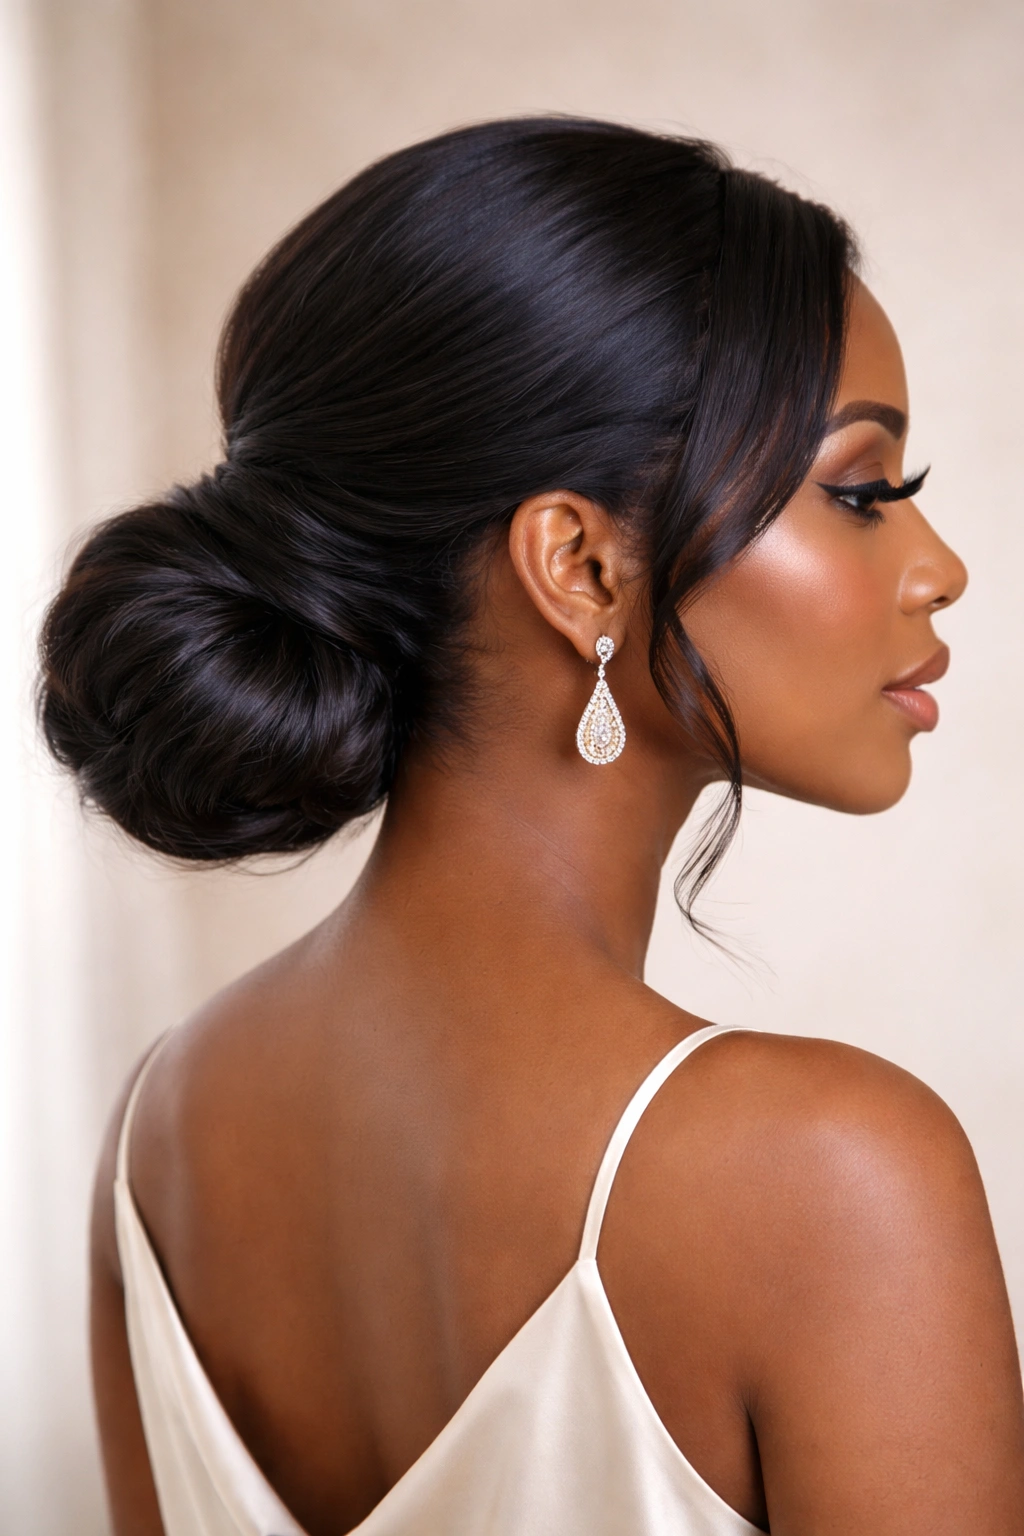
This elegant hybrid style sits somewhere between a ponytail and a bun, created by gathering your hair low at the nape of your neck and then twisting it loosely before coiling it into a soft, relaxed shape. The result is more texture and visual interest than a tight bun, but more structure and polish than a traditional ponytail. This style has vintage roots that go back decades and feels equally appropriate for a casual workday or a formal evening out. It’s also remarkably practical—your hair is completely off your neck and shoulders, which makes it perfect for warm weather or activities where loose hair would be annoying.
Why the Hybrid Works
The beauty of this approach is that it bridges the casual and formal—it’s not quite as structured as a traditional bun, which makes it feel approachable and wearable, but it’s more polished and intentional than a loose ponytail. The twist or soft coil you create adds visual texture that makes it feel special without requiring an elaborate technique. This style also works beautifully across multiple hair lengths; you can create it with shoulder-length hair or much longer hair, and the effect remains elegant either way.
Building the Hybrid Bun-Ponytail
- Brush your hair back smoothly and gather it into a low ponytail at the nape of your neck
- Secure the ponytail with an elastic
- Take the ponytail tail and divide it into two sections
- Twist these two sections around each other several times, creating a spiral
- Coil the twisted section loosely around the base elastic, forming a soft, undone-looking bun shape
- Secure the coiled section with bobby pins, allowing some texture and looseness rather than pulling everything tight
- You can leave a few face-framing pieces down if you want a softer effect, or smooth everything back for a more polished appearance
Worth knowing: This style holds better if you use a bit of texturizing spray or light gel to give your hair grip before you start the twisting and coiling process—freshly washed, slippery hair is harder to manipulate into this shape.
9. Textured Top Knot Ponytail with Lifted Crown
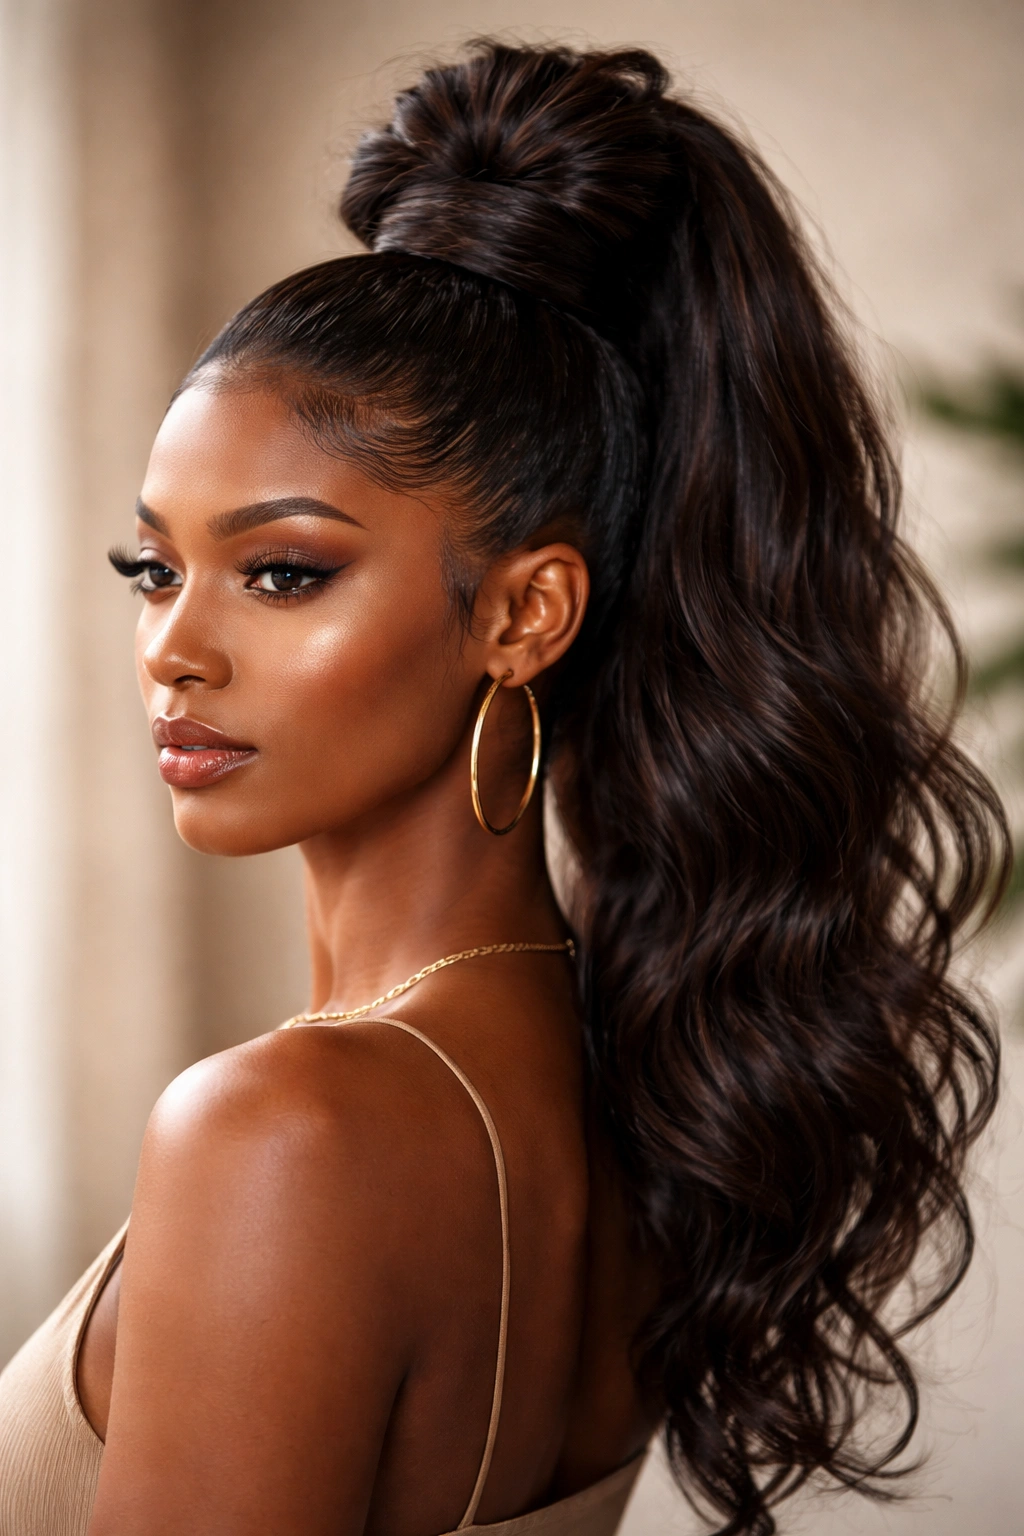
This playful style combines the height and visual drama of a top knot with the elongating effect of a ponytail by creating volume and texture at the crown while keeping the length of your hair in a gathered tail below. The result is a style that’s both practical and visually interesting—your hair is off your face and neck, but the lifted crown creates flattering height and prevents the style from feeling flat. This particular approach became popular in the 2000s and has remained a favorite because it’s so versatile and photogenic from every angle.
Creating Drama with Textured Volume
The textured top knot works because texture creates the illusion of volume without necessarily requiring thickness or length. By backcombing or teasing the hair at your crown and then smoothing the top layer, you create a lifted, voluminous effect that makes you look taller and gives your face more frame. This is particularly effective on naturally textured hair, where the texture itself creates visual fullness, but it works beautifully on straight hair too when you add teasing or use a volumizing product.
Technique for the Textured Crown
- Create a small section of hair at your crown (approximately 4-6 inches in diameter, depending on how much volume you want)
- Backcomb this section gently, using a fine-tooth comb to create texture without matting
- Smooth the outer layer of the teased section, maintaining the volume underneath
- Gather the entire crown section into a small ponytail or topknot, securing with a small elastic
- This becomes your “top knot” that sits at the crown
- Gather the remaining hair at a lower position (the nape of your neck or mid-back) into your main ponytail
- Secure this lower ponytail with an elastic
- The result is height at the crown with length below, creating a visually elongated silhouette
Pro tip: Use a light hairspray while teasing to help the texture hold better throughout the day—this prevents your top knot from flattening out hours after you’ve created it.
10. Side Bang Ponytail with Face-Framing Detail
This style keeps the majority of your hair pulled back into a ponytail while intentionally leaving one side section as a face-framing bang or partial piece. The framing piece can be straight, curled, twisted, or braided, and it creates visual interest and softness around your face while the rest of your hair is neatly organized. This approach was particularly popular in the 1990s and early 2000s, worn by Black women who wanted something that was sleek and pulled-together but also a bit more textured or softer around the face. It’s an incredibly versatile style that can be dressed up or down depending on how you style the face-framing section.
The Balance Between Polished and Soft
What makes the side bang ponytail work is the contrast it creates—the sleekness of the pulled-back ponytail contrasts beautifully with the texture or movement of the face-framing piece. This contrast is what makes the style feel dynamic and intentional rather than like you just didn’t want to deal with pulling your hair back. The face-framing section also has the practical benefit of being able to change the feel of the style with minimal effort—straighten it for a sleek look, curl it for more dimension, braid it for added visual interest.
Creating the Face-Framing Effect
- Section out one side of your hair, starting at your temple, to be your face-framing piece (approximately 1-2 inches wide, depending on how prominent you want it)
- Gather the remaining hair into your chosen ponytail position and secure
- Style the face-framing section separately: you can leave it straight, curl it with a curling iron, twist it, or braid it
- Pin the styled piece gently to the side of your head using bobby pins that match your hair color
- If you’re curling or styling the piece, make sure it falls naturally and frames your face rather than looking stuck on
Quick fact: This style works particularly well if you want to show off an interesting texture or color in a face-framing piece—if you have highlights, a color transition, or particularly beautiful curls, this is the style to showcase them in.
11. Wrapped and Coiled Ponytail with Thread Detail
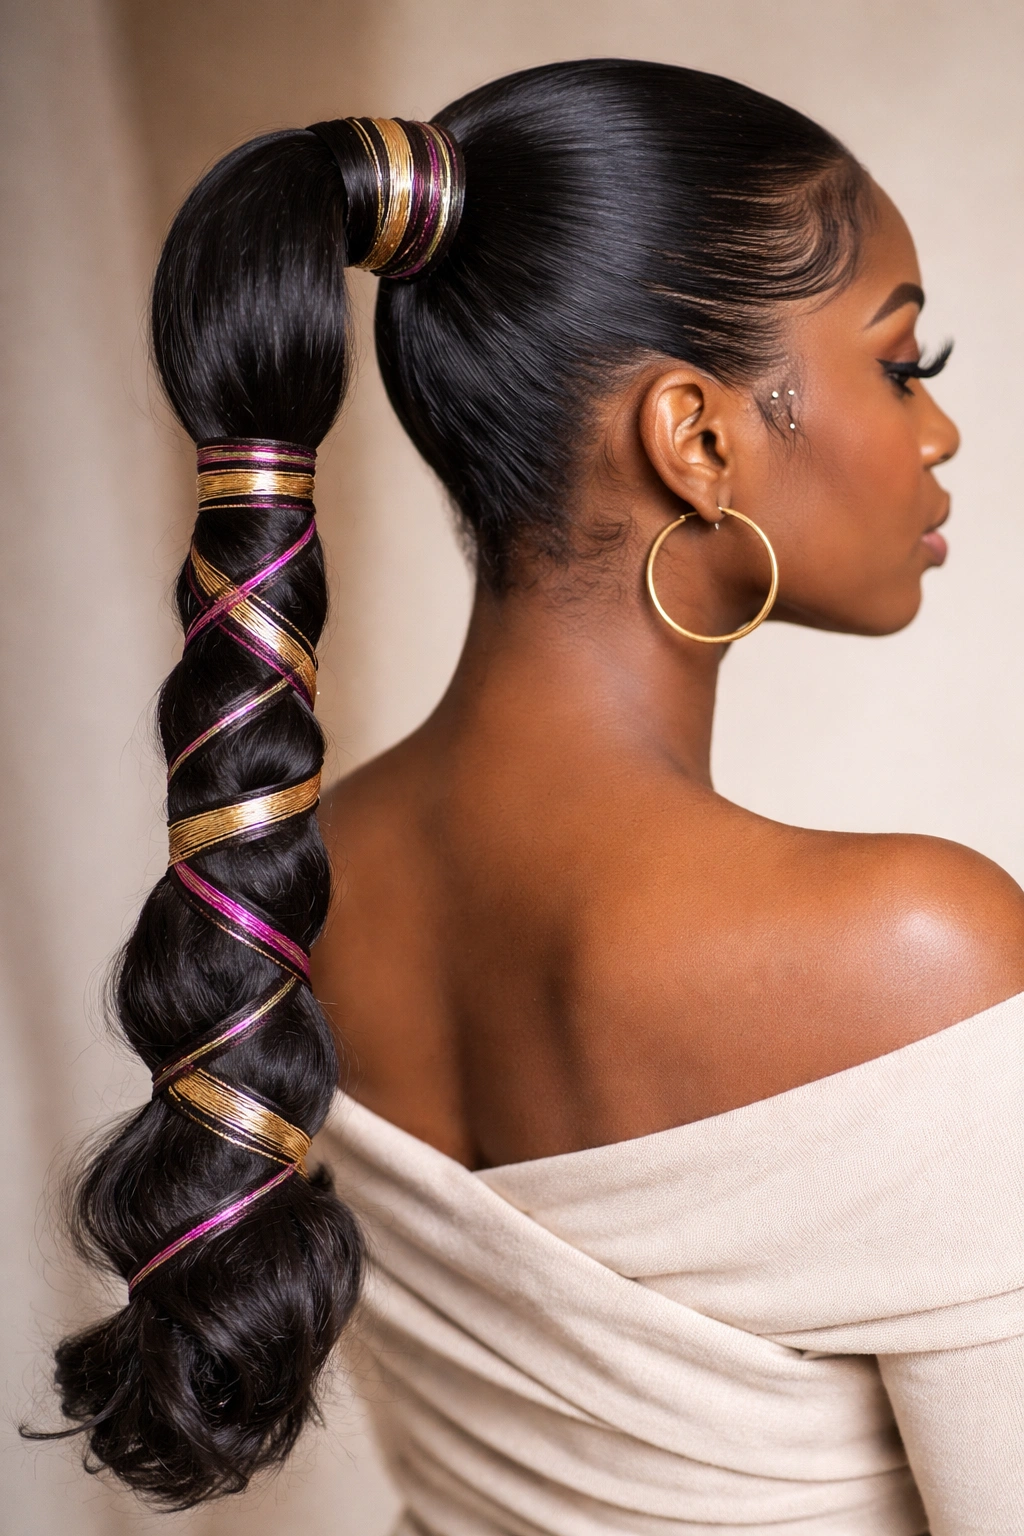
This elegant style features a ponytail that’s been wrapped with thread or yarn in a coordinating color, then coiled or twisted in sections down the length of the tail for a completely customized, one-of-a-kind look. The wrapping and coiling add visual interest and texture to what might otherwise be a simple ponytail, and they’re a great way to add a pop of color or metallic detail without dyeing your hair. This approach has deep roots in Black hairstyling tradition and represents one of the most creative ways to personalize a ponytail.
The Artistry of Thread Wrapping
Thread wrapping is genuinely an art form—the colors and patterns you choose can completely transform the feel of your style. A metallic gold thread wrapped around a black ponytail creates glamour and sophistication. Brightly colored thread creates playfulness and youthful energy. Multiple colors woven in create something uniquely custom. The wrapping also has the functional benefit of protecting your ponytail ends, keeping them from fraying or splitting as readily as unwrapped hair.
How to Wrap and Coil
- Gather your hair into your chosen ponytail position and secure with an elastic
- Cut a length of thread or yarn (about 2-3 times the length of your ponytail)
- Start at the base of your ponytail and begin wrapping the thread around the ponytail, working downward
- Wrap as tightly or loosely as you like—tight wrapping creates a neat, defined look, while looser wrapping creates texture
- As you wrap, you can occasionally coil or twist the ponytail section, creating spirals of wrapped thread that add visual drama
- Continue wrapping all the way to your ends, and secure the thread by tying it off or tucking it under the last few wraps
- You can wrap the entire ponytail, or just sections of it, depending on the effect you want
Worth knowing: Using a waxed thread or yarn holds better and looks more finished than regular cotton thread—and metallic or iridescent thread catches light beautifully without needing to use a ton of it.
12. Statement Cuff Ponytail with Metallic or Beaded Accent
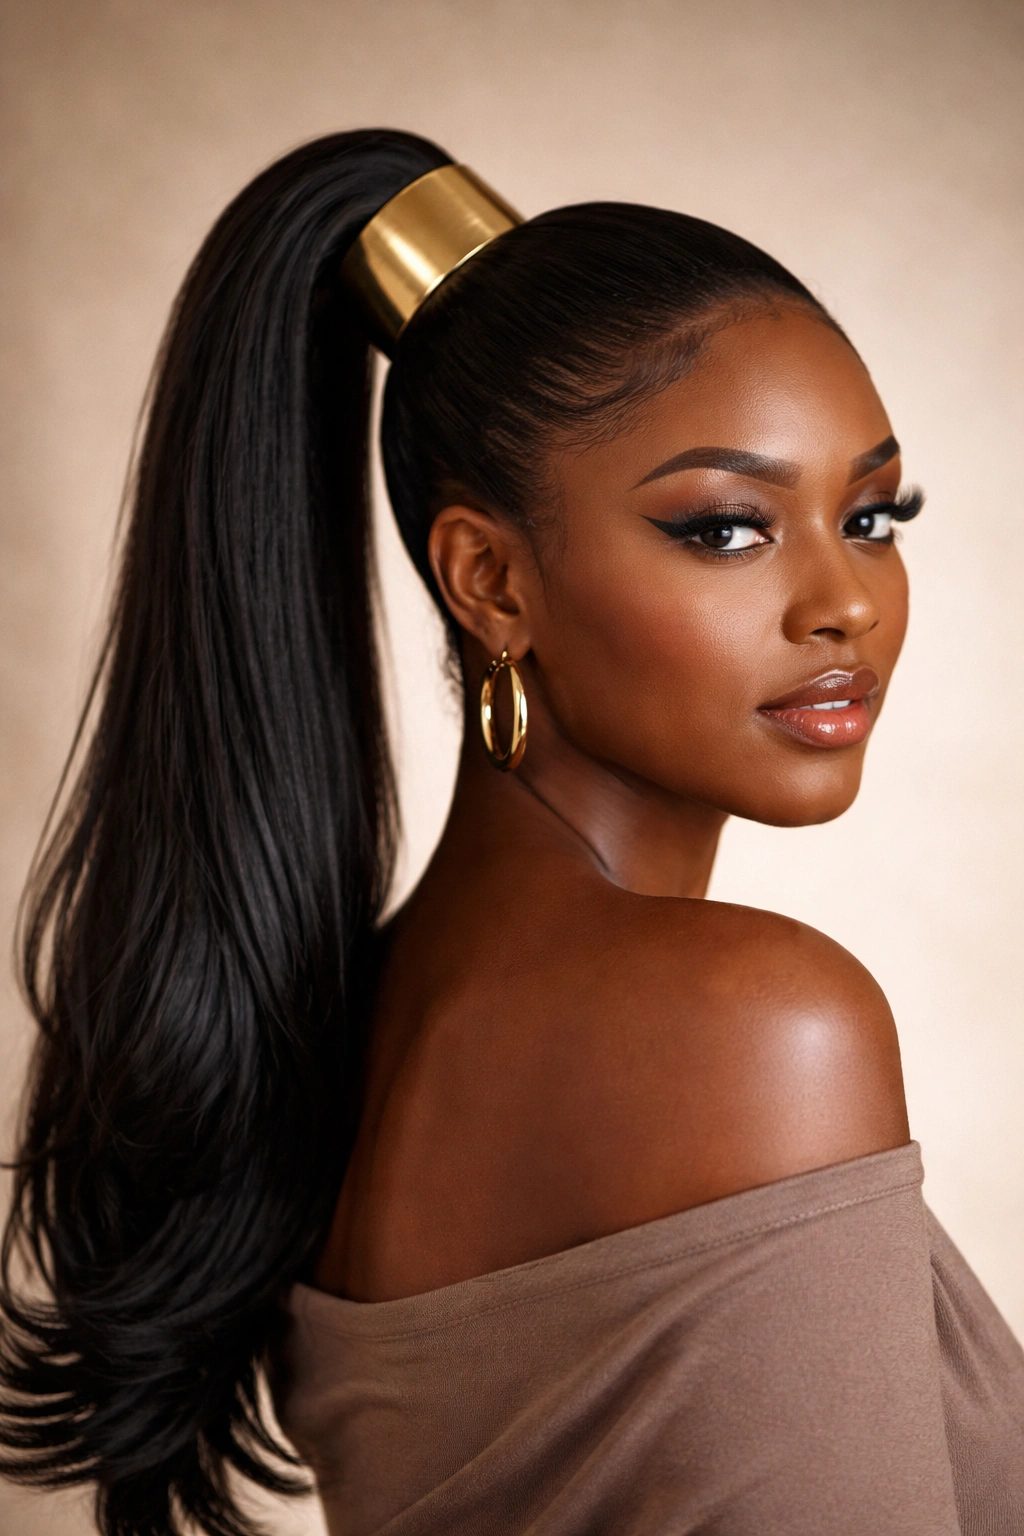
This final style elevates a simple ponytail with a bold decorative cuff or cuff-like accessory positioned at the base of the tail. The cuff can be metal, beaded, threaded, or even fabric-based, and it serves as both a functional way to add visual interest and a statement piece that transforms the entire look. This approach became particularly popular in the 1980s and 1990s, when decorative hair cuffs and rings were a signature Black hairstyling accessory. A statement cuff turns a basic ponytail into something that feels intentional, elevated, and fashion-forward.
Making Accessories Work
A statement cuff works because it draws focus and creates a visual anchor point—your eye is immediately drawn to wherever the cuff sits on the ponytail, which makes the entire style feel more deliberate and designed. The cuff also has the practical benefit of helping to secure the ponytail base and prevent slipping, so it’s not just decorative; it’s functional too. A single cuff can completely change the energy of a style, from casual to glam to bohemian, depending on which cuff you choose.
Styling with Cuffs
- Create a simple, sleek, or textured ponytail using any of the techniques mentioned above
- Instead of wrapping hair around the elastic base, slide a decorative cuff or ring over your ponytail, positioning it right at the elastic
- The cuff should sit snugly enough that it won’t slip, but not so tight that it creates pressure on your hair
- For added security, you can place a small elastic or piece of thread under the cuff to anchor it
- One cuff creates elegance and simplicity; multiple cuffs stacked create a bolder, more statement-making look
- Make sure your cuff choice coordinates with your overall styling—metallic cuffs work beautifully with sleek ponytails, while beaded or fabric cuffs pair nicely with textured styles
Insider note: Gold cuffs pair beautifully with warm-toned skin and darker hair colors, while silver cuffs create a more modern, minimalist feel. Don’t be afraid to choose a cuff color that contrasts with your hair—a bright gold cuff against dark hair creates eye-catching drama.
Final Thoughts
These twelve retro ponytails represent the range and creativity that’s possible within this single category of style. What they all share is a sense of intentionality and polish—whether you’re going sleek and smooth or textured and full, high or low, simple or adorned, each of these approaches says something about how you’re presenting yourself to the world. The fact that these styles have remained popular across decades—from the 1970s through the 2000s and right into the present—speaks to something fundamental about their appeal: they’re practical, they’re protective, they’re beautiful, and they work.
The real gift of exploring retro ponytail options is discovering which variations align with your lifestyle, your hair type, and the image you want to project. Some of these styles take five minutes to create; others require more time and precision. Some work beautifully every single day; others are better reserved for special occasions. The key is understanding your options and feeling confident enough to execute them properly, because a ponytail done well is genuinely one of the most transformative and confidence-boosting styles you can wear.
Your hair is long enough for a ponytail—that’s the only requirement. Whether you’re drawn to the sleek elegance of a high ponytail, the playful energy of a bubble style, the protective benefits of cornrow braiding, or the creative expression of a wrapped and coiled design, there’s a retro ponytail that’s waiting to become your signature move. The beauty of these styles is that they’re not trends that will disappear next season; they’re classics that have already proven their staying power and will continue to work beautifully for as long as you want to wear them.