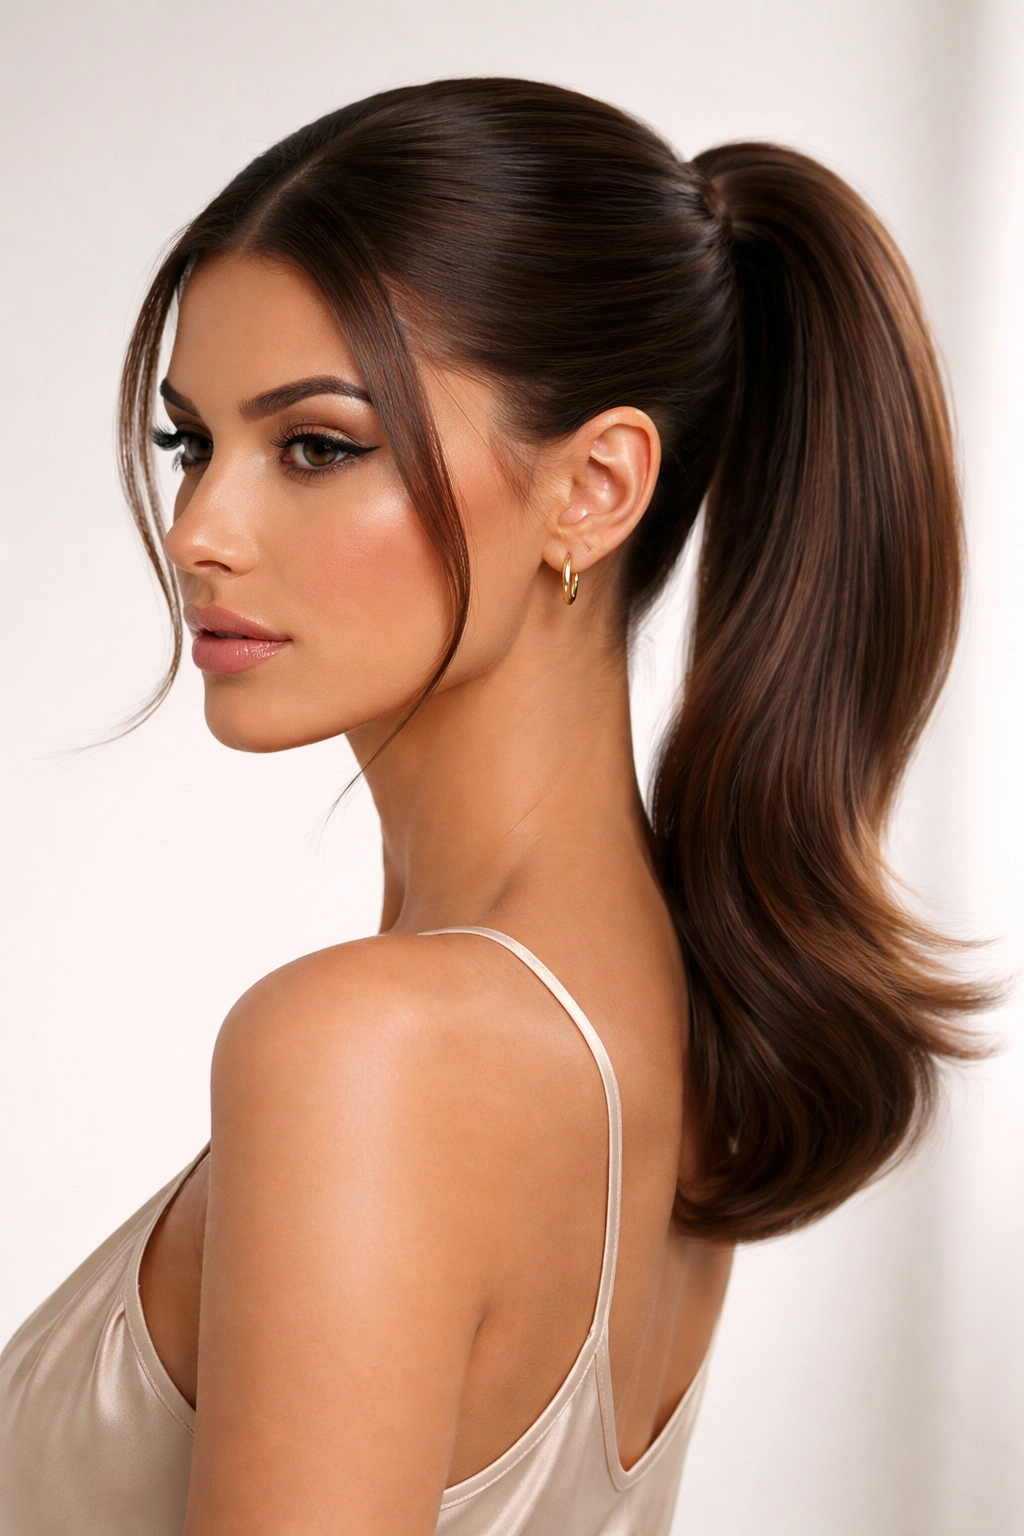
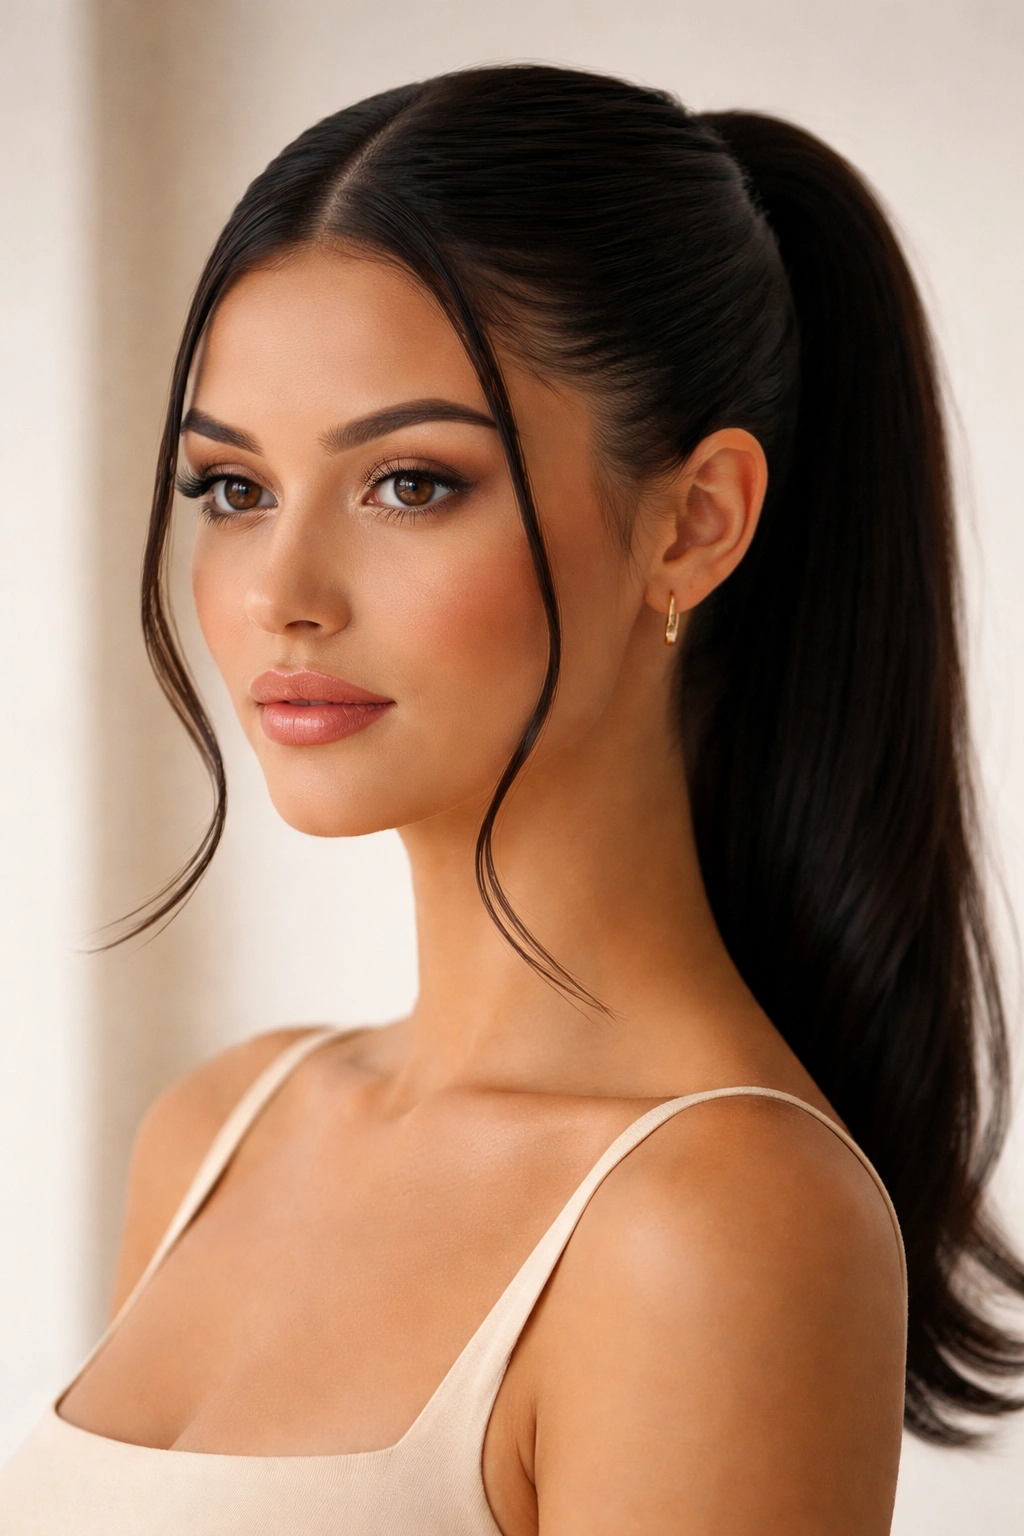
A middle part has a way of transforming your entire face, creating a naturally balanced, sophisticated frame that feels effortlessly chic. When you pair that clean center line with a sleek ponytail, you’ve got a hairstyle that works equally well for a professional meeting, a date night, or simply when you want to elevate your everyday look. There’s something undeniably polished about the combination—it’s the kind of style that photographs beautifully, stays in place all day, and makes you feel genuinely put-together.
The beauty of sleek middle part ponytails lies in their versatility. Whether your hair is pin-straight, naturally wavy, or textured, there’s a version that works for your texture and face shape. The middle part itself is forgiving; it suits most face shapes remarkably well because it balances width evenly, and the sleekness amplifies that effect. You’re not adding volume or drama on one side—everything flows down the center, creating clean lines that feel intentional and refined.
What makes these styles so practical is that they work across different hair lengths, skill levels, and occasions. You can wear them slicked back with surgical precision for corporate settings, or leave a few face-framing pieces slightly undone for a romantic vibe. The ponytail placement changes everything too: a high ponytail with a middle part feels youthful and energetic, while a lower placement reads more mature and elegant. Once you understand the core technique, you can adapt these styles to fit whatever your day demands.
Let’s walk through ten distinct sleek middle part ponytail looks, each with its own character and the specific techniques that make them work beautifully.
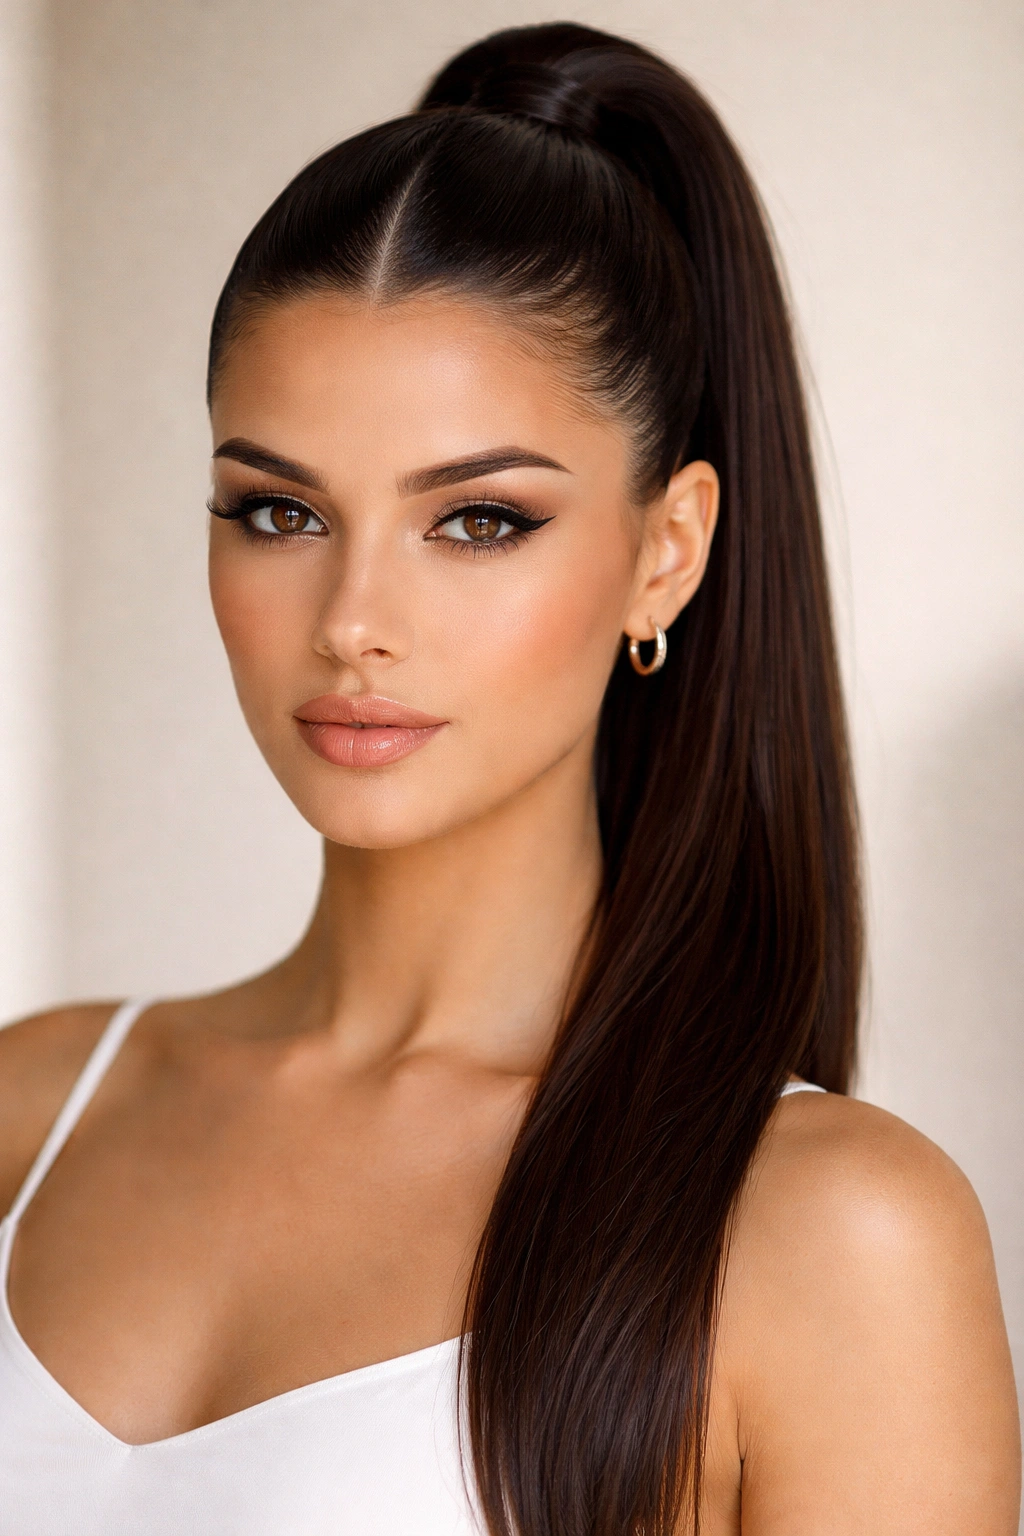
1. The Sleek High Ponytail with Razor-Sharp Middle Part
This is the most classic version, and for good reason—it’s clean, youthful, and impossible to do halfway. Start by creating your middle part while your hair is completely dry. Use a rattail comb to ensure it’s genuinely centered from your forehead straight back to your nape. The key to razor-sharpness is working with hair that’s already dry; trying to part damp hair almost always results in a blurry line that shifts as it dries.
The Technique That Creates That Glass-Smooth Finish
Apply a lightweight smoothing serum to your palms, then run your hands down each side of the middle part, smoothing the hair in one direction on each side. This isn’t about making it wet—you want just enough product to catch flyaways and create shine without leaving it slick or greasy. Work in small sections if needed, especially around your face where stray hairs are most visible.
Essential Steps for Staying Sleek All Day
- Use a slicking gel with hold rather than just serum if you’re aiming for 8+ hours of perfection; serums give shine but not staying power
- Gather your hair into a high ponytail at the crown, positioning it roughly where the crown of your head naturally peaks
- Use a fine-tooth comb to smooth any bumps in the ponytail before securing with a strong elastic
- Wrap a small section of hair around the elastic base to hide it, then secure with a bobby pin that matches your hair color
- Finish with a light hairspray, holding the bottle far enough away that it mist-coats rather than soaking your hair
This style is a non-negotiable for job interviews, formal presentations, and any occasion where you want zero doubt that you’ve made effort. The sleekness reads as intentional polish, not accidental styling.
2. The Curved Sleek Ponytail with Soft Face-Framing
Not every sleek ponytail has to be blunt and severe. This version uses the middle part as your anchor but allows the ponytail itself to curve slightly outward at the back of the head, creating dimension while maintaining that polished front. The middle part stays sharp, but the ponytail has gentle fullness rather than sitting flat against the skull.
Creating Volume Without Sacrificing Sleekness
Start with the same razor-sharp middle part technique. When you’re ready to create your ponytail, use a paddle brush to gently tease the crown section—not dramatically, just enough micro-texture that the hair has something to grip and won’t slip flat. Smooth the teased section on top while leaving the underlayers textured, then gather everything at your desired height.
Styling Tips That Make the Difference
- Position the ponytail slightly lower than you would for a strictly sleek version (around mid-crown rather than at the very apex of your head) to give the curved shape room to develop
- After securing, gently pull down on the front sections near your part to create a subtle face-frame, then use a fine-tooth comb to re-smooth the part itself so it stays sharp
- Consider leaving two thin pieces of hair in front of your ears to catch and frame your face—part these pieces at your middle part line and let them curve naturally
- Use clear elastics under your smoothed ponytail so the part remains visible and sharp from the front view
This style bridges the gap between a structured, no-nonsense look and something that feels slightly softer and more approachable. It’s brilliant for creative industries or any setting where you want to look polished without appearing stern.
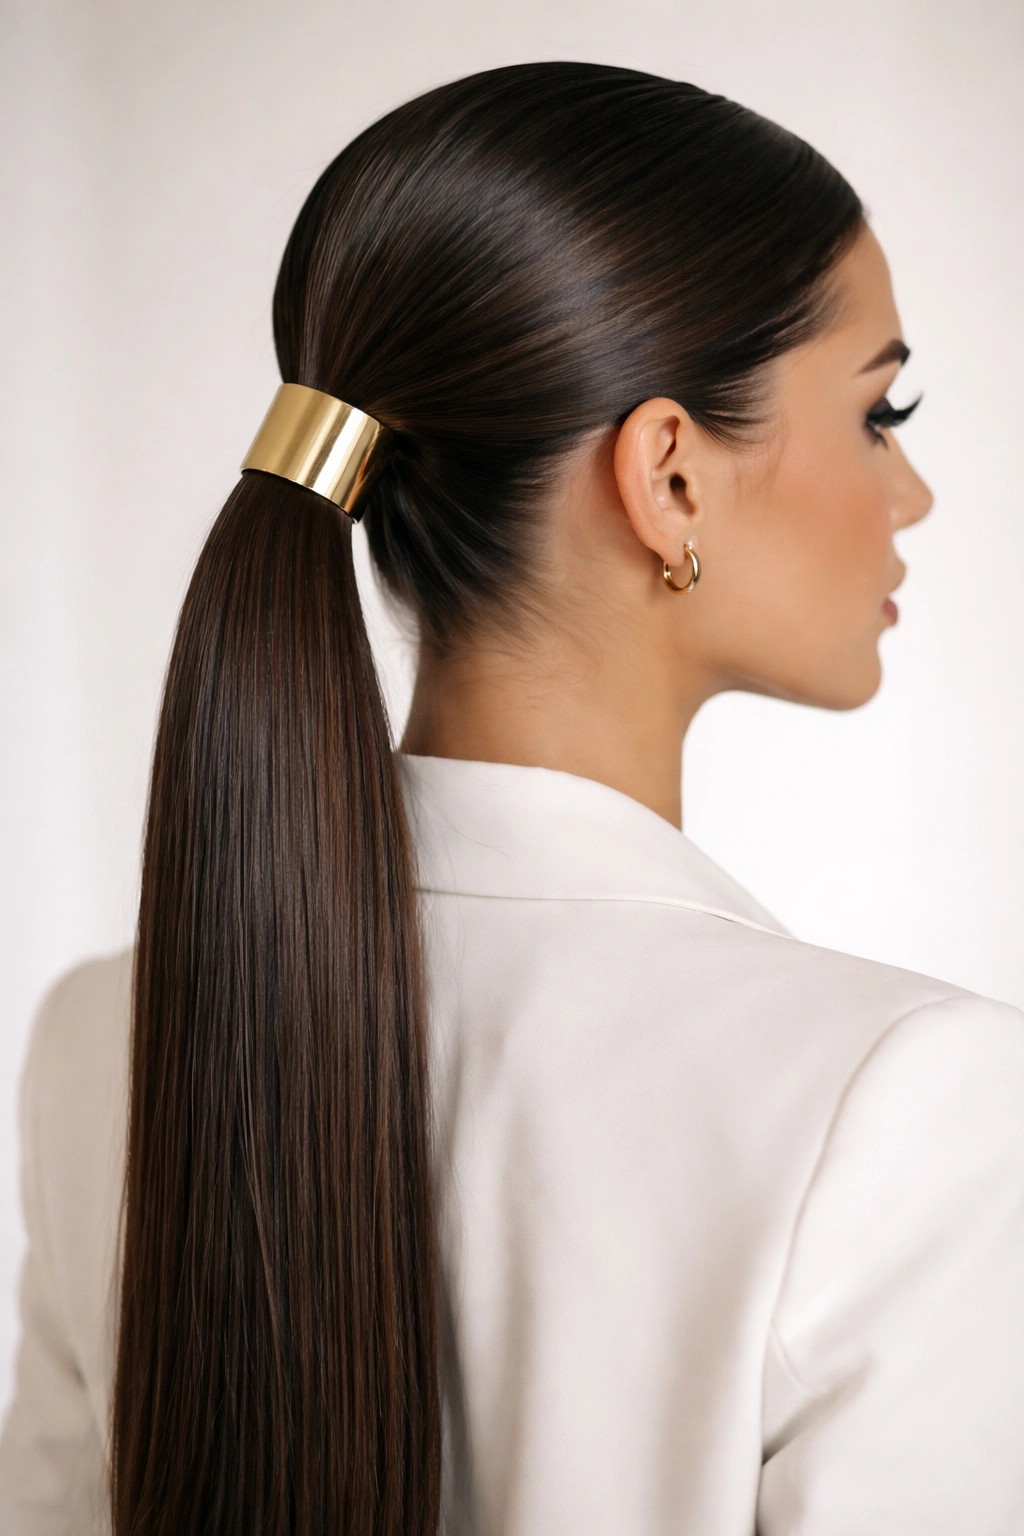
3. The Low Sleek Ponytail with Dramatic Middle Part
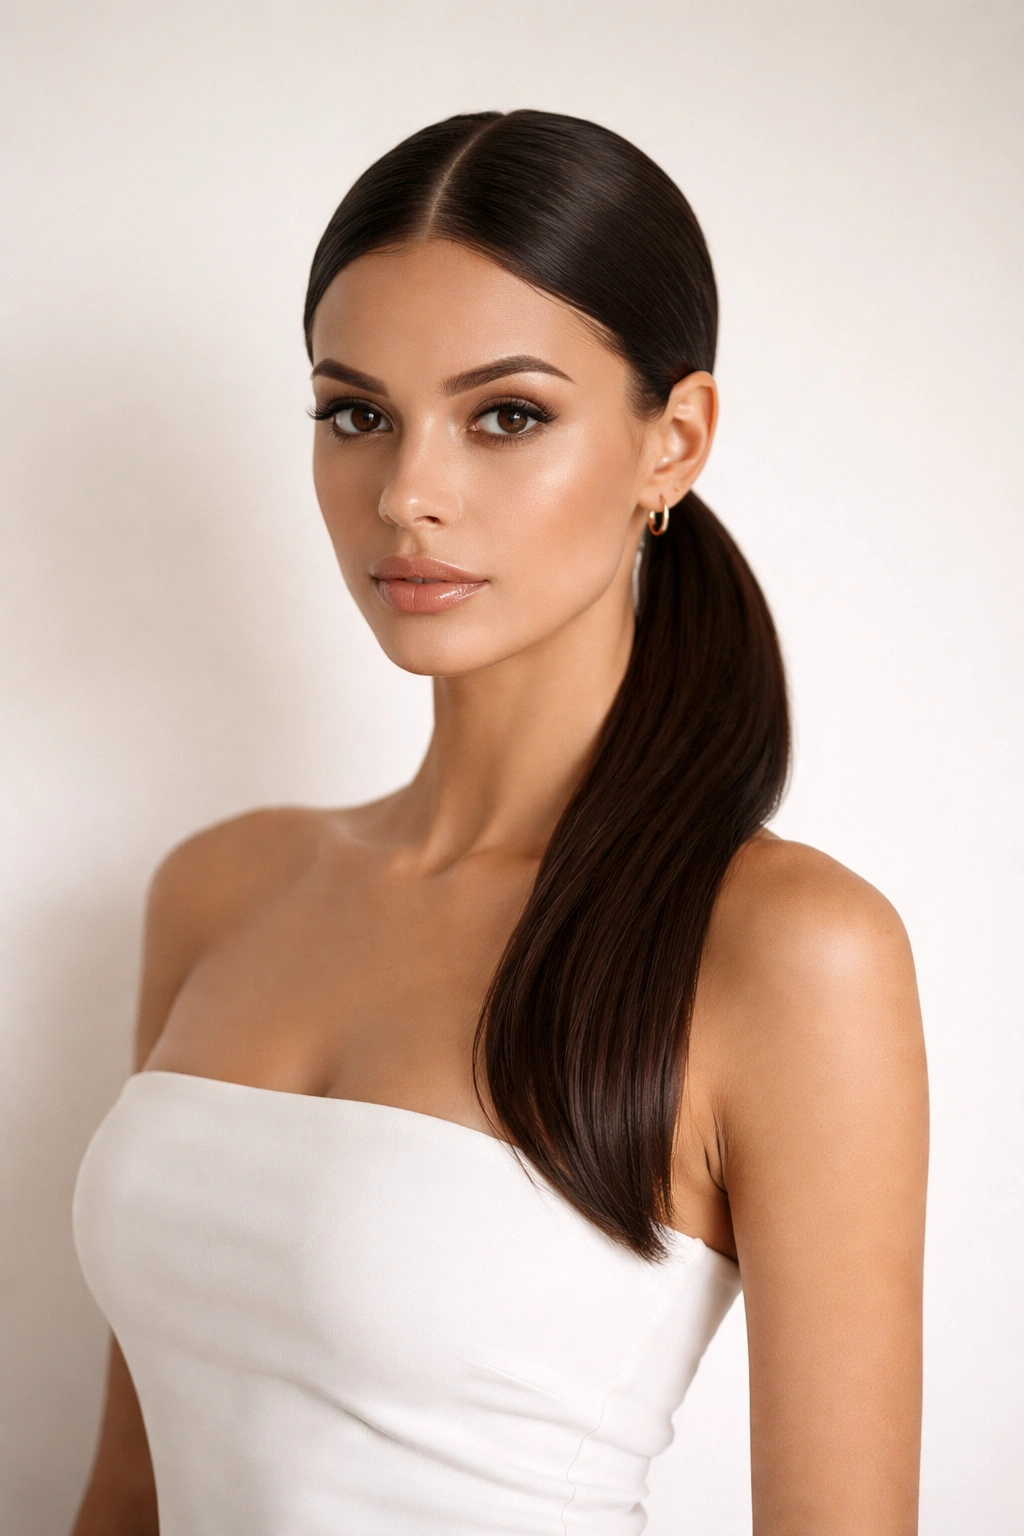
The lower you position a ponytail, the more sophisticated it reads. A low sleek ponytail with a perfectly defined middle part creates an elongated line from your part straight down your back, which visually lengthens your neck and face. This is an especially smart choice if you prefer to emphasize your bone structure or if you find high ponytails pull at your scalp.
Positioning and Tension for a Graceful Low Ponytail
The actual ponytail should sit at the nape of your neck—that soft spot where your neck meets the base of your skull. This placement creates a long, elegant line while being much less harsh on your hairline than a high version. Keep your hands gentle when smoothing; tight pulling over time can stress your edges, and a sleek low ponytail doesn’t need brutally tight tension to look polished.
Achieving Definition From All Angles
- Create your middle part as usual, using a rattail comb for precision
- Brush your hair smoothly back toward the low ponytail point, using a paddle brush to direct hair in one cohesive direction on each side
- At the nape, use a softer elastic designed for fine or delicate hair rather than thick gym-style elastics; lower ponytails benefit from a lighter grip that doesn’t risk rippling or damaging hair
- Polish the nape area by smoothing any flyaways with a tiny bit of gel applied with the back of your index finger
- Leave your middle part visible from the front; resist the urge to cover it with hair
This placement is universally flattering and reads equally well whether you’re in business casual, an evening event, or a creative workspace. It’s the ponytail style that makes you look like you have your life together.
4. The Sleek Ponytail with Intricate Braided Wrap
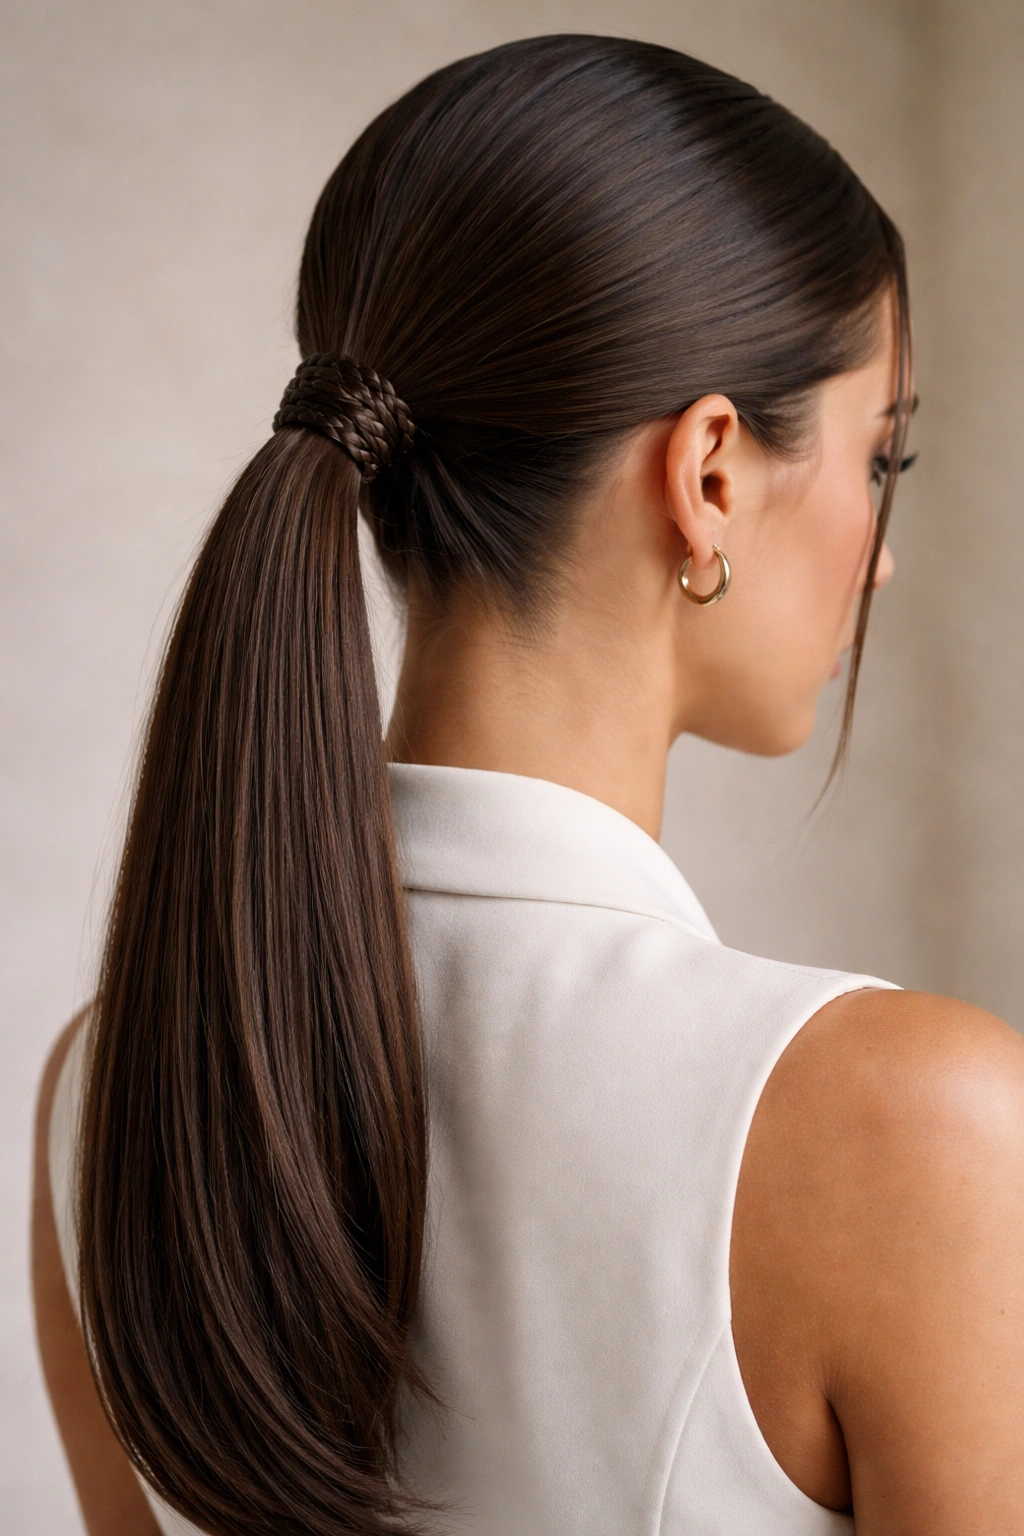
This version takes the basic sleek ponytail and adds a small braided element around the elastic, creating visual interest that feels more special than your everyday ponytail but isn’t complicated enough to require serious styling skills. The middle part remains sharp and central, while the braided wrap draws the eye to the back.
Creating a Polished Braided Detail
After securing your sleek middle-part ponytail with an elastic, take a very thin section of hair from the ponytail (roughly the thickness of a pencil) and divide it into three even strands. Create a simple three-strand braid that wraps around the elastic base, then secure it with a tiny clear elastic or bobby pin that sits behind the main ponytail where it’s hidden.
The Secret to Making It Look Intentional
- Make sure your initial ponytail sections are smooth and secured completely before adding the braid; any bumps underneath will show through the braided wrap
- Use a fine-tooth comb to smooth the section you’re about to braid so it lies flat against the elastic
- Braid loosely and keep the braid slightly to one side of the elastic rather than perfectly centered; this creates the impression of a carefully placed accent rather than looking like you couldn’t quite control the ponytail
- After securing, gently fan the braid’s edges with your thumb to create a slightly fuller, more organic appearance
This style signals that you’ve paid attention to detail and put actual thought into your appearance, which reads as sophisticated without being overdone. It’s perfect for video calls where the back of your head is visible, or for occasions where you want to feel polished but not severe.
5. The Sleek Ponytail with Hidden Undercut Effect
If you have medium-to-thick hair and want a sleek ponytail that looks intentionally architectural, creating a subtle undercut effect within your ponytail gives that high-fashion polish. The middle part remains sharp at the front, but the ponytail itself has a defined shape where underneath sections are trimmed or tucked inward, creating the illusion of a slimmer ponytail.
Achieving the Look Without Permanent Cutting
You don’t need to actually cut your hair to get this effect. After creating your sleek middle part and ponytail, use a fine-tooth comb to section out the bottom 1.5 to 2 inches of the ponytail. Smooth these bottom sections and secure them separately with a second, clear elastic positioned just below your first elastic. The middle sections of your ponytail (between the two elastics) will fan out slightly, creating natural dimension.
Pro Technique for Maximum Impact
- Make sure your first elastic is tighter than your second elastic; this creates the visual tension that makes the undercut effect readable
- After securing both elastics, use your fingers to very gently tug the middle sections outward and slightly backward so they puff slightly
- Smooth everything with a fine-tooth comb again so the puff is subtle, not dramatic
- Hide both elastics by wrapping a thin section of hair around them (use a pencil to thread the wrapping hair cleanly under and around the elastics)
This approach gives you that coveted high-fashion slicked-back aesthetic without requiring an actual undercut, and you can change your mind about it the next day. It reads as modern and intentional.
6. The Sleek Middle Part with Graphic Sleek Bun
Sometimes the ponytail is just the foundation for something more elaborate. This style uses the sleek middle-part ponytail as your base, then transforms the ponytail into a low, flat bun that sits at the nape of your neck. It’s polished, modern, and significantly easier to achieve than people expect.
Creating a Bun That Actually Stays Flat
Start with your sleek middle-part ponytail positioned at the nape of your neck. Before you do anything else, twist the entire ponytail clockwise (or counterclockwise—pick one direction and commit to it) about 3-4 times. This creates tension within the ponytail and gives you a sturdy base that won’t unravel.
Wrapping It Into a Sleek Bun Shape
- Once twisted, wrap the ponytail around the base elastic in a neat spiral, tucking the end under and securing with bobby pins that match your hair color
- As you wrap, keep slight tension so the bun sits flat rather than creating loops or bumps
- Use 3-4 bobby pins positioned at different angles to anchor the bun securely
- Smooth any surface bumps with a fine-tooth comb and a tiny bit of smoothing gel applied precisely to the problem areas
- Check the bun from multiple angles—front (where your middle part remains visible and sharp), sides, and back
This is the style that makes you look like you’ve gone to a salon, but you’ve actually achieved it in five minutes. It’s especially effective for situations where you need to look elevated—client meetings, date nights, events where you want to be noticed.
7. The Sleek Ponytail with Feathered Whisps
This version breaks the “sleek” rule slightly by intentionally releasing a few delicate pieces of hair around your face. The middle part is still sharp and the main ponytail is still smooth, but the face-framing whisps create a balanced, human softness that pure sleekness sometimes lacks.
Intentionally Releasing Whisps That Look Planned
After creating your basic sleek middle-part ponytail, release two very thin sections of hair on either side of your face (about the thickness of a pencil), parting them along your existing middle-part line so they appear intentional rather than escaped. These pieces should frame your face and extend roughly to your jawline or slightly longer.
Making Whisps Look Polished Rather Than Accidental
- Curl these wisps away from your face using a small-barrel curling iron or a straightener twisted slightly at the ends
- Smooth the wisps gently with a fine-tooth comb so they have soft movement without being kinky or obviously curled
- Leave your main ponytail completely sleek and smooth to create contrast with the softness of the wisps
- Use a light hairspray on the wisps to keep them in place without making them stiff or crunchy
The effect is a ponytail that looks like you’re being yourself while simultaneously looking put-together. It’s sophisticated enough for professional settings but approachable enough that you don’t look unapproachable.
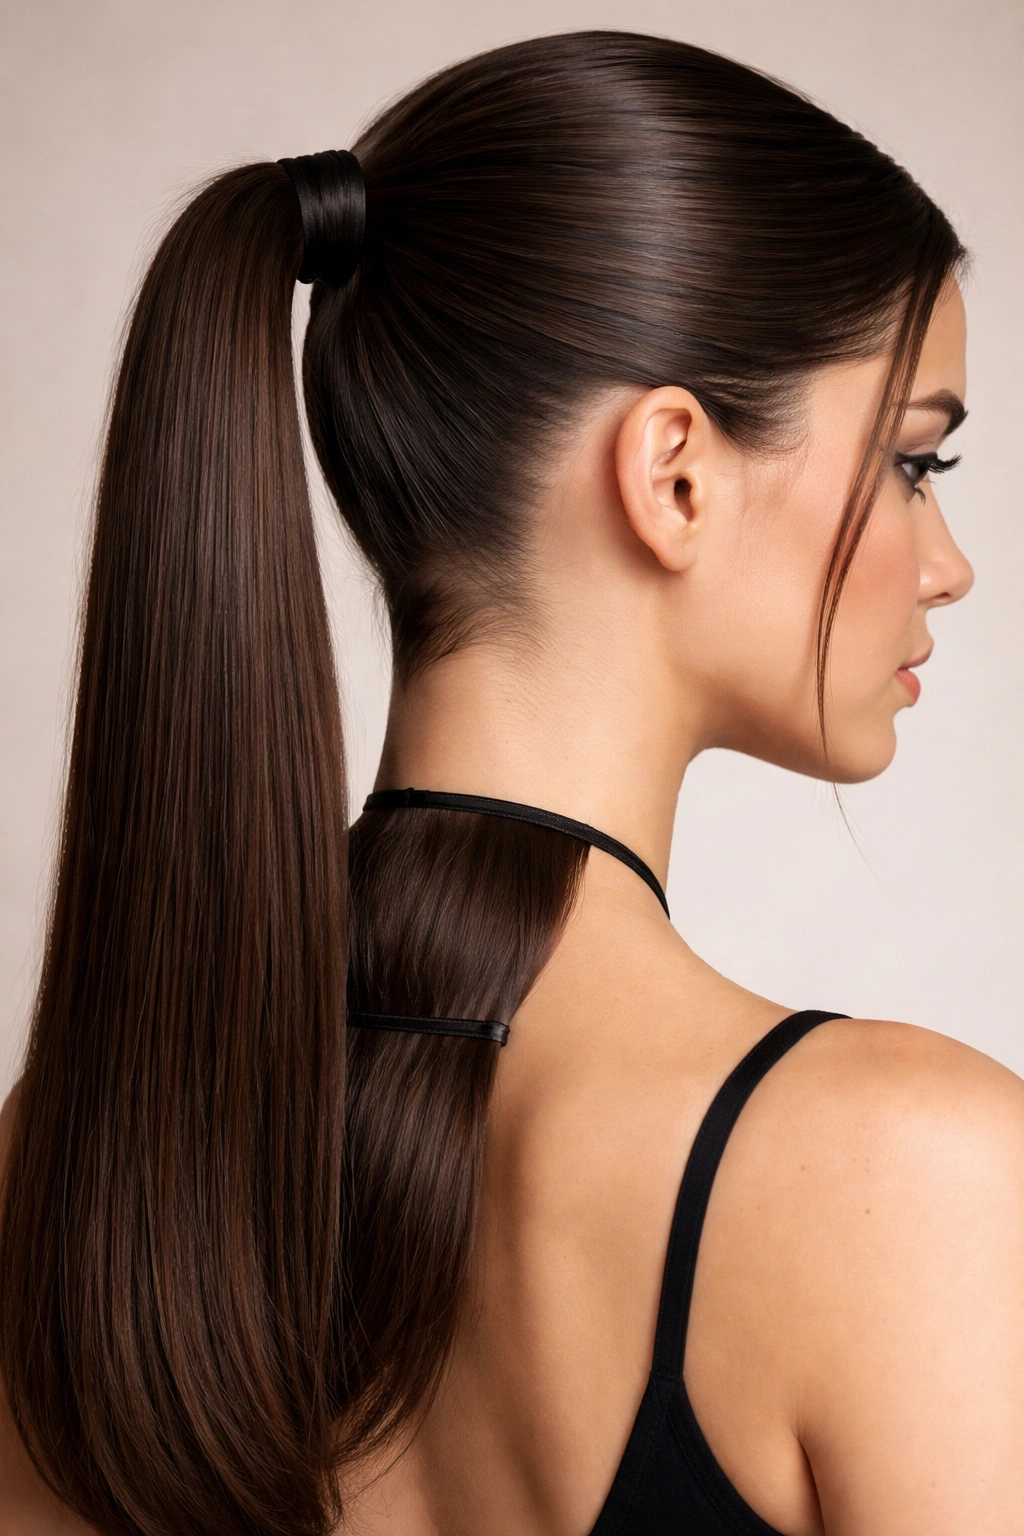
8. The Sleek Ponytail with Geometric Accessory
Sometimes the sleekness is best enhanced by adding a striking geometric hair accessory—a silver cuff, a minimalist clip, or a structured scrunchie that emphasizes the ponytail’s shape. The middle part carries the style, but the accessory at the base elevates it into the deliberately fashionable category.
Choosing Accessories That Amplify Rather Than Overwhelm
The best accessories for this look are minimalist and structured: metal hair cuffs, geometric clips, sleek leather hair ties, or architectural bows. The sleekness of your ponytail is the star; the accessory should emphasize that cleanliness rather than competing with it or covering up your hard work smoothing.
Positioning for Maximum Visual Impact
- Position your accessory directly at the base of your ponytail, covering the elastic completely
- Make sure your middle part remains visible and sharp from the front; the accessory is a back-of-head detail
- If you’re using a cuff, slide it onto the ponytail base after securing the initial elastic, then tighten a second clear elastic above it to hold it in place
- Step back and check the proportion; the accessory should enhance the ponytail’s shape, not distract from it
This approach transforms a basic sleek ponytail into something that reads as intentionally styled. It’s the difference between a default hairstyle and a chosen statement.
9. The Sleek Ponytail with Wet-Look Finish
A wet-look sleek ponytail uses pomade or a specialized wet-look gel to create an almost glossy, deliberately slicked appearance. This isn’t actually wet hair—it’s strategically styled to look like it might be, which creates a bold, fashion-forward vibe that photographs beautifully.
Achieving a Wet Look Without Damaging Your Hair
Use a lightweight hair pomade or specialized wet-look styling gel rather than actual water or mousse, which will eventually dry and flake. Apply the product to your palms (start with about a nickel-sized amount) and run your hands down each side of your middle part, smoothing as you go. Build up the glossy effect gradually rather than applying too much product at once.
Maintaining the Wet Look Throughout Your Day
- Use a pomade formulated for wet-look styling rather than heavy oils, which separate and look greasy rather than intentional
- Apply the product to damp rather than fully dry hair for the most convincing wet appearance
- The wet look works best with hair that’s naturally straight or has been straightened; texture underneath will show through and break the effect
- Refresh throughout the day by lightly dampening your fingers and running them down the ponytail to reactivate the product and maintain shine
- Don’t use hairspray over a wet-look style; it dulls the glossy effect
This style is bold and editorial—it reads as fashionable and intentional rather than simply neat. It’s perfect for creative fields, editorial shoots, or any time you want to make a style statement.
10. The Sleek Ponytail with Pearl or Metal Thread Accents
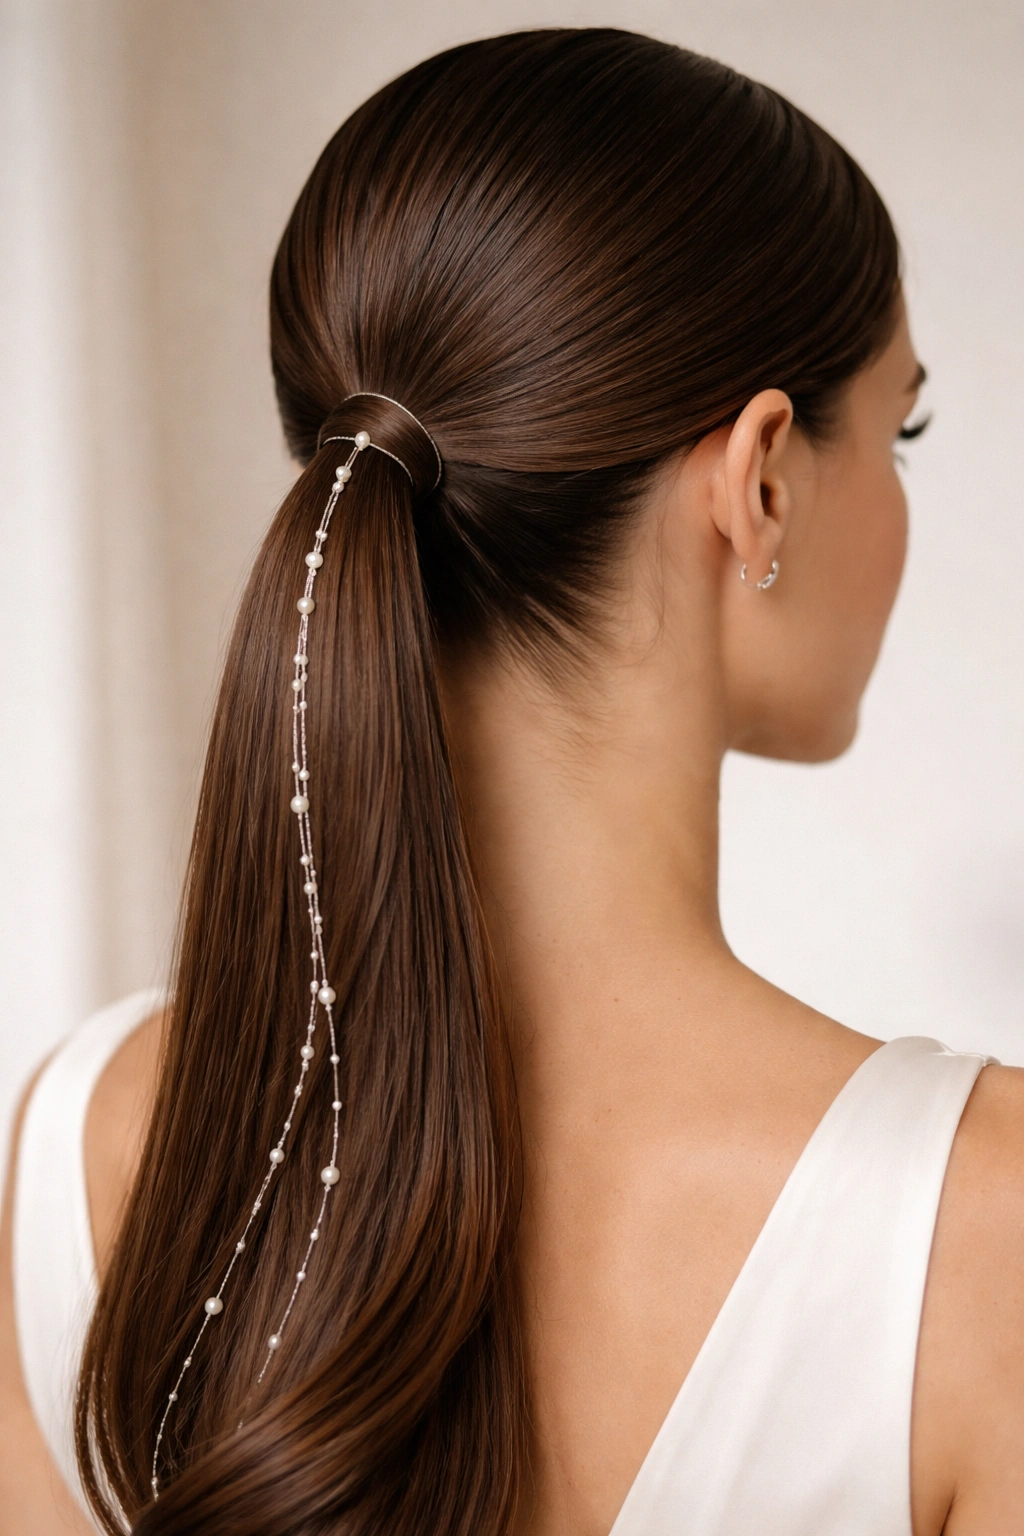
For the ultimate in polished sophistication, weave thin pearl beads, delicate metal thread, or rhinestone strands through your sleek ponytail. The middle part remains sharp and clean, but the ponytail itself has subtle sparkle that catches light with every movement.
Incorporating Decorative Elements That Look Intentional
Before you begin, decide whether you want to weave the accents throughout the length of the ponytail or keep them concentrated around the base. For a more subtle approach, weave them only around the elastic base and the first 2-3 inches of the ponytail. For a bolder statement, weave them down the length in vertical lines.
Technique for Seamless Integration
- Create your sleek middle-part ponytail first and secure it fully
- Use a thin crochet hook or a bobby pin bent into a hook shape to thread pearl or metal strands through small sections of your ponytail
- Thread each strand through 3-4 small sections spaced an inch or two apart so the accents appear consistently throughout rather than bunching in one area
- Secure the thread ends by tucking them inside the ponytail or wrapping them around the base elastic
- Step back and assess whether the accents are evenly distributed and whether they enhance the sleekness or distract from it
This approach is ideal for special occasions, celebrations, or any event where you want to feel genuinely glamorous. The pearl or metal accents catch light beautifully in photographs and add a touch of intentional luxury.
Final Thoughts
A sleek middle-part ponytail is one of those styles that genuinely works across contexts and occasions. The middle part itself is the anchor—once you’ve perfected that center line, everything else flows from it. The key isn’t choosing one of these styles and rigidly committing to it; it’s understanding the core technique (clean part, smooth sections, proper securing) and then playing with variations based on what feels right for your day.
The easiest mistake to make is over-tightening your ponytail, thinking that tension equals polish. Actually, the most sophisticated sleek ponytails have just enough tension to stay in place all day without creating visible strain on your hairline or scalp. Smoothness and intentionality matter far more than tightness.
Invest in the right tools: a quality rattail comb for parting, a paddle brush for smoothing, and a few different types of elastics so you can choose the right tool for your hair texture and ponytail height. A lightweight smoothing serum and a light-hold slicking gel are the only products you truly need. Everything else is refinement and personal preference.
The best part of these styles is that once you’ve done a few, they become genuinely quick. A sleek middle-part ponytail that takes you twenty minutes the first time can become a five-minute default once you know exactly how your hair responds and what technique works for your texture. That’s when it transforms from a special-occasion style into something you wear regularly because it makes you feel put-together, and you know it actually looks that way.