Cornrow ponytails are such a game-changer for kids’ hair, and honestly, if you haven’t explored this style yet, you’re missing out on one of the most versatile, protective, and adorable options available. Whether your child has thick, coily hair or you’re looking for a style that keeps everything neat and secure during active play, cornrowed ponytails deliver on practicality while looking absolutely stunning. The beauty of cornrows is that they protect the hair from daily friction and breakage while allowing you to create intricate, eye-catching designs that your child will actually love showing off.
What makes cornrow ponytails so special for kids is the combination of function and fashion. These styles hold up through playground adventures, sports practice, swimming, and everything in between—without the constant need for restyling or reapplication throughout the day. Kids can be themselves, moving freely and playing hard, while their hair stays beautifully styled and protected. Plus, cornrows offer the perfect foundation for so many creative variations that your child can feel confident, special, and expressive through their hairstyle choice.
The styles below showcase the range of possibilities, from sleek and simple to bold and intricate. Each one can be customized to match your child’s hair texture, length, personality, and lifestyle. Some take longer to create but last longer between touch-ups, while others are quicker to install but offer that perfect balance of style and practicality. Let’s explore the cornrow ponytail styles that work best for kids of different ages, hair types, and style preferences.
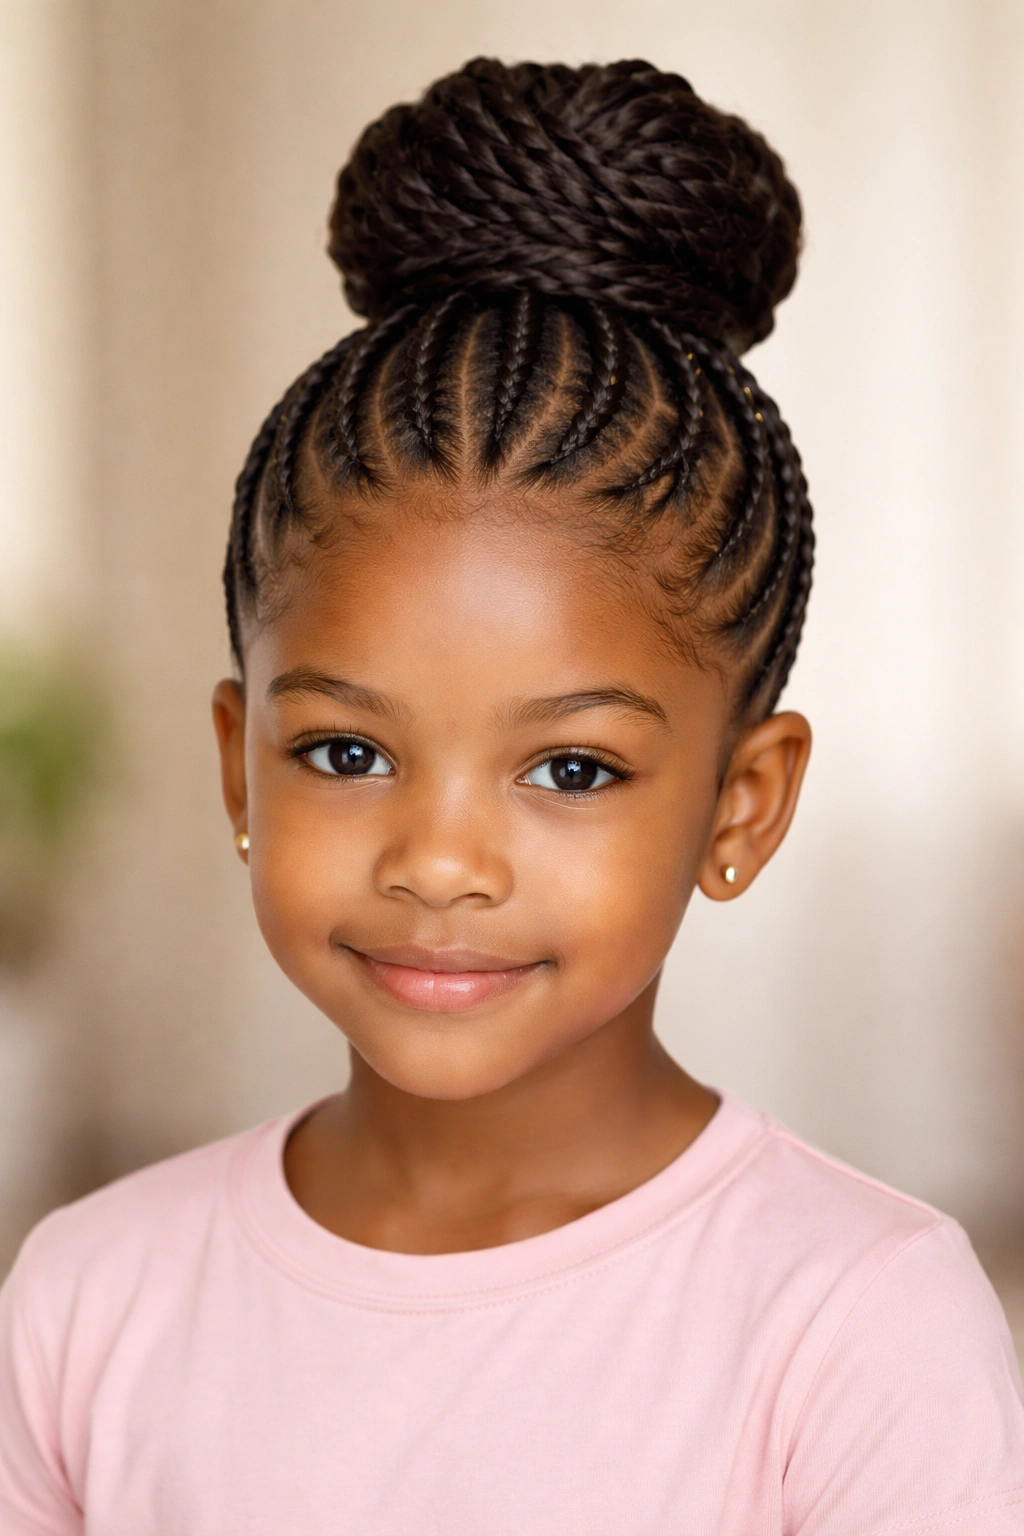
1. Classic Center-Part Cornrow Ponytail
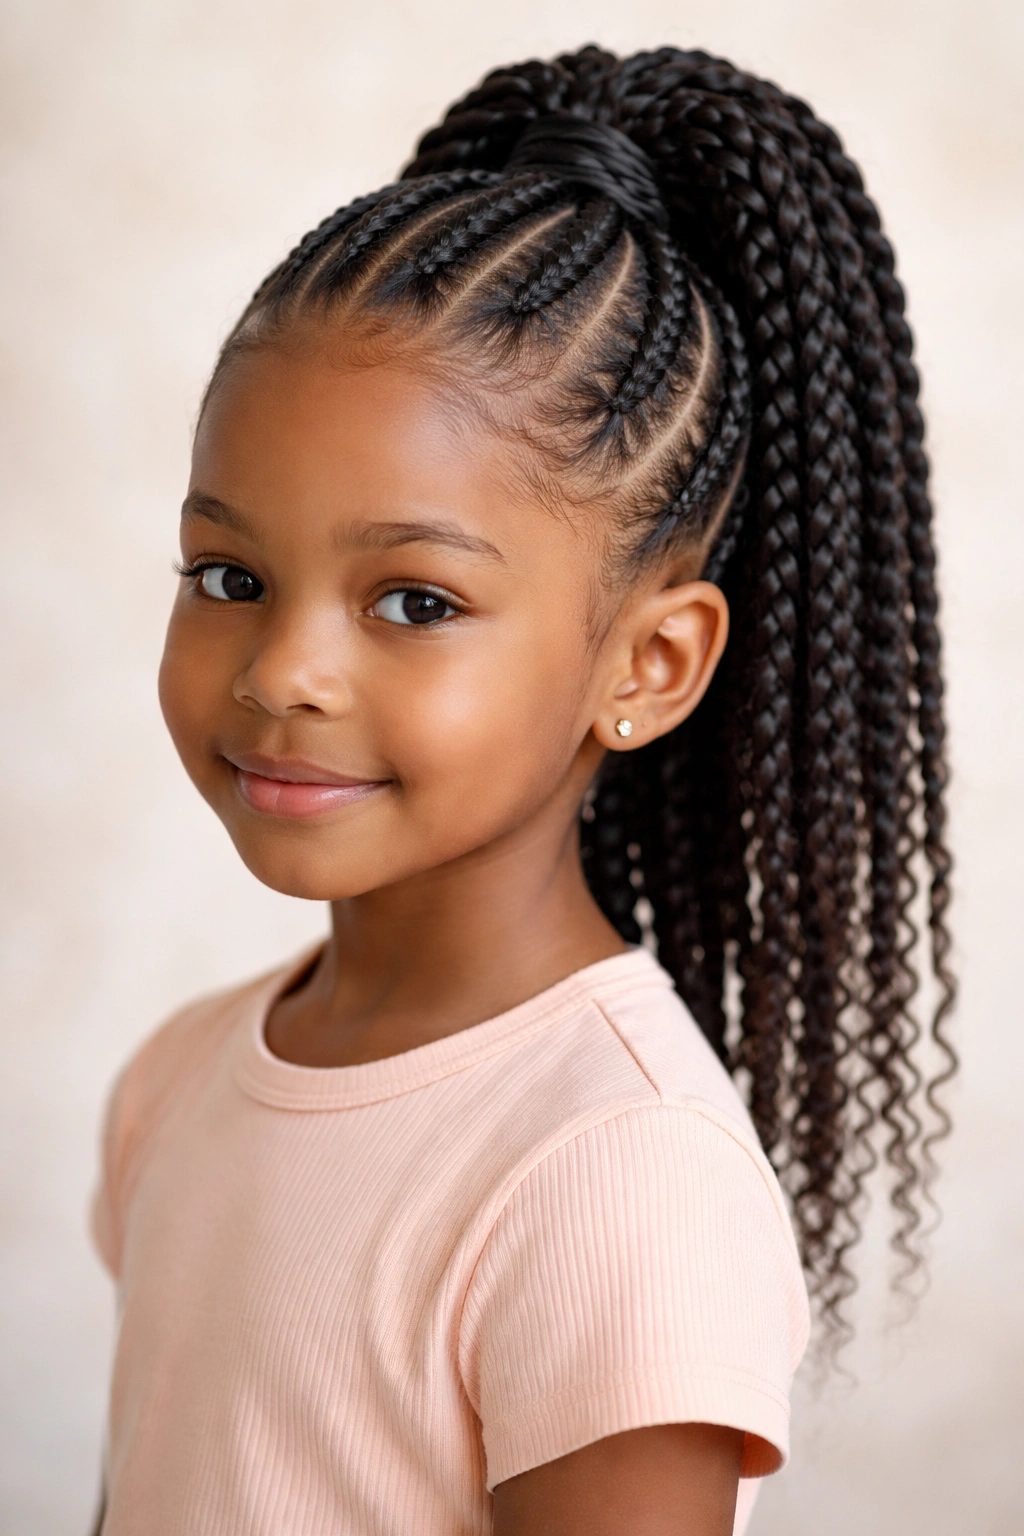
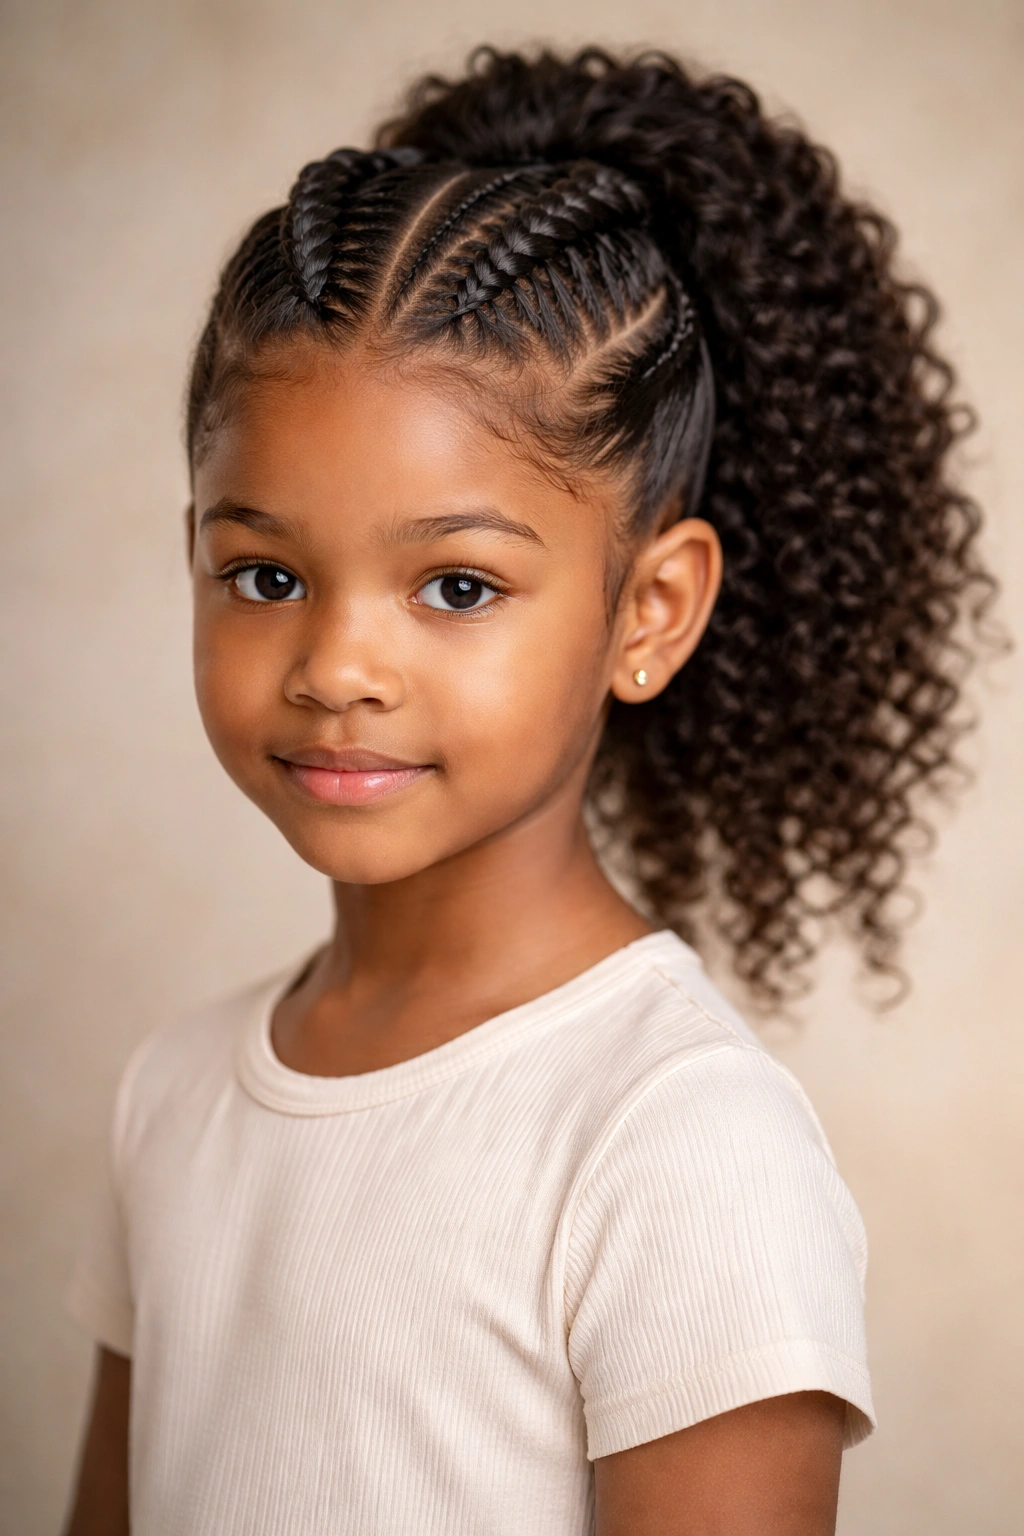
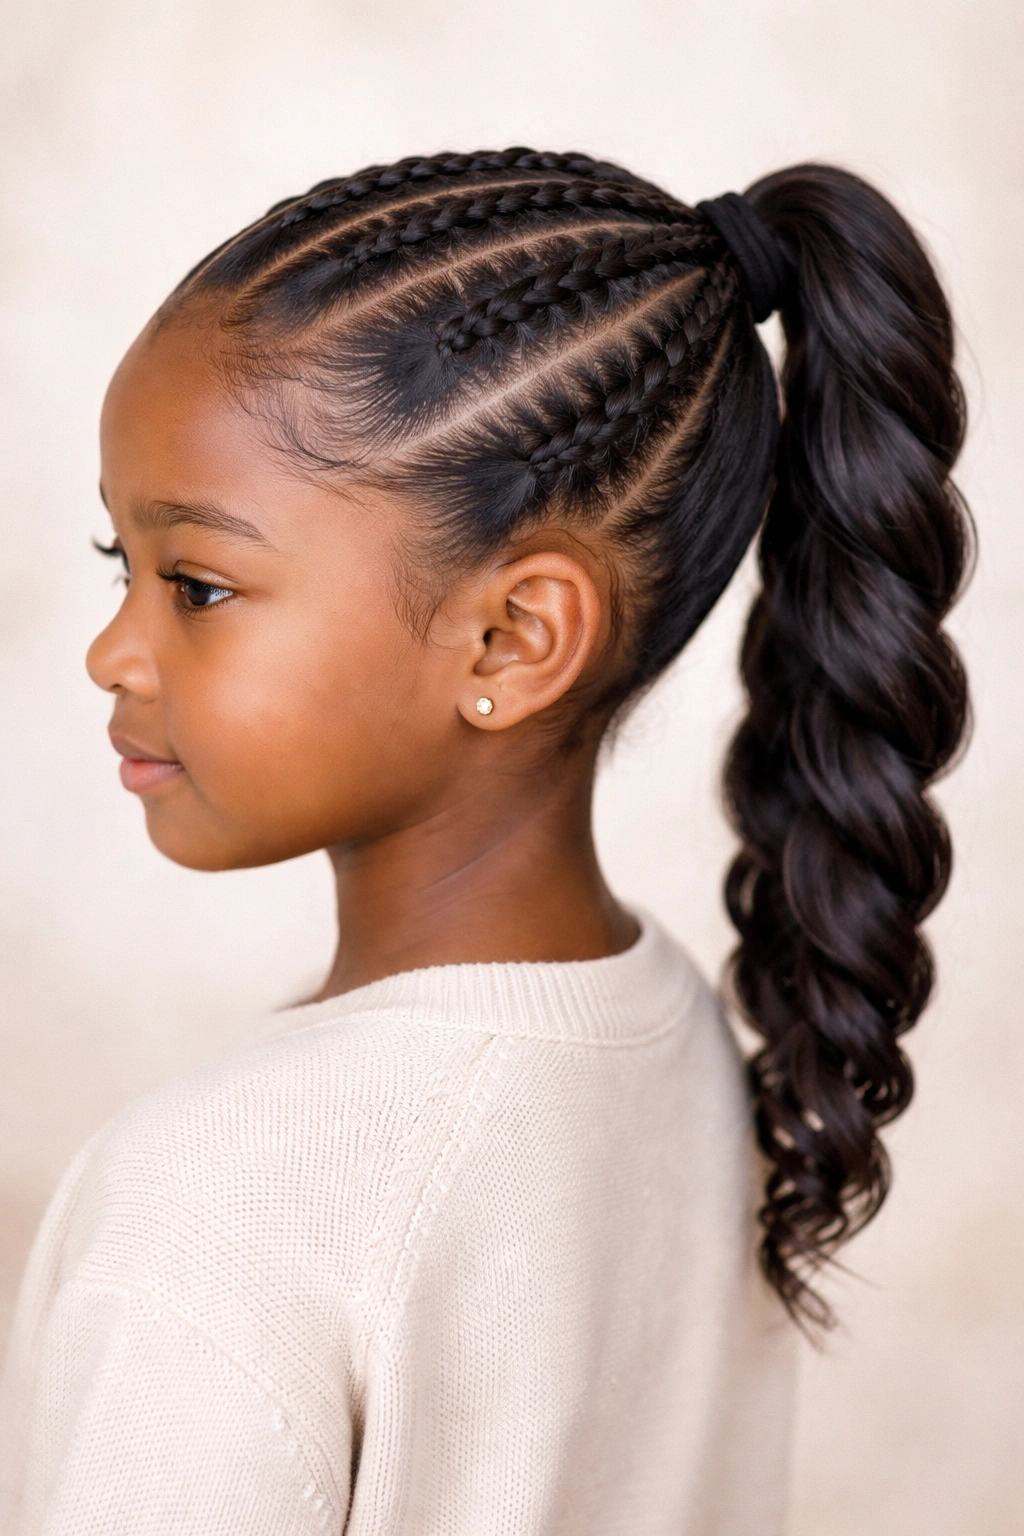
The classic center-part cornrow ponytail is the foundation style that works beautifully on almost every kid with coily or textured hair. You’re creating two cornrows that run down the center of the head from the forehead to the back, then gathering all the hair into one ponytail at the nape or crown, depending on your preference. It’s clean, symmetrical, and takes anywhere from 45 minutes to an hour to complete depending on how thick your child’s hair is.
What Makes It Timeless
This style works because it’s the perfect balance of neat and playful. The two center cornrows frame the face beautifully and create a structured look that feels intentional and polished. Kids love how the cornrows create definition and movement, and parents appreciate how long it lasts—often staying fresh for a full week with minimal daily maintenance. The simplicity means you can finish it in one sitting without your child getting restless in the chair.
Installation Tips and Tricks
- Start with freshly washed and deeply moisturized hair, then let it fully dry before cornrowing
- Use a lightweight leave-in conditioner and a tiny bit of edge control to keep the cornrows looking smooth
- Part the center line as straight as possible using a rattail comb and ruler—precision at the beginning makes the whole style look more polished
- Keep the cornrows even in thickness by dividing your sections carefully before you start braiding
- Pull the ponytail as tight or loose as your child prefers—tighter holds longer but looser feels more comfortable for sensitive scalps
Pro tip: If your child finds cornrowing uncomfortable or experiences tension headaches, loosen the cornrows slightly as you braid—they’ll still look great but feel infinitely better.
2. Four-Cornrow High Ponytail
This style creates drama and holds incredibly well because you’re distributing the hair across four cornrows instead of just two. You’re essentially dividing the entire head into four sections and braiding each one separately, then pulling all four cornrows together into a high ponytail at the crown. It’s bold, it’s protective, and it photographs beautifully.
Why Kids Adore This Look
Four cornrows create more volume and movement in the ponytail itself—the gathered hair bounces and flows differently than a two-cornrow style. Kids with longer hair absolutely love the fullness, and the multiple cornrows create an intricate, almost crown-like effect on the scalp. The style also tends to last longer than a two-cornrow version because the weight is distributed more evenly, meaning less slipping and loosening throughout the week.
Step-by-Step Approach
- Divide the head into four equal sections: start with your center part, then create a perpendicular part from ear to ear across the crown
- This creates four quadrants—two in front and two in back
- Braid each quadrant as a separate cornrow, following the natural growth pattern from front to back
- Gather all four cornrows at the crown, securing them with a clear elastic or decorative hair clip
- Option: Add hair wraps, beads, or colored thread woven into each cornrow for extra visual interest
Worth knowing: Four cornrows work best on kids with medium to thick hair density. On finer hair, four sections might look sparse—in that case, stick with two or three cornrows for a fuller appearance.
3. Side-Swept Cornrow Ponytail

Instead of creating symmetrical patterns, the side-swept version moves all the cornrows to one side of the head, creating a dramatic, romantic look that’s different from traditional styles. All the braiding follows the contours of the head from the opposite side, flowing toward and gathering into a ponytail on the side. It’s edgier, more fashion-forward, and honestly, it looks amazing on kids with any hair texture.
What Makes It Stand Out
This style has a completely different vibe—less structured, more artistic. It shows off the whole shape of your child’s head and face from the side that doesn’t have the cornrows, while the braided side creates beautiful dimension and visual interest. Kids often prefer this because it feels less symmetrical and formal than center-parted styles, giving them a bit more personality and flair. The asymmetry makes it feel intentional and stylish rather than purely practical.
How to Create the Side-Sweep Effect
- Start your cornrows on the side opposite from where you want the ponytail (if you want the ponytail on the right, start cornrowing from the left side)
- Create 2-4 cornrows that angle and curve toward the back, following the natural growth pattern and the shape of the head
- Guide the cornrows gradually toward the desired ponytail location—don’t force a straight line; let them curve naturally
- Gather all cornrows into the side ponytail and secure with an elastic
- Leave a few face-framing pieces loose if your child wants them, or keep everything tucked for a cleaner look
Insider note: This style works particularly well as a go-to for special occasions because it feels elevated and intentional compared to everyday ponytails.
4. Starburst Cornrow Ponytail
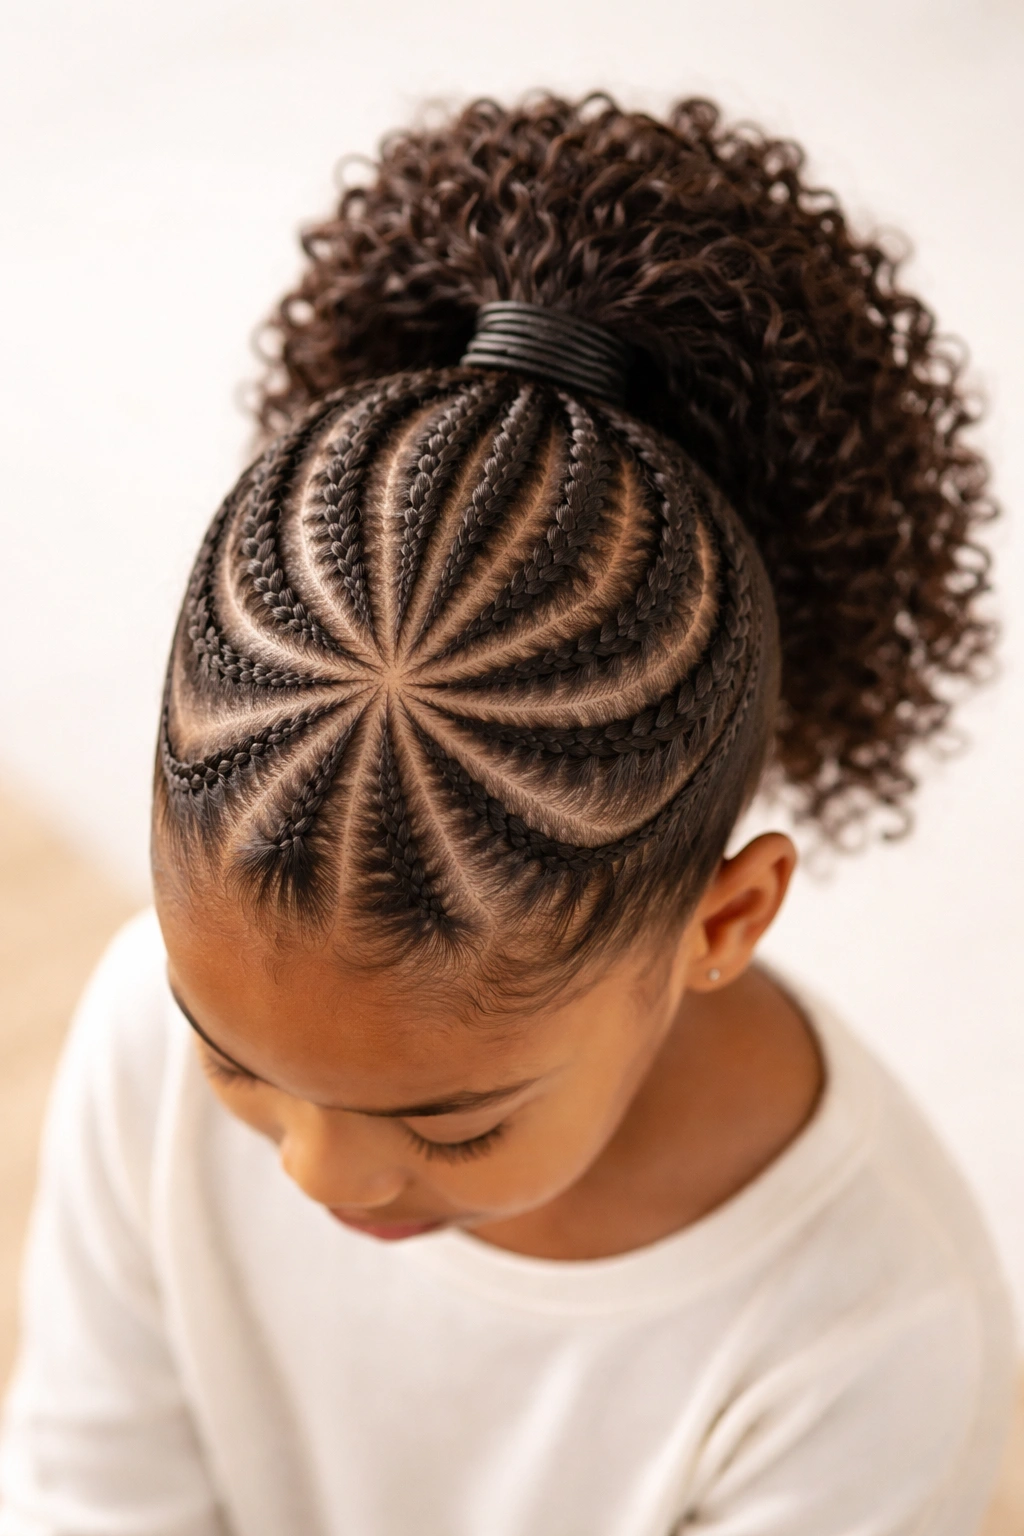
The starburst pattern is one of the most visually striking cornrow designs—you’re creating multiple cornrows that radiate outward from a center point, then gathering them all into a ponytail. From above, the pattern looks like rays of sunshine emanating from the crown. It requires more skill and planning but absolutely delivers on the “wow” factor.
Why This Style Impresses
Starburst patterns attract attention because they’re complex and clearly intentional. Kids feel genuinely special wearing this style, and it becomes a conversation starter. The multiple cornrows spreading across the head create tons of visual interest while still being fully protective. This isn’t a style you throw together quickly—it’s one you plan for and show off, which appeals to kids who love having a distinctive look.
Creating the Starburst Pattern
- Decide on the center point where your ponytail will be (usually at the crown or slightly forward)
- Create 6-8 cornrows that all start from different points around the hairline and angle back toward your center point
- Some cornrows should start at the front, some at the sides, some at the back—spreading them all around
- Keep the cornrows even in thickness so the starburst pattern looks intentional and balanced
- Gather all cornrows at your center point and secure with a hair elastic and/or decorative hairpiece
Pro tip: Mark your center point with a small clip before you start cornrowing so you have a clear target for where each braid should end.
5. Dutch Braid Ponytail with Cornrows
This hybrid style combines Dutch braids (which sit on top of the scalp rather than under it like traditional cornrows) with cornrows in the back, creating a style that’s part modern, part protective. The Dutch braids in the front and crown sections feel more intricate and eye-catching, while the cornrows in the back handle the bulk of the hair and create the secure foundation for the ponytail.
Why Hybrid Styles Work for Kids
Kids often love the combination because it gives them the best of both worlds—the dimensional, raised texture of Dutch braids where people see them (face-framing and crown areas) plus the protective security and longevity of cornrows in less visible areas. The style feels more contemporary and less uniform than all-cornrow styles, which appeals to kids who want something special but not too traditional. Plus, the Dutch braids can be loosened slightly for a softer, more romantic look compared to tight cornrows.
Installing the Hybrid Approach
- Create two Dutch braids in the front sections, starting at the hairline and angling back toward the crown
- Create 2-3 cornrows in the back sections, starting from the lower back of the head and angling toward the crown
- Let all braids meet at the crown where you’ll create your ponytail
- Secure everything together with a hair elastic, making sure the Dutch braids aren’t too loose or they’ll slip throughout the day
- The contrast between the raised Dutch braids and the flatter cornrows creates visual depth
Worth knowing: Dutch braids can feel looser and more comfortable for sensitive scalps, so if your child finds traditional cornrows too tight, this hybrid approach might be the answer.
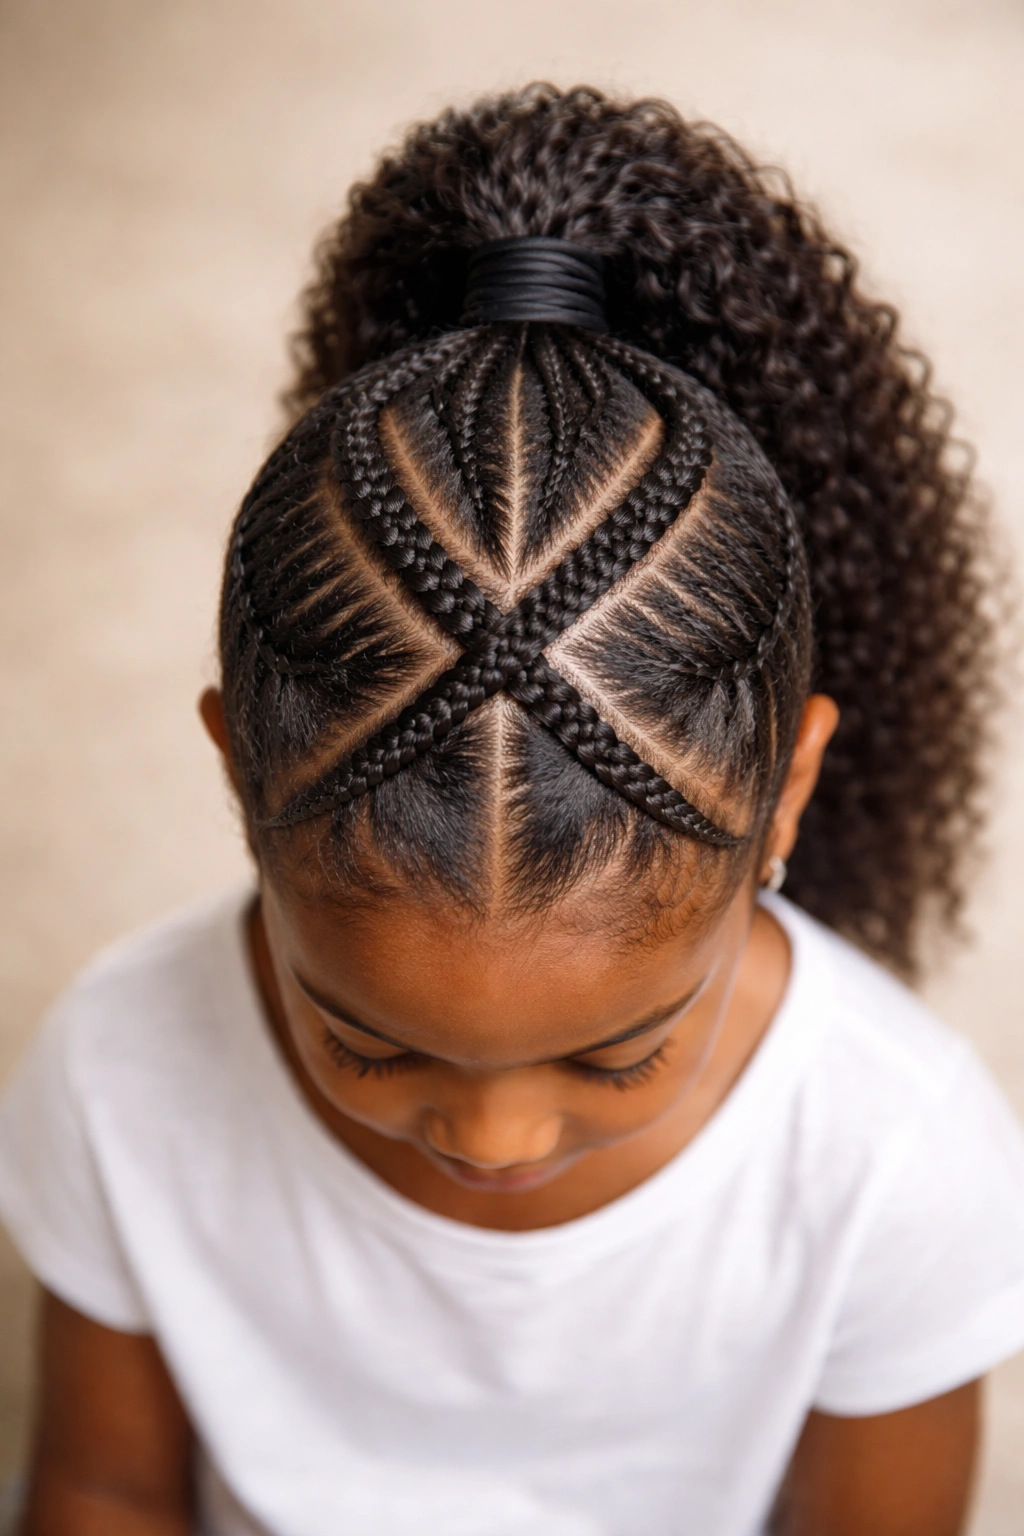
6. Criss-Cross Cornrow Ponytail
The criss-cross pattern is pure fun—you’re creating four cornrows that intersect and cross each other as they move toward the back, creating an X or crosshatch pattern when viewed from above. It requires careful planning and sectioning, but the result is like wearable art that kids absolutely love. It’s intricate without being overly complicated in execution.
The Visual Appeal of Criss-Cross
This style catches light differently because the cornrows overlap and create new visual lines and shadows. It’s eye-catching without being chaotic, and kids love the playfulness of a pattern that’s clearly intentional and designed. The intersection points become natural focal points of the style, adding depth and dimension. Photographed from above, it’s absolutely striking—which is why many parents choose this for special photos.
Mapping Out the Criss-Cross Pattern
- Divide the top and back of the head into four quadrants
- Create one cornrow from the front-left that angles toward the back-right
- Create a second cornrow from the front-right that angles toward the back-left
- These two create your main X pattern
- Create two additional cornrows in the back quadrants that also angle toward the center, adding additional intersecting lines
- Gather everything at the ponytail point where the pattern converges
Pro tip: Use colored thread woven into the cornrows to enhance the criss-cross pattern—the color contrast makes the pattern even more obvious and impressive.
7. Twisted Ponytail with Cornrows
For a softer, less linear alternative to straight cornrows, you can create twisted sections instead of braided ones. These twists are looser and create a completely different aesthetic—they look less structured but still protective and beautiful. You’re creating 2-4 twisted sections that flow toward a ponytail, rather than tightly braided cornrows.
When Twists Win Over Cornrows
Twisted ponytails work beautifully on hair that’s slightly finer or less densely coiled, because twists define texture without creating harsh lines the way cornrows do. Kids often prefer how twists feel—they’re gentler on the scalp and easier to tighten or loosen as needed throughout the day. Twists also have a more elegant, less sporty vibe compared to cornrows, making them perfect for dressier occasions while still being casual enough for everyday wear.
Creating Clean Twists
- Section the hair into 2-4 sections from the front of the head toward the back
- Take two sub-sections within each main section and twist them together from root to tip, adding hair as you go
- This creates a two-strand twist rather than a three-strand braid—less work, different look
- Keep the twists even in thickness and tension so they look intentional
- Gather all twists into your ponytail and secure with an elastic
Insider note: Twists can sometimes feel looser than cornrows by day three or four, so if longevity is your priority, cornrows are still the better choice. But for comfort and ease, twists are unbeatable.
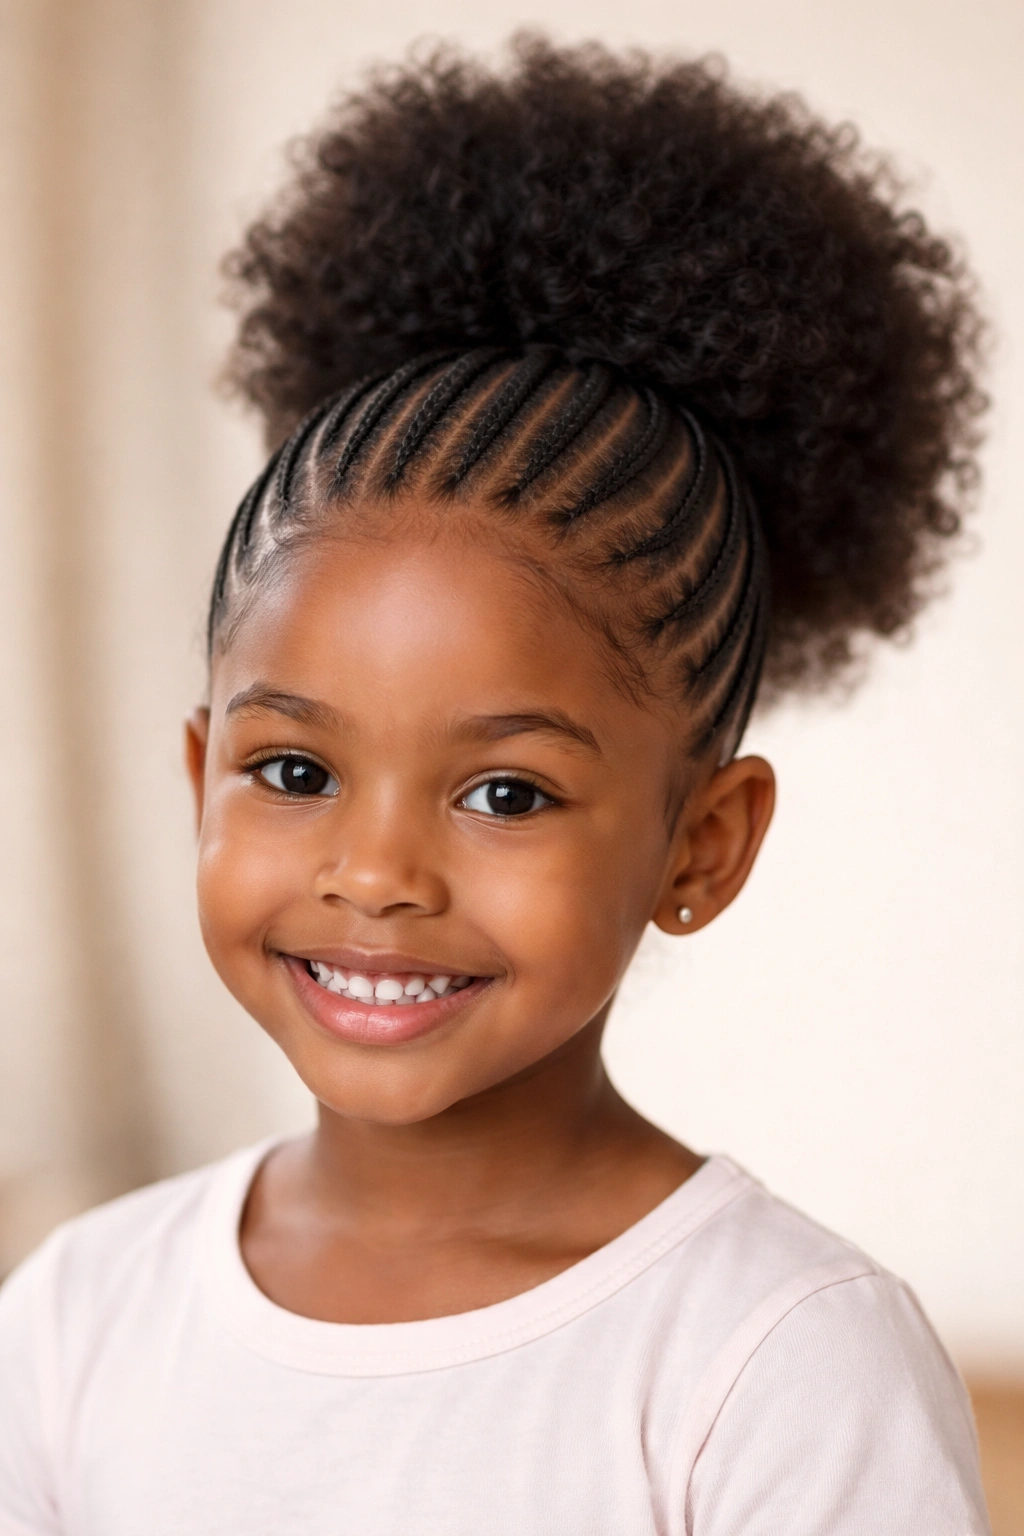
8. Thin Cornrows with Large Ponytail Puff
This style maximizes the contrast between detailed, delicate cornrows and an absolutely massive ponytail puff at the back. You’re creating 8-12 very thin cornrows instead of thick ones, then gathering all of them into a high ponytail that you can fluff and style into a gorgeous puff. The thin cornrows create intricate detailing on the scalp while the puff becomes the statement element.
Why This Style Works for Active Kids
The thin cornrows provide security and protection for the scalp area and keep everything off the face, while the ponytail puff handles the bulk of the hair and creates movement. Kids love the practicality—the puff can be tucked into a bun for sports, loosened for a softer everyday look, or accessorized with clips and ribbons. The style photographs beautifully from the front because you see the delicate cornrow details, but it also looks amazing from behind because of the voluminous puff.
Creating Thin, Detailed Cornrows
- Create more sections than usual—use a comb to mark out 8-12 equal sections
- Keep each cornrow narrow so the overall pattern is more visible and detailed
- The narrower braids also mean less scalp tension, which kids appreciate
- Pay extra attention to keeping all the thin cornrows even in size and tension so the pattern looks intentional
- Gather everything at the ponytail location and tease gently to create volume in the puff section
Pro tip: Use a perm rod or flexi-rod set in the ponytail section for 20-30 minutes after styling to help lock in bounce and curl definition in the puff.
9. Feed-In Cornrow Ponytail with Hair Extensions
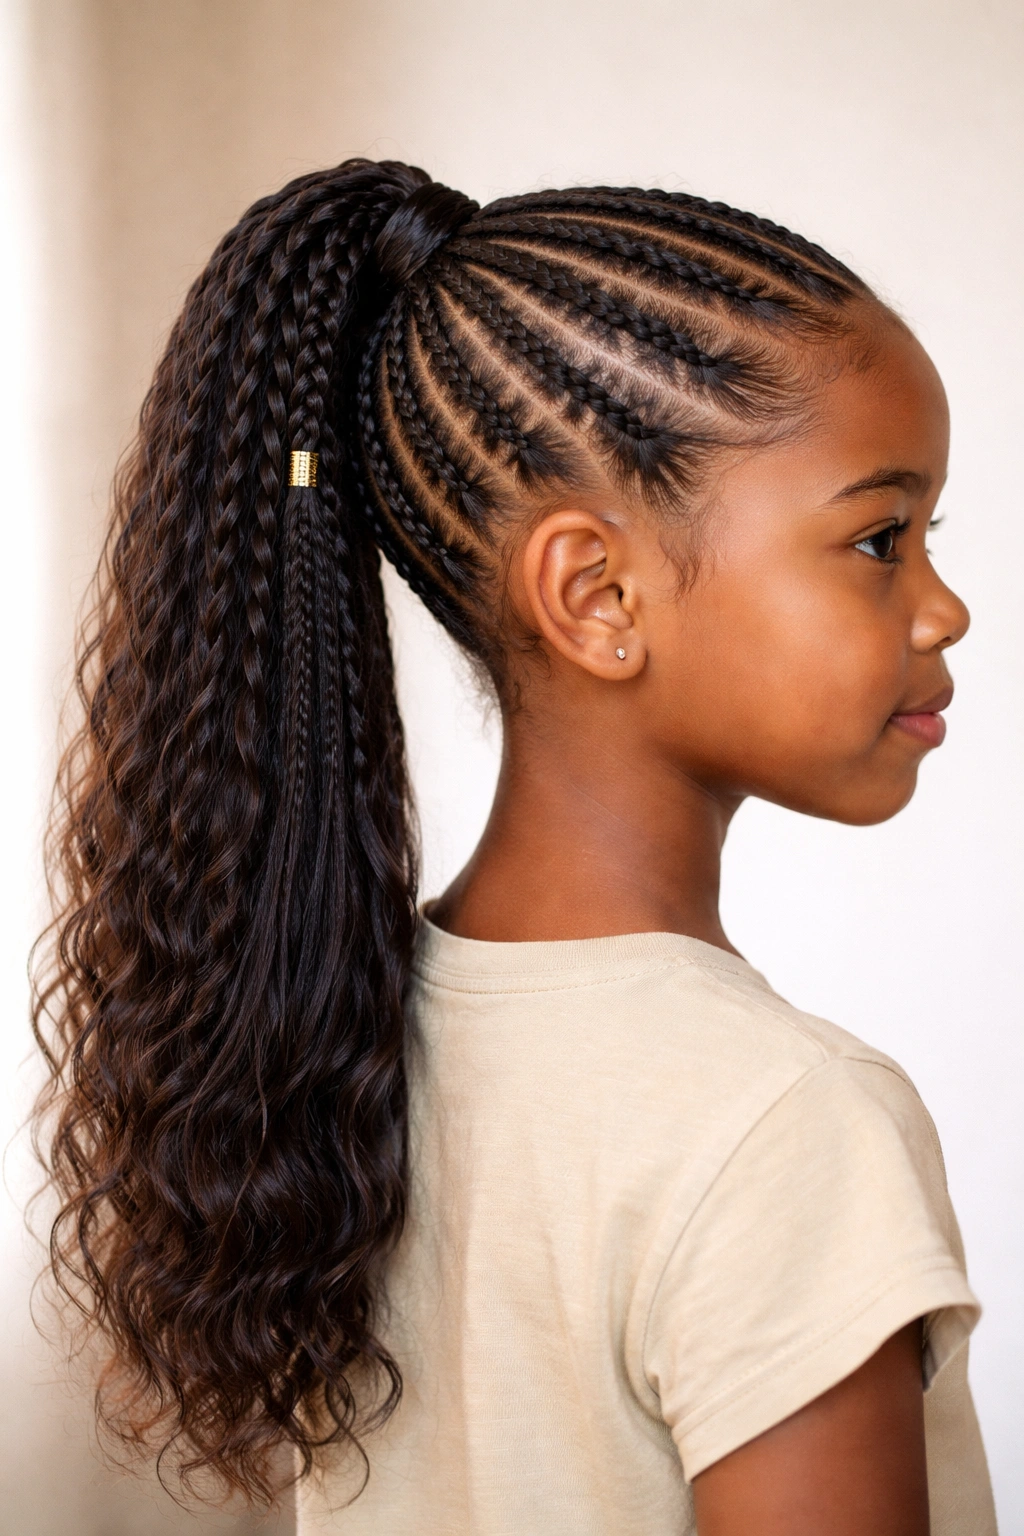
If your child’s hair is shorter or finer, incorporating hair extensions during the cornrowing process (called feed-in cornrows) allows you to create fuller, longer-lasting styles. You’re feeding extension hair into the cornrows as you braid, which instantly doubles the thickness and length of the finished style. The extensions can be removed after a week or two, making the style temporary and low-commitment.
Advantages of Extension Cornrows
Feed-in cornrows create thicker, more impressive-looking braids that last longer and handle more wear without loosening. Kids with fine or shoulder-length hair can suddenly have long, full cornrowed ponytails that feel transformative. Extensions also mean you can be more creative with color and contrast—add a bright or metallic extension color for visual interest. The style is protective for natural hair growth while still delivering the look kids want.
Selecting and Installing Extensions
- Choose kanekalon or human hair extensions in a color that matches or intentionally contrasts with your child’s hair
- Use a feed-in technique where you start the cornrow with your child’s natural hair, then add extension hair to increase the thickness as you braid
- Keep the extensions smooth and even by separating them clearly from the natural hair
- The finished cornrow should look naturally full, not obviously added on
- Extensions can typically stay in place for 1-2 weeks before needing removal
Worth knowing: Always remove extensions gently to avoid damaging the child’s natural hair. If you’re uncomfortable doing this yourself, have a professional stylist remove them to ensure the hair remains healthy.
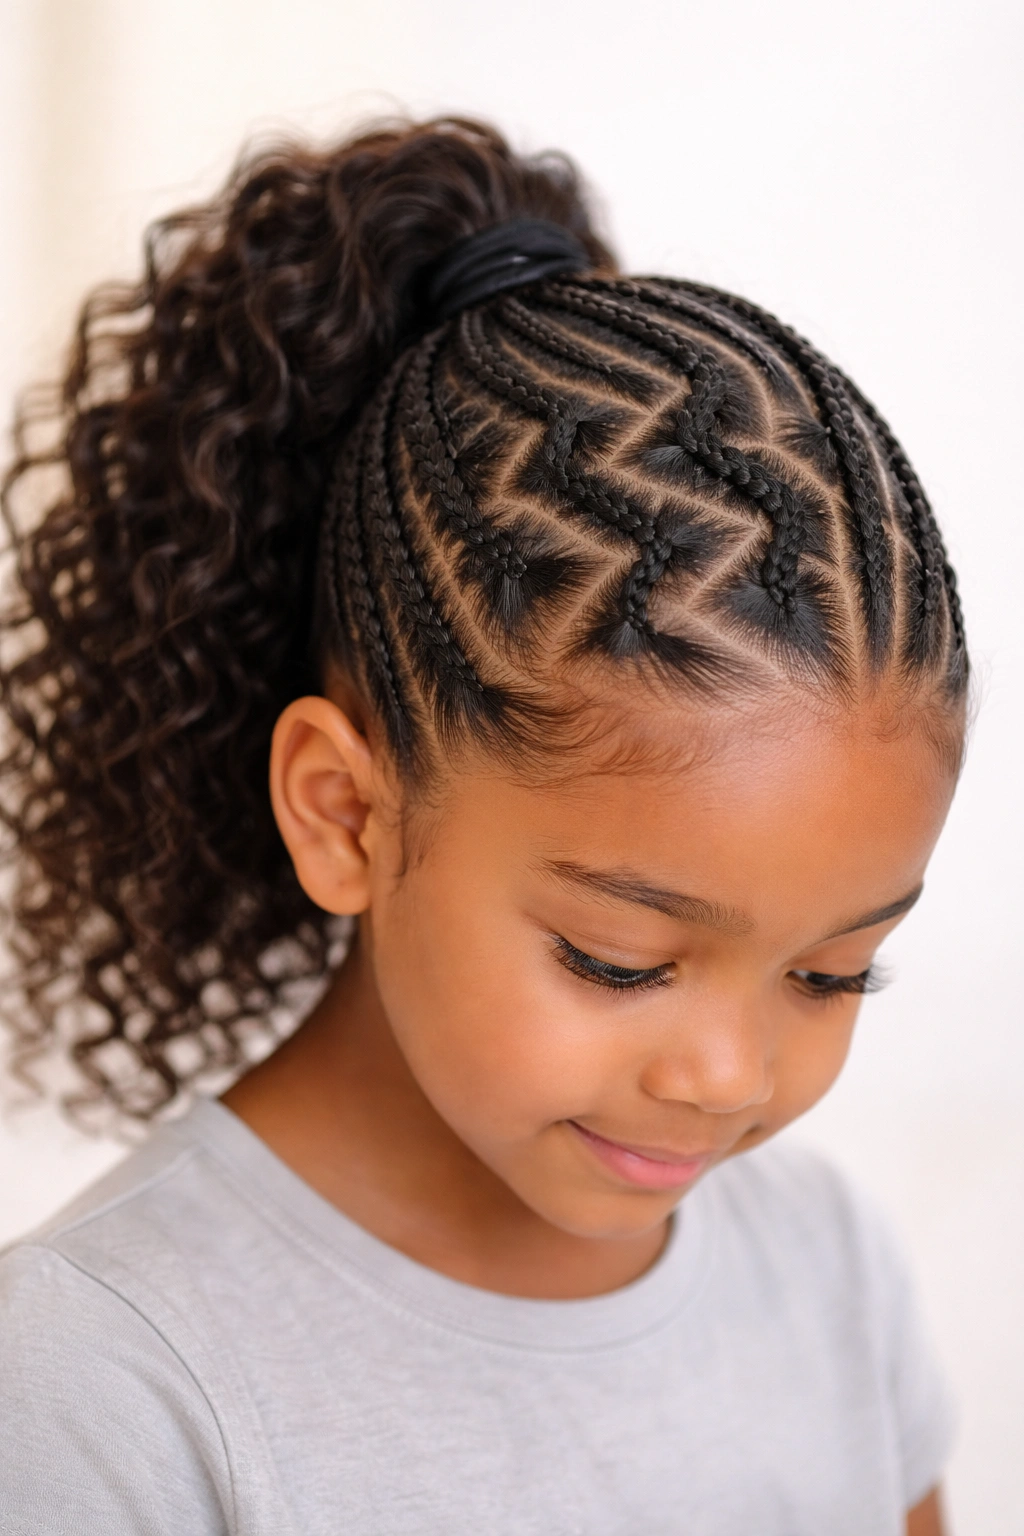
10. Zigzag Cornrow Ponytail Pattern
Instead of straight lines, zigzag cornrows angle back and forth across the head, creating a dynamic, energetic pattern that’s more playful than traditional straight cornrows. You’re creating 4-6 cornrows that move in an S or zigzag pattern from the front of the head toward the back ponytail point. It requires more skill in directing the braids but creates a completely unique visual effect.
The Energy of Zigzag Patterns
Zigzag patterns feel more youthful and playful compared to symmetrical, straight cornrow styles. Kids with personality absolutely love the movement and flow of cornrows that don’t go straight back. The pattern creates visual motion even when your child is standing still, and it photographs beautifully from any angle. It’s a style choice that says your child is confident, creative, and not interested in boring convention.
Creating the Zigzag Effect
- Divide the head into sections that will allow for the zigzag pattern—usually 4-6 main sections
- Braid the first cornrow from one side toward the center back
- Braid the second cornrow from the opposite side, angling to pass the first cornrow and continue toward the back
- Continue alternating so the cornrows create a zigzag or woven pattern
- All cornrows converge at your ponytail point
- Keep tension consistent so the pattern looks intentional rather than accidental
Pro tip: Map out your sections and your planned zigzag pattern with a pencil on paper before starting to braid—it helps you visualize the final result and execute it more confidently.
11. Cornrow Bun with Wrapped Detail
This style combines the protective benefits of cornrows with the elegance of a bun. You’re creating cornrows from the front toward the crown area, then gathering all the hair into a bun at the crown or top-back of the head, and wrapping the base of the bun with thread, ribbon, or additional hair for a finished, polished look. It’s dressier than a ponytail but uses the same cornrow foundation.
When to Choose a Cornrow Bun Over a Ponytail
Buns work beautifully for special occasions, school events, or situations where you want a more formal, elegant look. They’re also practical for very active kids because the bun is more secure and won’t swing around like a ponytail. Cornrow buns stay put through play, sports, and movement better than loose ponytails do. Plus, they look absolutely stunning in formal photos—parents love having this option in their styling toolkit.
Creating a Secured Cornrow Bun
- Create your cornrows (2-4 depending on hair thickness) from the front toward the crown area
- Gather all cornrows at the crown and secure them with a small elastic
- Twist or braid the gathered ponytail hair and wrap it around the elastic base to create a bun shape
- Secure the bun with bobby pins and U-shaped pins for extra security
- Wrap the base of the bun with colored thread, ribbon, or a hair wrap for a finished detail
- Hair gel or edge control on any flyaways will keep everything looking polished
Worth knowing: Buns pull hair more tightly than ponytails, so ensure your child doesn’t experience scalp tenderness. If she does, loosen the bun or use more of a twisted, loose bun shape rather than a tight sculptural one.
12. Cornrow Ponytail with Beaded Ends
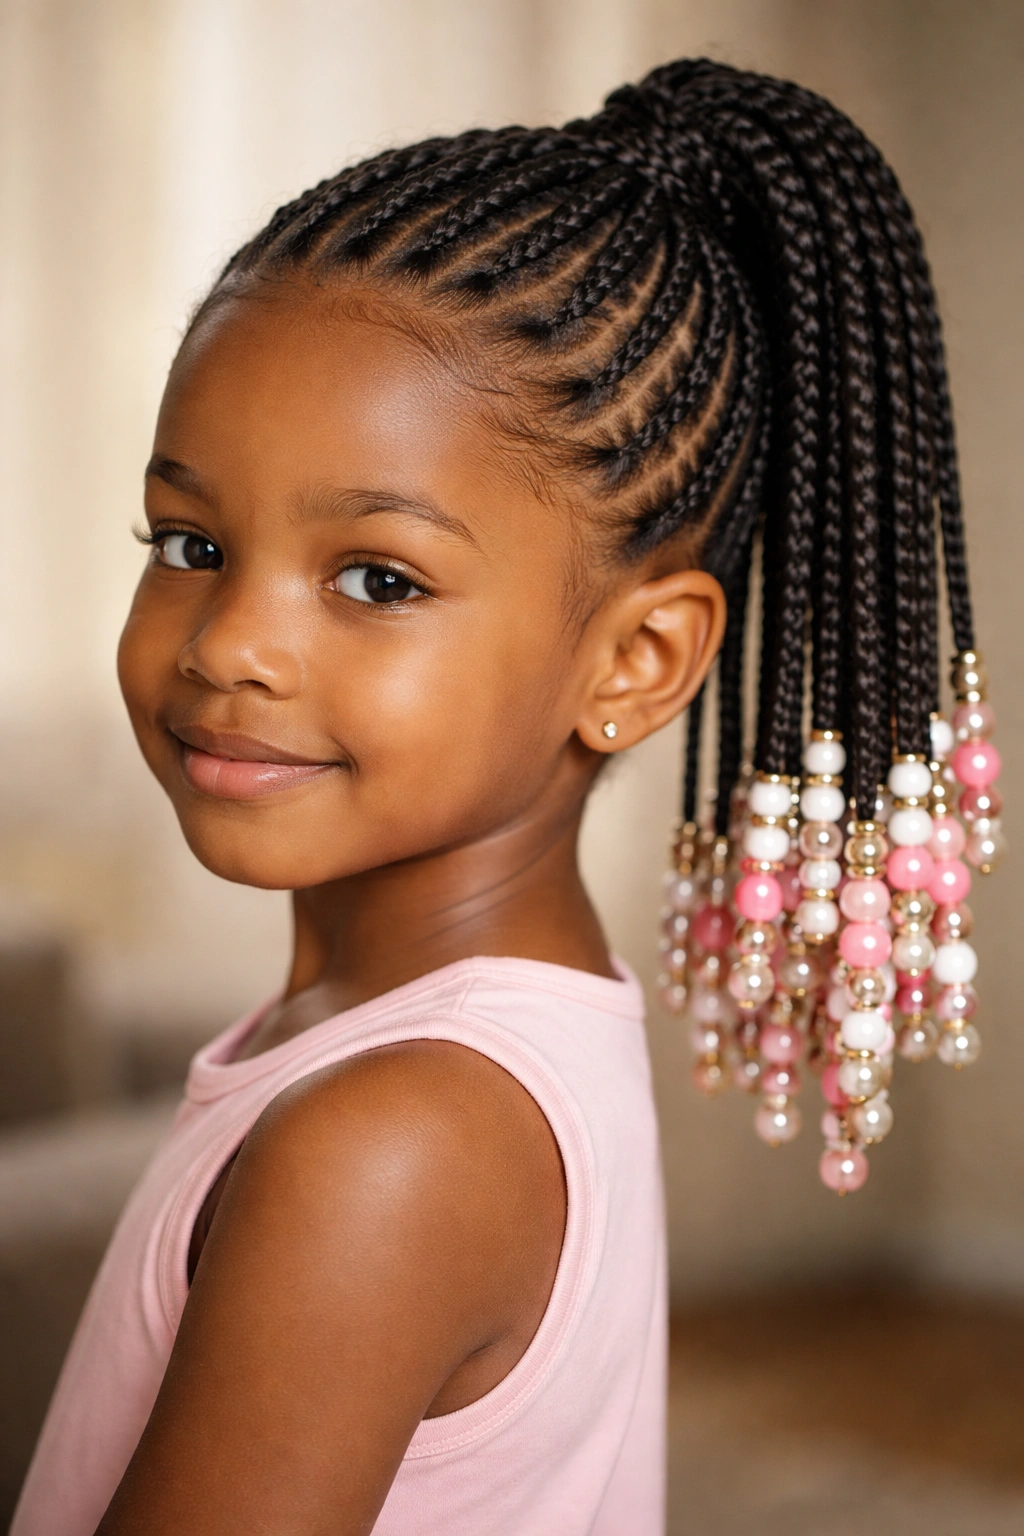
Adding beads to the ends of cornrows—or to the ponytail itself—creates visual interest, celebration, and personality. Wooden beads, metallic beads, pearl-look beads, or colorful acrylic beads can be threaded onto the cornrows or the ponytail hair, creating a style that’s playful and expressive. It’s the perfect finishing touch that transforms a classic cornrow ponytail into something truly special.
Why Kids Love the Bead Detail
Beads add texture, movement, and a tactile element that kids genuinely enjoy. They create little clicks and sounds when hair moves, which kids find satisfying. Visually, beads catch light and add dimension and color to the style without requiring you to change the cornrow pattern itself. Kids feel like they’re wearing wearable jewelry, which boosts confidence and makes them feel special in their styling choice. Beads are also totally customizable—you can change them out whenever your child wants a different look.
Safely Adding and Securing Beads
- Thread beads onto individual cornrows or onto sections of the ponytail hair
- Use wooden or plastic beads with larger openings rather than tiny beads that are hard to thread
- Secure beads by knotting the hair at the base and tip of each bead so they won’t slide off
- Start with just a few beads to test whether your child is comfortable with them—some kids love them, others find them annoying
- Beads can stay in as long as the style lasts (usually 1-2 weeks) before being removed
- Remove beads carefully by sliding them off or gently untying the knots
Pro tip: Let your child choose the bead colors and where they go in the style—it makes them feel like they had creative input and they’ll be way more excited about wearing the style.
The beauty of having so many cornrow ponytail options is that you can match the style to your child’s personality, the occasion, her hair texture, and how much time you have available. Some styles take 45 minutes and last two weeks, while others come together in 30 minutes and work better as temporary styles. The key is finding the approach that works best for your family while keeping your child’s comfort and hair health as the absolute priority. Whether your child loves simple and classic or bold and intricate, there’s a cornrow ponytail style that’s absolutely perfect for her.
Final Thoughts

Cornrow ponytails have earned their place as one of the most practical, beautiful, and protective styling options for kids with textured hair. The incredible range of patterns, from classic center parts to bold starburst designs, means your child can express her personality while keeping her hair healthy and secure. Each style can be adapted based on her preferences, hair texture, and lifestyle—there’s no single “best” option, only the best option for your individual child on any given day.
The real magic of mastering cornrow ponytails is realizing how much creative freedom you have within the category. You’re not limited to one or two looks; you can switch up the pattern, adjust the cornrow thickness, play with the ponytail placement, and add accessories to create something completely new while using the same fundamental technique. Start with styles that feel manageable for your skill level, then gradually work toward more intricate patterns as your confidence grows. Your child will love the variety, and you’ll appreciate how long these styles last and how well they protect developing hair. Whether you’re prepping for the first day of school, a special event, or just a regular Tuesday, you’ve now got a whole arsenal of beautiful, protective styles to choose from.