Short hair can feel limiting when it comes to styling options, but the reality is that shorter lengths are perfect for creating polished ponytails that feel fresh, modern, and incredibly wearable. Whether you’re heading to work, out for the weekend, or preparing for a special event, a well-executed ponytail can transform your entire look in just a few minutes. The best part? Short hair ponytails actually tend to look more contemporary and put-together than their longer counterparts, and they’re far easier to manage without all that extra length weighing you down.
The key to mastering short hair ponytails is understanding how your specific length works with different gathering techniques, styling products, and strategic bobby pin placement. Contrary to what many people assume, short hair offers incredible versatility—you just need to know the right tricks to make each style work. From sleek and sophisticated to textured and playful, there’s a ponytail option for every occasion, hair texture, and personal style. These styles work best on hair that’s roughly chin-length to shoulder-length, though many can be adapted for even shorter cuts with the right approach.
What makes these styles so appealing is that they’re genuinely easy to recreate at home without special training or expensive tools. Most require nothing more than your fingers, a few bobby pins, and maybe a lightweight hair tie or elastic band. Once you understand the foundational techniques—how to gather the right amount of hair, where to position your ponytail on your head, and how to use texture to create visual fullness—you’ll find yourself reaching for these styles constantly.
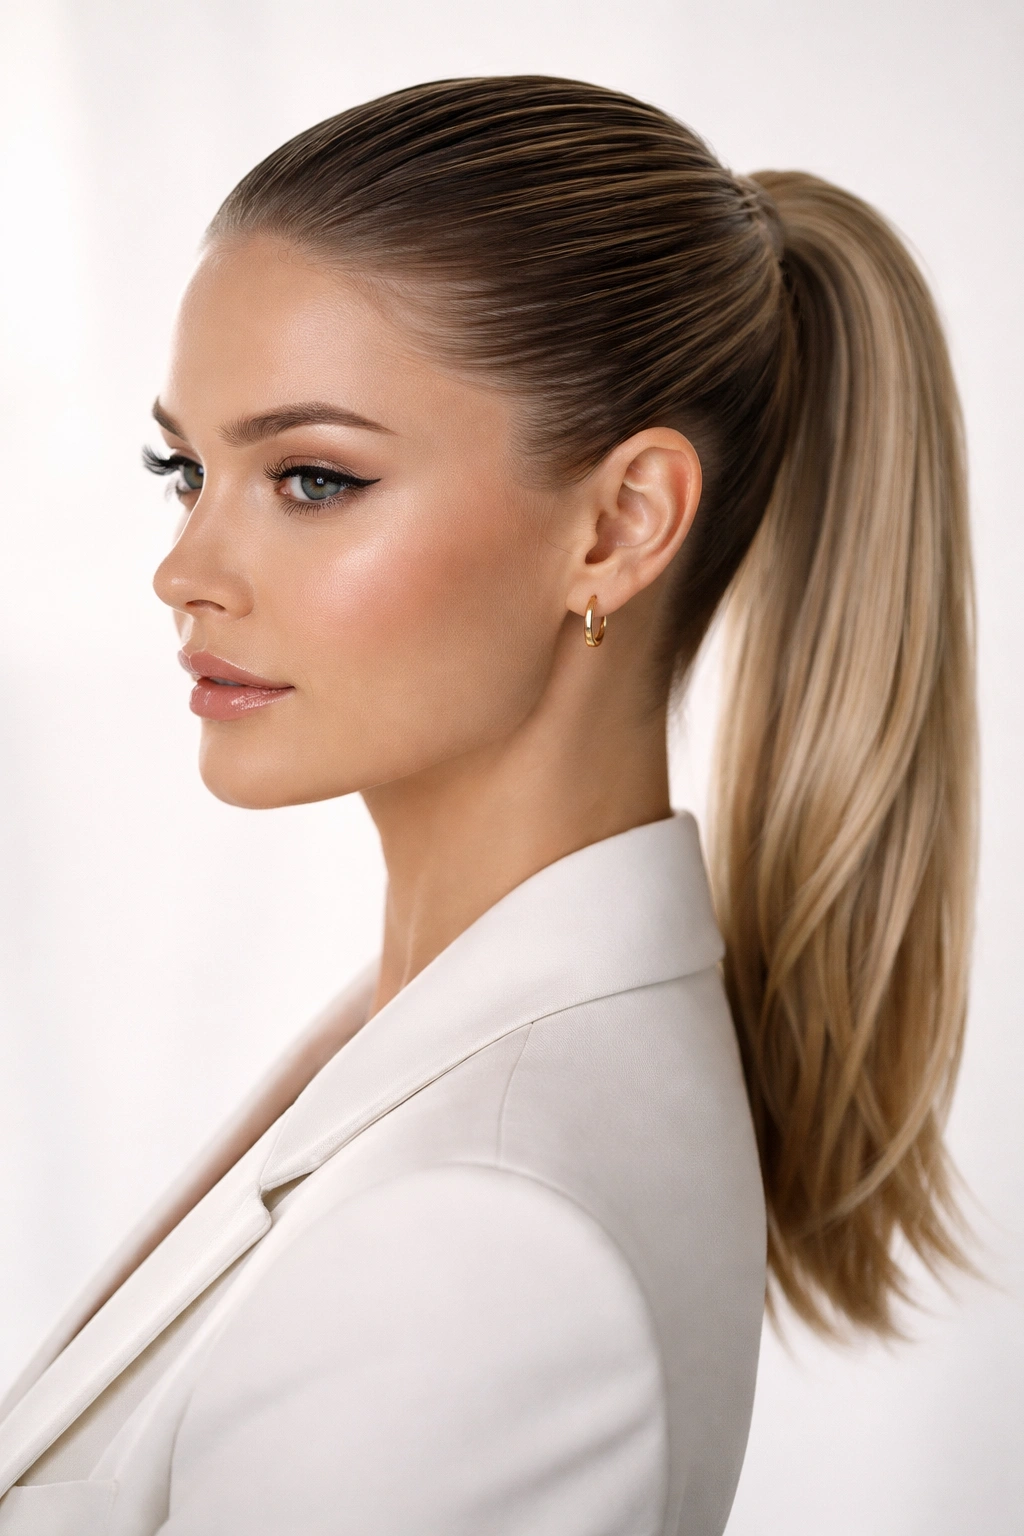
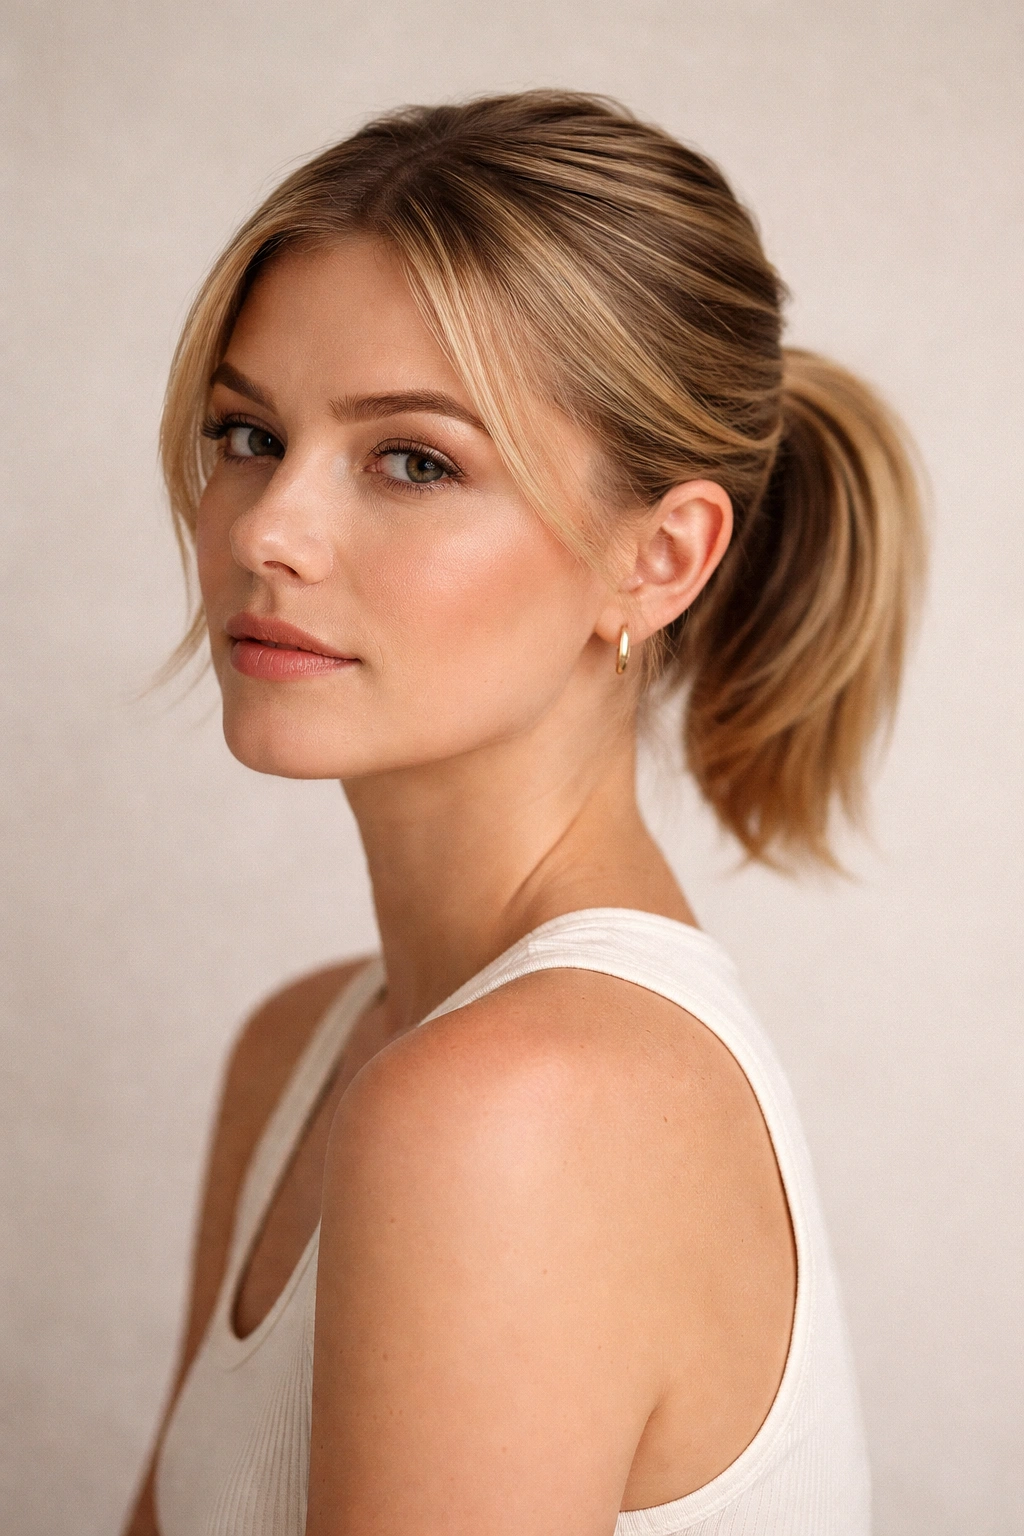
1. The Classic High Ponytail
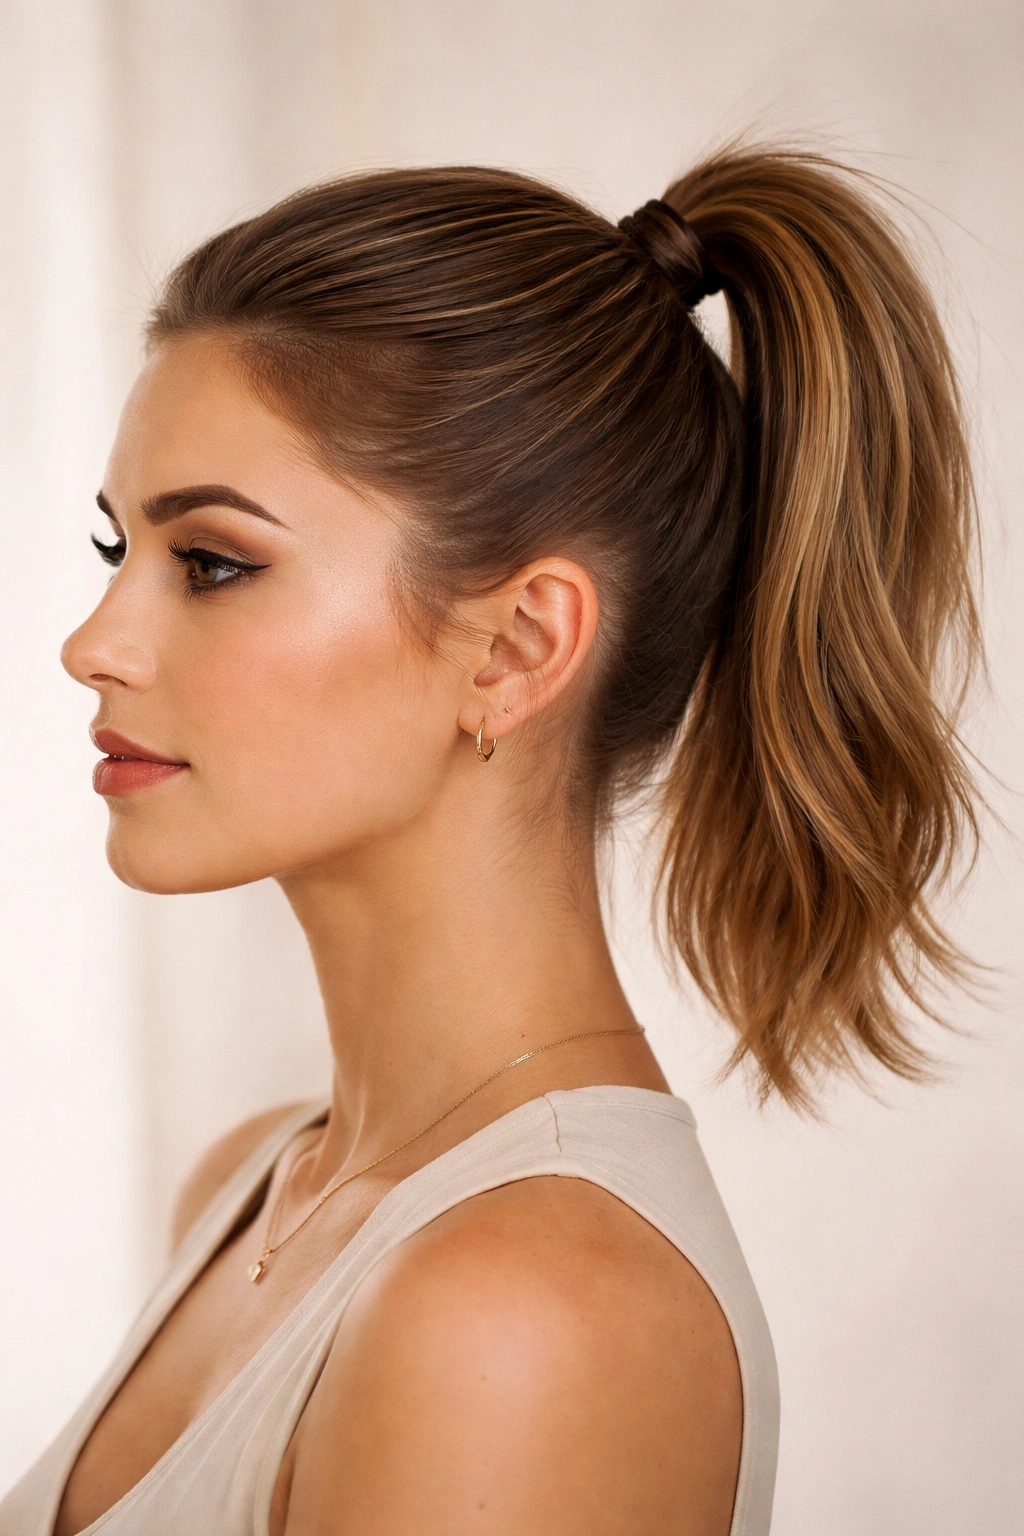
The classic high ponytail is the foundation of short hair styling, and mastering this version teaches you everything you need to know about securing short lengths effectively. Positioned at the crown of your head, this style pulls hair away from your face while creating an instantly polished appearance. What makes this work beautifully on short hair is that the shorter length creates natural texture and movement at the ends, giving you a softer, more modern take on this traditionally sleek style.
Why This Works So Well for Short Hair
A high ponytail on short hair sits at the perfect angle to feel current rather than dated. Because your hair doesn’t have the weight of longer lengths pulling it down, the ponytail naturally falls with a slight curve and bounce. The gathering point lands exactly where you have the most hair density, making it genuinely easy to secure without awkward gaps or loose pieces pulling free throughout the day. This style actually looks more intentional and polished on shorter lengths than it does on very long hair.
How to Create the Perfect High Ponytail
Start by brushing your hair straight back from your face, using a fine-tooth comb to smooth the crown and sides. Gather your hair at the very top of your head—position your ponytail so the elastic sits roughly one to one-and-a-half inches back from your hairline. Once you’ve gathered everything into your hand, wrap the elastic around two or three times to ensure it’s secure. The shorter length means you need that extra security, since there’s less hair wrapping around the band.
For a polished finish, take a small section from the ponytail itself and wrap it around the elastic to hide the band completely. Secure this wrapped section underneath with a bobby pin that matches your hair color. Smooth any flyaways with a light smoothing serum or gel, paying special attention to your part and hairline. The secret to this looking intentional rather than accidental is ensuring your ponytail has zero bumps or loose sections at the base—spend an extra thirty seconds smoothing everything before securing.
Pro tip: If your hair is naturally wavy or curly, apply the ponytail to damp hair and let it air dry slightly before smoothing—this prevents frizz and keeps the hold stronger throughout the day.
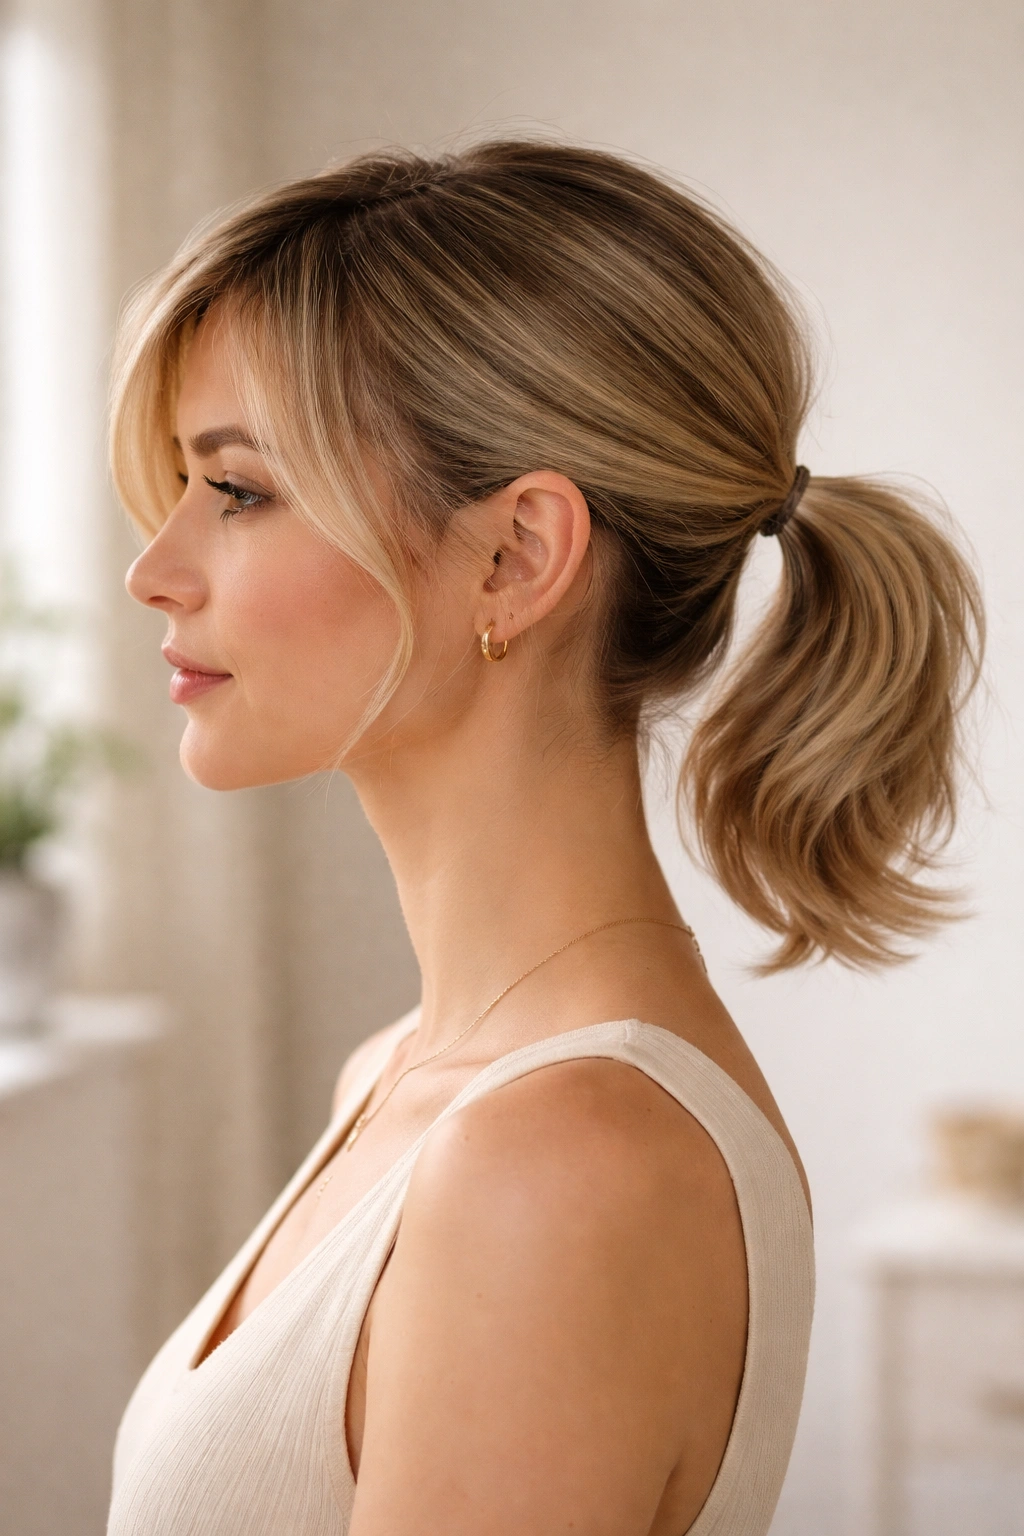
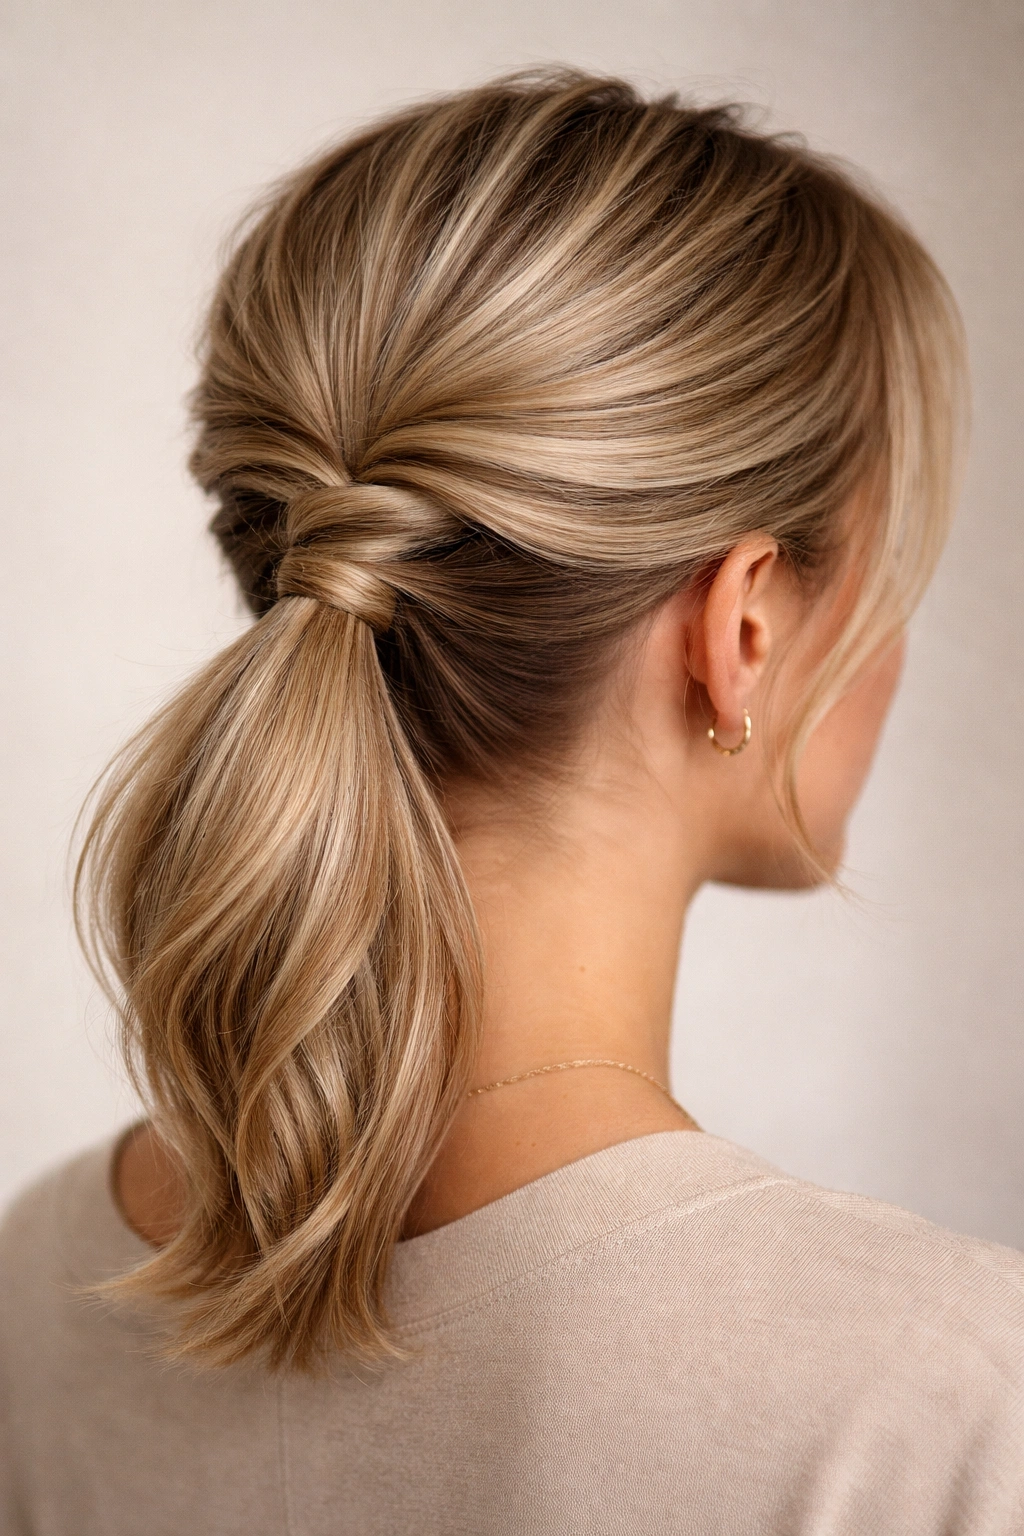
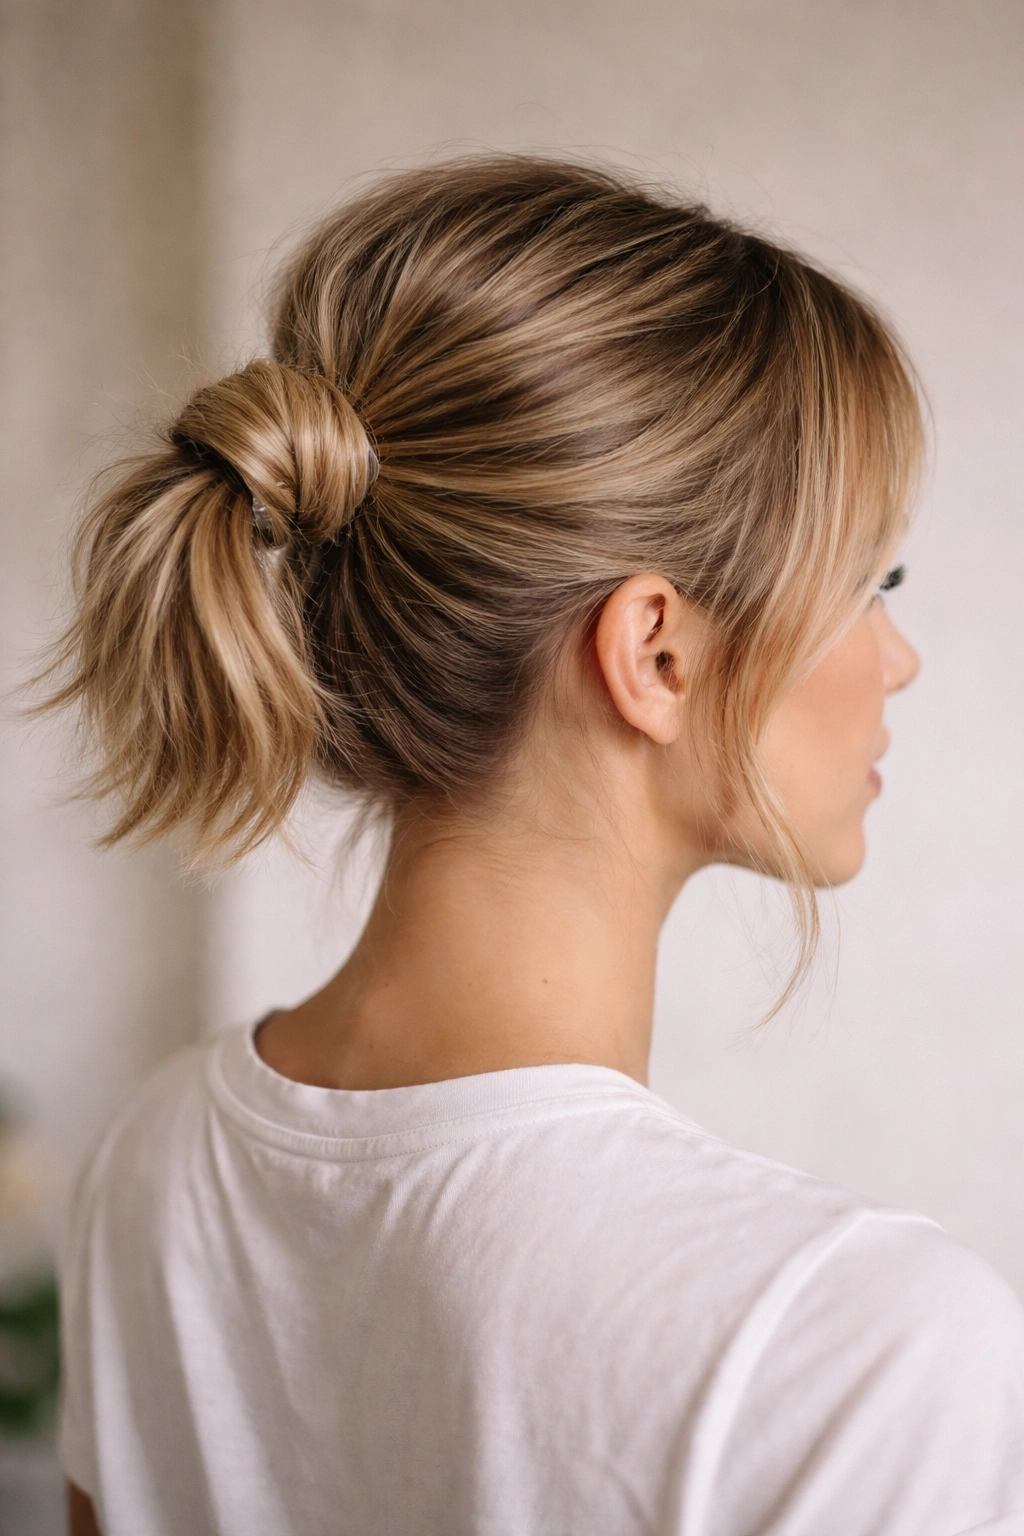
2. The Sleek Low Ponytail
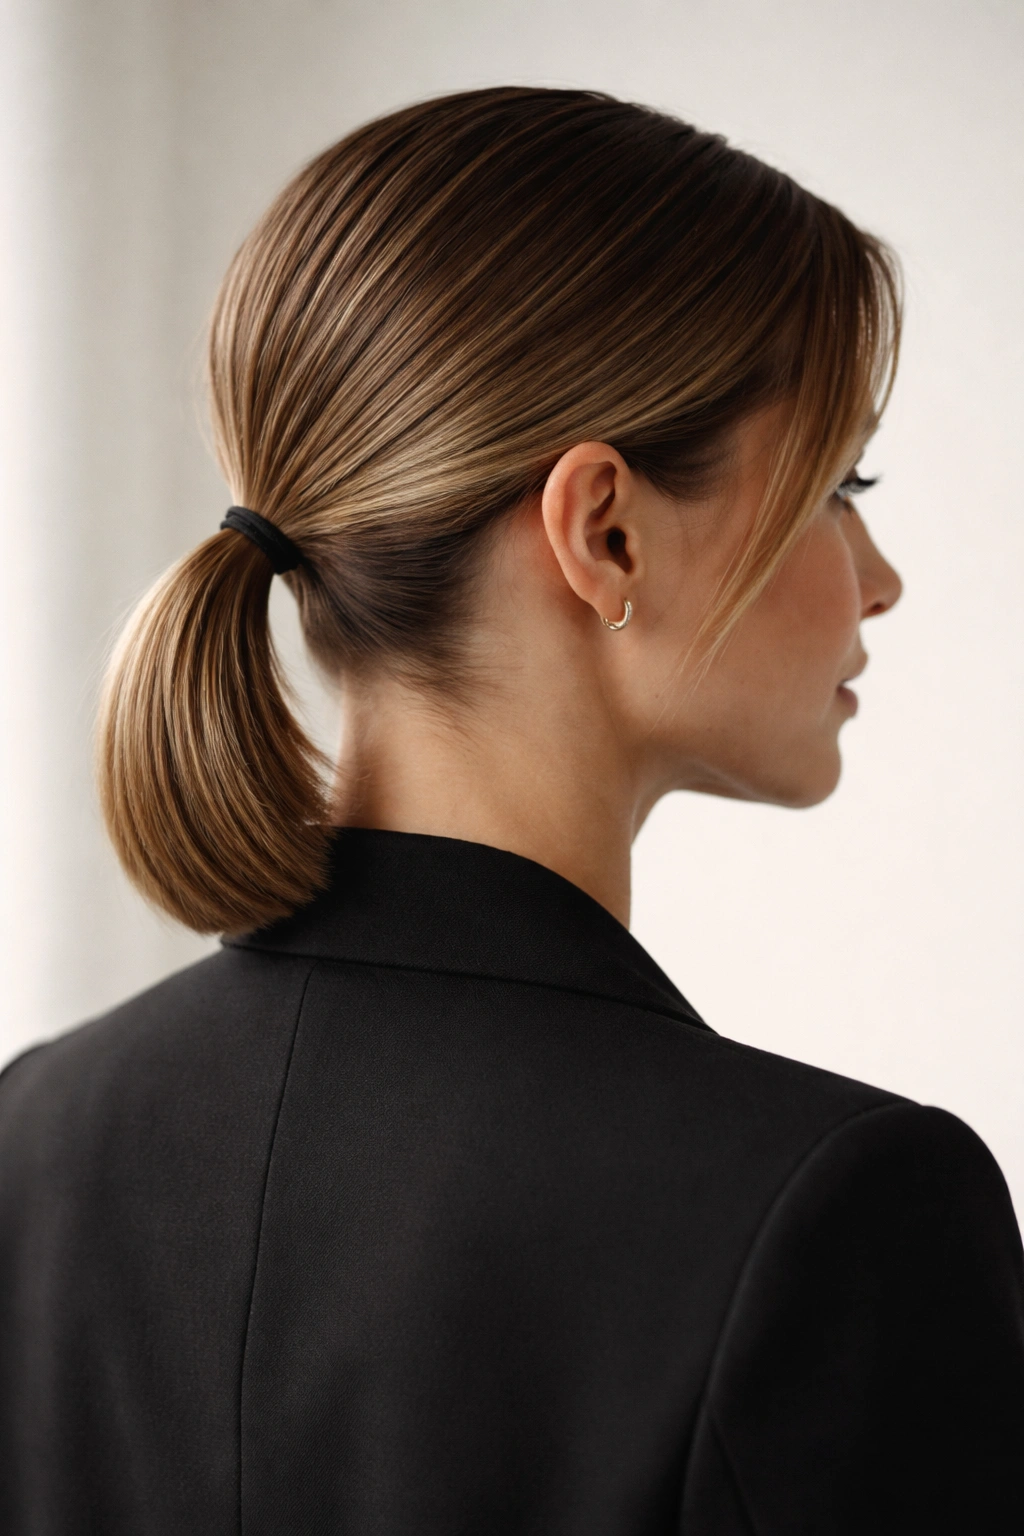
The low ponytail is sophisticated, wearable, and surprisingly flattering on short hair because it requires far fewer bobby pins and styling tricks than its high counterpart. This style gathers hair at the nape of your neck—approximately where your bottom ear lobe aligns with the back of your head. The lower position means you’re working with a smaller section of hair, which actually makes this easier to master than you’d expect, and the finished look feels effortlessly elegant.
What Makes the Low Ponytail Special
This style works beautifully because it frames your face while still pulling hair off your neck and shoulders. On short hair, the gathered section sits perfectly against the back of your head without any awkward sticking-out sections, and the shorter ends have just enough length to create a finished look rather than looking like a stub. The style feels inherently sophisticated—it’s the ponytail choice for professional settings, formal events, or days when you want your face to be the focus rather than your hair.
Step-by-Step Instructions for Execution
Begin by brushing your hair smoothly and deciding whether you want a center or slightly off-center part. Gather your hair at the nape of your neck, using the natural curve where your head meets your neck as your guide. You can position this lower than you might expect—it looks more polished when positioned closer to where your hair naturally ends. Once gathered, secure with an elastic band, wrapping it three or four times for maximum security on shorter lengths.
For an ultra-polished look, don’t stop at just one elastic. Take a small section from underneath the ponytail and wrap it around the base, securing it with a bobby pin underneath. This technique hides the elastic completely and creates a finished, intentional appearance. Smooth your hairline with a clear smoothing gel or edge control product, paying special attention to any baby hairs framing your face. A polished low ponytail should look completely seamless at the nape—no bumps, no loose strands, just smooth, intentional styling.
Worth knowing: This style is ideal if you have natural texture because the looser gathering allows waves and curls to show through, creating visual interest while keeping hair off your face.
3. The Messy Textured Ponytail
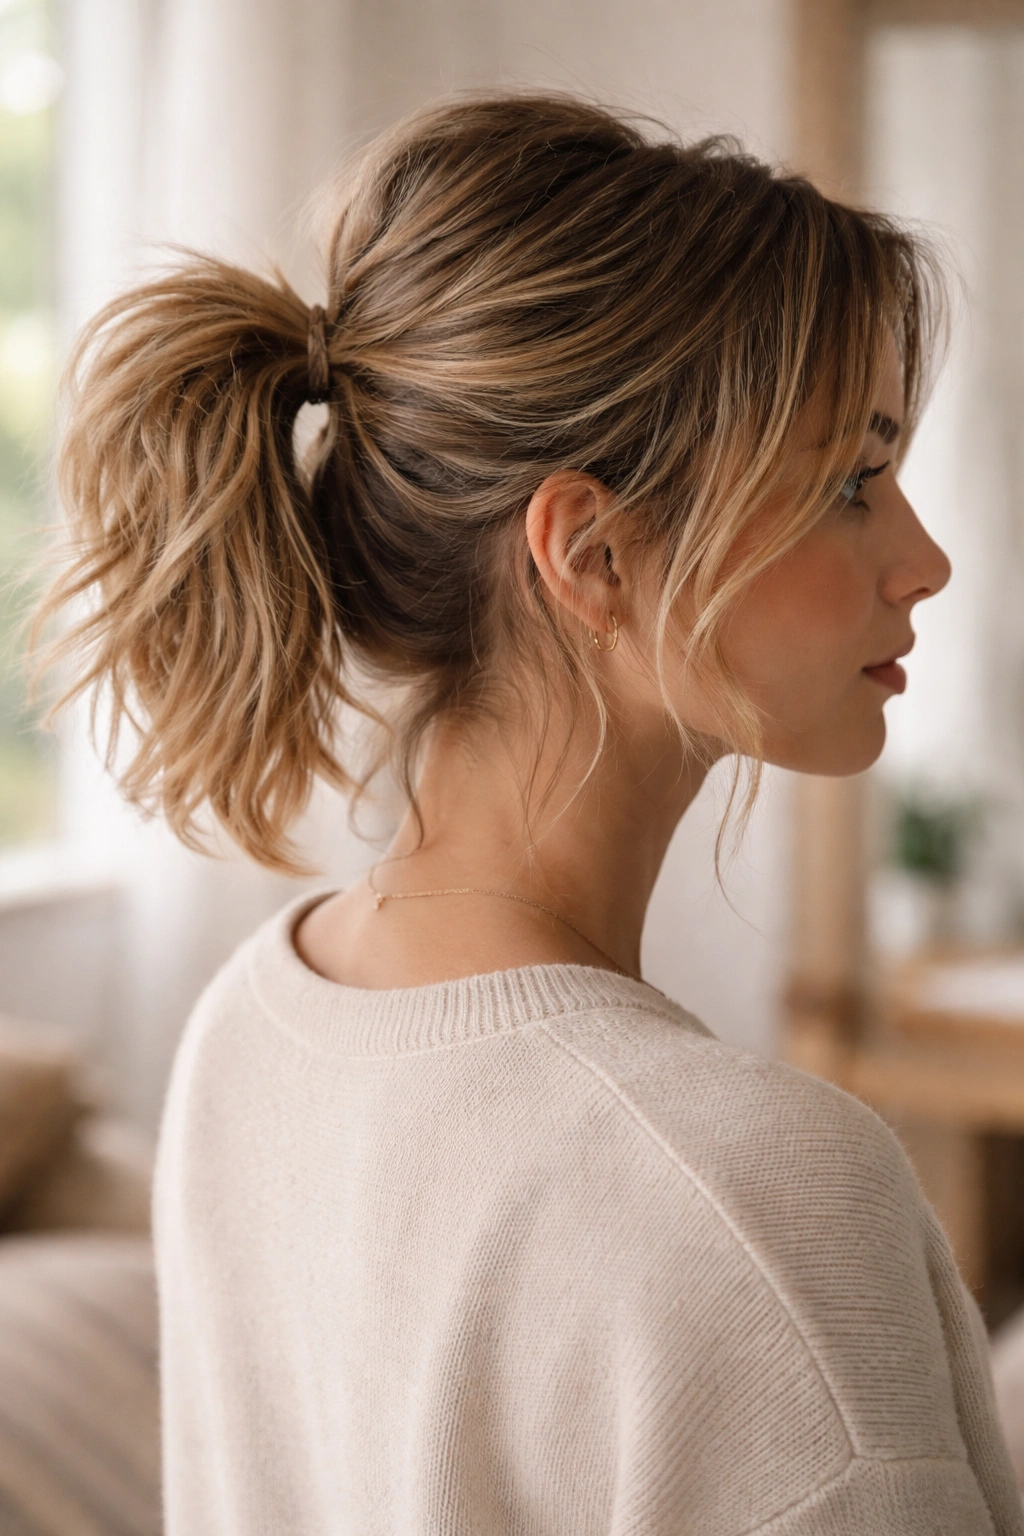
The messy ponytail is deceptively intentional—it looks casual but actually requires strategic planning to achieve that perfectly undone aesthetic. This style celebrates texture and movement, making it ideal for short hair where you want the focus on dimension and natural-looking waves rather than sleekness. The beauty of this approach is that it works with your hair’s natural personality rather than fighting against it.
How to Build Authentic-Looking Texture
The key to a convincing messy ponytail is starting with actual texture rather than trying to fake it with products alone. If your hair is naturally wavy, you’re already halfway there. If your hair is straight, create soft waves using a curling iron or wand before pulling the ponytail—aim for loose, undone-looking waves rather than tight, defined curls. These waves will break up the ponytail’s outline and create the intentional messiness that makes this style so appealing. The texture needs to be genuine enough that stray pieces falling around your face look like part of the design rather than a styling mishap.
Building the Ponytail with Movement in Mind
Rather than smoothing everything back tightly, use your fingers or a wide-tooth comb to gather your hair loosely at your crown or mid-height on your head—this isn’t a precisely positioned style. Secure loosely with an elastic, wrapping only once or twice so the tension isn’t pulling everything taut. Gently tease the crown area with a fine-tooth comb to add height and volume at the gathering point. Now comes the fun part: pull a few face-framing pieces free from the ponytail, allowing them to fall naturally around your cheeks and temple.
Finish by using your fingers to gently pull the ponytail slightly apart at the elastic, loosening it just enough that the edges feel soft and undone. Mist everything lightly with a flexible-hold hairspray that won’t stiffen the texture. The entire style should feel like you threw your hair up casually five minutes ago, not like you spent twenty minutes perfecting it, even though you actually did invest real thought in creating that impression.
Pro tip: This style is perfect for second-day hair, which often has more natural texture and grip than freshly washed hair—plan to wear this style on day two for easiest execution.
4. The Braided Base Ponytail
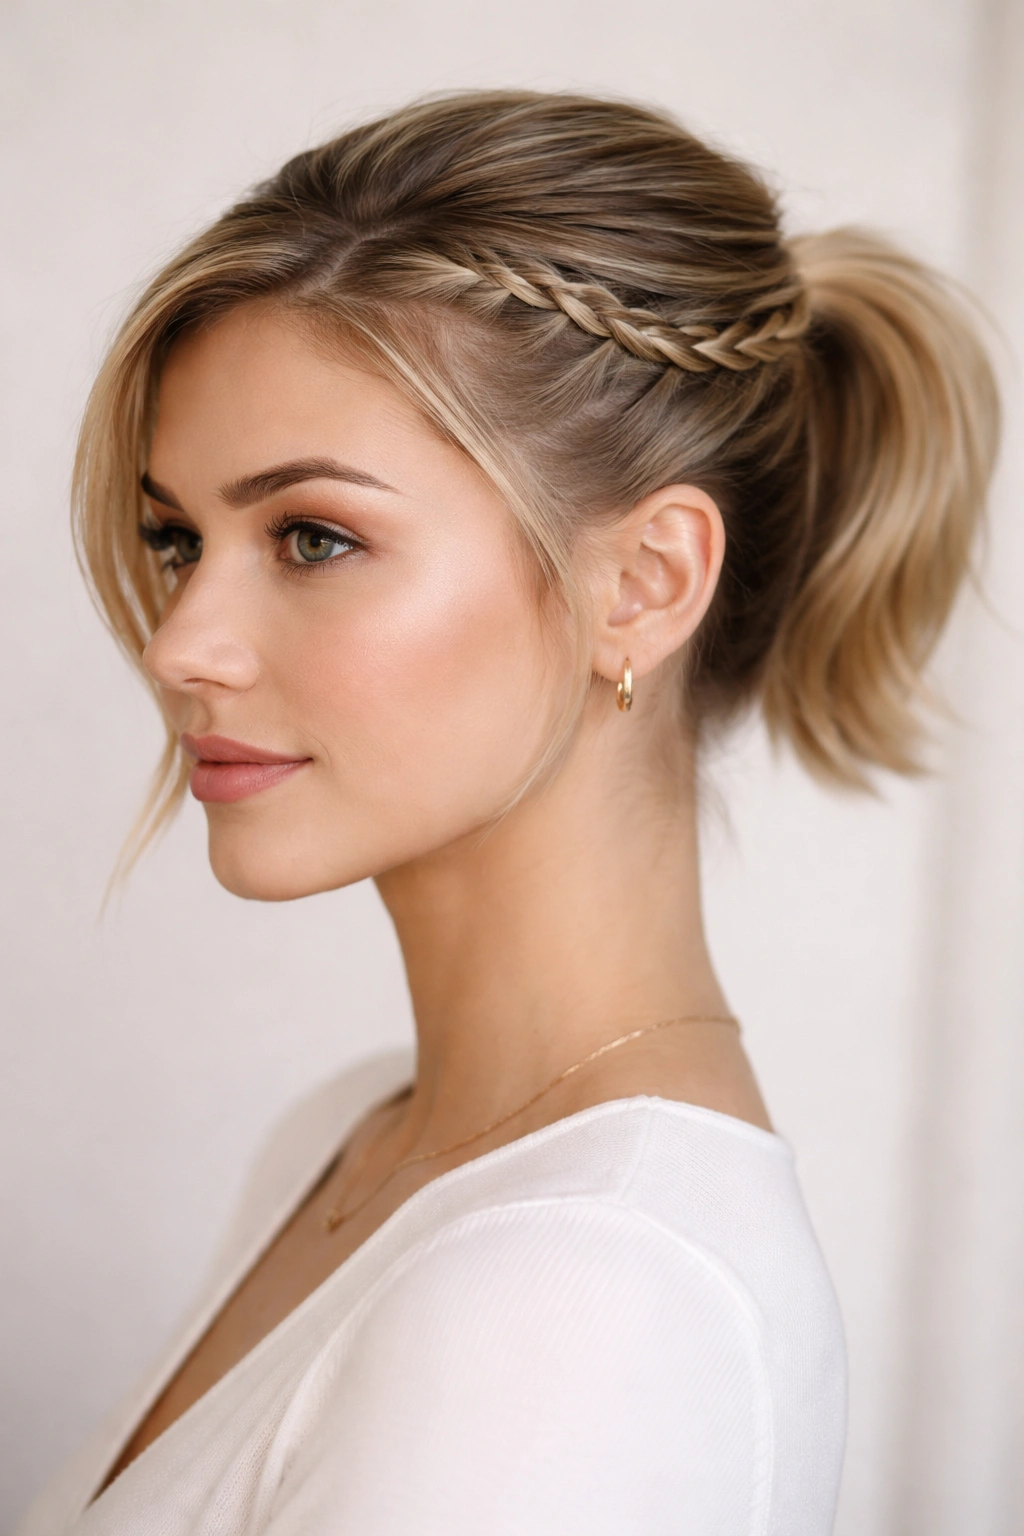
The braided base ponytail looks impossibly intricate but is surprisingly approachable once you understand the basic technique. A small braid runs from your hairline back to where your ponytail begins, creating visual interest and structural support that keeps flyaways in place and adds dimension to an otherwise simple style. This is the ponytail that makes people ask “how did you do that?” while you realize it takes just five minutes longer than a regular ponytail.
Understanding the Braid-to-Ponytail Transition
The braid doesn’t need to be complicated—a simple three-strand braid starting at your center part and traveling straight back works beautifully. The braid should begin at your hairline and travel approximately three to four inches back, ending just where your ponytail gathering point begins. This short braid adds just enough visual complexity that the entire style feels more deliberate and interesting. The genius is that this small braid also helps anchor your ponytail, preventing it from slipping or shifting throughout the day.
Creating Your First Braided Base
Start with either slightly damp or textured hair, which gives you better grip for braiding. Take a one-inch section from the center of your hairline and divide it into three strands. Begin a traditional three-strand braid, adding a tiny piece of hair from the left side and right side with each pass. Make the braid slightly loose rather than pulling it tight—a relaxed braid looks more modern and is easier to control. Continue braiding straight back approximately three to four inches, then secure the braid’s end with a tiny elastic.
Now gather all your hair—including the braided section—into a ponytail at your natural gathering point. The braid becomes part of the ponytail structure, adding texture and holding power. Secure with an elastic band, then take a small section from the ponytail to wrap around the base, hiding the elastic. The finished effect should look like the braid naturally flows into the ponytail, creating one cohesive style rather than two separate elements.
Worth knowing: If braiding feels intimidating, you can achieve a similar effect by simply twisting a small section from your hairline back to your ponytail gathering point, then incorporating it into your ponytail for added visual interest and hold.
5. The Side Swept Ponytail
The side ponytail instantly makes short hair feel more interesting and modern, and it’s particularly flattering if you have a face shape you want to show off. Rather than pulling hair straight back, you’re gathering everything to one side—typically the right side, though left-sided works equally well. This asymmetrical approach adds movement and femininity to short hair while still keeping strands off your face and neck.
Positioning for Maximum Impact
The side ponytail works best when positioned low to mid-height on the side of your head, approximately where your ear is located or slightly lower. The gathered section should sit against the back of your head rather than pulling hair completely to the side—this prevents that awkward stretching sensation and looks more intentional. The beauty of this style is that it leaves some hair falling around the opposite side of your face, creating a softening effect while still keeping the majority of hair secured and styled.
Creating the Swept Ponytail Effect
Begin by brushing your hair and deciding which side you want the ponytail on. Using your fingers or a brush, sweep all your hair toward that side, angling slightly backward rather than pulling it completely sideways. This angled sweep is what creates the flattering, intentional look rather than looking like you simply forgot to brush one side. Gather everything at your chosen position and secure with an elastic, wrapping two to three times for security. Take a small section from the ponytail to wrap around the base.
The key difference between a side ponytail and a regular low ponytail is the asymmetry—leave at least one face-framing section on your non-ponytail side, allowing it to fall naturally and frame your face. Smooth your hairline on the side with the ponytail, but allow the opposite side to have some softness and texture. This style is incredibly flattering because it emphasizes one side of your face while creating movement and visual balance through asymmetry.
Pro tip: Side ponytails photograph beautifully—the asymmetry creates depth in photos that center, balanced styles sometimes lack, making this perfect if you want a style that looks great both in person and on camera.
6. The Half-Up Half-Down Style
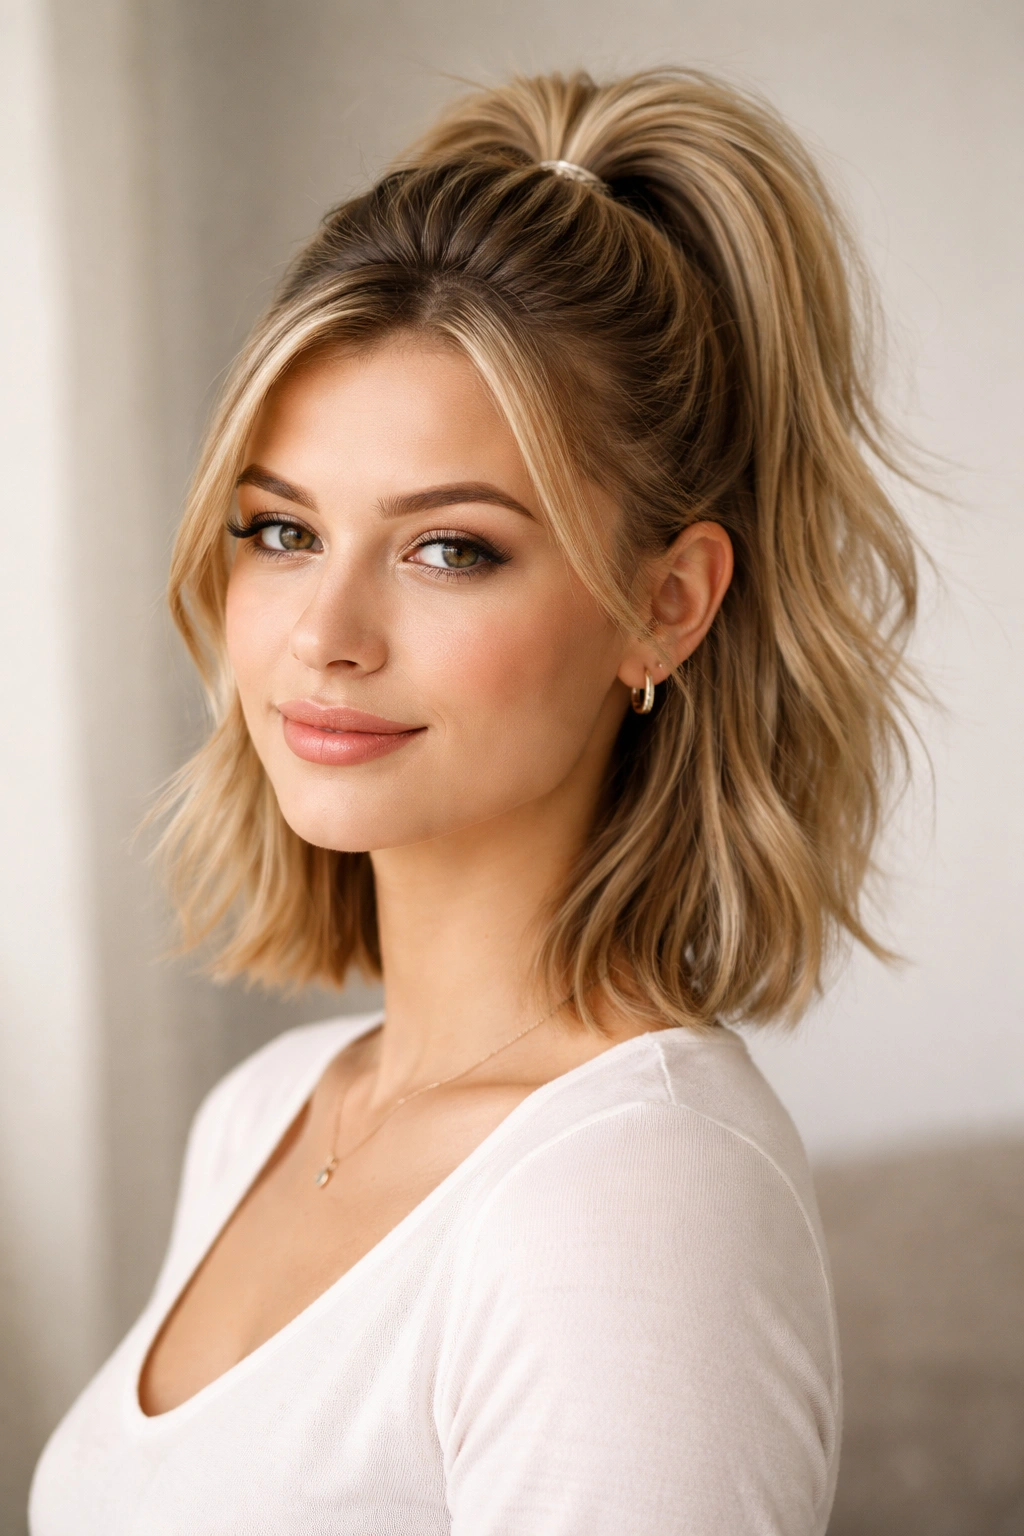
The half-up half-down ponytail splits the difference between leaving your hair down and pulling it completely back, making it perfect for days when you want some hair off your face but don’t want a completely secured ponytail. This style is especially flattering on short hair because the bottom half gets to showcase your length, texture, and natural waves, while the top half creates the polished, pulled-together appearance.
The Balance Between Control and Freedom
What makes the half-up half-down style work so well on short hair is that you’re gathering roughly the right amount of hair—enough to feel like a genuine style rather than just pieces randomly pinned back, but not so much that it looks like you couldn’t commit to a full ponytail. The gathering point typically sits at the crown or slightly back from the crown, creating a feminine silhouette. This positioning feels intentional rather than accidental, and it frames your face beautifully without pulling too tightly.
Building the Half-Up Foundation
Start by brushing your hair and identifying how much volume you have at the crown—you’re going to gather roughly the top third of your hair. Using either your fingers or a brush, collect hair from above your ears upward and back toward your crown. Gather this section and secure it with an elastic band, using at least two full wraps for security. Here’s where the styling magic happens: immediately after securing, very gently pull the gathered section slightly outward and backward, loosening the elastic just enough that the hair around your face feels soft rather than severely pulled.
Take a small section from the gathered hair and wrap it around the elastic, securing it with a bobby pin underneath. This finishes the look beautifully, hiding the elastic and creating a seamless transition between your gathered section and the hair hanging down. Let the bottom half of your hair fall naturally—if it’s wavy or curly, this creates beautiful texture; if it’s straight, consider adding waves with a curling iron. The entire style should feel balanced and intentional, with enough structure at the crown that it looks styled but enough freedom in the bottom half that it feels natural and not overly done.
Worth knowing: This is the perfect style for hair that’s slightly too short for a full ponytail—you can still achieve the polished look without fighting with stubborn shorter layers.
7. The Twisted Wrap Ponytail
The twisted wrap ponytail looks more complex than it actually is, using a clever optical illusion to create a style that appears intricate but requires just two simple steps. Instead of a braid, you’re creating a twisted section that wraps around the base of your ponytail, adding visual texture and dimension without any complicated techniques. This is a fantastic style for when you want to look like you’ve put real effort into your hair without actually spending much time on it.
Understanding the Twist Technique
A twist is simply taking two sections of hair and rotating them around each other—it’s easier than braiding and often looks more modern and current. For this style, you’re creating a small twist at the crown before gathering your ponytail, then using that twist as an anchor for the base wrap. The twist should be loose and relaxed rather than tight, creating a texture that catches light and adds visual interest to your overall style.
Step-by-Step Execution
Begin by taking a one-inch section from the very top center of your head. Divide this section into two halves and begin twisting them around each other, adding tiny pieces of hair from the scalp as you go—exactly like you’re doing a two-strand braid. Twist backward approximately three to four inches, then secure the end temporarily with a small clip. Now gather all your hair—including the twisted section—into a ponytail at your preferred height. The twist automatically becomes part of the ponytail structure.
Once your ponytail is secured, remove the temporary clip from the twisted section and gently untwist the very end just slightly, making the texture more visible. Wrap a small section from your ponytail around the elastic to hide the band, incorporating the twisted section into this wrap. Secure everything with a bobby pin. The finished effect is a ponytail that looks like it has texture and depth woven throughout, even though you only twisted one small section at the crown.
Pro tip: If you struggle with keeping a twist intact while gathering the rest of your hair, do the twist last—gather your full ponytail first, then create the twist with a small section of the already-gathered hair and wrap it around the base for a foolproof finish.
8. The Faux Hawk Ponytail
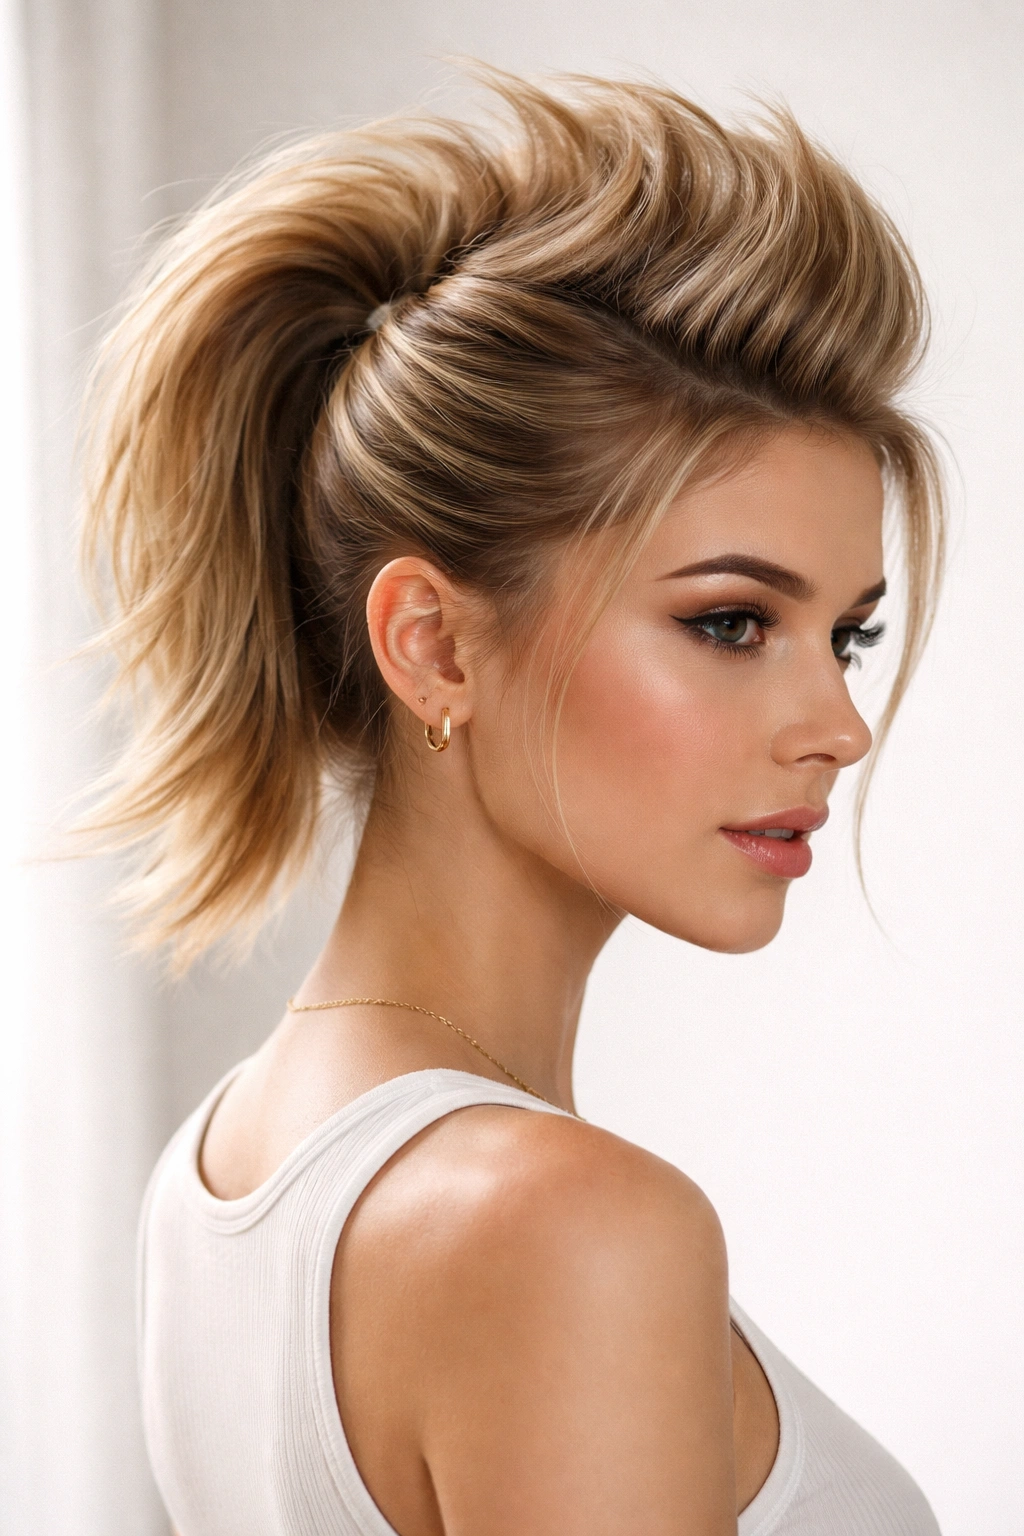
The faux hawk ponytail is playful and modern, creating a bold silhouette by teasing volume at the crown and pulling the sides smooth. This style is perfect for short hair because the shorter length means you’re building height over just a few inches rather than trying to create volume over a long section. The result is a style that feels edgy and intentional without being dramatic or difficult to execute.
Building Intentional Volume
The faux hawk works through contrast—you’re creating dramatic volume at the center crown while sleekly securing the sides. This is an excellent opportunity to use texturizing spray or dry shampoo before styling, which gives you something grippy to work with. If your hair is naturally straight, tease gently along the center crown, building height gradually. If your hair has natural texture, you might need to tease less—instead, focus on smoothing the sides while letting the crown piece stand upright naturally.
Creating the Complete Faux Hawk Look
Start by applying texturizing spray throughout your hair, concentrating on the crown. Using a fine-tooth comb, backcomb the very top center section of your hair, building height gradually rather than creating one massive tease. You want structured height that moves naturally rather than one immobile chunk. Once you’ve created your volume, smooth your hands over the top to make it look intentional rather than ratty, then smooth the sides of your hair completely with a smoothing gel or edge control product.
Gather the sides toward the back of your head, just below the volume you’ve created, and secure them with bobby pins rather than an elastic—this keeps them invisible and maintains the sleek side effect. The gathered side sections should be smooth and tight, creating maximum contrast with the textured volume at the crown. Finish by smoothing your hairline with edge control product, creating a sharp, intentional appearance. The overall silhouette should look bold and modern, with dramatic volume at center and sleekness everywhere else.
Worth knowing: This style works best with slightly damp hair or hair that hasn’t been washed in two to three days, which has more natural grip and texture to work with.
9. The Bubble Ponytail
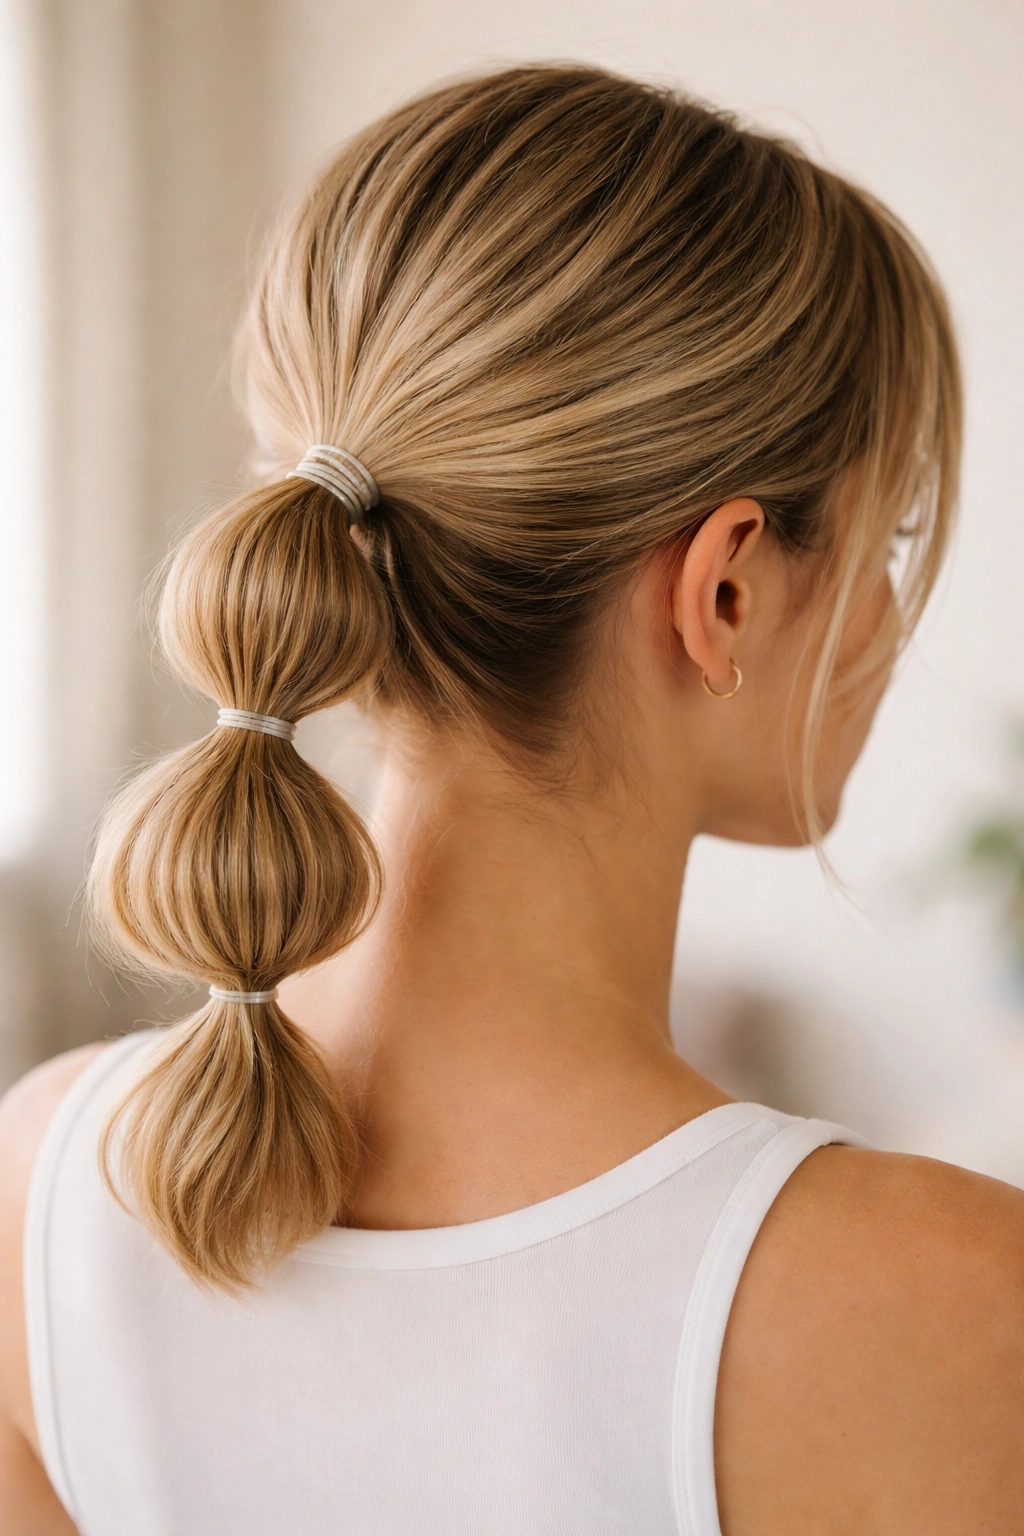
The bubble ponytail is playful and visually interesting, created by securing multiple sections with elastics spaced down the length of your hair. Each section puffs out slightly between elastics, creating that bubble effect. On short hair, you’re typically creating just two or three bubbles rather than five or six, making this style totally manageable and surprisingly easy to execute once you understand the concept.
Understanding Bubble Placement and Spacing
For short hair, the most flattering bubble ponytail usually has two to three bubble sections. Start with a ponytail at your preferred height—crown or mid-height works beautifully. Space your elastics approximately one to one-and-a-half inches apart down the length of your ponytail. The spacing determines how pronounced your bubbles appear—tighter spacing creates delicate, small bubbles, while wider spacing creates more dramatic puffs. On shorter ponytails, consistent, evenly-spaced elastics create the most polished appearance.
Creating Perfectly Shaped Bubbles
After securing your initial ponytail with an elastic, position your second elastic approximately one to one-and-a-half inches down the ponytail. Don’t tighten it yet—first, gently push the hair between the two elastics upward toward the first elastic, creating a bubble shape. Once you’re happy with the bubble’s size and shape, tighten the second elastic to secure it. Repeat this process for any additional bubbles, always pushing the hair upward between elastics before tightening.
For the most polished appearance, make sure each bubble is evenly shaped and consistent in size. This requires adjusting slightly after tightening—if one bubble is significantly larger than the next, gently loosen that elastic and redistribute the hair. The finished style should look intentional and balanced rather than lumpy. Bubble ponytails photograph beautifully and create a playful impression, making them perfect for more casual occasions or when you want your style to feel fun rather than strictly professional.
Pro tip: Mist finished bubbles lightly with hairspray to set their shape—this prevents them from deflating or losing their definition throughout the day, keeping your style polished and intentional-looking for hours.
10. The Curly Volumized Ponytail
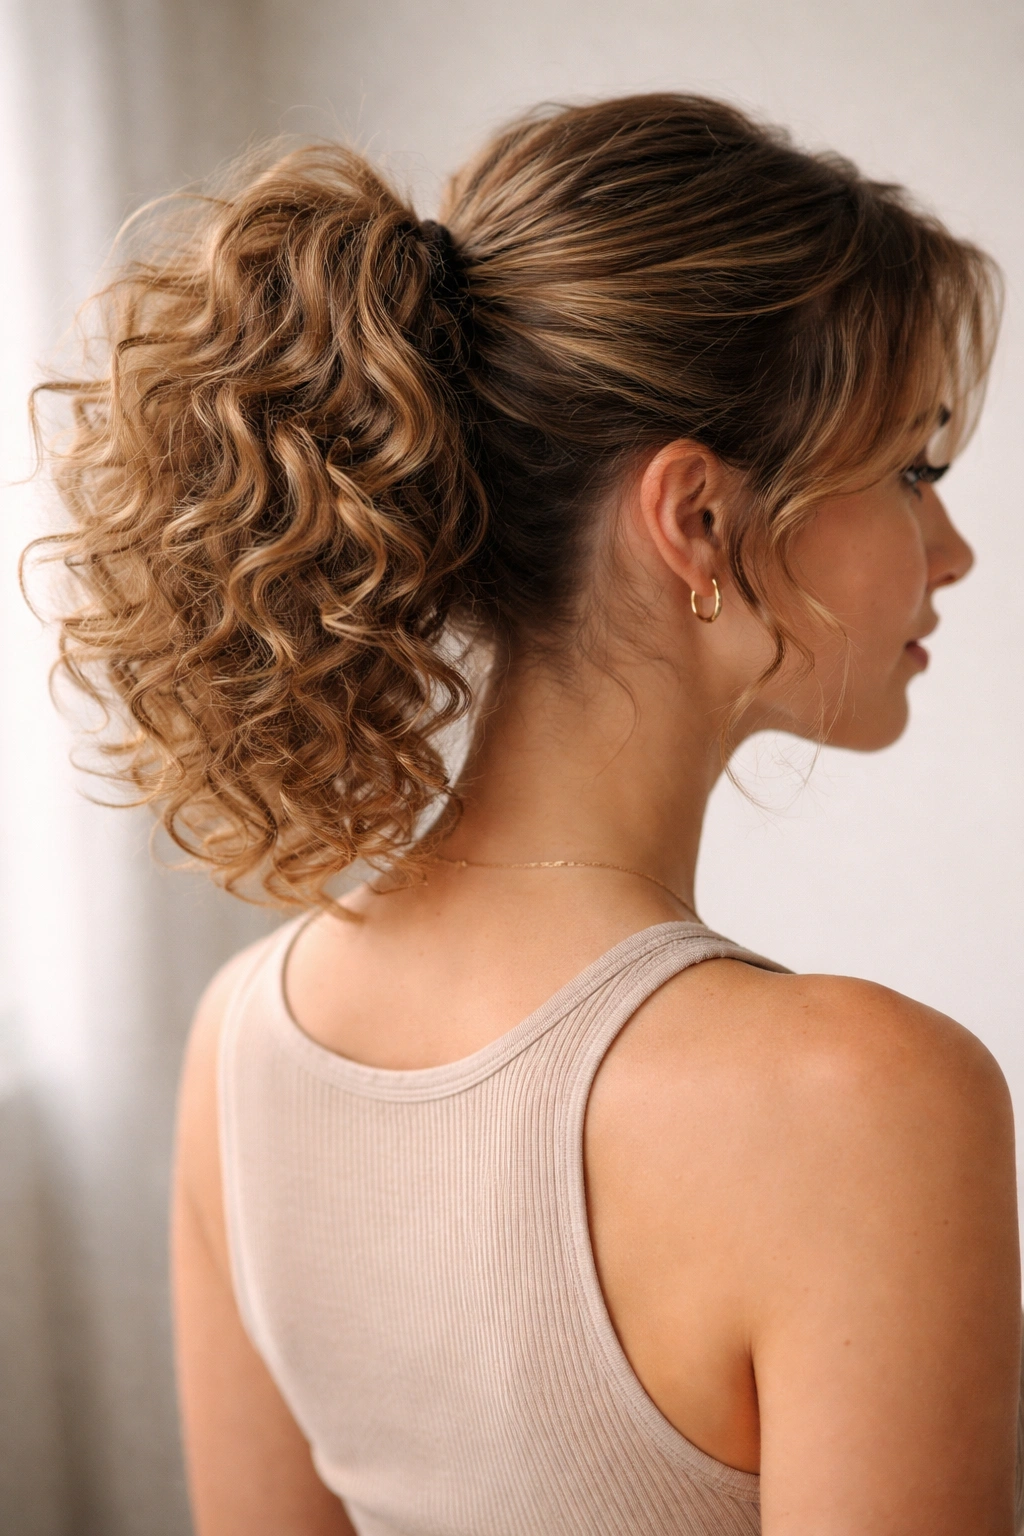
The curly volumized ponytail celebrates texture and movement, making it ideal if you have naturally curly or wavy hair or if you’re willing to spend a few minutes creating curl or wave before pulling your ponytail. This style works beautifully on short hair because the shorter length means each curl gets maximum visibility, and the overall effect feels modern and effortlessly beautiful rather than overly styled.
Preparing Curls for Maximum Impact
If you have naturally curly hair, you can work with your texture directly—simply arrange curls as you gather your ponytail, allowing them to stack and interlock for maximum volume. If your hair is straight or wavy, use a curling iron or wand to create soft waves or curls before ponytailing. The key is creating curls with enough texture that they hold together and create visual interest in your gathered section. Avoid tight, spiral curls unless that’s your natural texture—loose, flowing waves look more current and allow better shape in the ponytail.
Gathering Curly Hair Into a Ponytail
Rather than using a fine-tooth comb, use your fingers or a wide-tooth comb to gather curly hair, which prevents disrupting your curl pattern and causing frizz. Gather at your preferred height, but don’t pull so tightly that you’re compressing all the texture—allow the curls some freedom to maintain their shape. Secure with an elastic band, wrapping only once or twice so the tension stays loose. Immediately after securing, gently fluff the gathered section, teasing it slightly to add even more volume and allow curls to expand.
For maximum visual impact, pull a few face-framing curls free from the main ponytail, allowing them to frame your face. These loose pieces add softness and femininity while showcasing your hair’s texture. Wrap a small section from the ponytail around the elastic to hide the band, then use your fingers to fluff everything one final time. The finished style should look voluminous and textured, with curls visible throughout the gathered section and plenty of movement and dimension.
Worth knowing: Curly hair ponytails actually hold better with fewer elastic wraps than straight hair—wrapping too many times compresses curls and causes them to lose definition, so embrace using just one or two wraps.
11. The Sleek Gel Slicked Back Ponytail
The sleek gel slicked-back ponytail is the ultimate sophisticated style, using edge control or gel to create an ultra-polished, clean appearance. This style is perfect for professional settings, formal events, or simply days when you want your styling to scream intentional and put-together. On short hair, the slicked-back effect is incredibly easy to achieve and looks extremely current and modern.
Selecting and Applying the Right Products
The key to a genuinely sleek ponytail is using the right product—you need something with enough hold that it keeps flyaways in place throughout the day without looking greasy or crunchy. Edge control products specifically designed for smoothing work beautifully, as do lightweight gels. Apply product to your hairline and work backward, smoothing your hair as you go. Use a fine-tooth comb or a brush to ensure every strand lies flat against your scalp. This isn’t a casual style—precision is what makes it look intentional and polished.
Executing the Perfect Slicked Aesthetic
Begin by brushing your hair straight back from your face, using product to create a completely smooth base. Every flyaway, every piece of texture, should be smoothed flat. Gather your hair at your chosen ponytail position—high, mid, or low all work beautifully with this style. Wrap your elastic around two or three times for maximum security, then take a small section from the ponytail to wrap around the base. Smooth any product residue from your hairline using a clean toothbrush or fine-tooth comb, creating sharp, clean edges around your face and the back of your neck.
This style requires maintenance throughout the day—keep a small container of edge control or product with you and smooth any flyaways as they appear. The entire point of this style is that it looks completely controlled and intentional, so any loose strands or texture immediately diminishes the effect. A truly polished slicked ponytail should look like you just stepped out of a salon, even though you created it at home.
Pro tip: This style is ideal for fine hair or straight hair types that struggle with other styles—the slicked-back approach actually works with rather than against hair that’s naturally flat or thin.
12. The Textured Top Knot Ponytail
The textured top knot ponytail combines the polished appearance of an updo with the ease of a ponytail, creating a hybrid style that’s genuinely easy to execute on short hair. Rather than a fully twisted or braided bun, you’re creating a loose knot with your ponytail, adding texture and visual interest while keeping everything secure and neat. This style is perfect for situations where you want to look intentionally styled without actually spending much time on your hair.
Understanding the Knot Structure
A knot ponytail begins like a regular ponytail but then takes an extra step—once gathered, you’re loosely twisting or wrapping the ponytail and securing it into a loose knot at the base. On short hair, this creates a small, delicate knot rather than a large bun, which looks incredibly current and is proportional to your shorter length. The knot should be loose enough that some texture shows through rather than being pulled so tightly that it looks like a rigid bun.
Creating Your Textured Knot
Start by gathering your ponytail at your crown or mid-height, securing it with an elastic. Rather than leaving it as a regular ponytail, take the gathered section and twist it gently—don’t make the twist tight, just enough to create texture. Now wrap this twisted section around the base of the ponytail, creating a loose loop or knot shape. Secure the knot’s end with a bobby pin, hiding the pin under the twist. Gently loosen the knot slightly, allowing texture to show through and preventing it from looking too structured or rigid.
To add even more dimension, pull a few tiny pieces from the knot, allowing them to fall around your face and add softness. These loose pieces keep the style from looking too severe while showcasing your hair’s natural texture. Mist lightly with flexible-hold hairspray to set the shape without stiffening the style. The finished effect should look like you casually gathered your hair into a knot, not like you spent twenty minutes creating a perfectly sculpted bun—that effortless, intentional aesthetic is what makes this style so appealing.
Worth knowing: This style is perfect for hair with natural wave or curl because the texture automatically creates visual interest in the knot without requiring additional teasing or backcombing.
Final Thoughts
Short hair ponytails offer incredible versatility once you understand the fundamental techniques that make each style work. Whether you’re drawn to sleek sophistication, playful texture, or something in between, there’s a ponytail approach that fits your hair type, personal style, and daily needs. The best part about these styles is that mastering even three or four of them gives you options for virtually any situation you encounter.
The techniques discussed here—gathering, securing, wrapping, and adding texture—apply across multiple styles, so learning one approach inevitably makes the next style easier to execute. You don’t need expensive tools, professional training, or hours to spend in front of a mirror. All you need is understanding how your specific hair length and texture responds to different techniques, plus the willingness to practice a style two or three times before you nail it. Most people find that their favorite go-to style becomes genuinely quick after just a few repetitions.
Give yourself permission to experiment with these styles without pressure to achieve perfection immediately. Some styles will feel instantly natural while others require a bit of practice and adjustment. Your hair, face shape, and lifestyle will naturally gravitate you toward certain approaches—lean into the styles that make you feel confident and beautiful rather than forcing styles that don’t serve you. The goal is a ponytail that makes you feel polished, intentional, and genuinely happy with how you look.