Getting your edges to lay flat and stay that way is one of the most satisfying parts of styling a sleek ponytail. There’s something about perfectly controlled, gleaming edges that instantly elevates your entire look — whether you’re heading to the office, the gym, or out for the evening. The secret isn’t complicated: the right gel, the right technique, and understanding how different ponytail styles showcase those polished edges differently. A well-executed gel ponytail doesn’t just look put-together; it feels intentional and confident. The best part? Once you’ve mastered a few of these styles, you’ll have endless options depending on your mood, your hair type, and how much time you have in the morning.
Gel has become a game-changer for edge control because it gives you precision without heaviness when you choose the right formula. Not all gels are created equal — some leave your hair stiff and flaky, while others grip beautifully without the white cast or crunchiness. The styles you’re about to see all work with gel-based edge control, but the specific way you apply it, the amount you use, and the technique you combine it with changes the whole vibe. Some ponytails emphasize ultra-sleek simplicity, while others layer in texture or playful dimension while still keeping those edges locked down. What they all have in common is that polished, intentional aesthetic that makes people ask how you got your edges so smooth.
Whether your hair is naturally straight, wavy, coily, or textured, gel ponytails work for you — you just need to know which style suits your hair type and lifestyle best. A high ponytail with gel edges reads completely different from a low ponytail with the same technique. A sleek base with a textured ponytail body gives you sophistication plus dimension. A sleek ponytail with laid baby hairs adds a touch of softness and femininity. The goal here is to give you 15 distinct approaches to the gel ponytail, each with its own character, so you can pick the ones that resonate with you and actually use them.
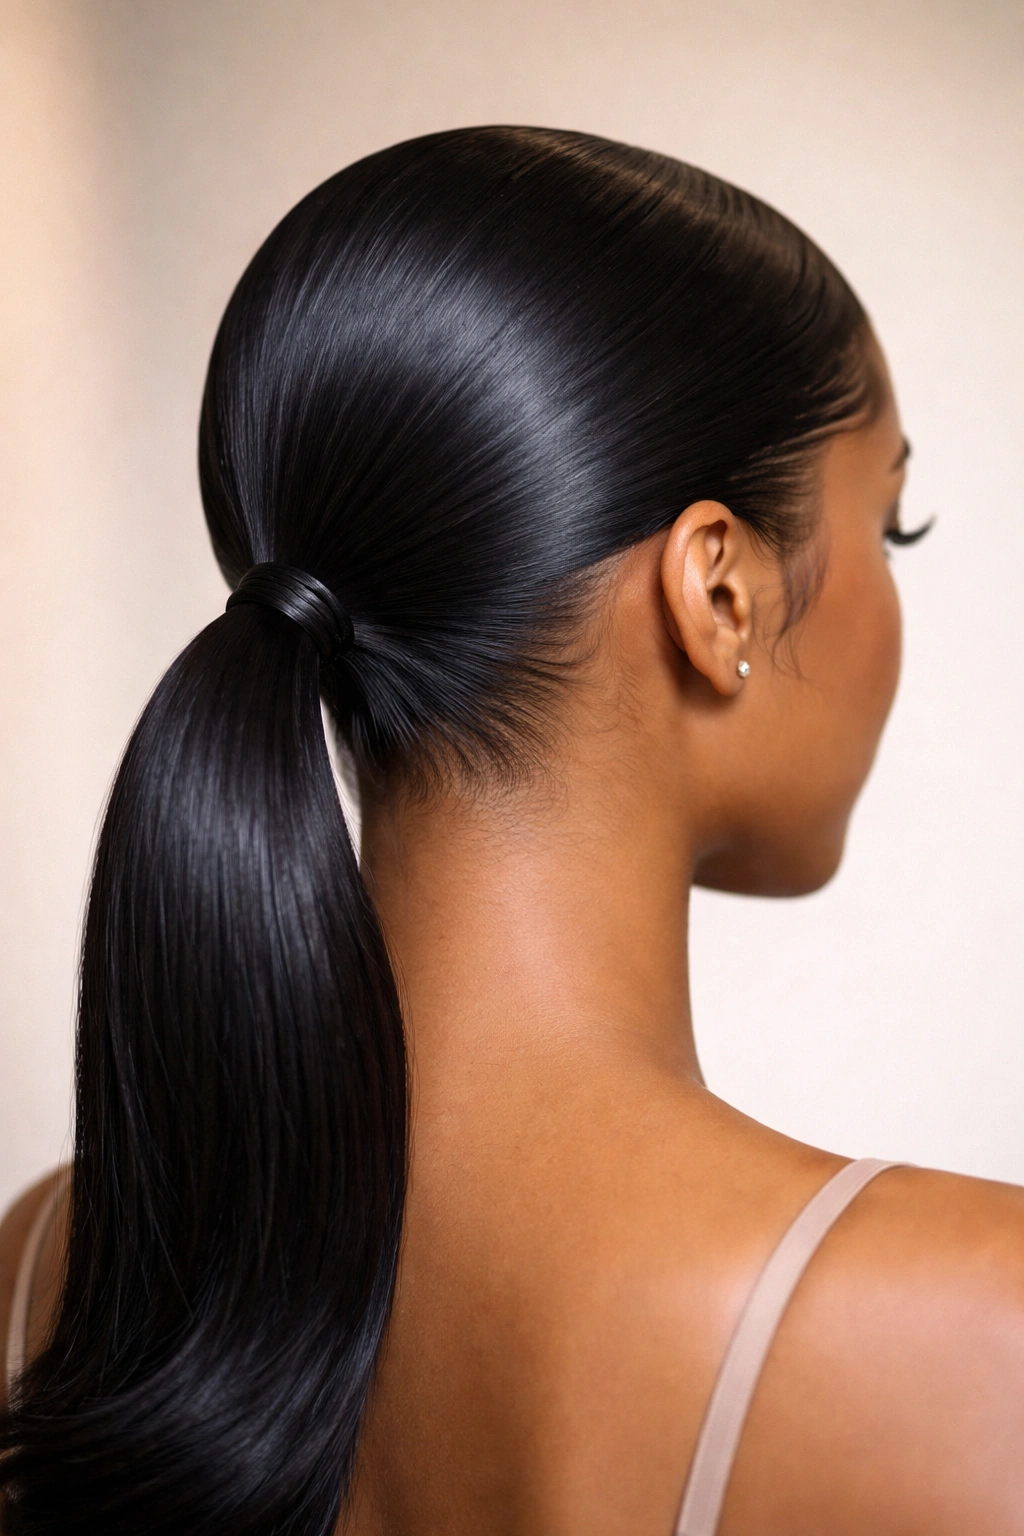
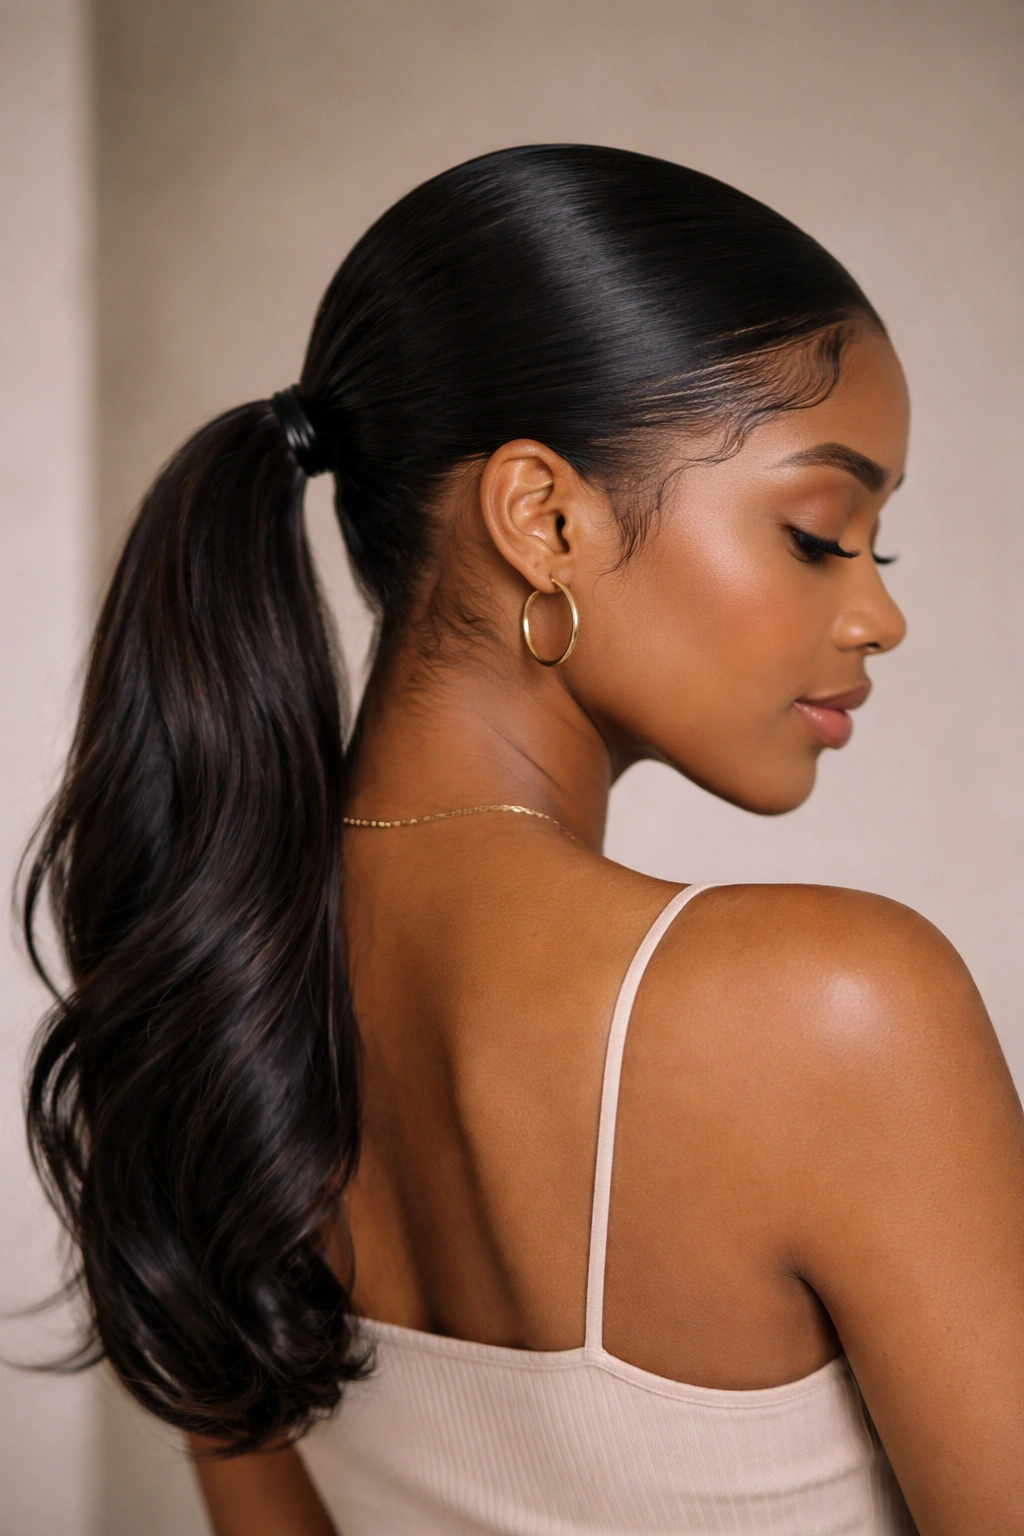
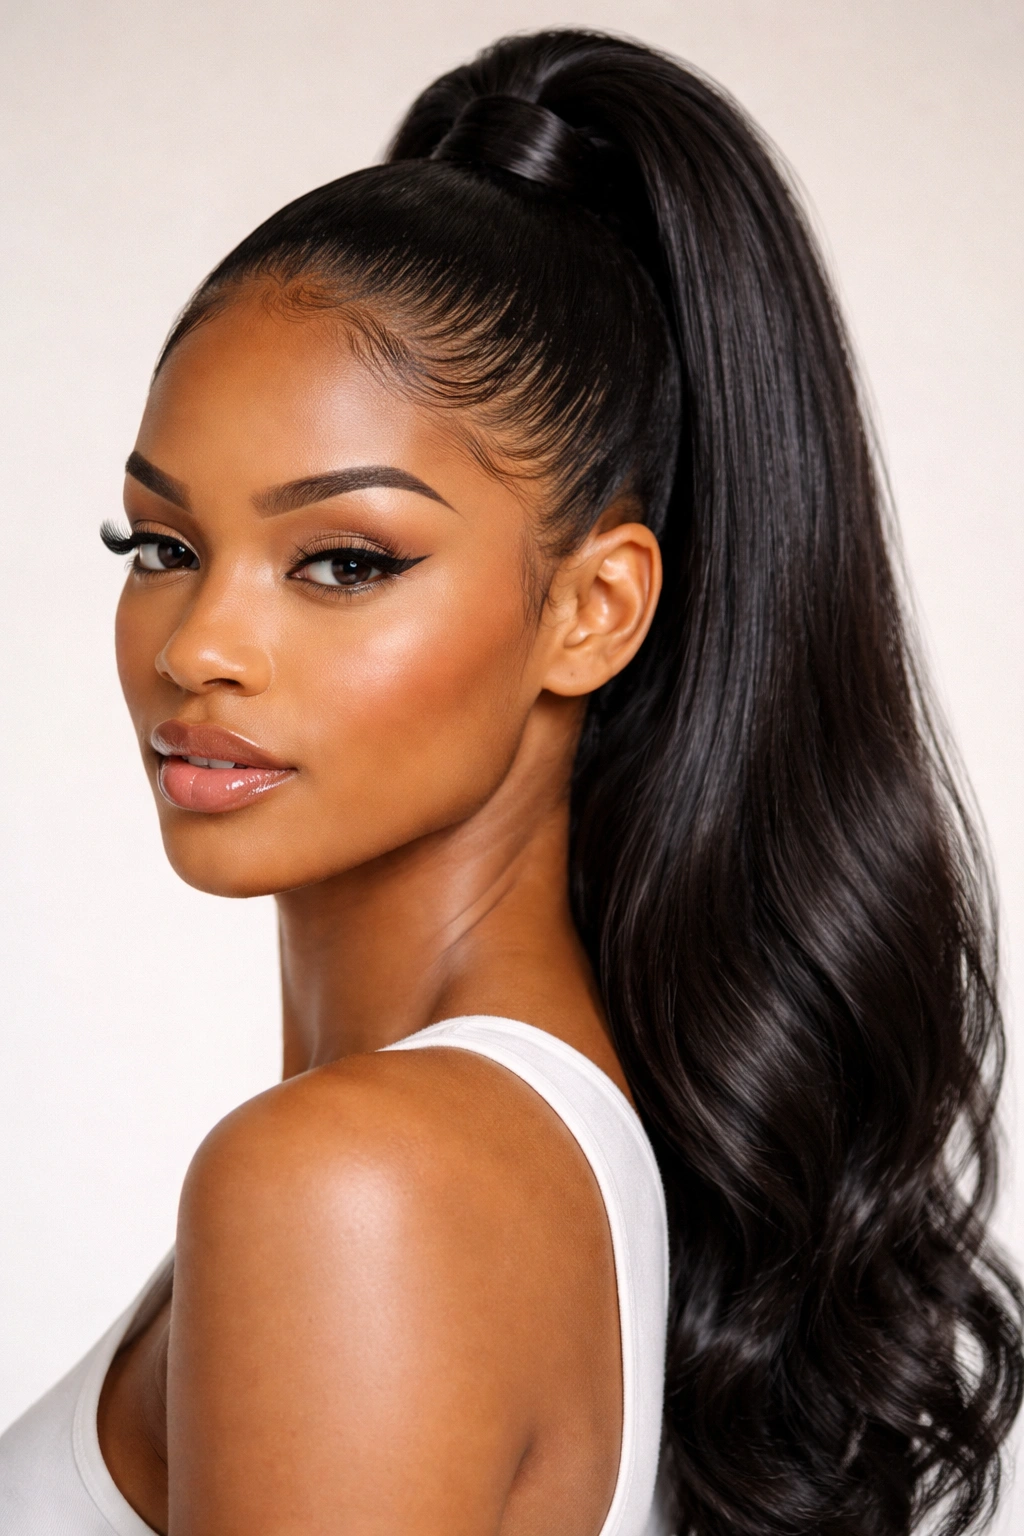
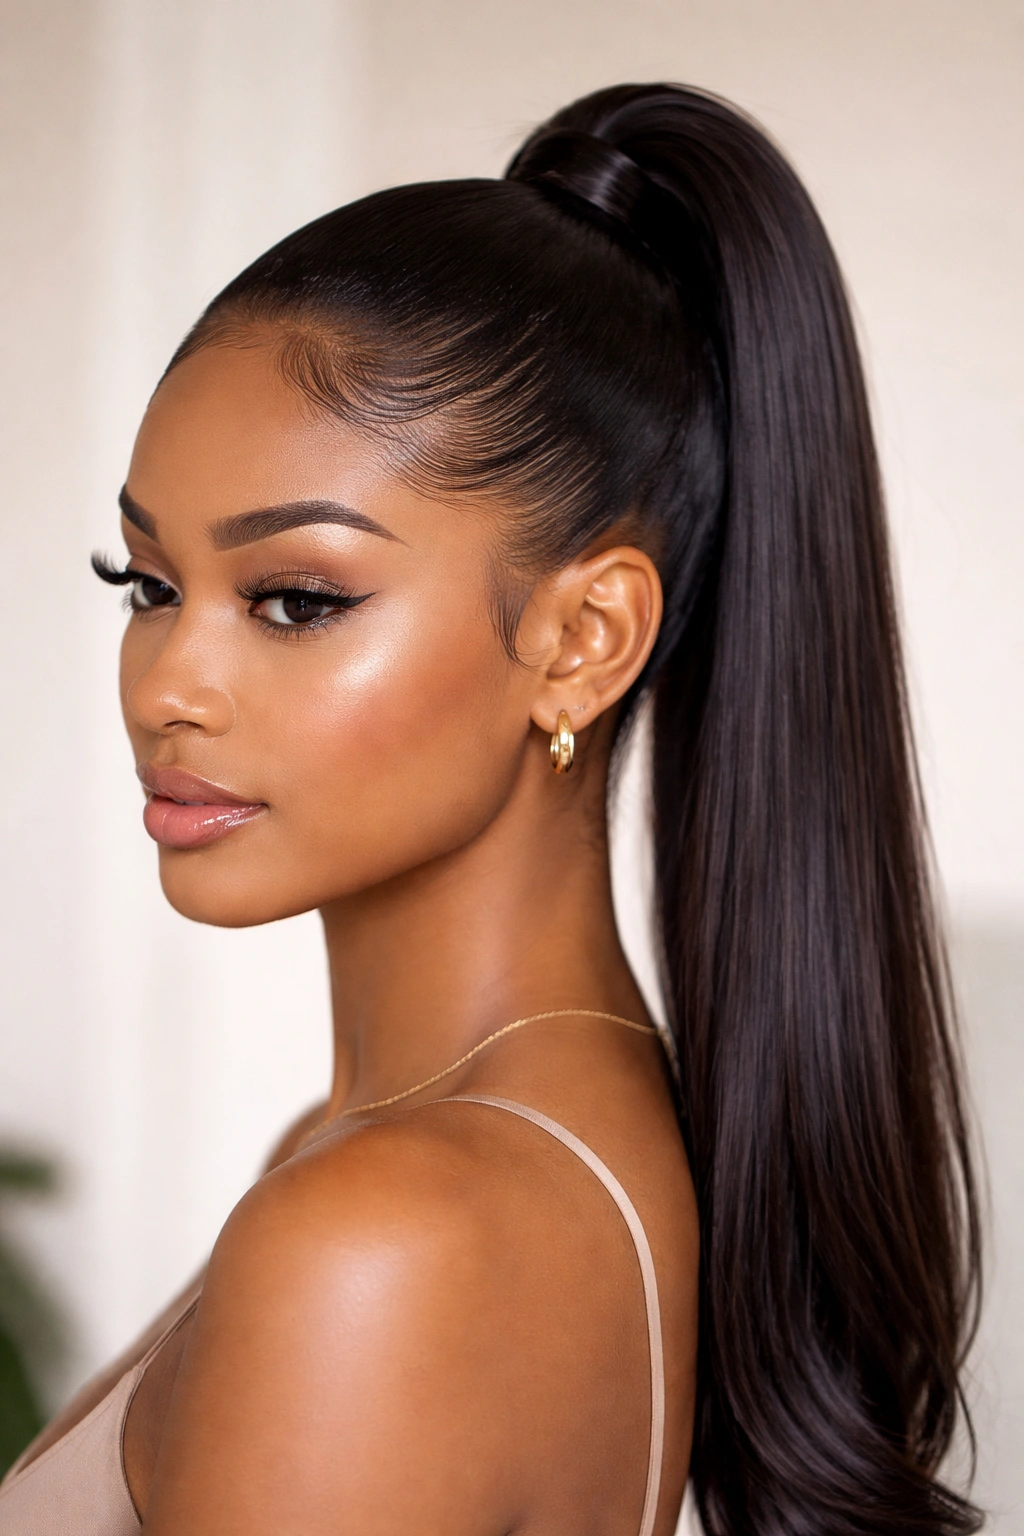
1. Classic High Sleek Ponytail
This is the foundational gel ponytail that works for nearly every occasion and hair type. You’re pulling your hair back into a high, centered ponytail at the crown, securing it tightly, and using gel to smooth every edge — front, sides, and nape — into a polished finish. The simplicity is the strength here. There’s nowhere to hide, so every detail matters: clean edges, a smooth base, and that signature shine from well-chosen gel.
Why This Style Works for Everyone
The high placement naturally elongates the face and works with most face shapes. It’s formal enough for professional settings and casual enough for everyday wear. The high positioning also showcases your edges beautifully because they’re visible and framed by the sleekness of the base.
How to Perfect Your Edges
- Start with a fine-tooth comb or edge brush and apply a firm-hold gel directly to your hairline
- Work in small sections, smoothing from the part down toward your ears and across the nape
- Use your brush to press the gel into place, then follow with your fingers for a final smooth
- Allow the gel to set for 2-3 minutes before touching it — this helps the edges firm up
- A finishing spray locks everything in place without adding tackiness
Pro tip: If your hairline is sensitive, apply a thin layer of leave-in conditioner before the gel to protect your skin and hair.
2. Low Sleek Ponytail
A low ponytail positioned at the nape of your neck transforms the entire energy of a gel ponytail style. It’s more understated, more sophisticated, and surprisingly works beautifully with formal wear, casual outfits, and everything in between. The lower placement means your edges are less visually prominent, which actually makes this a great choice if you want the neatness of gel-controlled edges without the full spotlight on them.
The Elegance of Simplicity
Low ponytails automatically feel more refined and less high-fashion than their high counterparts. They suit professional environments perfectly because they read as polished without trying too hard. If you have a round face, low ponytails also create a flattering lengthening effect.
Application Technique for Low Ponytails
- Gather your hair lower, usually 2-3 inches above the nape of your neck
- Use gel to smooth the crown and the sides of your head, creating a clean pathway to where your elastic sits
- Pay special attention to the nape edges — use a fine brush to apply gel in the same direction your hairline grows
- The ponytail itself can be slightly fuller or softer than with a high style; the smooth base does the heavy lifting
Worth knowing: Low ponytails can sometimes feel sleepy or droopy if your hair is fine or slippery. A good-grip elastic and extra gel at the crown help maintain the structure.
3. Sleek Side Ponytail
Side ponytails are all about asymmetry and movement, but when you add gel edges, they become modern and polished instead of casual. Your hair is swept to one side — usually right or left depending on which side you naturally part — and secured into a ponytail that rests against your shoulder or back. The gel edges create a clean shape around the entire circumference of your head, making the side sweep intentional rather than accidental.
Creating Drama With Direction
A side ponytail instantly draws the eye to one side of your face, so you’re highlighting whatever you want people to see — a sharp jawline, interesting earrings, or just a change from your usual symmetry. The side sweep combined with gel edges reads fashion-forward and intentional.
Technique for Side Placement
- Create a deep side part, then gather your hair into a ponytail positioned slightly behind your ear on the side you’re sweeping toward
- Gel the front hairline and the area around your ear where the ponytail begins, smoothing everything toward the side part
- Use a fine brush to smooth the back of your head and around your nape, following the direction your hair naturally grows
- The key is blending the natural texture of your crown with the sleek sides — no harsh lines
Insider note: If you have baby hairs or a soft front hairline, a lighter gel with a fine brush gives you control without making those delicate hairs look plastered.
4. Slicked-Back High Bun Ponytail
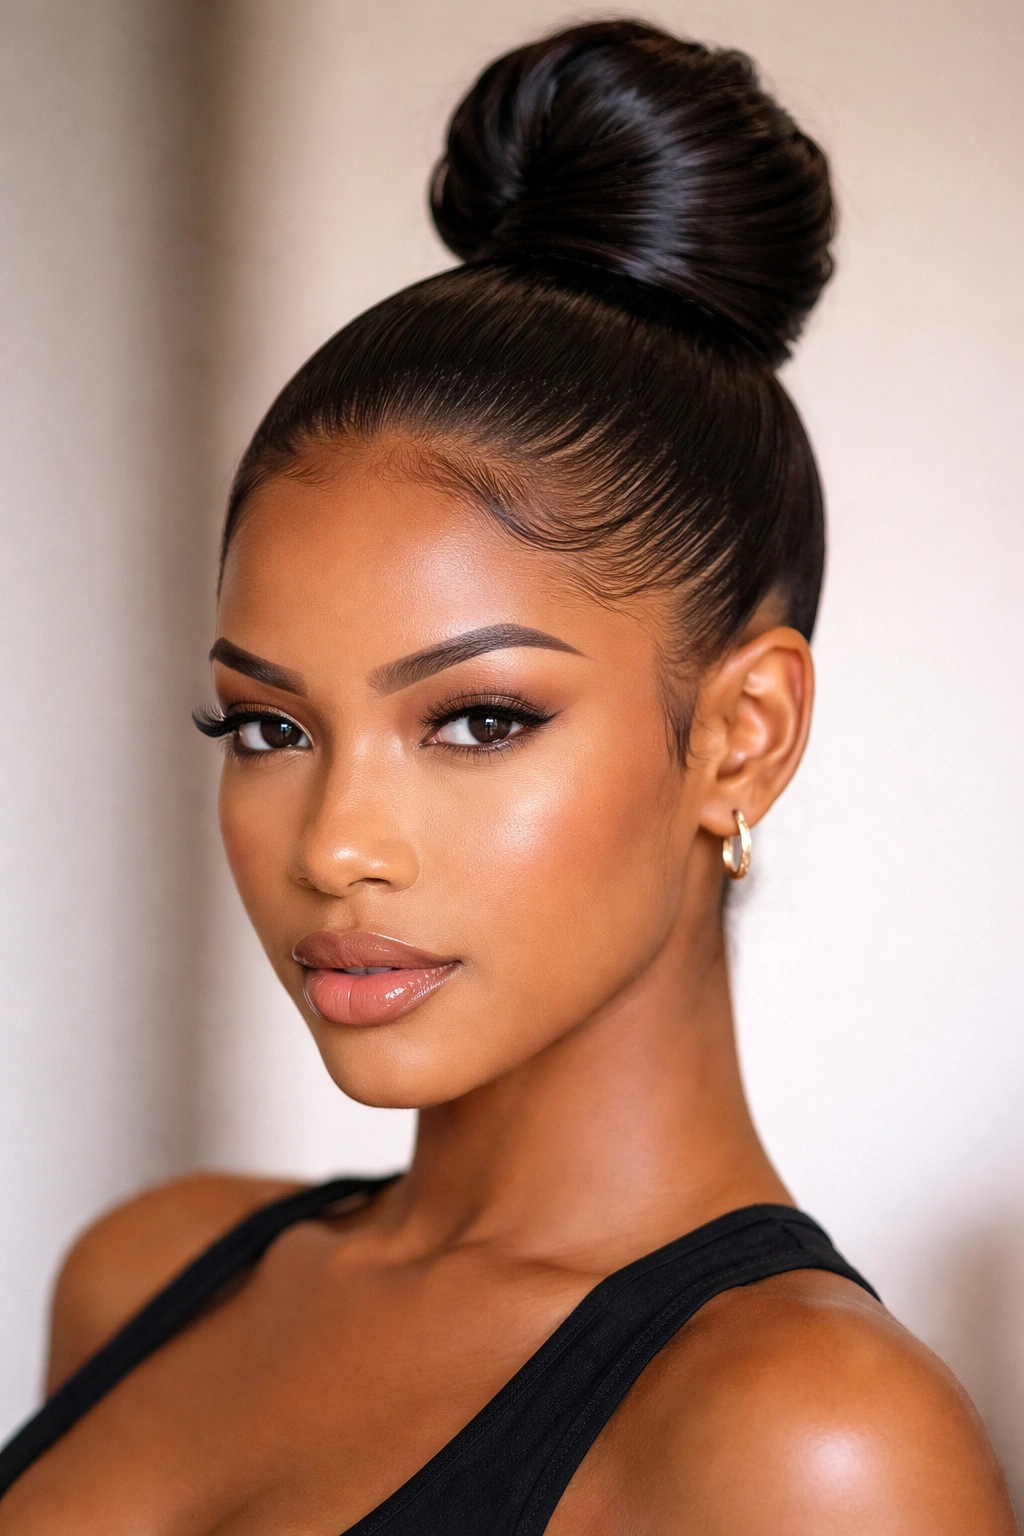
This is a ponytail that transitions into a bun at the base, giving you a hybrid style that’s both ponytail and bun. Your hair is pulled straight back from your forehead, smoothed aggressively with gel at the crown and sides, then twisted or wrapped into a neat bun at the high crown. It’s sleek, it’s dramatic, and it’s one of the most flattering styles for showing off your face and bone structure.
Why Slicked Styles Demand Gel
Without gel, pulling your hair straight back can look harsh or unfinished. Gel adds intentionality — it signals that this sleekness is deliberate and polished. Slicked-back styles also work beautifully on different hair textures because the gel holds everything uniformly.
Building Your Slicked-Back Base
- Use a thick, heavy gel that grips well — you’re fighting gravity and movement here
- Apply gel from your hairline backward, smoothing with a comb or brush
- Divide your hair into quadrants if you have a lot of it, treating each section methodically
- Once your hair is pulled back and secured, wrap sections around the base of your ponytail and pin to create the bun shape
- Use a fine brush to smooth any flyaways and define the shape
Pro tip: Slicked-back styles can sometimes feel severe if your face is very angular. Soften the look with minimal makeup or a smile that crinkles your eyes — the style is bold enough without additional intensity.
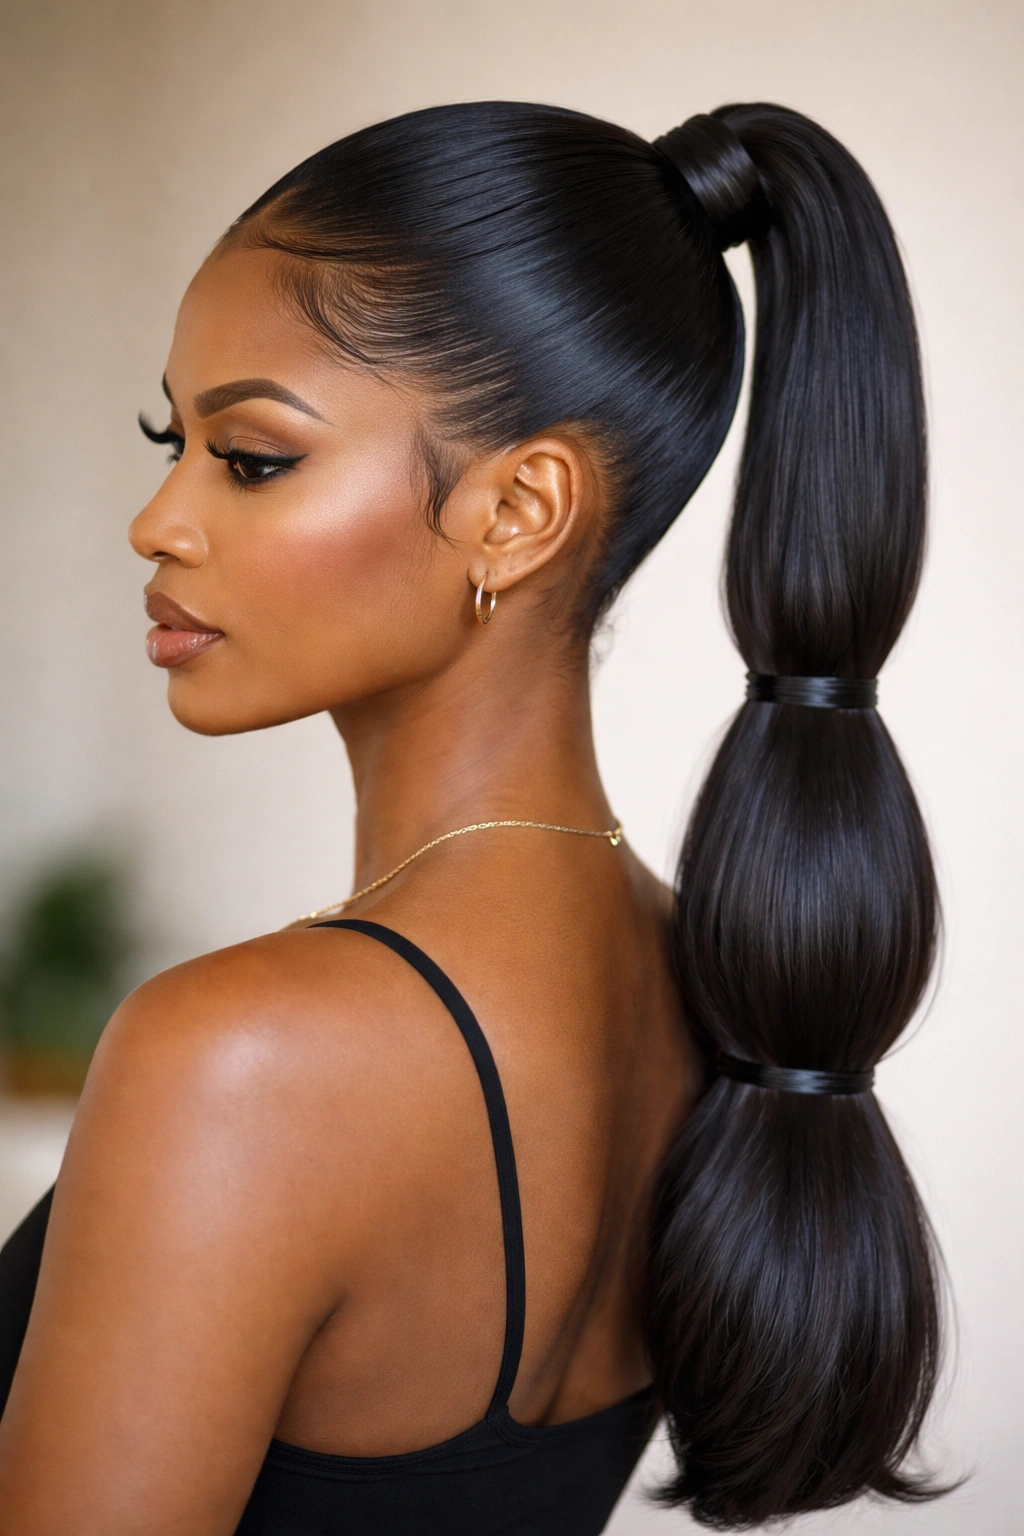
5. Bubble Ponytail With Gel
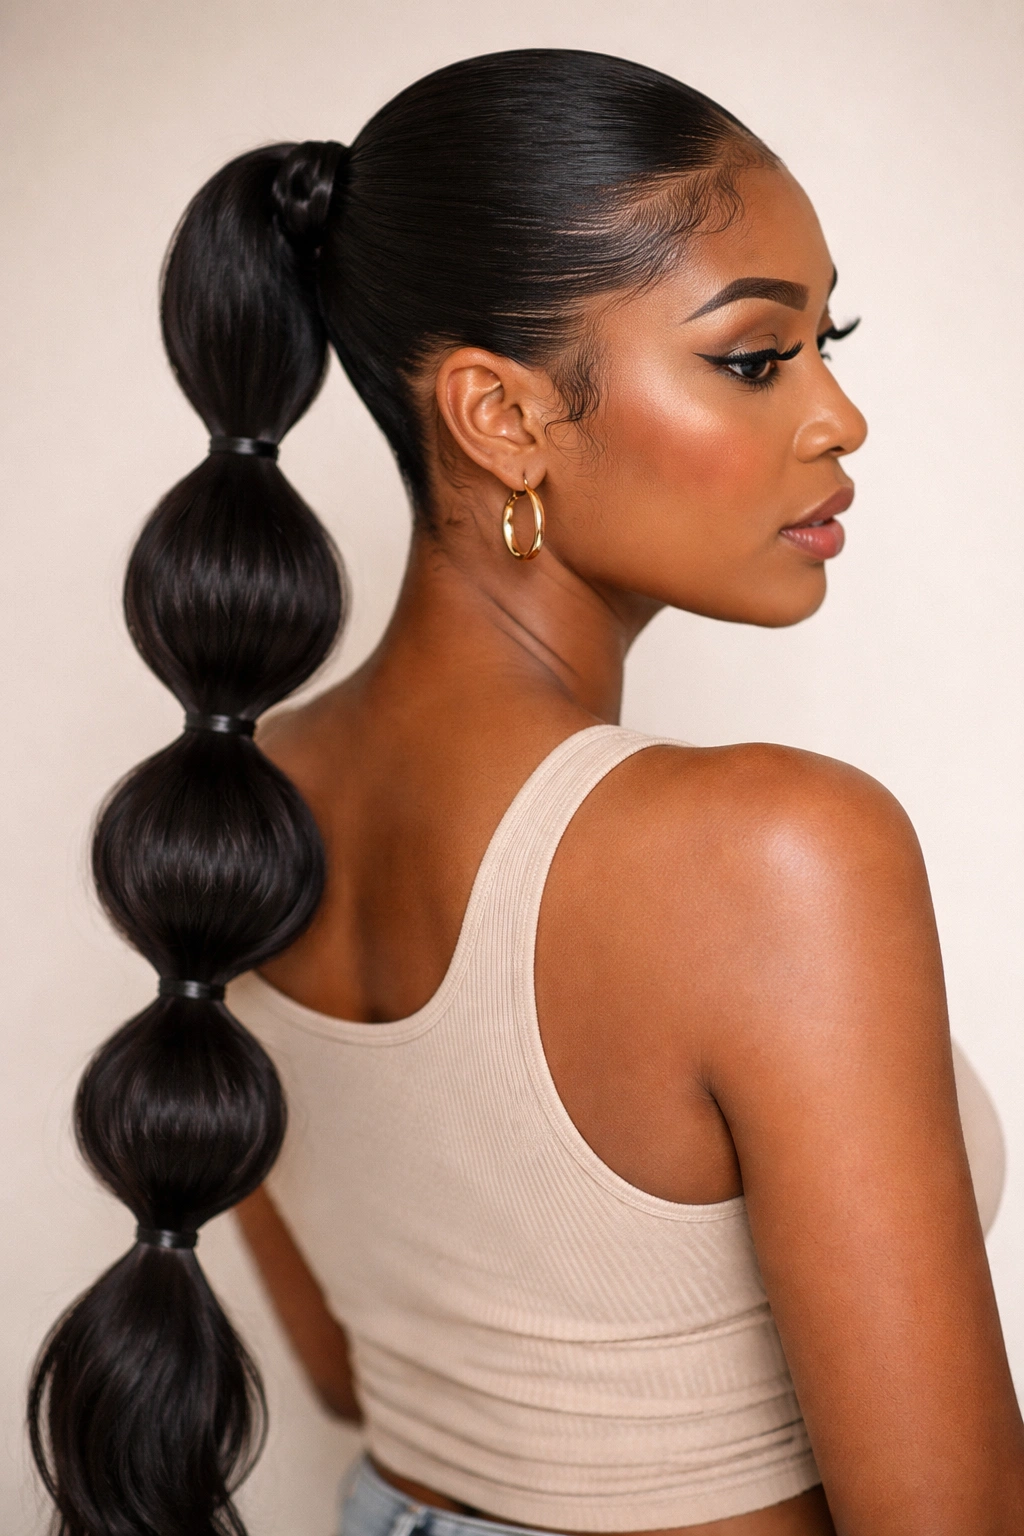
A bubble ponytail is a series of sections along a central ponytail, each tied with its own elastic to create stacked bubble shapes. When you add gel to the edges, you’re creating clean separations between each bubble and a polished base — the bubbles have definition and shape instead of looking messy or playful. It’s a style that reads fun but controlled, youthful but intentional.
Structural Precision With Texture
Bubble ponytails are all about the segments, and gel edges make those segments crisp and visible. You’re essentially creating multiple focal points along the length of your ponytail, and the sleek edges tie the whole composition together. This works especially well if you’re wearing the ponytail down the back or to the side.
Building Your Bubble Structure
- Create your main ponytail with gel-smoothed edges at the crown and sides
- Divide the ponytail into 3-5 segments depending on length — each bubble should be roughly 3-4 inches
- Secure each segment with a small elastic, then gently pull out and fluff each bubble section
- Use a fine-tooth comb and gel to re-smooth your edges after you’ve created the bubbles — styling can disturb what you’ve smoothed
- A light finishing spray helps the bubbles hold their shape throughout the day
Worth knowing: Bubble ponytails work best on hair with some weight and texture. Fine, thin hair can look stringy in bubbles unless you use volumizing techniques.
6. Sleek Braided Ponytail
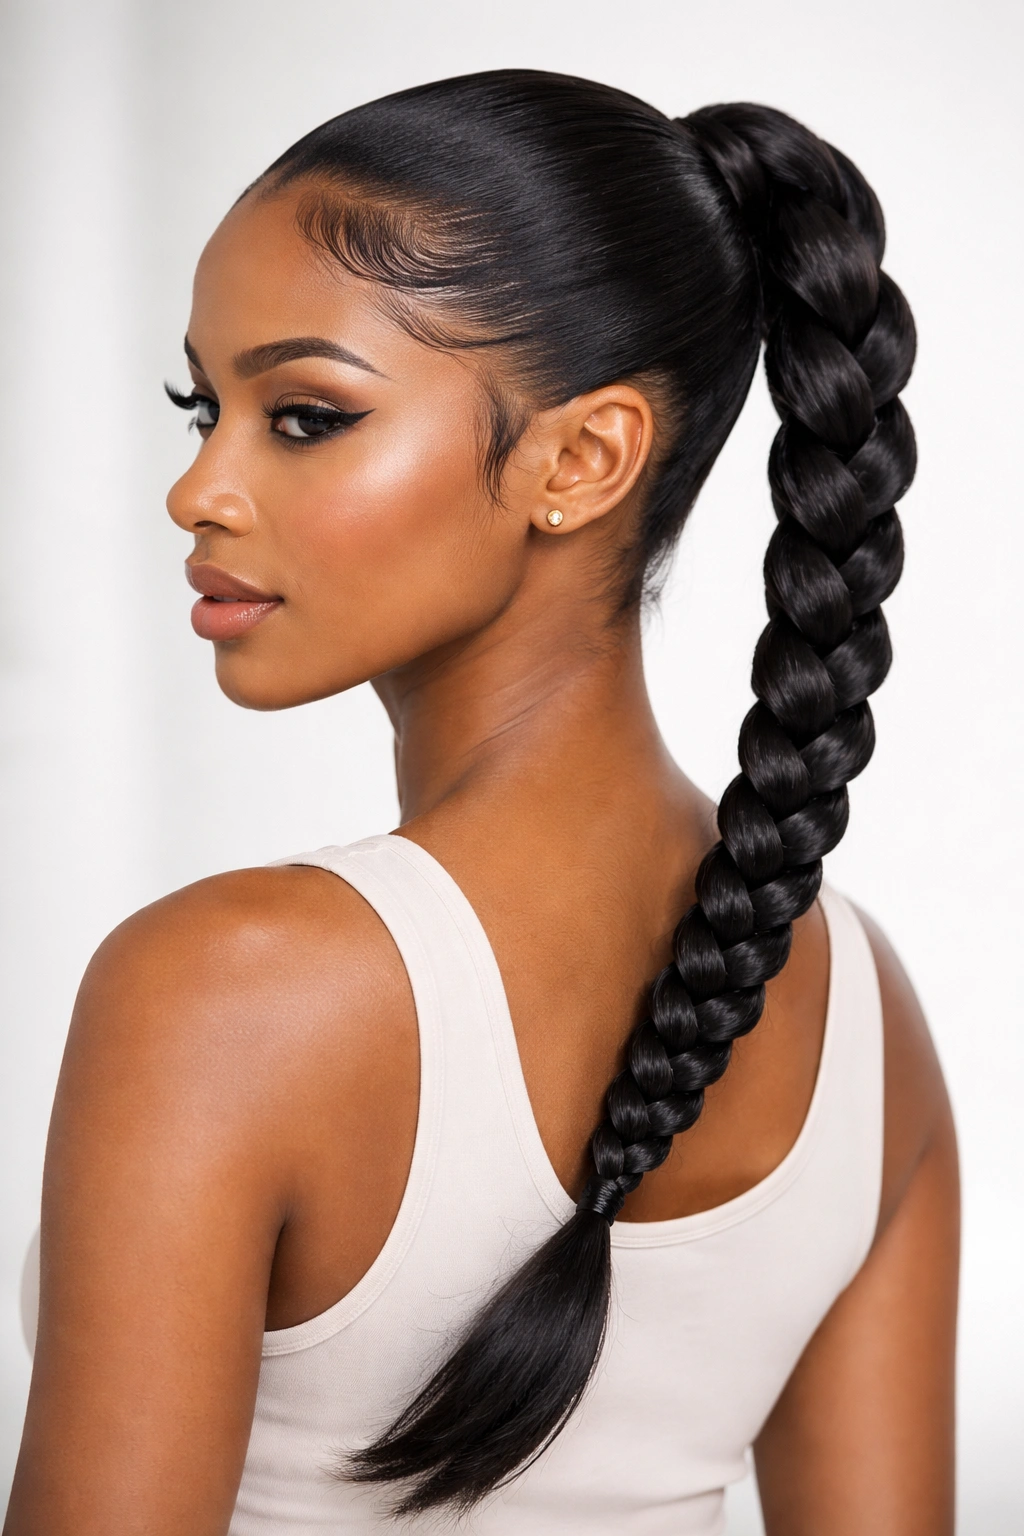
A braided ponytail combines the polish of sleek edges with the visual interest of a braid running through the ponytail itself. Your edges are controlled with gel, but instead of a smooth ponytail, the ponytail body becomes a tight, neat braid. You can do a single braid, double braids, or even a halo-braided effect depending on how much time you have and your skill level.
Texture Meets Polish
The contrast between the smooth, gel-controlled edges and the textured braid creates visual depth and sophistication. You’re not trying to smooth everything — you’re strategically smoothing the frame and letting the braid do the talking. This approach works beautifully if you want an impressive style that doesn’t scream “high maintenance.”
Executing the Braid Structure
- Start with perfectly smoothed edges using gel — this is non-negotiable
- Secure your ponytail, then divide it into three sections for a classic braid
- Braid tightly from the base of your ponytail all the way down, keeping tension even
- Use a light gel or edge control on your hands before braiding if your hair tends to frizz
- After braiding, you can gently pull the braid to make it appear fuller — this is called “pancaking”
Pro tip: Three-strand braids are quickest, but French braids worked from the crown down create a more seamless transition from edges to style.
7. Textured Sleek Ponytail
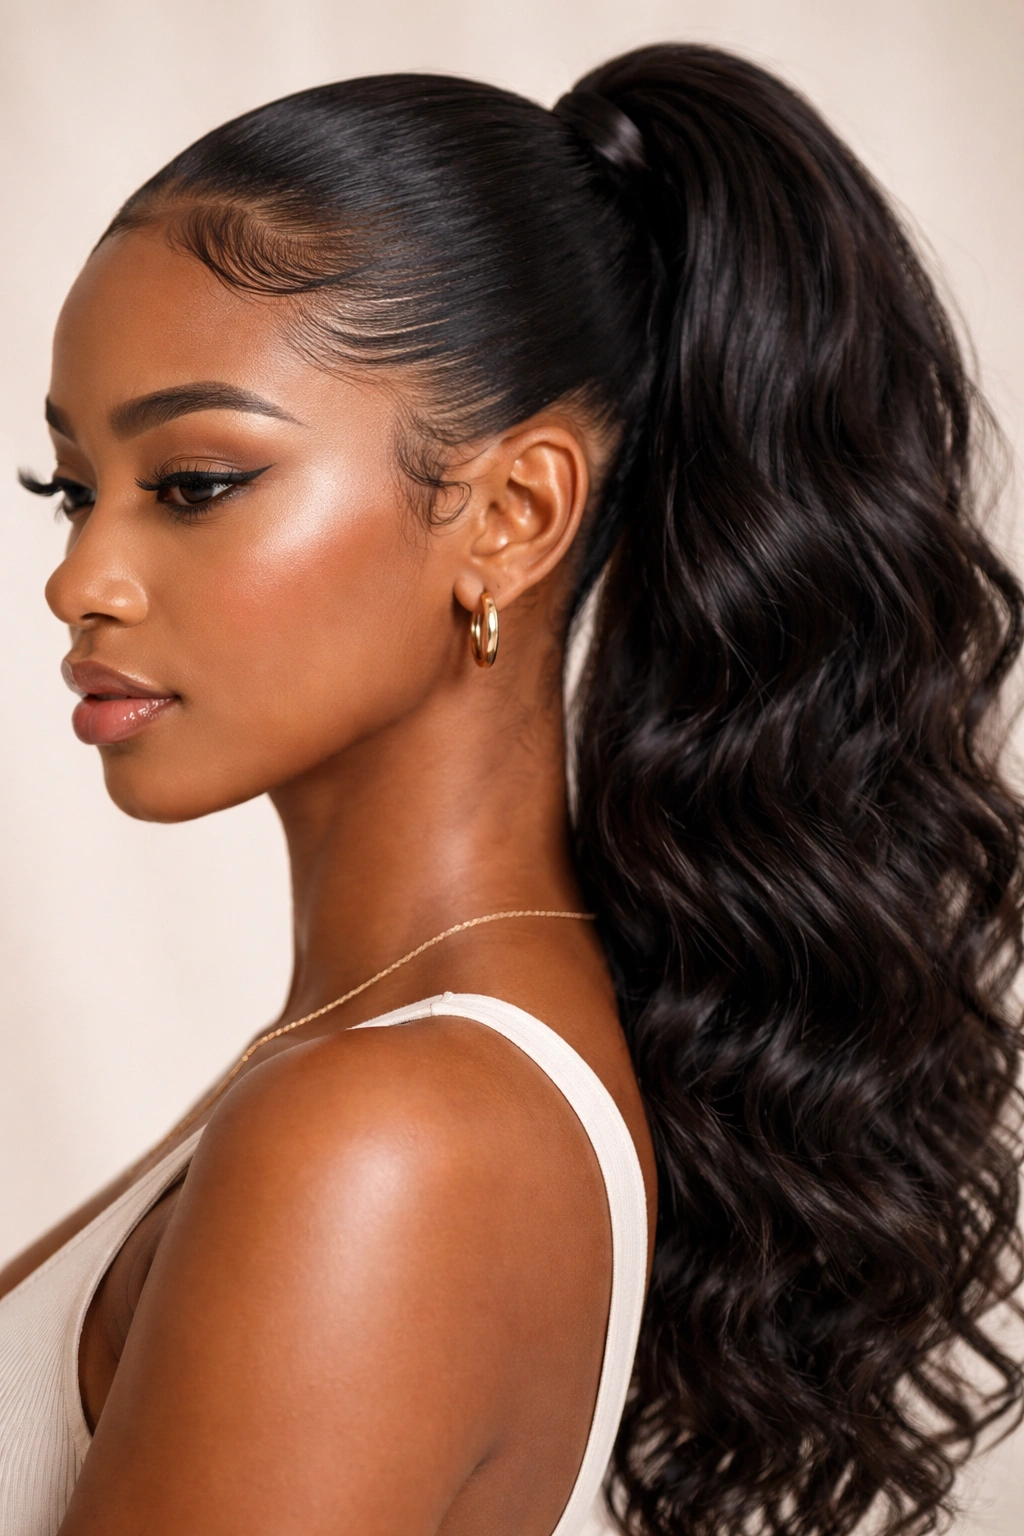
This style keeps your edges smooth and controlled with gel while intentionally leaving the ponytail body wavy, curly, or textured. You’re creating a beautiful contrast: a sleek frame and textured movement. This works especially well if you have natural texture or waves and want to celebrate them while maintaining that polished, put-together edge (literally).
Balancing Control and Movement
The artistry here is knowing when to control and when to let go. Your edges are about precision — smooth, shiny, intentional. Your ponytail body is about freedom — curls, waves, or natural texture allowed to do their thing. The combination feels modern and intentional, not like you couldn’t decide between two styles.
Technique for Textured Definition
- Smooth your edges aggressively with gel — you’re creating a clear boundary between sleek and textured
- Secure your ponytail, then either apply a curl cream or wave spray to the ponytail body for enhanced texture
- If you have naturally curly or wavy hair, simply let your curls do their thing in the ponytail without over-smoothing them
- Use a light hand with gel on the ponytail body — you want definition without that plastered, wet look
Worth knowing: This style is especially beautiful on textured hair types because it honors your natural pattern while maintaining professional polish.
8. Sleek Ponytail With Wrapped Base
A wrapped base means you’re taking a section of your hair and wrapping it around the elastic at the base of your ponytail, completely hiding the elastic and creating a finished, seamless look. Combined with gel edges, this style reads incredibly polished and intentional. The wrapped base adds a touch of elegance without complexity — it’s a small detail that elevates the entire look.
The Power of Hidden Details
Wrapping your base transforms a simple ponytail into a curated style. The wrap obscures the mechanics of the ponytail and creates a smooth, intentional shape. When your edges are also gel-controlled, you’re essentially saying, “I thought about every detail,” which is exactly what polish communicates.
Creating the Wrapped Base
- Secure your ponytail with a clear elastic or an elastic that matches your hair color
- Take a thin section (about 1-2 inches wide) from underneath your ponytail
- Wrap this section around the base of your ponytail, covering the elastic completely
- Secure the wrap with a bobby pin that matches your hair color, tucked underneath
- Before wrapping, apply gel to your edges so they’re perfectly smooth — the wrap should be the final step
Pro tip: If your hair is slippery, use a texturizing spray on the section you’re wrapping to give you more grip.
9. High Sleek Puff Ponytail
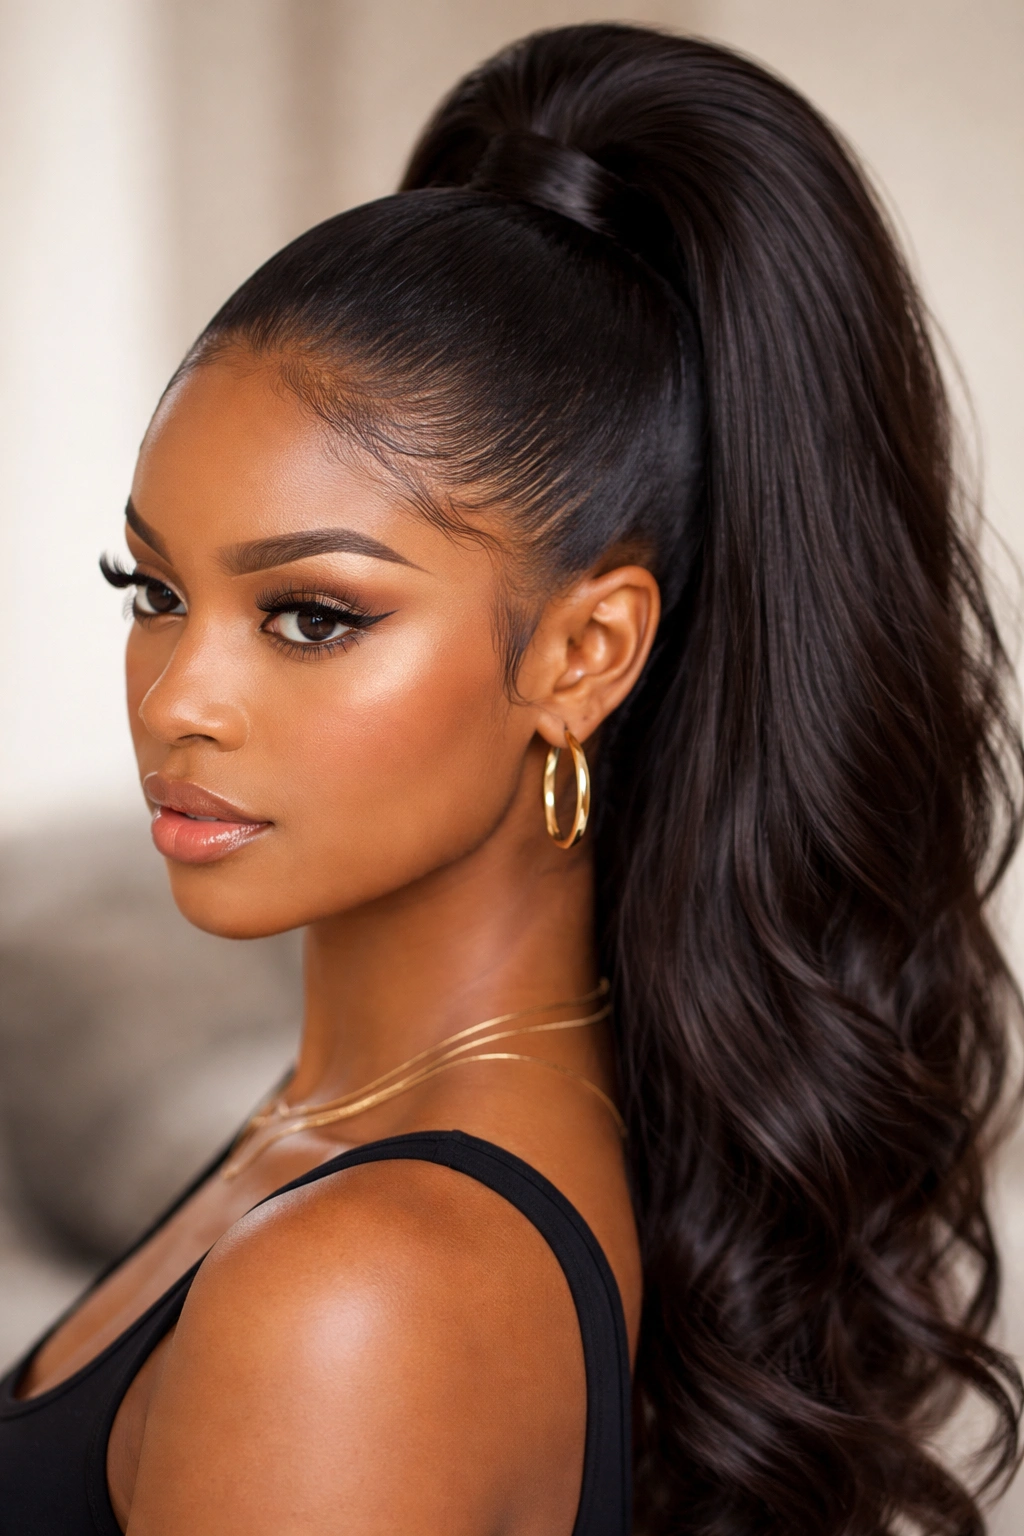
A puff ponytail is made by creating volume at the crown while the rest of your hair is smoothed and pulled back. It’s a ponytail on top with sleek sides and nape — combining fullness, dimension, and polish all in one style. When you add gel edges, you’re emphasizing that contrast between the voluminous top and the controlled everything else.
Creating Dimension Without Mess
A puff is an excellent option if you want your ponytail to look thick, full, and impressive without requiring you to flat-iron everything or blow-dry to death. You’re using your natural hair volume (or added volume) strategically, then controlling the rest with gel. It reads high-fashion and interesting without being complicated.
Building Your Puff Structure
- Create a high ponytail, but don’t pull it super tight — leave some slack at the crown
- Gently backcomb the crown section to add volume and texture
- Smooth your edges with gel, working from the front hairline toward the back
- Once your edges are set, you can adjust the tightness of your ponytail and the height of your puff
- A light finishing spray locks the volume without making your puff feel crunchy
Worth knowing: Puffs work best when you have some natural texture or wave. Stick-straight hair can look flat at the crown even with backcombing.
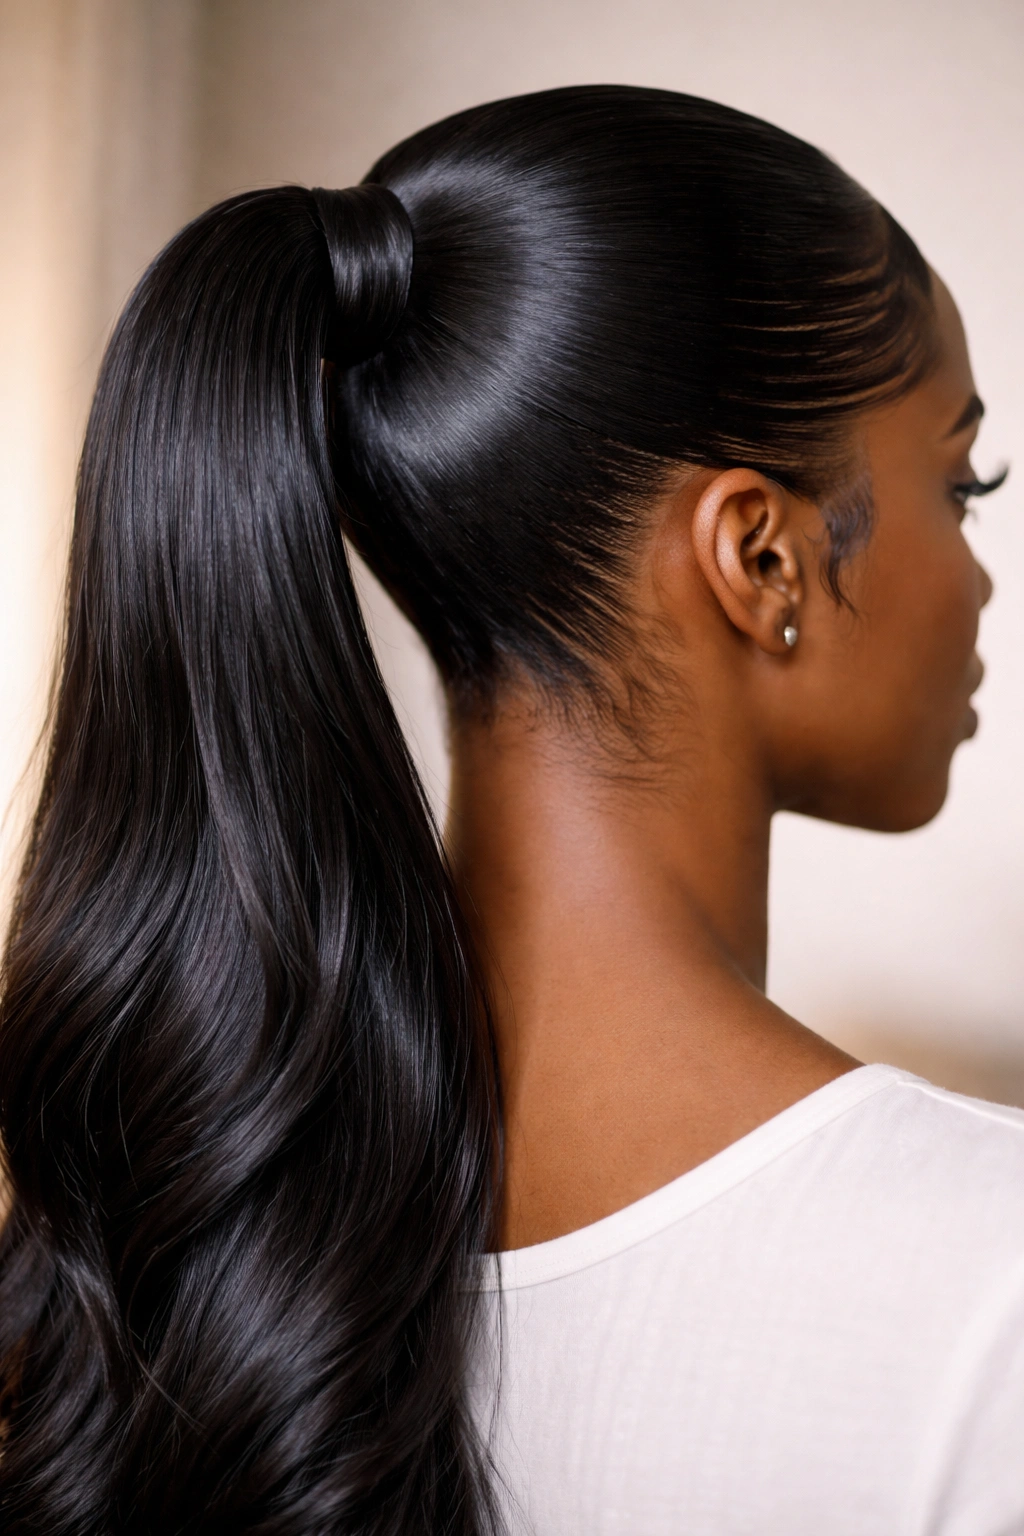
10. Sleek Sleepy Ponytail
The sleepy ponytail (sometimes called a “sad ponytail” or “low, lived-in ponytail”) is positioned very low, often slightly off-center, and deliberately styled to look effortless and casual. With gel edges, though, this casual style becomes intentional and polished. You’re bringing together two opposing energies: relaxed and controlled, undone and precise.
Effortless Elegance
Sleepy ponytails work beautifully in professional settings because they communicate confidence and ease. There’s an implied message: “I’m so put-together that I don’t need to try hard.” The gel edges elevate what could otherwise look like bed hair into a deliberately styled choice.
Creating Intentional Casualness
- Position your ponytail very low, at the nape or just above it, slightly lower than center
- Leave a few face-framing pieces loose if you want — the style is about relaxed elegance
- Use gel to smooth your edges crisply, creating that contrast between the casually positioned ponytail and the controlled frame
- Don’t worry about every strand being smooth in the crown — some softness actually enhances the sleepy vibe
- The key is that your edges are sharp and intentional while everything else feels relaxed
Insider note: If your ponytail tends to feel too casual or actually messy, tighten it slightly and add a wrap at the base — the gel edges stay soft, but the structure becomes more defined.
11. Sleek Swoop Ponytail

A swoop ponytail involves pulling your hair back with a dramatic sweep, often creating height on one side while keeping the other side smooth and controlled. One side might be pinned or secured differently, creating an asymmetrical, fashion-forward shape. Gel edges define the swoop and make the asymmetry intentional rather than accidental.
Playing With Directional Movement
Swoop ponytails are about movement and direction. You’re using gel to make sure that directional choice is clear and controlled. The swoop itself might be swept across the back of your head, pinned to one side, or created by the way you position your ponytail. It’s a style that photographs beautifully and feels special.
Executing the Swoop
- Decide which direction you want to sweep — usually following your natural part or opposite to it for drama
- Apply gel to define your hairline and the direction of the sweep
- Secure your ponytail with consideration for how it’ll sit once you’ve swooped your hair
- Use bobby pins to anchor your swoop in place, especially if you have fine hair or slippery texture
- The edges should be the smoothest part — gel them deliberately to define the shape
Pro tip: If you want your swoop to last all day, apply gel before you create the swoop, let it set for a few minutes, then swoop and secure.
12. Double-Banded Sleek Ponytail
Double-banded ponytails (or multi-banded) feature two or more elastics spaced evenly down the length of your ponytail, creating segmented sections without the fluffed bubble effect. The bands are visible, creating a geometric, modern look. Gel edges frame these segments beautifully, making the whole composition feel intentional and designed.
Geometric Precision
Double bands are incredibly effective at making a basic ponytail feel special and styled. The bands themselves become a design element, especially if you choose bands in a contrasting color or metallic finish. Combined with gel edges, this style reads editorial and fashion-forward.
Creating Defined Segments
- Create your sleek ponytail base with perfectly smoothed edges
- Place your first elastic about 3-4 inches down from your hair tie
- Secure your second elastic another 3-4 inches lower, and so on
- You can flip or twist the sections between bands if you want more movement
- Re-smooth your edges with gel after you’ve placed your bands — styling can disturb your smoothness
Worth knowing: Double-banded styles work best on hair with some length. Very short ponytails don’t have enough to make the banding feel intentional.
13. Sleek Ponytail With Laid Edges
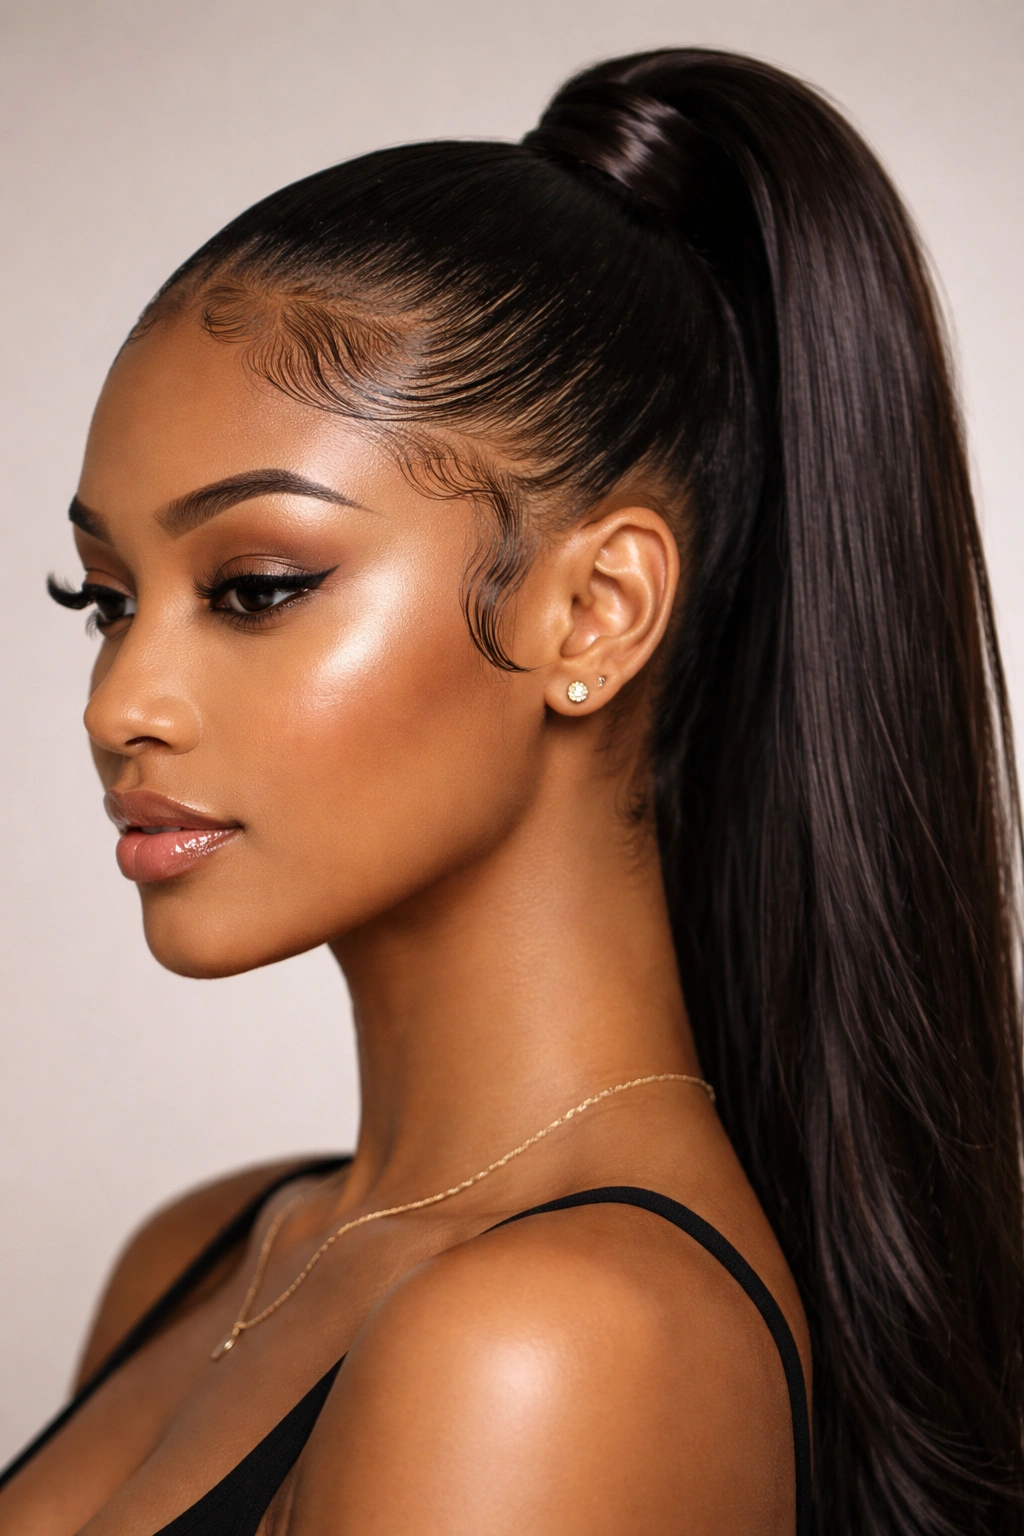
This style emphasizes your edges so much that they become the star of the show. You’re taking extra time to lay them perfectly — not just smooth, but sculptural and gleaming. Every edge is controlled: your baby hairs, your temples, your hairline, and your nape. The ponytail itself is secondary; you’re essentially styling for the frame.
Making Edges the Feature
When you commit to laid edges as the focal point, you’re making a statement about precision and care. This style reads expensive, put-together, and intentional. It works beautifully for events, photo opportunities, or any time you want to feel extra polished.
Mastering Edge Laying
- Use a firm-hold gel specifically formulated for edges — not regular styling gel
- Apply the gel with a fine-tooth brush, working in small sections
- Smooth each section in the direction your hair naturally grows
- Use the brush to press the gel in place, then follow with your fingers or a silk scarf
- Allow the gel to set completely before touching your hair — at least 3-5 minutes
- Wear a silk bonnet overnight if you laid your edges before bed; it preserves the style perfectly
Pro tip: The quality of your gel matters immensely for edge-laying. Invest in formulas designed for edge control rather than all-purpose styling gels.
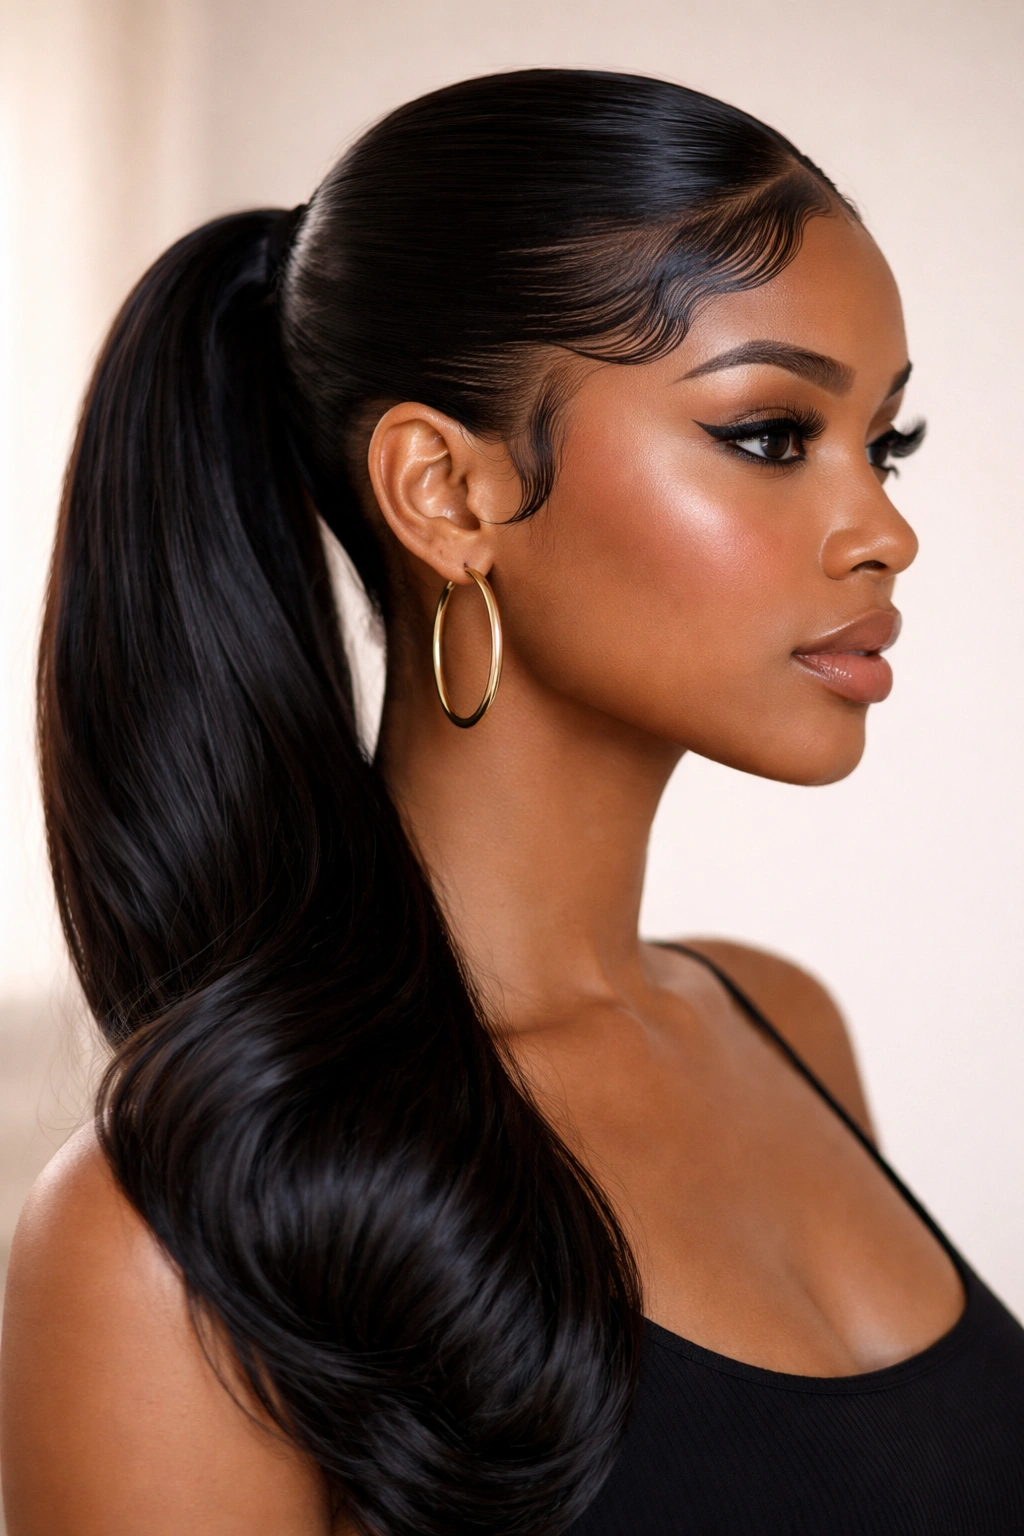
14. Sleek Ponytail With Baby Hairs
This style celebrates those soft, shorter hairs at your hairline and temples — your baby hairs. Instead of slicking them completely into the ponytail, you’re gently curling them, framing them, or styling them into soft wisps while keeping your main edges clean and controlled. It adds femininity and softness to an otherwise structured style.
Softness as Strategic Choice
Baby hairs add a romantic, intentional quality to a sleek ponytail. You’re not trying to hide them or over-control them; you’re featuring them. This works beautifully if you want a polished style that still feels approachable and soft.
Styling Baby Hairs With Intention
- Use a very light gel or edge cream on your baby hairs — you want them soft, not stiff
- Create loose, gentle curls with a small curling iron or by twisting the hairs between your fingers
- Smooth your main edges crisply, creating a clear distinction between controlled and soft
- If you prefer straight baby hairs, apply gel lightly and smooth them with a fine brush, letting them curve naturally
- The key is that your main edges look deliberate while your baby hairs add softness
Worth knowing: This style is especially beautiful if you have naturally lighter, finer baby hairs. They catch light and create a halo effect.
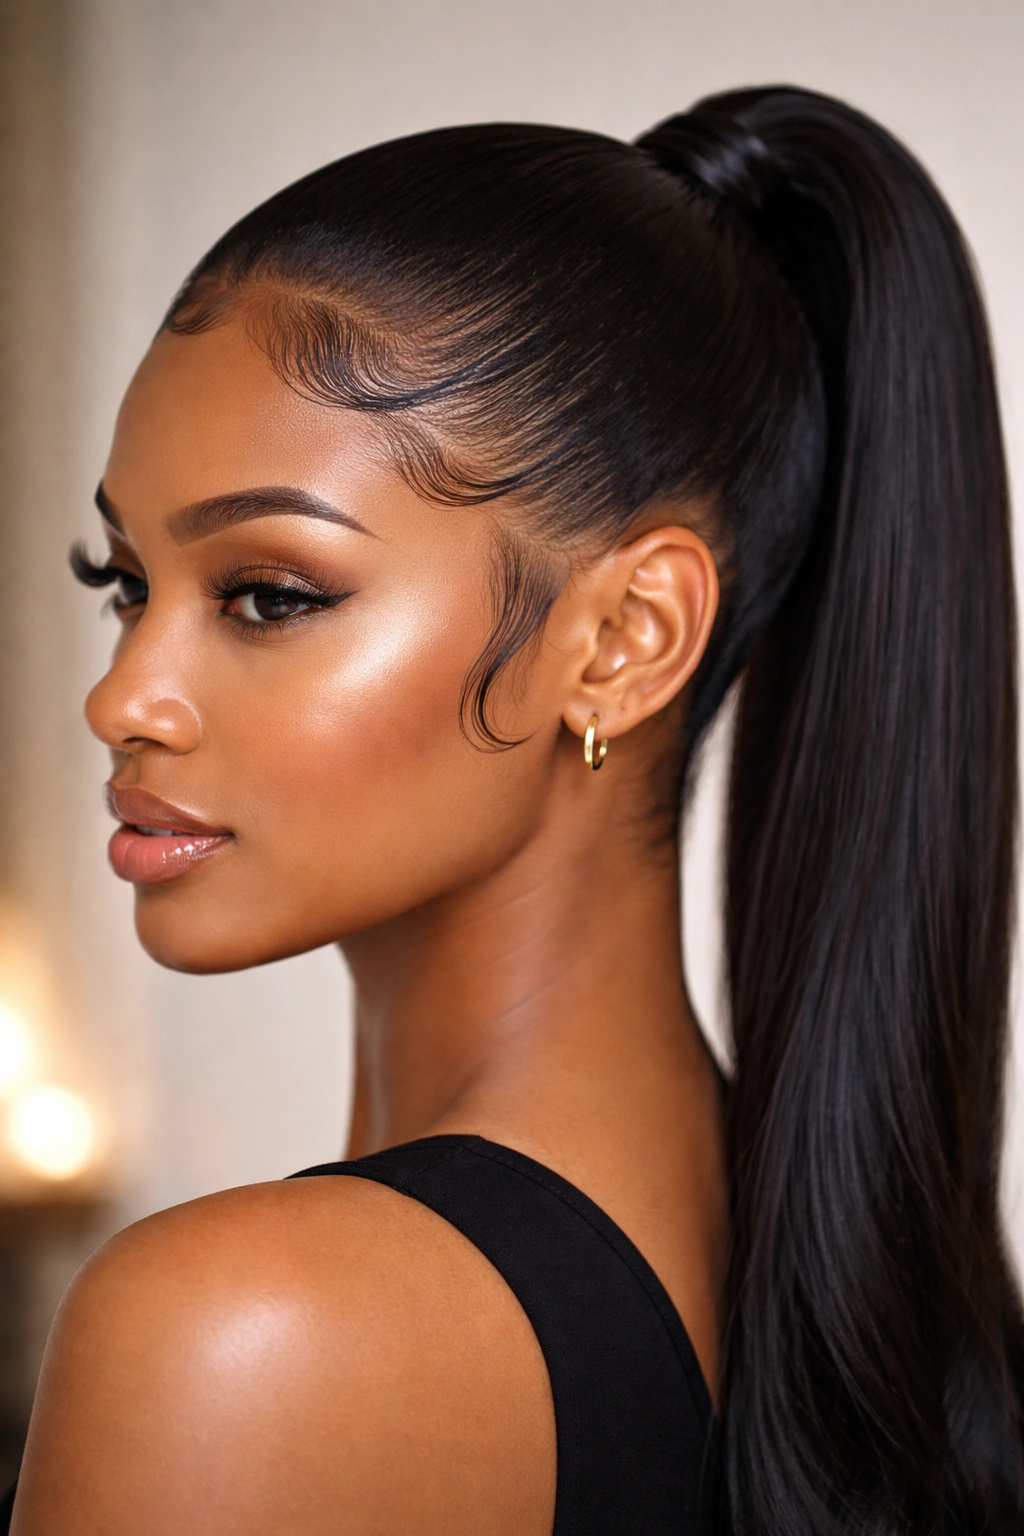
15. Sleek Crown Gel Ponytail
The crown ponytail sits high but slightly back from your absolute crown, usually in that area where a headband would sit. Your edges are controlled from your front hairline and temples back toward where your ponytail begins. It’s an elegant, elongating style that works beautifully with face-framing pieces or completely smooth. The emphasis is on creating a clean path from your face to your ponytail base.
Refined Positioning
Crown ponytails feel less dramatic than high ponytails but more intentional than middle-height ones. They suit most face shapes and work beautifully for both casual and formal settings. The positioning naturally draws the eye upward, creating a subtle lifting effect.
Perfecting Your Crown Positioning
- Position your ponytail at the crown — think of where a tiara would sit
- Create a clean center part or a deep side part, depending on your preference
- Use gel to smooth from your hairline backward toward your ponytail base
- Work in small sections, especially around your temples, where the most fragile hair sits
- The smooth path you’re creating should lead directly to where you’ll secure your ponytail
- Once your ponytail is secured, you can allow some pieces to fall naturally around your face, or keep everything locked
Pro tip: If you have a larger forehead or want to create a more dramatic effect, create some swooped or waved pieces in front of your ponytail base.
Final Thoughts
These fifteen styles prove that gel ponytails aren’t one-dimensional. The same gel and technique combine with different placements, textures, wraps, and edge treatments to create looks ranging from ultra-formal to deliberately casual. The foundation is always the same — smooth, intentional edges created with the right gel and technique — but the possibilities multiply from there.
The real secret isn’t complicated. It’s consistency: using a gel formula that works with your hair type, understanding how your specific hairline and hair texture respond to gel, and practicing your technique enough times that you can execute it without thinking. The first ponytail takes fifteen minutes; the tenth one takes five because your hands understand the motions.
Experiment with different gel formulas until you find one that grips without flaking, that’s easy to wash out, and that feels good on your scalp. Invest in good tools — a fine-tooth comb and a proper edge brush make an enormous difference. Most importantly, remember that your edges are a canvas. They can be dramatic or soft, sculptural or subtle, depending on the overall mood you’re trying to create. Each of these styles is just a different way of using that canvas to frame your face and complete your look.