Your wedding day is one of the most significant moments of your life, and every detail—from your attire to your jewelry—deserves thoughtful consideration. Yet there’s one element that can completely transform your entire look: your hairstyle. For Indian weddings, the ponytail has evolved far beyond a casual everyday style into a sophisticated, elegant option that rivals traditional updos. The beauty of a well-executed Indian wedding ponytail lies in its versatility—it can be sleek and modern, intricately braided and traditional, or a stunning hybrid that blends both worlds.
The right ponytail accomplishes something that many brides overlook: it keeps your hair perfectly in place throughout elaborate ceremonies, allows your jewelry and makeup to take center stage, and provides a graceful canvas for wedding ornaments like gajra (floral garlands), traditional pins, and draped dupatta fabric. Whether you’re planning a full evening wedding with multiple ceremonies or a more intimate celebration, a thoughtfully designed ponytail honors Indian aesthetics while keeping you comfortable and confident. The styles that follow represent some of the most beautiful and practical approaches that wedding hairstylists across India are creating for brides right now—each one offers its own character, skill level, and visual impact.
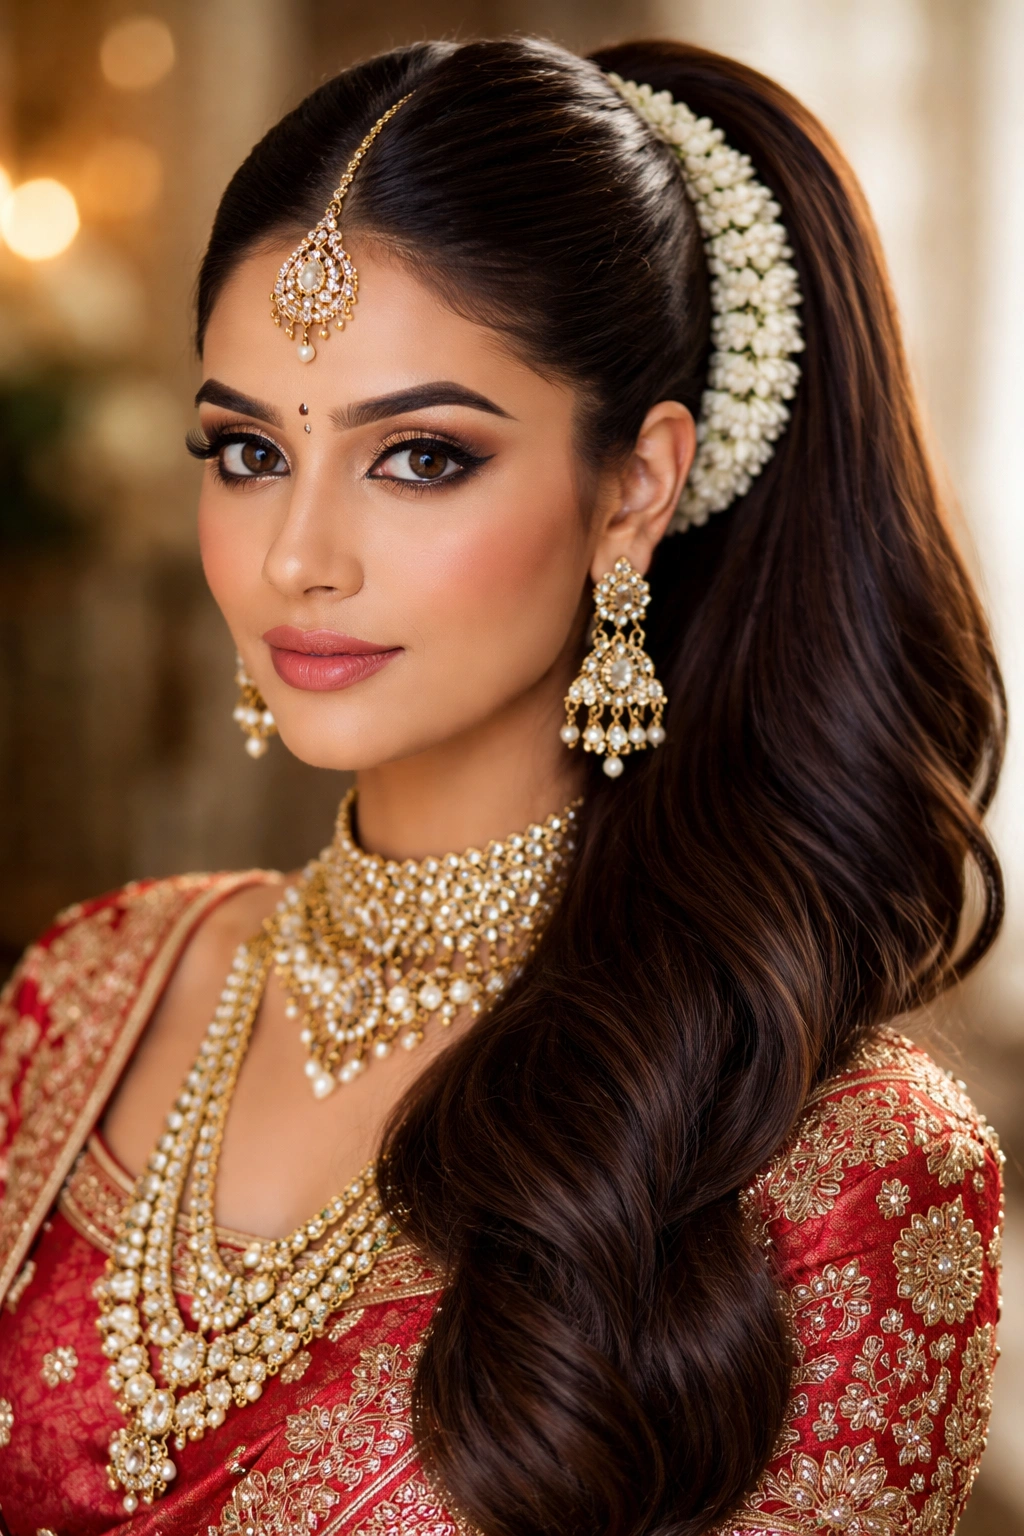
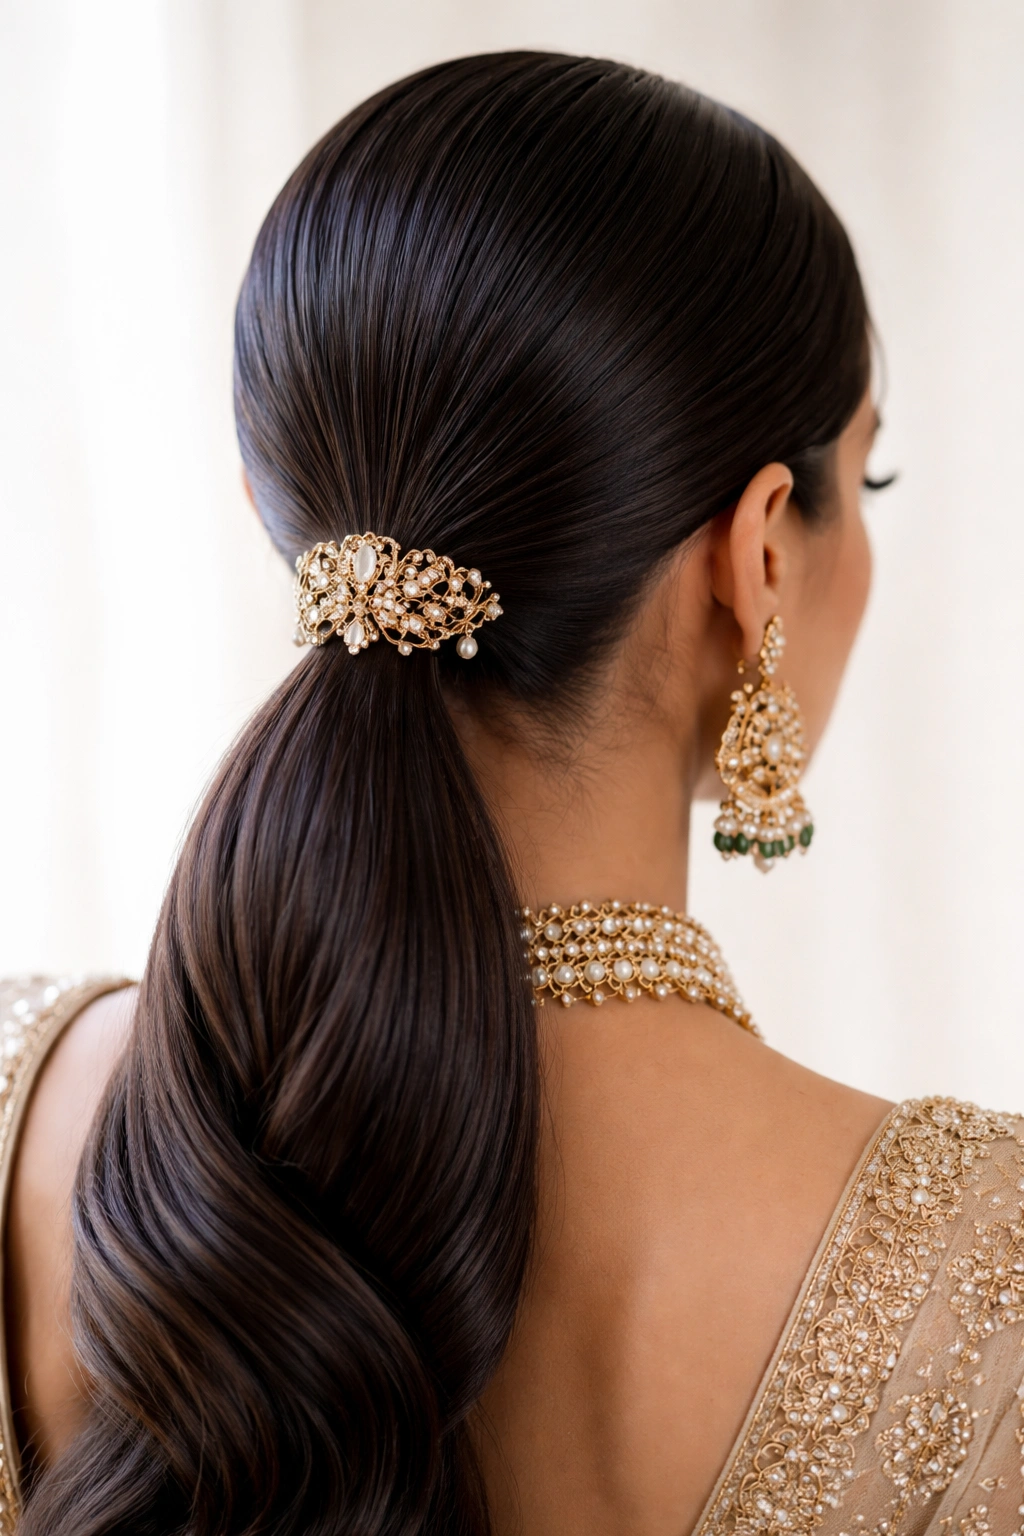
1. High Sleek Ponytail with Jeweled Pin
This is the timeless power move of Indian wedding hairstyles. A high sleek ponytail pulled tight from the crown, finished with a polished, mirror-smooth surface, projects confidence and elegance that photographs beautifully under wedding lighting. The style works whether your wedding involves traditional ceremonies or contemporary celebrations, and it suits virtually every face shape when positioned at the right height.
Why This Style Commands Attention
The sleek ponytail works because it’s intentional—there’s no softness or looseness that could read as casual or undone. Your hairline is fully visible, which means your jewelry, forehead decorations, and facial features have complete prominence. The tautness creates elegant lines that draw the eye upward, elongating the face and emphasizing bone structure. For Indian weddings specifically, this clean canvas becomes the perfect anchor for traditional ornaments—a statement bindi sits perfectly unobstructed, heavy earrings get full visibility, and a draped dupatta or decorative fabric can cascade down the sides without competing with loose strands.
Key Details That Elevate the Look
- Hair should be blow-dried straight or lightly smoothed with a flat iron before gathering to eliminate any frizz or texture
- Position the ponytail base 2-3 inches above your natural crown for maximum lift and refinement
- Use a jeweled hair clasp, decorative brooch, or traditional gold pin at the base where the elastic meets the hair—this becomes a focal point
- The ponytail itself can be left sleekly straight, gently curled, or woven through the base to create a more textured effect at the bottom
- Secure with maximum-hold products (pomade, mousse, or specialized wedding hair spray) and bobby pins hidden underneath for zero slip
- Consider a synthetic hair extension that matches your shade to add visible length and fullness without compromising the sleekness
Pro tip: Have your stylist blow-dry your hair the night before with silk-setting lotion and sleep on a silk pillowcase—this preserves smoothness and reduces styling time on the morning of your wedding.
2. Braided Ponytail with Dupatta Integration
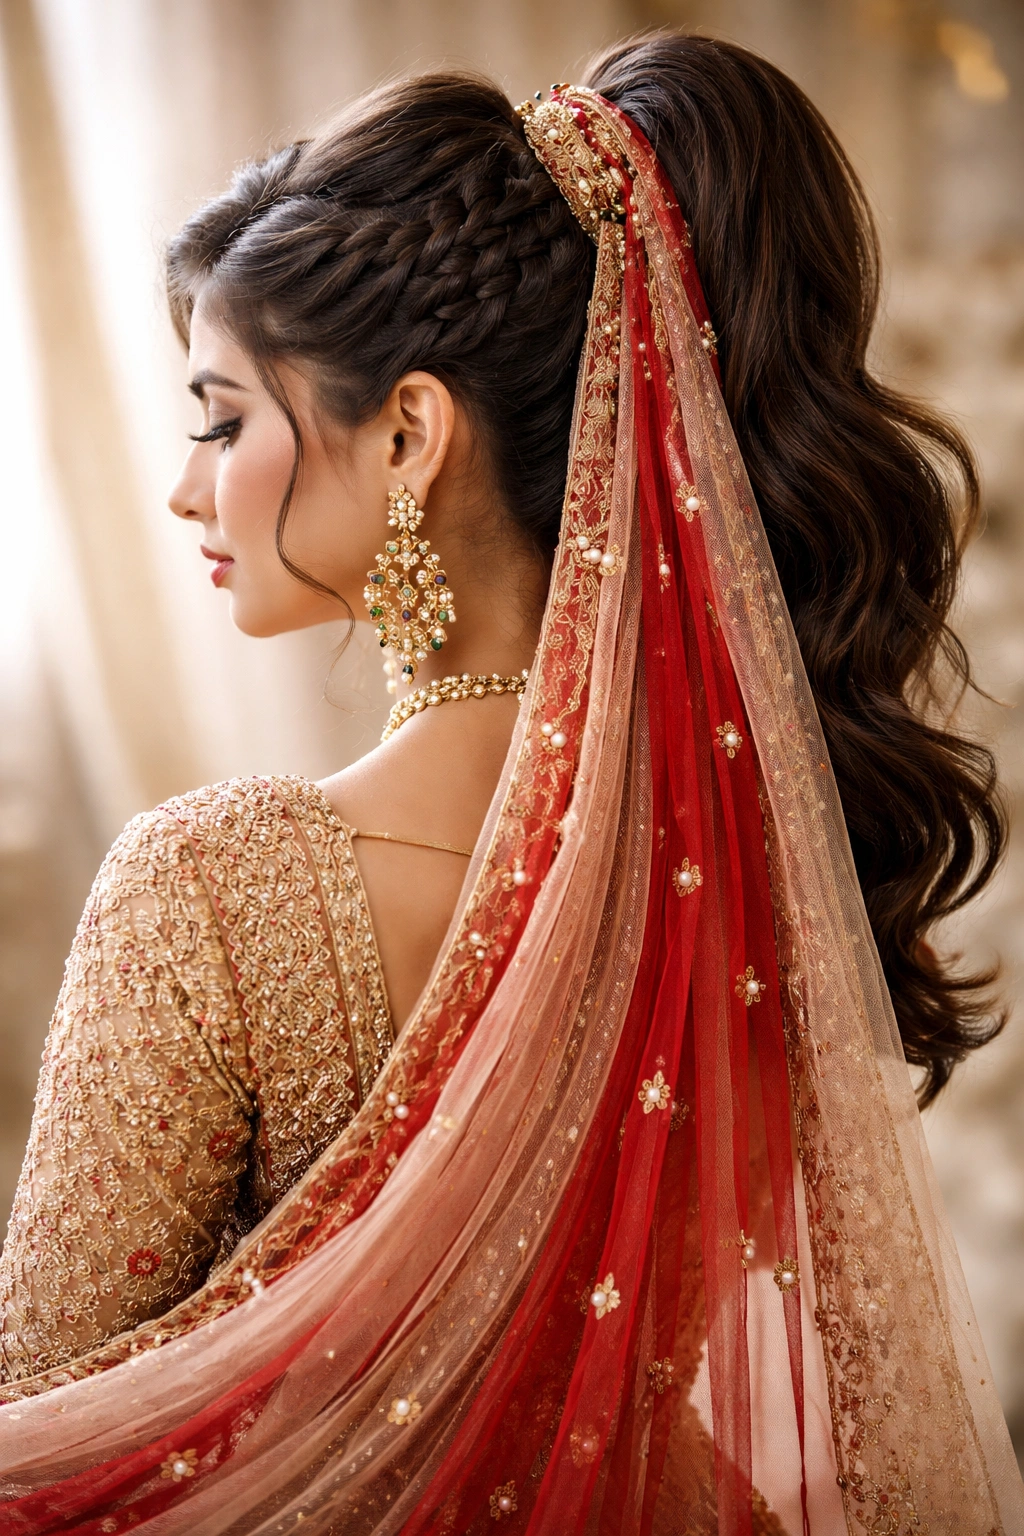
This style honors traditional Indian aesthetics by incorporating an ornate braid that becomes visually inseparable from the draped dupatta fabric. The braid starts at one or both sides of the head and flows into the main ponytail, creating the impression that decorative fabric and hair are woven together as a unified design. It’s especially stunning for ceremonies where the dupatta is essential to your overall attire.
The Technique Behind the Visual Impact
A braided ponytail works by creating intentional texture and dimension that fabric can naturally follow and enhance. Rather than simply gathering straight hair, the braid creates pockets and curves that allow the dupatta to drape organically and nestle into the hairstyle rather than sitting awkwardly on top of it. This integration is what separates a braided ponytail from other styles—the fabric isn’t an afterthought; it’s part of the design from conception. The braid should be loose and lush enough to feel substantial against the fine silk or net of your dupatta, and the ponytail base should have enough grip to hold the weight of both hair and draped fabric throughout long ceremonies without slipping.
What Makes This Approach Distinctive
- The braid can originate from one side (creating an asymmetrical look) or both sides (more balanced and formal)
- A Dutch braid (braid that sits on top of the scalp rather than underneath) creates more visible texture and catches light beautifully
- The braid should be intentionally loose, with sections gently pulled to add volume and softness—tight, athletic braids don’t photograph as well for weddings
- Weave delicate flowers, baby’s breath, or small jasmine blooms directly into the braid for added opulence
- Ensure the dupatta is anchored by pinning it into the base of the ponytail, not just draped over top, so it holds in place during movement
- The ponytail itself can be curled into loose waves or left straight below the braid—the braid provides the visual interest
Worth knowing: Have your stylist practice this style with your actual dupatta fabric before the wedding day. Different weights of fabric drape entirely differently, and the braid placement may need adjustment based on how your specific dupatta naturally falls.
3. Low Twisted Ponytail with Flower Garnish
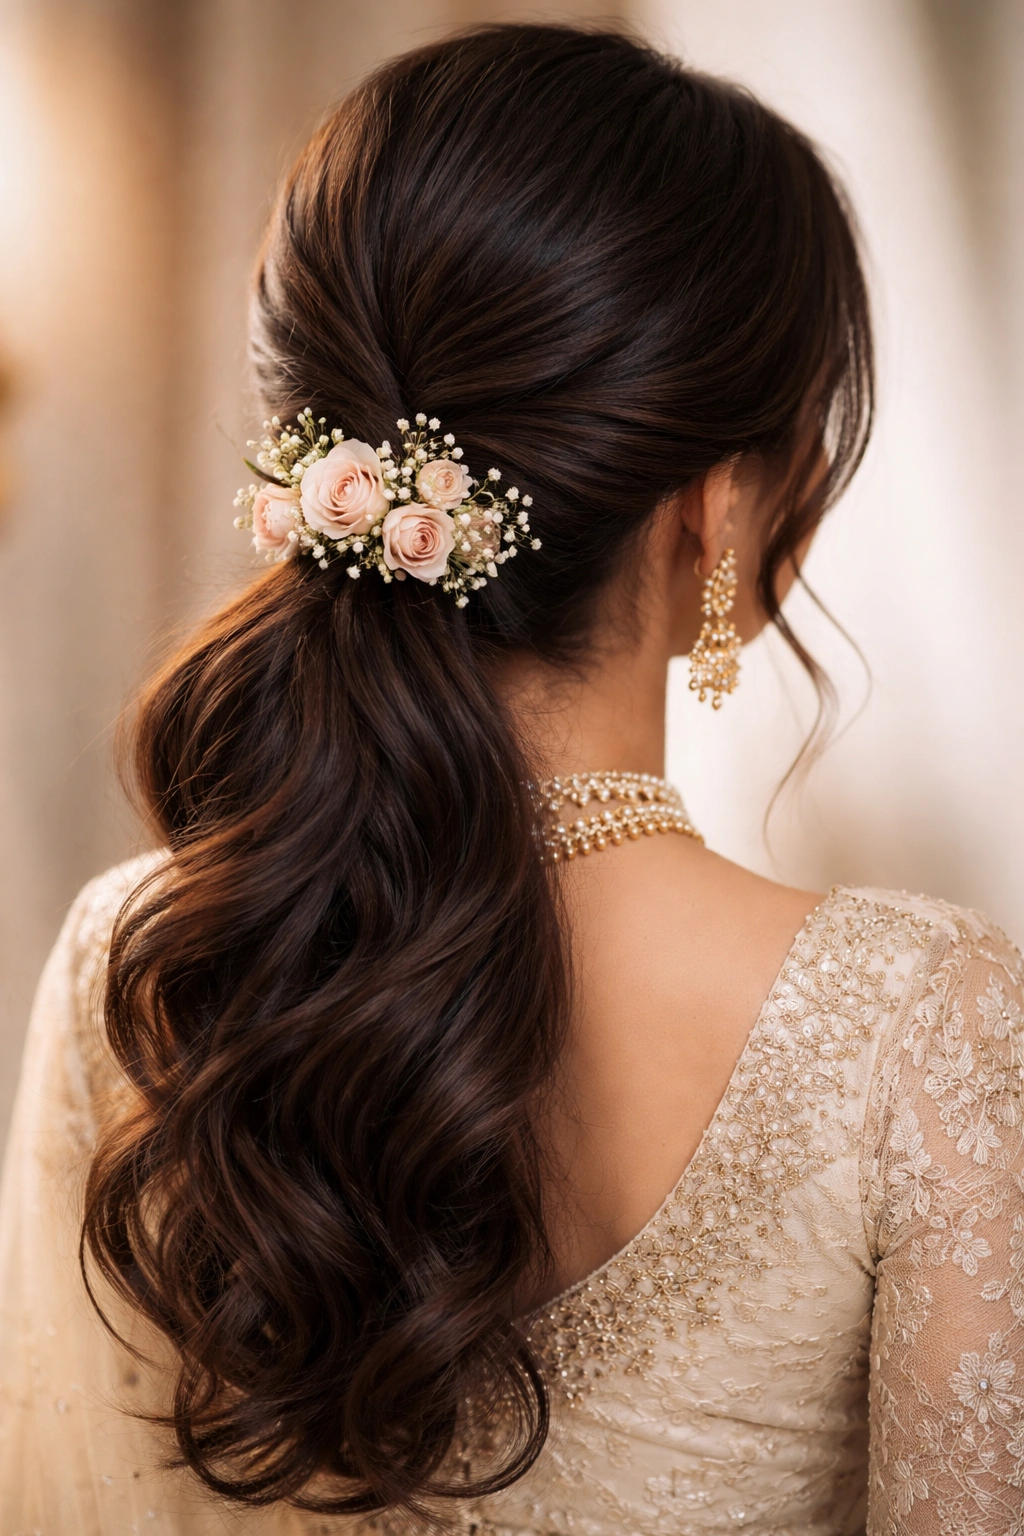
For brides who want to project softness and romance while maintaining the structured elegance of a ponytail, a low twisted style offers the perfect balance. Positioned at the nape of the neck or just below, this style creates a refined look that feels less formal than a high ponytail but more intentional than loose waves. The twists add visual interest and texture without requiring the precision of an intricate braid, making it more forgiving if you’re nervous about your hairstyle holding perfectly throughout multiple events.
Why Twists Work Better Than Simple Ponytails
Twists accomplish something subtle but important: they break up the visual heaviness of a lot of hair gathered in one place. A simple low ponytail, if pulled too tight, can look severe or create uncomfortable tension on the hairline and scalp. Twists, by contrast, distribute the hair more organically—they’re looser, they create visible dimension, and they signal intentionality without looking overdone. For Indian weddings where you’re likely wearing substantial earrings, a high neckline, or a heavy lehenga or saree, a low twisted ponytail keeps your nape visible and delicate while anchoring the overall look. Flowers woven into or placed around the twist add traditional beauty without the formality of a full braided style.
Structural Elements That Create Visual Success
- Create 2-4 subtle twists from the crown or partline down to the ponytail base, spiraling around the back of the head
- Twists should be loosely constructed—not tight, but not so loose they fall apart during dancing or movement
- Leave a few small, delicate face-framing strands free on either side of the face to soften the overall effect
- Gather these twists plus the remaining hair into a low ponytail at the nape, securing with a decorative band or hair stick
- Insert fresh flowers—roses, jasmine, marigolds, or orchids depending on your wedding colors—directly into the twists and around the ponytail base
- The ponytail itself can be left straight, gently waved, or curled—the twists provide visual structure, so the tail can be softer
Insider note: Flowers wilt quickly under hot lights and during long ceremonies. Ask your florist to prepare flower pieces on water picks or have your stylist freshen them halfway through the night if your wedding spans multiple hours.
4. The Raven’s Tail (Kali Ponytail) with Gold Accents
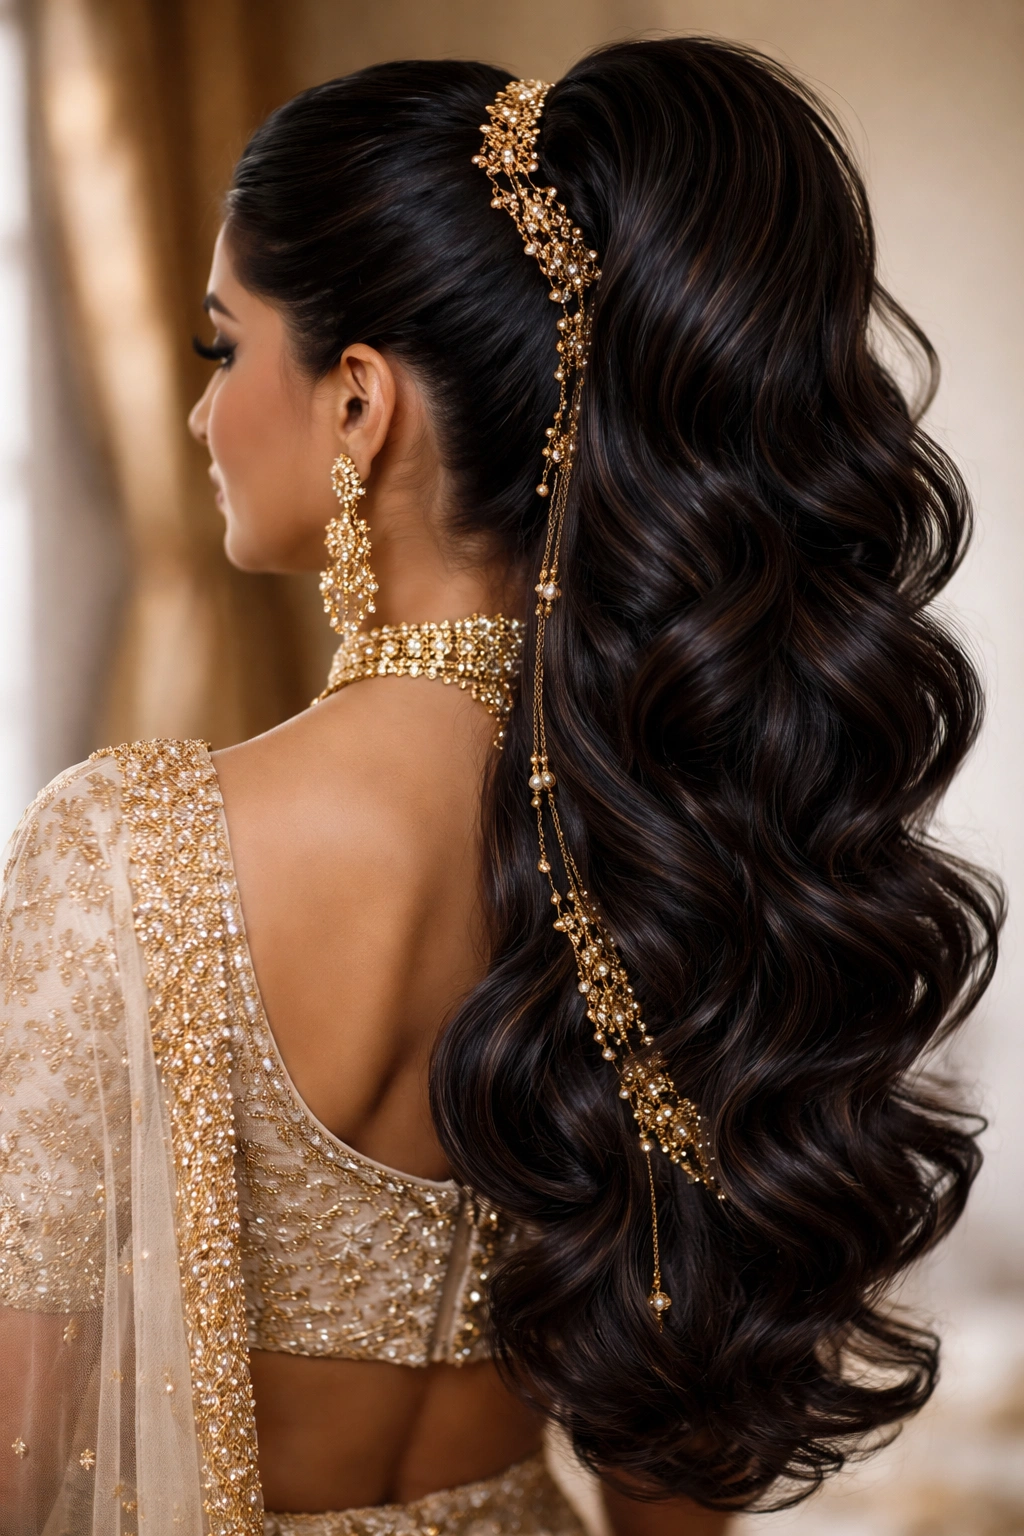
The Kali ponytail—named after the deep, lustrous black of the goddess Kali’s hair in traditional depictions—is a style rooted in Indian classical aesthetics. It’s a high, full ponytail with dramatically voluminous, sculpted waves that flow from the crown downward, creating the impression of cascading power and grace. This is the choice for brides who want to make a significant visual statement and have the hair length and thickness to pull off dramatic volume.
The Philosophy Behind This Classic Style
The Kali ponytail celebrates thick, long hair as a symbol of beauty, health, and femininity in Indian tradition. Rather than minimizing hair or creating delicate effects, this style amplifies hair volume through careful blow-drying, curling, and strategic product use. The waves aren’t random—they’re sculpted waves that cascade smoothly from the crown down the length of the ponytail, creating motion and visual drama. For weddings, this style is especially powerful because it commands attention and photographs exceptionally well, creating an almost ethereal quality as the waves catch light. Gold jewelry, ornamental pins, and traditional bindis work beautifully with this style because the voluminous hair creates space around the face for accessories to shine.
Technical Elements for Maximum Impact
- Blow-dry hair with volumizing mousse at the roots to create a foundation of lift at the crown
- Use large-barrel curling irons (2-3 inches) to create soft waves throughout the length of the hair before gathering into the ponytail
- Backcomb or tease gently at the crown before gathering to boost height without creating an obviously ratted section
- Gather the ponytail at the crown, high enough that volume sits directly above the crown rather than trailing behind it
- Use decorative gold pins, ornamental clasps, or a jeweled hair stick to secure the base
- Leave a few strategically positioned face-framing layers loose to soften the effect around the face
- Consider adding a synthetic hair extension with matching waves to increase the visible volume of the actual ponytail tail
Pro tip: Kali-style waves last longer if you use a flexible hold hairspray rather than a maximum-hold—maximum hold products can make waves feel stiff and unnatural. You want movement, not immobility.
5. Faux Hawk Ponytail for Modern Brides
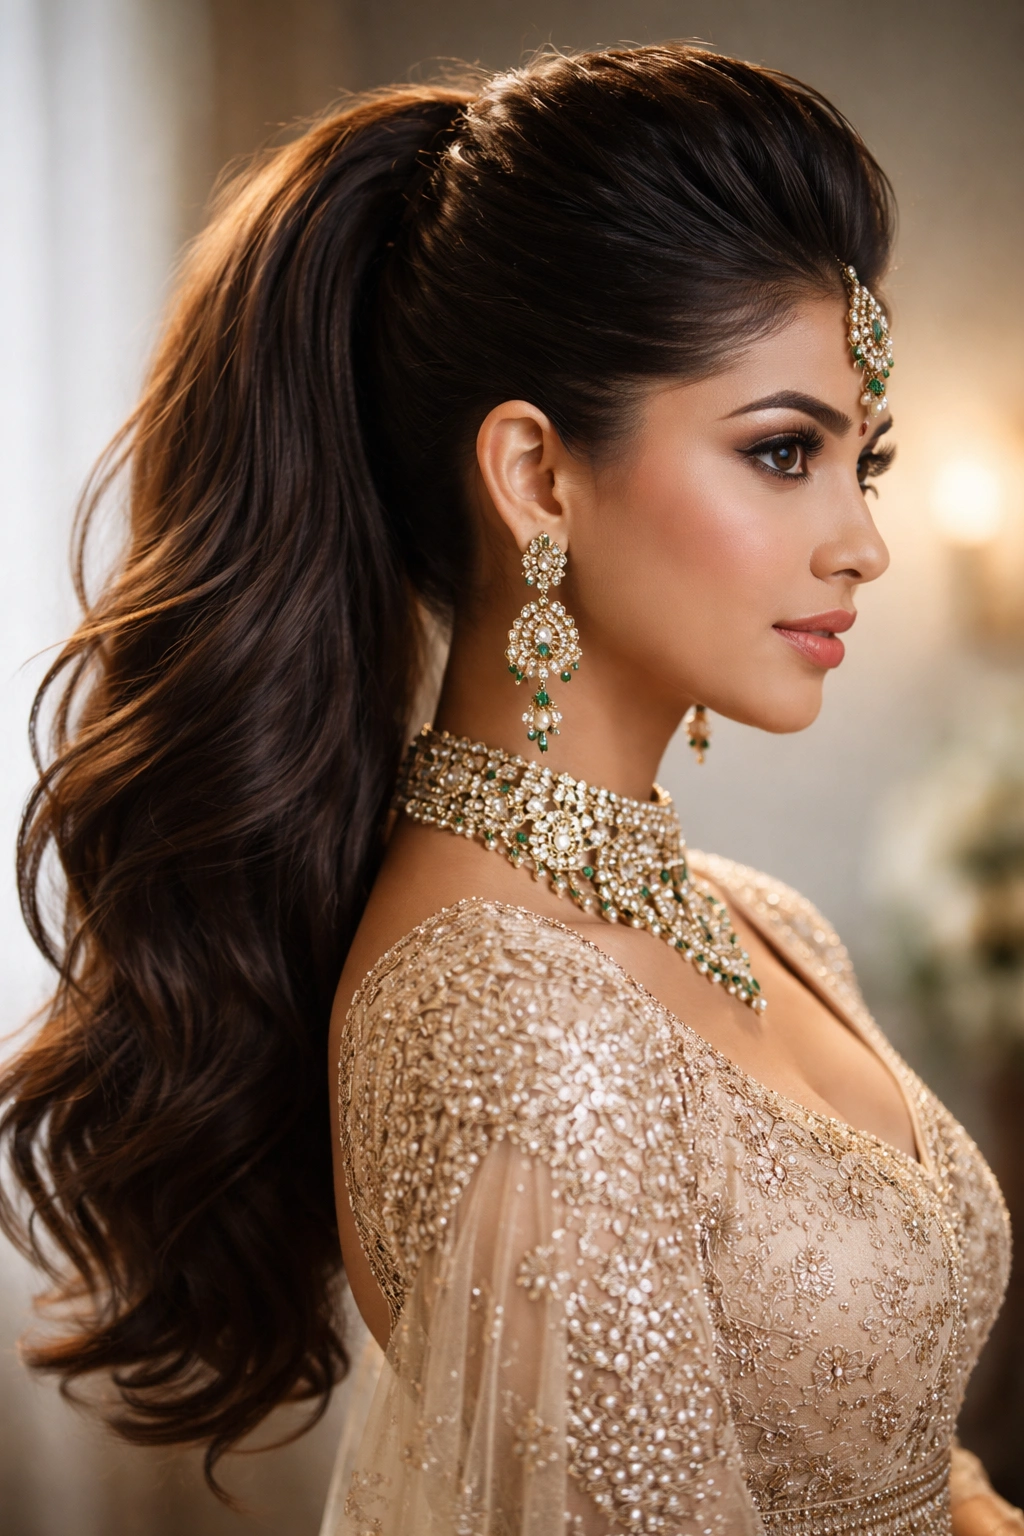
For the bride who wants to honor Indian wedding aesthetics while incorporating contemporary edge, the faux hawk ponytail is audacious and memorable. Hair is gathered into a high ponytail at the crown, but the top portion of the scalp is deliberately styled with height and sculpting—creating a subtle mohawk effect that reads modern without feeling costume-like. This style works particularly well for urban weddings, second-day celebrations, or brides who’ve worn their hair in this edgier style before and want to maintain their personal aesthetic on their wedding day.
What Makes a Faux Hawk Work for Weddings
A true mohawk would be too aggressive for most traditional Indian wedding events, but a faux hawk—the subtle suggestion of that shape—gives you the visual edge without the shock value. The back of the head remains fully gathered in a sleek ponytail, which maintains the grace and formality weddings demand. The sides are styled smoothly, and the top has intentional volume and height that creates an almost sculptural effect when viewed from the side or back. For Indian weddings where you’re wearing jewelry that frames your face and heavy fabric that demands a structured silhouette, this subtle architectural element actually complements the overall aesthetic while keeping you feeling like yourself.
Design Elements That Balance Edge with Elegance
- Create a defined parting down the center of the crown and blow-dry the hair at the parting straight up for maximum height
- The sides should be sleek and smooth—use pomade or gel to create a polished surface with no flyaways
- The back is gathered into a high ponytail at the crown, but the styling at the very top creates the visual of height extending from the crown
- You can straighten the ponytail tail for a sleek, sharp look, or curl it into waves for a softer contrast with the structured crown
- Add a statement hair comb, brooch, or decorative pin at the base where the ponytail gathers
- Consider adding subtle temporary color (chalk, spray, or gemstones) at the crown for a striking accent, depending on your comfort level
- Keep makeup bold and eyes defined—this hairstyle pairs best with confident, dramatic makeup
Worth knowing: This style requires significant product and precise blow-drying to maintain throughout the day. Bring a small spray bottle of setting spray and have your stylist do a final touch-up right before you walk into your first ceremony.
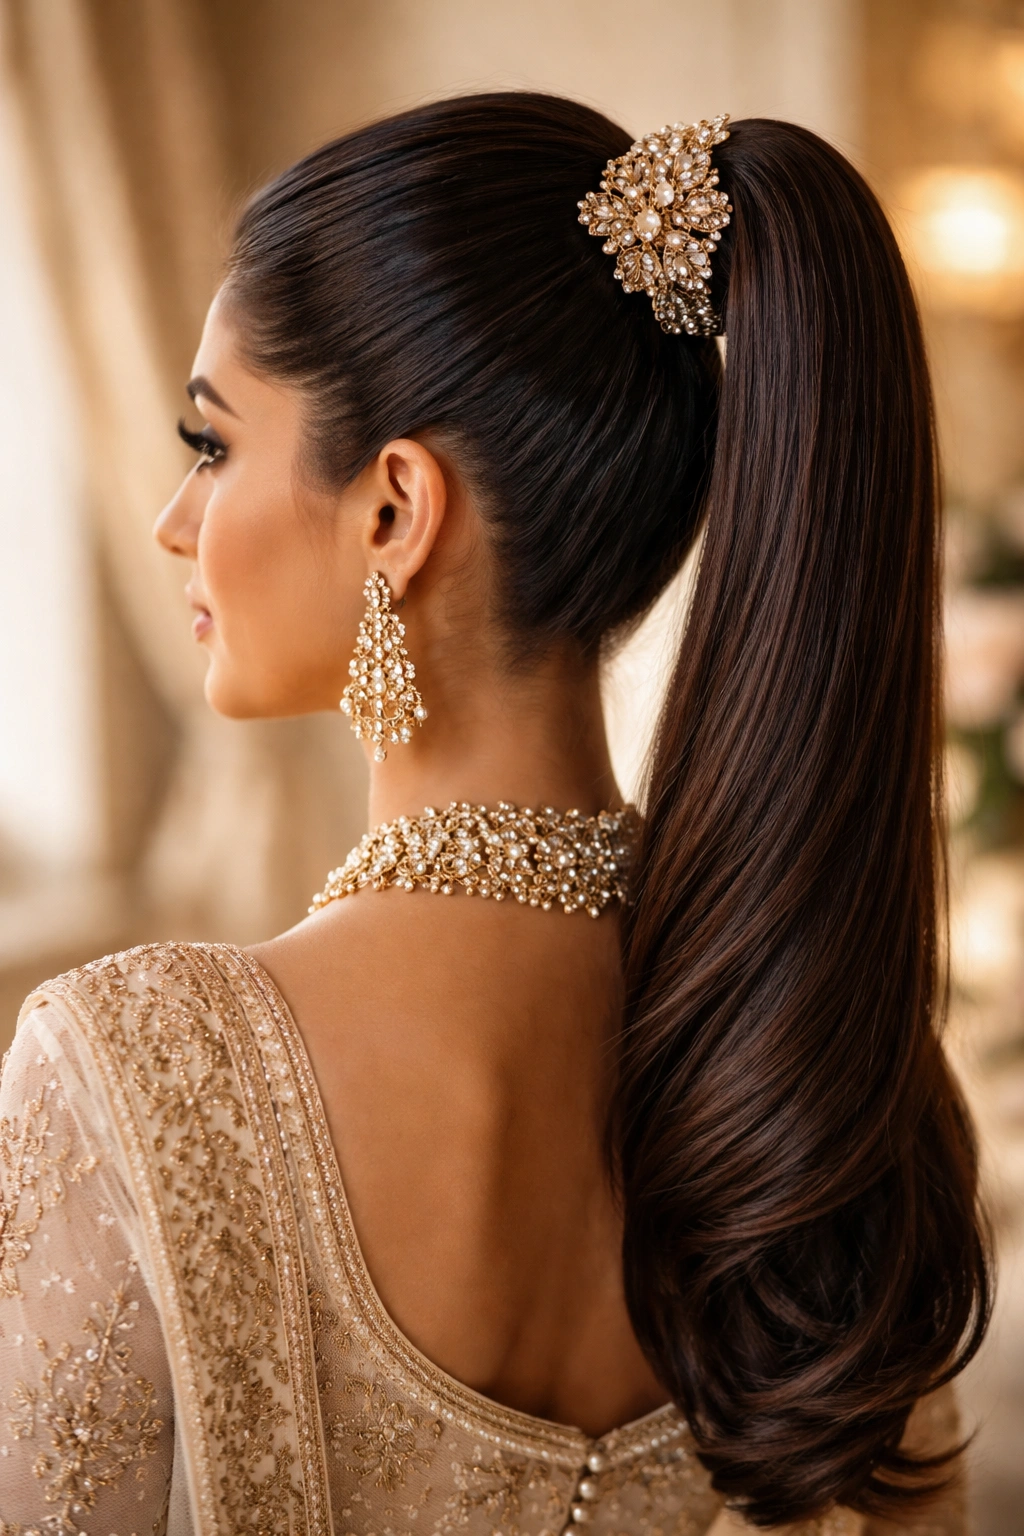
6. Center-Parted High Ponytail with Gajra
A center parting creates perfect symmetry and balance, making it one of the most traditionally auspicious choices for Indian weddings. When paired with a high ponytail and a fresh gajra—a woven floral garland made from jasmine, marigolds, or tuberose—this style channels classic Indian bridal beauty. The gajra is woven around the ponytail base in concentric circles, creating layers of fragrance, texture, and color that feel both modern and rooted in tradition. This approach is especially popular for South Indian weddings, but it works beautifully across all Indian wedding traditions.
The Elegance of Symmetry and Simplicity
A center part naturally divides the face into two equal halves, which our brains perceive as balanced and harmonious—it’s why centered partings feel innately formal and bridal. Combined with a high ponytail, this creates the impression of intentionality and polish without requiring elaborate braiding or twisting. The gajra, traditionally made fresh each morning in Indian homes, adds fragrance that travels with you throughout your wedding day—you’ll catch whiffs of jasmine or tuberose as you move, creating an olfactory dimension to your beauty. The gajra also signals cultural continuity; whether you’re a South Indian bride or simply honoring Indian traditions, the gajra is universally recognized as a wedding essential.
Styling and Gajra Integration
- Part hair down the exact center from hairline to crown using a fine-toothed comb
- Blow-dry both sides smoothly backward and gather into a high ponytail at the crown
- The ponytail should sit high enough that it’s visible above the crown when viewed from the front or side
- Secure with an elastic and then wrap the gajra around the ponytail base in concentric circles, pinning between layers to hold
- The gajra should completely obscure the elastic and hair tie—this is where it serves both a practical and aesthetic function
- Leave the ponytail tail straight, waved, or gently curled below the gajra
- If using a fresh gajra, have the florist prepare it just hours before the wedding and keep it misted with water to extend freshness
- If using a silk or artificial gajra, you have more flexibility with timing and can prepare it the day before
Pro tip: Fresh gajra can feel heavy, especially if woven too tightly. Ask your stylist to use a light hand and secure the gajra primarily with bobby pins hidden beneath the flowers rather than threading it so tightly that it pulls on your scalp or causes discomfort.
7. Zig-Zag Braided Ponytail with Layering
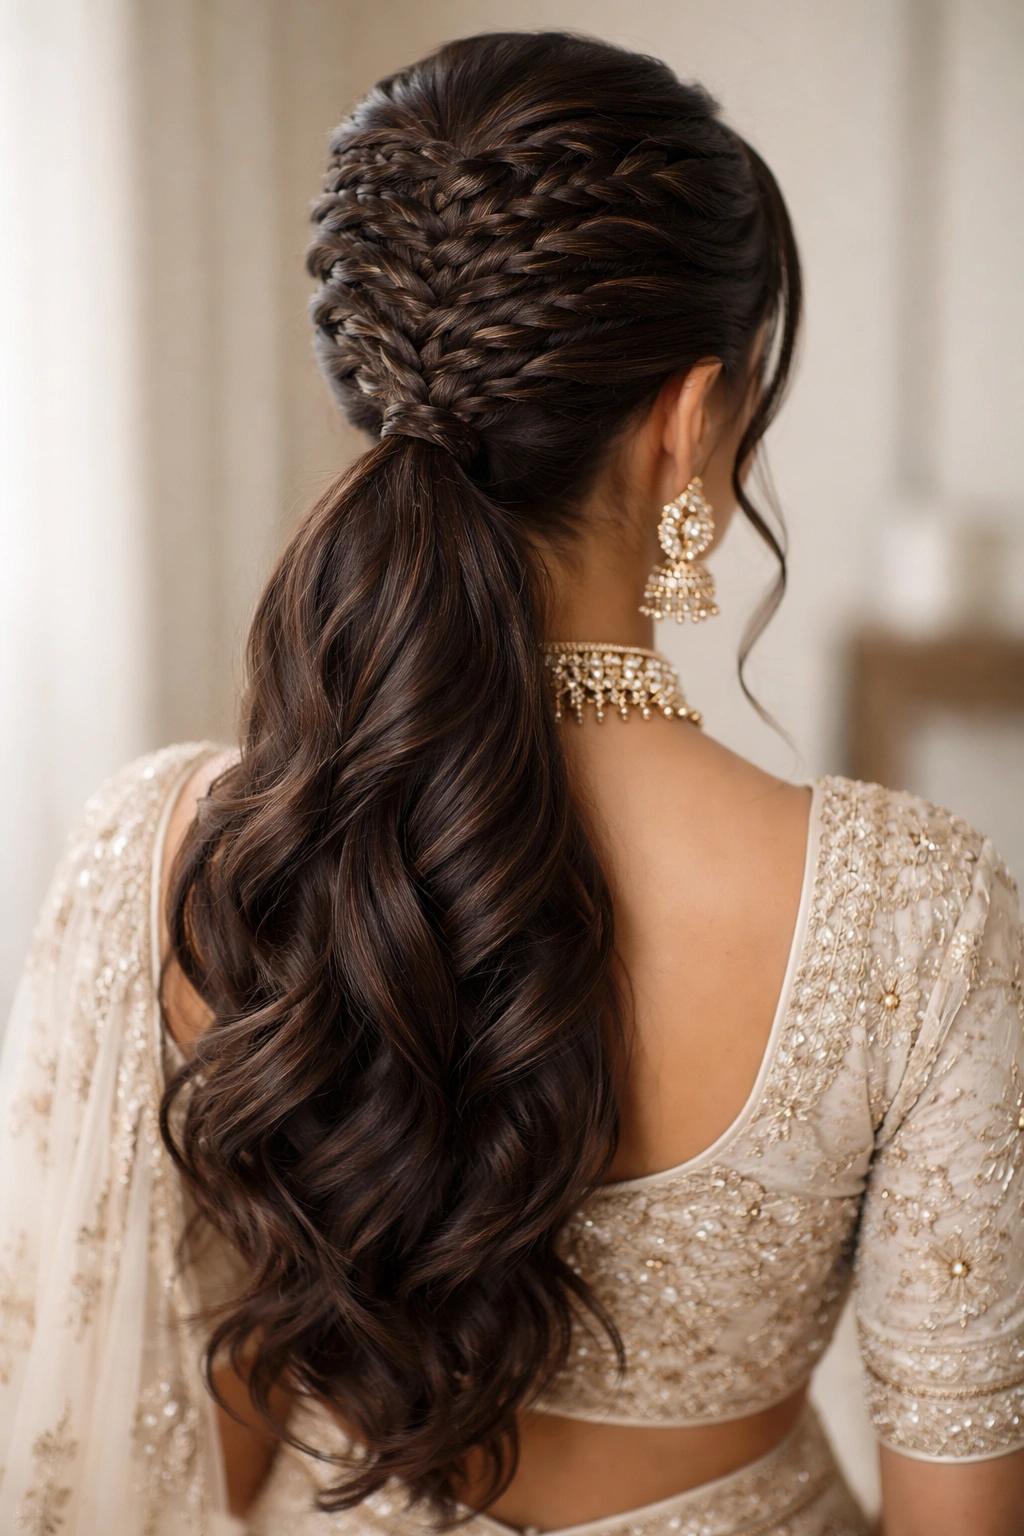
For the bride with patience for intricate styling and a desire to create a truly original look, a zig-zag braided ponytail with layering offers visual complexity that reads stunning in photographs and commands attention in person. Rather than a single continuous braid, this style creates multiple parallel braids that zig-zag across the back of the head before converging into a ponytail. The layering effect creates depth and dimension that makes even medium-length hair appear voluminous.
The Technical Mastery Behind This Style
A zig-zag braided ponytail requires your stylist to plan the braiding pattern carefully—it’s not a technique that can be improvised. The braids are typically created at angles, sometimes starting from both sides of the head and meeting in the center, or created in a pattern that spirals across the back of the crown. Each braid is intentionally loose and voluminous, often with small sections gently pulled from each braid segment to increase texture. Layering refers to the technique of not gathering all the hair at once—instead, each braid is secured into the ponytail at a slightly different height, creating a cascading effect. This layering is what prevents the final ponytail from appearing flat or one-dimensional; instead, it has depth and architectural interest.
Execution Elements for Complex Styling
- Plan the exact braid pattern with your stylist ahead of the wedding—bring reference photos and discuss how many braids and which directions
- Each individual braid should be loose and textured, not tight—looseness allows flowers or ribbon to be woven through without looking forced
- The layering of braids into the ponytail can be achieved by securing each braid separately with a small clear elastic at slightly different points, then combining them
- Once all braids are gathered, wrap a larger decorative elastic or hair stick around the entire base to unify the look
- Weave delicate ribbon, thin silk scarves, or flowers through the braids for additional visual interest
- The ponytail tail below the braiding can be curled into cascading waves or left straight for contrast
- This style works best with longer hair (at least 18-20 inches) to have enough length for substantial braids plus a visible tail
Worth knowing: A zig-zag braided style with layering typically takes 45 minutes to an hour to execute properly, so schedule your wedding-day hair appointment accordingly and arrive with clean, slightly dampened hair for easier braiding.
8. The Rope Twist Ponytail with Drape
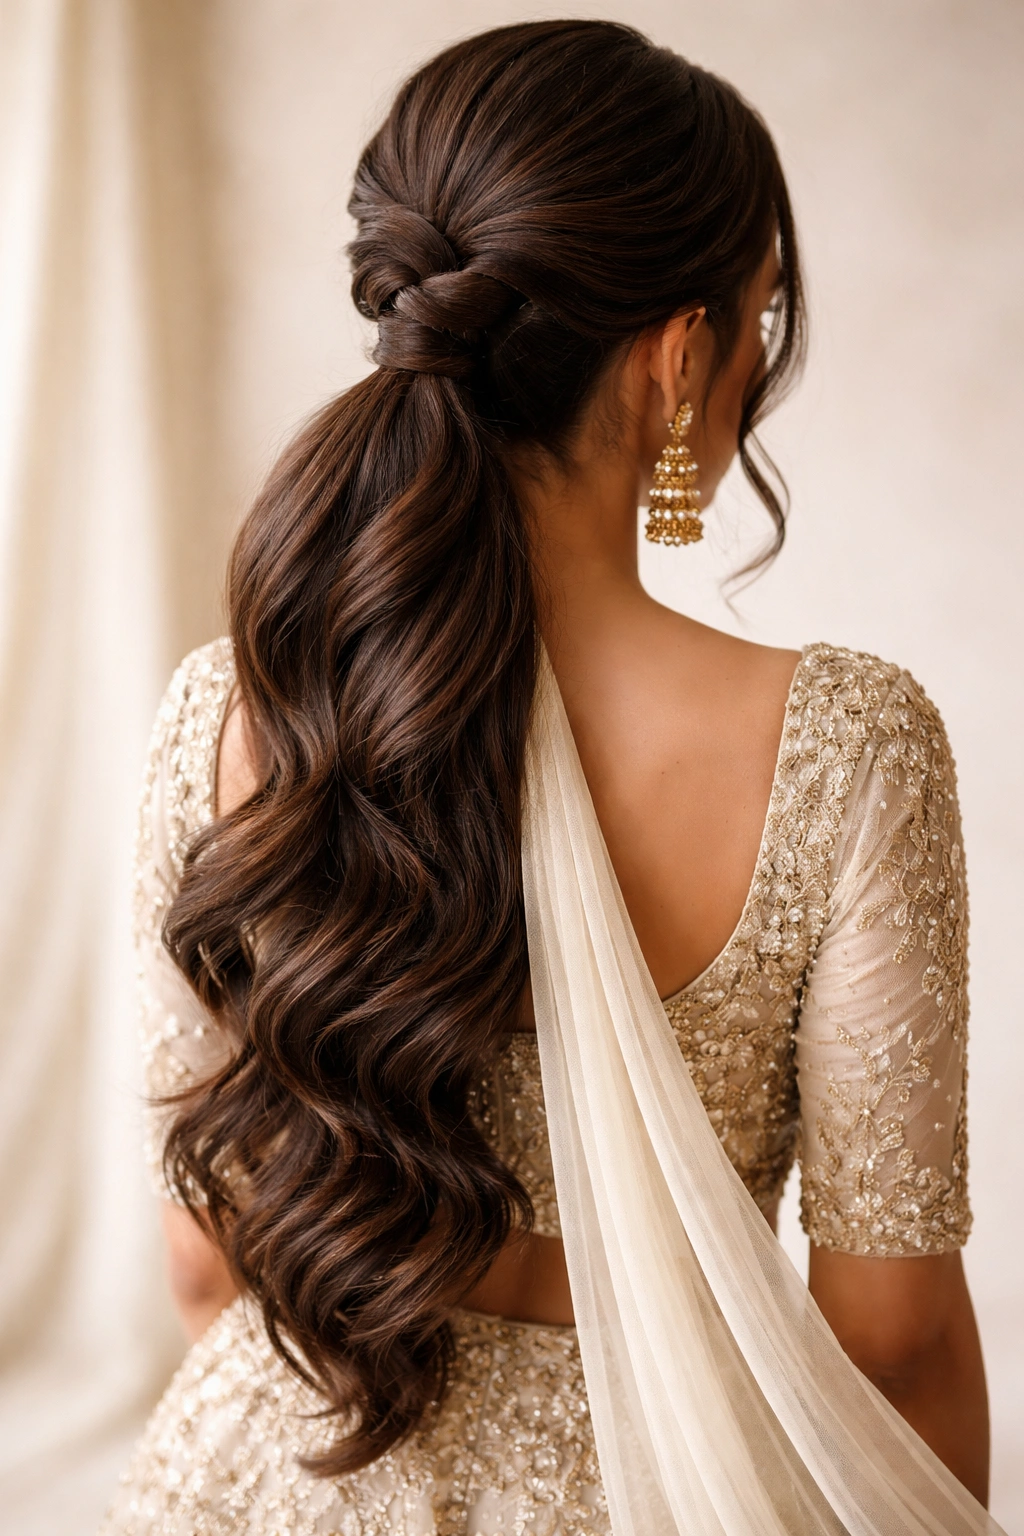
A rope twist creates visual drama and movement through a technique that’s more sculptural than a traditional braid. Two thick sections of hair are twisted around each other in a helical pattern, creating the effect of a rope that coils around the back of the head and descends into the ponytail. When combined with a draped element—dupatta fabric, a silk scarf, or even the ponytail itself draped elegantly down one side—this style becomes dynamic and photo-worthy.
Why Twists Create Different Visual Effects Than Braids
A twist uses only two sections of hair spiraling around each other, whereas a braid uses three or more sections interlocking. This difference means twists create larger, more visible loops and curves—they photograph bigger and bolder than braids of similar thickness. A rope twist, when created loosely, has an organic, almost sculptural quality that catches light beautifully and creates strong shadows that photograph wonderfully in wedding photography. The simplicity of the two-strand twist also makes it more forgiving than a braid; if a small section comes slightly undone during your wedding day, it’s less noticeable and easier to quickly pin back into place.
Design and Drape Techniques
- Create a deep side parting and gather one substantial section of hair from temple to the crown
- Twist this section tightly (but not uncomfortably) and wrap it around the back of the head in a coiling pattern
- Secure the end of the twist at the opposite side of the head with bobby pins
- Gather the remaining hair plus the twisted section into a ponytail at the nape or slightly higher
- For added drama, create a second rope twist that mirrors the first, both spiraling down into the ponytail
- Attach a length of dupatta fabric to the ponytail base and let it drape down the back of your lehenga or saree
- Alternatively, curl the ponytail into dramatic waves that cascade down one side of your body
- Secure the drape with bobby pins hidden in the folds of fabric so it doesn’t shift during the ceremony
Pro tip: Rope twists work best when created with damp hair that’s had product (mousse or light gel) applied. Dry hair creates too much friction and the twist can feel rough and uncomfortable; damp hair creates the perfect amount of grip without discomfort.
9. Half-Up Ponytail with Tiered Braids
For brides who want to balance the sophistication of a gathered style with the romance of loose hair, the half-up ponytail is a brilliant middle ground. Hair is partially gathered at the crown into a ponytail, while the lower half flows loose—either straight, waved, or curled. Tiered braids integrate into the gathered portion, creating visual interest and allowing traditional flowers or ornaments to be woven throughout.
The Psychological Appeal of Half-Up Styling
The half-up style creates visual lightness—not all your hair is pulled back, so the overall effect feels less severe than a full ponytail. For weddings where you want to display length and movement while still maintaining a polished, intentional appearance, half-up is ideal. The style works particularly well if you have very long hair (24+ inches) because you get the benefit of length and volume without the weight and management demands of wearing hair completely down. Tiered braids—multiple smaller braids incorporated into the gathered section—add texture and detail that make the style feel formal enough for a wedding while the loose lower portion adds softness.
Building the Tiered Braided Half-Up
- Section hair horizontally, creating a line from temple to temple across the crown
- Create 2-3 thin braids within this upper section, starting from the hairline and braiding toward the crown
- Each braid should be loose and textured, with small sections gently pulled for volume
- Gather the entire upper section (all braids plus the unbraided hair between them) into a high ponytail at the crown
- Secure with an elastic, then wrap a decorative band or place a jeweled clip over the elastic to conceal it
- Leave the lower section completely loose—this can be blown out straight, waved with a curling iron, or air-dried for natural texture
- Consider curling just the very ends of the loose section into soft waves that complement the texture of the braids above
- Weave fresh flowers or ribbons through the tiered braids where they’re visible
Insider note: Half-up styles can feel unbalanced if the ponytail base is placed too high or too low. Work with your stylist to find the exact placement that feels proportional to your face and head shape—typically, the ideal spot is about one inch above where your ear naturally ends.
10. Sleek Low Ponytail with Ornamental Clasp
For an understated, deeply elegant approach, a sleek low ponytail positioned at the nape of the neck exudes quiet confidence and timeless beauty. This style is sophisticated without being fussy, allowing elaborate jewelry, makeup, and wedding attire to take center stage while still providing the structured polish that a gathered hairstyle offers. The ornamental clasp—a statement piece whether it’s traditional gold, a modern geometric design, or an ornate vintage piece—becomes the focal point and can be changed between wedding events.
The Refinement of Simplicity
A sleek low ponytail works because it’s honest—there’s no elaborate technique hiding mediocre execution. The style demands that your hair be smooth, healthy, and well-maintained, because there’s nowhere for imperfections to hide. This means if your hair tends toward frizz, flyaways, or split ends, this style makes those more visible. However, for brides with naturally smooth, healthy hair or those willing to invest in professional smoothing treatments (keratin, Japanese straightening, or Botox for hair) before the wedding, a sleek low ponytail is an absolute power move. The nape exposure allows you to display neck jewelry, intricate blouse designs, and the delicate nape region—all areas that deserve visibility.
Achieving and Maintaining Sleekness
- Shampoo and condition with smoothing products the night before and the morning of your wedding
- Use a blow-dryer with a concentrator nozzle to blow-dry hair straight, smoothing in the direction of the hair cuticles
- Apply a light smoothing serum or anti-frizz product to damp hair before blow-drying
- Use a flat iron on low-to-medium heat (depending on your hair texture) to create a mirror-smooth finish
- Gather hair into a ponytail at the nape, pulling gently but firmly to eliminate any bumps or loose sections
- Secure with an elastic, then cover the elastic immediately with your ornamental clasp, decorative brooch, or traditional gold pin
- Use hairspray and bobby pins to secure any flyaways around the hairline and sides
- The ponytail tail itself can be left stick-straight for maximum sleekness or very gently curled for a slightly softer finish
Worth knowing: Sleek ponytails show the exact position where your hair ties meet the elastic. Work with your stylist to place the elastic far enough down that you’re not showing an obvious band-line where the elastic is; the hair should appear to flow continuously without any bulky section visible.
11. Fishtail Ponytail with Dupatta Wrap

A fishtail braid is distinct from a standard three-strand braid—it uses two sections of hair instead, with tiny subsections pulled alternately from each side, creating an intricate, delicate appearance despite being technically simpler to execute than a regular braid. When a fishtail emerges into a ponytail and dupatta fabric is wrapped around the base and allowed to drape, the combination creates an almost ethereal effect. This style is stunning for brides who want the intricate look of detailed braiding without the technical complexity, and it photographs absolutely beautifully.
Why Fishtail Creates Visual Magic
A fishtail braid, even when loosely constructed, appears more delicate and intricate than a regular braid because of the way the tiny subsections catch light and create visual texture. The technique is actually easier than a three-strand braid once you understand the pattern, making it accessible even if you’re working with a stylist who specializes in this particular technique. When a dupatta is woven through or wrapped around the base of a fishtail ponytail, the fine dupatta fabric and the delicate braid visual create a harmonious effect—neither overshadows the other; instead, they enhance each other. The result feels romantic, sophisticated, and distinctly Indian without being costume-like.
Executing the Fishtail and Wrap Integration
- Section hair into two equal parts at the crown
- Begin a fishtail pattern by taking a small section from the outer edge of the right section and crossing it over to the left
- Then take a small section from the outer edge of the left section and cross it over to the right—continue this alternating pattern
- Keep the fishtail relatively loose by not pulling the subsections too tightly; looseness creates the delicate effect
- Continue the fishtail down the back of the head and gather it into a ponytail at the nape or mid-back
- Secure with an elastic and wrap your dupatta around the ponytail base, weaving it through the bottom loops of the fishtail
- Allow the dupatta to drape down one or both sides of your body
- Pin the dupatta strategically so it doesn’t slip, but allow it to move gracefully with your body as you walk and move through ceremonies
- The ponytail tail can be left straight, curled, or woven with additional strands of the dupatta for a unified effect
Pro tip: A fishtail braid holds better if created with hair that has slight texture—completely slick, wet hair can be slippery and harder to control. Have your stylist create the fishtail with hair that’s been blow-dried and has light product (mousse or light gel) applied.
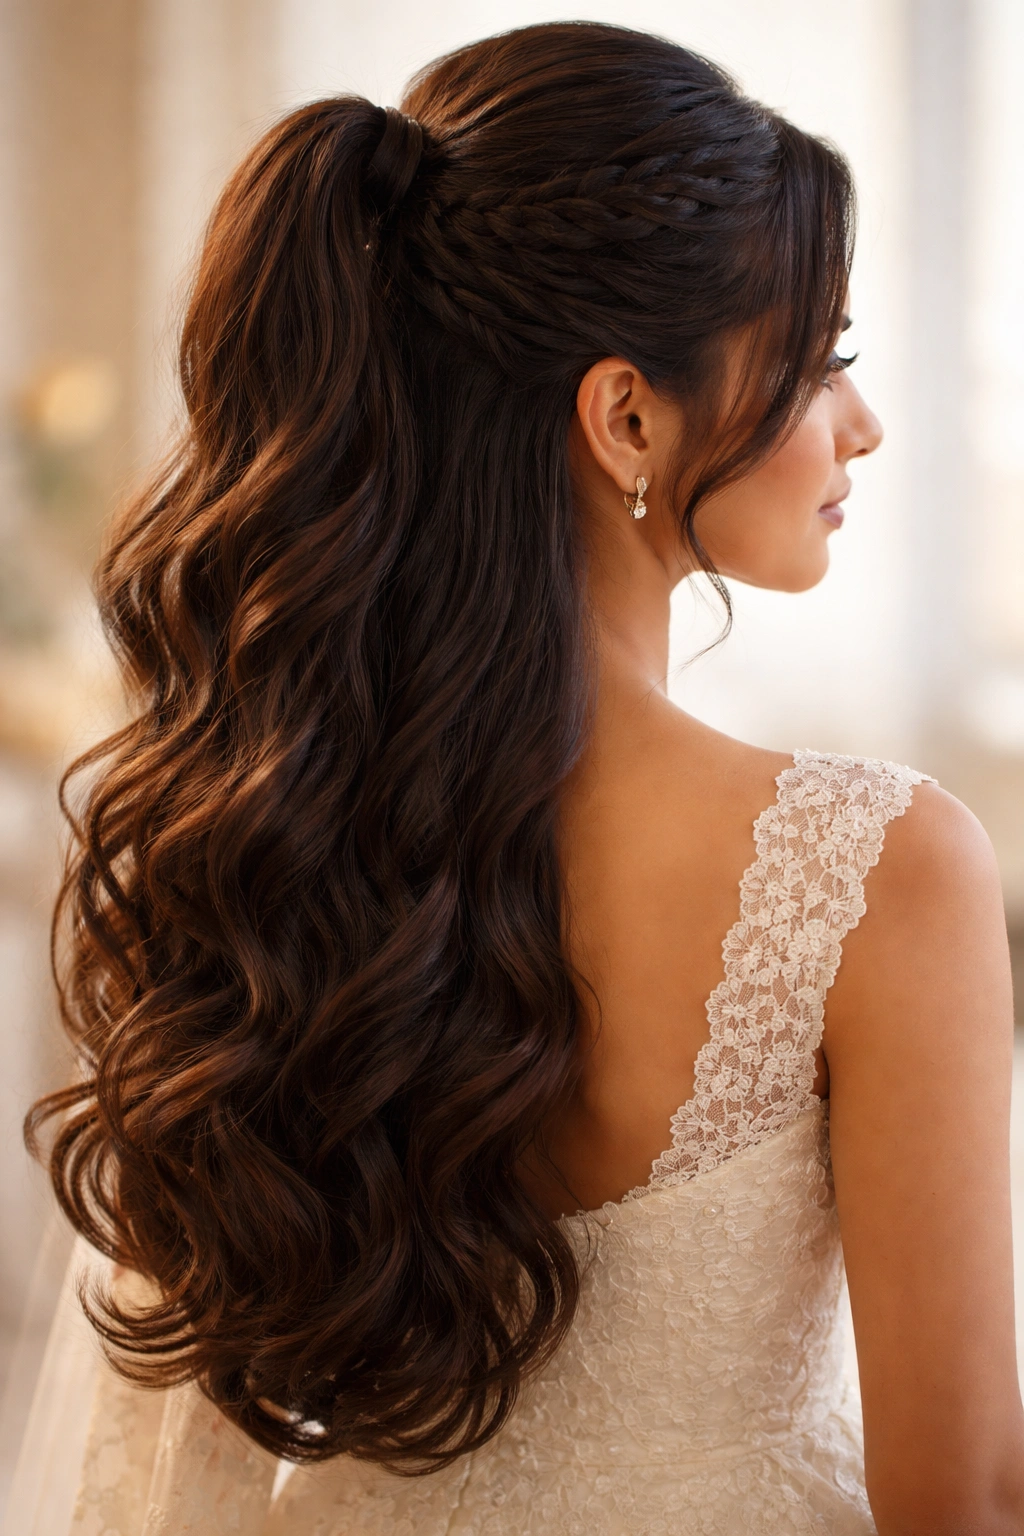
12. Volume Ponytail with Cascading Waves
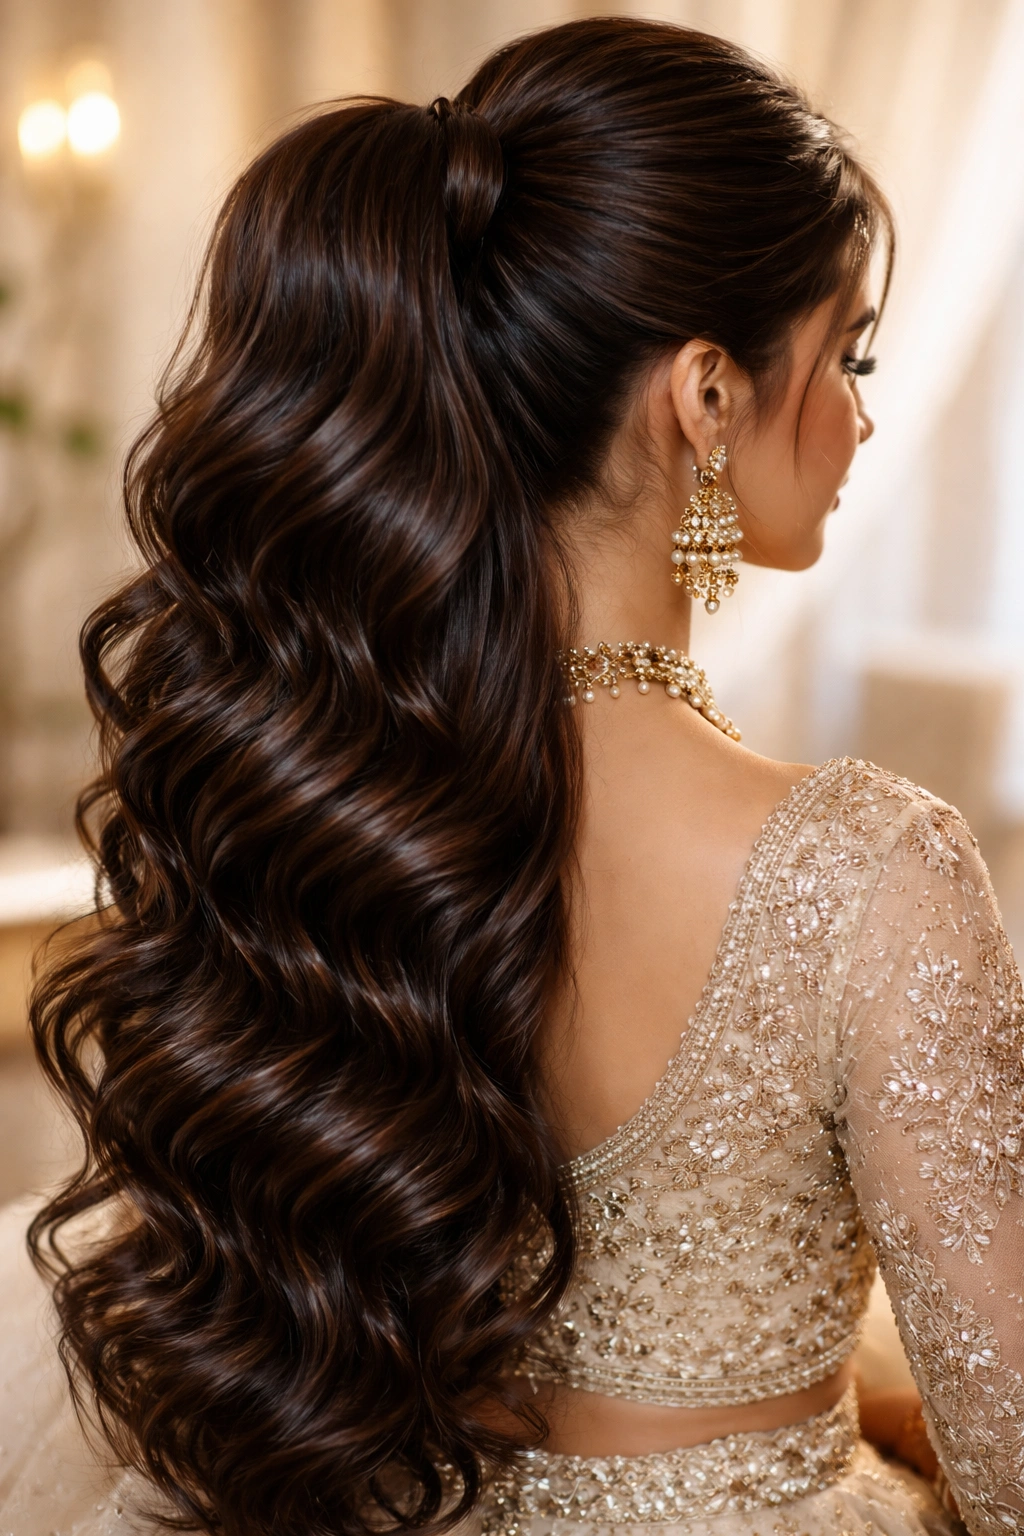
To close the collection, the ultimate celebration of length and volume is a ponytail styled with cascading waves—dramatic, romantic curls that flow from the crown all the way down the length of the ponytail. This style is the choice for brides who have considerable hair length and thickness and want to create an almost ethereal, movie-like aesthetic. Every wave catches light, creating movement and dimension even when you’re standing still. This is the style for elaborate, multi-day weddings where you can handle the weight and maintenance of significant styling without it feeling burdensome.
The Art of Creating Cascading Waves
Cascading waves aren’t random curls; they’re intentionally designed waves that graduate in direction and size, creating the impression of movement flowing from crown to tail. A stylist typically uses large-barrel curling irons in a specific pattern—curling some sections toward the face, some away, some in alternating patterns—to create the effect that waves are actually cascading rather than just standing as static curls. The waves should be loose and flowing, not tight ringlets; tight curls look costume-like, whereas loose waves feel bridal and romantic. For Indian weddings, cascading waves work beautifully with heavy gold jewelry because the movement of the hair creates motion that echoes the movement of metal pieces.
Building Waves for Maximum Impact and Longevity
- Blow-dry hair with volumizing mousse at the roots to create a foundation of lift
- Use a large-barrel curling iron (2.5-3 inches) to create loose waves throughout the entire length
- Curl some sections away from the face and some toward the face to create dimension and the impression of movement
- As you curl, try to avoid curling the same direction every time; alternating directions creates more natural, flowing waves
- Once all hair is curled, gently brush through the waves with a soft paddle brush or your fingers to break up the curls slightly and create waves rather than defined ringlets
- Gather the curled hair into a high ponytail at the crown, ensuring the ponytail base sits high enough that the crown waves remain visible from the front
- Secure with an elastic and cover with a decorative clasp or ornament
- Use flexible-hold hairspray rather than maximum hold—maximum hold makes waves feel stiff and prevents the cascading effect
- Consider adding a synthetic hair extension with matching waves if you want additional visible volume in the ponytail tail
Worth knowing: Cascading waves require significant product and often involve sleeping on the curls the night before the wedding (pinned in a loose bun or wrapped in a silk scarf) to allow them to set. Discuss timing and preparation with your stylist well in advance—this style isn’t something that can be thrown together the morning of your wedding.
Final Thoughts
Each of these twelve Indian wedding ponytails offers a distinct approach to balancing tradition with personal style, sophistication with comfort, and intricacy with wearability. The right choice depends on your hair length and texture, your personal aesthetic preferences, the specific events you’ll attend across your wedding week, and your comfort level with the styling time required. Some styles, like the sleek high ponytail or the low twisted style, can be executed relatively quickly and maintained easily throughout long ceremonies. Others, like the zig-zag braided ponytail with layering or the volume ponytail with cascading waves, demand time, precision, and products—but the visual payoff is extraordinary.
More importantly, your wedding hairstyle should feel like you—elevated and intentional, absolutely, but authentically connected to how you normally style yourself. If you’ve never worn your hair in braids before your wedding, a zig-zag braided design might feel uncomfortable and unfamiliar despite being beautiful. Conversely, if you regularly wear your hair in braids and feel confident with braided styles, the opportunity to create an ornate braided ponytail might be exactly what makes you feel most like yourself on your wedding day. Communicate openly with your hairstylist about your comfort level, bring reference photos from multiple styles, and request a trial run if possible—most wedding hairstylists will do a practice appointment weeks before the wedding so you can see exactly how each style looks on your face and hair texture.
Your ponytail is more than just a hairstyle; it’s a choice about how you want to feel and be perceived during one of the most important celebrations of your life. Choose the style that makes you feel confident, beautiful, and authentically yourself.