If you’ve ever spent 20 minutes perfecting a braided ponytail only to watch it unravel by mid-afternoon, you know the frustration. The good news? Not all braided ponytail styles are created equal—and some are specifically designed to hold strong from sunrise through sunset without a single bobby pin repositioning required.
The secret isn’t just about technique (though that matters). It’s about choosing a braid style that naturally locks into place, keeping tension distributed evenly throughout the day. Whether you’re dealing with fine, slippery hair or thick waves that tend to slip free, there’s a high braided ponytail style that’ll stay put through workouts, humid weather, or an entire day of movement. The styles that hold best use overlapping braid patterns, strategic anchor points, and positioning techniques that work with your hair’s natural weight rather than against it.
These ten styles range from classic French braids to modern hybrid designs—each one chosen specifically because it resists loosening, doesn’t require constant tightening, and actually looks better as the day goes on. Whether you’re prepping for a busy workday, an athletic event, or simply tired of hair maintenance, these are the braided ponytails worth mastering.
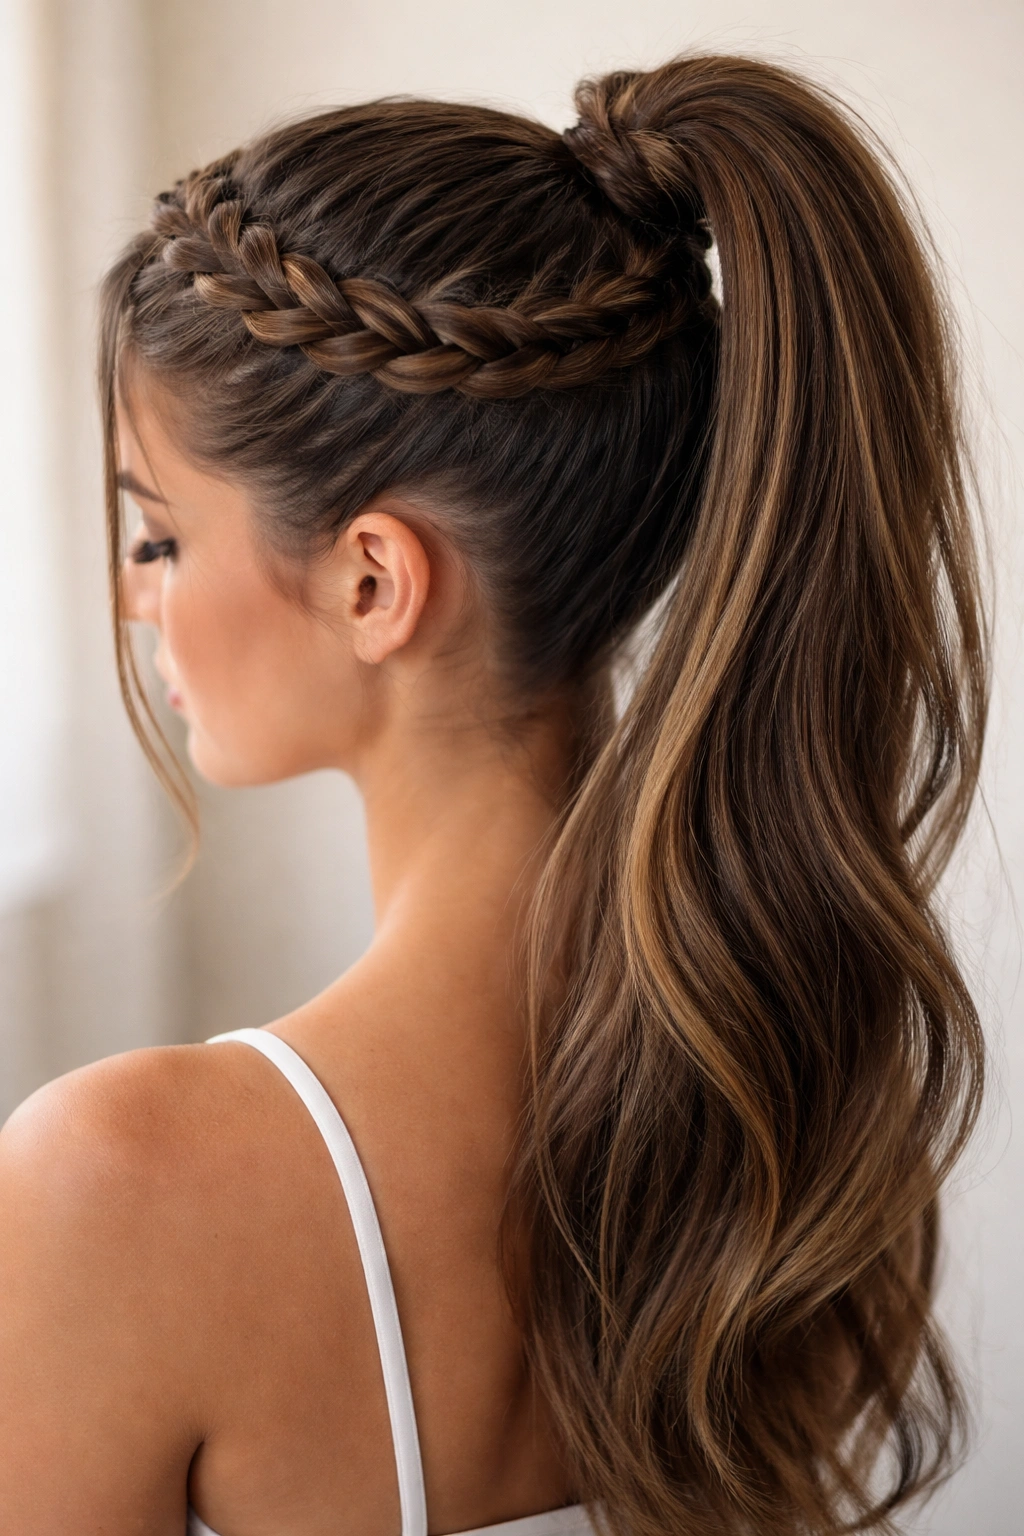
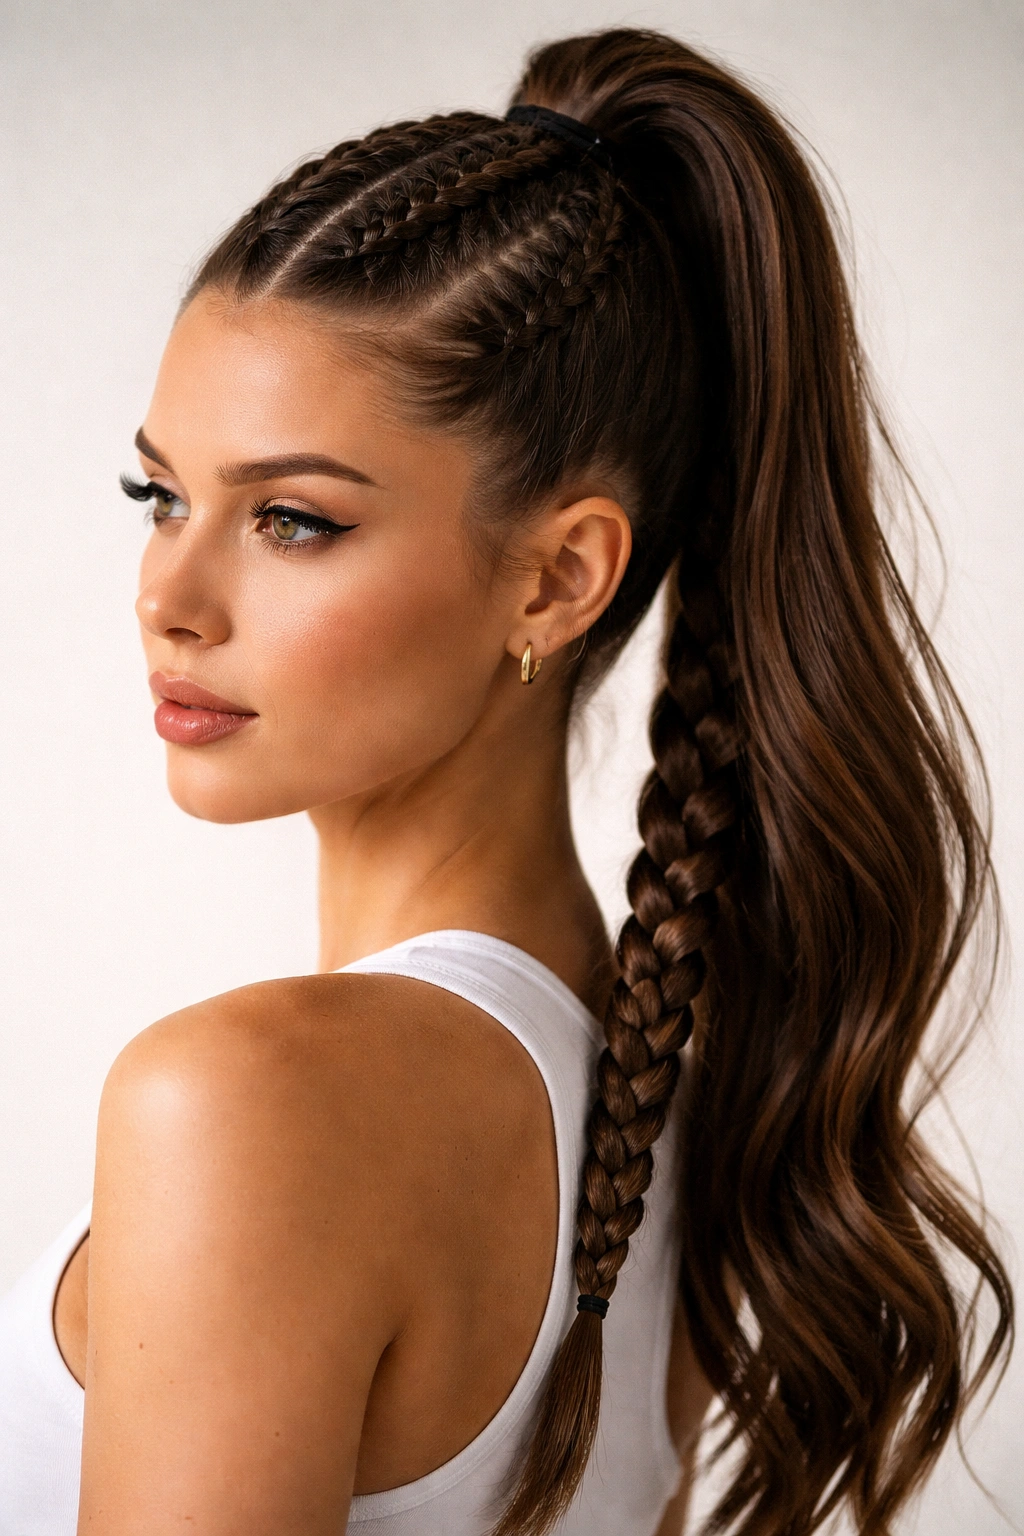
1. Dutch Braid High Ponytail
The Dutch braid is basically a French braid’s bold cousin—instead of braiding hair over the center, you braid underneath, creating a raised, dimensional braid that sits on top of your scalp. When you anchor it into a high ponytail, this braid naturally grips and locks, making it nearly impossible for pieces to slip free as your day progresses.
Why This Style Holds So Well
Dutch braids create a tighter hold because the under-braid technique compresses the hair strands more securely than traditional braiding methods. As you move throughout the day, the tension actually works in your favor—gravity and movement help seat the braid even more firmly against your scalp. The raised appearance also means any loosening is less visible, so even if a few pieces gradually work free, the style still looks intentional and polished.
How to Make It Last Longer
Start by prepping your hair with texture spray or dry shampoo, applied from roots to mid-length—this gives your hair grip and prevents slipping right from the start. Create the Dutch braid slowly and deliberately, pulling each section tightly as you work. Don’t rush; taking 2-3 minutes to braid deliberately beats spending 10 minutes retightening a hastily done braid. Once you’ve gathered the ponytail at the crown, smooth the front pieces, and use bobby pins to anchor any face-framing sections along the braid itself. Finish with a strong-hold hairspray that’ll set the entire style and cement those individual strands in place.
This style works beautifully on all hair types and textures. The key is starting with slightly damp or textured hair rather than freshly washed, slippery strands. If your hair is naturally slick, applying a texturizing spray beforehand transforms the entire holding capacity of the braid.
2. Fishtail Braid High Ponytail
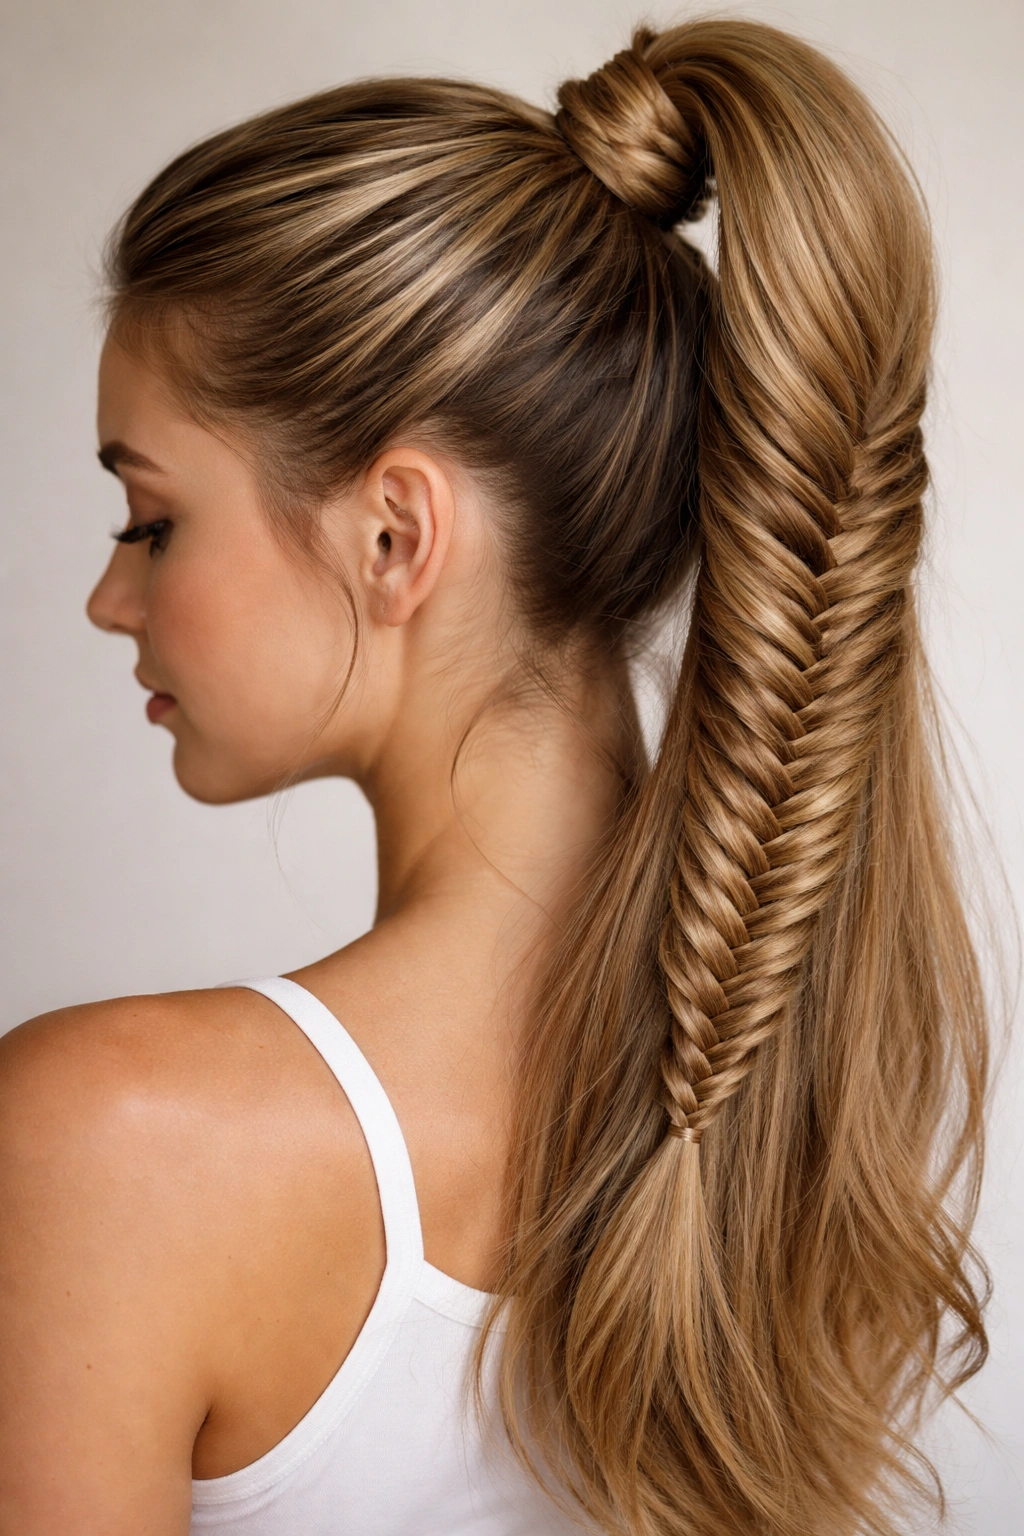
The fishtail braid creates an intricate, woven appearance using just two sections of hair instead of the traditional three-strand method. Because it uses thinner strands that wrap around each other rather than sit side-by-side, the fishtail creates a denser, more interlocking pattern that’s exceptionally secure. When pulled tight and anchored into a high ponytail, it becomes one of the most damage-resistant styles for all-day wear.
Why It’s a Durability Champion
The fishtail’s two-section weaving method means each piece of hair is crossed and recrossed multiple times, creating natural friction that prevents slipping. The overall effect looks delicate, but the construction is actually far more secure than you’d think. Paired with a high ponytail position, gravity works to keep the braid seated firmly against your scalp throughout the day.
Application Tips for Maximum Hold
Section your hair into two thick halves and start your fishtail braid at the crown. Work slowly—fishtails look better when they’re slightly loose and flowing, but they hold longer when you create tension with each crossing. As you add hair into the braid (taking tiny sections from each side), pull these additions tight before moving to the next section. The individual small sections accumulate into a very secure overall structure.
Once your fishtail reaches the nape of your neck, gather it into your high ponytail elastic. The beauty of fishtails is that loose, flyaway pieces naturally get incorporated back into the braid as the day progresses, so a style that looks slightly undone in the morning often looks more refined by evening. Finish with flexible hairspray rather than hardening formulas—fishtails actually improve with a bit of movement and rearrangement.
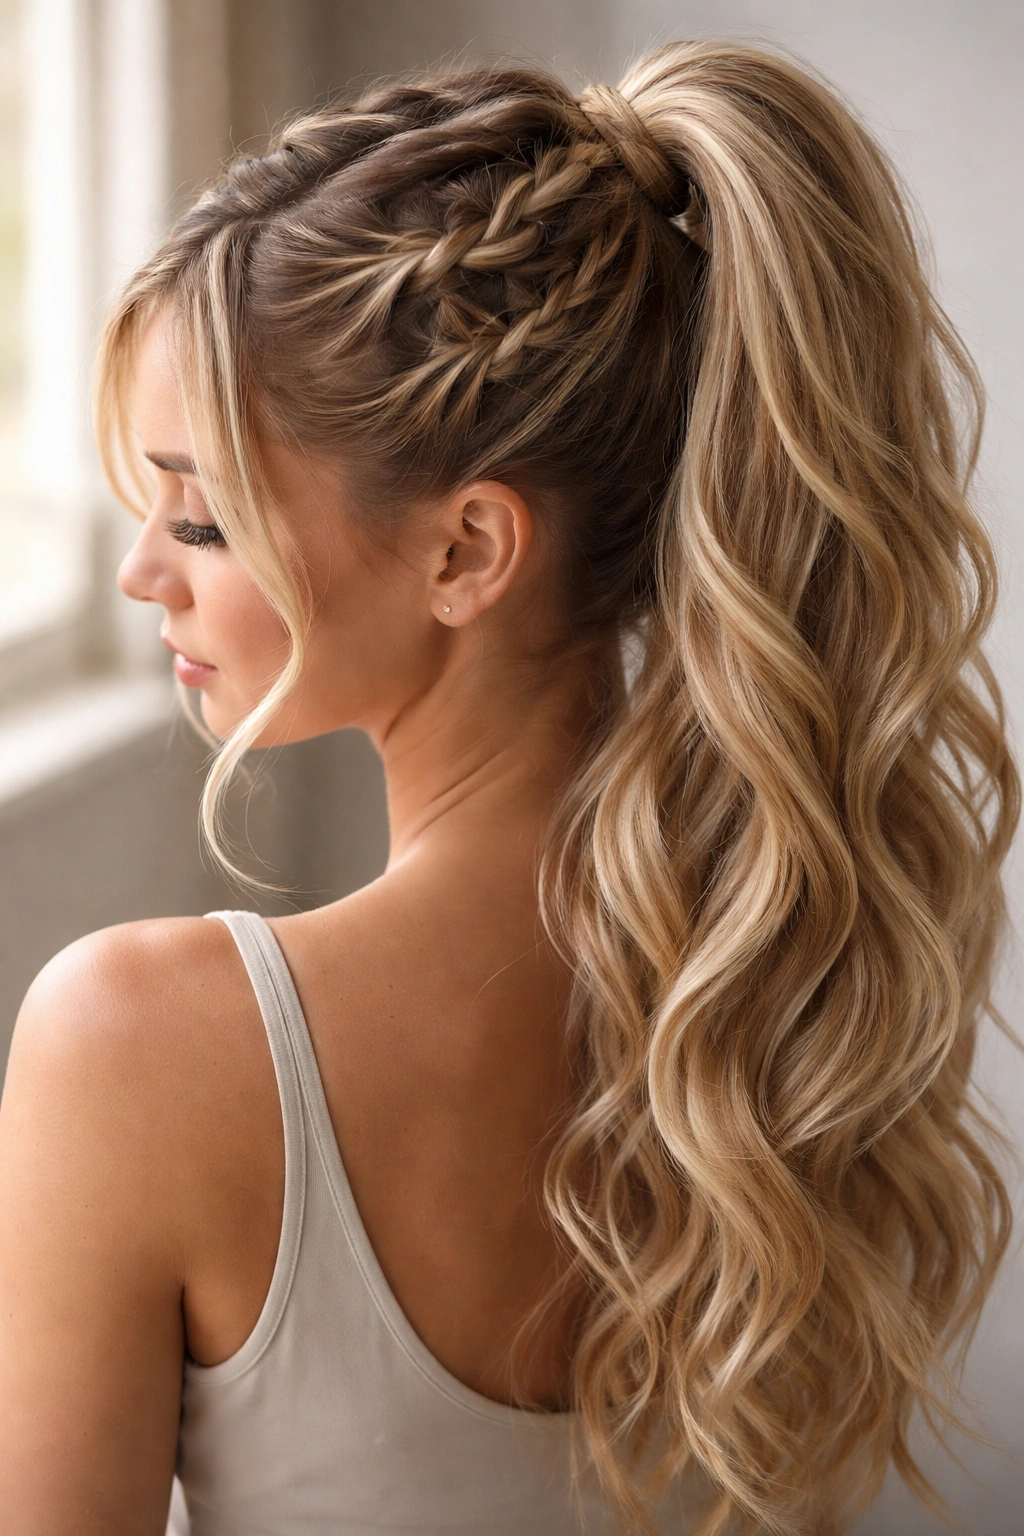
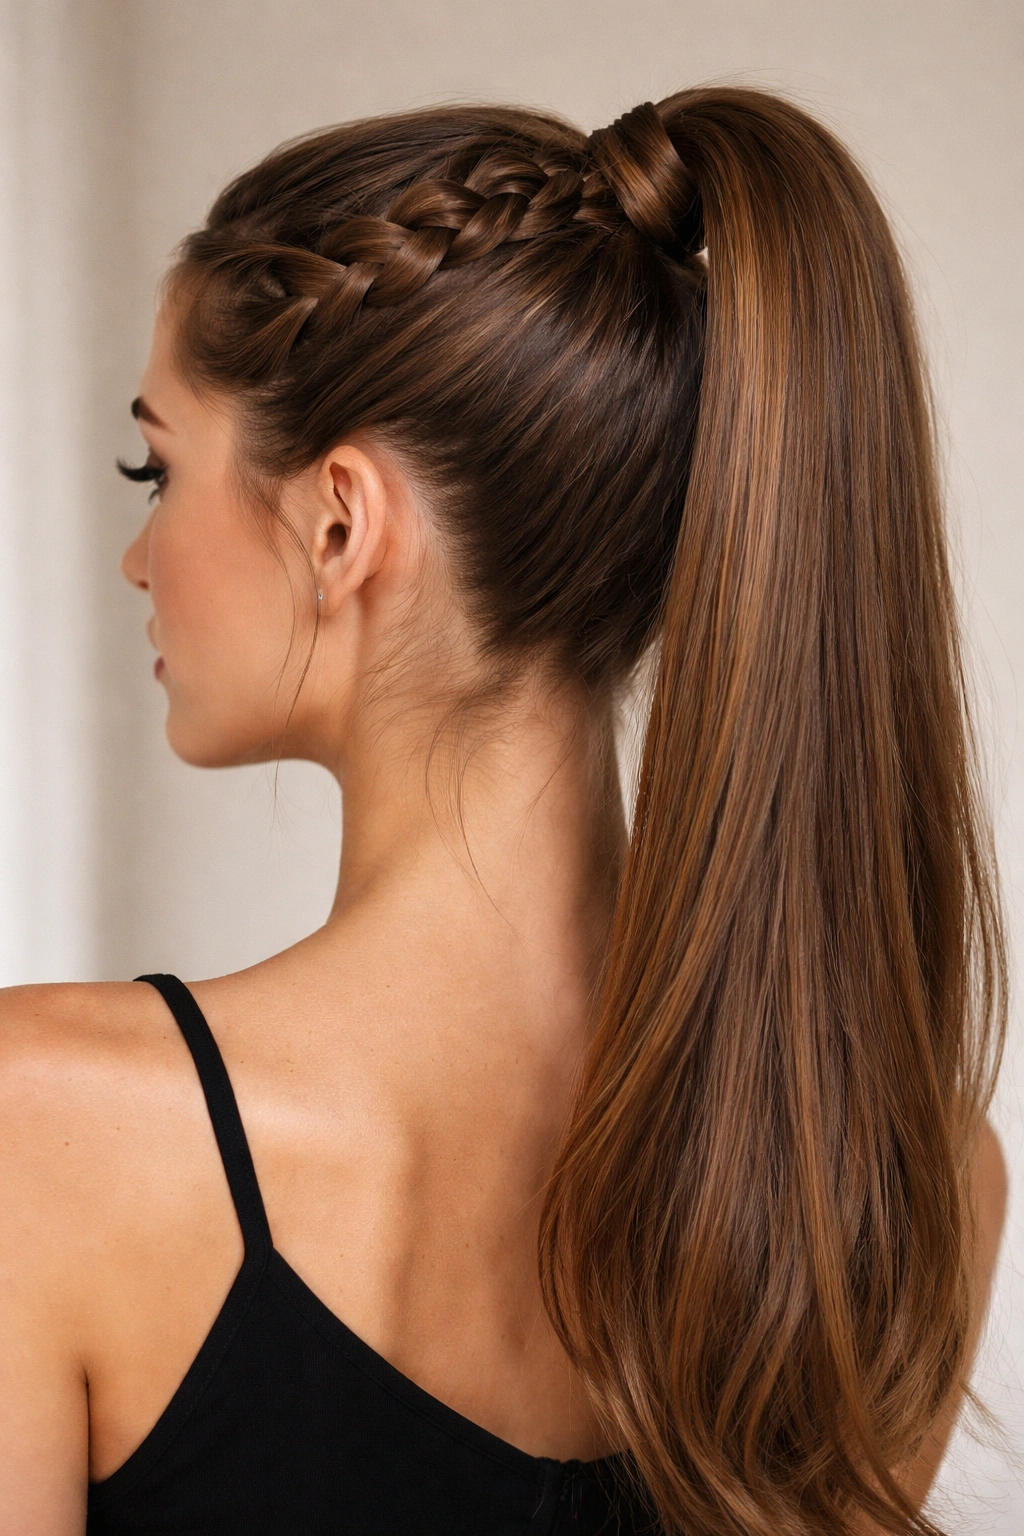
3. French Braid High Ponytail
The French braid remains the gold standard for secure, long-lasting braided ponytails. It’s the original braid-from-crown technique, and it’s remained popular for centuries because it simply works. When you feed hair into the braid as you descend toward the nape, you’re progressively incorporating more and more hair, which means the structure gets tighter and more anchored as it goes down.
The Mechanics That Make It Hold
French braids work because you’re continuously adding new hair strands to the braid, increasing density and security with every row. By the time you reach the ponytail elastic, you’ve essentially locked hundreds of hair strands into an intricate grid that’s mechanically very difficult to loosen. The braid also distributes tension evenly, so no single section bears all the stress—the load spreads across the entire braided area.
Perfecting Your Technique for All-Day Wear
Begin with your hair in slightly damp condition, not soaking wet—moisture adds pliability without making hair slippery. Start the braid at your very crown with a small three-strand section, and as you braid downward toward your nape, continuously add thin sections of hair from both sides. The thinner your added sections, the smoother and tighter your finished braid will be. Many people make the mistake of adding thick sections, which creates a loose, bumpy braid that’s more prone to loosening. Thin, consistent additions create a braid that looks streamlined and holds tight.
When you’re ready to secure your ponytail at the nape, twist the braid’s end around the base of the ponytail elastic for extra security, then pin it down with bobby pins. This twist-and-pin technique is what separates a french braid that makes it to dinner looking perfect from one that’s frayed by afternoon snack time.
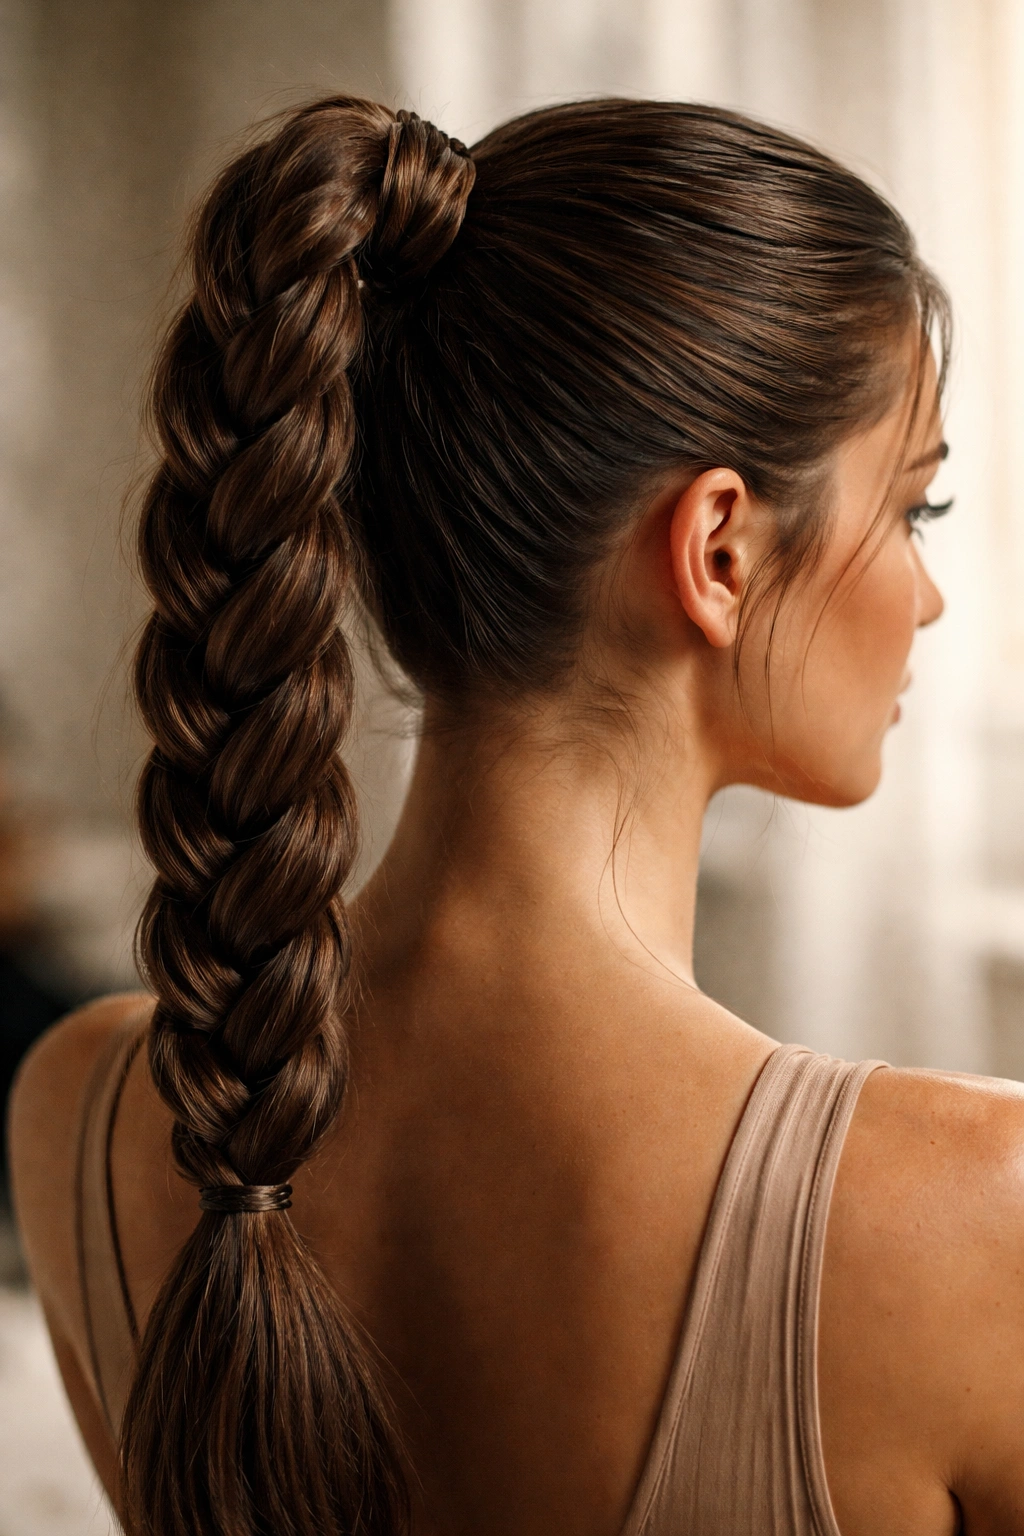
4. Twisted Rope High Ponytail
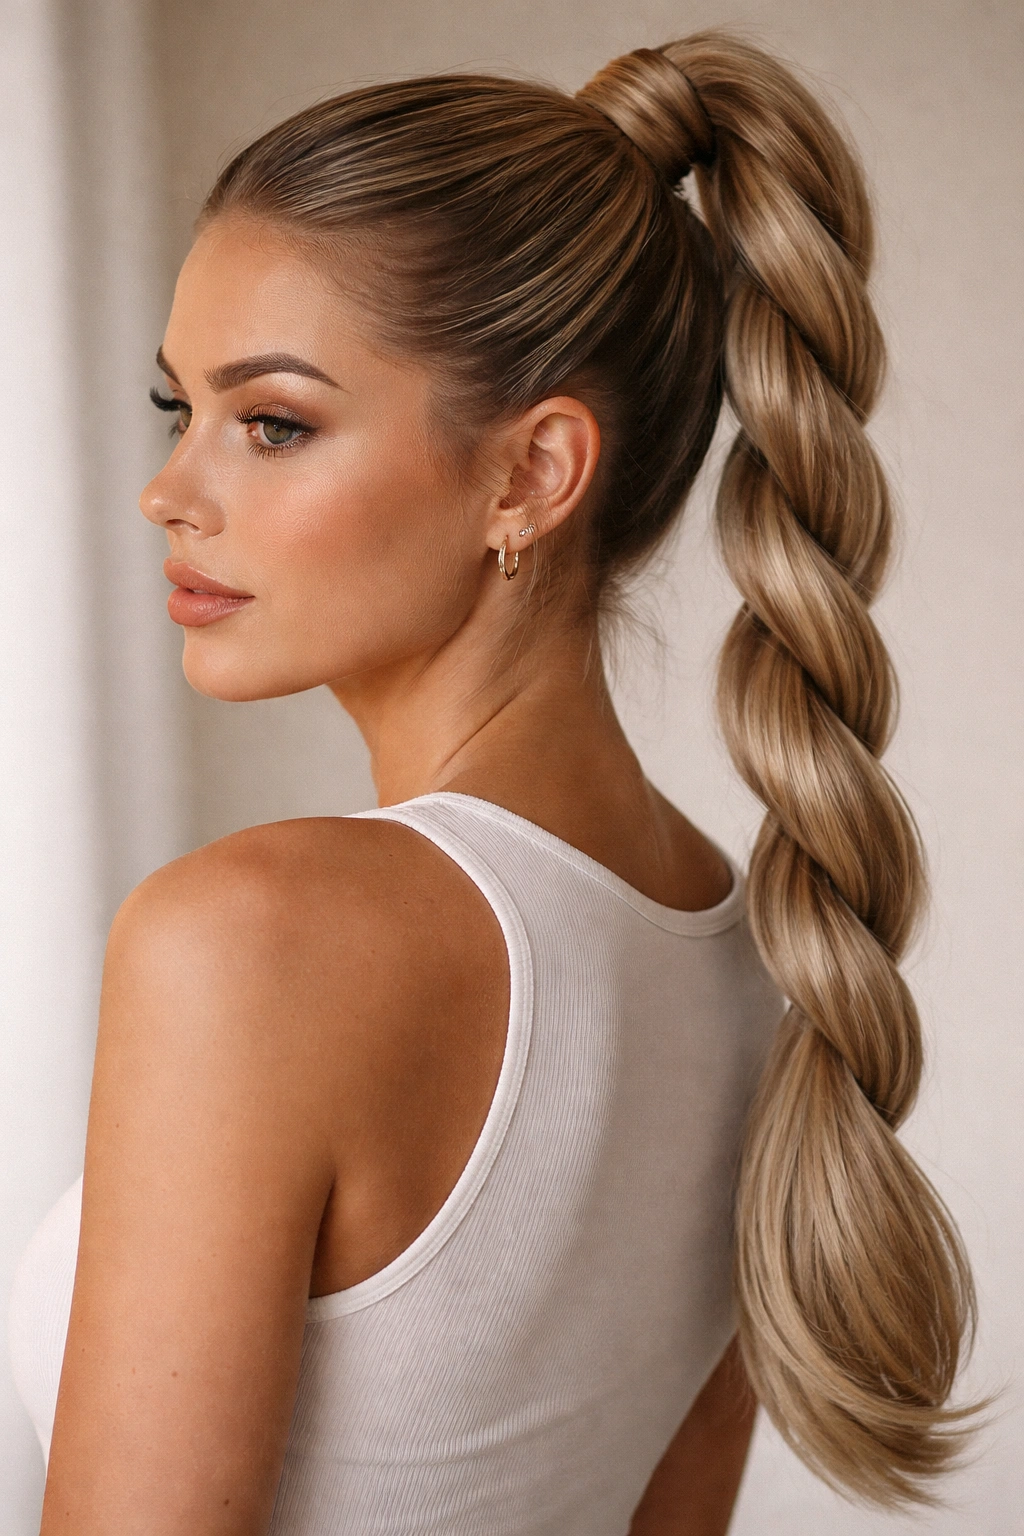
While technically not a “braid,” a twisted rope ponytail uses the same principle of wrapping and interlocking strands to create a secure, elegant updo. Two thick sections of hair are twisted around each other from crown to nape, then anchored into a high ponytail. The simplicity of the technique makes it surprisingly fast, yet the mechanical grip rivals more complex braids.
Why Twists Deliver Impressive Hold
Twists work through friction and compression—as two sections of hair spiral around each other, they create a tight interlocking structure that’s very resistant to loosening. Unlike braids, where strands can sometimes slip within the weave, twisted sections create a unified rope that acts almost like a single unit. This means less maintenance and fewer adjustments needed throughout your day.
Creating a Twist That Lasts
Section your hair into two equal parts, starting at the crown. Twist one section clockwise while simultaneously twisting the other section counterclockwise, allowing them to wrap around each other as they descend toward your neck. The key is maintaining consistent tension and thickness throughout the twist—if you let one section get thinner halfway down, the structure weakens and the whole thing becomes prone to unraveling.
As you near the nape, gather both twisted sections and your remaining loose hair into a high ponytail elastic. For extra longevity, wrap a thin section of hair around the elastic base to cover it and add visual polish. This wrapped base also serves as a securing point—you can discreetly pin it to itself to prevent any loosening. Twisted rope ponytails photograph beautifully and look more sophisticated than their simple construction suggests.
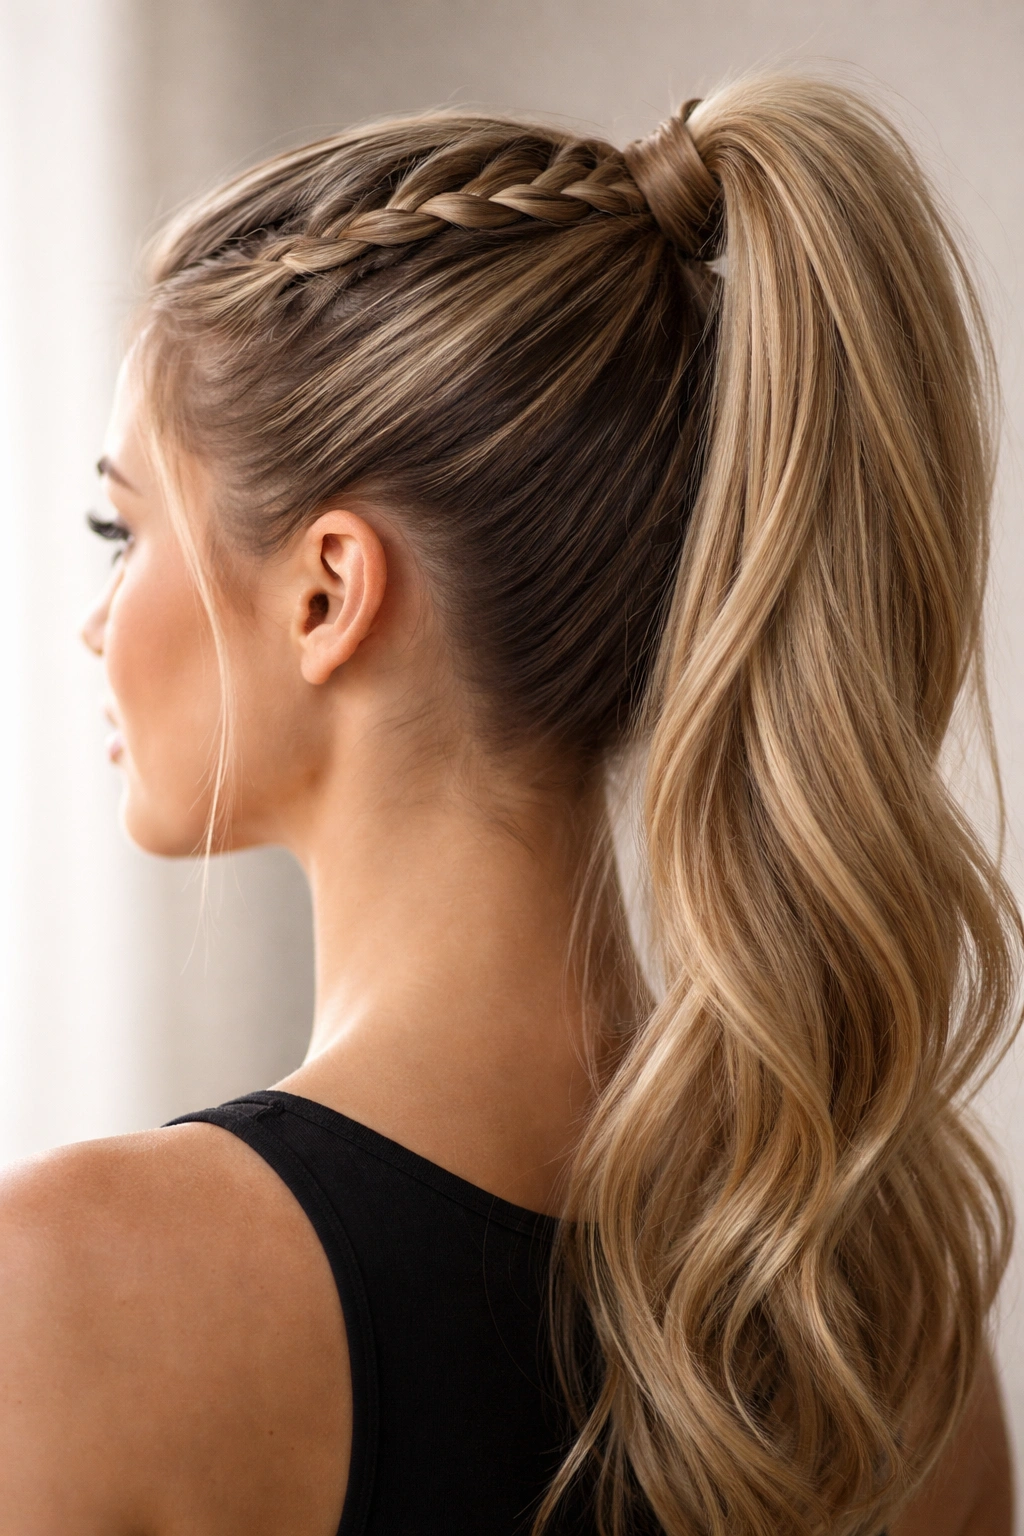
5. Milkmaid Braid High Ponytail
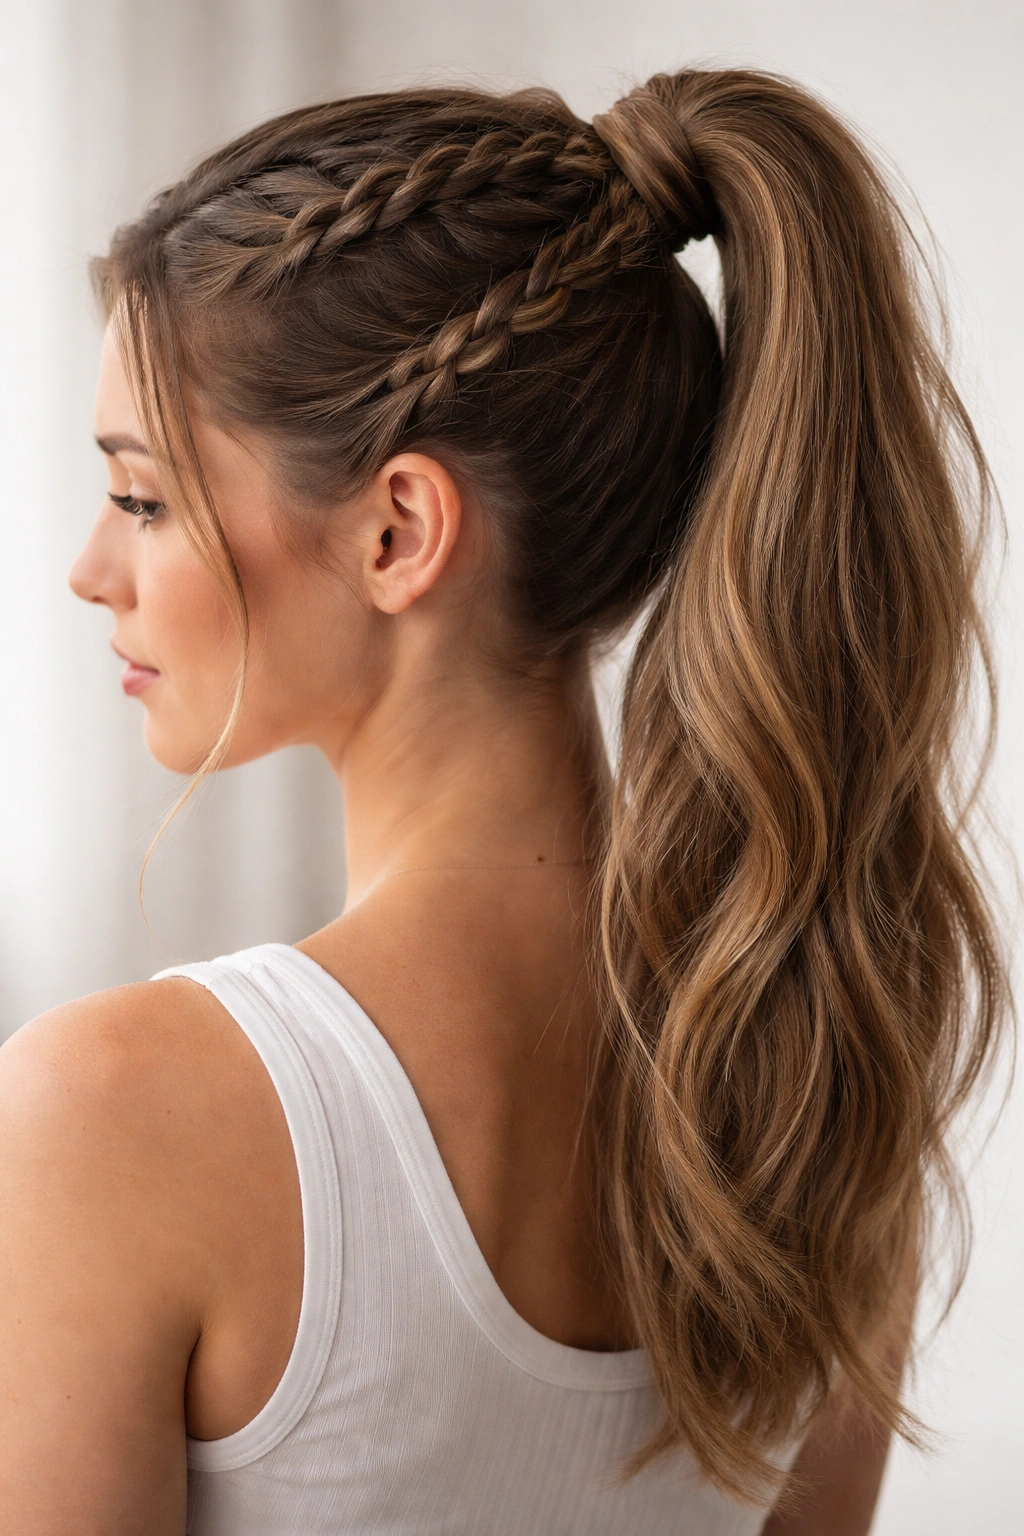
The milkmaid braid is essentially two French braids, one on each side of the head, that meet in a high ponytail at the back or crown. This style creates incredible visual impact while delivering double the holding power—you’re essentially securing your hair with two anchor points instead of one. It’s a go-to style for people with very fine, slippery hair because the dual braids distribute weight and tension across both sides of the scalp.
Why Two Braids Beat One
The mechanical advantage of using two braids instead of one is substantial. Each braid individually locks hair into place, but together they create a redundant system—if one braid loosens slightly, the other compensates. This redundancy is why milkmaid braids remain intact for people with hair that typically escapes regular ponytails by mid-afternoon. The style also forces your hair to sit in a specific position, with the two braids on either side acting almost like rails that keep everything aligned.
Executing the Milkmaid Technique
Part your hair down the center from forehead to nape, creating two equal sections. Begin a French braid on each side simultaneously, starting at your temple and working toward the back of your head. This simultaneous braiding is the key—it ensures both braids have the same tension and tightness, which keeps the style balanced and secure. As you reach the nape on both sides, you’ll have two braids ending just above your neck.
Gather both braids and any remaining loose hair into a high ponytail at the crown or slightly lower, depending on your preference. The meeting point of these two braids should sit right where you place your elastic—this creates a natural anchor point that’s virtually impossible to loosen. You can leave the ponytail as-is, or you can fan and pancake the braids slightly (gently pulling the edges outward) to create a fuller, more dimensional appearance.
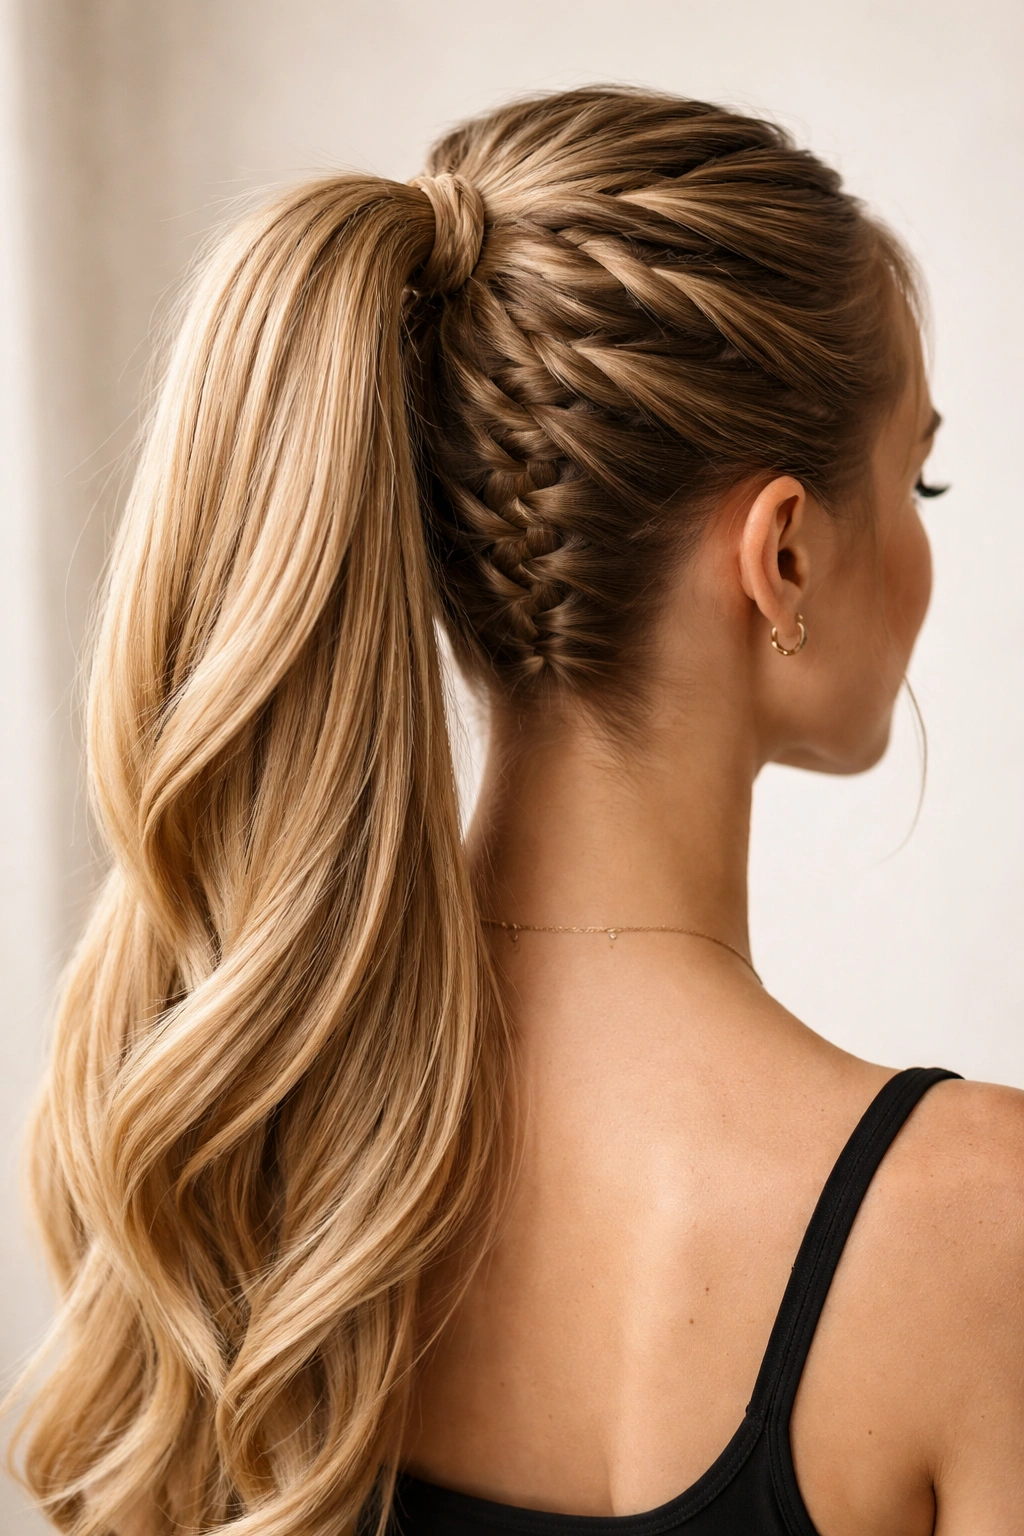
6. Halo Braid High Ponytail
The halo braid circles the crown of your head like a crown, then descends into a high ponytail at the back. It’s essentially a crown braid that you’re extending into a full-coverage style. The circular wrapping creates an incredibly secure anchor point—imagine a thick band running around your entire crown, holding everything in place.
The Security of a Crown Anchor
Halo braids work brilliantly for holding because they create tension all the way around your head. Rather than anchoring your style at a single point (the back nape), a halo braid distributes that anchor load across your entire crown. This means movement in any direction is countered by the braid’s resistance. Even if you shake your head vigorously or move around actively, the halo structure keeps everything locked in place.
Building Your Halo for Maximum Hold
Start with texture spray applied throughout your hair—halo braids need grip to prevent the hair from sliding as you braid. Begin at one temple and create a Dutch or regular braid that travels around the back of your head, ending at the opposite temple. The key is starting thin at the temples and gradually widening the braid as you work around the back. This creates a balanced look and distributes weight evenly.
Once your halo braid is complete, secure it with bobby pins on both sides of your head (at the temples). Then gather all remaining hair into a high ponytail at the crown or slightly back, depending on whether you want a very high placement or something slightly more moderate. The halo itself now becomes the primary security mechanism—it’s essentially tying your entire head together. Pin the base of your ponytail, and you’ve created a style that can legitimately handle a full day of activity without loosening.
7. Waterfall Braid High Ponytail
The waterfall braid is a French braid variation where you deliberately drop sections of hair out of the braid, allowing them to cascade down like a waterfall while the braid continues upward. When incorporated into a high ponytail, it creates a romantic, textured look that’s surprisingly secure because the remaining braided portions are quite dense.
Why Waterfall Braids Stay Secure
By dropping hair out of the braid, you’re reducing the total amount of hair in the braid structure itself, which might seem counterintuitive for holding power. However, what remains in the braid becomes tighter and more interlocked. Additionally, the cascading pieces actually serve as anchoring elements—once dropped from the braid, they can be incorporated back into the ponytail, effectively creating multiple holding points. It’s a clever mechanical design that looks intricate but holds firmly.
Technique for a Waterfall That Lasts All Day
Begin a French braid at your temple, angling toward your crown. When you’ve completed a few rows, drop one section of hair out of the braid by ceasing to incorporate it, allowing it to hang freely. Continue your French braid with the remaining two sections, creating a new three-strand structure. Repeat this drop-and-continue pattern every few rows as you work around the back of your head.
Once you reach the nape, gather the braid and all the cascading waterfall pieces into a high ponytail. The waterfall pieces become part of the ponytail’s body, so they’re secured by the elastic. The density of the remaining braid, combined with the multiple anchor points created by the waterfall sections, creates a style that’s mechanically sound and visually interesting. This works particularly well if you have some natural texture or wave to your hair—the cascading pieces will show off those details.
8. Crown Braid High Ponytail
A crown braid travels in a circular pattern around the crown of your head, rather like a halo, but then the remaining hair falls free into a high ponytail. This style creates a circlet of braiding that acts as a secure base, while the ponytail adds length and visual interest. It’s elegant enough for formal occasions but practical enough for regular wear.
The Crown’s Role in Stability
The crown braid creates a physical barrier and support system around the top of your head. As your scalp moves throughout the day, the crown braid essentially moves with it, providing consistent support and preventing slipping. The braid itself becomes the main security structure, while the ponytail is simply the continued length of hair that’s now collected below this secure crown.
Crafting Your Crown Braid
Start at one side of your head and create a Dutch or French braid that curves around the back of your crown, ending on the opposite side. The braid should sit toward the back of your head, not right at the temples. Keep the braid relatively flat against your scalp—you want it neat and secure, not pillowy or loose.
Once the crown braid is complete, secure both ends with bobby pins positioned along the braided area. Gather all the remaining hair (both the loose pieces below the braid and any hair you haven’t yet incorporated into the braid) into a high ponytail. The crown braid now serves as a secure anchor for the entire style. You can leave the ponytail loose, curl it, or braid it further, depending on your preference. The crown braid itself will hold everything in place.
9. Double Braid High Ponytail
A double braid ponytail uses two braids that run parallel down the back of your head, slightly offset from center, eventually meeting and merging into a single high ponytail. It’s visually striking and creates outstanding holding power because the two braids essentially act as dual anchor systems.
Mechanical Advantages of Dual Braids
Two braids running simultaneously from crown to nape provide redundancy and distribute tension across your entire scalp. If one braid loosens fractionally, the other compensates. Additionally, the visual effect of two braids means any loosening is far less noticeable—even if one braid becomes slightly undone, the style still reads as intentional and polished. For people with very long or very slippery hair, the double braid approach is genuinely superior to single-braid styles.
Creating Your Double Braid Structure
Part your hair slightly off-center, creating two unequal sections. On the larger side, begin a Dutch or French braid starting at the temple and working toward the back and center of your head. On the smaller side, create a matching braid starting from slightly further back, also angling toward the center. The braids won’t be completely parallel—they’ll converge as they descend.
As both braids approach your nape, allow them to overlap slightly, then gather them (along with any remaining loose hair) into a single high ponytail. The meeting point where the two braids converge becomes a natural anchor point. You can pin this meeting area explicitly, or simply rely on the elastic to secure both braid ends simultaneously. Finish with a flexible hairspray that’ll set the braids while still allowing a bit of natural movement.
10. Boxer Braid High Ponytail
Boxer braids are two Dutch braids that run from your forehead all the way down to your nape, positioned close together down the center of your head. When you gather these braids into a high ponytail, you create one of the most secure, long-lasting styles possible. Boxers were literally designed for active wear—they were created to keep hair in place during intense physical activity.
Why Boxer Braids Are Nearly Impossible to Loosen
Boxer braids use the Dutch braid technique (under-braiding for a raised effect), which creates tremendous grip and tension. The fact that two braids run parallel means they’re essentially tethering your hair at multiple points simultaneously. Combined with their position running down the center of your head (where they’re less likely to be affected by side-to-side movement), boxer braids provide virtually unmatched stability. Athletes, dancers, and people with very active lifestyles often default to boxers because they’re proven to last through sweat, movement, and activity.
Building Boxer Braids That Last
Begin by parting your hair straight down the center from your forehead to the nape. On one side, create a Dutch braid starting at your forehead hairline and working straight back. On the other side, create an identical Dutch braid in the same position. The braids should be quite close together but not touching—about the width of a typical finger apart.
As you create each Dutch braid, pull firmly on each section before braiding it in. Dutch braids naturally sit raised on the scalp, but you want yours to sit as flat and tight as possible for maximum security. Once both braids reach your nape, gather them into a high ponytail (you might also have some loose hair at the back to include). The dual Dutch braids now form an incredibly secure anchor system. This style can legitimately handle a full workout, swimming, or an entire day of active movement without a single adjustment needed.
Making Any Braided Ponytail Last Longer
Regardless of which style you choose, a few universal techniques dramatically improve how long your braided ponytail stays secure. Texture is your best friend—applying dry shampoo, texture spray, or even a sea salt spray before braiding gives your hair grip and prevents slipping. Starting with second-day hair (rather than freshly washed hair) also helps considerably because your natural oils provide built-in texture and hold.
The tightness of your initial braid determines longevity more than any other single factor. Many people braid loosely for comfort, but loose braids inevitably loosen further as the day progresses. Create your braid with intention and tension from the very first section. It might feel slightly tight initially, but it’ll reach the perfect tightness by mid-morning. Using bobby pins strategically—at the base of your ponytail, along the braid itself, and anchoring any flyaway pieces—prevents the small unravelings that gradually compromise the entire style.
Finish every braided ponytail with a strong-hold hairspray applied throughout the braided section and ponytail. This isn’t about stiffness—you want movement and natural texture. It’s about setting individual strands in place so they can’t gradually slip free. Choose a flexible-hold formula rather than a hardening spray, which will create crunchiness and actually accelerate loosening as you move.
Final Thoughts
The difference between a braided ponytail that survives until bedtime and one that loosens by lunch isn’t about magic—it’s about choosing a braid style designed for security and applying technique-based holding strategies consistently. Dutch braids, fishtail braids, dual-braid systems, and boxer braids all offer specific mechanical advantages that keep hair locked in place throughout your entire day.
Start with texture spray to create grip, braid with deliberate tension, use bobby pins strategically, and finish with flexible hairspray. Pick whichever of these ten styles speaks to your hair type and your day’s demands. The French braid works beautifully for formal settings, while boxer braids own active days. Crown braids bring elegance to professional environments, while double braids handle both beauty and function. Once you master one or two of these styles, you’ll have reliable all-day hairstyles that actually simplify your mornings rather than complicate them.