Low ponytails are having a major moment, and the Korean beauty world has perfected the art of making them look effortlessly elegant and refined. There’s something uniquely appealing about the Korean approach to hair styling — it’s never overdone, always polished, and somehow makes even the simplest hairstyle feel intentional and chic. If you’ve ever scrolled through Korean beauty and fashion influencers and wondered how they make a low ponytail look so sophisticated, you’re about to discover the techniques and styling tricks that separate a basic ponytail from a genuinely stunning one.
What makes Korean low ponytails different from the versions you might be familiar with isn’t just about placement — it’s about texture, finish, and the small details that signal polish and intentionality. Korean hairstyling philosophy emphasizes clean lines, soft texture, strategic volume, and hair that looks healthy and cared for rather than stiffly styled. A low ponytail in the Korean beauty aesthetic tends to feel relaxed yet refined, textured yet controlled, and always wearable for everything from casual outings to professional settings and even formal events.
The beauty of exploring Korean low ponytail styles is that many of them work across different hair textures, lengths, and face shapes. Whether your hair is thick and voluminous, fine and delicate, straight, wavy, or curly, you’ll find techniques here that you can adapt to your own hair. The focus is on what looks good on you and what makes you feel confident, not rigid adherence to one specific style. Let’s explore twelve gorgeous Korean low ponytails that you can recreate right now — each with the specific techniques and styling tips that make them work.
1. The Glossy Sleek Low Tail
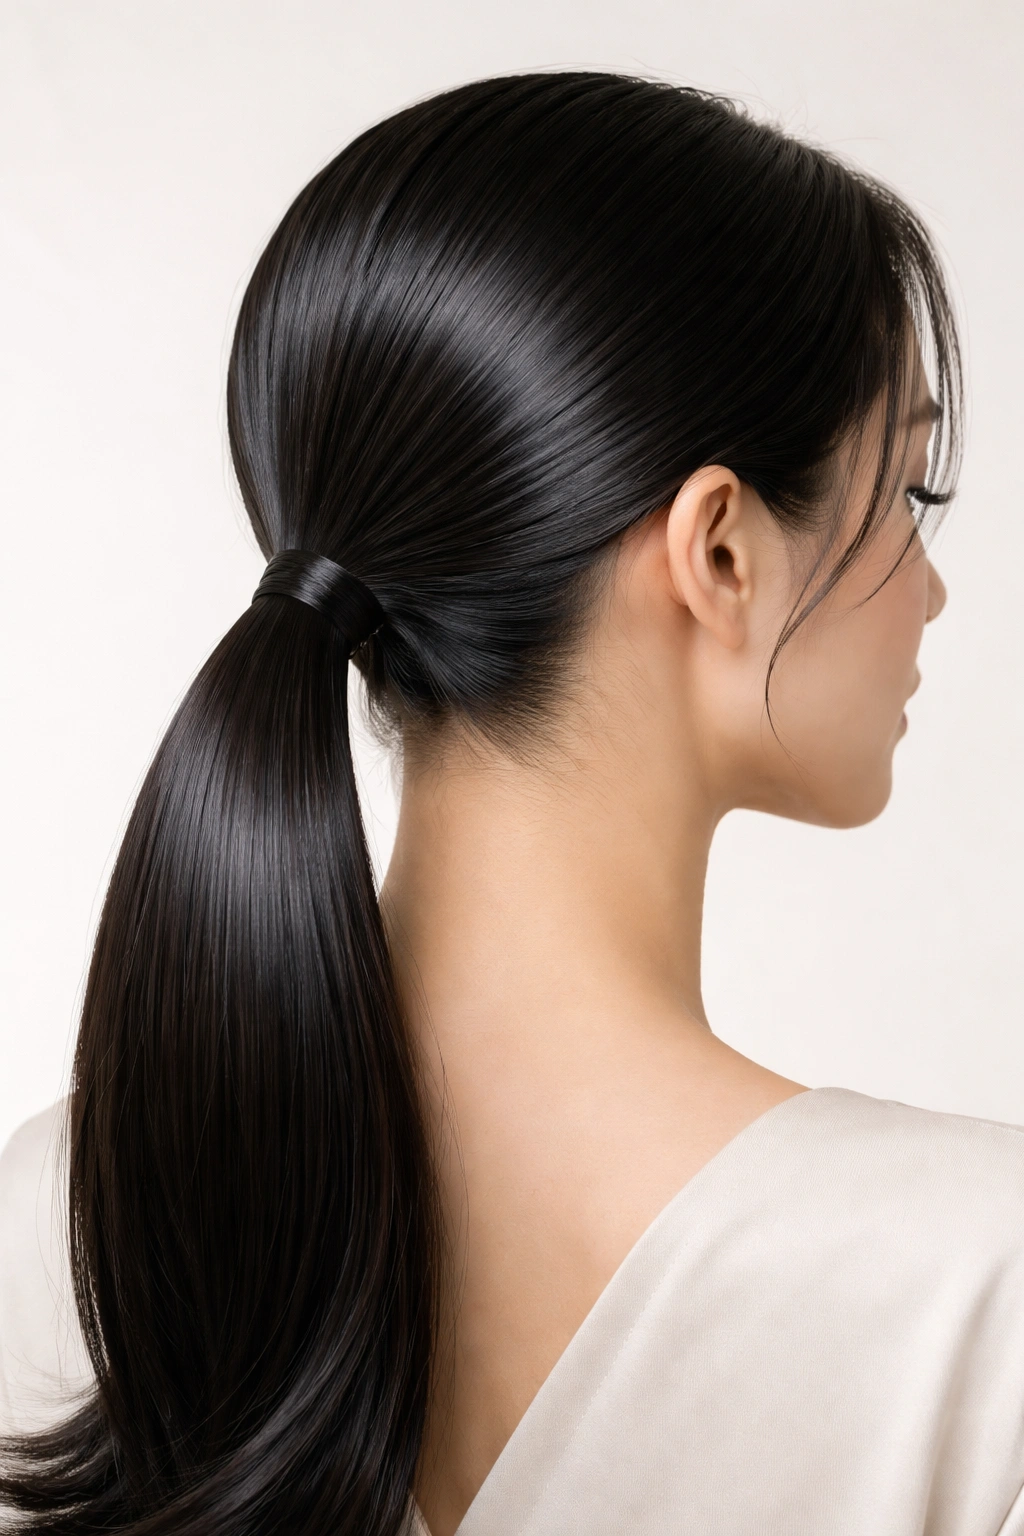
This is the foundation of Korean low ponytail elegance. The glossy sleek low tail is all about creating a smooth, reflective surface that catches light beautifully while keeping everything tucked back in a streamlined, minimalist way. What makes this version distinctly Korean is the emphasis on shine — not from heavy product buildup, but from healthy, well-conditioned hair that’s been smoothed to perfection. The ponytail sits low at the nape of the neck, gathering only the hair from roughly ear-level downward, which keeps the look modern and face-framing rather than severe.
Why This Style Looks So Polished
The secret to this look is the preparation. Start with hair that’s freshly washed or refreshed, so it has natural shine without being greasy. Apply a lightweight smoothing serum or hair oil to the mid-lengths and ends while your hair is still damp, then blow-dry using a paddle brush to create a smooth base. The smoothing step is non-negotiable here — this isn’t a style where texture reads as intentional. You want each strand lying flat against the next, creating that mirror-like finish. Once your hair is completely dry and smooth, gather the lower section into a ponytail at the base of your neck and secure it with a thin, seamless hair tie that matches your hair color.
How to Achieve Maximum Shine
- Use a hydrating hair oil or lightweight serum on damp hair before blow-drying to infuse shine without weight
- Blow-dry with a concentrator nozzle to direct the cuticles downward, creating maximum light reflection
- Smooth each section with a paddle brush as you blow-dry to eliminate flyaways and frizz
- Finish with a light spritz of shine spray or anti-frizz mist, but avoid anything thick or sticky
- Pin down any baby hairs around the hairline with bobby pins for a completely polished finish
Pro tip: If you have naturally curly or textured hair, this style still works beautifully — you’re just working with your hair’s natural pattern rather than fighting it. Apply smoothing products and let your curls dry naturally into a sleek texture, then gather into the low ponytail.
2. The Soft Cloudy Low Pony

While the glossy sleek tail leans minimal, the soft cloudy low pony embraces texture and volume while maintaining that same refined aesthetic. This style uses strategic teasing and gentle layering to create a soft, pillowy effect that feels romantic and approachable. The volume sits mainly at the crown and sides of the head, while the ponytail itself remains relatively smooth and tapered. It’s the Korean equivalent of “effortlessly romantic” — polished but not stiff, textured but controlled.
The Layering Technique That Creates Volume
Start with clean, dry hair. Section the crown area (from your forehead to roughly the middle-back of your head) and tease gently at the roots using a fine-tooth teasing brush. The goal isn’t to create dramatic, obvious texture — it’s to add enough volume that the hair has body and movement without looking matted or heavily backcombed. Layer your teasing so that the top layer is smooth but the underneath has texture creating support. Once you’ve built gentle volume at the crown and sides, smooth the outer layer lightly with a fine-tooth comb. Gather the lower section into a low ponytail, positioning it slightly lower than you might instinctively place it so that the volume at the crown really stands out by contrast.
Customizing the Cloud Effect
- Tease selectively at the roots of the crown section for subtle volume that doesn’t look overdone
- Use a fine-tooth comb to gently smooth the surface after teasing so only the volume remains visible
- Add a soft wave or gentle bend to the ponytail section using a curling iron on low heat for extra dimension
- Secure with a hair elastic, then gently pull out a few face-framing pieces to soften the overall effect
- Use texture spray or dry shampoo before teasing if your hair is very slippery or fine — this gives the teasing something to grip
Worth knowing: The softer, cloudier effect works beautifully on hair that’s 1-2 days old, not fresh from a wash. Day-old hair has enough natural texture to work with and doesn’t require as much manipulation.
3. The Twisted Rope Low Ponytail
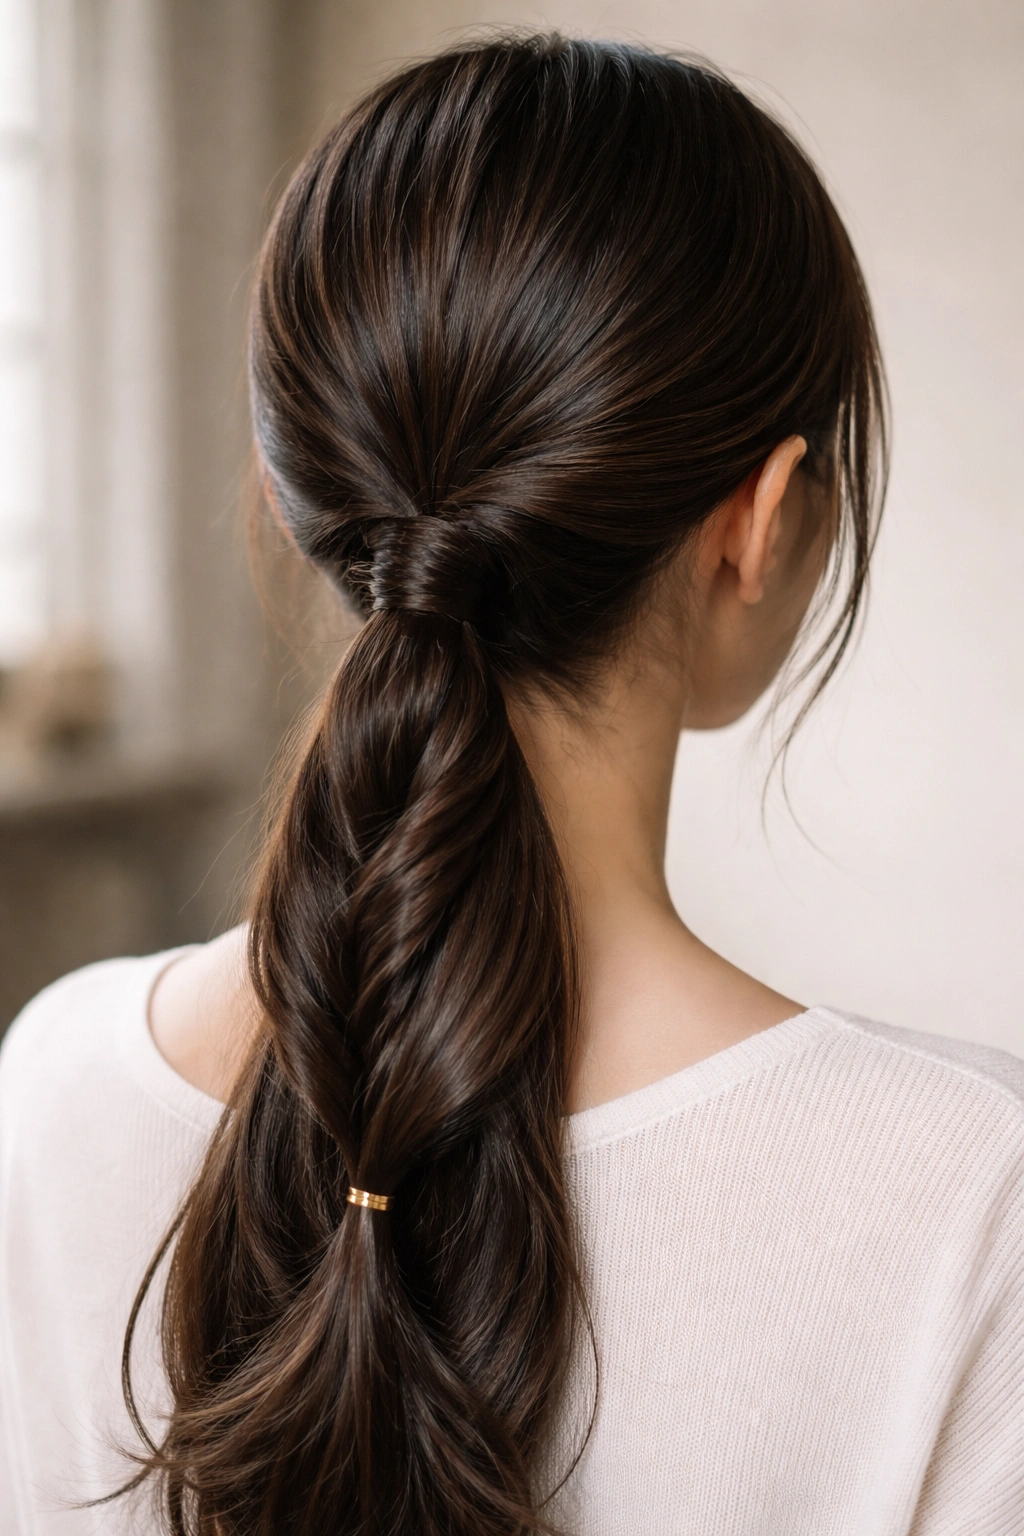
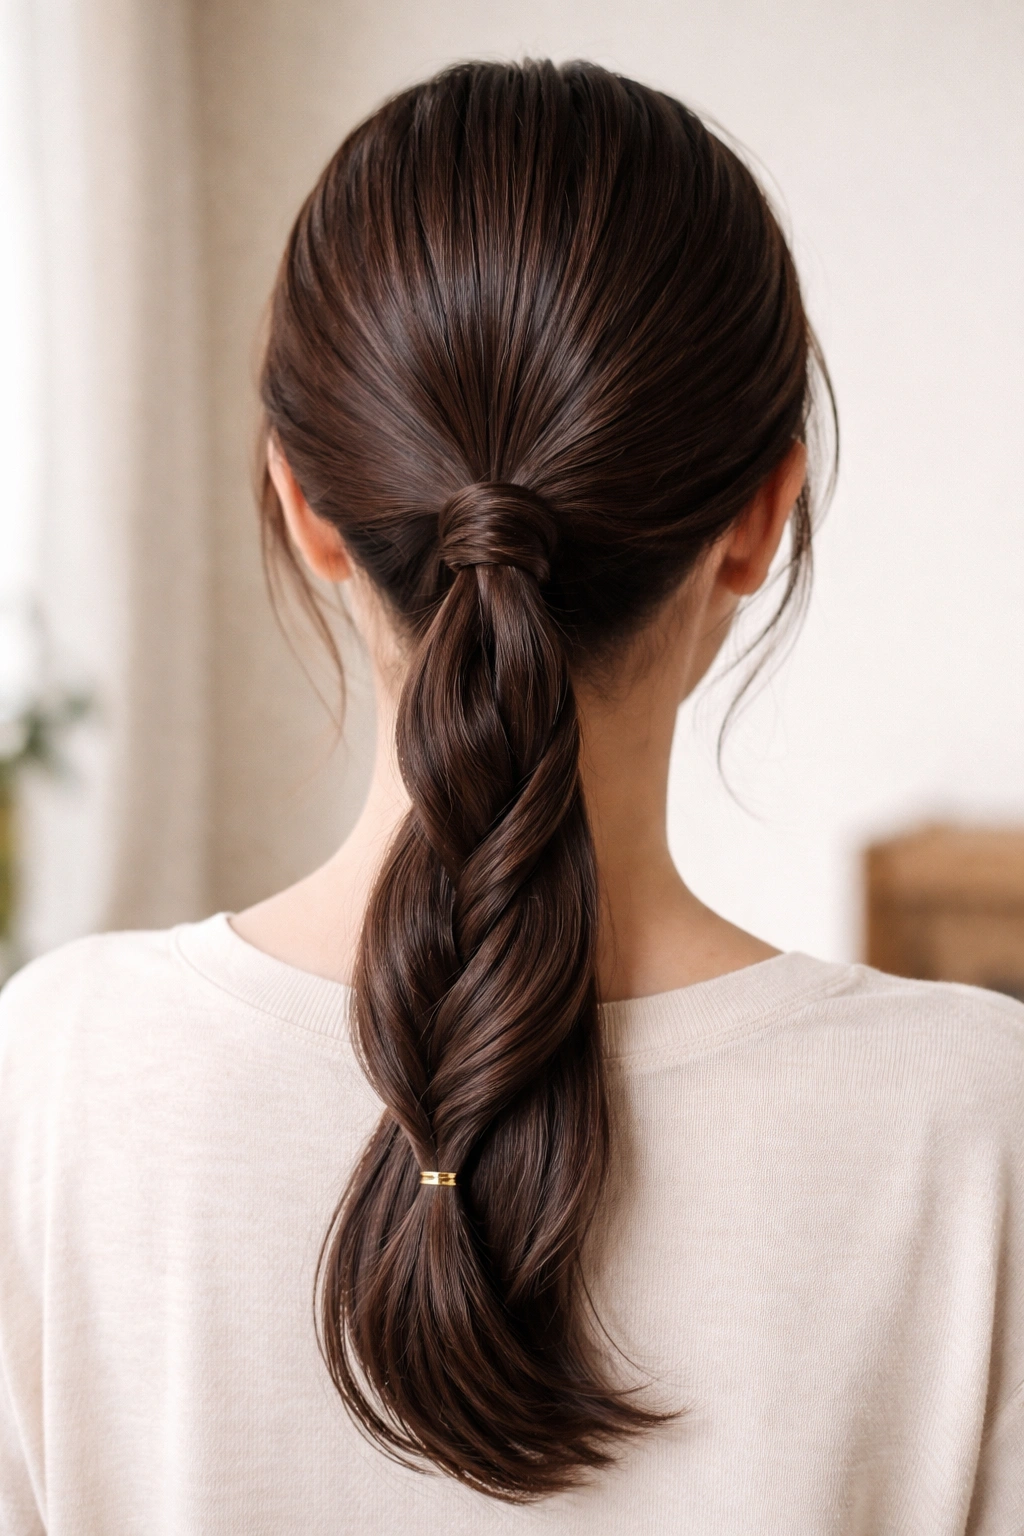

This style adds visual interest and a touch of intricacy without requiring braiding skills or spending extra time on your hair. The twisted rope low ponytail uses a simple twisting motion to gather the lower section of hair, creating defined spiral details that look intentional and polished. From the front, it reads as a sophisticated low ponytail, but the back reveals elegant rope twists that elevate it beyond basic.
Creating Clean, Defined Twists
Gather the lower section of hair loosely at the nape of your neck — don’t secure it yet. Divide this section into two equal parts. Take the right section and twist it away from your face (clockwise if you’re looking at the back of your head), then take the left section and twist it in the same direction. Cross the right twist over the left, then continue alternating this motion down the length of the ponytail, keeping the twists relatively tight and consistent. As you work, the two twists will naturally wrap around each other, creating a rope effect. Secure at the bottom with a hair tie, and gently pull the twists slightly outward to add dimension and make them more visible.
Pro Tips for Perfect Rope Twists
- Work with slightly damp or textured hair rather than freshly blow-dried smooth hair — the texture helps twists stay in place
- Keep your twists consistently tight throughout so the spiral pattern reads as intentional rather than loose and accidental
- Pull the finished twists gently outward after securing to add volume and make the detail visible
- Smooth any flyaways with a small amount of smoothing serum on a fine-tooth comb for a polished finish
- This style holds beautifully for 2-3 days if you sleep on a silk pillowcase and refresh with a light texture spray in the morning
Insider note: You can create a triple rope ponytail by dividing into three sections and twisting each before combining — this creates a more intricate look that’s still easier than braiding.
4. The Half-Gathered Low Tail with Face-Framing Pieces
This style sits at the intersection of a low ponytail and loose waves, offering the polished feel of a ponytail without the “all business” energy. By gathering only the lower half or lower two-thirds of your hair and intentionally leaving face-framing pieces loose, you create a style that looks soft, intentional, and works beautifully for both casual and dressier occasions. The loose pieces frame the face and add movement while the secured section keeps everything tidy.
Strategic Placement of Face-Framing Pieces
Begin by identifying which pieces you want to leave out — typically a section from each temple down to roughly your jawline, plus potentially a few pieces from the nape that you’ll release. Section off these pieces and secure them away temporarily. Gather the remaining hair into a low ponytail at the base of your neck or slightly lower. Release your face-framing sections and gently wave or curl them using a curling iron, working with 1-2 inch sections and leaving the ends out for a soft, undone finish. The waves add visual interest and softness that balances the structured ponytail.
Creating Intentional Softness
- Choose face-framing pieces that start just behind your temple and are roughly 1-1.5 inches wide for balanced proportions
- Wave or curl the loose pieces away from your face so they frame rather than cover
- Consider adding a very light layer of hair texture spray to the loose pieces so they hold their shape throughout the day
- Vary the wave pattern — some tighter, some looser — for an organic, undone look rather than uniform waves
- This style works beautifully if you skip one or two waves and leave the ends of the face-framing pieces straight for contrast
Quick note: If you have shorter face-framing pieces that don’t wave easily, that’s perfectly fine — straight, soft pieces create a modern, clean look that’s equally polished.
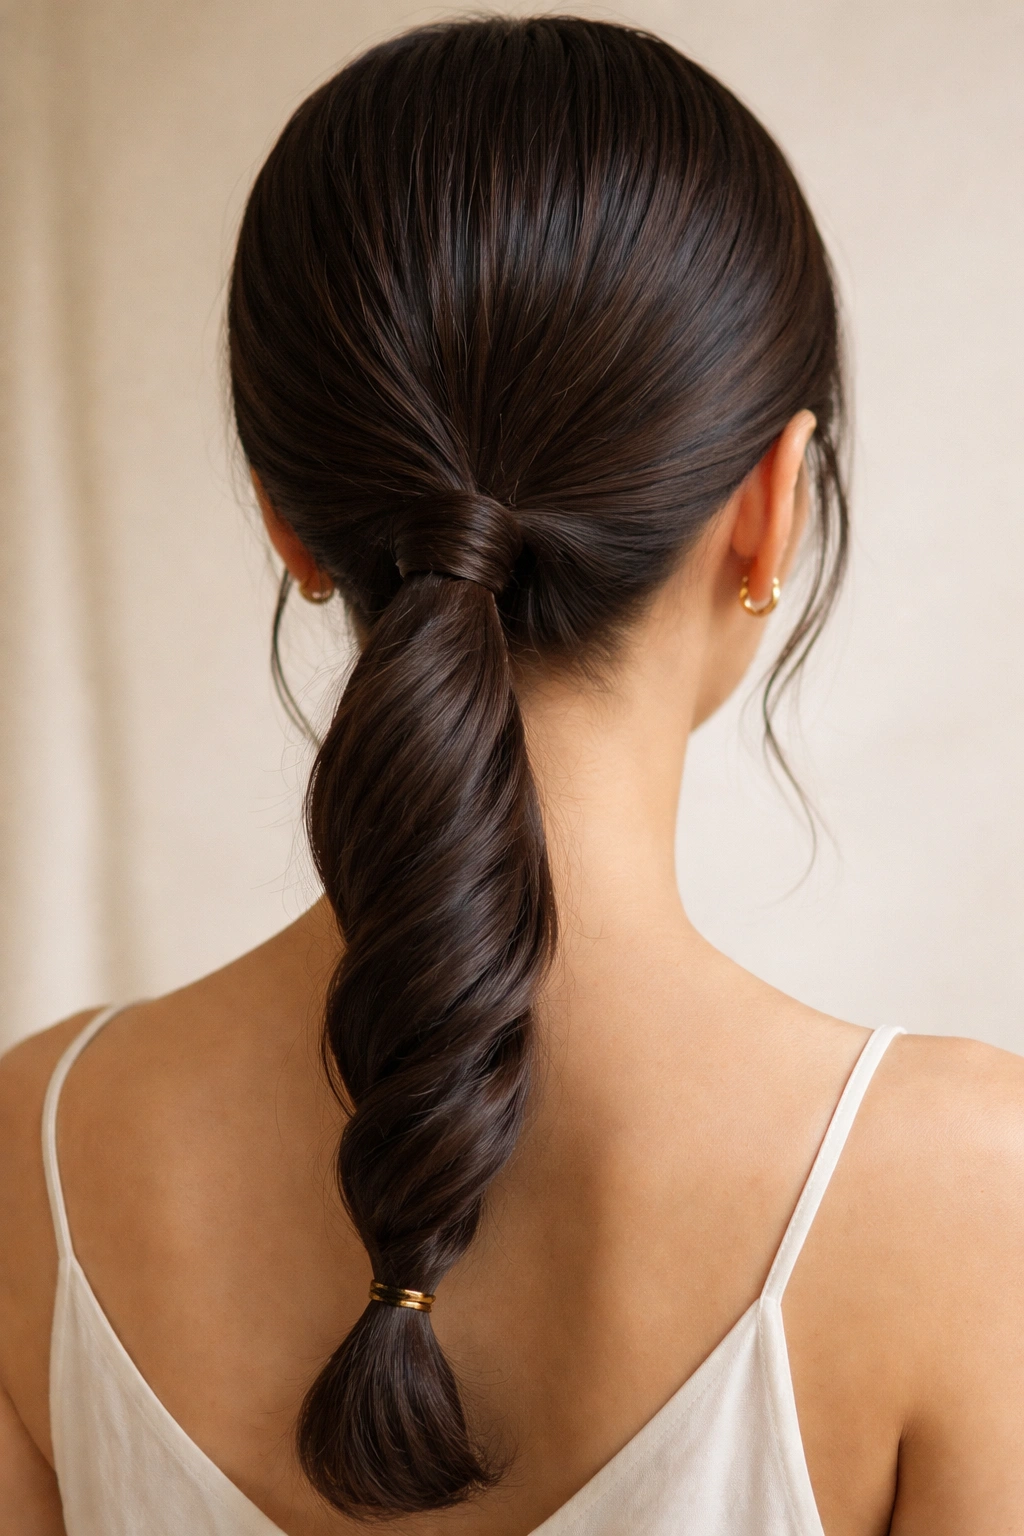
5. The Bubble Ponytail Low Variation
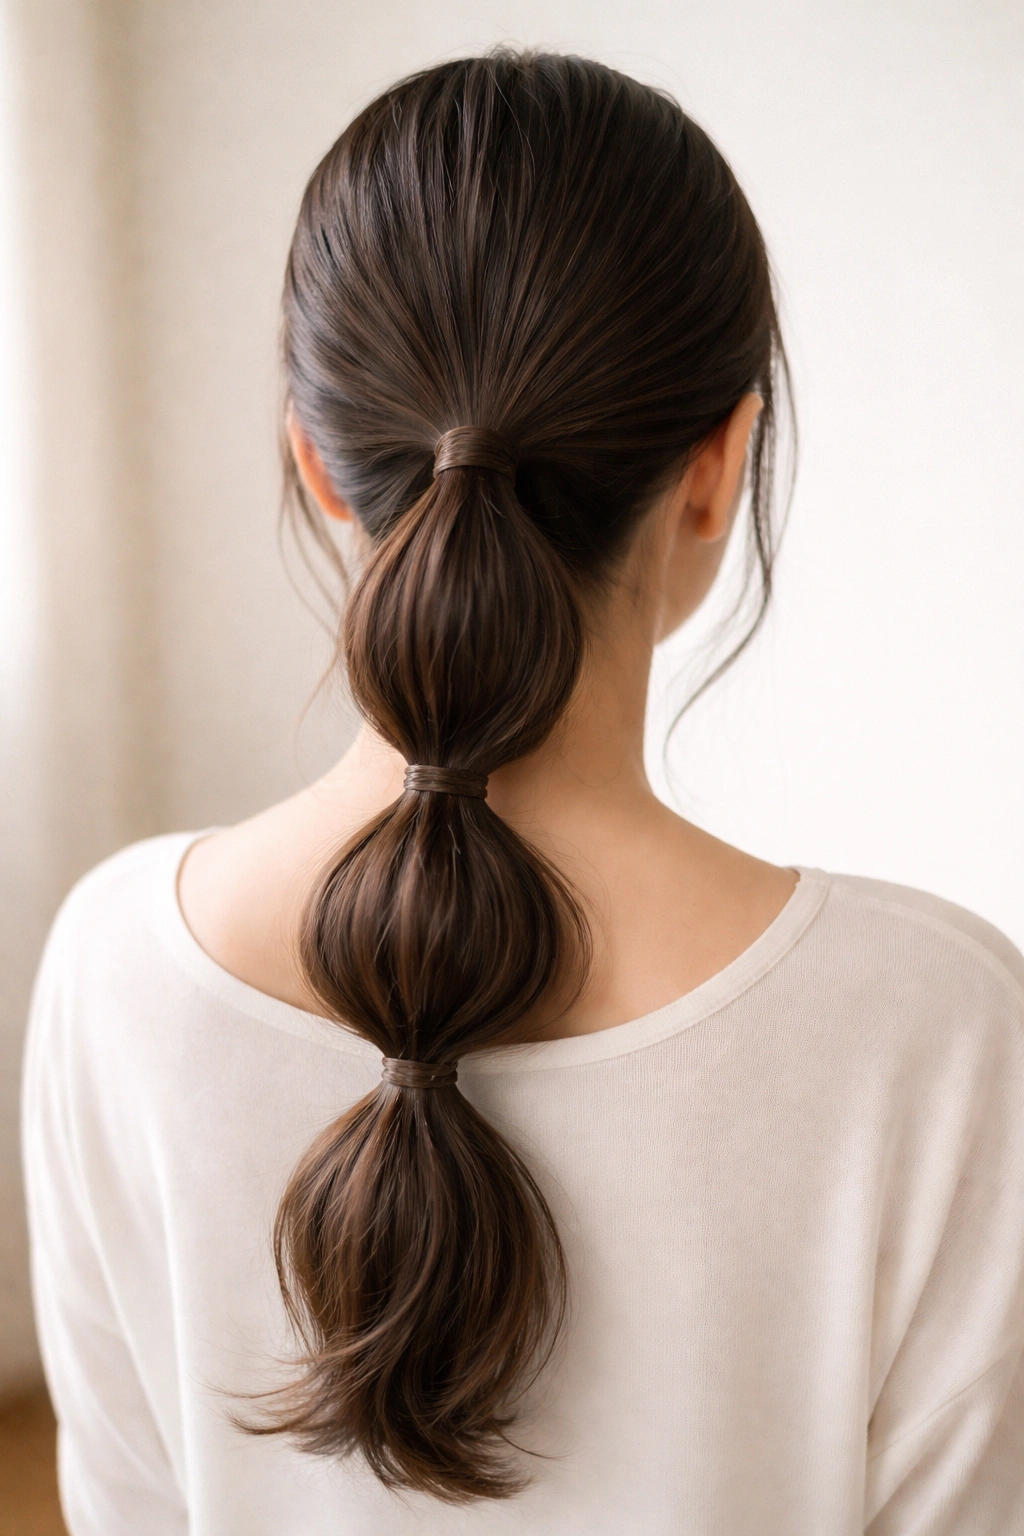
The bubble ponytail trend comes from Korea and combines multiple secure points along a gathered section to create distinct rounded sections that look playful yet sophisticated. The Korean take on this style uses smaller, more subtle bubbles along a low ponytail rather than the more exaggerated versions you might see elsewhere, resulting in something that reads as refined rather than dramatic.
Building Subtle Bubble Details
Start by creating a smooth base at the crown, then gather the lower section into a low ponytail secured with a hair tie. Now comes the technique that makes this work: place a second hair tie about 2-3 inches below the first, gather all the ponytail hair and secure it. Between these two ties, gently pull the hair outward horizontally to create a rounded “bubble” effect without making it look oversized or obvious. Repeat this process one or two more times down the ponytail, depending on length. Each bubble should be subtle — you’re not creating giant poofs, but rather gentle swells that add dimension and interest.
Making Bubbles Look Polished Rather Than Playful
- Use hair ties that match your hair color so the securing points are less visually obvious
- Create bubbles that gradually increase in size as you move down the ponytail for a more intentional, flattering effect
- Pull the bubbles gently rather than dramatically so they read as sophisticated texture rather than obvious styling
- Smooth the sections between bubbles with a fine-tooth comb to keep them sleek
- This style works best when the ponytail itself remains relatively smooth — the interest comes from the bubble structure, not from waves or texture throughout
Worth trying: If your hair is very thick or long, you might need five or even six securing points to keep the bubbles from falling flat throughout the day. Experiment with spacing until you find what works for your hair density.
6. The Sleek Bow-Accent Low Ponytail
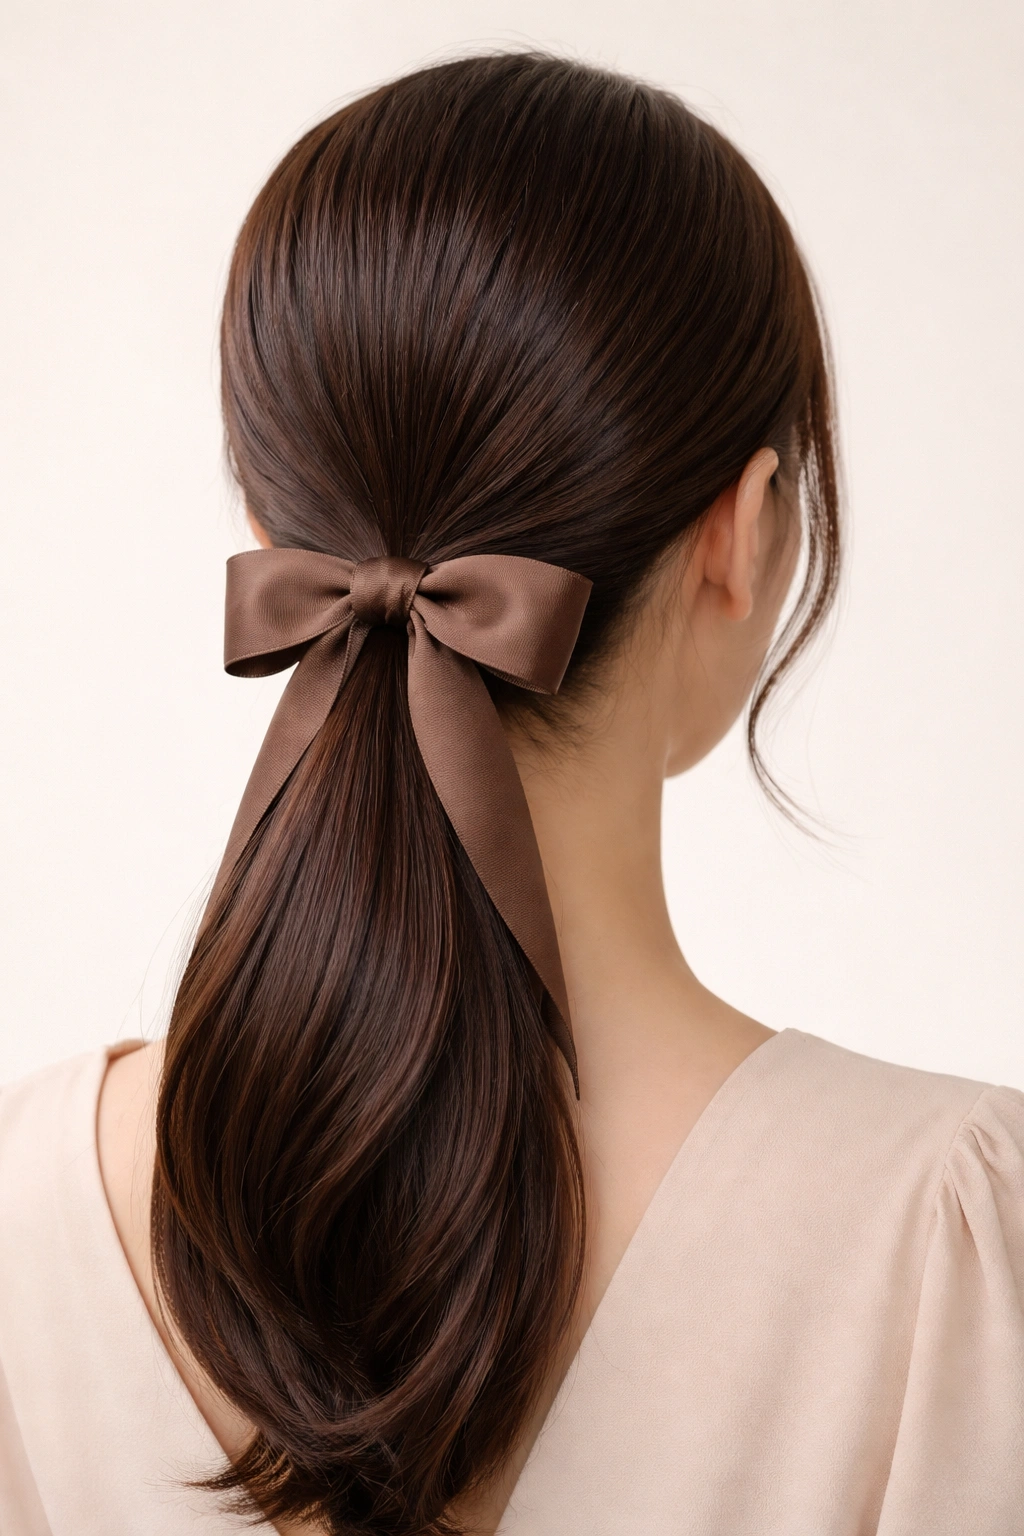
Korean beauty culture has embraced decorative hair accessories with sophistication and restraint, using them as intentional styling details rather than costume pieces. A sleek low ponytail paired with an elegant bow or ribbon accent transforms the style into something that reads as romantic and put-together. The key is choosing a bow that’s proportionate to your ponytail and positioning it in a way that feels integrated rather than attached as an afterthought.
Selecting and Positioning the Right Bow
Choose a bow or ribbon in a color that either matches your hair or complements your overall look — black, navy, blush, gold, or tortoiseshell all work beautifully with the minimalist Korean aesthetic. Secure your low ponytail first, then wrap the ribbon or bow around the hair tie, positioning it so that it sits at the very base of the ponytail where the hair tie is located. If you’re using a removable bow clip, secure it in the same spot. The bow should feel like a natural extension of the style, not obviously added on top. For extra polish, you can wrap a thin strand of hair around the base of the ponytail to conceal the hair tie before adding the bow.
Bow Styling Options
- Use a satin or velvet ribbon in a tone that coordinates with your outfit for a cohesive, intentional look
- For a more understated effect, choose a bow in the same color family as your hair
- Metallic gold or silver bows work beautifully if you want subtle shine and sophistication
- You can curl the loose ends of a ribbon bow slightly using a curling iron for added dimension
- Layer a small tortoiseshell or pearl-detailed hair clip directly on top of the bow for extra polish and visual interest
Pro tip: If you have fine or thin hair, position the bow slightly below the hair tie rather than directly at the base so it doesn’t weigh down the ponytail or make it look thinner.
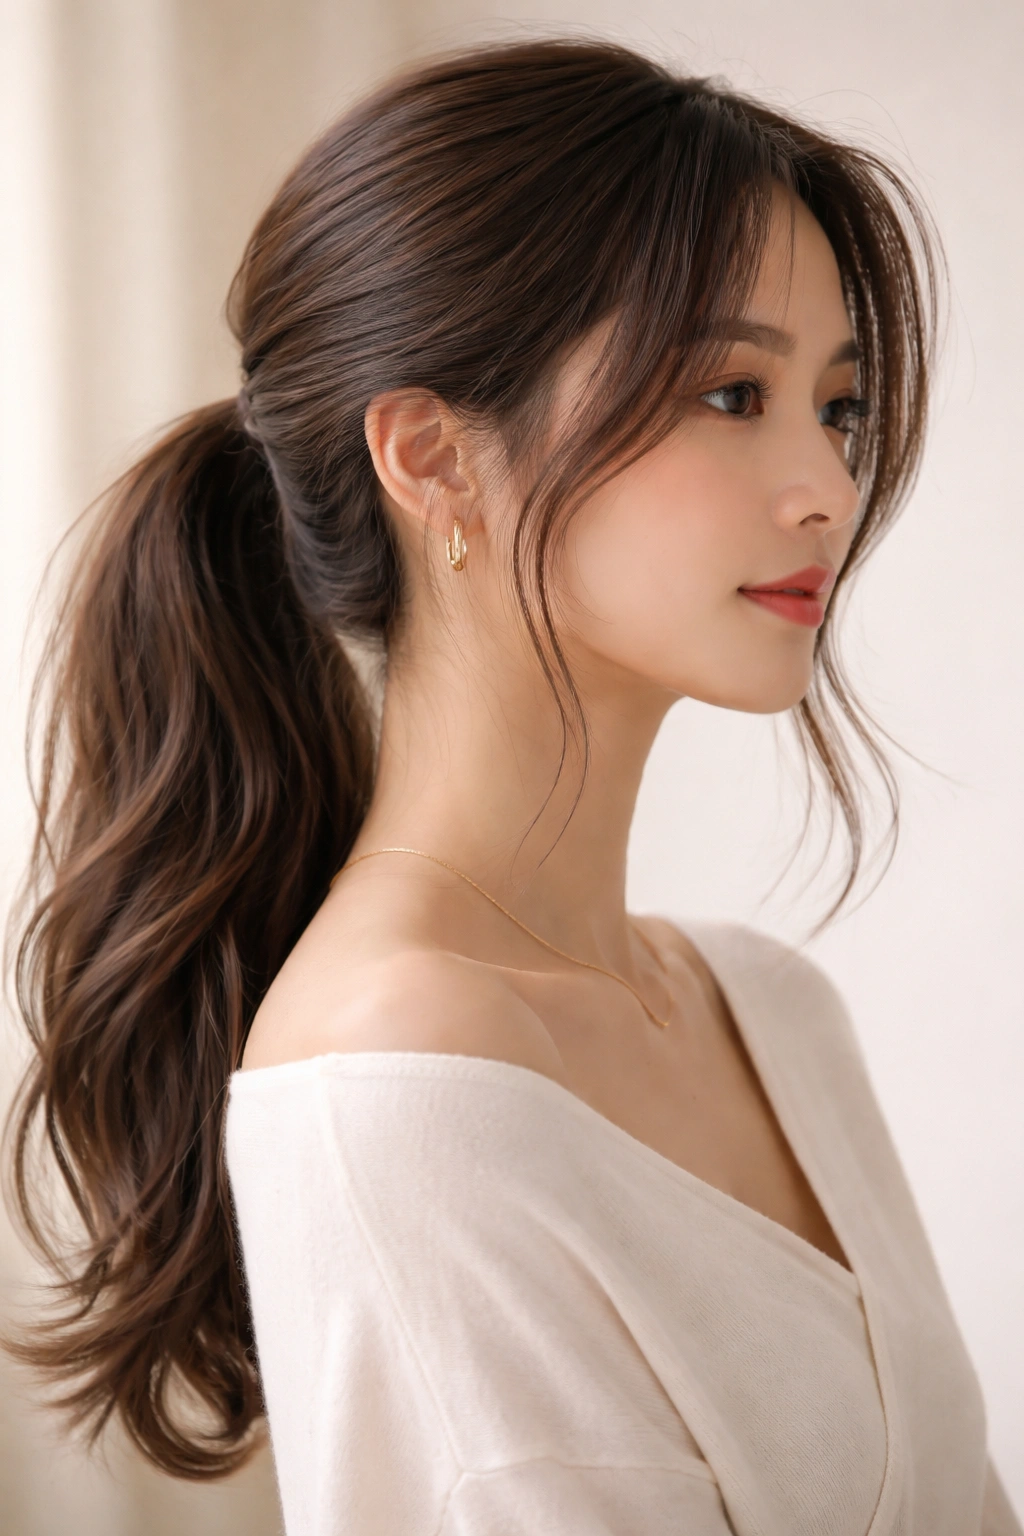
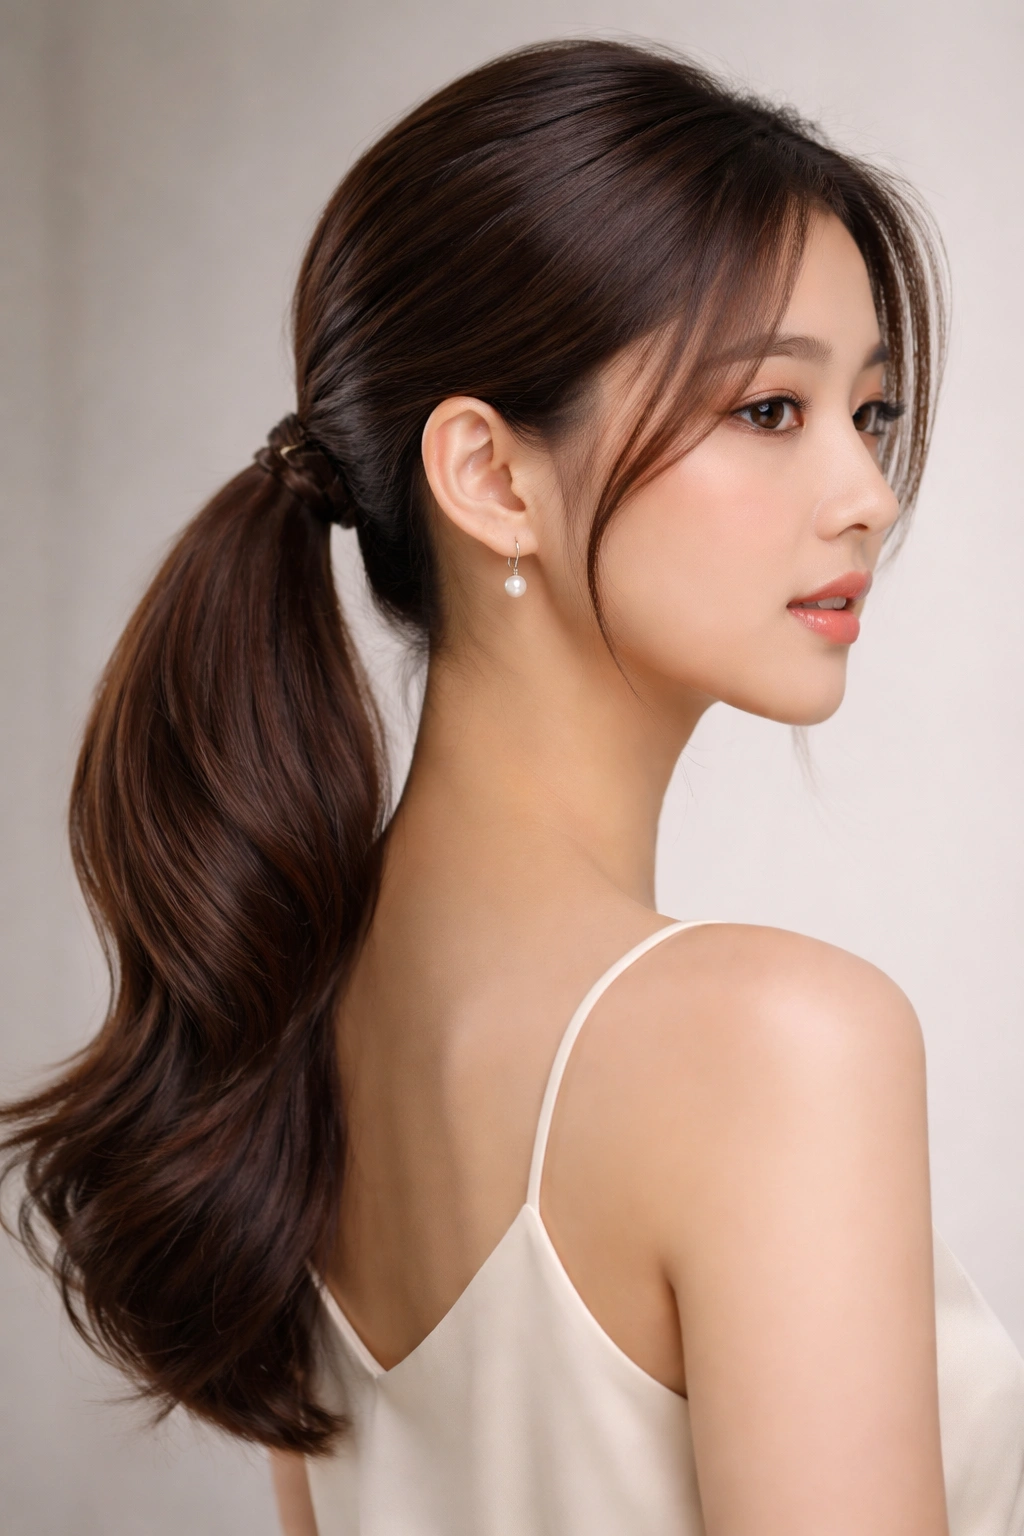
7. The Honey-Toned Layered Low Pony
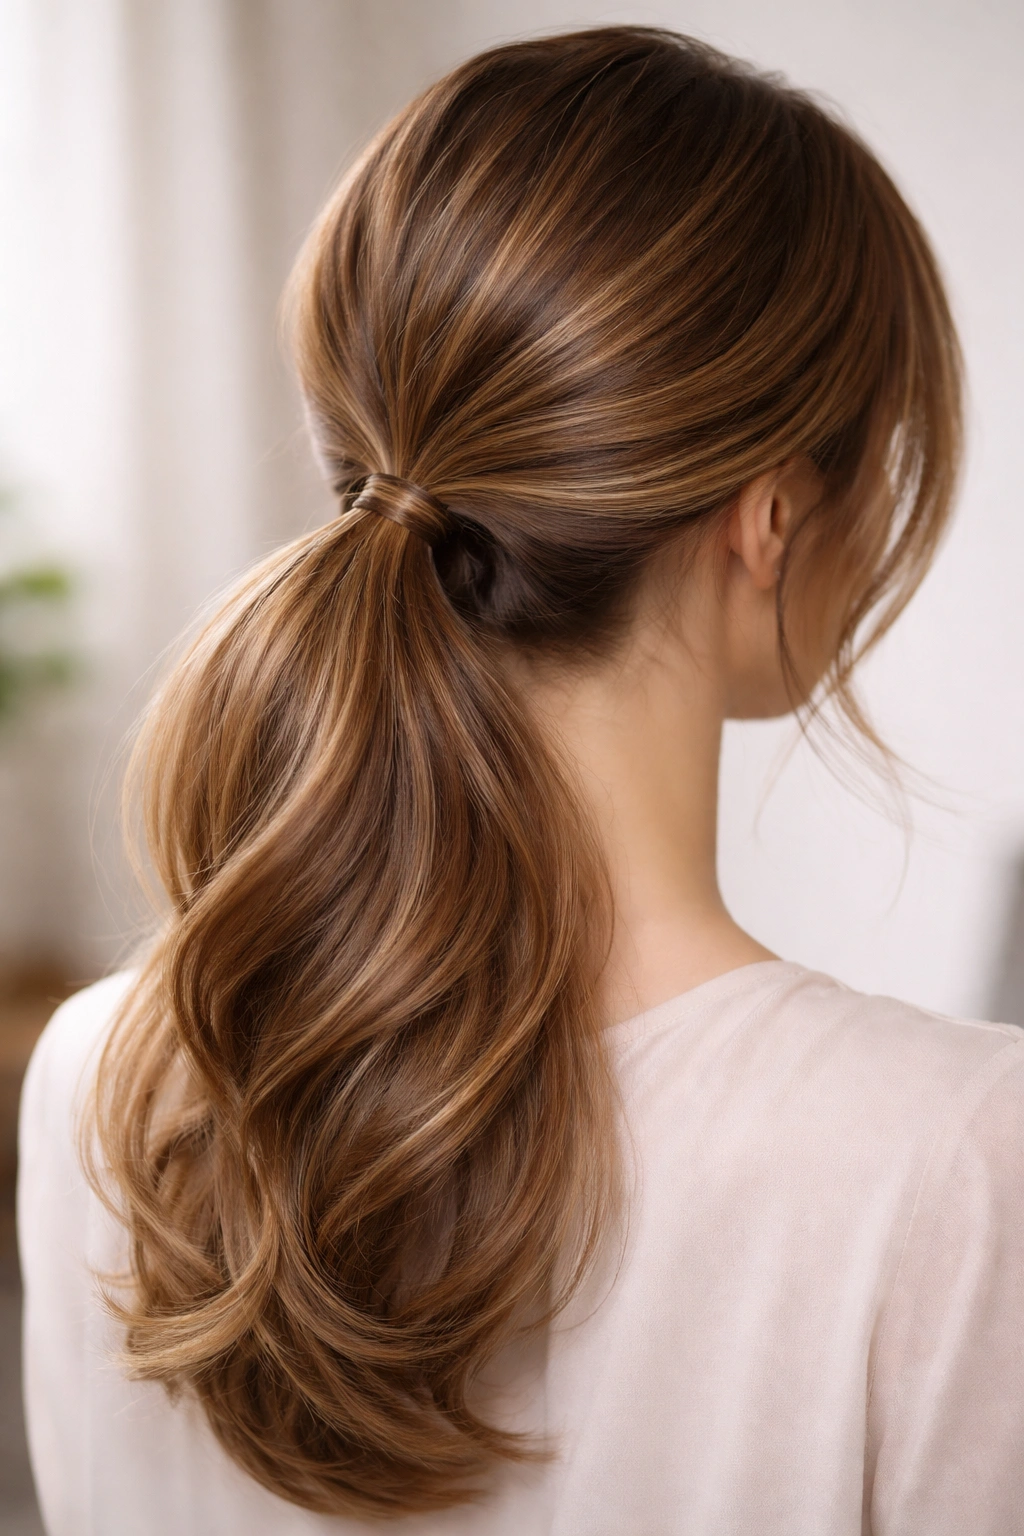
This style focuses on how color and dimension can transform a simple low ponytail into something that looks expensive and expertly styled. If you have naturally varied hair color or balayage highlights, this style showcases that dimension beautifully. The Korean approach emphasizes bringing out natural dimension through careful styling and product choices rather than heavy manipulation. Even if your hair is one solid color, creating the appearance of dimension through layering, texture, and light reflection makes the style feel more dynamic and interesting.
Enhancing Natural Dimension
Start with smooth, hydrated hair that’s been blow-dried with a paddle brush for shine. If you have highlights or natural color variation, apply a hydrating shine serum that will make those tones glow without adding weight. Gather into a sleek, smooth low ponytail positioned at the nape of your neck. To enhance dimension, use a very fine curling iron (around 0.5 inches) to create subtle waves throughout the ponytail, separating each wave as you work so they look intentional rather than uniform. The combination of varied color and soft wave texture makes the ponytail appear more textured and dynamic than it actually is.
Making Color Shine Through
- Apply shine products specifically designed for color-treated hair if you have highlights or balayage
- Use a concentrator nozzle when blow-drying to direct light down the hair shaft, which maximizes how dimension catches light
- Curl the ponytail in sections with a small-barrel curling iron, varying the direction slightly for organic-looking waves
- Separate and define each curl once it cools so waves are visible rather than blended together
- Use a light texture spray rather than heavy product to maintain shine while adding hold
Worth knowing: This style looks absolutely stunning with honey, caramel, or golden-toned highlights against darker roots, which is a classic Korean beauty color choice. The dimension is maximized when you have at least two distinctly different tones in your hair.
8. The Braided Lower Section Low Ponytail
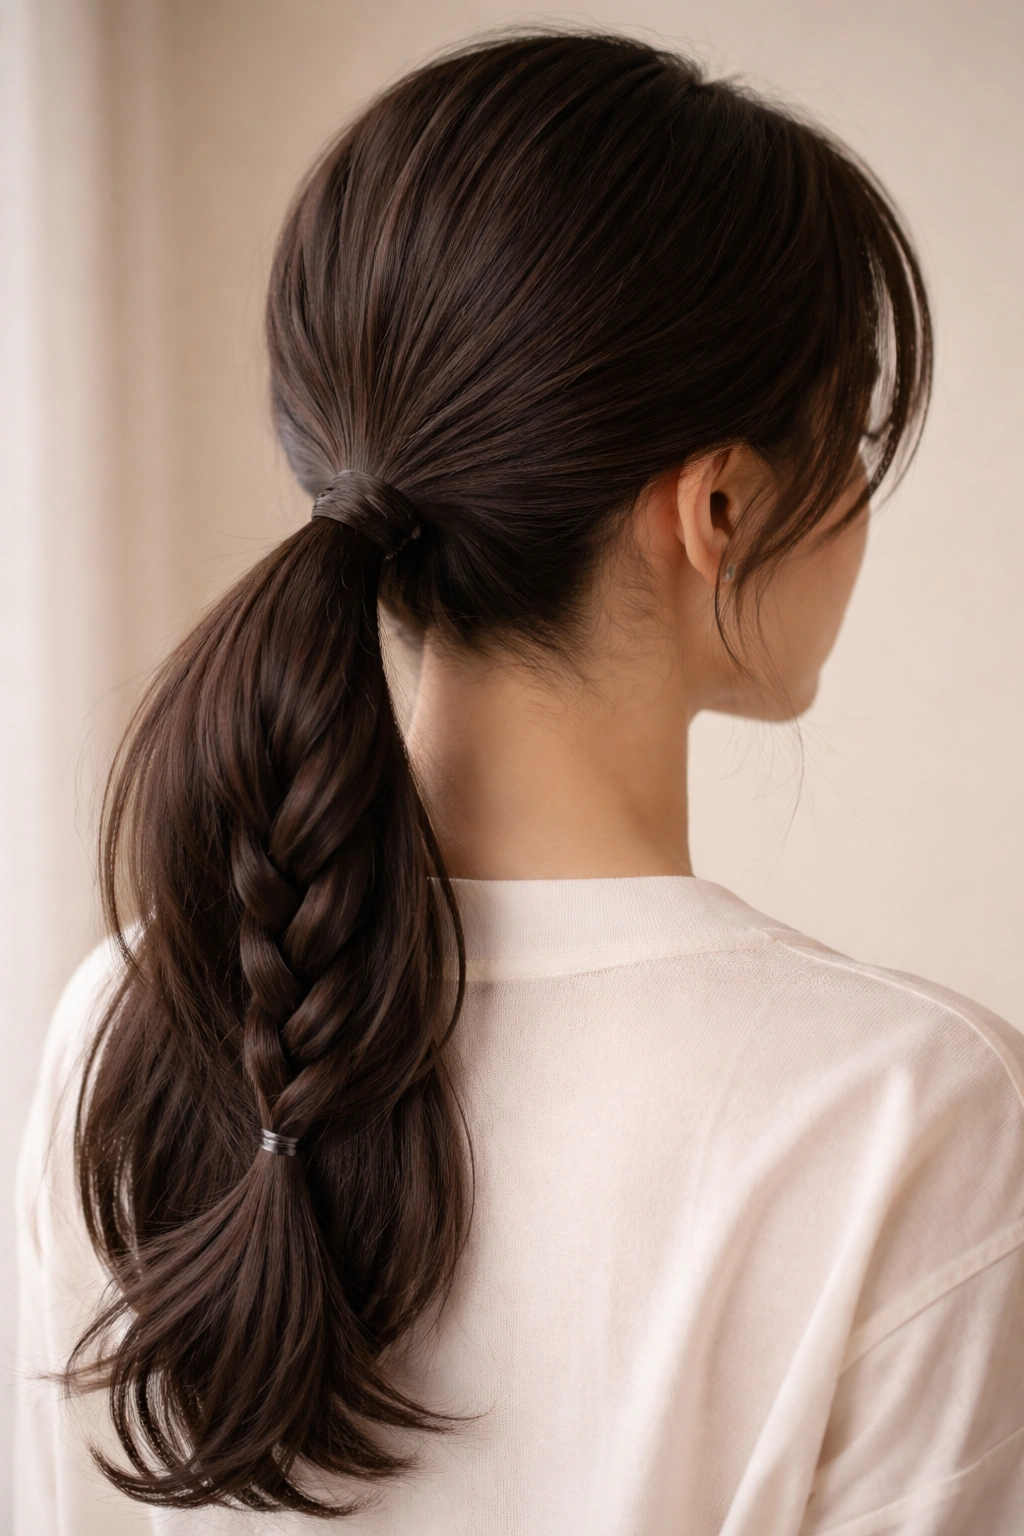
For a style that feels slightly more intricate without requiring advanced braiding skills, a braid tucked into the lower section of a low ponytail adds visual interest and polish. This works beautifully whether you can braid your own hair or prefer to have someone help you. The braid detail is visible from the back and side profile, making it perfect for occasions where your hair will be seen from multiple angles.
Incorporating a Braid into Your Low Pony
Gather the lower section of hair at the nape of your neck, but instead of immediately securing it with a hair tie, divide this lower section into three parts and create a simple three-strand braid. Work the braid down about halfway the length of the ponytail section, then secure the bottom of the braid with a small, thin hair tie. Continue the unbraided ponytail section below the braid and secure it all together with a final hair tie at the very bottom. This creates a hybrid style where the upper ponytail section features the braided detail while the lower section remains smooth.
Braid Variations for Different Occasions
- A simple three-strand braid works for casual, everyday wear and is the easiest to execute
- A French braid that starts from the base of the neck and works downward creates a more formal, intricate look
- Two thin braids created side-by-side add visual interest without looking heavy
- Gently pull the sides of a completed braid outward to add dimension and make the texture more prominent
- For a softer effect, braid slightly loosely and then gently tease each strand outward for a fuller, more romantic braid
Styling note: This works beautifully with face-framing pieces left loose — the braided ponytail feels less formal when soft waves frame the face, creating nice visual balance.
9. The Wrap-Around Accent Low Ponytail
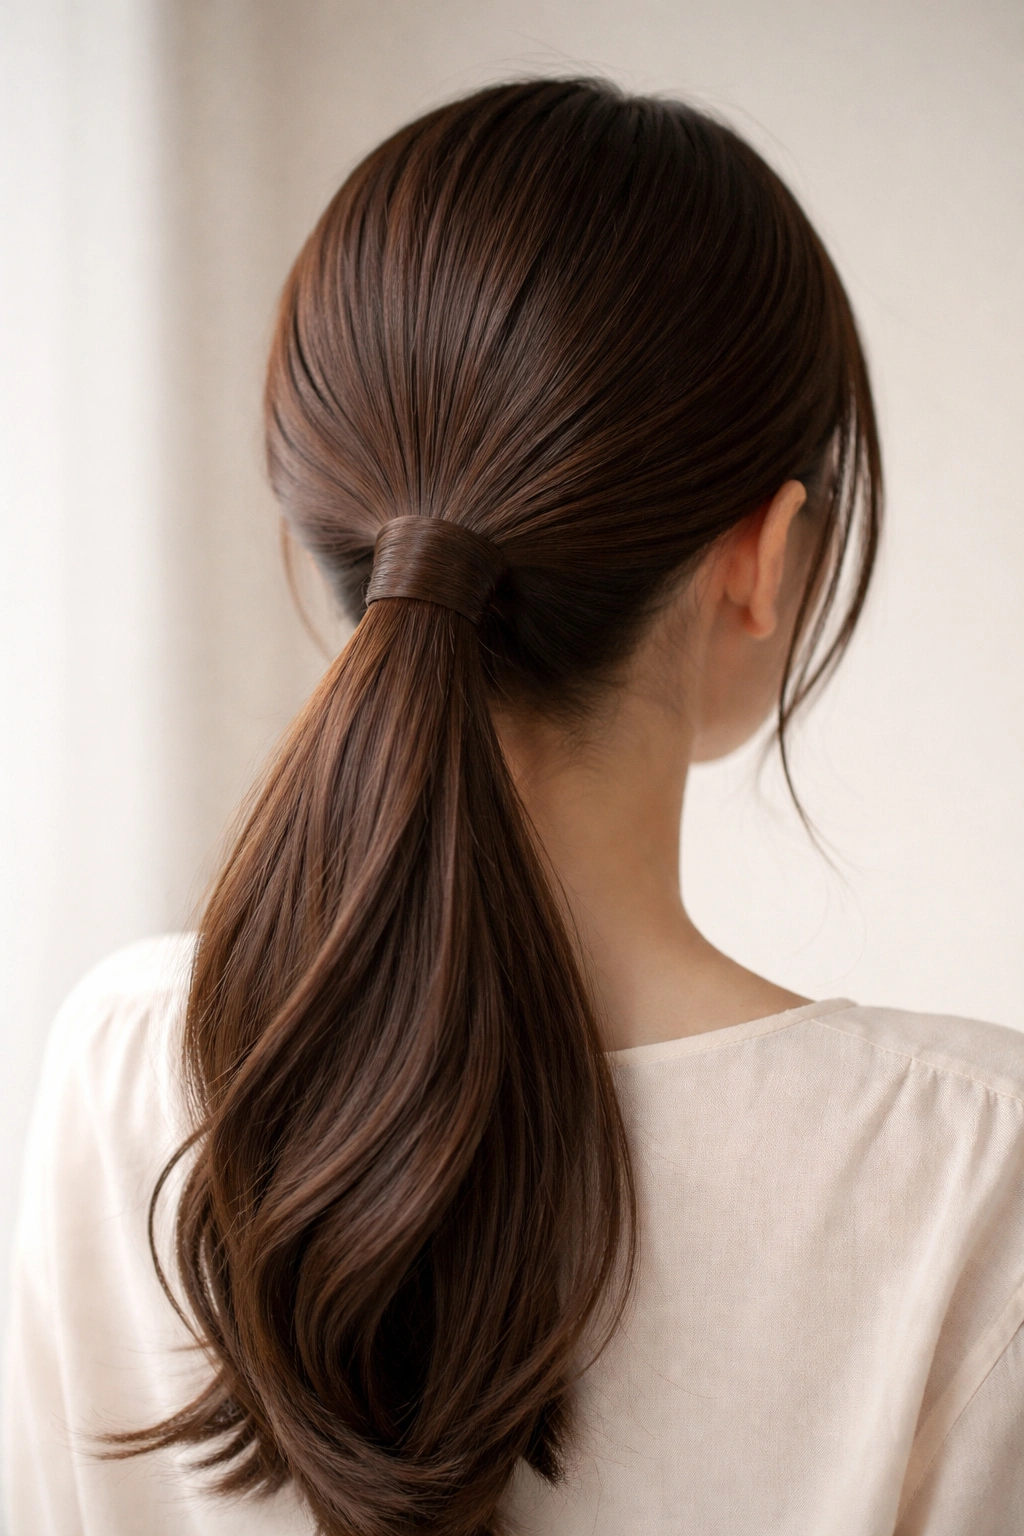
This style uses a thin section of hair from the crown area to wrap around the base of the ponytail, creating a detail that looks intentional and hides the hair tie completely. It’s a touch more involved than simply securing a ponytail, but the result is so polished that it’s worth the extra minute. The wrapped section adds dimension and visual interest while serving the practical purpose of concealing the securing mechanism entirely.
Creating a Flawless Wrap-Around Section
Gather your low ponytail as usual, but before securing it, take a thin 1-inch section of hair from the front of the crown area and secure it temporarily out of the way. Secure the main ponytail with a hair tie, then release the thin section you set aside. Bring this section around the outside of the hair tie, wrapping it once or twice around the base of the ponytail, then secure the end underneath the ponytail with a bobby pin that matches your hair color. The wrap completely conceals the hair tie and creates a polished, intentional-looking detail. For extra refinement, apply a tiny drop of smoothing serum to the wrapped section so it sits perfectly smooth.
Advanced Wrap Techniques
- For a more decorative effect, gently curl or wave the wrap-around section before securing it for added texture
- Use two thin sections from opposite sides of the head and wrap them around the base in opposite directions for a more elaborate look
- If you have shorter hair that won’t wrap around easily, use a thin decorative ribbon instead
- Ensure the bobby pin is completely hidden underneath the wrap for a seamless, polished appearance
- This technique works beautifully with the bubble ponytail — wrap the section after creating your bubbles for maximum polish
Pro tip: Tease the wrap-around section very slightly at the root before wrapping so it has enough grip to stay in place throughout the day without needing to pin it.
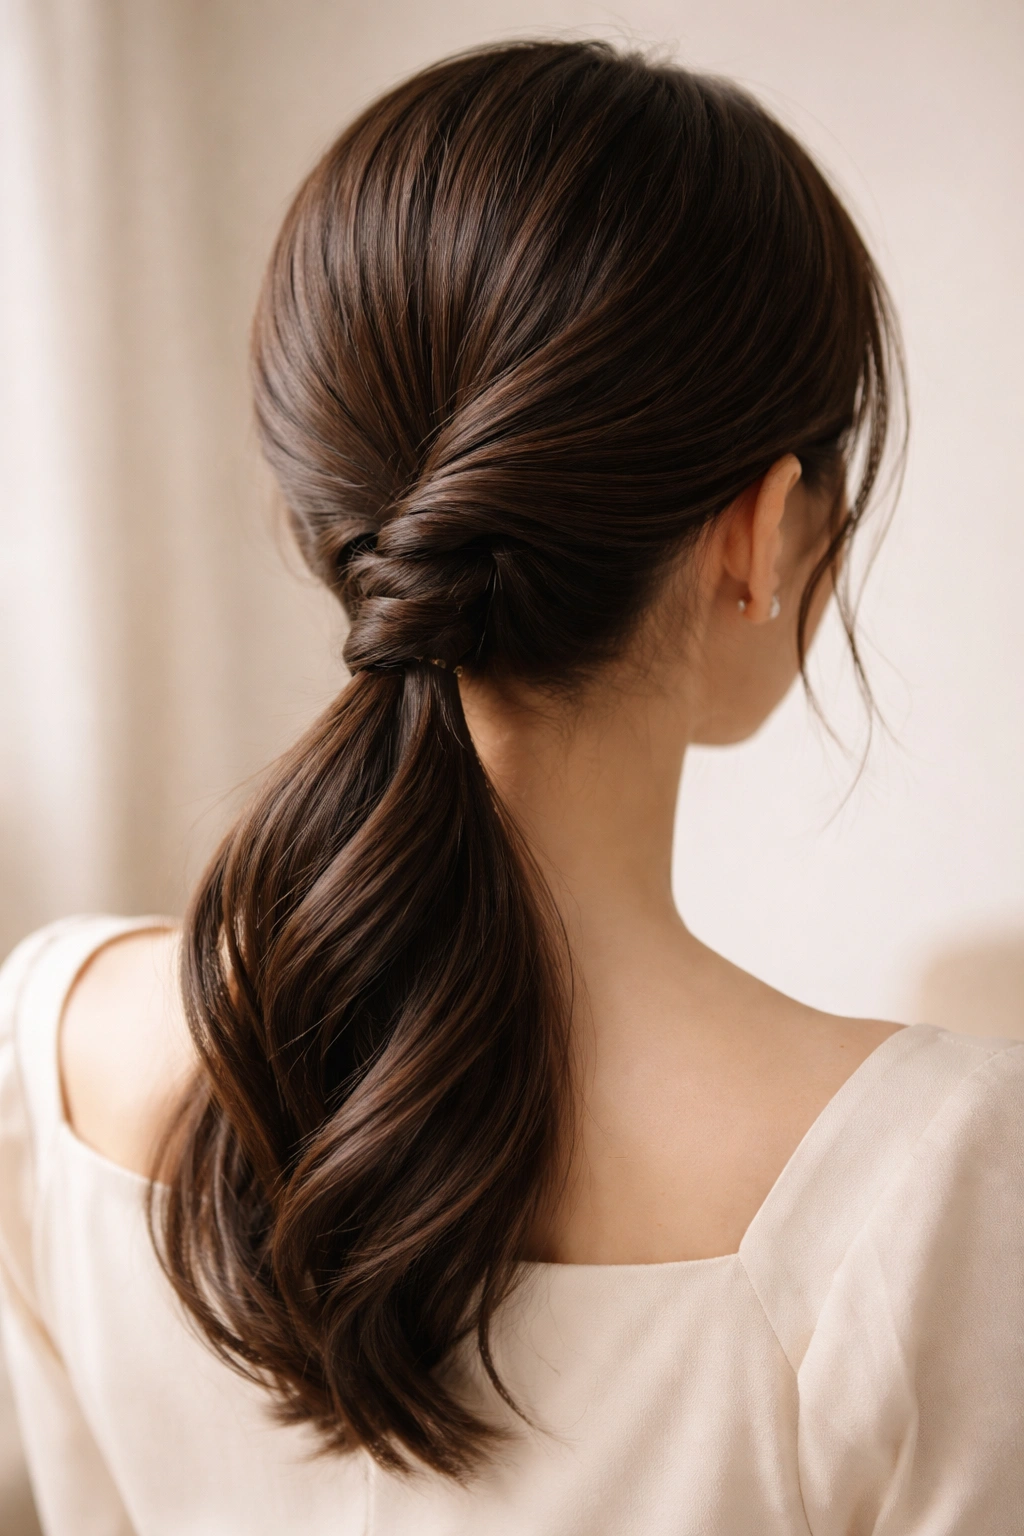
10. The Twisted Crown Low Ponytail
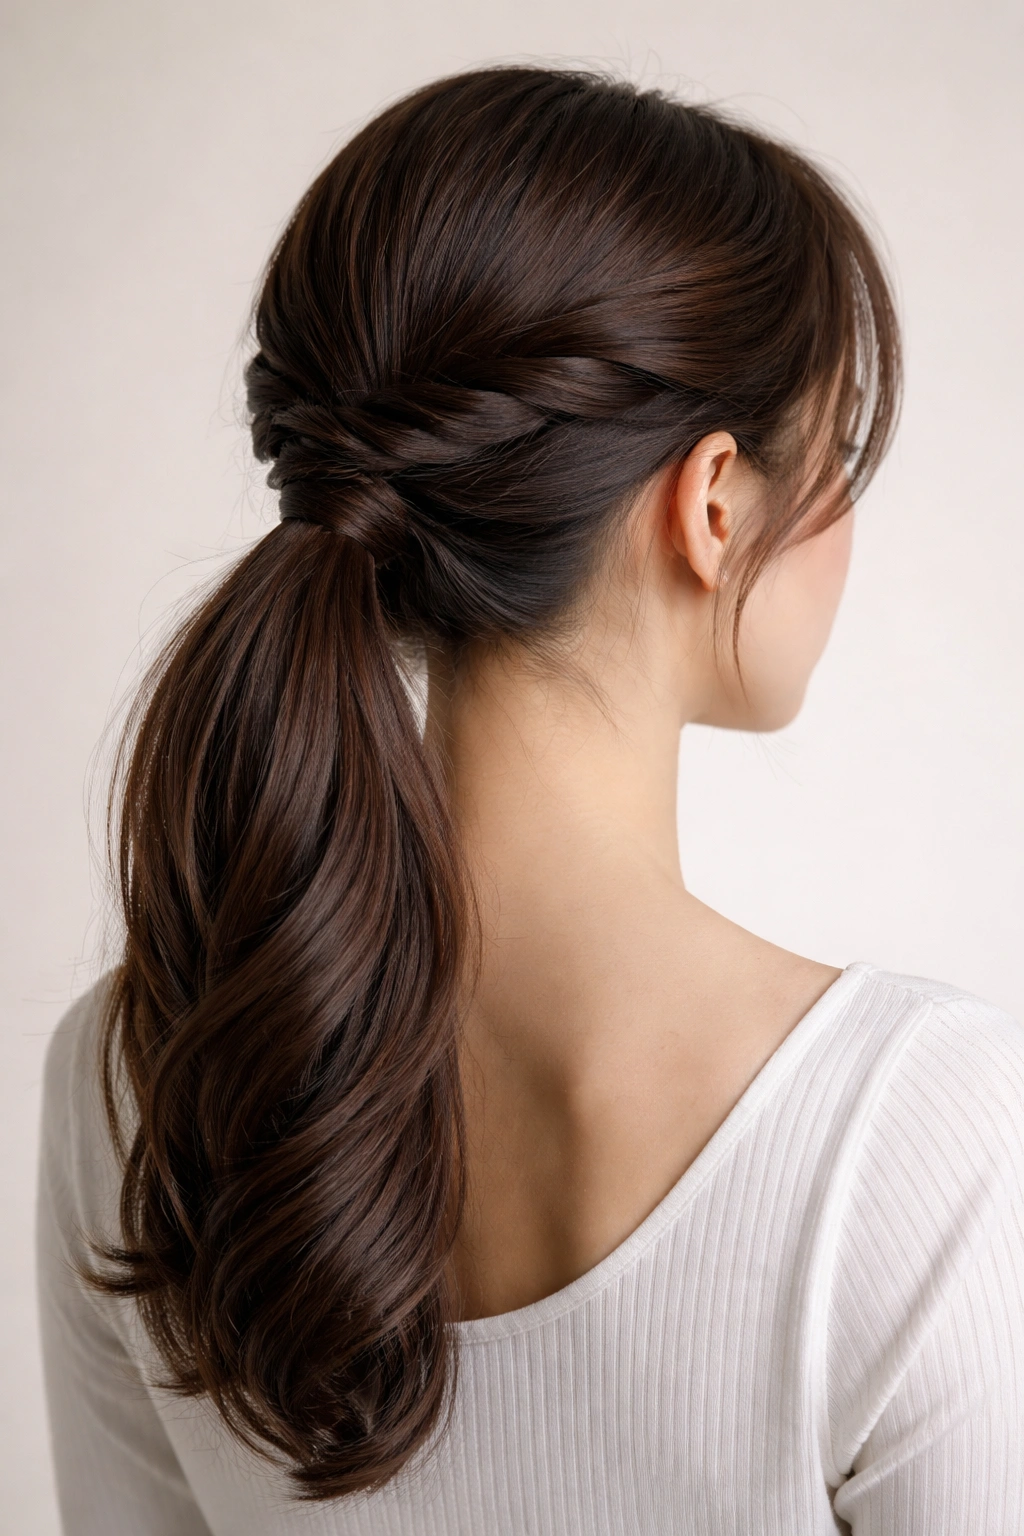
This style combines the polish of a low ponytail with the visual interest of crown detail, created through twisting rather than braiding. The twist starts at one side of the head, travels across the back of the crown, and feeds into the low ponytail at the nape. From the front, it reads as a stylish, polished low ponytail, but the back and side view reveals the sophisticated twisted crown detail.
Mapping Your Twisted Crown Path
Start on one side of your head (let’s say the right side) at roughly temple level. Take a 1-inch section of hair and begin twisting it away from your face, moving backward along the side of your head toward the back. As you move, gather additional hair into the twist, incorporating strands as you go (similar to a French braid, but with twisting rather than braiding). Twist across the back of the head, then at the opposite side (left side), continue the twist down toward the nape of your neck. Release the twist at the nape and incorporate the entire twisted section into your low ponytail. Secure everything together with a hair tie.
Making the Crown Twist Prominent
- Twist consistently and fairly firmly so the spiral pattern is clearly visible from behind
- Once you’ve secured the ponytail, gently pull the twisted sections outward to add volume and make the detail more pronounced
- Smooth any flyaways with a fine-tooth comb and a light smoothing serum for a polished finish
- Curl or wave the loose ponytail section to contrast with the sleekness of the twisted crown
- This style works beautifully with subtle color — the dimension created by the twist structure makes even a solid hair color look more dynamic
Worth noting: This style takes a bit of practice, so don’t worry if your first attempt isn’t perfect. Once you understand the concept of incorporating hair as you twist around the crown, it becomes much easier and faster.
11. The Romantic Textured Low Tail with Pearl Clip
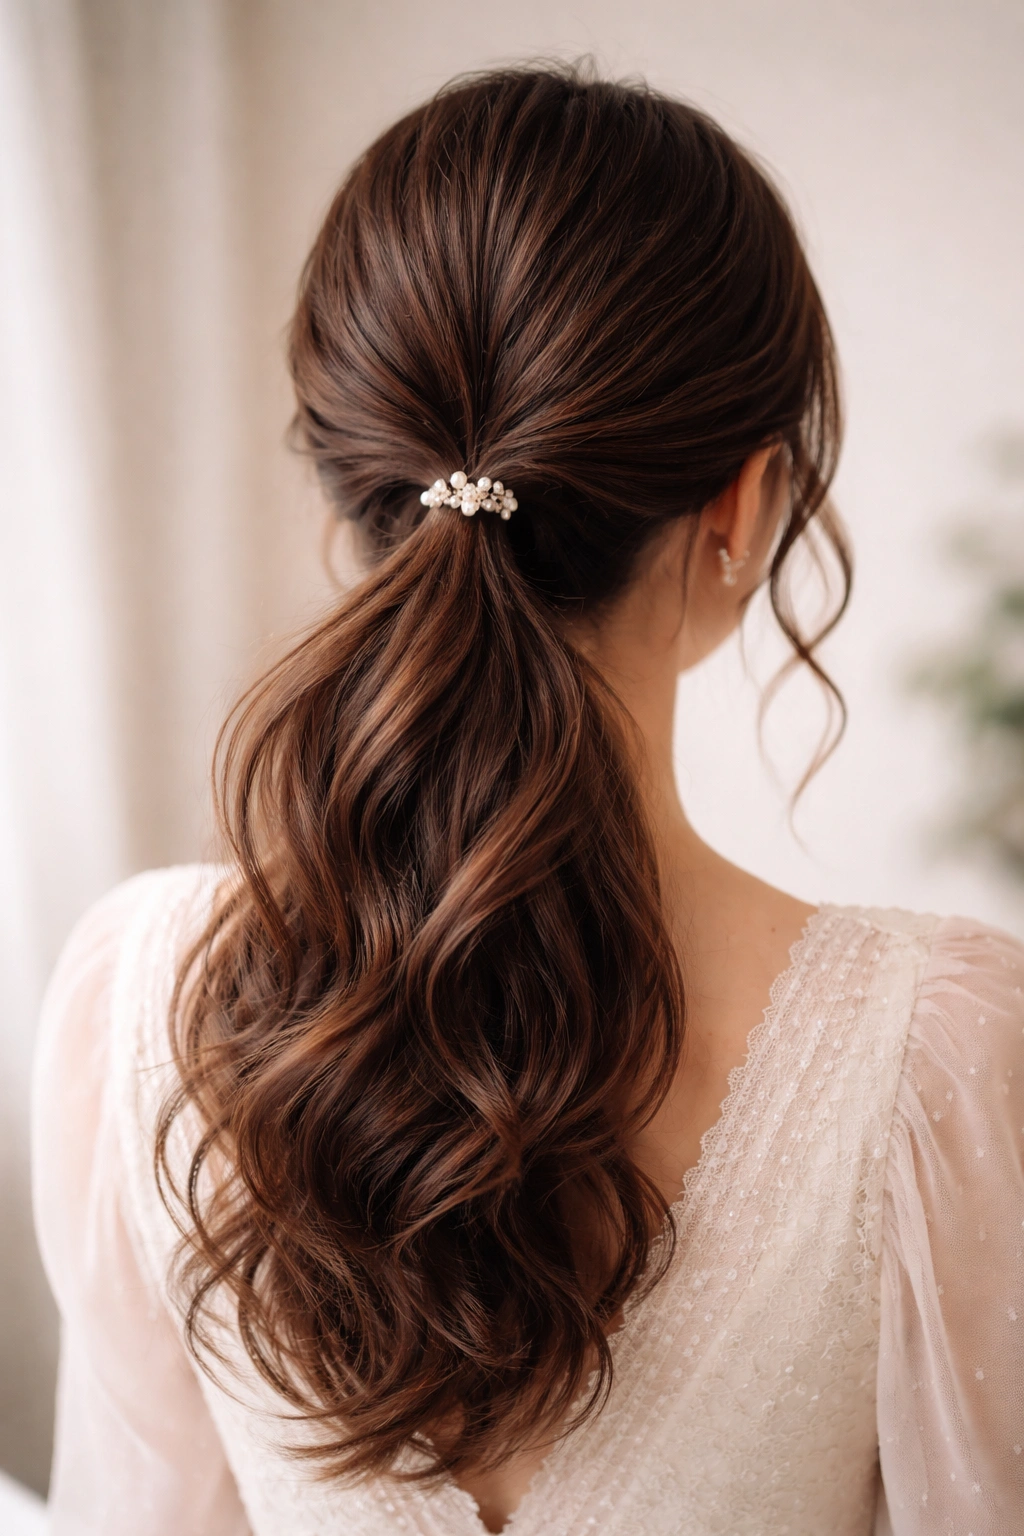
For occasions that call for a bit more refinement and elegance, this style combines soft texture throughout the ponytail with a delicate pearl or jeweled hair clip as an accent. The texture is created through loose waves and gentle curling, while the clip adds just enough embellishment to signal that this is a styled look without appearing costume-like. It’s the Korean interpretation of “quiet luxury” applied to hairstyling.
Building Soft, Intentional Texture
Blow-dry your hair smooth as a base, then take a 1-1.5 inch curling iron and create loose waves throughout your hair, working in sections and leaving the ends of each section out for a soft, undone finish. Vary the tightness of the curls — some tighter, some looser — so the waves don’t read as uniform or overly styled. Once all the waves are complete, gently run your fingers through your hair to separate and soften the curls. Gather the lower section into a low ponytail and secure with a hair tie. Position a delicate pearl or jeweled hair clip at the base of the ponytail to add polish and subtle sparkle.
Selecting and Positioning Hair Accessories
- Choose a clip in gold, silver, or pearl tones that coordinate with your overall aesthetic
- Opt for clips with fewer, larger pearls or stones rather than dense, heavy jewelry for a refined look
- Position the clip so it catches light from the side profile while not appearing to be struggling under the weight of hair
- If your clip feels heavy, secure it with a bobby pin hidden underneath for added security
- Matte gold or antique brass clips feel more sophisticated than shiny, bright metallics
Beautiful addition: You can wear this style with or without the clip depending on the occasion — the soft texture alone is beautiful for casual days, and the clip elevates it for events.
12. The Sleek Center-Part Low Ponytail
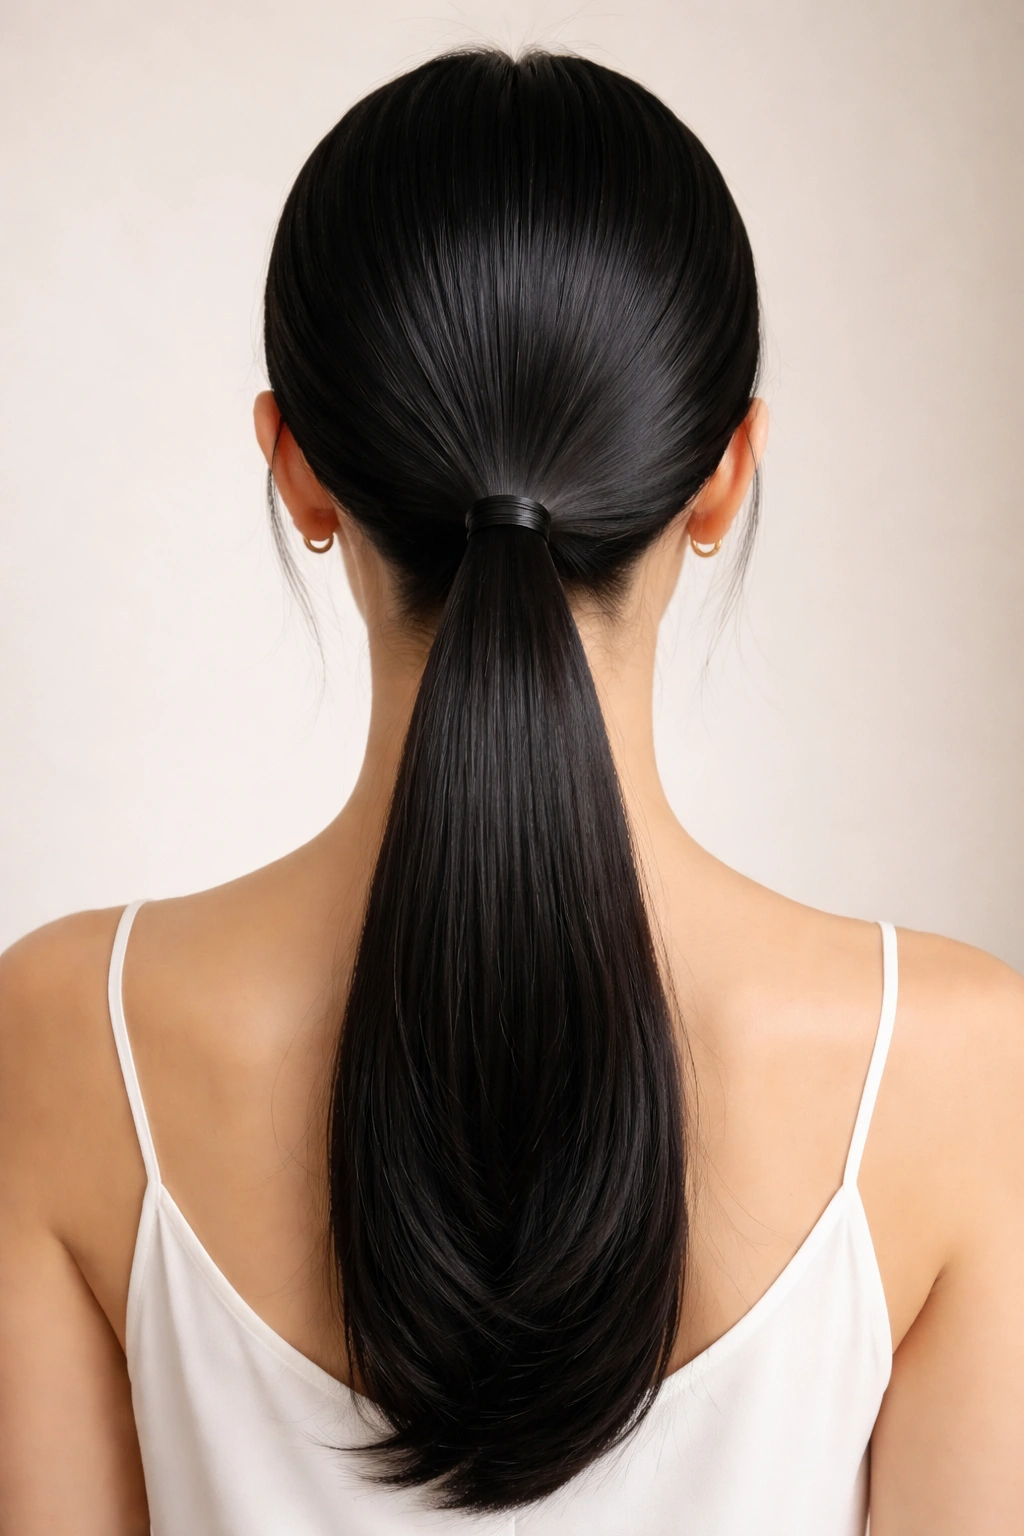
This final style returns to simplicity but with a specific focus on one detail that makes an enormous difference: the center part. A perfectly executed center part paired with a very sleek low ponytail creates an incredibly polished, modern look that’s somehow both minimal and striking. The symmetry of the center part frames the face beautifully and creates an intentional, put-together appearance.
Creating a Flawless Center Part
Blow-dry your hair completely smooth using a paddle brush and concentrator nozzle. Using a fine-tooth comb or the tail of a rattail comb, create a perfectly straight center part from your hairline to the nape of your neck. Take your time with this step — the straighter and more precise your part, the more polished the overall effect. Apply a light smoothing serum to your hair, focusing on taming any flyaways or frizz along the part line and throughout the lengths. Gather the hair at the base of your neck into a very sleek, smooth low ponytail using a hair tie that matches your hair color.
Perfecting the Center-Part Foundation
- Use a spray bottle with a tiny bit of water to help guide a perfectly straight center part
- Apply smoothing serum to your fingers and gently run them along the part line to ensure it’s smooth and frizz-free
- Blow-dry the part one final time with a concentrator nozzle to ensure it stays perfectly straight
- Secure the ponytail tightly enough to look polished but not so tight that you create tension or a headache
- Smooth any flyaways at the hairline and around the face using a fine-tooth comb and clear gel
Final touch: For maximum polish, use a clear gel or lightweight smoothing serum along the hairline and the part line, which keeps everything in place throughout the day. The sleekness amplifies the sophistication of this simple style.
Final Thoughts
Korean low ponytails succeed because they balance two seemingly opposite qualities: they’re simultaneously simple and detailed, polished yet approachable, refined but never severe. The best style for you depends on your hair texture, length, the occasion, and what makes you feel most confident. Many of these styles can be mixed and matched — you might combine the glossy sleek base with twisted sections, or pair the soft cloud effect with a wrap-around accent and bow detail.
What’s truly beautiful about the Korean approach to hair styling is the emphasis on working with your hair rather than against it and on making intentional choices that serve you. Whether you choose a style that’s all about shine and smoothness or one that embraces texture and movement, the goal remains the same: a low ponytail that makes you feel polished, put-together, and genuinely yourself.
The techniques covered here require no special tools or advanced skills — just patience, practice, and a willingness to spend a few extra minutes on styling details that elevate your overall appearance. Start with whichever style resonates most with your aesthetic, then experiment with variations once you’ve mastered the basics. Your low ponytail has far more potential than you might have realized, and with these Korean-inspired techniques in your styling toolkit, you’ll have options for any occasion and any mood.