The combination of pearls and ponytails represents one of the most elegant, versatile trends in modern hairstyling. Pearls add instant sophistication to any ponytail, transforming a casual everyday style into something that works equally well at a formal event or a polished weekend brunch. Whether you’re drawn to delicate, understated details or bold, statement-making pearl placements, this styling choice works across hair textures, face shapes, and personal aesthetics.
What makes pearl-adorned ponytails so appealing is their flexibility. Pearls photograph beautifully for social events and special occasions, but they’re equally at home in everyday styling when you want to elevate your look without overhauling your entire routine. The soft luster of pearls catches light differently than metal hair accessories, creating a warm, refined quality that feels both classic and contemporary. From simple pearl hair clips to intricately woven pearl strands threaded through your ponytail, the options let you express your personal style while keeping your hair neatly styled and off your face.
Pearl ponytails work across virtually every hair type and length. Fine hair benefits from the visual interest that pearls add, while thick hair can showcase elaborate pearl placements and weaving. The key is choosing the right pearl accessory and ponytail technique for your hair texture and the overall look you’re aiming for. Each variation brings different levels of elegance, ease of execution, and real-world wearability.
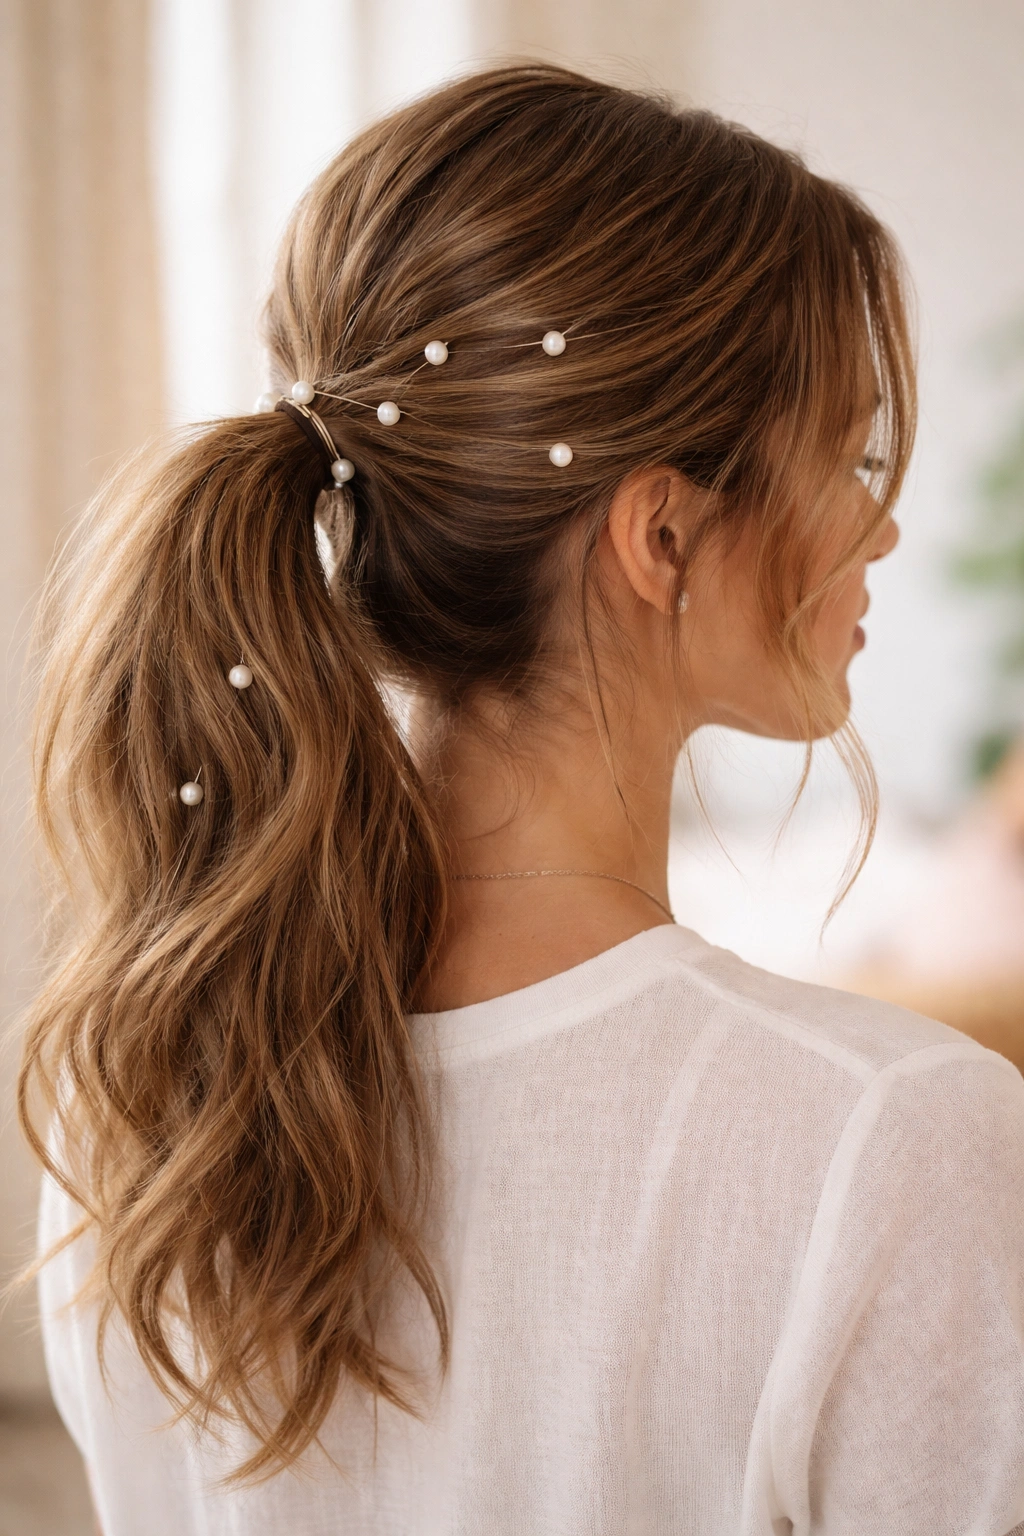
1. Pearl-Wrapped High Ponytail
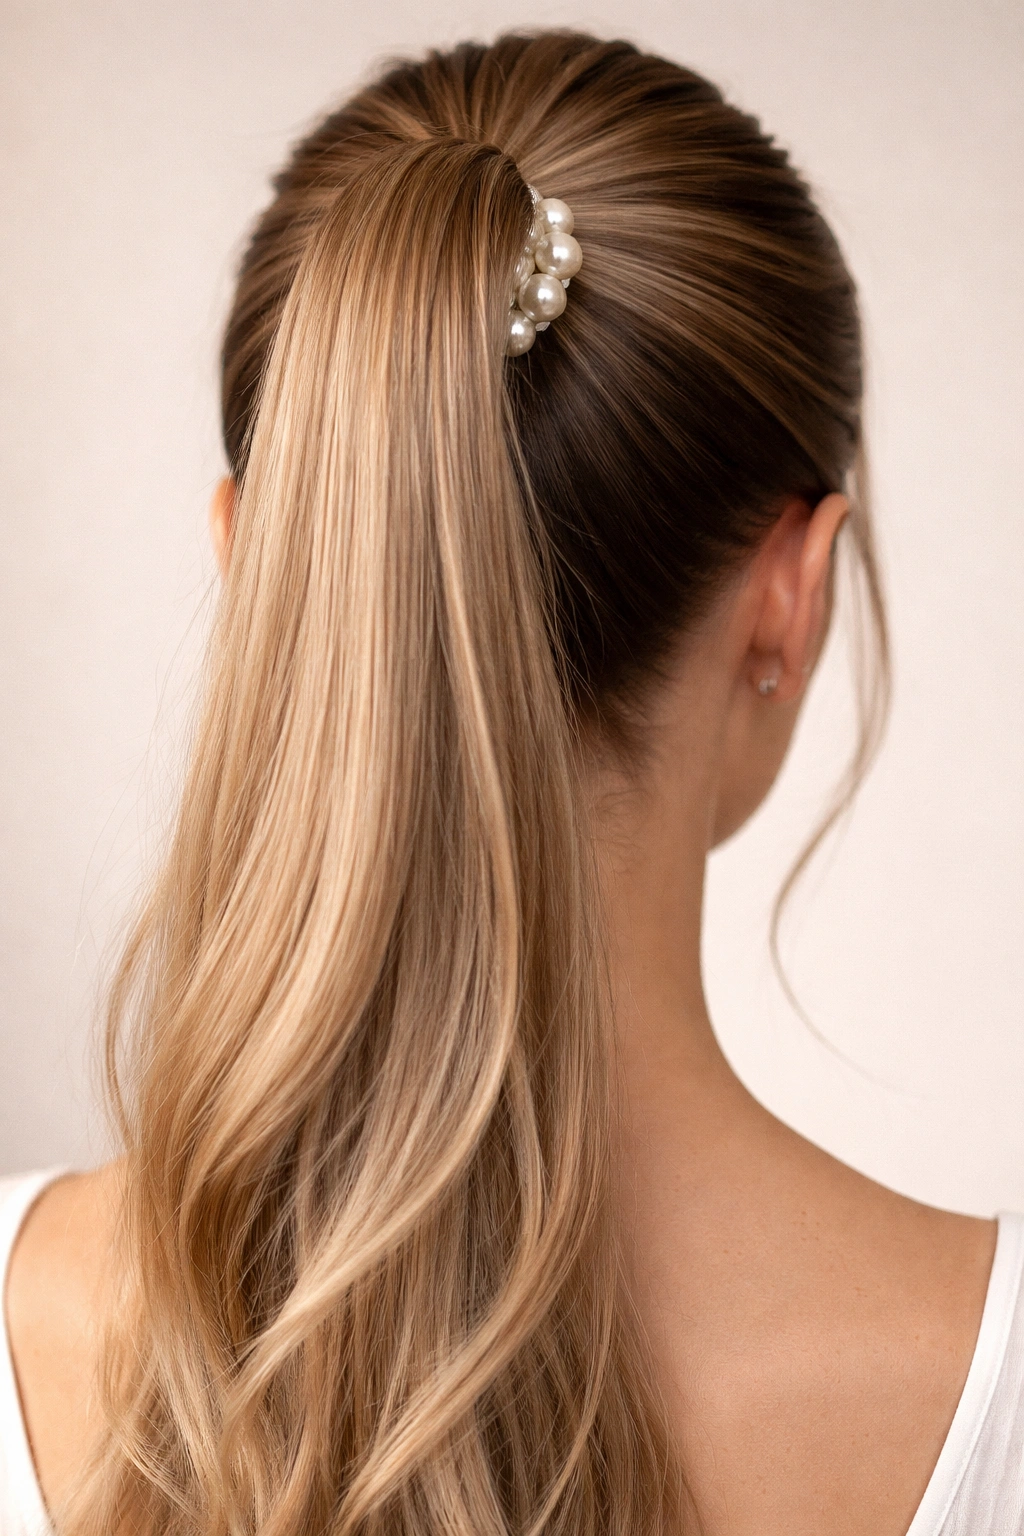
This foundational pearl ponytail style starts with a high, tight ponytail secured close to the crown. Rather than using a standard elastic, this look replaces the elastic with a string of pearls or a pearl-adorned hair cuff that wraps around the base of your ponytail. The pearls become the main focal point, so choose strands with larger, more visible pearls—freshwater pearls or imitation pearls work beautifully and are far more budget-friendly than fine pearl jewelry for everyday styling.
Creating the Perfect High Ponytail Base
To build this style, start with hair that’s been blow-dried smooth or has natural texture depending on your preference. Brush your hair up toward the crown, gathering it into your hands at a point about three inches above the natural hairline. Use a clear elastic to secure the base loosely at first, then flip your head upside down and tighten the elastic as you flip back up—this creates incredible volume and lift that makes the pearls stand out more prominently against a fuller base.
Pearl Placement and Wrapping Technique
Once your ponytail is secured, remove the clear elastic and immediately wrap your pearl strand around the base two to three times, covering where the elastic sits. Use bobby pins hidden underneath the pearl strand to secure the ends, or opt for a pre-made pearl hair cuff that slides directly over your ponytail base. The pearls should sit snugly enough that they don’t slip but loose enough that they don’t pull your hair uncomfortably.
Pro tip: Tease gently at the base of your ponytail before wrapping pearls around it. The added texture helps pearls grip without slipping, and it creates a more voluminous base that photographs beautifully.
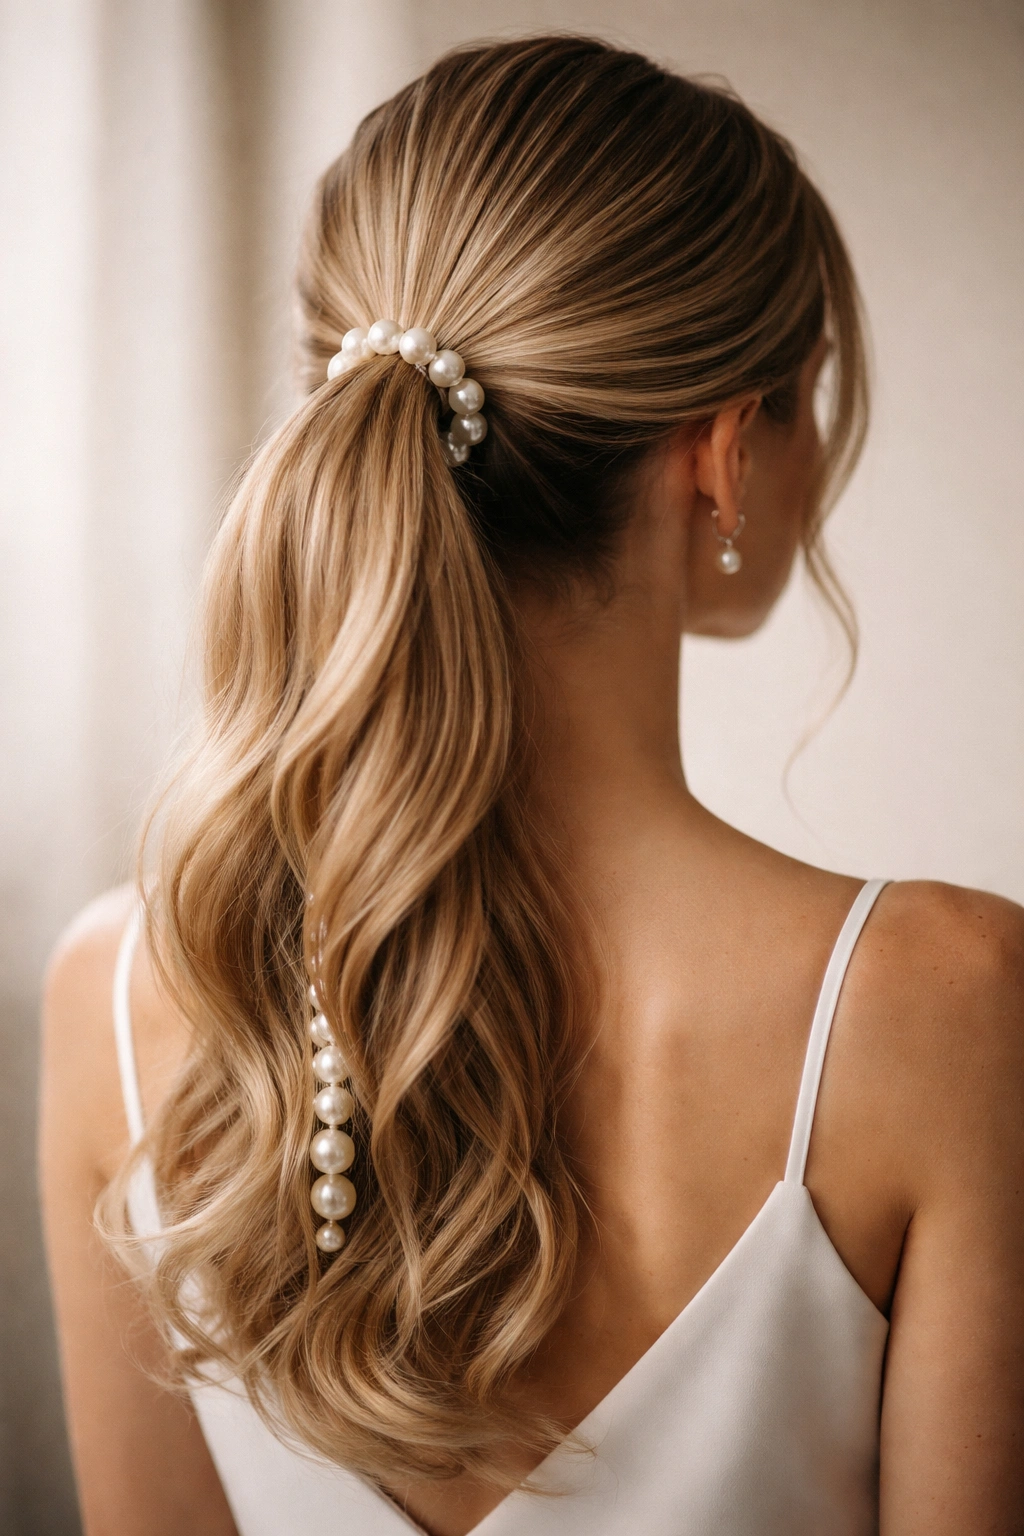
2. Sleek Low Ponytail with Pearl Pins
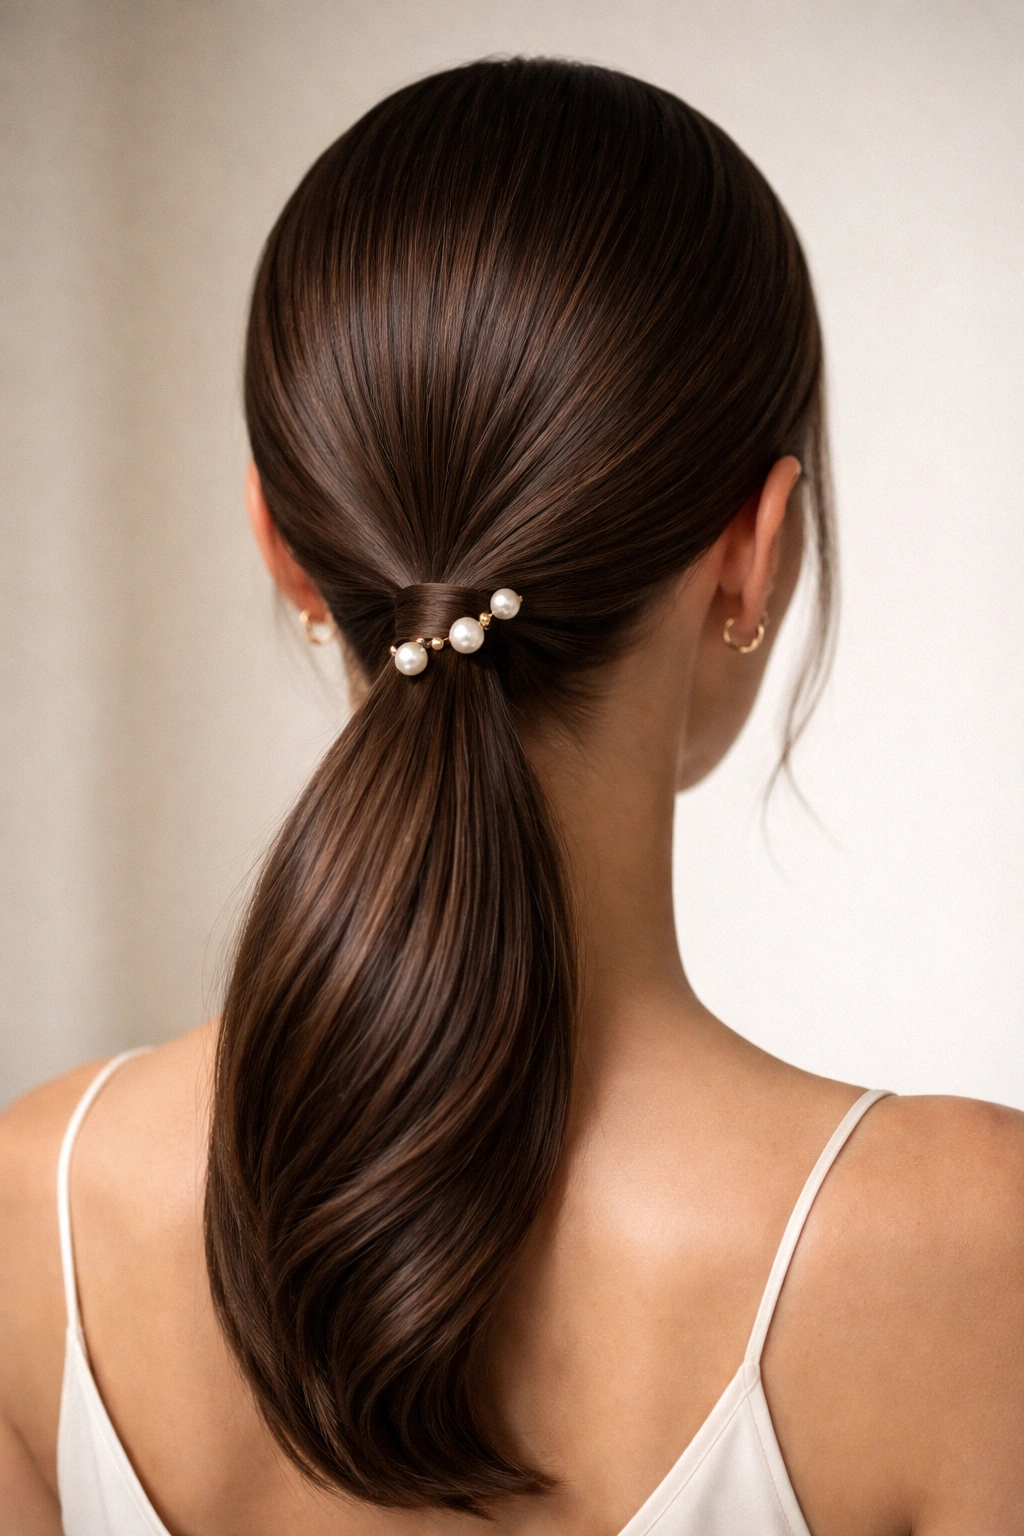
The sleek low ponytail represents understated elegance—perfect for professional settings, formal events, or anyone who prefers minimalist styling. This version incorporates individual pearl hair pins placed strategically around the ponytail base rather than wrapped strands. The effect is refined and intentional without feeling overdone.
Achieving Sleek, Polished Hair
Sleekness requires smooth hair foundation and the right products. Apply a smoothing serum to damp hair before blow-drying, using a round brush to create a smooth surface. Once dry, use a fine-tooth comb and light hairspray to smooth any flyaways. Gather your hair low at the nape of your neck—around ear level or slightly lower—and secure with a clear elastic. The lower placement feels more sophisticated and grown-up than a high ponytail.
Strategically Placing Pearl Pins
Rather than filling the base with pearls, this approach uses three to five pearl bobby pins placed at specific angles around the elastic. Insert pins diagonally through the elastic and into your hair, spacing them evenly around the circumference of your ponytail base. Use varied pin sizes if your set allows it—mix medium and larger pearls for visual interest without chaos.
Worth knowing: Pearl pins on a sleek ponytail require more secure anchoring than wrapped pearl strands. Push each pin deep into the elastic and secure ponytail base, using a small amount of clear gel at the insertion point if you’re concerned about movement throughout the day.
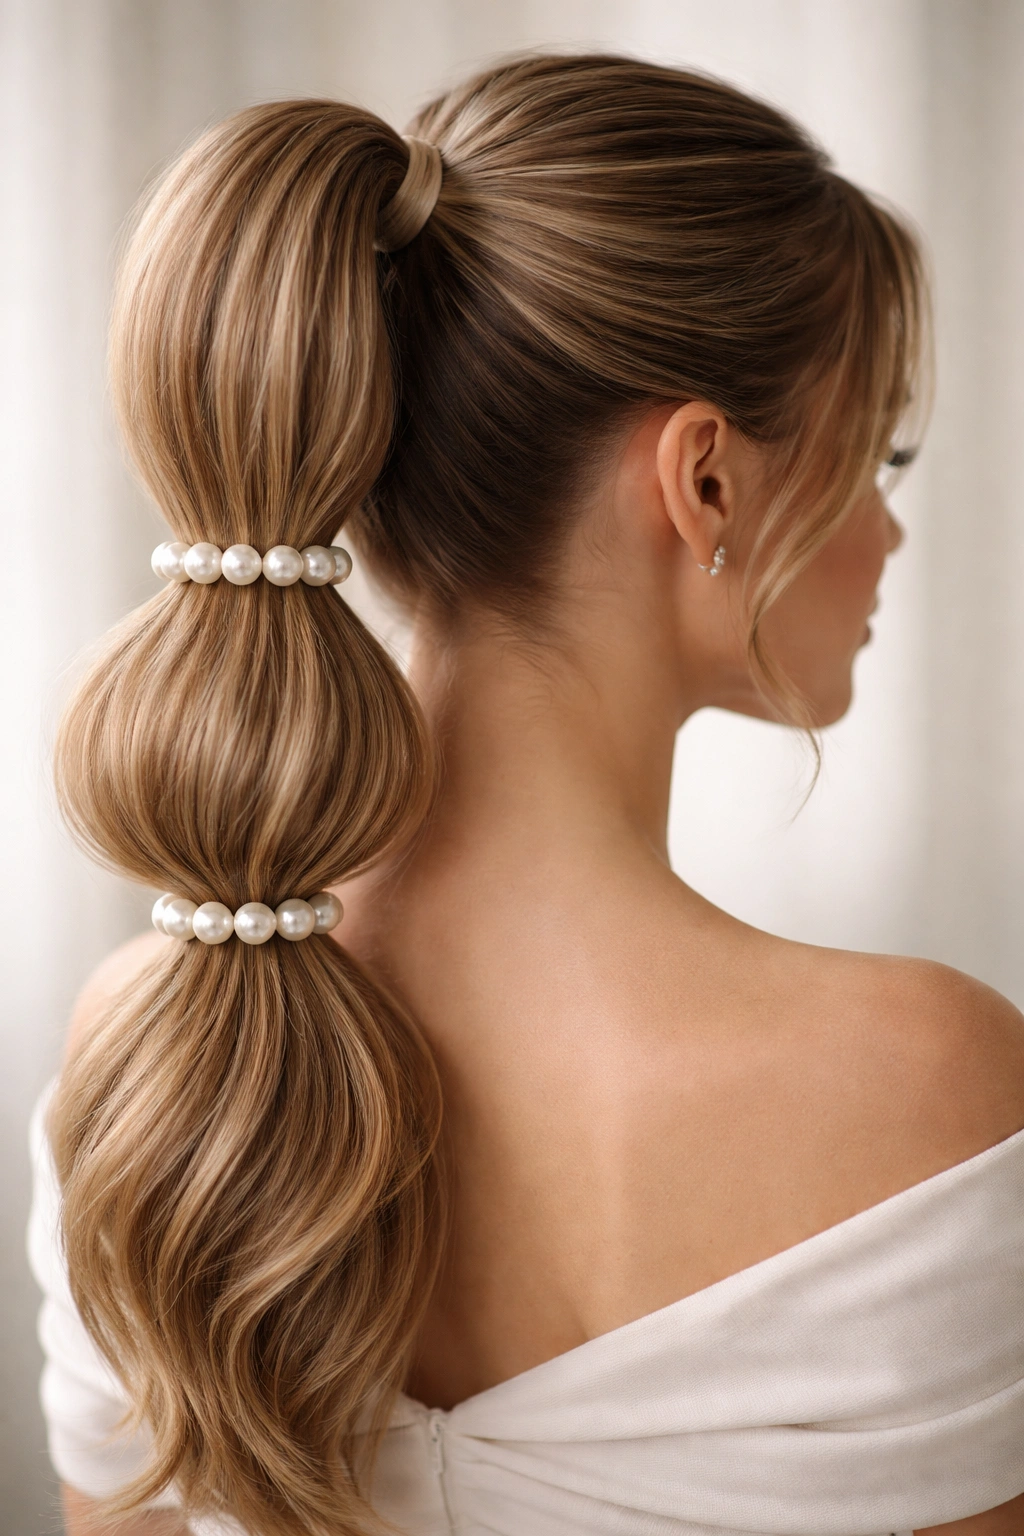
3. Bubble Ponytail with Pearl Details
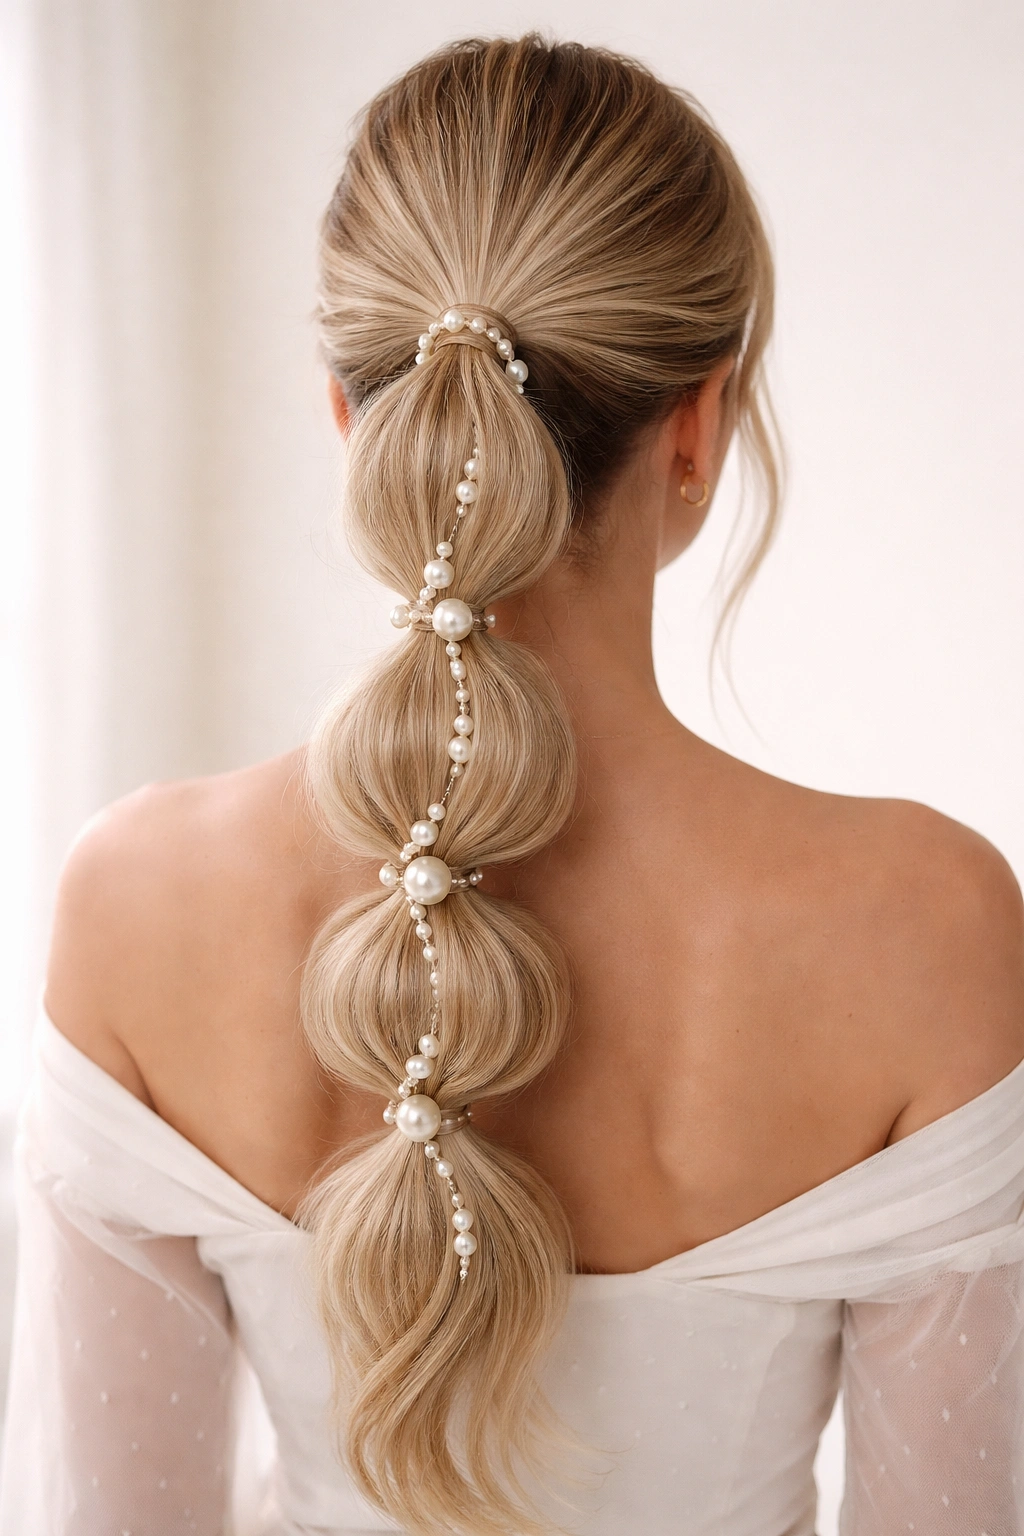
Bubble ponytails—also called stacked ponytails—feature multiple elastic bands creating separated “bubbles” of hair along the length of your ponytail. Adding pearls between each bubble or woven through the gaps transforms this playful style into something more elegant and intentional. It’s a great option for anyone with longer hair who wants dimension without committing to braids.
Creating Perfect Bubble Sections
Start with a ponytail secured at your crown or upper back, depending on where you want the bubbles to begin. Position your first elastic about two inches down from the base, then push the ponytail hair upward slightly to create puffiness above the elastic. Continue placing elastics two to three inches apart down the length of your ponytail, pushing hair up between each elastic to create distinct bubbles. Use clear elastics throughout so they’re invisible—the bubbles themselves become the visual focus.
Incorporating Pearls Between Bubbles
As you create each bubble, insert small pearl clips or bobby pins into the base of that bubble section. Alternatively, thread thin pearl strands between bubbles, anchoring them with pins underneath. Some people weave individual pearl beads onto the hair sections between elastics using needle and thread—this technique requires patience but creates a truly custom look that won’t slip or move.
Insider note: The higher your bubbles sit on your ponytail, the more polished and intentional the style reads. Low, loose bubbles feel casual and youthful, while tighter bubbles placed closer together feel more refined and styling-forward.
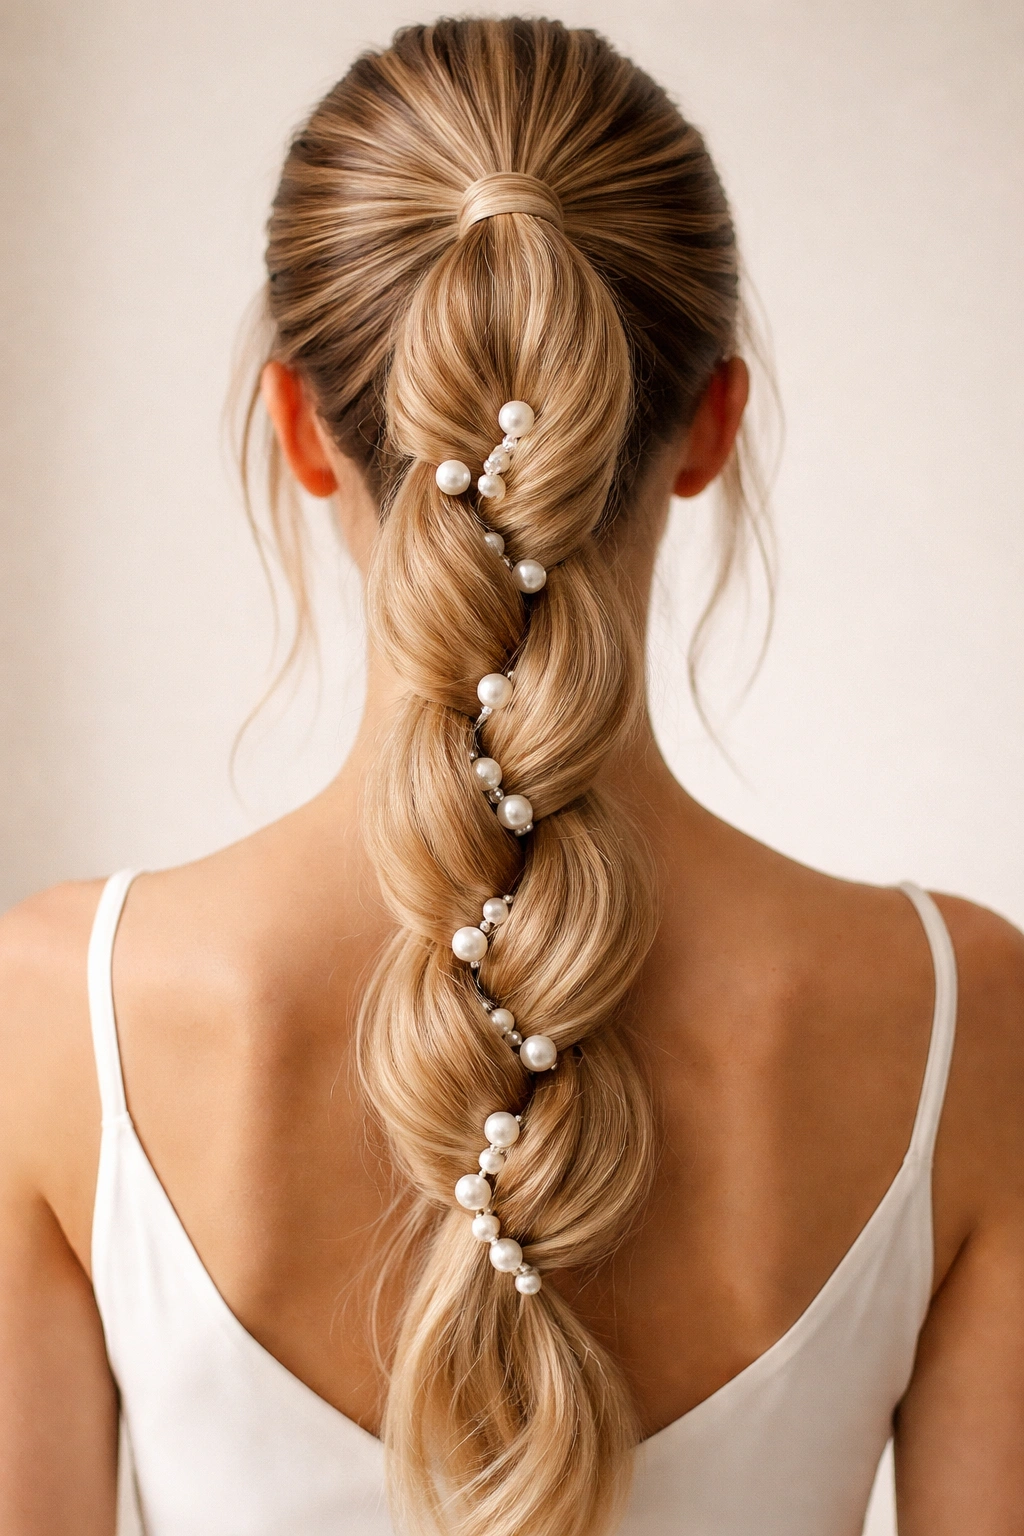
4. Braided Ponytail with Pearl Accents
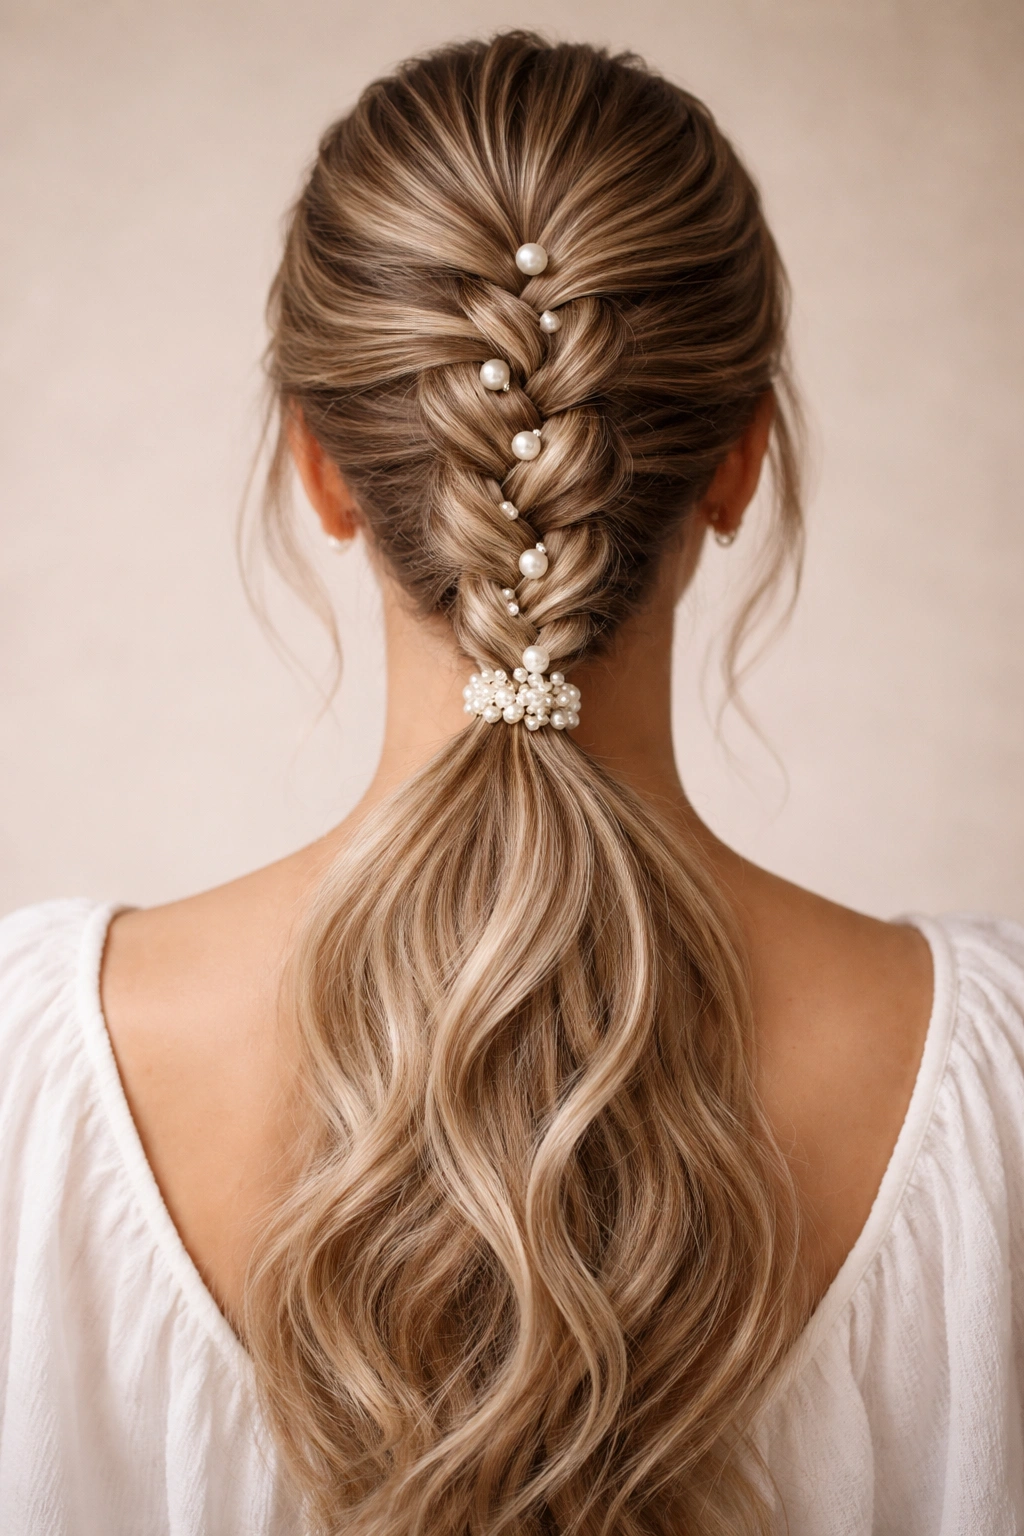
Combining braiding with pearls creates dimension and visual complexity without requiring advanced technical skill. This style works beautifully when you braid a section of your ponytail and thread pearls through or around the braid, or when you create a braided base and wrap pearls around it.
Braiding Your Ponytail Section
Secure your initial ponytail, then divide it into sections based on how many braids you want. For one central braid, split your ponytail into three equal sections and create a standard three-strand braid starting from the base. French braiding or Dutch braiding directly into your ponytail from the base creates an even more polished effect. Dutch braids (with strands woven under rather than over) photograph especially well with pearl details because pearls sit visibly on top of the braid structure.
Threading Pearls Through Braid
Once your braid is complete, use a needle or a fine crochet hook to thread pearl beads or pearl strands through the braid, weaving them over and under each braid strand. This requires a light touch and patience, but the result looks incredibly intentional and custom. Alternatively, wrap finished braids with pearl strands, anchoring with small clear pins.
Quick facts:
- French braids integrate pearl accents more seamlessly than three-strand braids
- Pearl beads on fishing line thread more easily than loose strands
- Threading pearls before finishing your braid creates a fuller, more integrated look
- Wrapping pearls around finished braids takes less time and allows for repositioning
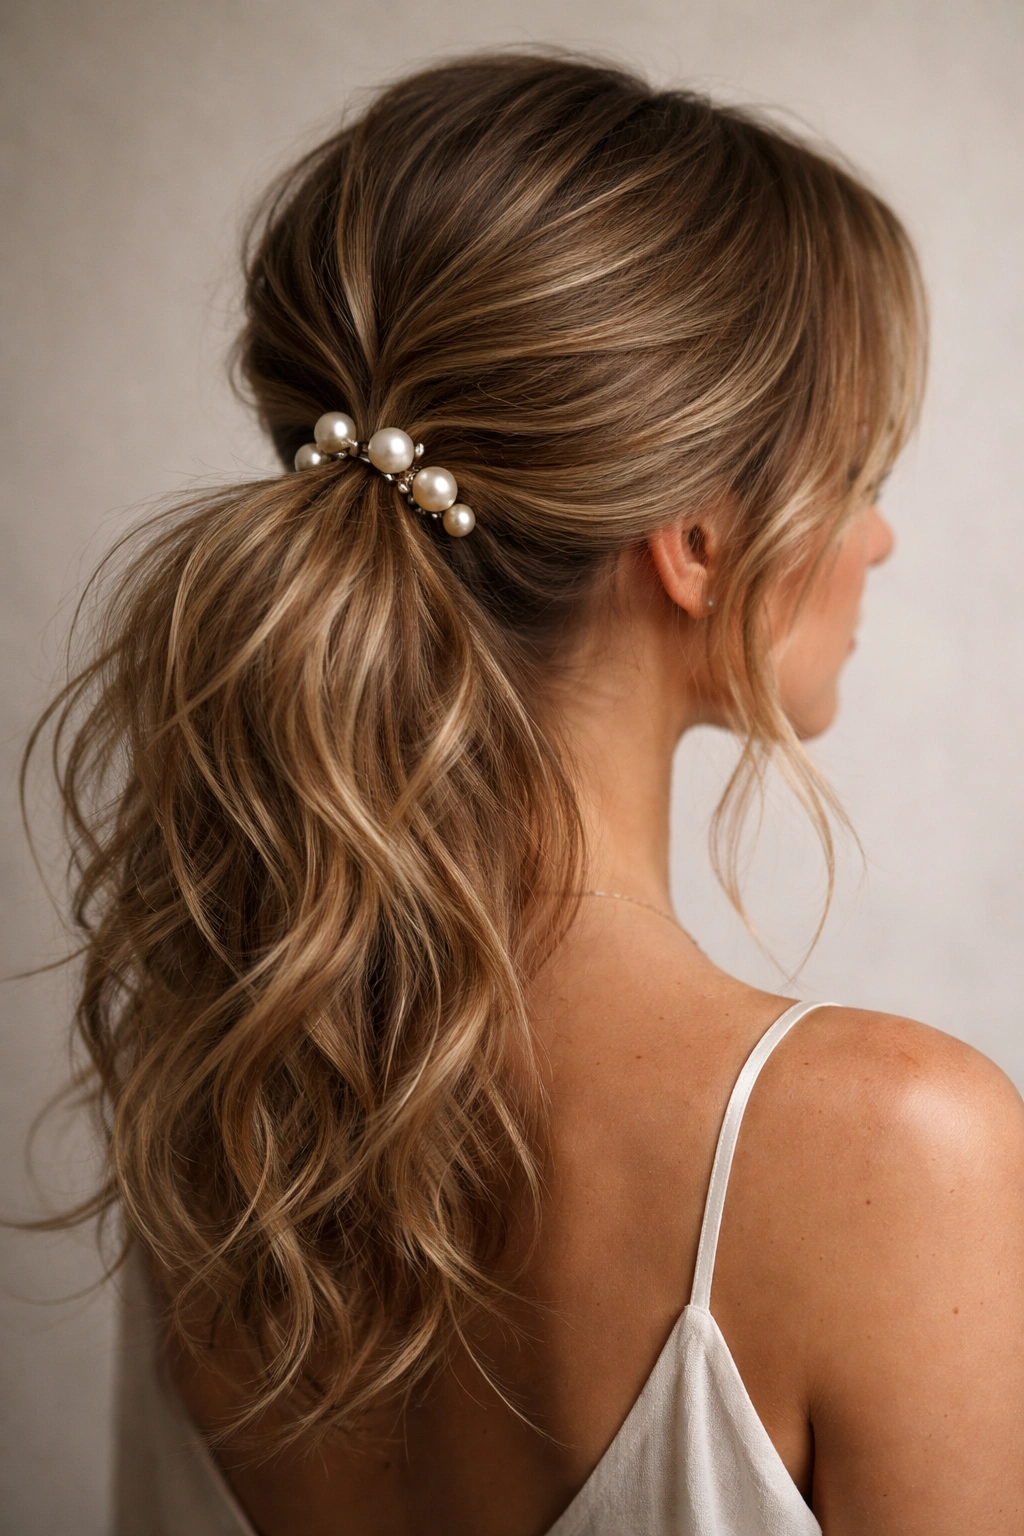
5. Half-Up Ponytail with Pearl Clip

The half-up style releases some hair while pulling the top section back, creating a balanced, face-framing effect. Adding a pearl hair clip at the point where you secure the half-up section adds elegance while serving a functional purpose—keeping those top layers in place while freeing up the length below.
Creating the Half-Up Base
Take hair from your temples and the crown area—roughly the top third of your hair—and gather it together at the back of your head around ear level. Leave the bottom two-thirds of your hair down around your shoulders. Use a small elastic to secure the half-up section loosely; you want it to feel gentle and romantic, not pulled tight. Tease slightly at the crown before pulling hair back to create volume that makes the style feel less severe.
Choosing and Placing Your Pearl Clip
Pearl clips range from delicate single-pearl designs to elaborate multi-pearl statement pieces. The size should be proportional to the amount of hair you’ve pulled back. A smaller clip works for finer hair or minimal styling, while a larger clip can anchor thicker hair and make a bolder statement. Position the clip to cover the elastic entirely, or leave the elastic visible if your pearl clip is small and delicate.
Worth knowing: This style photographs beautifully in profile because the pearl clip becomes a focal point against your hair. It’s perfect for occasions where you want some styling without feeling formal or heavily accessorized.
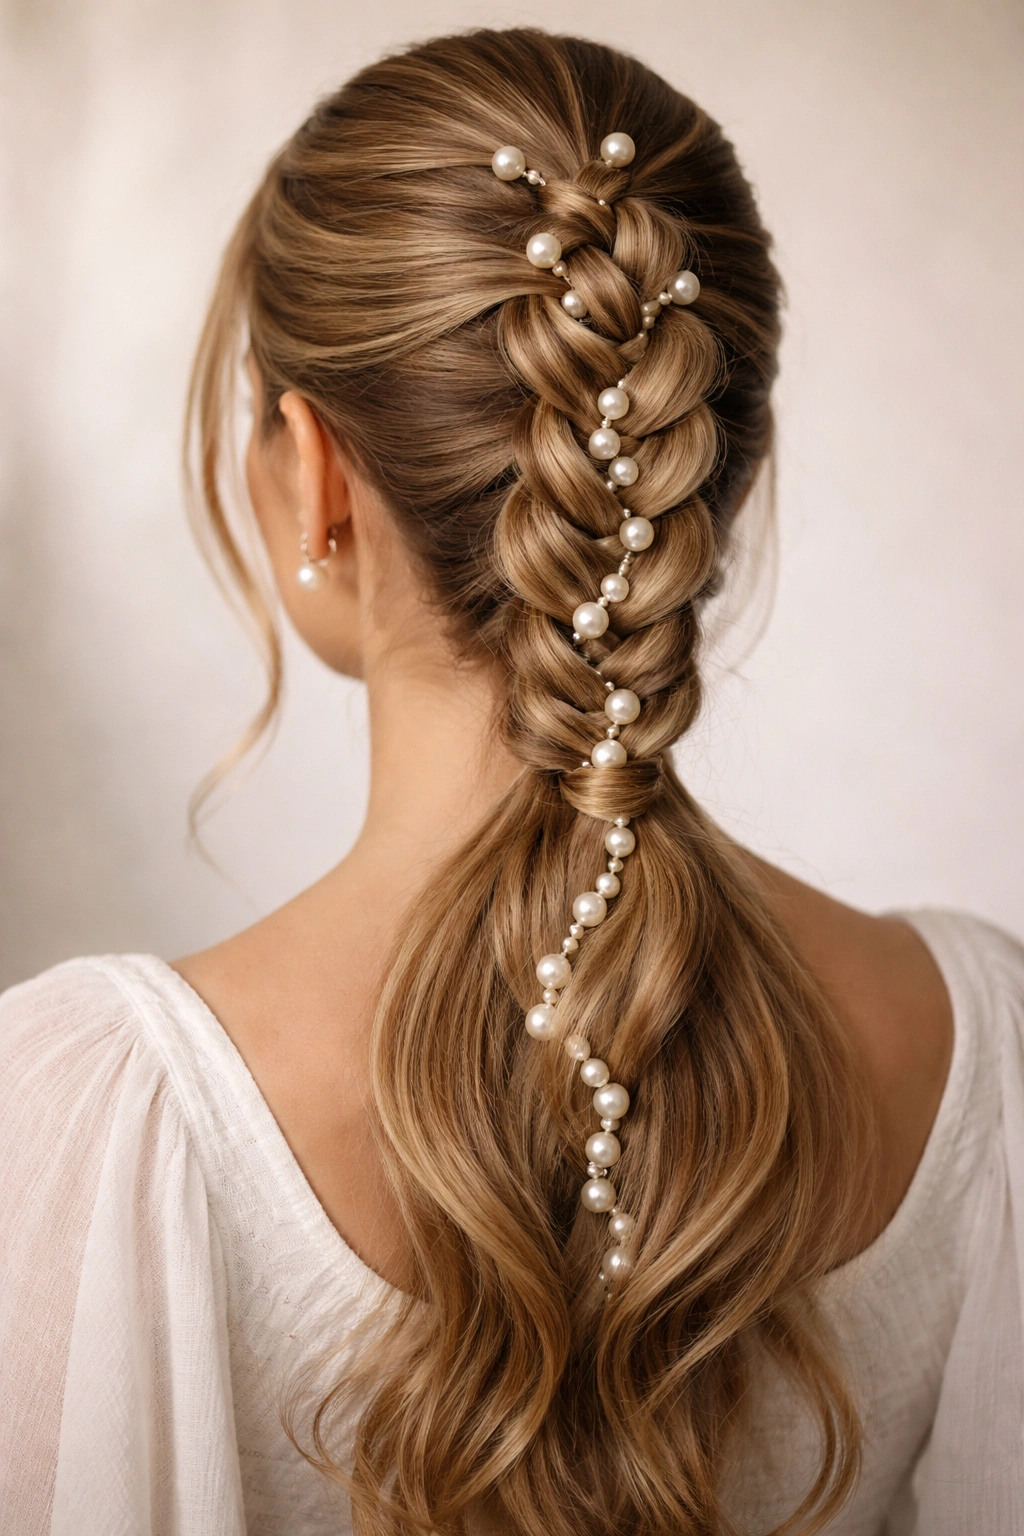
6. Twisted Ponytail with Pearl Beads
Twisting sections of your ponytail and threading pearl beads through those twists creates texture and movement while keeping your hair contained. This style works especially well on second-day hair or hair with natural texture, which grips the twist and holds beads securely.
Twisting Sections of Your Ponytail
Create your base ponytail—high or low depending on preference. Divide the ponytail into four to six sections from base to tip. Take one section and twist it gently from root to end, rotating the hair on itself without braiding. As you twist, the hair naturally forms a rope-like structure perfect for threading beads onto. Secure each twist end with a small elastic or a bobby pin tucked into the twist itself.
Threading Pearls Onto Twisted Sections
Use beads with large enough holes that your hair twists can pass through easily. Thread pearl beads onto each twist section, sliding them up to nestle against the base or spacing them down the length of the twist. The natural texture of the twist holds beads in place much better than smooth hair. You can mix pearl beads with metallic or glass beads for variety, or keep them uniform for a more elegant aesthetic.
Pro tip: Pre-twist sections loosely, thread all your beads on, and then tighten the twist by sliding beads down toward the ponytail base. This creates a more secure hold than twisting and threading simultaneously.
7. Textured Messy Ponytail with Pearls
A deliberately undone, textured ponytail paired with pearls walks the line between casual and polished—perfect for someone who wants an effortless look that still feels intentional. This style celebrates natural texture and allows for loose, face-framing pieces that a tightly controlled ponytail would eliminate.
Building Texture Into Your Base
Start with hair that has natural wave or texture, or create waves using a curling iron or braid method before styling. Gather your hair into a loose ponytail at the crown or upper-middle back, leaving some pieces out around your face and neck. Don’t tighten it aggressively—the appeal is that it looks like you grabbed your hair quickly but still styled it intentionally. Use an elastic that matches your hair color or a claw clip for an even more relaxed vibe.
Adding Pearls to Textured Hair
Textured hair grips pearl accessories naturally, so this style is forgiving of placement. Scatter three to five pearl bobby pins throughout the base of your ponytail at varying angles, or wrap a loose pearl strand around the elastic without obsessing over perfect positioning. You can also tuck individual pearl beads into pieces of hair that you’ve pulled out around your face.
Worth knowing: This style is less formal than sleek pearl ponytails but reads as more intentional than a plain messy bun. It’s excellent for creative professionals, weekend styling, or anyone who gravitates toward effortless-looking elegance.
8. Sleek Side Ponytail with Pearl Hair Piece

A side ponytail positioned over one shoulder creates an asymmetrical, editorial look that feels modern and fashion-forward. Adding a decorative pearl hair piece or pendant below the elastic transforms the practical elastic into a focal point rather than something to hide.
Perfecting Side Ponytail Positioning
Sleek side ponytails require smooth hair and precise placement. Apply smoothing serum to damp hair, blow-dry completely straight, and use a fine-tooth comb to eliminate any texture. Gather your hair to one side of your neck—typically around ear level or slightly lower—creating a low side ponytail. The higher your side ponytail sits, the more playful it feels; lower placements feel more sophisticated and event-appropriate.
Selecting Your Pearl Hair Piece
Pearl hair pieces for side ponytails range from simple drop pendants hanging below the elastic to elaborate multi-strand designs. A single pearl pendant is timeless and works with virtually any aesthetic, while multi-strand designs work best with formal styling. The weight of the piece affects how it hangs, so test your choice before committing to an event.
Quick facts:
- Side ponytails paired with pearls photograph beautifully at angles
- Lower side ponytails (at neck level) feel more elegant than high-positioned side ponytails
- Pearl pieces with movement (hanging strands or pendants) create more visual interest than static designs
- Side ponytails require regular touch-ups throughout the day since hair naturally pulls forward
9. Curly High Ponytail with Pearl Strands
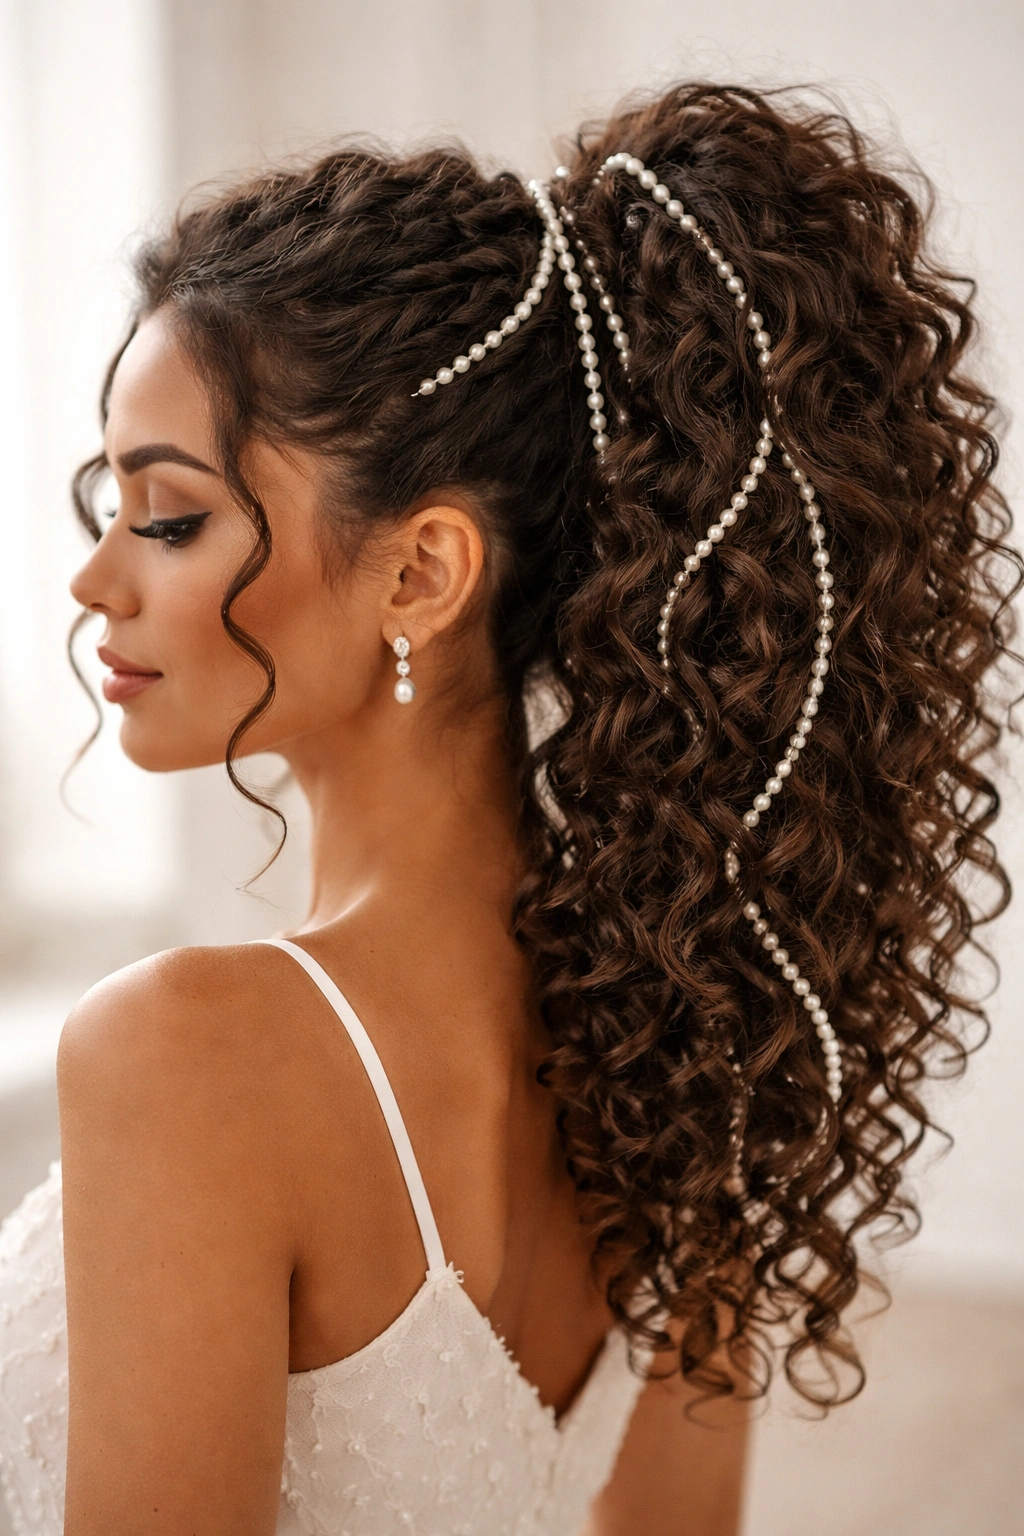
If you have naturally curly or textured hair, a high ponytail with woven pearl strands celebrates your curl pattern while adding refinement. Curly hair holds volume beautifully at a high crown point, and pearl details add polish without flattening your texture.
Securing Curly Hair at the Crown
Curly hair requires a gentler hand than straight hair to avoid frizz and breakage. Use a ponytail holder with a coil or cloth covering rather than a tight elastic. Gather your curls high at the crown, securing loosely to allow for volume. Don’t brush or comb through your curls excessively—this disrupts curl pattern. Instead, finger-comb or use a wide-tooth comb in the shower before styling to define curls, then simply gather them as they fall.
Weaving Pearls Through Curls
Pearl strands work beautifully in curly hair because the texture holds them in place naturally. Wrap one or two pearl strands around your ponytail base, tucking them into the curls themselves rather than pulling them tight. Some people prefer threading individual pearl beads throughout the ponytail, positioning them at varying heights for dimension. The key is making sure beads are secure enough that they won’t fall out during the day.
Worth knowing: Curly ponytails look fuller and more voluminous than straight ones, so you can use more elaborate pearl accents without overwhelming your hair. The curl texture itself provides visual interest that pairs beautifully with pearl details.
10. Dutch Braid Ponytail with Pearl Weave
A Dutch braid—where strands weave under rather than over—creates a raised, visually prominent braid structure perfect for showcasing pearls. Creating a Dutch braid down to your ponytail base and then weaving pearls throughout the braid creates an intricate, gallery-worthy style.
Executing a Flawless Dutch Braid
Dutch braiding requires practice but rewards you with a distinctive look. Begin at your crown and start your Dutch braid by dividing a section into three parts. Instead of crossing strands over the center (as in a regular French braid), cross them under, creating a braid that protrudes outward. Continue down to where you want your ponytail to begin—usually a few inches below the nape—and secure with an elastic. The raised braid creates a runway for pearl accents.
Integrating Pearls Into Your Braid
Once your Dutch braid is complete, weave pearl beads or pearl strands through the braid, threading them over and under each raised section. Fishing line holding pearl beads threads more smoothly than loose strands. Work carefully to preserve the braid structure as you thread pearls. The contrast between the raised braid and the pearl details creates a three-dimensional, architectural look.
Pro tip: Dutch braid braids hold pearls more securely than standard braids because each strand sits raised and visible. Even pearls that aren’t anchored with pins typically stay in place thanks to the braid’s structure.
11. Layered Ponytail with Pearl Bands
A layered ponytail uses multiple elastics at different heights to create distinct sections, with pearl accent bands defining each layer. This variation differs from bubble ponytails in technique and offers a different visual effect—more structural and defined rather than puffy.
Creating Clean, Defined Layers
Start with a high ponytail secured tightly. Place your second elastic approximately three inches down, creating a layer. Continue adding elastics in three-inch intervals down to the desired length. Rather than pushing hair up to create puffs, keep each section smooth and defined. This creates a streamlined look with clear visual separation between layers.
Placing Pearl Bands at Each Layer
A pearl band—designed specifically to fit over ponytail bases—sits perfectly over each elastic, covering it completely. Alternatively, use multiple small pearl hair clips placed side by side to define each layer. The pearls themselves become the visual anchor point for each section, drawing the eye downward along the ponytail. Choose pearl bands that match your metal tone (gold, silver, rose gold) for cohesion.
Worth knowing: This style requires precision and patience but rewards you with a polished, editorial look that reads as intentional styling. It works beautifully for events, professional settings, or anyone who loves architectural, structured hairstyles.
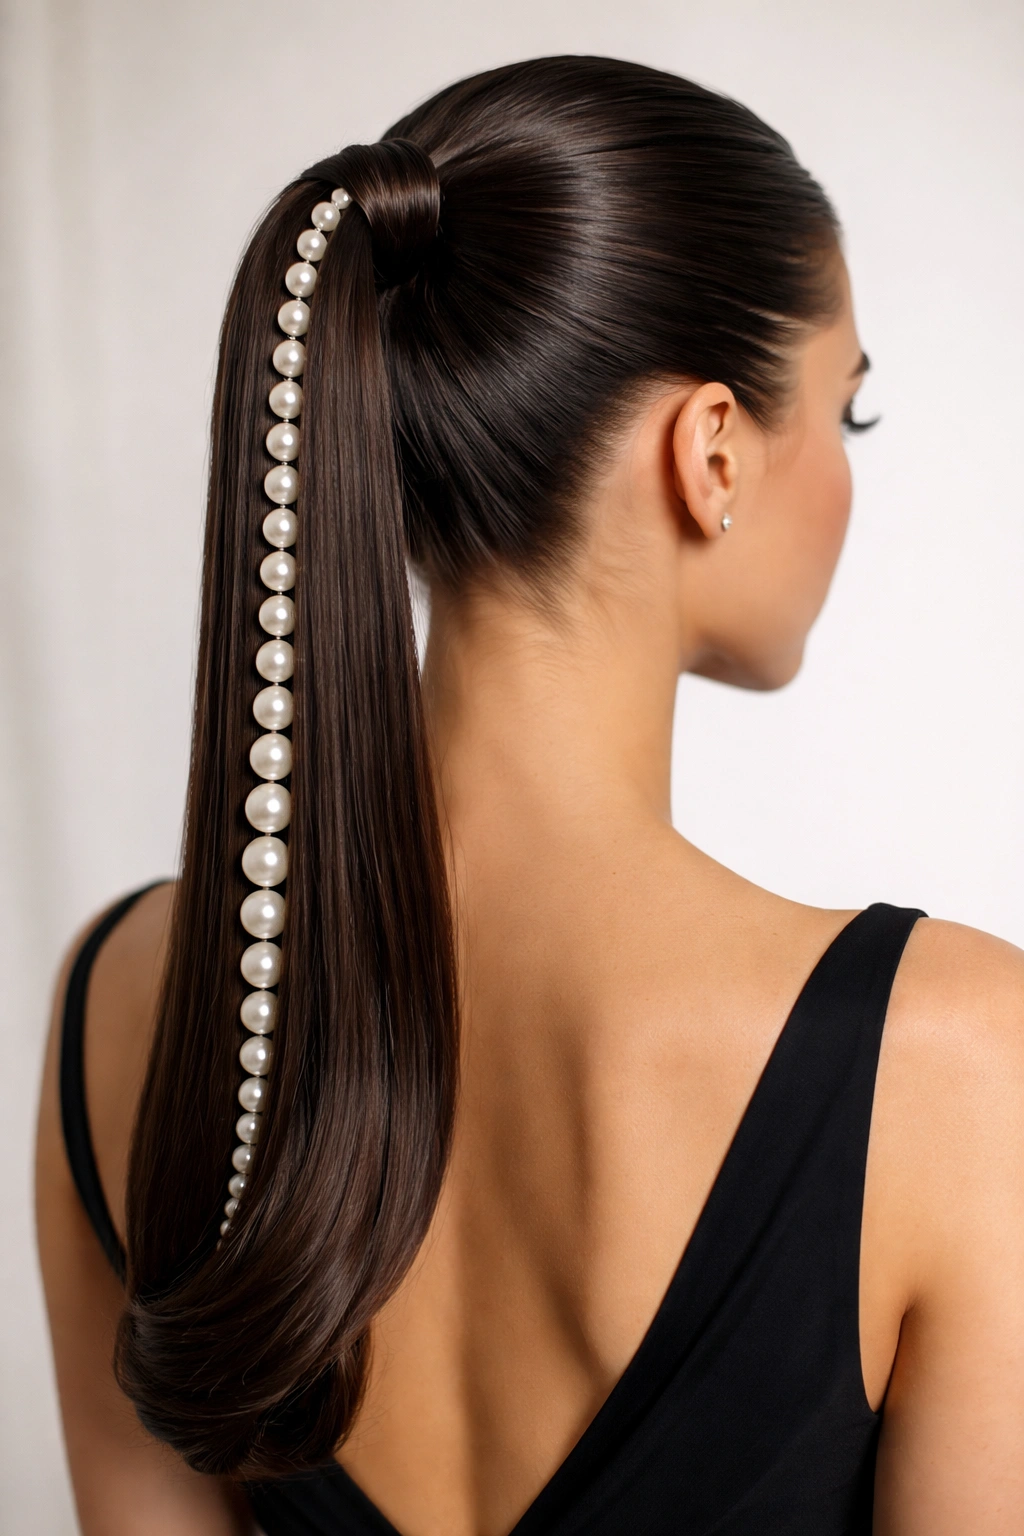
12. Pearl-Threaded Sleek Ponytail
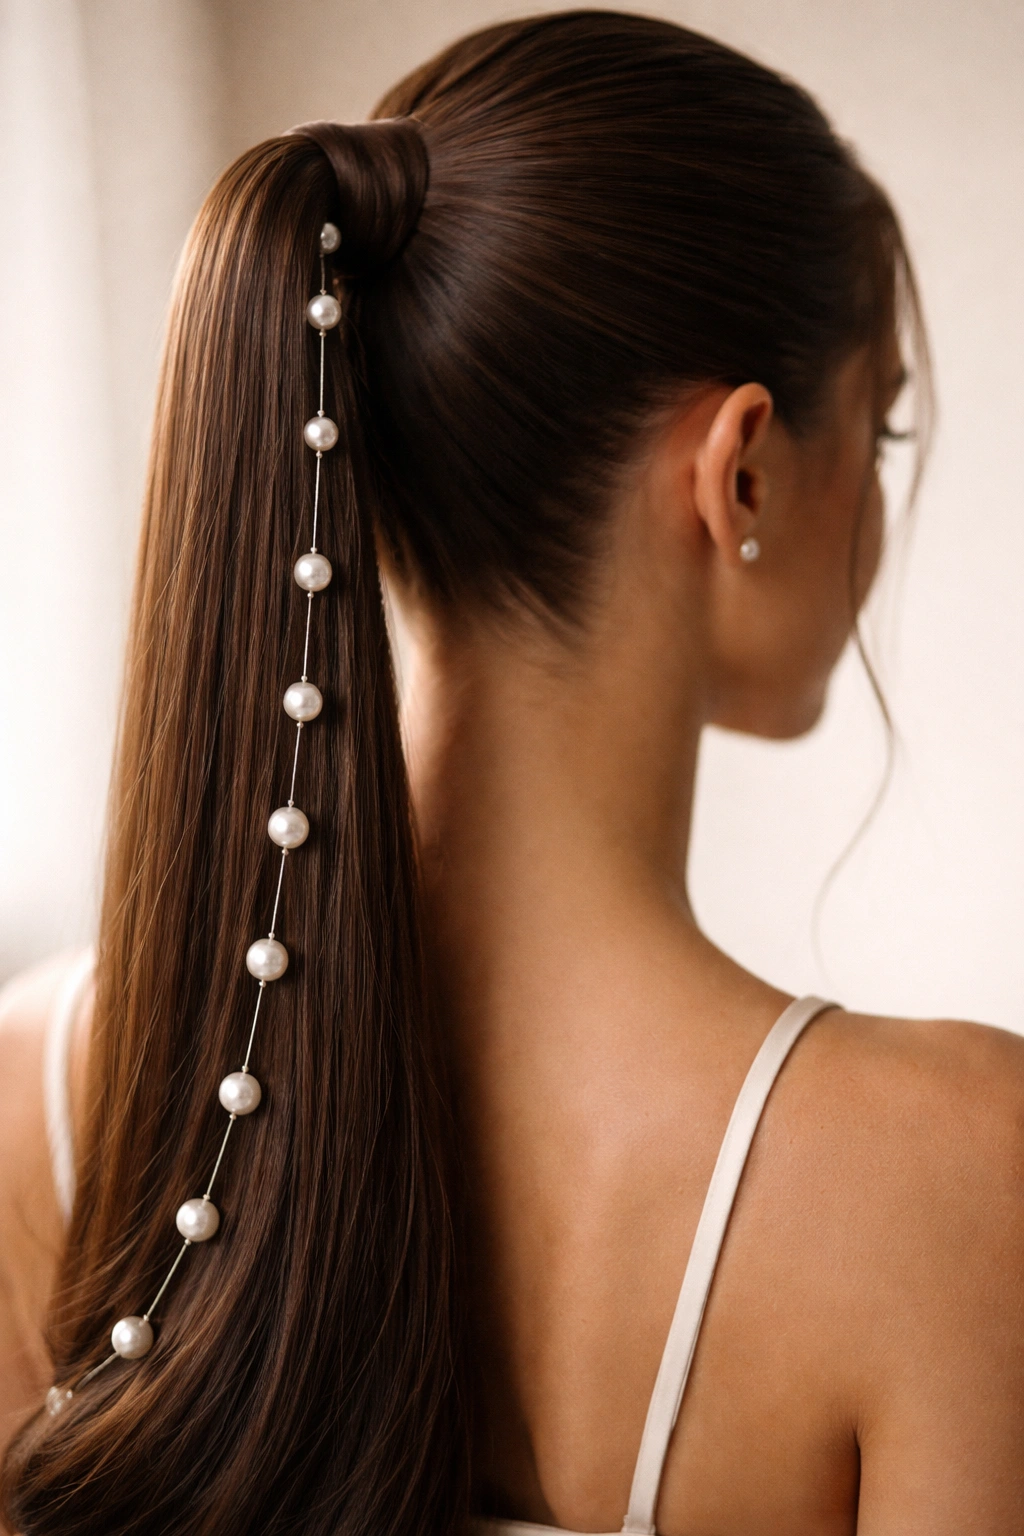
A pearl-threaded style involves physically threading individual pearl beads onto your ponytail itself using needle and thread, then securing the strand into your ponytail. This creates a custom look where pearls become integrated into the hair rather than simply clipped or wrapped around the outside.
Preparing Your Hair and Materials
You’ll need a needle (preferably one with an eye large enough for your thread but fine enough to pass through pearl bead holes), thread or thin fishing line, and pearl beads. Create your base ponytail first—sleek and smooth works best for this technique. Thread your needle and begin stringing pearls onto it, spacing them however you prefer. You can create multiple strands of pearl-threaded hair or just one for subtlety.
Securing Threads Into Your Ponytail
Once your pearls are threaded, position the strands along the back and sides of your ponytail. Using a separate piece of thread, anchor the pearl strand to your actual hair in multiple places—typically at the base, middle, and tip of the ponytail. This prevents pearls from slipping and ensures they stay exactly where you’ve positioned them. The effect is seamless and polished.
Quick facts:
- Pearl-threaded ponytails photograph incredibly well because pearls integrate naturally with hair
- This technique works best on longer ponytails where you have more room to work
- Pre-threading pearls before anchoring them into your hair allows for repositioning
- Fishing line shows less than regular thread, creating an invisible effect
13. Voluminous Updo Ponytail with Pearl Accents
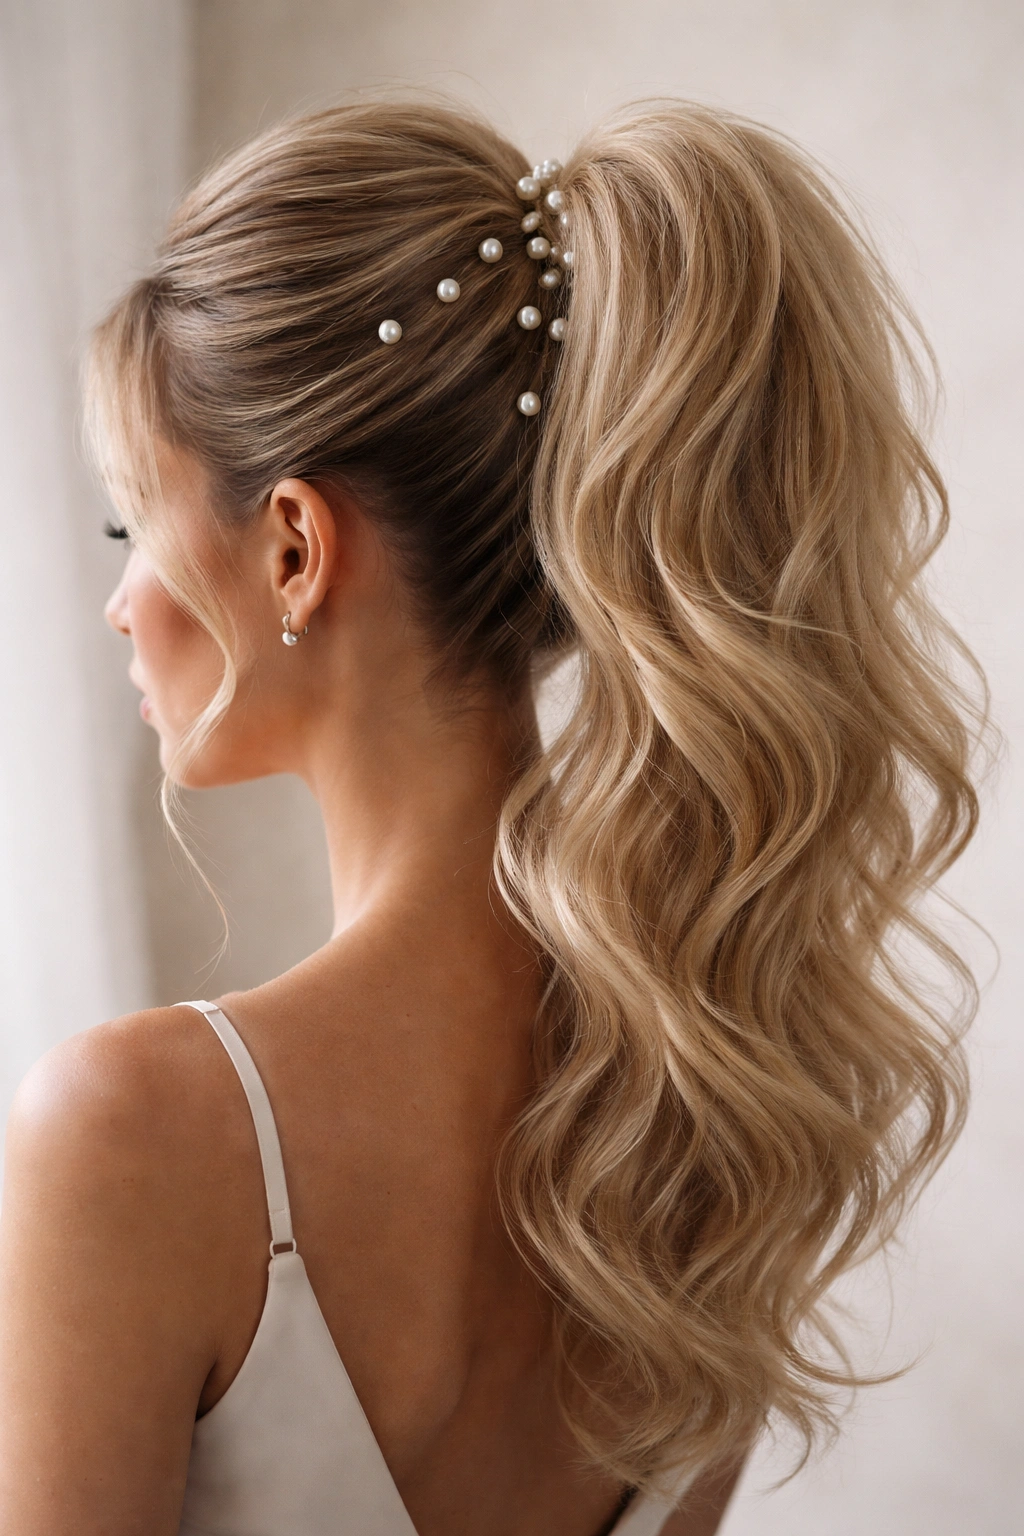
A voluminous ponytail sits high on the crown with maximum fullness and body, often achieved through teasing, blow-drying techniques, and strategic styling. Pearl accents scattered throughout add elegance to this dramatic, eye-catching style.
Building Maximum Volume at the Crown
Start with your hair freshly blow-dried with a volumizing product applied at the roots. Take sections from the crown and gently backcomb them to create texture and hold, then smooth the surface layer. Gather everything into a high ponytail at your crown, using a secure elastic. The underneath should feel full and textured while the top appears smooth and polished. This contrast creates the elegant, controlled-volume effect.
Placing Pearls Throughout the Voluminous Base
Scatter pearl bobby pins and small clips throughout the base and crown area of your ponytail, at varying angles and heights. The volume gives you plenty of places to tuck pearls without overcrowding the look. Alternatively, wrap pearl strands around the ponytail base multiple times—the fullness allows this without feeling heavy or overdone.
Worth knowing: Voluminous ponytails look stunning at events and photograph beautifully in both front-facing and profile shots. The pearl accents catch light throughout the volume, creating movement and dimension.
14. Sleek Graphic Ponytail with Pearl Placement
A graphic ponytail uses intentional placement and geometric arrangement of pearls to create a statement look. Rather than scattered or wrapped pearls, this style positions them deliberately—often in lines, clusters, or patterns—for a fashion-forward aesthetic.
Creating Your Sleek Base
As with all sleek styles, smooth hair is essential. Create a high or low ponytail depending on whether you want your graphic design to be obvious from the front or revealed when you turn your head. Secure tightly so the base is a clean platform for pearl placement.
Designing Your Pearl Placement
Decide on your graphic—this could be a vertical line of pearls down the center back of your ponytail base, a circular ring of pearls around the elastic, a diagonal sweep, or clusters at specific points. Sketch it out mentally before placing pins. Use bobby pins spaced precisely to create clean lines, or arrange pearl clips in a deliberate pattern. The graphic approach transforms styling from decorative to intentional and editorial.
Pro tip: Photograph your graphic pearl placement from multiple angles before considering it finished. What looks perfect from the front might benefit from adjustment once you see it from behind or the side.
15. Casual Ponytail with Scattered Pearl Clips
The easiest pearl ponytail style combines a simple, loose ponytail with scattered pearl bobby pins placed casually throughout. This approach requires minimal effort while still elevating an everyday style into something polished and intentional.
Creating a Relaxed, Casual Base
This style thrives on a loose, effortless energy. Create your ponytail high or low without obsessing over tightness or perfection. Leave face-framing pieces down around your ears and temples. Use a clear elastic or a claw clip rather than a sleek metal barrette. The looser your base, the more casual and approachable the final result will feel.
Scattering Pearl Clips for Ease and Elegance
Place three to seven pearl bobby pins around your ponytail base at random angles. You’re not creating a pattern or design—you’re simply anchoring pearls wherever they look good to you. Insert them at slightly different depths for natural variation. Step back and assess: if it feels intentional and balanced rather than haphazard, you’ve succeeded. If something feels off, move a pin or add one more.
Worth knowing: This is the most forgiving pearl ponytail style because imperfection is part of the aesthetic. It’s perfect for anyone who wants elevated styling without the time investment or technical skill requirements of more complex variations.
Final Thoughts
Pearl ponytails work across every hair type, length, and styling ability because the options are genuinely flexible. You can spend fifteen minutes creating a casual scattered-pearl look or invest time in a complex braided design with threaded pearls—both are equally valid and beautiful. The key is choosing the variation that matches your hair texture, the occasion, and the amount of styling time you want to invest.
What makes pearls so effective with ponytails is their universal flattering quality. The soft, luminous finish of pearls complements every skin tone and age, and the way they catch light adds dimension without feeling heavy or overdone. Whether you prefer minimalist elegance or maximalist drama, there’s a pearl ponytail approach that speaks to your personal aesthetic.
Start with whichever style resonates most strongly with you, and don’t hesitate to experiment once you’ve mastered the basics. The beauty of pearl ponytails is that they feel both timeless and fashion-forward simultaneously. You can wear the same style to a casual weekend outing or a formal evening event simply by adjusting your overall styling—changing your clothing, makeup, or accessories around your pearl-adorned ponytail. That versatility makes investing in quality pearl hair accessories and mastering a few key techniques well worth the effort.