Whether you’re prepping for a special event, wanting to elevate your everyday look, or searching for a hairstyle that combines elegance with playfulness, braided ponytails with bows offer the perfect solution. The combination of intricate braiding and a feminine bow detail transforms an otherwise simple ponytail into something that feels intentional, polished, and distinctly charming. What makes this style so versatile is that it works equally well for a casual day out, a professional setting, a romantic date, or a formal celebration — you simply adjust the bow choice and the braid complexity to match the occasion.
The beauty of braided ponytails with bows lies in their ability to showcase creativity while keeping hair neatly secured. A bow adds instant visual interest and draws the eye upward, creating a flattering frame for the face. The braid component gives you options for customization — tight and sleek, loose and romantic, single or multiple braids woven together, or braids that wrap around the ponytail base. This is the kind of hairstyle that looks complicated enough to turn heads but is genuinely achievable with a little practice and the right technique.
Over the years, this style has evolved from a childhood aesthetic into a sophisticated, wearable option for adults of all ages. Celebrity red carpets, bridal editorials, and fashion runways have all embraced the braided ponytail with bow as a signature look, proving that it’s far more than a nostalgic throwback. The style works beautifully with different hair lengths, textures, and types — whether you have fine, straight hair or thick, curly strands, there’s a braided ponytail bow style that will work for you.
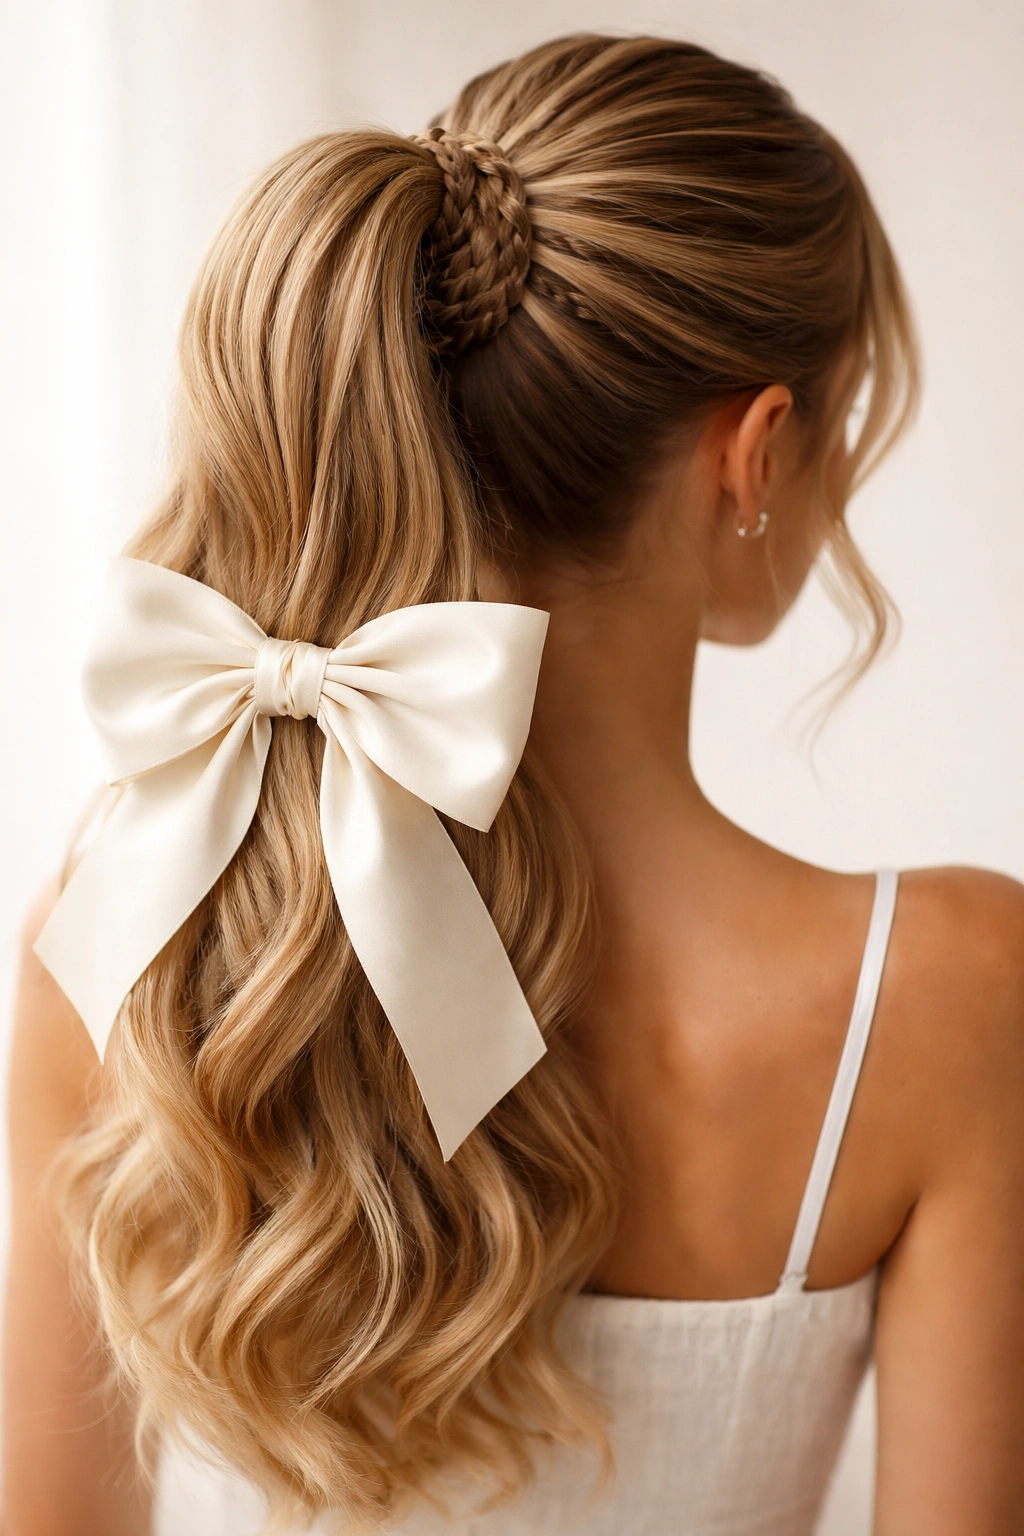
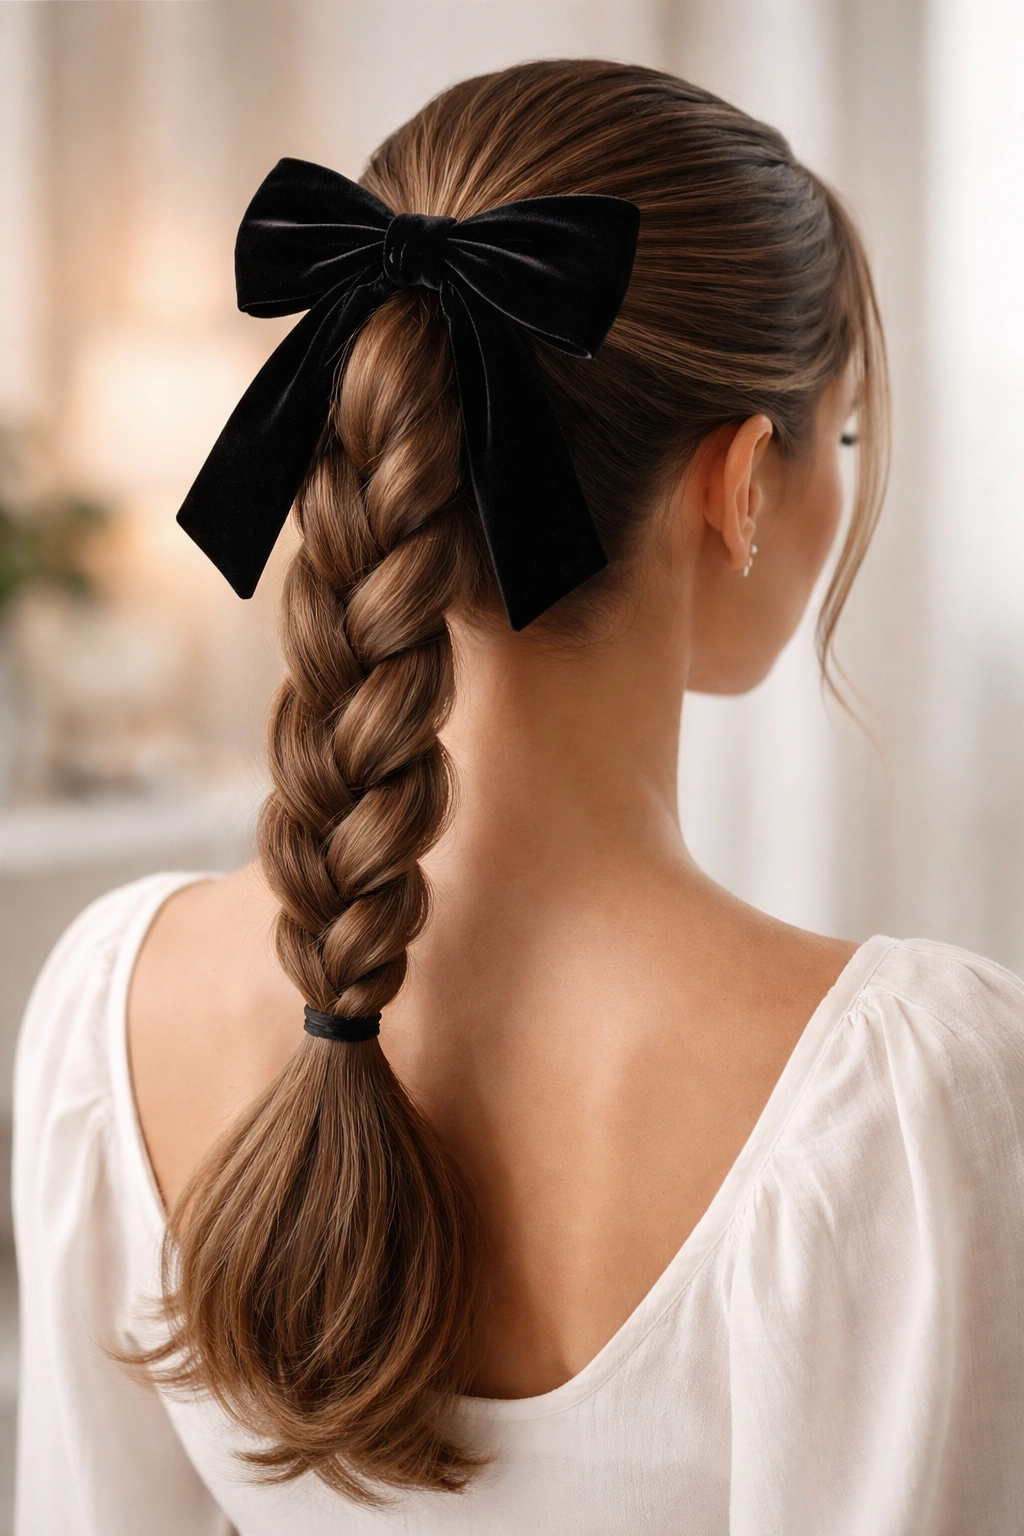
1. Classic Single Braid Ponytail With Velvet Bow
This is the foundational braided ponytail with a bow, and it’s the style that works in virtually every situation imaginable. The single braid wraps around the base of a sleek, centered ponytail, and a velvet bow sits just above it, creating a polished, timeless look. The beauty of this version lies in its simplicity — there’s nothing fussy about it, yet it feels intentional and well-executed.
Why This Style Is Endlessly Wearable
The single braid ponytail with a velvet bow hits a sweet spot between sophistication and approachability. It’s formal enough for professional settings and special occasions, yet relaxed enough for casual outings. The velvet material adds subtle luxury without being over-the-top. This style also has the advantage of being quick to execute once you get the technique down, making it perfect for mornings when you want to look polished without spending 30 minutes on your hair.
Key Features and Styling Notes
- The ponytail base: Create a smooth, high or mid-height ponytail depending on your preference and face shape. Use a fine-tooth comb to smooth flyaways and create a sleek foundation. If you have naturally textured hair, a smoothing cream or edge control product will help create a polished base.
- The braid: Take a small section of hair from the side of the ponytail and create a tight three-strand braid. Wrap this braid around the base of the ponytail and secure it with a small elastic or bobby pin.
- The bow placement: Position your velvet bow directly above the braided band, securing it with bobby pins to match your hair color. A 2-3 inch velvet bow works perfectly for most hair types without overwhelming the style.
Pro tip: If your braid feels loose or wispy, try French braiding the small section around the ponytail base instead of a regular three-strand braid — it holds together more securely and looks more refined.
2. Double Dutch Braids Into High Ponytail With Satin Bow
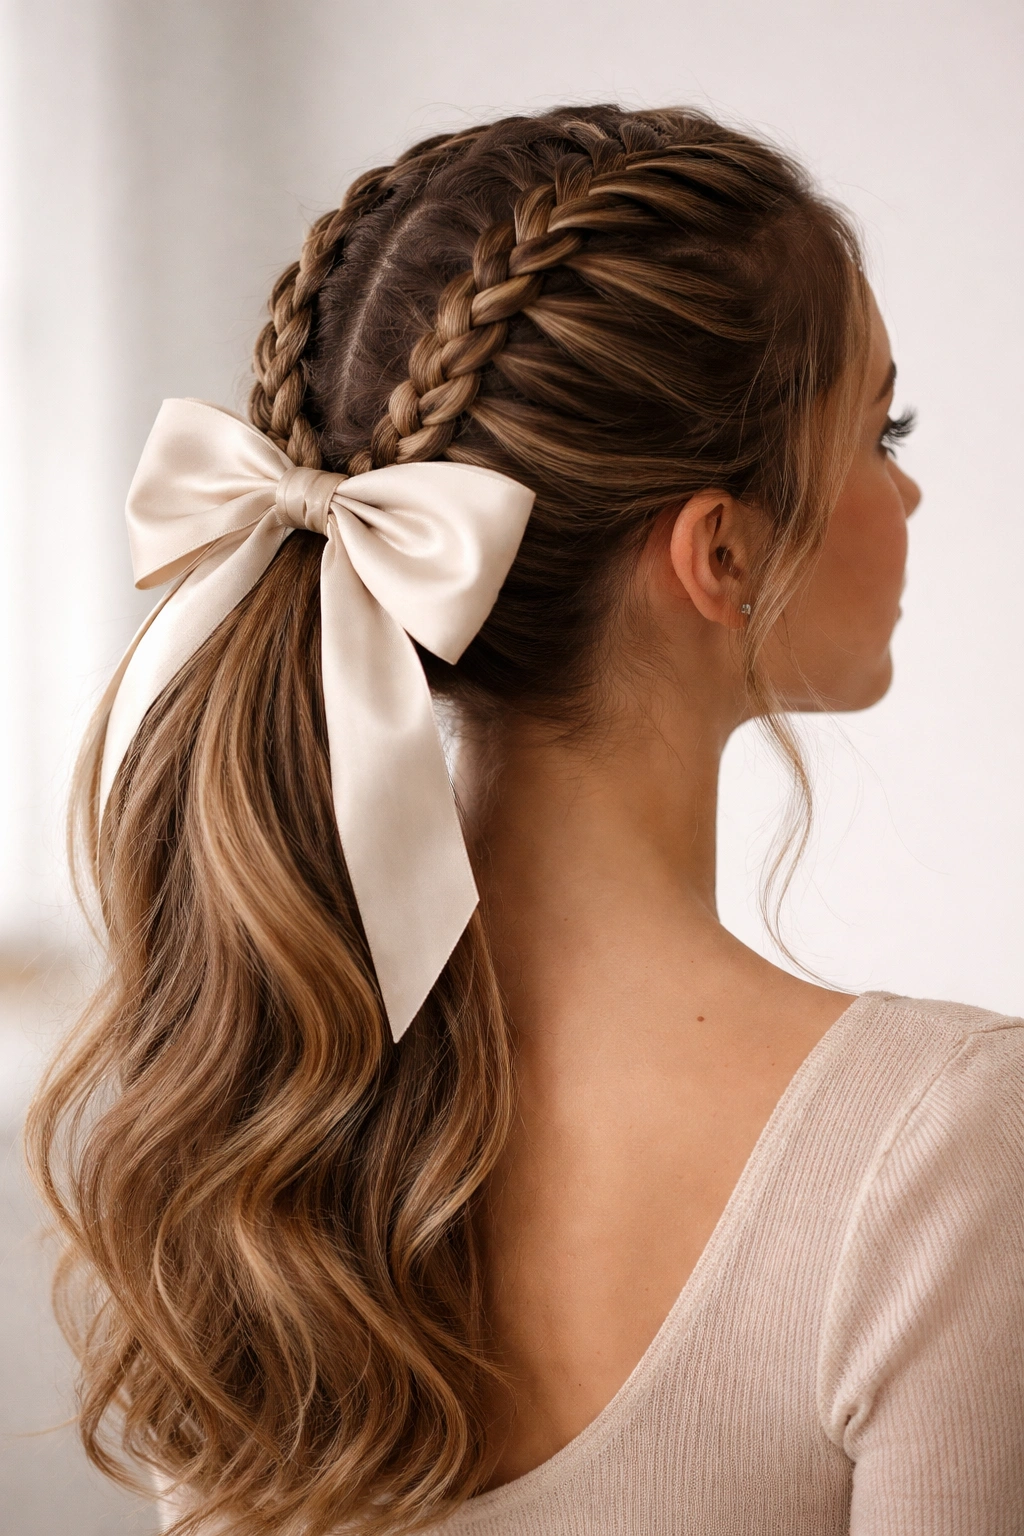
This style starts with two Dutch braids that run from your temples down to the nape of your neck, where they merge into a high ponytail. A satin bow anchors the ponytail base, and the double braids create dimension and visual interest from every angle. The Dutch braid technique (braiding away from the scalp rather than toward it) creates raised, textured braids that photograph beautifully and feel more modern than traditional three-strand braids.
Why Double Braids Create Impact
Two braids automatically look more intricate and intentional than a single braid, which makes this style feel special even though it’s not significantly more difficult to execute. The double braids also distribute the visual weight of the style across the head, making it flattering for a wider range of face shapes. If you have fine or thin hair, two braids actually look fuller than a single thick braid would, because the texture of the braids creates the illusion of density.
Step-by-Step Approach
- Part your hair down the middle from your hairline to your nape, creating two even sections.
- Start the first Dutch braid at your right temple. Take a small section of hair and create an inverted braid (where you cross sections underneath rather than over the top). Add hair from the middle part as you braid downward.
- Repeat on the left side, mirroring the same technique.
- Gather both braids at the nape of your neck and secure them into a high ponytail along with any remaining loose hair.
- Use a satin bow in a contrasting or complementary color to finish. Satin catches light beautifully and has a more luxe feel than cotton or grosgrain ribbons.
Worth knowing: Dutch braids work better when your hair has some texture or grip. If you have very slippery, straight hair, try curling your hair or using a texturizing spray before braiding to help the sections hold together.
3. Twisted Wrap-Around Braid Ponytail With Metallic Bow

Instead of a traditional braid, this style uses twisted sections of hair to create a dimensional wrap around the ponytail base. Twists are faster to create than braids and look equally elegant, making this an excellent option if you’re short on time. A metallic bow — gold, silver, or rose gold — adds a contemporary, slightly edgy touch that elevates the whole look.
The Appeal of Twists Over Traditional Braids
Twists create a similar three-dimensional effect to braids but with a slightly different visual texture. They feel modern and are genuinely quicker to execute, especially if you’re working with thick or longer hair. Twists also work beautifully on different hair textures; they’re particularly flattering on curly or textured hair, where they can define the natural pattern while keeping hair neatly secured.
How to Execute the Twisted Wrap
- Create a smooth, centered ponytail at the height that suits your face shape — generally mid-to-high works best with this style.
- Take two sections of hair from the back of your ponytail, each about 1.5 inches thick.
- Twist each section around the base of the ponytail, wrapping them in opposite directions so they create a spiral effect together.
- Secure both twists with bobby pins and a small elastic to anchor them firmly.
- Select a metallic bow in a width and size proportional to your ponytail. A 1.5-2 inch bow typically works well without looking too large.
- Pin the bow directly above the twisted wrap, securing it with bobby pins.
Insider note: The tighter you twist, the more controlled and polished the final look will be. Loose twists can look a bit undone, which works if that’s your intention, but tighter twists read as more intentional and refined.
4. Fishtail Braid Ponytail With Pearl-Adorned Bow
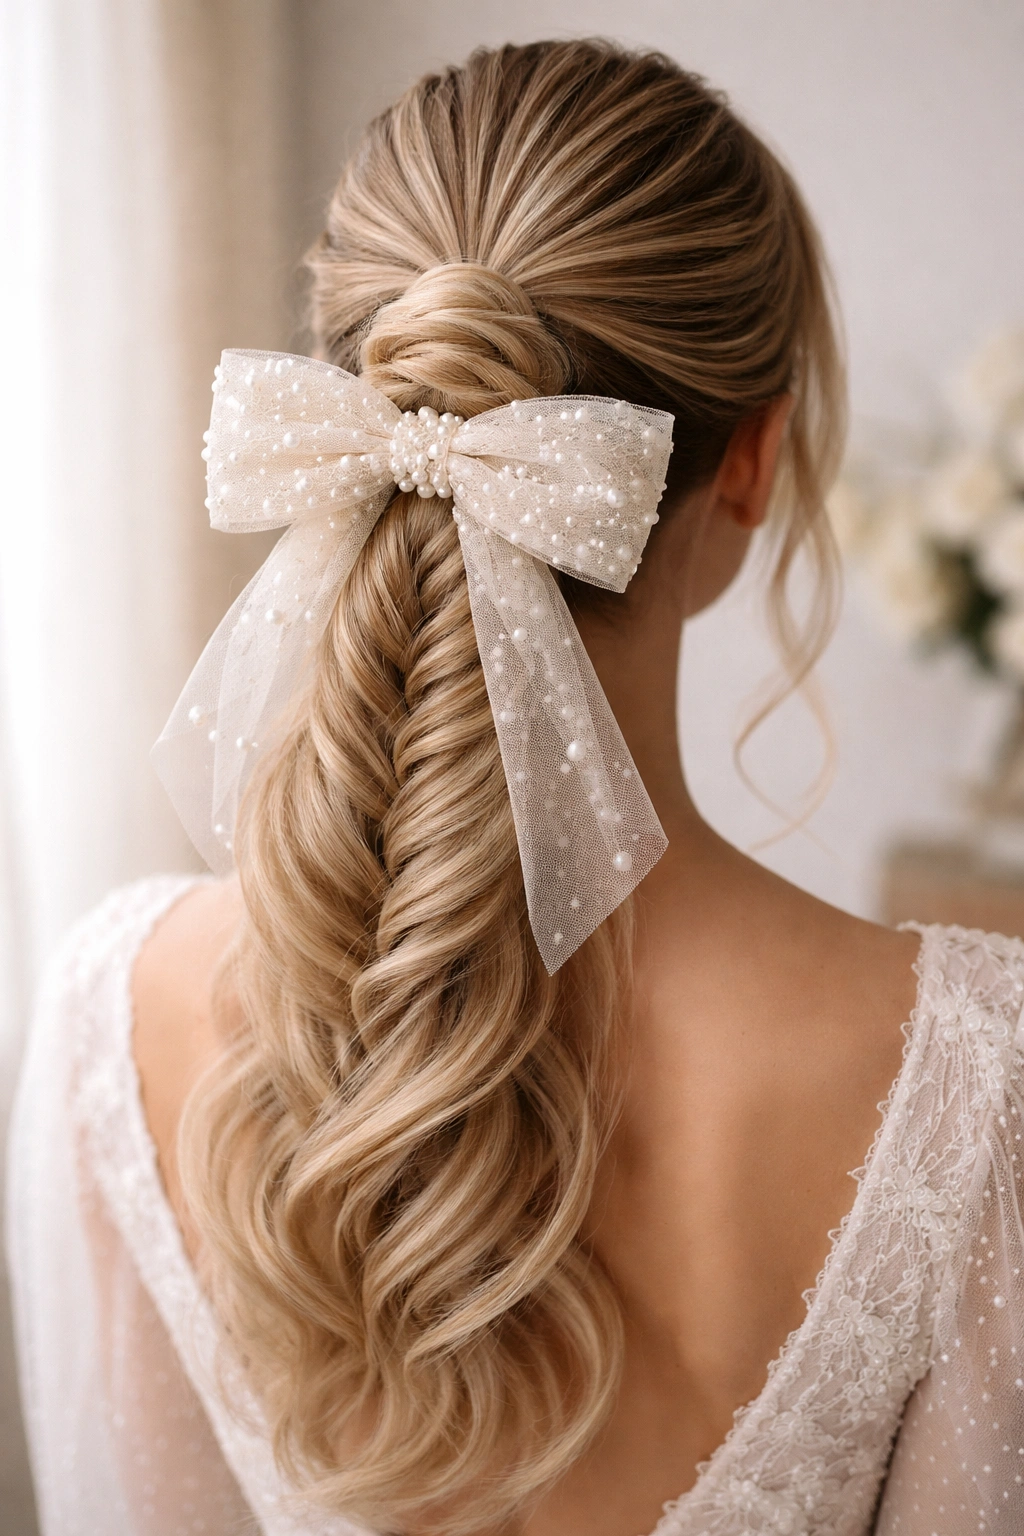
The fishtail braid is distinctive and striking — it uses a two-section braiding technique that creates a delicate, intricate appearance that looks far more complex than it actually is. A fishtail braid wrapping the ponytail base, paired with a bow that has pearl or rhinestone details, creates an immediately elegant and somewhat romantic aesthetic. This style is particularly stunning for events where you want to feel special and put-together.
Understanding the Fishtail Technique
A fishtail braid works by dividing your hair into two sections instead of three. You take a thin piece from the outside of the right section and cross it over to the left section, then take a thin piece from the outside of the left section and cross it to the right — and repeat. It sounds complicated, but once you practice it a few times, your hands learn the rhythm naturally. The result is a braid that looks impossibly intricate, with a delicate, woven texture that’s genuinely beautiful.
Creating This Romantic Style
- Smooth your hair into a high or mid-height ponytail depending on your preference. A bit of texture spray helps the fishtail hold better throughout the day.
- Take a small section of hair from the side of your ponytail and divide it into two equal parts.
- Begin the fishtail braid by taking a thin strand from the outside of the right section and crossing it into the left section. Then take a thin strand from the outside of the left section and cross it into the right.
- Continue this pattern around the base of the ponytail, keeping your tension consistent so the braid looks even and intentional.
- Secure the fishtail braid with a small elastic or bobby pins.
- Attach your pearl-adorned bow with bobby pins, positioning it so the pearls catch light and draw attention to that area.
Pro tip: Fishtail braids look best when they’re slightly loose and have some movement. Don’t pull too tightly, or you’ll lose the delicate, intricate look that makes this braid style so appealing. A little softness is actually intentional and beautiful here.
5. Half-Up Braid With Cascading Bow
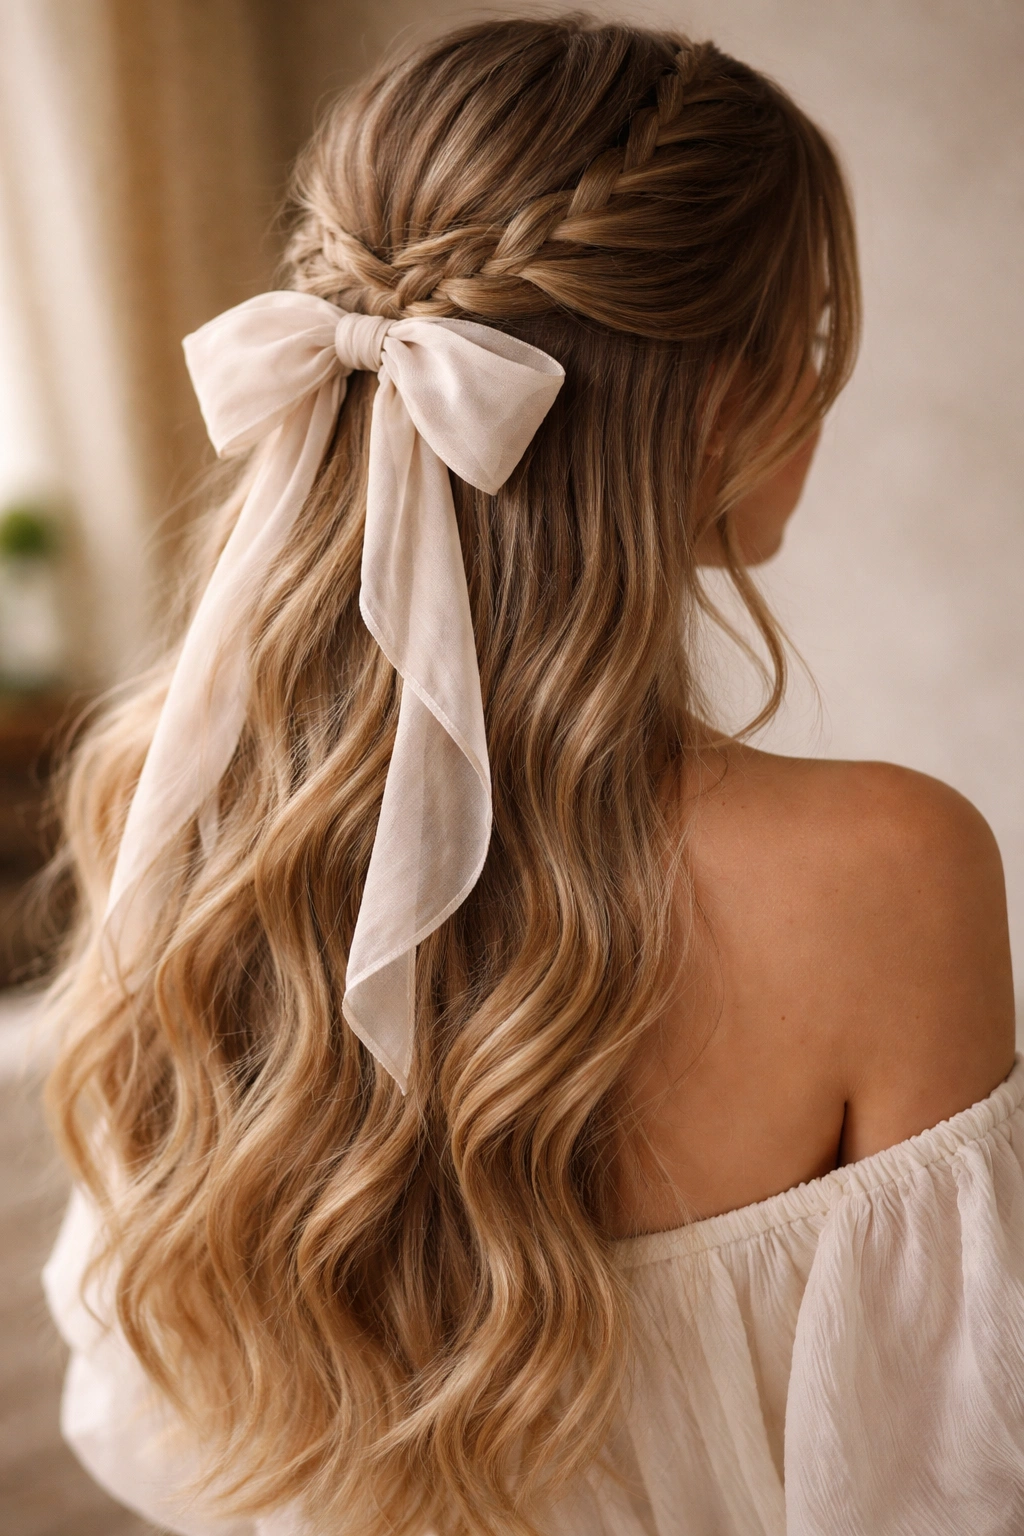
This style takes a different approach entirely — rather than braiding around the base of a full ponytail, you create a half-up style where the top section is gathered into a small ponytail, braided, and anchored with a bow. The lower half of your hair flows free, creating a romantic, soft, Bohemian aesthetic. This works beautifully for anyone with longer hair and is exceptionally flattering for events where you want to look effortlessly elegant.
When Half-Up Styles Shine
Half-up styles sit in a sweet spot between having your hair fully down and fully up. They offer the softness and femininity of down hair while keeping the top section neatly controlled. The addition of a braid through the top section and a cascading bow creates visual interest without looking overdone. This style is particularly flattering if you want to show off longer hair length or a particular cut or color you’ve invested in.
Building the Half-Up Braided Bow Look
- Section the top half of your hair from temples to temples, creating a line across the crown. Leave the lower half completely loose.
- Gather the top section into a small, tight ponytail at the crown or slightly off-center, depending on your preference.
- Create a three-strand, French, or Dutch braid from the ponytail section. The braid can be tight and structured or soft and loose — both work beautifully with this style.
- Secure the braid with a small elastic.
- Position your bow where the small ponytail sits, securing it with bobby pins. A cascading bow (where the long tails of the bow flow down along the braided section) creates extra visual interest.
- Use texture spray or curl-relaxing serum on the lower section to enhance waves or curls if desired, creating contrast with the structured top section.
Worth knowing: This style works best when you have some texture or waves in the lower section. If your hair is completely straight throughout, consider adding beach waves or loose curls to the bottom half before you start, so the two sections look intentionally different in texture.
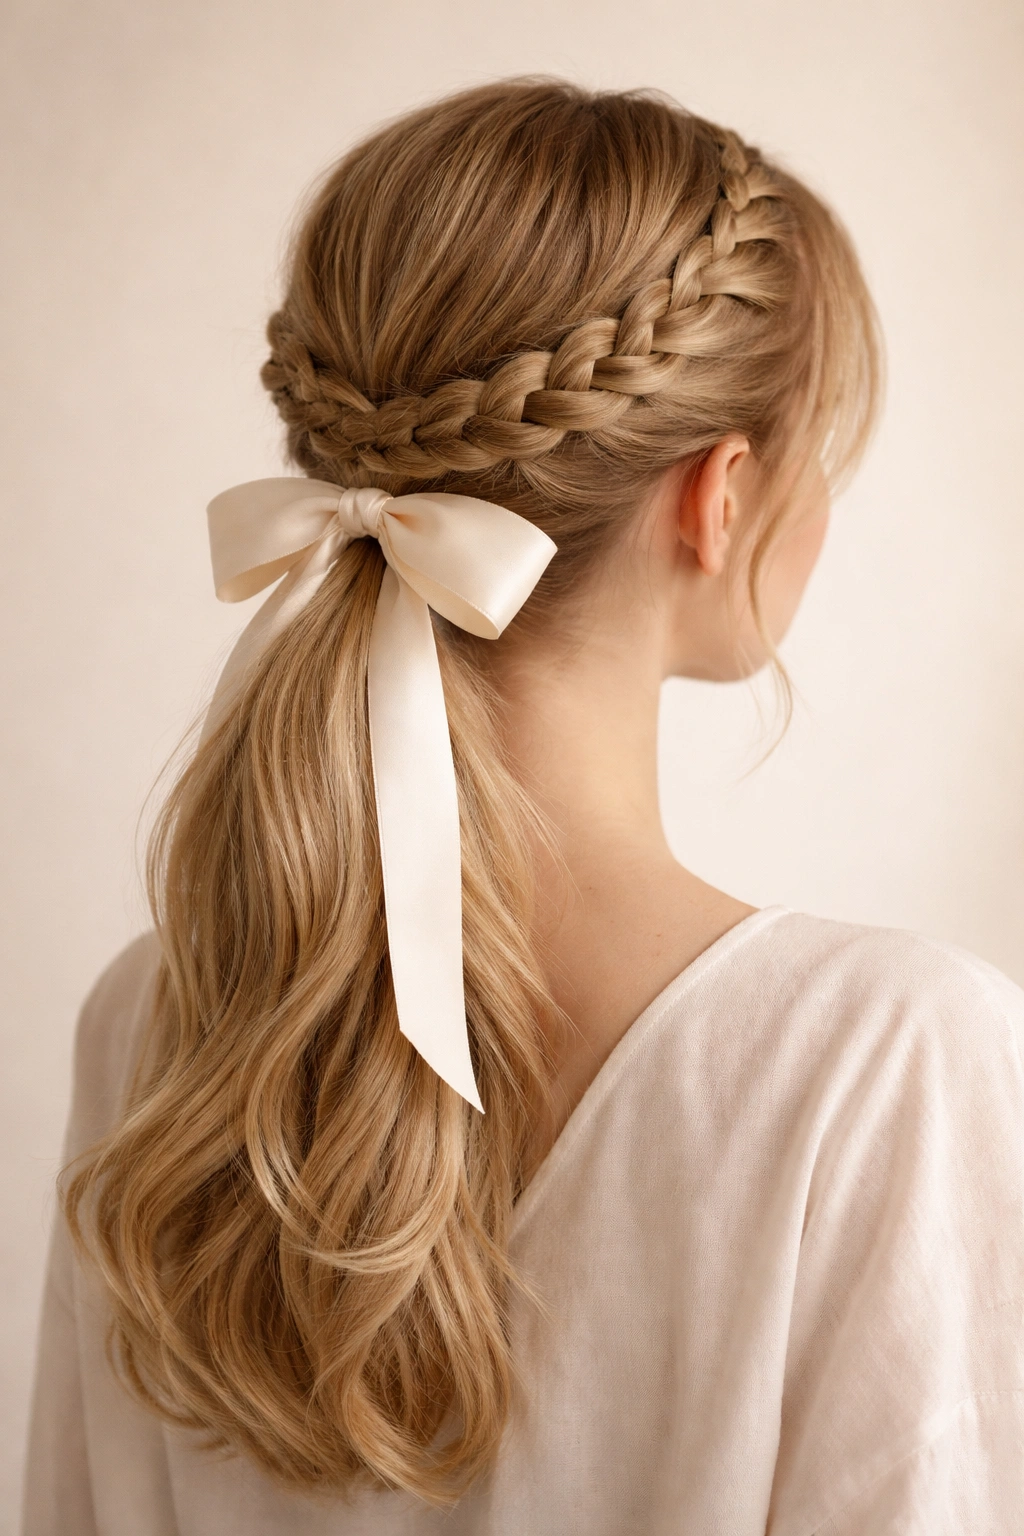
6. Cornrow Base Ponytail With Silk Bow
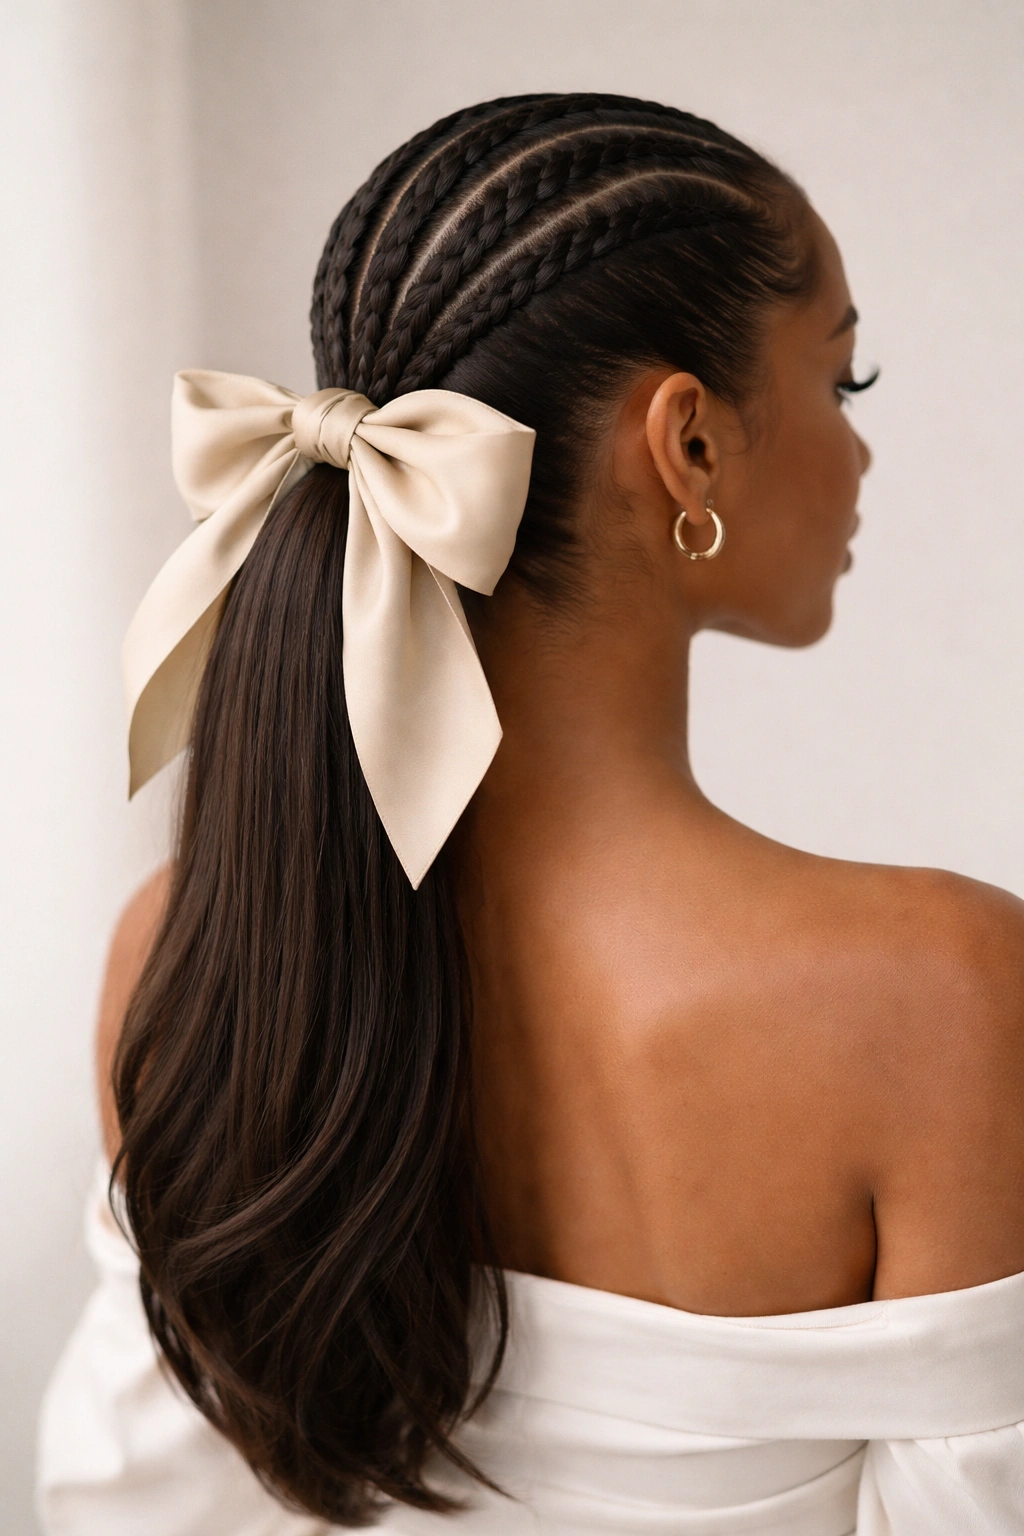
Cornrows leading into a sleek ponytail represent a more intricate, time-intensive style, but the payoff is genuinely worth it. Two or three cornrows run down the back of the head and feed into a tight, smooth ponytail. A silk bow — chosen in a color that either matches your hair or provides striking contrast — finishes the look. This style is particularly stunning on textured hair and has a distinctly modern, fashion-forward aesthetic.
Why Cornrows Into a Ponytail Reads as Sophisticated
Cornrows are an enduring, timeless technique that creates structure and visual interest. When they feed directly into a ponytail, you get the best of both worlds: the intricate detailing of cornrows with the neat, controlled presentation of a ponytail. The style also keeps hair secured throughout the day, making it practical for active situations while still looking intentional and carefully executed.
The Cornrow to Ponytail Technique
- Section your hair into 2-3 vertical sections, depending on your hair density and personal preference. Two sections creates a sleeker look; three sections creates more texture and visual interest.
- Create a cornrow down each section, braiding tightly and maintaining consistent tension so each row looks even and intentional. Start at your hairline or slightly back from it, depending on the effect you want.
- Direct each cornrow down toward your nape, where they’ll merge with your loose hair.
- Gather all the loose hair (the ends of the cornrows plus any unbrained sections) into a tight, high ponytail at the nape or just above it.
- Select a silk bow that complements your style. Silk is crucial here — it’s gentle on hair and has a luxe feel that completes the polished look.
- Secure your bow directly above the ponytail elastic, using bobby pins to anchor it firmly.
Pro tip: Cornrows hold better and look smoother when you braid with tension but not so much tension that you create discomfort or risk hair damage. Practice finding that sweet spot of firm, secure braiding that still feels comfortable throughout the day.
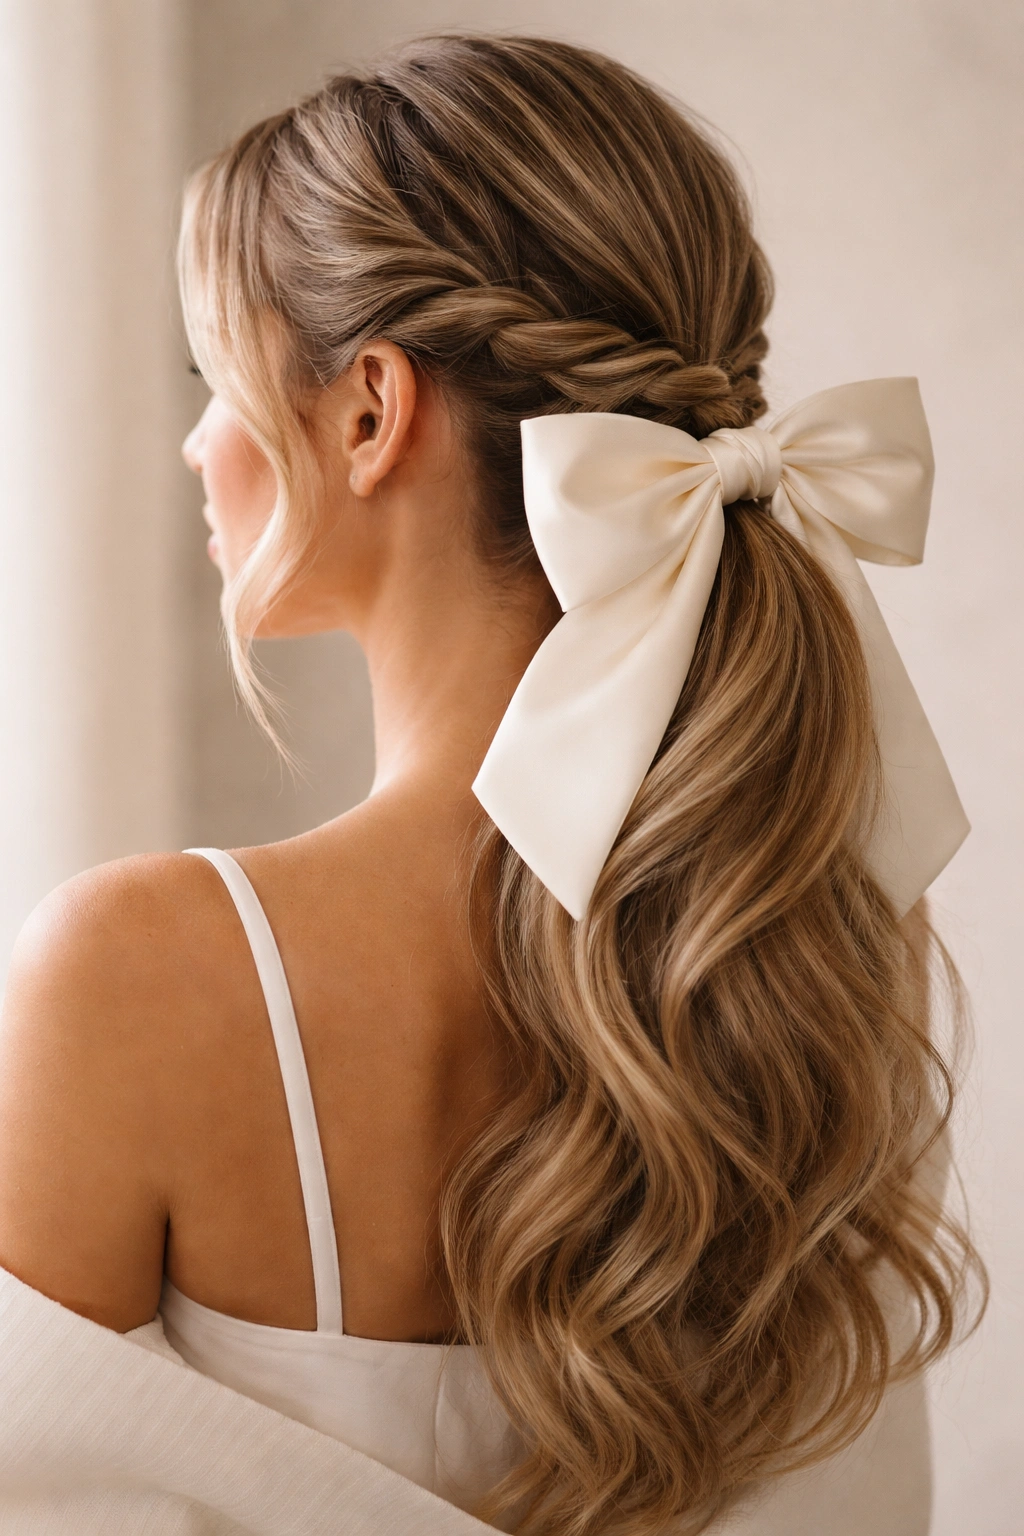
7. French Braid Ponytail With Tulle Bow
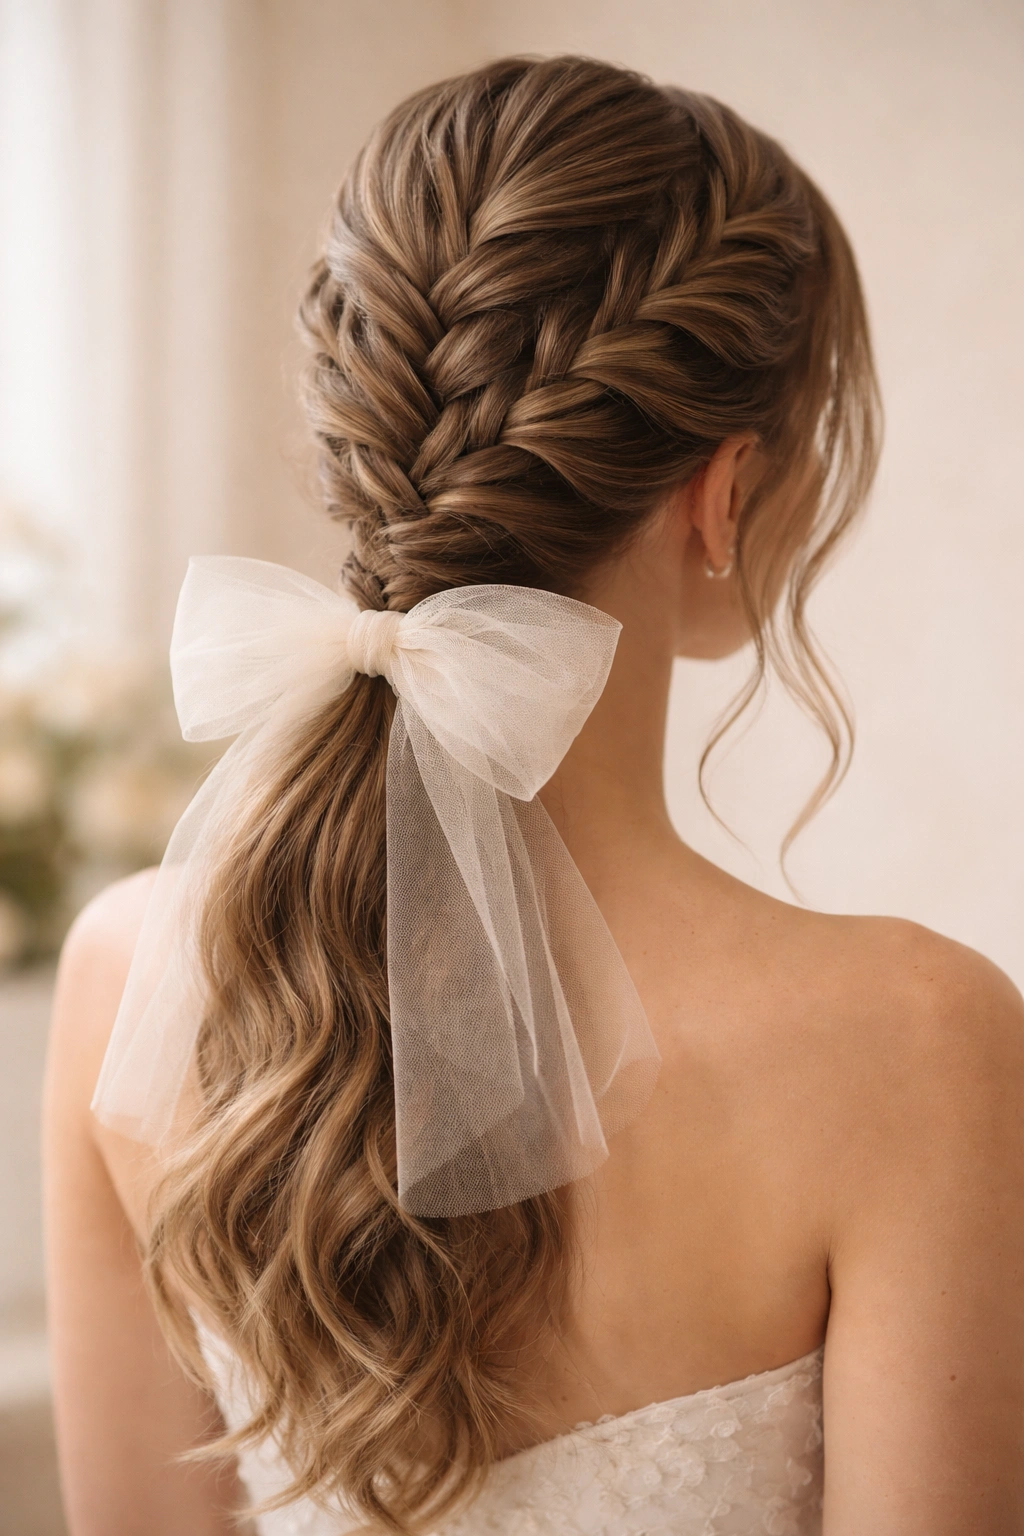
A French braid that starts at your hairline and descends down the back of your head, merging into a low ponytail, creates an incredibly elegant and refined aesthetic. Pair this with a tulle bow — the lightweight, ethereal fabric creates a romantic, almost bridal quality. This style is perfect for special occasions where you want to look feminine and intentionally put-together without appearing overly formal or costume-like.
The Romance of French Braid Into Ponytail
French braids are iconic for a reason — they’re beautiful, they work on virtually every hair type, and they create an immediately polished appearance. When a French braid feeds directly into a ponytail, you get a style that flows naturally from your hairline all the way down your back, creating visual continuity and movement. The tulle bow adds a touch of whimsy and femininity that feels current and fashion-forward.
Steps for This Classic-Meets-Modern Style
- Section a small piece of hair at the crown of your head and divide it into three equal strands.
- Begin the French braid by crossing the right strand over the middle, then the left strand over the new middle. As you continue, add hair from both sides of your head into each section as you cross it, gradually incorporating more and more hair.
- Continue the French braid down the back of your head toward your nape, picking up all your hair as you go.
- When you reach the nape (where you’ve incorporated all your hair), secure the braid into a low ponytail position. You can either continue braiding the ponytail section as a three-strand braid, or secure the ponytail right where the French braid ends.
- Attach your tulle bow with bobby pins directly above the ponytail elastic. Tulle bows look best in soft, romantic colors — blush, ivory, pastels, or neutrals.
Insider note: The looser your French braid, the more romantic and soft it appears; the tighter your braid, the more structured and polished. For special events, many people actually prefer a slightly looser braid paired with a tulle bow, as it creates a dreamy, fairy-tale quality.
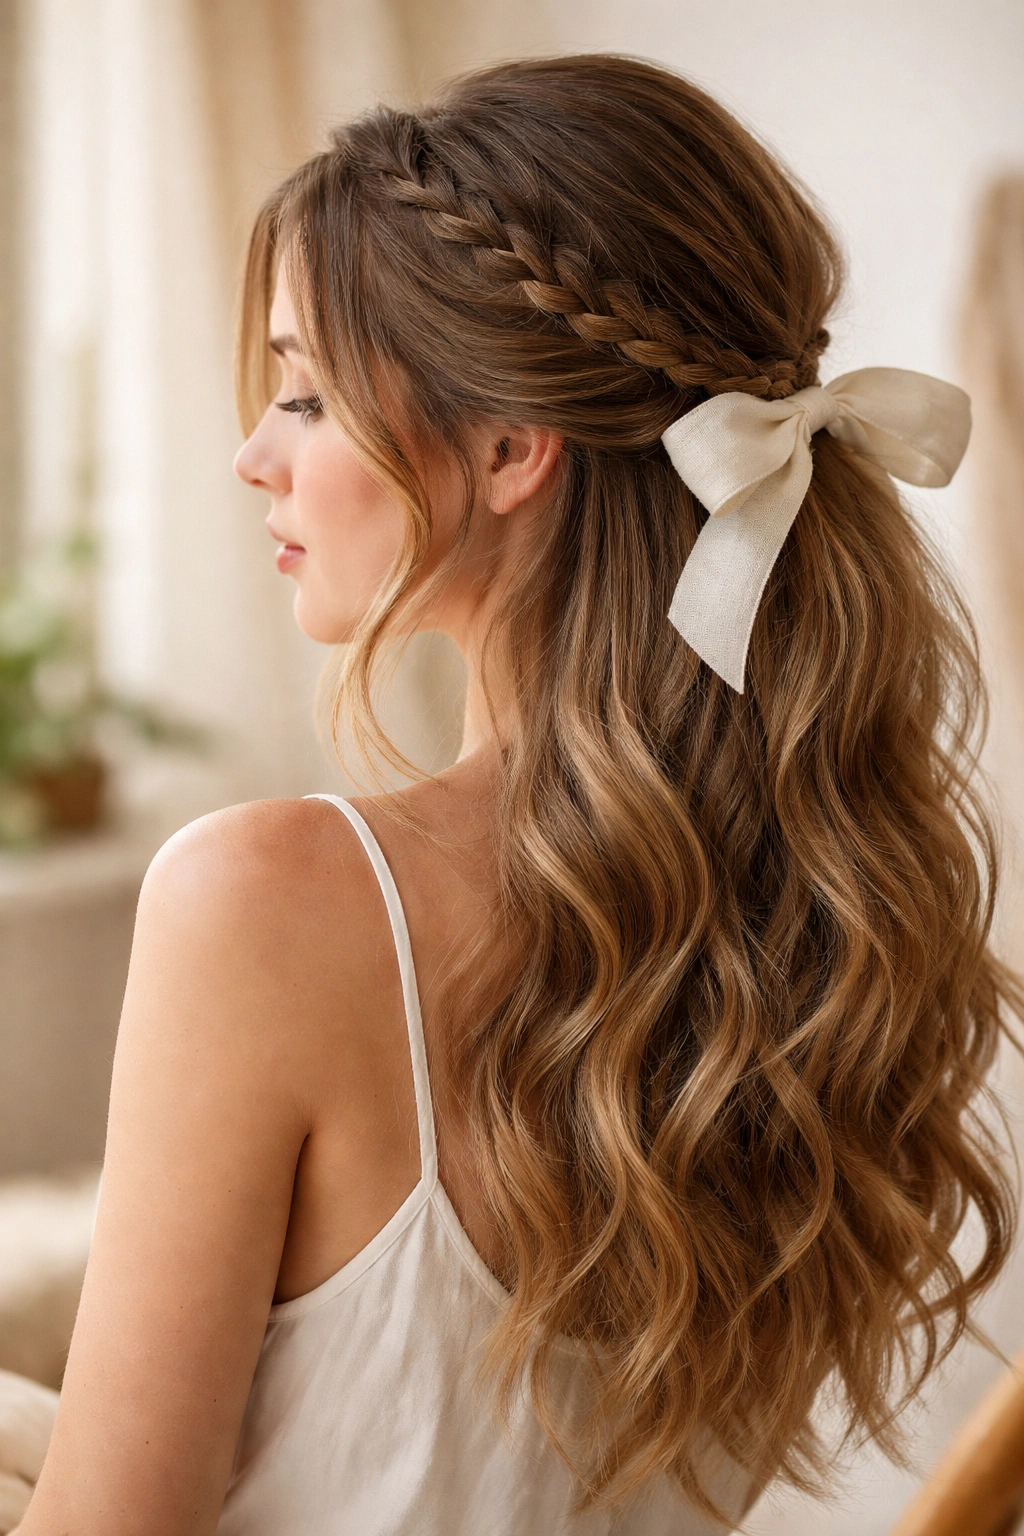
8. Braided Crown Ponytail With Ribbon Bow
Instead of braiding around the base of the ponytail, this style creates a braid that wraps around the sides and back of your head like a crown, with the ponytail sitting centrally in the middle. A ribbon bow accents where the braid circle meets the ponytail. This style creates a distinctive, almost tiara-like effect and is exceptionally flattering for oval or heart-shaped faces.
The Crown Braid Creates Visual Balance
Crown braids (braids that wrap around the head) automatically draw attention upward and create a halo effect around the face. When paired with a centered ponytail, this effect becomes even more pronounced. The style reads as intentional and artistic, and it’s far less common than traditional ponytail braids, so it stands out as something special without looking costumey or over-the-top.
How to Create the Braided Crown Effect
- Start with a center part running from your forehead to your nape, or slightly off-center if you prefer asymmetrical balance.
- Create a Dutch or French braid starting at one temple, braiding across the back of your head and finishing at the opposite temple. Think of it as a headband of braid.
- Secure the end of your braid with bobby pins on the opposite side from where you started.
- Gather all your hair (both the loose sections and the bottom sections of your braid) into a centered, high ponytail in the middle-back of your head.
- Attach a ribbon bow where the braid meets the ponytail, creating a focal point. A contrasting ribbon color (metallic, patterned, or a bold color) looks stunning with this style.
- Gently loosen the braid strands slightly for a soft, romantic effect, or keep them tight for a more structured appearance.
Worth knowing: This style requires a bit more practice than simple single braids, so don’t be discouraged if your first attempt isn’t perfect. The beauty of the crown effect makes the effort worthwhile once you’ve practiced it a few times.
9. Loose Waves With Braided Accent and Fabric Bow
For a more relaxed, undone aesthetic, this style pairs loose, flowing waves with a small accent braid and a fabric bow. Rather than braiding all the way around a ponytail base, you create a single, loose braid as an accent element and secure it along with a full ponytail of loose waves. A fabric bow — perhaps in linen, cotton, or other textured material — anchors the style while maintaining its intentionally casual vibe.
When Undone Elegance Works Best
Not every occasion calls for a tight, structured hairstyle, and this version acknowledges that. The loose waves feel relaxed and confident; the small accent braid shows intentionality; and the fabric bow ties it all together without overcomplicating things. This style works beautifully for casual events, creative workplaces, weekend hangouts, or any situation where you want to look polished but not overly formal.
Creating Effortless Texture
- Prepare your hair with waves or curls using a curling iron, heat-free methods, or by sleeping in braids the night before. You want soft, loose waves rather than tight curls.
- Create a low ponytail at the nape of your neck, leaving a few face-framing pieces loose if you prefer.
- Take a small section from the side of your ponytail and create a loose, flowing three-strand braid. Gently pull on the sides of the braid to make it look softer and fuller.
- Wrap this accent braid around the base of the ponytail.
- Secure everything with bobby pins and a small elastic.
- Attach your fabric bow (try cotton, linen, or canvas for a casual feel) directly above the braided band.
- Gently tousle the ponytail to ensure the waves look loose and intentional rather than tied too tightly.
Pro tip: This style actually looks better if you don’t blow-dry your hair completely smooth. A bit of natural texture or the texture from air-drying creates the perfect base for this relaxed aesthetic.
10. Multi-Braided Ponytail With Statement Bow
Rather than a single braid around the base, this style incorporates three to five smaller braids that wrap around the ponytail base in a layered effect. Each small braid sits slightly offset from the others, creating dimension and visual interest. A larger, more statement-making bow — perhaps with tassels, multiple layers, or bold coloring — completes the look. This is the style to choose when you want maximum visual impact and don’t mind spending a bit more time on your hair.
Why Multiple Braids Create Drama
One braid is elegant; multiple braids are striking. The layered effect automatically draws the eye and creates a focal point that can’t be ignored. This style works particularly well if you have thick hair (which can accommodate multiple braids without looking overwhelming) or if you’re going for a bold, fashion-forward aesthetic.
Building Layers of Braided Interest
- Create a high or mid-height ponytail and secure it tightly with an elastic.
- Divide the bottom section of your ponytail into 3-5 small sections, depending on your hair thickness and the drama level you want.
- Create a separate small braid from each section. These can be three-strand braids, fishtail braids, or twist braids — mix and match for visual variety.
- Secure each braid individually with a small elastic or bobby pin.
- Arrange the braids around the base of the ponytail in a staggered, overlapping pattern.
- Select a statement bow — something larger, patterned, or with interesting details like tassels, rhinestones, or multiple layers.
- Anchor the bow over the braided section with multiple bobby pins, ensuring it’s absolutely secure.
Insider note: If you’re using multiple different types of braids (fishtail, three-strand, twist), make sure they’re all the same general tightness and size so the combined effect looks intentional rather than chaotic.
11. Bubble Braid Ponytail With Ribbon Bow
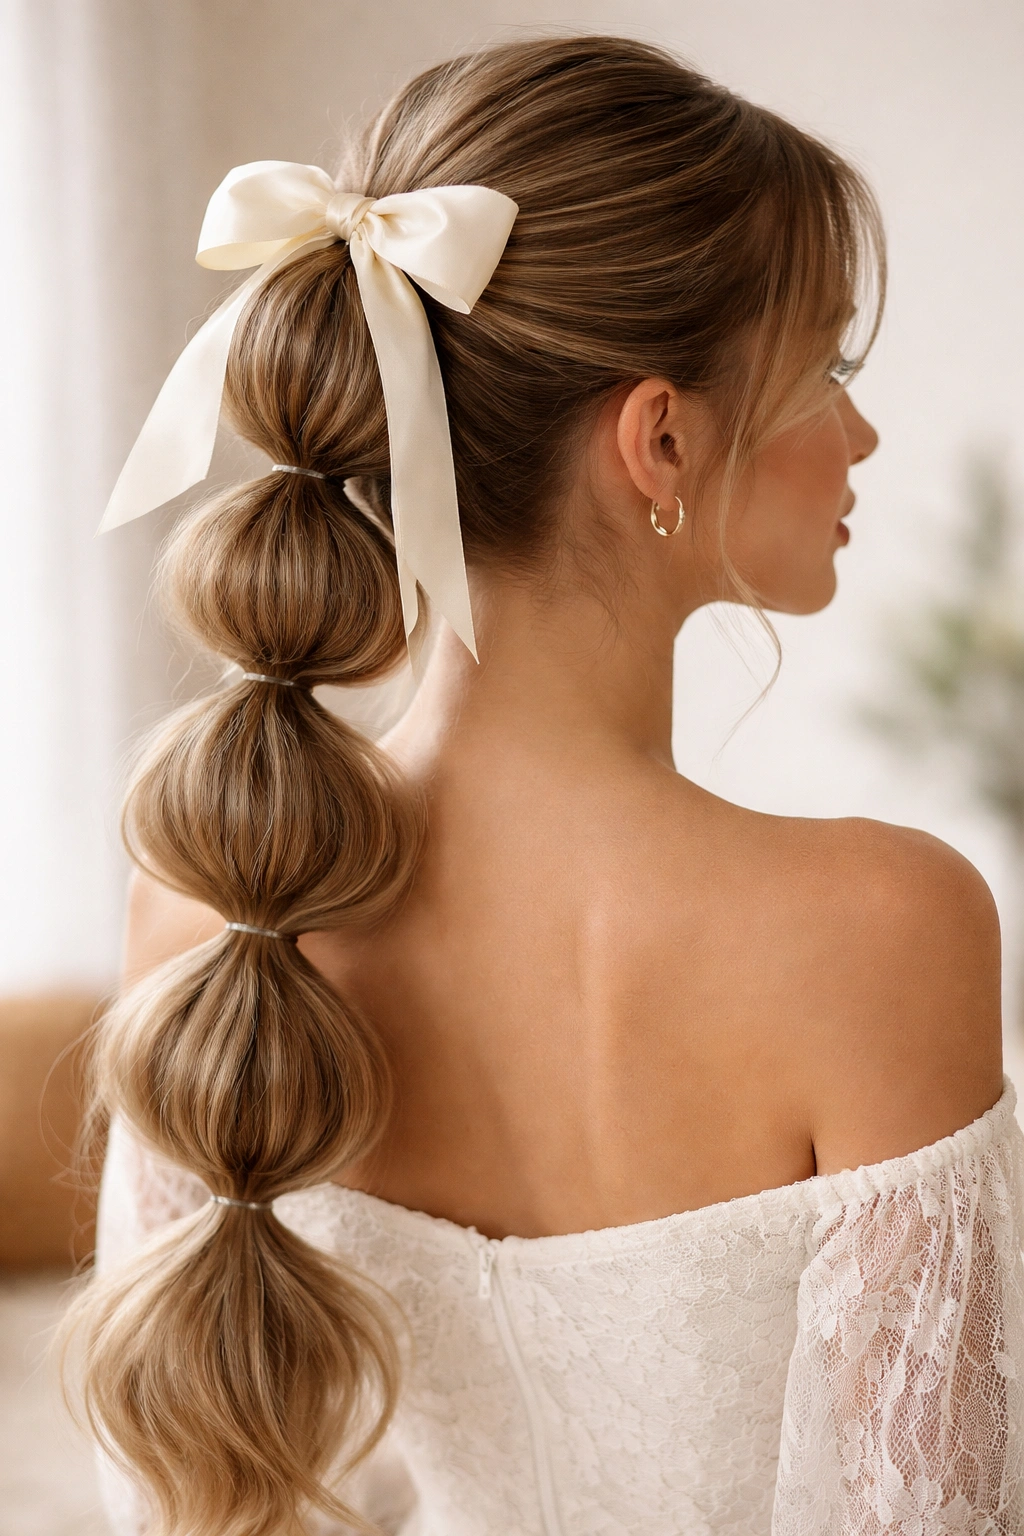
A bubble braid is created by making a series of ponytails down the length of a braid section, then gently pulling the hair between each elastic to create “bubbles” of fluffy texture. When applied to a braided ponytail base, bubble braids create a playful, dimensional, almost sculptural effect. A ribbon bow anchors the bubbles and adds a charming, youthful quality. This style is particularly popular for younger hair-wearers but works beautifully on anyone who wants a fun, distinctive look.
The Bubble Braid Appeal
Bubble braids are inherently eye-catching and different. They create three-dimensional texture that photographs beautifully and immediately signals that the wearer put thought and effort into their hairstyle. Unlike slick, tight braids, bubble braids celebrate volume and play, making them perfect for casual events, parties, or any situation where you want to stand out with a fun, creative style.
Creating the Bubble Effect
- Create your base ponytail at the height you prefer — bubbles work at any height, though they’re particularly striking on higher ponytails.
- Create a three-strand or Dutch braid around the base of your ponytail, or create a braid through the ponytail itself if you prefer the bubbles to run down the length of the ponytail.
- Secure your braid with multiple small elastics placed about 1.5-2 inches apart down the length of the braid.
- Gently pull the sections of hair between each elastic outward and upward, creating fluffy “bubbles.” The more you pull, the fuller and more dimensional the bubbles become.
- Attach your ribbon bow at the base where the bubbles begin, securing it with bobby pins. A contrasting color or patterned ribbon looks particularly striking with bubble braids.
Worth knowing: Bubble braids hold much better throughout the day if you use elastics with a bit of grip (like fabric-covered elastics) rather than slippery metal ones. Also, gently spritz the bubbles with a light hairspray to help them maintain their shape and fullness.
12. Twisted Side Braid Ponytail With Oversized Bow
A side ponytail, elevated by a twisted braid that wraps around the base, paired with an oversized bow creates a bold, fashion-forward, almost avant-garde aesthetic. Rather than placing the ponytail at the center back, you position it to the side of your head. The twists wrap around this side ponytail, and a dramatically oversized bow becomes the focal point. This style works best on longer hair and creates an immediately striking impression.
The Drama of Side-Positioned Style
Centering something in the back is classic; moving it to the side immediately feels more interesting and contemporary. Combined with a twisted base treatment and an oversized bow, this style reads as intentional, artistic, and fashion-aware. It’s the kind of hairstyle that people notice and remember, making it perfect for events where you want to make a statement.
Executing the Side Ponytail With Drama
- Create a sleek ponytail positioned to one side of your head — either at the side-back or the side-low position, depending on your preference and hair length. Use a fine-tooth comb and smoothing product to keep everything neat and controlled.
- Take two thin sections from near the ponytail elastic.
- Twist each section around the base of the side ponytail, spiraling in opposite directions so they create an intertwined effect.
- Secure the twists with bobby pins.
- Select an oversized bow — think 3-4 inches wide or larger. The bow should be substantial enough to balance the side-positioned ponytail and draw the eye.
- Pin the oversized bow directly above or slightly overlapping the twisted base, using multiple bobby pins to ensure it’s absolutely secure. An oversized bow needs firm anchoring.
- Consider adding subtle texture to the ponytail itself (soft waves or slight curling) to balance the boldness of the oversized bow and twisted base.
Pro tip: Oversized bows work best with higher, more dramatic styling. If you’re wearing this look, consider pairing it with statement jewelry, bold makeup, or other fashion-forward elements to ensure the overall aesthetic feels cohesive rather than one hairstyle element standing alone.
Final Thoughts
Each of these twelve braided ponytail bow styles offers something distinct, whether you’re drawn to classic elegance, playful romance, or bold, fashion-forward drama. The foundation of all of them remains the same — clean, intentional braiding paired with a bow that feels right for the occasion and your personal style. The magic happens when you choose the specific version that resonates with your aesthetic and your comfort level with styling complexity.
The beautiful truth about braided ponytails with bows is that they reward practice. Your first attempt might not feel perfect, but with each repetition, your hands learn the motions and the style becomes faster and more polished. Start with whichever style speaks to you, practice it until it feels natural, then gradually explore the others as you build confidence and skill.
Remember that the bow itself can completely change the mood of the hairstyle. Velvet reads formal and luxe; silk feels romantic; tulle becomes ethereal; ribbons become playful or sophisticated depending on the pattern and color. Don’t underestimate how much impact the bow choice has on the overall aesthetic — sometimes switching from a velvet bow to a fabric bow is all you need to transform the same braided ponytail from evening-wear to casual-cool.