Half up braided ponytails are the sweet spot between “I just rolled out of bed” and “I spent two hours on my hair.” They’re elegant enough for occasions that matter but approachable enough to style on a regular Tuesday morning. If you have long hair and you’re tired of wearing it down or scraping it all the way back into a full ponytail, this style strikes the perfect balance—and there are way more variations than most people realize.
The beauty of a half up braided ponytail is how it works for virtually every hair texture and face shape. Whether your hair is thick and wavy, fine and straight, or somewhere in between, you can adapt these styles to flatter your features and work with what you’ve got. Long hair also gives you the canvas you need to experiment with different braid types, thickness levels, and texture combinations without worrying that your style will look too wispy or sparse.
What makes these hairstyles so versatile is that each one has a distinct personality. Some feel romantic and soft; others look edgy and modern. Some are intricate enough that people will ask you how you did it; others are simple enough to style in under five minutes. The half up braided ponytail works for date night, the office, casual weekends, and even formal events when you choose the right variation. The key is understanding the different braid techniques and knowing how to adjust the look based on what you’re trying to achieve.
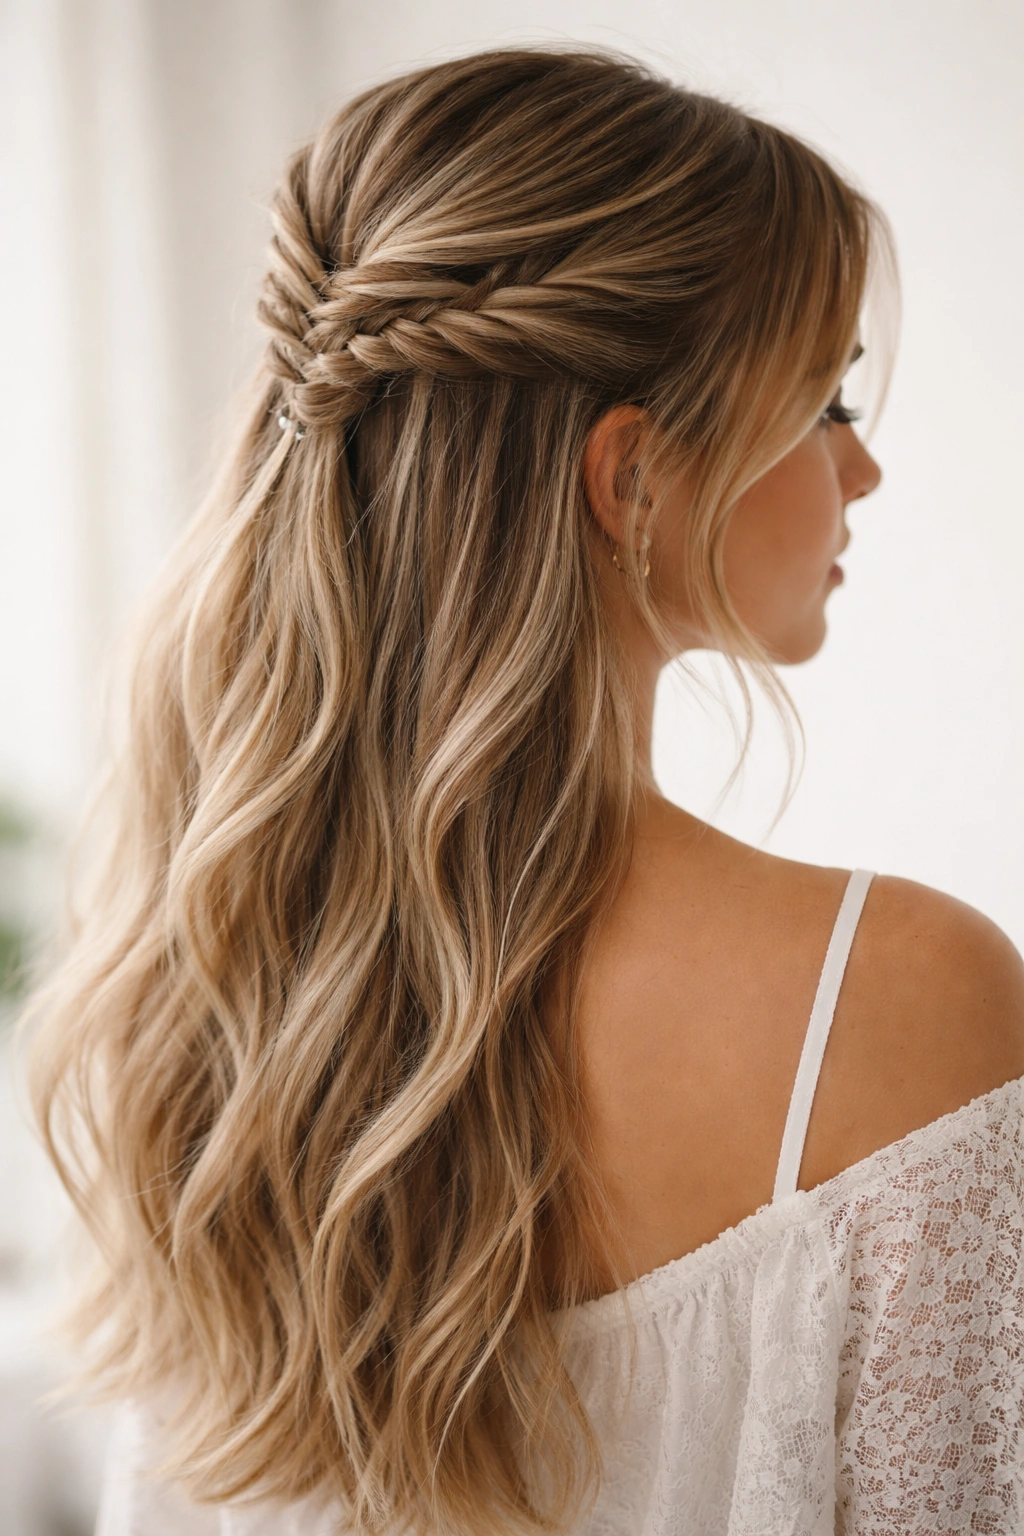
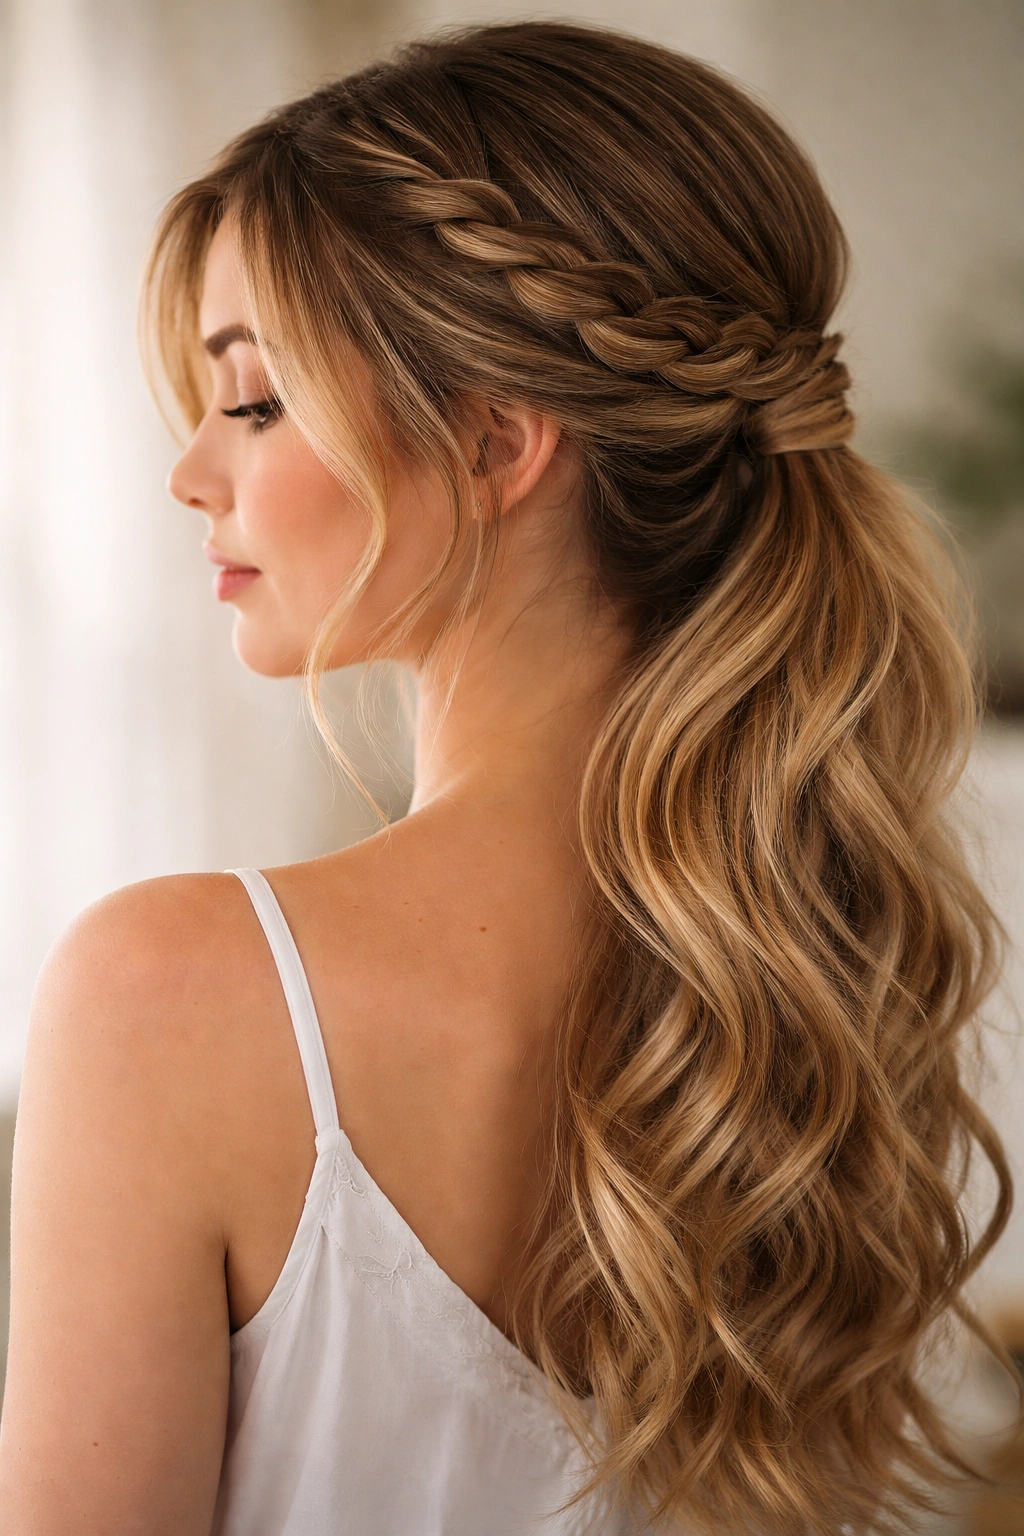
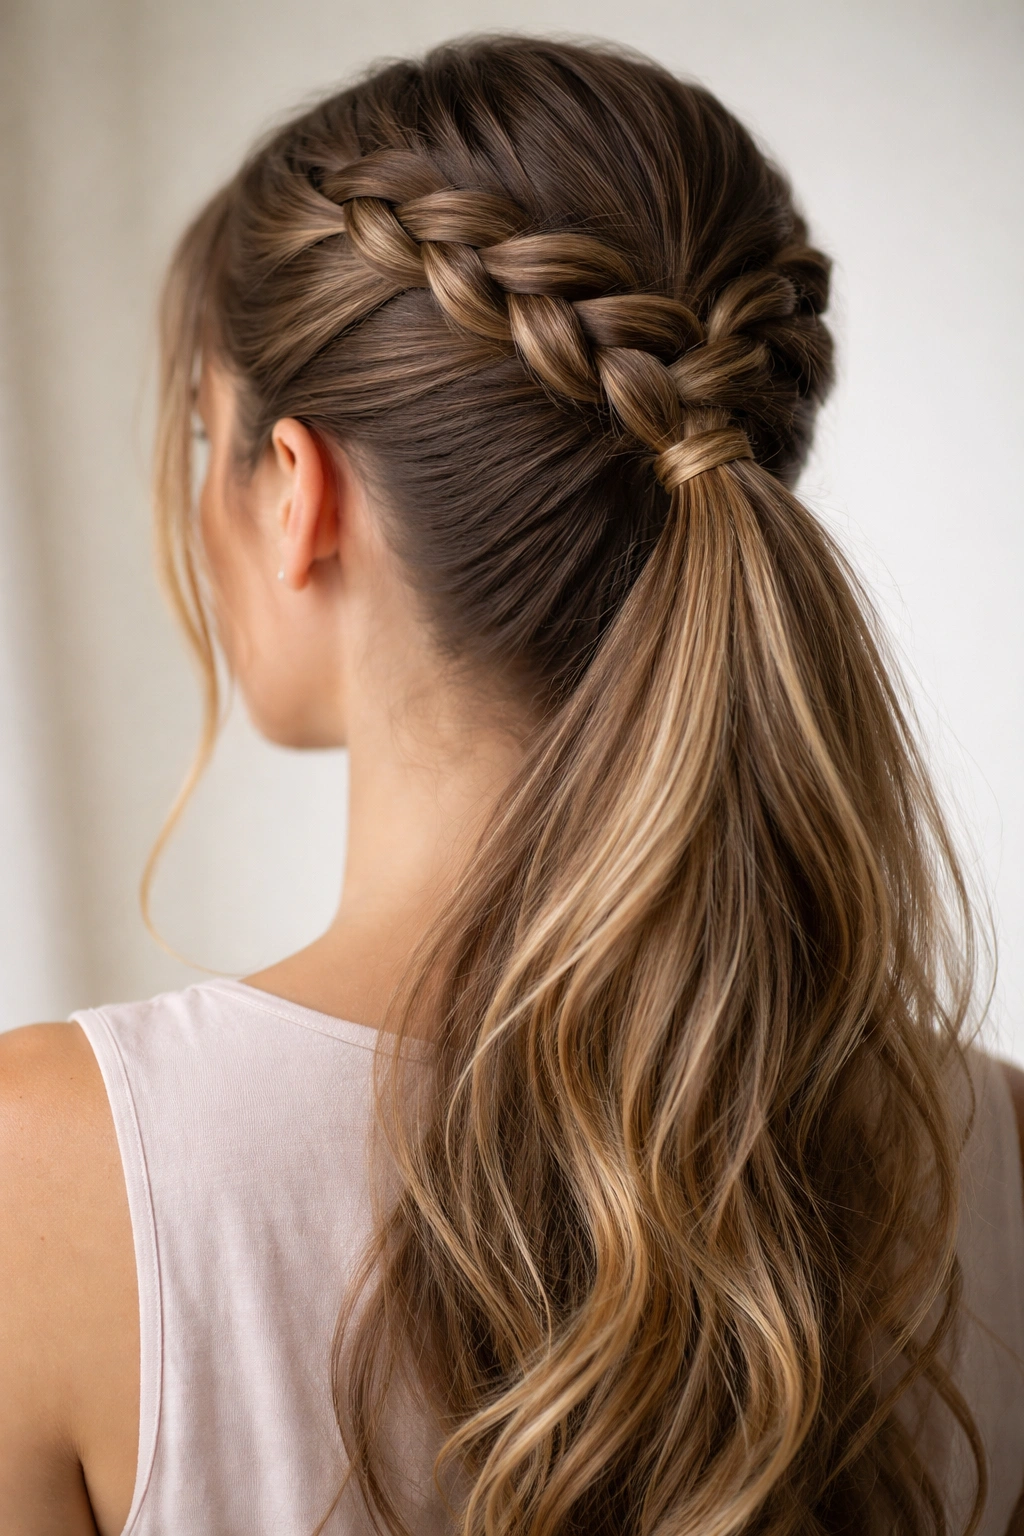
1. Classic Three-Strand Dutch Braid Half Up
The three-strand Dutch braid is the foundation braid that every other variation builds on—it’s the one where you braid “under” instead of “over,” creating that raised, dimensional texture that looks intentional and polished. Starting from your crown and working the braid down to about mid-head height, then securing the rest of your hair into a ponytail, creates a look that’s effortlessly put-together without looking overdone.
Why It Works So Well
This braid style creates immediate visual interest at the top of your head, which draws attention to your face and away from any areas you might feel self-conscious about. The Dutch braid sits prominently against your head, so it becomes a focal point of the style—and because it’s braided “under,” the technique naturally creates texture and dimension that makes even fine hair look fuller. The contrast between the structured, detailed braid and the flowing ponytail below feels intentional and balanced.
How to Style It
- Start with smooth, detangled hair—use a fine-tooth comb and work through any knots from bottom to top
- Create a center or side part, depending on which direction feels natural for your face shape
- Take a section from one side of your part at the crown and divide it into three equal strands
- Cross the right strand under the center, then the left strand under the center (this “under” motion is what makes it Dutch)
- As you continue down, add new hair from the sides of your head into the braid with each movement
- Braid down to approximately the middle of your head, then secure that braid with a small elastic
- Gather all your hair—including the braid—into a low or mid-height ponytail and secure with your main elastic
- Gently pull the edges of the braid to loosen it slightly and create a softer, fuller appearance
Pro tip: If your braid feels too tight or formal, spray it lightly with texture spray before you start—damp hair and added grip make the braid much easier to loosen and shape without it falling apart.
2. Fishtail Braid Half Up with Wispy Strands
The fishtail braid looks infinitely more complicated than it actually is, which is part of its charm. Instead of three thick strands, you’re working with two strands but constantly adding tiny sections to each one, creating that intricate, woven fishtail pattern. When you combine this with leaving out a few face-framing pieces that stay loose and wispy, you get a romantic, effortlessly undone vibe that works for everything from coffee dates to garden parties.
Why It Works So Well
Fishtail braids have a delicate, intricate appearance that makes people assume you spent thirty minutes on your hair when you actually spent ten. The braid naturally sits tighter against your head than a three-strand braid, which means it doesn’t slip or loosen as easily throughout the day. When you leave the wispy strands down, they soften your face and add a romantic element that feels current and fashion-forward without trying too hard.
How to Style It
- Brush your hair smooth and create a deep side part
- On the side with less hair, gently pull out two thin, face-framing sections and set them aside temporarily
- Take the remaining hair and divide it into two equal sections at the crown
- Take a thin piece from the outside of the right section and cross it over to join the left section
- Take a thin piece from the outside of the left section and cross it over to join the right section
- Continue this alternating pattern, working down the back of your head
- Once you reach the middle of your head, secure the braid with a small elastic
- Gather all your hair into a low ponytail, keeping the wispy face-framing pieces out
- Curl or wave the loose strands gently with a 1.25-inch barrel curling iron for softness
Worth knowing: Fishtail braids look best when you don’t pull them too tight—the looser and messier they are, the more expensive and intentional they look.
3. French Braid Half Up with Sleek Finish
The French braid is the classic that never goes out of style, and when you combine it with a sleek, polished ponytail below, you get something that reads as both timeless and current. The key here is creating contrast—the structured, detailed braid on top paired with ultra-smooth, glossy hair in the ponytail creates a striking visual effect that works equally well for a professional setting or a night out.
Why It Works So Well
French braids are universally flattering because they follow the natural contours of your head and frame your face in a way that suits almost every face shape. When you keep the ponytail sleek and shiny, you’re creating visual depth and dimension—the eye is drawn upward to the detailed braid first, then down to the polished ponytail. This combination feels intentional and expensive-looking, even though the technique is straightforward once you practice it a few times.
How to Style It
- Apply a smoothing serum to damp hair and blow-dry straight using a paddle brush to eliminate frizz
- Create your desired part and take a small section from the crown
- Divide this section into three strands and begin a traditional French braid (crossing “over” instead of “under”)
- As you braid down, add new hair from the sides into each strand continuously
- Braid down to about mid-head height and secure with a small, clear elastic
- Use a fine-tooth comb or brush to smooth any flyaways around the braid
- Gather all your hair into a ponytail at the base of your braid, pulling it as tight and sleek as possible
- Use a fine-tooth comb and pomade or gel to smooth the ponytail’s base and any pieces around your face
- Optionally, use a flat iron on the lowest setting to smooth the ponytail even further
Quick note: If you have texture or waves naturally, this style actually works better when you embrace a slight bend rather than forcing it completely straight—a soft wave paired with the braid looks current and intentional.
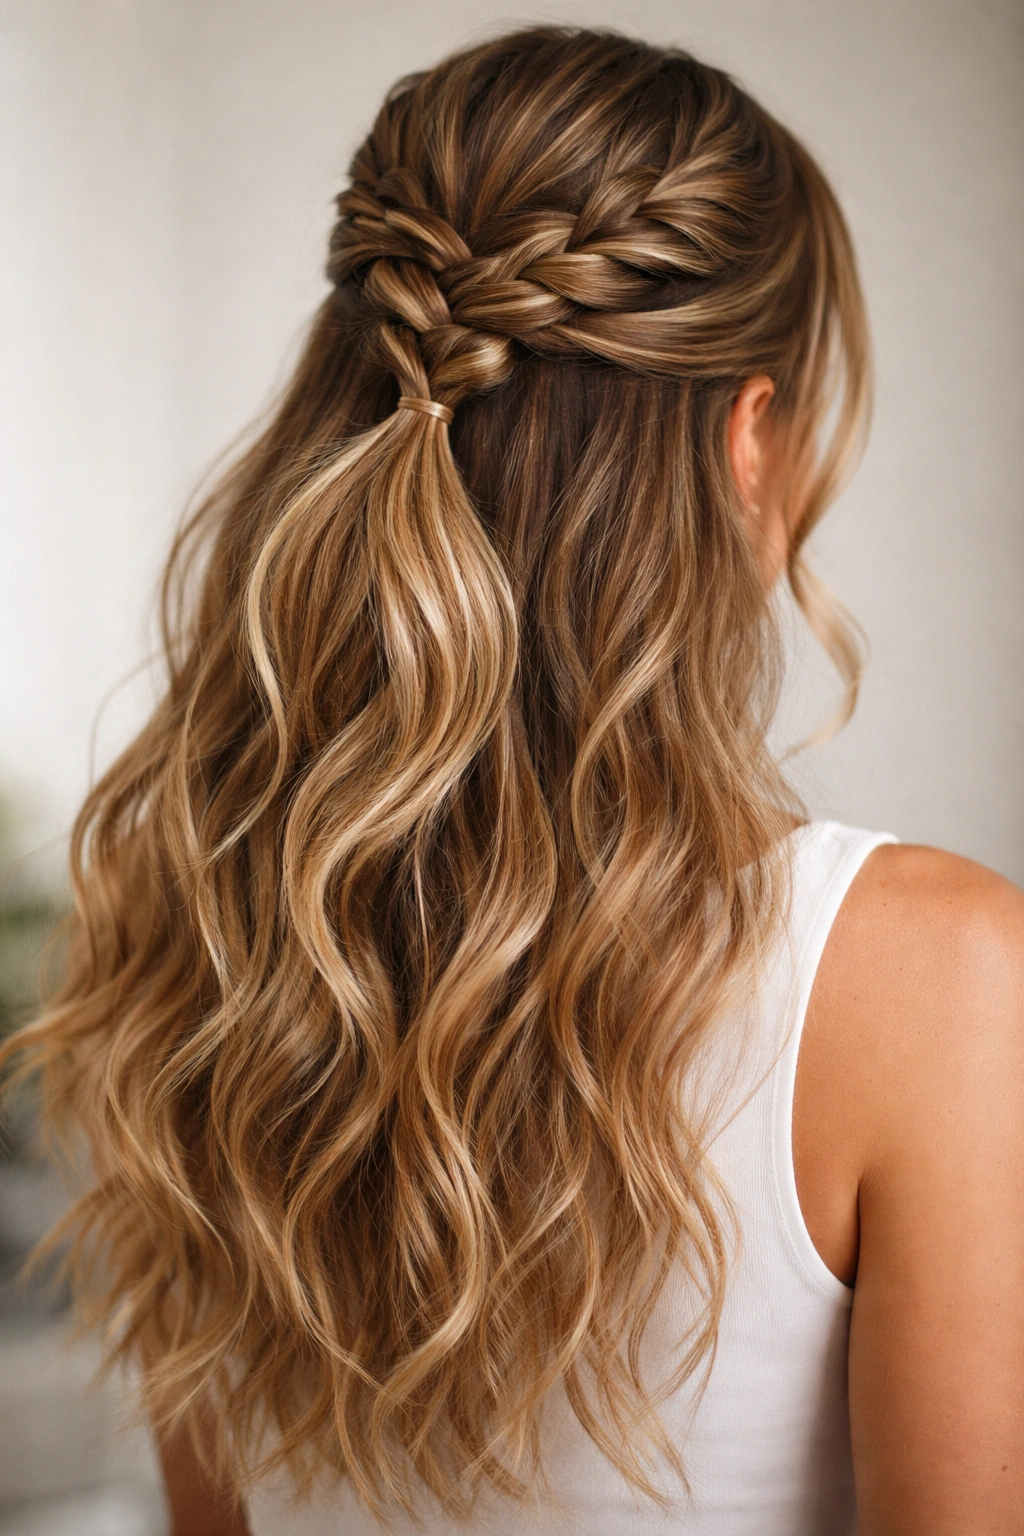
4. Double Braid Half Up (Two French Braids)
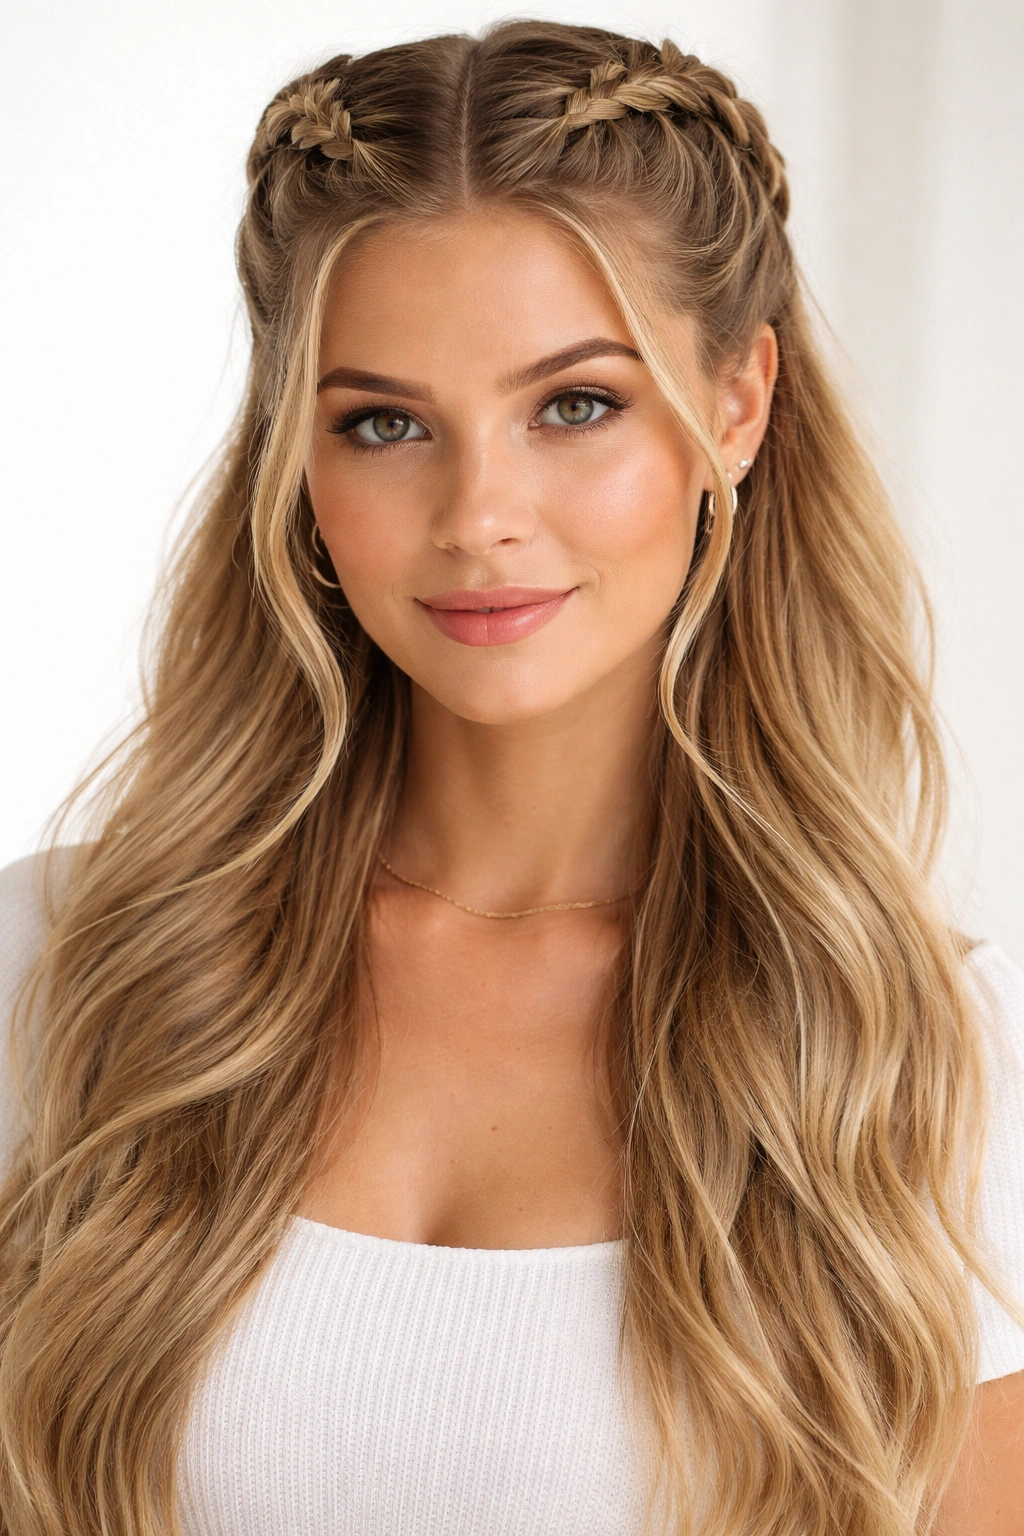
If one braid feels like it needs more visual interest, two braids on either side of your head create a look that’s playful, balanced, and surprisingly versatile. Starting both braids from your temples and bringing them back to meet in a single ponytail creates a frame for your face that’s flattering and modern, and it distributes the weight evenly so the style lasts all day without slipping.
Why It Works So Well
Two braids create symmetry, which our brains naturally find pleasing and balanced. The style works across a massive range of occasions—it can read as sweet and playful for a casual vibe, or polished and intentional for something more formal, depending on how you finish it. Because you’re splitting the braid into two sections, they’re thinner individually, which means they’re easier to maintain and less likely to slip throughout the day.
How to Style It
- Section your hair down the middle with a fine-tooth comb, creating two equal halves
- Start a French braid on one side at your temple, incorporating hair from that side as you work back
- Braid down to about the middle of your head and secure with a small elastic
- Repeat on the opposite side, creating an even, matching braid
- Gather both braids plus the remaining hair into a single ponytail at the base where the braids meet
- Gently pull and loosen both braids to create softness and dimension
- If desired, curl the ponytail section loosely with a 1.25-inch barrel curling iron
Pro tip: This style looks best when your two braids are as close to identical in thickness and tightness as possible—stand in front of a mirror to compare them from the side and make small adjustments before you secure the final ponytail.
5. Braided Crown Half Up with Twisted Ponytail
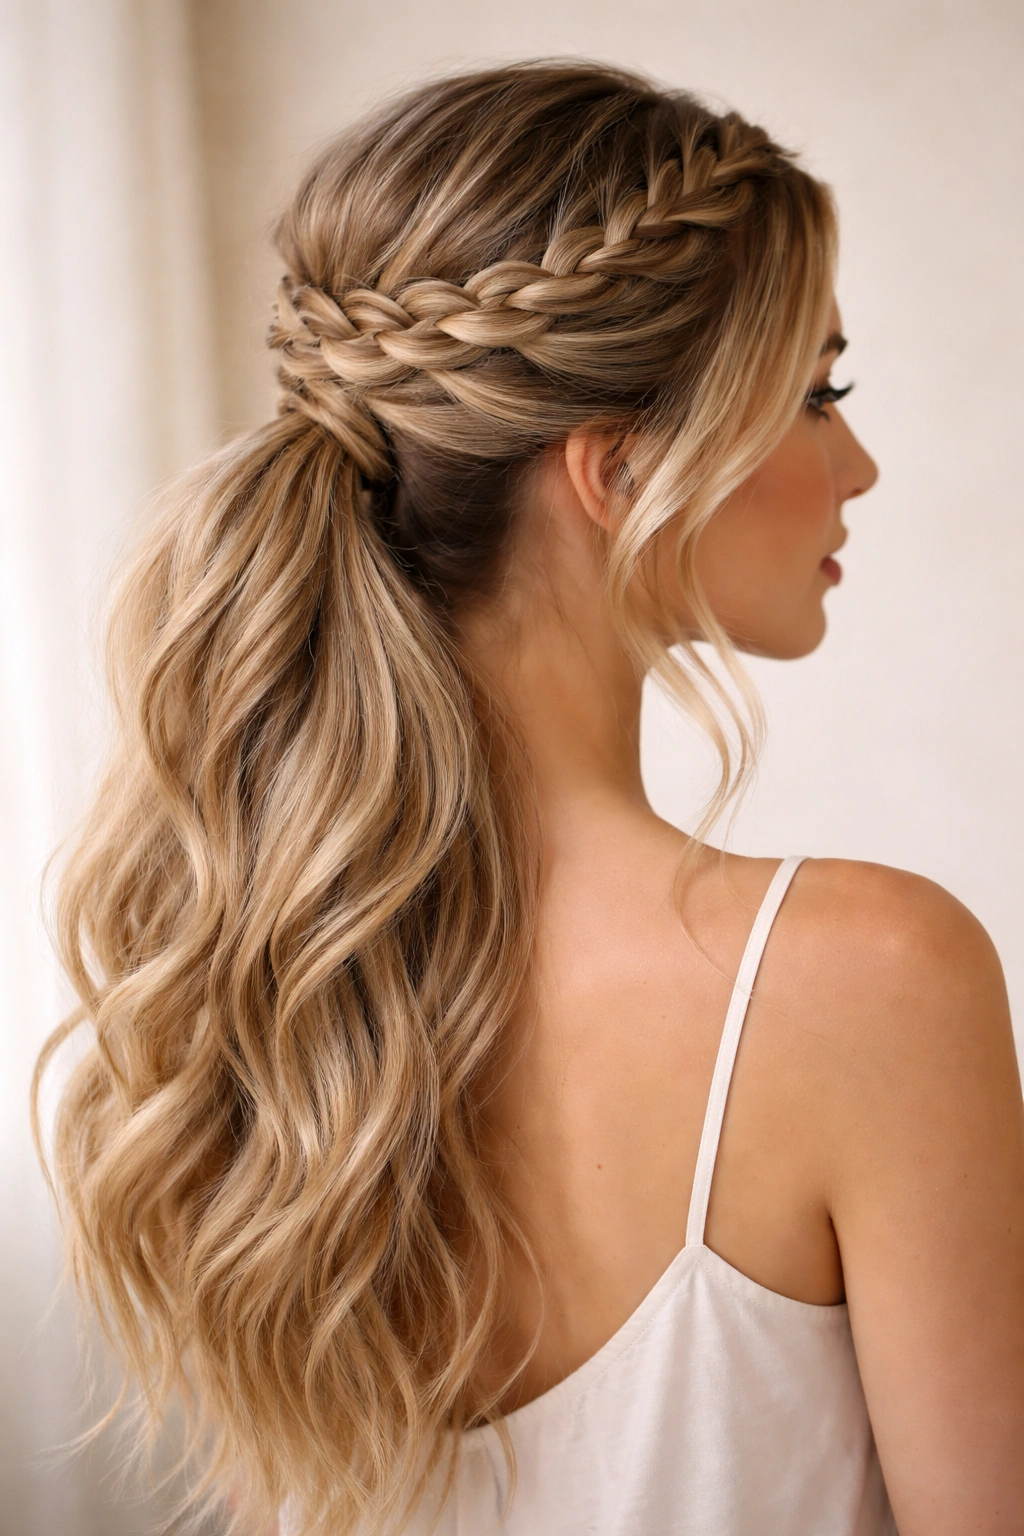
This style takes the concept of a half up braid and elevates it by creating a braided crown effect—where the braid wraps more horizontally across the back of your head rather than down the center. Pairing this with a twisted rather than braided ponytail creates a look that feels bohemian and romantic without being overly fussy or difficult to execute.
Why It Works So Well
The horizontal placement of the braid creates the illusion of width and height, which is particularly flattering for those with longer or narrower face shapes. The twist in the ponytail below adds visual texture and interest without requiring you to master another complex braid variation. The overall effect feels like you’ve spent a lot more time on your hair than you actually have, which is the whole goal of a good hairstyle.
How to Style It
- Brush your hair smooth and create a deep side part
- Take a section from one side at your temple and begin a French braid, angling it slightly backward and across the back of your head
- Instead of bringing the braid all the way down, angle it toward the opposite side of your head at ear height
- Secure the braid with a small elastic behind your opposite ear
- Gather all your hair (including the braid) into a low ponytail
- Divide the ponytail into two equal sections
- Twist the two sections around each other, pulling gently as you go to create a defined spiral
- Secure the twist with a small elastic at the bottom, allowing a few inches of hair to flow loose below it
Styling secret: Apply a texturizing spray to your hair before styling—it gives you more grip and makes the twist much easier to control.
6. Braided Halo Half Up
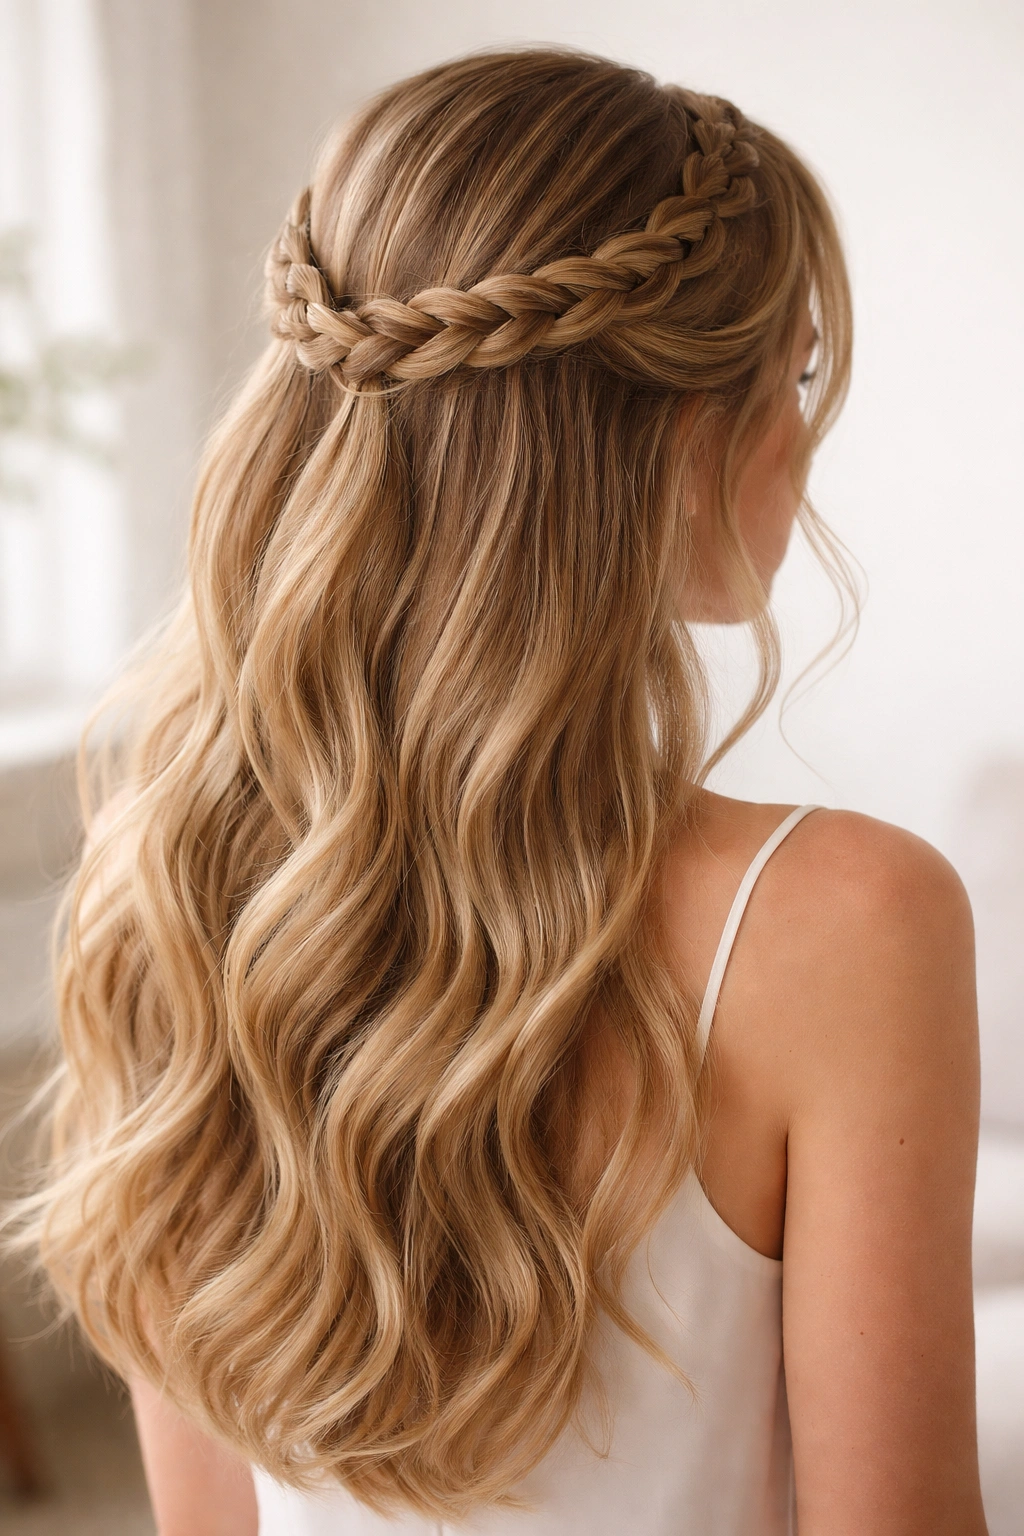
The halo braid effect wraps around the back of your head in a U-shape rather than down the center, creating an ethereal, romantic vibe that reads as bridal or special occasion without being over-the-top. When you keep the top portion down and create a half up braided ponytail, you’re adding structure while maintaining that soft, romantic essence.
Why It Works So Well
Halo braids are inherently flattering because they frame your entire face from the sides, which naturally draws attention upward. The style works particularly well for long hair because you have enough length to create a substantial-looking braid without it feeling thin or wispy. The half up version is less formal than a full halo would be, making it suitable for occasions ranging from casual to elegant.
How to Style It
- Start with smooth, lightly textured hair (a salt spray or texturizing product helps the braid grip better)
- Take a section from one side of your head at ear height
- Begin a Dutch or French braid, working horizontally across the back of your head toward the opposite ear
- Angle the braid slightly downward as it moves across the back, following the natural curve of your head
- Bring the braid around to approximately ear height on the opposite side
- Secure the braid with a small, hidden elastic on that side
- Gather all your hair below the braid line into a mid-height ponytail
- Gently loosen the braid to create softness and dimension
Real talk: This style works best when you don’t make the braid too tight—the looser and softer it is, the more romantic and intentional it appears.
7. Reverse Dutch Braid Half Up with Textured Waves
The reverse Dutch braid (where you braid “under” so the braid sits raised and prominent) paired with textured waves in the ponytail creates a look that’s modern, undone, and effortlessly cool. The structured braid at the top contrasts beautifully with the loose waves below, creating visual interest and dimension without looking overdone.
Why It Works So Well
Reverse Dutch braids naturally create a more dimensional, textured appearance than standard three-strand braids, and because they sit proud of the head, they become a real focal point. When you pair this with waves that have actual movement and texture, you’re creating a hairstyle that photographs well and holds up throughout the day. This is the style for someone who wants to look like they just effortlessly woke up like this, even though there’s actually technique behind it.
How to Style It
- Blow-dry your hair smooth, then apply a texturizing or heat protectant spray
- Create a deep side part and take a section from the larger side at your crown
- Begin a reverse Dutch braid (crossing under), adding hair from the sides as you work back
- Braid down to the middle of your head and secure with a small elastic
- Gather all your hair into a low ponytail
- Using a 1.25-inch barrel curling iron, create loose waves throughout the ponytail section, curling away from your face
- Let the waves cool completely before running your fingers through them to break them up
- Use a light hairspray to hold the texture without making it look stiff
Pro tip: The key to this style is making the waves look intentional but undone—curl larger sections of hair rather than individual strands, and don’t worry about perfection.
8. Boxer Braids Half Up (Two Dutch Braids)
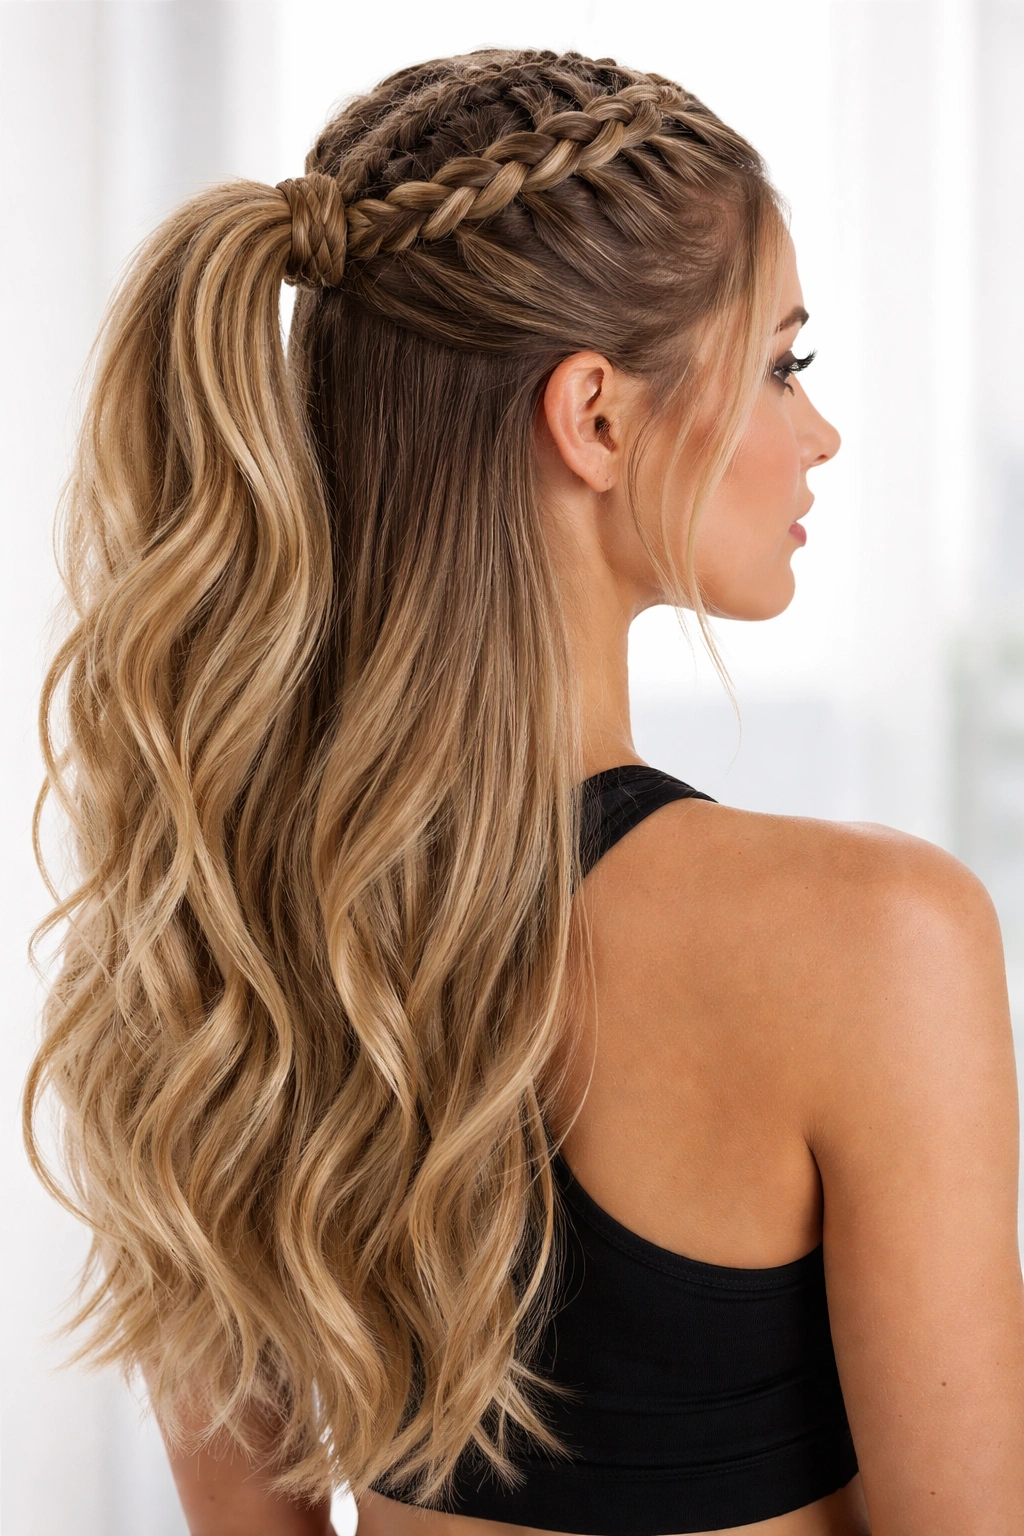
Boxer braids are essentially two Dutch braids that run parallel down the back of your head, and when you modify the style to a half up version, you’re creating a sporty, modern look that’s perfect for active days or anyone who wants their hair to look intentional and polished without being fussy. The braids naturally create structure that keeps your hair secure while still allowing you to style the ponytail portion however you want.
Why It Works So Well
Boxer braids are practical and gorgeous—they hold up to movement, don’t slip throughout the day, and create a balanced, symmetrical look that’s flattering on most face shapes. The half up version gives you the best of both worlds: the security and visual interest of the braids with the softness and movement of loose hair below. This is genuinely a hairstyle you can wear to the gym, to the office, or to a casual night out, and it looks intentional in all settings.
How to Style It
- Section your hair down the middle, creating two equal halves
- Starting on one side, take a section from your temple and begin a Dutch braid
- Braid straight back (parallel to the center part) toward the back of your head, incorporating hair from that side as you go
- Continue the braid until you reach approximately the middle of your head, then secure with a small elastic
- Repeat on the opposite side, creating an even, matching braid
- Gather all your hair—including both braids—into a ponytail at the base where the braids meet
- Gently loosen and widen both braids to create dimension
- Curl or wave the ponytail section, or leave it straight for a sleek finish, depending on your preference
Worth knowing: These braids actually look better when they’re not perfectly matched—slight variations in tightness add to the undone, intentional vibe.
9. Braided Pony with Wrapped Ends
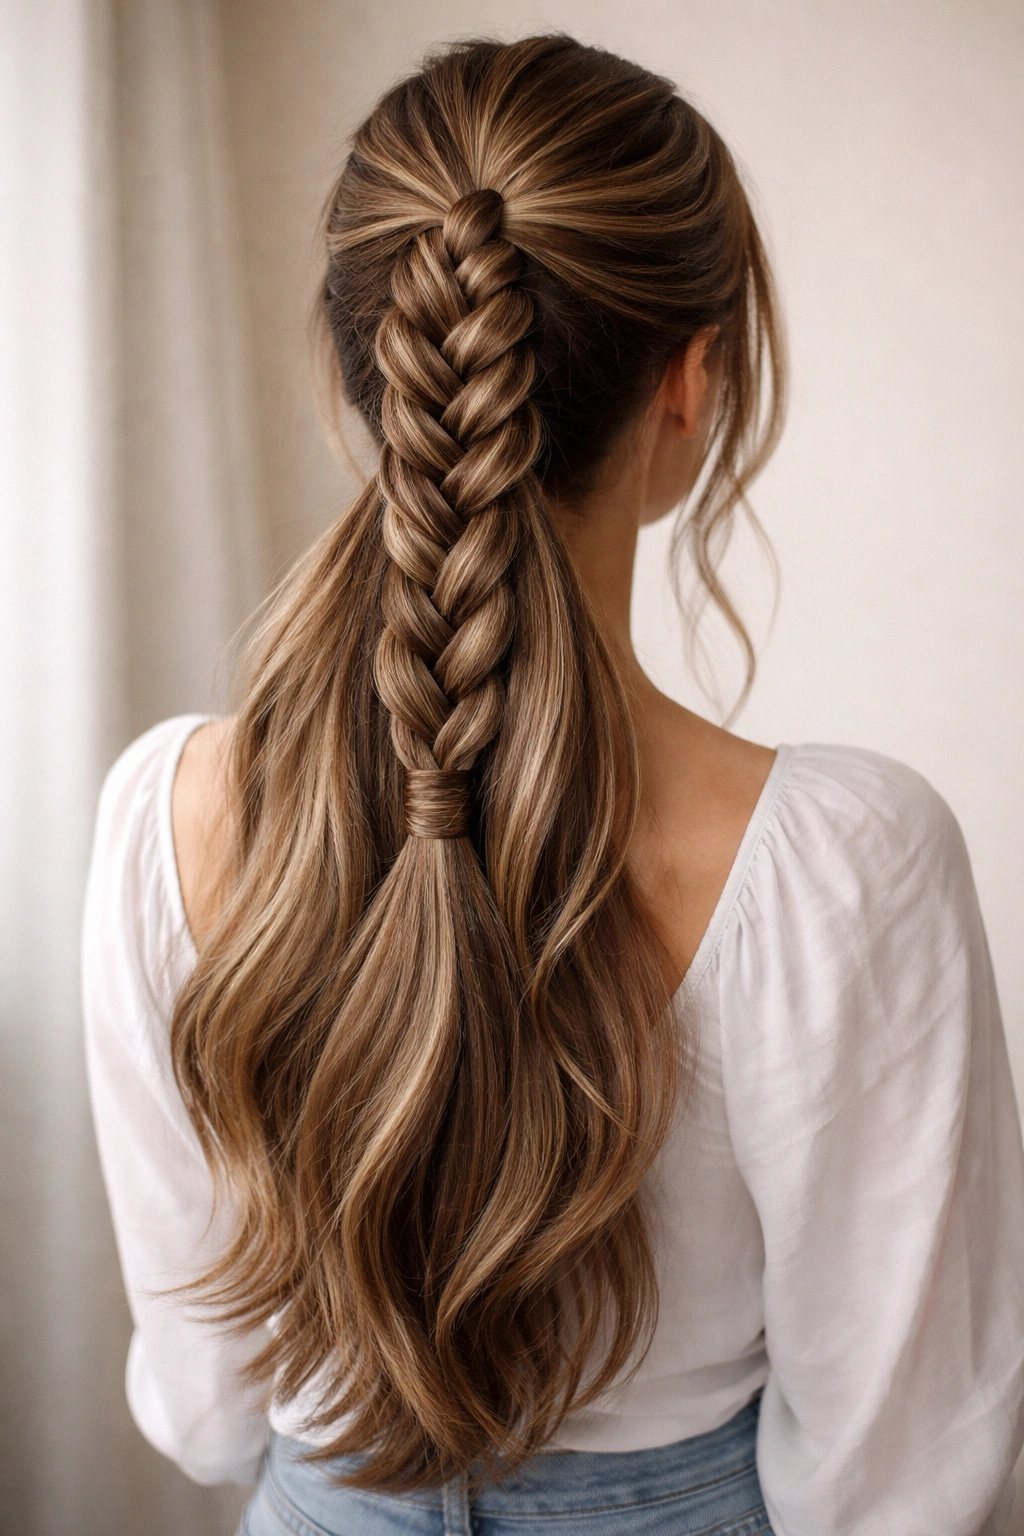
This style reverses the typical half up braid concept by creating a thicker, more substantial braid that goes all the way from the top of your head down through the entire ponytail length, then wrapping the base with a thin section of hair for a polished, finished look. It’s more of a commitment in terms of styling time, but the result is a cohesive, elegant style that works for events that matter.
Why It Works So Well
By extending the braid all the way through the ponytail, you’re creating one continuous line of texture and detail rather than a visible transition between the braid and the loose hair. The wrapped base adds a professional, intentional finishing touch that elevates the entire style. This works particularly well for formal occasions, important meetings, or events where you want your hair to look polished and thought-out.
How to Style It
- Blow-dry your hair smooth and apply a light texturizing spray for grip
- Create a center or side part and take a generous section from your crown
- Begin a French braid, incorporating hair from the sides as you work down
- Instead of stopping at mid-head height, continue the braid down through where your ponytail would normally sit
- Once you reach the bottom of your hair, secure the braid with a small elastic
- Take a very thin section of hair from the ponytail itself and wrap it around the base elastic several times, completely covering the elastic
- Secure the wrapped section with a bobby pin that matches your hair color, tucking it underneath where it won’t be visible
Styling secret: This style is much easier if you’ve already secured the ponytail base with one elastic, and then use a second, temporary elastic for the initial braid—once the braid is complete, you can remove the temporary elastic and secure everything together permanently with the wrapped section.
10. Side-Swept Braid Half Up with Romantic Softness
This variation emphasizes romance and softness by creating a French or Dutch braid that starts from one side, sweeps back toward the opposite side, and gathers into a ponytail that sits slightly off-center. The asymmetry of the style creates visual interest, and the side-swept direction makes it particularly flattering for those with round face shapes or anyone who wants to create an intentional, styled moment without looking stiff.
Why It Works So Well
Asymmetrical hairstyles are inherently more interesting to look at than symmetrical ones—they create movement and draw the eye in a way that feels dynamic and intentional. The side-swept direction also creates an opportunity for one side of your face to be beautifully framed while the hair flows back from the other side, which is universally flattering. When you add softness and subtle waves to the ponytail, the entire effect reads as romantic and special.
How to Style It
- Create a deep side part, with significantly more hair on one side than the other
- On the side with more hair, take a section at temple height and begin a French braid
- Angle the braid slightly backward, moving toward the back of your head
- Braid down to approximately mid-head height or slightly past, then secure with a small elastic
- Gather all your hair into a low ponytail slightly toward the side where your braid is
- Using a medium barrel curling iron, create soft, loose waves throughout the ponytail section
- Allow waves to cool, then gently separate them with your fingers or a fine-tooth comb
Pro tip: This style looks best when you leave a few pieces down around your face on the opposite side from the braid—the contrast between the braided side and the soft, wispy side is what creates the romantic vibe.
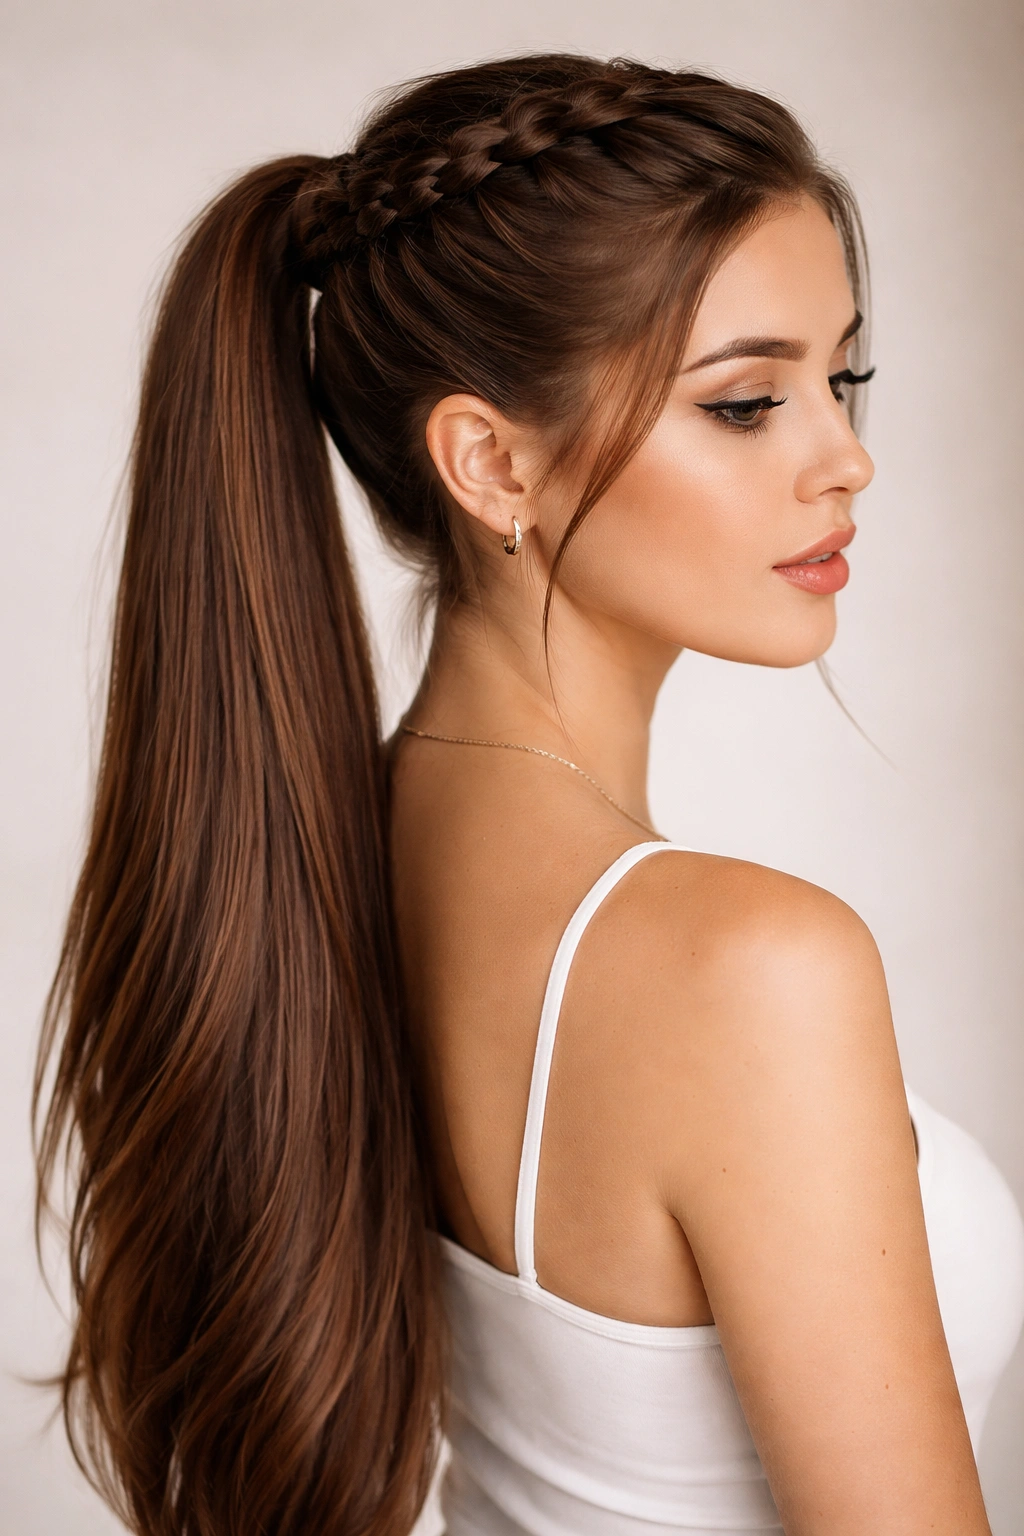
11. Bubble Braid Half Up (Braid with Segmented Ponytail)
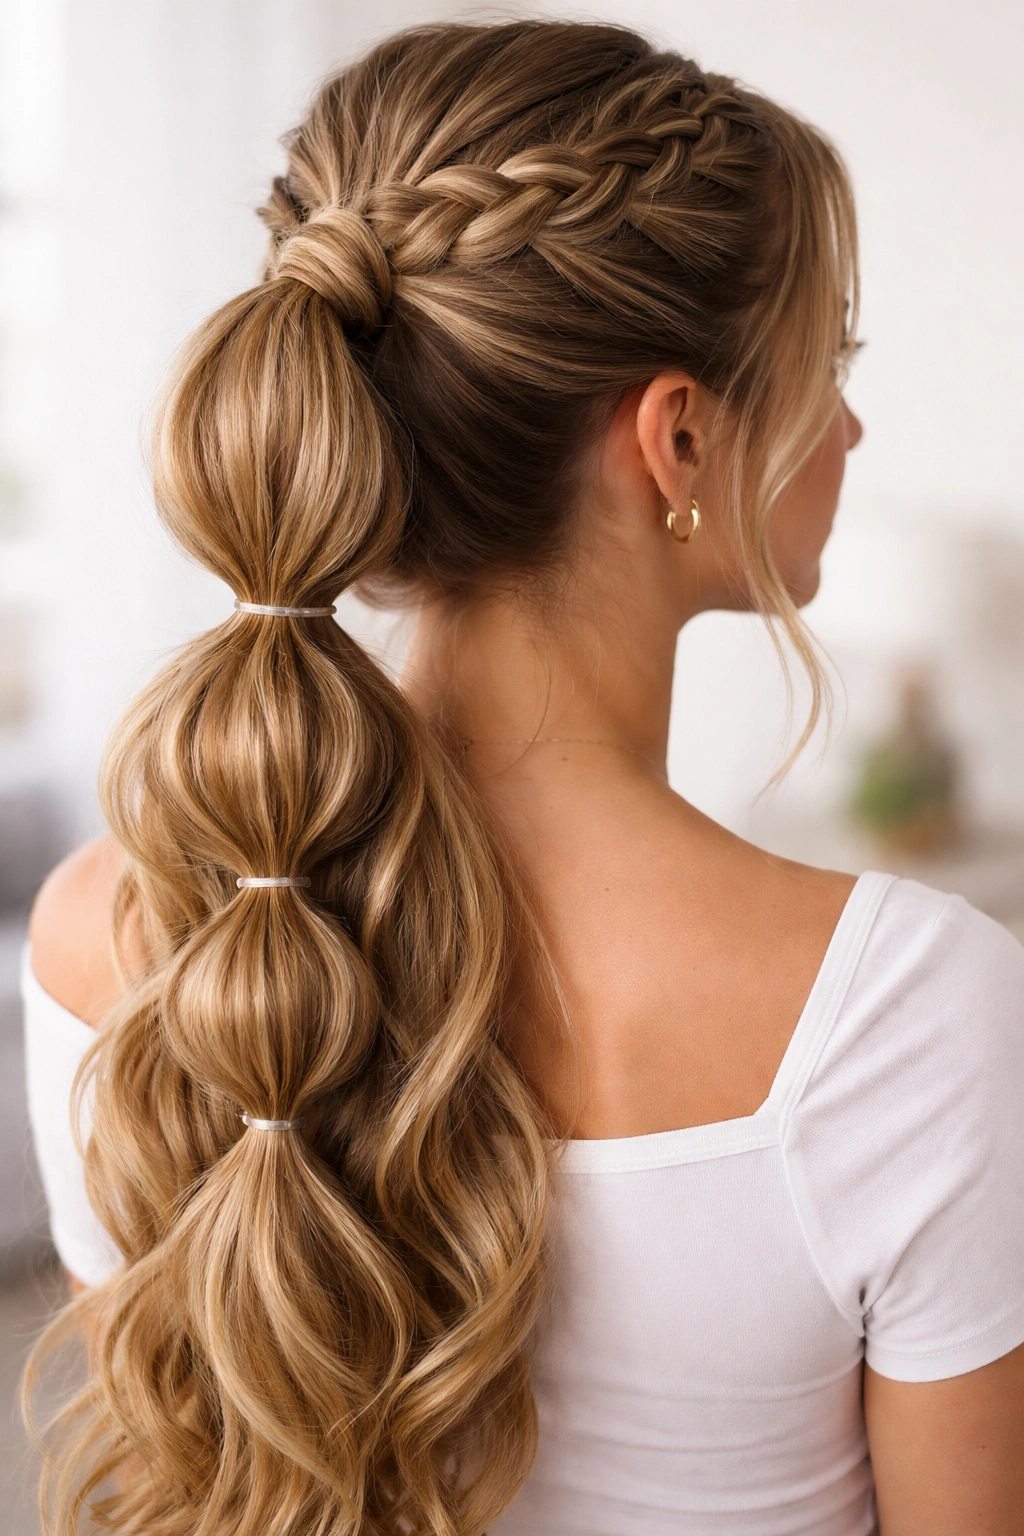
The bubble braid is a trendy variation where you create sections along the length of a braid or ponytail and tie them off with small elastics, creating a segmented, dimensional look that’s modern and eye-catching. When you combine this with a half up braid on top, you’re creating a style that’s playful, current, and genuinely fun to wear—plus it actually holds better throughout the day because of the multiple anchor points.
Why It Works So Well
Bubble braids feel contemporary and fashion-forward, and they draw immediate visual attention because of their distinctive segmented appearance. The multiple tie-off points mean your style stays put and doesn’t slip, which is especially helpful for longer hair. The playfulness of the style also makes it feel fresh and fun—it works for anyone who wants to look intentional and trendy without being overly formal.
How to Style It
- Create a center or side part and begin a Dutch or French braid at the crown
- Braid down to mid-head height and secure with a small elastic
- Gather all your hair into a ponytail at the base of the braid
- Starting at the base of the ponytail, place a small elastic about 1.5 inches down from the base
- Gently pull and puff out the hair between the base and this first elastic to create a bubble
- Continue placing elastics every 1.5 to 2 inches down the length of the ponytail, creating bubbles between each one
- For extra dimension, gently pull the hair to widen each bubble section
Worth knowing: This style works best when you use very small, thin elastics—clear ones are nearly invisible, and the thinner they are, the more prominent and defined your bubbles will be.
12. Braided Half Up with Hair Accessories
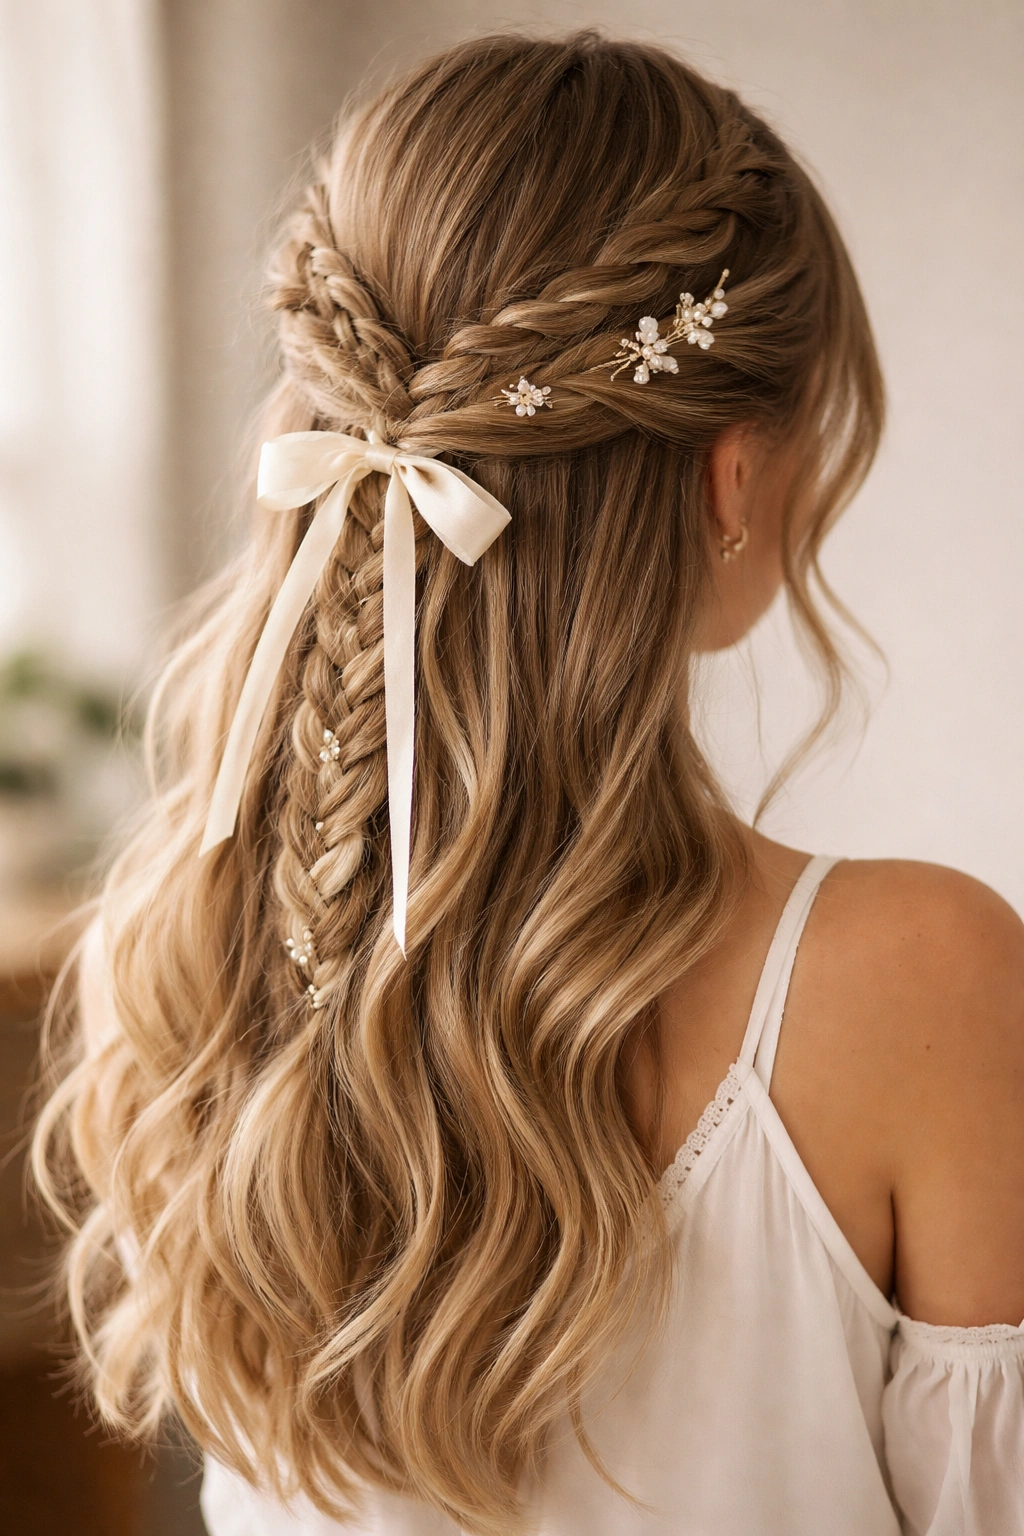
The final variation is less about a specific braiding technique and more about elevating any half up braided style with the right hair accessories. Whether you’re adding pearl clips, a decorative comb, ribbon woven through your braid, or delicate bobby pins, accessories transform a casual style into something special and intentional. This is the trick professional stylists use to make ordinary hairstyles feel extraordinary.
Why It Works So Well
Accessories immediately signal that you’ve put thought and intention into your appearance, which elevates the entire look. They also serve a functional purpose—they help anchor your style and keep everything in place throughout the day. An unexpected accessory can also add personality and make your half up braided style feel uniquely you rather than just a standard style everyone else has tried.
How to Style It
- Create any half up braided style from the options above
- Once your braids and ponytail are secured, assess where an accessory would look intentional and balanced
- For delicate pearl or metal clips: Slide them into the base of your braid or along the sides, ensuring they’re secure and won’t slide down
- For ribbon: Thread it gently through your braid starting from about halfway down, creating a woven effect
- For decorative combs: Insert them horizontally at the base of your braid where the braid meets the ponytail, ensuring the teeth grip firmly
- For bobby pins: Use 2-3 strategically placed pins to secure any fly-away pieces, choosing pins that match your hair color for invisibility
- Ensure all accessories are secure by gently tugging on your style to test that nothing will slip during the day
Real talk: The best accessories are ones that feel personal to you and match the occasion—there’s no single “correct” accessory, so experiment with different options and see what makes you feel confident and like yourself.
Final Thoughts
Half up braided ponytails offer an incredible range of styling possibilities for anyone with longer hair who wants more dimension and intentionality than a simple ponytail but doesn’t want to commit to an entirely braided look. Each of these twelve variations has its own personality and best-use scenario, but they all share one crucial quality: they’re achievable with practice and look significantly more complicated than they actually are.
The secret to mastering any of these styles is understanding that practice genuinely does make perfect with braiding—your hands need to learn the muscle memory of the technique, and that only comes from repetition. Don’t get discouraged if your first Dutch braid looks wonky or your fishtail feels impossible. By the third or fourth time you do it, your hands will know what they’re doing almost automatically, and the style will come together in half the time it took initially.
Start with whichever style speaks to you most and practice it a few times before moving on to more complex variations. Once you’ve mastered the basic French and Dutch braids, most other variations are just modifications of those two techniques. You’ve got this—and once you do, you’ll have a year’s worth of hairstyles that look like you walked straight out of a salon.