The difference between a hairstyle that works during your workout and one that falls apart halfway through your run comes down to one thing: the right ponytail structure. Whether you’re heading to the gym, hitting the trails, or doing an intense cardio session at home, how you secure and style your hair dramatically affects your comfort, focus, and performance. A poorly executed ponytail becomes a distraction—you’re constantly pushing hair out of your face, fighting with loose strands, or dealing with a throbbing headache from too-tight tension.
But here’s what most people don’t realize: there’s actually a specific technique and style for almost every type of workout. A high ponytail works brilliantly for boxing or yoga where you need zero hair in your face, but it can pull uncomfortably during running. A low ponytail keeps pressure off your scalp during weight training, but loose pieces escape during high-intensity interval training. The key is matching the ponytail style to your specific activity and hair type, then mastering the technique that keeps it locked in place through sweat, movement, and time.
The good news is that once you understand the mechanics of what makes a workout ponytail actually stay put, you’ll never deal with a falling-apart hairstyle again. You’ll move with confidence, your focus stays where it belongs, and you’ll be able to push harder because you’re not constantly managing your hair. Let’s walk through fifteen proven ponytail styles that handle everything from intense cardio to strength training to flexible, low-impact workouts.
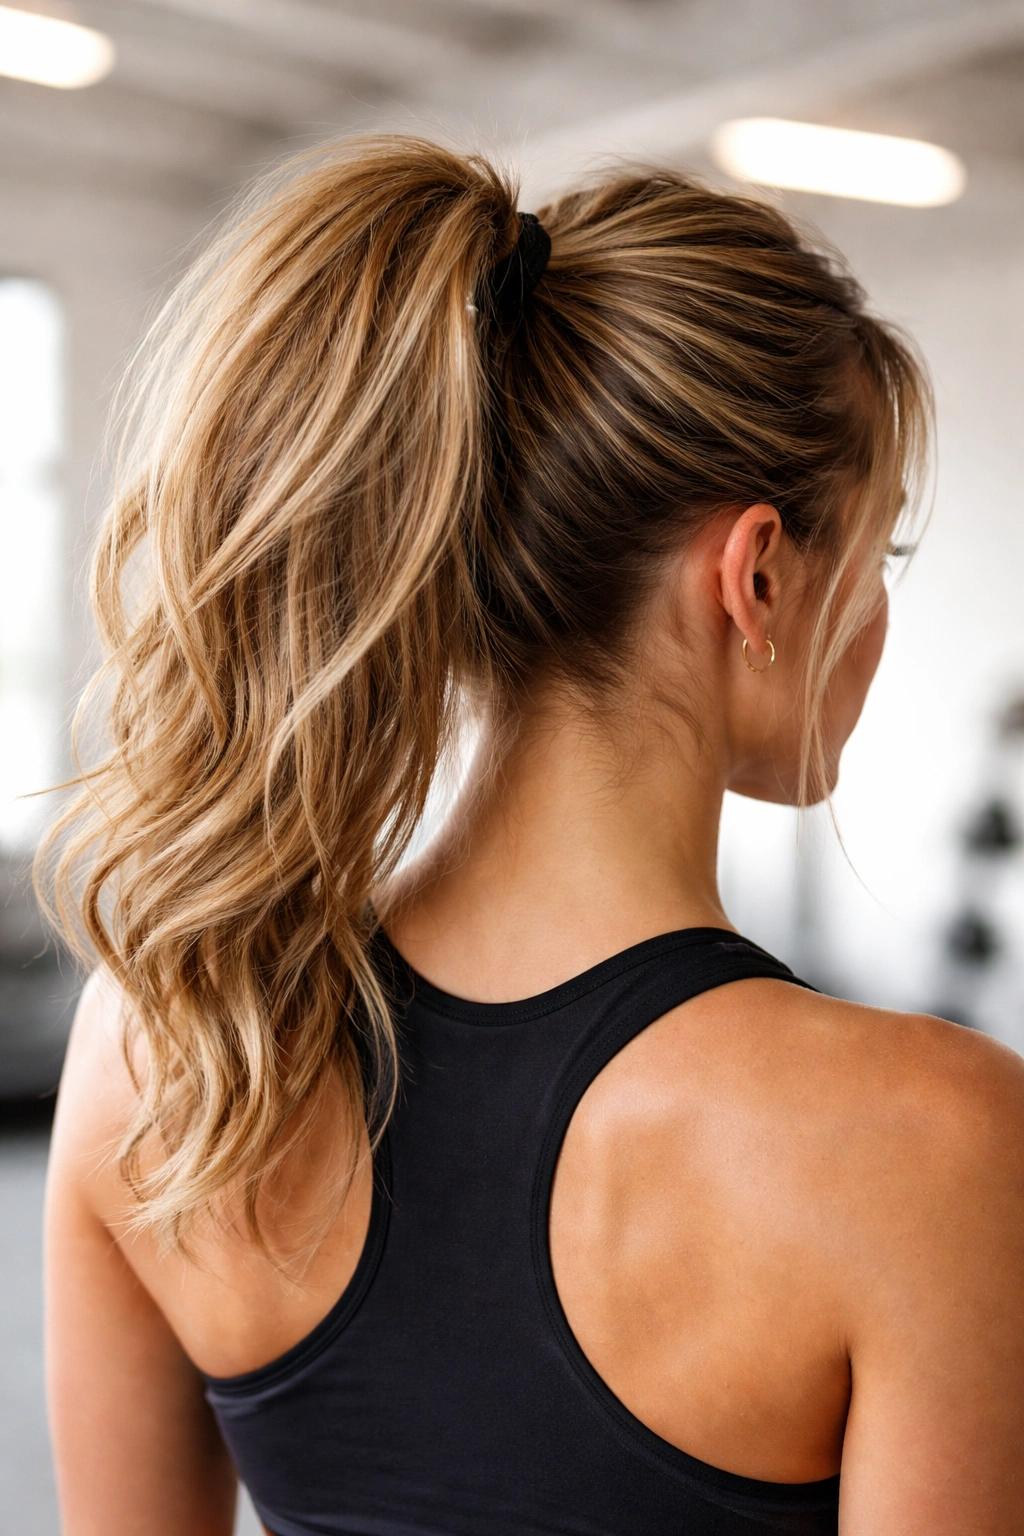
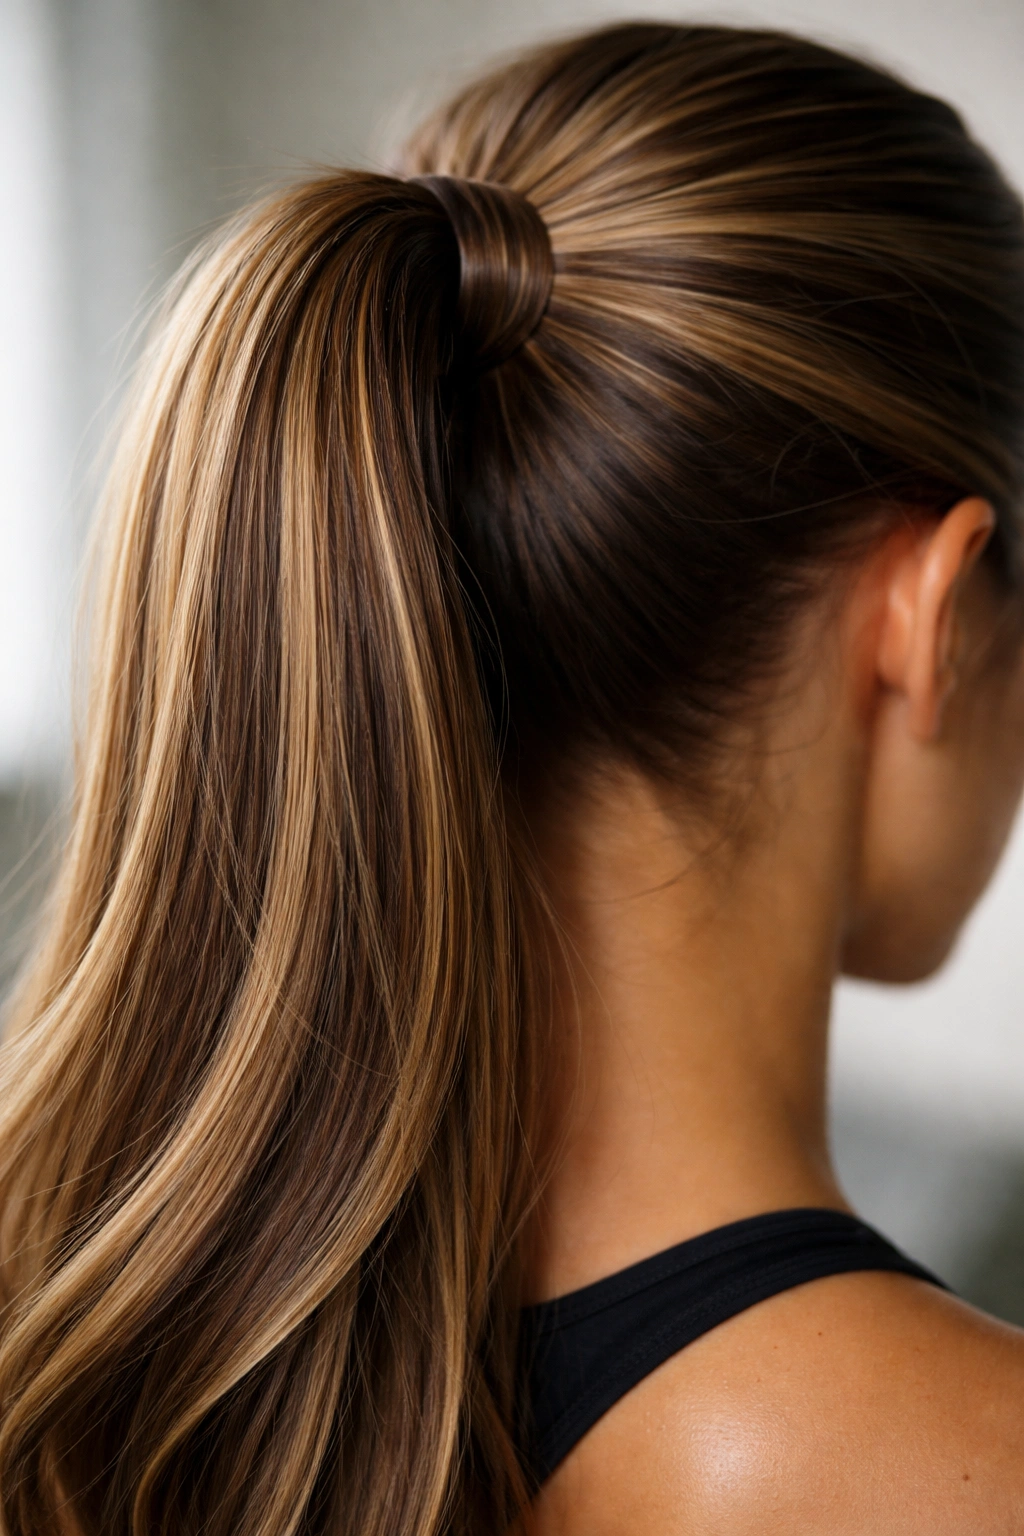
1. The High and Tight Performance Ponytail
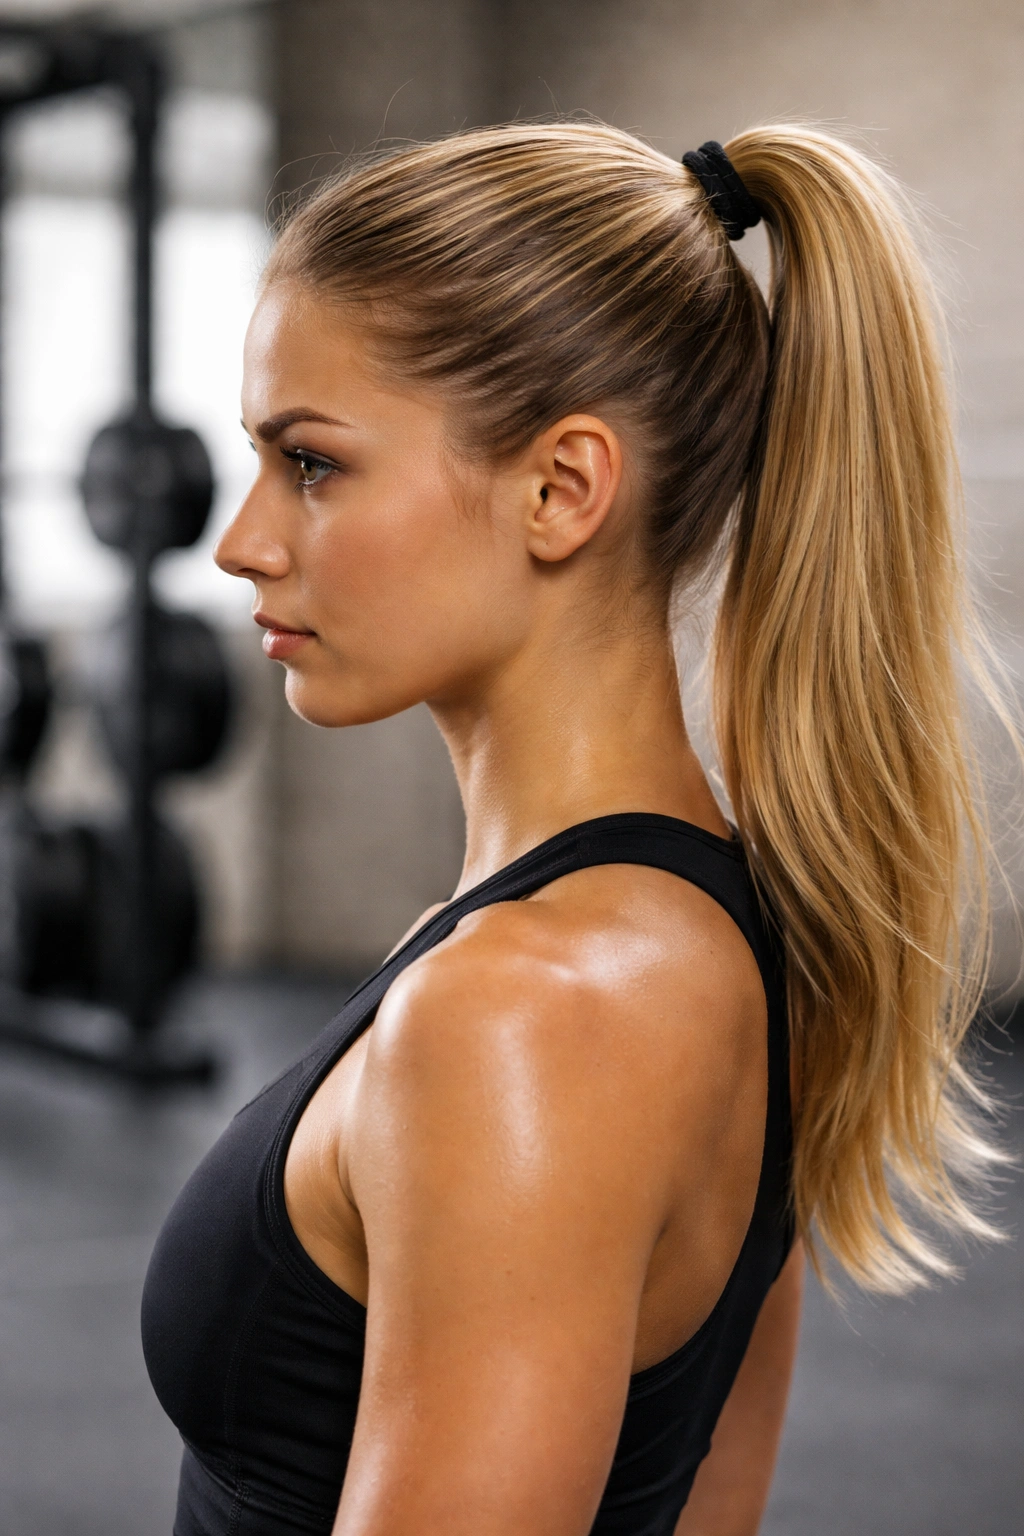
This is the workhorse style for anyone who needs maximum stability and zero hair in the face. The high and tight ponytail sits just at the crown of your head, pulling hair cleanly away from your face and neck. The tight tension creates a secure grip that holds steady through intense movement, bouncing, and sweat—it’s the style you’ll see on competitive athletes and professional trainers.
Why It Works for Intense Workouts
The high placement sits naturally above your center of gravity, meaning less hair swings around and distracts you during explosive movements. The tightness distributes tension across your entire scalp rather than concentrating it in one spot, which is counterintuitive but actually more comfortable for longer workouts. You can adjust the tightness as you warm up—your hair naturally loosens slightly as your scalp heats up, so starting tight keeps it stable without becoming painful.
How to Master the Technique
- Use a fine-tooth comb to smooth your hair completely before gathering, eliminating flyaways that escape throughout your workout
- Gather hair at the very crown (imagine a point directly above where your hairline peaks), not slightly back—this is what creates the high placement
- Use two elastics instead of one: secure the initial ponytail, then wrap another elastic around the base for reinforcement and extra grip
- Smooth a light pomade or gel around your hairline and the base of the ponytail to tame any edges and prevent pieces from slipping out
- If hair is fine or slippery, roughen the elastic first by running it across a dry towel to increase friction
Pro tip: Tuck a small bobby pin or two horizontally through the base of the ponytail under your elastic—this creates an anchor point that prevents even the loosest hair from sliding free.
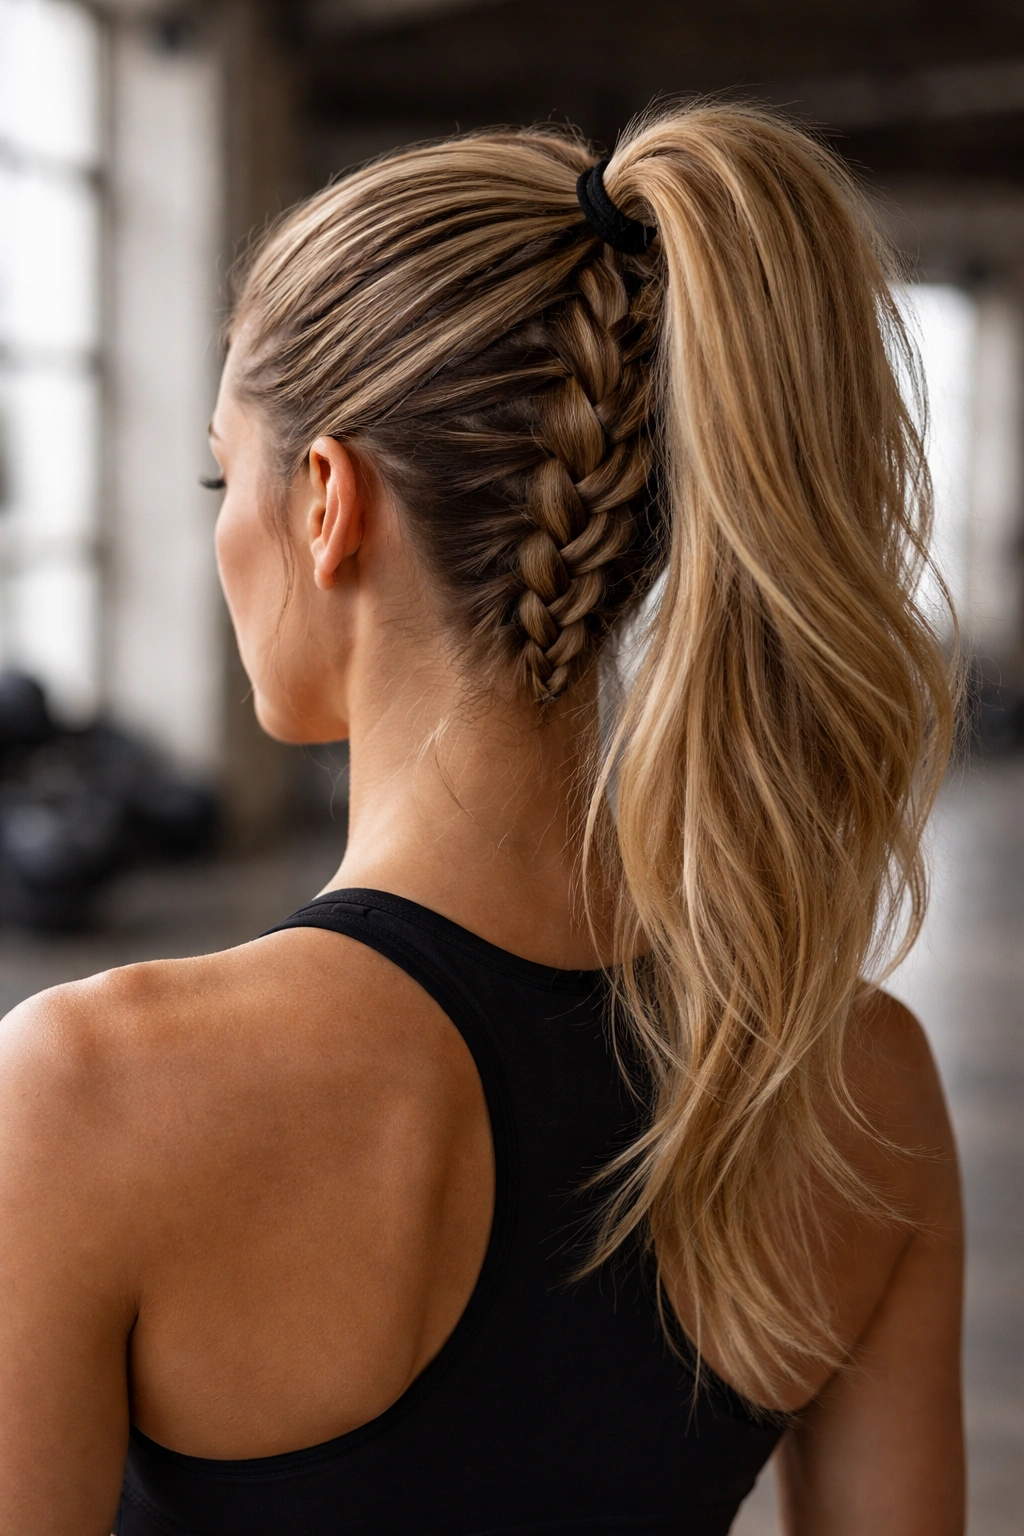
2. The Double-Elastic Dutch Braided Ponytail

This style combines the strength of a braid with the simplicity of a ponytail by sectioning your hair and securing it in stages. You create vertical sections that get braided separately, then gathered into a single ponytail at the base. The result is a thick, textured ponytail that feels luxurious and distributes tension beautifully across your entire head.
Why This Creates Unbeatable Grip
Dutch braiding creates natural texture that helps the elastic grip your hair instead of slipping. The multiple braids mean more surface area contacts the elastic, and the braided sections are thicker than loose hair, so they hold more securely. This style is especially effective for people with fine hair who normally struggle with ponytails slipping throughout the day.
How to Build It Step-by-Step
- Section your hair into 2-3 vertical sections running from your hairline to the nape of your neck—if you have thick hair, use three sections; finer hair can work with two
- Dutch braid each section by crossing strands under (rather than over, which creates a standard French braid) all the way down
- Gather all the braided sections together at the base of your head and secure with one strong elastic
- Go back and gently pull each braid slightly wider to create a fuller, more textured look
- Finish with hairspray to lock everything in place
Keep bobby pins nearby for any shorter pieces that escape from the braids—this style occasionally produces small flyaways that you can pin back quickly if needed.
3. The Bubble Ponytail for Low-Impact Workouts
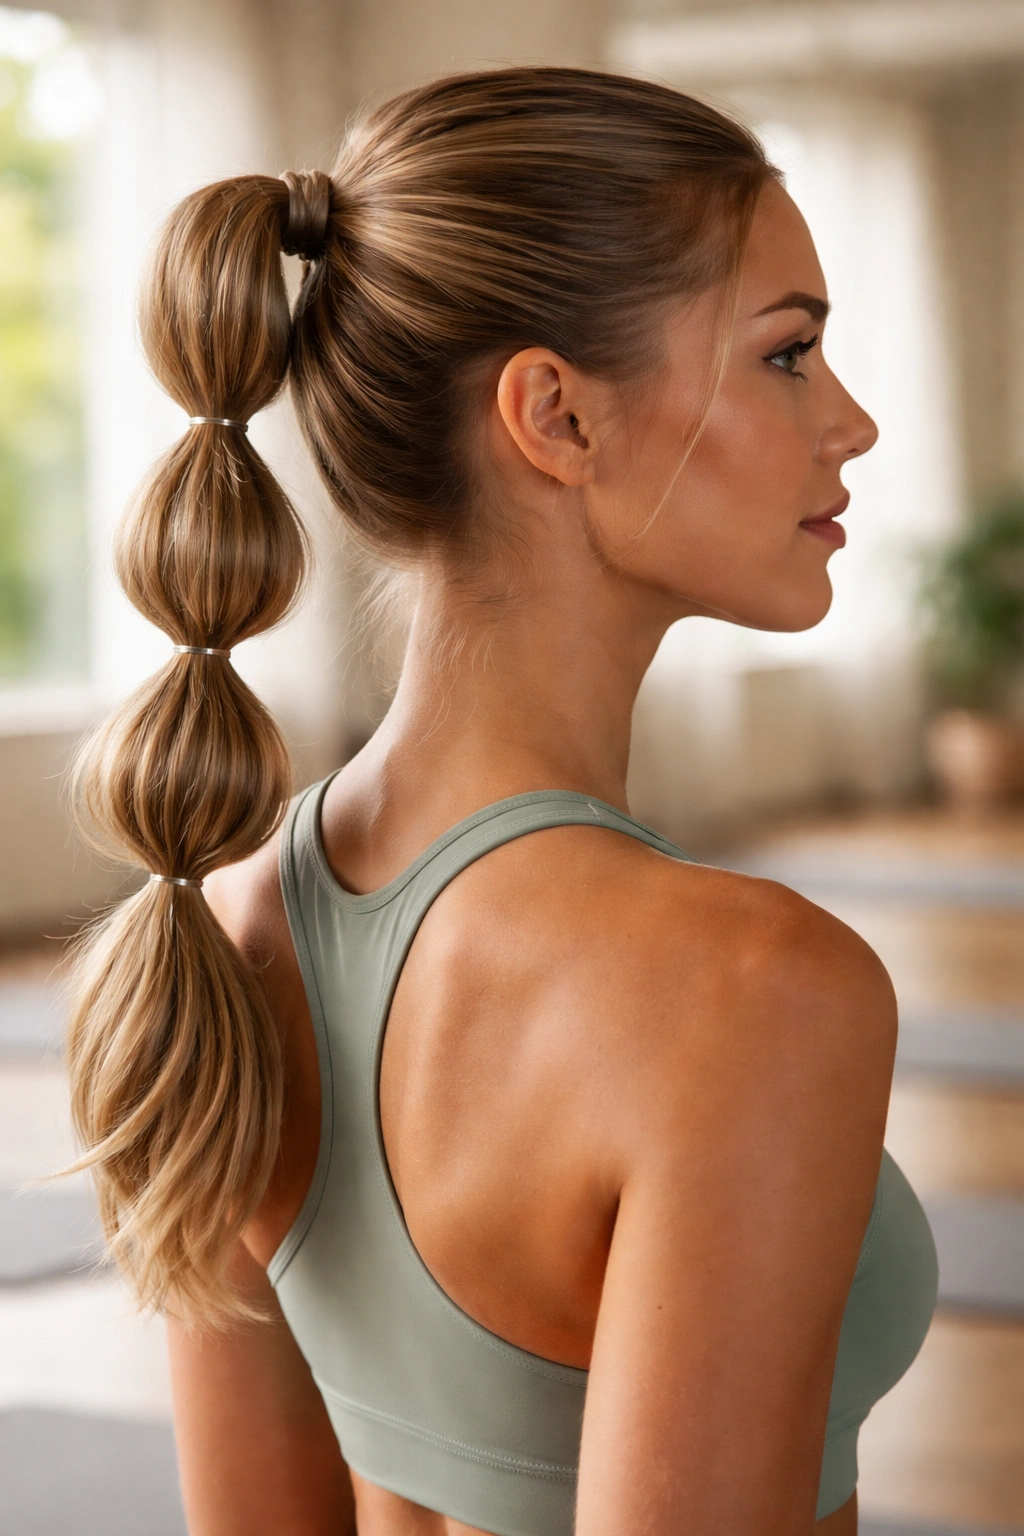
The bubble ponytail looks playful and fun, but more importantly, it distributes your hair weight evenly along its length rather than concentrating tension at the base. You’re essentially creating multiple smaller ponytails stacked on top of each other, which changes how weight pulls on your scalp. It’s excellent for yoga, Pilates, or any workout where you’re moving gently but need hair fully secured.
What Makes This Style Different
Instead of one long tail, the bubble ponytail uses three to five separate elastics spaced evenly down the length of your hair. Each section between elastics puffs out slightly, creating that bubble effect. The genius is that each elastic takes the weight of only that section of hair, not your entire ponytail, so no single point on your scalp bears excessive tension.
Step-by-Step Construction
- Secure your hair into a high or mid ponytail with the first elastic as usual
- Measure down about 2-3 inches and place a second elastic around the ponytail (don’t separate the hair—it’s all still one ponytail, just banded at intervals)
- Gently fluff the hair between the first and second elastic, pulling it out slightly to create a bubble
- Continue placing elastics every 2-3 inches down the length of your ponytail, fluffing each bubble as you go
- Use small, transparent elastics that match your hair color for a cleaner look, or colorful elastics if you want visual impact
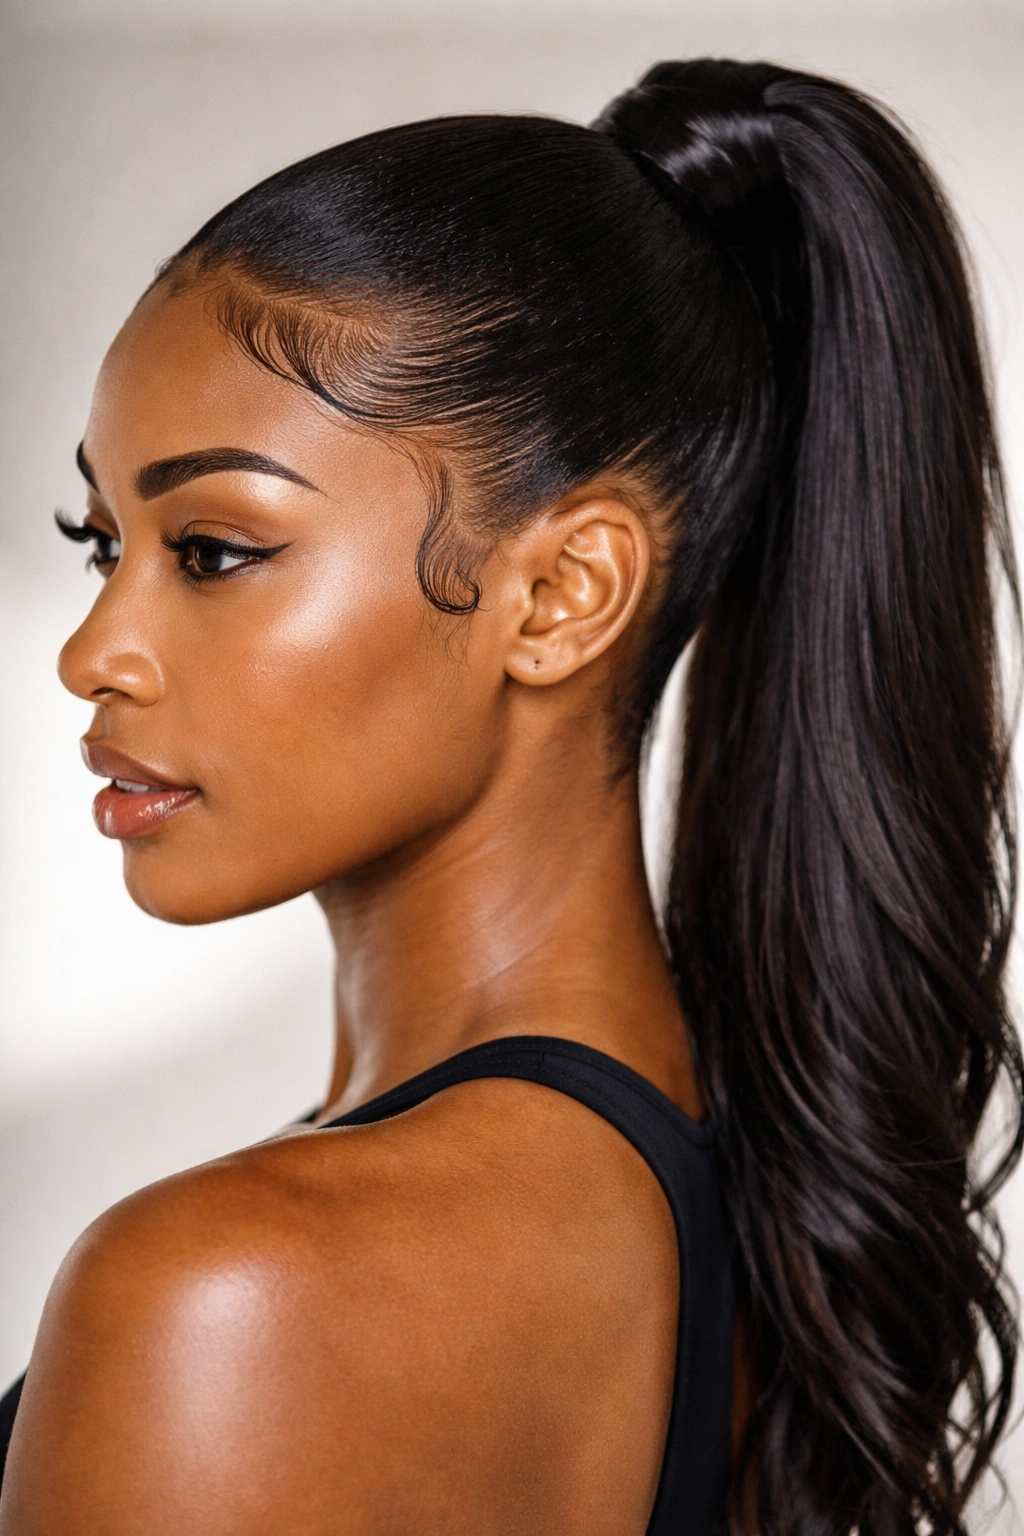
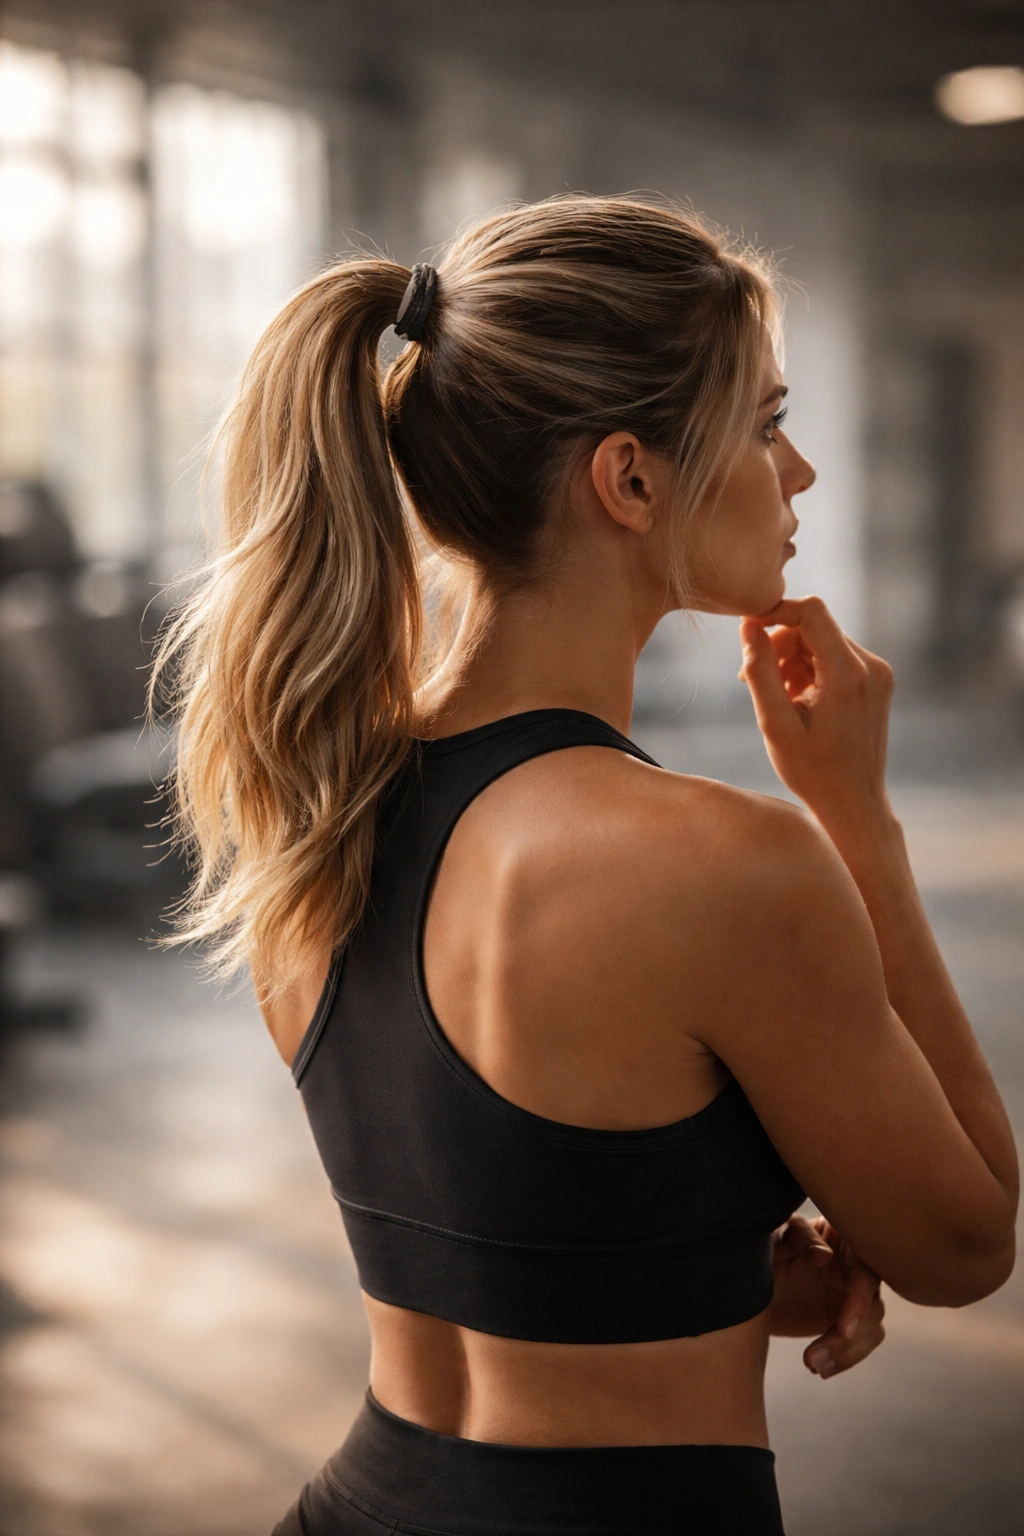
4. The Slicked-Back Low Ponytail
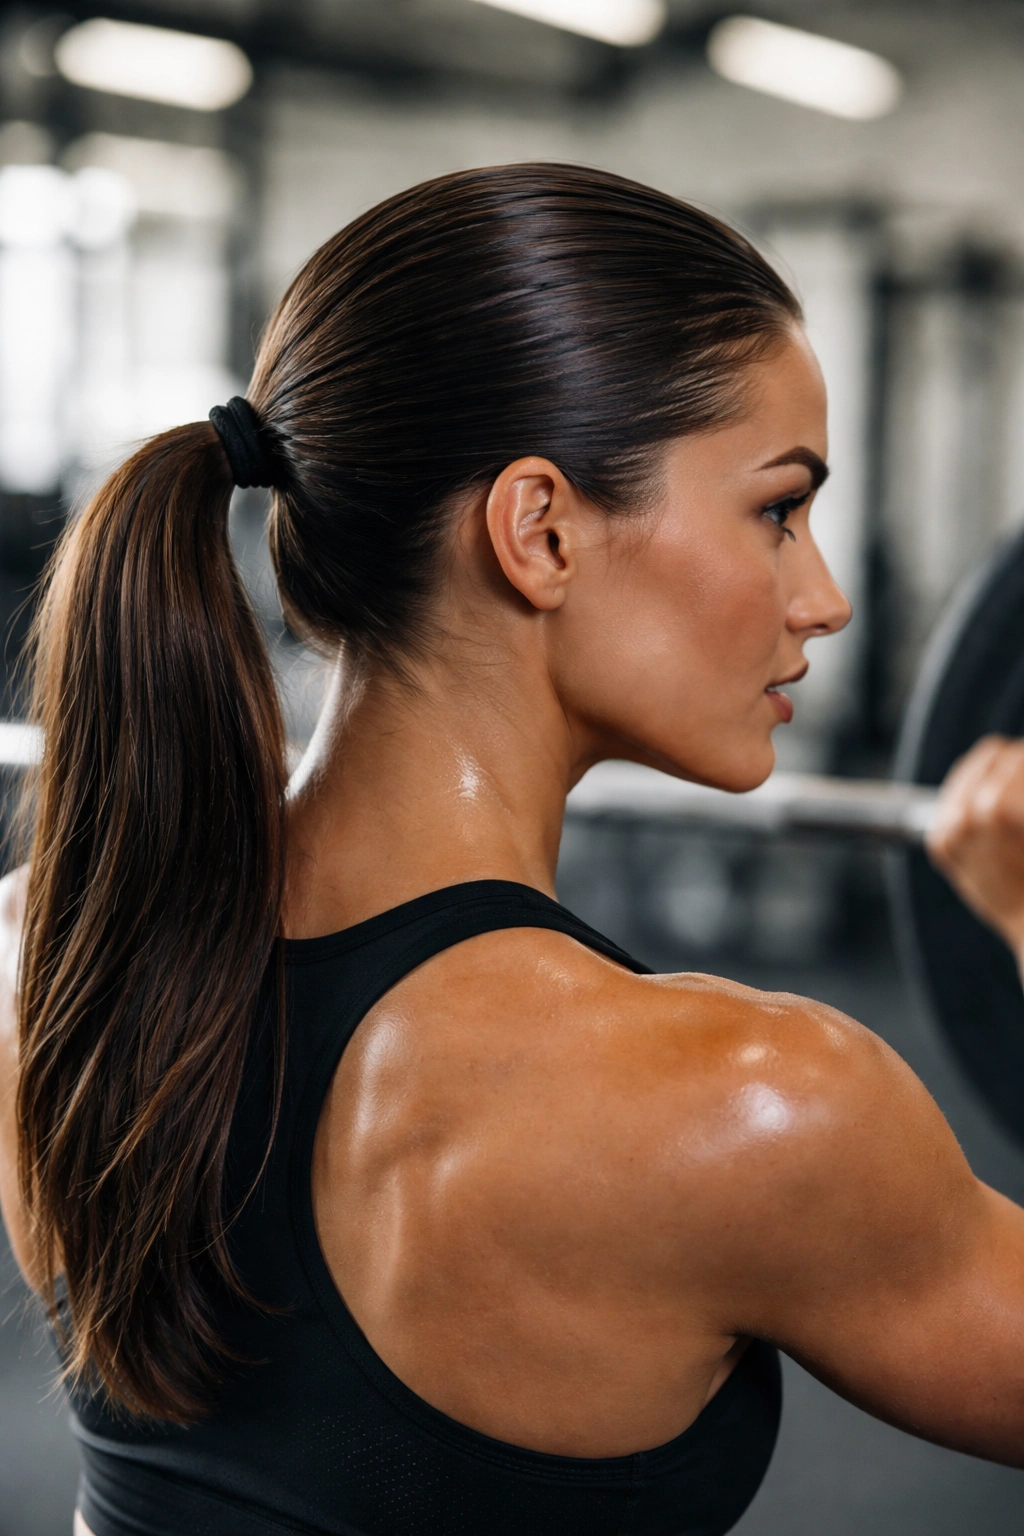
A sleek, low ponytail pulled tightly at the nape of your neck with perfectly smooth hair is the signature look for weightlifting, CrossFit, and strength training. This style keeps hair off your face and shoulders while you move through compound movements, and the low placement doesn’t interfere with barbell positions or gym equipment. It’s also gentler on your scalp than a high ponytail if you have a sensitive hairline.
Why Athletes Choose This for Heavy Lifting
The low placement means hair doesn’t bounce or shift during explosive movements like cleans or snatches. It sits low enough that it won’t catch on your shirt or equipment as you move. The slicked-back finish looks professional, feels controlled, and shows you’re focused and ready to work—there’s a psychological component to how this style makes you feel about your workout.
The Slicking Technique That Actually Works
- Start with damp hair (not soaking wet, but freshly wet from a quick spray bottle)
- Apply a smoothing serum or gel designed for slicking—avoid heavy oils or butters that sit too heavily on fine hair
- Use a fine-tooth comb to rake the product through your hair from your roots outward, smoothing every piece as you go
- Brush your hair straight back and down, applying slight tension against your scalp
- Gather at the nape of your neck and secure tightly with a covered elastic
- Smooth any flyaways with a comb and a tiny dab more product
- Finish with hairspray to lock everything in place through your entire workout
Worth knowing: Damp hair holds gel much better than dry hair. If your hair is dry by the time you’re ready to ponytail, lightly spritz it with water before applying product.
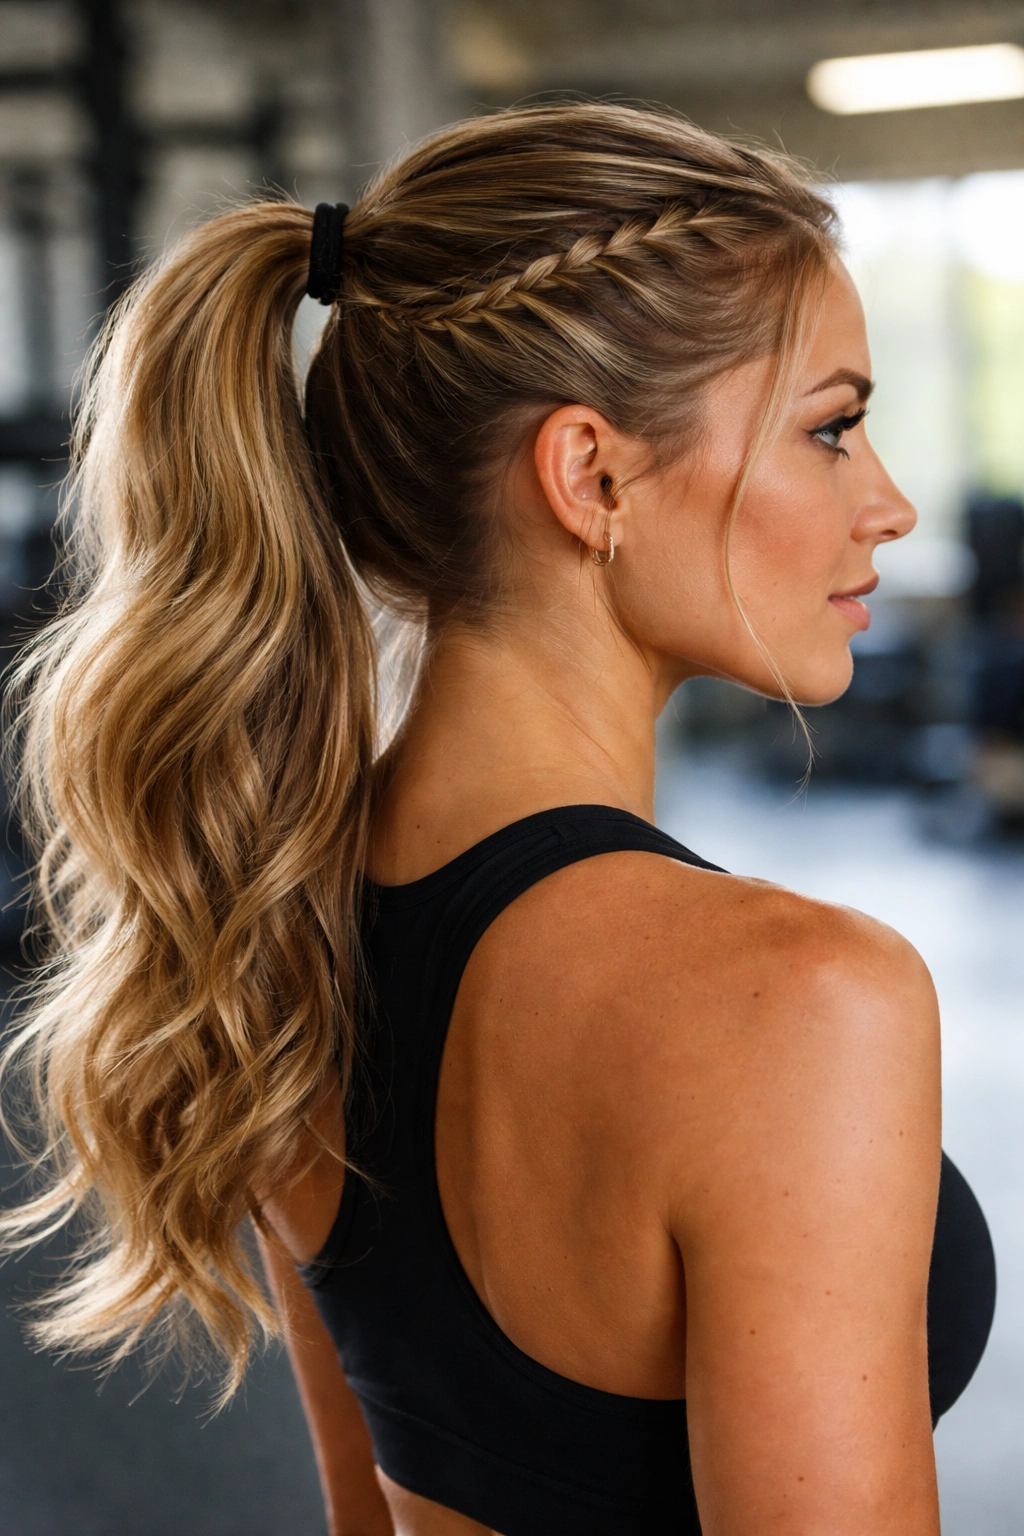
5. The Twisted High Ponytail with Wrapped Base
This style elevates the basic high ponytail by adding a twisted section at the top and wrapping a small piece of hair around the elastic base. It looks significantly more polished and intentional than a standard ponytail, but it’s just as functional for intense workouts. The wrapping creates additional grip and makes the style feel sturdier because you’re covering the elastic.
How the Wrapping Adds Stability
When you wrap a piece of your own hair around the elastic at the base of your ponytail, you’re essentially creating a hidden anchor point. That wrapped section pulls tight against the elastic, preventing it from loosening slightly as you move and sweat. It’s a small detail that makes a measurable difference in how long your ponytail stays perfectly in place.
Building the Twisted Wrap Style
- Gather your hair into a high ponytail, but leave out a small 1-inch section at one side of the face before securing the elastic
- Secure the main ponytail tightly
- Twist that reserved section around your index finger to give it shape and texture
- Wrap the twisted section around the base of the ponytail, covering the elastic completely
- Secure the wrapped section with a small bobby pin hidden inside the ponytail base, or use a second tiny elastic to clip it in place
- Smooth the wrapped section so it looks intentional and neat
6. The Split Ponytail for Maximum Stability
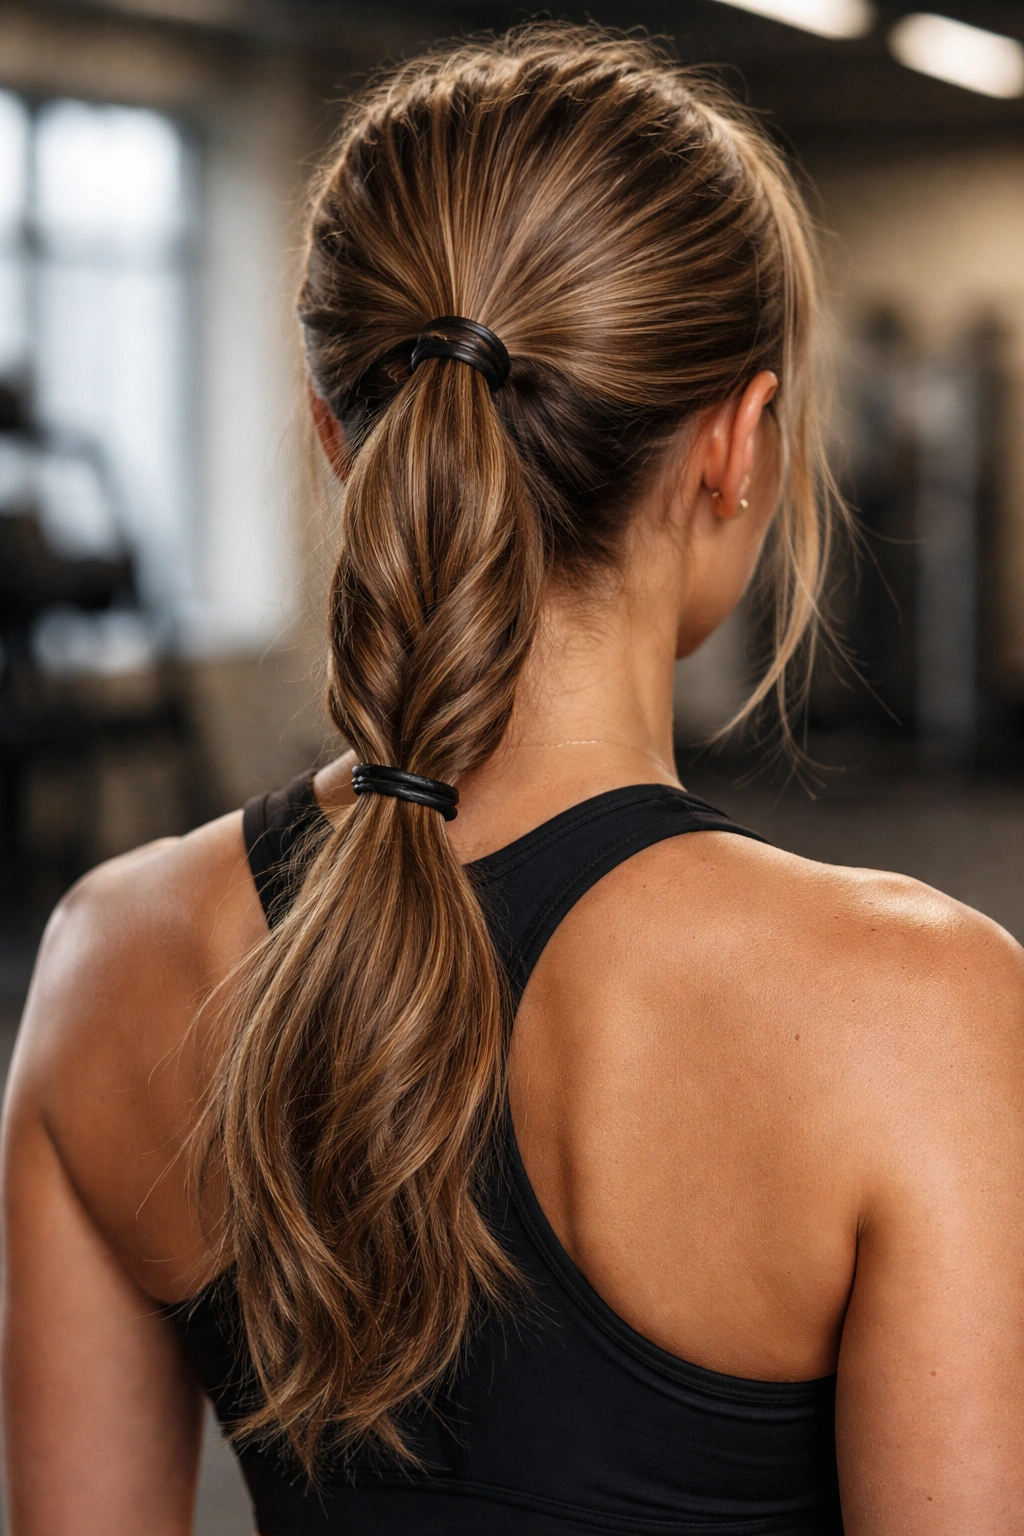
The split ponytail divides your hair into two sections, twists or braids each section separately, then wraps both sections around each other at the base before securing everything together. This creates a thicker, textured ponytail that’s nearly impossible to disrupt during movement. It looks intricate but is surprisingly fast once you’ve done it a few times.
Why This Works Better Than You’d Expect
By splitting your hair in two and handling each section separately, you’re creating more texture and grip throughout. The twisting or braiding adds even more friction, so the elastic holds your hair with incredible strength. The visual effect is also fuller and more substantial, which many people find more satisfying than a standard simple ponytail.
How to Create the Split Style
- Section your hair vertically down the middle (or slightly off-center if you prefer asymmetry)
- Twist one half-section tightly, then twist the other half
- Bring both twisted sections together and wrap them around each other at the base, creating a spiral effect
- Secure everything together with one elastic at the point where they meet
- Pin down any loose pieces with bobby pins, tucking them into the twists
- Use light hairspray to hold the twisted texture throughout your workout
7. The Inverted French Braid into Ponytail Hybrid
This style braids a section of your hair from the nape of your neck upward (inverted or Dutch braid), then gathers everything—the braid and your remaining hair—into a ponytail at the crown. It’s visually interesting, incredibly secure, and distributes tension in a way that feels almost weightless on your scalp even during intense activity.
Why This Hybrid Is Unexpectedly Comfortable
By beginning the braid at the nape and working upward, you’re using the weight of your lower hair to anchor everything. The braid itself acts like a reinforcement system, holding your hair structure stable before it’s even gathered into the ponytail. The texture of the braid gives your elastic tremendous grip, and you’re essentially using leverage and structure rather than just tension.
Step-by-Step Inverted Braid Construction
- Section out hair from the nape of your neck up the back of your head
- Begin a Dutch braid (crossing strands under, not over) at the nape, adding hair as you braid upward toward your crown
- As you approach the crown, stop the braid and gather it along with your remaining hair into a high ponytail
- Secure with a strong elastic
- Loosen or tighten the braid slightly to suit your comfort level and the intensity of your workout
- Pin any loose pieces and finish with hairspray for extended hold
8. The Tight Crown Braid with Hanging Tail
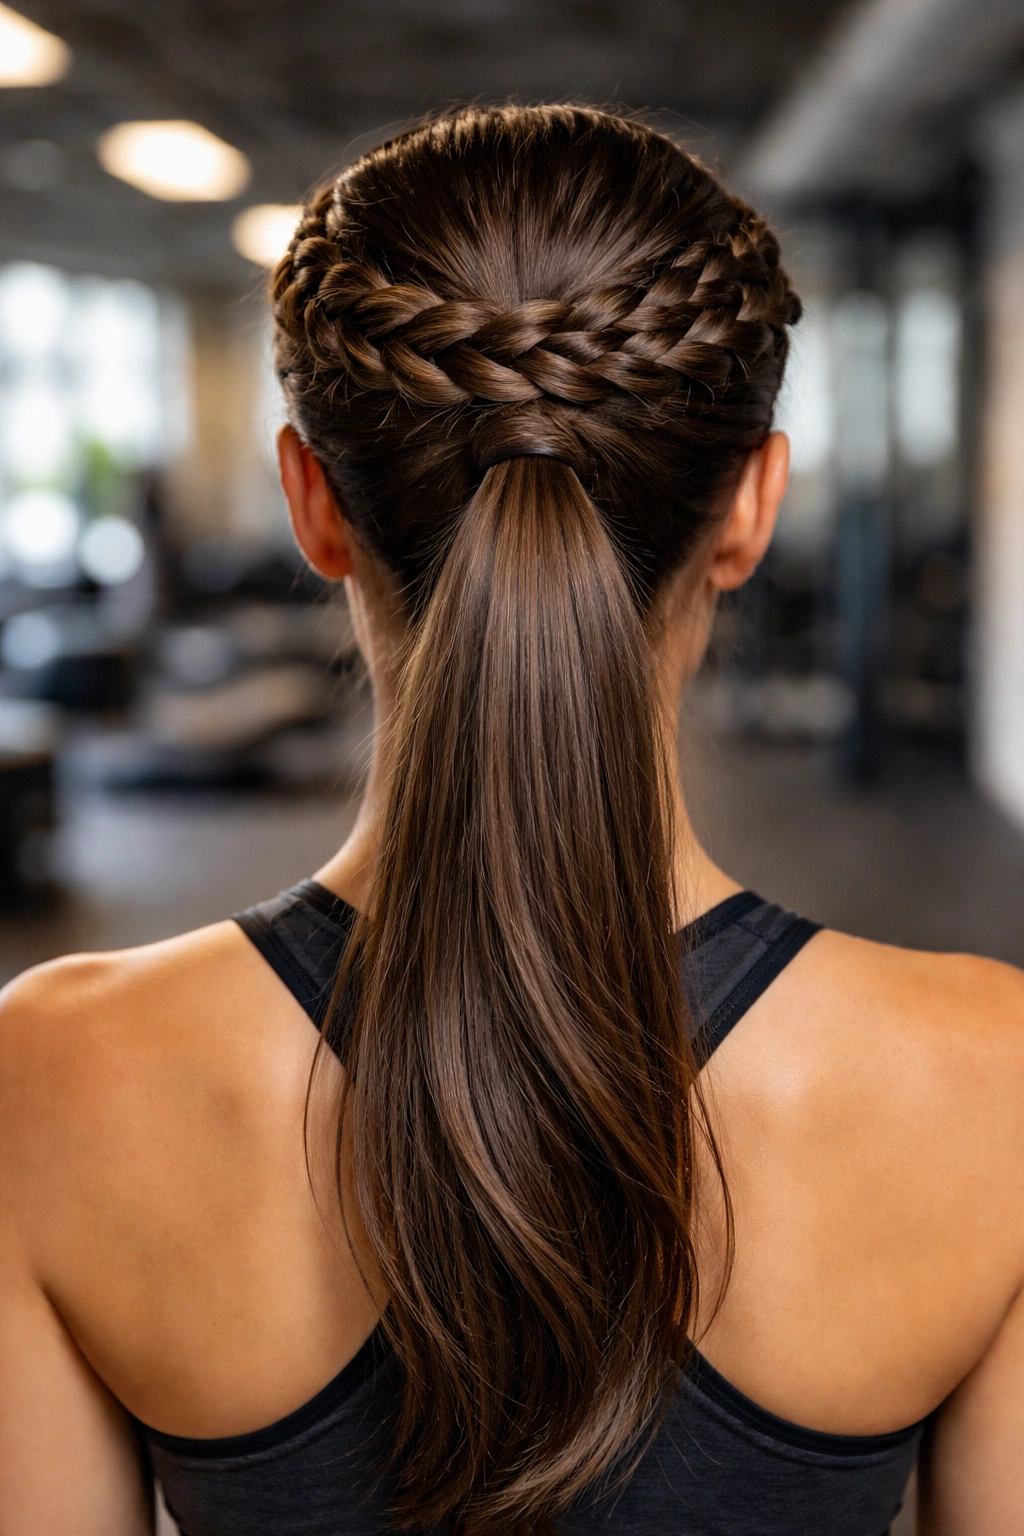
A single braid that circles your crown like a halo, with loose hair left hanging as a simple ponytail beneath it, combines the security of braiding with the ease of a ponytail. It’s a style you’ll see on runners and outdoor athletes because it keeps hair off your face and neck while maintaining natural movement. The crown braid anchors everything, so the hanging tail stays secure even during high-impact activity.
The Security Benefits of Crown Placement
A braid that runs around your crown distributes tension evenly across your entire scalp. Because it circles your head, no single point bears excessive weight. The remaining hair hanging below is secured by the braid above it, meaning it won’t shift or loosen regardless of how much you move. This is particularly effective for activities with repetitive bouncing motions.
How to Create the Crown Braid
- Section your hair into three strands at one side of your head, behind the ear
- Begin a Dutch braid, moving horizontally around your head, adding hair as you go
- Continue braiding around your crown until you reach the opposite side where you started
- Secure the end of the braid with a small elastic
- Leave all remaining hair hanging loose below the braid, or gather it into a low ponytail at the nape
- Pin the braid at a few points if needed to keep it from shifting, or use bobby pins to tuck loose pieces back
9. The Sleek Gel High Ponytail with Graphic Edges
This style takes the high ponytail to the next level with ultra-smooth, defined edges that look sharp and intentional. You’re applying gel around your hairline and smoothing every piece backward, creating a graphic, almost architectural aesthetic. It’s ideal for gym-based workouts where you want to look polished and feel supremely in control.
What Makes the Edges Look So Defined
A firm-hold gel or edge control product applied with a fine-tooth comb or even a toothbrush creates clean, sculptural lines around your hairline. The gel holds individual hairs in place, so no flyaways escape to soften the edges. This isn’t about looking overly done—it’s about creating a clean canvas where your face is the focus and your hair is a structured frame.
The Edge-Defining Technique
- Shampoo and condition your hair the day before, not the day of—freshly washed hair is too slippery for perfect edges
- Spray your hair lightly with water or a texturizing spray to create slight grip
- Apply an edge control gel or firm-hold pomade around your hairline
- Use a fine-tooth comb or old toothbrush to comb the product through, smoothing each section of hair backward and slightly downward
- Comb from your temples back toward where your ponytail will sit
- Gather your hair, secure tightly, and go back over any edges that need refinement
- Finish with hairspray to lock the edges throughout your workout
10. The Voluminous Teased High Ponytail
If you prefer a fuller, more textured aesthetic while maintaining workout functionality, tease your hair at the crown before gathering it into a high ponytail. Teasing (also called backcombing) creates texture and height at the base, giving you a ponytail with genuine volume. It looks bouncy and fun while remaining completely secure during movement.
Why Teasing Increases Grip Without Extra Tightness
When you tease your hair, you’re creating small knots and tangles that give the elastic something to grip. This means you can use a slightly lighter elastic and still maintain security, which is more comfortable during long workouts. The texture also catches light differently, making your ponytail look thicker and healthier. It’s a styling technique that serves a genuine functional purpose, not just an aesthetic one.
The Teasing Process That Lasts
- Start with hair that has some texture (day-two or day-three hair, or freshly washed and dried with a texturizing spray)
- Take a section of hair at your crown about 2 inches wide
- Hold that section up and use a teasing brush or fine-tooth comb to brush backward (toward your roots) in short, quick strokes
- Tease until you see visible texture and volume building
- Smooth the outer surface of the teased section with your comb, but leave the texture underneath
- Repeat with 1-2 more sections around your crown if desired
- Gather everything into a high ponytail, which will have built-in volume at the base
- Secure tightly and finish with hairspray to hold the teasing throughout your workout
11. The Rope Twist Ponytail for Beach or Outdoor Workouts
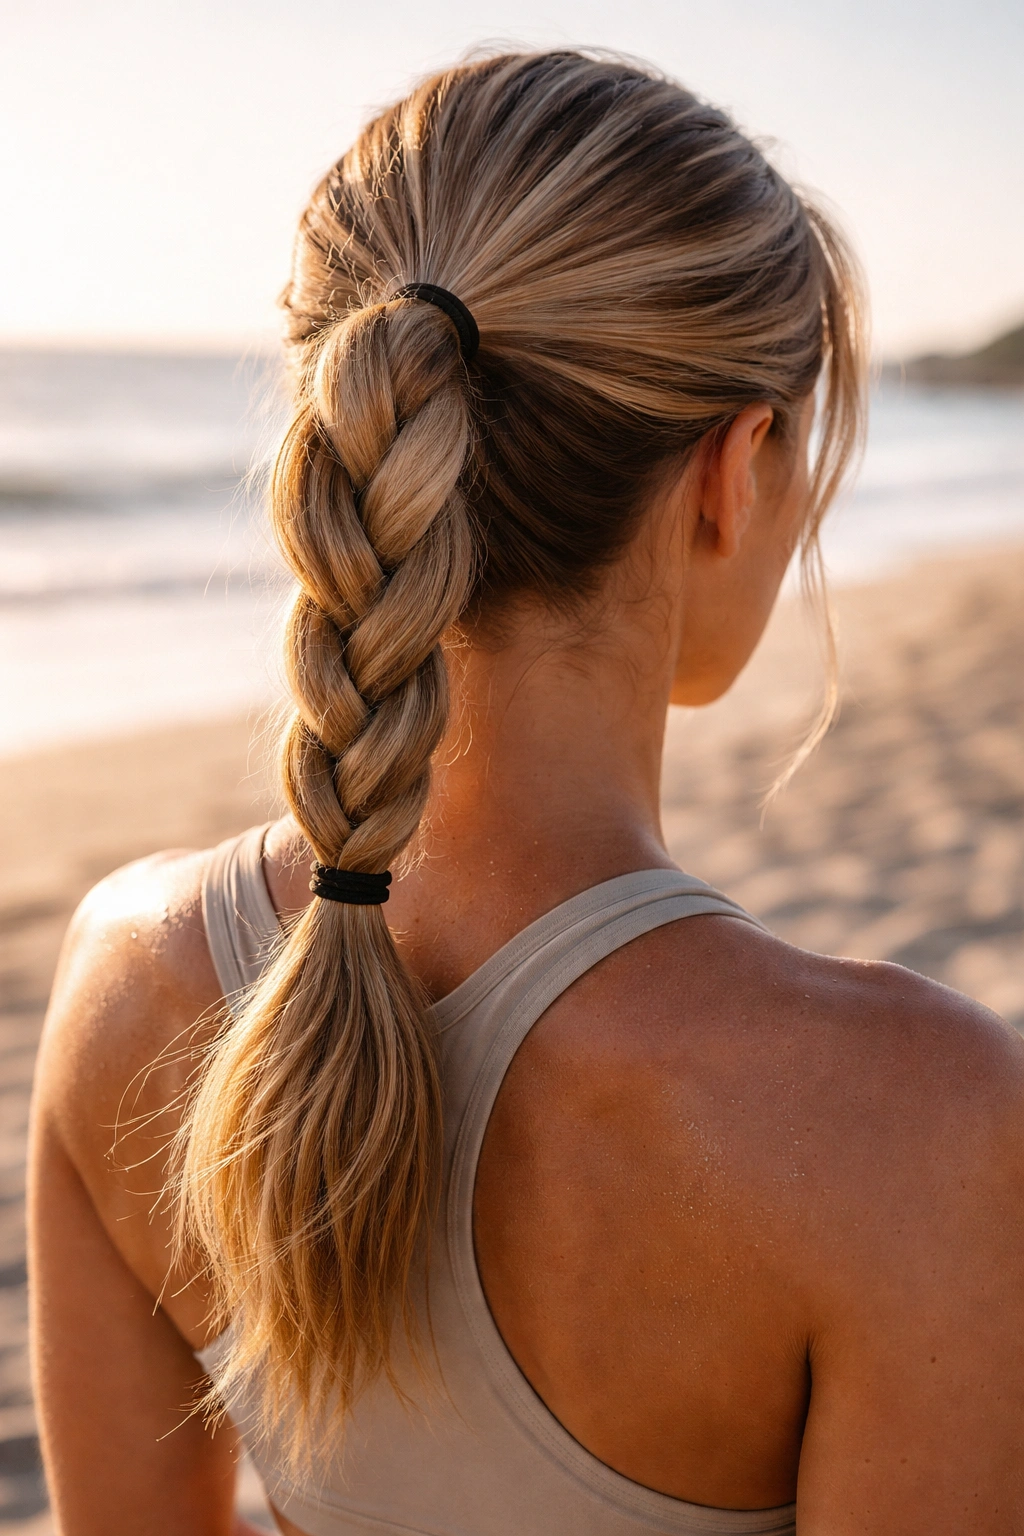
Instead of a standard single ponytail, divide your hair into two sections and twist them around each other, then secure at the base. The rope twist creates a thicker, more interesting-looking ponytail with better grip than loose hair would have. It’s especially popular for outdoor or beach workouts because it looks intentional and stays secure in wind and water.
How Twisting Changes Hair Behavior
Twisting your hair creates tension and texture without the time investment of braiding. The two twisted sections interlock with each other, creating natural thickness. When you secure a rope-twisted ponytail with an elastic, that elastic grabs both the twisted sections and the interlock points, giving you multiple grip points rather than just one. It’s simple physics that creates remarkably secure hold.
Creating the Rope Twist
- Divide your gathered hair into two equal sections
- Twist one section tightly clockwise
- Twist the other section tightly clockwise as well
- Bring the two twisted sections together and wrap them around each other, allowing them to intertwine (think of it like making a rope by twisting two cords together)
- Secure the resulting rope-textured ponytail with an elastic at the base
- Smooth any flyaways and finish with hairspray
- You can loosen the twist slightly for a more relaxed look, or keep it tight for maximum definition
12. The Side Ponytail with Braided Accent
A side ponytail positioned slightly off-center, with a small braid woven from one side and incorporated into the base, adds visual interest while maintaining excellent stability. This style distributes your hair asymmetrically, which can feel more comfortable if you have a preferred side or if one side of your scalp is more sensitive than the other.
The Comfort Advantage of Side Positioning
A side ponytail shifts the weight and tension away from the center of your scalp. If you experience tension headaches during or after workouts, moving your ponytail off-center can make a noticeable difference. The braided accent that feeds into the ponytail base adds security without requiring symmetrical tension across your entire scalp.
How to Build the Side Ponytail with Braid
- Begin a small three-strand braid on one side of your head, starting near your temple
- Braid about halfway down, then stop and secure the braid loosely
- Gather your hair to one side (the side opposite your braid is standard)
- Pull the braided section and wrap it around the base of your side ponytail
- Secure everything together with an elastic, hiding it where the braid ends
- Pin the braid in place if needed and smooth any loose pieces
- Finish with hairspray to hold the style through your entire workout
13. The Workout Bun with Braid Band
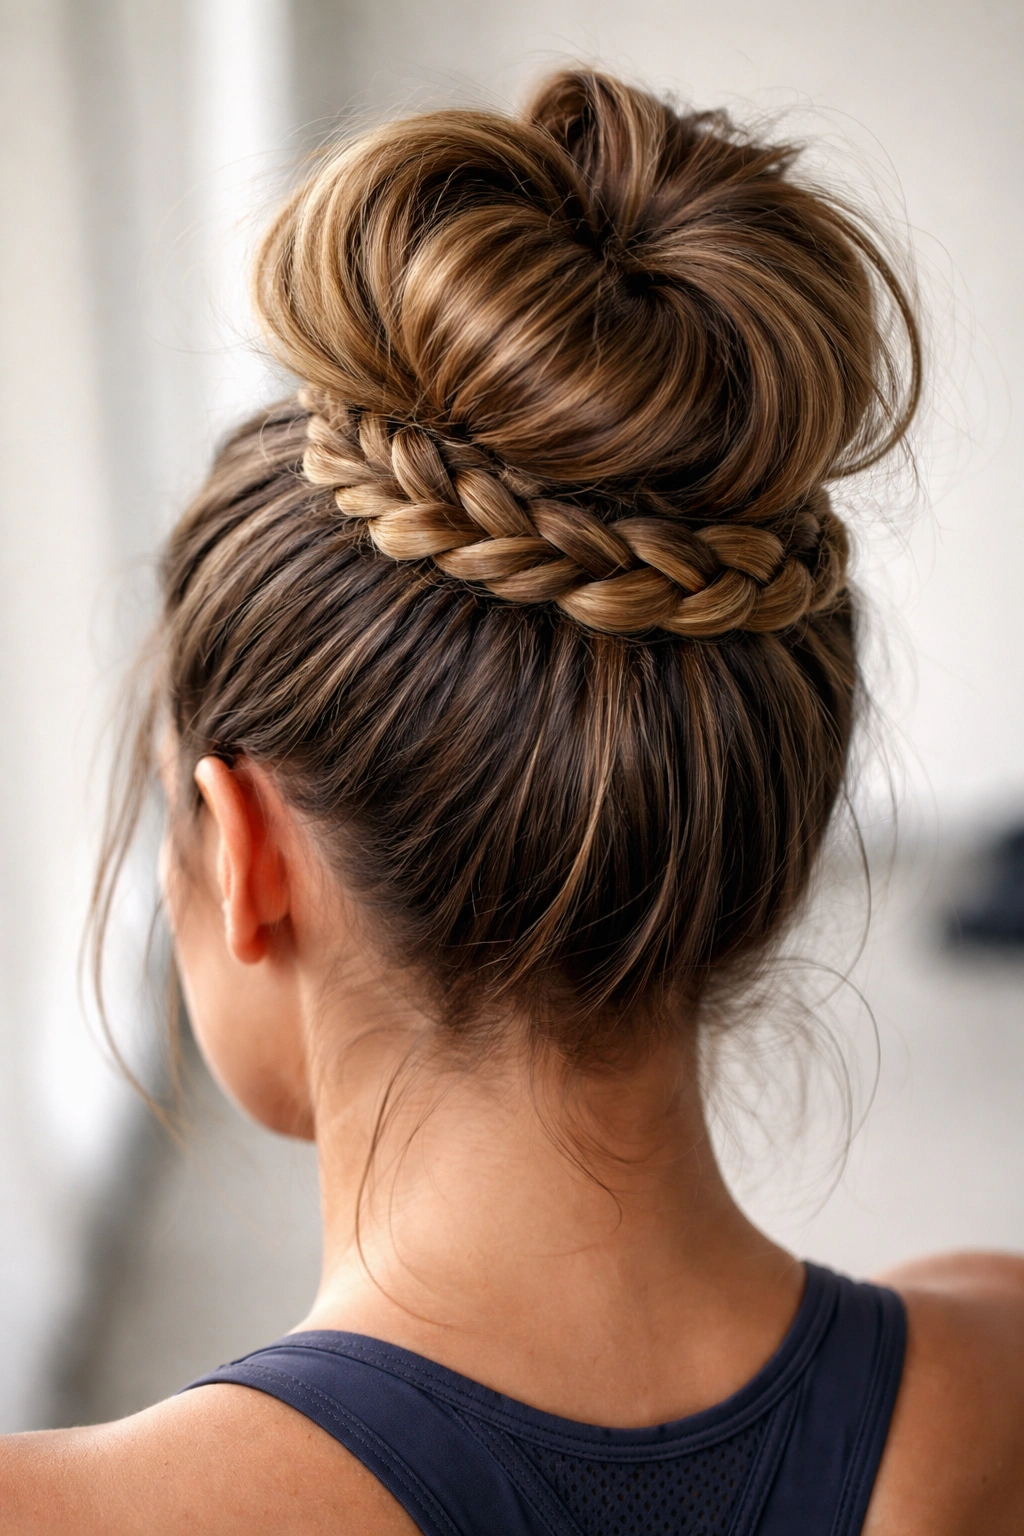
This style combines a high bun with a braided band wrapped around the base, creating a look that’s somewhere between a bun and a ponytail. The braid band adds security and visual interest while keeping hair completely off your face and neck. It’s perfect for yoga, Pilates, dance-based workouts, or any activity where you want zero hair distraction.
Why Bun-Plus-Braid Is Supremely Stable
A bun alone can slip if it’s not anchored properly, but a braided band wrapped around the base of a bun transforms it into a much more secure style. The braid adds texture that grips bobby pins, and the bun itself is wrapped with that braided section, preventing any rotation or loosening. You’re essentially using the braid as a reinforcement band for the bun.
Creating the Braided-Band Bun
- Gather your hair into a high ponytail and secure it tightly
- Twist the ponytail around itself to form a bun, pinning it securely with bobby pins
- Reserve a small section of hair before you finish the bun, or take a small section from the bottom of your ponytail before twisting
- Braid that reserved section into a three-strand braid
- Wrap the braided section around the base of your bun like a band
- Secure the braid end under the bun with additional bobby pins
- Smooth any flyaways and pin down any pieces that stick out
- Finish with hairspray for extended hold throughout your workout
14. The Synthetic or Hair Extension Wrap Ponytail
If you want extra volume, length, or security, wrap a small synthetic braid or hair extension around the base of your natural hair ponytail. This adds visual fullness, creates a thicker base that grips elastics better, and can make even a thin ponytail look substantial. It’s a technique used by athletes and fitness professionals who want their hair to look impressive during workouts.
How Extensions Add Functional Security
A wrapped extension doesn’t just look fuller—it physically increases the thickness of your ponytail base, which means your elastic grips more securely. The synthetic braid or extension hair is textured differently than your natural hair, so the elastic can grab both textures simultaneously. It’s a surprisingly effective hack if your hair is fine or slippery naturally.
How to Apply the Wrap Correctly
- Secure your natural hair into your chosen ponytail style
- Choose a thin synthetic braid or hair extension in your hair color
- Wrap it around the base of your ponytail, covering your elastic
- Secure the extension wrap with a bobby pin, tucking the end into your ponytail base
- Use hairspray or a small amount of gel to tack down the extension and make it blend with your natural hair
- Style the wrapped ponytail so it looks intentional, not like an afterthought
- The wrap should feel secure and move with your ponytail throughout your workout
15. The Secure Sleek Bun with Hidden Bobby Pins

A sleek, high bun represents the ultimate in no-nonsense hair security. You’re not dealing with a hanging tail that bounces or moves—everything is twisted up and pinned securely at your crown. It’s the style of choice for gymnasts, dancers, and anyone who needs absolute certainty that their hair won’t shift at all during intense movement.
The Bobby Pin Technique That Actually Works
Most people pin a bun with just a few bobby pins, which is why buns slip. A truly secure bun needs bobby pins placed strategically all around the base, not just at the top. You’re creating an anchor point from multiple angles so the bun can’t rotate or loosen. The pins should be hidden inside the bun itself, so they don’t show or feel uncomfortable against your scalp.
Building the Unslippable Bun
- Start with slicked-back hair (using the gel technique from the Slicked-Back Low Ponytail section above, but position it high on your head instead)
- Gather into a high ponytail and secure very tightly with an elastic
- Twist your ponytail tightly around itself, coiling it into a bun shape against your scalp
- Tuck the tail end under the bun to hide it
- Take a bobby pin and insert it horizontally through the bun, anchoring it to your scalp underneath (insert from outside the bun, then push through to secure inside)
- Place a second bobby pin in an X formation with the first one, creating an anchor cross
- Add a third and fourth pin if you have thick hair or if your workout involves significant bouncing
- Smooth the outer surface of the bun and tuck any loose pieces underneath
- Finish with strong-hold hairspray, spraying directly on the bun to lock the twist in place
Final Thoughts
The right workout ponytail isn’t just about looking put-together—it’s a functional tool that lets you move confidently and perform at your best. Each style works because it uses specific techniques (strategic placement, texture, wrapping, braiding, or pinning) to keep hair secure regardless of how intensely you move. The high and tight ponytail works brilliantly for cardio because of the high placement and tension distribution. The split ponytail works for lifting because of the texture and thickness. The crown braid works for running because it anchors hair from multiple points.
Your goal is finding the style that matches your workout type, hair texture, scalp sensitivity, and personal preference—then mastering the technique so you can create it quickly before every session. Once you’ve got one or two styles down perfectly, trying the others becomes a natural progression. You’ll discover that what feels awkward the first time becomes automatic after a few attempts, and then you’ll have backup options for different situations.
The key insight that changes everything is this: a good workout ponytail isn’t tight because you’re pulling hard—it’s secure because of the structure you’ve built into it. Braids, twists, wrapping, multiple elastics, bobby pins, and strategic placement all work together to create stability that lasts through your entire workout without requiring uncomfortable tension. That’s how you end up with a hairstyle that performs as hard as you do.