Fine hair can feel impossible to style in a way that looks genuinely full and voluminous. You probably notice that regular ponytails show too much scalp, fall flat against your head, or just look thin no matter what you try. But here’s what most people don’t realize: the thickness you’re seeing in those enviable full ponytails often comes from a specific technique rather than from naturally thick hair — and double weave ponytails are the secret that professional stylists use to transform even fine or thin hair into something that looks genuinely substantial.
A double weave ponytail works by creating two separate woven sections that sit close together, trapping hair in a way that creates the optical illusion of much greater density than actually exists. The technique builds height and fullness by using the space between the sections strategically, and it works especially well because the weaving process itself adds texture and visual interest that reads as volume. Whether you’re working with naturally fine strands or just want more visual fullness than a standard ponytail provides, this approach delivers noticeably thicker results.
The best part? Double weave ponytails aren’t just for people with special hair types or professional stylists. Once you understand the core principles — how to section the hair, where to position the weaves, and which variations work with different hair textures — you can create these looks at home with basic supplies. The following techniques showcase different ways to build this fuller effect, from classic double weaves that sit side by side to more creative options that combine weaving with other fullness-boosting methods.
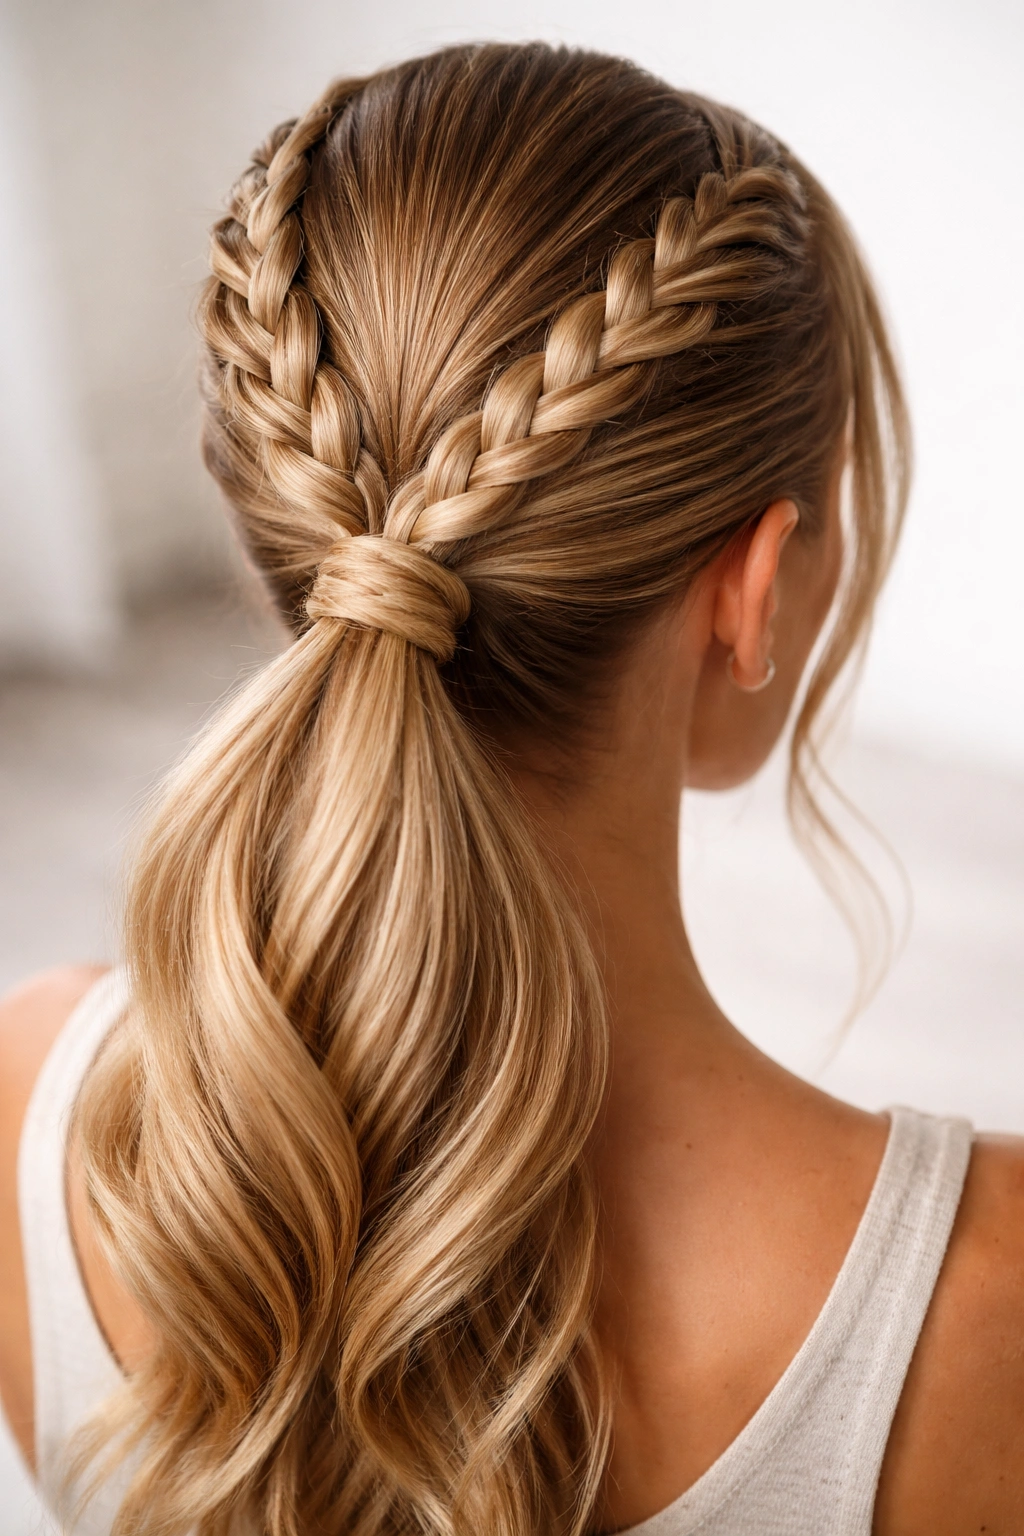
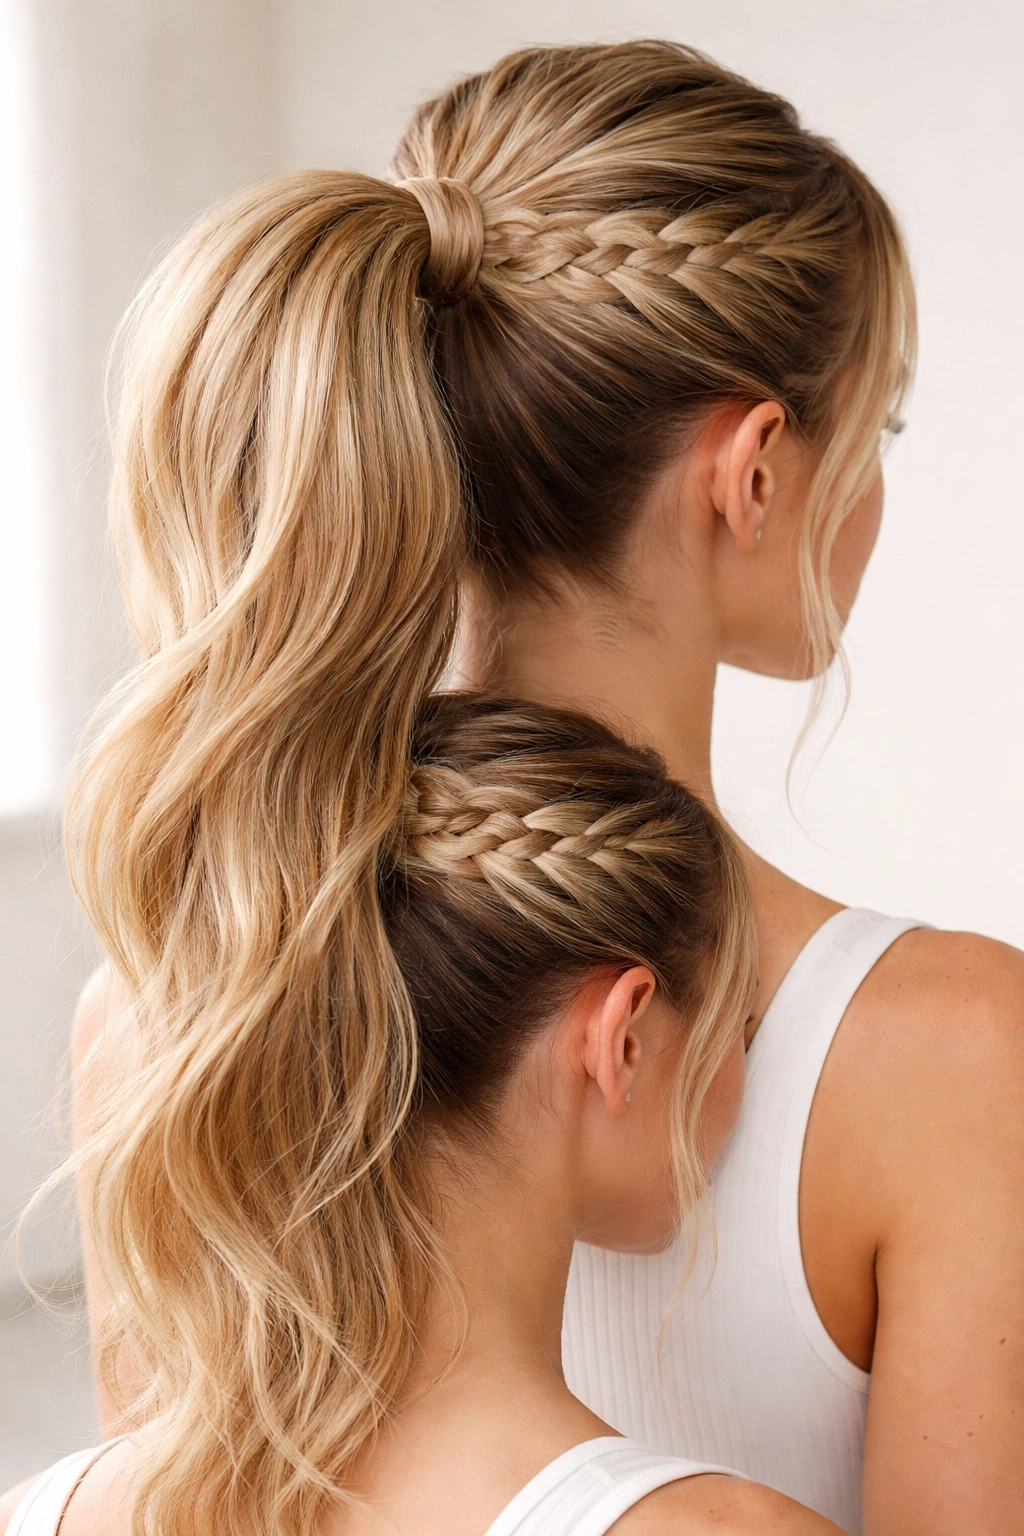
1. Side-by-Side Double Weave With Center Part
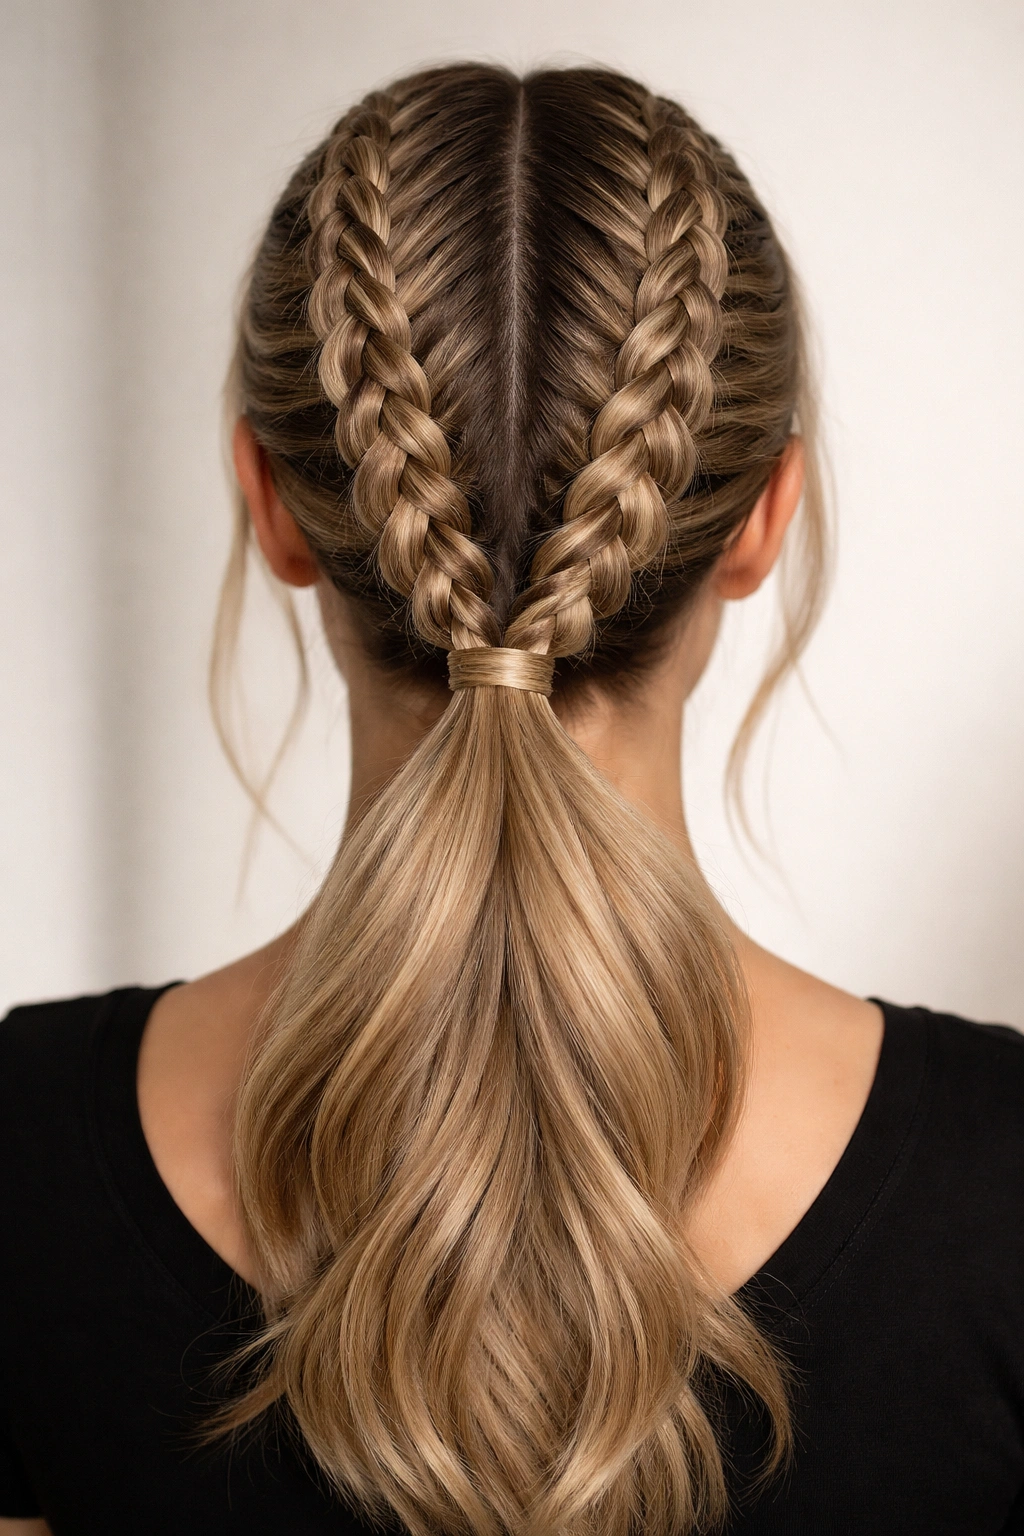
This is the most straightforward double weave ponytail, and it’s the perfect starting point if you’ve never tried the technique before. You create two clean French or Dutch braids that run parallel down the back of your head, positioned just close enough that they nearly touch without actually connecting. They meet at the base of your ponytail, where you secure them together with a single elastic band.
Why It Works So Well
The side-by-side positioning creates an immediate sense of fullness because each weave occupies its own space, and together they take up more visual real estate than a single braid ever could. The center part emphasizes the symmetry and draws attention to both braids equally, making the overall look feel intentional and styled rather than accidental.
How to Create This Look
- Blow dry your hair with volume at the roots — use a volumizing mousse or texturizing spray before drying to build foundation texture
- Create a clean center part from your forehead all the way down the back of your head
- On each side, take a section about 2 inches wide from your part and begin a French braid (or Dutch braid for more texture) moving straight back toward the crown
- Keep both braids equally tight and follow the same lines on both sides for symmetry
- When the braids reach the base of your skull, gather all remaining hair and the ends of both braids into a low or mid-height ponytail
- Secure tightly with an elastic, then gently pull the sides of each braid outward to create a fuller, more textured appearance
This style works on shoulder-length hair and longer. For extra fullness, incorporate a hair extension or clip-in ponytail piece at the base — this instantly adds density that makes the weaves pop even more.
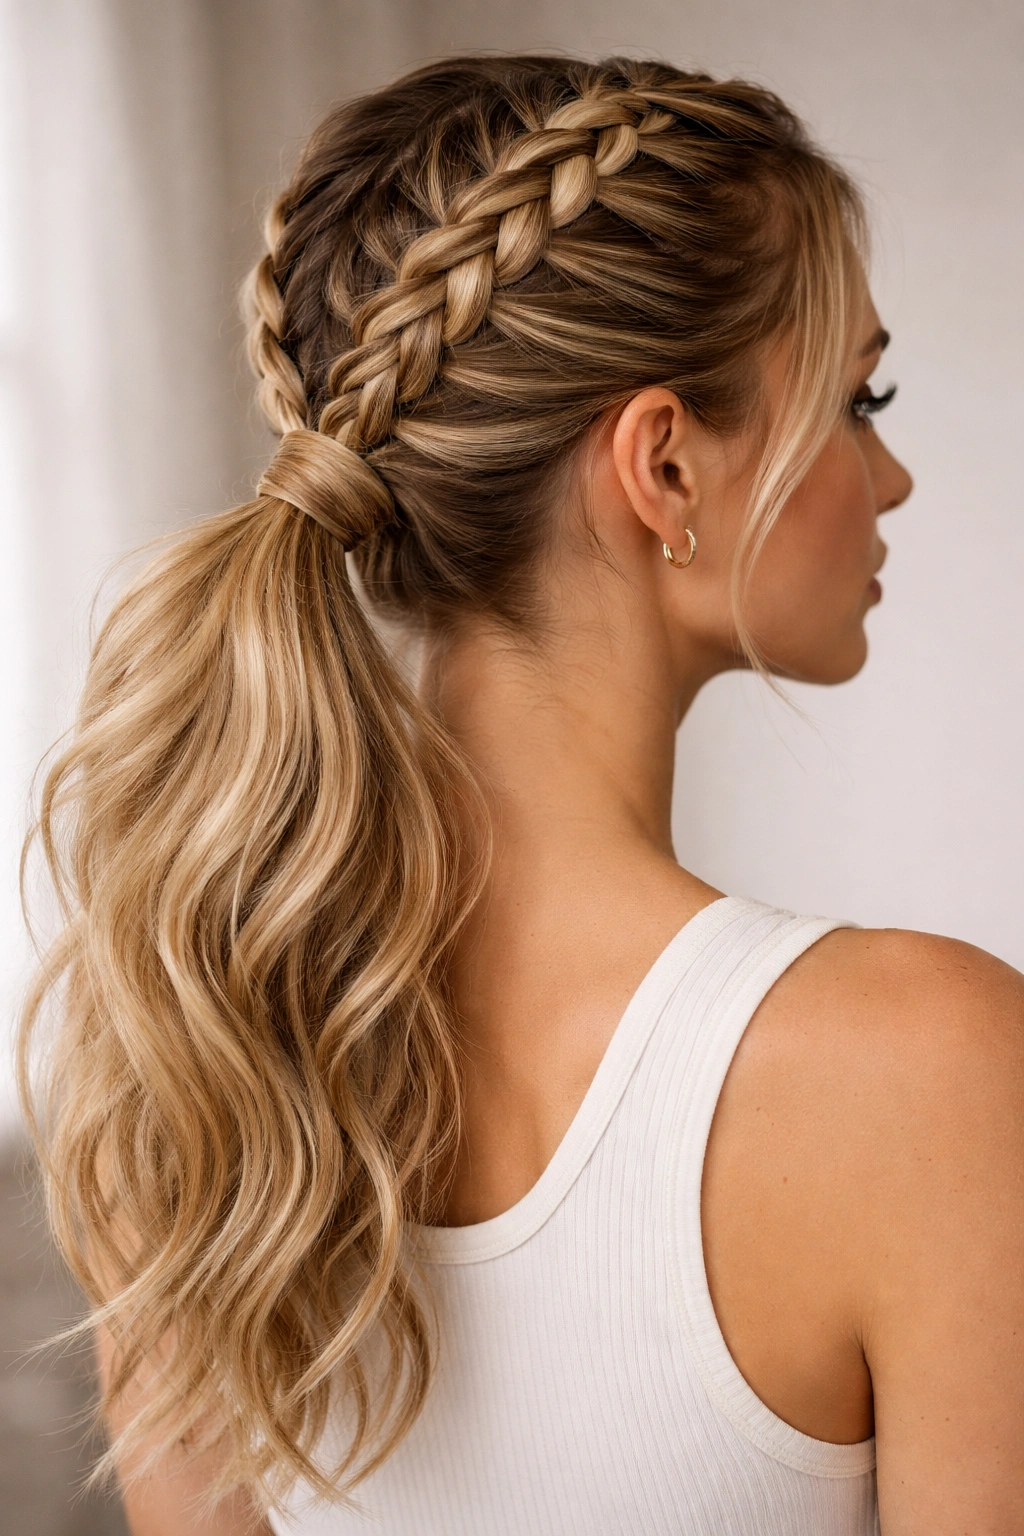
2. Double Weave High Ponytail With Bouffant Crown

This variation takes the basic double weave and adds height at the crown by creating backcombed volume before you even begin the braids. The bouffant creates a cushioned base that makes the weaves sit further away from your head, automatically increasing the perceived fullness.
The Bouffant Factor
Backcombing the crown area tangles the hair at a microscopic level, creating a stable, airy foundation. This creates visible height and gives your double weave ponytail somewhere substantial to sit, rather than lying flat against your head. It’s the trick that transforms a decent double weave into a genuinely impressive one.
Step-by-Step Technique
- Blow dry your hair with maximum volume, focusing on the crown area
- In your crown section (roughly 3 inches back from your hairline), take a 2-inch section of hair and backcomb it at the roots only — not all the way through the strand, just the first inch or two
- Smooth the top layer gently so it looks polished while keeping the teased texture underneath
- Repeat this backcombing in 3-4 sections across your crown, building layers of height
- Once your bouffant is set, part the remaining hair down the middle and create your two braids as in the basic technique
- Secure the ponytail high, tying it where the bouffant begins so the height is fully visible
High ponytails benefit dramatically from this approach because the crown height elongates your face and the bouffant automatically fills out the space where a high pony would otherwise look sparse or strained.
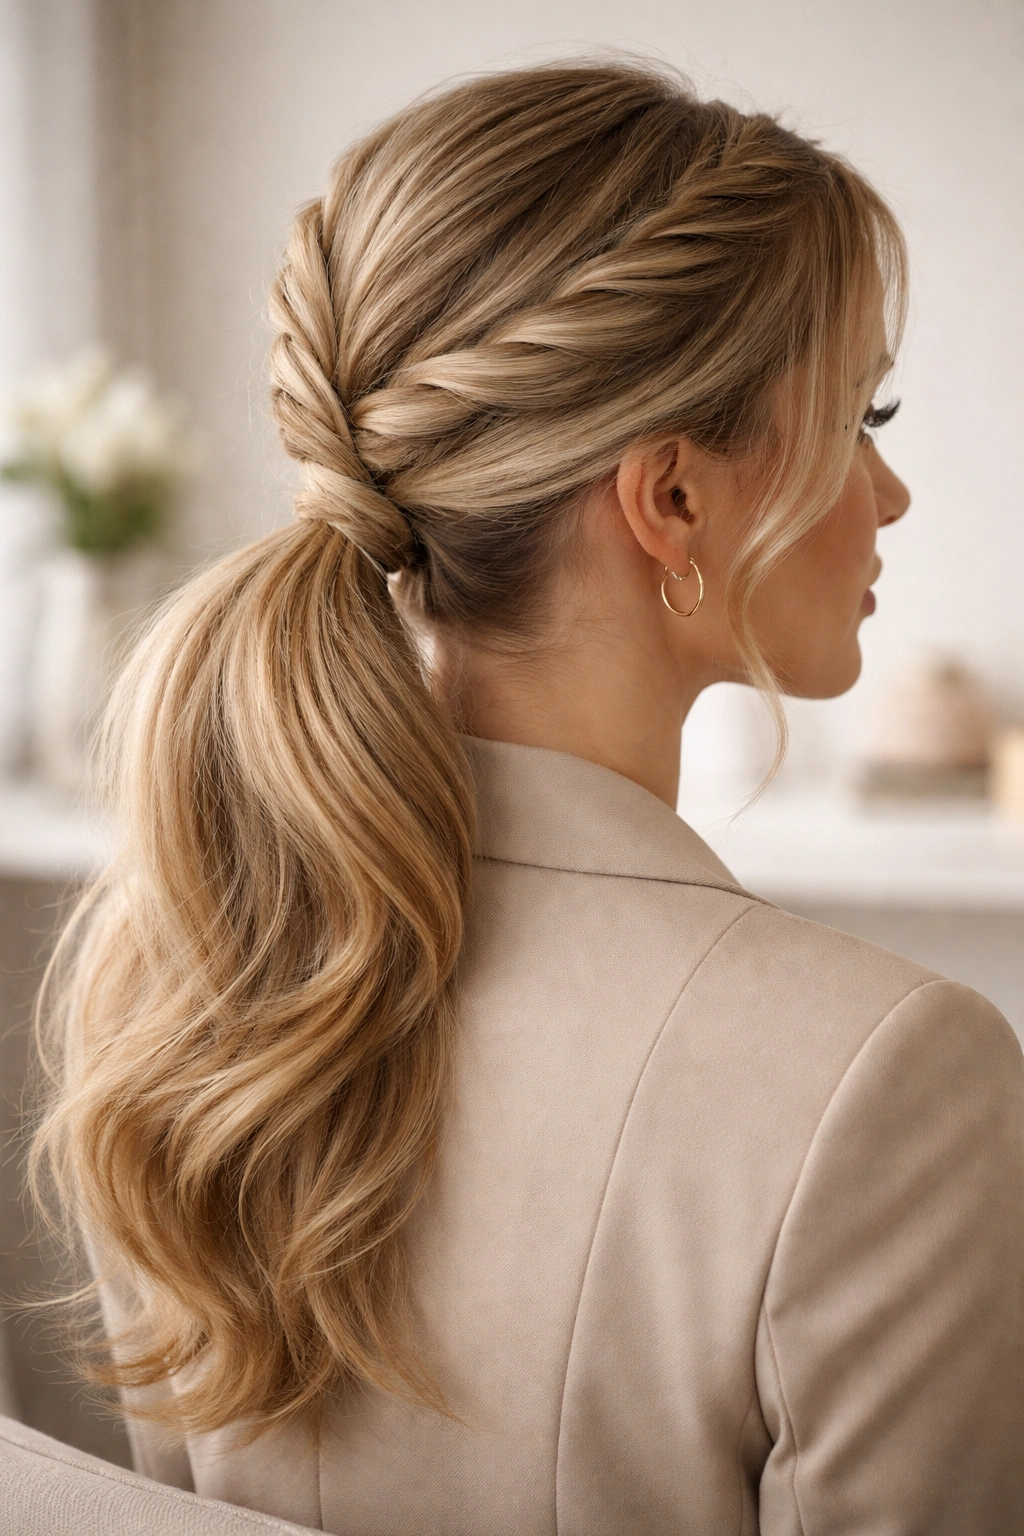
3. Double Dutch Braids Into Twisted Wrap Ponytail
If you want extra texture and a more intricate look, Dutch braids (where you braid the sections under rather than over) create more visual dimension than French braids. When these lead into a twisted wrap rather than a traditional elastic, the entire ponytail feels more intentional and sophisticated.
Dutch Braid Advantages
Dutch braids sit slightly more forward on the head than French braids and create more pronounced ridge lines that catch light differently. This creates visual texture that reads as volume, even if the actual hair density remains the same. The technique is slightly trickier to learn, but the payoff in appearance is significant.
How to Execute
- Create two Dutch braids from your temples back toward your crown, following the same parallel pattern as the side-by-side technique
- These braids should feel tight and textured, with visible ridge work visible from the front and back
- When you reach the base of your braids, gather the remaining hair and braid ends into a mid-height ponytail
- Take a small section from the ponytail itself and wrap it around the elastic base multiple times, covering the elastic completely
- Secure the wrap with a bobby pin and gently tease the ponytail ends to add extra texture throughout
The wrapped-base technique adds a polished finishing touch that elevates the entire style — it makes the ponytail look like it required professional help, even though you did it yourself at home.
4. Double Weave Low Ponytail With Volumizing Mousse and Teasing
For those who prefer a more relaxed, undone aesthetic, a low double weave ponytail with strategic teasing throughout gives you fullness without the high-maintenance appearance. This style works particularly well for office settings or events where you want polish without obvious styling.
The Teasing Strategy
Teasing creates texture and grip that lets fine hair hold volume longer. Rather than backcombing your entire crown (which can look costume-y), strategic teasing in your ponytail itself adds density where it matters most — where your elastic sits and where you actually need visual fullness.
Application Method
- Apply volumizing mousse to damp hair at the roots, focusing on your crown and the base of your ponytail area
- Blow dry thoroughly — proper drying with volume product is half the battle for maintaining fullness throughout the day
- Create two French braids that follow the natural curve of your head, allowing them to sit slightly off-center
- Gather the braids and remaining hair into a low side or center ponytail, positioned at the nape of your neck
- Use a teasing brush or fine-tooth comb to gently backcomb just the underside of your ponytail where it sits at the elastic
- Smooth the top layer and mist lightly with texture spray — this locks in fullness without the weight of heavy product
This technique keeps your styling subtle while ensuring that the ponytail looks full even under close inspection, which matters if you’ll be photographed or in formal settings.
5. Double Weave With Textured Ponytail Extension
This is where hair extensions become genuinely strategic rather than just adding length. A wavy or textured clip-in ponytail extension at the base of your double weave automatically multiplies the fullness because the extension’s texture creates volume that blends seamlessly with your woven sections.
Extension Selection Matters
The key is matching the texture and color of your extension to your natural hair as closely as possible. Wavy extensions add fullness immediately, while straight extensions can sometimes highlight density differences. Balayaged or multi-tonal extensions blend more naturally than single-color options, especially if your hair has any dimension.
Installation for Maximum Impact
- Create your two French or Dutch braids as usual, ending at the base of your neck in a low gathering
- Before securing with an elastic, clip your extension into the base of the gathered hair
- Once the extension is clipped securely, wrap a thin section of your own hair around the elastic multiple times to hide the clip
- Arrange the extension hair so it blends evenly with your natural hair — flip your head upside down and arrange strands to fall naturally
- Tease both your natural ponytail hair and the extension hair together slightly to create unified texture
Extensions work best when they’re not obviously additions — the goal is for someone looking at you to think you have naturally very full hair, not that you’ve added pieces. Proper blending and color matching achieve this completely.
6. Diagonal Double Weave With Wrap-Around Braid
Instead of creating two parallel braids, diagonal double weaves start on opposite sides of your head and angle toward the center as they travel backward. This creates a completely different visual effect — the diagonal lines are more flattering to round face shapes, and the angle creates an impression of even greater fullness because the weaves take up more visual space.
Geometric Advantage
Diagonal lines draw the eye differently than parallel lines. They create visual interest and movement that makes the style feel more dynamic. Because the braids angle toward each other, they naturally meet at a point that automatically feels fuller and more unified than two separate parallel sections.
Creating Diagonal Weaves
- Part your hair slightly off-center rather than down the middle
- Start one French braid at your temple on the larger side of the part, angling it back toward your opposite ear
- Start the second braid at your temple on the smaller side of the part, also angling backward but slightly higher
- Both braids should meet somewhere in the center-back area of your head
- Gather both braids and remaining hair into a ponytail at that meeting point
- The ponytail will naturally sit slightly to one side, which actually enhances the overall visual of fullness
- Wrap your base and tease slightly for maximum impact
This style is particularly flattering for anyone with fine hair who wants a more interesting look than the basic double weave — the diagonal angle immediately reads as intentional and fashion-forward.
7. Double Weave Half-Up Ponytail for Medium-Length Hair
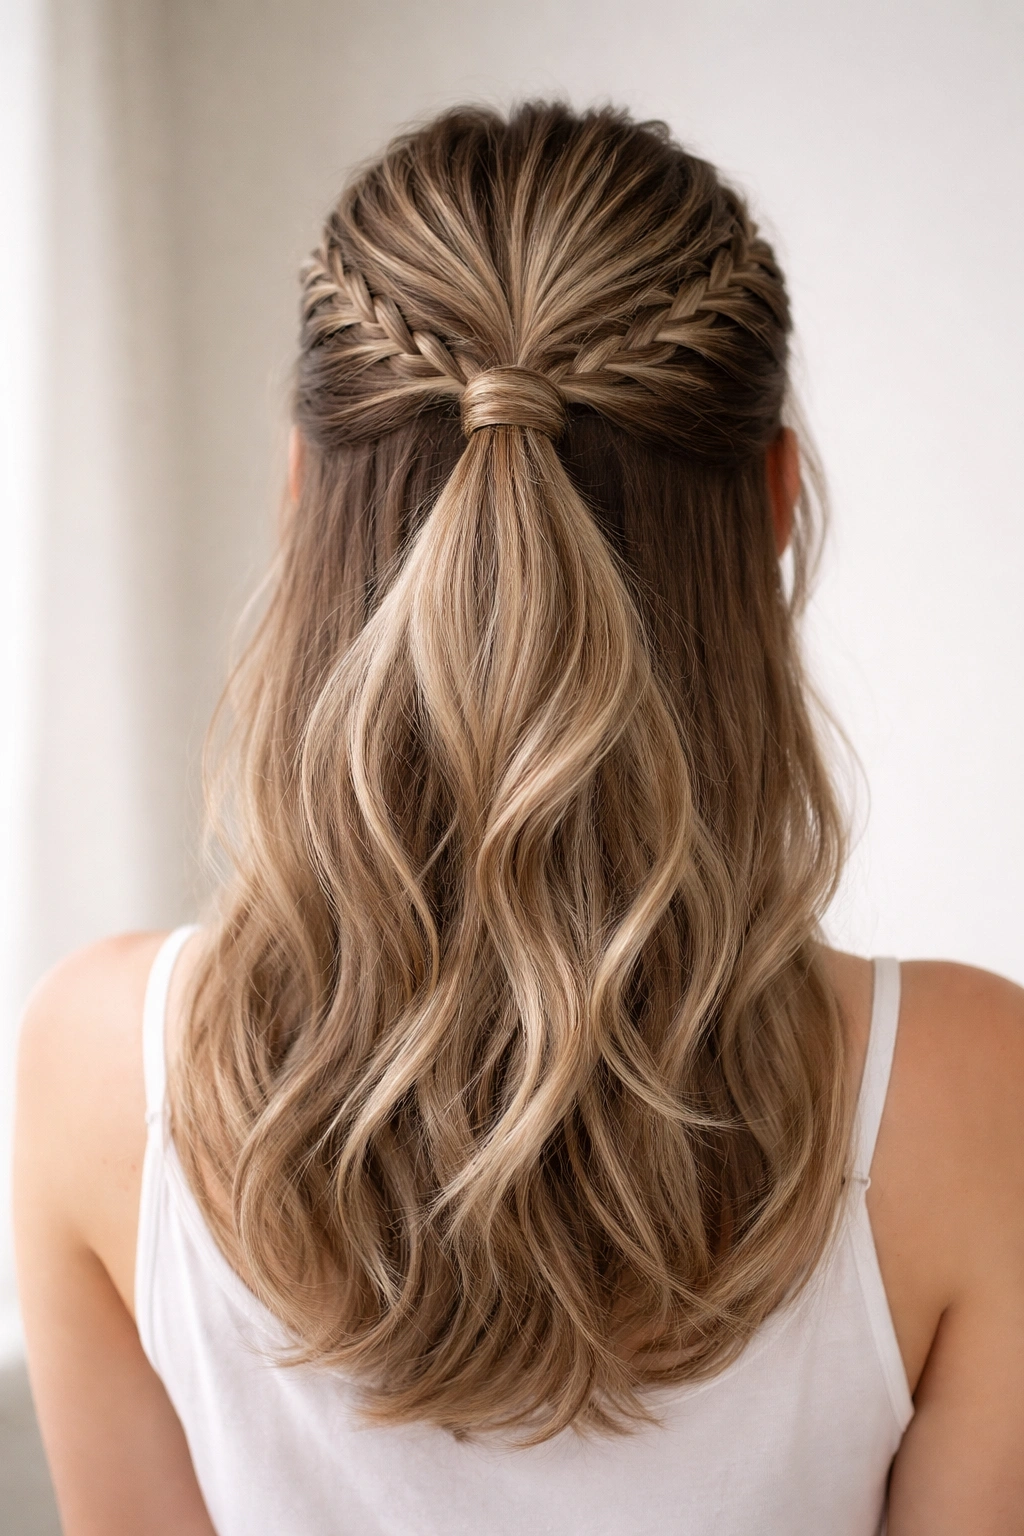
If you don’t have shoulder-length hair or prefer to show more of your length, a double weave half-up ponytail solves that problem while still delivering serious fullness where it matters — at the crown and center back.
Why Half-Up Works
Half-up styles automatically look fuller because the visible hair at the bottom of your head gets combined volume from the two braids above it. The contrast between the styled top and looser bottom creates visual interest and makes the fuller sections stand out even more prominently.
Half-Up Double Weave Method
- Create two French braids starting from your temples, continuing them straight back (not all the way to your neck like a full ponytail)
- Stop the braids roughly 2 inches above where your ears are at their back
- Gather these braids with the surrounding top section of hair into a half-up ponytail positioned at your crown
- Secure tightly and wrap your base with a thin strand
- Leave the remaining hair down — you can wave it, curl it, or keep it straight depending on your style preference
- The contrast between the textured, woven top and the rest of your hair creates multiple layers of visual fullness
This style works beautifully for casual settings, events where you want to show your hair length, and anyone whose hair gets uncomfortable in a full ponytail for extended periods.
8. Double Weave With Criss-Cross Wrap and Volume Powder

This variation adds layers of styling technique to maximize the fullness effect. The criss-cross wrap involves wrapping the elastic base with sections of hair that cross over each other, creating a detailed finish that looks far more complex and fuller than a simple single-wrap technique.
The Wrap Technique
A criss-cross wrap creates visual fullness in a completely different way than the braids themselves — it adds height and texture right at the base where your elastic sits. This is critical for very fine hair because it gives that area substance and dimension.
Building the Criss-Cross Wrap
- Create your two braids and gather hair into a ponytail as usual
- Instead of wrapping with one strand, divide a thin section of ponytail hair into two pieces
- Cross one piece over the elastic, then wrap the elastic with it and secure with a bobby pin
- Take the second piece and wrap it in the opposite direction, creating an X-pattern
- Add a fine volume powder to your roots before styling (applied when hair is completely dry) — this creates texture grip throughout the day
Volume powder is criminally underused by people with fine hair. It’s not heavy like mousse, and it creates microscopic texture that allows hair to hold its styled position longer. This means your double weave ponytail will look full all day rather than gradually deflating.
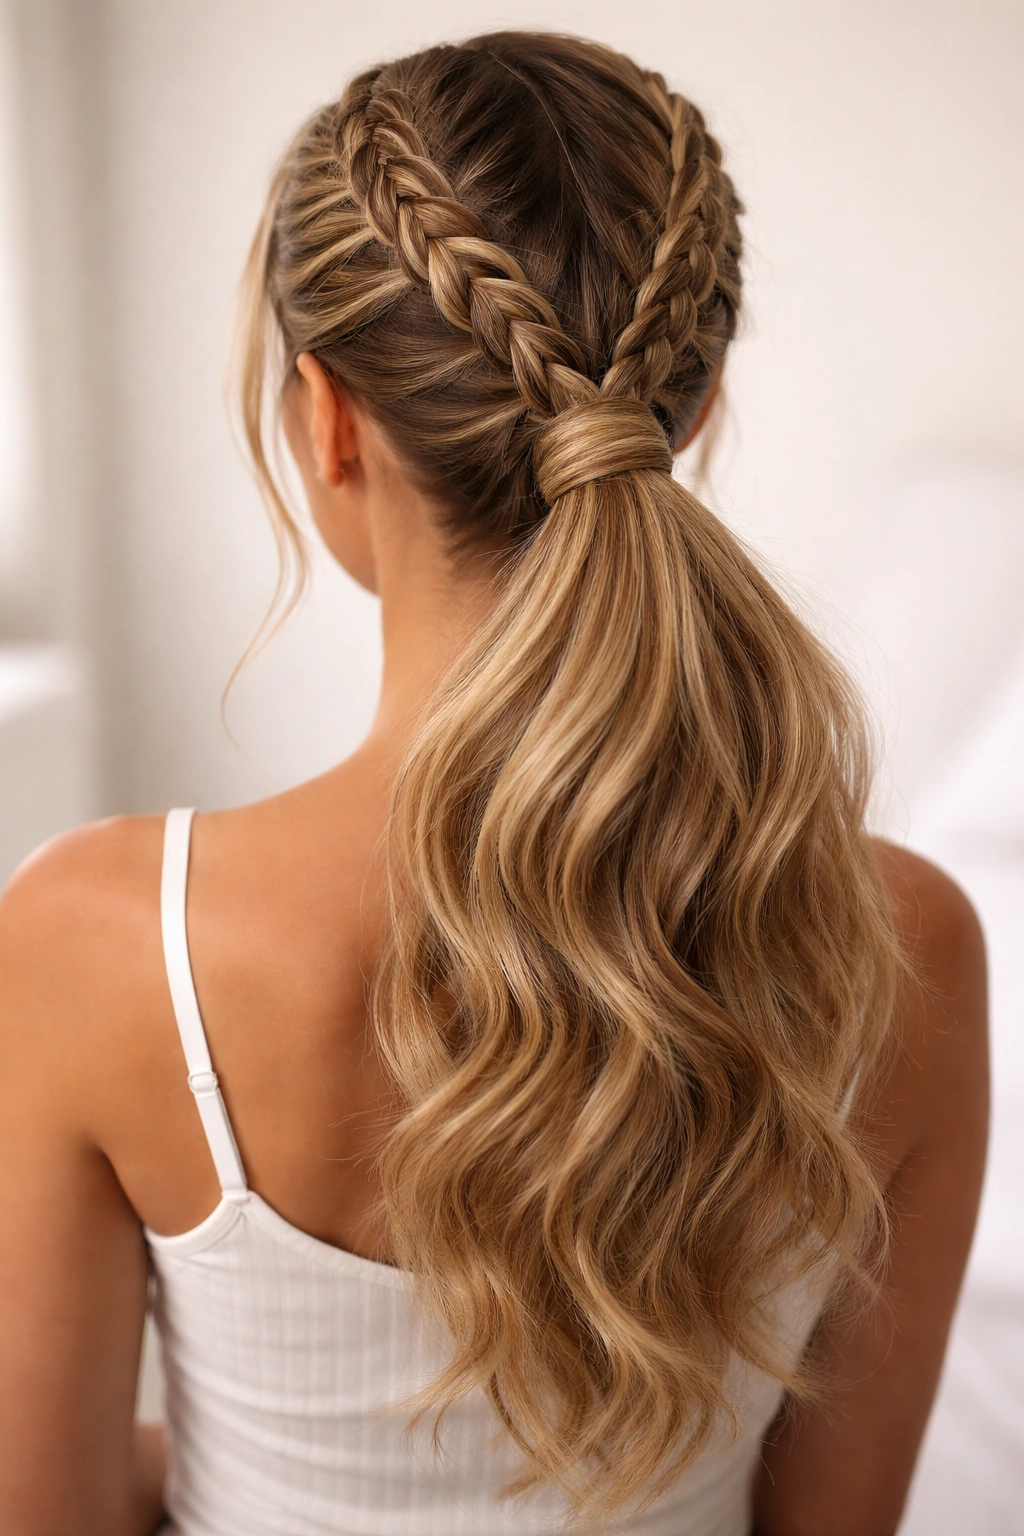
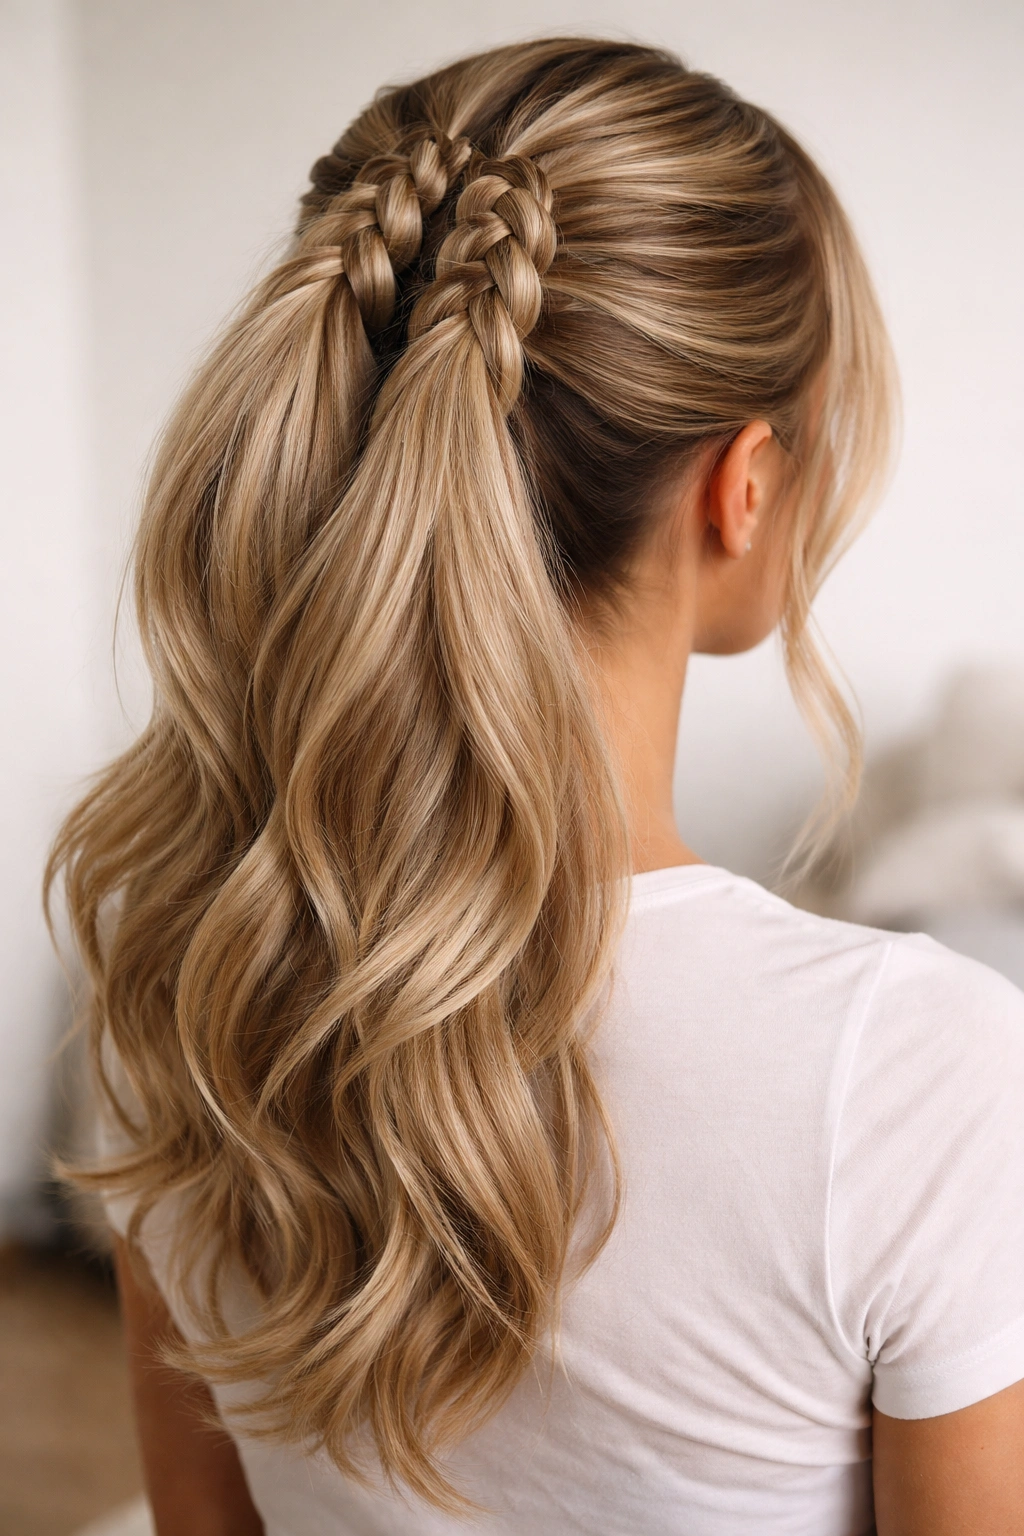
9. Double Weave Braids Positioned High on Crown
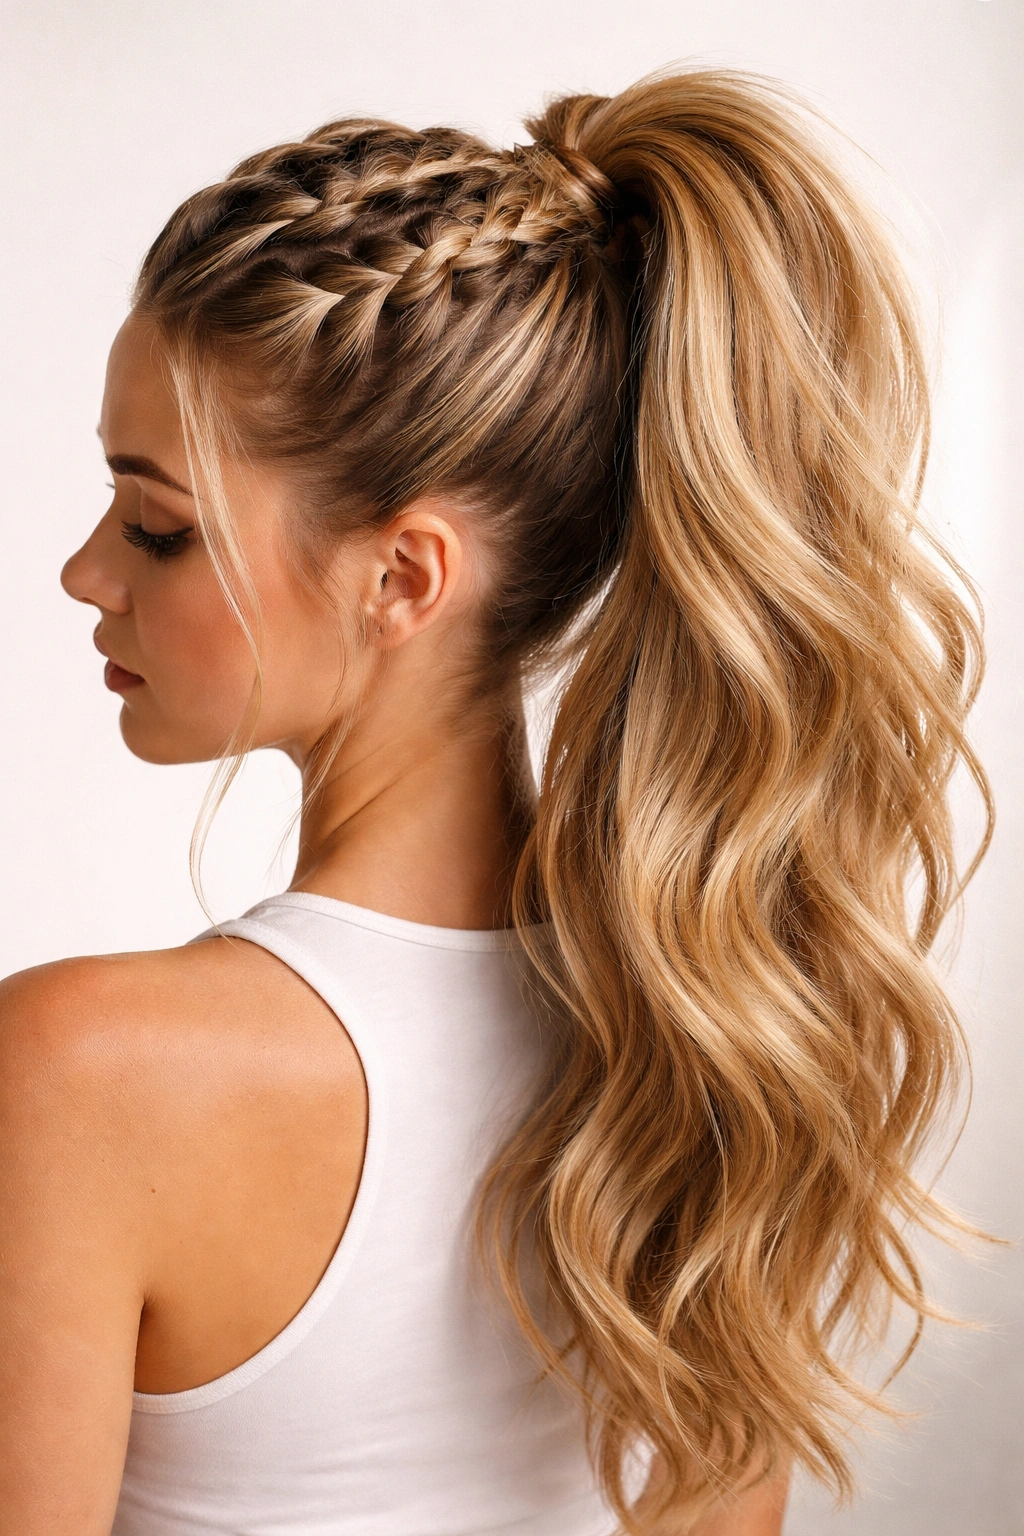
If you want maximum fullness impact, positioning your braids high on your crown — starting further back from your face rather than at your temples — changes everything. Your braids sit on top of more hair, and the positioning naturally creates height.
Positioning Strategy
High crown braids work best on hair that’s at least shoulder-length and relatively straight or naturally wavy. On very curly hair, the positioning can be trickier because curls take up space naturally and high braids can look disproportionate.
High-Crown Placement Method
- Create a deep side or off-center part, then section off a triangle of hair from roughly the crown area (about 3 inches back from your hairline, rather than starting at your temple)
- Create your first braid from this high position, moving straight back toward your neck
- Create your second braid from the opposite side of that high section, also moving back
- Both braids should feel elevated on your head rather than lying flat
- Gather them with all remaining hair into a high ponytail — this creates the maximum visual height possible
- The resulting style looks noticeably thicker because the braids sit on top of a substantial base of gathered hair
This variation is ideal for anyone who wants their double weave ponytail to make a statement — it’s not subtle, and it’s exactly what you’re aiming for if fullness is your primary goal.
10. Double Weave With Textured, Curled Ponytail Ends
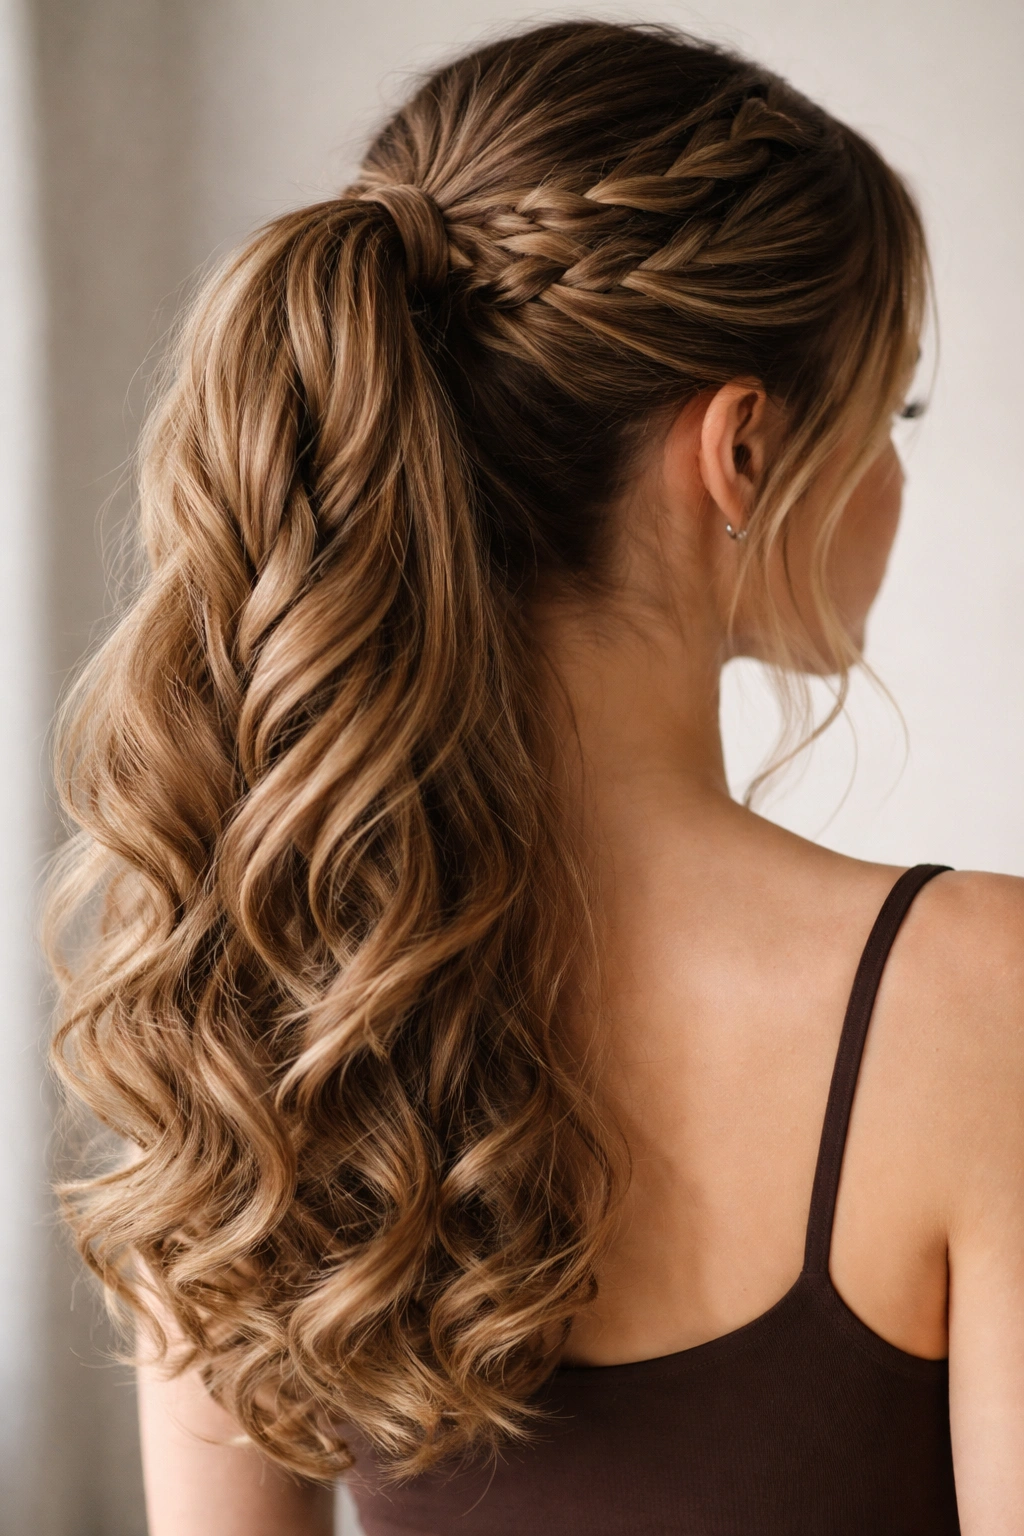
The braids are only part of the equation for creating fullness. How you finish your ponytail ends matters just as much. Curled or textured ponytail ends automatically read as fuller because texture creates volume, while straight ponytail ends look flat and fine by comparison.
End Texture Amplification
Curling your ponytail ends is one of the easiest ways to amplify the fullness your double weave creates. Waves and curls catch light differently, creating the illusion of density that doesn’t exist in straight hair. The texture also prevents the ponytail from looking wispy or thin at the edges.
Curling Strategy for Ponytail Ends
- Create your double weave braids and ponytail following any method above
- Once secured, take sections of your ponytail about 1.5 inches wide
- Wrap each section around a one-inch barrel curling iron, holding for 8-10 seconds
- Release the curl and allow it to cool completely before touching it — cooling allows the curl to set and last significantly longer
- Lightly tease the inside of each curl once it’s cooled to increase volume and longevity
- Avoid brushing through curls; instead, use your fingers to separate and arrange them naturally
- Finish with texture spray or a light hairspray to lock in the texture
Curled ponytail ends take a good double weave and transform it into something that looks like you spent two hours styling. The curl adds so much visual fullness that it’s worth the extra five minutes of curling time.
11. Dual-Layer Double Weave for Maximum Depth
Instead of creating two braids that meet at a single point, dual-layer double weaves involve creating a double weave at two different heights on your head. One set of braids sits higher and one lower, creating actual depth and dimension that makes the overall ponytail appear substantially fuller.
The Depth Principle
When you layer styling techniques vertically, you’re not just creating fullness — you’re creating the illusion of multiple ponytails stacked on top of each other. This works because the eye sees layers and automatically reads layers as more volume.
Dual-Layer Construction
- Create your first set of two French or Dutch braids at your crown, gathering them into a high ponytail
- Secure this high ponytail with an elastic
- From the remaining hair below this first ponytail, create a second set of two braids
- These lower braids should also meet in the center, creating a mid-height ponytail just below the first one
- Secure the second ponytail with a separate elastic
- The result looks like two separate double weave ponytails stacked vertically, creating substantial overall fullness
This technique requires more hair than a single double weave and works best on hair that’s thick or long enough to support two full ponytails. It’s a commitment, but for anyone who wants maximum fullness and doesn’t mind that the style obviously required effort, this is as full as it gets.
12. Double Weave With Braided Base Wrap and Accessory
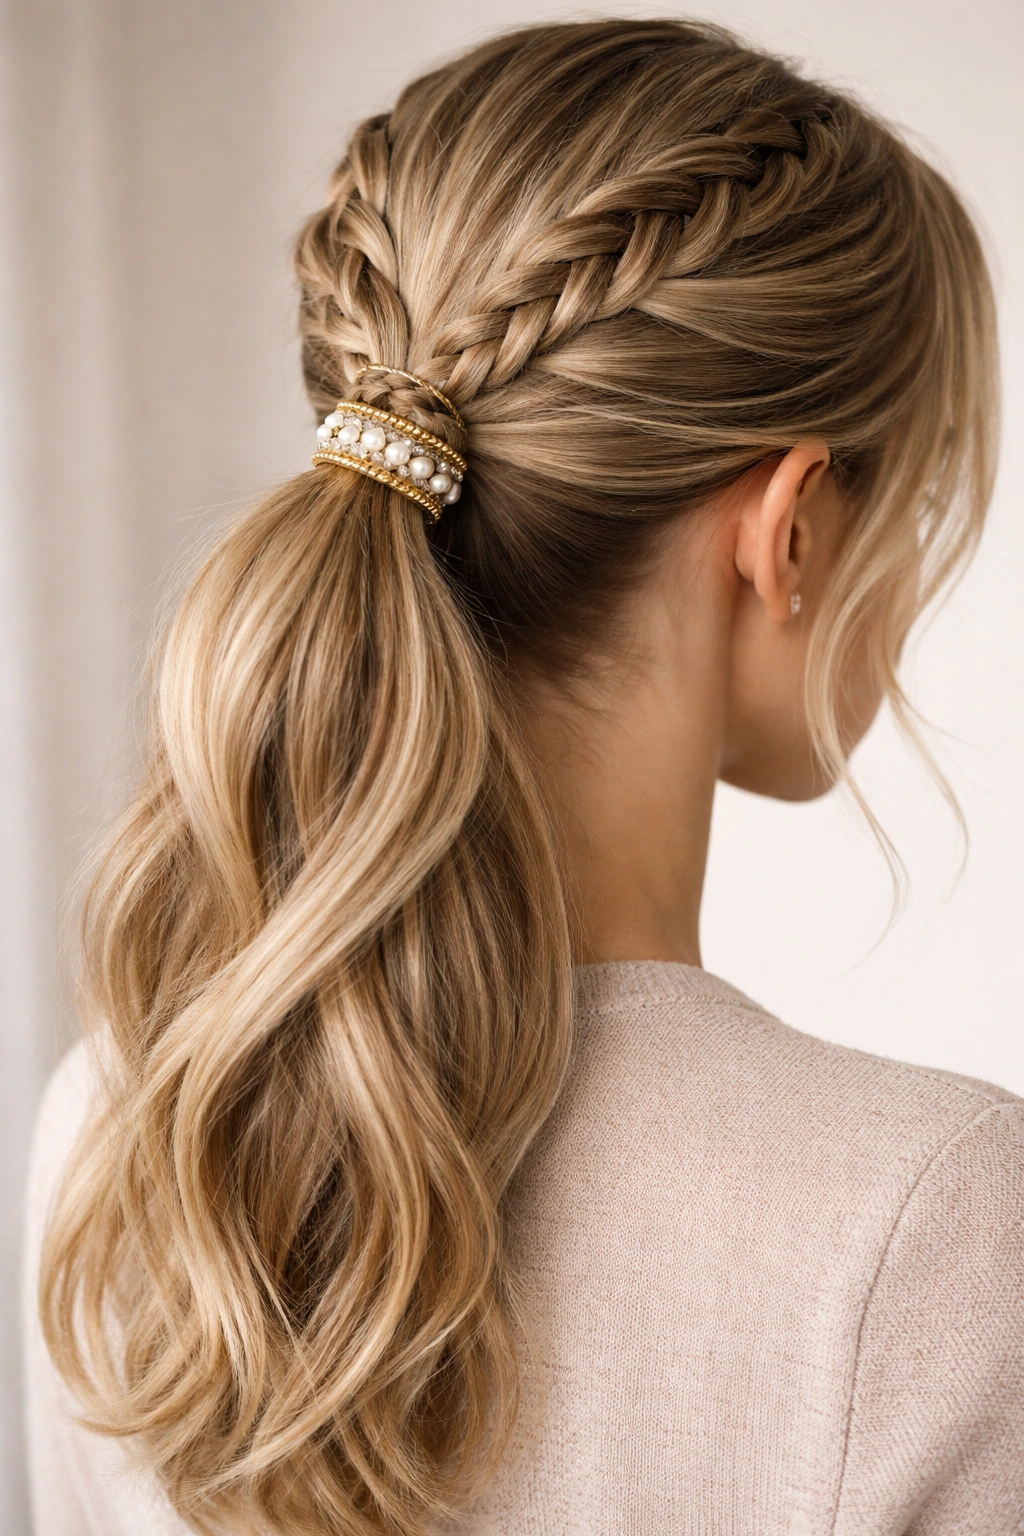
For the ultimate styling statement, combine your double weave ponytail with a second braid wrapped around the base and finish with a metallic cuff, pearl clip, or decorative elastic. This elevates your double weave from casual to event-appropriate while maintaining all the fullness benefits.
Accessory Strategy
Accessories aren’t just decorative — they frame and emphasize the area where your ponytail sits, drawing attention to exactly where you’ve created fullness. Metallic cuffs and pearl clips especially add visual weight and importance that makes the ponytail look more intentional and deliberate.
Complete Accessorized Finish
- Create your two main braids and gather into a ponytail
- Take a thin section from the ponytail and create a tiny three-strand braid from it
- Wrap this small braid around your elastic base, covering it completely, and secure with a bobby pin
- Slide a decorative cuff or clip over the wrapped base — metallic gold, silver, or pearl options work beautifully
- Add a small amount of dry texture spray or finishing spray to lock everything in place
- For extra polish, gently curl or wave the ponytail ends as described in variation 10
This style transforms a double weave ponytail into something appropriate for weddings, formal events, or occasions where you want to look exceptionally polished. The accessory catches light and draws attention to your styling work, emphasizing the fullness you’ve created.
Final Thoughts
Double weave ponytails have completely changed the game for anyone who’s felt frustrated by thin ponytails that never look quite full enough. The technique works because it’s not relying on hair density alone — it’s using strategic placement, texture, and layering to create visual fullness that reads as thicker hair than you actually have. Whether you choose the simple side-by-side approach or get creative with diagonal placement, bouffants, and accessories, the core principle remains the same: two braids positioned close together automatically look fuller than a single braid ever could.
The best version for you depends on your hair length, your daily schedule, and how much styling time you’re willing to invest. If you’re getting started, begin with the basic side-by-side double weave or the high-ponytail version with bouffant — these are straightforward and deliver obvious fullness improvement on the first try. Once you’re comfortable with the basic technique, experiment with variations like texturing, different braid angles, and accessories to discover which approach makes you feel most confident.
Remember that fullness is as much about preparation as technique. Volumizing mousse applied before blow-drying, backcombing or teasing strategically at the crown, and using texture spray throughout the day all work together with your double weave to maintain that full look from morning through evening. Your first double weave might take twenty minutes — by your tenth attempt, you’ll be able to create one in under ten minutes, with noticeably better results. Give yourself grace while you’re learning the technique; once it clicks, you’ll have a styling skill that works for years.