Thick hair is a blessing—it’s voluminous, lustrous, and gives you endless styling possibilities. But it’s also a challenge. Half-up half-down styles can easily flatten under the weight of all that texture, leaving you with limp sections and a style that won’t hold. What you really need are braided half-up half-down styles engineered specifically for thick hair—styles that grip, anchor, and actually stay in place while looking effortlessly beautiful.
The beauty of braids for thick hair is that they work with your texture instead of against it. A braid distributes the weight across multiple strands, creates natural tension that keeps everything secured, and transforms thick hair from something that feels unmanageable into your greatest styling advantage. The half-up half-down silhouette is perfect for this because it lets you showcase the volume while keeping hair off your face and neck—especially helpful if you’ve got thick hair that gets warm or feels heavy.
Over the years, hairstylists have developed dozens of braided variations on this theme, each with its own personality and difficulty level. Some work best for casual everyday wear, while others shine at events or special occasions. The trick is understanding which braid techniques actually grip thick hair securely, which styling tricks prevent drooping, and how to adapt each style to work with—not against—your hair’s natural density and weight.
1. Dutch Braid Half Up
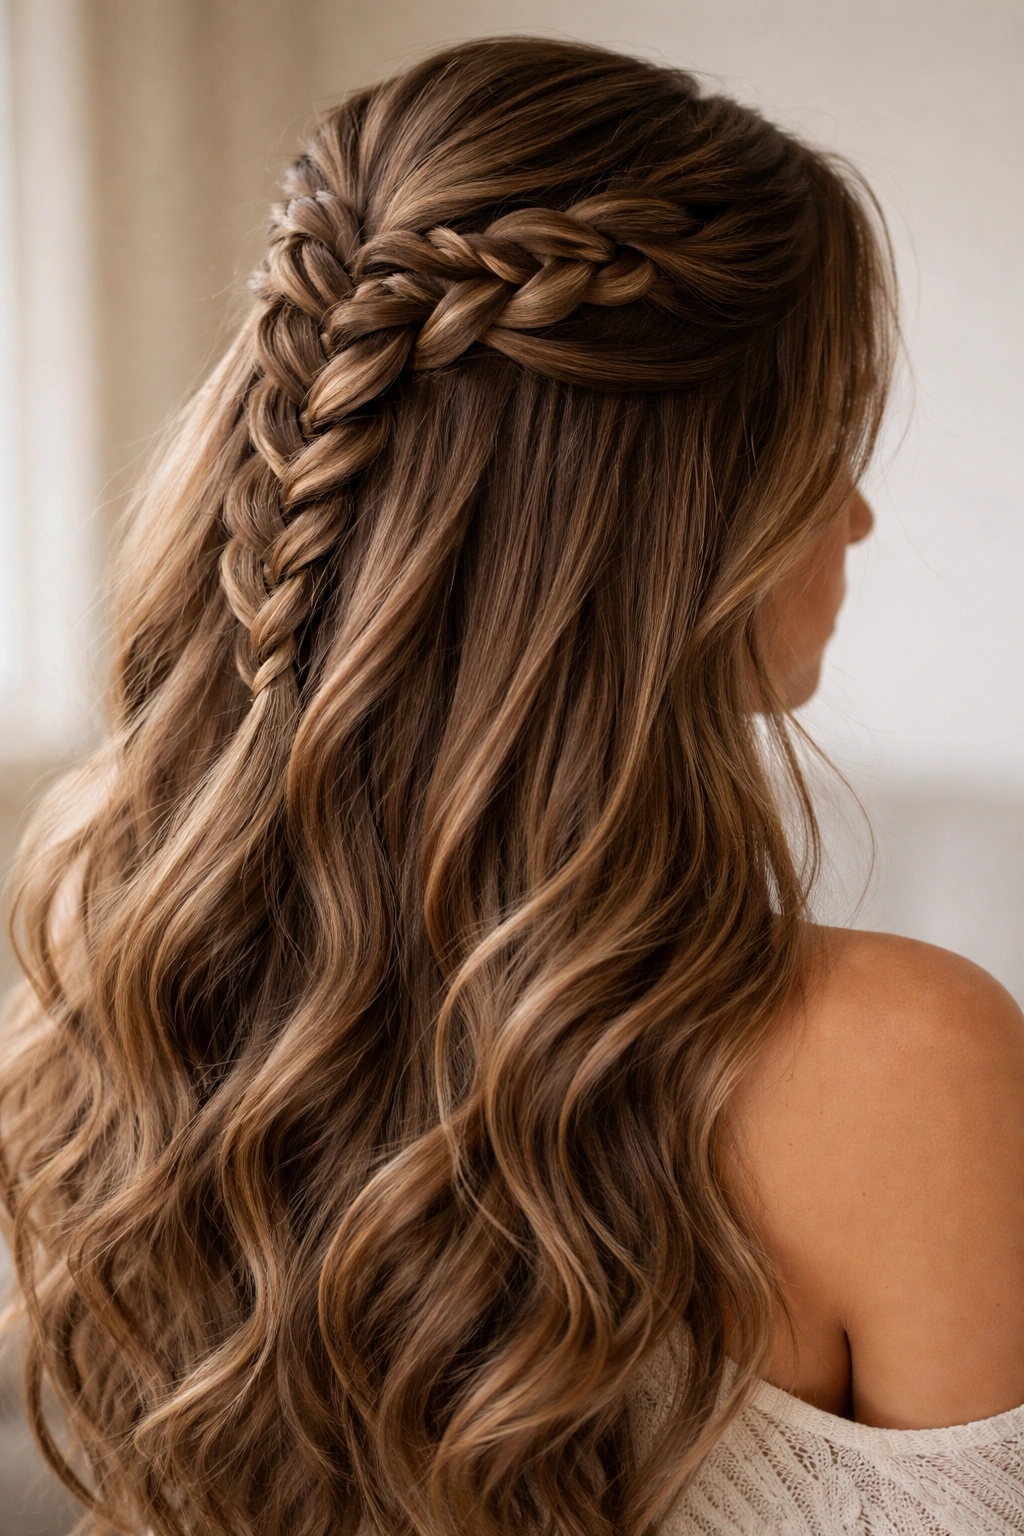
The Dutch braid (also called an inverted French braid) is your secret weapon for thick hair. Instead of weaving sections over each other like a traditional braid, you weave them under, which creates a raised, 3D texture that sits beautifully on top of thicker strands. Start at the crown by taking a section of hair about two inches wide, divide it into three parts, and weave the sections under rather than over—this creates that signature bold, dimensional look.
Why It’s Perfect for Thick Hair
The under-weaving technique grips thicker strands naturally without slipping, and the raised texture of the braid shows beautifully against full hair. Thick hair fills out the braid completely, making it look intentional and polished rather than sparse. The weight of thick hair actually works in your favor here—it keeps tension on the braid and prevents drooping throughout the day. You can take the Dutch braid from the crown straight back, then secure it at the base of the half-up section with bobby pins that grip securely into the thickness.
Best For This Style
- Thick hair with natural waves or curls that add texture to the braid
- All-day wear—it holds longer than many other styles
- Anyone who wants maximum impact with minimum fuss
- Creating height and dimension at the crown
Pro tip: Before starting, tease the section you’re about to braid lightly with a comb. This creates more grip and makes the braid hold even better in thick hair.
2. French Braid Half Up
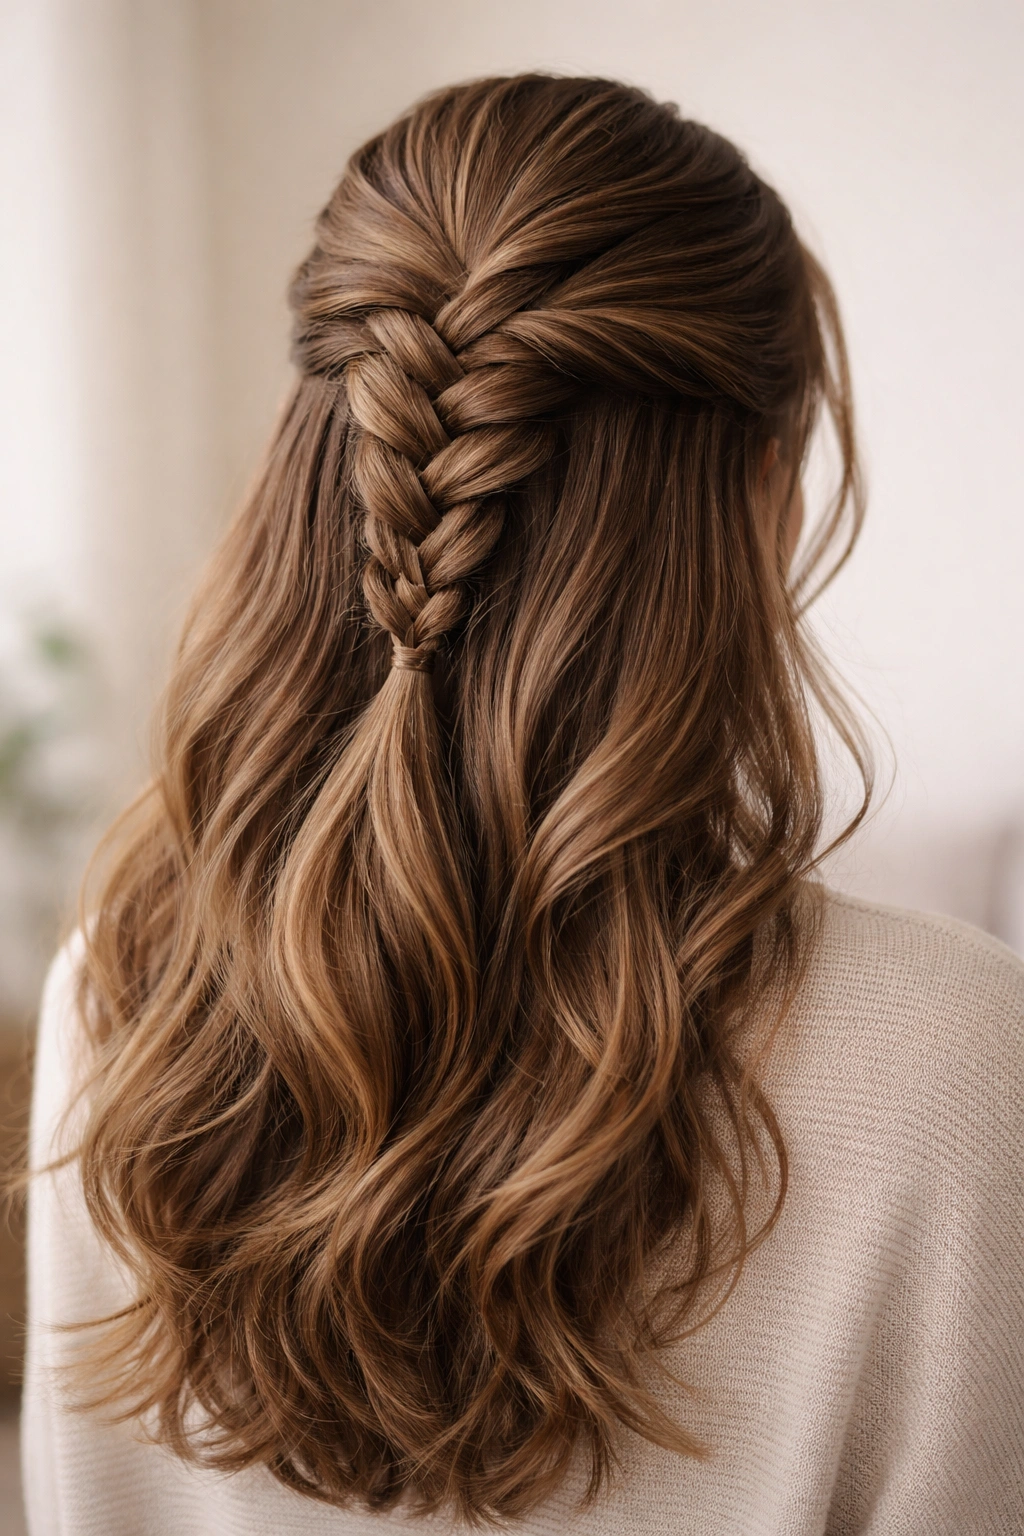
The classic French braid is a timeless choice, and for thick hair, it’s incredibly forgiving. Start at the crown with a three-strand braid, but instead of using the same three sections throughout, you gradually add more hair as you braid downward—taking thin sections from the sides and incorporating them into the three main strands. This technique works beautifully with thick hair because the expanding braid naturally distributes the weight evenly.
How to Make It Work With Thick Hair
The key is keeping your sections even and not pulling too tightly. Thick hair will create tension on its own, so if you pull too hard, you’ll end up with a style that feels uncomfortable and looks overly rigid. Let the braid be a little loose and textured—this is actually more flattering on thick hair and lasts longer because the looser weave can move slightly with your hair rather than fighting against it. Stop the braid at the nape of your neck, twist the remaining hair into the center braid, and secure everything into a half-up knot or ponytail.
Key Details to Perfect
- Section size matters: take thin, even sections from the sides for a controlled braid
- Keep one hand at the base of the braid to maintain steady tension
- Stop adding hair when you reach the nape, then twist the remaining lengths together
- Use at least three bobby pins to secure the base—thick hair needs more anchoring
Worth knowing: French braids look even better the day after you wear them because your hair relaxes and the braid gets softer and more textured.
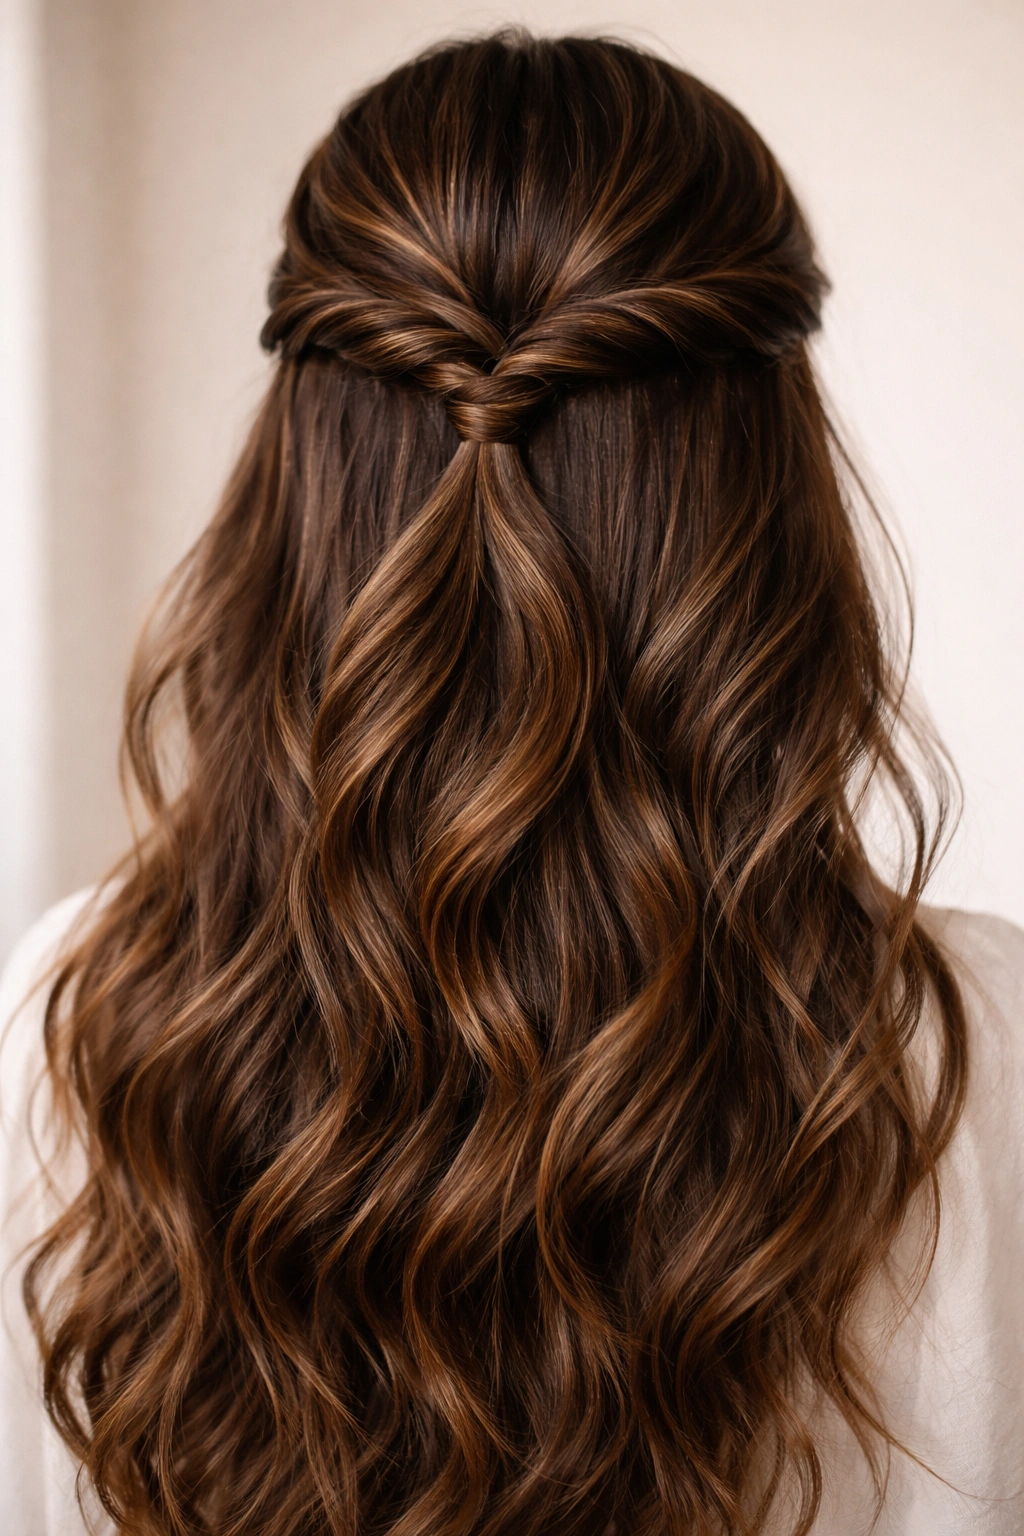
3. Twisted Half Up
If you don’t have time to braid but want something more interesting than a plain half-up ponytail, try two smooth twists instead. Take two sections from either side of your face (about one inch wide each), twist each section tightly as you move backward toward the crown, then combine both twists at the crown and secure them into a half-up section. The twists create visual interest while twisting actually grips thick hair better than you’d expect.
Why Twists Outperform on Thick Hair
Twists work like a natural tension system—as you twist, you’re essentially wrapping thick hair around itself, which creates incredible grip. The twisted sections won’t slip the way some braids might in dense hair, and the style is surprisingly secure even without many bobby pins. What makes this especially good for thick hair is that it looks elegant and polished while being genuinely easy to execute, even if you’re not a braiding expert.
Styling Variations
- Single twist on each side, meeting at a center point
- Three thinner twists instead of two for a more detailed look
- Wrap the twists around each other multiple times before securing for extra texture
- Loosen the twists slightly after securing for a softer, more romantic look
Real talk: This style can be done one-handed if you need speed, making it perfect for mornings when you’re rushed but still want to look intentional.
4. Double Braid Half Up
Double braids instantly read as “I put effort into this,” and they’re actually easier than one complex braid. Create two identical Dutch or French braids, one on each side of your head, starting from the temples and working backward. When both braids reach the crown, secure them together with bobby pins to form a single half-up section, or cross them over each other for a more intricate look.
Making Double Braids Work With Thick Hair
The advantage of splitting thick hair into two braids is that each braid has less total weight, making them easier to control and less likely to slip. Each individual braid appears thicker and more dimensional because you’re distributing your hair volume across two styles instead of one. This is especially useful if your hair is so thick that a single braid feels bulky or sits awkwardly. Two evenly matched braids also create better symmetry and visual balance—which is harder to achieve with one braid in truly thick hair.
Securing Techniques That Work
- Secure each braid separately with bobby pins, then interlock them at the crown
- Wrap one braid around the base of the other for a braided crown effect
- Combine both braids into a single elastic at the center
- Leave the braids separate and secure them on either side of a decorative clip
Insider note: Thick hair + two braids = the style holds through a full day of activity without loosening.
5. Fishtail Braid Half Up
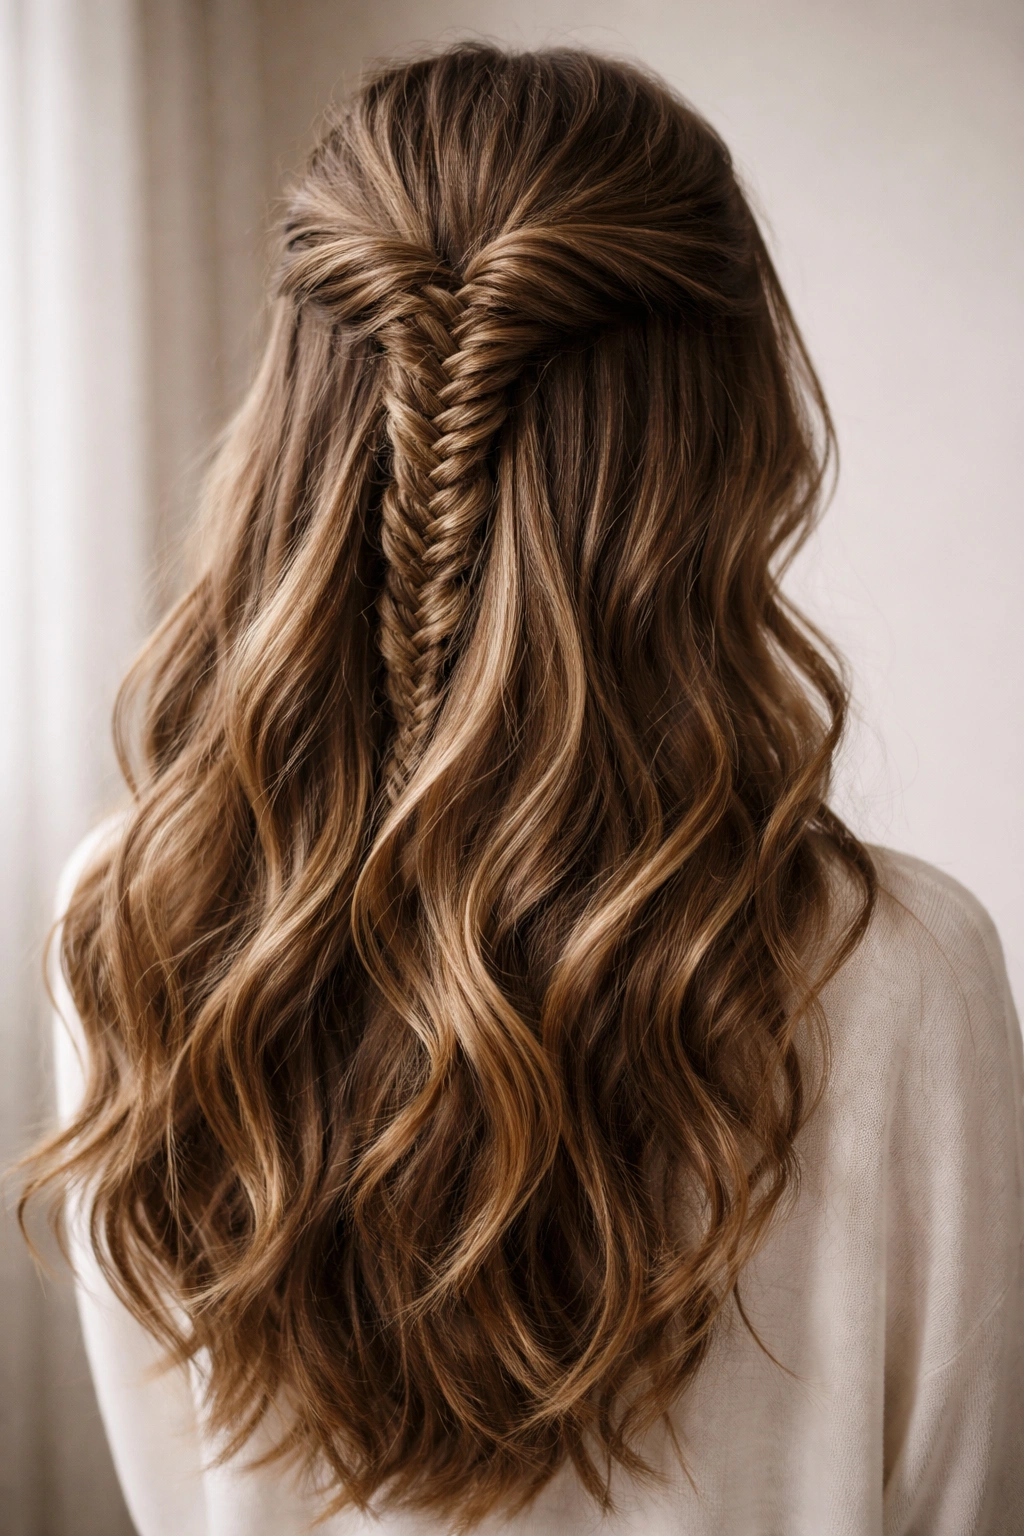
The fishtail braid looks intricate and complicated, but it’s actually quite simple once you understand the technique—and it looks absolutely gorgeous in thick hair. Instead of working with three sections, you work with two. Take your half-up section, divide it into two equal parts, then take a thin section from the outside of the left part and cross it over to the inside of the right part. Alternate this motion, always taking thin sections from the outside edges and crossing them inward, until you’ve braided down to where you want to stop.
Why Fishtail Braids Shine With Thick Hair
Fishtail braids create an incredibly fine, detailed texture that shows beautifully against full hair. The thinness of the individual sections means the finished braid looks delicate and intricate, which contrasts beautifully with the overall thickness of your hair. Even though you’re working with two sections instead of three, the frequent crossing creates tons of grip in thick strands—so the braid stays put all day. The fishtail also has a natural shimmer effect that looks more dimensional and interesting than traditional braids.
Technique Tips for Success
- Keep your two main sections separated—use your fingers to create a clear divide
- Take thin, consistent sections from the outer edges only
- Don’t pull too tightly; let the braid be slightly loose and textured
- The braid will naturally compress and tighten as you work
Pro tip: Practice on damp hair first—it holds the braid pattern better while you’re learning the motion.
6. Rope Twist Half Up
A rope twist is one of the smoothest, sleekest half-up options for thick hair, and it holds like you wouldn’t believe. Take your half-up section, divide it into two equal parts, then twist both sections tightly (in the same direction), bring them together, and let them naturally spiral around each other. Secure at the crown. It’s simpler than a braid but looks far more intentional, and the grip is incredible.
How Rope Twists Anchor Heavy Hair
When you twist two sections tightly and then let them spiral together, you create a compact, sturdy structure that physically grips thick hair fibers. The double-twist motion means there’s tension pulling on the hair from two directions, making slippage nearly impossible. This is genuinely one of the most secure half-up styles you can do, making it ideal for thick hair that tends to feel heavy or pulls at the roots.
Variation Ideas
- Create two rope twists and intertwine them for a more complex look
- Use three sections instead of two for a denser, more textured rope
- Wrap the rope twist around itself at the base for a braided knot effect
- Combine a rope twist with a plain half-up section for asymmetrical interest
Worth knowing: Rope twists look especially elegant with a sleek, polished finish—straighten your hair before styling for maximum impact.
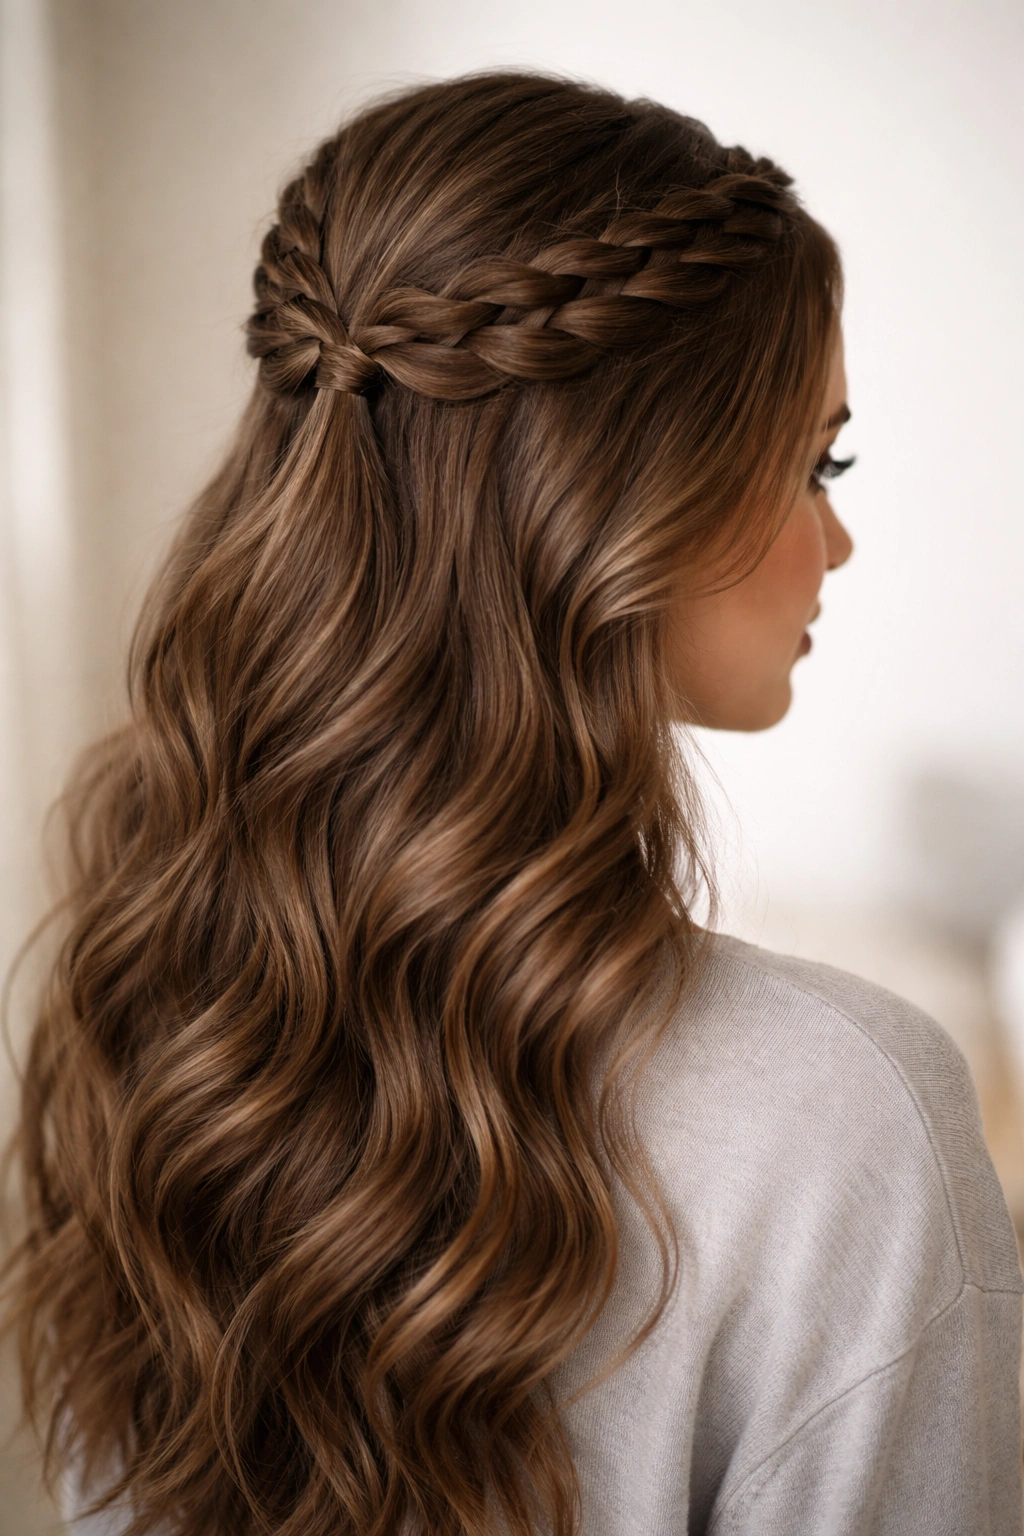
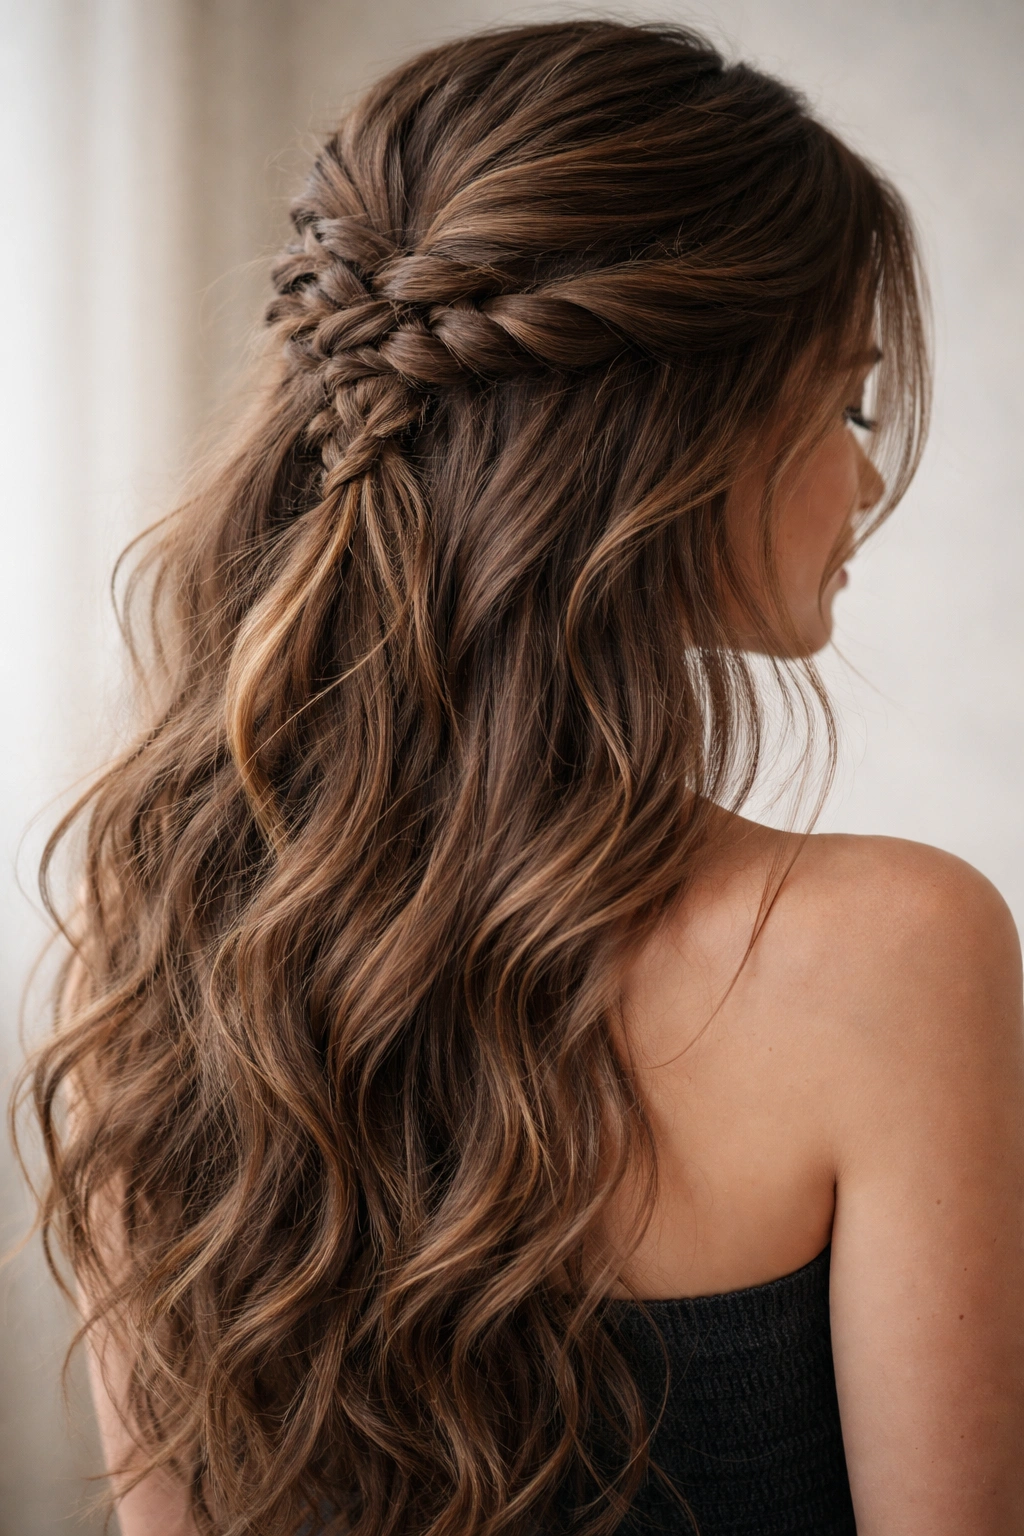
7. Crown Braid Half Up
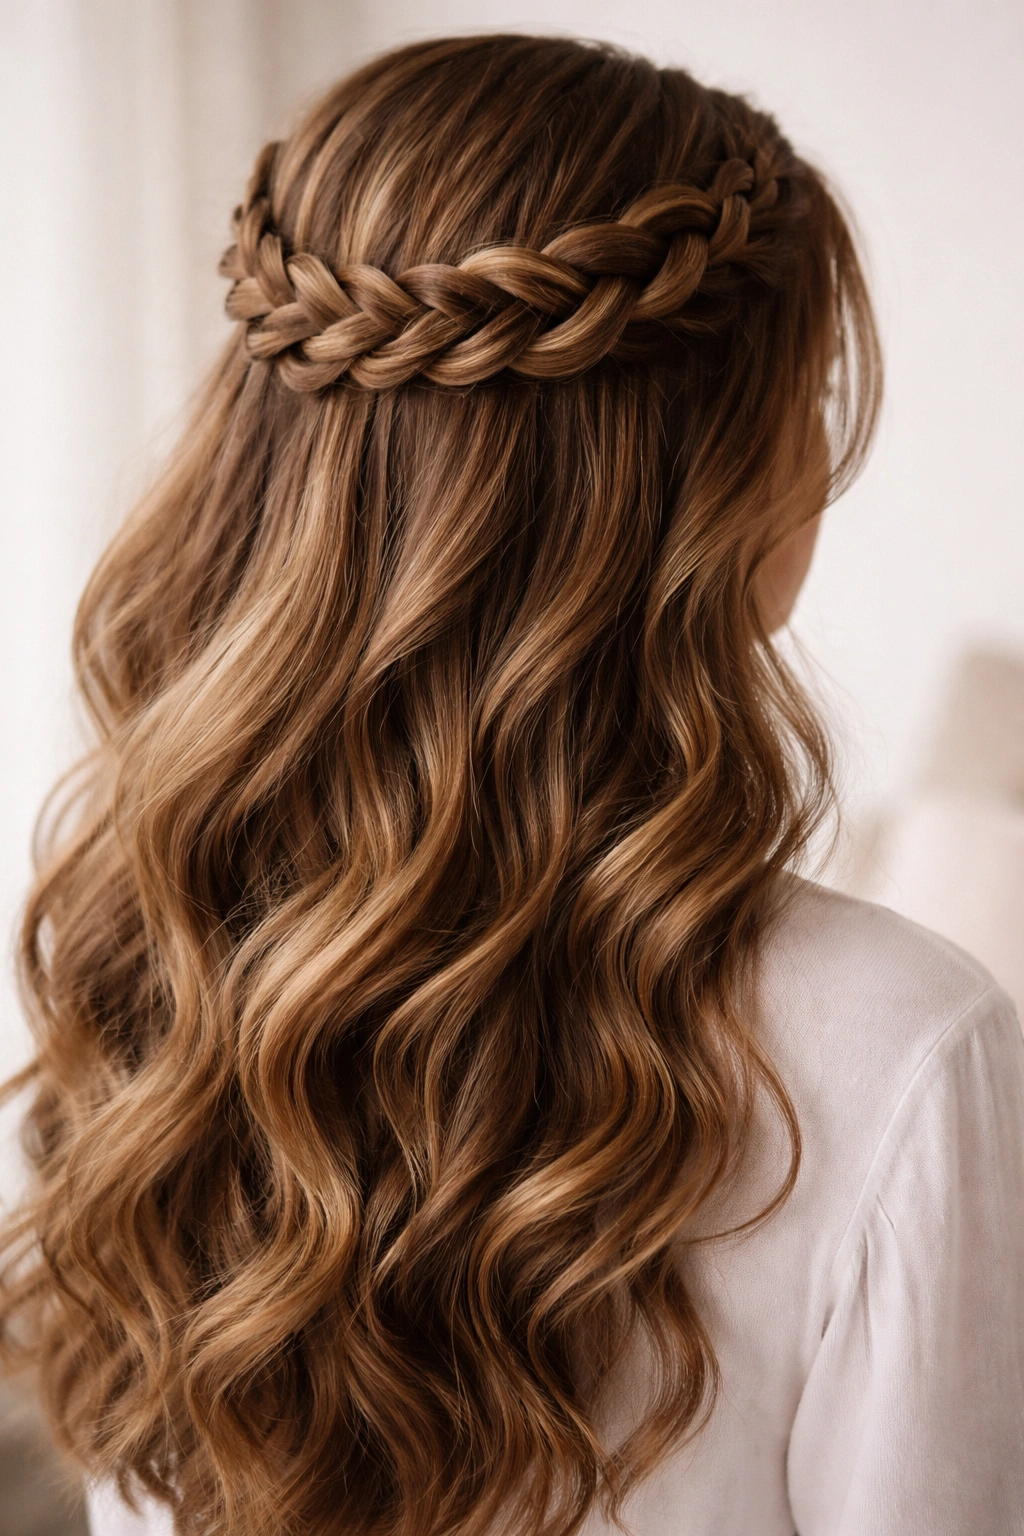
A crown braid curves around your head like a halo, and when you stop it at the nape and secure it as a half-up style, you get something genuinely special. Start a French or Dutch braid at one temple, curve it up and around the crown, and bring it down to the opposite temple. Secure the braid and the remaining hair together into a half-up section at the back of your head. With thick hair, this style has serious presence.
Crown Braids for Maximum Volume
A crown braid positioned at the top of your head creates a natural height line that makes thick hair look intentional and styled rather than just volumized. The braid draws the eye upward, which is flattering for most face shapes, and it showcases the texture and shine of thick hair beautifully. The half-up component means you’re not covering all your hair—you’re framing it with the braid, which is a more sophisticated approach than a full crown braid.
Positioning and Balance
- Start the braid higher than you think you need to—it will drop as you wear it
- Keep the braid slightly loose for a softer, more romantic look
- Make sure both sides of the braid are even width for balanced appearance
- Secure with bobby pins that match your hair color for invisible anchoring
Pro tip: Add small fresh flowers or delicate hair clips along the crown braid for an elegant, special-occasion vibe.
8. Side-Swept Braid Half Up
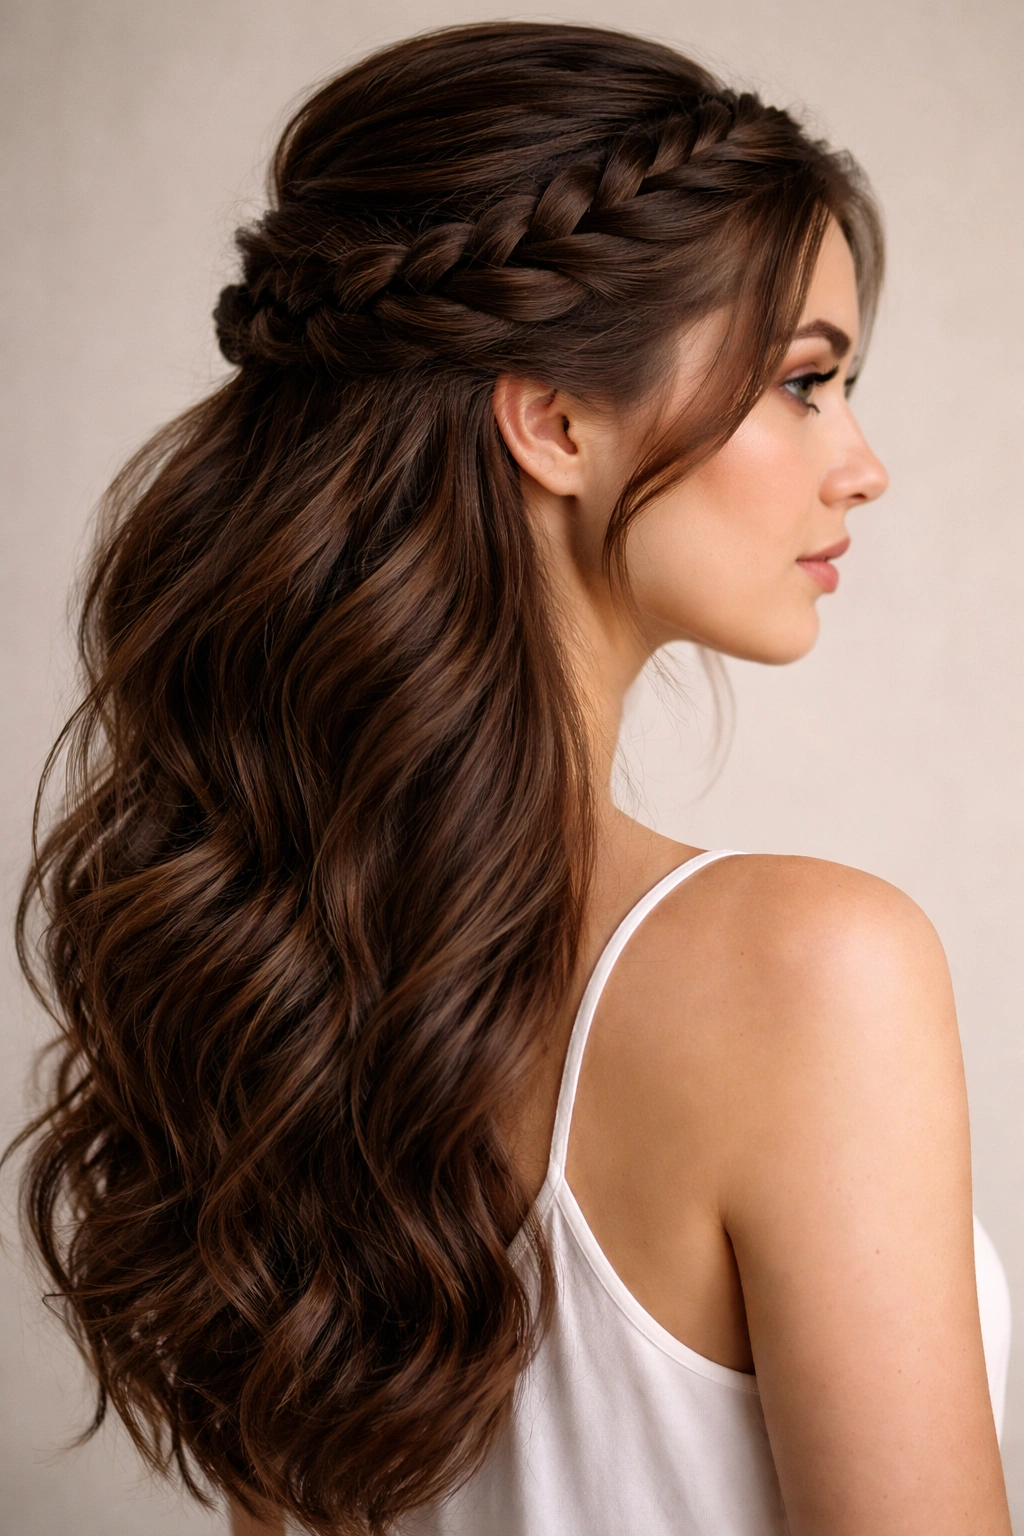
Instead of a center-part half-up, sweep your braid dramatically to one side. Start a Dutch or French braid at the temple on one side, take it across the back of your head, and secure it at the nape on the opposite side. This creates movement and asymmetry that’s genuinely flattering on thick hair—it breaks up the fullness and creates visual interest. The side-swept direction also shows off the dimension of your braid against the bulk of your hair.
Why Side-Swept Styles Flatter Thick Hair
A centered half-up can sometimes look too symmetrical or heavy on genuinely thick hair. The side-swept approach creates movement and imbalance that makes the overall look feel lighter and more intentional. It also allows you to show off the braid from one side while letting the unbraid portion of your hair show volume on the other—you get the best of both the braid detail and the thick-hair fullness.
Creating the Side-Sweep Effect
- Begin your braid on one side of your temple, not at the center crown
- Angle the braid slightly downward as you move toward the opposite side
- Stop at the nape and secure lower than you would for a centered half-up
- Leave loose tendrils around your face on the starting side
Real talk: This style works especially well if you have a slightly asymmetrical face shape—the braid draws attention to your better angle.
9. Waterfall Braid Half Up
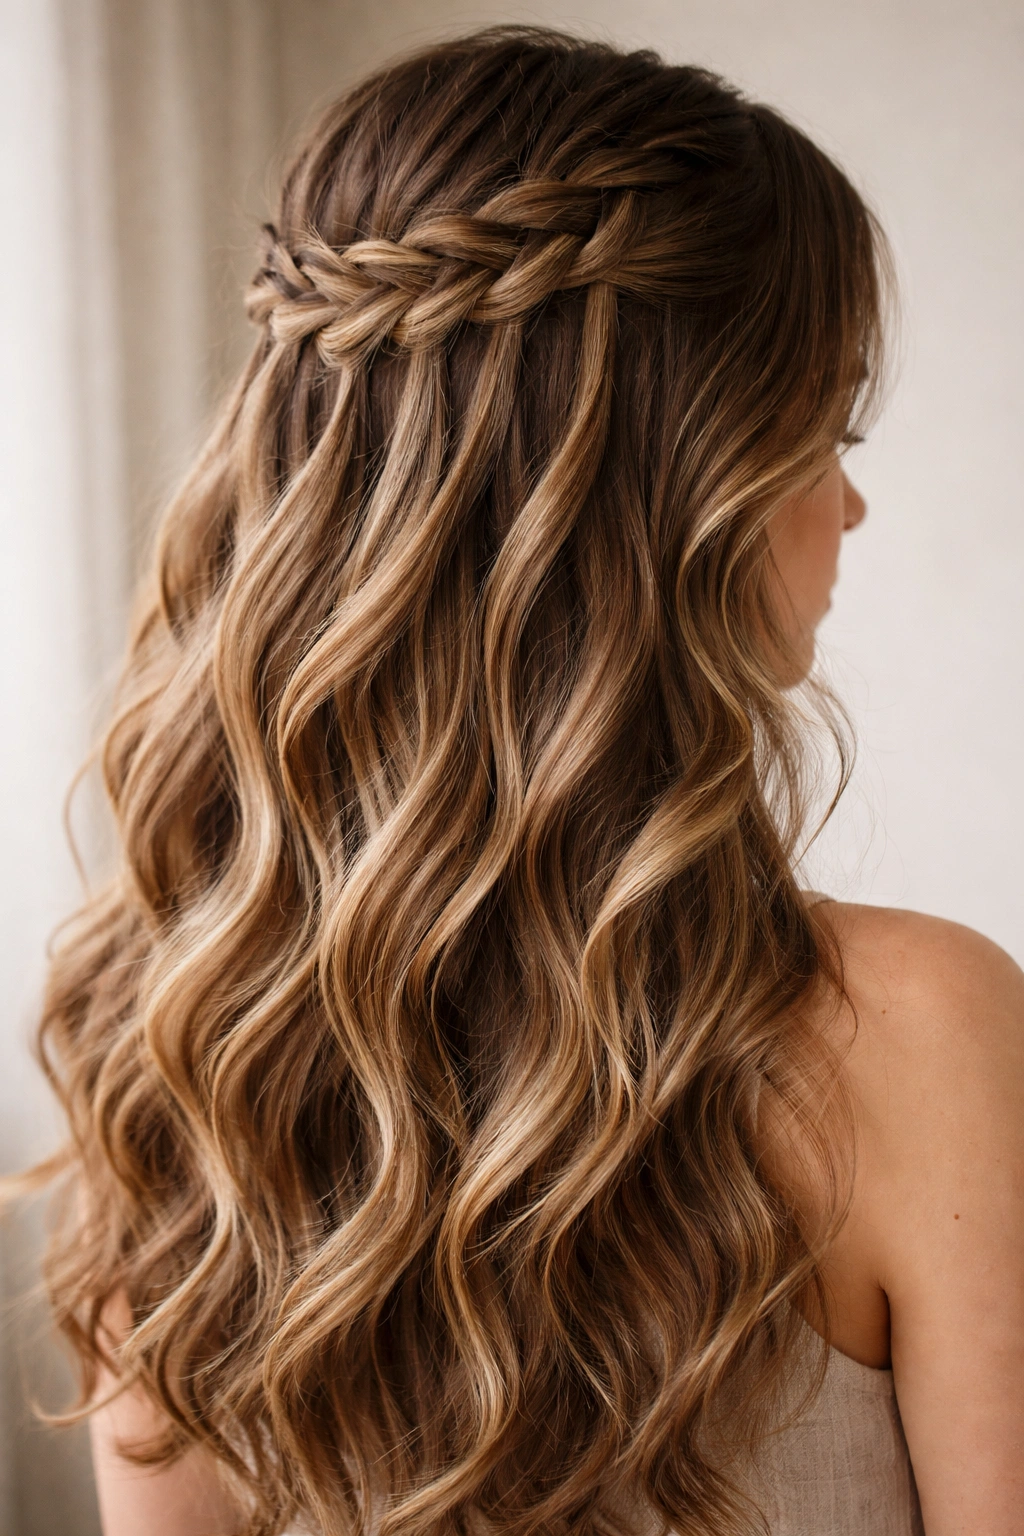
A waterfall braid is a French braid variation where you strategically drop sections of hair as you braid, creating a cascading effect. Start a French braid at your temple, and as you add new hair from the sides, occasionally let one strand from the middle section fall free. Continue braiding and dropping alternating strands until you’ve reached the back. The dropped strands create a waterfall effect while the braid itself anchors everything at the crown.
Adapting Waterfall Braids for Thick Hair
With thick hair, a waterfall braid creates incredible texture and movement. The dropped strands integrate beautifully with your full hair without disappearing, and the braid itself reads as more intentional and complex. The key is dropping consistent sections so the waterfall looks deliberate rather than accidental. With thick hair, you can be generous with the drops—the abundance of hair means the waterfall effect becomes even more dramatic and beautiful.
Execution Tips
- Drop every second or third strand of the middle section for a consistent pattern
- Let dropped strands curl naturally—don’t straighten them
- Keep the main braid slightly loose to highlight the cascading effect
- Tease the dropped sections lightly for more volume and texture
Worth knowing: Waterfall braids photograph beautifully because the movement and cascading strands create depth in images.
10. Braided Knot Half Up
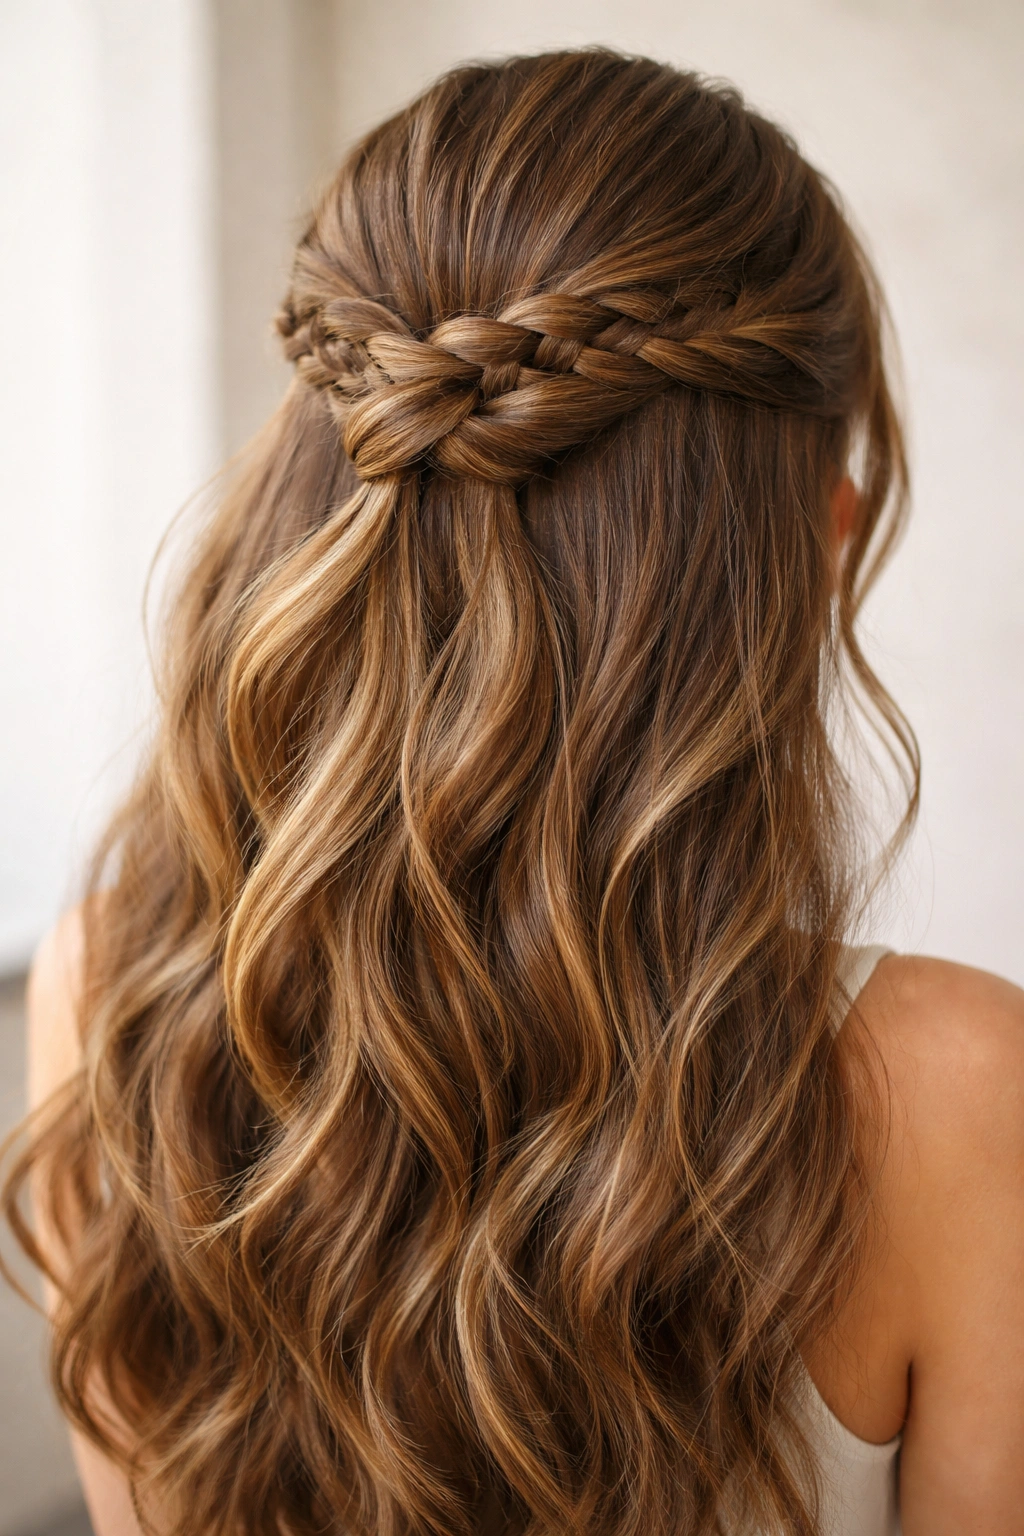
Instead of securing your braid into a simple ponytail, tie it into a knot. Create a half-up braid (Dutch, French, or fishtail—your choice), but instead of fastening it with an elastic at the crown, tie the braid into a loose knot and secure the knot with bobby pins. This creates a dimensional, textured look that’s more interesting than a standard ponytail and surprisingly stable in thick hair.
Why Knots Grip Thick Hair Better Than Elastics
A knot uses the hair itself as the anchoring mechanism rather than relying on an elastic to hold everything together. The knot takes advantage of the thickness and weight of your hair, actually getting tighter as your hair naturally shifts throughout the day. This is especially useful for thick hair that sometimes slips out of elastics. The knot also creates more visual texture and interest than a simple ponytail base.
Creating the Perfect Braid Knot
- Braid loosely so you have enough hair length to work with for the knot
- Bring the braid around and position it where you want the knot
- Tie the braid as you would tie shoelaces, creating one or more loops
- Secure with bobby pins positioned both above and below the knot
- Leave the knot slightly loose for a softer, more romantic appearance
Pro tip: Leave a few strands of hair unbraided and loose around your face—they soften the knot and make the style feel less formal.
11. Three-Strand Thick Braid Half Up
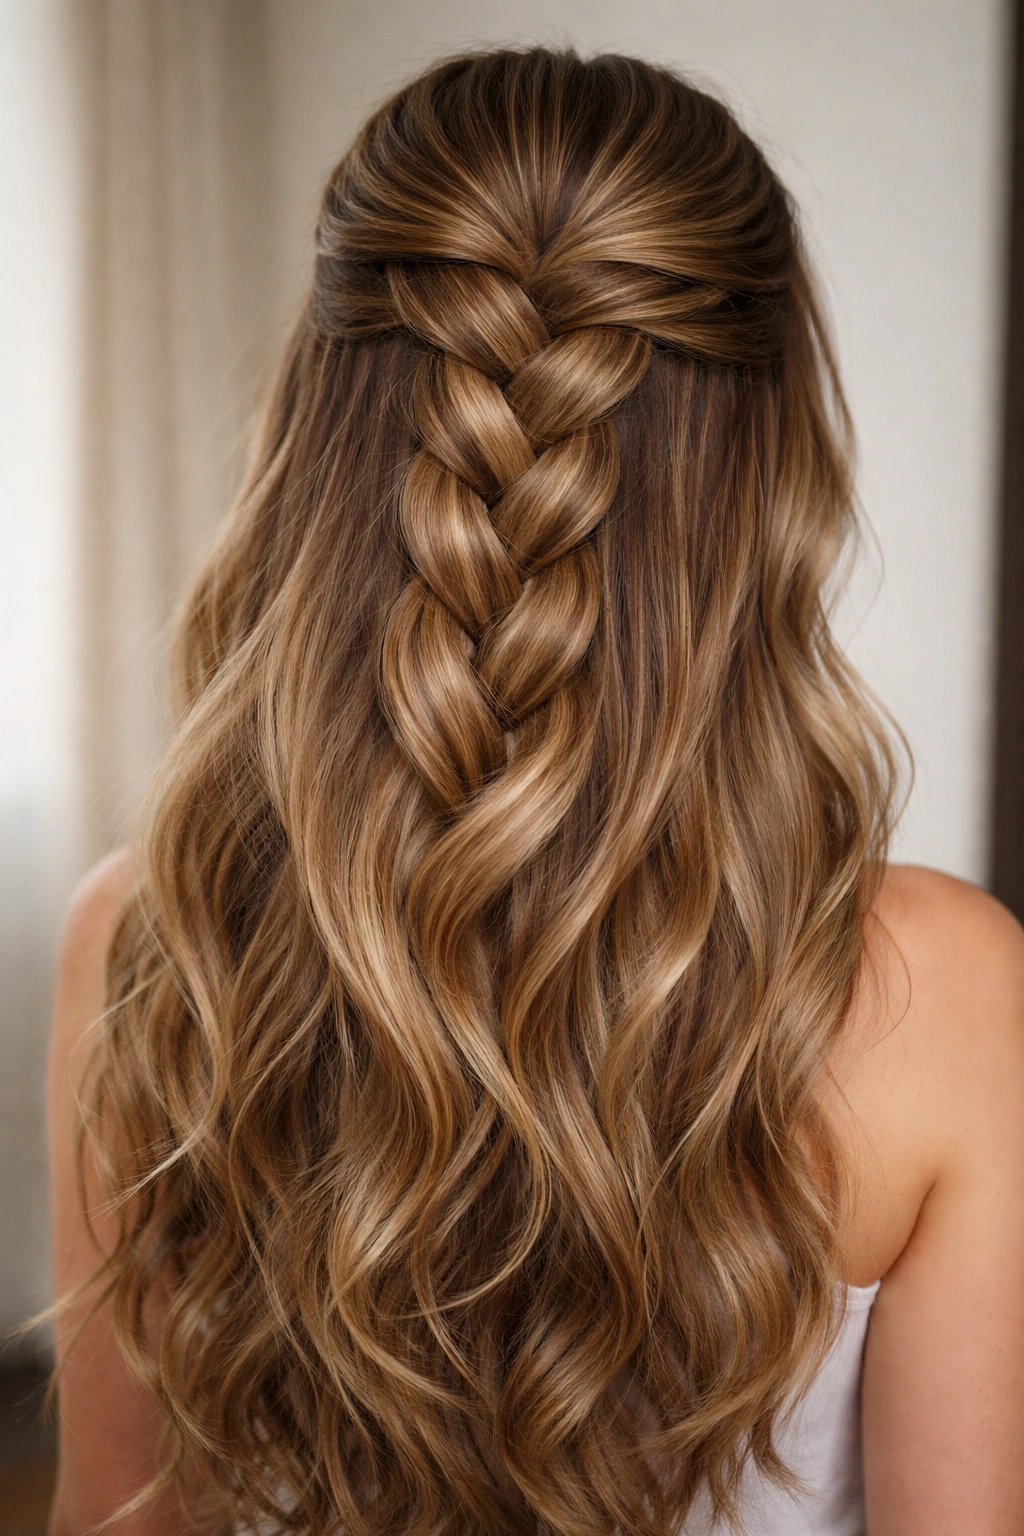
Sometimes the most stunning styles are the simplest. A basic three-strand braid, executed with generously thick sections, looks absolutely stunning in thick hair. The key is taking larger-than-usual sections so the finished braid reads as bold and substantial rather than delicate. Create your three-strand braid using thick sections, secure it at the crown into a half-up style, and you’ve got something genuinely elegant.
The Power of Simple Thickness
Thin sections create delicate, detailed braids. Thick sections create bold, architectural braids. In truly thick hair, a braid made from thick sections looks intentional and powerful—like you’re showcasing your hair’s fullness rather than trying to tame it. This style works especially well if your hair has a beautiful natural texture or color variation that you want to highlight.
Making a Thick Braid Look Polished
- Use sections about 1.5 to 2 inches wide
- Keep tension even throughout so the braid doesn’t twist
- Braid loosely so each strand shows clearly
- The finished braid should look substantial, not thin or wispy
- Secure with multiple bobby pins—thick hair braid bases need proper anchoring
Real talk: This is the style you do when you want to look intentional but don’t have time for anything complex.
12. Messy Loose Braid Half Up
Not every braid needs to be tight and controlled—sometimes a deliberately messy, loose braid is exactly what thick hair needs. Create a half-up section using any braiding technique you like (French, Dutch, fishtail), but braid loosely and don’t worry about keeping every section perfectly in place. After securing the braid, gently pull the sides to make it even looser and more textured. This creates a soft, romantic aesthetic that works beautifully with thick hair’s natural fullness.
Why Messy Works Better Than Perfect for Thick Hair
Tight, controlled braids can sometimes look overwhelmed by thick hair volume. A deliberately messy approach embraces that volume and creates something that looks effortlessly beautiful rather than over-structured. The looseness also creates more surface area for the braid to catch light, making hair appear shinier. Plus, loose braids actually last longer because they have room to settle and adjust as you move throughout the day.
Creating the Perfect Messy Braid
- Braid loosely from the beginning—don’t grip too tightly
- After securing, use your fingers to pull gently on the sides of the braid
- Pull unevenly so some sections stick out more than others
- Leave some flyaways and baby hairs—this adds to the texture
- This style gets better as the day goes on, not worse
Pro tip: Apply a light texturizing spray before braiding to give the braid more grip and definition.
13. Braided Ponytail Half Up

Take a half-up section, create a braid from that section, then gather the braid and the remaining loose hair into a low ponytail at the nape. This creates a layered look where the braid becomes the detail within a larger ponytail. It’s more interesting than a plain half-up ponytail and secures better in thick hair because you’ve got both the braid structure and the ponytail base anchoring everything.
Why Combining Braid and Ponytail Creates Security
With thick hair, using two different securing techniques instead of one creates exponentially better hold. The braid distributes weight and creates grip, while the ponytail elastic provides additional anchoring at the nape. The combination means even if one section relaxes slightly, the other keeps everything in place. This is especially useful if you have genuinely heavy, thick hair that pulls on a single anchor point.
Styling This Combination
- Create a loose half-up braid so you can still gather hair below it
- Make the ponytail slightly loose to accommodate the braid thickness
- Position the ponytail low (at the nape) for a relaxed, elongating effect
- Use a texturizing spray on the ponytail section for grip
- Wrap a small section of hair around the ponytail base to hide the elastic
Worth knowing: This style stays secure through workouts, sports, and active days—perfect if you need something reliable.
14. Infinity Braid Half Up
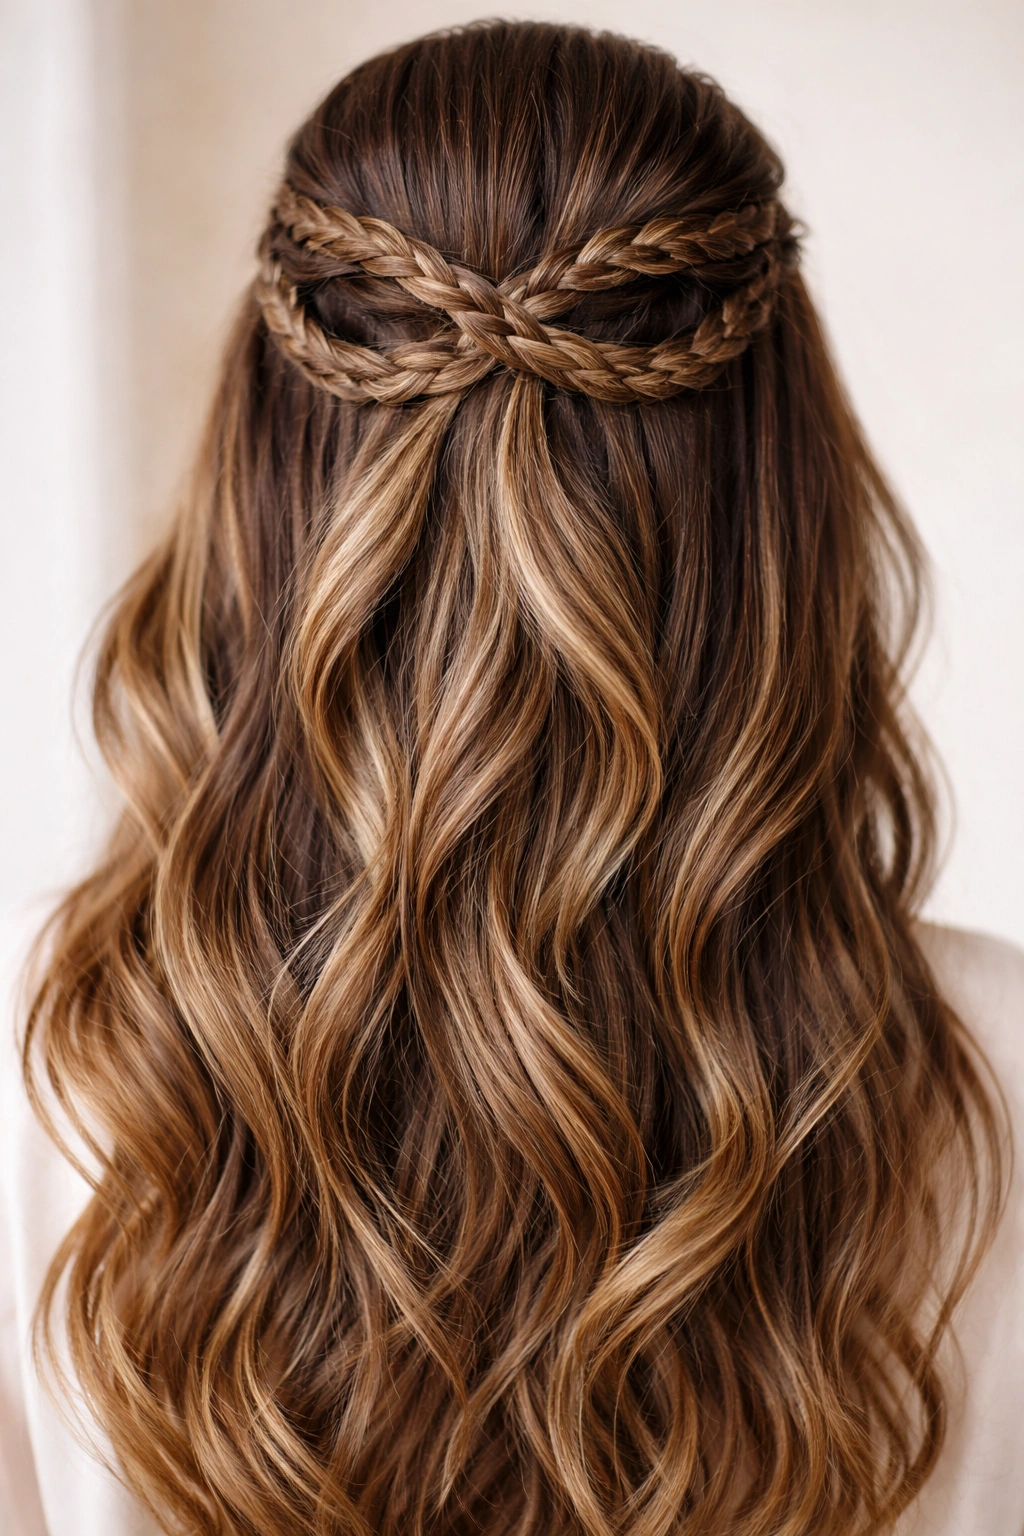
An infinity braid is a variation where you create two small braids and then loop them over each other, creating an infinity symbol (∞) shape. Start two small Dutch or French braids from either side of your head, bring them to the crown, cross them over each other (creating the middle point of the infinity), then loop them back to meet in the center. Secure at the crown into a half-up style. It’s more complex than other options but absolutely stunning in thick hair.
Why Infinity Braids Suit Thick Hair
The infinity braid creates a detailed, intricate pattern that showcases the texture and dimension of thick hair. The looping creates height and interest, and the multiple crossing points mean incredible grip and security. The style reads as genuinely impressive without being overly formal—it’s the kind of braid that makes people ask “how did you do that?” even though it’s more about design than difficulty.
Executing the Infinity Braid
- Create two identical braids, one on each side
- Cross the right braid over the left at the center crown
- Loop the right braid back around to the left side
- Cross the left braid over the right
- Loop the left braid back around to the right side
- Continue this crossing and looping pattern until you reach the base
- Secure both braids together with bobby pins
Pro tip: Practice this on a friend first—it’s easier to execute on someone else’s head than on your own.
15. Scarf-Threaded Braid Half Up
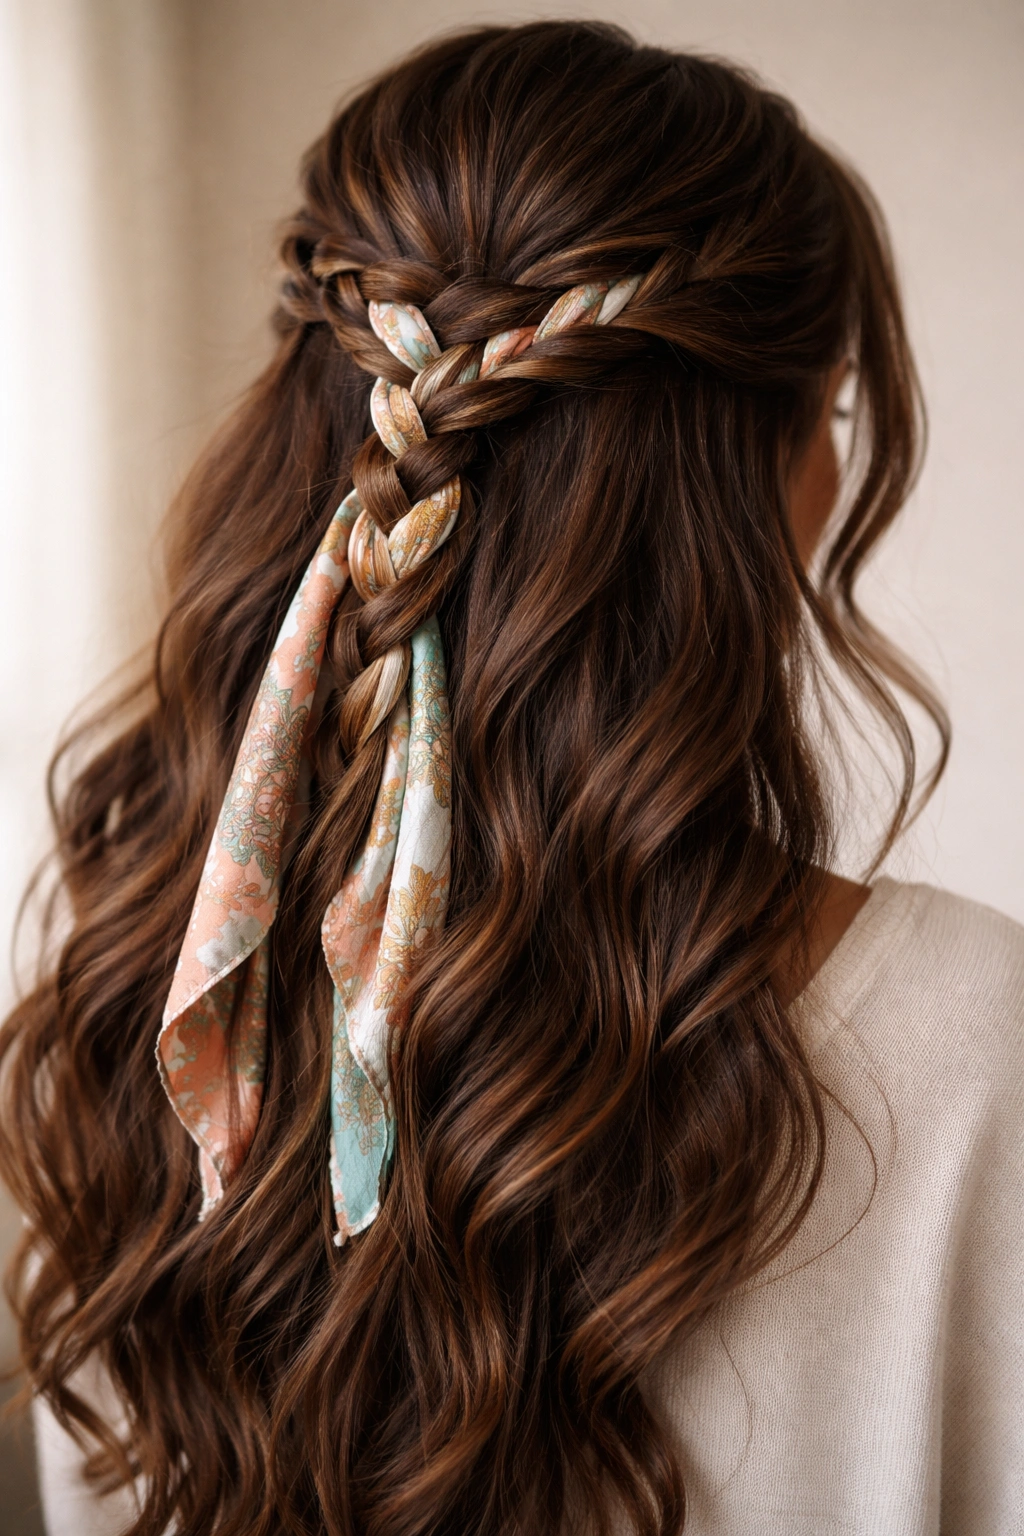
Take any half-up braid style and weave a thin scarf, ribbon, or decorative string through it as you braid. This adds color, texture, and visual interest while also creating additional grip in thick hair. The fabric threads through the braid sections, creating a more complex, dimensional pattern. It’s an easy way to make a basic braid look special and intentional.
How Threading Transforms a Simple Braid
Adding a threaded element to a braid instantly elevates it from “everyday” to “special occasion.” The scarf or ribbon provides contrast, adds color without dyeing your hair, and creates visual interest. For thick hair, the added texture of the fabric creates more dimension—you can see both the hair braid and the fabric weaving, creating a layered, intricate look. The fabric also helps grip the braid strands, making it hold even better.
Threading Techniques
- Choose a lightweight scarf or ribbon that won’t add too much weight
- Start threading from section two or three of your braid
- Alternate threading over and under the braid sections
- Use the scarf as your “third strand” in a three-strand braid for easy integration
- Tie the scarf ends together at the base to secure
- Choose scarf colors that complement your hair tone and skin
Real talk: This is an easy way to make a basic half-up braid look like you spent way more time on it than you actually did.
Final Thoughts
Thick hair and braids are genuinely a perfect pairing—braids grip your density naturally, showcase your volume beautifully, and create styles that actually stay in place rather than drooping by noon. The 15 styles above represent the full range from simple rope twists to complex infinity braids, so you’ve got options whether you’re rushing out the door or have time to create something intricate.
The most important thing to remember is that your thickness is an asset, not a problem. All these styles work better in thick hair than they would in fine hair—the braids hold tighter, the texture shows more clearly, and you’ve got the hair volume to make even simple styles look intentional and polished. Pick one style and practice it until it feels natural, then experiment with variations. Your thick hair is genuinely your advantage, so choose braided half-up styles that let that advantage shine.