Wavy hair and braids are basically a match made in heaven. There’s something about the way braids interact with natural texture that makes you look effortlessly polished without actually trying that hard—and when you combine that with the half-up styling trick, you’ve got a versatile look that works for everything from casual weekends to actual events. The beauty of braided half-up styles is that they solve that awkward in-between problem where your hair’s too long to wear completely down but too short to pull fully up without looking severe. Add waves to the equation and suddenly you’ve got dimension, movement, and a style that photographs well from literally every angle.
The magic of this combination is how forgiving it is. Your waves don’t have to be perfect. That slightly messy texture is actually what makes braided half-up styles look intentional rather than contrived. Smaller braids work beautifully with wavy hair because the braid sits on top of the wave pattern rather than fighting against it. Thicker, chunky braids give you that romantic, bohemian vibe that’s been popular for years and works whether you’re dressing up or keeping things casual. The fact that you’re only braiding the upper half of your hair means you can achieve these looks even if you don’t have tons of experience with braiding—you’re working with a smaller section, which is genuinely easier to manage.
What makes half-up styles particularly smart for wavy hair is how they manage volume. Waves naturally create fullness, and pulling half your hair up removes it from your face while letting the lower half do its volumizing thing. You get the best of both worlds: a polished top that shows off your braiding skills, and waves cascading down your back that add movement and texture. Whether you’re working with loose beachy waves, tighter ringlets, or something in between, there’s a braided half-up style that’s going to make your hair look intentional and beautiful.
1. The Delicate Three-Strand Braid Center Part
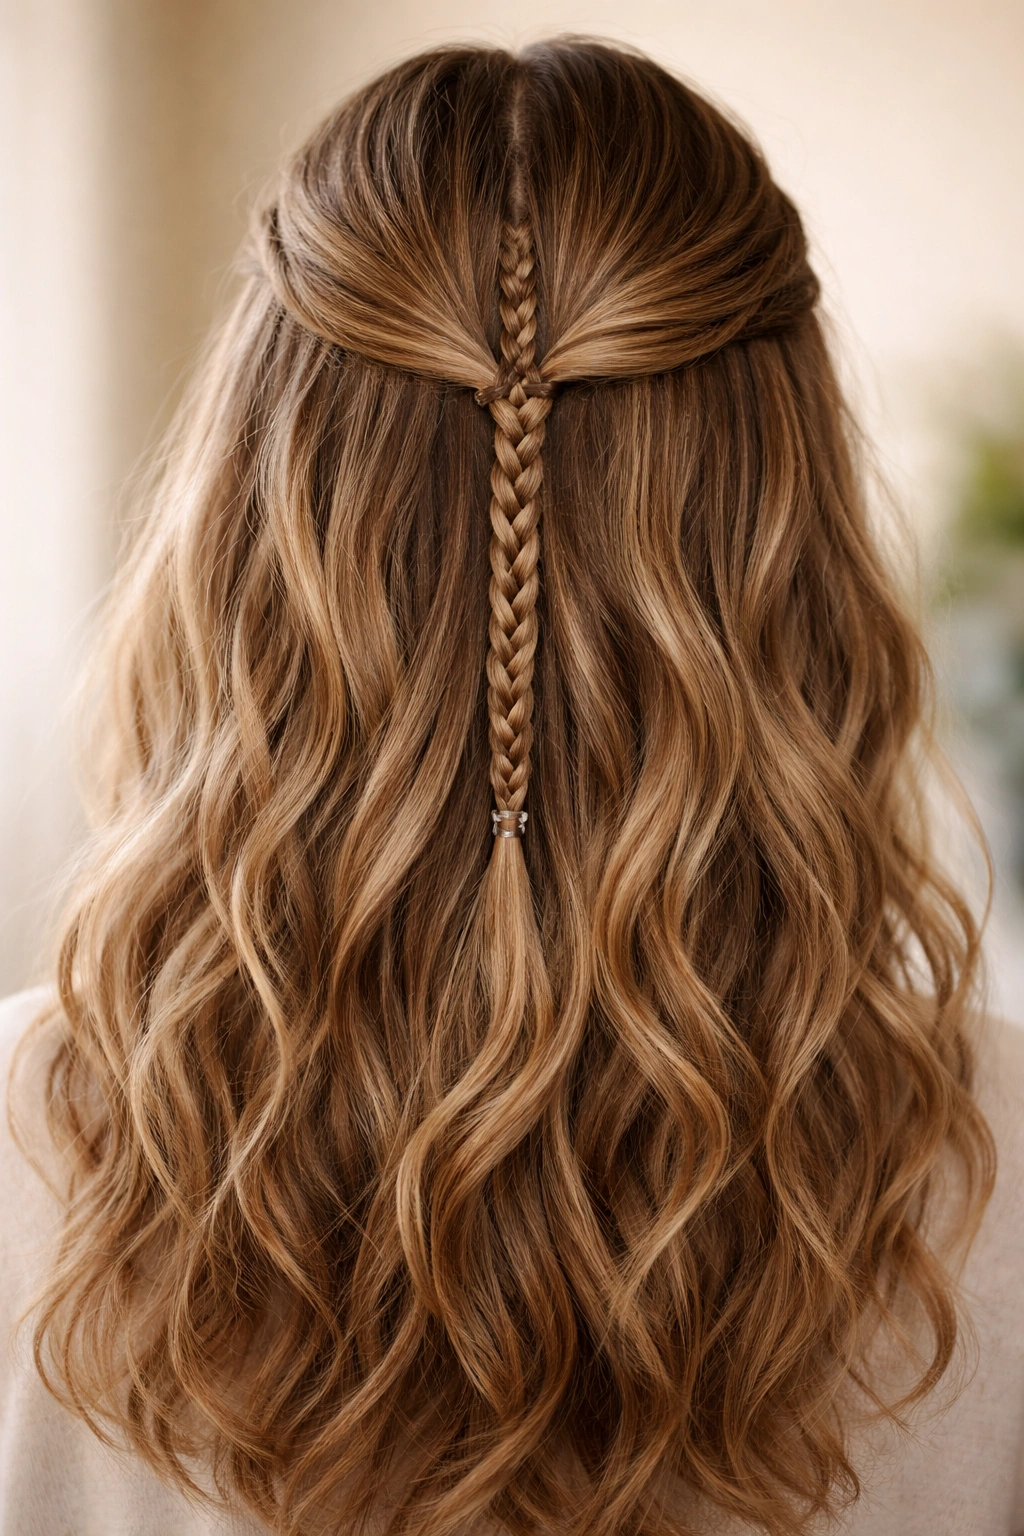
This is the most elegant version of the half-up style—clean, classic, and the kind of braid that looks effortlessly sophisticated. You’re taking a thin three-strand braid from the center of your head, running it down the back, and securing it with a clear elastic or bobby pin. The thinness of the braid is key here; it doesn’t compete with your waves, it complements them. When you finish, you’ll pull a few face-framing pieces loose and let your waves do their thing below.
Why It Works with Wavy Hair
This style shines because the single, delicate braid acts as a visual anchor without overwhelming your waves. The three-strand braid is tight enough to look intentional but thin enough that it doesn’t flatten the top of your head. With wavy hair, that balance matters—you want enough hold that the style stays polished throughout the day, but not so much structure that it fights your natural texture.
How to Create It
Part your hair down the center, then take a small section from just above one ear, divide it into three strands, and start braiding back toward the crown. As you braid, you can pull the edges slightly to make it look a bit looser and less rigid. Once you reach the nape of your neck, secure it with a clear elastic. Pull a few face-framing pieces loose and use a curl-enhancing spray to define the waves around your face. This look stays put all day and actually looks better as the day goes on because the waves relax into it.
2. The Two-Braid Half-Up with Center Parting
Double braids automatically look more intricate and intentional, even though they’re honestly not much harder than a single braid. You’re creating a braid on each side of your head, starting near your ear and working back, then joining both braids at the back of your head with a single clear elastic. The effect is a fuller, more textured crown while your waves fall freely below.
Why It’s Perfect for Waves
Two braids create width and balance on the head, which actually flatters wavy hair even more than a single braid. Your waves naturally fall into the space between and beneath the braids, creating this really beautiful, multi-dimensional look. The two braids also mean you’re pulling hair from a larger area of your head, which reduces any flat spots that can happen with a single braid.
Steps to Achieve This Style
Start on one side by taking a small section of hair near your ear and braiding it back toward the center of your head. Don’t braid all the way to the ends—stop about halfway to three-quarters of the way. Do the exact same thing on the other side. Then gather both unfinished braids along with the loose hair in the center back of your head and secure everything with a clear elastic. You can tease gently at the crown just before securing for added volume.
3. The Dutch Braid with Soft Waves Below
Dutch braids sit on top of the hair rather than weaving through it, which means they’re visible and textured in a really beautiful way. A Dutch braid starting at the crown and running down the center of your head gives you that strong, defined braid element while your waves cascade freely below. It’s a style that looks edgy and put-together simultaneously.
Why Dutch Braids Complement Wavy Hair
The raised texture of a Dutch braid looks stunning against wavy hair because the two different textures create visual interest. The braid itself catches light differently than your waves do, so it stands out without looking out of place. With wavy hair, a Dutch braid actually looks more complex and detailed than it would with straight hair, because your waves add another layer of texture underneath.
How to Braid and Finish
Start at the very crown of your head and take three small sections. Cross the outer strands over the center strand (this is what makes it Dutch rather than French). As you move down, grab small sections from each side and incorporate them into the braid. Once you’ve braided about two-thirds of the way down, secure with a clear elastic. Leave the bottom section loose so it blends into your waves. Pull some face-framing pieces out before you start braiding, and use a sea salt spray to enhance your wave texture.
4. The Twisted Half-Up with Hidden Braid Detail
Not everyone loves braiding, and that’s totally valid. This style combines twists with a hidden braid element, giving you the visual impact of something more complex. You’re creating two twisted sections from each side of your head that meet in the middle, where they’re secured with a braid crown. It looks intricate but takes about five minutes.
Why Twists Work Beautifully with Waves
Twists follow the natural movement of your waves more softly than a tight braid does. They create a romantic, organic look that feels like your waves are just naturally falling that way. The combination of twists and waves creates this really beautiful, fluid silhouette. Because twists are looser than braids, they also work brilliantly if your hair is on the finer or more delicate side.
Creating the Twisted Detail
Take a section from each side of your head at about ear level. Twist each section loosely as you work backward—don’t make it too tight. Bring both twists together at the back of your head and secure them with a clear elastic. You can weave a thin braid through where the twists meet to add that extra detail, or leave it as is. Gently pull the waves of the twists to make them look looser and more relaxed.
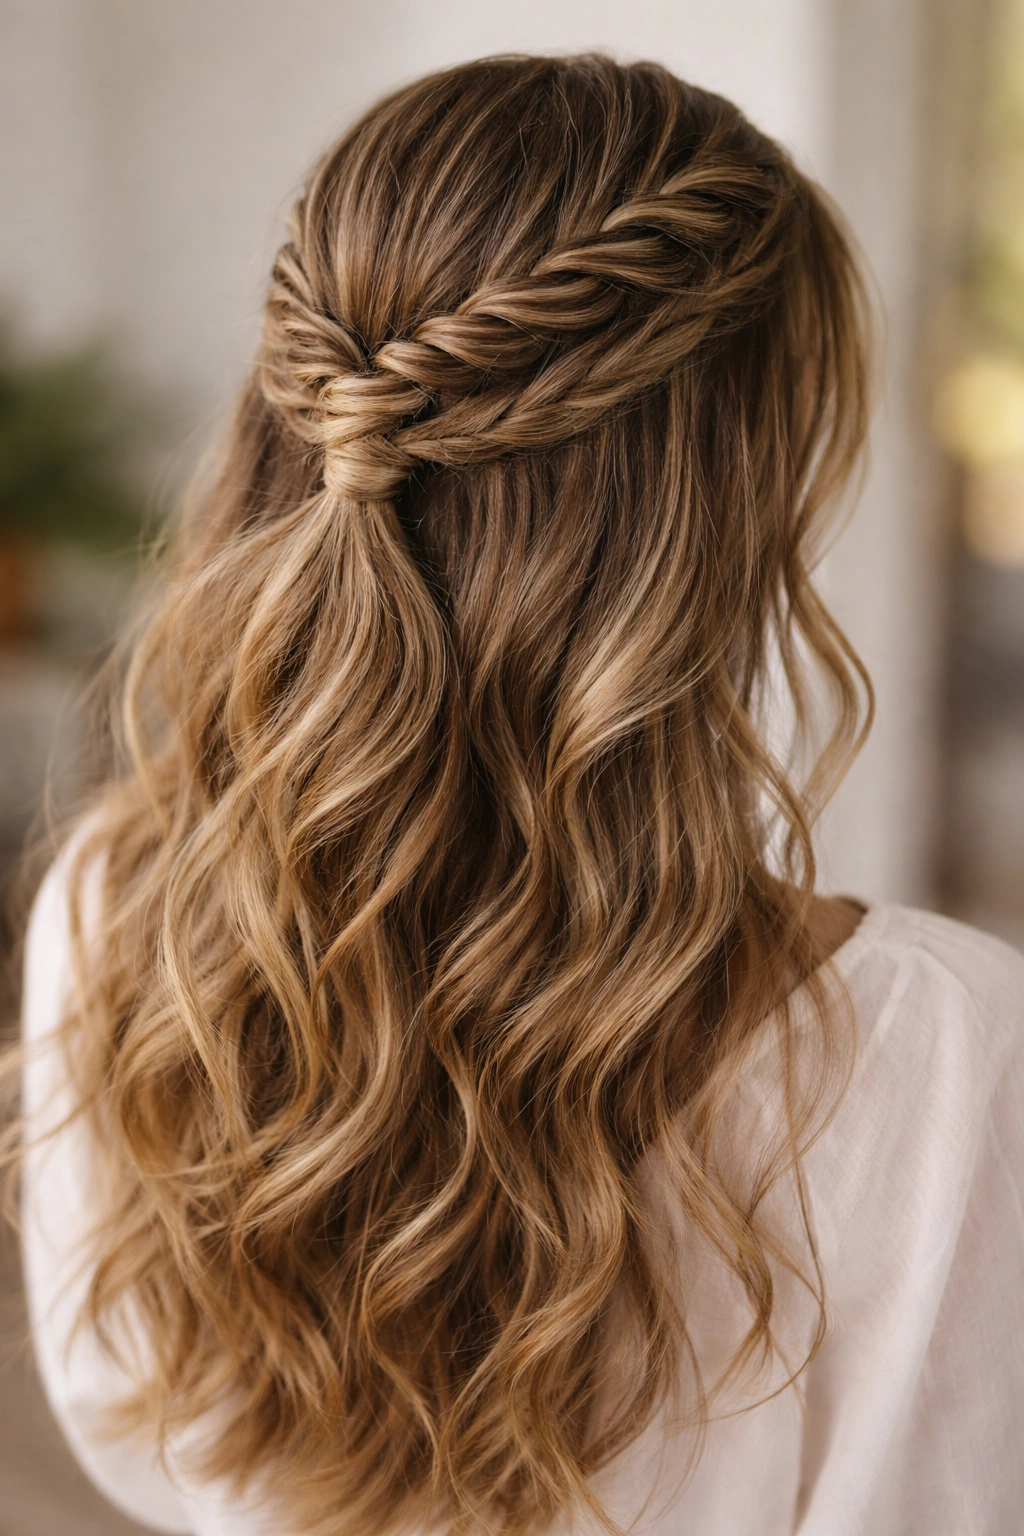
5. The Fishtail Half-Up Braid
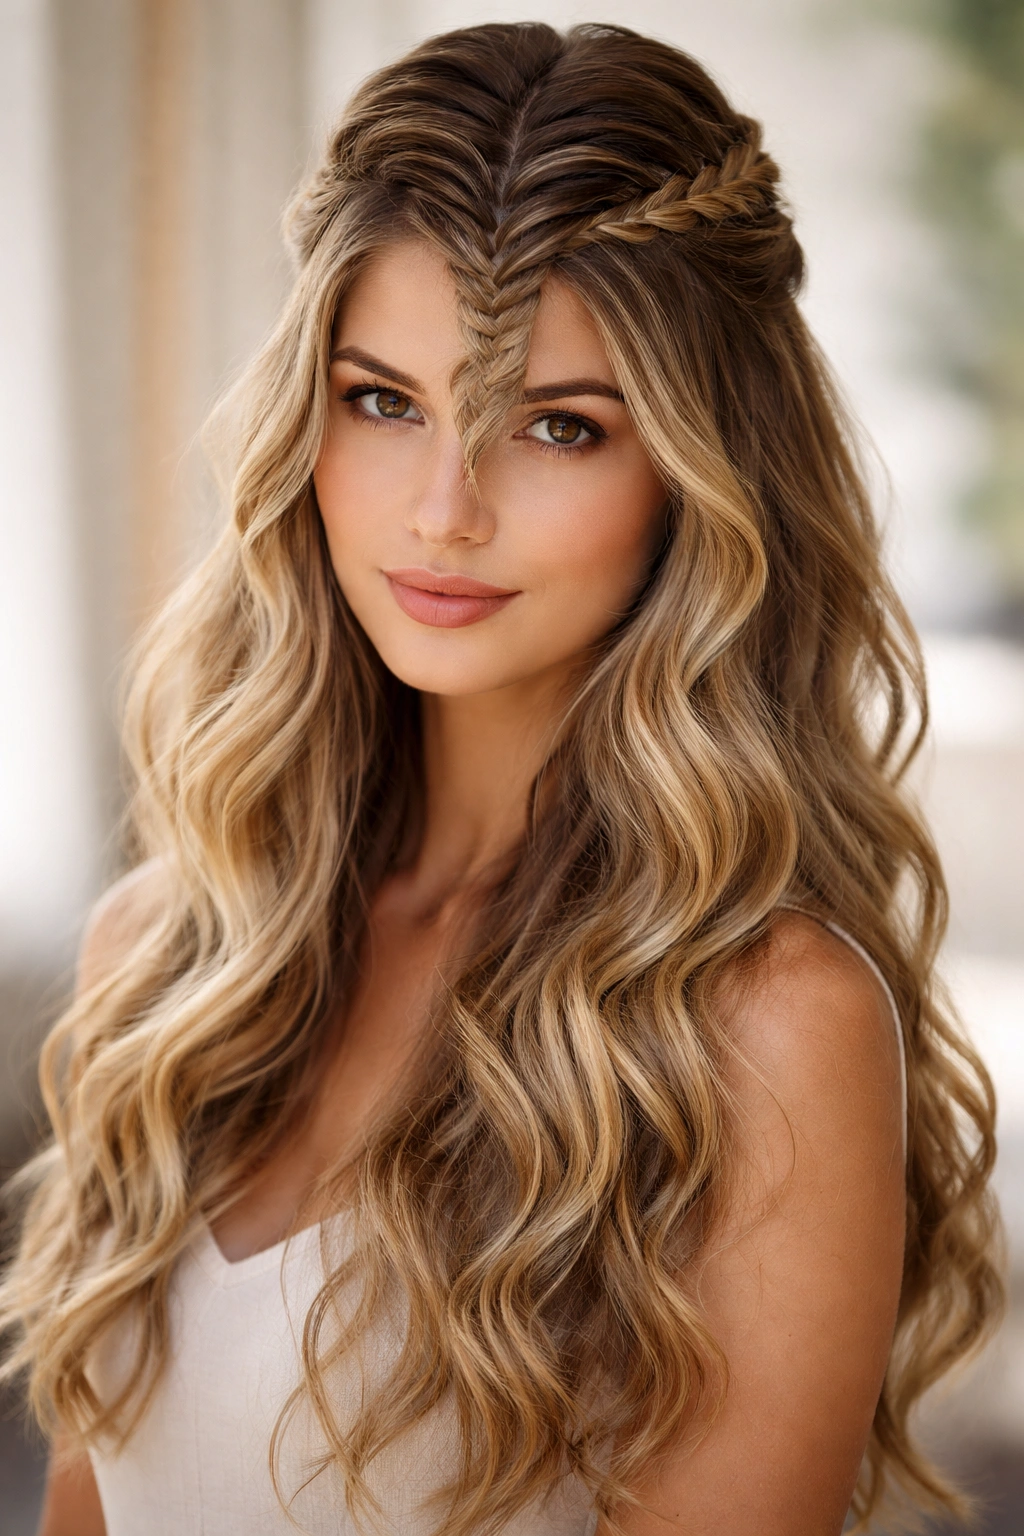
Fishtail braids are the visual equivalent of a perfectly worn-in vintage sweater—they look detailed and intricate even though they’re technically very simple. A fishtail braid running down the center of your head with half your hair pulled up creates this incredibly romantic, boho-inspired look. The braid sits beautifully against wavy hair because the width of a fishtail braid has this airy quality that doesn’t feel heavy.
Why Fishtail Braids Are Ideal for Wavy Hair
Fishtail braids have a looser, more organic feel than traditional three-strand braids. They’re made from just two strands instead of three, which means they naturally have more texture and movement. This texture pairs perfectly with your waves—instead of competing, they complement each other. A fishtail braid also looks particularly gorgeous when you tease it out slightly, which makes it blend beautifully into the waves below.
How to Execute a Fishtail Braid
Gather the top half of your hair and secure it loosely with a clear elastic. Split the hair in the elastic into two sections. Take a small piece of hair from the outer edge of the left section, cross it over to the right section. Repeat on the right side, taking a small piece from the outer edge and crossing it to the left. Keep alternating—the small pieces are what create that delicate, fishtail appearance. Once you’ve braided about halfway down, secure the end with another clear elastic. Gently pull the sides of the braid to make it look fuller and less structured.
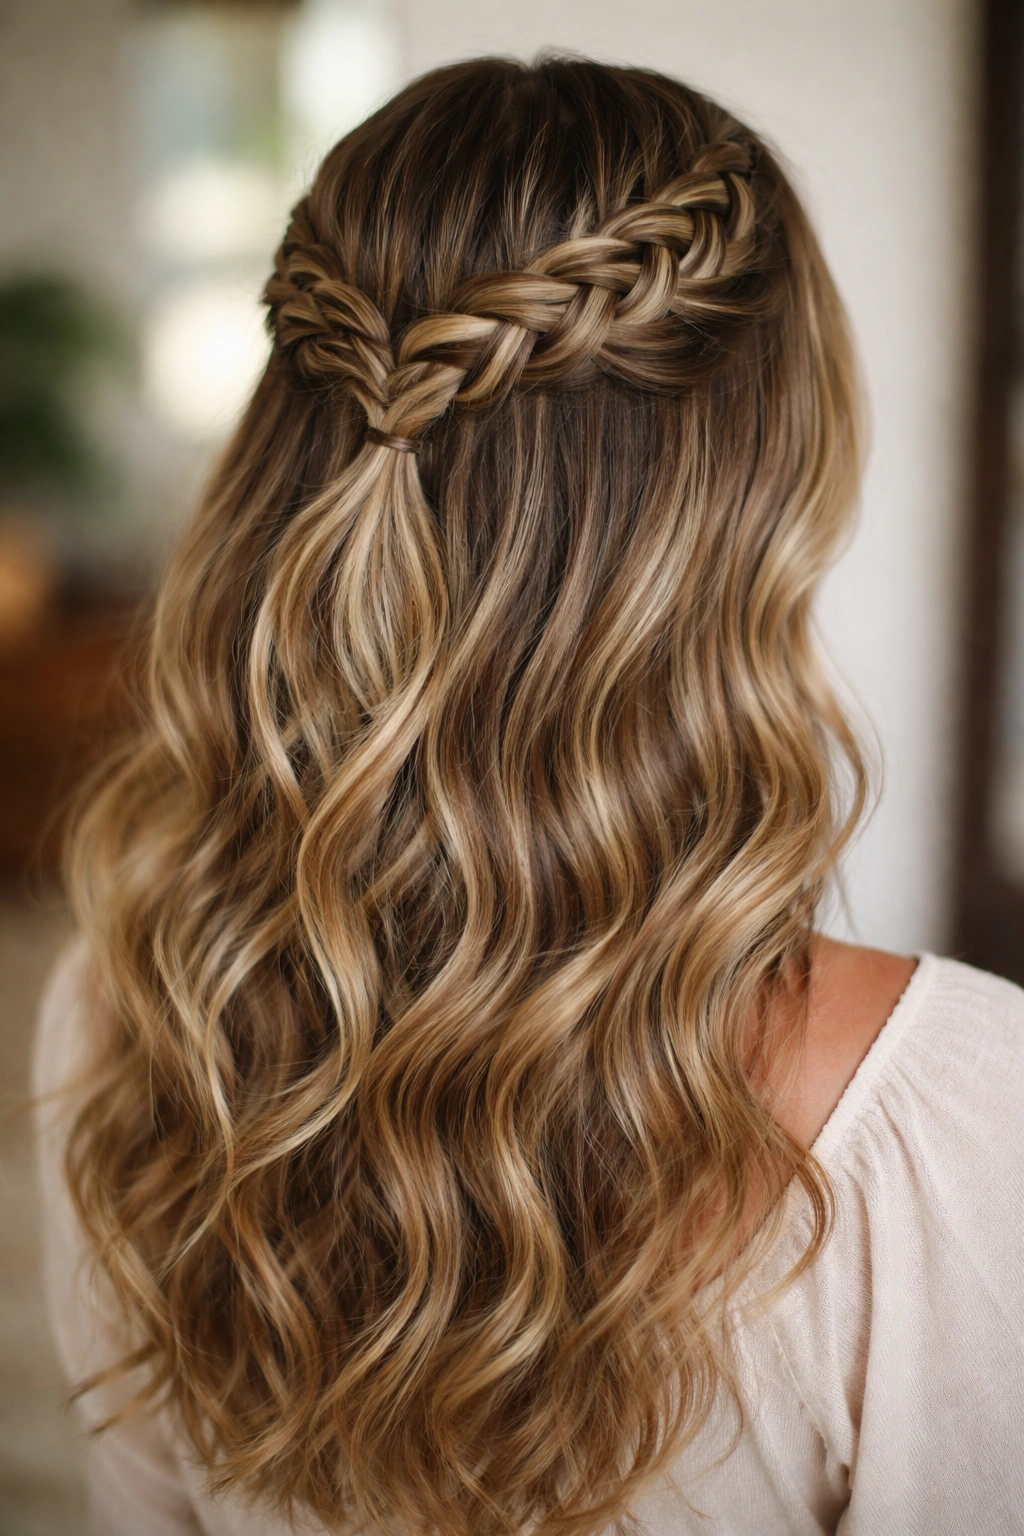
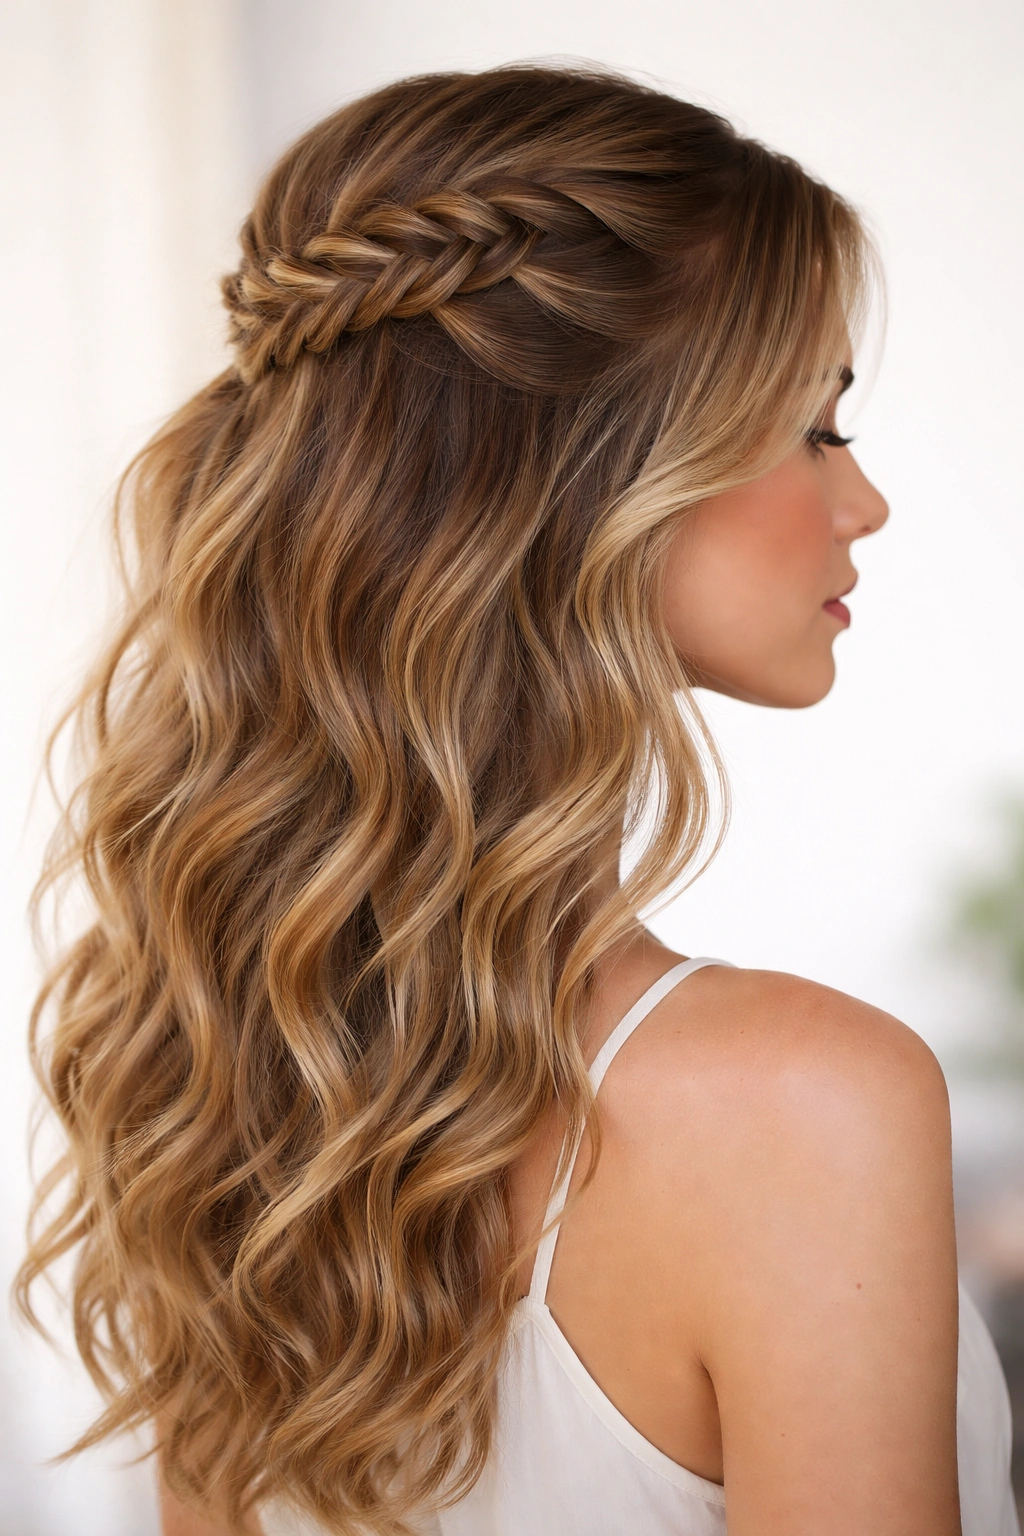
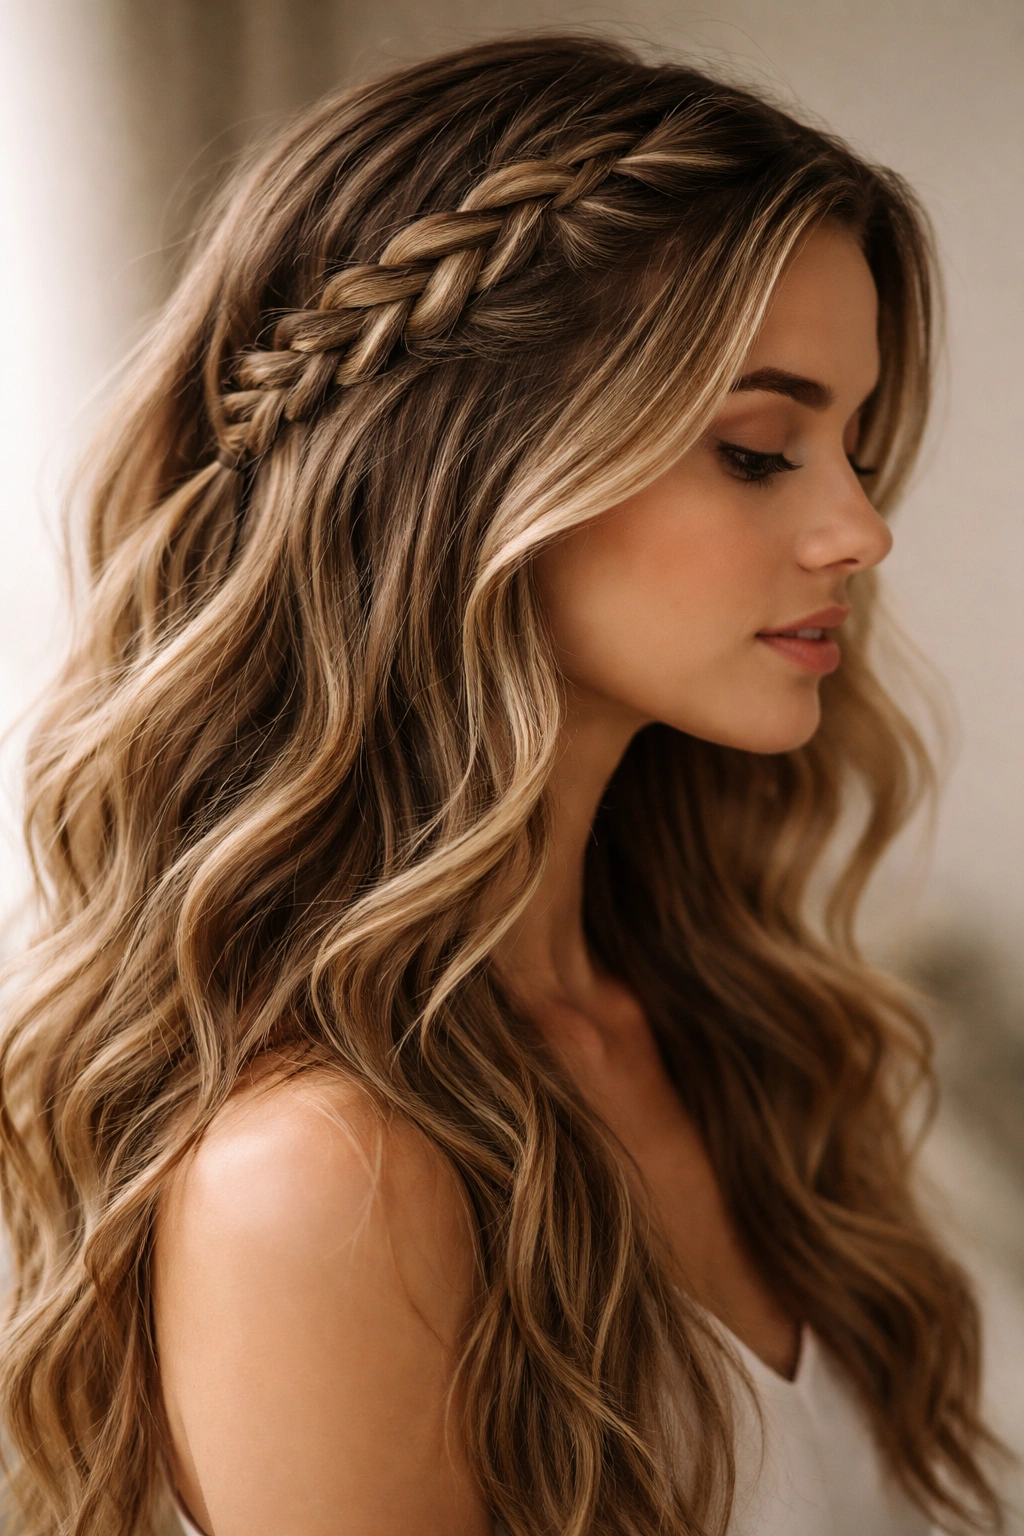
6. The Braided Crown with Layered Waves
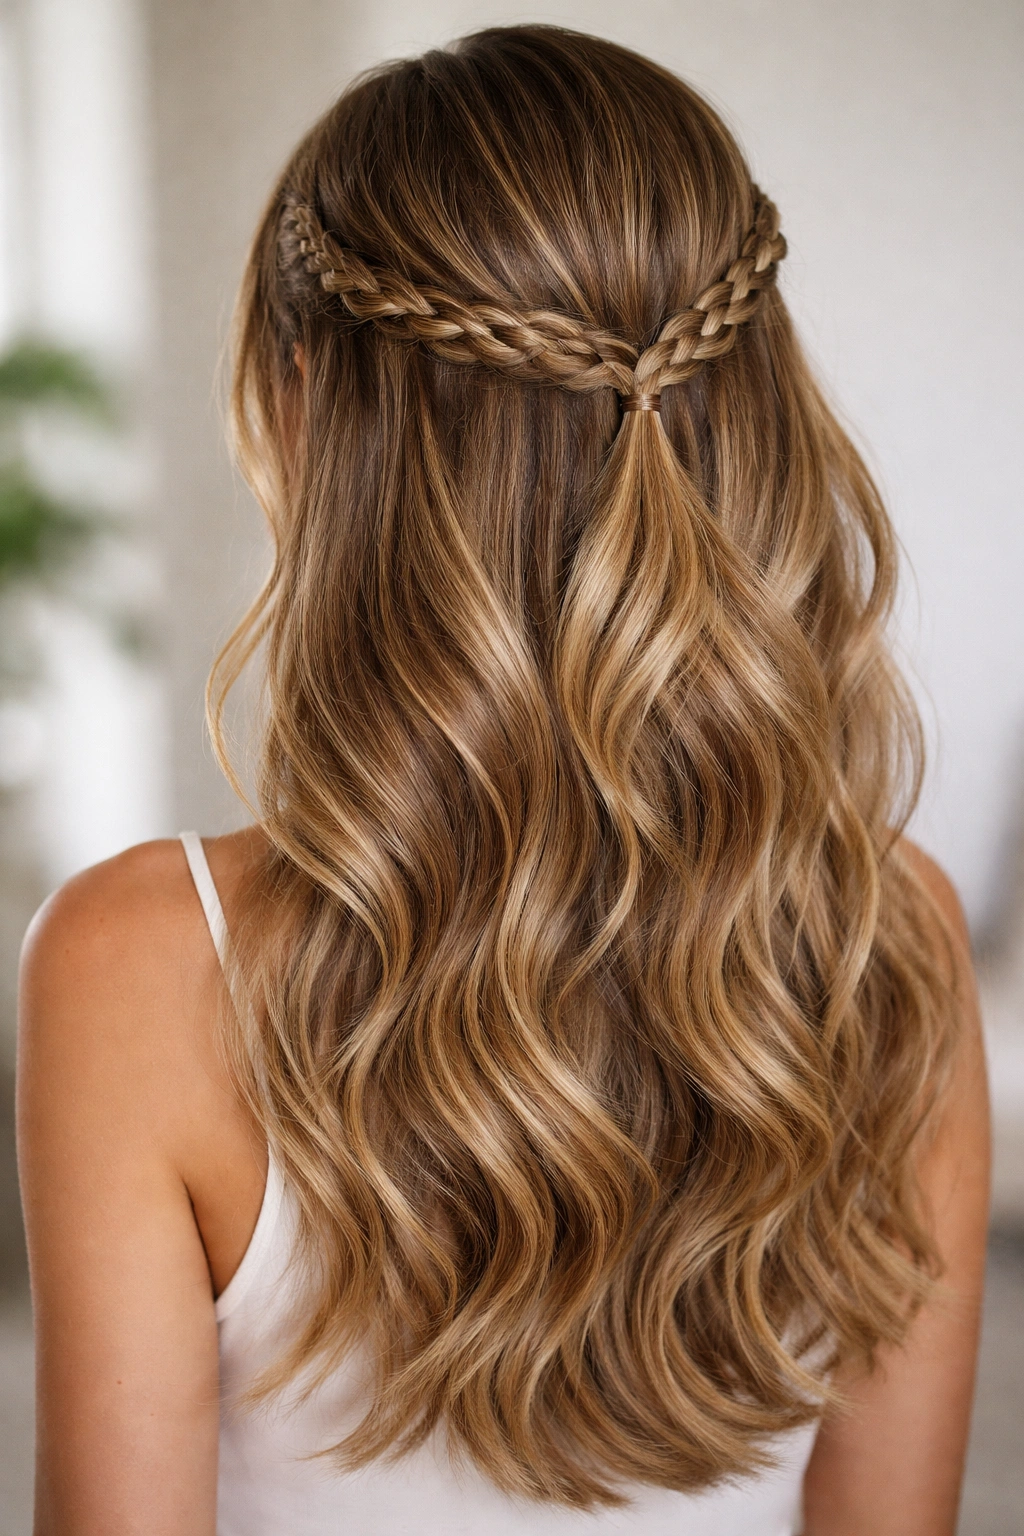
This style pulls inspiration from princess hairstyles but makes it work for modern wavy hair. You’re creating braids on both sides of your head that meet at the back, creating a crown effect. The key is keeping the braids relatively thin and pulling them loosely so they frame your face without looking formal. Your waves fall down underneath, creating layers and dimension.
Why the Crown Effect Enhances Waves
When you braid hair across the sides of your head, you’re creating a natural frame for your face. With wavy hair, this frame becomes even more interesting because your waves fall in different layers underneath. The braided crown adds structure to the top while the waves provide softness and movement on the bottom. It’s genuinely one of the most flattering styles for face shape because it pulls the right amount of hair off your face without being severe.
Steps for the Braided Crown
Start on one side of your head, near your temple. Take a section of hair and begin a simple three-strand braid, working it back toward the center of your head. As you braid, you can leave some face-framing pieces out before you start. Do the same thing on the other side. When both braids reach the center back of your head, gather them together along with any loose hair in that area and secure with a clear elastic. You can braid these ends together if you want a more finished look, or leave them loose. Gently pull the braids to make them look fuller and more relaxed.
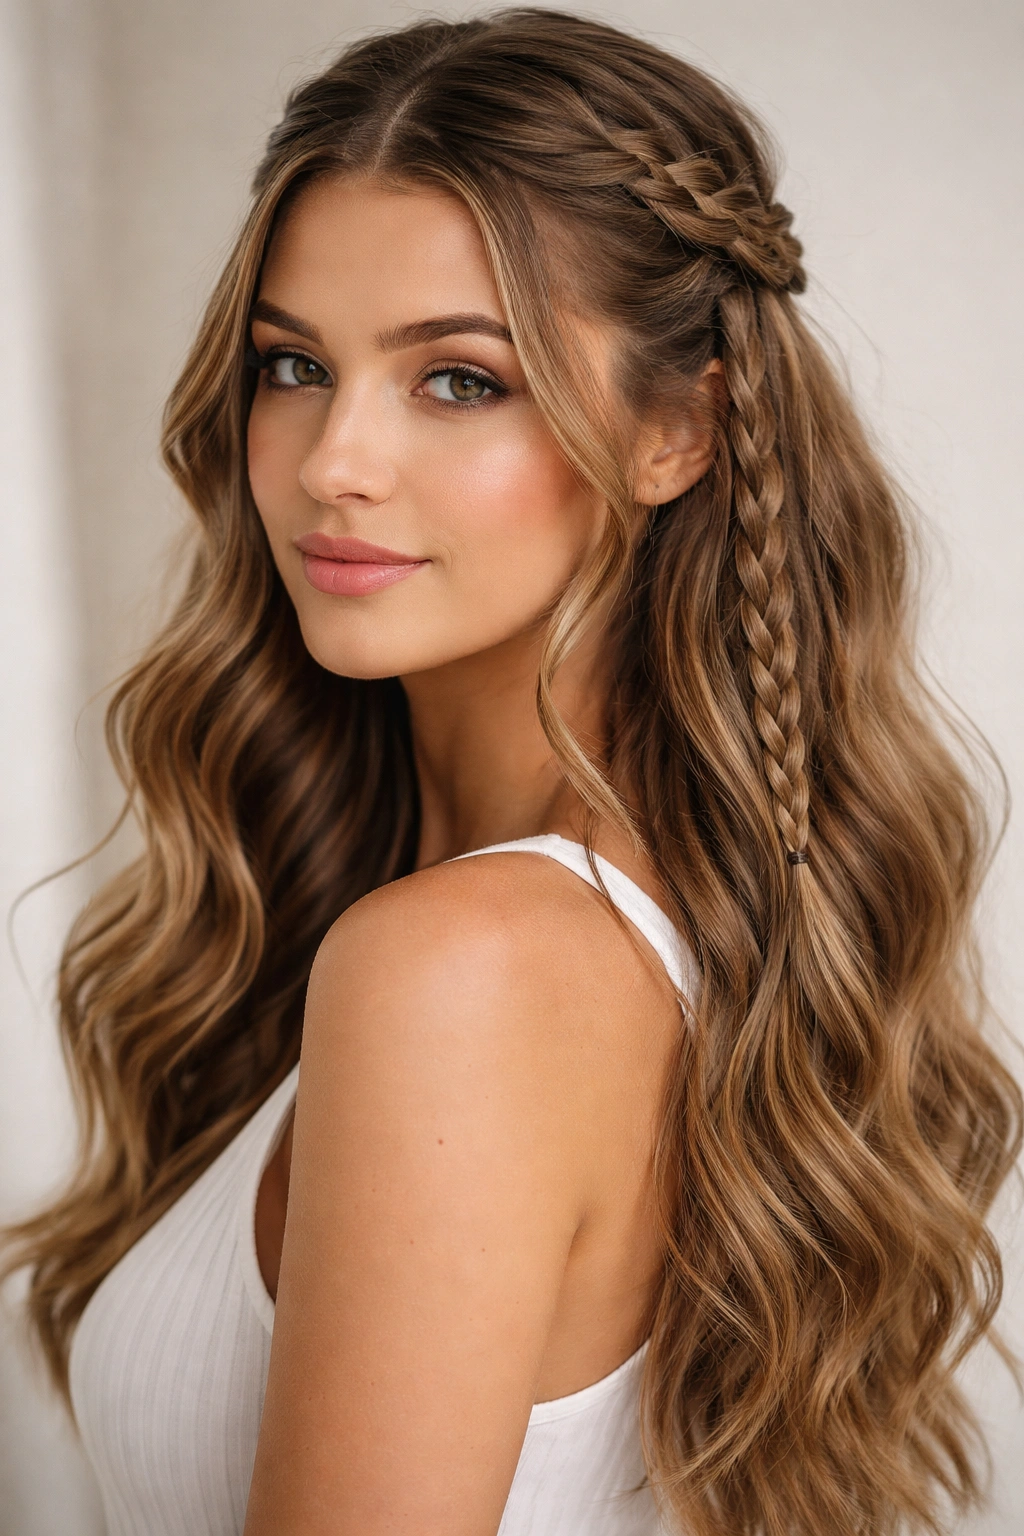
7. The Single-Side Dutch Braid with Volume
This is an asymmetrical take on the half-up style—instead of centering your braid, you’re putting it on one side. You create a Dutch braid starting near the temple on one side, work it back toward the crown, and secure it at the center back. It’s edgy and interesting, and it works beautifully if you have a favorite side to wear your hair on. Your waves look particularly good when only one side is braided because it creates asymmetrical texture.
Why Asymmetry Works for Waves
Asymmetrical styles often look more modern and interesting than centered ones, and with wavy hair, asymmetry actually enhances the natural texture. Your waves naturally fall differently on each side of your head anyway, so working with that asymmetry rather than fighting it creates a more harmonious look. One Dutch braid feels bold without being over the top.
Creating the Asymmetrical Style
Start on your preferred side, near the temple area. Begin a Dutch braid and work it back, picking up sections as you go. Stop braiding around the center back of your head. Secure the braid with a clear elastic and leave the rest of your hair down. Use a curl-enhancing product on your waves to make sure they look defined and intentional. The asymmetry actually makes the style feel more editorial and less “I’m following a tutorial.”
8. The Goddess Braid with Thick, Defined Waves
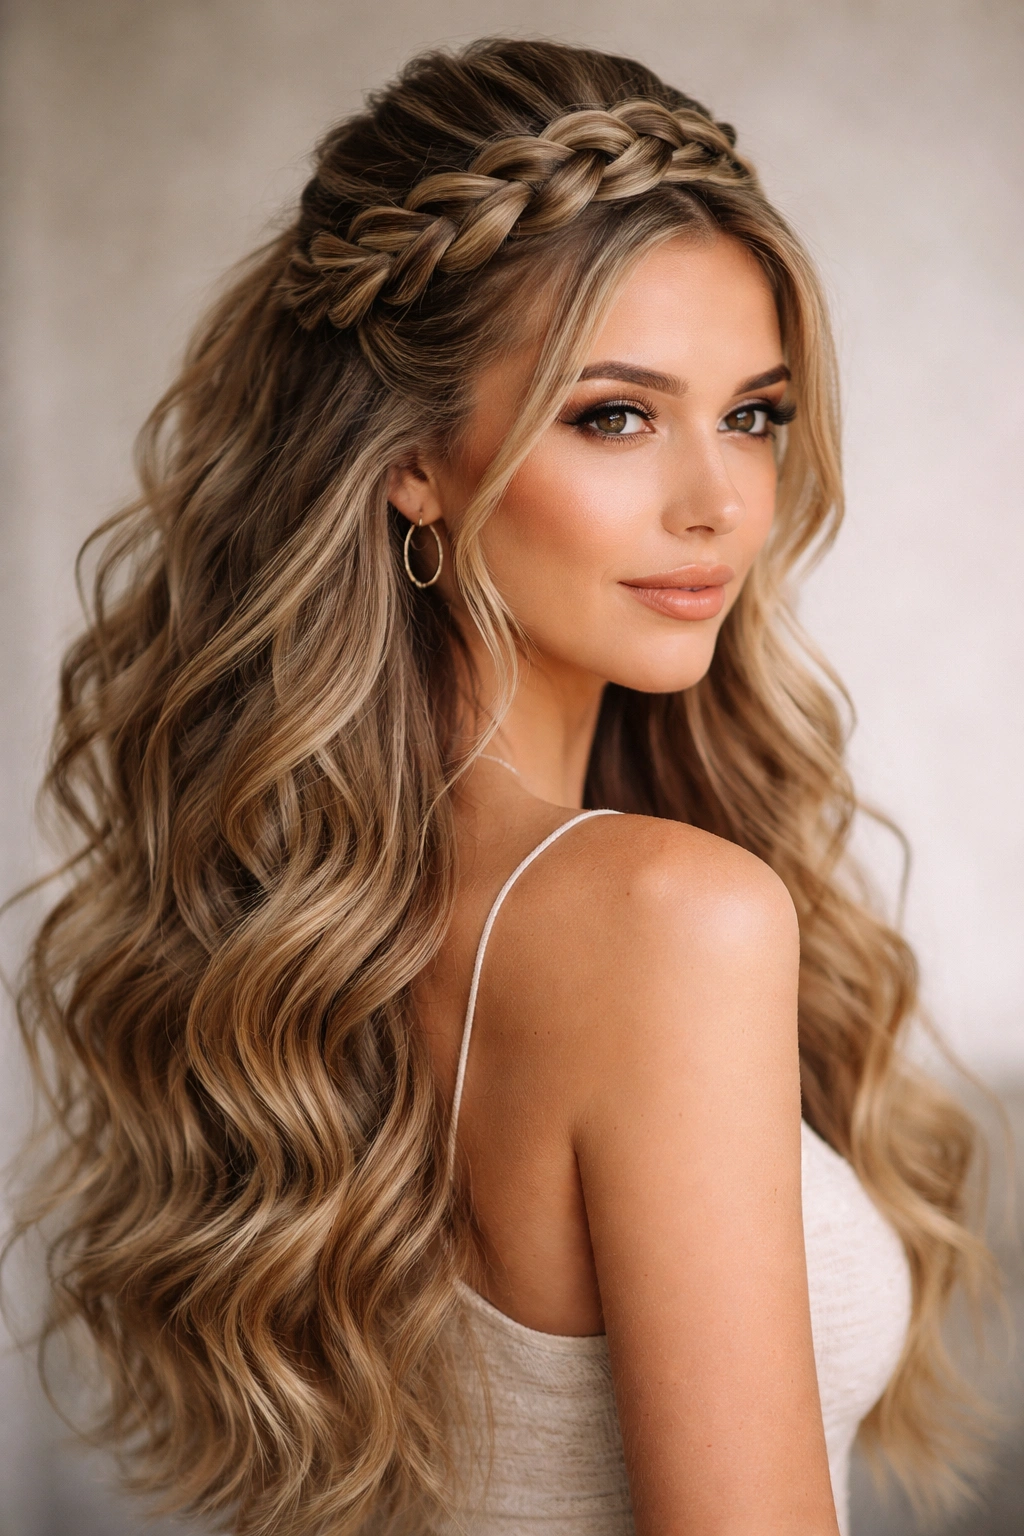
A goddess braid is essentially a thicker, more heavily styled braid that sits on top of your hair rather than through it. It’s basically a French or Dutch braid that you’ve heavily teased and pulled out to make it look thicker and more textured. Combined with half-up styling and wavy hair, you get this really strong, confident look that feels both romantic and powerful.
Why Thick Braids Complement Textured Hair
Thicker braids look more cohesive against wavy hair because the scale is proportionate. A thin, delicate braid can get a bit lost in really thick wavy hair, but a braided style that’s been teased and pulled out creates visual weight that matches your waves. The braid becomes a statement element rather than a delicate detail. This style is also incredibly practical because thicker braids actually last longer throughout the day.
How to Create a Goddess Braid
Begin a regular French or Dutch braid from the crown, incorporating hair as you work down the back. Once you’ve braided most of your hair into a half-up style, secure it with a clear elastic. Now comes the magic part: take each section of the braid and gently pull it outward and downward to make it wider and fluffier. The braid should look almost shredded in the best possible way. This process takes a few minutes but transforms the braid from neat and tidy to textured and impressive. Finish with a light spray to hold it in place.
9. The Micro-Braids Half-Up Style

This is the intricate-looking version that actually takes less work than it appears to. You’re creating multiple thin braids across the back of your head from the sides, pulling the top half of your hair up in a really textured, detailed way. Micro-braids work particularly well with wavy hair because each individual thin braid creates its own texture line, and together they create an almost rope-like effect. It’s a style that looks editorial and definitely turns heads.
Why Multiple Thin Braids Shine with Waves
Instead of one braid doing the work, you’re distributing the braiding across multiple thinner sections. This means none of them flatten your hair or create heavy weight in one place. Each thin braid actually moves with your waves rather than against them. The effect is intricate without being overwhelming—it looks like you spent an hour styling when you probably spent twenty minutes.
Executing Multiple Micro-Braids
Divide the top half of your hair into 4-6 thin sections, depending on how detailed you want the final result to look. Create a thin three-strand braid from each section, working them all back toward the center. As you work, try to keep the braids at roughly the same tightness so the final result looks intentional rather than random. Secure all the braids together at the back with a clear elastic. Gently tease each braid to make it look fuller. The finished effect should look complex and textured.
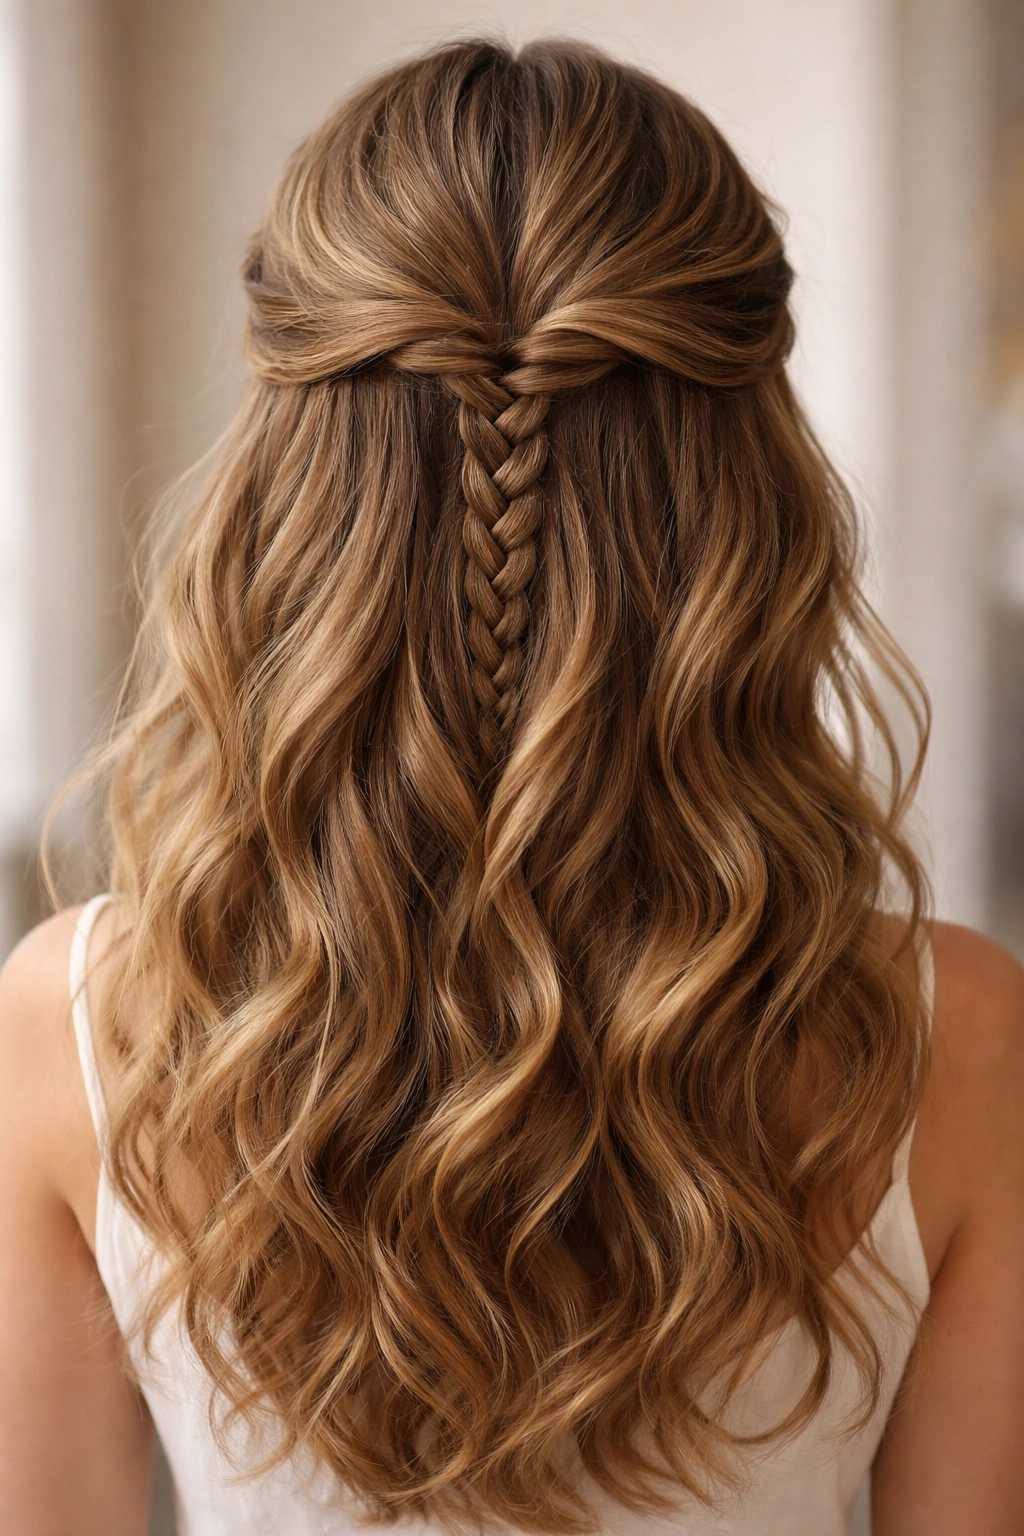
10. The Braided Ponytail with Loose Top Section
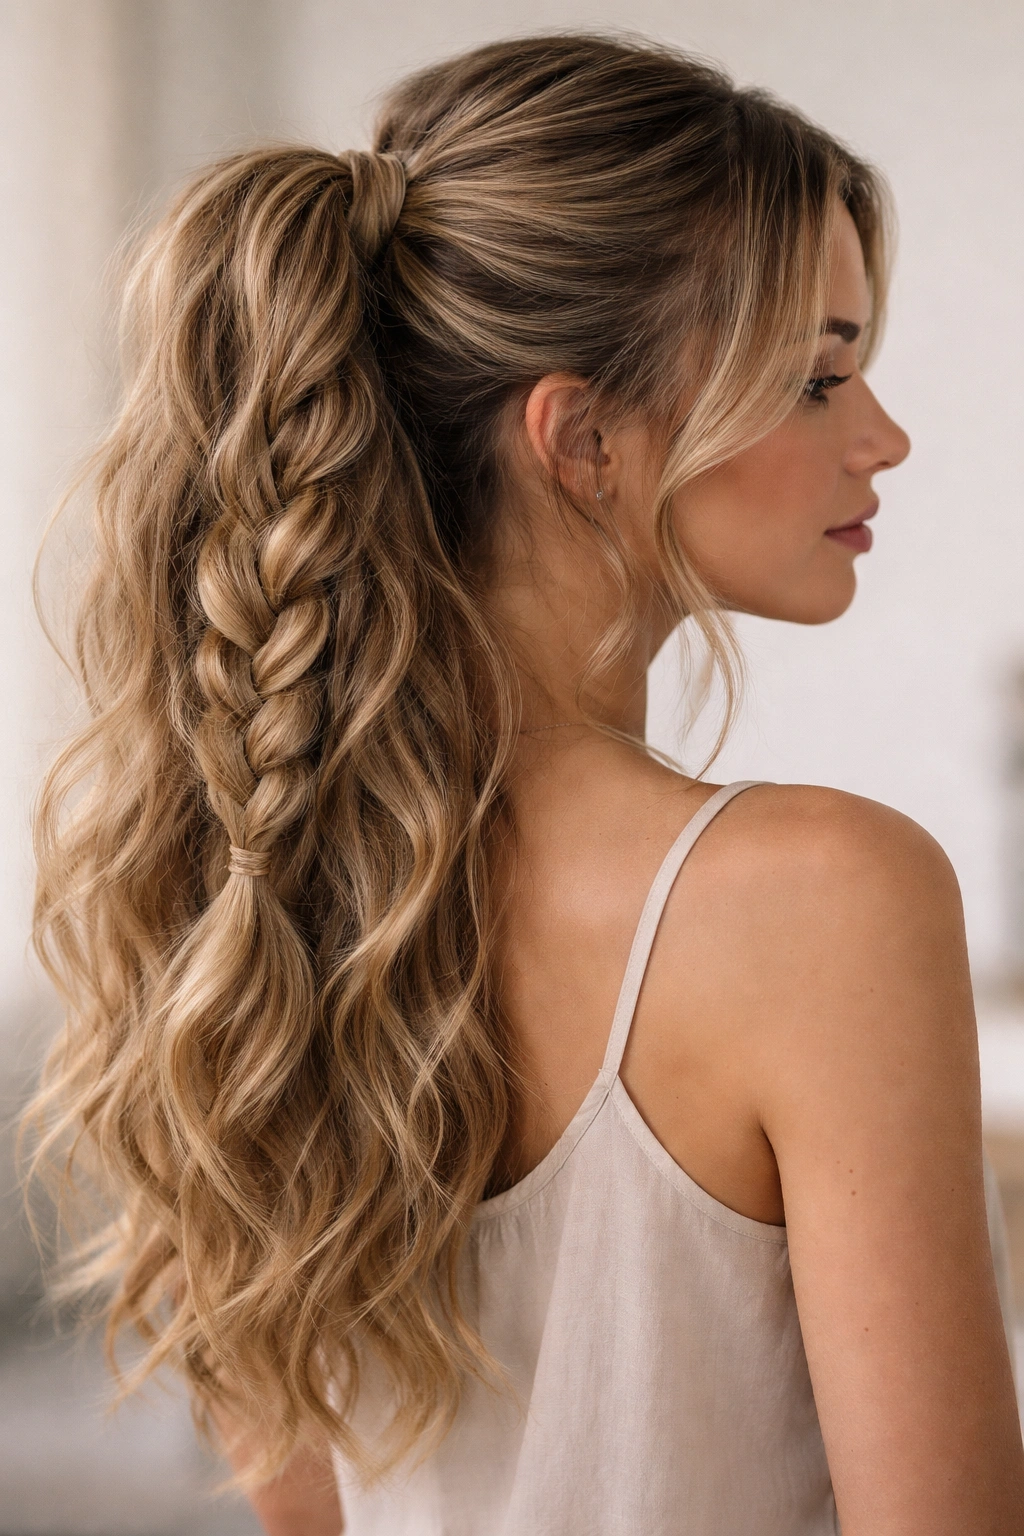
This hybrid style gives you the smoothness of a ponytail with the detail of a braid and the visual interest of wavy hair. You’re pulling the top half of your hair into a ponytail position at the back of your head, then braiding the ponytail itself. This works especially well if your waves are on the looser or more relaxed side because the braided ponytail looks polished while the loose top section looks soft and undone.
Why Braided Ponytails Complement Waves
A regular ponytail can sometimes flatten the top of your head, but by leaving the top section loose and braided, you maintain volume and texture on top. The braided ponytail also sits on top of your waves, creating layers and movement. This style feels both polished and relaxed—you could wear it to work or to a casual weekend event and feel appropriate in either setting.
Creating This Hybrid Style
Pull the top half of your hair back and secure it with a small clear elastic at the back of your head. Don’t pull it too tight; you want some volume and movement in that top section. Now take that gathered ponytail and divide it into three sections to create a three-strand braid. Braid the ponytail from the elastic down to the ends and secure with another clear elastic. Leave the bottom half of your hair completely down so your waves are visible. This style holds particularly well because the braided ponytail anchors everything, so you can wear it confidently all day.
11. The Spiral Braid with Half-Up Pull
A spiral braid wraps around the crown of your head and comes in at the back, creating this really beautiful, dimensional effect. For a half-up version, you’re spiraling the braid around the top half of your head, starting near one ear and wrapping around to the center back. It looks complicated but is actually very doable, and with wavy hair, the spiral creates this gorgeous multi-layered effect that’s honestly one of the most flattering braid styles out there.
Why Spiral Braids Work for Wavy Hair
Spiral braids create movement and dimension in a different way than traditional braids do. The spiral wraps around your head, so it interacts with your waves from multiple angles. The style also naturally creates some lift at the crown, which is flattering for pretty much every face shape. With wavy hair, a spiral braid looks more textured and interesting than it would with straight hair.
How to Execute a Spiral Braid
Start near one ear and take a section of hair. Begin a thin three-strand braid and work it back and around toward the center of your head in a spiral motion. As you move, keep picking up new sections so the braid stays incorporated with your hair. By the time you reach the back center of your head, you should have incorporated most of the top section of your hair. Secure the braid with a clear elastic at the back. Leave the bottom half of your hair completely loose. Gently pull the spiral to make it look fuller and less defined—the more relaxed it looks, the better it complements your waves.
12. The Reverse French Braid Half-Up
A reverse French braid (where you cross sections under instead of over) creates an inverted, almost inside-out effect that catches light beautifully. For a half-up version, you’re reverse braiding from one side of your head back to the center, creating this really dimensional, textured element. It’s a style that looks complex enough to impress but simple enough that you can do it without a mirror once you’ve practiced.
Why Reverse Braids Enhance Texture
The reverse braid sits differently on your head than a traditional braid, and that difference becomes really apparent with wavy hair. Instead of the braid sitting on top of your waves, it creates these raised, dimensional lines that interact beautifully with your natural texture. The style also looks particularly good in photographs because the reverse braid catches light differently than a regular braid.
Creating a Reverse French Braid
Start near one temple. Take three sections of hair and cross the outer sections under the center section (this is the reverse motion). As you move back toward the crown, keep picking up new sections and incorporating them into the braid using the same under-cross motion. Once you reach the center back of your head, secure with a clear elastic. Leave the other half of your hair down. Gently stretch the braid to make it look fuller and more textured. The beauty of this style is that the reverse motion creates the appearance of more detail than you actually put in.
13. The Braided Halo with Loose Waves
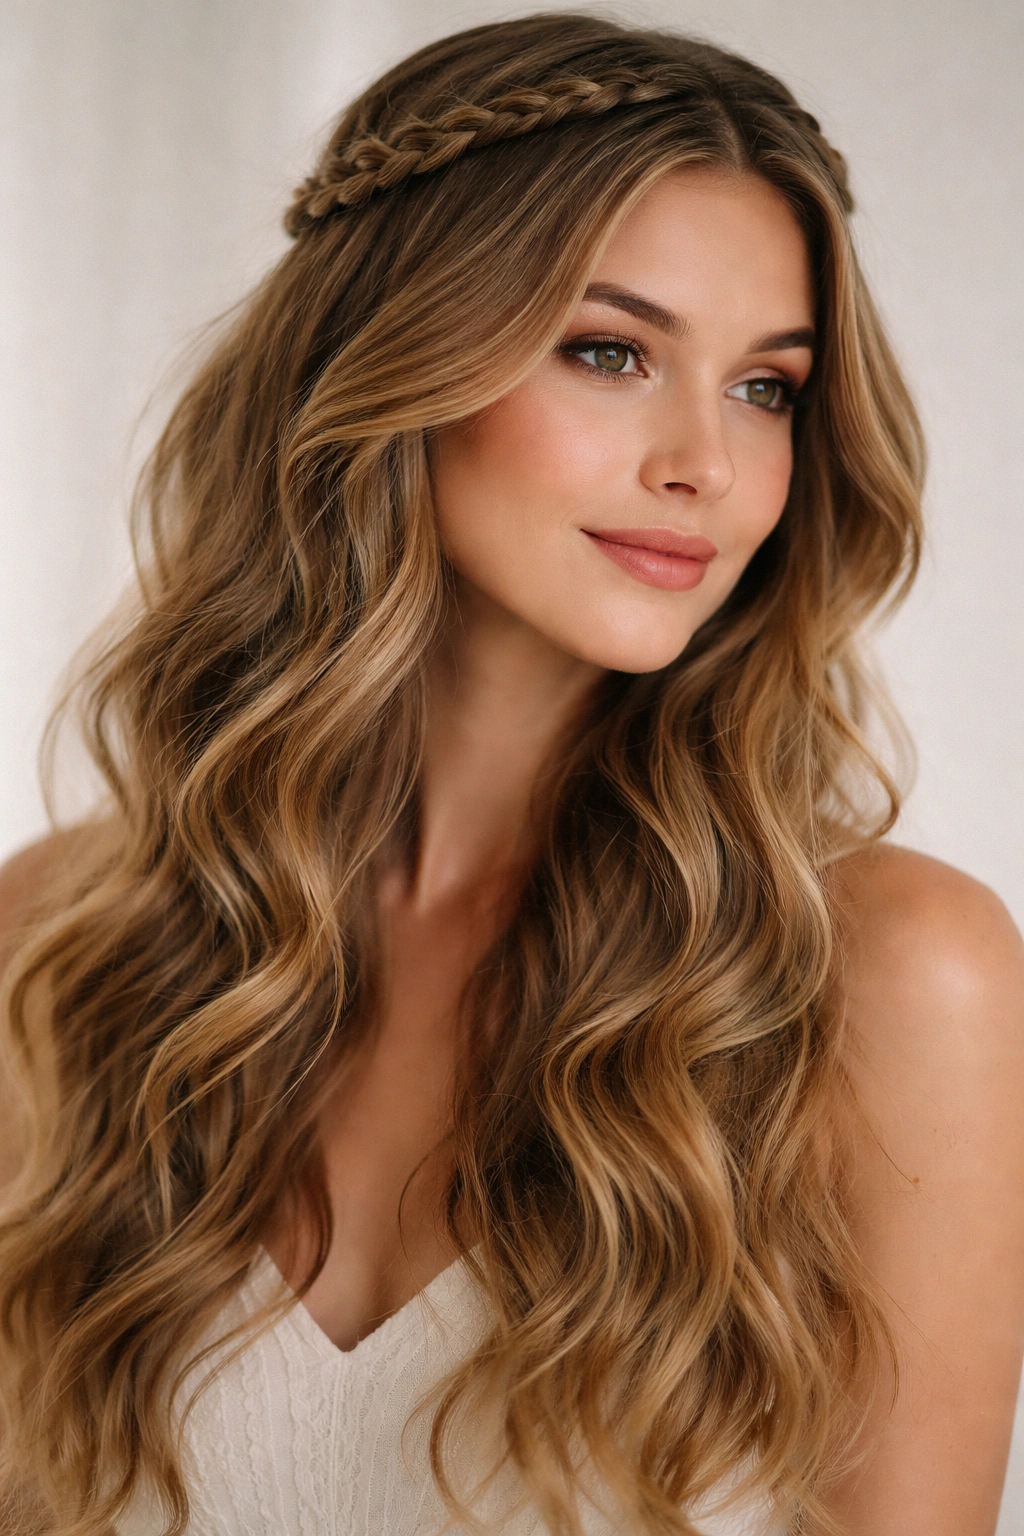
A braided halo sits around the crown of your head, creating this really romantic, crown-like effect. You’re essentially taking two thin braids from each side of your head and connecting them at the back, then leaving all the hair below that point completely loose with your waves. It’s a style that makes you look put-together while still feeling relaxed and effortless.
Why Halos Work with Wavy Hair
A braided halo naturally frames your face and hair, and with wavy texture, that frame becomes even more interesting. Your waves fall in waves from beneath the halo, creating this beautiful layered effect. The style is also surprisingly comfortable because the braids sit at the crown without pulling tight, and your full wave length is visible.
How to Style a Braided Halo
Take a thin section from one side of your head near the ear and begin braiding toward the back. When you reach about the center of the back of your head, stop and secure. Do the same thing on the other side. Where the two braids meet in the back, you can secure them together or braid them together for a more finished look. The goal is for these braids to create a halo shape around your head. Leave all the hair below this halo completely loose. The contrast between the structured braids and the free-flowing waves below is what makes this style special.
14. The Braided Accents with Volume at the Crown

This style is about subtlety and suggestion rather than obvious braiding. You’re creating thin braids on either side of your center part, running them back to meet at the center of the head. But the focus here is the volume you’re creating at the crown through teasing and the way your waves fall around those minimal braids. It’s a style that looks effortlessly elegant rather than intentionally styled.
Why Minimal Braiding Suits Wavy Hair
With wavy hair, sometimes less is more. Subtle braided accents add interest and dimension without fighting your natural texture. This style works particularly well if you’re new to braiding because you’re only creating two simple braids rather than an elaborate arrangement. The focus ends up being on your waves rather than on the braiding technique, which actually makes the overall look more cohesive.
Creating Subtle Braided Accents
Part your hair down the center and create a thin three-strand braid on each side, starting near your ear and working back toward the crown. Stop braiding before you reach the very back so the braids feel delicate and subtle. Secure each braid with a small clear elastic, then tease the crown area to create volume. Let the rest of your waves fall freely. This is a style you can do in about ten minutes, and it looks like you made an effort without looking overdone.
15. The Waterfall Braid Half-Up
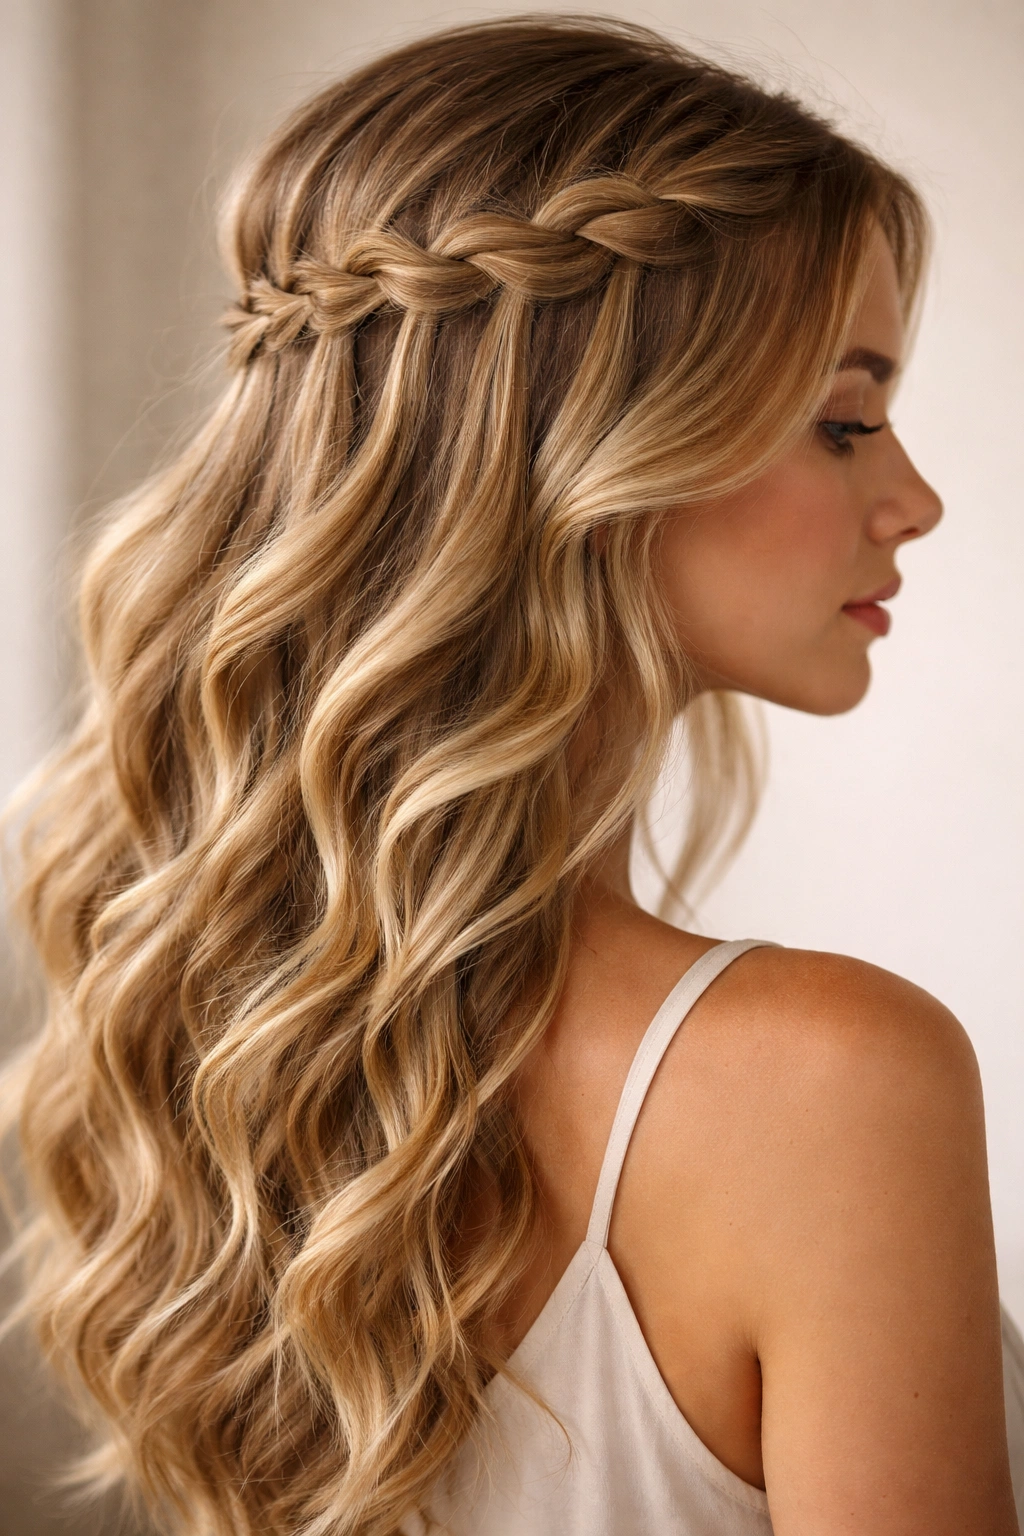
A waterfall braid is one of the most visually stunning braid styles—instead of incorporating all the hair into the braid, you let sections drop out, creating this cascading, flowing effect. For a half-up version, you’re creating a waterfall braid from one side of your head to the other, with the “water” sections creating these beautiful flowing lines through your waves. It looks intricate and romantic in a way that’s hard to achieve with other styles.
Why Waterfall Braids Are Magic with Waves
A waterfall braid naturally creates movement and flow, which complements your waves perfectly. The sections you leave out of the braid fall through the braid in beautiful spirals, and with wavy hair, these sections have even more dimension and texture. The overall effect is genuinely one of the most flattering, photogenic braid styles you can do. It’s also surprisingly simple once you understand the basic technique.
How to Execute a Waterfall Braid
Start on one side of your head near the temple. Take three sections and begin a regular three-strand braid. After each cross, instead of incorporating a new section from the sides like you would in a French braid, you instead drop the lower section out of the braid and pick up a new section from the top. Those dropped sections become your “waterfall.” Continue this pattern all the way around the back of your head. The dropped sections fall naturally through your hair, and your waves make them look even more dimensional and beautiful. Secure the finished braid at the back with a clear elastic.
Final Thoughts
Wavy hair and braids genuinely are a perfect combination, especially when you’re working with the half-up styling approach. The fact that you have fifteen completely different options here means you can match your braid style to your mood, your hair texture on any given day, and the occasion you’re dressing for. Some of these styles are delicate and romantic; others are bold and edgy. Some take five minutes; others take fifteen. That variety means you can keep rotating through different styles without your hair routine ever feeling stale.
The beautiful thing about all of these styles is that none of them require perfect braiding skills. Your waves do so much of the work for you by adding texture and dimension automatically. The braid is just the framework; your natural wave pattern is what makes it look impressive. Don’t stress about your braids being perfectly even or tight—the looser, slightly messier versions often look better anyway because they blend more seamlessly with your waves.
Go ahead and pick the style that speaks to you right now, and give it a try. You might feel like you’re going to mess it up the first time, but honestly, with wavy hair, messing it up a little bit often makes it look better. Embrace the slightly undone quality that comes naturally with this combination and trust that your waves have your back.