There’s something undeniably magical about a braided half up half down hairstyle. It sits in that perfect sweet spot—polished enough to feel intentional, casual enough to actually be wearable on a regular day. And when you’ve got long hair? You’ve got an absolute playground for creativity. The length gives you room to experiment with braid thickness, texture, layering, and embellishment in ways that simply aren’t possible with shorter styles.
The half up half down approach is brilliant because it solves one of the biggest frustrations long-haired people face: managing all that length without completely committing to an updo. You get the best of both worlds—the volume and flow of your hair down, plus the practical security of something pulled back from your face. Add braids into the mix, and suddenly you’re not just solving a functional problem—you’re creating something genuinely beautiful that looks like you actually spent time on your hair.
What makes braided half up half down styles so versatile is that they work everywhere. They’re elegant enough for weddings and formal events, casual enough for running errands on a Saturday, and they hold up beautifully through a full workday without looking limp by 3 p.m. Whether you’re heading to the beach, a dinner date, or just want to feel more put-together while working from home, there’s a braided half up half down style that fits.
The styles below range from simple and achievable for beginners to more elaborate designs that take practice to master. Each one works beautifully on long hair, and you’ll find options whether you prefer classic elegance, romantic texture, or something with a modern edge.
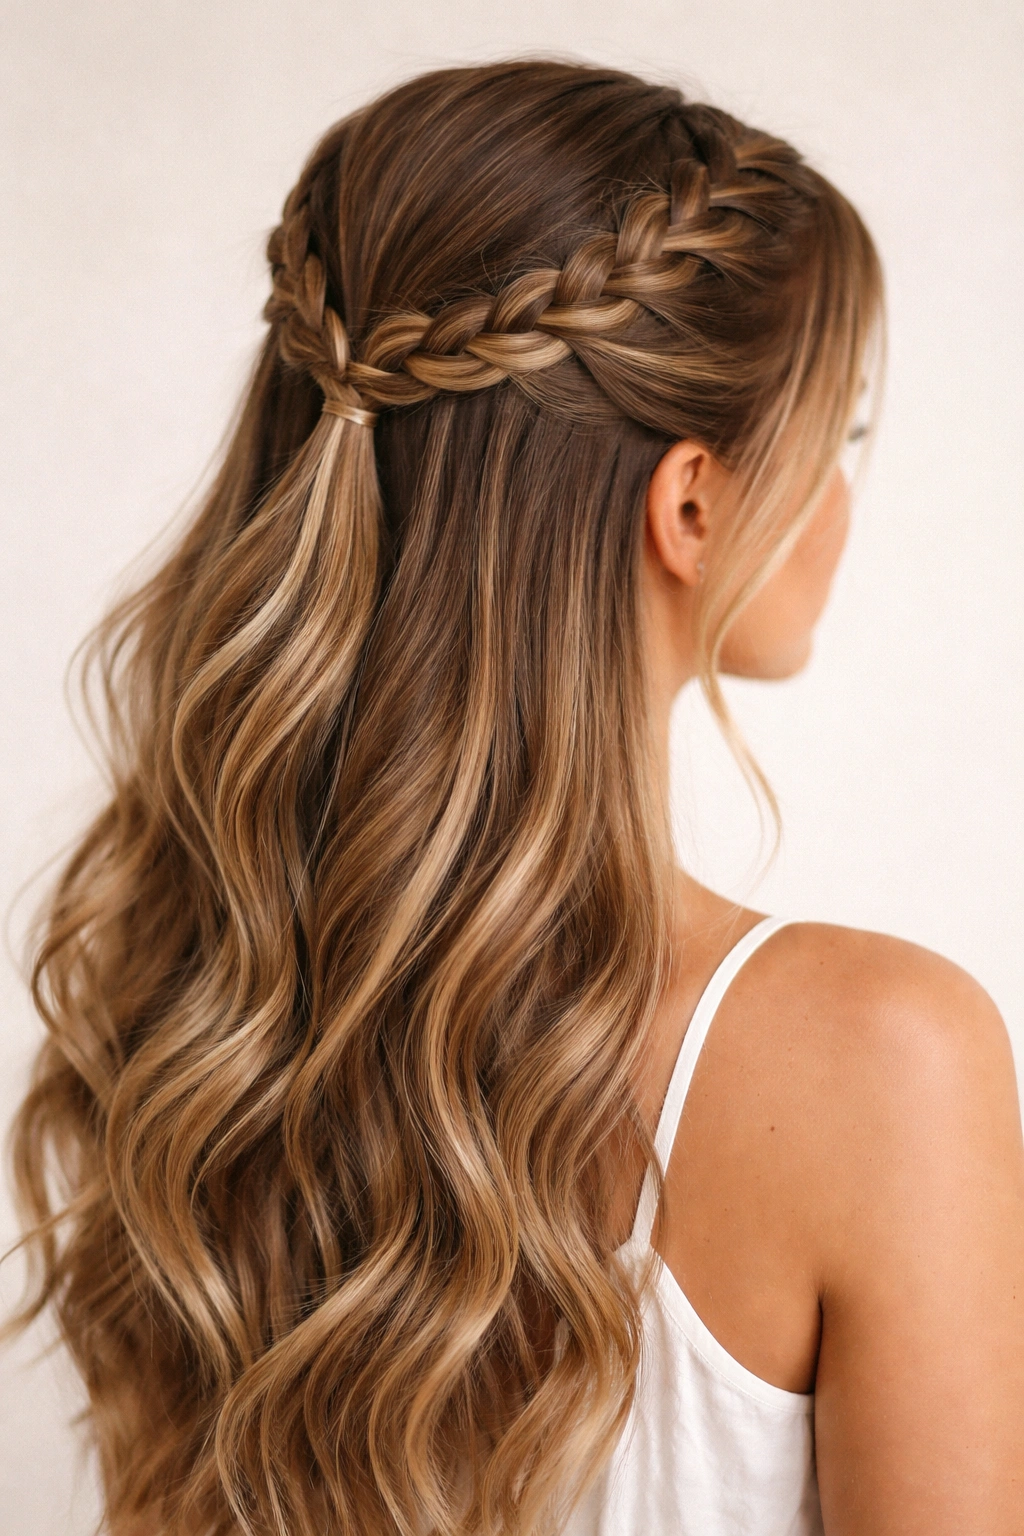
1. Classic French Braid Half Up
The French braid half up is the foundation that inspired countless variations. Start by taking a section of hair from one temple and begin a traditional French braid, picking up sections from both sides as you braid back toward the crown. Continue braiding until you’ve collected hair roughly to the back of your ear on both sides, then secure with a small elastic. Leave the rest of your hair down in soft waves.
Why This Style Never Goes Out of Style
The French braid half up works because it’s immediately recognizable and universally flattering. The braid frames your face beautifully while the loose waves below add movement and dimension. It’s structured enough to keep hair off your face and neck, but the soft texture of the braid prevents it from looking rigid or overly formal.
How to Make It Look Fuller and Messier
- Gently pull and loosen each section of the braid starting from the bottom, working upward
- Use a texturizing spray or sea salt spray before braiding for better grip and texture
- Braid slightly looser than you think feels right—the fullness is what makes it beautiful
- Pin the braid in place rather than relying solely on the elastic for a more secured feel
Pro tip: If your hair is very slippery or fine, apply dry shampoo or texturizing spray to damp hair before blow-drying. This creates just enough texture for the braid to hold without looking dusty.
2. Double Dutch Braid Half Up
This style takes two French braids running parallel from each side of your head, meeting at the back where both braids are secured together. Each braid starts near the temple and braids backward toward the crown, with the braids sitting on top of the head rather than next to it. The effect is bold, modern, and surprisingly easy once you’ve practiced a few times.
The Appeal of Double Braids
Two braids create more visual interest than one, and they’re incredibly practical for keeping hair secure and off your face. The parallel lines draw the eye upward and make your hair look thicker and fuller. This style looks especially striking on thick, healthy hair, but it works on finer textures too—just use that texturizing spray trick.
Tips for Getting Both Braids Even
- Start both braids at exactly the same height on each side
- Use a comb to separate your parting clearly before you begin
- Keep tension consistent on both sides as you braid—if one is tighter than the other, it’ll be obvious
- Take about the same amount of hair into each braid from each side as you move back
- If one braid ends up higher or lower, you can adjust by repinning with bobby pins
Real talk: Your first attempt probably won’t be perfect. It takes 4-5 tries to develop the feel for keeping both braids even and symmetrical. That’s completely normal.
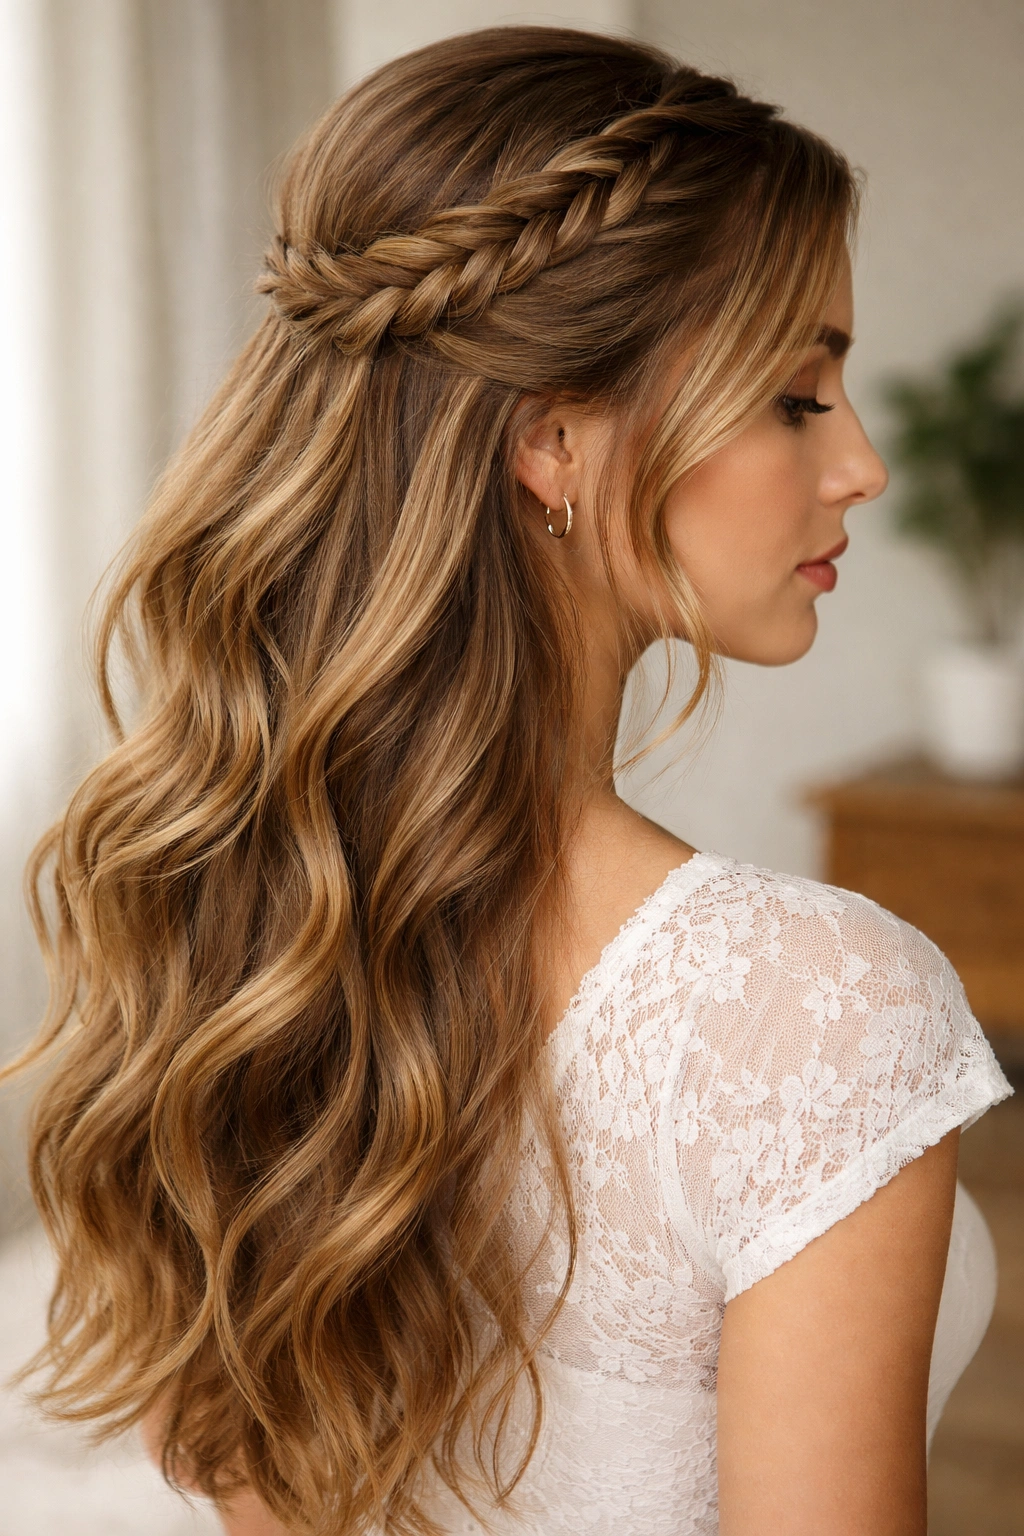
3. Dutch Braid Half Up
The Dutch braid—which is a reverse French braid—creates a completely different visual effect from a French braid. Where a French braid sits on top of the hair and looks smooth, a Dutch braid sits raised and prominent on the scalp, creating beautiful texture and dimension. Start the same way you would a French braid, but cross sections under rather than over, and let it sit at the crown.
How Dutch Braids Create More Texture
Because you’re braiding underneath rather than on top, Dutch braids look bolder and create more prominent texture. They sit higher on the head and have natural dimension. This makes them perfect if you’re going for a more dramatic or statement-making look while still keeping the hair half-up style.
Making the Dutch Braid Pop Even More
- Loosen each section significantly more than you would a French braid—Dutch braids look better when they’re messy and full
- Consider adding a decorative hair cuff or ring around the base of the braid
- Use dry shampoo for extra texture and grip
- You can even add a thin second braid alongside the main one for extra visual interest
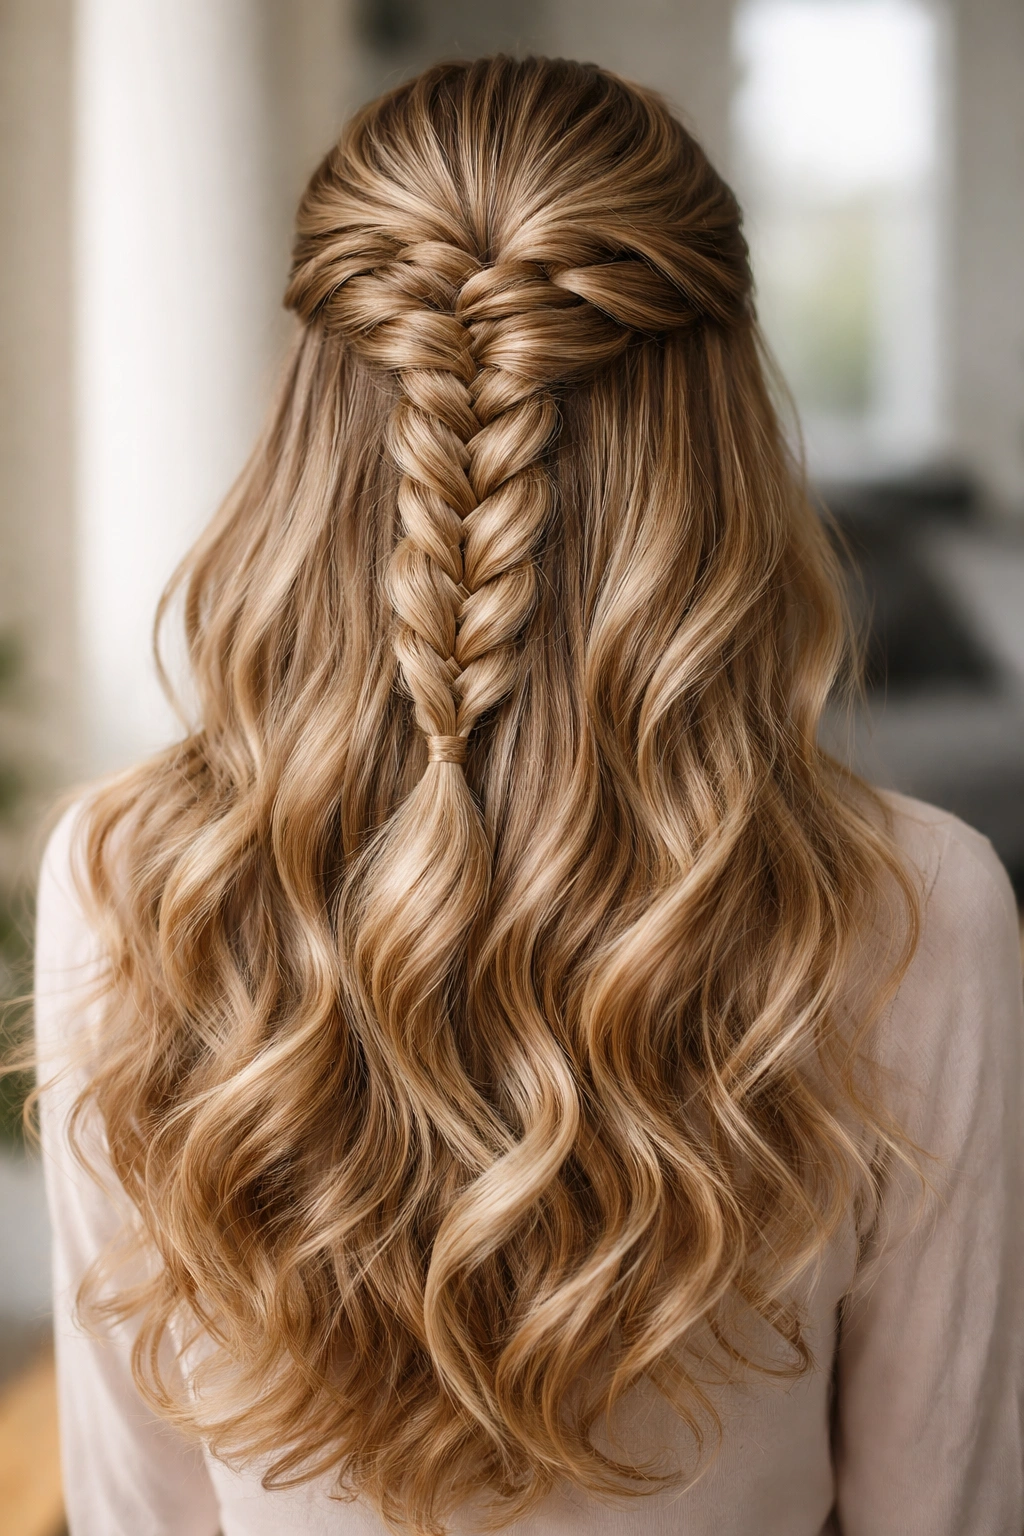
4. Mermaid Braid Half Up
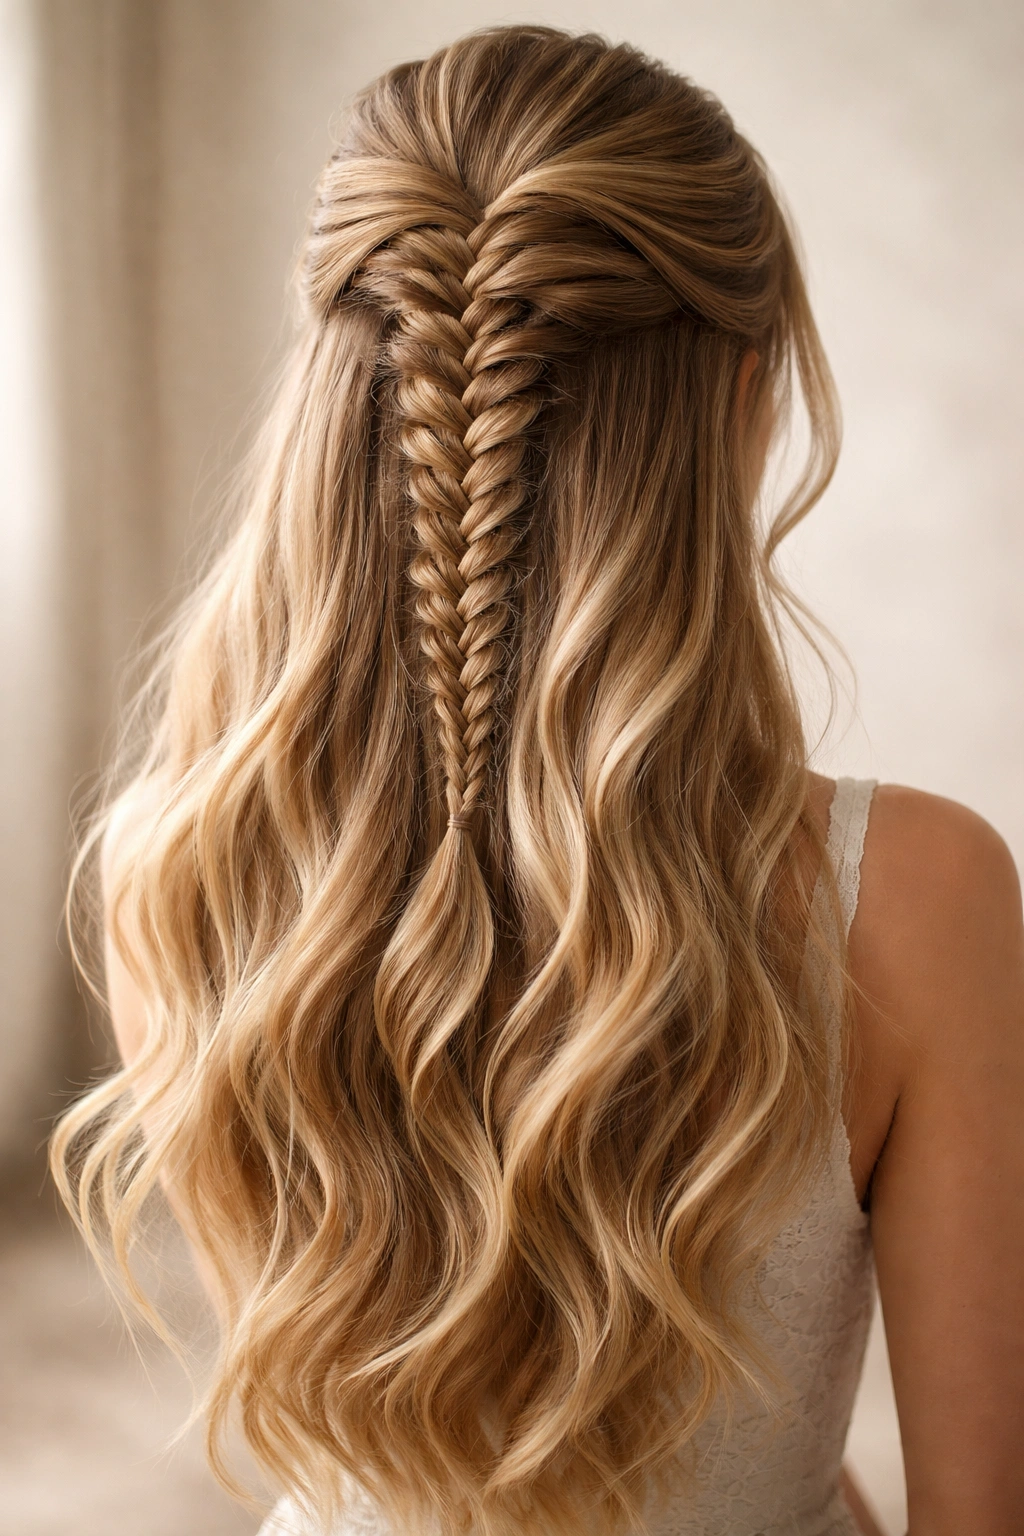
The mermaid braid is thick, textured, and undeniably romantic. Instead of starting at the crown, you’ll start this one lower—at the nape of your neck or just above—and braid upward. Take a section of hair from the nape and begin a Dutch braid, adding hair from both sides as you braid up toward the crown. Once you reach the top, secure everything together.
Why the Mermaid Braid Feels Luxurious
This braid feels different because it travels vertically up the back of your head rather than down from the crown. It creates an unexpected direction and feels more intentional. The upward movement also adds instant texture and visual weight to the style. Combined with loose waves flowing below, it’s genuinely stunning.
How to Nail the Upward Braid
- Start with very clearly defined section of hair at the nape—use a comb to separate it cleanly
- Braid loosely; this style needs texture to work
- As you add hair from the sides, make sure you’re adding from below the existing braid line, not from above
- When you reach the crown, you can either secure it there or continue braiding a bit further and secure at the back
- Loosen the braid generously afterward for that romantic, undone effect
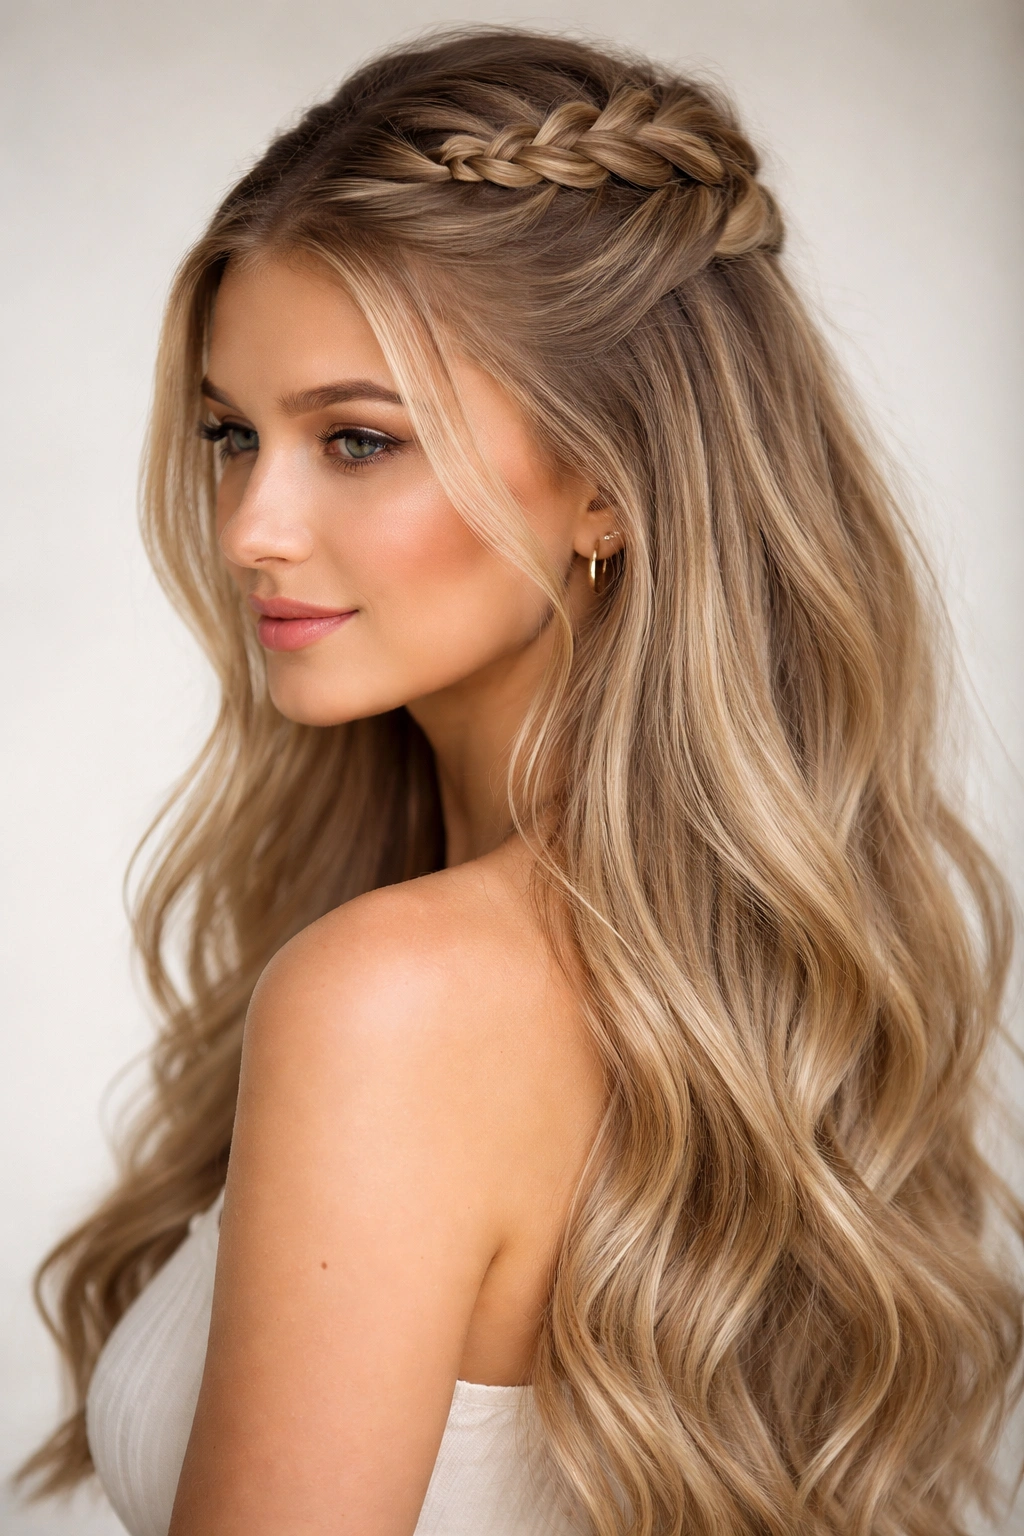
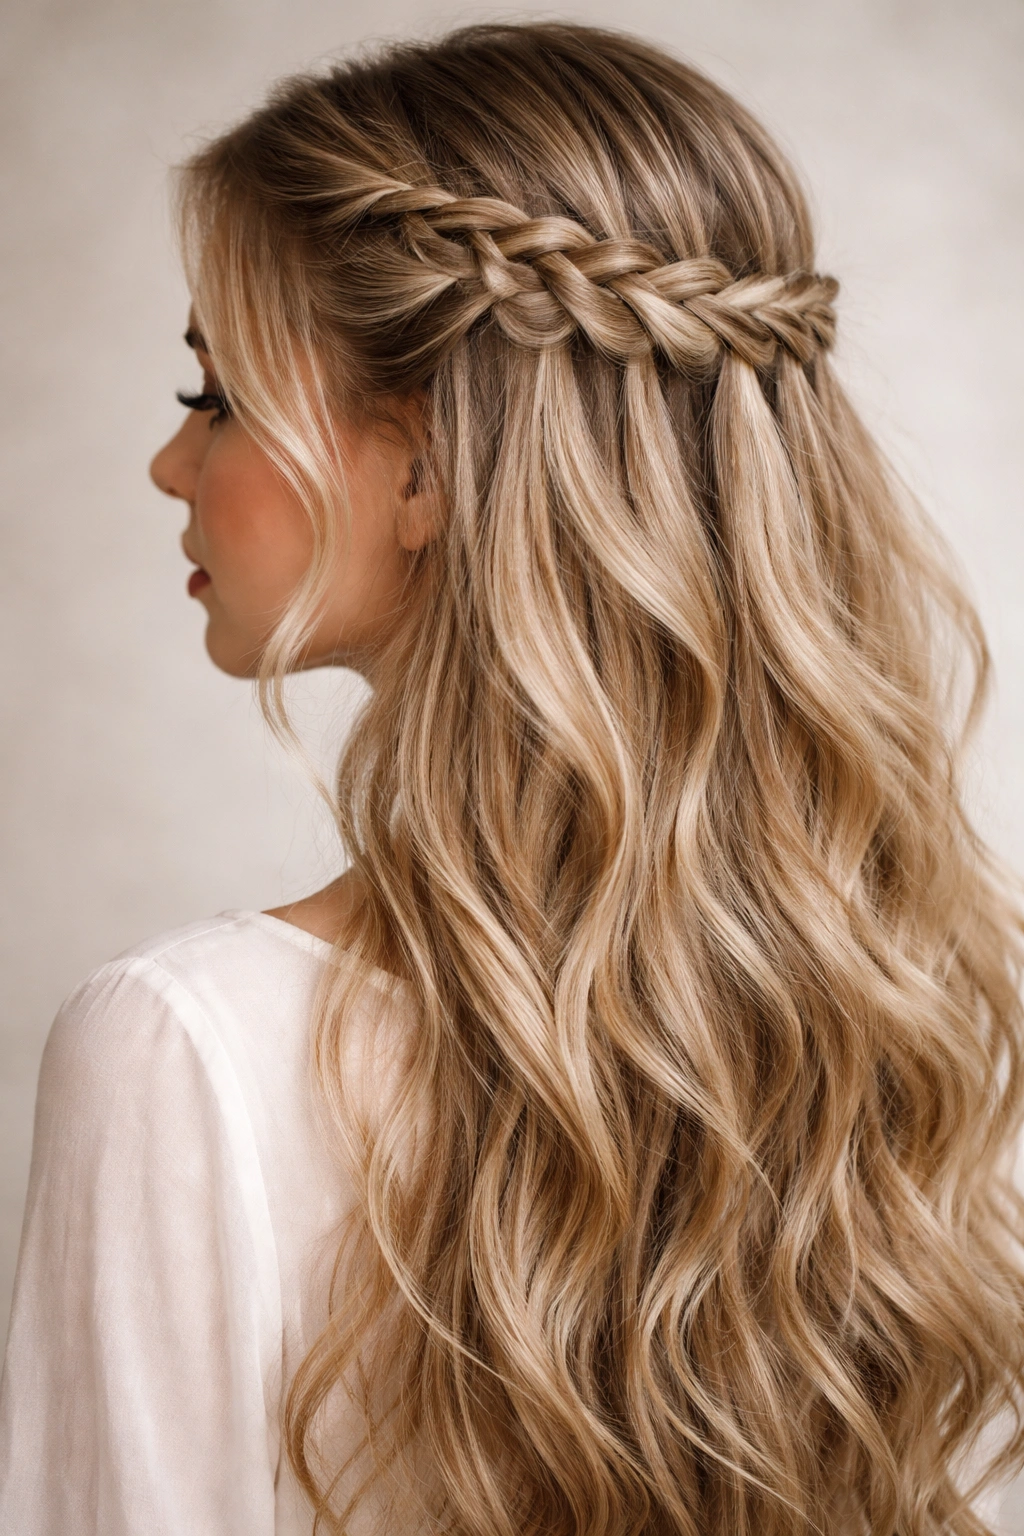
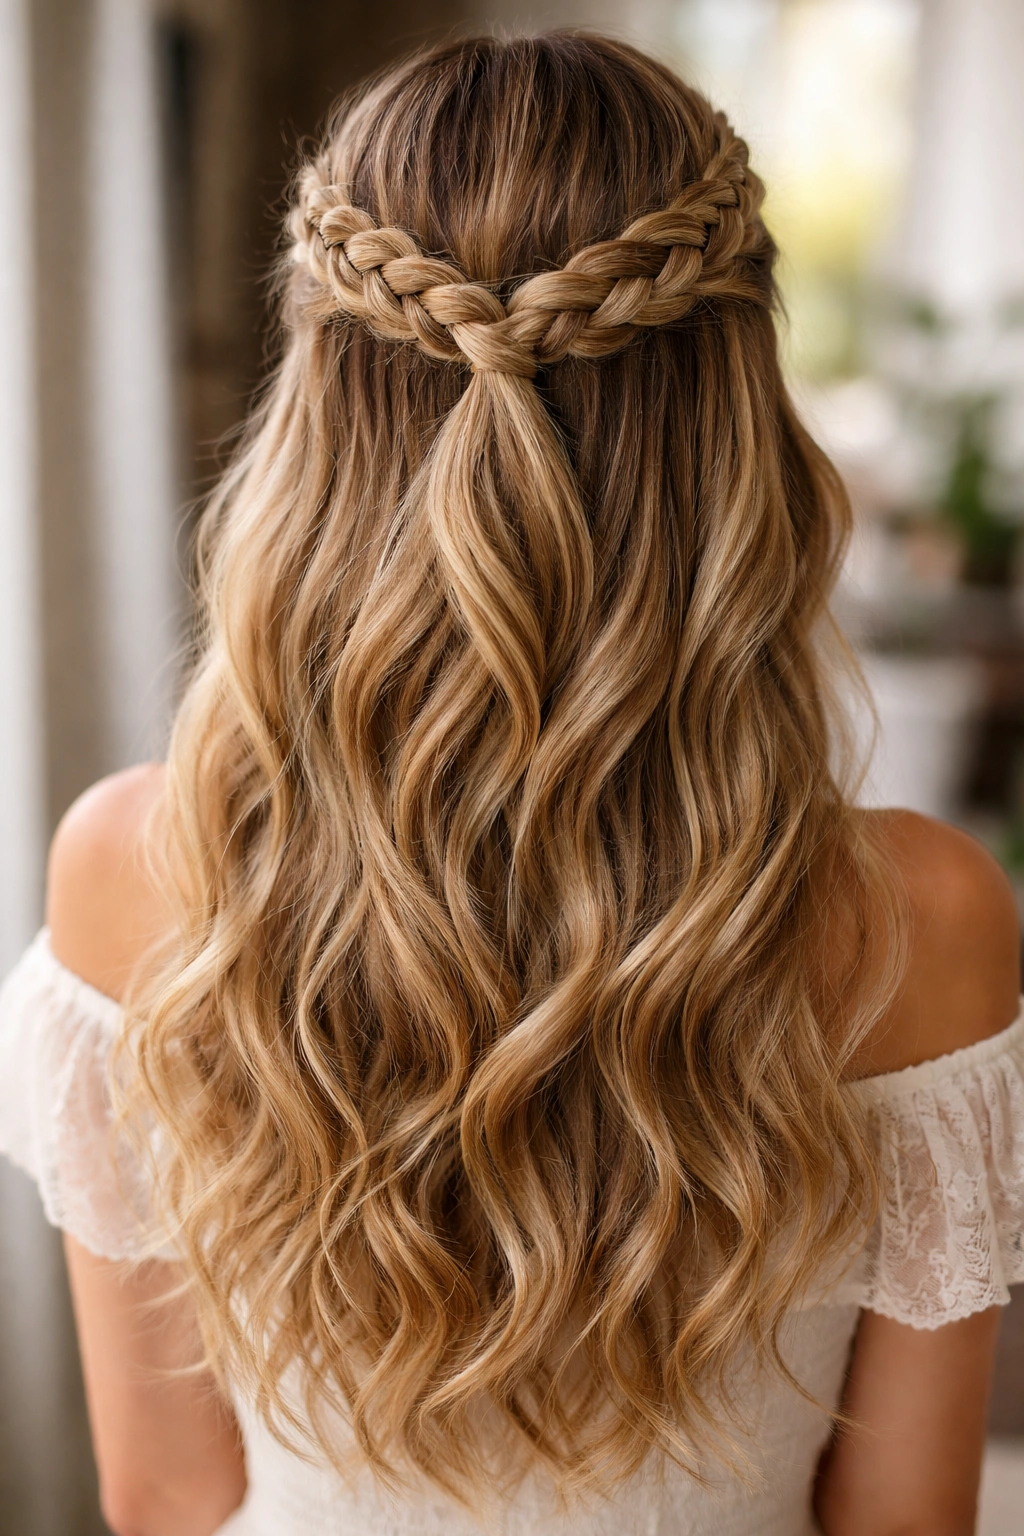
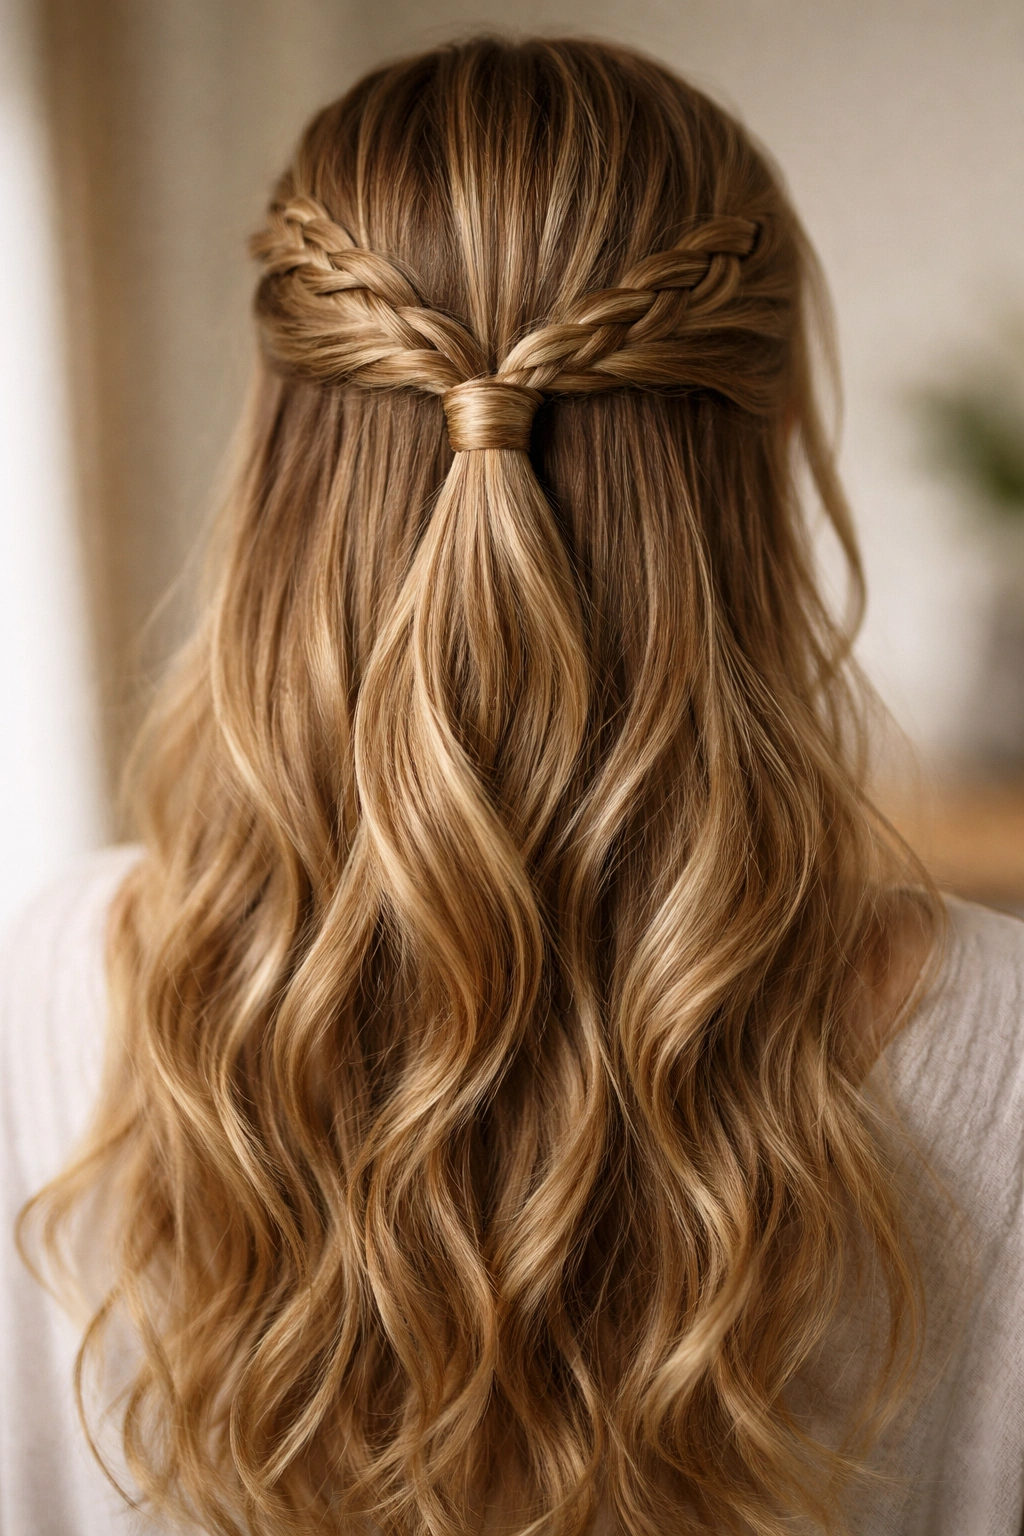
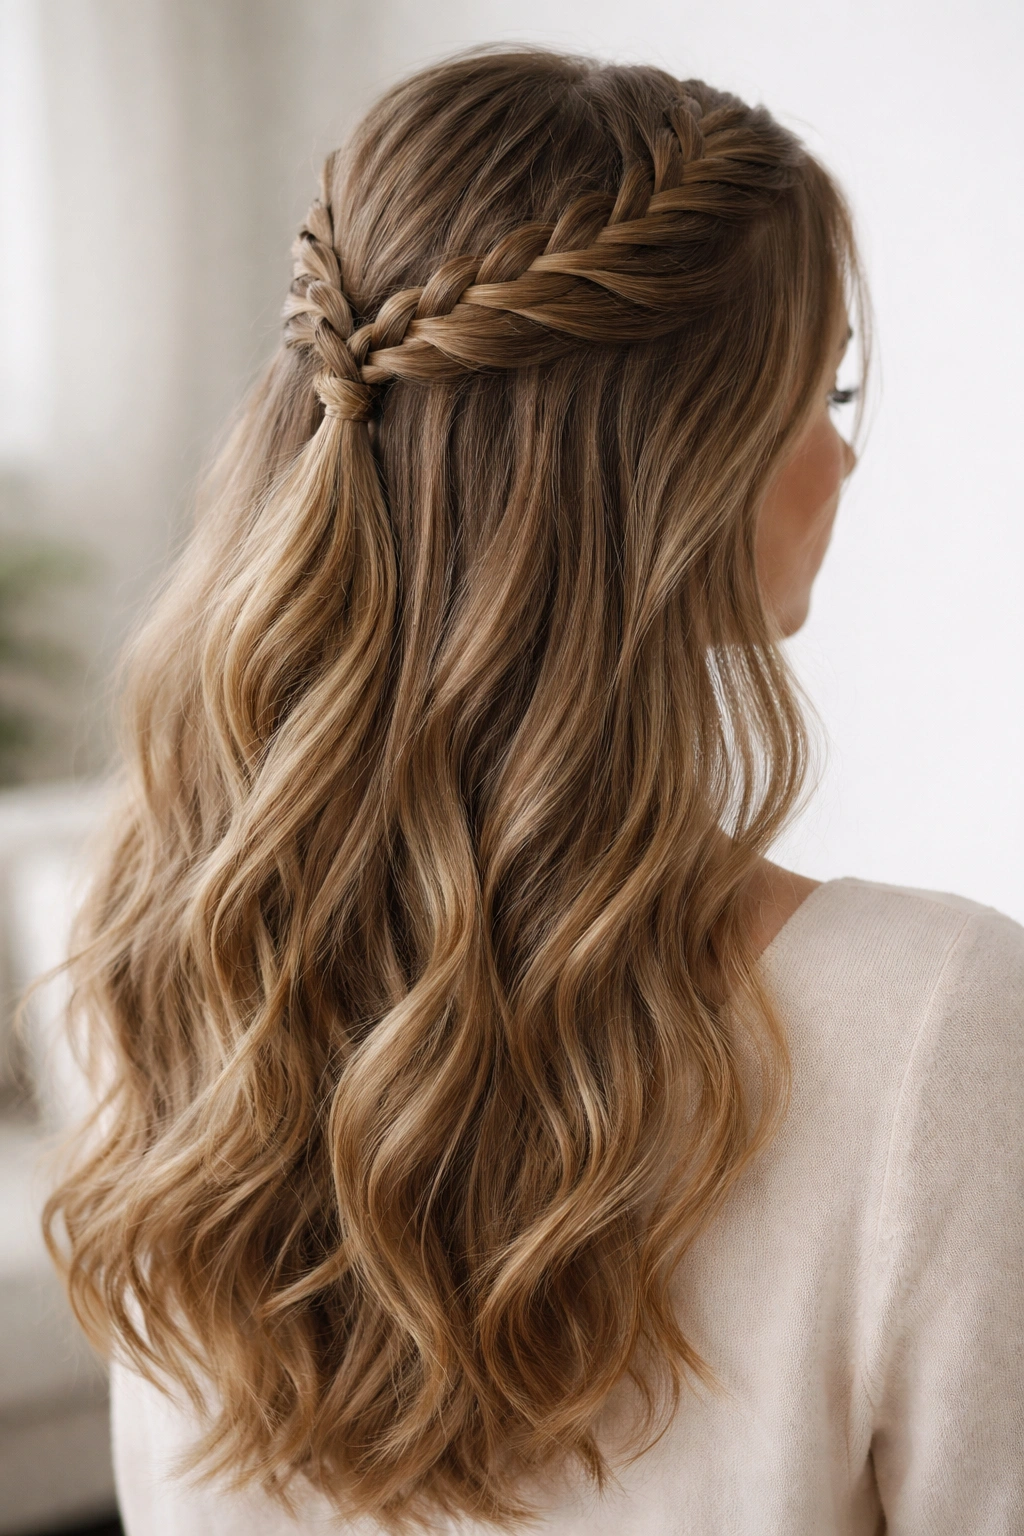
5. Halo Braid Half Up
A halo braid wraps around the crown like a crown itself. Start by taking a small section from one side of your head and create a braid that traces your hairline, picking up hair as you go, until you meet on the other side. Secure the ends, then tie the remaining hair into a half-up ponytail beneath the halo braid. The halo creates a frame for your face while the ponytail keeps everything controlled.
The Romanticism of a Halo Style
Halo braids automatically feel elegant and bridal, even on a casual day. They’re particularly stunning on people with longer, thicker hair because the braid sits beautifully on top, and there’s enough volume below to create real movement. The style frames your face without being overly complicated.
Creating a Secure Halo
- This style works best if you braid all the way around your head, creating a full circle, rather than just partway
- Use bobby pins along the entire length of the braid to secure it against your scalp
- Tuck the elastic of the ponytail beneath the halo braid so it’s hidden
- If hair is slippery, braid with dry shampoo or texture spray applied beforehand
- You can make the halo braid even fuller by gently loosening sections as you go
6. Fishtail Braid Half Up
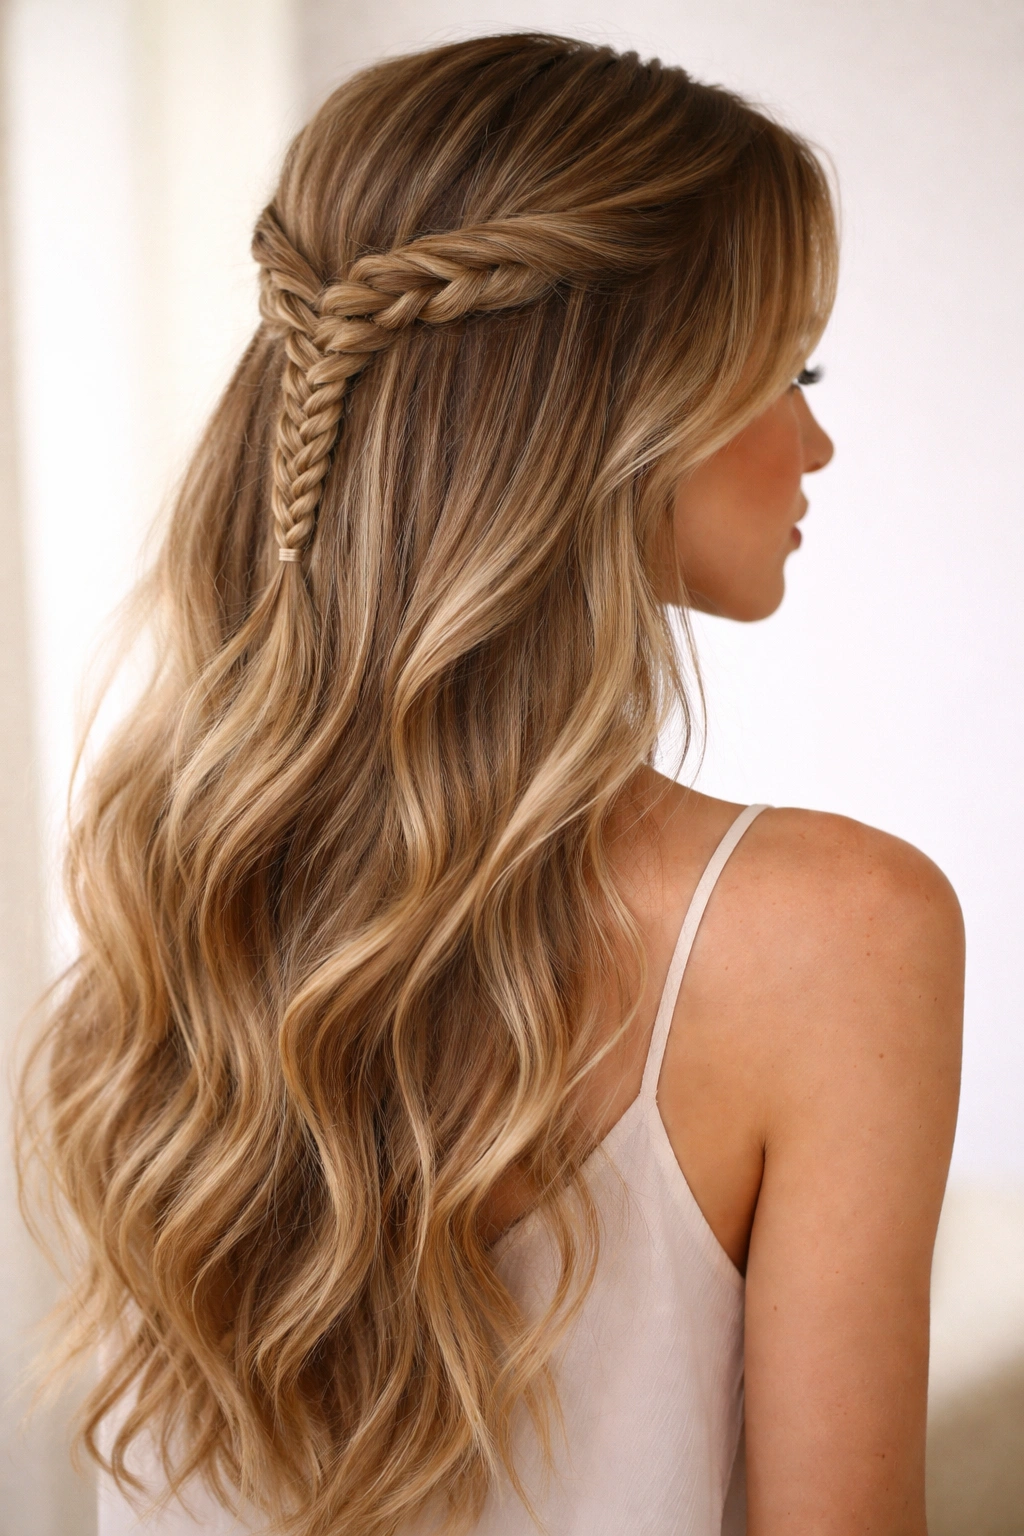
The fishtail braid looks delicate and intricate, but it’s easier than you’d think—you only work with two sections instead of three. Divide your half-up section into two equal parts, then take a thin piece of hair from the outside of one section, cross it over the top, and add it to the other section. Alternate sides, always taking from the outside and crossing over. The result is a fine, woven-looking braid that’s undeniably beautiful.
Why Fishtail Braids Look More Sophisticated
Fishtail braids have a fine, delicate quality that reads as more polished than traditional braids. They look like they take hours to do, but most people can master the basic motion in 10 minutes. The thin, interwoven appearance adds a romantic, almost vintage feel to any hairstyle.
Fishtail Braid Technique Breakdown
- Divide your half-up section into two equal parts from the start
- Work with very thin sections—this is what gives the fishtail its delicate appearance
- Keep consistent tension on both sides so the braid stays centered
- Fishtail braids look better when they’re slightly loose, so don’t pull too tight
- After you secure it, gently tease and loosen the braid sections for more texture and fullness
Worth knowing: If you struggle with traditional braids, the fishtail might actually be easier once you understand the two-section motion. Try it a few times on someone else’s hair first if you’re hesitant.
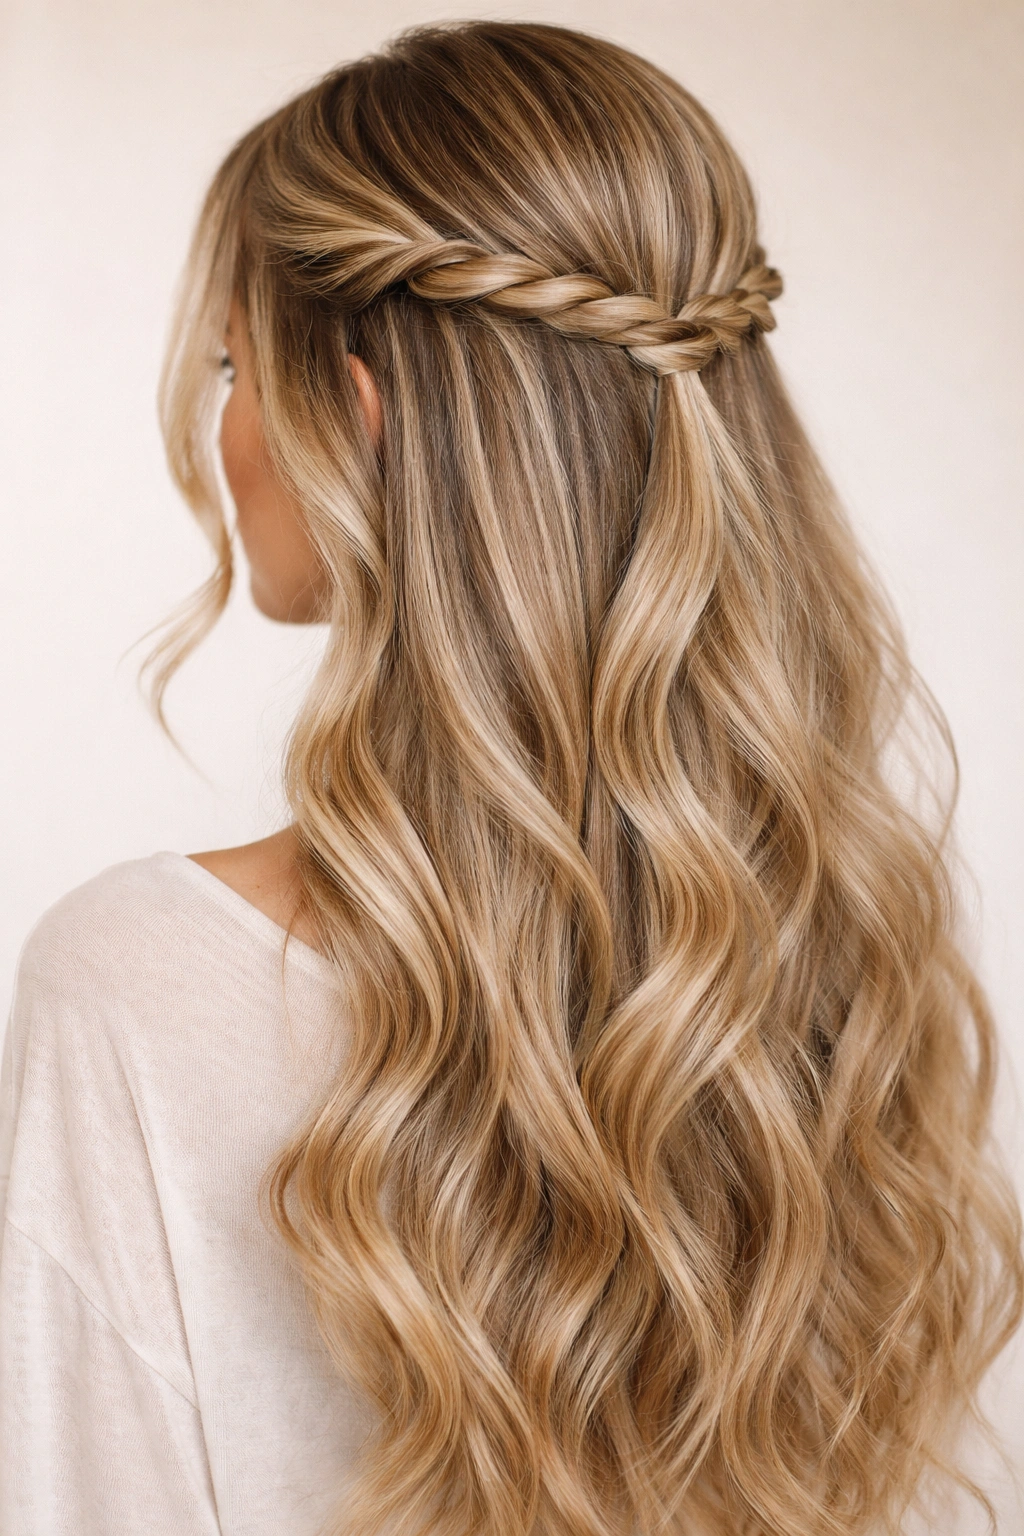
7. Twisted Half Up
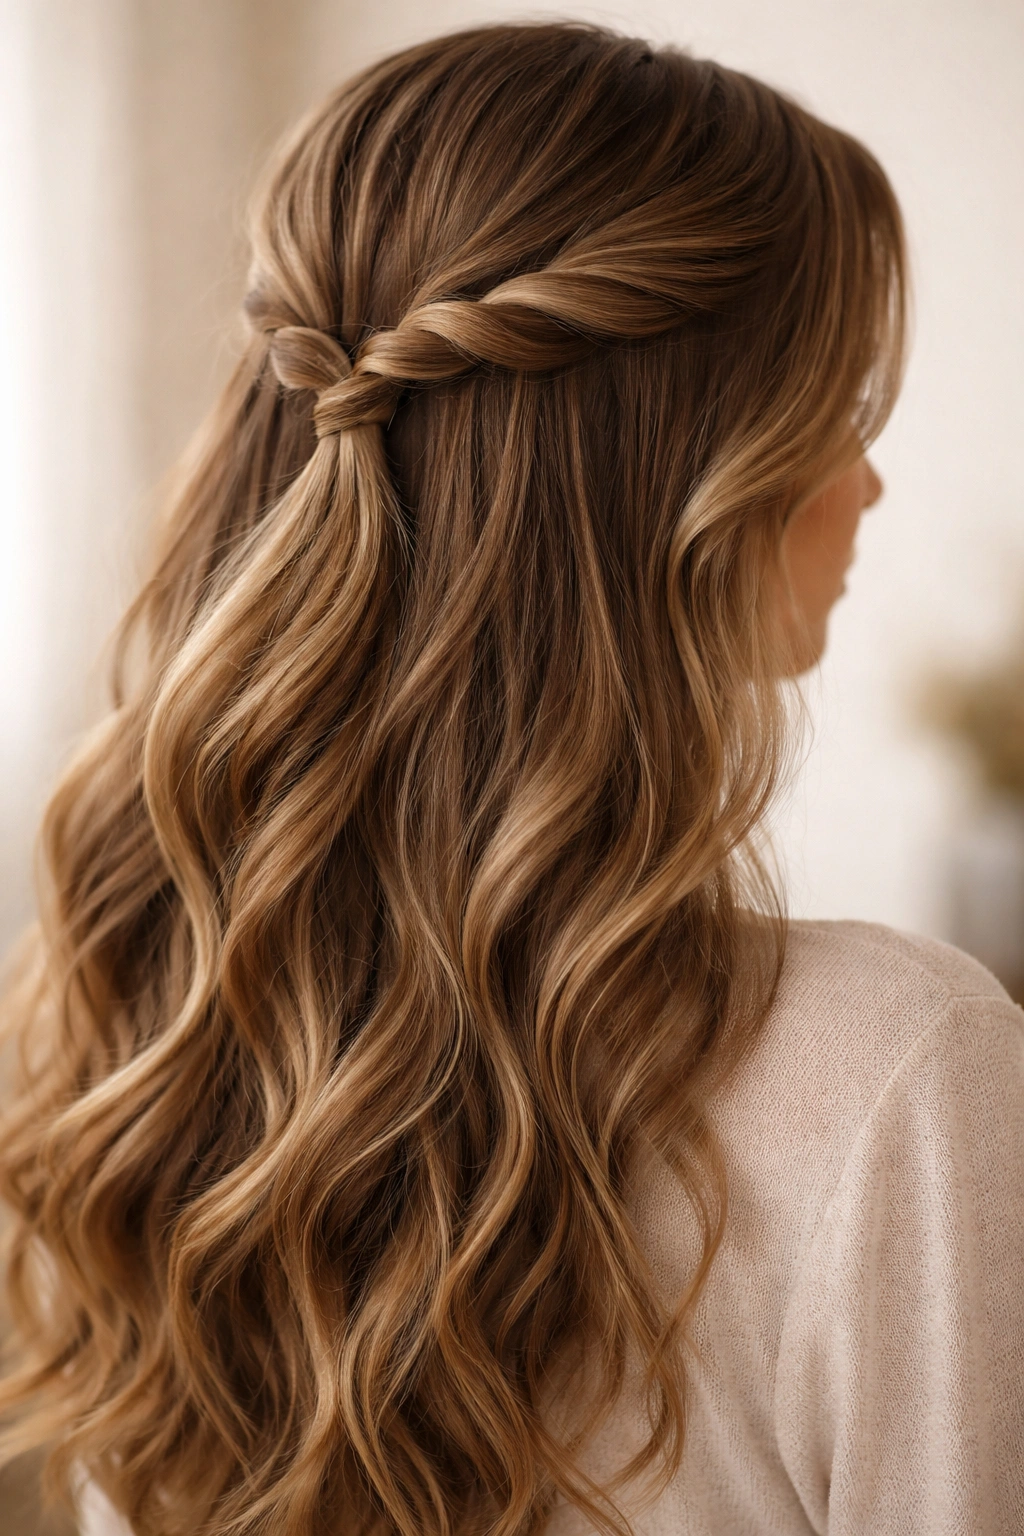
For days when you want something that looks braided but requires less coordination, a twisted half up is your answer. Take your half-up section and simply twist two sections of hair around each other—like a rope—rather than braiding. Secure at the back. It’s faster than braiding, looks equally polished, and holds beautifully throughout the day.
The Simplicity and Appeal of Twists
Twists are incredibly forgiving and actually look better when they’re slightly imperfect. You can’t really mess them up the way you can mess up a braid. They’re also faster, which matters when you’re getting ready in real time rather than doing your hair for a photo.
Making Twists Look as Good as Braids
- Use two sections of roughly equal thickness for symmetrical twists
- Twist loosely so the style has texture and dimension
- You can twist around just one section while the other hangs straight for an asymmetrical look
- Loosen the twists after securing to add volume and texture
- Spray with light hairspray before twisting for better grip on slippery hair
8. Rope Twist Half Up
A rope twist is similar to a regular twist but uses three thin sections twisted together in a spiral rather than two sections crossed. It looks more intricate than a two-strand twist but takes only slightly longer. The visual effect is a rope-like braid that’s fine and elegant, perfect for a more polished look.
What Makes a Rope Twist Different
Instead of two sections crossing over each other, you’re twisting three thin sections together in one direction, creating a rope-like appearance. It sits between a twist and a braid in terms of complexity, but the result looks impressively detailed.
How to Execute a Perfect Rope Twist
- Take three thin sections of hair from your half-up area
- Hold them so they’re easy to work with—one in each hand plus between your fingers
- Twist all three sections together in one consistent direction (all clockwise or all counterclockwise)
- Keep the twists even and tight if you want a polished look, or slightly loose for a more relaxed feel
- Secure with bobby pins underneath to keep the rope from unraveling
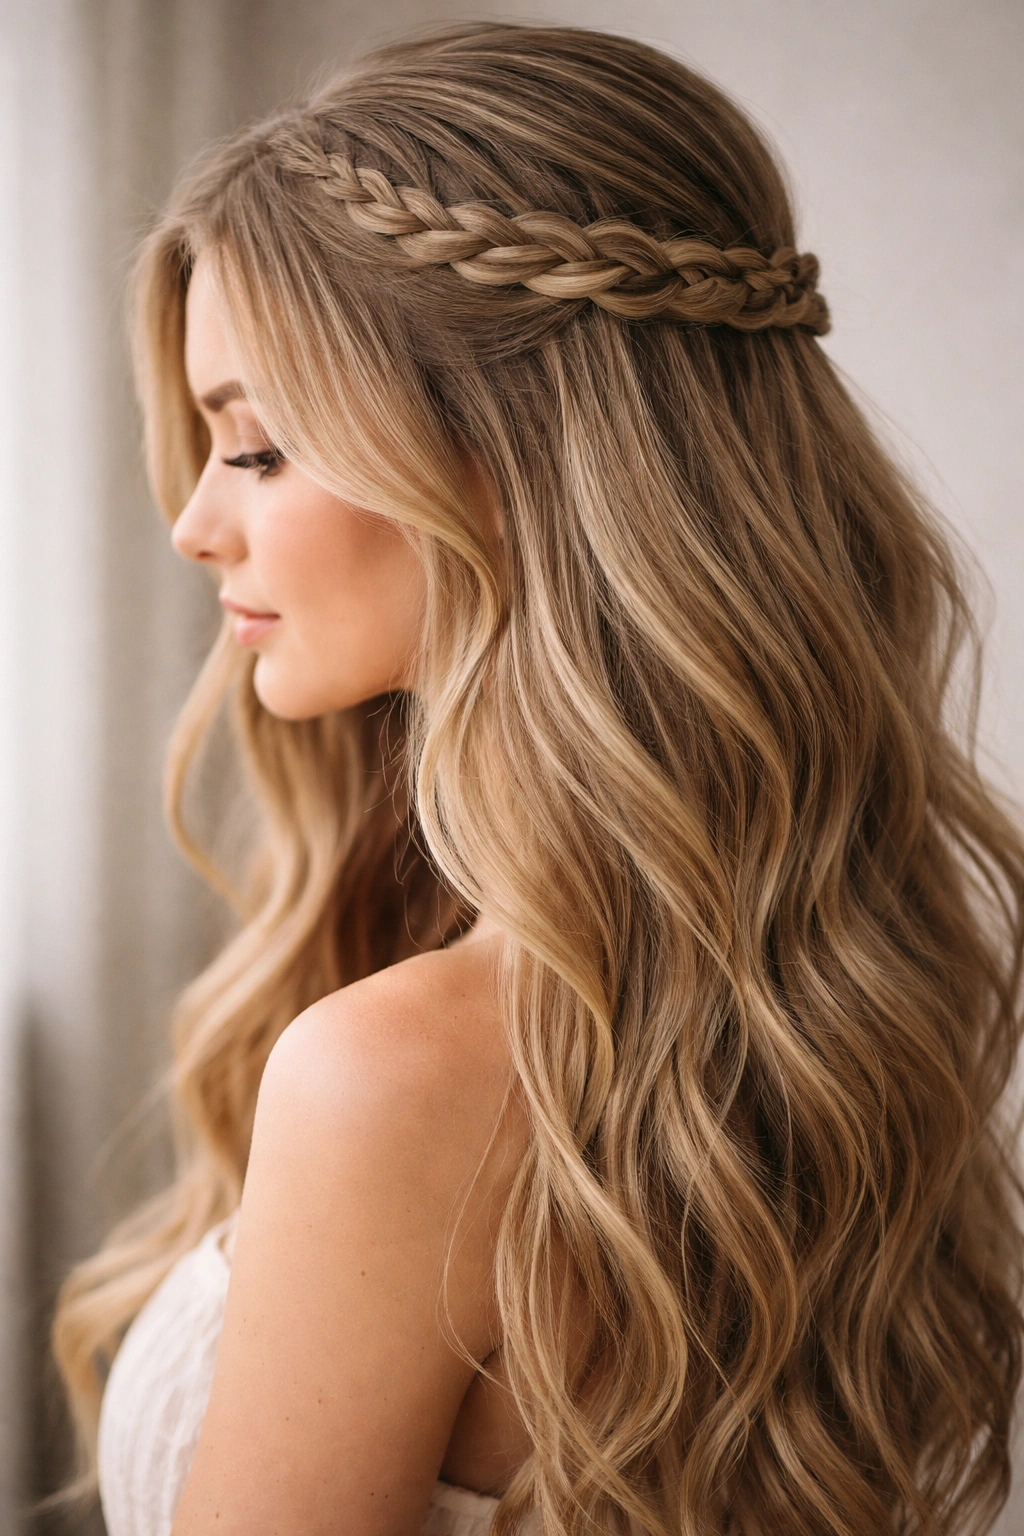
9. Crown Braid Half Up
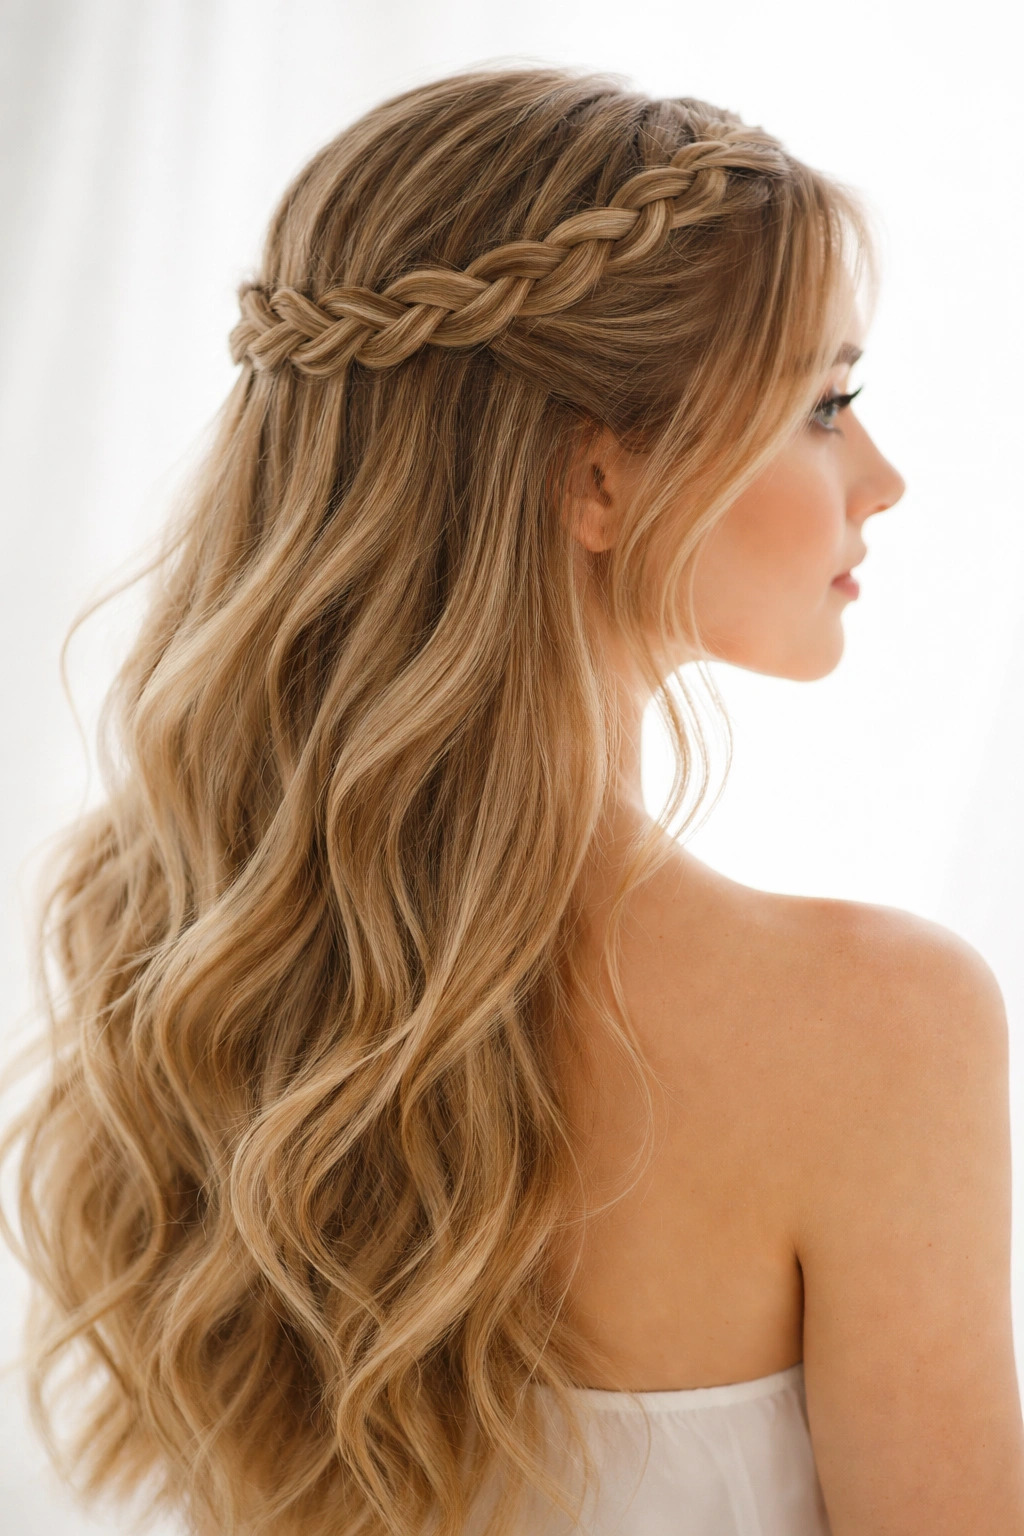
This style positions a braid across the very top and back of your crown, creating a delicate frame for your face. Start one braid from above your left ear and braid across the top back of your head toward the right ear. As you braid, gently pick up small sections of hair to create dimension. Secure at the base of the right side, and leave everything else down in waves.
Creating a Delicate Crown Frame
The crown braid works because it’s positioned high, which automatically makes your face look more open and draws attention upward. It’s subtle enough for everyday wear but beautiful enough for special occasions. Combined with loose waves, it creates an effortlessly romantic look.
Tips for a Secure Crown Braid
- Start your braid higher than you think—almost at the crown of your head—so it sits properly
- Use bobby pins along the entire braid to secure it against your scalp, not just at the end
- Don’t pull the braid too tight or it’ll slide forward during the day
- Loosen the braid slightly to add texture and prevent it from looking too neat
- If you have a lot of flyaways, smooth them first with a lightweight smoothing serum
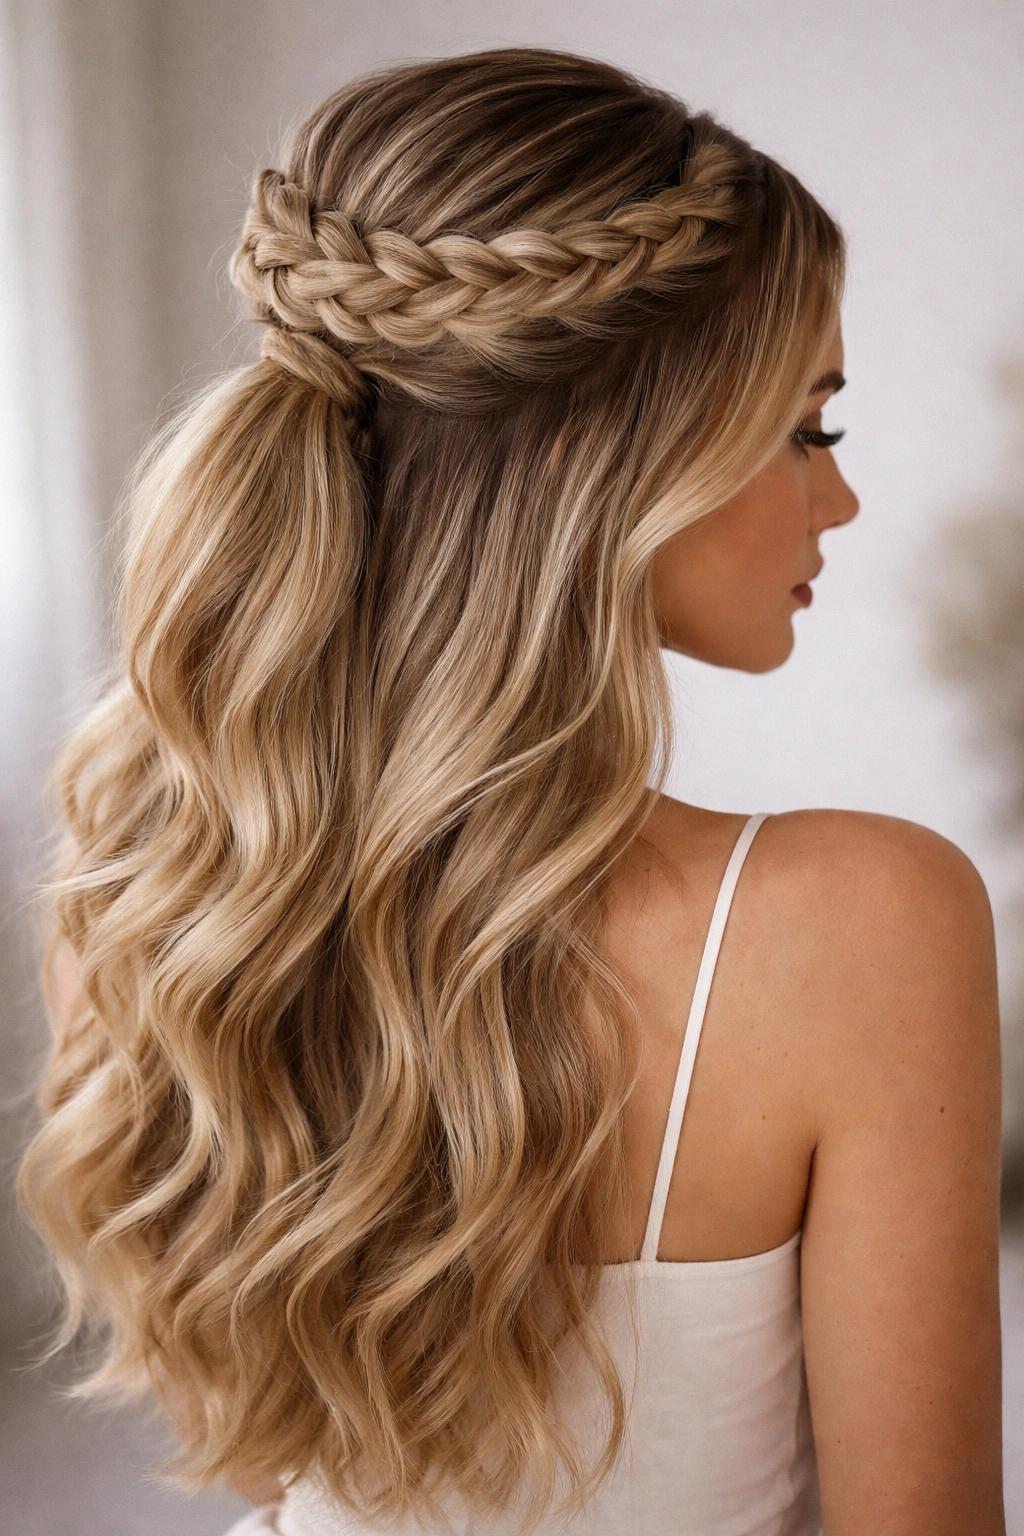
10. Braided Ponytail Half Up
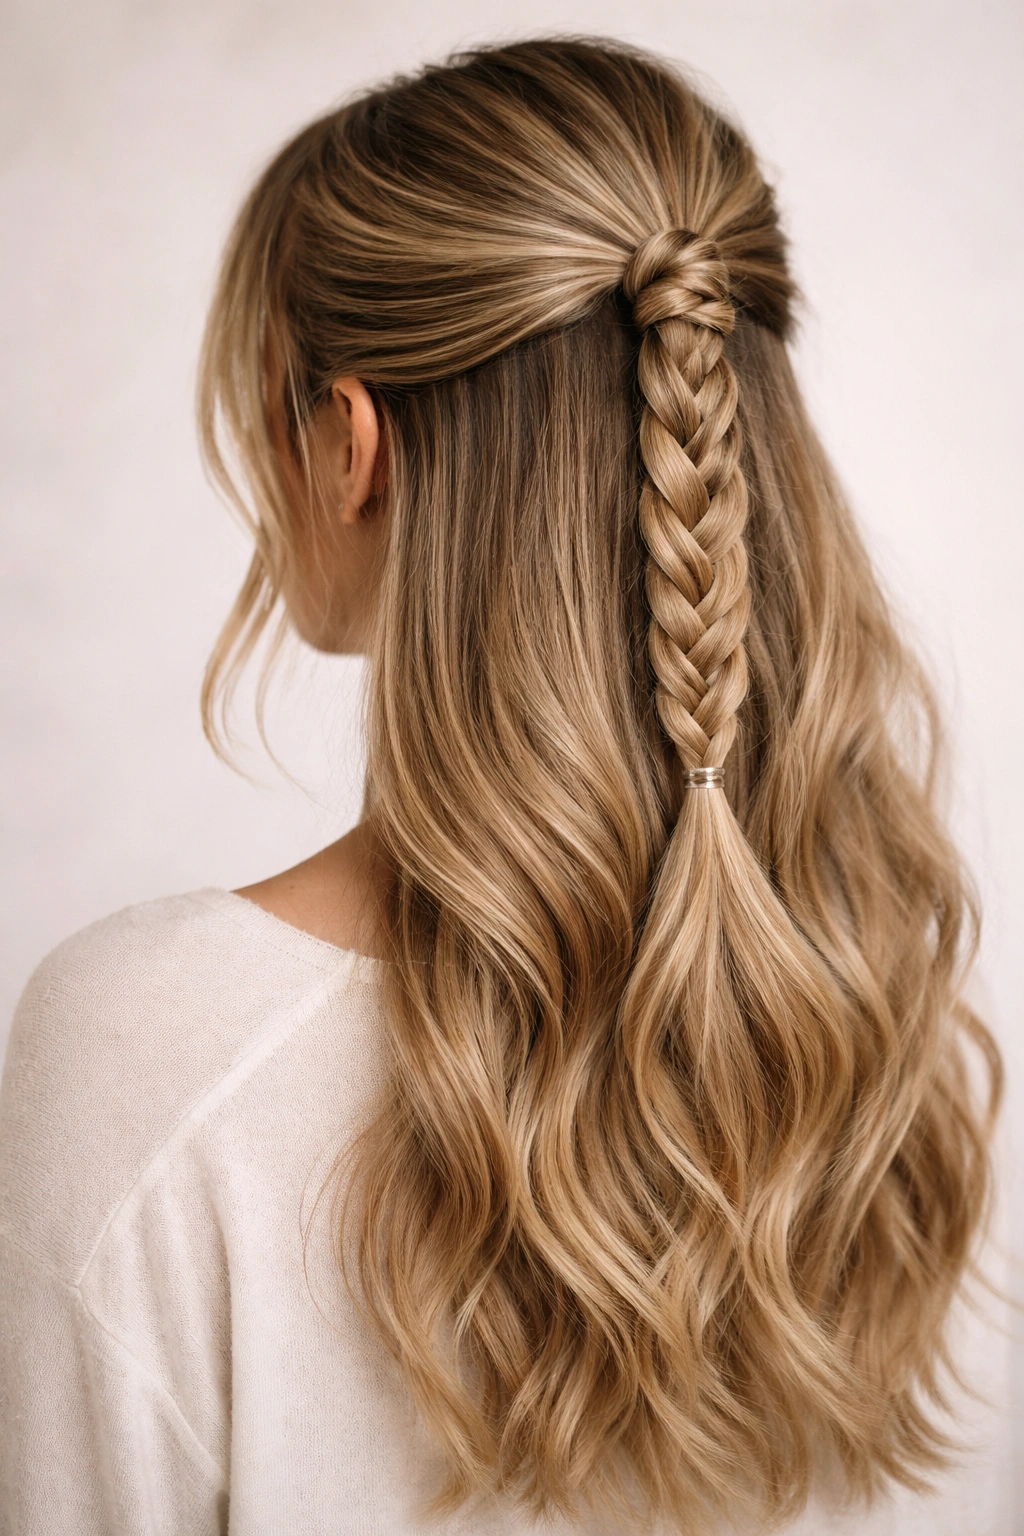
This is a hybrid style where your half-up section is gathered into a small ponytail, and then you braid the ponytail itself. Create your half-up with your preferred braid—French, Dutch, or fishtail—but instead of ending at the base of the crown, continue braiding the remaining gathered hair. Secure the braid tail with a small elastic. This keeps all your hair under control while creating visual interest.
Why Combining Braids Works
Using a braid within a half-up, half-down style multiplies the visual interest. You get the softness of flowing hair below combined with the texture and structure of braids above. It’s a great style for actively because the braid keeps everything secure, but it looks far more polished than a standard ponytail.
Executing the Braided Ponytail Half Up
- Start with a full French or Dutch braid from your crown
- When you reach the nape, gather all the hair into a small ponytail base
- Continue braiding the ponytail tail until you reach the ends
- Secure with a clear elastic so the braid detail shows
- Loosen both the upper braid and the ponytail braid for a fuller, softer look
- Consider wrapping a thin strand of hair around the elastic to hide it
11. Waterfall Braid Half Up
The waterfall braid creates a cascading effect by releasing sections of hair as you braid, letting them flow freely while new sections are incorporated. Start a braid at one temple and braid backward toward the crown, but instead of incorporating every section of hair, occasionally let a section “fall” down your head while you pick up new hair below it. This creates the illusion of water flowing down your hair.
The Visual Impact of a Waterfall
Waterfall braids are stunning because they combine structure with flow. The braid itself is intricate and detailed, but the falling sections create movement and softness. On long hair, this effect is especially beautiful—the fallen sections can flow down several inches, creating genuine visual drama.
Mastering the Waterfall Technique
- Start your braid and practice the motion: braid over, then drop the bottom section and pick up new hair from below
- The dropped sections should run vertically down your head, not diagonally
- If you want more cascading sections, drop more frequently; for a subtler effect, drop less often
- This braid is easier on second-day hair with existing texture
- You can do a waterfall braid on one side of your head, or symmetrically on both sides
12. Lace Braid Half Up
A lace braid is created by braiding only from one side of your head—picking up hair only from the top, never from underneath. This creates a delicate, lace-like appearance as the braid traces along your scalp. Start at one temple and braid toward the back of your head, always picking up from the top only. Secure at the base, and leave the rest of your hair down and wavy.
The Delicate Appeal of Lace Braids
Lace braids look far more intricate than they are to create. Because you’re only picking up from one side, they sit flatter and more decoratively against your head, creating a genuine lace-like pattern. They’re perfect if you want something that looks complicated but doesn’t require advanced skill.
Creating Your First Lace Braid
- Start at your temple or part and begin a regular three-strand braid
- Here’s the key: only pick up new hair from the top side of your braid, never from underneath
- As you continue, ignore the hair below your braid line and focus only on incorporating hair from above
- This creates the lace effect—the braid sits on top of unpicked hair
- Loosen the braid gently for more texture and to make the lace pattern more visible
13. Pancake Braid Half Up
A pancake braid is a regular braid that’s been intentionally loosened and fluffed so dramatically that each section looks padded and full. Start with any braid style—French, Dutch, or fishtail—and create it tightly. Then, starting from the bottom and working upward, gently pull each braid section outward and upward. The braid transforms from neat and tight to voluminous and textured.
Why Pancake Braids Look Luxurious
Pancake braiding is about volume and impact. The fluffed sections create real dimension and visual weight, making your hair look thicker and fuller. This technique works especially well on longer hair because you have more sections to fluff, and the effect is more dramatic.
How to Pancake a Braid Successfully
- Create your chosen braid style first—it should be relatively tight
- Working from the bottom section, gently pull each braid piece sideways and slightly upward
- Pull generously; you want obvious, visible fluff, not subtle loosening
- Continue section by section until you reach the top of the braid
- Don’t worry about perfect symmetry—pancake braids look better slightly undone
- Secure the braid with bobby pins if it starts to collapse during the day
14. Milkmaid Braid Half Up
A milkmaid braid is technically two braids—one on each side of your head—that meet in the middle and are pinned together. Start a braid from behind each ear, braiding upward and backward toward the crown. Bring both braids to meet at the center back and secure them together with bobby pins. The style is charming, a bit vintage, and works beautifully as a half-up style with long, loose waves below.
The Romantic Heritage of Milkmaid Braids
This style draws from traditional European braiding and feels inherently romantic and feminine. On long hair, it’s particularly stunning because you have enough volume to create full, textured braids. The symmetry of two braids feels intentional and special without being overly formal.
Creating Secure Milkmaid Braids
- Start each braid at the same height behind each ear for symmetry
- Braid upward and backward at a slight angle toward the center of your head
- Both braids should meet at approximately the center back of your crown
- Use bobby pins to anchor each braid to the ones beside it where they meet
- Loosen both braids generously for a softer, more romantic appearance
- You can pancake these braids too for extra volume and texture
15. Braid with Hair Wrap Half Up
This style combines a simple half-up braid with a decorative element: wrapping a thin section of hair around the base where the braid meets the elastic. Create your preferred half-up braid style, secure with an elastic, and then take a thin section of hair from underneath the braid, wrap it around the elastic, and pin the end underneath. The hair wrap conceals the elastic and adds a polished finishing touch.
Why the Hair Wrap Matters
A thin hair wrap completely changes how polished a style looks. It hides the elastic, adds dimension, and signals that you’ve actually taken time with your appearance. This detail is especially noticeable in photos and under close inspection, making it worth the extra 30 seconds it takes to do.
Mastering the Hair Wrap Technique
- Create your main braid and secure it with an elastic
- Take a thin section of hair—about the width of a pencil—from underneath and toward the side
- Wrap this section tightly around the elastic, working your way around until the elastic is fully covered
- Pin the end underneath with a bobby pin so it’s hidden
- The wrapped section should sit flush against the elastic, not loosely
- Use matching bobby pins so any pin that shows blends in with your hair color
16. Side Braid Half Up
This asymmetrical style positions a braid on one side of your head rather than centered. Start a French or Dutch braid from your part and braid at an angle toward the opposite ear. Secure at the side, and let all your hair flow down in loose waves. The asymmetry makes this style feel modern and intentional, and it’s incredibly flattering because it draws attention to one side of your face.
The Modern Appeal of Asymmetrical Styling
Asymmetrical braids feel current and stylish while still being wearable and practical. They’re less formal than centered styles, making them perfect for everyday wear, but still polished enough for more special occasions. The side positioning also creates flattering framing around your face.
Positioning a Side Braid Correctly
- Start your braid slightly off-center rather than at your natural part—this creates the asymmetry
- Braid at an angle toward the opposite ear, not straight back
- Secure the braid on the opposite side from where you started
- The lower you position the elastic, the more dramatic and side-swept the style feels
- Loosen the braid for a softer appearance
- This style works beautifully with long bangs or longer face-framing pieces
17. Multiple Braids Half Up
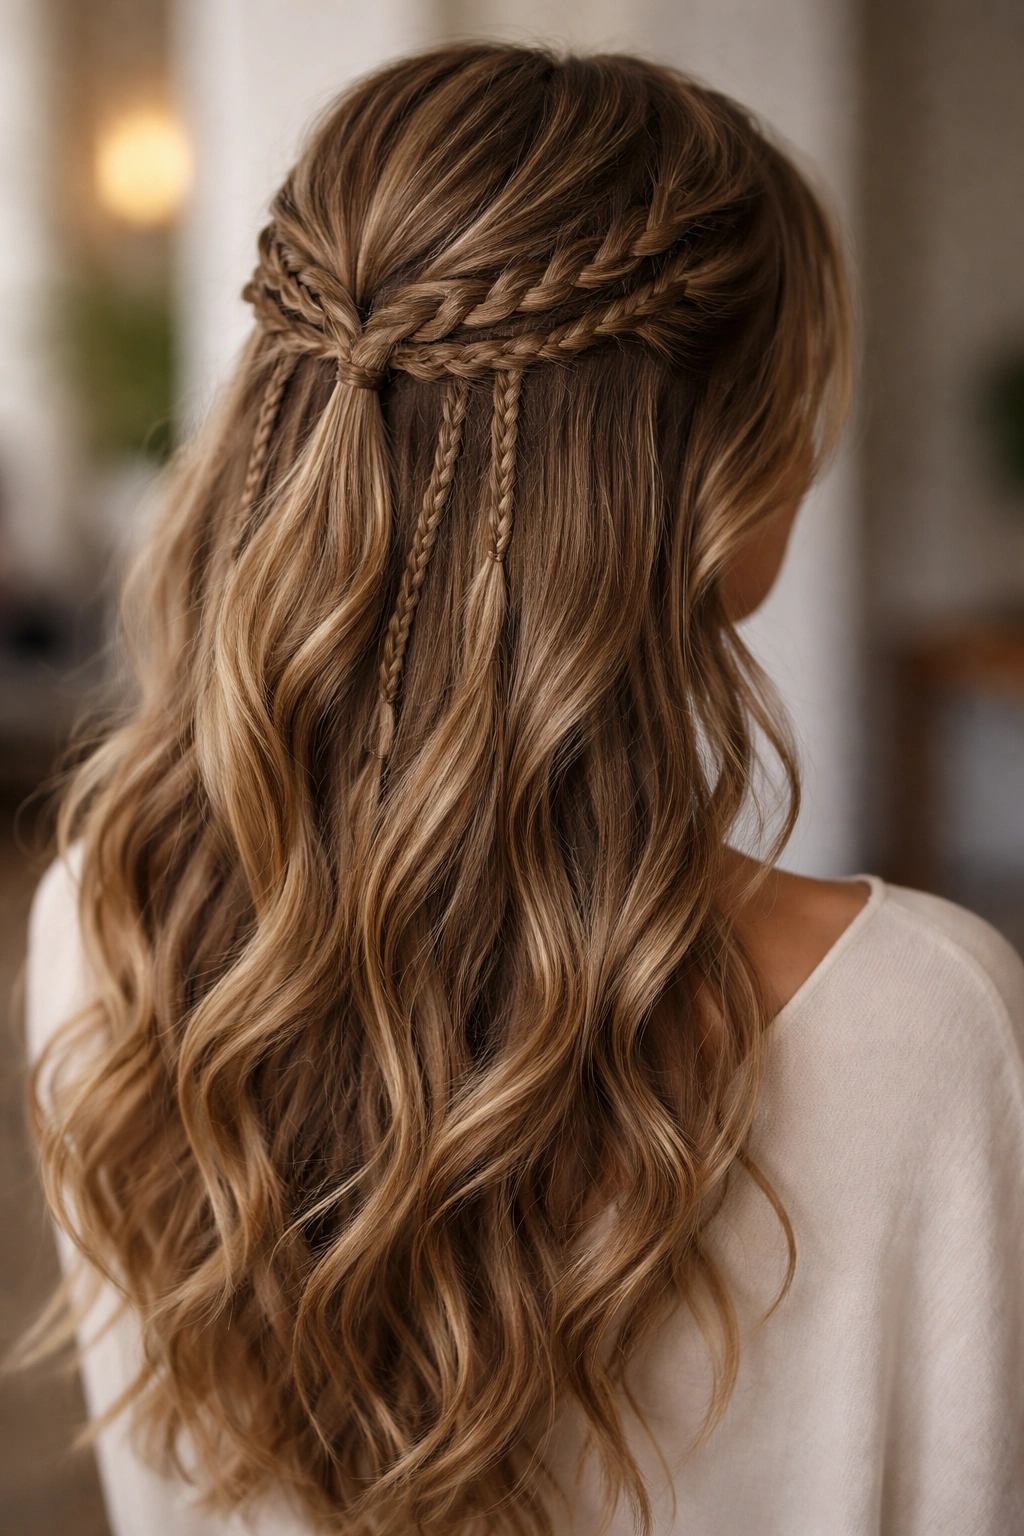
For a bold, statement-making look, combine multiple smaller braids in your half-up section. Rather than one thick braid, create two or three thinner braids running parallel within your half-up area. Secure each individually with small elastics, or gather all the braids together at the base with one larger elastic. The multiple braids create texture, visual interest, and an undeniably impressive aesthetic.
Why Multiple Braids Create Impact
Several thinner braids create more visual texture and movement than one thick braid. They’re also more practical in that if one braid slips, the others keep your hair secure. The multiple-braid look is especially stunning on thick hair, but it works on finer textures too—just adjust the size and number of braids accordingly.
Organizing Multiple Braids
- Divide your half-up section into 2-3 sections before you start braiding
- Create a similar braid style on each section—typically French or Dutch works best
- Decide whether you’ll secure each braid individually with small elastics, or gather them together at the end
- Space the braids evenly so they look intentional rather than random
- Loosen each braid individually for maximum texture and volume
- You can weave ribbons or hair cuffs through the braids for added detail
18. Half-Up Topknot with Braid
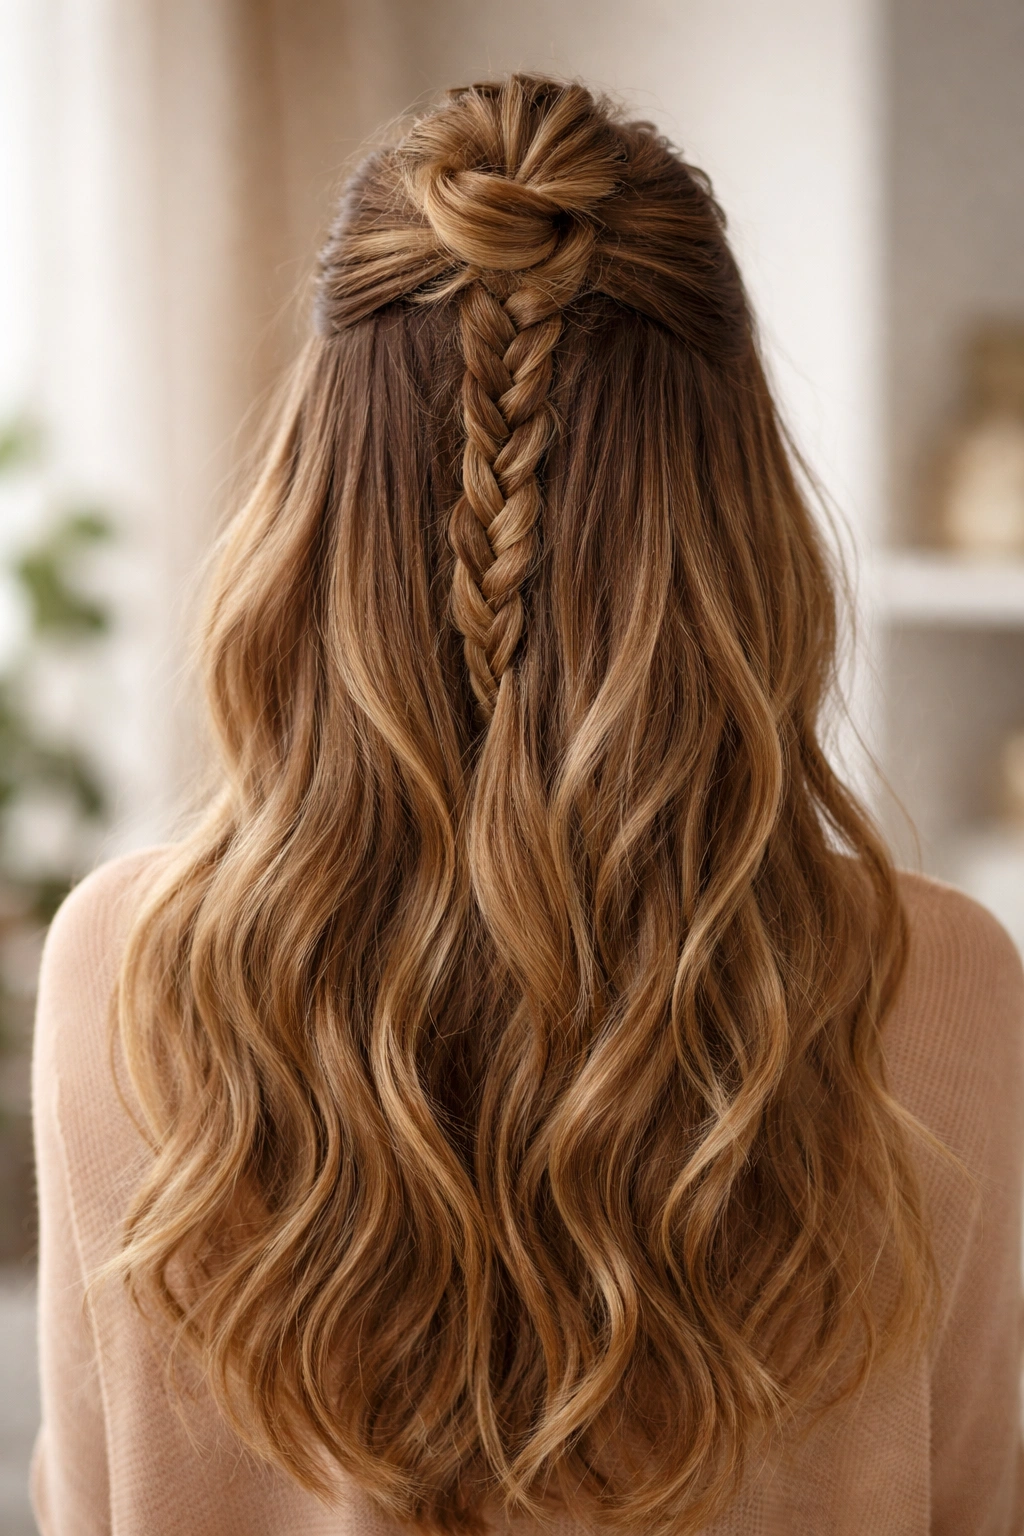
This hybrid style combines a braided element with a partially twisted-up knot. Create a half-up section and either braid it or create a twisted rope. Instead of securing straight across the back of your head, twist or wrap the braid around itself to create a small knot or bun shape at the crown or back of your head. Secure with bobby pins. This gives you the best of both worlds: the braided detail plus the practical security of a partial updo.
Why Braided Knots Are Supremely Practical
A braided knot keeps hair maximally secure while still showing off braid detail. This style won’t slip or loosen during an active day. It’s elegant enough for dressier occasions but practical enough for workouts, outdoor activities, or days when you need everything fully controlled. The knot shape also adds instant interest and dimension to your overall look.
Securing a Braided Knot
- Create your braid or twist as you normally would, making it slightly longer than you think you’ll need
- Bring the braid to your desired knot location—back of crown or lower back
- Wrap the end of the braid around itself several times to create a small knot shape
- Secure with multiple bobby pins inserted at different angles for maximum security
- Loosen the braid before or after wrapping so the knot has texture and fullness
- Tuck any loose ends underneath and pin them down
Final Thoughts
Braided half up half down styles are genuinely one of the most versatile categories of hairstyling. Whether you’re going for romantic, modern, casual, or formal, there’s a braided option that works. The beauty is that these styles improve with practice—your first attempts might not be Instagram-ready, but by your fifth time doing a particular braid, your muscle memory kicks in and the style becomes almost automatic.
What makes these styles so wearable is that they solve real problems while actually looking great. You get the hair-off-your-face practical benefit, combined with the style and polish of something deliberately designed. And on long hair, you have the length to really showcase whatever braiding technique you choose, meaning your effort is visible and impactful.
Don’t feel locked into doing the same style repeatedly. The most interesting approach is to rotate through different braids depending on your mood, your hair texture that day, and the occasion. Your hair will thank you for the variation, and you’ll keep the style feeling fresh and exciting rather than predictable. The 18 options above are just starting points—once you master the basic techniques, you can combine them, add accessories, adjust the positioning, and create combinations that are entirely your own.