Half up half down hairstyles strike the perfect balance between elegance and romance—and when you add pearls into the mix, you’ve got a wedding look that feels both timeless and undeniably bridal. The beauty of these styles is that they work for nearly every bride, whether you’re going for classic formality, bohemian softness, or modern minimalism. Pearls catch the light beautifully as you move, add subtle luxe without overwhelming your face, and complement virtually every wedding dress style imaginable.
The half up half down silhouette is particularly flattering because it shows off your face, keeps hair away from your shoulders for a clean look in photos, and lets you showcase the back of your dress—something a fully up style doesn’t do. When you anchor that style with pearls, whether through hair combs, bobby pins, hair vines, or woven strands, you’re adding dimension and a touch of jewelry-like refinement that reads incredibly sophisticated in person and photographs beautifully. The versatility of this combination means you can customize it to suit your dress neckline, your hair texture, your personal style, and the overall vibe of your wedding day.
Let’s walk through twelve distinct half up half down pearl-adorned styles, each with its own personality and best-use scenarios. Whether you’re drawn to structured elegance or relaxed romance, you’ll find inspiration here.
1. Classic Pearl-Adorned Twisted Half-Up
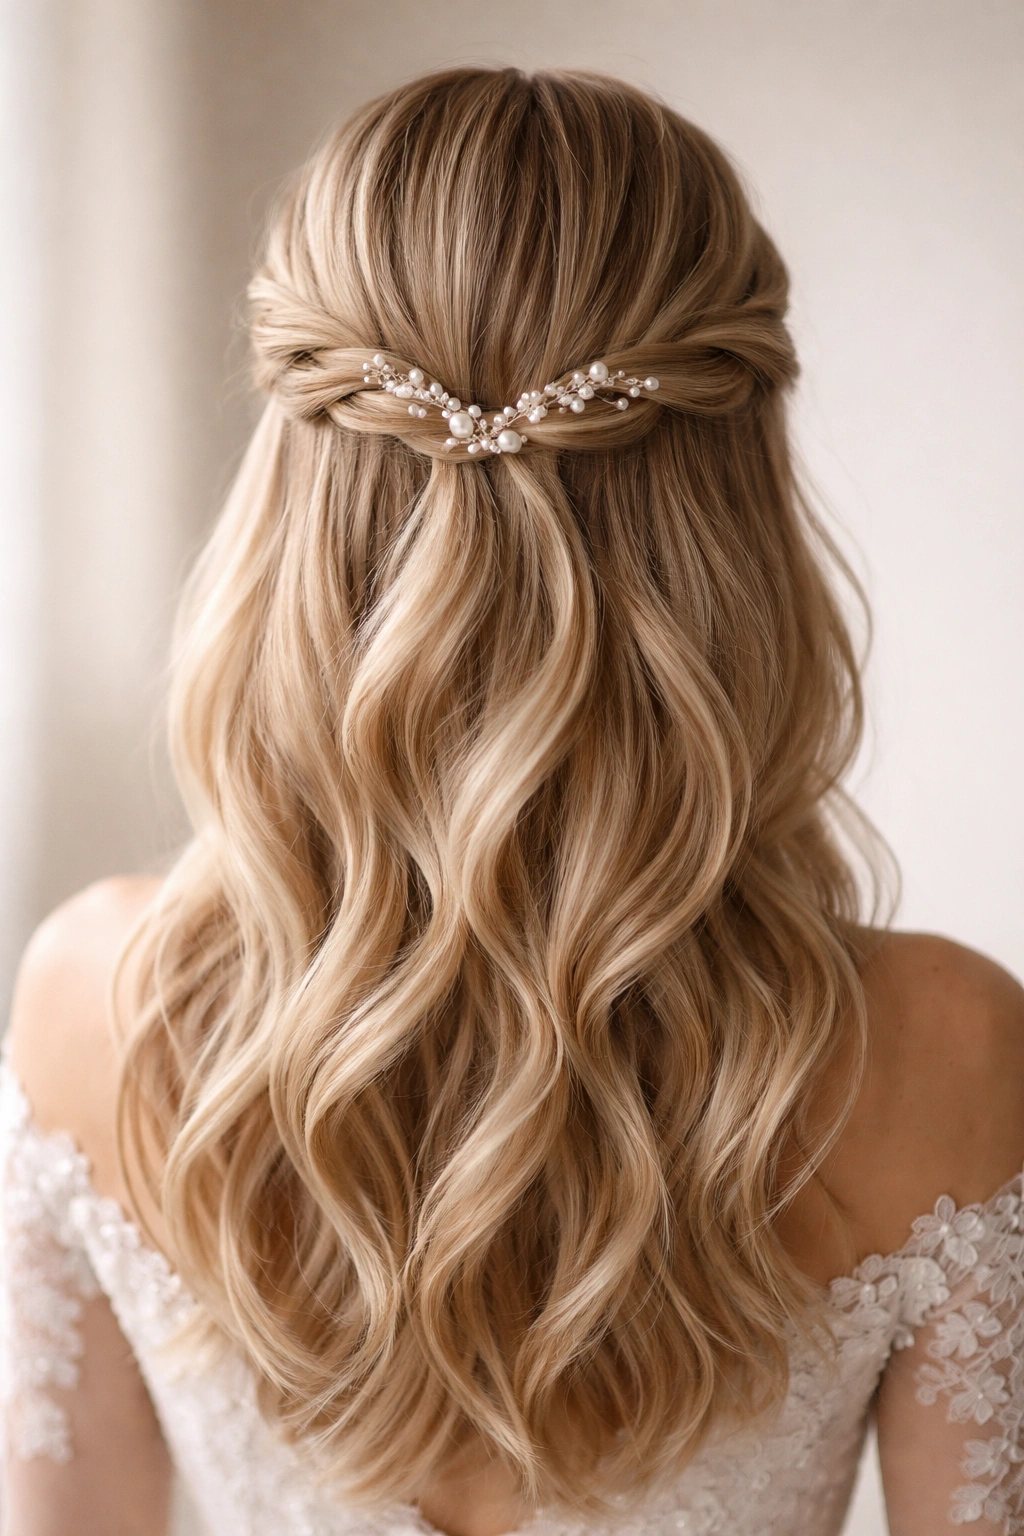
This timeless style takes the simplicity of a half-up look and elevates it with elegant restraint. You’re taking sections from each side of your head, twisting them gently as they move back, and securing them at the crown with pearl-studded bobby pins or a small pearl hair clip. The twists create a subtle crown effect that frames your face beautifully without feeling overly constructed.
Why This Style Feels Effortlessly Bridal
Twisted half-ups have a soft, romantic quality that reads as intentional without looking overdone. The twists create natural texture and visual interest even if your hair is completely straight, and they’re forgiving enough that minor flyaways actually add to the romantic, lived-in aesthetic. Pearl pins catch light at your crown, drawing the eye upward and elongating your face. This style pairs exceptionally well with classic wedding gowns, particularly strapless or sweetheart necklines that need a clean frame.
How to Execute It and Make It Last
- Curl or wave your hair lightly before beginning—this gives the twists something to grip and makes them hold all day
- Start with dry shampoo or texturizing spray at the roots for hold without looking greasy
- Take a 1-2 inch section from just above each ear and twist it loosely back (not tightly—loose twists look more romantic and hold better)
- Secure both twists together at the back of your crown using 2-3 pearl bobby pins crisscrossed for security
- Leave the bottom half of your hair completely down and brushed through for maximum movement
- Finish with a light hairspray that won’t make curls stiff
Pro tip: Have your stylist tease gently at the crown before twisting—this creates an anchor point that prevents the twists from sliding throughout the day, which is crucial if you’re wearing this style for 8+ hours.
2. Soft Waves with Pearl-Scattered Bobby Pins
If you love the idea of pearls throughout your hair rather than concentrated in one spot, this is your style. You’re creating loose, romantic waves throughout your entire length, then using pearl bobby pins strategically placed along where the half-up section sits. The pins become decorative elements, not just functional, catching light and adding interest all around your crown.
The Visual Impact of Scattered Pearl Details
Distributed pearl pins create a sense of movement and playfulness that feels more modern and less “traditional bride” while remaining completely elegant. This style works brilliantly in photography because the scattered pearls catch light from different angles, creating dimension that reads beautifully in both close-ups and full-body shots. The technique also works on virtually any hair texture—fine, thick, curly, or straight—because the pins are doing the visual work, not relying on your hair’s natural texture to create impact.
Styling Techniques for Best Results
- Wave your entire head with a large-barrel curling iron for soft, romantic waves that move naturally
- Create the half-up section by clipping back a section from ear to ear (approximately 2 inches thick) with a regular bobby pin underneath
- Insert pearl bobby pins around the perimeter of this clipped section—aim for 5-7 visible pins spaced evenly, interspersed with regular pins for security
- Make sure pearl pins are visible from the front and sides, not hidden completely under hair
- Keep the bottom half waved and soft, allowing it to blend seamlessly with the pinned section
- Use a flexible hold hairspray so waves still move and feel lived-in, not cemented
Worth knowing: Pearl bobby pins show best when your hair is medium to dark (they disappear into very light blonde), so adjust your pin strategy based on your hair color.
3. Pearl-Adorned Braided Crown
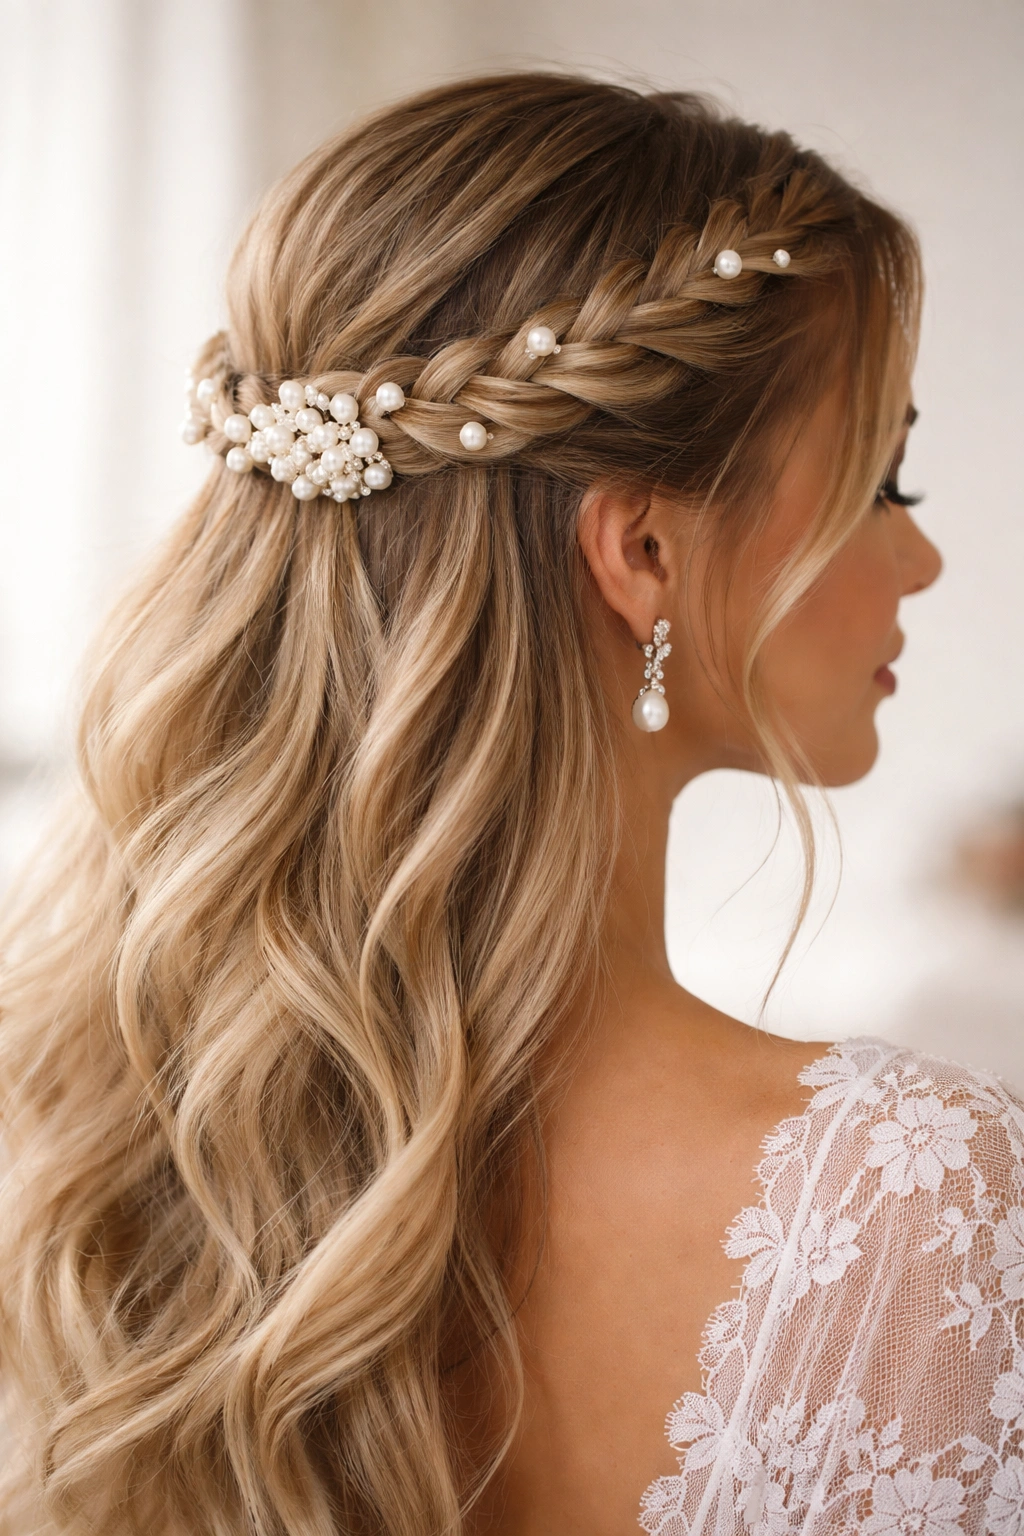
This style merges two wedding hair classics: the braided crown and the half-up silhouette. You’re creating a braid that starts at one ear, travels across the back of your head to the other ear, and is secured low where it meets the half-up section. Pearl hair comb or small braid clip anchors everything while the rest of your hair flows freely below.
Why Braids Make Pearl Accents Shine
A braid naturally creates crevices and layers within the hair, giving pearl accents multiple planes to sit on and catch light. This means your pearl embellishments—whether woven into the braid itself, clipped at the base, or placed around where the braid meets the rest of your hair—have a three-dimensional quality that feels especially luxurious. The structured geometry of a braid also balances heavier, rounder face shapes beautifully, and the half-up element keeps it feeling soft rather than severe.
Braiding Techniques for Stability and Beauty
- Prep your hair with waves or texture—completely straight hair is harder to braid tightly and doesn’t hold as well
- Section off your hair from ear to ear at the back, creating your half-up zone
- Begin braiding on one side, starting just behind the ear, and braid toward the opposite ear in a gentle curve
- Use a three-strand braid for a delicate look, or a Dutch braid for more definition and hold
- Incorporate pearl beads or small pearl hair comb into the braid itself as you braid, spacing them evenly
- Secure the braid where it ends with a small pearl clip or comb, then secure all the hair together into a low half-up ponytail with bobby pins
- Gently pull and loosen the braid slightly after securing—this creates a softer, more romantic feel than a tight braid
- Leave the lower section down in waves for contrast
Pro tip: Ask your stylist to use clear fishing line or pearl-colored thread woven through the braid to secure pearl beads as you go—this looks infinitely more polished than trying to clip beads to the finished braid.
4. Soft Curls with Pearl-Adorned Center Part
This style is for the bride who wants maximum softness and femininity. You’re creating full, bouncy curls throughout your entire head, parting in the center, and anchoring the half-up section at the back with a substantial pearl hair comb or barrette. The center part elongates your face and creates beautiful symmetry, while the half-up element keeps those gorgeous curls from looking like you’re just wearing your hair down.
Why Center Parts and Pearls Create a Soft-Romantic Impact
A center part inherently feels younger and softer than a side part, making it ideal for romantic, feminine bridal aesthetics. Paired with full curls, it creates an almost Victorian or modern-vintage vibe that photographs beautifully. A substantial pearl comb at the back anchor point becomes a statement piece—it’s the focal point that transforms a “hair down” look into a styled bridal moment. This style is particularly flattering on brides with longer hair and face shapes that benefit from face-framing.
Creating Curls That Hold and Move
- Start with completely dry hair and apply a heat protectant
- Use a 1.25-inch curling iron to create curls, curling each section away from your face on both sides for consistency
- Curl the entire back section too—don’t skip this, as you want uniformity throughout
- Let curls cool for 5-10 minutes before touching them, which helps them set properly
- Run your fingers gently through the curls once they’ve cooled to break up the ringlet effect and create waves
- Create your center part by gently sectioning down the middle of your head
- Clip back the top 2-3 inches of hair from your face on both sides, meeting at the back of your crown
- Secure with a 2-3 inch pearl comb positioned low and centered
- Let the back section flow into the half-up clip for a seamless look
- Finish with flexible-hold hairspray that allows curls to move
Worth knowing: This style works best on hair that’s at least shoulder-length and ideally longer—shorter hair can look overly full and poofy with this many curls.
5. Sleek and Straight with Pearl Hair Clips
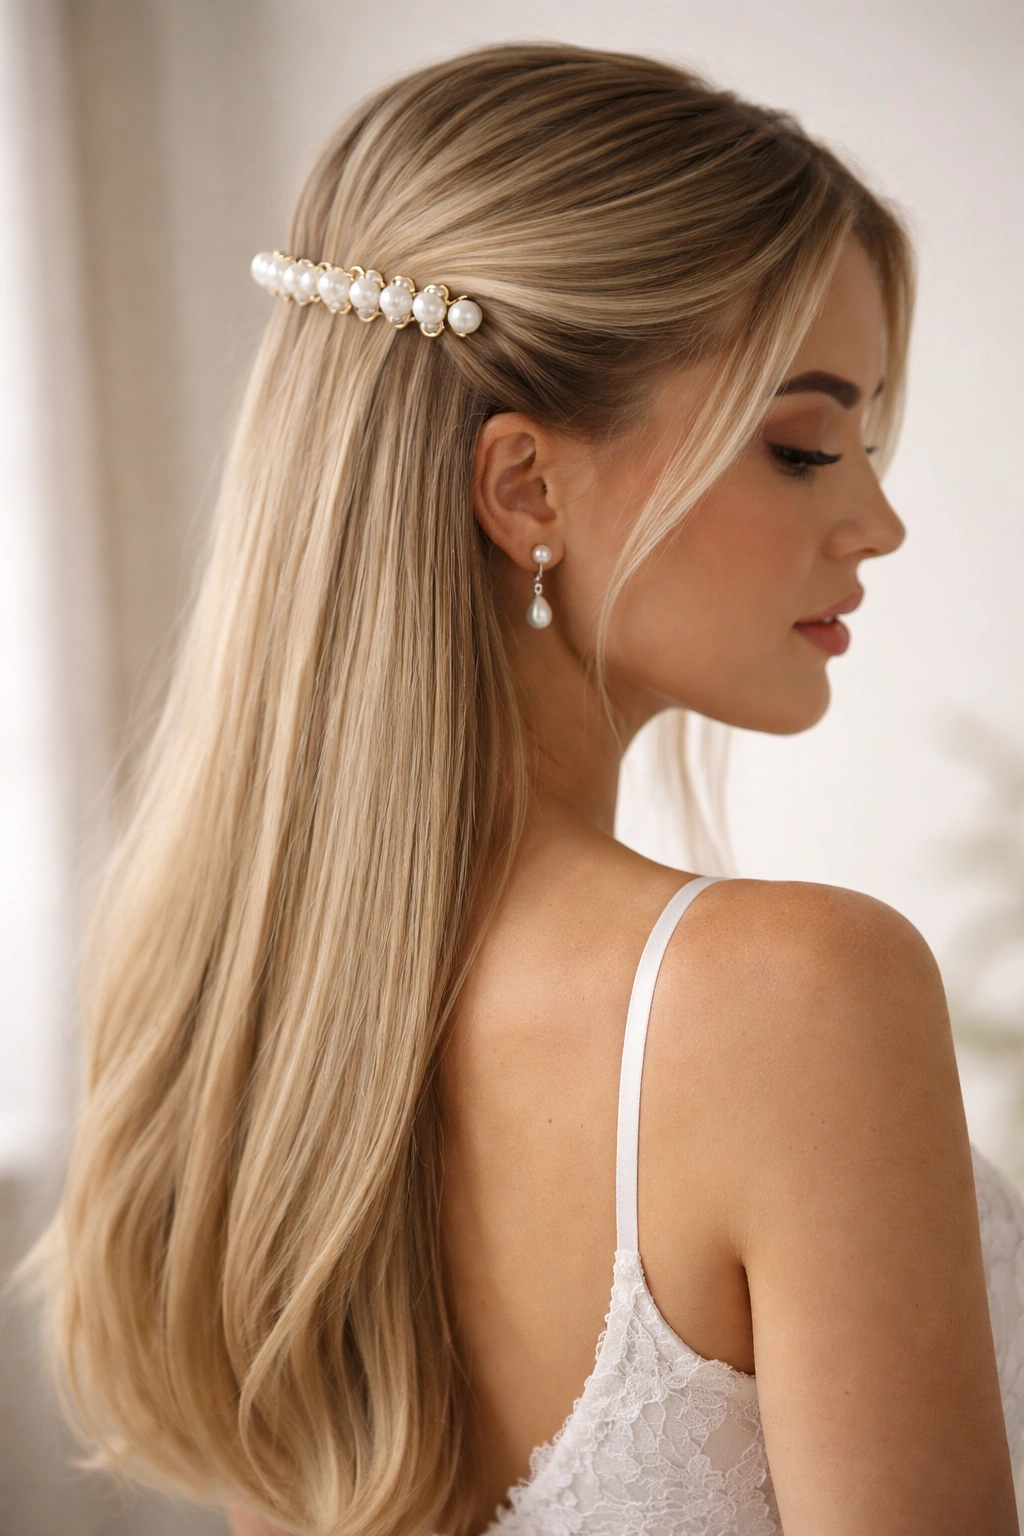
For the bride who loves modern minimalism with bridal elegance, this style strips everything back to its cleanest form. You’re keeping your hair completely straight and smooth, creating the half-up section with sleek, polished lines, and securing it with a contemporary pearl hair clip or geometric barrette. The contrast between the structured smoothness and the luxury of pearls creates unexpected sophistication.
The Modern Elegance of Clean Lines and Pearl Luxury
Sleek styles feel expensive and fashion-forward, especially paired with high-quality pearls. This aesthetic works beautifully with modern, minimalist wedding dresses, architectural updo details, or statement jewelry. The simplicity means every detail reads clearly—your face, your dress neckline, the beautiful texture of the pearl clip—nothing competes for attention. This style is also deeply practical for brides who want to move freely, dance without worrying about their hair, and maintain that polished look all evening.
Techniques for Sleek, Long-Lasting Straightness
- Use a professional smoothing or anti-frizz treatment the day before, if your hair needs it
- Blow-dry your hair completely straight using a paddle brush, directing the nozzle downward to seal the cuticle
- Section off your half-up portion from ear to ear, keeping the line clean and precise
- Use a fine-tooth comb to smooth the section absolutely flat before clipping
- Secure with a contemporary pearl hair clip—look for geometric shapes, minimalist designs, or sculptural pieces that feel like jewelry
- Make sure the clip is positioned slightly lower than your crown, at the back of your head where the curve meets the nape
- Smooth the back section down with a round brush and blow dryer for a polished finish
- Use a serum or light oil to add shine without creating greasiness
- Finish with a strong-hold hairspray designed to lock in straightness
Pro tip: Achieve the sleekest possible finish by doing your hair the day before your wedding if possible, then sleeping on a silk pillowcase—this prevents overnight frizz and gives you the smoothest base to start with on wedding day.
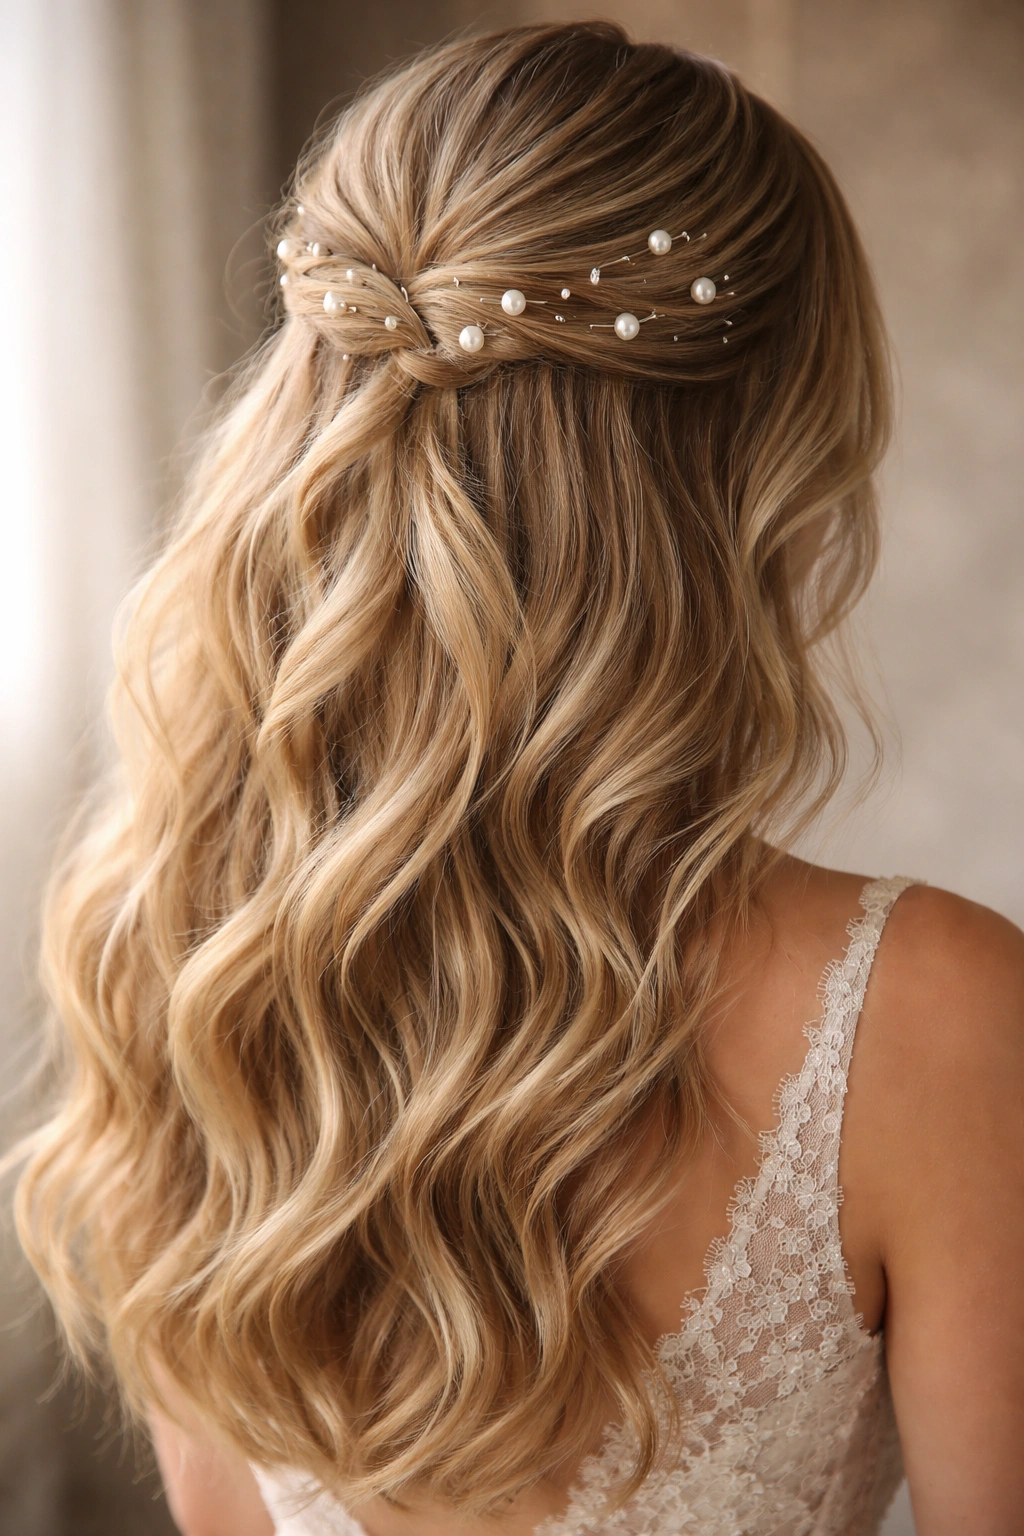
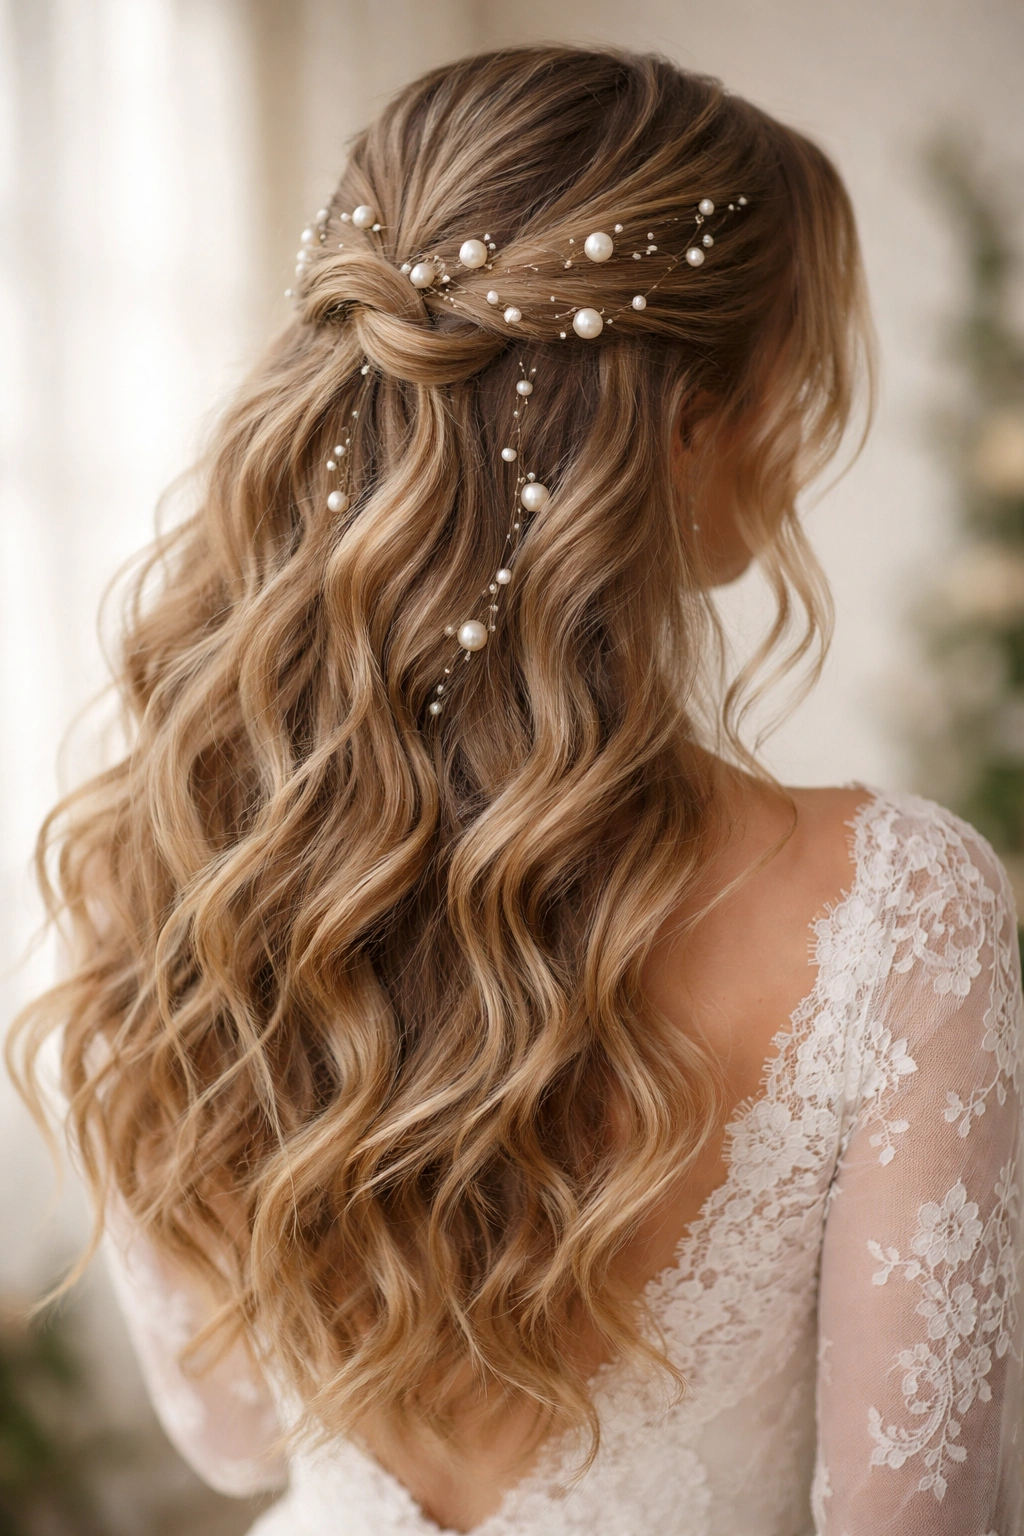
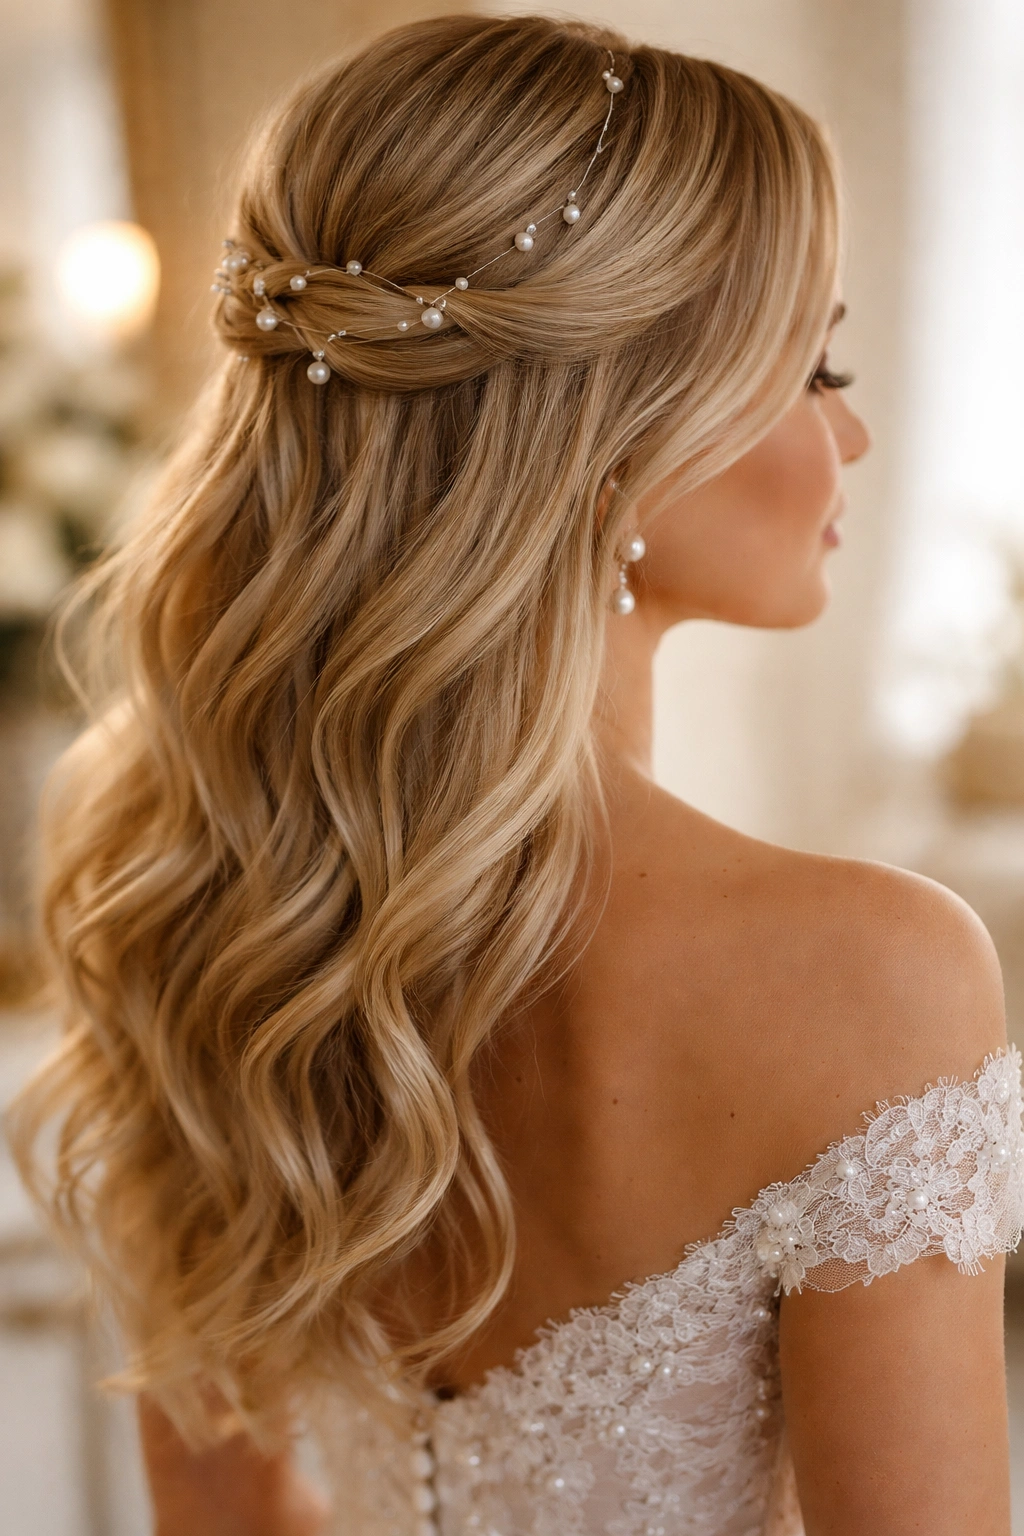
6. Romantic Waves with Pearl Hair Vines
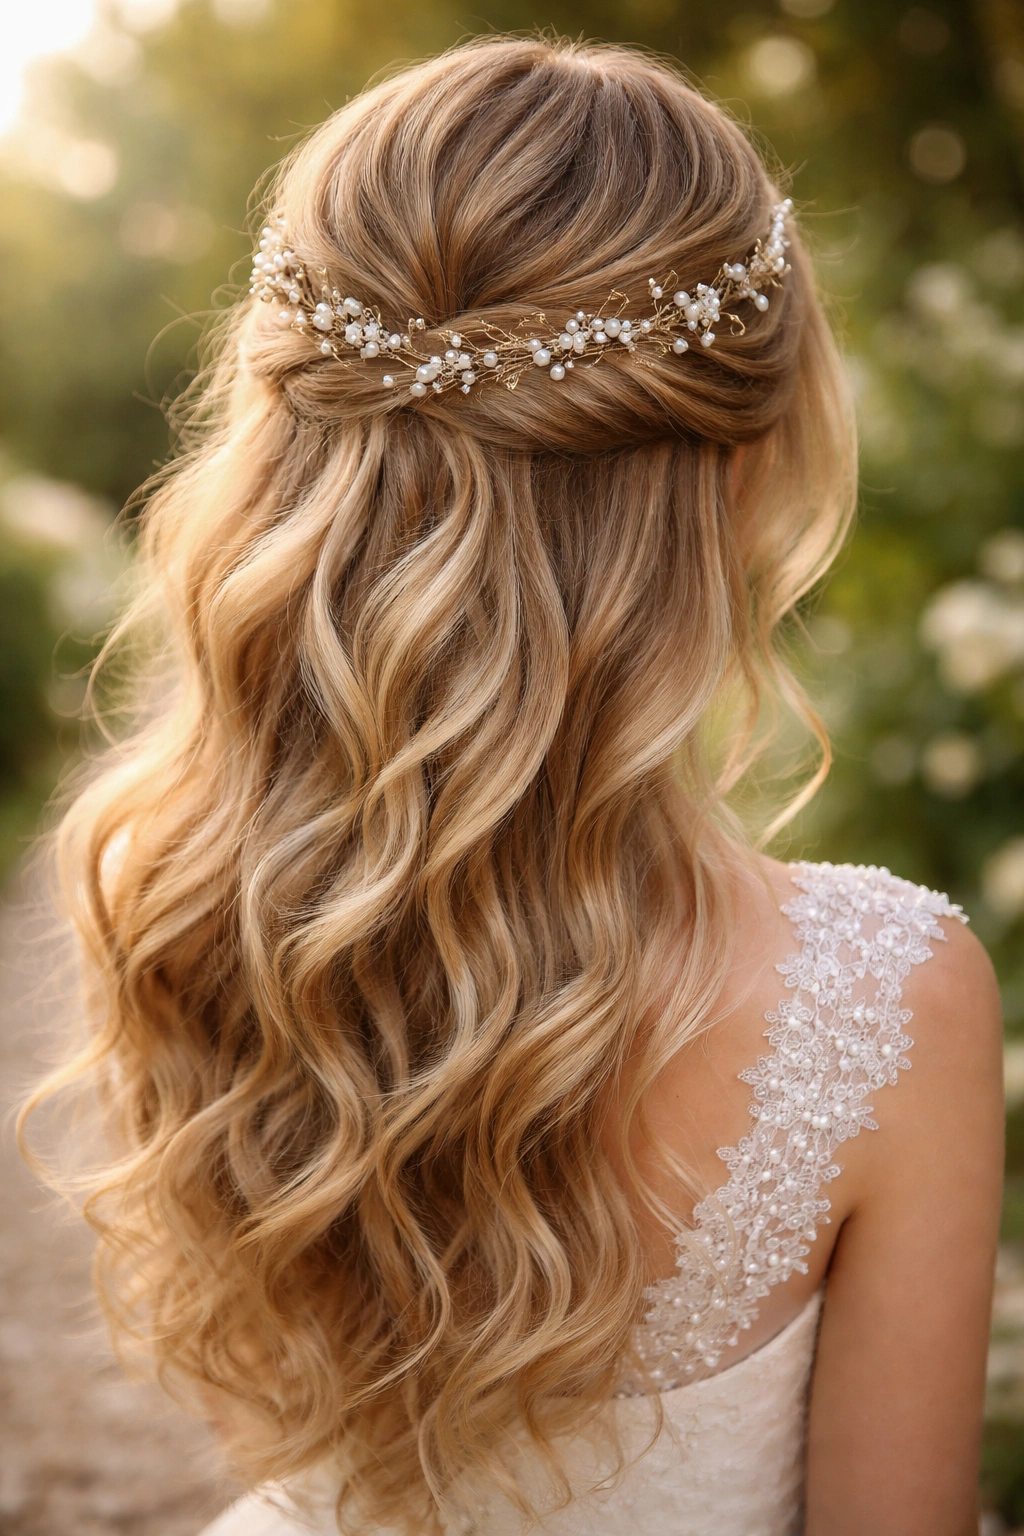
This style uses a pearl hair vine—a delicate, flexible accessory with pearls and rhinestones woven through wire or a thin cord—as your primary styling element. You’re creating soft waves throughout your hair, taking back a section to create the half-up silhouette, and wrapping the pearl vine around where that section meets the rest of your hair, almost like a delicate crown or halo effect.
Why Pearl Vines Create Bridal Magic
Hair vines offer something bobby pins and combs can’t: they create an almost ethereal quality, like pearls are naturally threaded through your hair rather than clipped on top. They catch and refract light beautifully as you move, creating a subtle glow around your head. The flexibility of a vine means it can accommodate different head shapes and hair volumes without looking like it’s sliding or sitting awkwardly. This style reads as exceptionally romantic and works especially well for outdoor, garden, or bohemian-inspired weddings.
Wrapping and Securing Pearl Vines for All-Day Hold
- Create soft waves throughout your hair with a curling iron or overnight braiding method
- Section back your half-up portion from ear to ear, approximately 2 inches thick
- Use bobby pins to secure this section at the back of your crown
- Unwind a portion of your pearl vine (you want it to wrap around without traveling down into the loose hair section)
- Starting at one side where your half-up section begins, wrap the vine loosely around the back, positioning it where your bobby pins anchor the hair
- Wrap it around the full circumference so it sits like a tiara or halo effect
- Secure the ends by tucking them into the pinned section, using a bobby pin to lock it in place
- The vine should sit on top of your hair, not underneath it, so it’s fully visible
- Adjust waves to frame your face beautifully and create soft movement
- Use light hairspray that allows waves to maintain their soft, romantic quality
Worth knowing: Pearl vines work best on hair that’s at least 8-10 inches below your shoulders—shorter hair can look crowded if you’re wrapping the vine completely around.
7. Vintage-Inspired Pearl Hair Combs
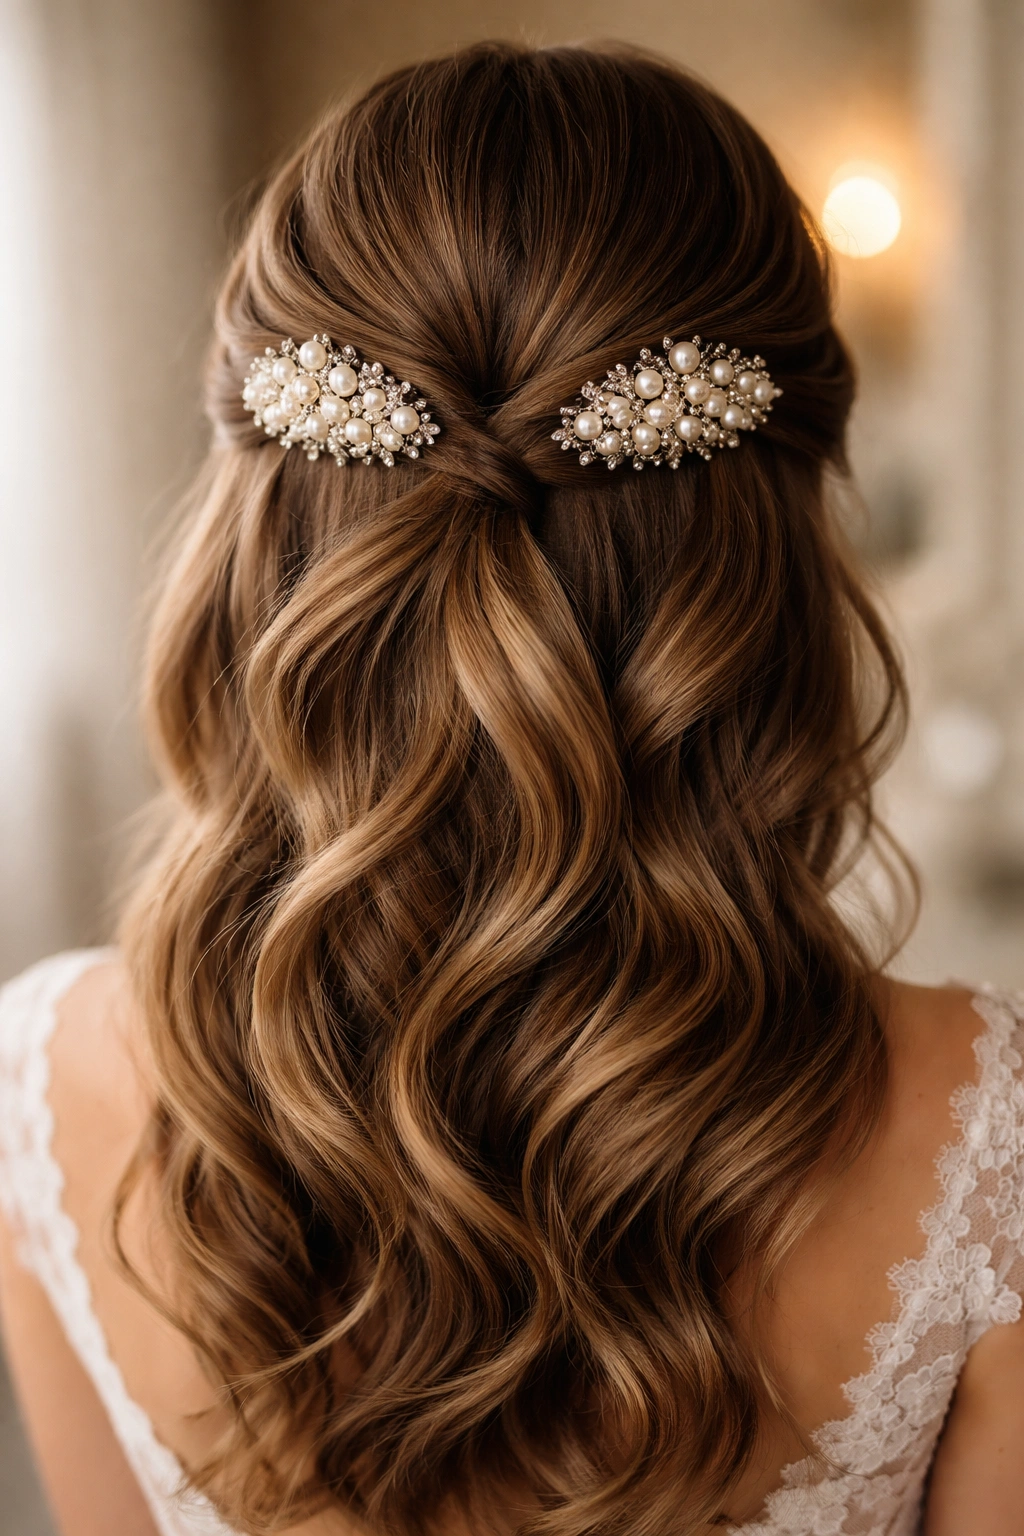
This style evokes old Hollywood glamour and classic bridal tradition. You’re creating soft waves or curls, taking back your half-up section, and securing it with a pair of decorative pearl hair combs—typically vintage-inspired, ornate designs that feel like jewelry rather than just functional accessories. The combs sit symmetrically on either side where your half-up section begins, creating a balanced, intentional look.
The Timeless Appeal of Ornate Pearl Combs
Decorative hair combs instantly evoke bridal tradition and vintage elegance without feeling dated when you choose the right design. Pearl and crystal combs specifically read as refined and expensive, elevating your entire look. Wearing a pair of matched combs (one on each side) creates symmetry and balance that’s inherently flattering on nearly every face shape. This style works beautifully in photography because the combs are positioned where you typically see light and detail, and they become a memorable visual element of your bridal look.
Positioning and Securing Decorative Combs
- Prep your hair with soft waves or loose curls for the most romantic, cohesive effect
- Create your half-up section from ear to ear, and lightly tease the roots where your combs will sit for anchor grip
- Position the first comb on one side, pushing it into the teased section at approximately the temple-to-ear level
- Insert it at an angle (approximately 45 degrees) so it grips securely and sits close to your head
- Repeat on the opposite side with a matching comb, ensuring both combs are positioned at identical heights for balance
- Make sure combs are pushed in far enough that they don’t slide, but angled so they don’t pull your hair uncomfortably
- The combs should hold your half-up section in place without additional bobby pins, though you can use a bobby pin underneath for extra security if needed
- Leave your bottom section down in waves, blending seamlessly with the pinned section
- Use flexible-hold hairspray so curls still move and feel soft
Pro tip: Test-drive your combs before wedding day—some vintage combs have fewer teeth and won’t grip well in fine hair; opt for combs with dense teeth if you have thin or slippery hair.
8. Fishtail Braid with Scattered Pearl Embellishments
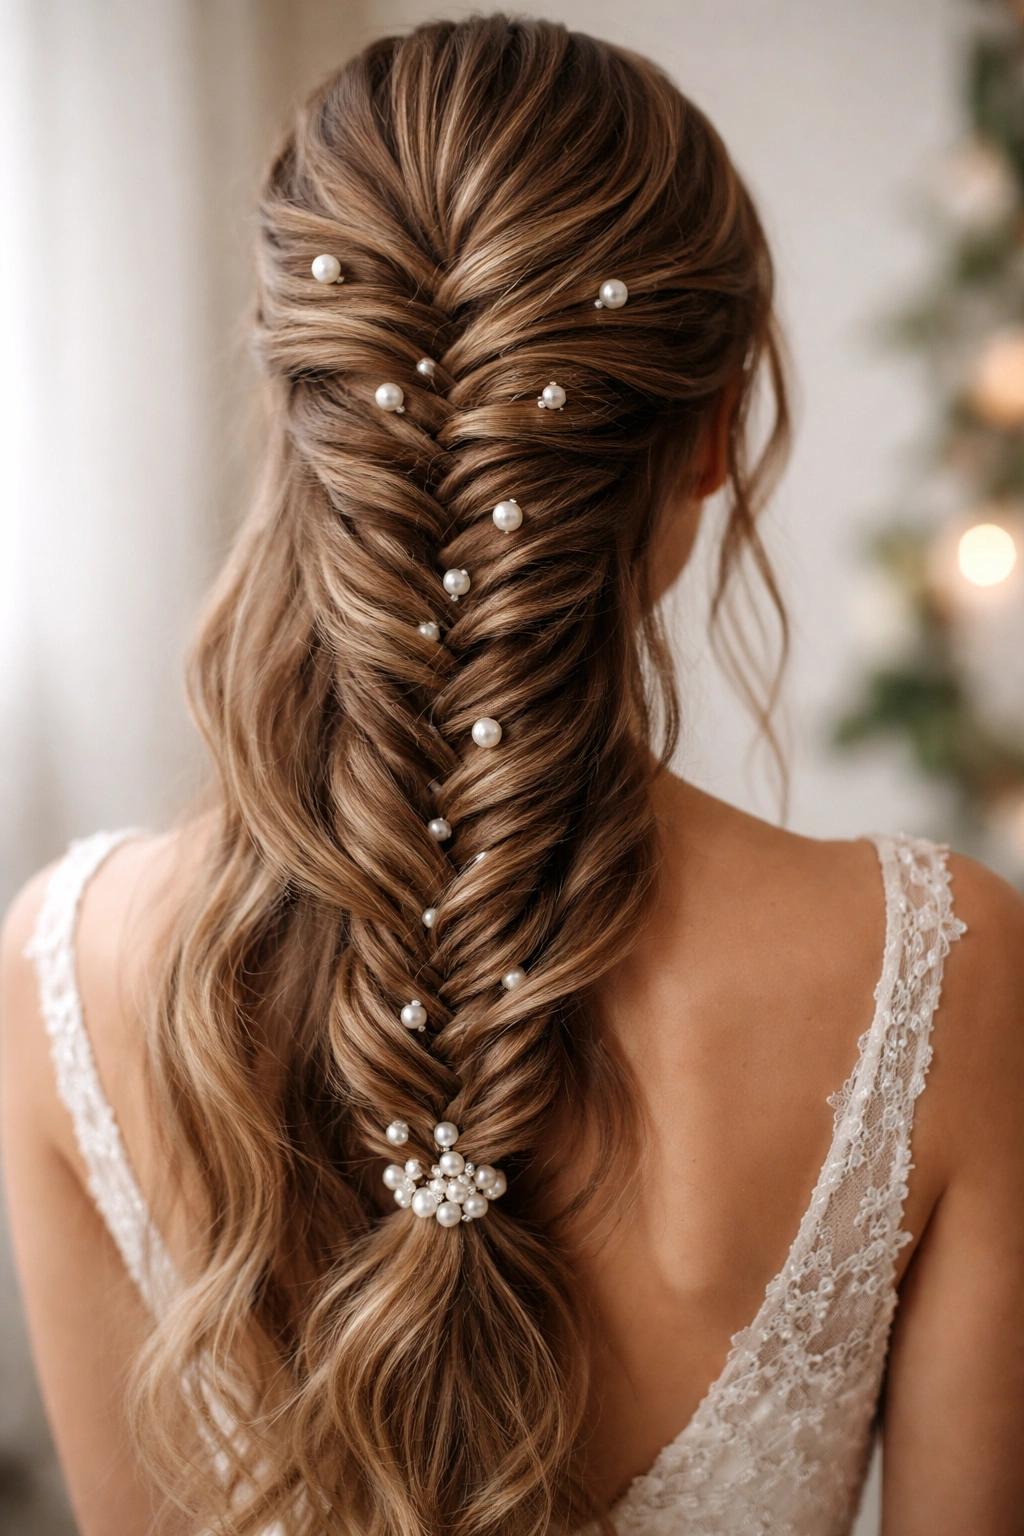
This style combines textural interest with modern sophistication. You’re creating a loose fishtail braid that starts higher than a traditional crown braid and extends down your back, securing it at the point where your half-up section meets your loose hair. Pearl bobby pins, a pearl clip at the base, or small pearl beads woven into the braid itself add touches of elegance throughout.
Why Fishtail Braids Are Perfect for Pearl Details
Fishtail braids have more intricate texture than three-strand braids, creating more visual interest and more places for light to catch and refract. This makes them an ideal canvas for pearl embellishments—the pearls integrate beautifully into the complex weave rather than looking separate from your hair. Fishtail braids also photograph beautifully from any angle, and they’re surprisingly forgiving if you’re not a master braider—a slightly imperfect fishtail looks romantic and relaxed, not sloppy.
Mastering the Fishtail Braid Technique
- Start with textured, waved hair (don’t begin with completely straight hair, as fishtails grip better with texture)
- Section off your half-up area from ear to ear
- Begin your fishtail braid at one ear, using the two-strand crossover technique: take a thin piece from the outside of one section and cross it over to the other section, repeat alternating sides
- Braid down the back of your head to the point where your half-up section ends
- Incorporate pearl beads by threading them onto a bobby pin and securing them into the braid at intervals as you braid, or place pearl bobby pins along the base of the braid after securing
- Secure the braid’s end with a small pearl clip or comb
- Gently pull and loosen the braid to create a softer, fuller appearance
- Blend the end of the braid with your loose bottom section so they appear as one fluid piece
- Use flexible hairspray to keep the braid in place while maintaining softness
Worth knowing: Fishtail braids take longer to create than traditional braids—budget extra time with your stylist and do a practice run beforehand if this is your first fishtail.
9. Boho Waves with Scattered Pearl Hair Pieces
This style is for the bride who’s drawn to relaxed, effortless-looking elegance. You’re creating loose, undone waves throughout your hair, keeping your half-up section soft and casually clipped back, and dotting small pearl hair pieces (individual pearl clips, tiny pearl barrettes, pearl-studded bobby pins) throughout rather than creating one focal point. The effect is romantic, touchable, and undeniably bohemian.
The Relaxed Elegance of Boho-Pearl Fusion
Bohemian styles feel more accessible and less “formal” than structured styles, which appeals to many modern brides who want elegance without rigidity. Adding pearls elevates the boho aesthetic into bridal territory—pearls bring luxury and formality that casual waves alone might not achieve. Scattered pearl pieces create visual interest without the commitment of a full comb or structured clip, and they’re forgiving if they shift slightly throughout the day (which only adds to the relaxed vibe).
Creating Effortlessly Beautiful Waves and Placement
- Prep your hair with salt spray or texturizing spray for a naturally undone texture
- Create loose waves with a large-barrel curling iron or by braiding damp hair overnight
- Don’t aim for perfect waves—slightly imperfect texture reads as more intentional and boho
- Loosely section back your half-up portion from ear to ear without making a sharp, precise line
- Clip back with a soft, flexible clip (avoid rigid barrettes) or use bobby pins in a casual, hidden way
- Scatter 5-8 small pearl hair pieces throughout: a few in your half-up section, a few around your face-framing, a couple near your nape
- Vary the types of pieces—mix pearl bobby pins, small clips, and decorative pins for visual interest
- Make sure no piece looks “placed”—style them to look like they fell into place naturally
- Leave your bottom section soft and flowing, with pieces of hair escaping from the half-up section for an undone feel
- Use flexible, light hairspray that doesn’t create a stiff, shellacked look
Pro tip: Scatter your pearl pieces asymmetrically rather than creating a perfectly balanced pattern—this reinforces the effortless, relaxed vibe you’re going for.
10. Modern Minimalist with Single Pearl Strand
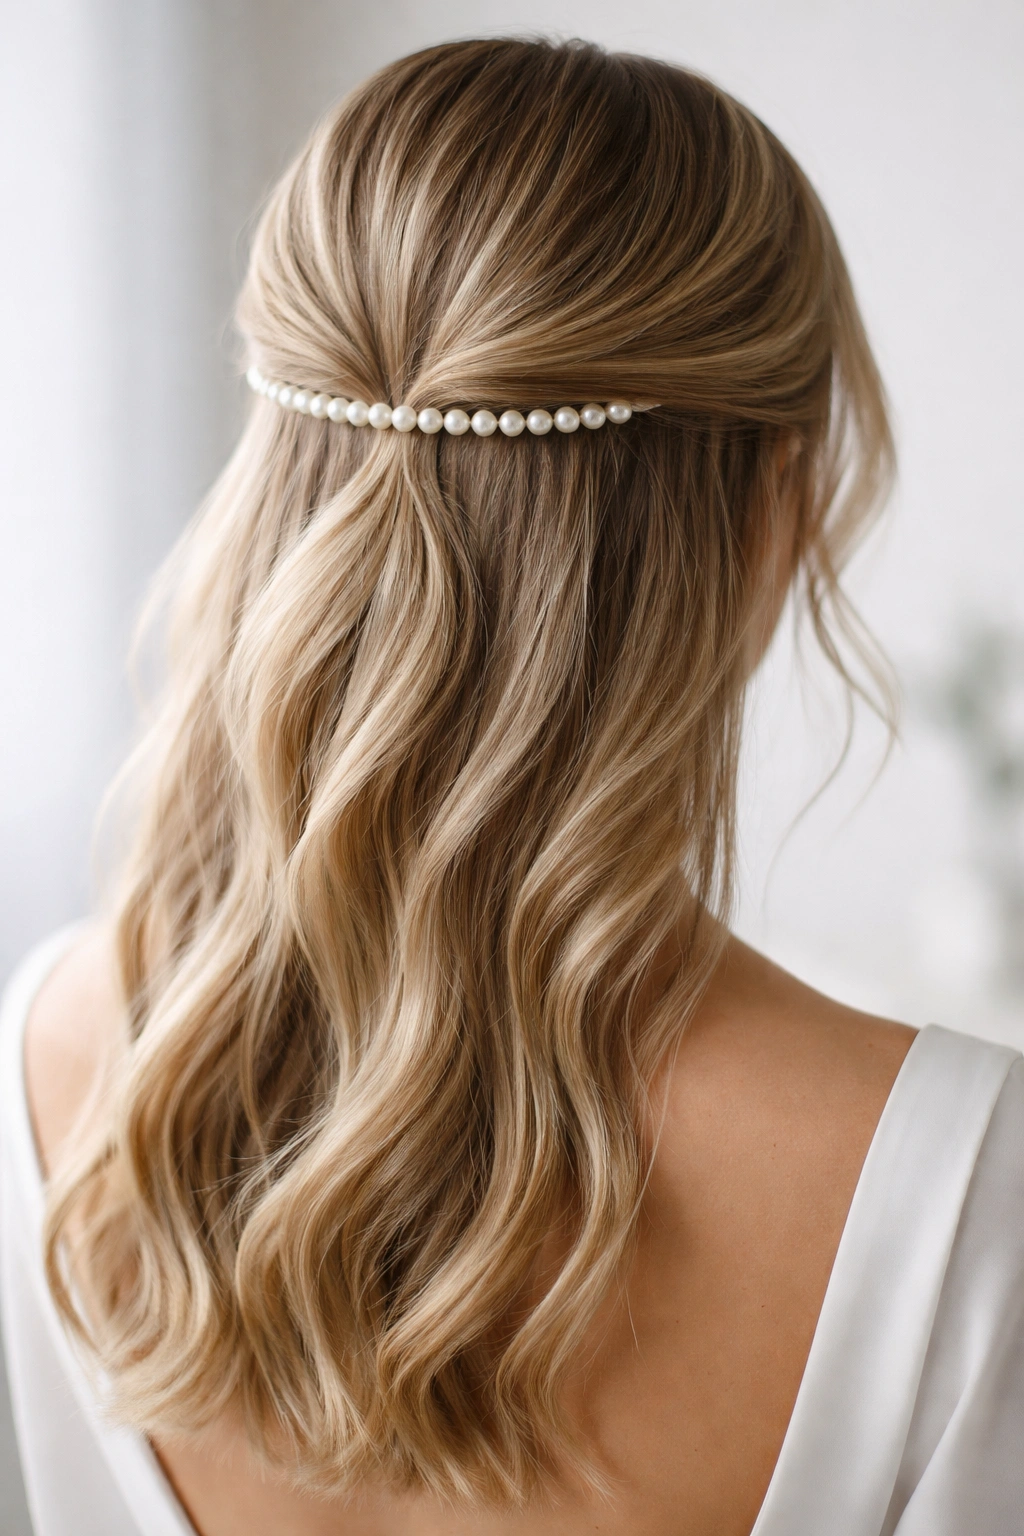
This sophisticated style strips everything back to its absolute essence. You’re creating soft waves or clean styling, taking back a simple half-up section, and securing it with a single strand of pearls—either a delicate multi-strand pearl necklace worn as a hair accessory, or a pearl strand specifically designed for hair. The effect is architectural, modern, and utterly elegant.
Why Pearl Strands Work as Minimalist Jewelry
A pearl strand worn through or around your half-up section functions as both hair accessory and jewelry, creating visual interest without physical bulk. This style appeals to brides who already have statement jewelry elsewhere in their look and want their hair to complement rather than compete. A single strand reads as intentional and expensive, conveying luxury through restraint. This aesthetic works beautifully with modern, architectural wedding dresses and pairs well with the trendy minimalist approach to bridal beauty.
Styling and Securing Pearl Strands
- If using an actual hair strand: prep your hair with either soft waves or sleek straightness depending on your overall aesthetic
- Create your half-up section and secure with bobby pins
- Wrap the pearl strand around the base of your half-up section, positioning it just where the pinned portion meets the loose hair
- Wrap it around the full circumference, creating a delicate “belt” of pearls
- Secure the ends by tucking them into the pinned section and using bobby pins to lock them in place
- If using a pearl necklace: drape it loosely where your half-up section sits, ensuring it looks intentional and integrated, not like you forgot to take off your necklace
- Step back and verify that the strand sits horizontally and looks balanced from the front and sides
- Use minimal hairspray so the overall look remains clean and unfussy
- Keep all other hair elements simple to support the minimalist aesthetic
Worth knowing: Pearl strands work best on medium to long hair where there’s enough surface area to display them properly—very short hair can look unbalanced with this styling approach.
11. Textured Updo with Pearl Embellishments
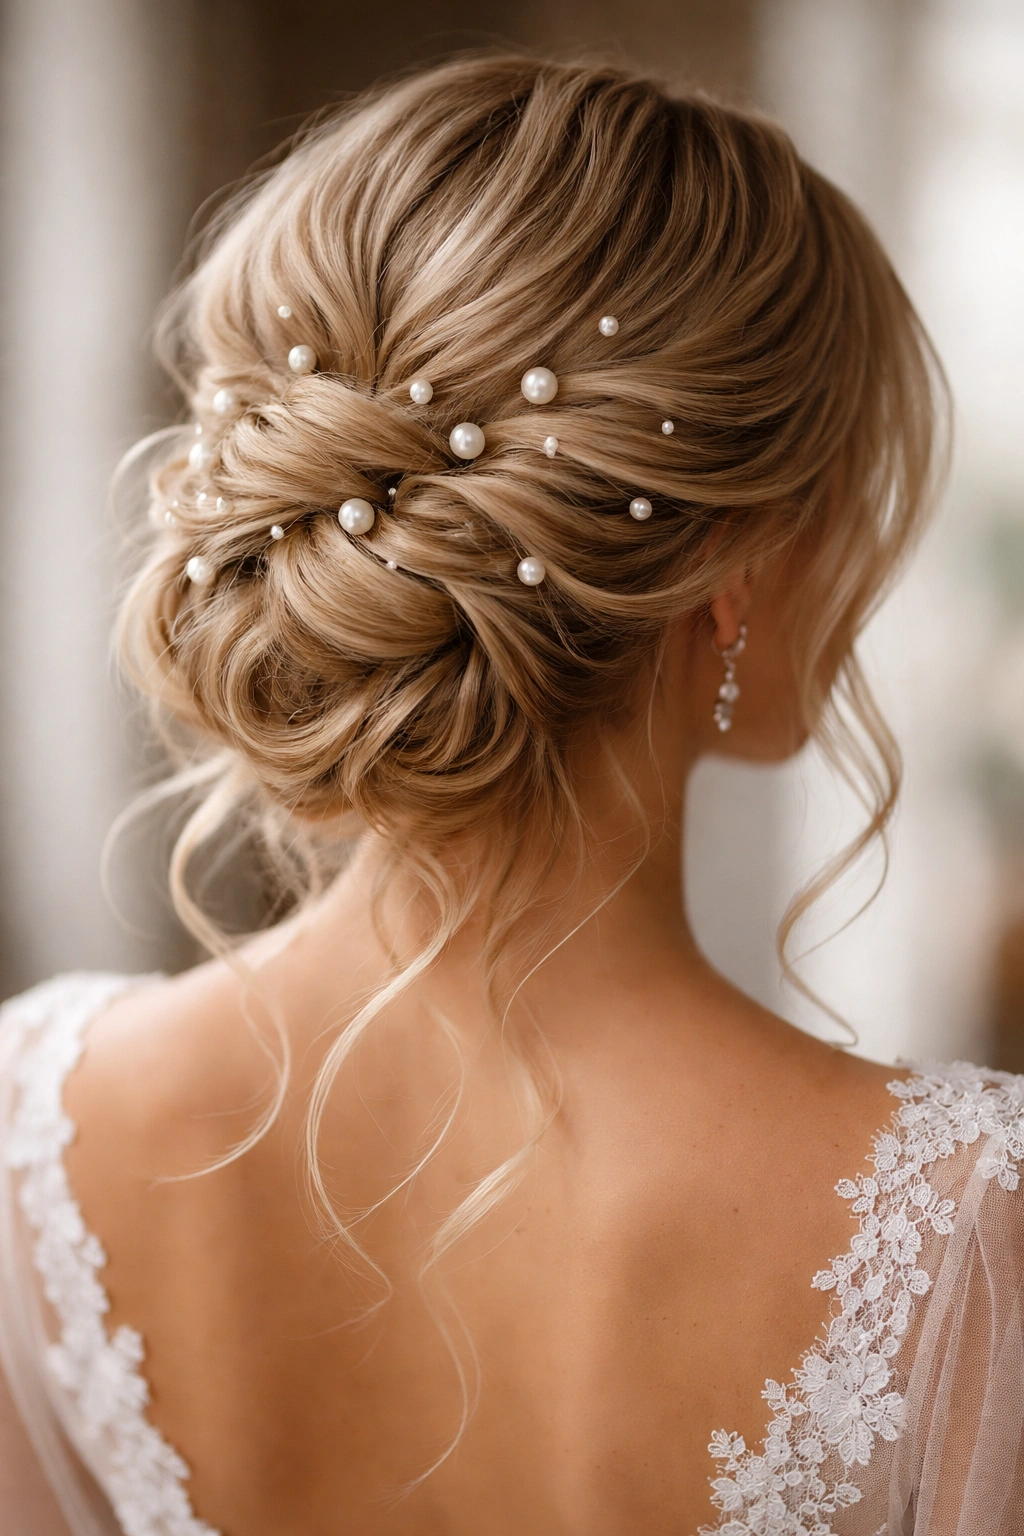
This style merges the structure of an actual updo with the softness and face-framing of a half-up element. You’re creating a loose, textured updo at the back of your head using the hair from your half-up section, securing it so that face-framing pieces still escape from the front, and embellishing the entire updo area with scattered pearl pins, combs, or woven details. The effect is complex and bridal while maintaining softness.
The Dimensional Beauty of Textured Updos
A truly textured updo—not sleek and tight, but intentionally loose with multiple heights and dimension—photographs beautifully and feels remarkably romantic despite being more structured than flowing waves. Adding pearls throughout the updo (rather than concentrating them in one spot) creates the impression of a pearl-studded crown, which reads as incredibly bridal and elegant. This style works particularly well for outdoor ceremonies where wind might move your hair, as the structured elements hold better than completely loose styles.
Building a Loose, Pearl-Studded Updo
- Prep your hair with waves or loose curls for texture and dimension
- Section off your half-up portion from ear to ear
- Tease the back section lightly at the roots to create volume and anchor grip
- Gently gather the back section and twist or loosely loop it, pinning it to create height and dimension rather than a tight, centered bun
- Aim for a relaxed, romantic updo rather than a structured one—use bobby pins to secure without pulling the hair completely taut
- Leave several face-framing pieces down from your front section, curling them to frame your face
- Begin placing pearl embellishments: scatter pearl bobby pins throughout the updo, use small pearl clips to secure loops of hair, or weave a pearl strand through sections of the updo
- Aim for 6-8 pearl elements so the updo reads as intentionally pearl-adorned, not like you just scattered pins randomly
- Verify the updo has height and doesn’t sit flat against your head
- Gently tousle the finished updo to enhance its romantic texture
- Use flexible-hold hairspray to maintain the textured effect
Pro tip: This style requires more pins than other half-up options—have your stylist do a full trial to ensure they’ve secured enough to last through an evening of dancing and movement.
12. Cascading Curls with Pearl Hairpins
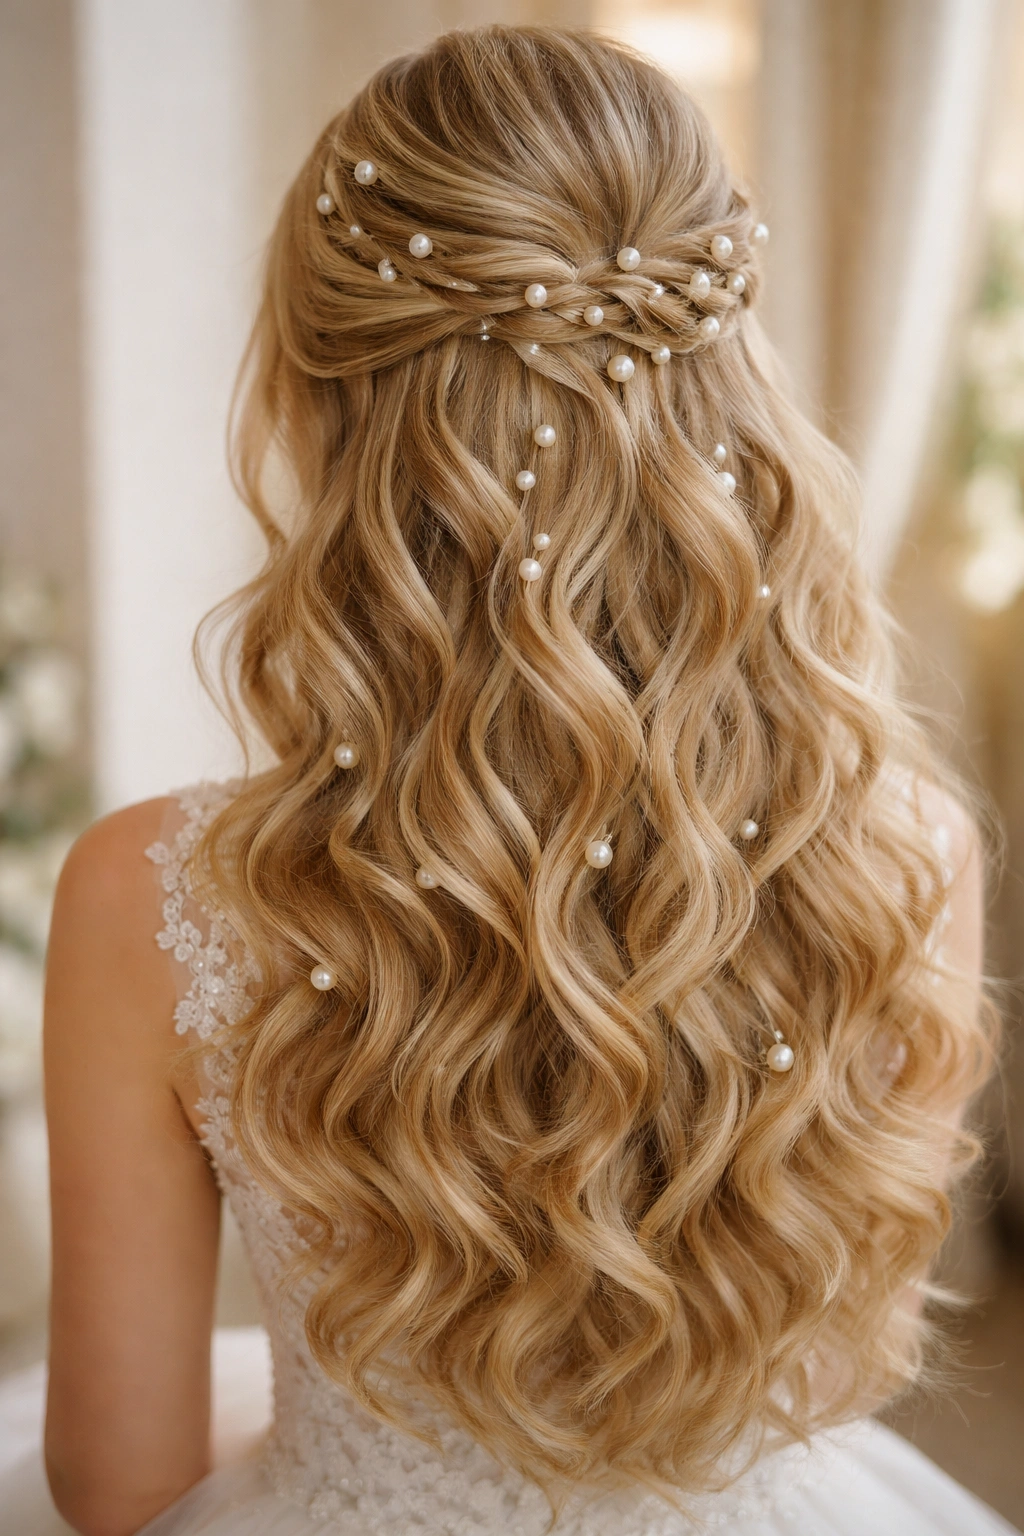
This final style celebrates movement and elegance in equal measure. You’re creating abundant, bouncy curls throughout your entire head, creating a soft half-up section that’s less about pulling hair tightly back and more about creating a gentle frame for your face, and anchoring everything with pearl hairpins positioned throughout rather than in one concentrated area. The result is lush, romantic, and timelessly bridal.
The Timeless Romance of Cascading Curls and Pearl Details
Abundant curls automatically read as bridal and romantic—they photograph beautifully because they create soft movement and dimension from every angle. Pearl pins woven throughout these curls, rather than in one focal point, create a “something tucked in her hair” quality that feels heirloom-elegant and less obviously styled. This style works on virtually any hair texture and length, though it’s especially stunning on longer hair that allows maximum movement and visual impact.
Technique for Beautiful, Long-Lasting Curls
- Start with clean, product-prepped hair using a strong-hold mousse or setting spray
- Use a 1-1.25 inch curling iron to create curls throughout your entire head
- Curl sections away from your face on both sides for a cohesive, intentional effect
- Curl the entire back section as well—don’t skip the lower back where hidden hair exists
- Let all curls cool completely before touching them—this sets them for maximum longevity
- Once cooled, gently run your fingers through the curls to break up ringlets and create soft waves
- Create your half-up section by softly clipping back sections from your face on both sides, meeting at the back of your crown
- Secure with a clear or pearl-toned elastic and bobby pins
- Use pearl hairpins to secure this section and decorate it—position them so they’re visible from the front and sides
- Scatter 5-6 pearl pins throughout the half-up section and around where it meets your loose curls
- Allow your entire bottom section to cascade down, blending with the half-up section
- Finish with a flexible-hold hairspray that keeps curls in place while maintaining movement and softness
Worth knowing: The more pins you use, the more secure your half-up section will be—this style benefits from generous pinning if you’re planning to be active or dance considerably.
Final Thoughts
Your choice of half up half down style with pearls should reflect both your personal aesthetic and your wedding day vision. Whether you’re drawn to structured braids, romantic waves, minimalist elegance, or abundant curls, each style here offers a distinctly different bridal mood. The beauty of these styles is that they’re equally elegant whether you’re getting married in a traditional ballroom, an outdoor garden, a modern venue, or somewhere completely unexpected.
The key to looking and feeling confident in your chosen style is booking a trial appointment with your stylist at least 4-6 weeks before your wedding. This gives you time to adjust details, test how the style holds throughout a full day, and build muscle memory if you’re doing your own hair. Bring photos of styles that appeal to you, be specific about how you want your hair to feel (soft and romantic versus sleek and modern), and communicate honestly about your hair’s texture, thickness, and how it typically behaves.
On wedding day, account for time adjustments with your stylist, do a final test of how your style interacts with your veil or headpiece if you’re wearing one, and trust that the combination of pearls and your carefully chosen style will photograph beautifully and make you feel like the best version of yourself. These twelve options give you multiple directions to explore—each one capable of making you feel bridal, elegant, and radiant.