Your wedding day hair deserves to be as stunning as your dress, and there’s something genuinely magical about a half-up, half-down style paired with jeweled accents. This combination hits the perfect balance — it’s romantic and intentional without feeling overly formal, and it keeps your hair partially off your face while still showcasing the length and texture you’ve been growing out. The jewels take the whole look from simple to absolutely show-stopping, catching the light as you move and drawing the eye exactly where you want it.
The beauty of a half-up, half-down wedding style is its versatility. Whether your wedding is black-tie elegant or bohemian beachside, whether you’re working with naturally curly hair, silky straight strands, or something in between, there’s a jeweled version that’ll make you feel like yourself — just elevated. You’re not choosing between sophistication and accessibility; you’re getting both. Plus, as someone who’s seen countless wedding photos over the years, I can tell you that half-up styles consistently photograph better than either full-up or fully-down styles. They frame your face beautifully, they last through hours of dancing and celebrating, and they work with every veil, tiara, or accessory combination you might add.
Let me walk you through twelve stunning half-up, half-down styles that work specifically with jeweled accents, along with exactly how to create each one and why it’ll work for your big day.
1. Classic Pearl-Crowned Half-Up

This is the style that never ages out of fashion — pure elegance with a timeless sensibility. You’re pulling the top section of your hair from both sides of your head, twisting or softly braiding as you bring the sections back to meet at the crown, then securing them together with a jeweled or pearl-adorned clip or comb. The rest of your hair flows freely in soft waves or curls. What makes this work is the restraint — it’s not over-decorated, which is exactly why pearl accents feel so right. They catch light subtly, creating dimension without screaming for attention.
Why It’s Perfect for Weddings
This style reads as effortlessly sophisticated, which is honestly the vibe every bride wants to project. Pearls photograph beautifully under any lighting — natural sunlight, flash, even candlelight in an evening reception. The simplicity means your face and your dress become the main event, and your hair plays a supporting role without competing. It’s also incredibly flattering on every face shape because the lifted sections create lift and dimension at the crown without pulling too tightly.
How to Build This Look
- Start with hair that’s been blow-dried smooth or styled into soft waves
- Create a deep side part and take a 2-3 inch section from one side at ear level
- Twist this section back gently, keeping the twist relaxed and textured
- Repeat on the other side, bringing both twisted sections to meet at the back crown
- Secure with a pearl-adorned comb, clip, or elastic wrapped in ribbon
- Leave the bottom half flowing naturally, using a curling iron to create soft waves if starting with straight hair
- Use bobby pins to secure any flyaways that escaped the twist
Pro tip: Pearl accents work best against darker hair or rich, jewel-toned dresses. If you have blonde or very light hair, consider switching to a clear-crystal or diamond-studded clip instead — it’ll create more contrast and visual interest without looking washed out in photos.
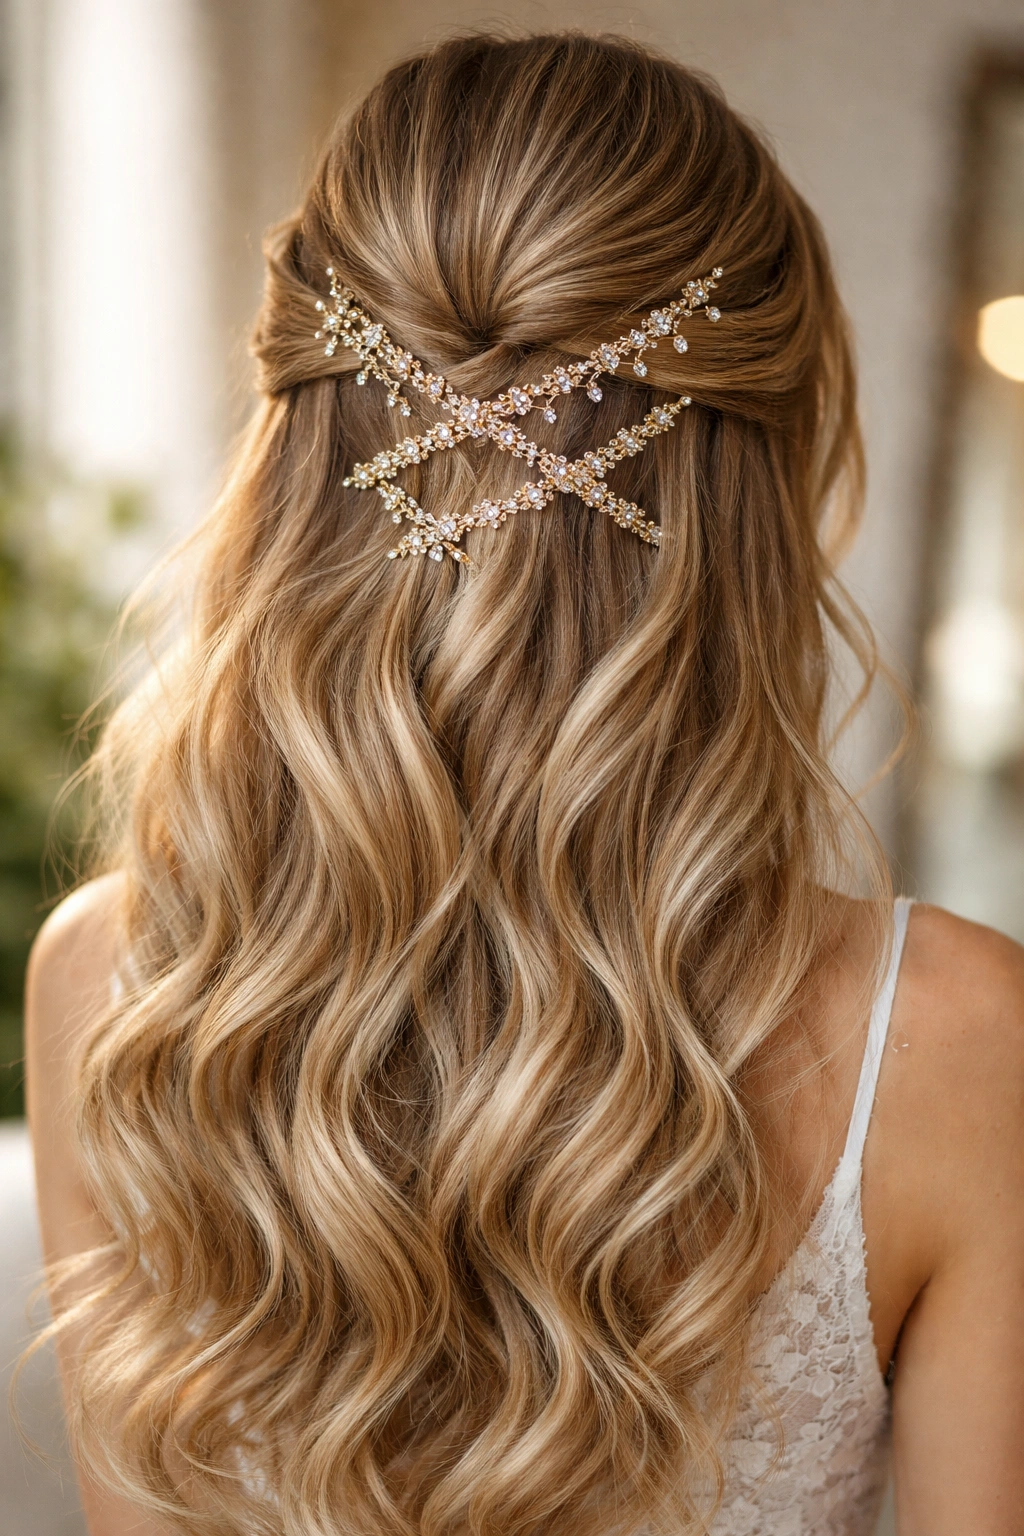
2. Twisted Criss-Cross Half-Up With Crystal Pins
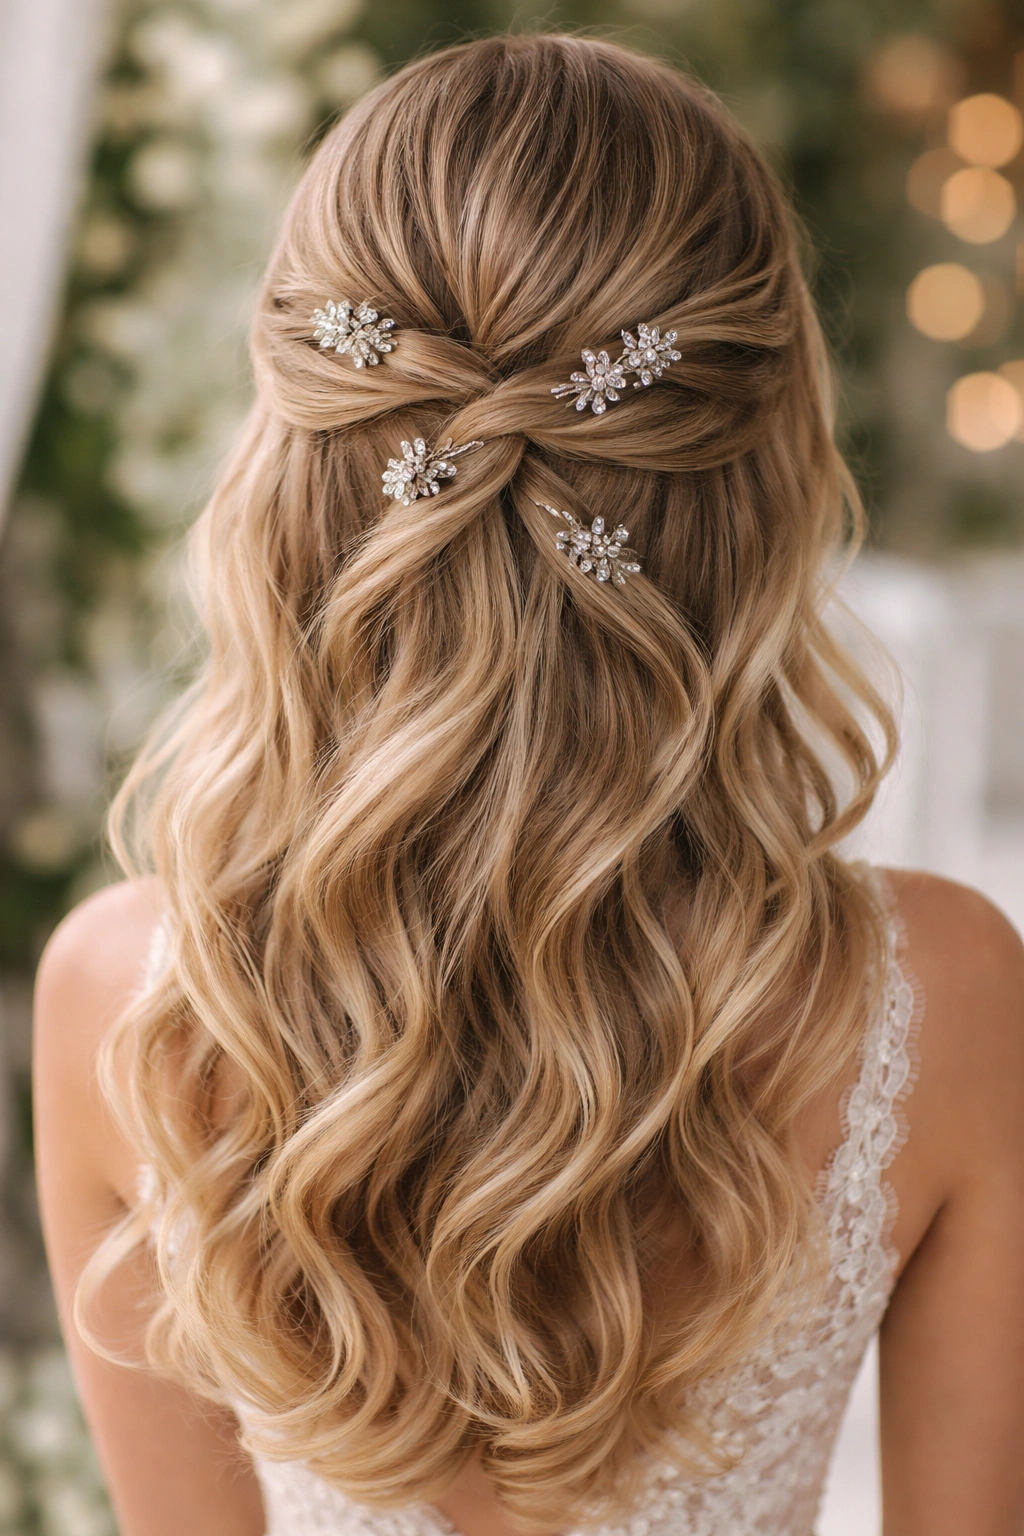
This style has a bit more intricacy built in, which makes it feel special without actually being complicated to execute. You’re creating two twisted sections that cross over each other at the back of your head before being pinned down, creating an almost-braided effect that’s softer and more romantic than an actual braid. Scattered crystal pins throughout the twisted sections catch light as they reflect off the crystals from multiple angles.
Why It’s Perfect for Weddings
The criss-cross element adds visual interest and movement that photographs incredibly well. When you turn your head, the crystals spark and shimmer, which creates dynamic, engaging photos. This style reads as thoughtfully designed — like you put genuine effort into every detail — while still looking natural and wearable for an eight-hour celebration. It’s particularly stunning with an open-back dress or if you’re planning a ceremony where guests will see the back of your head.
How to Build This Look
- Start with clean, dry hair styled in soft waves
- Take a 2-3 inch section from one side of your head at temple level
- Twist this section loosely back toward the center-back of your head
- Take a corresponding section from the other side and twist it the same way
- Cross the two twisted sections over each other, creating an X shape at the back
- Pin both sections down with clear or jeweled bobby pins, spacing pins about 2 inches apart
- Tuck any loose ends under the twisted sections so they’re hidden
- Finish with flexible hairspray that won’t make the twists feel stiff
Pro tip: Practice this style at least twice before your wedding day. The criss-cross alignment needs to feel natural and balanced, and you want to know exactly how many pins you need and where to place them for maximum shimmer and hold.
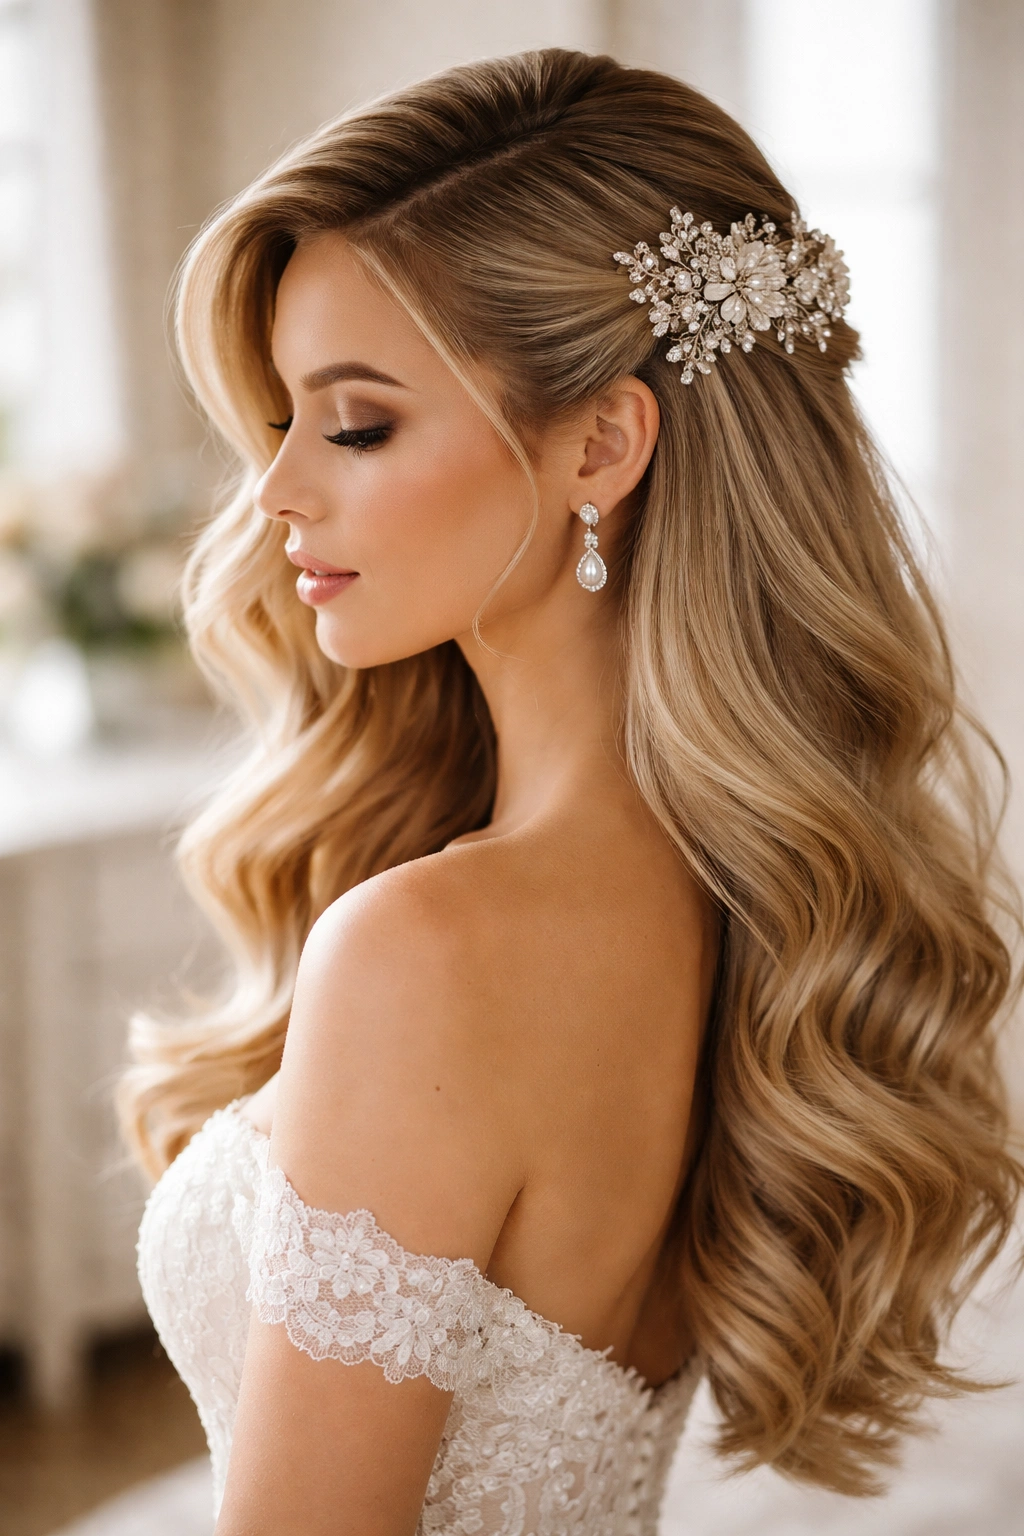
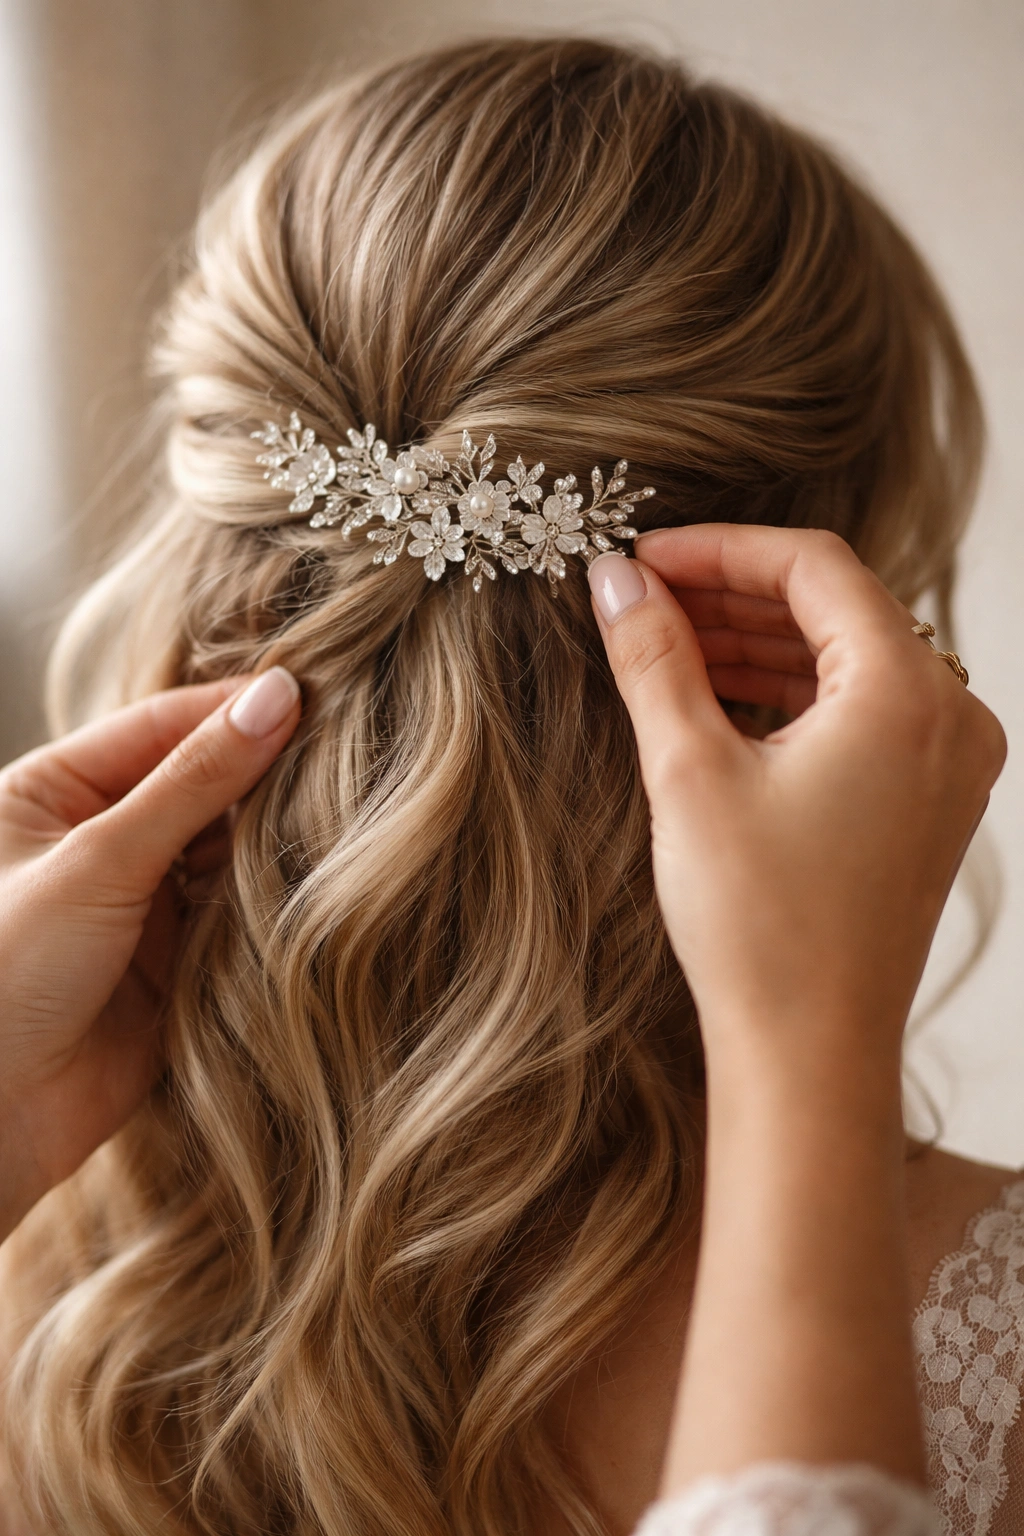
3. Jeweled Comb Half-Up With Textured Volume
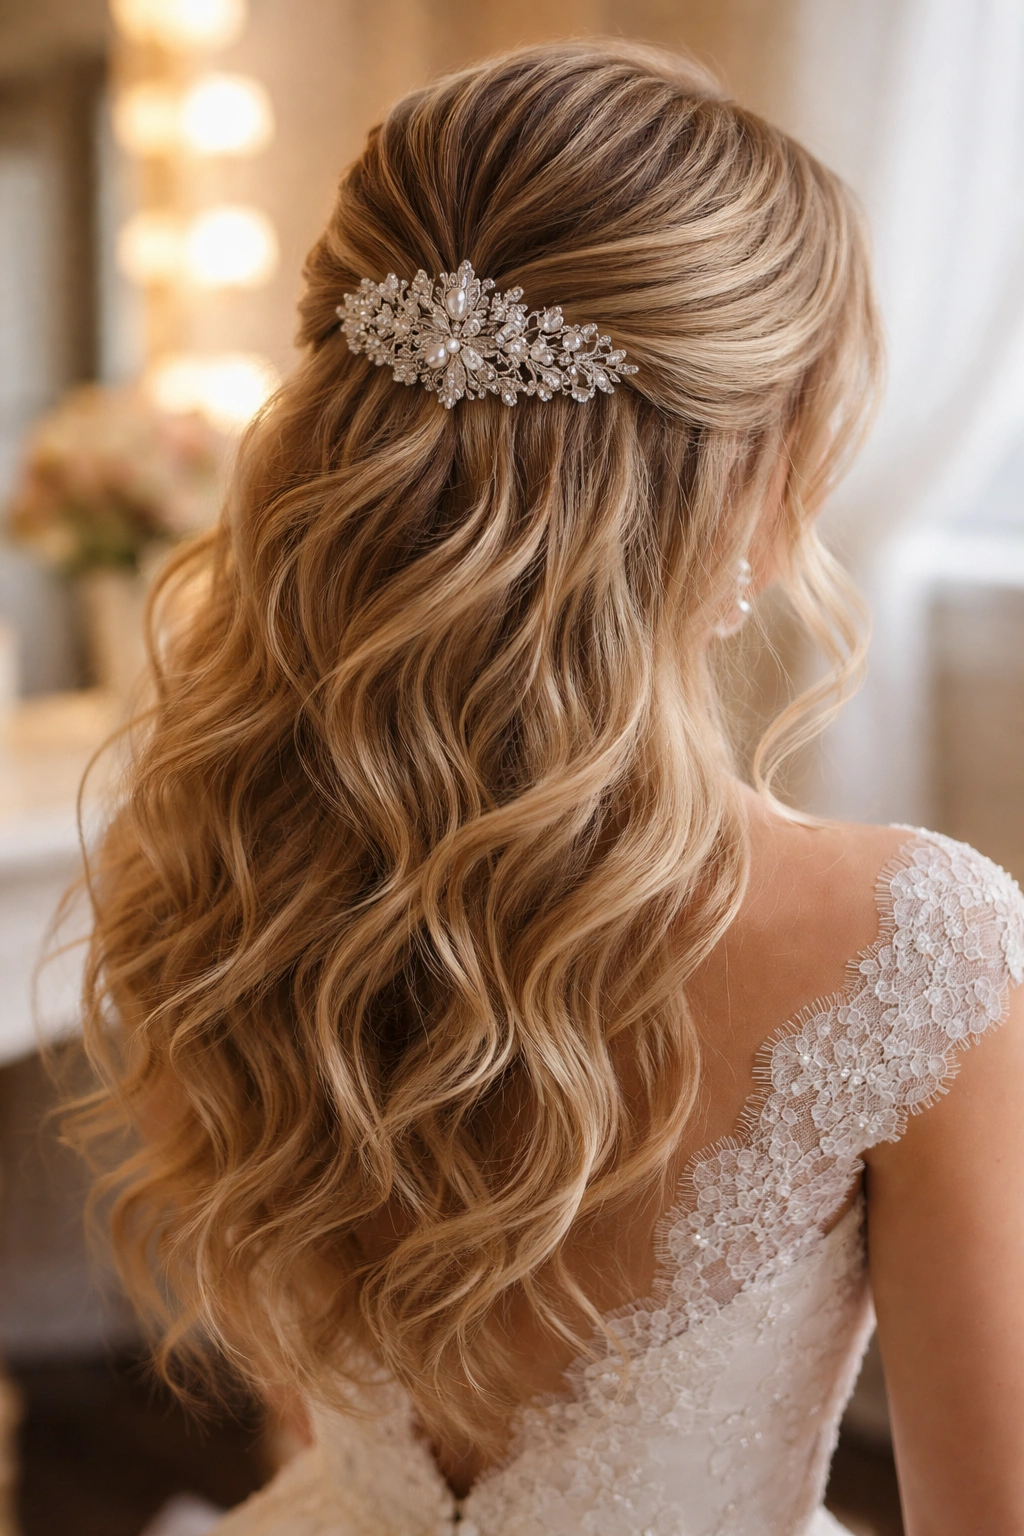
Here’s where you’re using the jeweled comb as the actual star of the show. You’re creating a generous half-up section with plenty of texture and volume — this could be a braid, a twist, or a soft gather — and securing it with a statement jeweled comb. The comb’s design becomes part of the overall aesthetic rather than just a functional piece. This works best when the comb has significant visual weight, like a wide ornate design or one loaded with crystals and pearls.
Why It’s Perfect for Weddings
A jeweled comb is a jewelry piece, essentially. It serves the practical function of holding your hair, but it’s genuinely beautiful enough to be the focal point of your entire hairstyle. This approach is particularly smart if you’re already wearing a complex dress or significant jewelry — one stunning comb can be all the adornment your hair needs. It also feels bride-specific without looking costume-y, which is the exact line you want to walk.
How to Build This Look
- Create maximum texture in your hair with waves, a loose braid, or a combination of both
- Gather the top half of your hair at the crown, using your fingers rather than combing to maintain texture
- Tease gently at the crown to create lift
- Smooth the surface layer slightly with a brush (you want the texture hidden but the volume visible)
- Secure the gathered section with a clear elastic at the crown
- Slide your jeweled comb through the secured section, positioning it so the design faces outward and downward where it’ll be visible
- Release any face-framing pieces from the secured section for softness
Pro tip: If your comb feels loose after securing, use two thin bobby pins anchored into the elastic under the comb to lock it firmly in place. You don’t want it sliding down during your vows or first dance.
4. High Crown Half-Up With Diamond Clips
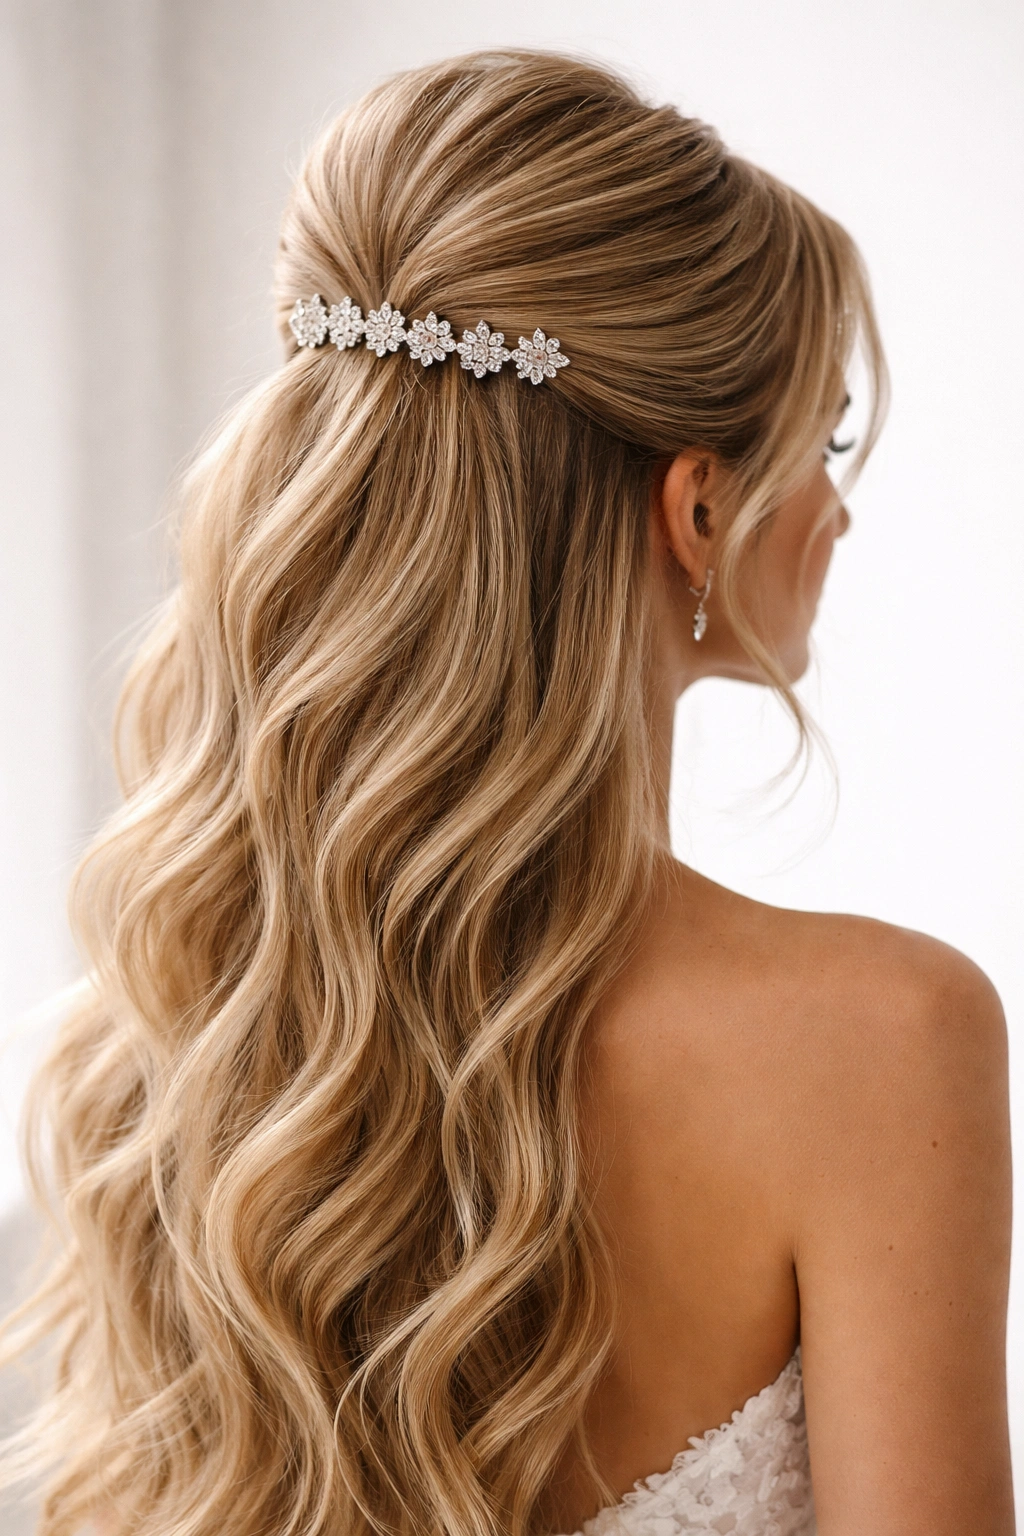
This style pulls the half-up section higher than typical — closer to the very top of your head — creating a lifted, elongated face shape and an elegant silhouette. Instead of one comb or clip, you’re using multiple smaller diamond-encrusted clips positioned in a line or pattern along the base of the gathered section. This distributed approach feels more modern and allows for more detailed sparkle without looking heavy.
Why It’s Perfect for Weddings
The high placement automatically gives an impression of lift and luxury. Your face looks longer (which is flattering on almost every face shape), and there’s something undeniably regal about wearing your hair pulled up this high. The multiple clips create a tiered sparkle effect that’s visually interesting and photographs beautifully from every angle. This style is particularly stunning if you’re planning to wear a veil — the clips anchor the veil securely while looking intentional and designed.
How to Build This Look
- Start with smooth, blow-dried hair or hair styled into subtle waves
- Create a large section at the crown of your head, extending from the front hairline back to about mid-crown
- Gather this section up and slightly back, aiming for the highest point of the crown
- Secure with a thin, clear elastic
- Position your first diamond clip at the center of the elastic base
- Position additional clips on either side of the center clip, spacing them about ½ inch apart
- Make sure all clips are facing the same direction and are anchored securely
- Leave the bottom half of your hair down, styling it in loose waves or curls
Pro tip: Avoid using too many clips — three to five is usually the sweet spot. More than that starts to look busy rather than elegant. The clips should enhance the style without overwhelming it.
5. Romantic Floral Crown Half-Up With Scattered Jewels
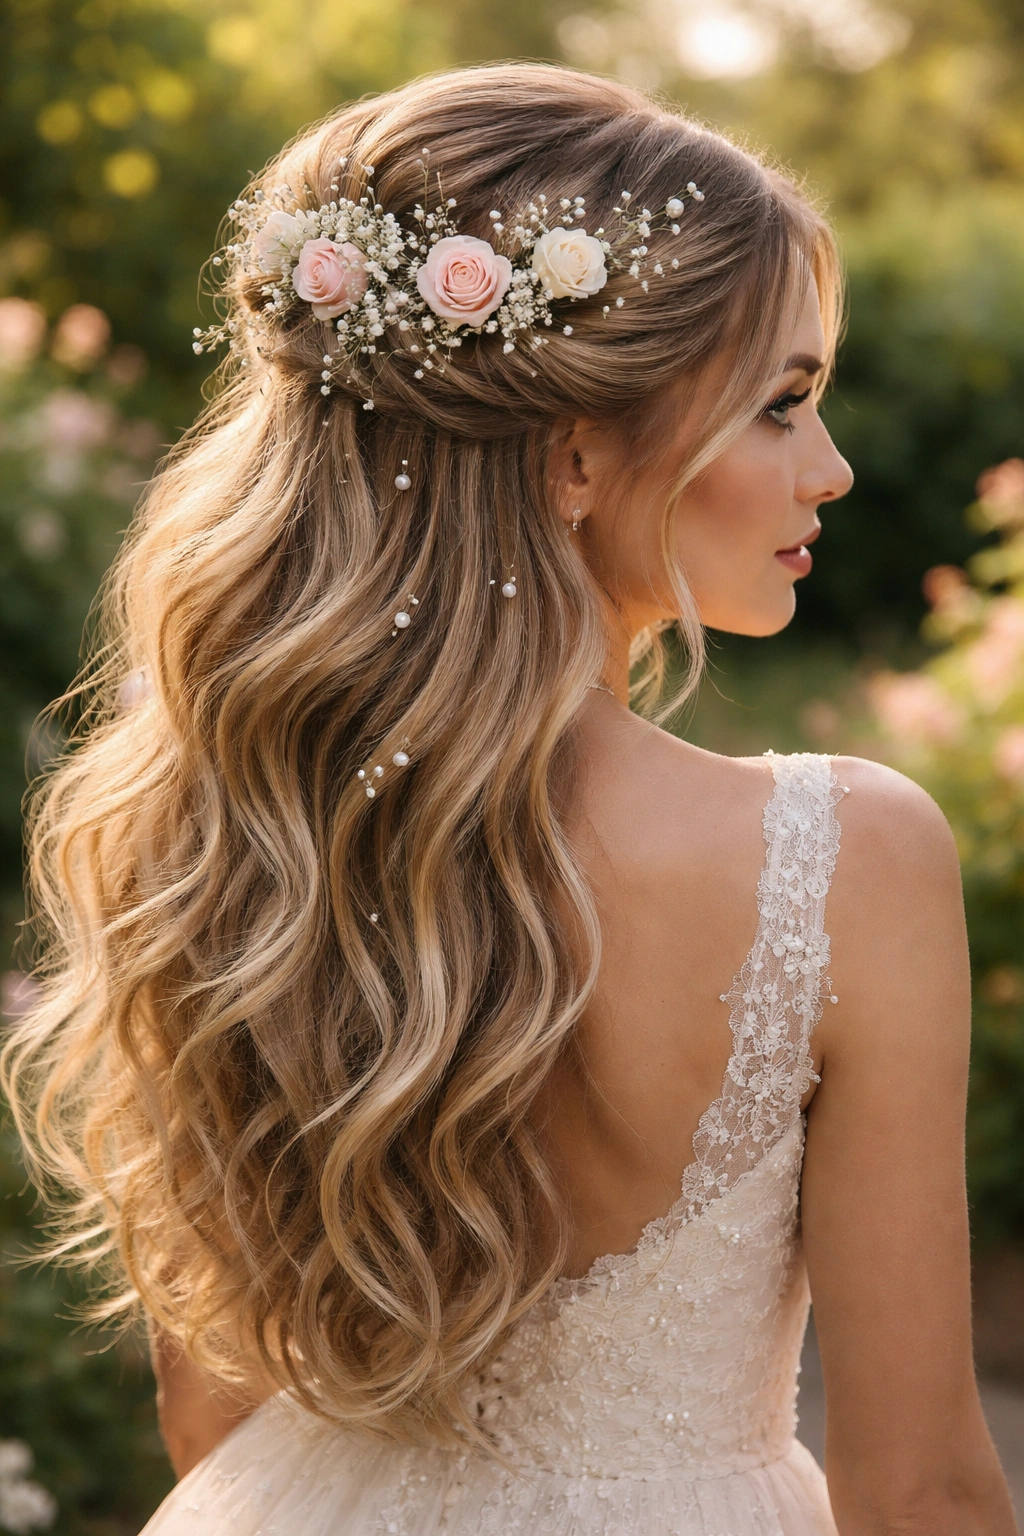
This is the style for brides who want a genuinely romantic, almost ethereal look. You’re creating a soft half-up gather, then weaving fresh flowers (or high-quality faux flowers if you prefer) through the gathered section and anchoring the whole thing with scattered crystal or pearl pins. The flowers become part of the securing mechanism, creating a crown-like effect without a formal crown structure.
Why It’s Perfect for Weddings
This style screams romantic bride without ever feeling costume-y. The combination of flowers and jewels is inherently bridal, and it feels intentional and thoughtfully designed. It photographs extraordinarily well in natural light, and the flowers add a living, breathing element that makes your hair feel organic rather than rigidly styled. If you’re having an outdoor or garden wedding, this style is practically made for that setting.
How to Build This Look
- Start with hair that’s been loosely waved or curled
- Gather the top half of your hair into a soft, loose ponytail at the crown using your fingers rather than a comb
- Secure loosely with a thin clear elastic
- Begin inserting small sprays of flowers into and around the gathered section, positioning them so they’re visible from the front
- Weave longer stems through the gathered hair, letting some hang slightly at the back
- Secure flowers in place with bobby pins that match your hair color, positioning pins where they’ll be hidden by flowers
- Scatter crystal and pearl bobby pins around the gathered section, between the flowers, for additional sparkle
- Allow some face-framing pieces to fall loose for softness
- Use flexible hairspray to hold everything in place without making it feel stiff
Pro tip: If using fresh flowers, have your florist prepare them the morning of your wedding and keep them in water until the last possible moment. Even high-quality faux flowers work beautifully though, and they eliminate concerns about wilting or pollen.
6. Bohemian Half-Up With Scattered Crystal Pins Throughout
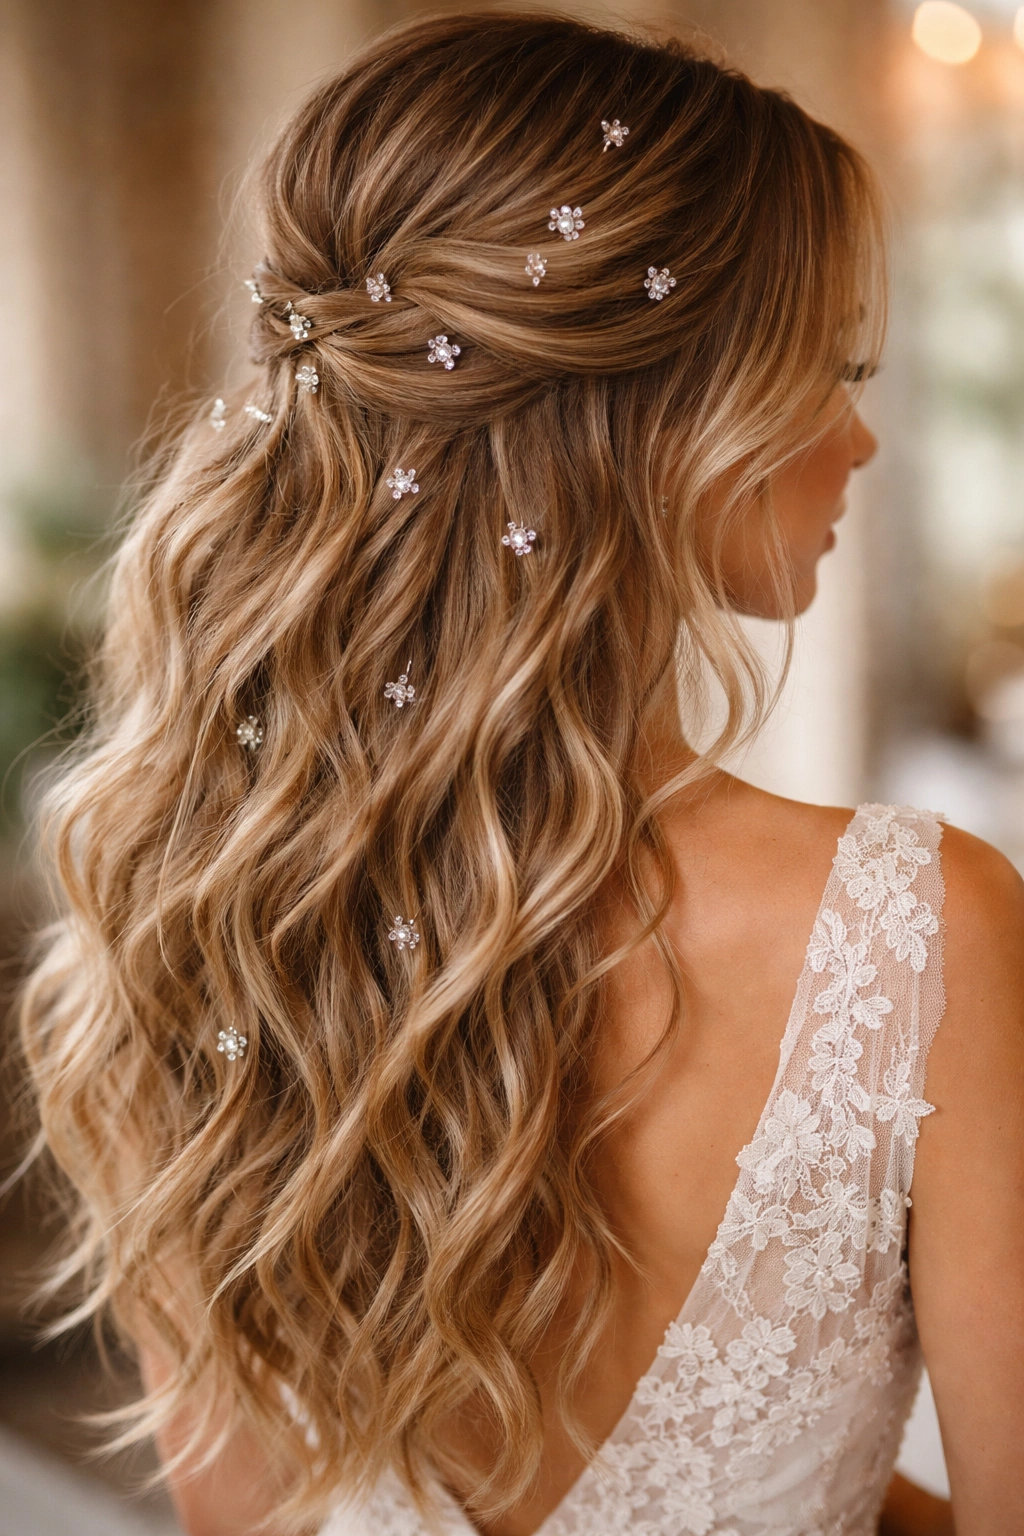
This style embraces texture and movement rather than precision. You’re creating a relaxed half-up gather with plenty of loose, undone texture, then studding the entire style with individual crystal pins placed seemingly at random (but actually strategically positioned for balance and sparkle). The result feels effortlessly bohemian rather than formal, which works beautifully for relaxed weddings, elopements, or ceremonies with a boho aesthetic.
Why It’s Perfect for Weddings
The scattered crystal approach works perfectly if you want maximum sparkle without a single statement piece. Every time you move, different crystals catch the light, creating dynamic movement in photos. This style is also incredibly forgiving — slight imperfections and loose pieces actually add to the bohemian vibe rather than detracting from it. It’s the kind of style that feels like it took you ten minutes even if you spent forty minutes perfecting the details.
How to Build This Look
- Create textured waves throughout your hair using a curling iron or braid method
- Take a generous section from the crown and sweep it back loosely
- Secure with a clear elastic, leaving the section intentionally loose and imperfect
- Release a few face-framing pieces to fall forward
- Starting at one side of the secured section, begin placing individual crystal bobby pins throughout
- Space pins about 1 inch apart, positioning them so they’re visible but blend with your hair texture
- Continue around the back and other side of the secured section
- Leave some areas with denser clustering and other areas more sparse for natural balance
- Tease lightly at the crown if you want additional lift
- Use a light hairspray that won’t weigh down the texture
Pro tip: The more texture you build into the hair before securing, the easier it is to hide bobby pins. Every crystal pin becomes part of the overall sparkle story rather than looking like it’s holding up weak hair.
7. Voluminous Half-Up With Chandelier-Style Jeweled Pins
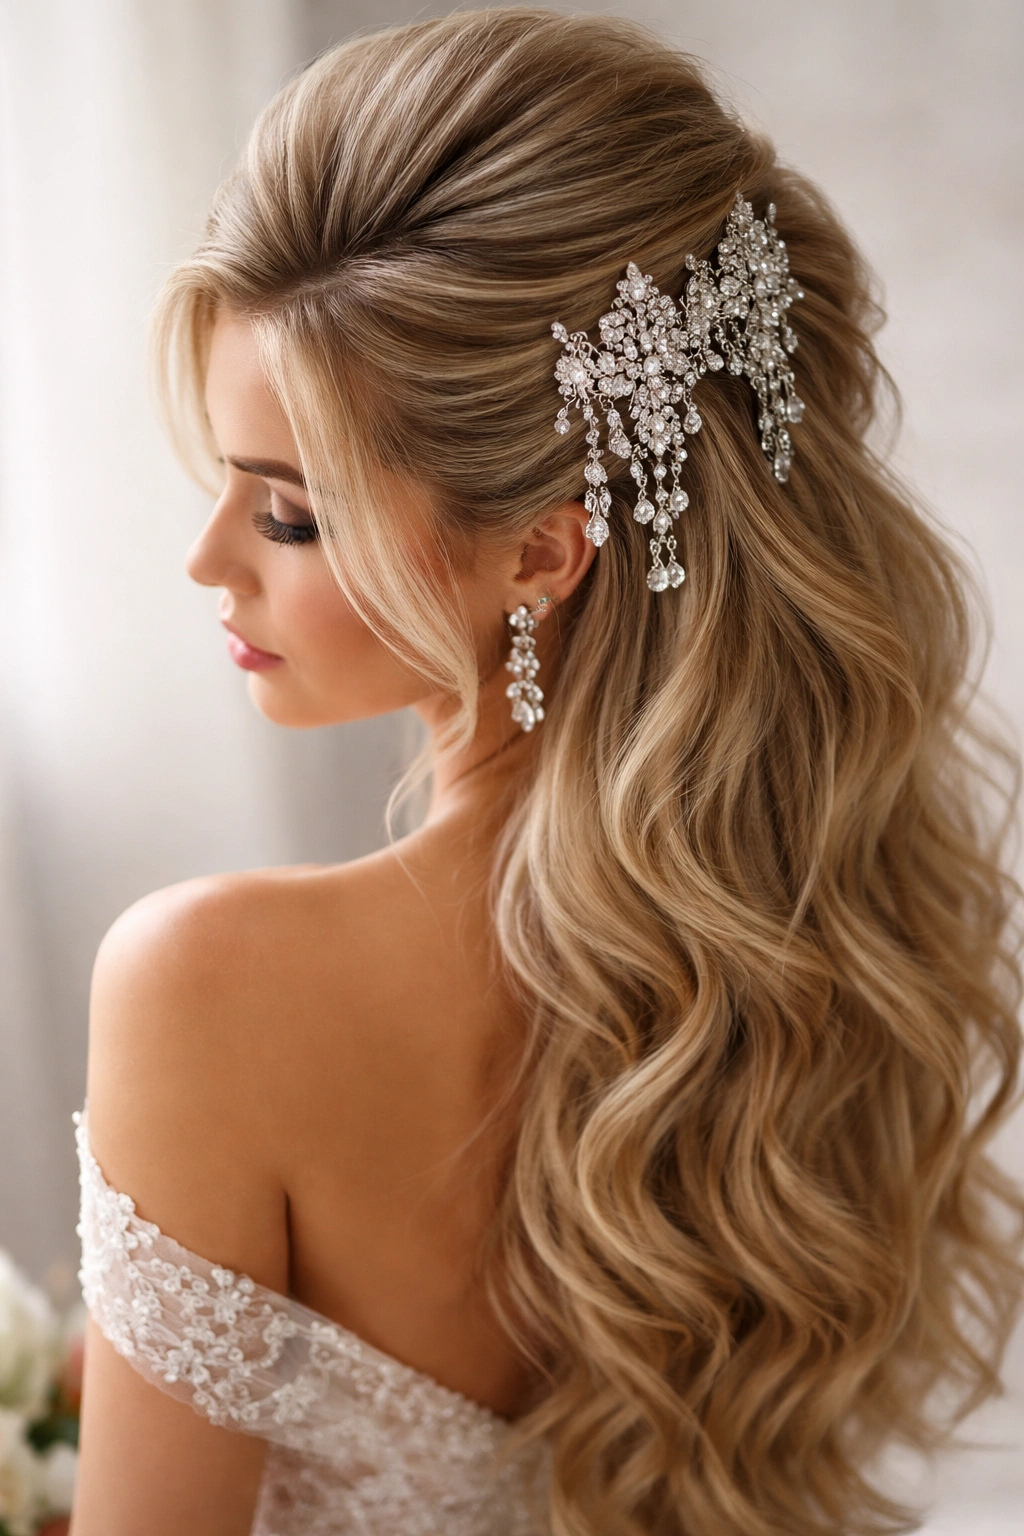
This is the statement-making option for brides who love drama and impact. You’re creating genuinely voluminous texture at the crown with significant teasing and backcombing, then anchoring the gathered section with chandelier-style pins that dangle and move. These aren’t delicate pins — they’re jewelry pieces that happen to secure hair. They should have weight, movement, and genuine visual presence.
Why It’s Perfect for Weddings
If you want guests to notice your hair from across the room, this is the style. The combination of volume and dangling crystals creates an undeniably luxe, attention-commanding look. It’s particularly stunning on brides with thick, healthy hair that can support the volume without looking matted. The movement of the chandelier pins is mesmerizing in photos and video, creating dynamic, engaged imagery rather than static styling.
How to Build This Look
- Start with clean, dry hair with good natural texture
- Apply volumizing mousse or spray to damp hair and blow dry for maximum lift
- Create a large section at the crown, extending from your front hairline to about 2 inches past the crown
- Backcomb this section generously at the roots to create substantial volume
- Smooth the surface layer gently with a brush to create shape while maintaining the height
- Gather the section loosely and secure with a sturdy elastic
- Position your chandelier pins along the base of the gathered section, spacing them evenly
- Make sure each pin is anchored securely so it won’t slip during movement
- Leave the bottom half in soft waves or curls to balance the volume at the top
Pro tip: The heavier the chandelier pins, the more important it is that your gathered section is truly secure. Use a quality elastic and consider adding bobby pins under the elastic for additional anchoring.
8. Side-Swept Half-Up With Statement Brooch
Instead of gathering at the center crown, you’re sweeping your half-up section to one side, creating an asymmetrical, elegant silhouette. A statement brooch — whether it’s a vintage piece, a contemporary design, or something custom-made — anchors the swept section at the side of your head. This approach feels more modern than a centered half-up while still being undeniably bridal.
Why It’s Perfect for Weddings
The side-swept look is inherently flattering because it creates height and dimension while keeping one side of your face fully visible (great for showing off makeup and features). A statement brooch in this position becomes a genuine jewelry piece rather than just a hair accessory, which means you could potentially wear it again. This style works beautifully with modern wedding aesthetics and photographs from most angles.
How to Build This Look
- Create soft waves or texture throughout your hair
- Take a generous section from the crown and sweep it to one side (let’s say the right)
- As you sweep, gently twist or softly braid the section to create texture and interest
- Secure the swept section at the side of your head with a thin elastic
- Position your statement brooch over the elastic, angling it so the design is visible
- Secure the brooch with bobby pins anchored into the elastic underneath, so the pins aren’t visible
- Leave the other side of your hair down and flowing, with subtle waves
- Release a few face-framing pieces from the secured section for softness
Pro tip: This style works best with a brooch that has significant visual weight and design. A delicate brooch will get lost in the sweep, but a bold, interesting piece becomes the focal point that makes the entire style work.
9. Textured Half-Up With Jeweled Bobby Pins Creating a Pattern
This style uses the bobby pins themselves as the design element. Instead of one securing piece, you’re using multiple jeweled bobby pins positioned in an intentional pattern — a line, a curve, a gradient — that becomes part of the visual design. This approach is modern, customizable, and allows you to match the pins to other jewelry or your dress details.
Why It’s Perfect for Weddings
The patterned-pin approach feels personalized and designed rather than standard. You can create literally any pattern that appeals to you — a straight line across the back, a curved swoosh, a diamond shape, a gradient from one color to another. This style photographs beautifully because the pins create visual interest and sparkle without looking like they’re hiding messy hair. It’s particularly effective if you’re having a modern, minimalist, or geometric-influenced wedding aesthetic.
How to Build This Look
- Start with clean, dry hair styled in soft waves
- Create a half-up section at the crown, gathering the hair gently without teasing
- Secure with a clear elastic that matches your hair color
- Plan your pin pattern — sketch it out if you want to — deciding where each pin will go
- Starting at one end of your pattern, begin positioning jeweled bobby pins through the secured section
- Space pins according to your chosen pattern, making sure each is anchored securely
- Continue until your pattern is complete
- The pattern should be visible from the back and side views, so keep it at a height where it’ll show
- Smooth any surface irregularities with a light hairspray
Pro tip: Clear-crystal pins work with any dress color, but consider using pins that match your jewelry metals or dress accents for maximum cohesion. All gold, all silver, or a mixed metallics approach all work beautifully.
10. Curled Half-Up With Tiara Accent and Crystal Pins
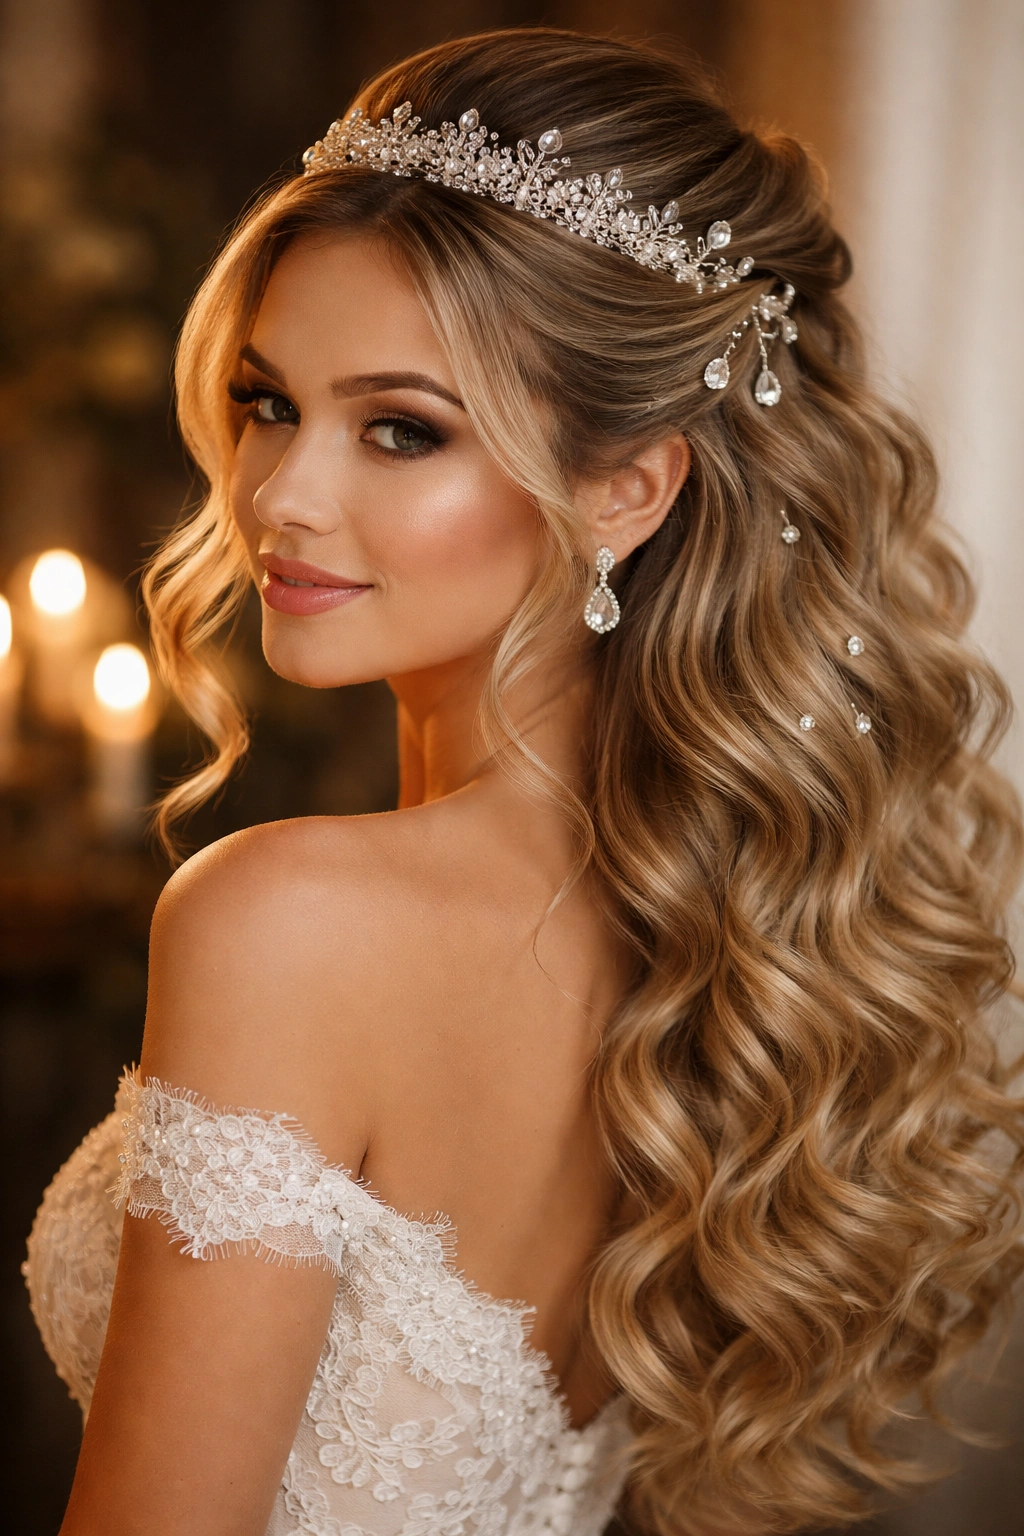
This style combines a feminine, princess-like vibe with modern sparkle. You’re creating voluminous, bouncy curls throughout your hair, gathering the top half, and anchoring it with a tiara positioned over the gathered section. Additional crystal pins scattered around the tiara create layered sparkle and make the whole arrangement feel intentional and designed.
Why It’s Perfect for Weddings
Curls automatically read as romantic and bridal, and a tiara elevates the entire look into genuinely special territory. The combination of bouncy curls with a tiara and scattered crystals feels confident and celebratory without being over-the-top. This style is particularly stunning on brides who love the princess-bride aesthetic or who are having a more formal, traditional wedding.
How to Build This Look
- Create tight, bouncy curls throughout your hair using a curling iron
- Allow curls to cool completely before touching them (this ensures they hold)
- Take a generous section at the crown and gather it loosely, allowing some curl texture to remain visible
- Secure with a clear elastic
- Position your tiara over the gathered section, making sure it’s anchored securely
- Secure the tiara with bobby pins at multiple points so it won’t shift
- Position crystal bobby pins around the base of the tiara, creating a sparkling frame around it
- Leave the bottom half of your hair in its natural curls, allowing them to cascade down
- Gently separate curls with your fingers to increase volume
Pro tip: Have someone help you secure the tiara — it’s genuinely difficult to position correctly on your own. Make sure every anchor point is secure so you don’t spend your wedding day adjusting it.
11. Asymmetrical Half-Up With Cascading Crystal Accent

This style plays with asymmetry and movement. You’re creating a half-up gather, but instead of centering it, you’re positioning it slightly off-center. Then, instead of a comb or clips holding it in place, you’re creating a cascading element — a braid, a twist, or a strand of crystals — that flows from the gathered section down one side of your head. It’s more artistic and less structured than traditional half-up styles.
Why It’s Perfect for Weddings
The cascading element creates movement and visual interest that’s genuinely mesmerizing in photos and video. Asymmetry feels modern and intentional, which appeals to brides who want something beautiful but not traditional. This style is particularly stunning if you’re planning movement — dancing, walking along a beach, spinning in your dress — because the cascading element will catch light and move dynamically.
How to Build This Look
- Create soft, textured waves throughout your hair
- Create your half-up section but position it slightly to one side of center
- Secure the gathered section with a clear elastic
- Create a braid or twist from the gathered section, letting it fall down the right or left side of your head
- As you braid or twist, weave in a strand of crystal beads or a chain of small jewels
- Secure the end of the braid with a small clear elastic or bobby pin
- Leave the bottom half of your hair down and flowing
- Release a few face-framing pieces for softness
- Use flexible hairspray to hold the braid structure without making it feel stiff
Pro tip: Practice positioning your cascading element so that it doesn’t obscure your face in photos. The cascade should flow down the side of your head, visible from profile or back views, but not covering your cheek or jaw.
12. Vintage-Inspired Half-Up With Jeweled Hairnet

This is the most intentionally styled option — a nod to vintage bridal aesthetics with a modern sparkle update. You’re creating a polished half-up gather with smooth waves or finger waves, then covering the gathered section with a delicate jeweled hairnet. The net catches light throughout, creating an overall impression of shimmer and romance while also making the hairstyle feel deliberately designed.
Why It’s Perfect for Weddings
A hairnet is the ultimate vintage touch, but a jeweled version reads as contemporary and intentional rather than historical costume. This style is particularly stunning in black-and-white photography because the net creates incredible texture and dimension. It’s also practical — the net helps secure the gathered section while adding visual interest, which is a rare combination.
How to Build This Look
- Start with clean, dry hair styled in smooth waves or finger waves
- Create a half-up section at the crown, gathering the hair smoothly without texture
- Secure with a thin, clear elastic
- Smooth any flyaways with a fine-tooth comb and lightweight hairspray
- Position your jeweled hairnet over the gathered section, making sure it covers the entire secured area
- Anchor the net with bobby pins at multiple points, tucking pins under the net so they’re not visible
- Adjust the net so the jewels are evenly distributed and visible
- Leave the bottom half of your hair down, maintaining the smooth wave texture
- For additional polish, apply a light shine spray to the waves
Pro tip: A jeweled hairnet is a significant investment piece, but it’s genuinely timeless. Look for nets made with quality materials that won’t tangle in your hair or feel uncomfortable to wear for an extended period.
Wrapping It Up
Your half-up, half-down style with jeweled accents is genuinely one of the most impactful styling choices you’ll make on your wedding day. It’s the detail that appears in every photograph, frames your face, and stays with you through every moment of celebration. The beauty of these twelve options is that each one creates a completely different impression — from ultra-romantic to modern and minimal, from princess-like to confidently unconventional.
The most important thing is choosing a style that feels authentically like you. If you’re more boho, the scattered crystals or floral crown versions will feel right. If you love drama, go voluminous. If you prefer understated elegance, a simple pearl-crowned style or classic diamond clips will be perfect. Your hair should enhance your confidence, not compete with your comfort.
Have a stylist try these styles during your consultation appointments — don’t just show pictures. How a style actually feels on your head, how secure it is, and whether you feel like yourself in it matters more than how it looks in inspiration photos. Your wedding day hair is going to be absolutely stunning because you’re taking the time to find the right style for you.