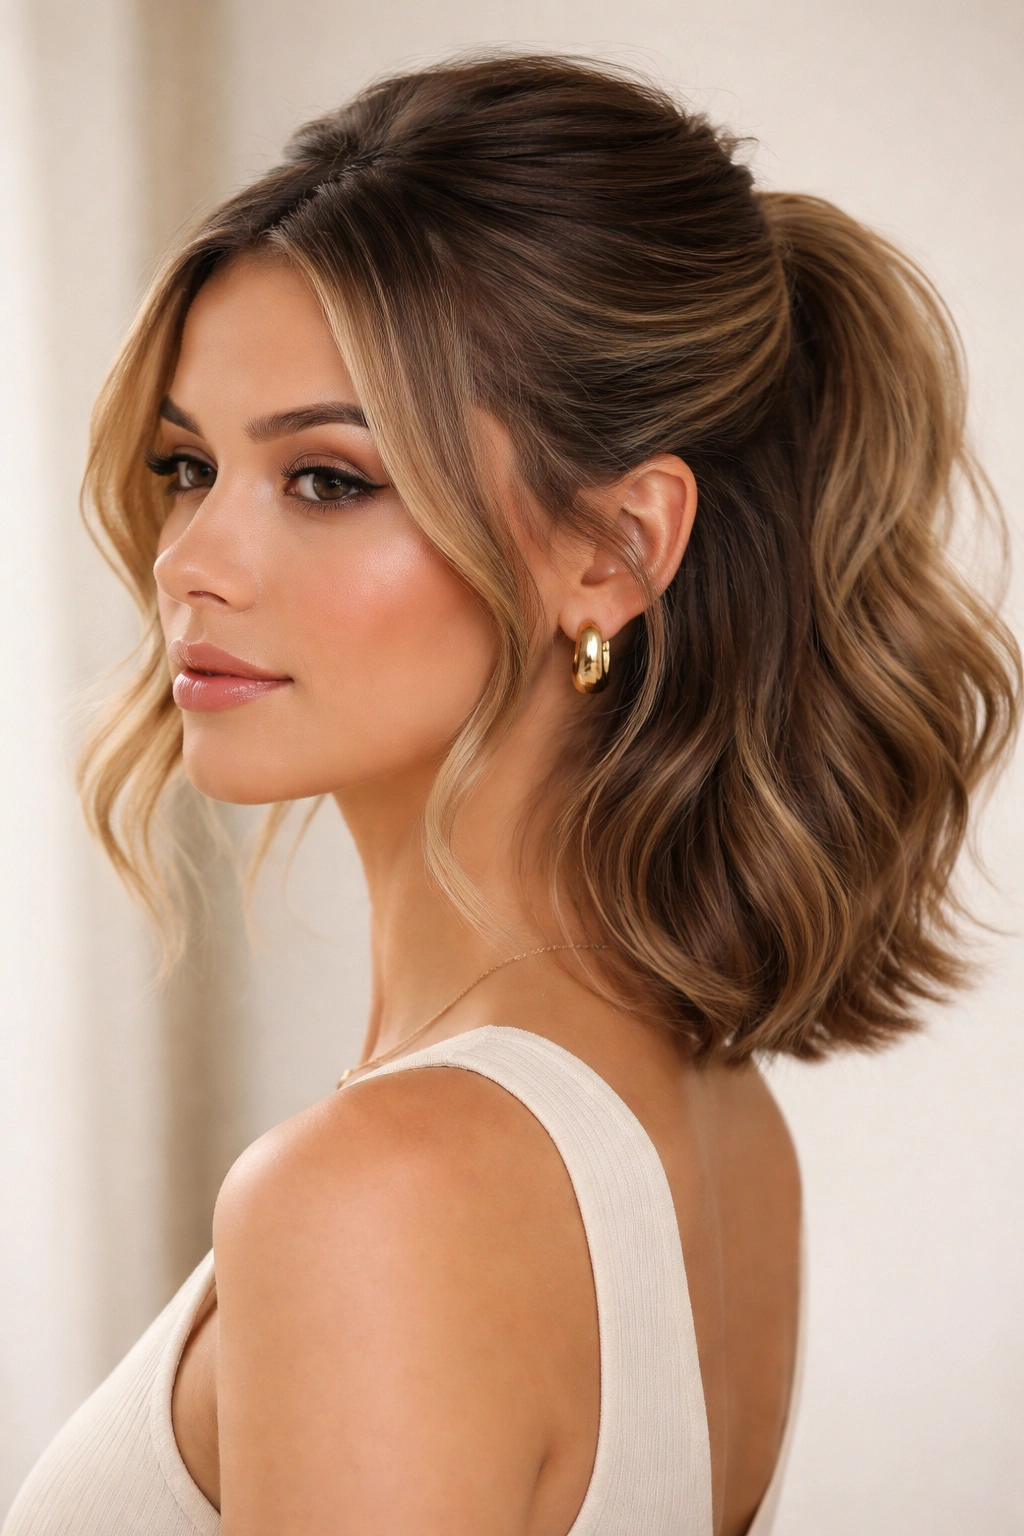
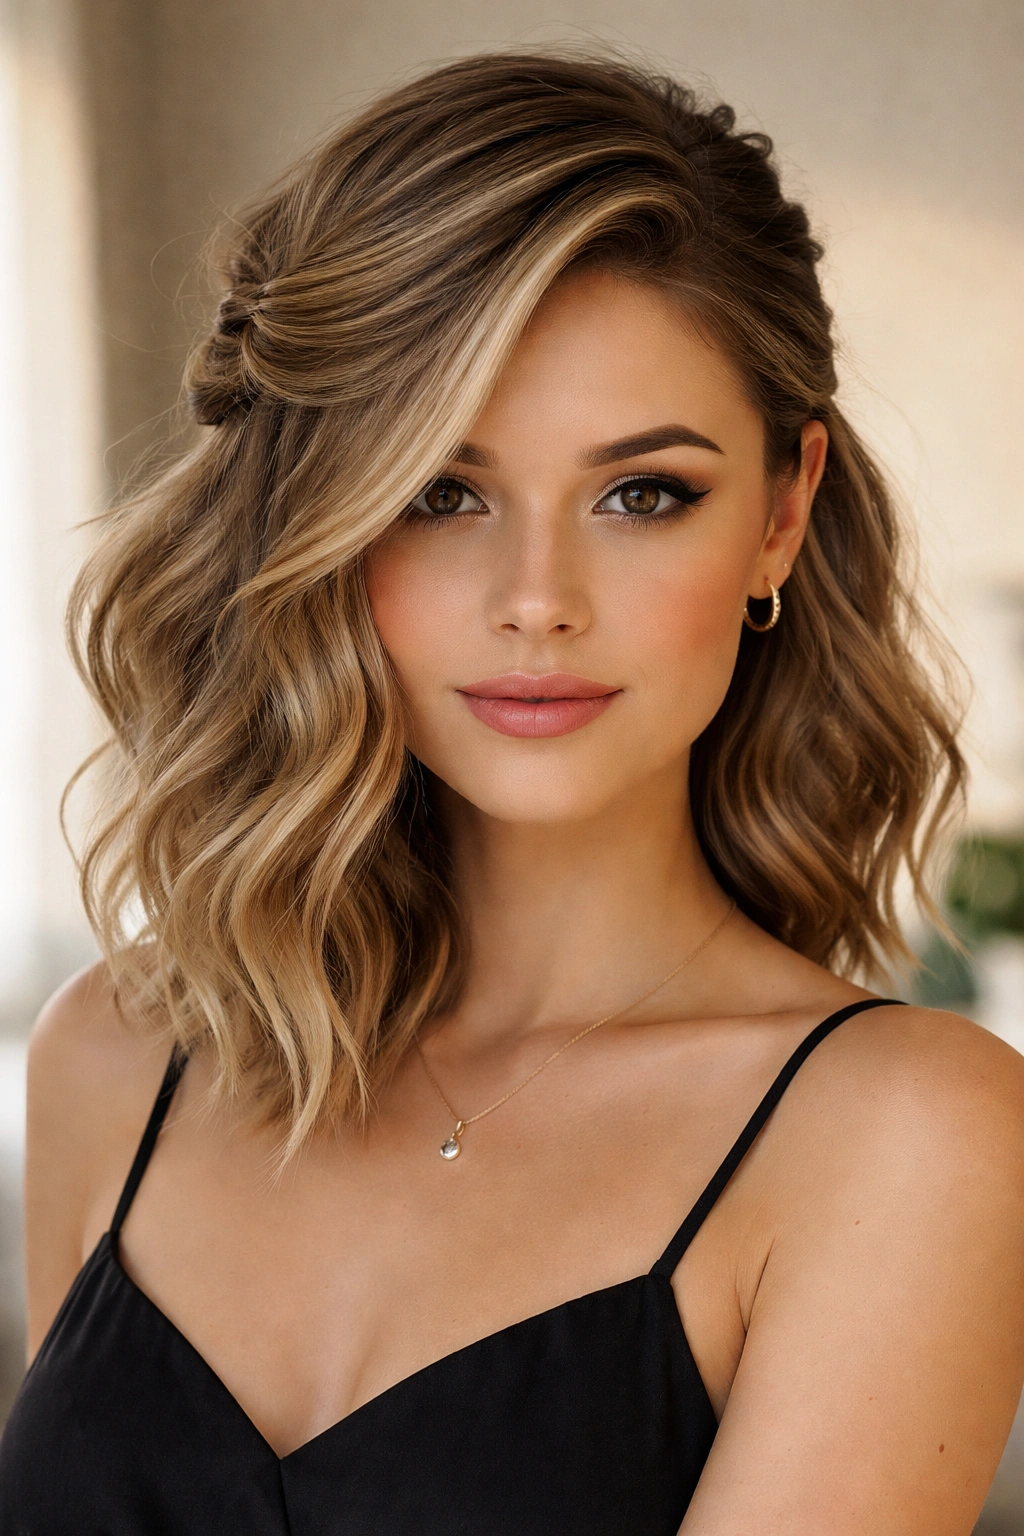
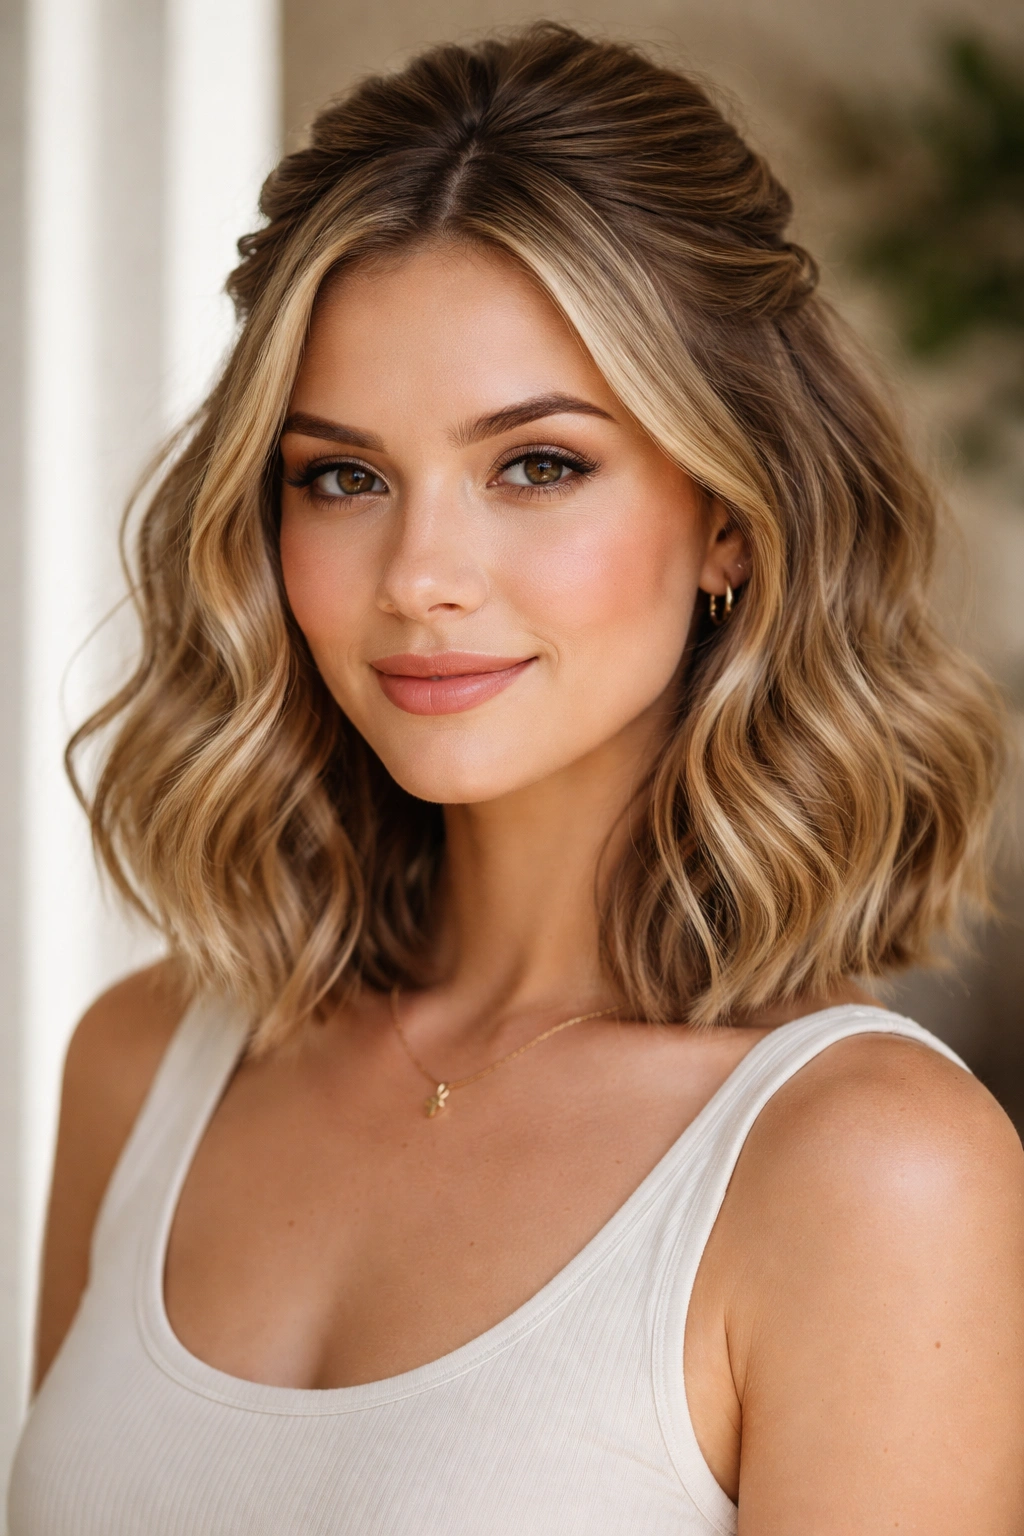
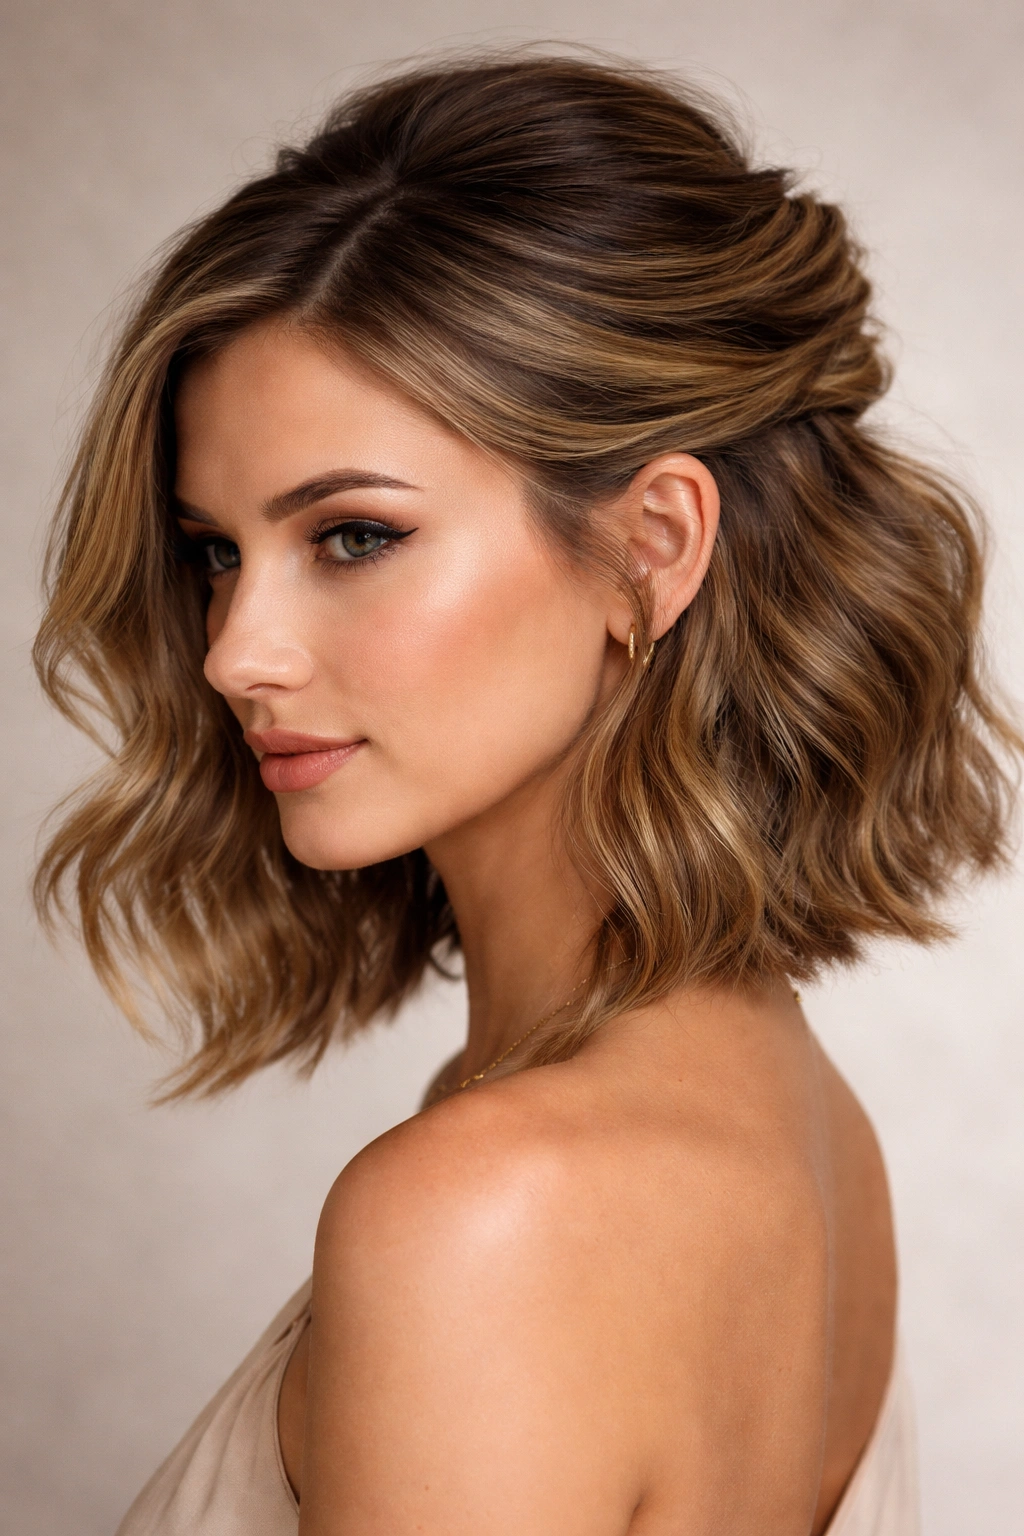
A wavy bob sits in that sweet spot between versatile and textured—giving you enough movement to work with without the long-hair commitment. The half-up half-down style takes that magic even further by combining the best of both worlds: dimension that frames your face while keeping hair off your neck, plus volume on top that makes you look like you spent an hour getting ready when you didn’t.
The beauty of a wavy bob with a half-up half-down style is the flexibility. Whether you’re going to the office, a casual lunch, or a night out, this look adapts to your vibe without requiring a complete restyle. The waves already have texture built in, which means half-up styles tend to feel effortless and modern—nothing stiff or overdone. Your hair’s natural movement becomes part of the design instead of fighting against it.
What makes this particular combination so effective is that it solves the real problems wavy-bob wearers face: how to style hair that’s too short for most updos but too long to wear completely down without feeling flat. A half-up half-up half-down approach adds instant polish, creates the illusion of more volume than you might naturally have, and gives you styling options that range from romantic to edgy to minimalist. Let’s explore fifteen distinct ways to style this look, from subtle twists to more dramatic braids and textures.
1. Romantic Half-Up Twist
This style captures that effortless, sun-kissed vibe by taking a small section from each side of your head and twisting them gently before pinning them together at the back of your crown. The twist shouldn’t be tight or uniform—you want it to have that undone, lived-in quality that reads as intentional rather than fussy. The waves below flow freely and frame your face naturally, creating soft movement around your cheeks and jawline.
Why This Works for Wavy Bobs
The beauty of the romantic twist is that it relies entirely on your existing wave pattern. You’re not fighting against your texture or forcing your hair into a structured style—you’re working with what you’ve got. The slight tension from the twist actually enhances your natural waves by giving them a subtle anchor point, which makes the rest of your hair look bouncier and more voluminous. This style works equally well on second-day hair as it does on freshly washed waves.
How to Get This Look
- Start with dry or damp wavy hair (don’t overstyled it—waves should look natural)
- Take a 2-inch section from the right side of your head, roughly at temple level
- Twist that section loosely as you move it toward the back of your head, allowing the waves to show through
- Repeat on the left side with a matching section
- Pin both twisted sections together at the nape of your neck using bobby pins that match your hair color
- Gently pull a few face-framing pieces loose to soften the overall look
- Finish with a light hairspray to hold without making anything feel stiff
Pro tip: Don’t twist too tightly—the magic of this style is that it looks like you barely did anything. A loose, relaxed twist reads as chic; a tight twist reads as forced.
2. Sleek Low Pony Half-Up
Take the bottom half of your half-up section and gather it into a smooth, low ponytail that sits right at the nape of your neck. This hybrid style gives you the sophistication of a pulled-together look without sacrificing the face-framing softness of loose waves around your features. The key is keeping the top section voluminous and slightly textured while the low pony feels sleek and controlled.
The Perfect Balance of Polished and Relaxed
A sleek low pony with a half-up half-down structure hits that professional-but-approachable sweet spot. You look like you made an effort without appearing overdone, which is exactly what works for most real-world situations—work meetings, dinners out, casual dates. The contrast between the smooth pony and the loose waves creates visual interest without looking chaotic. Your face gets the maximum framing benefit because most of your hair is still down.
How to Achieve This Look
- Blow-dry your wavy bob with a round brush for extra volume at the roots
- Use a texturizing spray or dry shampoo to add grip to your hair (this keeps the pony from sliding throughout the day)
- Take the bottom half of your usual half-up section and gather it into a low ponytail at the nape
- Smooth this section gently with a paddle brush or your fingers—aim for sleek, not wiggling flyaways
- Secure with a thin elastic that matches your hair color (or wrap a small strand of hair around the base to hide the elastic)
- Let the top half-up section stay textured and undone, allowing your natural waves to show
Worth knowing: This style stays put better if you use a texturizing product first. Regular hairspray alone won’t give you the grip you need to keep a low pony smooth all day.
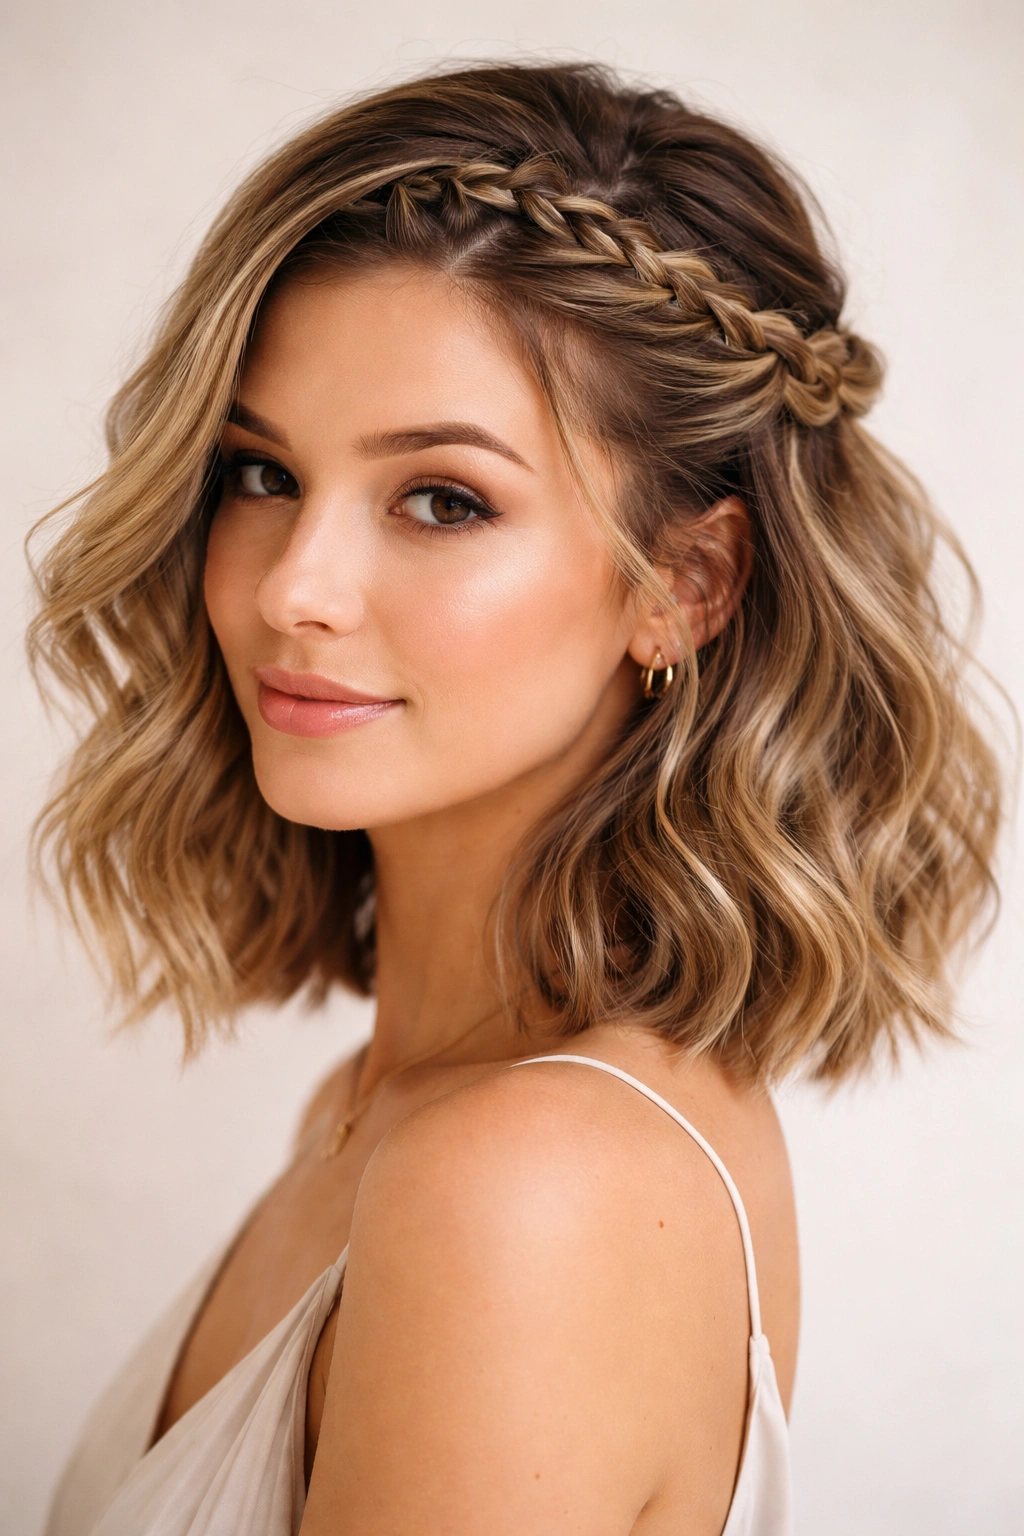
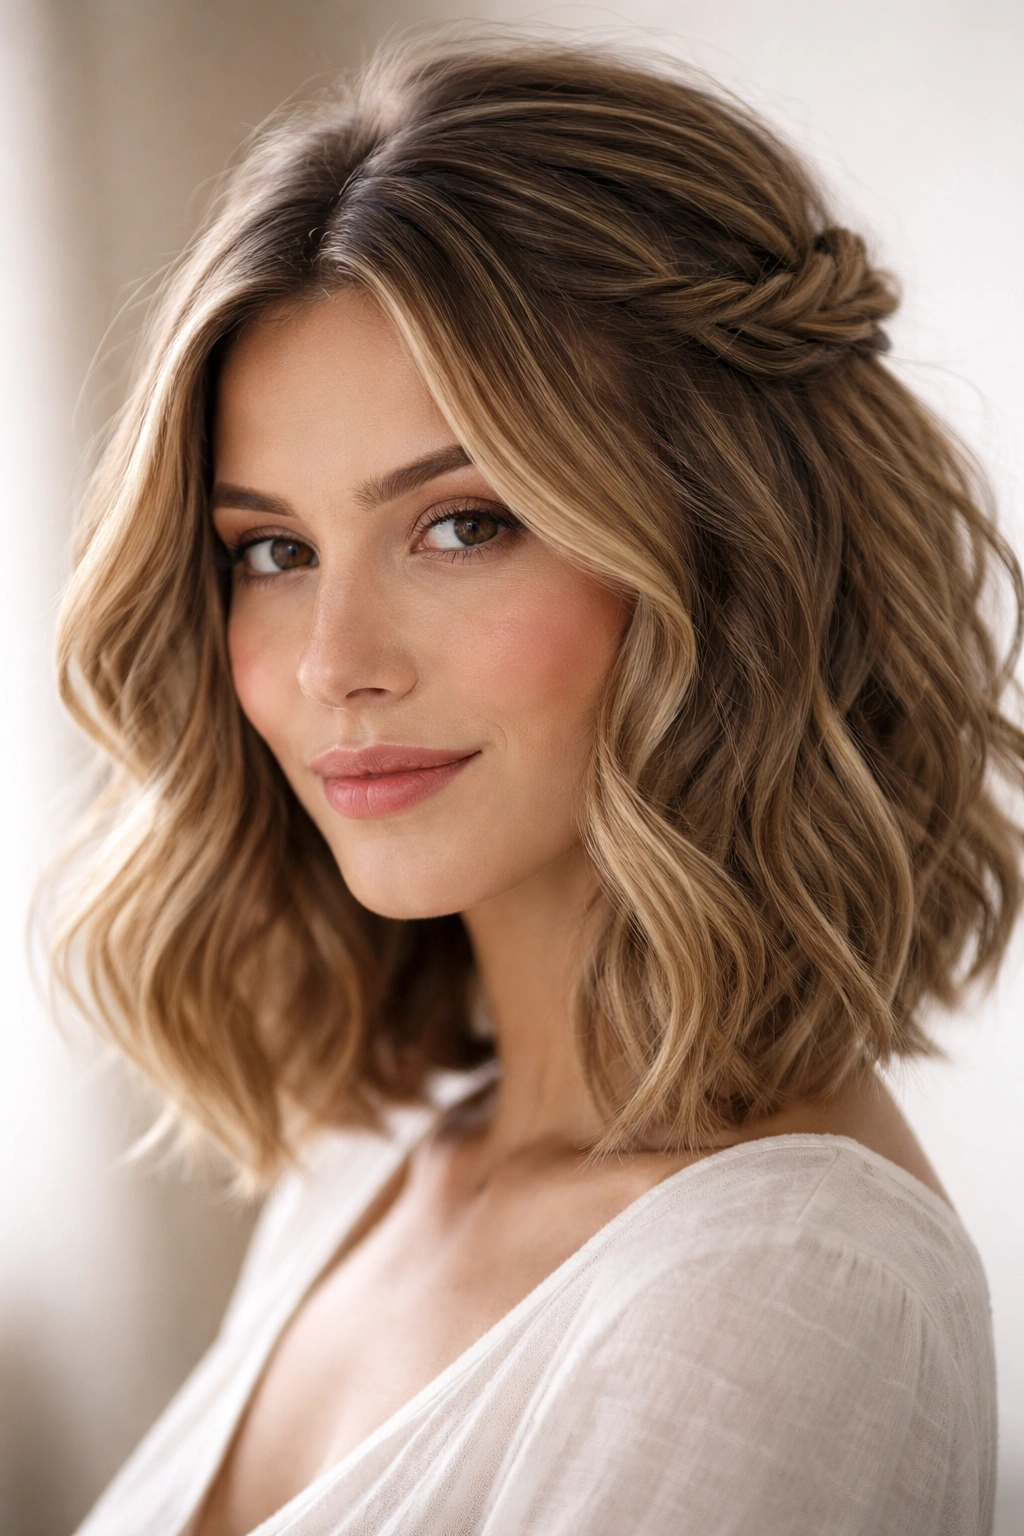
3. Braided Half-Up Crown
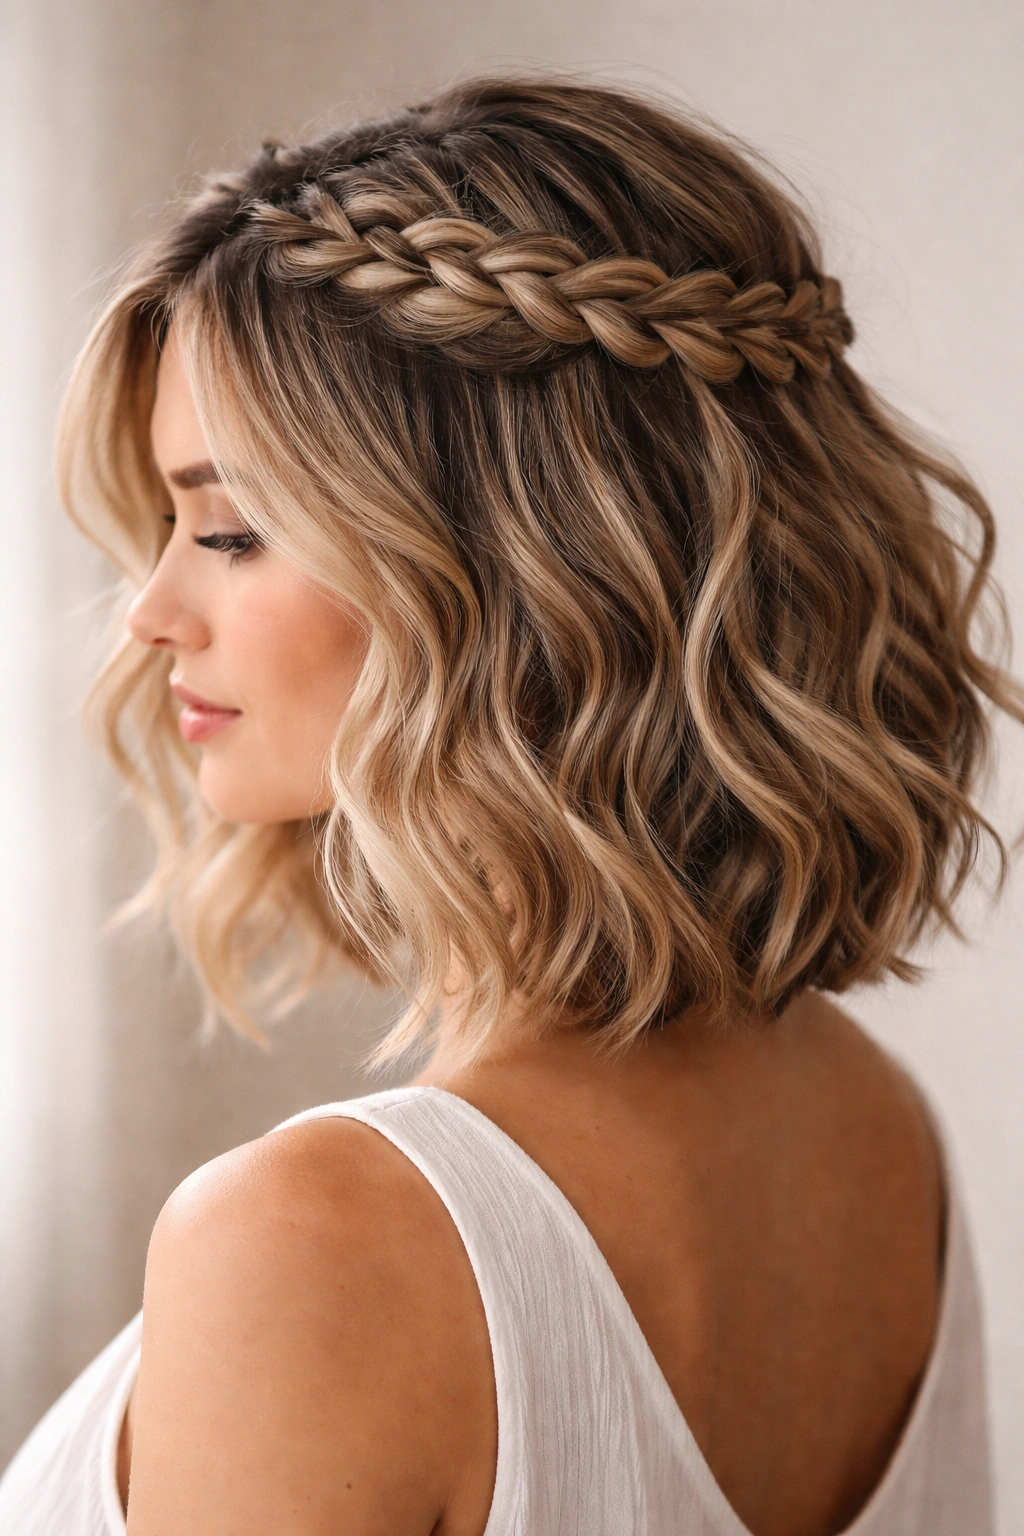
A Dutch braid (where the braid sits on top of the hair rather than under it) creates a crown-like effect when you position it across the top of your head. This style works beautifully with wavy hair because the texture gives the braid natural dimension—it doesn’t look thin or stringy like it might on perfectly straight hair. You’re creating an architectural element that makes your entire head look fuller and more intentional.
Why Braids Enhance Wavy Hair
Braids and waves are a natural pairing. Where straight hair can look limp in a braid, your existing waves create volume and interest within the braid structure itself. A Dutch braid on wavy hair catches the light differently, shows off texture, and reads as more modern than a simple, tight braid would. The crown positioning draws eyes upward and creates a flattering frame for your face.
How to Braid a Crown Half-Up
- Start with textured, wavy hair (braid on second-day hair if possible—it grips better)
- Create a deep side part using a fine-tooth comb
- Begin your Dutch braid just behind your ear on the deeper side, braiding back toward the opposite ear
- Keep the braid loose and let the waves show through—pull gently on each side of the braid as you go to create more dimension
- As you braid, you’re essentially creating your half-up section with the braid itself
- Pin the end of the braid to the opposite side of your head with bobby pins
- Leave the bottom section completely loose; the waves will frame your face and neck
Pro tip: Use a braid spray or texture spray before braiding. It makes the hair grip better and gives you cleaner, more defined braid sections without fighting against slippery waves.
4. Textured Bubble Ponytail
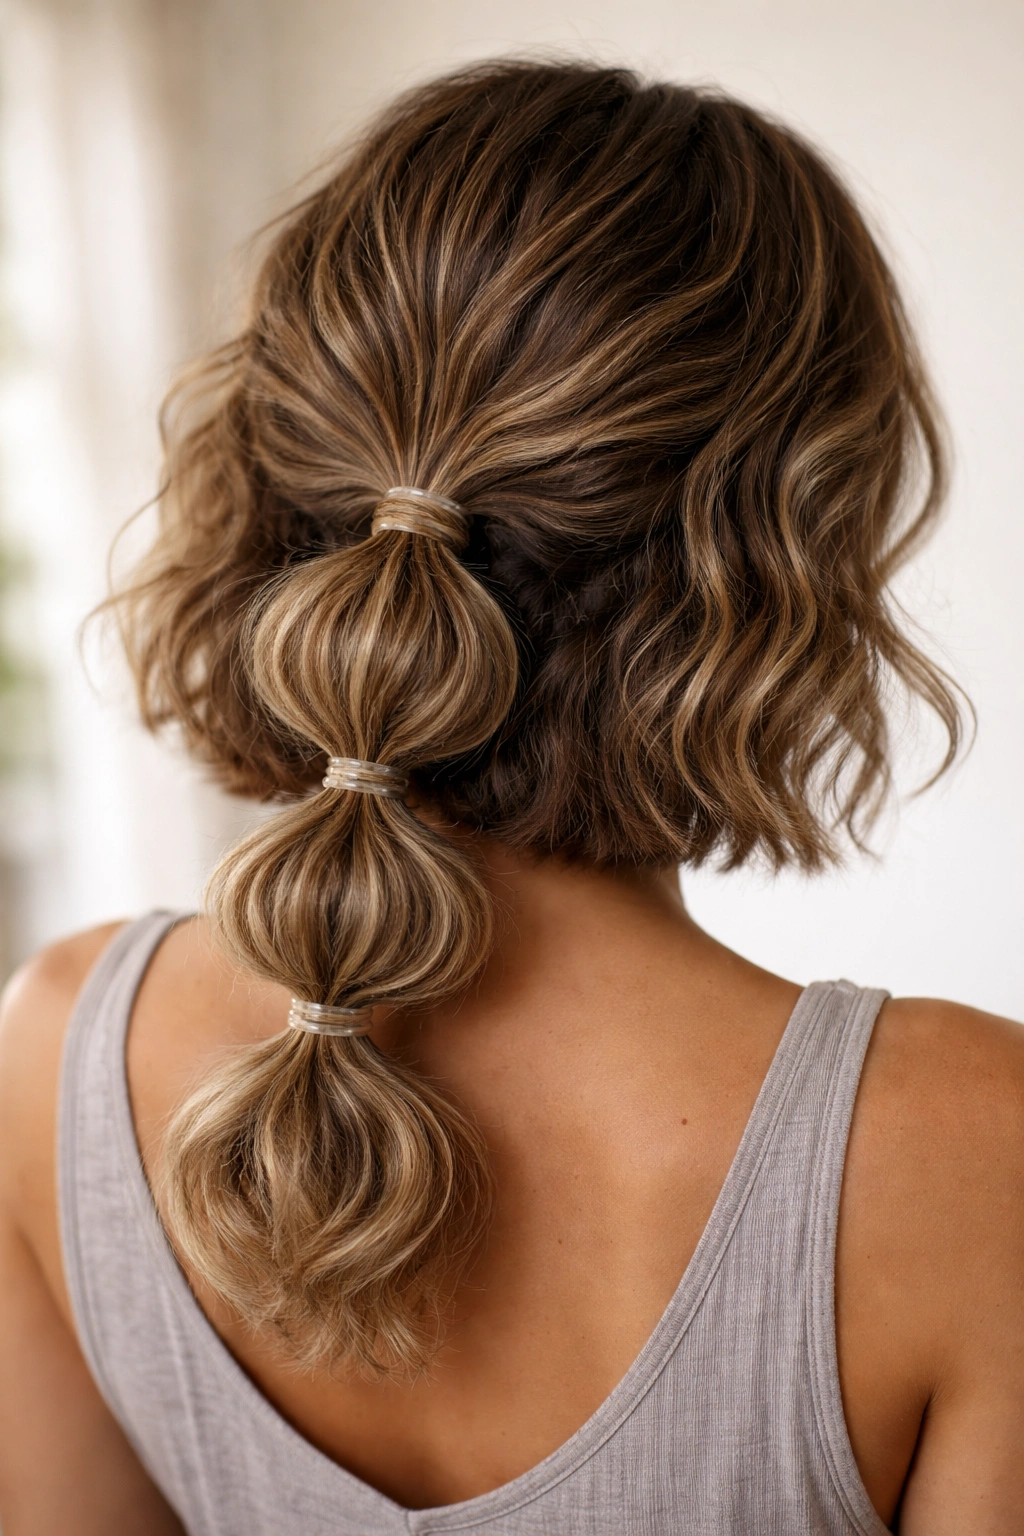
A bubble ponytail is exactly what it sounds like—a ponytail with three to four sections, each gathered separately to create rounded “bubbles” of volume stacked on top of one another. With a wavy bob, you create the bubbles using the bottom half of your hair while the top half stays down and textured. The effect is playful, modern, and surprisingly easy to execute.
Creating Visual Drama with Bubble Structure
Bubble ponytails have become more popular because they solve a real problem: how to make a half-up style look substantial without it being a full updo. Each bubble is secured with its own elastic, which creates distinct sections of volume that catch the light and make your hair look thicker overall. The bubbles also give you strategic anchor points that keep everything in place all day, even if you’re moving around or getting active.
How to Build a Bubble Half-Up
- Gather the bottom half of your hair into a ponytail at the nape of your neck—this is your first bubble
- Secure with a clear or color-matched elastic
- Gently pull the ponytail slightly outward to create the bubble effect
- About 2-3 inches above the first elastic, gather that section (including the hair from the first bubble) into a second ponytail
- Secure and pull gently to create a second, slightly larger bubble
- Repeat once more for a third bubble if your hair is long enough, or stop at two bubbles
- Leave the top section of your wavy bob completely down, allowing waves to frame your face
- Finish with light hairspray to hold the bubble structure without weighing hair down
Worth knowing: The bubbles look best when they’re slightly loose and textured, not pulled so tight that you see scalp. Aim for fullness and movement over precision.
5. Side-Swept Half-Up Wave
This style sweeps your half-up section dramatically to one side, creating an asymmetrical look that’s both romantic and modern. All the texture and volume sits on one side of your head, which creates a bold frame for your face and makes even a shorter wavy bob look substantial. The loose waves on the opposite side create visual balance by flowing freely.
The Power of Asymmetry
Asymmetrical hairstyles have an inherent elegance that symmetrical styles sometimes lack—they feel more intentional, more editorial, more interesting. When you combine asymmetry with the natural movement of wavy hair, you get a style that looks effortlessly put-together. This is the sort of look people assume took thirty minutes to perfect, when really it’s just strategic styling of your natural texture.
How to Create Side-Swept Volume
- Create a deep side part, roughly from your temple on the fuller side toward the nape on the opposite side
- Take your half-up section from the fuller side of your part, gathering it toward the opposite side of your head
- The gathering motion should move from the back of your ear toward the back of your skull, creating that diagonal sweep
- Secure with bobby pins on the opposite side, low enough that the pins are hidden under the rest of your hair
- Leave all your hair on the fuller side of the part completely down and loose
- The opposite side should have less volume naturally, which creates visual balance
- Use a texturizing spray to enhance the waves throughout, especially on the side with volume
Pro tip: If your hair is very short in the back, anchor your half-up section slightly higher (at the crown rather than the nape) so you have enough hair to work with and everything stays secure.
6. Voluminous Top Knot Half-Up

This style is your secret weapon when you want to look put-together but feel completely effortless. You’re creating a half-up section that twists up into a small, loose knot at the crown, giving you maximum volume at the top of your head while leaving the bottom section to flow freely. The key is making the knot intentionally undone—this isn’t a polished, tight bun. This is textured, slightly messy, and deliberately casual.
When to Reach for This Style
A voluminous top knot half-up works for almost any situation: work meetings where you need a composed look, casual coffee dates, running errands, or even dressier occasions if you style your makeup accordingly. The half-up aspect keeps it from reading as too casual, while the undone knot keeps it from looking overly formal. You get polish without rigidity.
How to Build a Textured Top Knot
- Start with textured, dry or damp wavy hair
- Gather your half-up section at the crown—you want the top third or half of your hair
- Use your fingers (not a brush) to gently gather the section; this preserves texture
- Twist the section loosely as you gather it, allowing waves to show through and create dimension
- Wrap the twisted section around itself at the crown, creating a small knot shape
- Secure with bobby pins that match your hair color, tucking them in so they’re hidden by texture
- Gently pull on the sides and top of the knot to create a slightly messy, textured appearance
- Leave face-framing pieces loose on both sides
- Use a light hairspray to hold the overall shape without making anything feel stiff
Worth knowing: The best top knots happen when you don’t overthink them. The more you try to make it perfect, the more stiff and unnatural it looks. Embrace the texture and imperfection.
7. Twisted Half-Up with Face-Framing Layers

This style focuses on intentionally pulling out and positioning face-framing pieces after you create your half-up section. You’re using your natural wave pattern to create soft, flowing layers around your face that make the hairstyle feel more dimensional and flattering. The twist at the back adds structure while the framing pieces add femininity.
Why Face-Framing Matters for Shorter Hair
With a wavy bob, strategic face-framing can make the difference between a style that looks flat and one that looks alive. When you intentionally pull pieces out after securing your half-up section, you’re creating layers and movement exactly where you want them. This is especially important if you have a rounder face shape or want to add softness around sharp cheekbones. The frame becomes your style’s best feature.
How to Create Intentional Face-Framing
- Create your basic half-up twist (see step 1 if you need the foundation)
- Once the twist is secured, identify 2-3 small sections on each side of your face that would benefit from framing
- These pieces should fall naturally from your half-up section, not be forced out
- Gently tease these pieces with a teasing brush to add texture and make them more prominent
- Use a light hairspray on the face-framing pieces to set them without making them stiff
- Let these pieces curve toward your face naturally; don’t blow-dry them into an artificial shape
- The goal is to look like you didn’t plan this—like the pieces naturally wanted to frame your face
Pro tip: Use a boar bristle brush to smooth the face-framing pieces once you’ve teased them. This creates a polished-but-textured effect that looks intentional.
8. Half-Up with Decorative Clip
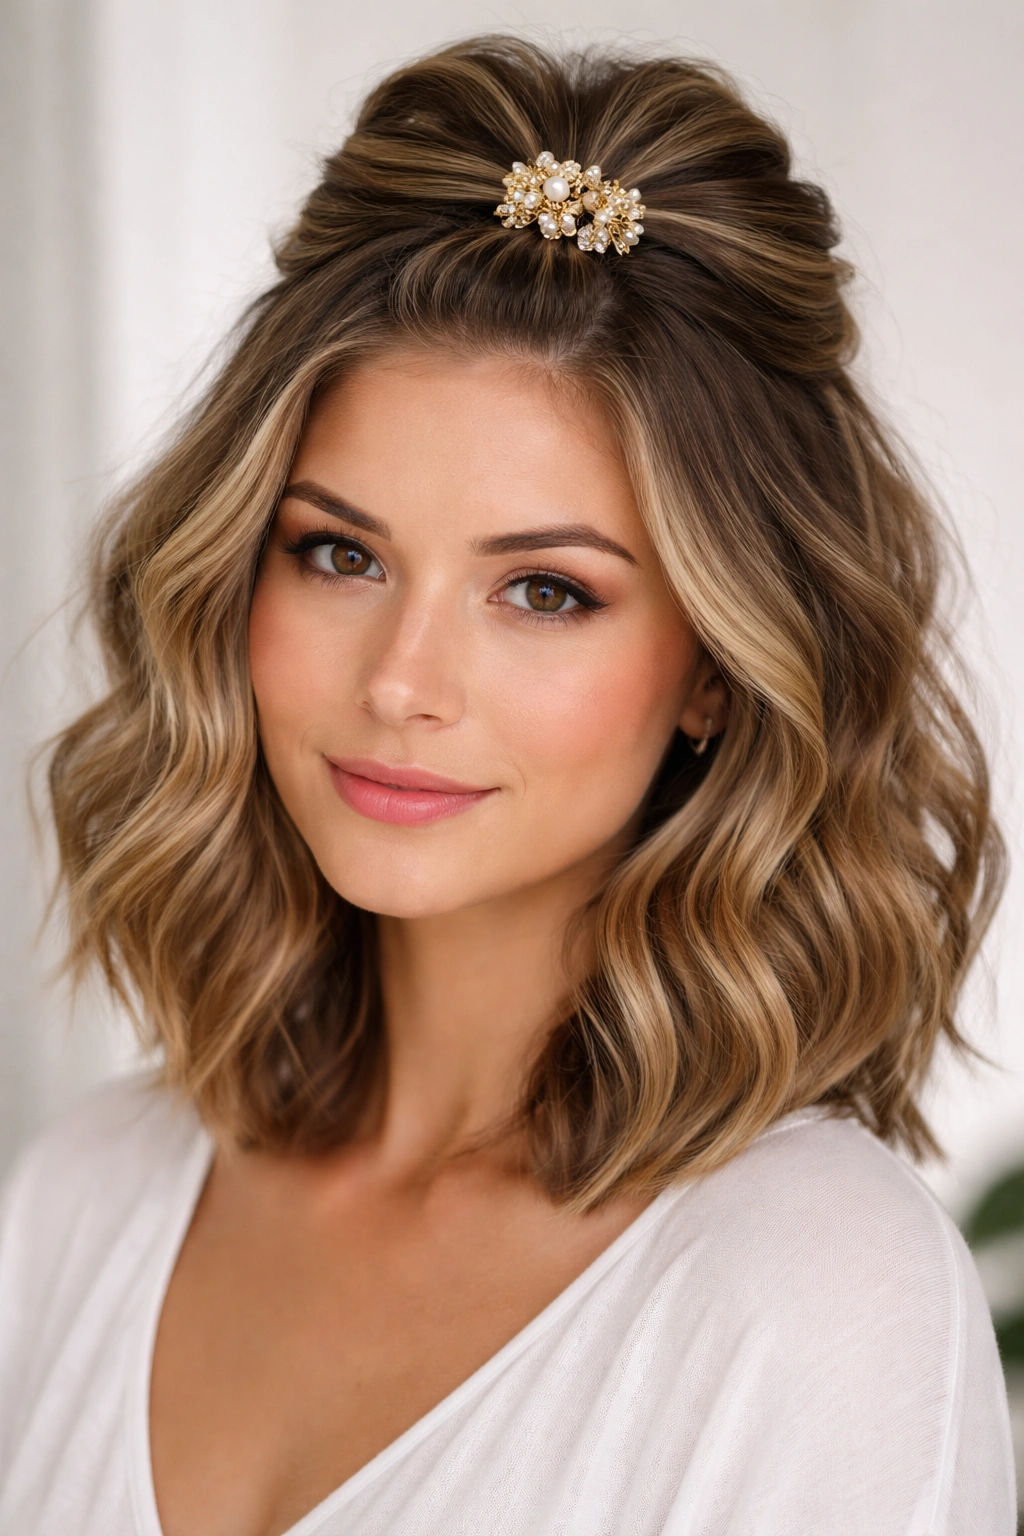
Sometimes the simplest approach is the most effective. A decorative clip—whether it’s pearl, metal, tortoiseshell, or jeweled—can elevate a basic half-up style into something special. The clip becomes a statement piece, a focal point that draws the eye and adds personality. With a wavy bob, the texture gives you plenty of surface area for a clip to nestle into and look naturally integrated rather than like an afterthought.
Choosing the Right Clip for Your Style
The clip you choose should feel like an extension of your personal style, not like you grabbed the first thing you found. Consider your everyday aesthetic: do you lean minimalist, romantic, edgy, preppy, or artistic? A sleek metal claw clip feels modern and professional. A tortoiseshell or vintage-inspired clip adds warmth and femininity. A jeweled clip adds glamour. Whatever you choose, make sure it’s large enough to actually secure your half-up section while remaining proportional to your head and hair volume.
How to Style Half-Up with a Statement Clip
- Gather your half-up section loosely at the back of your crown
- Don’t use a traditional hair elastic—instead, position your decorative clip at the gathering point
- The clip should sit horizontally across your hair, with the gathered section held securely between the two sides of the clip
- Position it so you can still see the clip from the front or sides; it should be slightly visible, not completely hidden
- Allow the bottom section of your hair to flow freely below the clip
- Let waves frame your face naturally on both sides
- The clip itself becomes the styling element, so you don’t need additional embellishment
Worth knowing: A good clip should grip without pinching. If your hair is very fine or slippery, you might need to use a small elastic underneath the clip for security, then position the clip over it to hide the elastic.
9. Messy Half-Up Bun
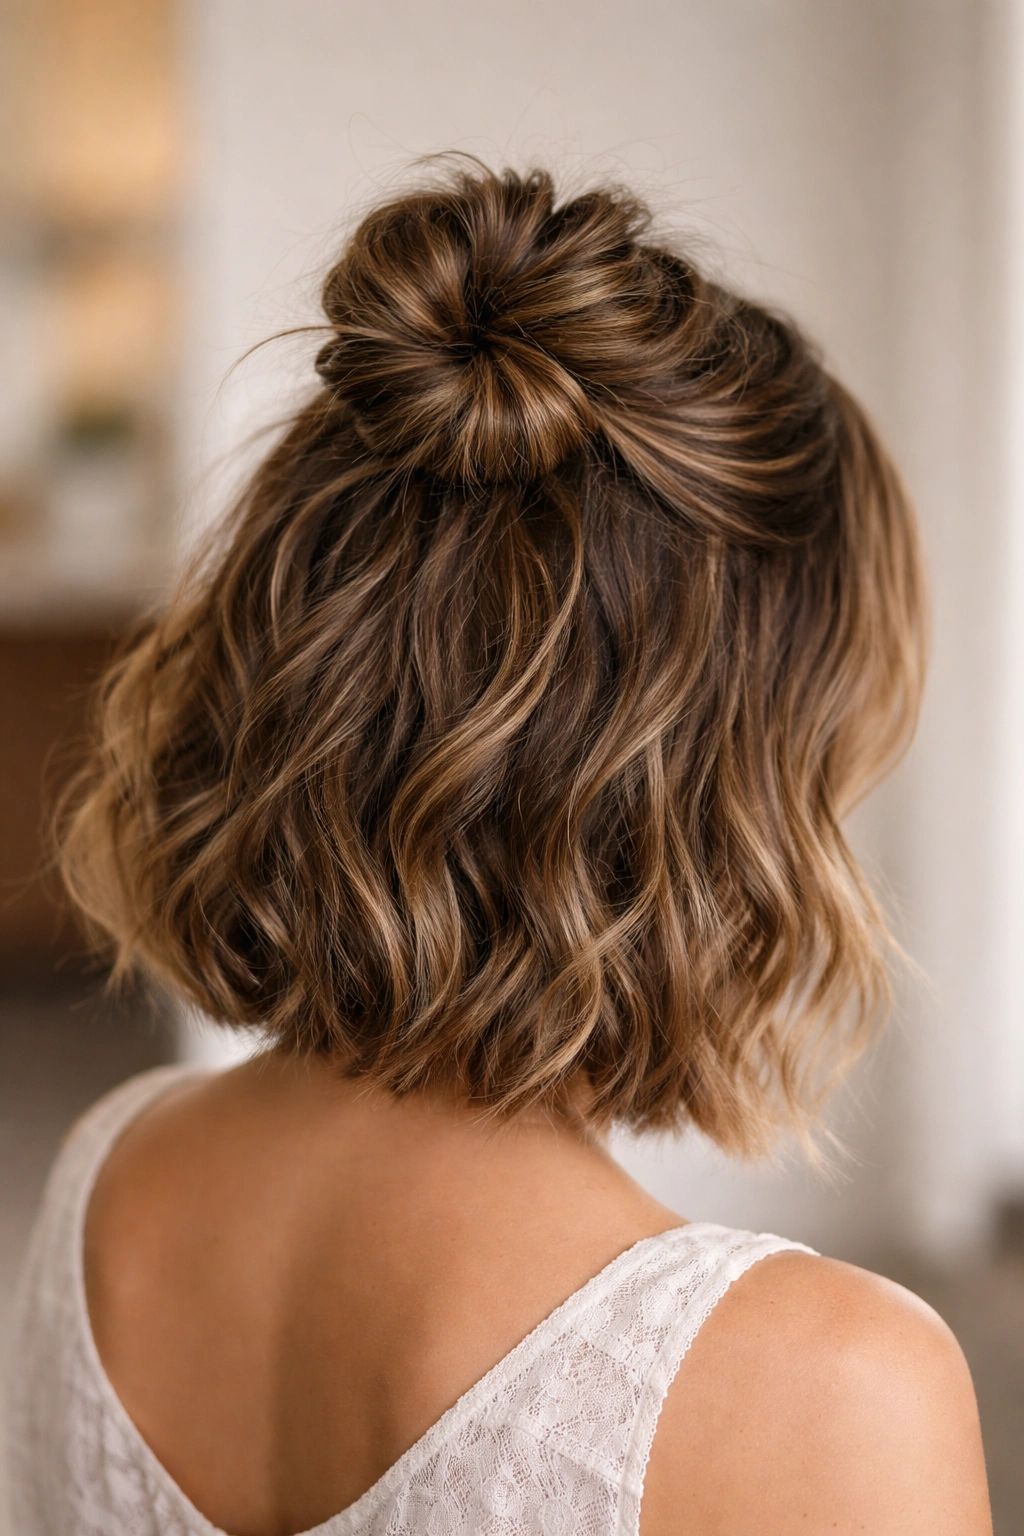
This is the ultimate I-woke-up-like-this style, perfect for days when you want to look cute without any effort. You’re creating a half-up section and loosely bunching it at the crown into a textured, intentionally imperfect shape. Nothing is smoothed, nothing is tightened, and that’s exactly the point. The messy bun reads as modern and cool, especially when paired with the loose waves of a wavy bob.
Messy ≠ Unkempt
There’s an important distinction here: a messy bun is a style choice, not a sign that you don’t care about your appearance. It’s styled messiness—you’ve deliberately created the impression of casual texture. This requires more finesse than it seems. You’re aiming for textured and relaxed, not tangled and unfinished. The difference is intention and execution.
How to Create an Intentionally Messy Bun
- Gather your half-up section at the crown using your fingers, not a brush
- The gathering motion should be gentle and loose; you’re not trying to get every single hair
- Once gathered, twist or bunch the section loosely around itself at the crown
- Secure with bobby pins, but leave plenty of texture visible—don’t pull it tight
- Gently tease small sections of the bun with a teasing brush to increase dimension and texture
- Pull a few shorter pieces loose around the base of the bun; these add to the undone effect
- Use a flexible hold hairspray (not a heavy one) to keep the shape without making it stiff
- Let the back and sides flow freely in waves
Pro tip: A messy bun looks best when you’ve got some natural texture to work with. If your waves are falling flat, add texture first with a texture spray or sea salt spray before creating the bun.
10. Half-Up with Faux Hawk Texture
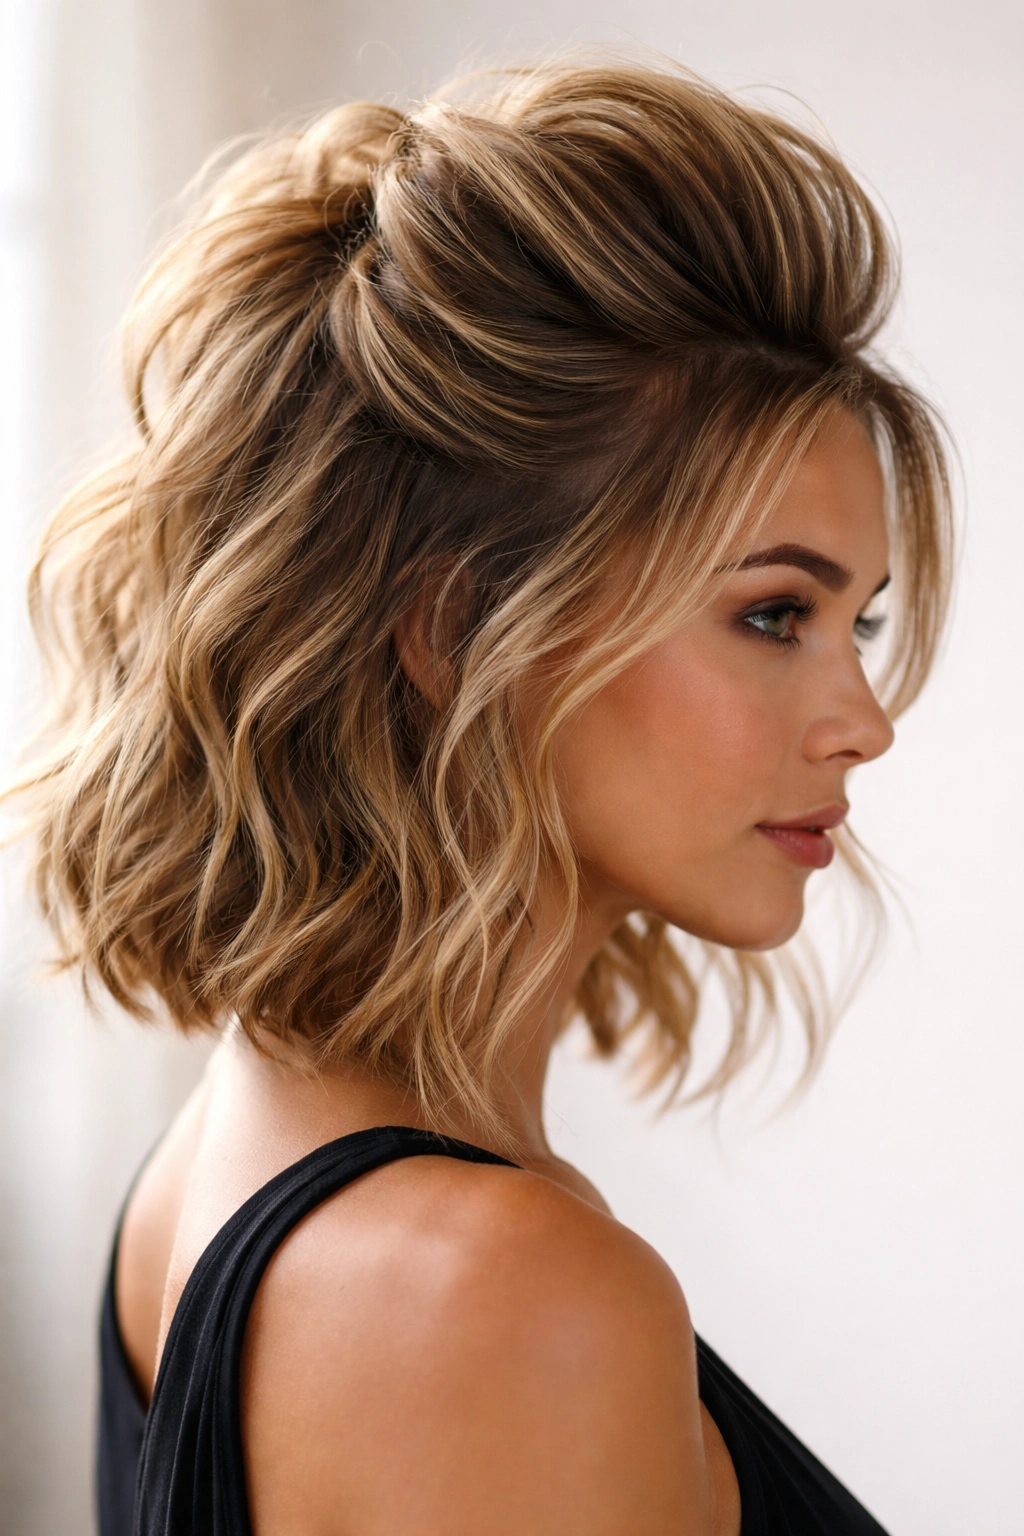
This edgy style pushes the half-up concept in a bolder direction by creating height and volume at the crown, making it look almost like a subtle faux hawk sitting on top of your wavy bob. You’re gathering your half-up section and teasing it strategically to create a ridge of volume down the center of your head. The effect is rock-and-roll meets feminine, dramatic but not extreme.
When to Wear a Faux Hawk Half-Up
This is the style for when you want to make a statement but aren’t ready for a full shaved undercut or true hawk. It’s edgy enough for a night out, creative enough for someone with an artistic sensibility, but still grounded enough that it reads as intentional styling rather than costume. Pair it with the right makeup and attitude, and you’ve got a look that turns heads.
How to Create the Faux Hawk Effect
- Gather your half-up section from both sides of your head toward the center of your crown
- As you gather, create a central line of hair down the middle of your head
- Secure this central line loosely at the crown with bobby pins
- Use a teasing brush to backcomb the hair along this central line, creating height and texture
- The goal is a visible ridge of volume running from your forehead back to your crown
- Smooth the outer edges of the teased section lightly with a smoothing brush, but leave the center textured
- The sides of your half-up section should remain loose and textured, not slicked back
- Allow your wavy bob to frame your face naturally; don’t pull it tight to the sides
Worth knowing: This style requires a strong hold product. Use a firm-hold hairspray or texture spray and let it dry completely before touching your hair, or you’ll deflate all your teasing work.
11. Braided Halo Half-Up
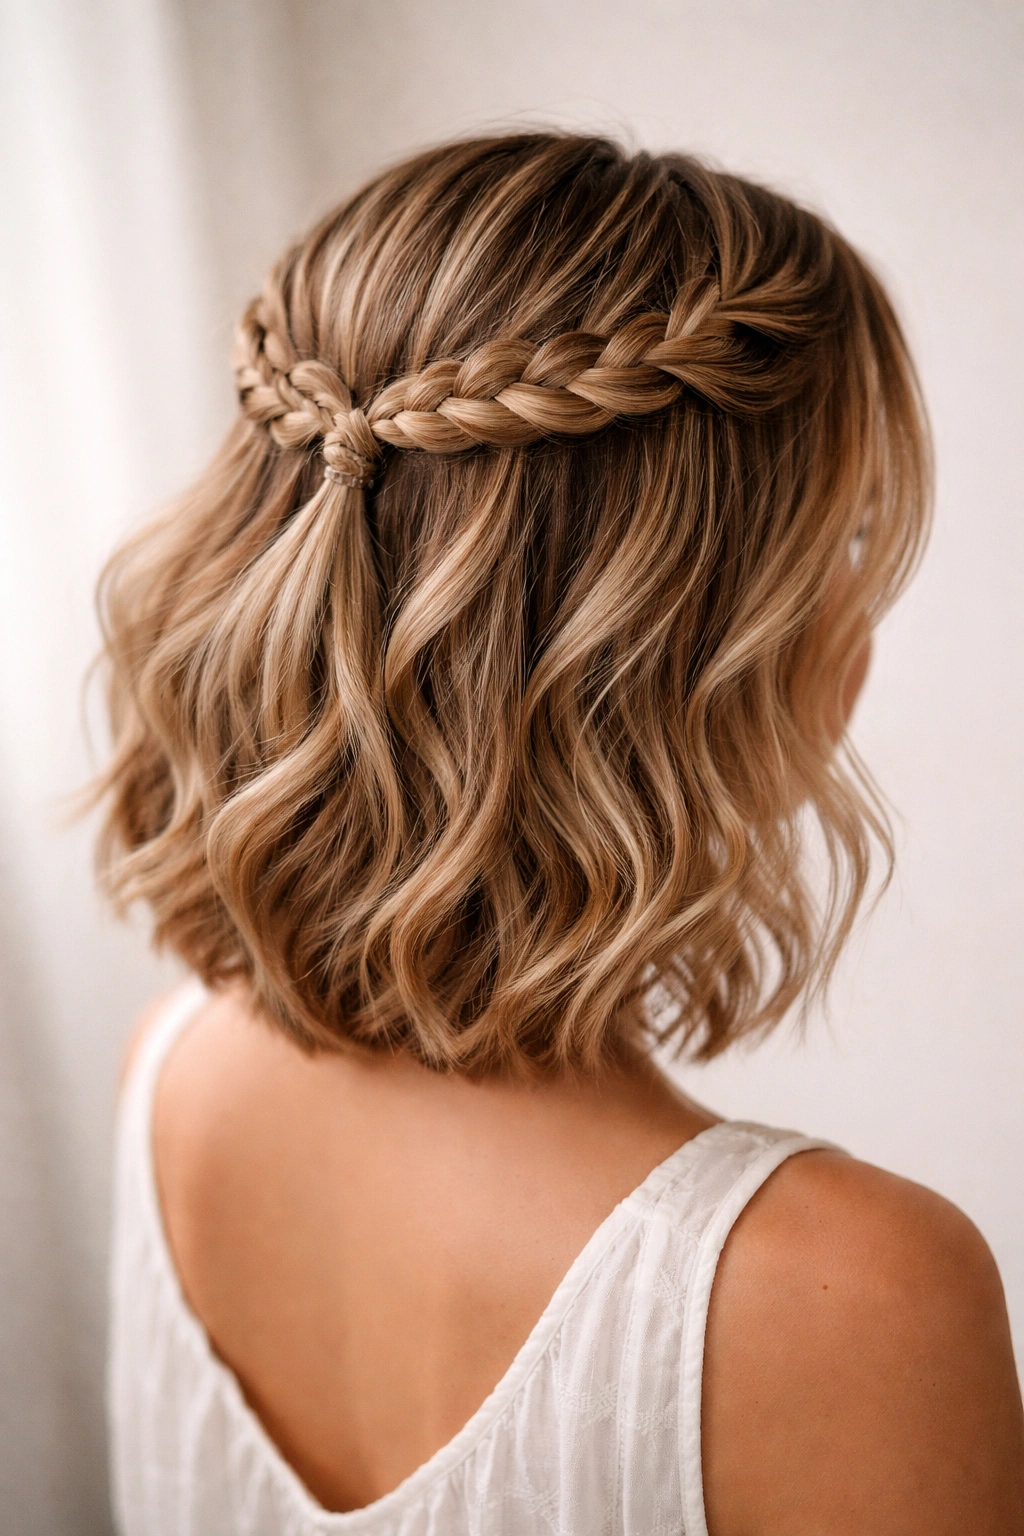
A halo braid that doubles as your half-up section creates one of the most romantic, intentional-looking styles possible. You’re braiding a section that wraps around the back of your head from one side to the other, securing your half-up while creating a crown-like frame. The loose waves below flow freely, and the structured braid creates a beautiful contrast with the soft waves.
The Drama of a Halo Braid
A halo braid is inherently dramatic and pretty—it’s the kind of style people associate with special occasions, even though it’s absolutely wearable every day. With a wavy bob, the halo braid gains extra dimension because your existing waves show through and around the braid structure. The overall effect is more interesting and textured than a halo braid on straight hair would be.
How to Braid a Halo Half-Up Section
- Start with textured, dry wavy hair (second-day hair is ideal for better grip)
- Create a section from one temple, moving horizontally toward the opposite side of your head
- Begin braiding this section (French braid or Dutch braid, depending on your preference and skill level)
- Continue the braid in a gentle arc around the back of your head toward the opposite temple
- As you braid, keep it loose and pull gently on the sides of the braid to add dimension
- The braid should sit roughly where your half-up section would normally sit—at the crown level or slightly lower
- Secure the end of the braid to your hair on the opposite side with bobby pins, hidden under your wave texture
- Leave all the hair below the braid completely loose; the waves will flow naturally
- The braid itself creates your half-up definition
Pro tip: A halo braid works best if you don’t try to make it too neat. Imperfection and texture are your friends here. Pull on the braid sides to make it look fuller and less structured.
12. Half-Up with Pinned-Back Waves
This minimalist approach uses strategic pinning to create a half-up effect without the formal gathering of a ponytail or bun. You’re pinning back just enough hair to open up your face and create visual interest, while the majority of your wavy bob remains loose and flowing. It’s understated, sophisticated, and perfect for someone who likes their styling subtle.
Minimalist Styling for Maximum Impact
Sometimes the most elegant choice is the simplest one. Pinning back waves rather than gathering them into a defined shape feels lighter and more feminine. This approach works beautifully if you have a longer wavy bob or if you prefer styling that feels less “done” and more naturally pulled back. The pins become almost invisible—they’re functional rather than decorative, which appeals to people who like stealth styling.
How to Pin Back Your Waves
- Identify a section on each side of your head, roughly from your temple toward the back
- These sections should be small enough that they feel like they’re just pulled back, not like half your hair is up
- Working with one side at a time, gently gather a small handful of waves between your fingers
- Using a bobby pin that matches your hair color, secure this section to the back of your head at or just below crown level
- Repeat on the opposite side with a matching section
- The pinned sections should be hidden underneath your remaining loose waves—they’re a structural element, not a visible design
- Allow the full length and movement of your wavy bob to flow freely
- No additional product should be necessary; the pins hold just enough hair to frame your face
Worth knowing: This style works best if your wavy bob has some length—at least chin-length or longer. If your bob is very short, there isn’t enough hair to pin back without it looking sparse.
13. Asymmetrical Half-Up Style
Take the concept of asymmetry even further by creating a half-up section that’s completely off-center. You’re pulling all your half-up hair from one side of your head, gathering it on the opposite side. The effect is boldly asymmetrical, modern, and interesting—it’s the kind of style that looks intentional and creative rather than accidental.
Making Asymmetry Look Intentional
Asymmetry requires confidence. It’s a statement that says you’re not going for balanced, traditional beauty—you’re going for interesting and editorial. With a wavy bob, asymmetry actually enhances the movement of your hair because the waves on the fuller side get full attention and dimension. You’re creating a visual weight shift that feels deliberate and flattering when executed correctly.
How to Style Asymmetrical Half-Up
- Create a deep side part, exaggerating it more than you normally would
- Take all your half-up section from the fuller side of the part
- Gather this entire section and move it dramatically across the back of your head to the opposite side
- Secure with bobby pins on the opposite side, making sure the pins are completely hidden under remaining hair
- The opposite side of your head should have minimal hair, which becomes the negative space in your design
- Use the contrast between the fuller side and the minimal side to create visual drama
- Let the waves on the fuller side be as voluminous and textured as possible—this is where your style lives
- Keep face-framing loose and free on both sides
Pro tip: This style looks best on people with longer bobs or wavy bobs that have some length in the back. If your hair is very short all around, there isn’t enough to create the asymmetrical volume you need.
14. Half-Up with Ribbon or Accessory Weave
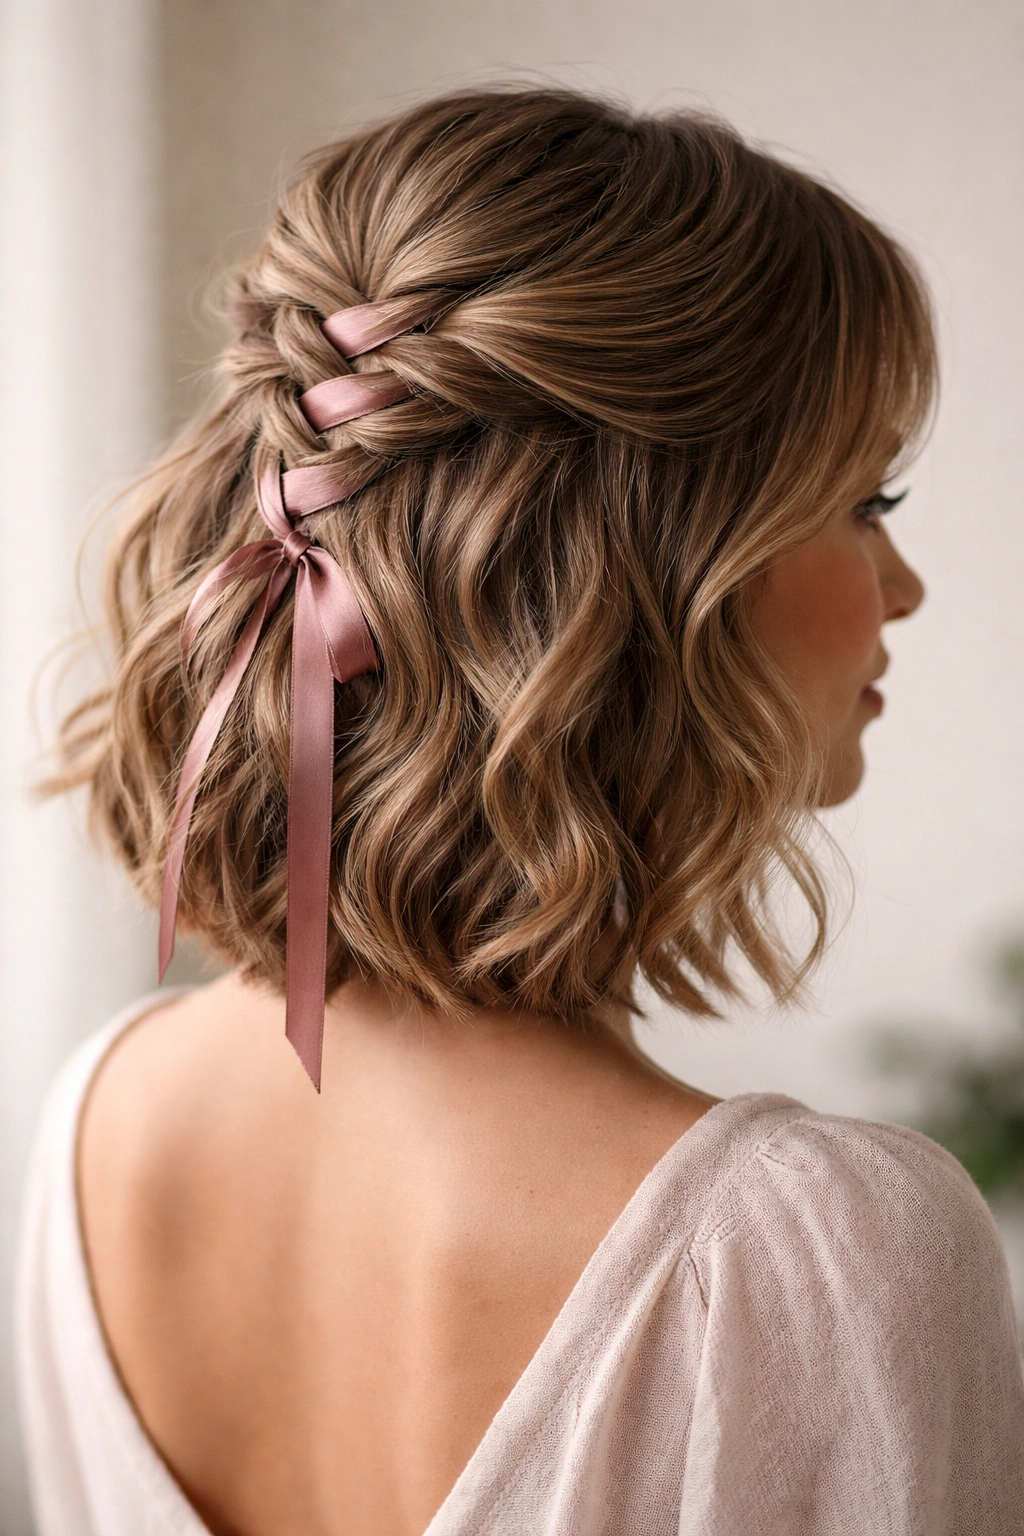
Instead of securing your half-up section with a traditional elastic or pin, weave a ribbon, thin scarf, or decorative cord through your gathered hair. This adds a pop of color or pattern while creating an interesting visual element that elevates a basic half-up style into something special. The ribbon catches the light and movement, and adds personality based on whatever color or pattern you choose.
Using Accessories as Design Elements
Accessories should feel like an intentional part of your style, not like an afterthought or something you grabbed because you needed to hold your hair up. When you choose a ribbon that coordinates with your outfit’s color palette or makes a deliberate statement, the accessory becomes part of your overall look. With wavy hair, a ribbon weaves beautifully through the texture and doesn’t get lost the way it might on smooth hair.
How to Weave an Accessory Into Your Half-Up
- Gather your half-up section loosely at the back of your crown
- Cut a length of ribbon or thin accessory string that’s roughly twice the length of your gathered section
- Thread the ribbon through the gathered hair by weaving it over and under sections, creating an X or lattice pattern
- Pull the ribbon taut so it holds the gathered section securely
- Tie the ends of the ribbon in a small bow at the back of your head, or secure them with bobby pins
- The bow can be placed at the crown (visible from behind) or hidden under your remaining waves
- Let the loose section of your wavy bob flow freely below the ribbon
Worth knowing: This works best with a ribbon that has some grip—avoid slippery, thin ribbons that will slide out of wavy hair. Grosgrain ribbon or a velvet ribbon grips better than satin.
15. Half-Up Dutch Braid Hybrid
Combine two braiding techniques in one style by creating a Dutch braid (braid sits on top of the hair) that forms one side of your half-up, with a simple twist on the opposite side that mirrors the braid. This creates a balanced, textured look that feels elaborate without being overly complicated. The asymmetrical-but-balanced approach works beautifully with wavy hair.
Mixing Techniques for Complex Simplicity
When you combine different techniques—a braid on one side, a twist on the other—you create visual interest without the actual complexity being overwhelming. A person looking at you sees an intricate, carefully styled look. The person doing the styling (you) knows it’s just two techniques applied to either side of your head. This is efficient styling with maximum impact.
How to Create a Braid-Twist Hybrid
- Start with textured, dry wavy hair
- Take a section from one side of your head and begin a Dutch braid toward the back of your head
- Keep the braid loose and pull gently on the sides to add dimension
- On the opposite side, take a matching section and create a loose twist (not a braid, just a twist) toward the back
- Both the braid and the twist should meet at the back of your head at roughly the same point
- Secure both together at the nape with bobby pins hidden under texture
- The braid and twist together form your half-up section
- Allow all your hair below this point to flow freely in waves
- The asymmetrical technique (braid on one side, twist on the other) creates visual interest while remaining balanced
Pro tip: The hybrid approach actually gives you more flexibility if one side of your hair is more cooperative than the other. If one side isn’t braiding neatly, stick with a twist on that side while you braid the other.
Key Takeaways
The genius of half-up half-down styling with a wavy bob is that it doesn’t require perfect execution or rigid structure. Your natural waves are doing half the work, adding texture and movement that make even simple styles look intentional and polished. Whether you prefer minimal styling like pinned-back waves or something more elaborate like a braided crown, the foundation of a wavy bob gives you a canvas that’s forgiving and flattering.
Rotate through these styles based on your mood, your outfit, and how much time you have to style. Some of them—like the romantic twist or the decorated clip—take less than five minutes. Others, like the braided halo, might take ten to fifteen minutes the first few times you try them. The more you practice, the faster you’ll get, and eventually you’ll be able to execute these styles without even thinking about it.
The real takeaway is that a wavy bob gives you access to styling options that other hair types require more effort to achieve. Lean into that advantage. Your natural texture is your asset, and a half-up half-down style is the perfect way to showcase it.