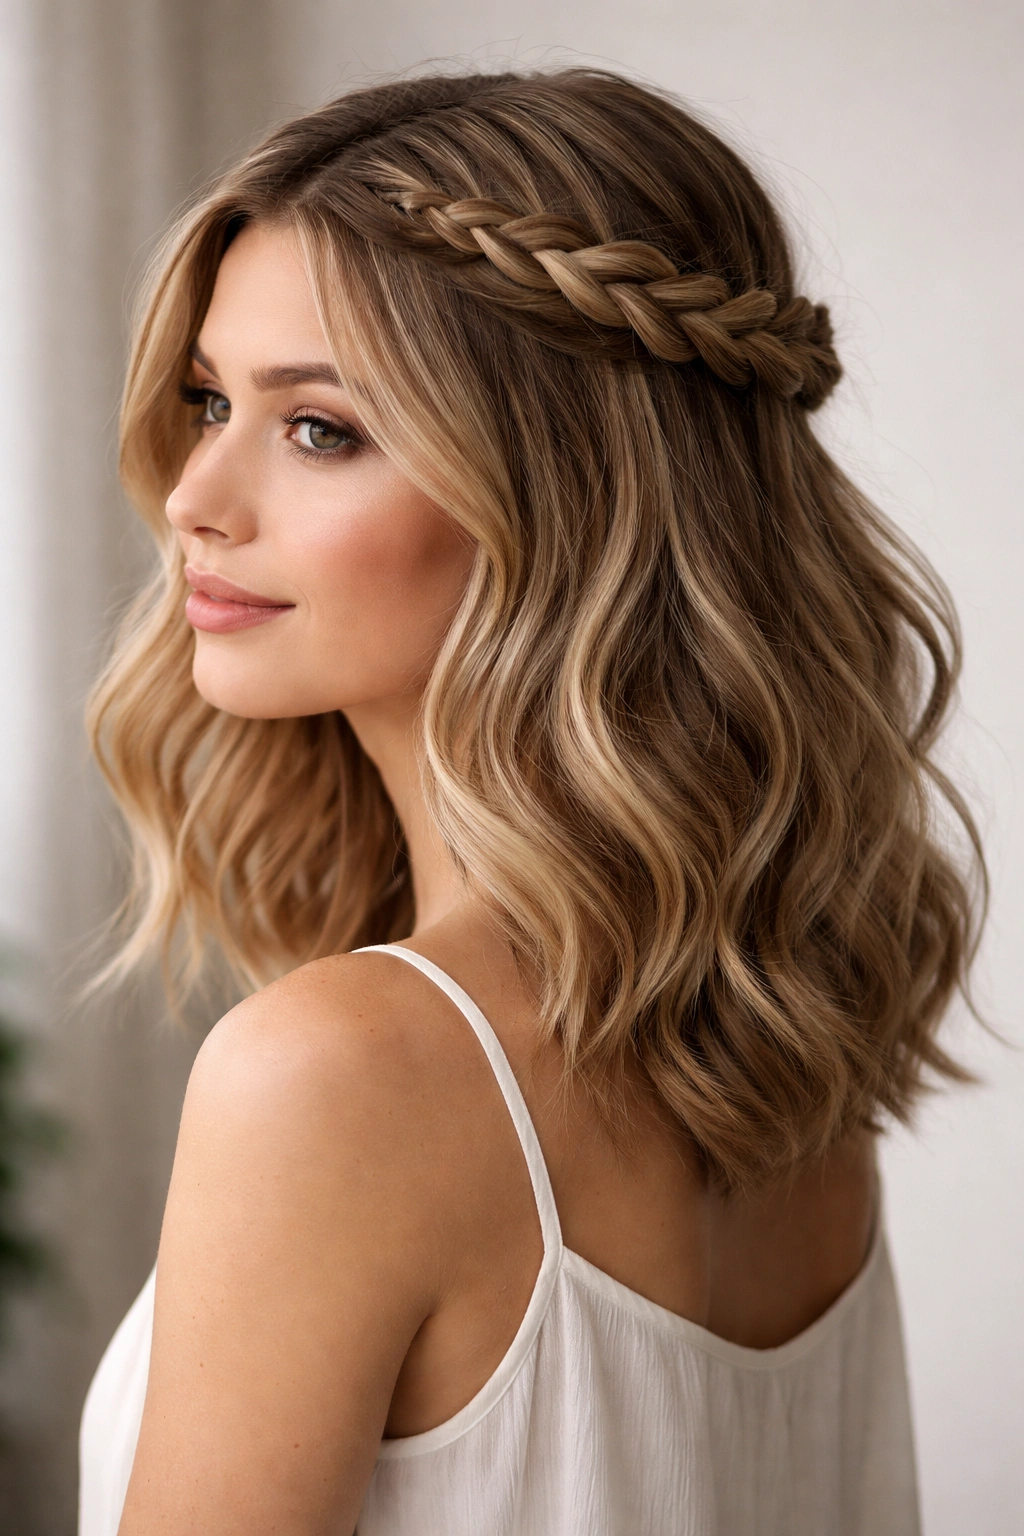
Half up half down styles are the perfect compromise between keeping hair off your face and showing off length. When you’re working with shoulder-length hair, the stakes feel different — your strands are long enough to create real texture and movement, but short enough that what you do with them actually shows. Add braids into the mix, and suddenly you’ve got hairstyles that look effortlessly put-together for everything from casual Tuesdays to weekend plans.
The beauty of combining braids with a half up half down approach is that it works with nearly every hair type and texture. Whether your hair is thick, fine, wavy, or stick-straight, there’s a braided version that transforms your look without requiring professional styling skills or hours of prep time. Most of these styles take somewhere between 10 and 20 minutes once you get comfortable with the technique — that’s faster than blow-drying, and the results last all day.
Shoulder-length hair hits that sweet spot where it’s long enough to braid convincingly but manageable enough that you won’t feel weighed down. The styles that follow work with your hair’s natural length, adding dimension and intentional texture without fighting against how your strands naturally sit. You’ll find styles here that range from sleek and polished to textured and undone — all of them work beautifully with this particular hair length.
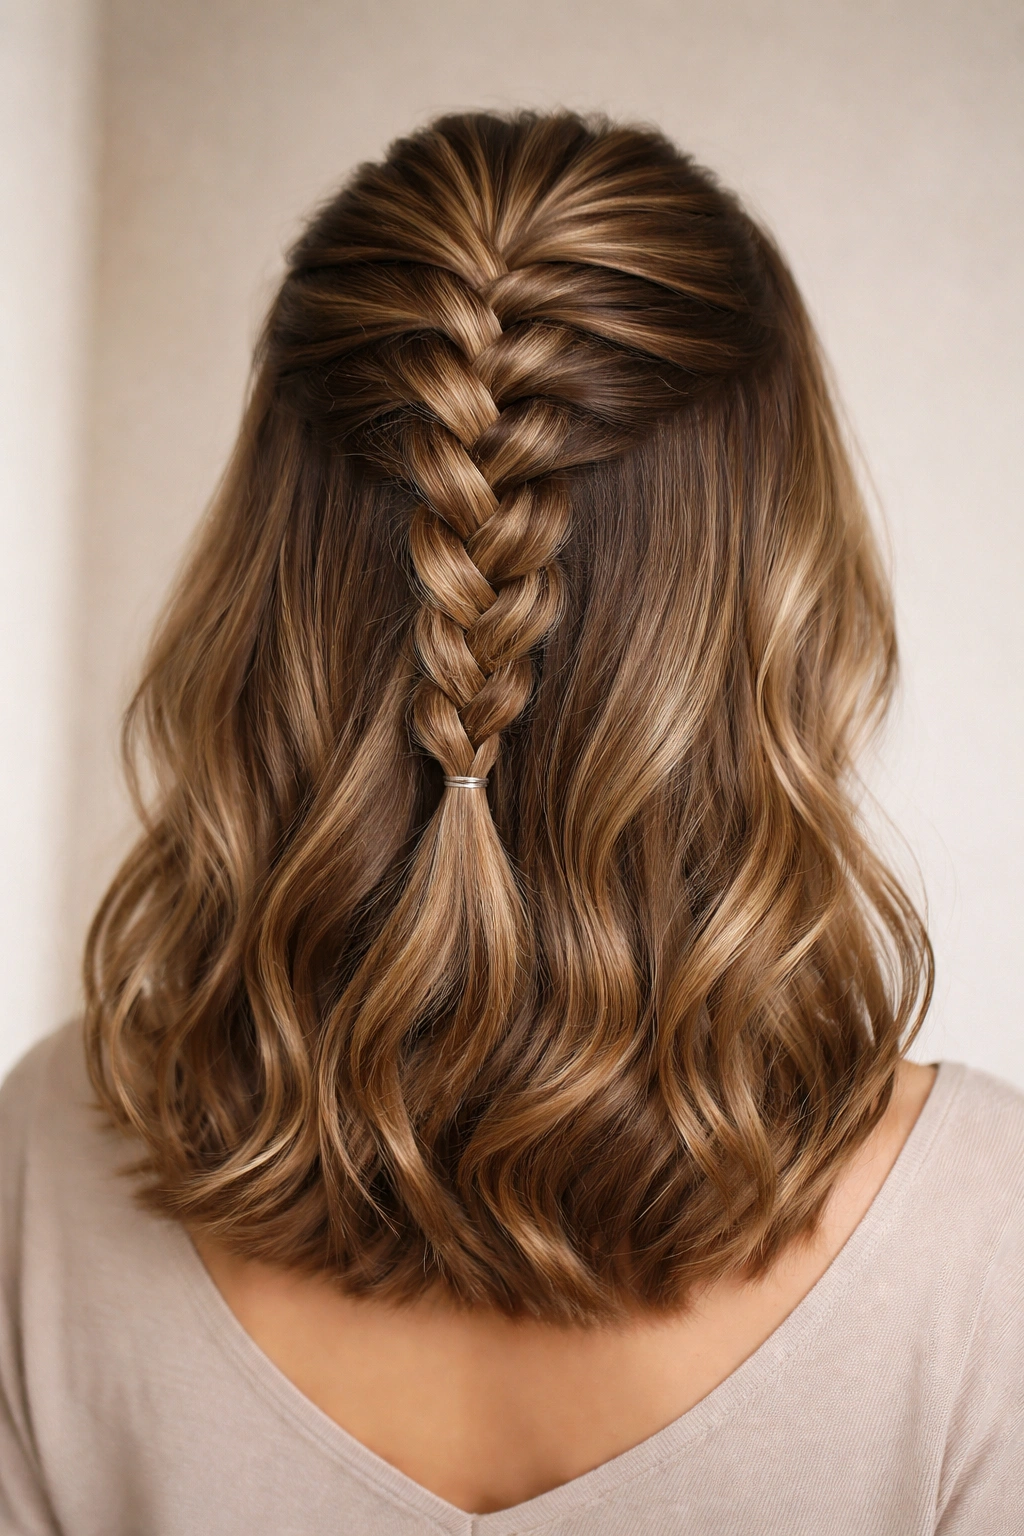
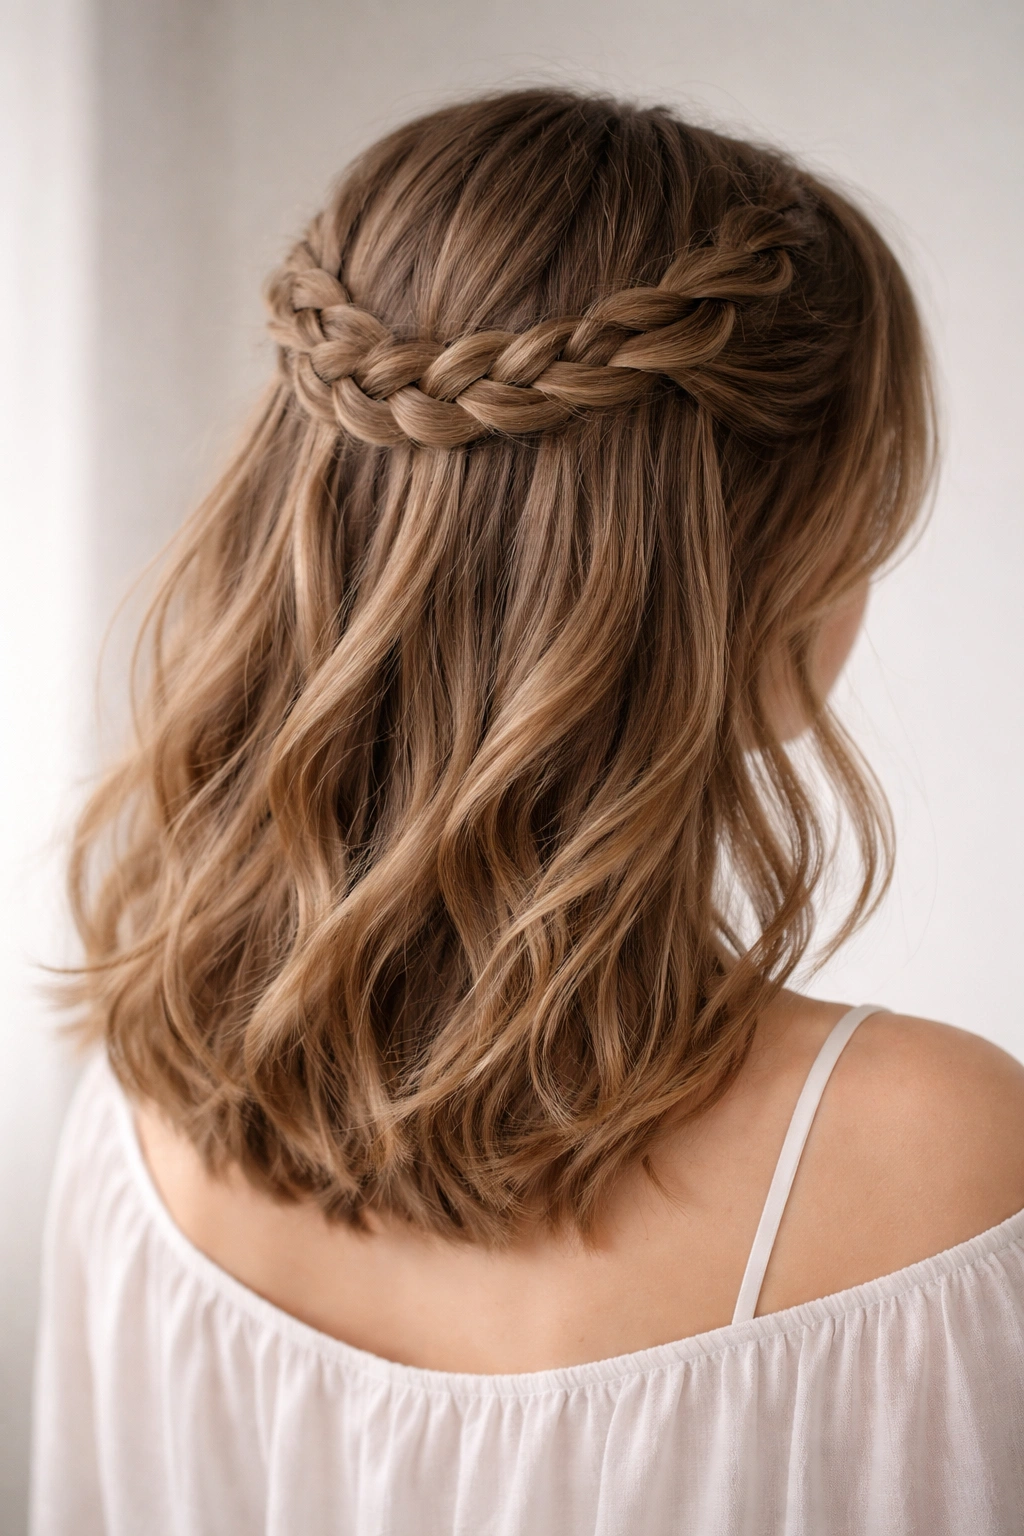
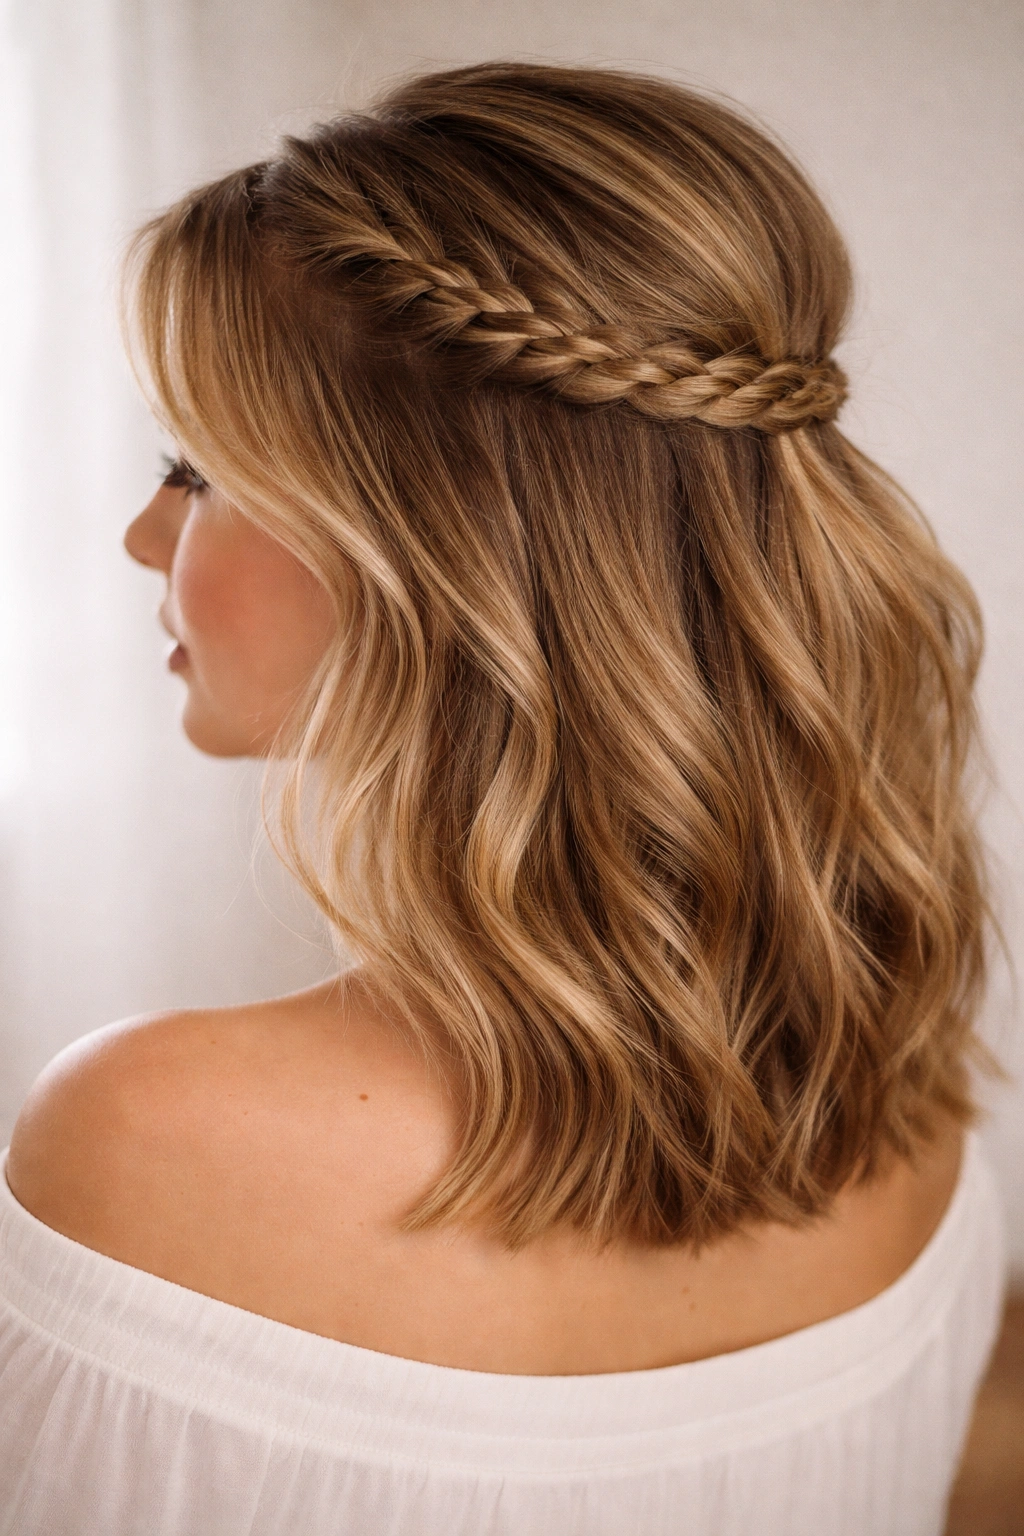
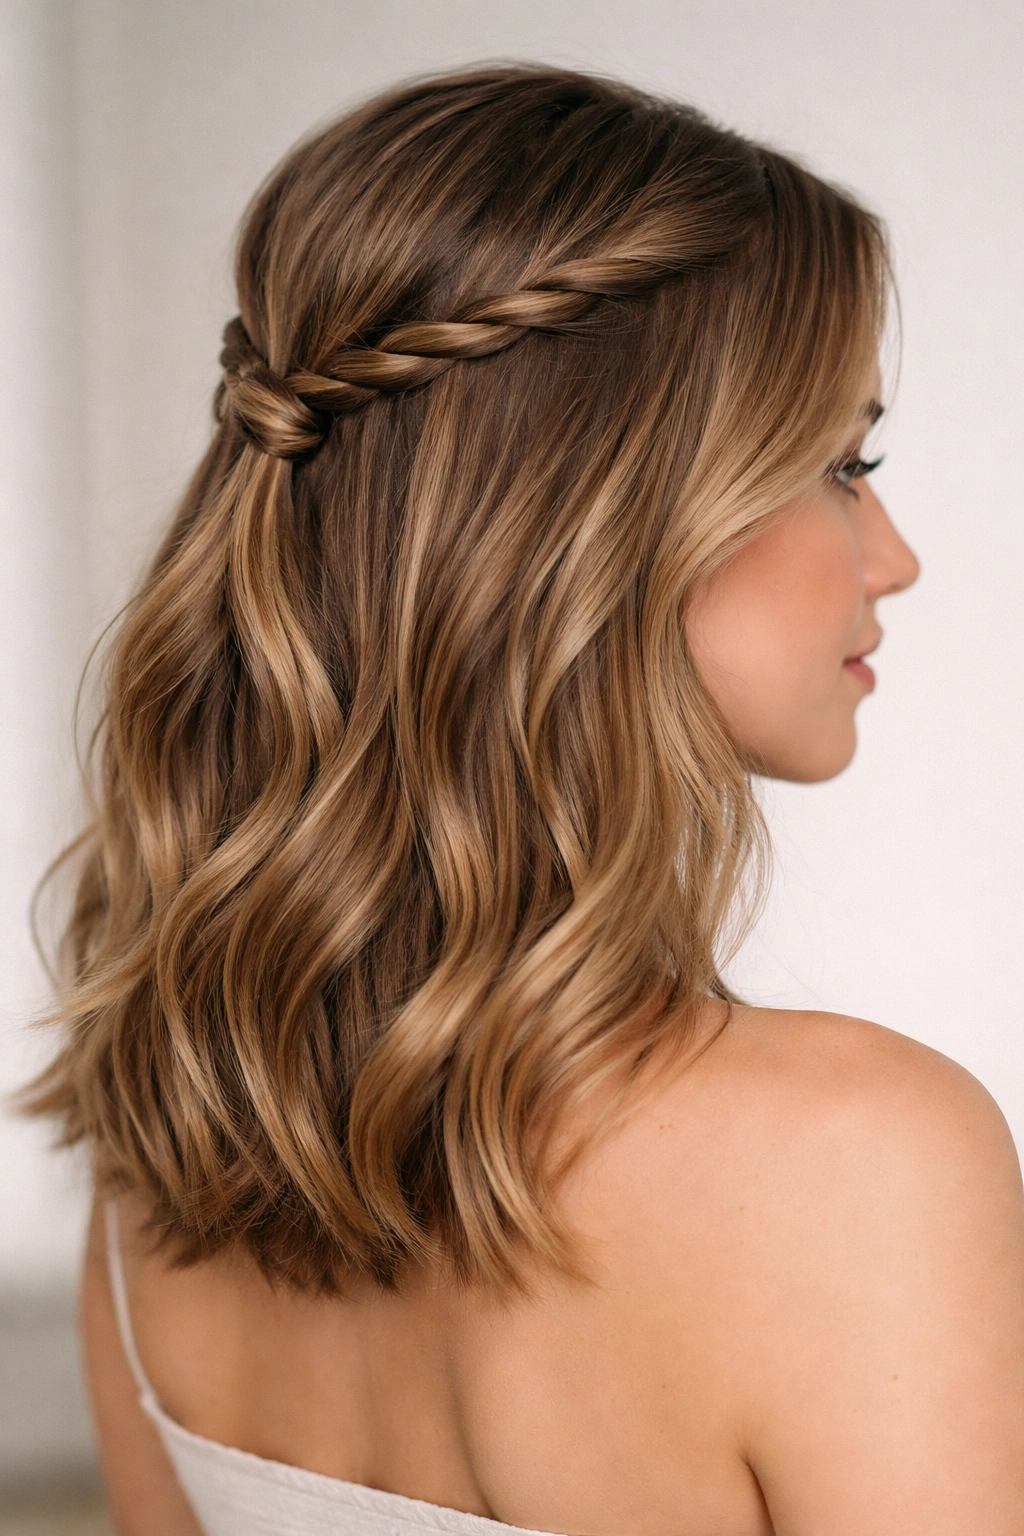
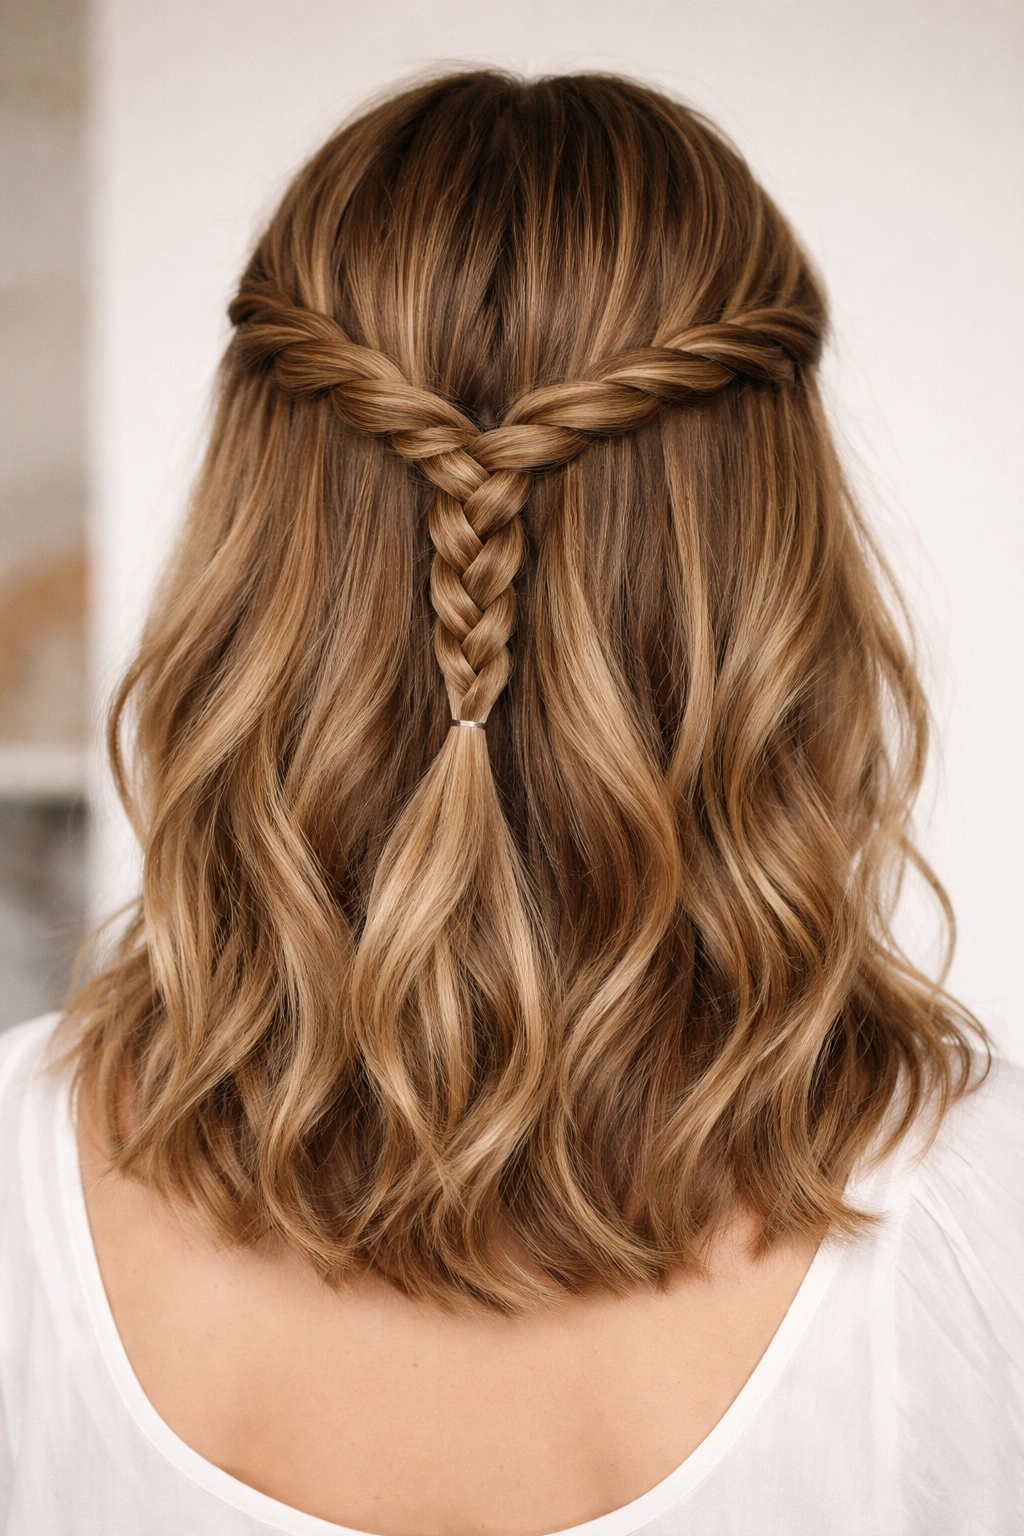
1. Classic Three-Strand Braid Half Up
This is the foundation that makes all other braided half up styles possible. Take a section from each temple about two inches wide, gather them at the back of your head just above where your ears sit, and braid with a simple three-strand technique. The beauty here is its versatility — it works on day-one hair, on second-day waves, and on freshly straightened strands.
Why It Works for Shoulder-Length Hair
A classic braid on shoulder-length hair hits right at the most flattering point of your face and neck. The gathered section pulls away from your face without creating that overly-styled tension that can look harsh on shorter lengths. With shoulder-length strands, you get enough hair flowing below the braid that it doesn’t feel thin or skimpy — it feels intentional and complete. The style sits at approximately the middle of your head, which is exactly where volume works best.
How to Master the Technique
- Section off hair starting at your temples, taking roughly two inches on each side from the front
- Gather these sections at the back of your head, securing loosely with a clear elastic or matching hair tie
- Take the secured section and divide it into three equal strands to create your braid
- Braid down loosely rather than pulling tight — this creates a more modern, undone feel that suits casual styling
- Gently pancake the braid (pull the edges outward) to make it look thicker and more textured
Pro tip: Don’t gather the braid section too high on your head — aim for just above ear level. If you gather too close to the crown, the style reads “little girl” instead of “intentional adult styling.”
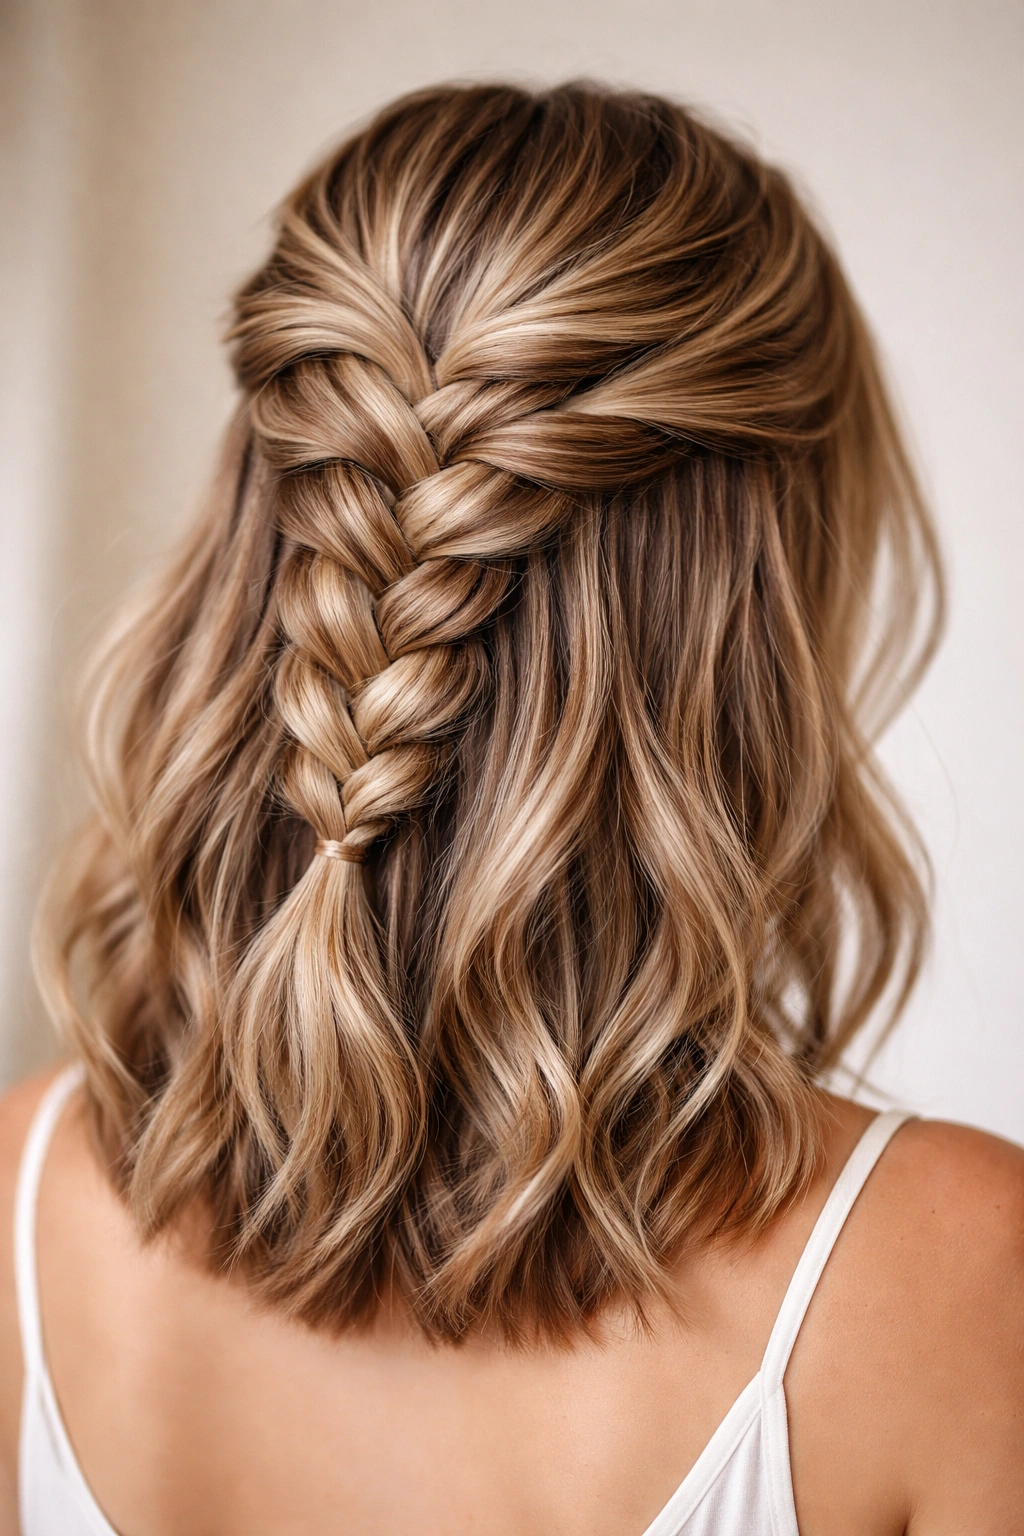
2. French Braid Half Up
The French braid half up takes the basic concept and elevates it by starting the braid from the crown and gradually incorporating hair as you work downward. This creates a more cohesive look where the braid feels like it emerges naturally from your half-up section rather than being added as an afterthought.
Why It Works for Shoulder-Length Hair
French braiding down from your crown creates beautiful dimension and makes shoulder-length hair look fuller. The braid gathers more hair as it descends, which means the final gathered section has real thickness and body — something that can be tricky to achieve on shorter lengths. With shoulder-length strands, the braid ends precisely at the sweet spot where the style transitions from gathered to loose, creating perfect visual balance.
How to Master the Technique
- Start at your crown with a small three-strand braid using only the top section of hair
- As you braid downward, gradually add hair from the sides into your existing braid strands
- Continue until you reach the back-middle area of your head, roughly at ear level
- Secure the braid with a clear elastic, allowing the rest of your hair to flow loose below
- Pancake the braid generously to create volume and a softer appearance
- Optional: gently pull out a few face-framing pieces for a romantic touch
Worth knowing: If you struggle with French braiding, practice by doing it on someone else first, or even on a wig. The angle and hand positioning are much clearer when you’re not looking in a mirror trying to work backwards.
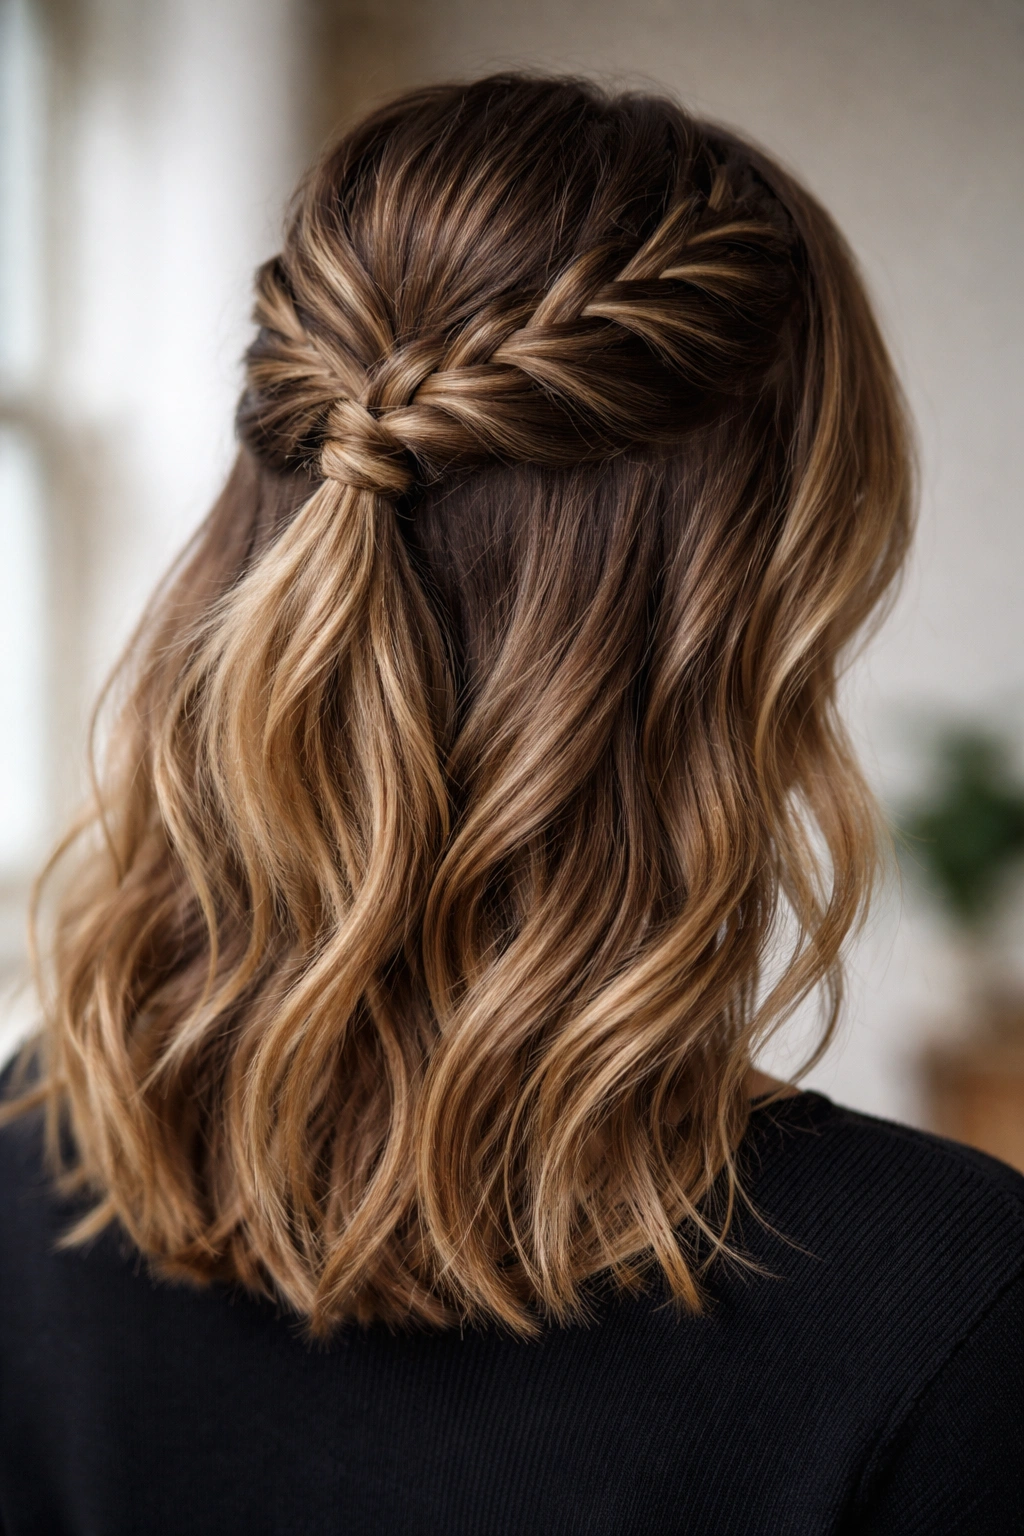
3. Dutch Braid Half Up
The Dutch braid is the inverse of the French braid — instead of crossing strands over each other, you cross them under, creating a braid that sits on top of your hair and stands out in bold relief. When worn half up, it becomes a statement style that reads more intentional and modern than a traditional braid.
Why It Works for Shoulder-Length Hair
Dutch braids create striking visual definition on shoulder-length hair because they literally sit on the surface of your head rather than sinking into your strands. The raised appearance makes the braid itself a design element, which is perfect when you have just enough hair to make it count. Shoulder-length strands provide enough substance that the braid doesn’t look thin or delicate — it looks strong and intentional.
How to Master the Technique
- Start at your crown with three sections of hair, approximately the same size
- Cross the right strand under (not over) the middle strand
- Cross the left strand under the new middle strand
- Continue alternating, crossing under rather than over, which creates the signature raised appearance
- Add hair from the sides as you descend, similar to a French braid technique
- Stop at the back-middle of your head and secure with an elastic
- Pull the braid edges outward to create dimension and soften the tight appearance
Pro tip: Dutch braids show every texture variation in your hair, so they look particularly striking on wavy or textured hair. If you have very fine or straight hair, try creating small waves with a straightener first, then braiding — the texture adds visual interest.
4. Twisted Half Up Half Down
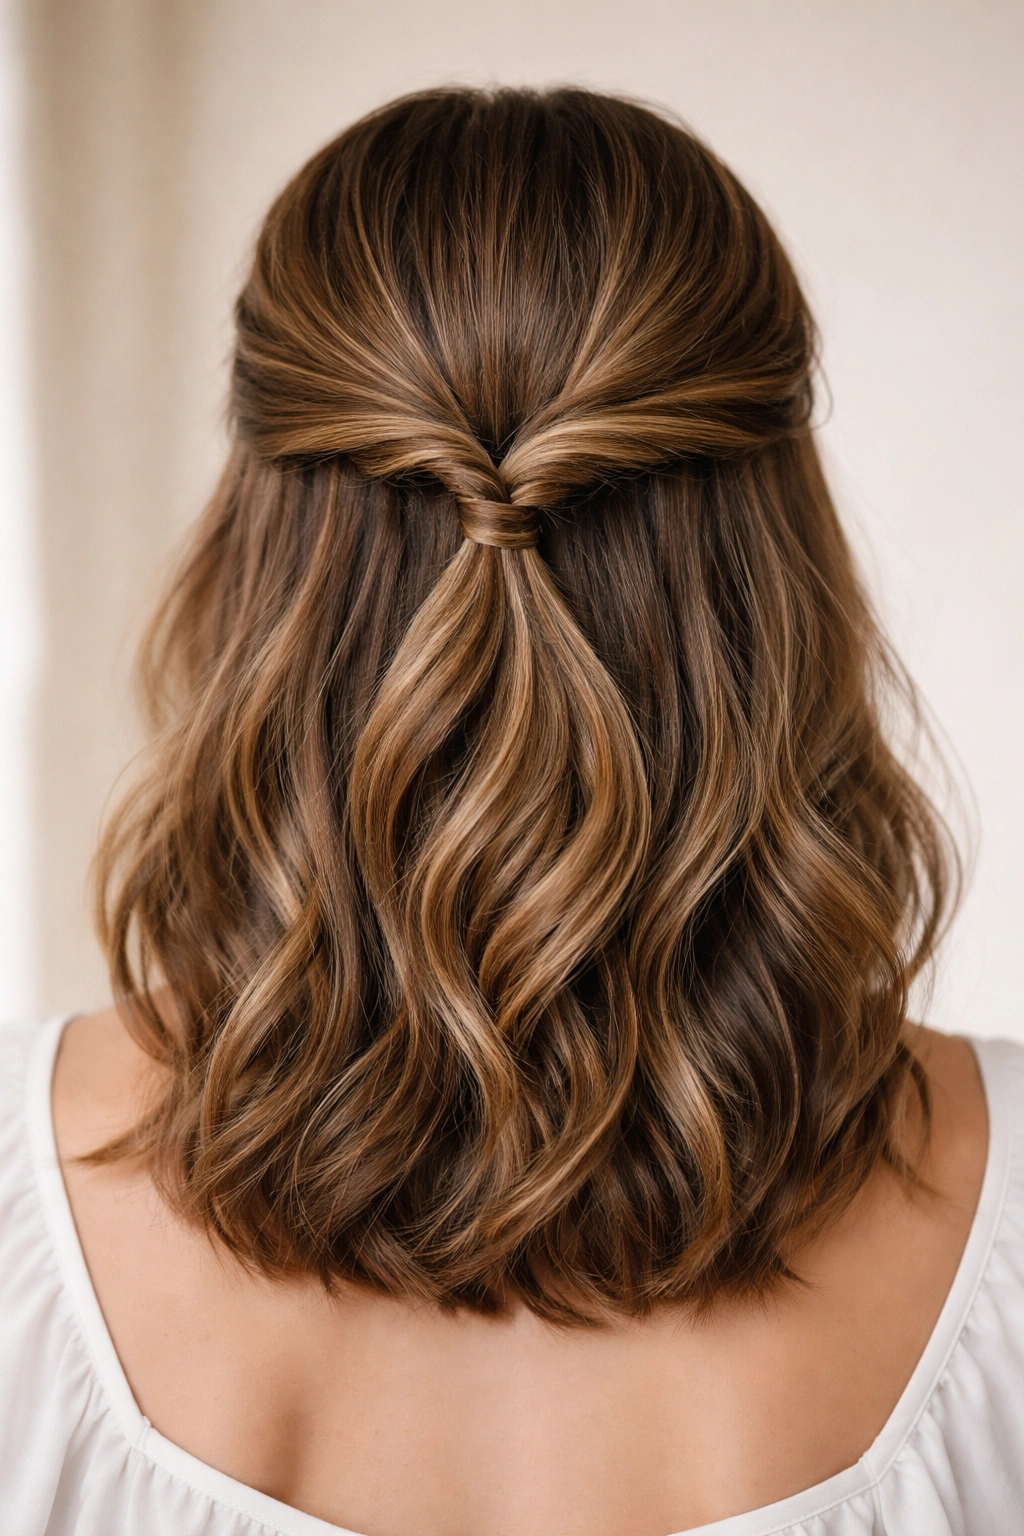
Not every half up style needs to be a braid. A twisted section creates a similar gathered effect while being faster to execute and potentially more flattering on very fine or fragile hair. Take a section from each side, twist each section individually, then wrap them around each other as you secure them.
Why It Works for Shoulder-Length Hair
Twists have an elegance that braids sometimes lack — they read as more refined and less juvenile. On shoulder-length hair, a twisted half up half down creates a sleek, polished silhouette without the visual weight of a full braid. The twisted sections sit beautifully at the back of the head when your strands are shoulder-length, creating a look that feels sophisticated enough for professional settings but casual enough for daily wear.
How to Master the Technique
- Section off hair starting at your temples, taking roughly two inches on each side
- Twist each section tightly as you work backward
- At the back of your head, cross the two twisted sections over each other
- Continue twisting them together as you wrap them around the back of your head
- Secure with a bobby pin or small elastic, allowing the loose ends to blend with the rest of your hair
- Gently pull the twists slightly to add texture and dimension
- Flip your head over and run your fingers through the loose section to add volume
Worth knowing: If your hair is too slippery to hold a twist, try starting with dry shampoo or texture spray at your roots. This adds grip and makes twisting much easier.
5. Fishtail Braid Half Up
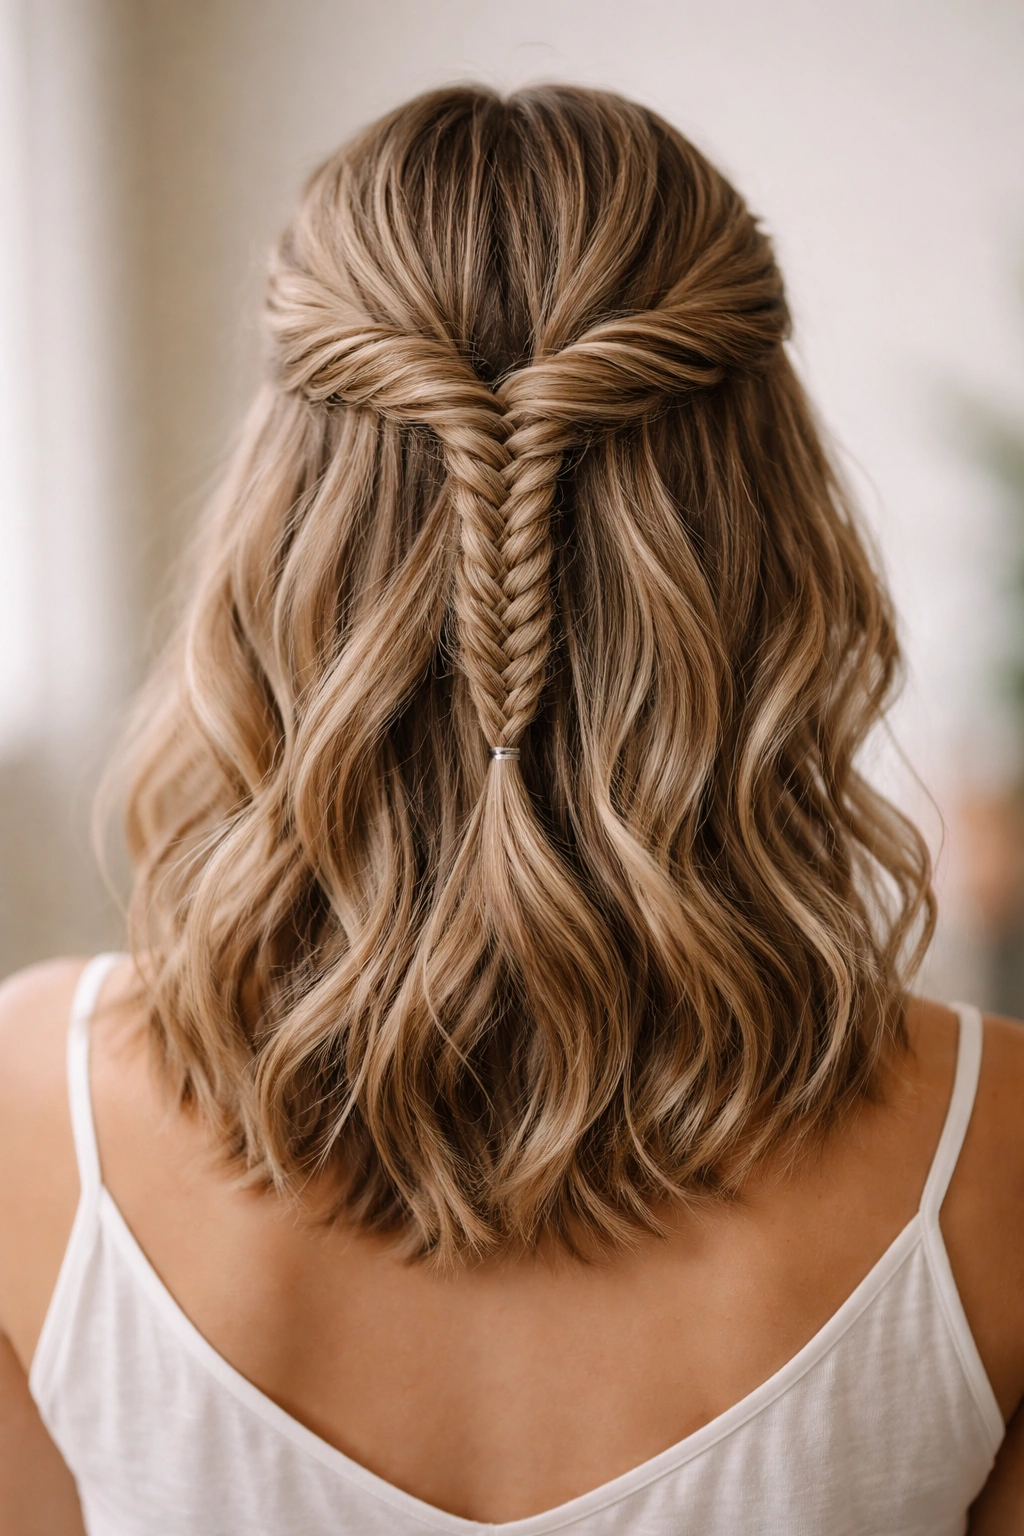
The fishtail braid looks incredibly complex but is actually easier than a traditional three-strand braid once you understand the technique. It uses just two sections instead of three, creating a delicate, intricate appearance that feels special without requiring technical skill.
Why It Works for Shoulder-Length Hair
Fishtail braids create texture and visual interest without the bulk of thicker braids, making them ideal for shoulder-length hair that might feel weighed down by a heavy braid. The tight, woven appearance of a fishtail adds sophistication, and on shoulder-length strands, the braid sits at just the right proportion — visible enough to appreciate the detail but not so thick that it dominates your look.
How to Master the Technique
- Gather your half-up section as you would with a classic braid, securing loosely with an elastic
- Divide the secured section into two equal parts
- Take a small piece of hair from the outer edge of the right section and cross it over to join the left section
- Take a small piece from the outer edge of the left section and cross it over to join the right section
- Continue alternating small pieces from each side — the smaller the pieces, the tighter and more intricate the braid
- Secure the end with a small elastic
- Gently pull the braid edges to create dimension and soften the appearance
Pro tip: If your fishtail braid looks too tight, try using slightly larger pieces. If it looks loose and messy, use smaller pieces. The size of each section you pull directly determines how tight and intricate the final braid appears.
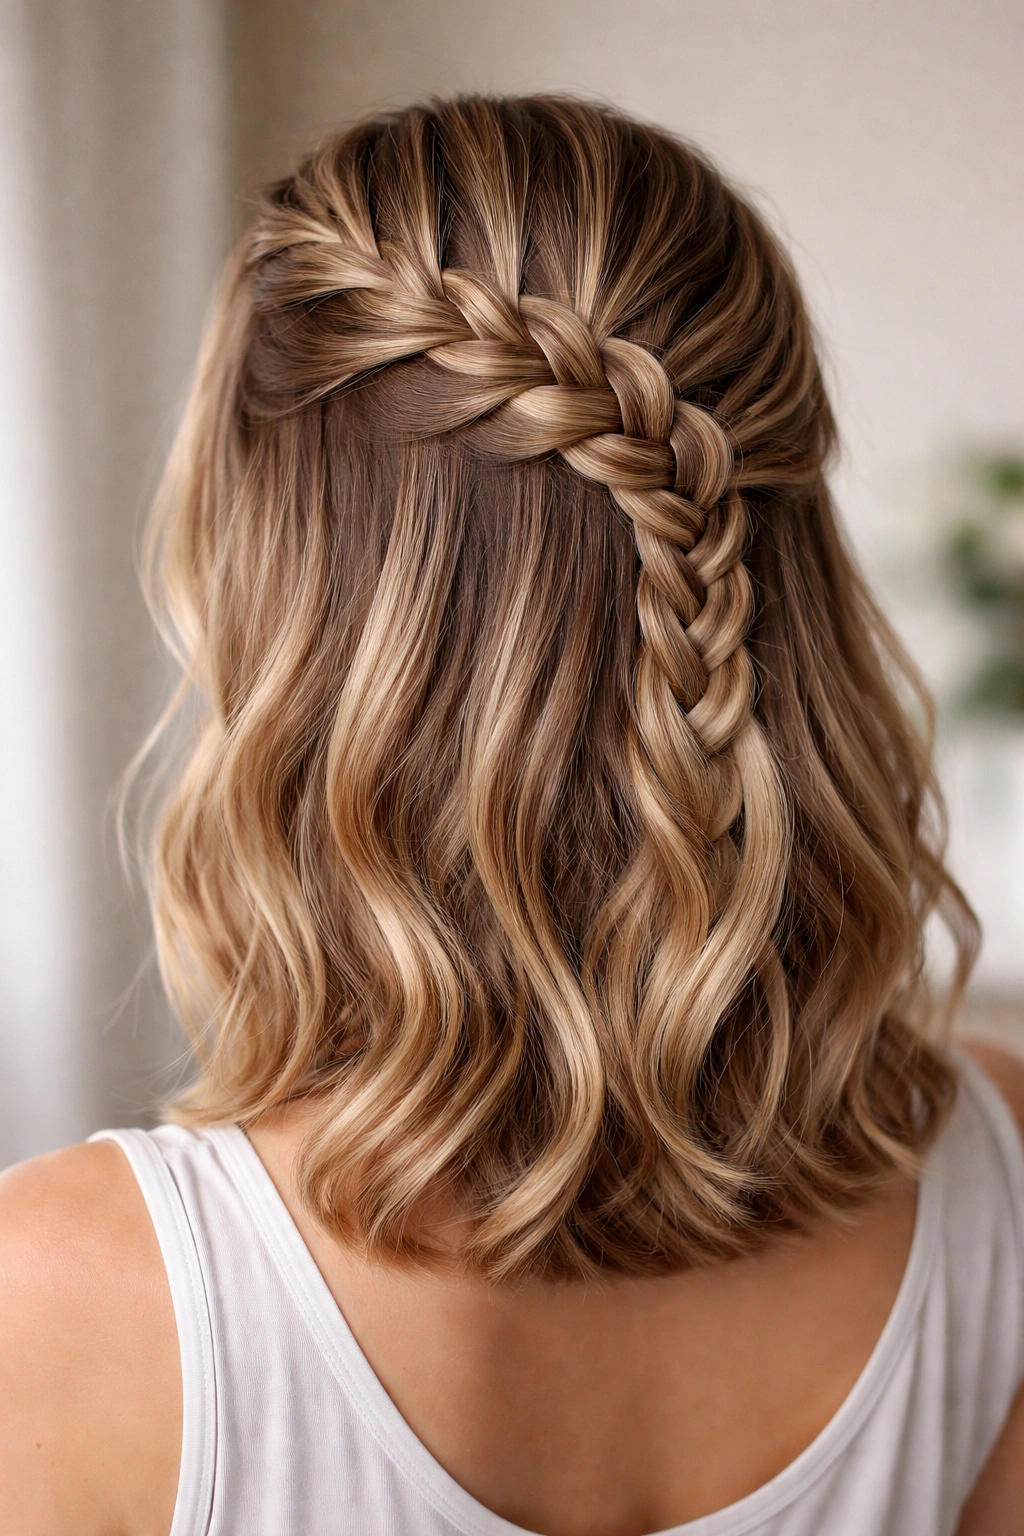
6. Waterfall Braid Half Up
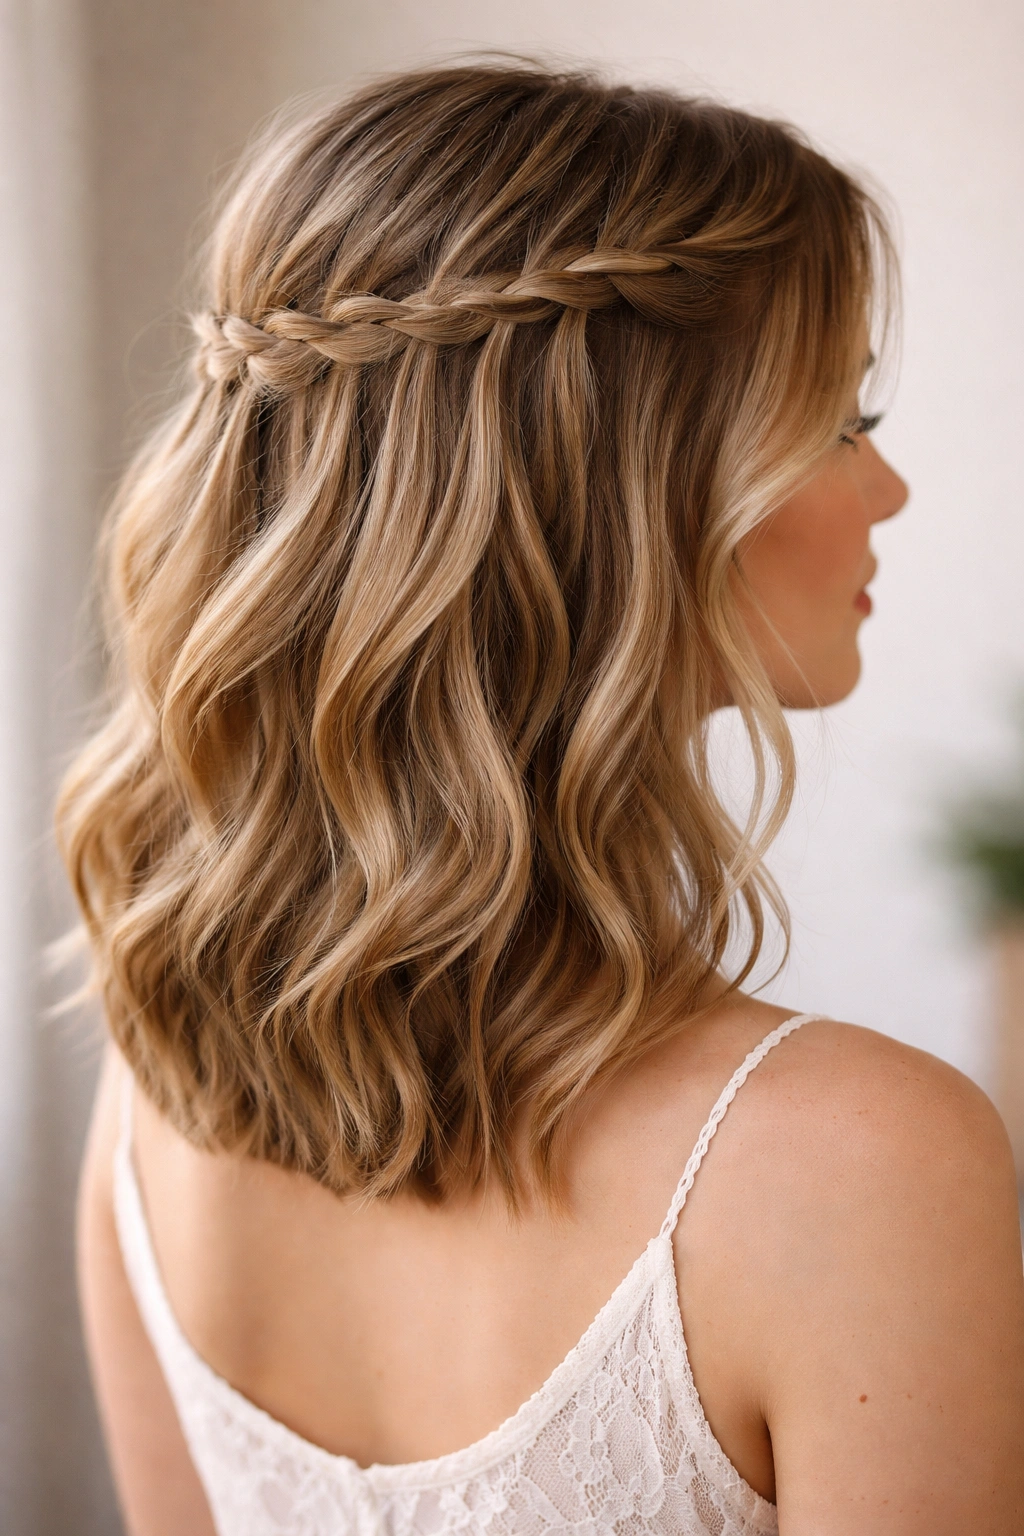
The waterfall braid is a romantic, bohemian-inspired style where sections of hair are released at intervals, creating the effect of water flowing down the side of your head. When worn half up, it combines the elegance of a gathered style with the movement of loose hair.
Why It Works for Shoulder-Length Hair
Waterfall braids on shoulder-length hair create a cascading effect that feels intentional rather than accidental. The released sections of hair create visual movement that makes shoulder-length strands look longer and more textured. The style sits beautifully across the back of the head when you’re working with this particular length, creating a graceful transition from gathered to loose sections.
How to Master the Technique
- Start a Dutch or French braid on one side of your head, beginning near your temple
- Instead of incorporating new hair from the sides as you descend, release the outer strand periodically by letting it fall free
- Replace each released strand with new hair from the top — this creates sections that cascade down
- Continue braiding around the back of your head at approximately ear level
- Secure the braid with a bobby pin or small elastic
- Pancake the braid gently and arrange the released sections to flow naturally down the back
- Flip your head and add volume to the loose section with your fingers or a texturizing product
Worth knowing: Waterfall braids show best on second-day hair with some natural texture. If your hair is freshly washed and smooth, try curling it lightly first to make the cascading sections more visible and defined.
7. Crown Braid Half Up Half Down
A crown braid sweeps around the back of your head like a halo, creating an ethereal, princess-worthy effect. When done as a half up style, it gathers some hair while leaving plenty loose for movement and dimension.
Why It Works for Shoulder-Length Hair
Crown braids on shoulder-length hair create a romantic, intentional look that works for both casual and special occasions. The braid circles the back of your head at approximately the middle, which is precisely where you want visual interest on shoulder-length strands. The gathered section isn’t tight at the crown, so it won’t create tension or make your hair look thin — instead, it creates a soft, romantic silhouette.
How to Master the Technique
- Start a Dutch or French braid on one side of your head, beginning near your temple
- Braid across the back of your head, incorporating hair as you work
- Continue the braid around to the opposite temple
- Instead of securing the braid at the back, secure it at the opposite temple where you began
- Pin the braid in place with bobby pins that match your hair color
- Leave the hair at the crown loose and fluffy
- Gently pull and pancake the braid to add dimension
- Create soft waves in the loose section for a romantic, cohesive appearance
Pro tip: This style is easier than it looks if you’re willing to use bobby pins liberally. Pin every 2-3 inches of the braid to keep it secure and in place, then hide the pins by covering them with small sections of surrounding hair.
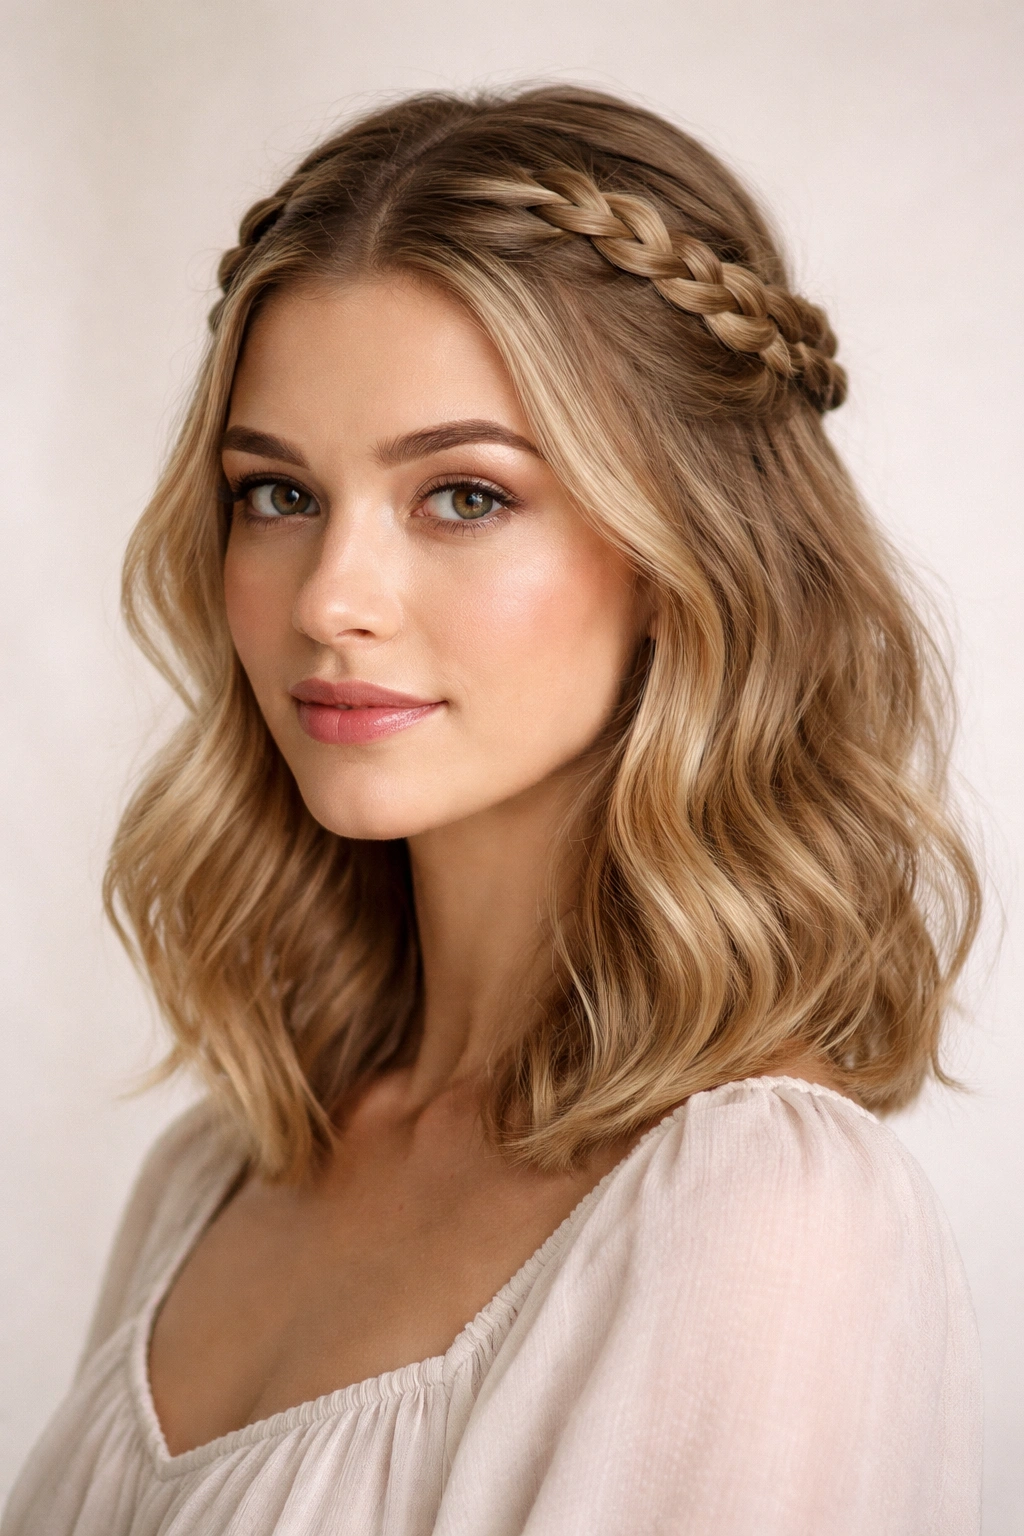
8. Halo Braid Half Up
A halo braid is essentially a crown braid secured into a half-up position rather than going all the way around your head. This creates the impression of a braided crown while keeping the majority of your hair loose and flowing.
Why It Works for Shoulder-Length Hair
Halo braids are flattering on nearly every face shape because they draw the eye to your features without overwhelming shorter hair lengths. On shoulder-length hair, a halo braid creates a soft, romantic frame that’s neither too dramatic nor too minimal. The style is perfect for occasions where you want to look intentionally styled without appearing overdone.
How to Master the Technique
- Start a Dutch or French braid on one side of your head, near your temple
- Braid around the back of your head, gathering hair as you work
- End the braid on the opposite temple, mirroring where you started
- Secure both ends with bobby pins, creating a half-halo effect around the back half of your head
- Leave the crown and hairline loose
- Pancake the braid generously to create volume and a softer appearance
- Add soft waves or curls to the loose section to enhance the romantic aesthetic
- Optional: pin small flowers, baby’s breath, or delicate accessories into the braid for special occasions
Worth knowing: If your braid won’t stay in place, try using a texturizing spray or dry shampoo beforehand. The added texture gives your hair something to grip, and the braid will feel less slippery throughout the day.
9. Lace Braid Half Up
A lace braid is a delicate variation where you only braid one side of your hair rather than pulling sections from both sides. The result is a thin, delicate braid that looks intricate without requiring complex technique. It’s perfect for fine or thin hair that might look overwhelmed by a traditional full braid.
Why It Works for Shoulder-Length Hair
Lace braids are ideal for shoulder-length hair because they create definition and dimension without the bulk. The thin, one-sided braid adds visual interest while keeping the overall look light and modern. On shoulder-length strands, a lace braid creates just enough texture to look intentional while preserving the softness and flow of your loose hair.
How to Master the Technique
- Section off hair starting at your temple, taking roughly two inches
- Create a thin three-strand braid using only this section — don’t incorporate new hair from the sides
- Braid down to approximately ear level
- Gather this thin braid along with the rest of your hair into a half-up section
- Secure everything with an elastic, positioning the thin lace braid so it’s visible against the gathered hair
- Gently pull the lace braid to add dimension
- Pancake the braid, then fluff the gathered section to create volume
- Create waves or curls in the loose bottom section for a cohesive, textured appearance
Pro tip: Lace braids look best on hair that has some texture or wave already. If you have super-straight hair, try curling it first or creating texture with a straightener, which adds grip and makes the braid more visible.
10. Rope Twist Half Up
A rope twist creates a braided appearance without actually braiding. Instead, you twist two sections of hair around each other, creating a rope-like texture that’s faster to execute than braiding and works beautifully on every hair type.
Why It Works for Shoulder-Length Hair
Rope twists are perfect for shoulder-length hair because they create visual interest with minimal effort. The twisted appearance adds dimension without the weight or bulk of traditional braids, and the finished style looks polished enough for professional settings. On shoulder-length strands, a rope twist half up creates a sleek, modern silhouette that’s modern and intentional.
How to Master the Technique
- Take a section from the temple area on each side, approximately two inches wide
- Twist each section tightly toward the back of your head
- At the back, cross the two twisted sections over each other, continuing to twist them together as they wrap around each other
- Continue wrapping the twisted sections around the back of your head
- Secure with bobby pins, blending the ends with your gathered hair
- Gently pull and loosen the twists to add texture and soften the appearance
- Flip your head and add volume to the loose section by running your fingers through it
- Optional: create soft waves in the loose section for a more textured, romantic appearance
Worth knowing: If you find rope twists slipping and unraveling throughout the day, try using a light hairspray or dry shampoo on your hands before twisting. The product adds grip and helps the twist hold its shape.
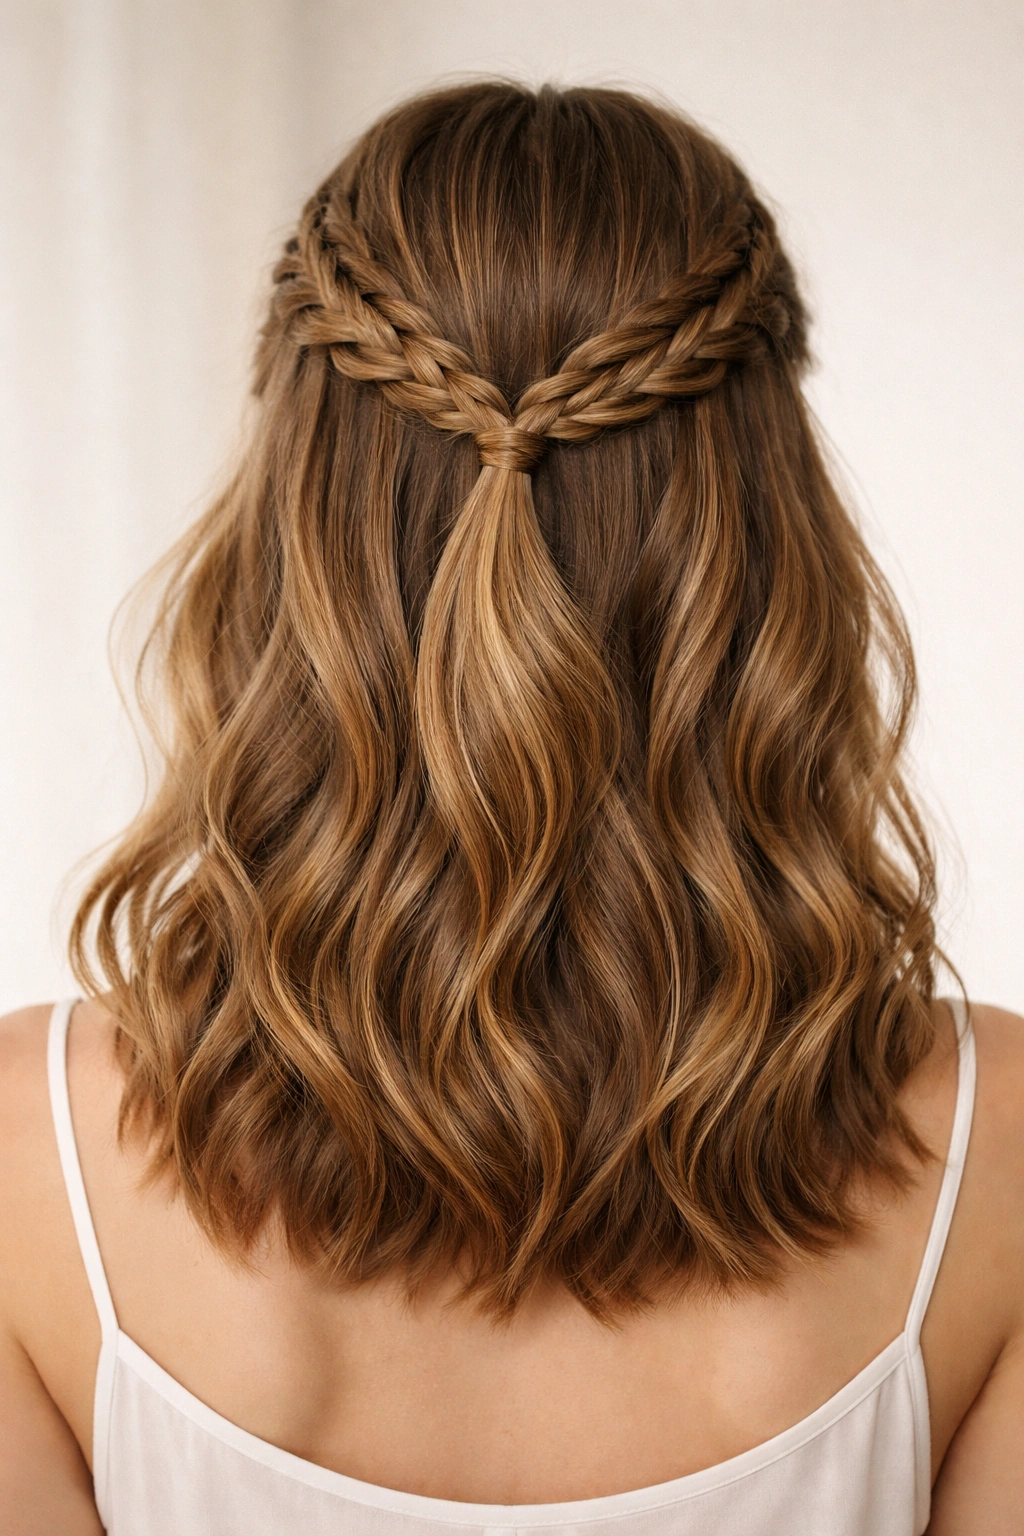
11. Double Braid Half Up
As the name suggests, a double braid half up uses two separate braids rather than one, creating a fuller, more defined look. Each braid sits on either side of your head, meeting in the middle at the back. The result is more visual impact and a style that reads as more intentional.
Why It Works for Shoulder-Length Hair
Double braids on shoulder-length hair create excellent balance because each individual braid is thinner while the combined effect is fuller. This approach works beautifully on fine hair that might be overwhelmed by a single thick braid, and it creates a more modern, playful aesthetic. Shoulder-length hair is the perfect length for double braids — long enough to braid convincingly but short enough that the braids don’t feel overly juvenile.
How to Master the Technique
- Create a center part from your crown to the nape of your neck
- On one side, section off hair starting at the temple and braid a Dutch or French braid working toward the back
- Mirror this process on the opposite side, creating a matching braid
- Gather both braids together at the back of your head, approximately at ear level
- Secure both braids together with a single elastic or with bobby pins
- Pancake both braids generously to add volume and dimension
- Leave the rest of your hair loose and wavy below the gathered section
- Flip your head and add volume to the loose section for a fuller, textured appearance
Pro tip: If you struggle with creating matching braids on both sides, braid one side, take a photo, then use it as reference while braiding the other side. This ensures both braids are positioned identically.
12. Milkmaid Braid Half Up
A milkmaid braid is actually a half-up style already — two braids start at your temples, wrap around the back of your head, and meet at the opposite temple, creating a style that looks like braided straps holding your hair back. It’s inherently a half-up style that feels both romantic and intentional.
Why It Works for Shoulder-Length Hair
Milkmaid braids were actually designed for longer hair, but they translate beautifully to shoulder-length strands. The style creates a frame around your face and holds hair back from your cheeks without pulling too tightly at the crown. On shoulder-length hair, milkmaid braids create a soft, feminine silhouette that’s flattering and modern.
How to Master the Technique
- Create two Dutch or French braids, starting one at each temple
- Work both braids toward the back of your head, incorporating hair from your sides as you progress
- As you reach the back, continue the braids around toward the opposite temple
- Secure each braid at the opposite temple with bobby pins
- Pancake both braids to add volume and texture
- Leave your crown and all hair below the braids loose and flowing
- Create soft waves in the loose section for a cohesive, romantic appearance
- Optional: add small flowers or delicate accessories to the braids for special occasions
Worth knowing: This style is easier than it sounds if you braid loosely and use bobby pins liberally. Pin every few inches to keep each braid in place, hiding the pins under small sections of surrounding hair.
13. Pancaked Braid Half Up
While pancaking is a finishing technique that works with many braids, emphasizing it as its own style highlights how transformative this technique truly is. A pancaked braid looks twice as thick as the braid itself, creating a fuller, softer, more textured appearance that’s distinctly different from a tight braid.
Why It Works for Shoulder-Length Hair
Pancaking creates the illusion of fuller, thicker hair — something that’s particularly valuable on shoulder-length strands where thickness impacts the overall silhouette significantly. The technique softens any braid, making it look less severe and more romantic. On shoulder-length hair, a heavily pancaked braid creates a fuller, bohemian appearance that reads as intentionally textured rather than just braid-focused.
How to Master the Technique
- Create any style of braid you prefer — French, Dutch, fishtail, or classic three-strand
- Once the braid is secured, gently pinch and pull outward on the edges of each section
- Work your way down the entire braid, pulling from both sides evenly
- For maximum pancaking, pull quite aggressively — the braid should nearly double in width
- The pancaking process actually makes the braid look more polished, not messier
- Gather your half-up section and secure, making sure the pancaked braid remains visible
- Flip your head and add volume to the loose section with your fingers or a texturizing spray
Pro tip: Pancaking works best when you braid more tightly than feels natural. Braid tightly, then pancake aggressively to transform it into a soft, textured style. If you braid loosely, pancaking won’t have much impact.
14. Zigzag Braid Half Up
A zigzag braid is a playful, modern variation where you create a braid that moves side-to-side across the back of your head rather than straight down the center. The result is a more dynamic, visually interesting style that feels creative without being difficult.
Why It Works for Shoulder-Length Hair
Zigzag braids create movement and visual interest that keeps the eye traveling across your hair, which makes shoulder-length strands look more textured and dimensional. The off-center, side-to-side path of the braid is more interesting than a straight central braid. On shoulder-length hair, the zigzag effect creates a modern, intentional appearance that feels both playful and polished.
How to Master the Technique
- Create a Dutch or French braid starting at one temple
- Instead of working straight back, angle the braid diagonally toward the opposite side as you work downward
- At approximately ear level on the opposite side, reverse direction and braid back toward the center
- Continue this zigzag pattern across the back of your head
- Gather the braid section together with the rest of your hair into a half-up style
- Secure with an elastic or bobby pins
- Pancake the braid to add volume and soften the appearance
- Leave plenty of loose hair below for movement and texture
- Create waves in the loose section for a cohesive, dynamic appearance
Worth knowing: This style takes longer than straight braids because of the side-to-side path, but the finished result is striking and unusual. The time investment is worth it for special occasions or when you want to feel extra intentional about your styling.
15. Bohemian Textured Half Up

The bohemian textured half-up uses multiple braiding techniques combined with waves, creating a style that looks effortlessly put-together and romantically undone. This is less about executing one specific braid and more about layering techniques for maximum texture and dimension.
Why It Works for Shoulder-Length Hair
Bohemian textured styles are perfect for shoulder-length hair because they create the illusion of more hair through dimension and texture rather than actual length. The combination of braids, twists, and waves creates visual interest that makes shoulder-length strands look fuller and more dynamic. This style feels intentionally styled without appearing overdone or formal.
How to Master the Technique
- Create soft waves throughout your entire head using a curling iron or braid method
- Create a thin lace braid on one side, starting at the temple
- On the opposite side, create a thin rope twist from the temple back
- Gather both the braid and twist along with small sections of wavy hair into a half-up section
- Secure with an elastic, leaving the braid and twist visible across the gathered section
- Pancake the braid and twist gently to add dimension without creating a stark contrast
- Leave the majority of your hair loose and wavy below the gathered section
- Flip your head and use your fingers to add volume and break up the waves
- Optional: insert a delicate hairpin or clip into the gathered section for a subtle accent
Pro tip: This style looks best when you embrace the “undone” aesthetic. Don’t aim for perfect, symmetrical waves — instead, focus on creating varied texture that reads as intentionally relaxed. The style should look like you spent minimal effort even though you actually put time into it.
Final Thoughts
Shoulder-length hair is the ideal canvas for braided half-up styles because the length gives you enough hair to braid convincingly while remaining manageable and practical for everyday wear. Whether you prefer sleek and polished braids or textured, bohemian-inspired styles, there’s a braided half up option that matches your aesthetic and skill level.
The most important factor in making any of these styles work is that you practice with patience. Your first attempt at a French braid might feel awkward, but by your third or fourth time, your hands will remember the motion and the technique becomes automatic. Start with the simpler styles like classic three-strand braids or rope twists if you’re new to braiding, then progress to more complex techniques as your confidence builds.
These styles offer real versatility because they work on nearly every hair texture and type. Fine hair benefits from heavily pancaked braids that create the illusion of fullness, while thick hair looks beautiful in tighter, more structured styles. The best style for you depends on your own hair texture, the occasion, and the amount of time you’re willing to invest in styling. Once you master even three or four of these techniques, you’ll have endless ways to style your shoulder-length hair that feel fresh, intentional, and entirely your own.