Fairy hairstyles have captured imaginations for years, blending whimsy, romance, and an ethereal quality that feels both timeless and enchanting. The half up half down style is particularly perfect for achieving that delicate, magical look—it keeps hair off your face while maintaining length and flow, creating the ideal canvas for fairy-inspired elements like twists, braids, ribbons, and gentle waves. Whether you’re preparing for a special event, a photoshoot, or simply want to bring some enchantment into your everyday style, these half up half down variations offer something genuinely magical for everyone.
The beauty of fairy-inspired hairstyles lies in their flexibility. You can adapt them to your hair texture, length, and the level of detail you’re willing to invest. Some require minimal effort and work beautifully on straight hair, while others truly shine with waves and curls. Many of these styles layer beautifully—you can combine elements from multiple techniques to create your own signature fairy look that feels authentic to you.
1. The Twisted Crown Half Up
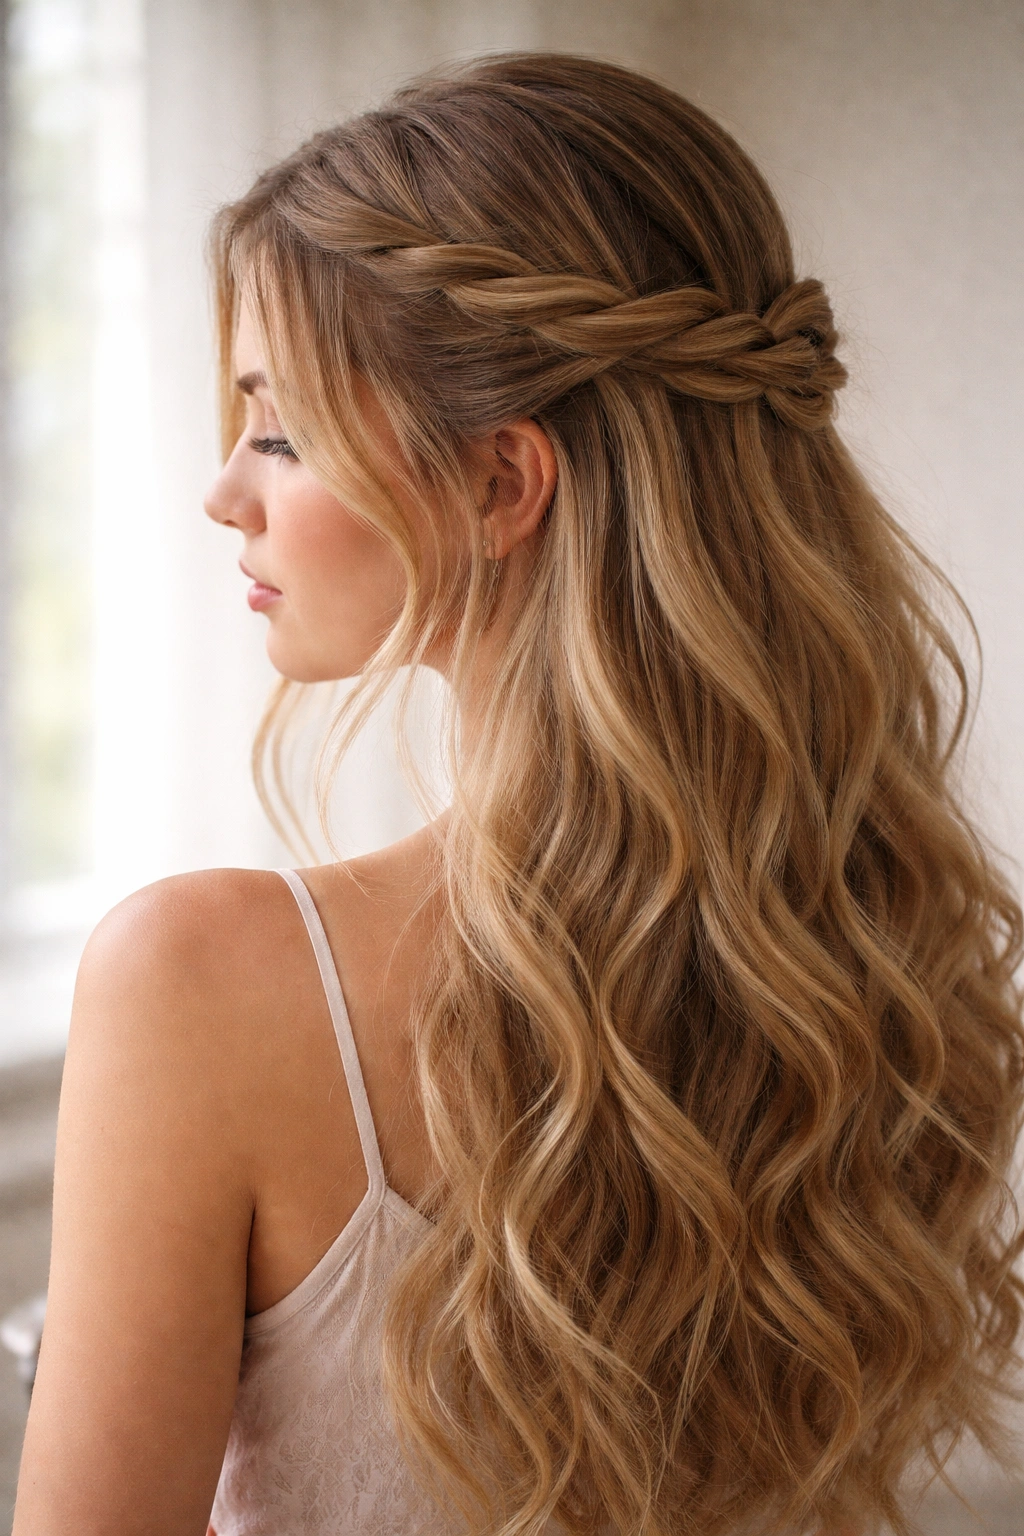
This style creates the appearance of an elegant crown by twisting two generous sections from the front of your hair and pinning them at the back of your head. Start by taking a section of hair from one side near your temple, twist it gently all the way back, and secure it with a bobby pin at the crown. Repeat on the other side, creating a symmetrical frame around your face. The twists catch the light beautifully and create dimension even if your hair is naturally straight.
Why It’s Perfect for Fairy Vibes
The twisted crown instantly elevates your look and feels inherently romantic and elegant. There’s something inherently fairy-tale about this style—it mimics crown-like structures without being as formal as an actual crown, striking that perfect balance between whimsical and wearable.
How to Make It Magical
- Tease slightly at the crown before twisting to create more texture and volume
- Add a delicate crystal clip or pearl bobby pin where the twists meet for a sparkly focal point
- Curl your bottom half with loose waves to enhance the ethereal quality
- Use texturizing spray before twisting to give your hair more grip and hold
Pro tip: This style holds better if you twist away from your face (twisting back) rather than toward it. If you have fine hair, don’t twist too tightly—loose, relaxed twists read as more intentional and romantic than tight, thin ones.
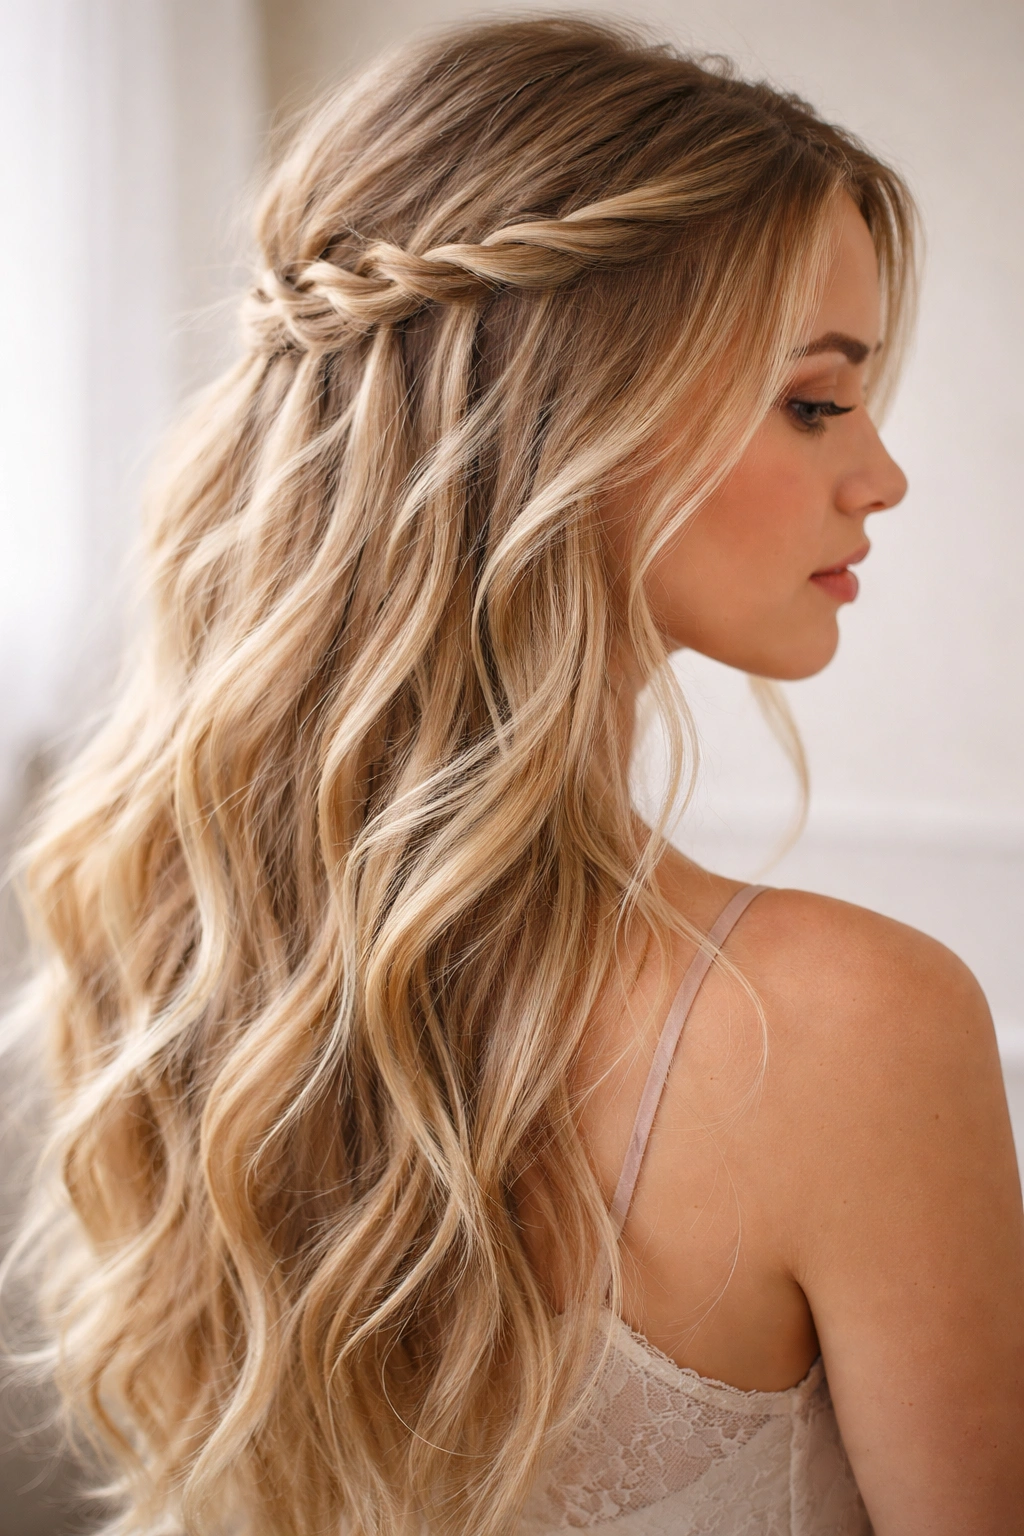
2. The Braided Halo Half Up

Begin with a center section of hair at the crown—about two inches wide. Create a three-strand braid starting just above your forehead, braiding downward and slightly angled toward one ear. At your ear level, secure the braid with a bobby pin, allowing the rest of your hair to fall freely. This creates the effect of a halo without requiring you to actually braid all the way around your head, making it much simpler to execute.
The Magic of the Braided Frame
This style works because a single braid down the center creates a focal point that frames your face beautifully. The braid catches light and adds visual interest, while the simplicity of only braiding one section keeps the look wearable and doesn’t feel overly complicated.
Styling Tips for Success
- French braid instead of a standard three-strand braid to create more fullness and texture
- Pancake the braid slightly (gently pull the loops outward) after securing it to make it look fuller and more romantic
- Pin the braid in a spiral at the side to create an even more whimsical look
- Add small flowers or baby’s breath woven throughout the braid as you create it
Worth knowing: This style photographs exceptionally well. The braid reflects light differently than straight hair, and the three-dimensional texture reads beautifully in photos and video.
3. The Wispy Waterfall Half Up
This style combines the delicate nature of a waterfall braid with the half up half down aesthetic. Begin with a section of hair above one ear and create a small waterfall braid by taking a strand, braiding it with two other sections, then releasing one of the outer strands to cascade down. Continue braiding and releasing strands as you move toward the back of your head, creating an effect where thin sections of hair flow freely while interlocking with the braid.
Why Waterfalls Feel So Fairy-Tale
Waterfall braids have an inherent movement and lightness that feels enchanted. The way the free strands flow alongside the structure of the braid creates visual interest without heaviness, achieving that sought-after “I woke up like this” fairy aesthetic.
Creating Extra Drama
- Start your waterfall braid lower, closer to ear level, for a subtler effect
- Create two waterfall braids instead of one, starting from opposite sides and meeting at the back
- Curl the waterfall strands separately after creating the braid to emphasize their distinct flowing texture
- Use a texturizing spray beforehand to make the cascading strands less slippery and easier to control
Quick fact: Waterfall braids work best on hair with some texture or wave. If you have very straight hair, adding loose waves throughout your entire head first will make the waterfall effect far more visible and romantic.
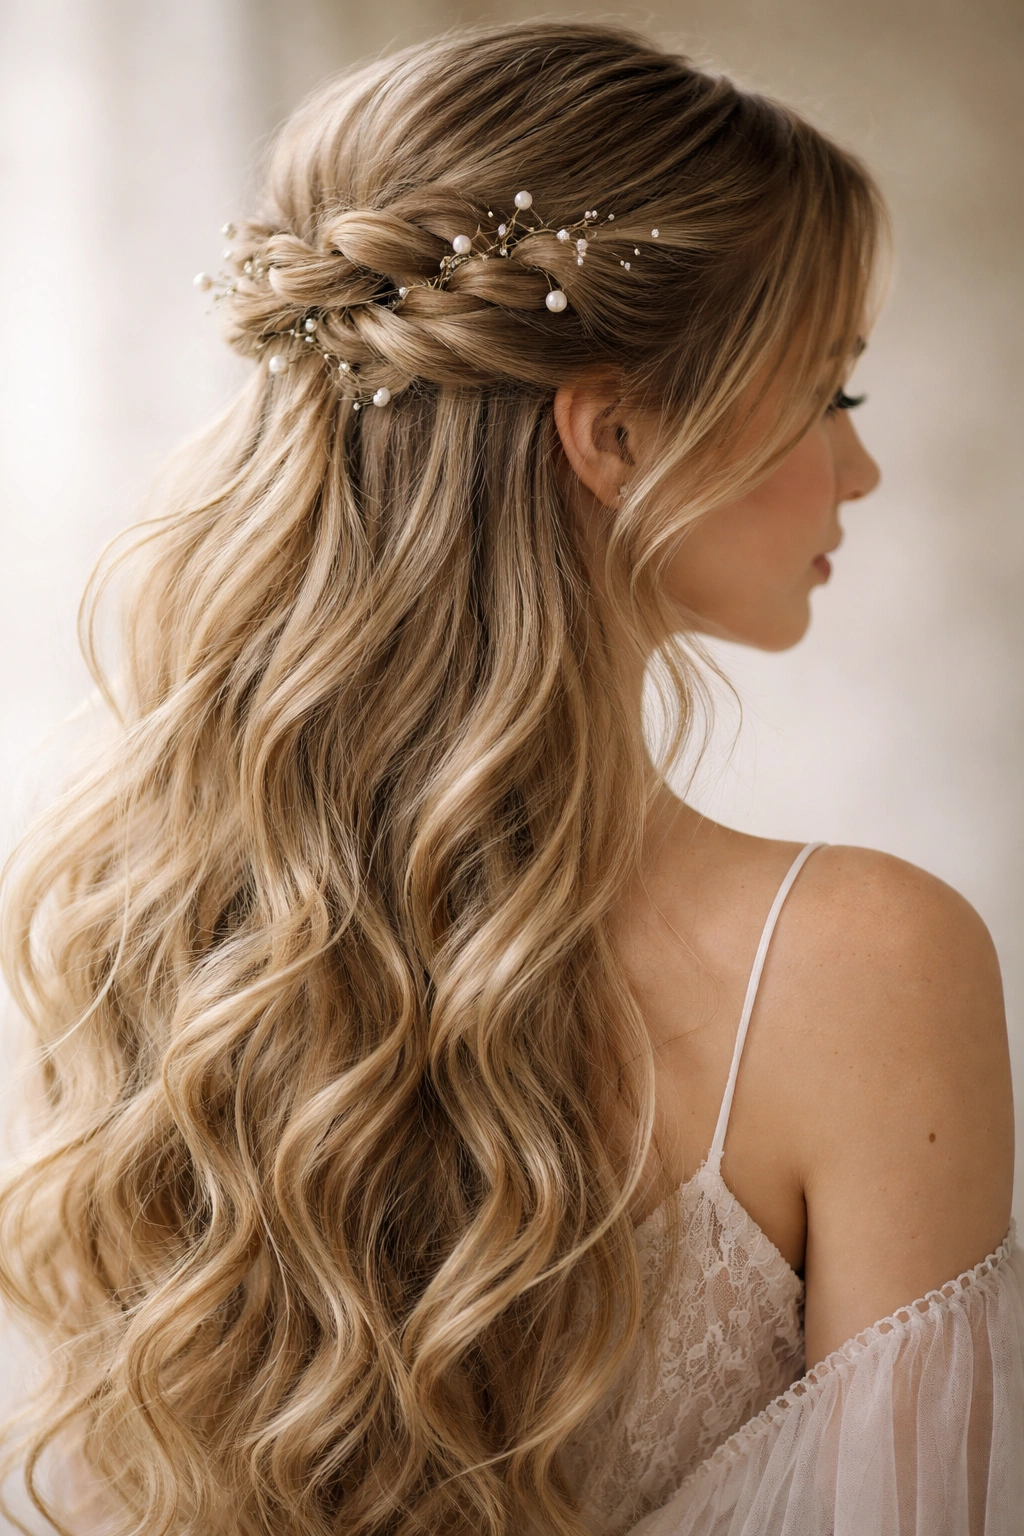
4. The Pearl-Adorned Half Up

Create a simple half up hairstyle—whether it’s a small ponytail, a twisted section, or a basic braid—then adorn it generously with pearl bobby pins, pearl hair clips, or a pearl hair comb. The key is placing the pearls intentionally rather than scattering them randomly. Group several pearl pins around your clip point, or use a larger pearl comb as your main securing element, arranging smaller pins around it.
The Elegance of Pearls
Pearls instantly elevate any hairstyle into fairy-tale territory. There’s something inherently romantic and luxurious about them, and they work with virtually any color hair and any complexion. The soft luminescence of pearls complements the ethereal quality of fairy aesthetics perfectly.
Pearl Placement Strategies
- Create a vertical line of pearls down one side of your head for a more structured, formal fairy look
- Cluster three to five pearl pins directly at your clip point for maximum glamour
- Use large statement pearl combs as the primary securing element, leaving smaller bobby pins visible
- Mix different sizes of pearls for a more organic, collected-over-time appearance
Insider note: Faux pearls work just as beautifully as real ones for hairstyling purposes, and they’re significantly more budget-friendly while still creating that luxurious, fairy-tale appearance.
5. The Double Twisted Half Up
Separate your hair into two distinct sections horizontally—imagine dividing your crown area in half. From the upper section, take a small piece of hair from one side and twist it back, securing it temporarily. Do the same with the lower section, creating two parallel twists stacked on top of each other. Then secure both twists together at the back with a single clip or pin, creating a sophisticated layered effect.
Why Layering Creates Magic
Double twists add sophistication and visual depth. This style reads as more intentional and polished than a single twist, yet remains simple enough to execute at home. The layering creates a three-dimensional effect that really photographs beautifully.
Enhancing the Double Twist
- Keep the upper twist tighter and the lower twist slightly looser for a gradient effect
- Pin the twists at slightly different heights rather than perfectly aligned for a more organic look
- Add texture spray before twisting to make both twists grip better and last longer throughout the day
- Curl the bottom half of your hair in the same direction as your twists flow for cohesion
Pro tip: If you have thin hair, start with the lower twist first and secure it, then create the upper twist and pin both together. This prevents the lower twist from becoming hidden under the upper one.
6. The Romantic Flower-Pinned Half Up
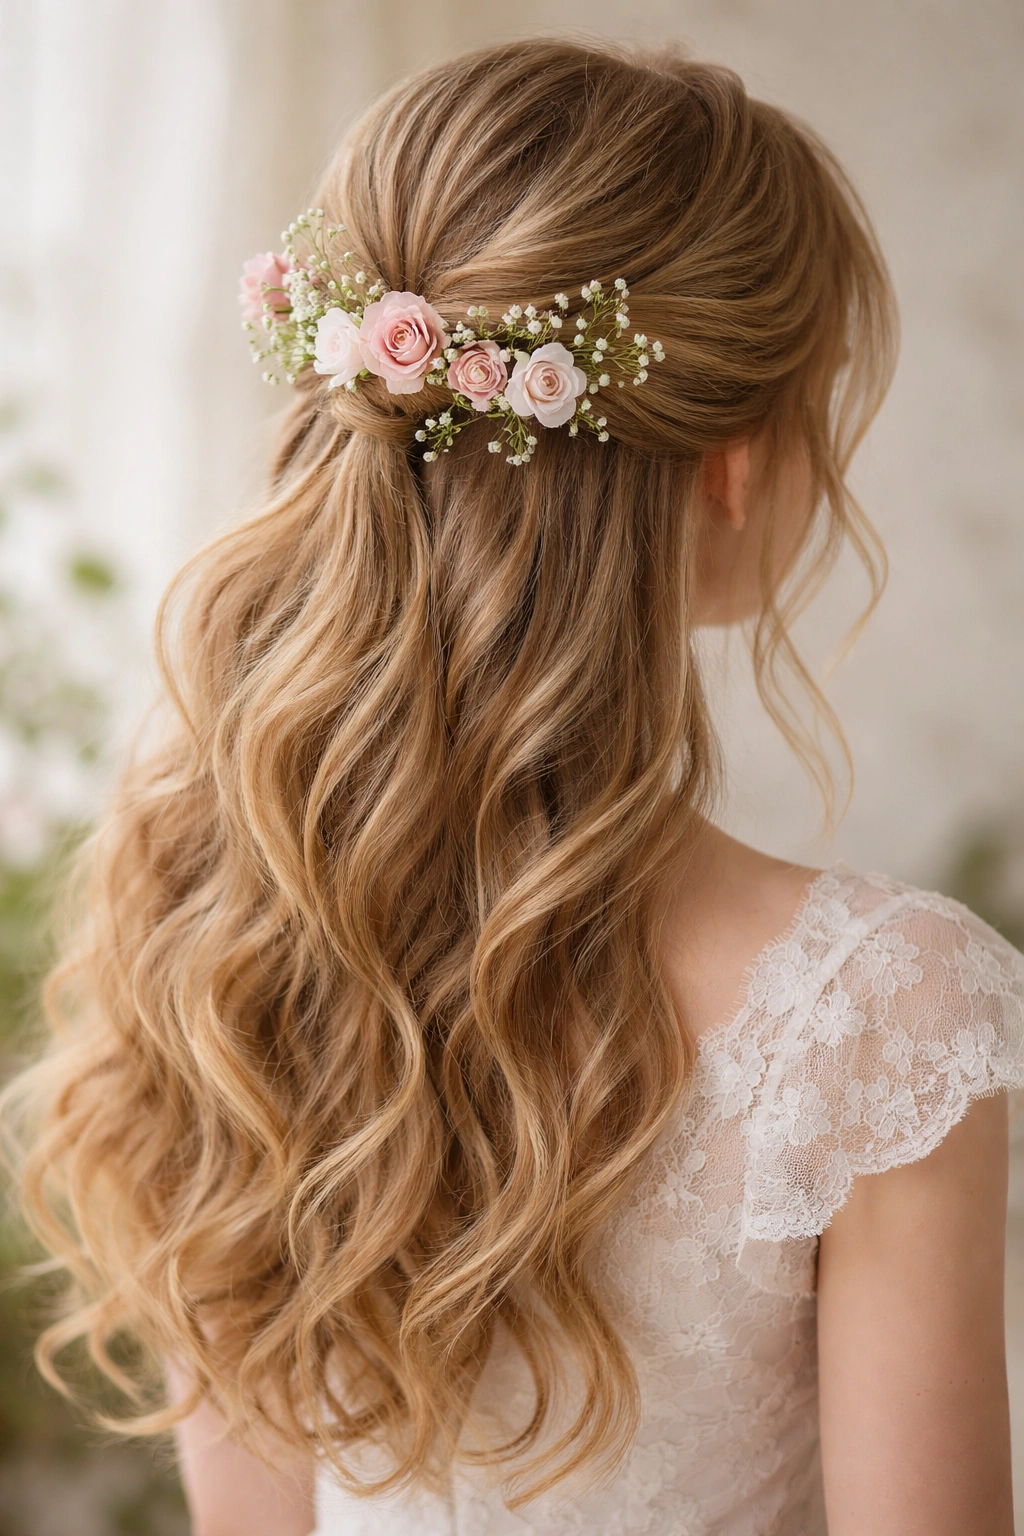
Start with a simple half up style—a low ponytail, a gentle twist, or a small braid—then secure it with a hair clip designed to look like flowers or surrounded by floral elements. Alternatively, create a basic half up look and pin real or faux flowers throughout the secured portion using small bobby pins or floral hair clips. Focus the flowers around the clip point and slightly above it.
Flowers as the Fairy Touch
Flowers instantly transform any hairstyle into something enchanted. Whether you’re using silk flowers, dried flowers, or fresh blooms, they add color, texture, and that essential fairy-tale quality. The soft, organic nature of flowers aligns perfectly with fairy aesthetics.
Flower Integration Methods
- Use a floral clip as your primary securing element, allowing other hair to flow around and behind it
- Scatter individual silk flowers throughout your half-up section using bobby pins
- Create a small “flower crown” effect by pinning flowers only at the very top of your half-up section
- Mix different flower types and colors for a garden-inspired, whimsical effect
Worth knowing: Fresh flowers will last a few hours in your hair if you’re doing this for an event. If you need your hairstyle to last longer, silk flowers are the practical choice and look remarkably realistic.
7. The Ethereal Loop Knot Half Up
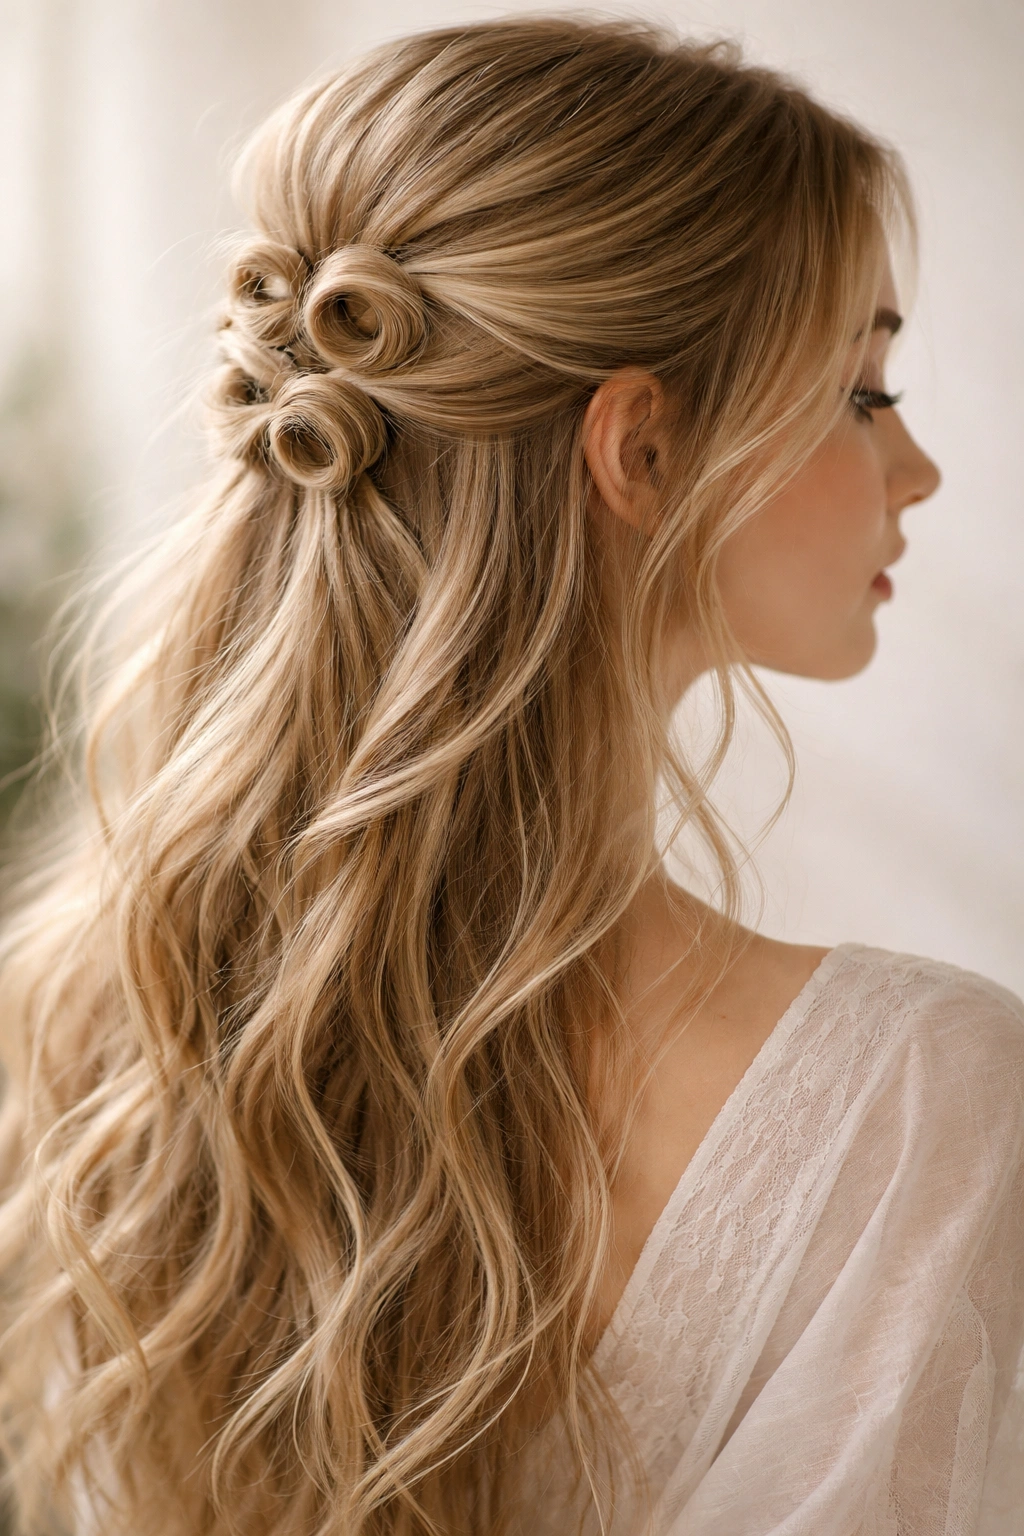
This style involves creating small loops or knots with your hair rather than traditional braids or twists. Take a section of hair from one side, make a small loop, pull the end through to create a knot-like shape, and pin it. Repeat this two to three times, stacking or spacing the loops vertically. The result is a series of delicate, three-dimensional shapes that catch light beautifully.
Why Loop Knots Feel Magical
Loop knots have an inherent whimsy that feels distinctly fairy-like. They’re more sculptural than traditional braids and create an organic, almost fantastical quality. This style really showcases hair texture and movement in a unique way.
Perfecting Your Loop Knots
- Practice on yourself several times before an important event—loop knots take a bit of finesse to get right
- Use medium-hold texturizing spray to prevent loops from sliding
- Make your loops deliberately loose and organic-looking rather than tight and perfect
- Space loop knots slightly apart rather than cramming them together for a more elegant effect
Quick fact: Loop knots hold better on wavy or curly hair than on straight hair. If you have straight hair, add waves throughout your entire head first, or consider using texturizing spray for better grip.
8. The Fishtail Braid Half Up
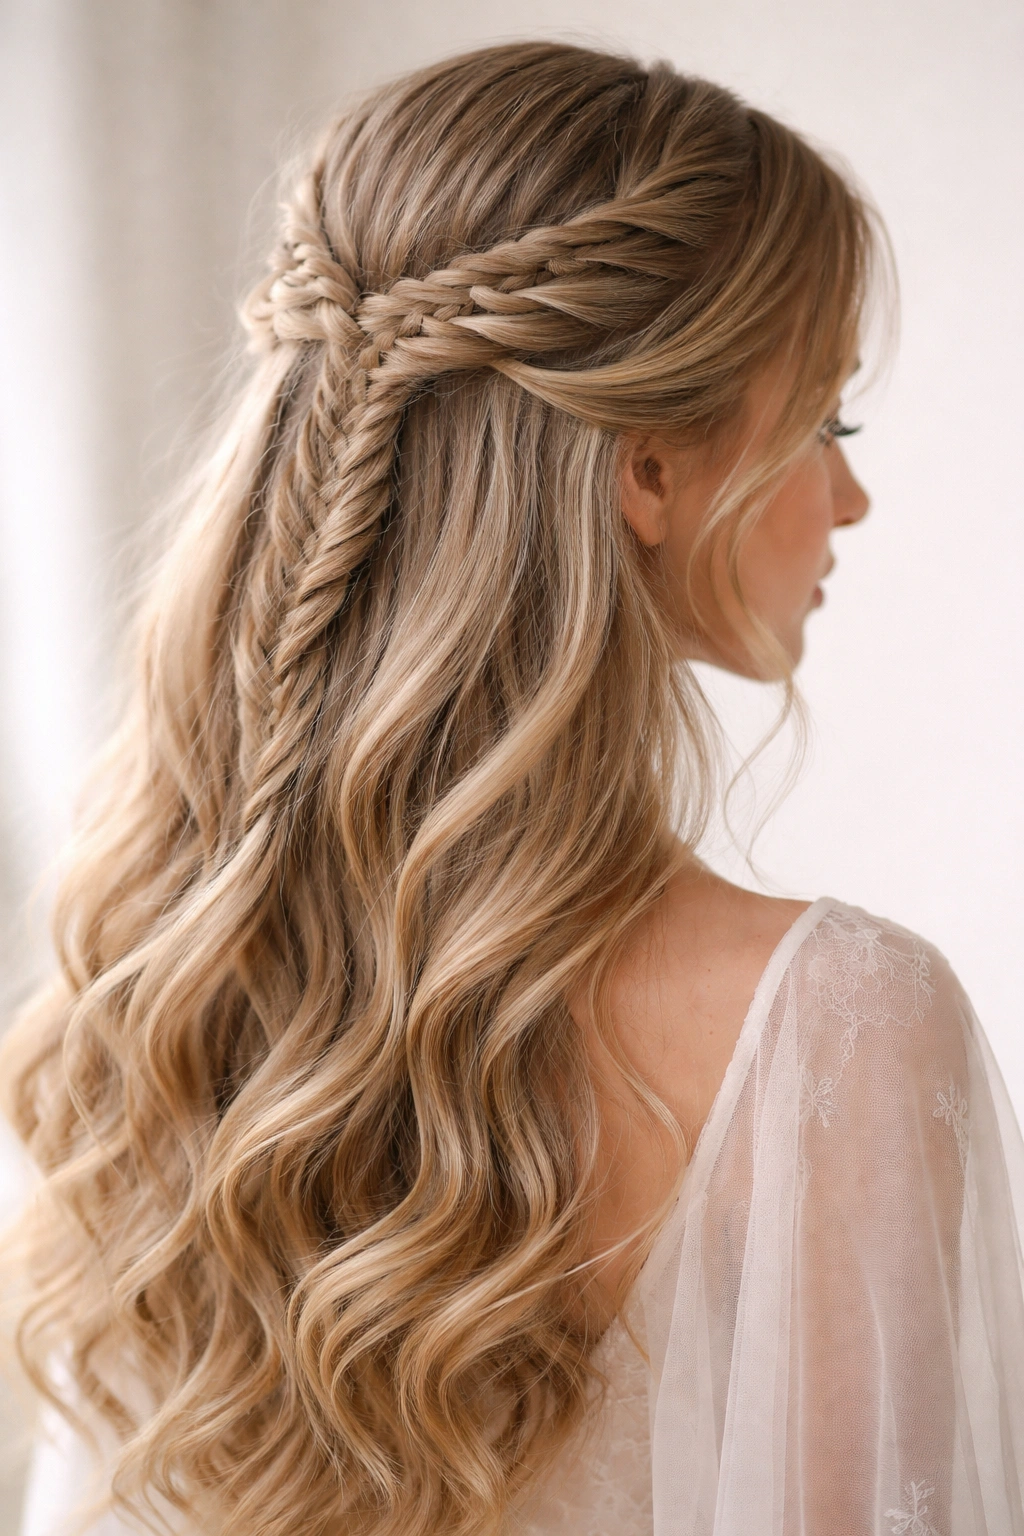
Begin a standard half-up section and create a fishtail braid instead of a three-strand or French braid. A fishtail braid uses alternating thin strands from each side, creating an intricate, delicate appearance with lots of texture and visual interest. Fishtail braids read as significantly more complex than they actually are, making them perfect for achieving a fairy-tale look without requiring extensive braiding expertise.
Why Fishtail Braids Scream Fairy Tale
Fishtail braids have an inherent intricacy and delicacy that feels magical. The way the thin strands interweave creates an almost lace-like appearance. Even a loose, slightly imperfect fishtail braid looks intentional and beautiful, fitting the ethereal fairy aesthetic perfectly.
Executing the Perfect Fishtail
- Start your fishtail at the crown or just behind one ear, depending on how much drama you want
- Pancake the finished braid gently to make it appear fuller and more romantic
- Leave the fishtail slightly loose rather than pulling it tight—the looseness adds to the fairy-tale quality
- Curl the loose hair below the braid in loose waves to complement the intricacy of the fishtail
Insider note: Fishtail braids look especially magical in photos because the intricate pattern reflects light beautifully. This is an excellent choice if you’re doing your hair for a photoshoot or special event.
9. The Twisted and Curled Half Up
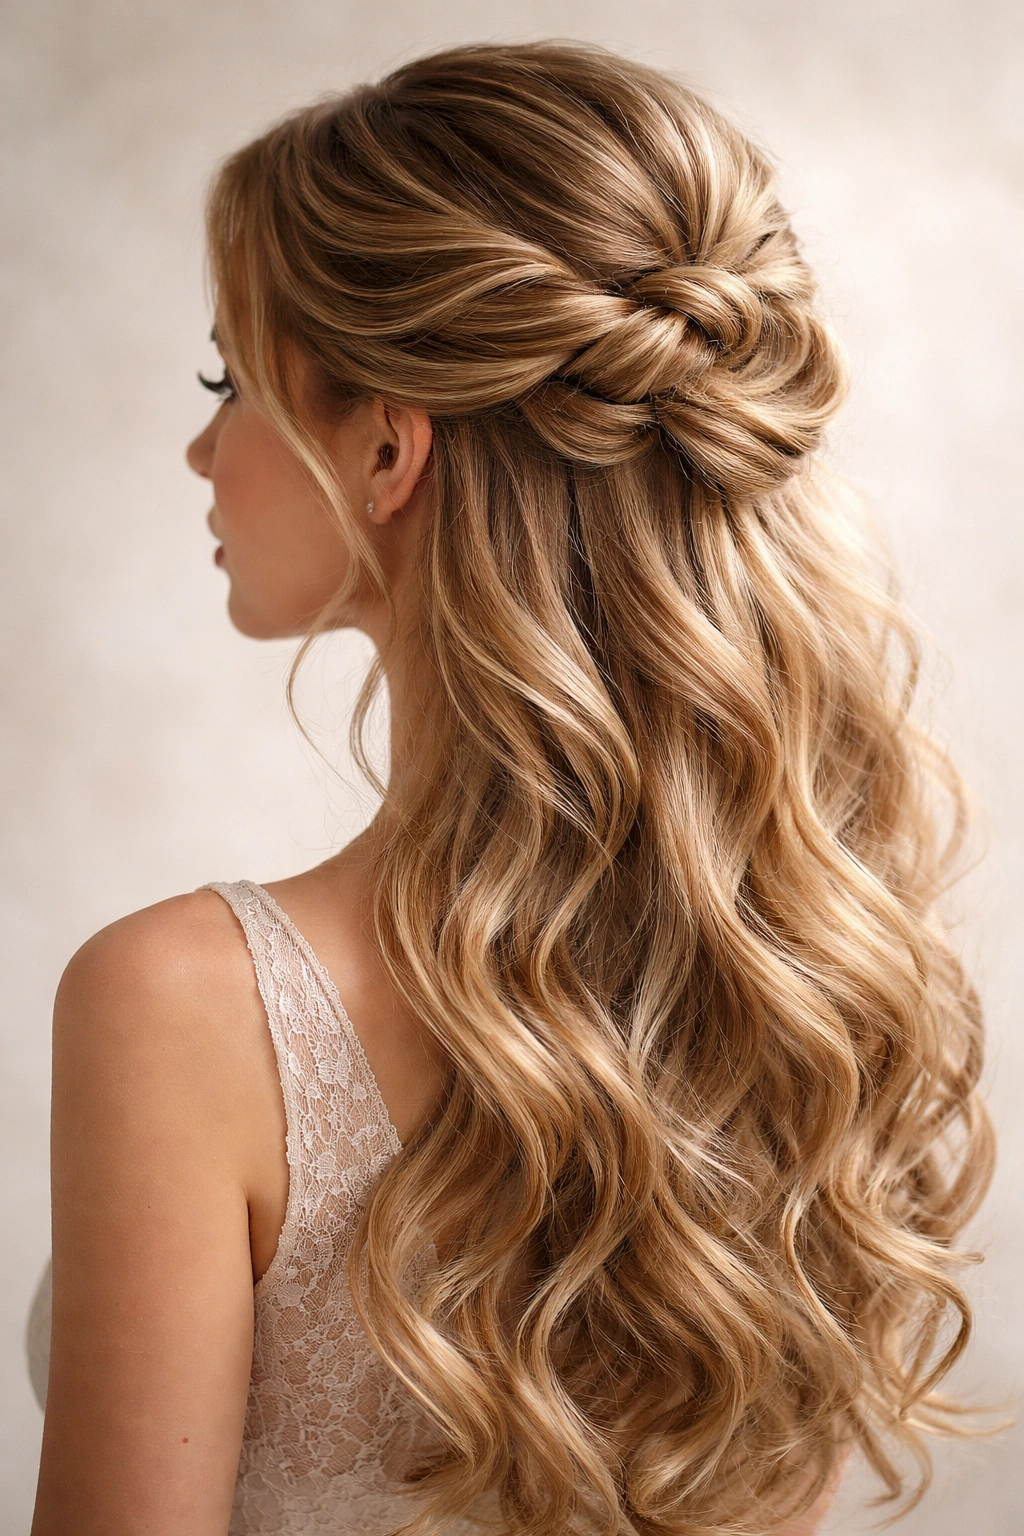
Create a half-up section, twist it gently from root to end, and secure it with a bobby pin or clip at the back of your head. Then, take the secured twist and gently curl it into a loose loop or coil, pinning the coiled twist in place. This creates texture and dimension, transforming a simple twist into something with more visual complexity and fairy-tale charm.
The Magic of Coiled Twists
Coiling a twist adds volume and creates a sculptural quality that reads as more intentional and polished. The coil catches light from multiple angles, creating dimension even on straight hair. This technique transforms a basic twist into something distinctly more glamorous.
Creating Successful Coils
- Coil your twist loosely rather than tightly—tight coils look formal, loose ones feel romantic
- Pin the coil at multiple points using bobby pins that match your hair color for invisibility
- Leave a small strand of hair loose at the edge of the coil for a softer, less structured appearance
- Add subtle waves to the bottom half of your hair to complement the texture of the coil
Pro tip: This style holds particularly well if you use a light hairspray before coiling. The spray provides grip without weighing down the coil or making it look stiff.
10. The Bohemian Half-Braided Half Up
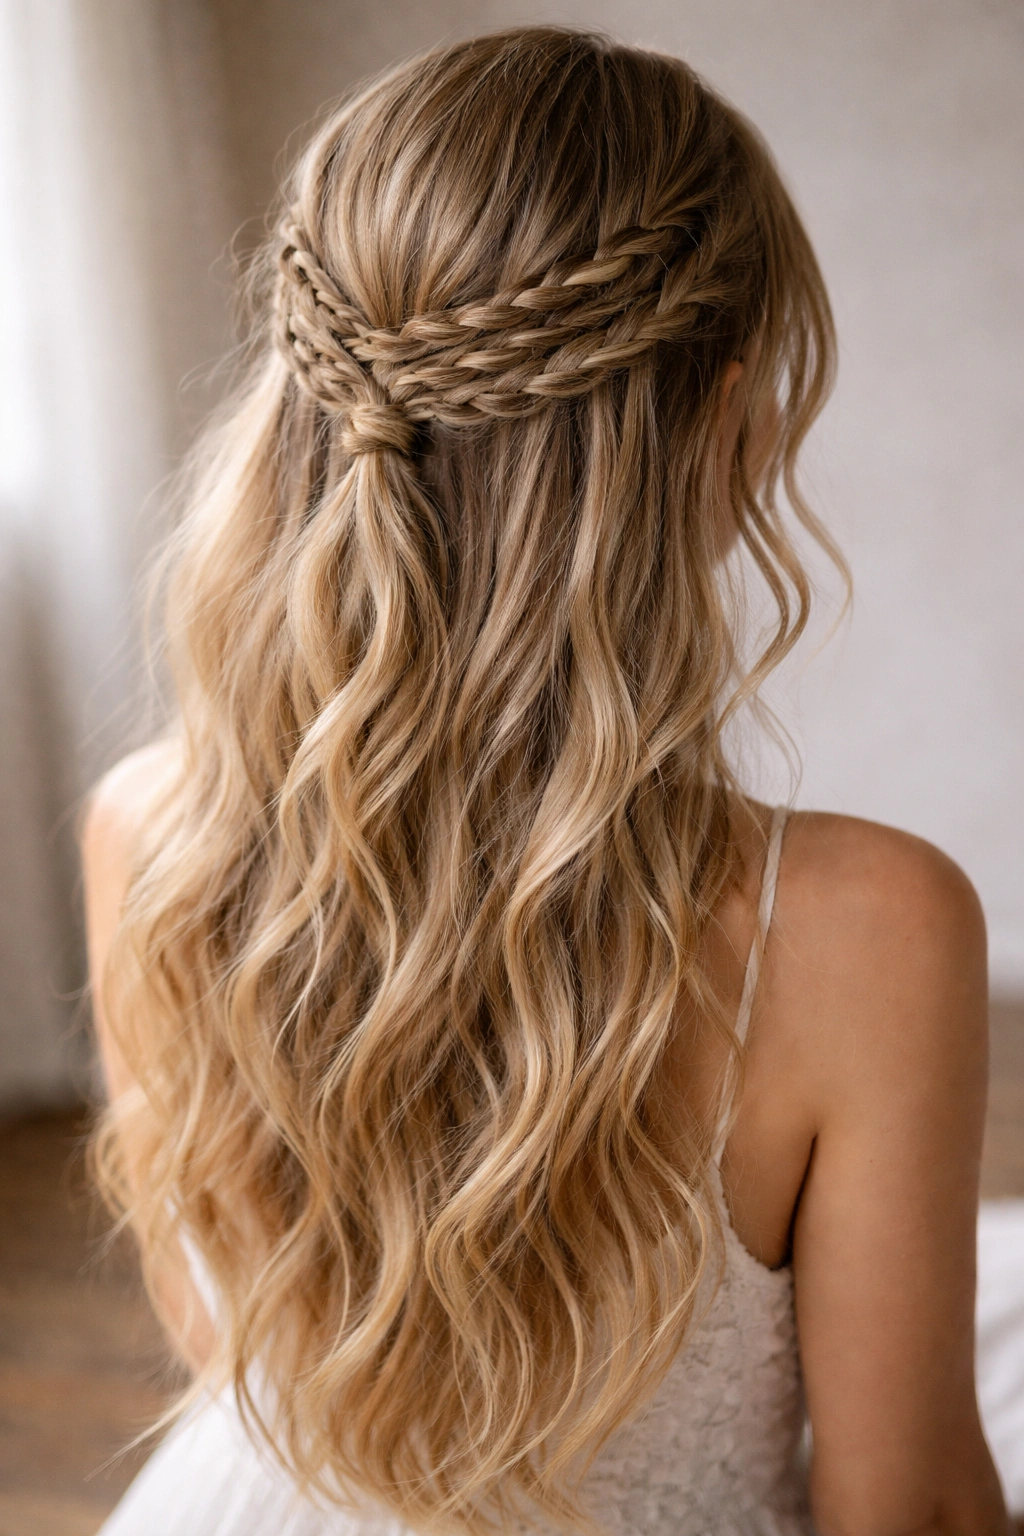
Create multiple small braids throughout the top half of your head—typically three to five braids of varying thickness—and gather them together at the back of your head, securing them as one unit with a clip or elastic. This creates the appearance of an intricate, woven crown without requiring you to master complex braiding techniques. The multiple braids work together to create visual interest and depth.
Why Multiple Braids Feel Bohemian and Fairy-Like
Several braids together create a gathered, romantic aesthetic that feels bohemian and enchanted. The variety in braid thickness and the way they work together to frame your face creates movement and visual interest. This style celebrates hair in an organic, free-spirited way.
Building Your Bohemian Look
- Create braids of intentionally different thicknesses—combine thick, medium, and thin braids for visual interest
- Don’t make your braids too tight; looser braids read as more romantic and bohemian
- Leave some face-framing pieces unbraided for a softer effect
- Pancake your braids gently after securing them to add volume and texture
Worth knowing: This style photographs beautifully because multiple braids create layered visual interest. It’s an excellent choice if you’re having professional photos taken.
11. The Delicate Ribbon-Woven Half Up
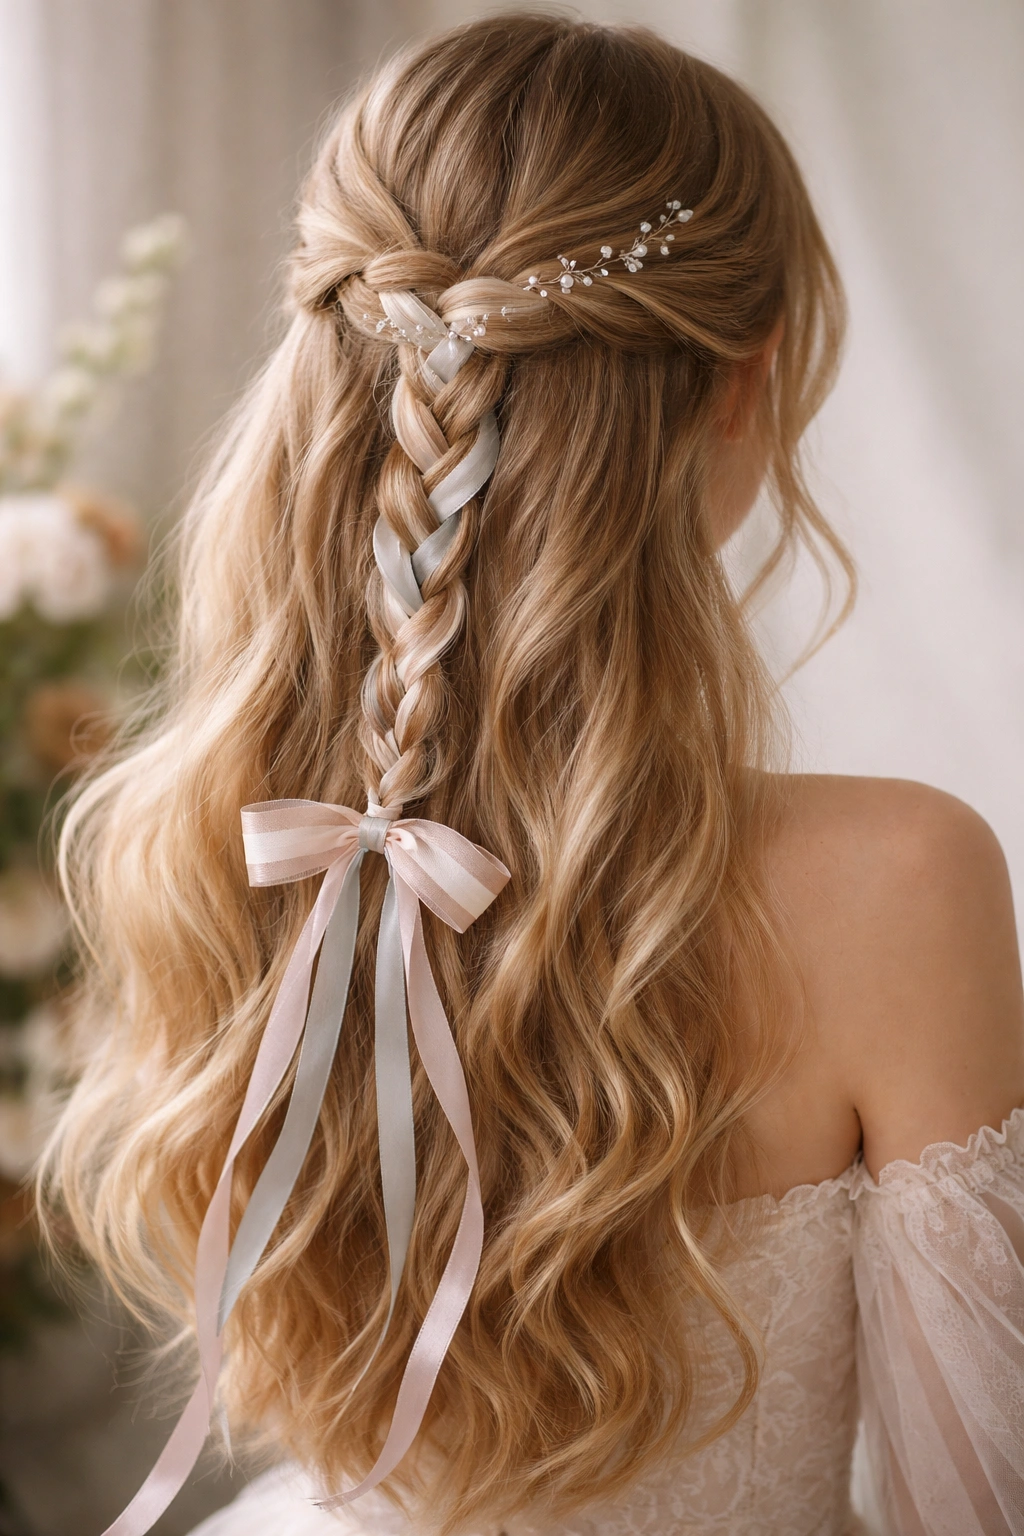
Create a simple braid or twist as your half-up base, then weave a delicate ribbon—satin, silk, or velvet—through or alongside your braid as you secure it. Alternatively, wrap a ribbon around the base of your half-up ponytail or use the ribbon itself as a securing element, tying it in a small bow at the back of your head. The ribbon adds color, texture, and that essential fairy-tale touch.
Ribbons as Magical Elements
Ribbons instantly evoke fairy-tale imagery. They add color and movement without adding weight, making them perfect for achieving that light, ethereal fairy aesthetic. A well-chosen ribbon can completely transform even a simple hairstyle into something distinctly more magical.
Ribbon Integration Strategies
- Choose ribbons in soft, romantic colors—blush pink, lavender, mint green, or champagne—for an authentic fairy aesthetic
- Use satin ribbon for a luxurious, lustrous appearance
- Weave the ribbon as you create your braid for seamless integration
- Use the ribbon as a hair tie and allow the ends to cascade down alongside your hair for movement and drama
Quick fact: Silk and satin ribbons are gentler on your hair than synthetic options. If you’re wearing ribbon frequently, choosing higher-quality materials will prevent hair damage.
12. The Soft-Curl Fairy Tale Half Up
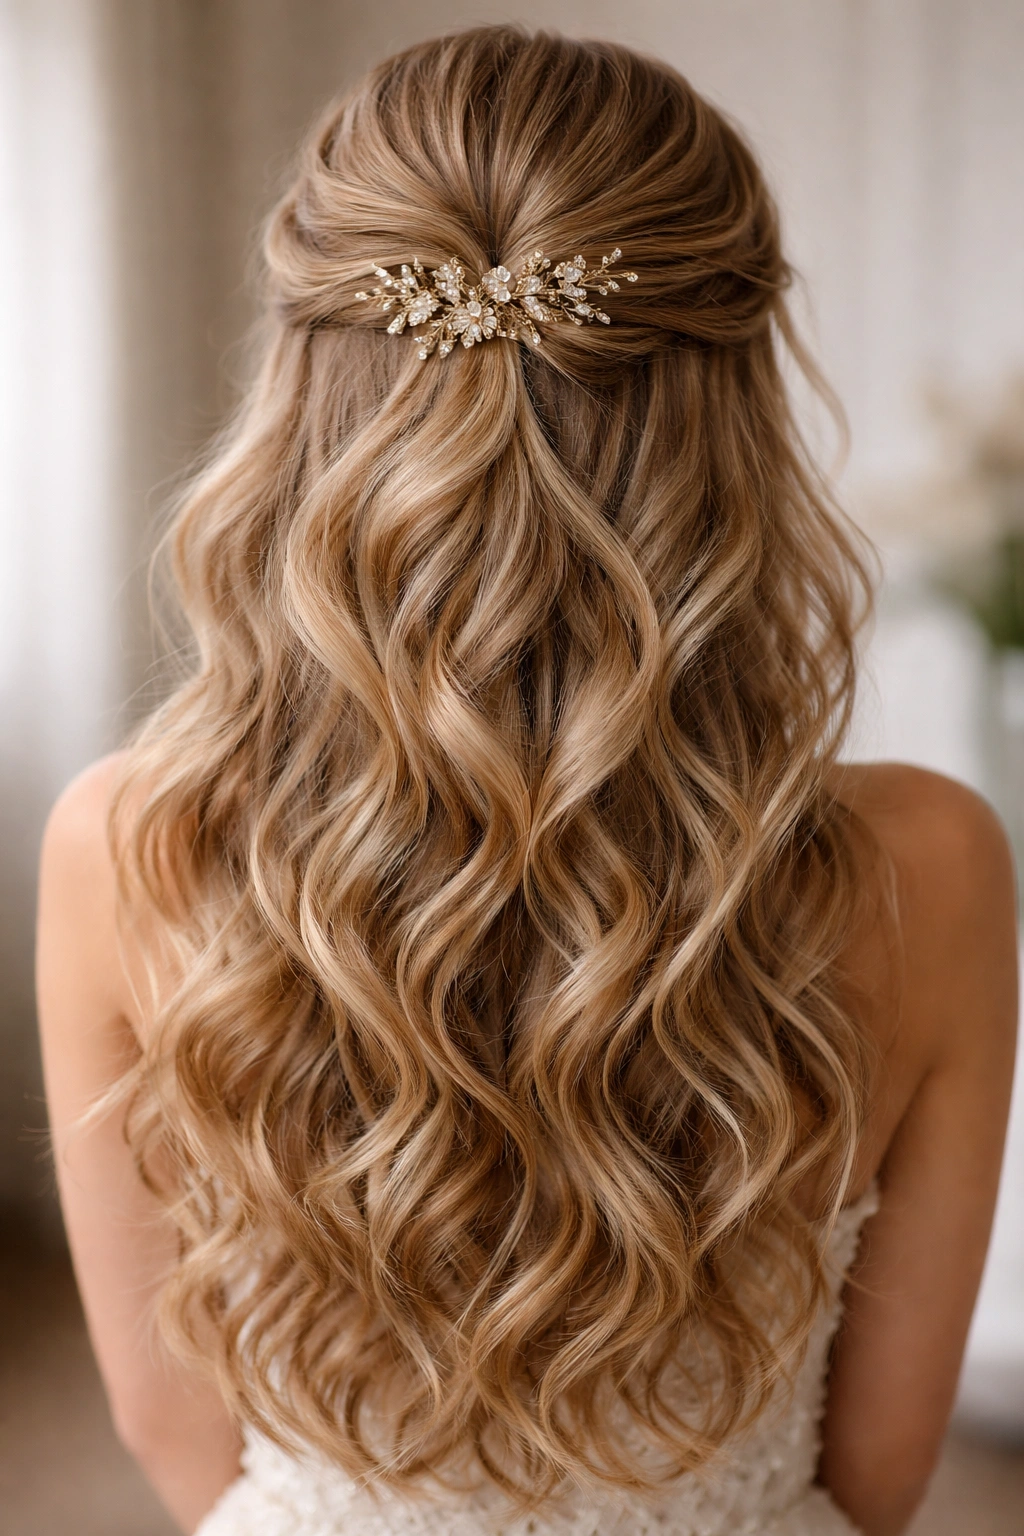
Begin with a half-up section secured with a simple clip or elastic, then focus your entire styling effort on creating soft, romantic waves and curls throughout your entire head. Use a large-barrel curling iron or wand to create loose waves, emphasizing slightly tighter curls within the secured section and looser, more relaxed waves in the bottom half. This creates a romantic, voluminous look that feels distinctly fairy-tale.
Why Curls Are Essential to Fairy Aesthetics
Curls and waves are fundamental to fairy-tale imagery. They create movement, texture, and volume, all essential elements of the ethereal, romantic fairy aesthetic. Even the simplest half-up style transforms when combined with beautiful curls.
Perfecting Your Fairy-Tale Curls
- Use a 1.5-inch to 2-inch curling iron for soft, romantic waves rather than tight ringlets
- Curl sections away from your face for a more flattering, softer appearance
- Let curls cool completely before touching them to ensure they hold and look bouncy rather than limp
- Finish with light hairspray or texture spray rather than heavy-hold spray for that soft, romantic appearance
Insider note: Curls hold better and last longer if you apply texturizing spray or dry shampoo to your roots before curling. This gives the curls something to grip onto, extending their lifespan significantly.
Final Thoughts
The magic of fairy half up half down styles lies in their ability to feel both intentional and effortless. Each of these twelve variations offers its own unique charm, from the ethereal simplicity of delicate twists to the romantic complexity of multiple braids working together. The beauty of these styles is that they’re adaptable—you don’t need perfect hair, professional equipment, or extensive braiding experience to create something truly enchanting.
The key to successfully executing any fairy-inspired hairstyle is working with your hair’s natural texture and characteristics rather than against them. If you have straight hair, invest in tools and products that create waves and texture. If you have curly hair, embrace that texture as part of your fairy aesthetic. Don’t stress about achieving perfection; some of the most magical hairstyles are those with a slightly imperfect, organic quality that reads as intentional rather than fussy.
Most importantly, remember that fairy aesthetics are fundamentally about making yourself feel magical. Whether you’re choosing a simple twisted crown or an elaborate fishtail braid adorned with pearls and flowers, the goal is creating something that makes you feel like the best version of yourself—enchanted, confident, and ready for anything your day brings.