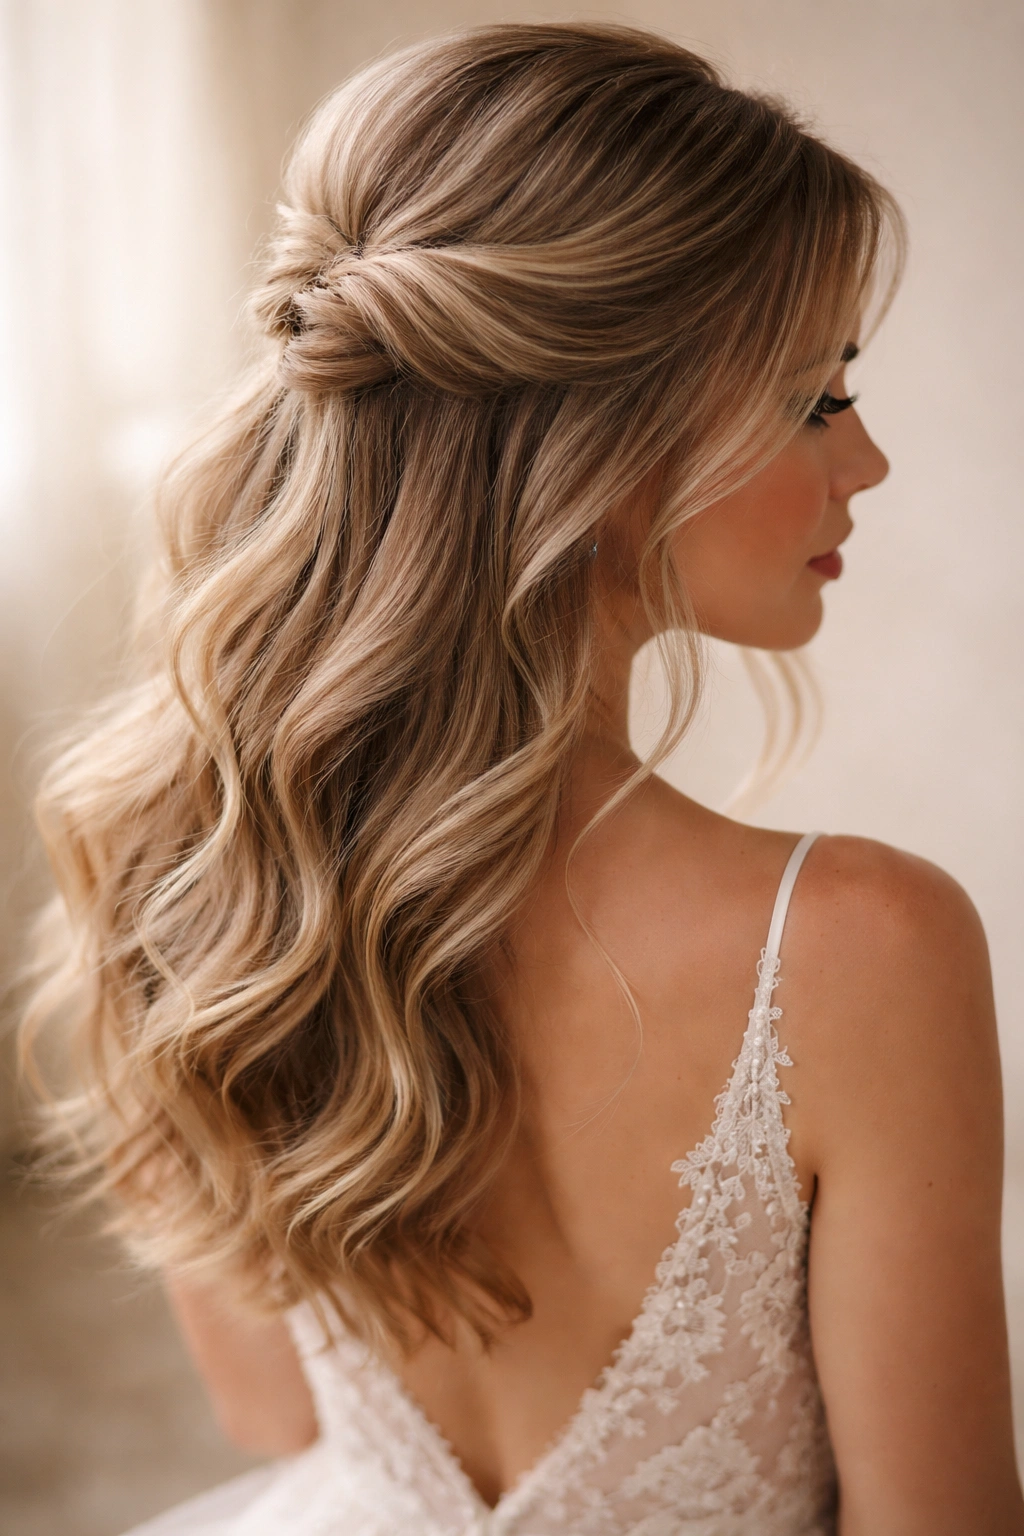
A half-up half-down hairstyle strikes that perfect balance for a bride—it feels romantic and polished without the severity of a fully swept style, and it lets your hair down without looking undone. But here’s the thing: a basic half-up can feel generic, especially on your wedding day when every detail matters. The real opportunity lies in the details—the twist, the texture, the embellishments, the way you secure and shape the elevated section. When done right, a half-up half-down style becomes a statement that feels distinctly yours while maintaining the soft, approachable elegance weddings demand.
The beauty of half-up half-down twists is their versatility. They work with virtually every dress neckline, suit any hair texture from stick-straight to heavily textured, and can be styled to match any wedding aesthetic—whether you’re going classic, bohemian, vintage, or modern minimalist. A well-executed twist adds dimension and visual interest that a simple half-up can’t achieve. It shows intention and artistry. And because your face is partially framed while your hair still flows freely down your back, you get maximum photogenic impact in every angle.
The styles that follow showcase twelve distinct takes on the half-up half-down twist—each with its own character, technique, and ideal wedding scenario. Whether you’re drawn to intricate braided versions, sleek modern twists, or soft romantic renderings, you’ll find detailed guidance on how to achieve each look, what it pairs best with, and the specific techniques that make it work. These aren’t theoretical styles; they’re real, wearable options that wedding hair professionals use and brides adore.
1. The Classic Twisted Crown

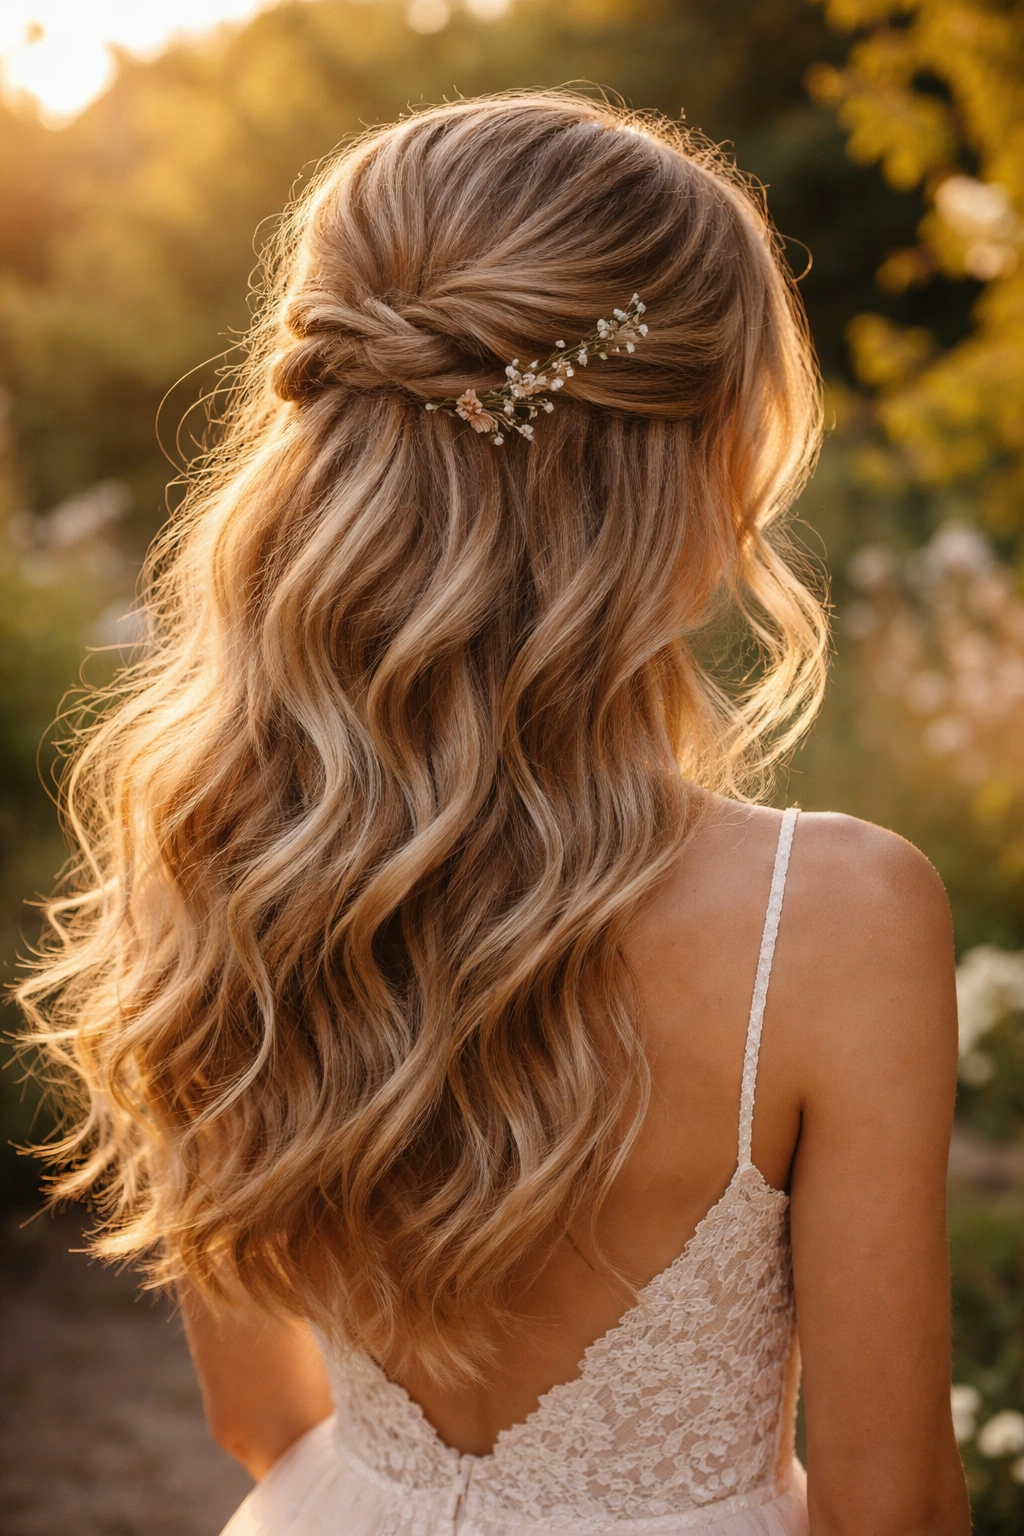
The classic twisted crown is the foundation style—two sections of hair twisted back and secured where they meet, creating an elegant loop that frames the face without overwhelming it. This style works because it’s clean, sophisticated, and surprisingly forgiving. The twist itself creates subtle texture even if your hair is naturally straight, and the secured section sits high enough that it reads as intentional rather than accidental.
Why This Style Works for Weddings
The twisted crown is timeless, which means your wedding photos won’t feel dated in five years or fifty years. It works with nearly every hair texture, every dress style, and every wedding aesthetic. The twist engages the hair enough that it doesn’t slip or shift during a long ceremony and reception—a practical concern that matters just as much as beauty. Because the twist is visible from the back and sides, it photographs beautifully from every angle, which matters when you’re dealing with a photographer capturing candid moments throughout the day.
How to Execute It Flawlessly
- Start with hair that has texture—either naturally wavy or gently curled beforehand for grip
- Section out the top layer from temple to temple, following your natural hairline
- Divide this section into two equal parts down the center of your head
- Twist each section tightly backward toward the back of your head, keeping tension even
- Meet both twisted sections at the crown and secure with bobby pins and styling spray for hold
- Leave the bottom half of your hair completely down and full—curl it gently for softness
- Tuck small baby’s breath or spray roses into the twisted section for bridal elegance without heaviness
2. The Braided Half-Up with Loose Waves
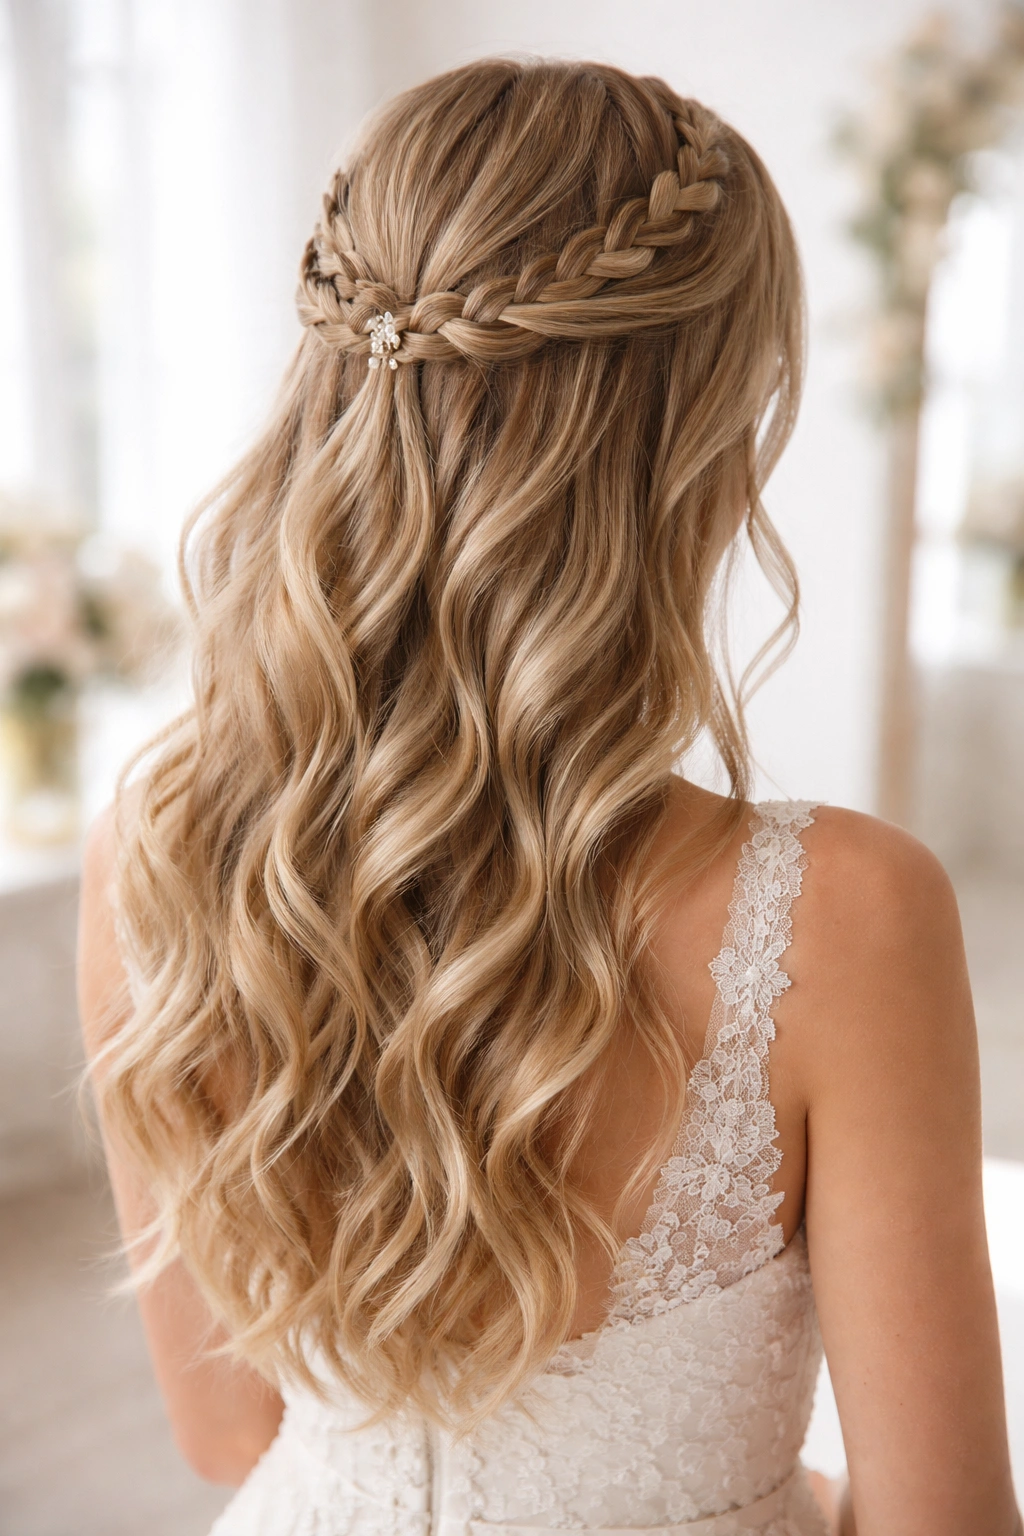
This style swaps the twist for a braid, which creates more visible texture and a distinctly more romantic feel. A single braid running from one side to the other, or two smaller braids woven back, add an artisanal quality that feels handmade and special. The braid catches light differently than a twist, and when paired with loose waves through the bottom section, it creates beautiful movement.
Why This Variation Stands Out
Braids photograph differently than twists—they create a clear, detailed pattern that adds visual interest to photos, especially close-ups. They also hold better through an entire day of movement, which matters for an eight-hour wedding. The texture of a braid also works beautifully with romantic, bohemian, and garden wedding aesthetics. It’s the style choice if you want your hair to feel a bit less formal and a bit more “enchanted garden bride.”
Technical Details for Success
- Prep with loose waves throughout your entire head before you start braiding
- Section from one temple, creating a diagonal part from temple to ear
- Braid that section tightly backward, keeping the braid smooth and even
- Secure the end of the braid at the nape with bobby pins hidden underneath
- Leave the bottom section completely loose and wavy—don’t worry about making it perfect
- Add small flowering branches, pearl pins, or delicate greenery woven throughout the braid
- Use flexible hairspray that won’t stiffen the waves below, maintaining movement
3. The Sleek Twisted Half-Up
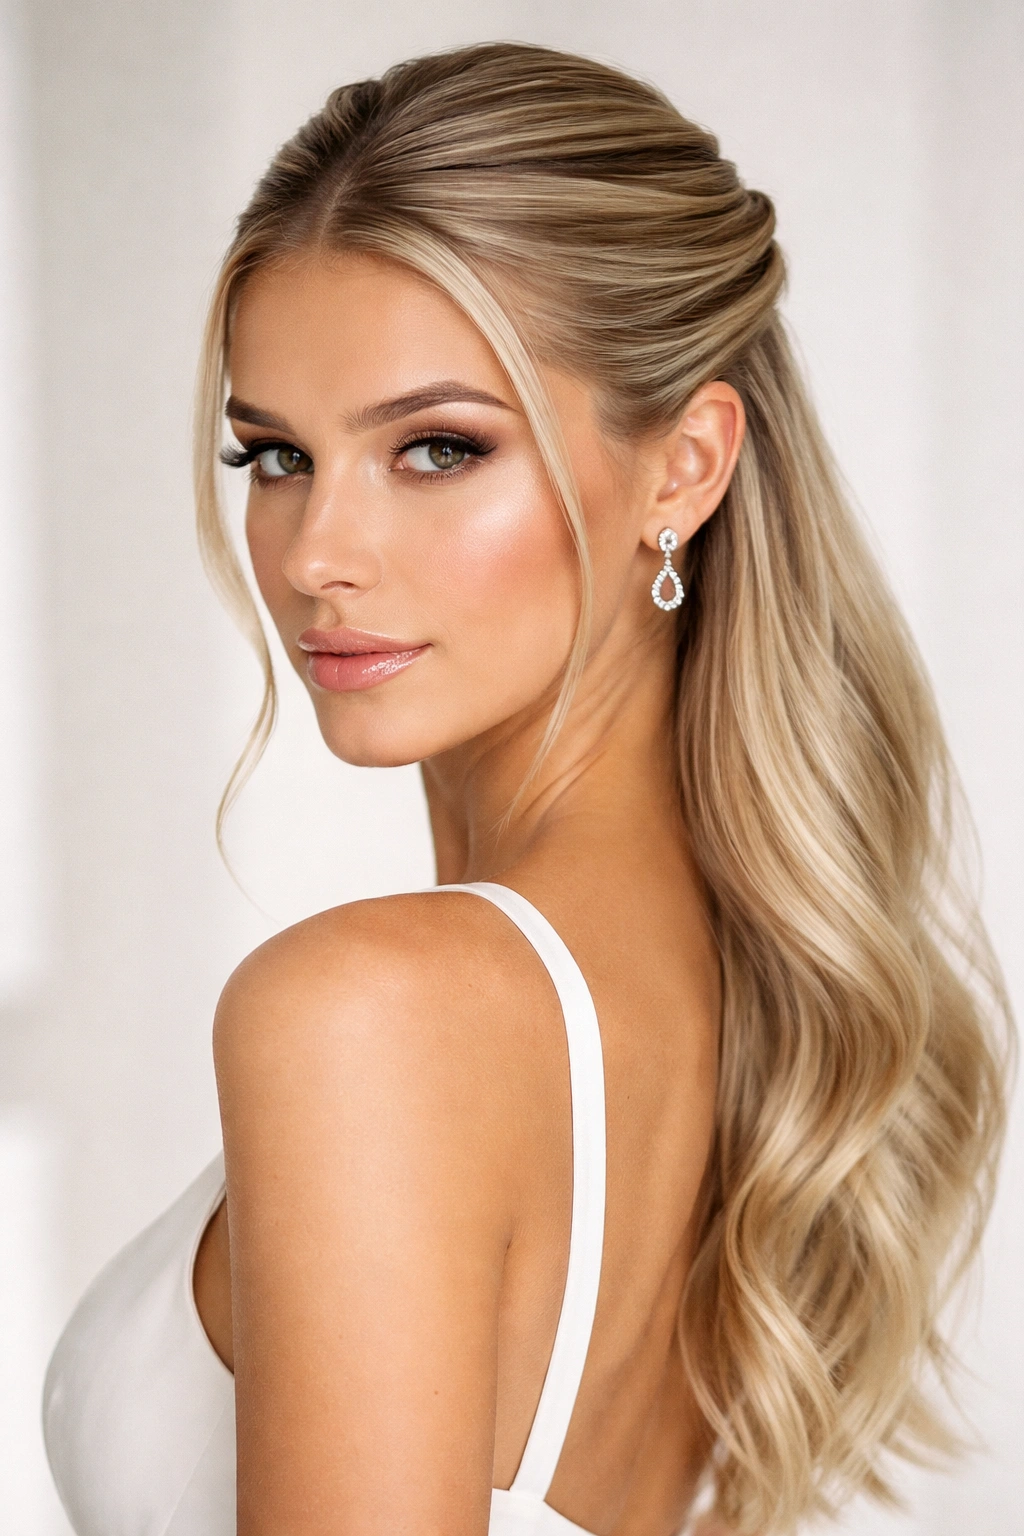
Where the classic twist feels romantic, the sleek twisted half-up feels modern and controlled. This style pulls the hair back tightly, twists it crisply, and secures it close to the head—no softness, no wispy pieces. It pairs perfectly with minimalist, modern, or architectural wedding aesthetics. This is the choice if your dress is streamlined, your makeup is dramatic, and you want your hairstyle to feel intentional and sharp.
What Makes This Style Different
The sleek twisted half-up is about precision and clean lines. It requires more product (gel or pomade under hairspray) to maintain the smooth appearance throughout the day. The visual effect is more dramatic—this style makes a statement rather than whispers a suggestion. It photographs beautifully in black-and-white, which is why it’s popular with brides going for editorial-style wedding photos. It’s also the best option if you’re wearing your hair down but want it completely controlled and off your face.
Execution Steps for a Polished Result
- Apply smoothing serum or lightweight gel to damp hair before styling
- Blow-dry with a paddle brush to ensure the smoothest possible base
- Create a deep side part and smooth one side completely back with a fine-tooth comb
- Twist that side section tightly toward the back of your head, keeping no flyaways or stray pieces
- Secure with bobby pins at the back, then use a finishing gel stick to smooth down any texture
- The remaining half should be blown out completely straight or with a slight wave for subtle movement
- Add a sculptural hair comb or minimal jewelry piece for polish without ornament
4. The Pulled-Back Half-Up with Soft Texture
This style sits somewhere between casual and bridal—it’s not as structured as the sleek twist, but more intentional than just pulling your hair back. You’re creating a gathered section at the crown rather than twisting all the way back, which gives a slightly tousled, effortlessly elegant feel. This works beautifully if your natural hair texture is wavy or curly, or if you’re going for an “undone luxury” vibe.
Why Brides Love This Approach
The pulled-back style feels accessible and achievable, which reduces wedding-day anxiety. It requires less precision than a tight twist, so even if a few pieces come loose during dancing, it still looks intentional rather than messy. This style pairs beautifully with unstructured wedding dresses, outdoor venues, and elopement-style weddings. It’s also perfect if you have delicate facial features that you want to frame softly rather than expose with a severe pulled-back style.
How to Create Soft, Gathered Height
- Start with your natural texture—curls or waves—and don’t over-smooth
- Brush hair gently to create soft waves rather than defined curls, using your fingers more than a brush
- Section the crown area with an invisible line from ear to ear
- Gently pull that section back without twisting, creating a gathered pouf at the crown
- Use a decorative hair comb or clip to secure, positioning it visibly as part of the design
- Leave the back section completely loose and voluminous—this style is about softness everywhere
- Pull a few face-framing pieces down intentionally, breaking up any severity at the temples
- Add a delicate floral crown, pearl pins, or ribbon for adornment that complements the softness
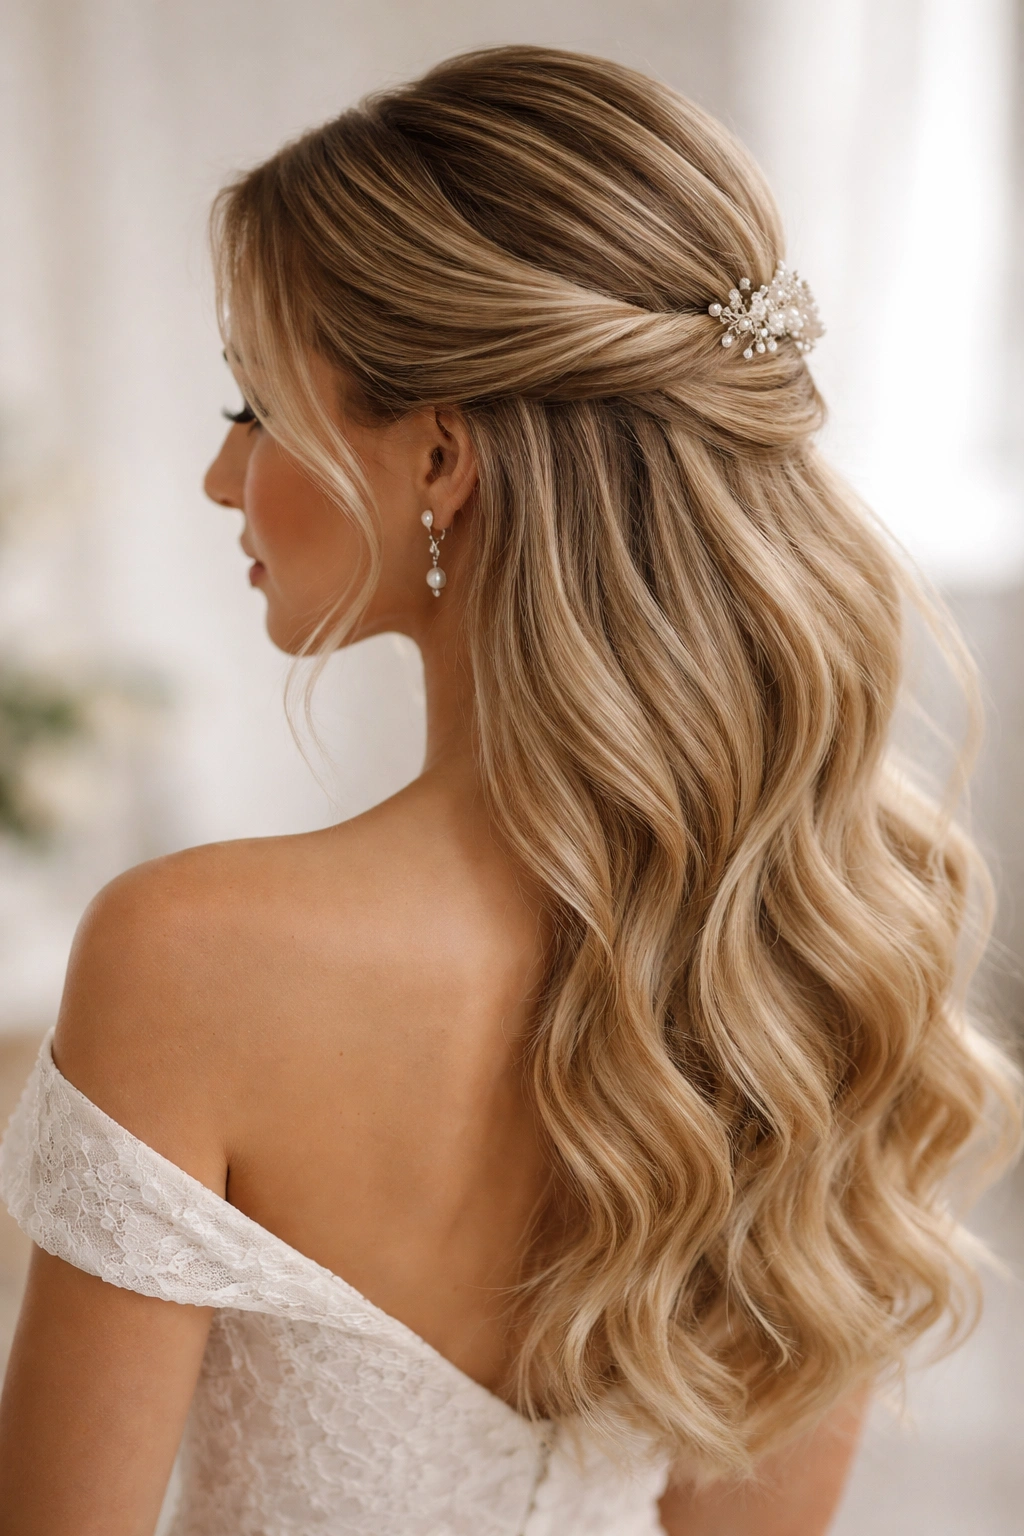
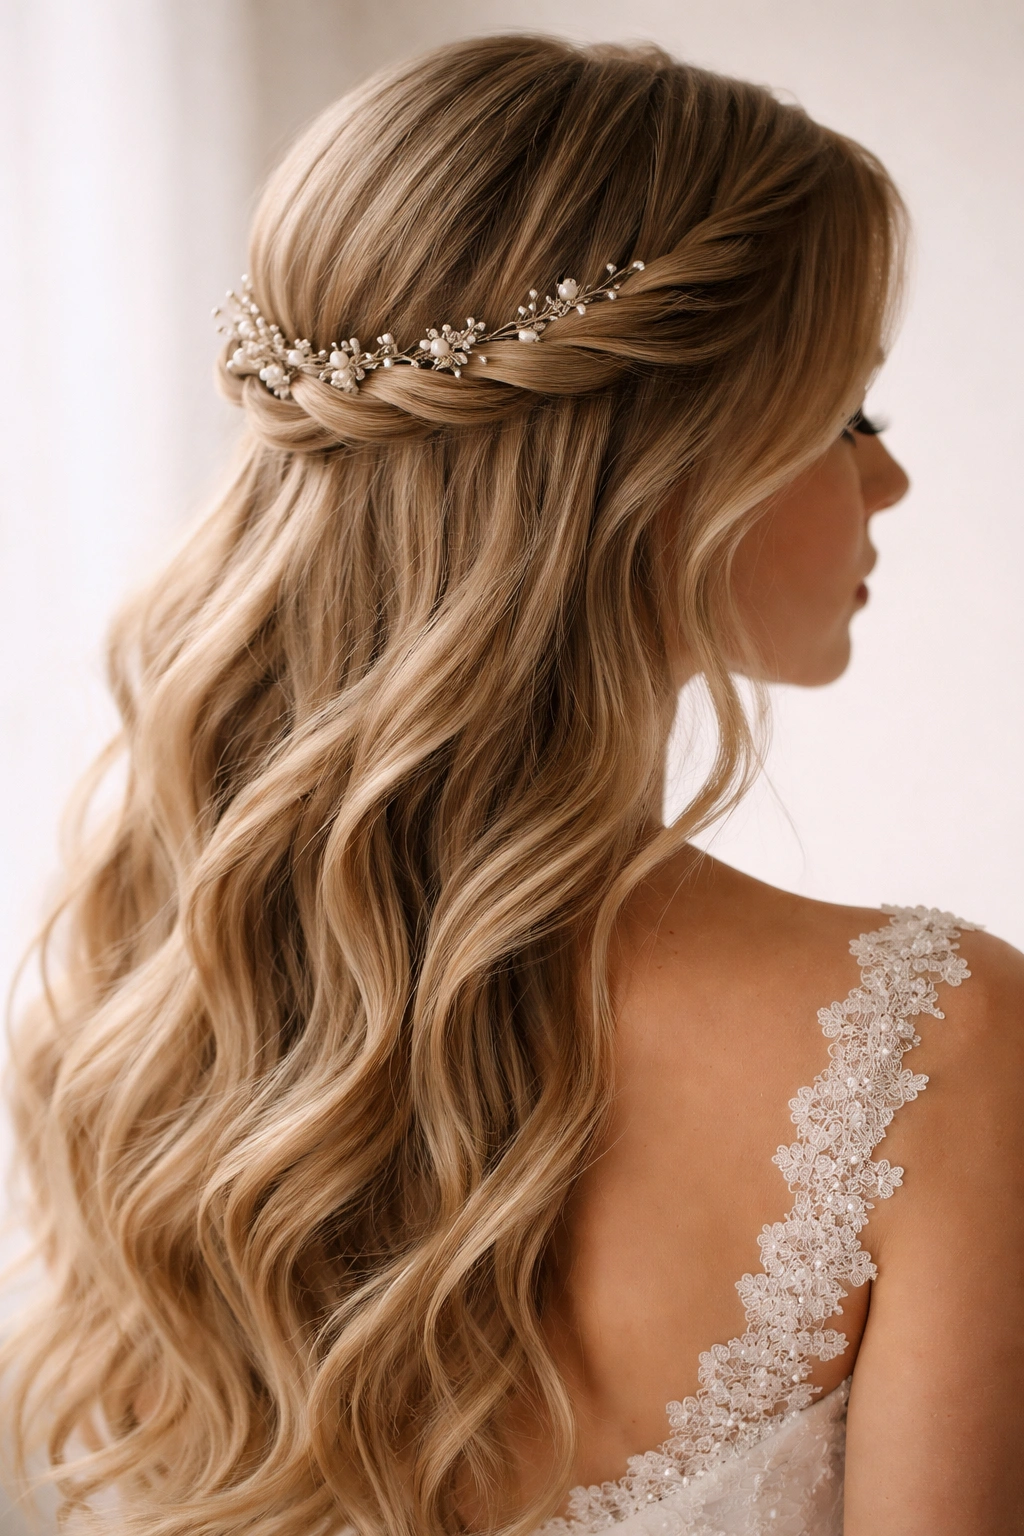
5. The Pearl-Pinned Twisted Half-Up
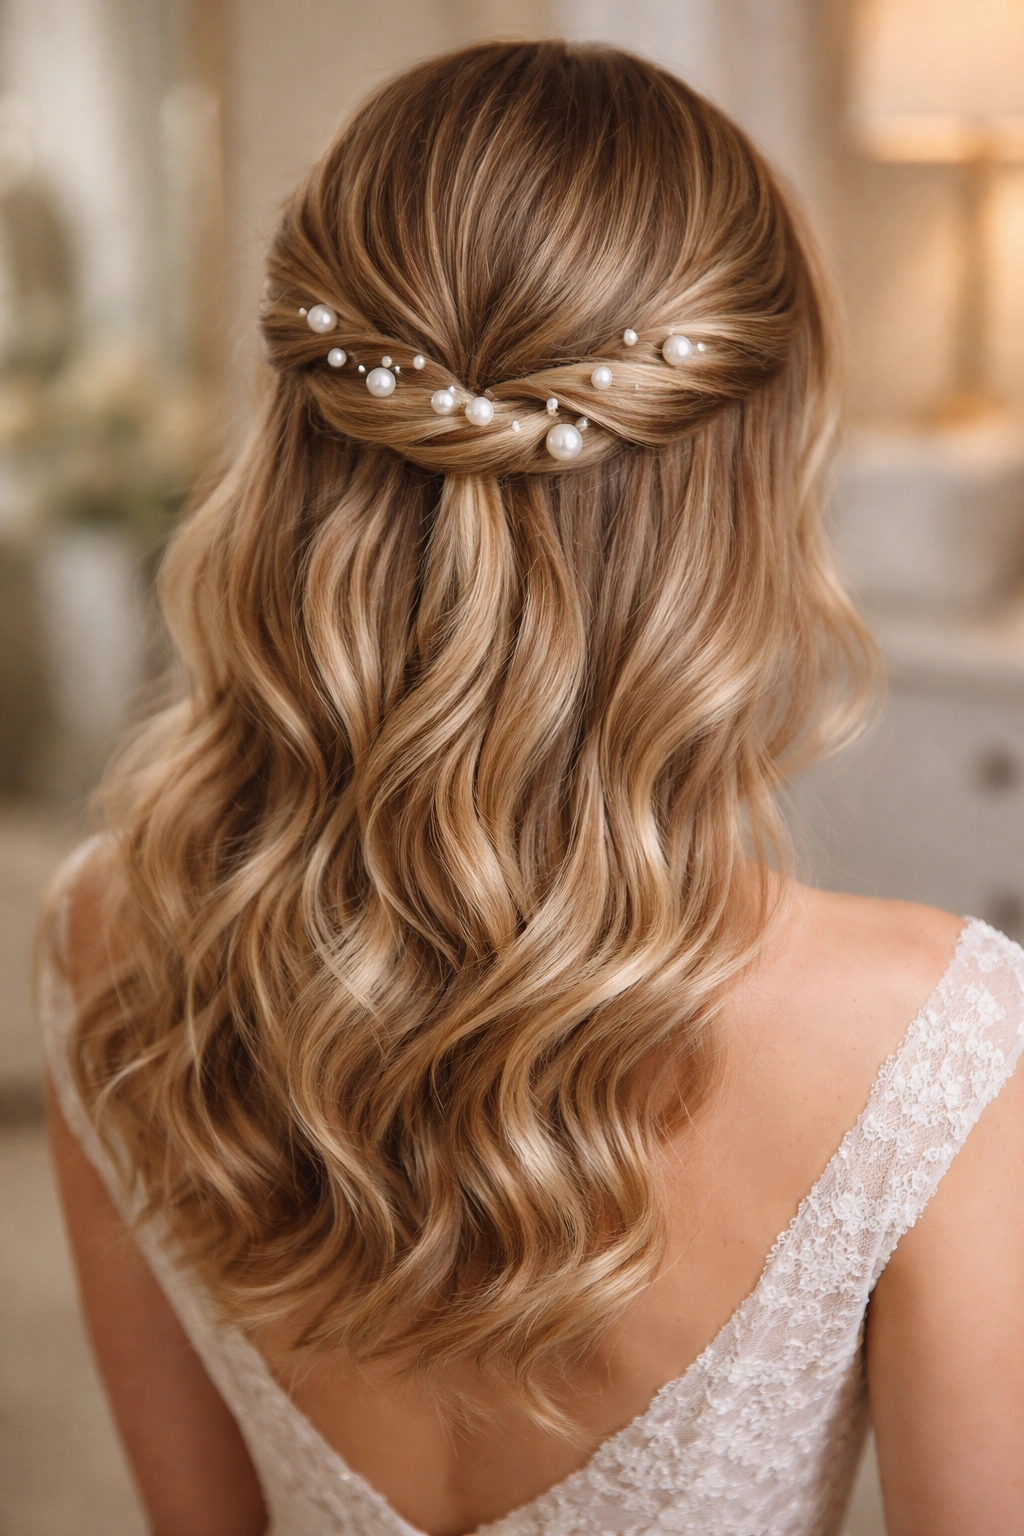
This variation focuses on embellishment—the twist itself is relatively simple and classic, but strategically placed pearl pins or crystal hair clips transform it into something visibly special. The pins aren’t hidden; they’re part of the design, creating a subtle sparkle and texture that reads as intentional luxury. This works beautifully if you’re wearing simple drop earrings or no earrings at all—the hair becomes the focal point.
The Art of Hair Jewels Done Right
Pearl and crystal pins should enhance rather than overwhelm. The goal is a scattering of intentional sparkle, not a crown of hardware. Three to five strategically placed pins create more visual impact than a dozen scattered randomly. Spacing matters—place pins along the twisted section, not clustered all in one spot. This style works best with neutral, soft color palettes where the hair jewelry creates unexpected elegance. Avoid this approach if your dress is heavily embellished; let one element shine, and this is your choice.
Step-by-Step Execution with Jewels
- Create the classic twisted crown following the method described in Style 1
- Secure the twist with bobby pins first, ensuring it’s completely stable
- Identify three to five placement points along the twisted section
- Insert pearl or crystal pins at slight angles, twisting them into the hair structure rather than pinning them flat
- Check each pin from multiple angles—they should catch light but not look accidental
- Use hairspray after placement to lock everything in position
- Coordinate the pins with your jewelry metal (white gold, rose gold, or silver)
- Consider tiny pearl studs that echo the hair pins if you’re wearing earrings
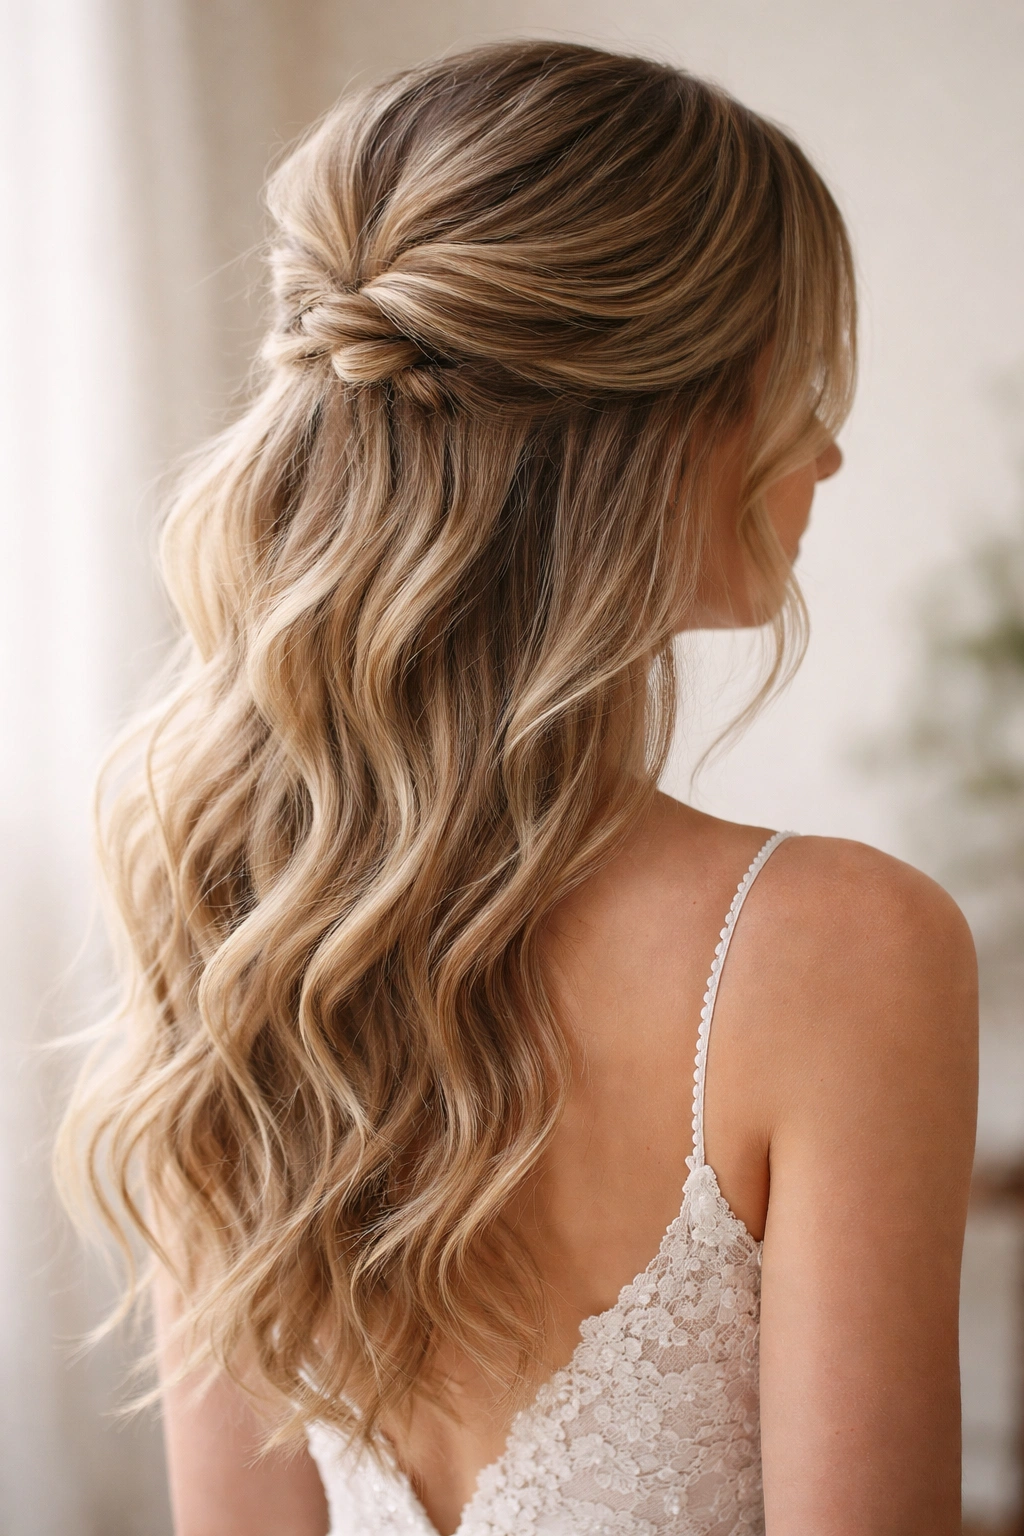
6. The Loose-Wave Half-Up with Texture
This style prioritizes movement and softness above all else. The “twist” is barely twisted—more accurately, it’s a loose, textured section that’s gently secured, creating a romantic focal point without the rigidity of a proper twist. This works beautifully if your hair is naturally wavy or if you’ve spent time creating loose, flowing waves through the entire head.
When to Choose This Approach
This is the style for bohemian weddings, beach ceremonies, garden celebrations, and any bride who wants to feel ethereal. It’s the opposite of the sleek twist—it prioritizes romance over precision. This style photographs beautifully in golden hour light, which is why it’s popular with elopement photographers and venues with sunset ceremonies. It pairs beautifully with lace, flowing fabrics, and vintage aesthetics. It’s also the right choice if you want your hair to feel loose and soft throughout the day rather than secured and controlled.
Creating Texture That Holds Without Stiffness
- Prep your hair with a sea salt spray before blow-drying to create natural texture
- Blow-dry with a diffuser to enhance natural waves or create loose, undefined waves
- Don’t use a flat iron for straightening—aim for soft, irregular waves
- Create your “twist” by loosely gathering the top section without actual twisting
- Secure with a bobby pin positioned low, where the twist meets the gathered hair
- Insert small flowers, delicate greenery, or a thin ribbon through the gathered section
- Let flyaway pieces and softness be intentional—this style should feel romantic, not perfectly smooth
- Use a light texture spray or flexible hairspray that maintains movement without stiffness
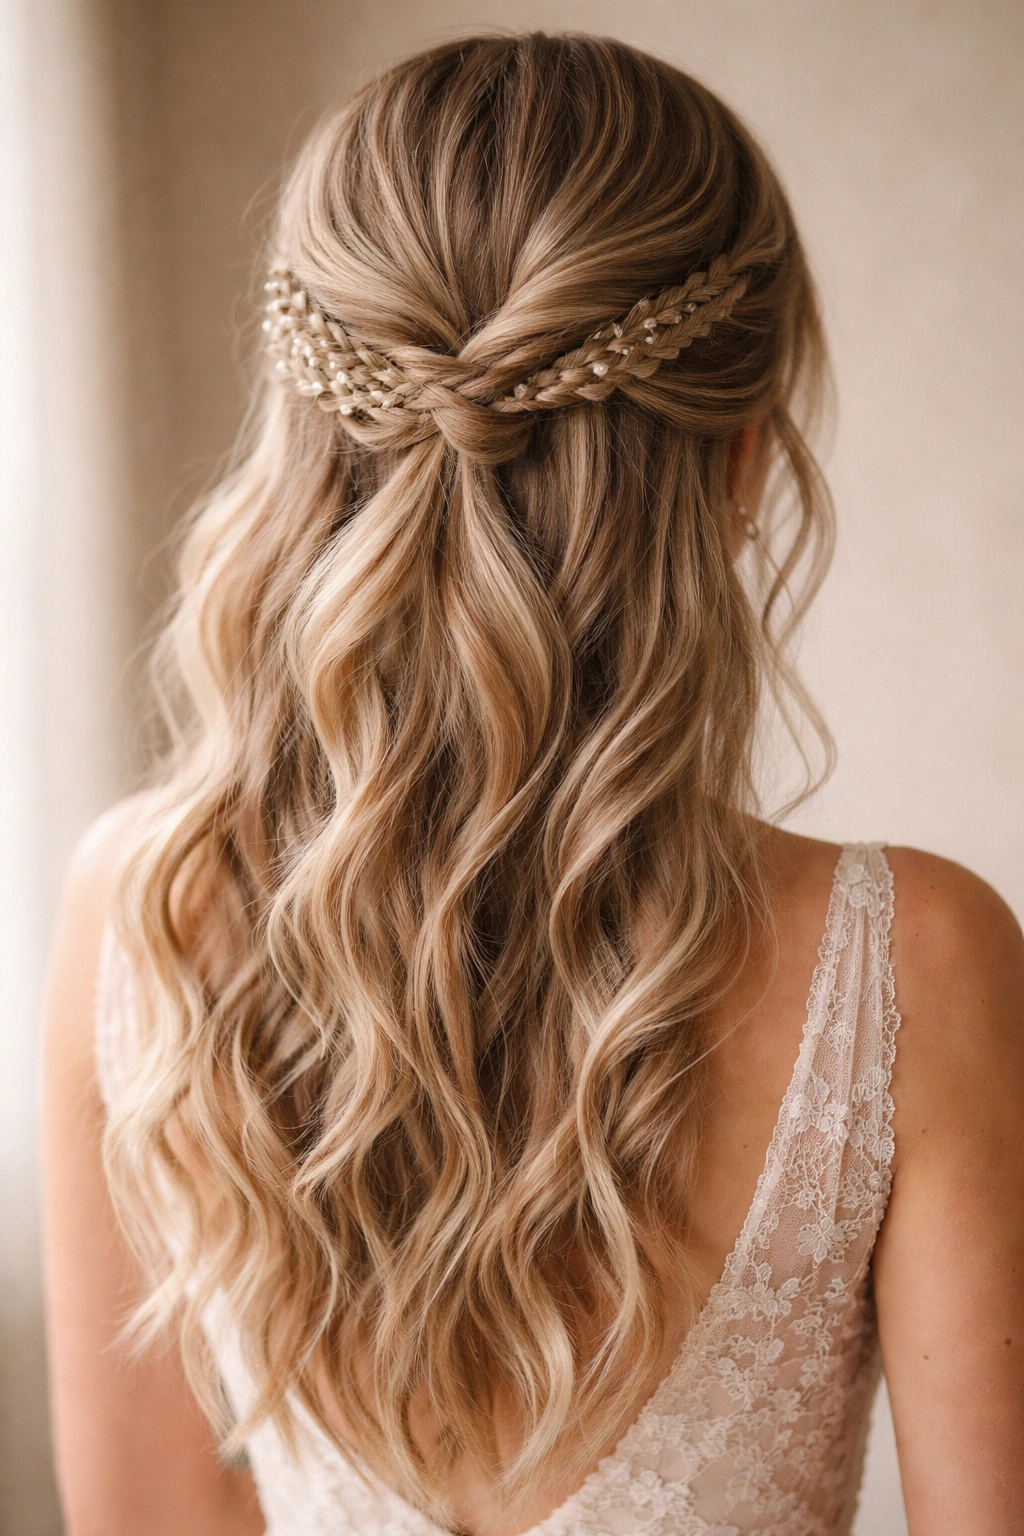
7. The Boho Braided Twist Hybrid
This style combines elements of both braiding and twisting, creating a textured, dimensional look that feels very intentional and artistic. One or two small braids are woven into a twist, or a loose braid transitions into a twist, creating layers of texture and visual interest. This approach requires more technical skill, making it ideal if you’re working with a professional hairstylist.
Why Hybrid Styles Photograph Best
The combination of braiding and twisting creates multiple planes of texture that catch light from different angles, which is why it’s beloved by wedding photographers. In photos, this style reads as intricate and special without being overwrought. It pairs beautifully with boho, rustic, and vintage aesthetics. It also works beautifully if you want your style to feel handcrafted and artistic, as though your stylist spent genuine time creating something unique rather than executing a standard template.
Technical Execution for Mixed Texture
- Create two small, tight braids starting from each temple and working backward
- As you work back, begin loosely twisting the remaining top section
- Weave the braids into the twist as you progress backward, creating an intertwined effect
- Secure all elements at the back of the crown with bobby pins hidden underneath
- Leave the bottom section completely loose and wavy, creating contrast with the intricate top section
- Add small flowers—eucalyptus, baby’s breath, spray roses—woven throughout both the braids and twist
- Use flexible hairspray that maintains the distinction between the braided, twisted, and loose sections
- Plan this style with your stylist beforehand; it requires more precision and timing than simpler twists
8. The Side-Swept Twisted Half-Up
Instead of centering the twist down the middle of your head, this style sweeps all of the top section to one side, twisting as it goes and securing it at the opposite side of your crown. This creates an asymmetrical, modern look that’s deeply flattering if you have a strong side profile or want to emphasize one side of your face. It also works beautifully if you’re wearing your dress off one shoulder or have asymmetrical wedding details.
When Asymmetry Works Beautifully
An off-center twist creates a different silhouette than a centered one—it’s more modern, slightly more editorial. This style pairs beautifully with contemporary wedding aesthetics, sleek updos, and modern dress designs. It also works if you’re planning candid photography that will capture your profile—an asymmetrical twist photographs more interestingly than a centered one from the side angle. This style also creates the illusion of width on the opposite side of your face, which is flattering if you have a narrower face shape.
Creating the Sweeping Effect
- Create a deep side part on the side where you want the twist to originate
- Smooth one entire side of your hair completely back using gel or pomade
- Begin twisting from that side, twisting backward and across toward the opposite side of your head
- The twist should travel diagonally across the back of your crown
- Secure the twisted section on the opposite side of your head, at ear level or lower
- The remaining side should be completely loose and voluminous—blow it out fully to create balance
- Use a side-swept wave through the loose section to echo the movement of the twist
- Add a single jeweled hair comb or delicate pin at the securing point for a focal interest
9. The Vintage Pin-Curl Half-Up

This style harks back to 1940s and 1950s hair styling—instead of a twist, you’re creating formal pin curls in the section you’d normally twist, then securing those curls at the back of your head. The result is deeply romantic, nostalgic, and feminine. This works beautifully if you’re going for a vintage-inspired wedding or you love classic, old-Hollywood glamour.
Why Vintage Details Feel Timeless
Pin curls aren’t trendy; they’re classic. A bride with vintage pin curls won’t feel dated looking at wedding photos a decade from now—if anything, she’ll feel timelessly elegant. This style requires more technical skill and time to set properly, making it best suited to working with an experienced bridal stylist. It also requires using pin curls that are tight enough to hold throughout your entire wedding day, which means using proper setting products and plenty of time to allow curls to cool and set.
Setting Pin Curls That Last All Day
- Work with slightly damp hair that has been moisturized with styling cream
- Section the top half as you would for a typical half-up style
- Create individual pin curls in that section, working methodically from one side to the other
- Each curl should be rolled tightly and pinned flat against the scalp with a bobby pin
- Allow curls to air-dry completely or use a cool setting on a blow dryer
- Once dry and cool, gently release the pin curls, letting them maintain their shape
- Gather the released curls at the back of your crown and secure with bobby pins
- Leave the bottom section completely loose and wavy—let that section be soft where the top is structured
- Consider a vintage hair comb, pearl pins, or a small tiara as your securing element
10. The Geometric Twisted Half-Up

This style creates visible geometric shapes in the twist section—perhaps crossing twists, interlocking twists, or a pattern of small twists woven together. The effect is modern, architectural, and visually striking. This works beautifully if you want your hairstyle to be as intentional and statement-making as your dress or jewelry.
The Modern Appeal of Structured Hair
Geometric twists appeal to brides with modern aesthetics and minimalist sensibilities. This style photographs exceptionally well in close-ups—the pattern of twists creates visual interest and shows off the skill of your stylist. It pairs beautifully with sleek, architectural dresses and sharp makeup. This style also works if you want your hairstyle to feel like an accessory in itself—something that stands on its own as a design element rather than simply framing your face.
Creating Visible Geometric Patterns
- Map out your pattern before you start—sketch it mentally or discuss it with your stylist
- Consider a crossing pattern where two twists intersect, or parallel twists running side by side
- Work with smoothed hair that has grip (slightly textured or with light product)
- Twist each section independently, maintaining even tension throughout
- Cross the twists intentionally at a visible point, or lay them parallel and secure them together
- Secure with bobby pins positioned so they’re either hidden or integrated into the design
- Keep the bottom section smooth or lightly waved—don’t compete with the structured top
- Consider your choice of embellishment carefully; too much jewelry can overwhelm the geometry
11. The Romantic Crown Twist
This style creates a visual crown effect by twisting hair from both sides of your head and meeting those twists at the back center, creating a frame around your entire head rather than just pulling the top half back. It’s similar to a crown braid but created with twists instead of braids. The effect is deeply romantic and bridal without being overly formal or structured.
The Bridal Magic of a Crowned Effect
A twist that creates a crown effect feels inherently special and wedding-day worthy. It frames your entire face beautifully and works with virtually every face shape. It also reads as an intentional, designed hairstyle rather than a casual half-up, which matters photographically. This style works beautifully with floral crowns or delicate hair jewels positioned within the twist itself. It also works if you want your hair to feel elevated and special without committing to a full updo.
Execution for a Complete Crown
- Create a subtle part down the center of your head from forehead to nape
- Section one side from the temple, following the hairline
- Twist that section tightly around the side of your head, working toward the back
- Mirror the same twist on the opposite side, working toward the center back
- Meet both twists at the nape and secure them together with bobby pins and styling spray
- Leave the length hanging down your back, curled gently for romantic movement
- Weave small flowers or greenery throughout both twisted sections, following the crown shape
- Add a delicate crown or flower arrangement that sits on top of the twists, not replacing them
12. The Soft Feminine Twist with Piece-Out
This final style is intentionally softened with deliberately pulled-down face-framing pieces. You’re creating a classic twist but then removing a few pieces from the gathered section and curling them softly around your face. This creates a romantic, approachable feel that’s less formal than a completely pulled-back style. It’s perfect if you have delicate features you want to frame or if you want your style to feel warm and inviting rather than severe.
Why This Approach Feels Most Romantic
The intentional “piece-out” creates softness without looking accidental. It’s a styling technique that says you planned every detail, including leaving these pieces loose for a reason. This style works beautifully with vintage dresses, romantic aesthetics, and outdoor venues. It also photographs beautifully—the framing pieces create a softer silhouette that’s flattering from nearly every angle.
Creating Intentional Softness
- Build your classic twisted half-up following the original method described in Style 1
- Before securing everything with your final bobby pins, identify three to five pieces to pull out
- Pull these pieces gently downward from the gathered section, creating soft wisps
- Curl these released pieces tightly around a small curling iron, creating delicate spirals
- Allow the curls to cool completely before releasing them to maintain their shape
- These should frame your face and collarbone area, creating softness
- Use flexible hairspray that maintains the distinction between the secured twist and the soft pieces
- Add a delicate floral crown, small pearl pins, or ribbon woven through the soft pieces
Key Takeaways
The best wedding hairstyle isn’t necessarily the most complicated one—it’s the one that feels authentically you while working with your hair texture, your face shape, and your wedding aesthetic. Half-up half-down twists offer that perfect middle ground, providing enough visual interest and intentionality to photograph beautifully while feeling romantic, approachable, and wearable throughout an entire day of celebration. Whether you’re drawn to sleek modern twists, heavily embellished styles, vintage references, or soft romantic approaches, the techniques above provide the foundation you need to achieve your vision.
The specific twist you choose should enhance your natural features and complement your overall wedding day aesthetic. Take the time before your wedding to try a few of these styles with your stylist—not just in a consultation, but in full practice runs with your veil, your dress, and proper styling products. The perfect style is one you feel confident in, that photographs beautifully from every angle, and that stays in place throughout dancing, ceremony, and celebration. Any of these twelve variations will deliver that—it’s simply a matter of choosing the version that feels most authentically you.