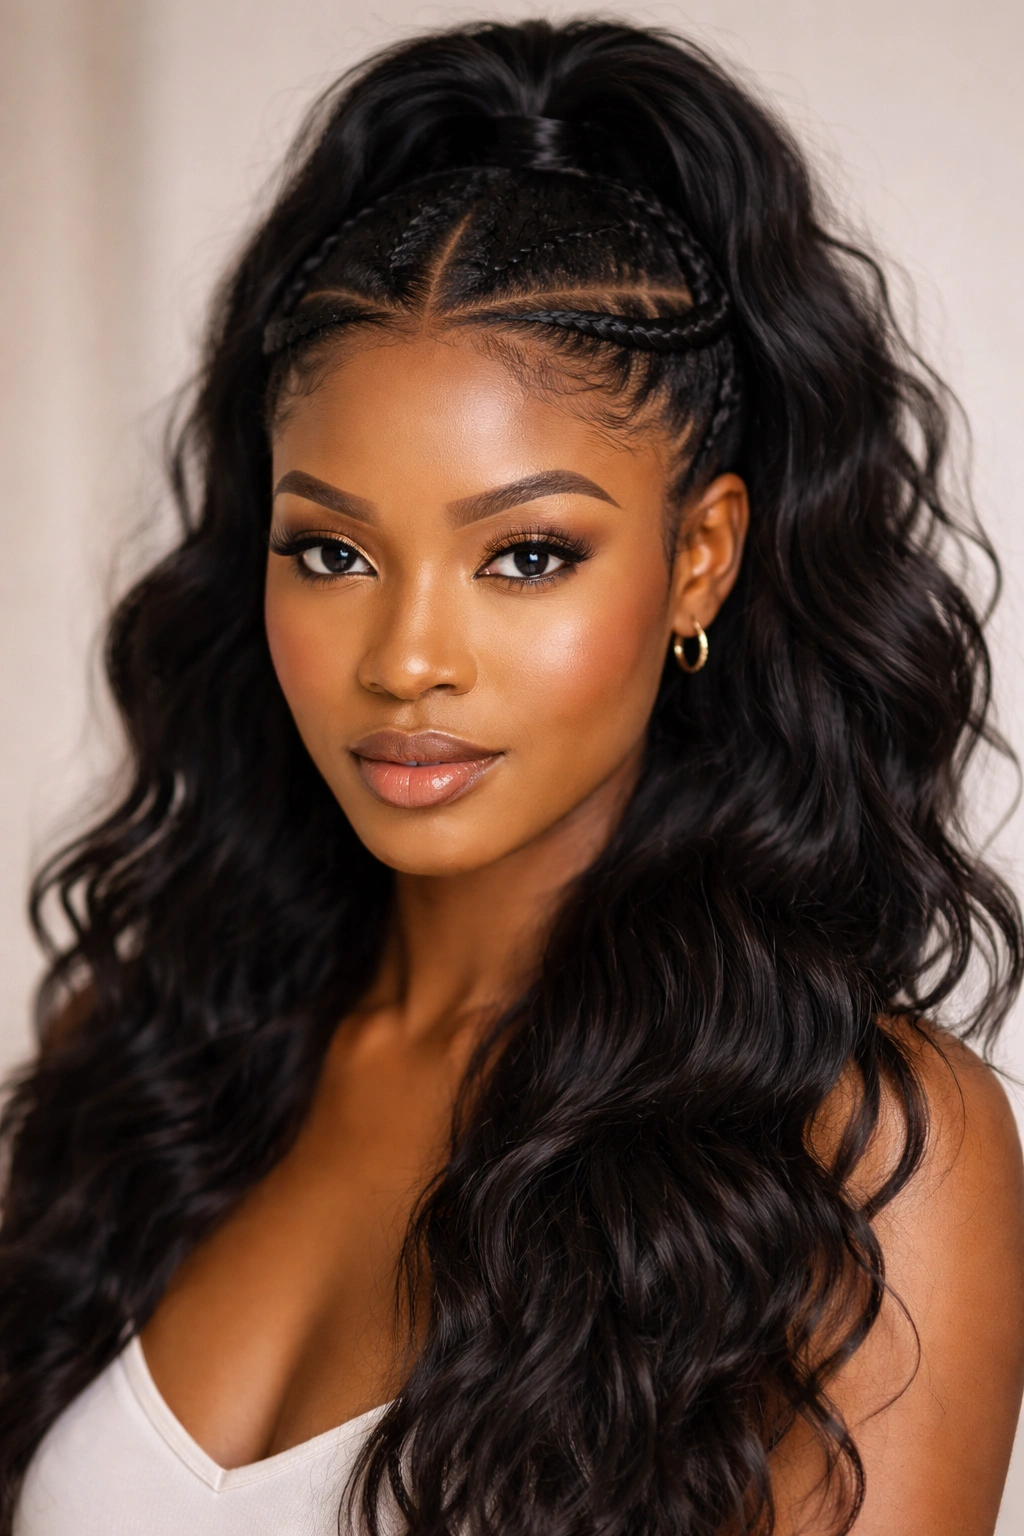
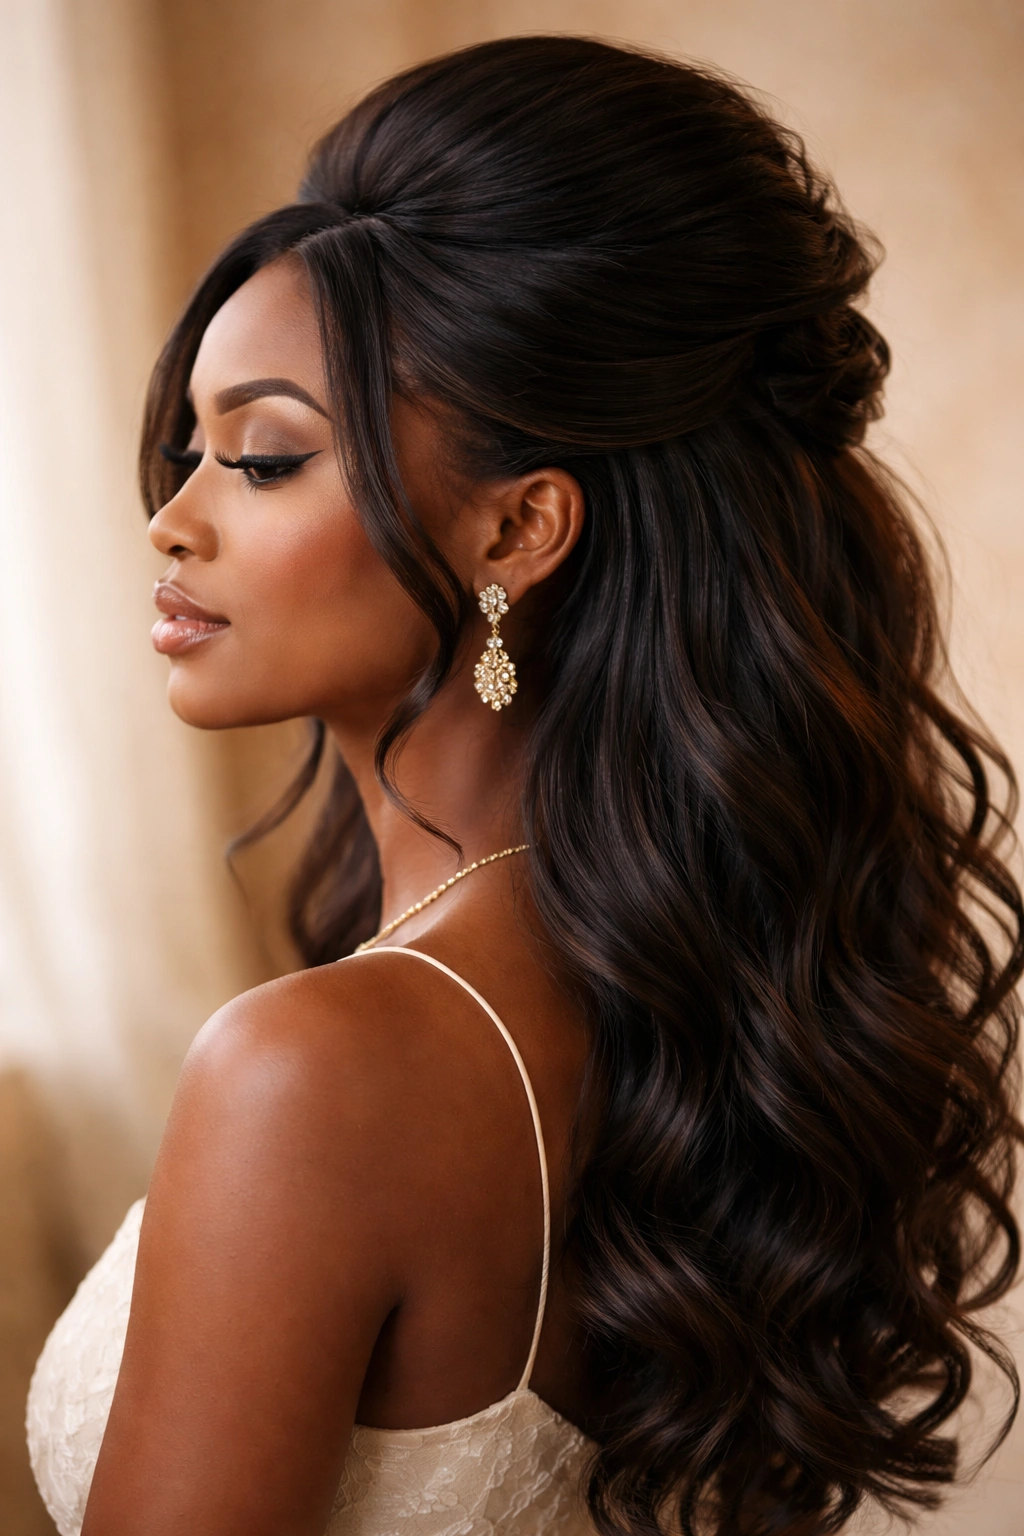
Half up, half down styles have become a go-to for Black women seeking a look that’s polished yet relaxed, protective yet versatile. There’s something about this approach that just works—you get the security of an updo without sacrificing the flow and movement that makes natural hair, locs, braids, and other protective styles so beautiful. Whether you’re heading to work, a special event, or just want a quick style that keeps hair out of your face while looking intentional, these styles deliver.
The best part? Half up, half down doesn’t require hours at the salon or complicated styling techniques. These are styles you can create at home with basic tools and practice. Many of them work across different hair textures and protective styles—from loose curls to thick locs to box braids. The real secret is understanding the fundamentals: how to section hair properly, which products help hair stay in place without weighing it down, and how small details like the height of your crown section or the way you wrap your hair around the base completely change the look’s impact.
What makes these 18 styles worth exploring is that they genuinely work for different occasions, different hair types, and different moods. Some are sleek and professional. Others are romantic and flowing. A few are bold enough for a night out. The point is that you don’t need one signature style—you need options that adapt to what you’re doing and how you’re feeling on any given day.
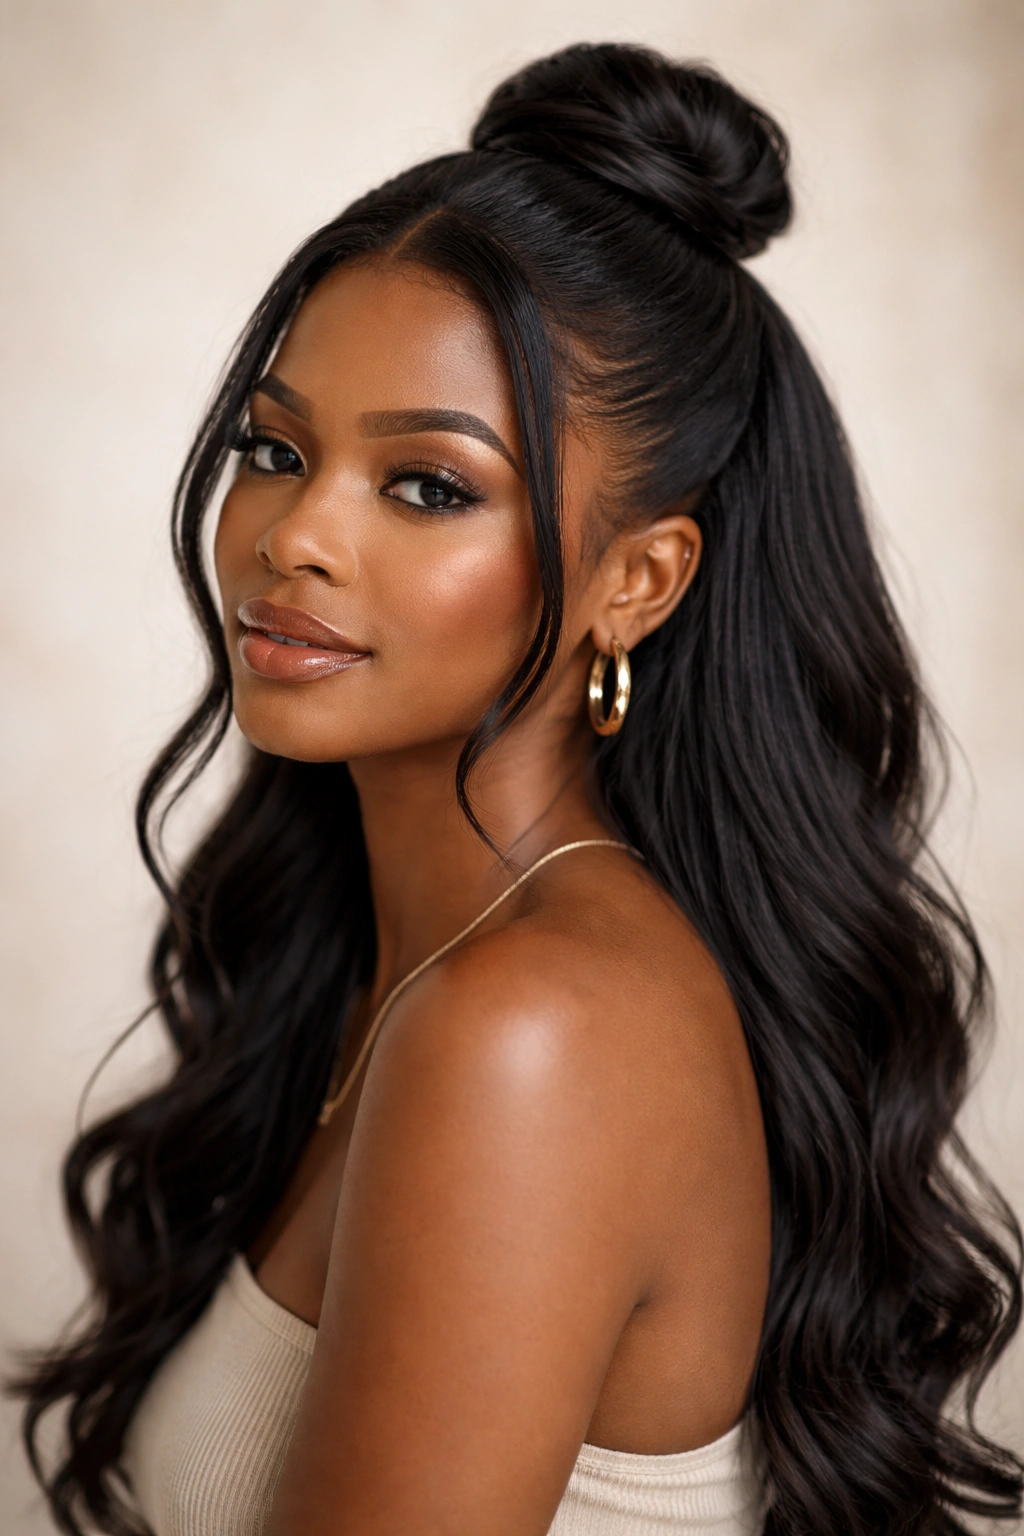
1. The Classic Crown Pull-Back
This is the foundation style that works as a daily look or as a base for more elaborate versions. The idea is simple: you’re pulling back the front and upper side sections of your hair, leaving the rest flowing down your back. What makes it a crown pull-back rather than just pulling some hair back is the placement and the way you secure it—you’re creating a visual crown effect that sits higher on your head.
How to Get the Look
Start by creating a deep side part if you don’t have one naturally. Take a horizontal section from one ear to the other, going over the crown of your head. This section should be about 2-3 inches deep. Smooth this section back using a light styling cream or edge control, then gather it at the back of your crown. Secure it with bobby pins that match your hair color, tucking the pins underneath so they’re hidden by the hair. The key is keeping the back section smooth while letting the bottom half of your hair fall naturally—the contrast between the sleek top and the free bottom is what makes this work.
What Makes It Work Best
- Works beautifully on natural hair, braids, locs, and twist-outs
- Keeps hair off your face without looking overly formal
- Takes about 5 minutes to style
- Stays in place all day without heavy products
- Creates the illusion of more volume at the crown, which flatters most face shapes
Pro tip: Use a light mist of hairspray on the pulled-back section rather than thick gel—this keeps the look soft and prevents the dreaded “helmet head” feeling that comes with heavy products.
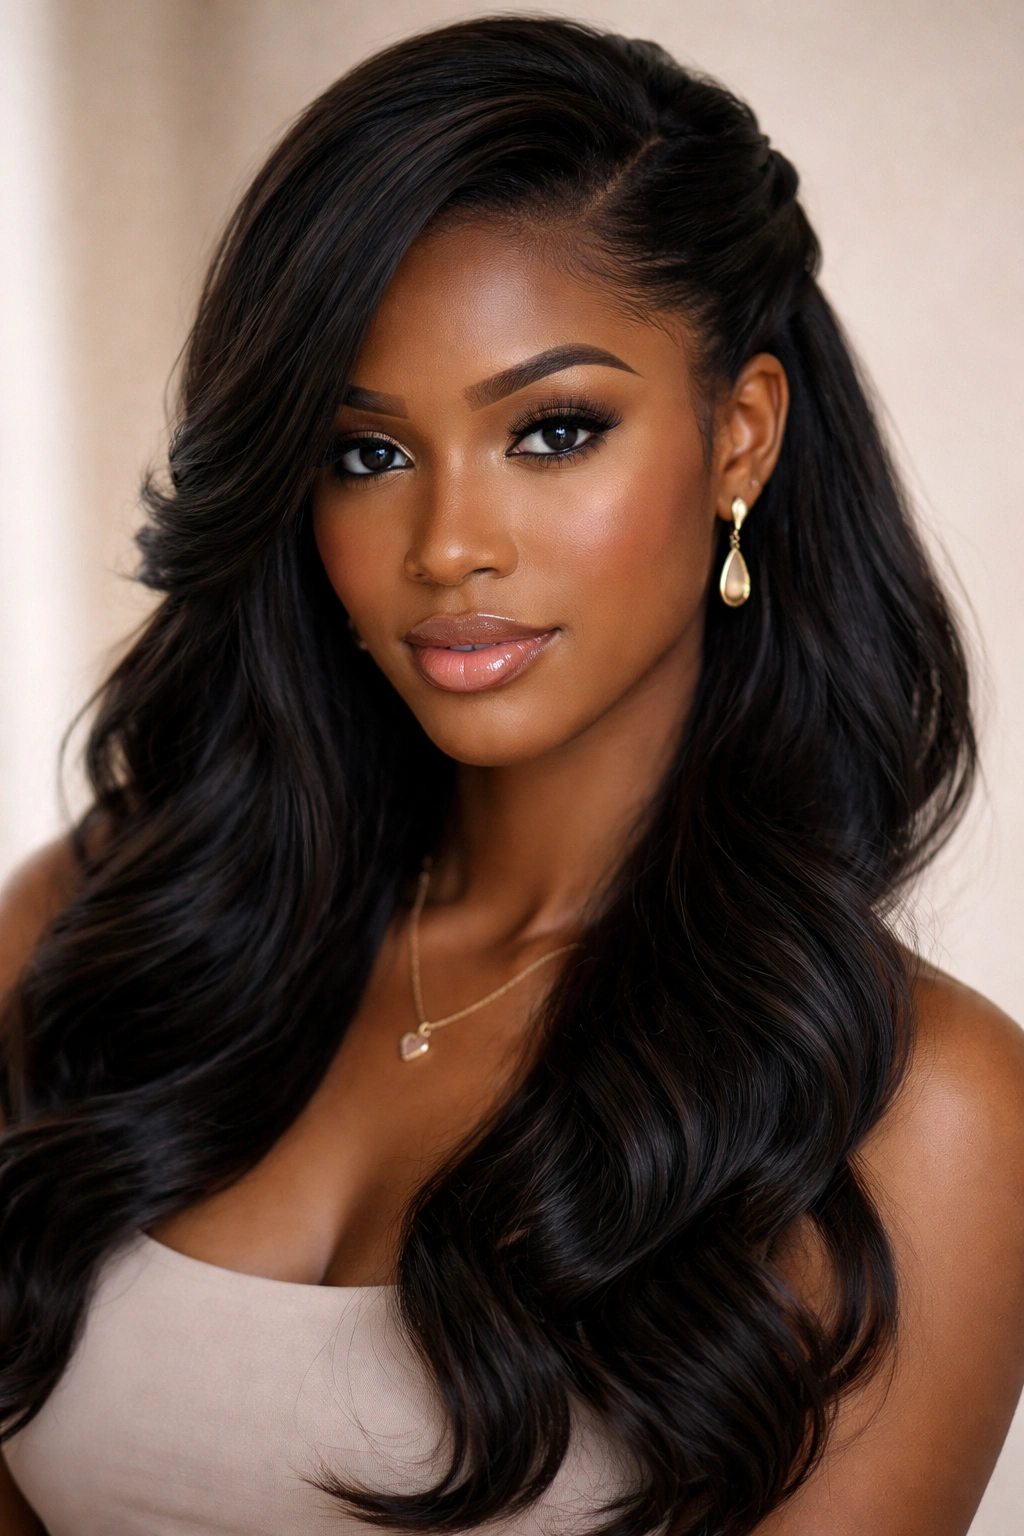
2. The Twisted Crown with Face-Framing Tendrils
This version takes the classic pull-back and adds movement and visual interest by twisting the crown section instead of smoothing it straight back. The twists catch light differently than a flat pull-back, and they photograph beautifully. This style works especially well if you have natural hair or textured hair because the twists blend seamlessly with your curl pattern.
How to Get the Look
Section your hair the same way as the crown pull-back, but instead of smoothing it straight back, divide this section into two or three smaller subsections. Take each subsection and gently twist it, rolling it back toward the crown. As you twist, you’ll naturally create a spiral pattern. Pin each twist at the base of your crown, then take a few small face-framing pieces and leave them loose around your face to soften the look. These tendrils shouldn’t be twisted—they should be soft and slightly tousled.
What Makes It Work Best
- Adds dimension to the crown area
- Face-framing pieces instantly soften and romanticize the style
- Works on curly, coily, and textured hair without needing extra styling
- Takes about 8-10 minutes
- Looks intentional and polished without looking too formal
Worth knowing: If your hair is prone to frizz, apply a small amount of smoothing serum to each section before twisting. This prevents the twists from looking fuzzy while still maintaining the soft, romantic vibe.
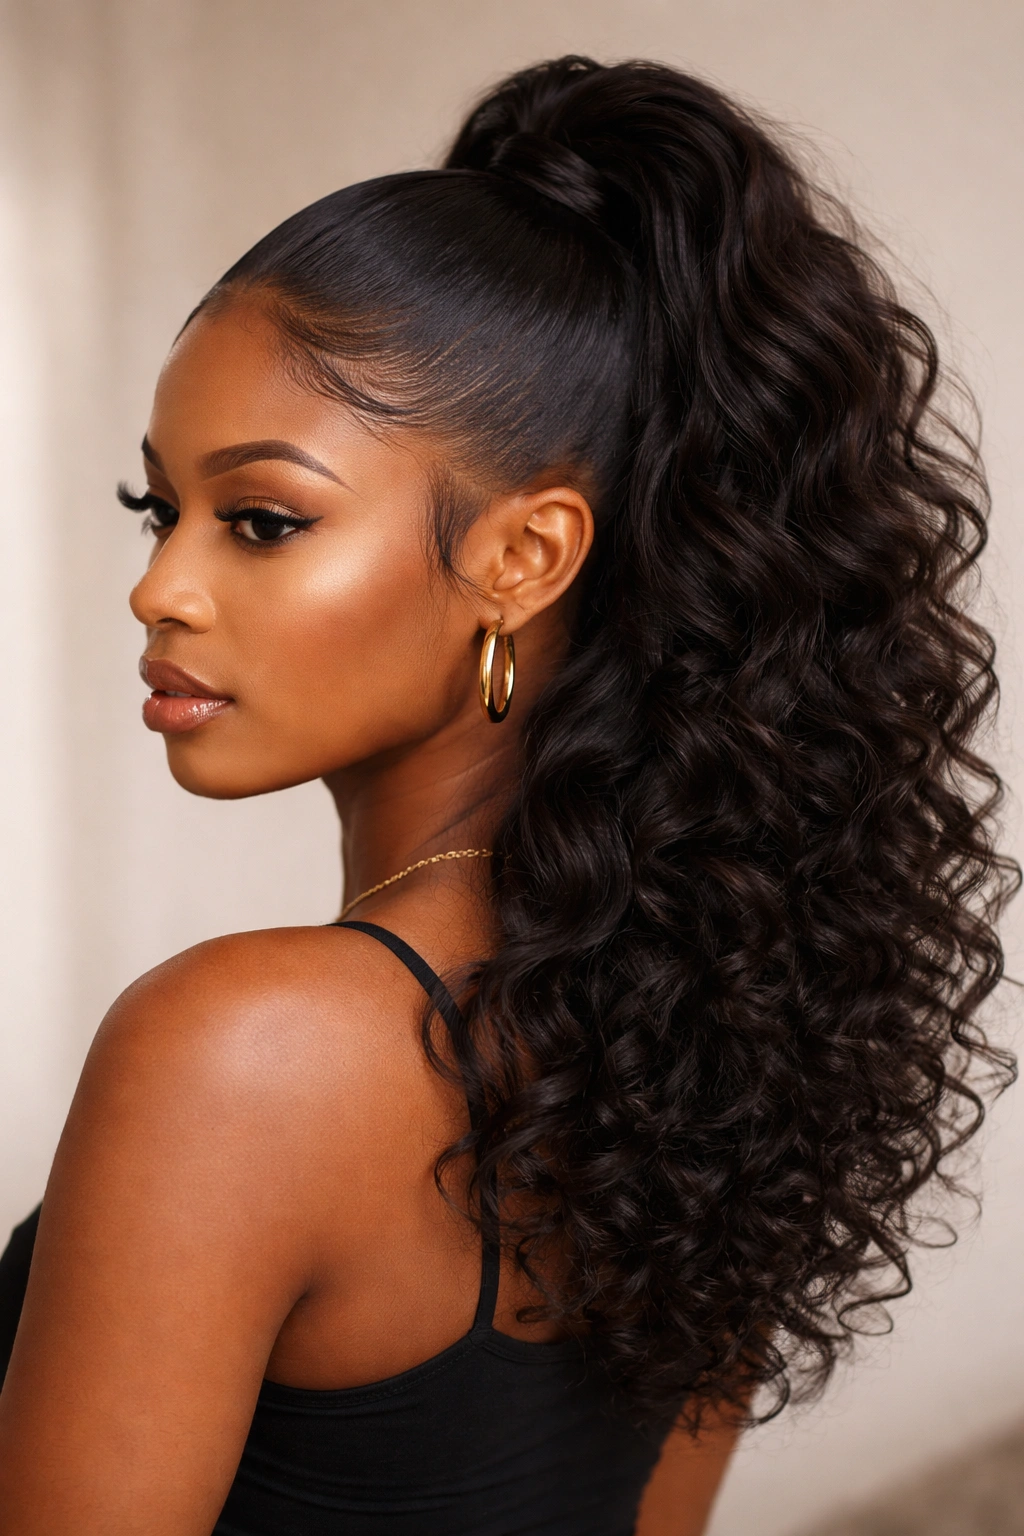
3. The High Crown Knot
Instead of twisting or smoothing, this style gathers your crown section into a small knot at the very top of your head. It’s more playful than the classic pull-back and works particularly well if you want to show off your face or if you’re having a day when your hair texture is being stubborn. The high placement is key—this isn’t a messy bun, it’s a deliberate, tight knot positioned at the crown.
How to Get the Look
Section your hair from ear to ear over the crown, making this section slightly larger than you would for a pull-back. Gather this section into a small, tight ponytail at the crown of your head using a clear elastic. Divide this ponytail into two sections and twist them around each other, then wrap them into a tight knot and secure with bobby pins. Leave the rest of your hair down and full. The contrast between the tight knot and the volume below is the whole point of this style.
What Makes It Work Best
- Perfect for showing off your facial features and bone structure
- Works on every hair type
- Stays secure throughout the day
- Takes about 7-8 minutes
- Looks polished enough for work but fun enough for casual days
Insider note: If you have very thick hair, use two small elastics stacked on top of each other instead of one—this gives you a more secure base for the knot and prevents it from unraveling by midday.
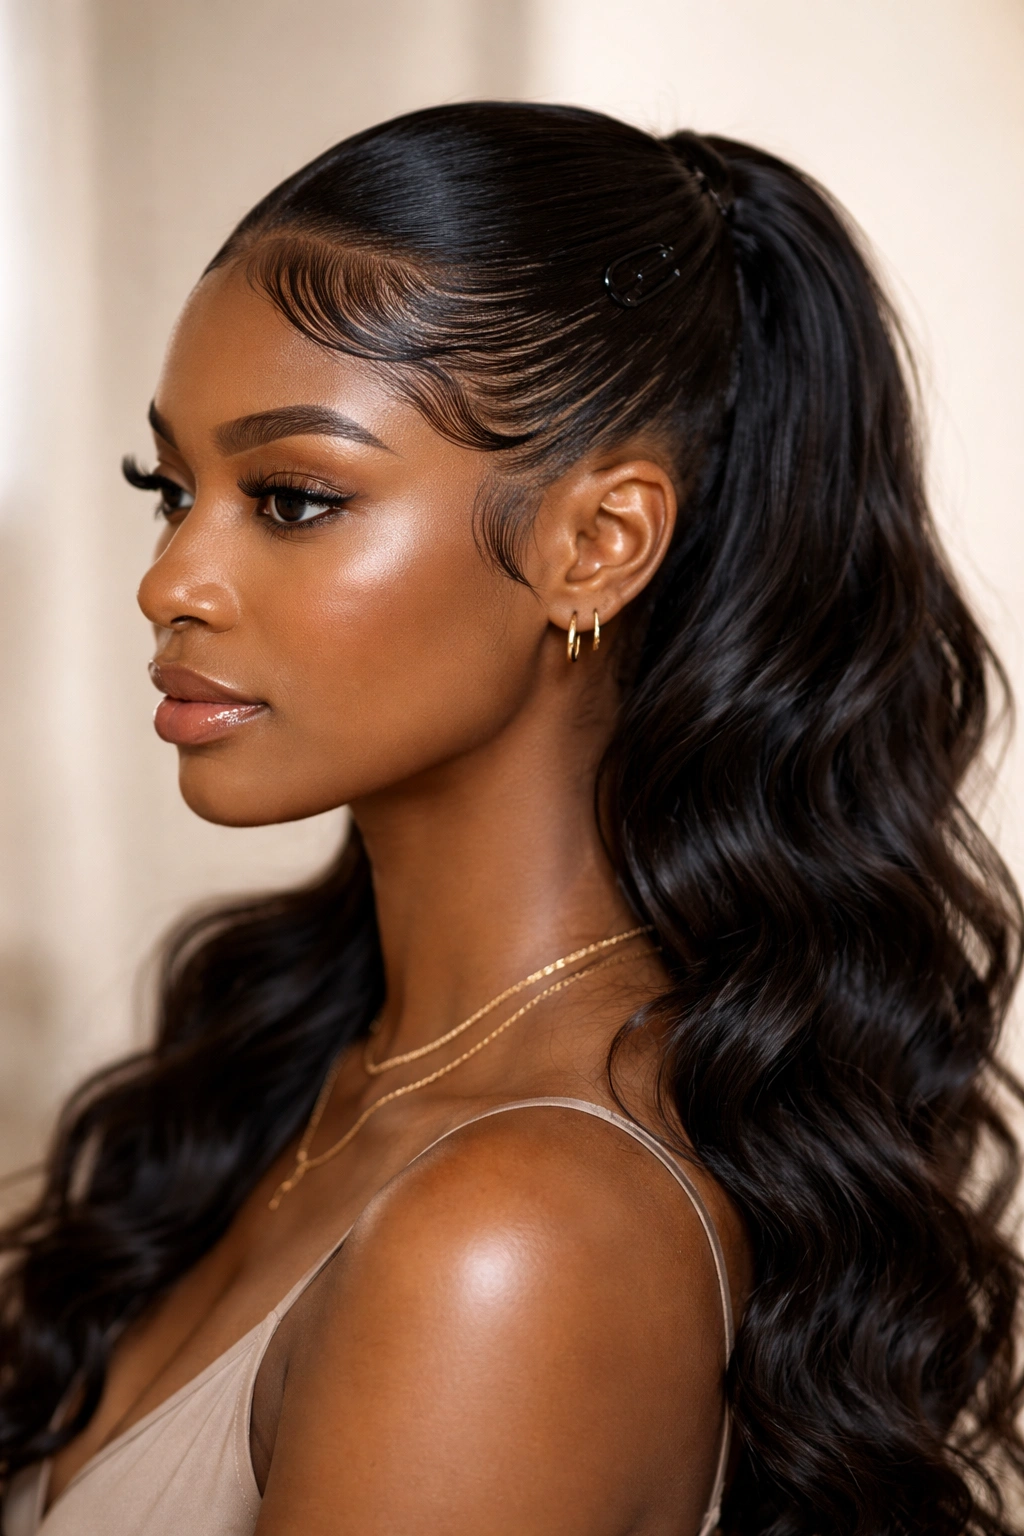
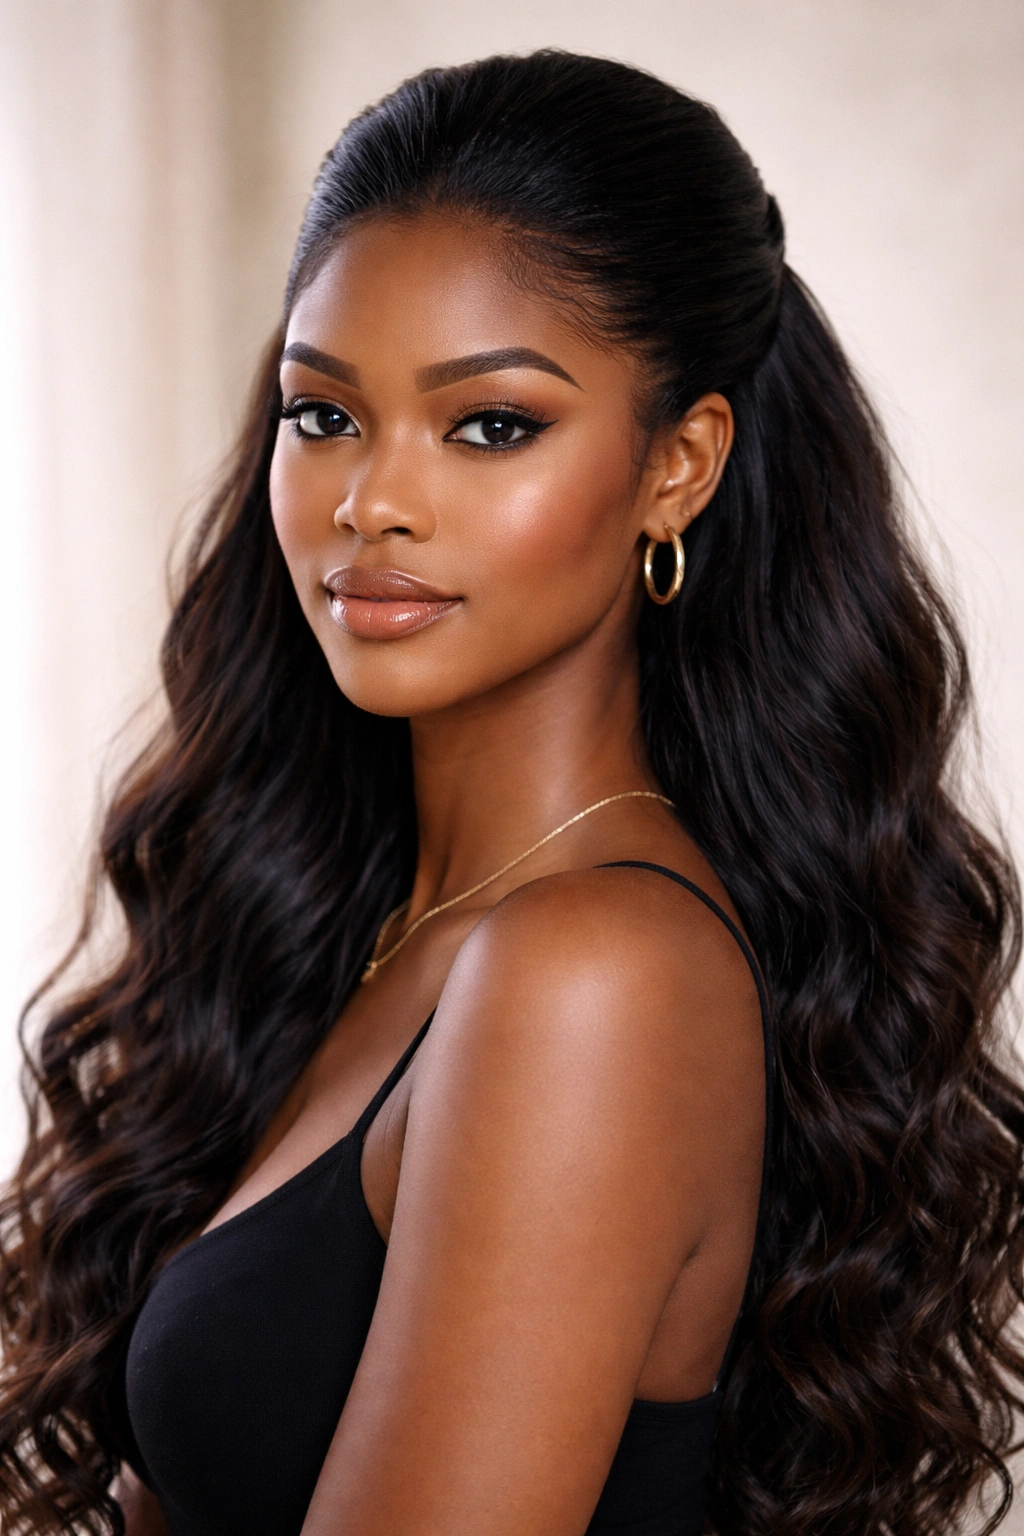
4. The Sleek Low Pony Half-Up
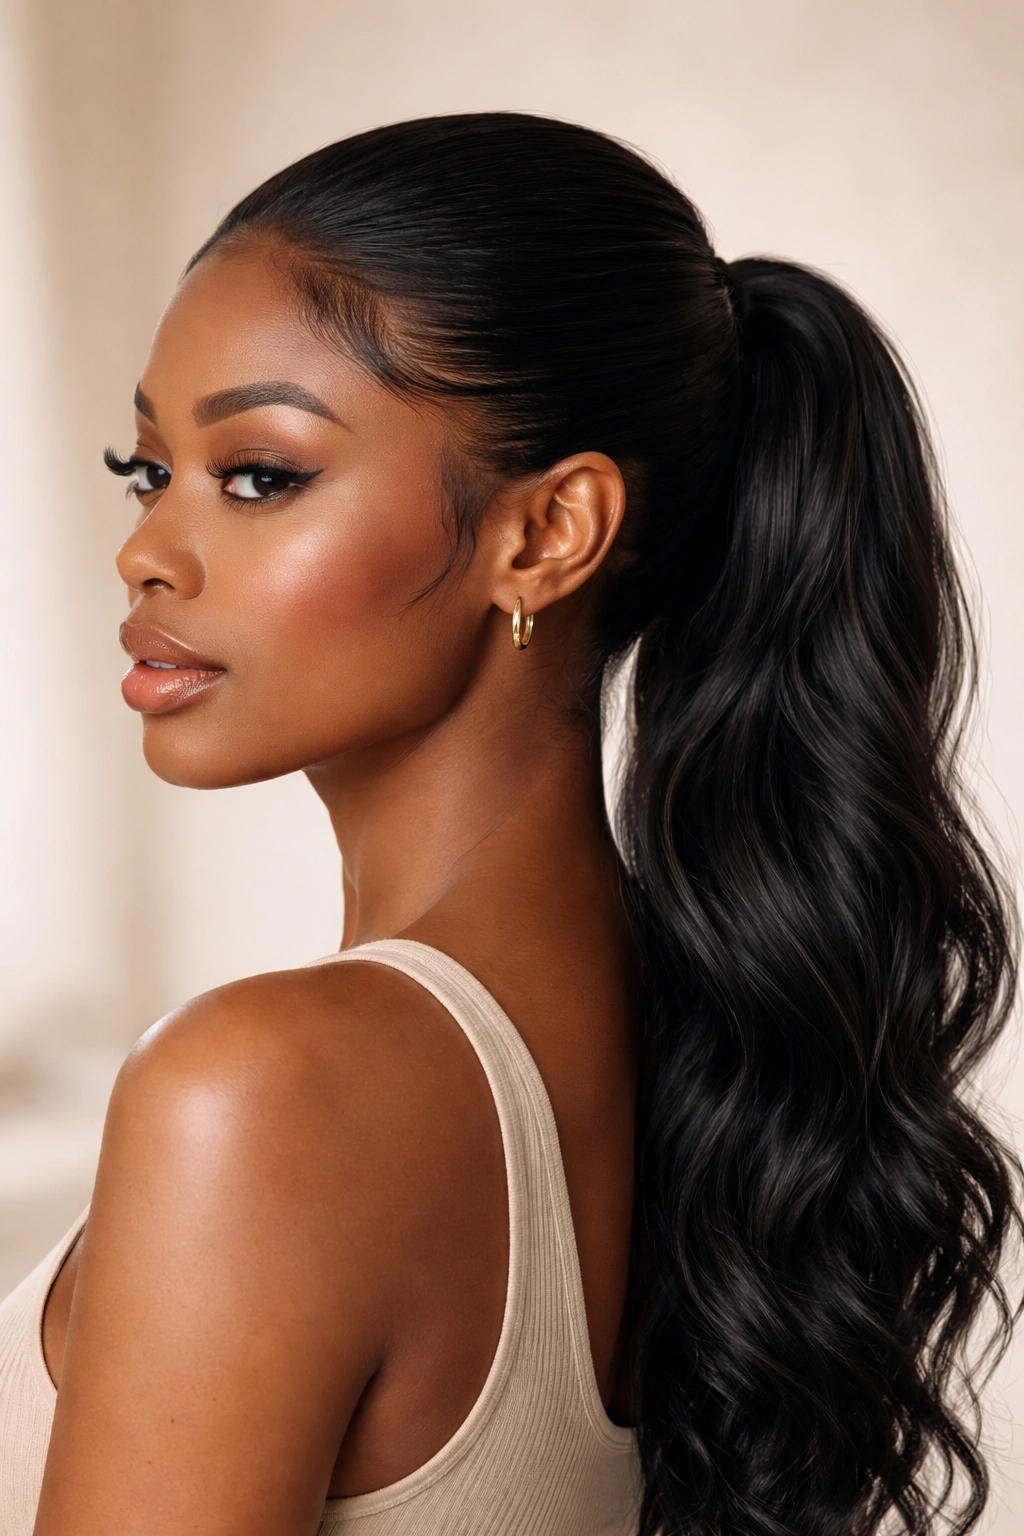
This style pulls back less hair than the crown versions, creating a lower, more relaxed silhouette. It works beautifully if you want the “hair off your face” benefit without committing to a full updo. The ponytail sits lower, around the middle-back of your head, and the bottom half of your hair flows freely below it. This is one of the easiest styles to replicate and maintain.
How to Get the Look
Create a deep side part and take a smaller section of hair from the front and upper sides—roughly from your temples back to about the middle of your head. Smooth this section back and gather it into a low ponytail positioned at the nape of your neck or slightly above it. Smooth the ponytail section with edge control or a light cream, then let the rest of your hair fall naturally around it. You can wrap a small strand of hair around the elastic to hide it, or leave the elastic visible if you prefer a modern, cleaner look.
What Makes It Work Best
- Incredibly quick—takes 5 minutes or less
- Requires minimal products
- Works on straight hair, wavy hair, curly hair, and protective styles
- Looks equally good for work, casual outings, or dates
- Stays in place without constant adjustment
Quick facts:
- Best worn with a side part for balance and visual interest
- Works well with both sleek and textured bottom sections
- Can be dressed up by wrapping the ponytail with a strand of matching hair
- Works beautifully with gold or silver hair jewelry wrapped around the ponytail
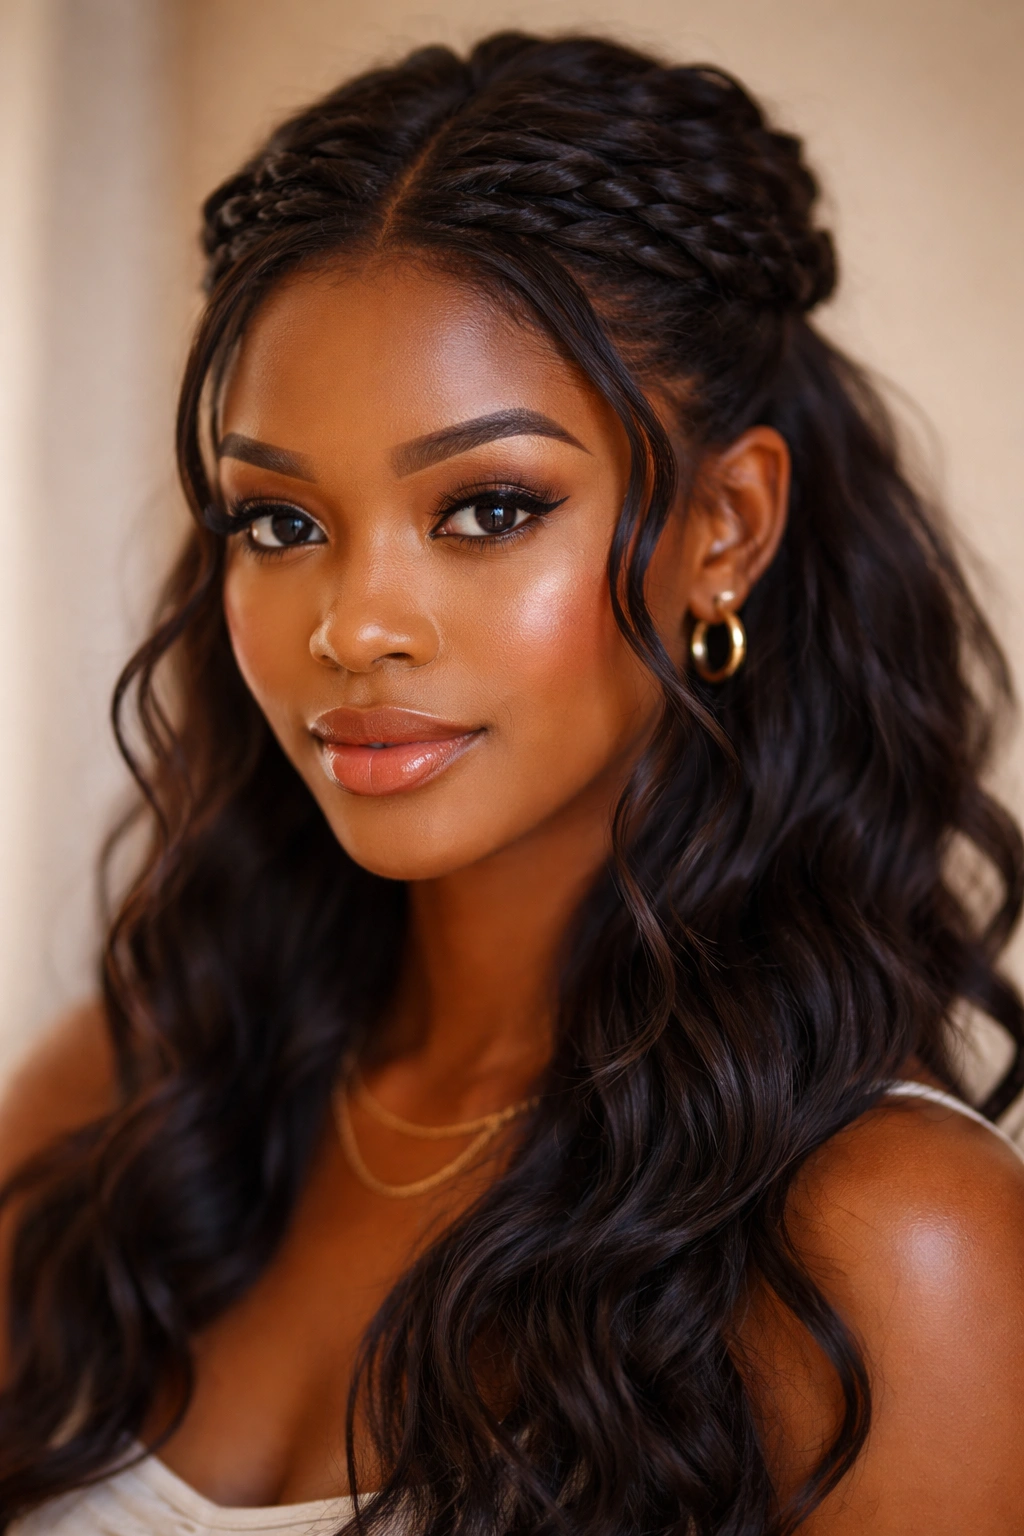
5. The Braided Crown Half-Up
If you have the time and patience for braiding, this style elevates the half-up look considerably. Instead of twisting or smoothing the crown section, you’re creating a braid that runs along the top of your head, anchoring the half-up portion. The braid becomes the focal point and instantly makes the style look more intentional and styled.
How to Get the Look
Section your hair from one side of your head to the other, going over the crown. Divide this section into three parts and begin a Dutch braid (where you braid under rather than over, creating a braid that sits on top of the hair surface). Braid from one temple back toward the crown, picking up small pieces of hair as you go so the braid is anchored to your head. When you reach the back of your crown, secure the braid with bobby pins and let the remaining hair flow down. You can leave the braid visible or tuck the end underneath the rest of your hair for a more seamless look.
What Makes It Work Best
- Creates a very polished, intentional appearance
- Works on natural hair, braided hair, and loc’d hair
- The braid actually helps hold the style in place
- Takes 10-15 minutes depending on your braiding speed
- Photographs beautifully from every angle
What to watch for: If your hair is very fine or slippery, do a loose Dutch braid rather than a tight one—tight braiding on fine hair can cause tension and breakage. A slightly looser braid looks softer anyway and is easier to maintain throughout the day.
6. The Wrap-Around Bun Half-Up
This style combines a low ponytail with a wrapped bun element. The front and crown sections are pulled back into a low ponytail, then that ponytail is twisted or braided and wrapped around itself to create a small bun, all while the bottom half of your hair remains loose underneath. It’s more intricate than a simple pull-back but still very doable at home.
How to Get the Look
Pull your crown section back into a low ponytail positioned at the nape of your neck. Take this ponytail and divide it into two sections. Twist these sections around each other, then wrap the twisted ponytail around the base of the ponytail holder to create a small bun shape. Secure this bun with bobby pins, making sure the pins are hidden underneath. Leave your bottom section completely loose. The loose hair will naturally cover part of the bun, creating a soft, integrated look.
What Makes It Work Best
- More polished than a simple ponytail but less commitment than a full updo
- Works on thick hair and fine hair alike
- The wrapped element adds visual interest
- Takes 10-12 minutes
- Perfect for special occasions or professional settings
Pro tip: Before you wrap the bun, lightly backcomb or tease the twisted ponytail at the base—this gives the bun more grip and helps it stay in place throughout the day without slipping.
7. The Side-Swept Half-Up with Waves
This style pulls hair back from one side of your head, creating an asymmetrical look that’s flattering and modern. The key difference from a simple side pull-back is that you’re deliberately creating soft waves in the bottom section, turning a functional style into a deliberately styled look. This works beautifully for dates, nights out, or any time you want to feel polished.
How to Get the Look
Create a deep side part and take the larger side of your hair—from your temple back to the crown. Sweep this section across to the opposite side of your head and secure it with bobby pins tucked behind your ear or at the back of your head. Use a curling iron or heat-free method to create soft waves in the bottom section of your hair. The waves should be loose and flowing, not tight ringlets. The contrast between the smooth, pulled-back top and the wavy bottom is what makes this style work.
What Makes It Work Best
- Instantly elongates your face and shows off your features
- Works beautifully on medium to long hair
- The waves add romantic, intentional styling
- Takes 15-20 minutes including wave-setting time
- Looks elegant enough for formal events
What you need:
- Curling iron or heat-free wave method (braiding overnight, flexi-rods, etc.)
- Light hairspray to hold the waves
- Bobby pins that match your hair color
- Optional: light smoothing cream for the pulled-back section
8. The Gelled Swoop Half-Up
For a more modern, sleek take on the half-up, this style uses edge control or smoothing gel to create a sculpted swoop in the pulled-back section. Instead of tucking the hair smoothly against your scalp, you’re creating intentional waves or swoops in the pulled section using gel. This look works especially well on natural hair and braids because it celebrates the texture rather than fighting against it.
How to Get the Look
Apply a strong-hold gel or edge control to your hands. Take your crown section and smooth it back, but as you do, deliberately create small waves or swoops in the hair before pinning it. Use your fingers and a fine-tooth comb to sculpt these waves into the pulled-back section. The waves should be visible and intentional, not smooth and flat. Secure with bobby pins and allow the gel to dry completely. The gel will set these waves in place so they last all day.
What Makes It Work Best
- Very modern and fashion-forward
- Works beautifully on natural hair, braids, and locs
- Celebrates texture rather than trying to smooth everything down
- Takes 8-10 minutes
- Stays in place all day without slipping
Quick facts:
- Best for people who don’t mind visible gel definition
- Works on any hair length
- Can be paired with sleek or textured bottom sections
- The stronger the hold gel you use, the longer the style lasts
9. The Half-Up Space Buns
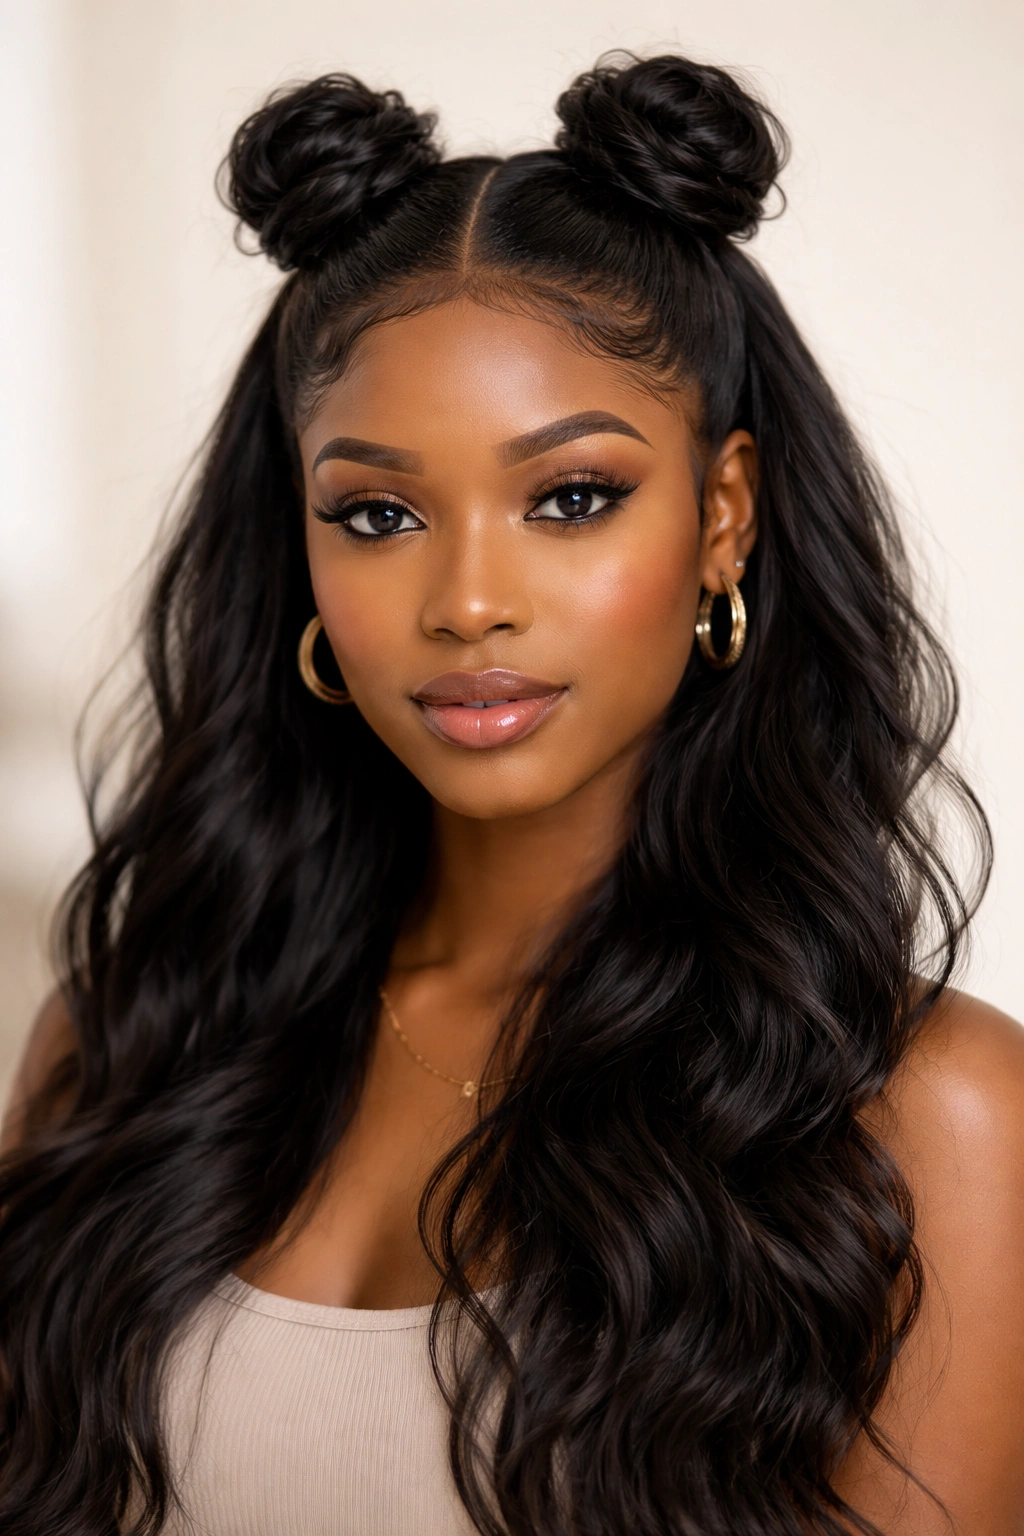
This playful style is somewhere between practical and fun—it’s definitely a hair-off-your-face situation, but the space buns at the crown make it clear you’re not trying to look serious. This style works beautifully on natural hair, braids, and locs and is honestly more comfortable and less restrictive than it sounds. The space buns are smaller and tighter than a full space bun style, so they don’t feel heavy.
How to Get the Look
Create a center part or a side part, depending on your preference. Take the top section of your hair from your temples back to the crown and divide it into two equal sections, one on each side of the part. Gather each section into a small, tight ponytail. Twist or braid each ponytail, then wrap it around itself to create two small buns positioned on either side of your crown. Secure each bun with bobby pins and let the rest of your hair flow freely underneath. The bottom section can be textured, wavy, curly, or straight.
What Makes It Work Best
- Fun and youthful without looking childish when done with longer bottom sections
- Works on all hair types
- Takes 12-15 minutes
- The buns actually help keep your hair secure throughout the day
- Perfect for casual outings, creative workplaces, or any time you want a lighter vibe
Insider note: If you make these buns slightly loose instead of super tight, they photograph better and feel more comfortable against your scalp, especially if you’re wearing them for several hours.
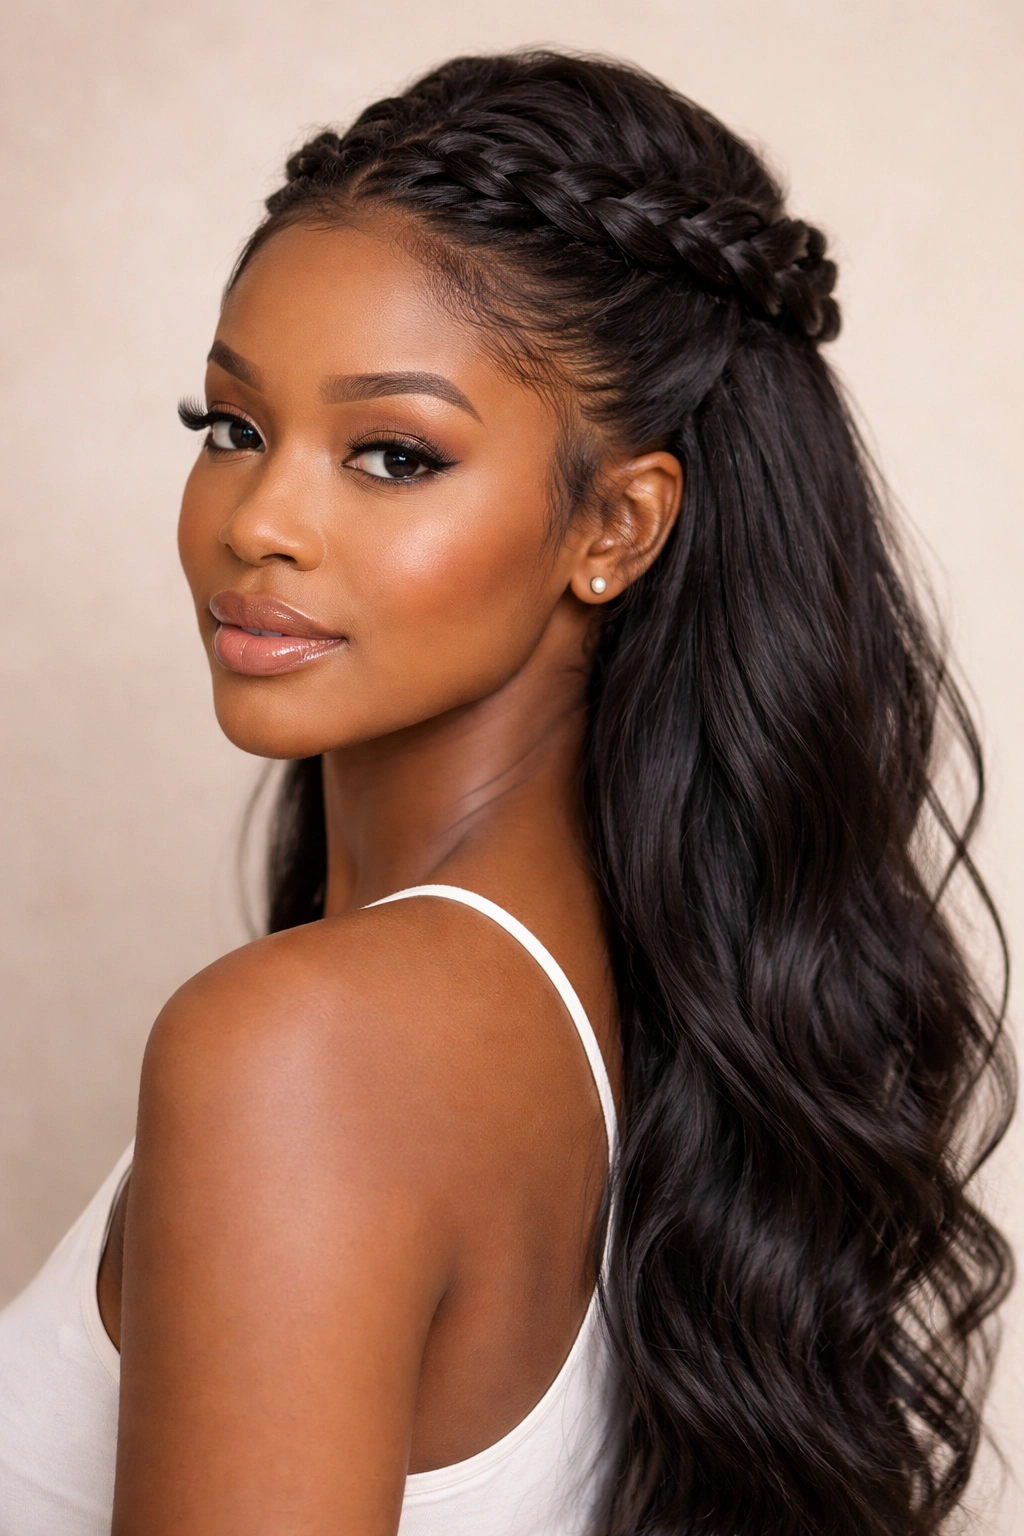
10. The Corned-Row Crown Half-Up
This style features cornrows running from the front of your head back to the crown, anchoring the half-up portion. The cornrows become the structural element and visual focal point. This works beautifully whether you’re braiding someone else’s hair or doing it to your own texture. The key is that the cornrows run to a designated point at the crown rather than continuing all the way down.
How to Get the Look
Starting from your hairline on one side, create a cornrow that runs back toward your crown. You can do one cornrow down the middle, two cornrows that angle back, or three cornrows that create a geometric pattern—the variation is part of what makes this style so interesting. Braid these cornrows all the way back to your crown area, then anchor them with bobby pins. The section of hair below the cornrows remains unbraided and loose. The cornrows themselves become a crown-like frame around the top of your head.
What Makes It Work Best
- Creates a very intentional, styled appearance
- Works beautifully on natural hair with the right tension
- The cornrows help hold the half-up in place
- Takes 20-30 minutes depending on how many cornrows you create
- Lasts several days if properly maintained
What to watch for: Make sure your cornrows aren’t so tight that they cause tension headaches or damage to your hairline. The goal is secure braids, not painful ones.
11. The Twisted Half-Up with Decorative Pin
This style takes the basic twisted half-up and elevates it with a decorative element. After you’ve twisted your crown section back, instead of using a standard bobby pin, you’re using a claw clip, a decorative pin, or a hair fork to secure the twist. This small change transforms the style from simple to styled. The decorative element should complement your outfit or your mood for the day.
How to Get the Look
Section your crown area and divide it into two or three subsections. Twist each subsection gently, rolling back toward your crown. Rather than pinning these twists down with bobby pins, gather them together and secure them with a decorative claw clip positioned at your crown. The clip becomes a visible accessory, not something you’re trying to hide. Choose a clip that either matches your hair color for a subtle look or contrasts with your outfit for a bold statement.
What Makes It Work Best
- Takes a basic style and makes it look more intentional with one accessory
- Works on all hair types
- Takes about 8-10 minutes
- The decorative element gives you a way to customize the style to different occasions
- Stays in place better than bobby pins because of the clip’s grip
Quick facts:
- Claw clips work best for this style because they have better grip than slide clips
- Tortoiseshell, gold, and black are the most versatile clip colors
- This works beautifully with vintage or modern aesthetic clothing
- The clip should be positioned at your crown, not lower on your head
12. The Romantic Waterfall Half-Up
This style incorporates a waterfall braid element into your half-up. Instead of pulling your crown section straight back, you’re creating a braid that runs from one side of your head to the other, with small sections left unbraided in between (creating the waterfall effect). This style is more complicated but absolutely worth the effort if you have time.
How to Get the Look
Start a Dutch braid on one side of your head at your temple. As you braid, periodically release a small section of hair (about the thickness of a pencil) and let it fall freely—this creates the waterfall effect. Continue braiding across to the opposite temple, releasing small sections as you go. When you reach the opposite side, secure the braid with bobby pins tucked behind your ear. The released sections will fall in front of the braid, creating a cascading, romantic effect. Let the rest of your hair flow freely below.
What Makes It Work Best
- Looks incredibly romantic and intentional
- Works beautifully on wavy or curly hair because the texture hides the braid mechanics
- Best for special occasions or dates
- Takes 15-20 minutes
- Photographs beautifully from every angle
Pro tip: Practice this style with a friend first—it’s easier to braid someone else’s hair than your own, so getting comfortable with the technique before you do it on yourself helps prevent frustration.
13. The Bubble Ponytail Half-Up
This style pulls back your crown section into a low ponytail, then creates bubble sections down the length of the ponytail using elastics. Each bubble is created by gathering a section of the ponytail with an elastic, fluffing out the hair slightly, then creating another elastic below it. It’s quirky, modern, and honestly more comfortable than it looks because the elastics distribute the weight throughout the ponytail rather than having all the tension in one spot.
How to Get the Look
Pull your crown section back into a low ponytail at the nape of your neck. Secure it with an elastic. Take a second elastic and place it about 2 inches down from the first one. Gather the hair between the two elastics and gently fluff it out, creating a bubble. Repeat this process down the length of your ponytail, spacing the elastics 2-3 inches apart. Each time you add a new elastic, fluff out the section above it. The number of bubbles depends on how long your ponytail is—shorter ponytails work with 3-4 bubbles, longer ones can have 5-6.
What Makes It Work Best
- Very modern and eye-catching
- Works on all hair lengths and types
- Takes 10-15 minutes
- The bubbles actually help the style feel lighter on your head
- Perfect for creative workplaces or casual outings where you want to make a statement
What you need:
- Multiple small elastics (clear or colored to match your hair)
- Patience and a steady hand
- Hair that’s at least collar-length for this to work well
14. The Feed-In Braid Half-Up
This style starts with a feed-in braid that runs along your hairline from one side to the other, anchoring your half-up section. A feed-in braid is slightly different from a cornrow—it’s created by adding hair gradually as you braid, creating a thinner, more delicate-looking braid that sits on top of your hair rather than incorporating your hair structure. This style works beautifully on textured hair and protective styles.
How to Get the Look
Start at your temple on one side. Take a small section of hair and begin a braid, but instead of incorporating all your hair into large sections, you’re slowly adding small pieces of hair as you braid forward. This creates the feed-in effect. Braid across your hairline to the opposite temple. Secure this braid with bobby pins tucked behind your ear. The braid creates a frame for your face and anchors your half-up. Let the rest of your hair flow freely below.
What Makes It Work Best
- Creates a very polished, detailed appearance
- Works beautifully on natural hair and protective styles
- Takes 15-20 minutes depending on your braiding speed
- The braid becomes a decorative element, not just functional
- Lasts several days if properly maintained
What to know: Feed-in braids are easier to do on someone else’s head than your own, so this might be a style you ask a friend or professional to help with initially until you get the hang of it.
15. The Half-Up with Faux Undercut Illusion
This modern style creates the illusion of an undercut by pulling back your crown section and styling the bottom section of your hair in a way that emphasizes volume or contrast. You’re not actually shaving or cutting your hair—you’re creating a visual effect through styling and sectioning. This works particularly well on natural hair where you can create visible contrast between the pulled-back section and the voluminous bottom section.
How to Get the Look
Pull your crown section back and secure it smoothly at the nape of your neck using edge control and bobby pins. For the bottom section, create volume by flipping your head upside down and lifting the hair at the roots with your fingers or a pick. You can also create a middle or side part in the bottom section to add visual separation. The contrast between the smooth, pulled-back top and the voluminous, textured bottom creates the undercut illusion without any actual cutting.
What Makes It Work Best
- Very modern and fashion-forward
- Works on natural hair, locs, and braids
- Takes 10-15 minutes
- Looks bold and intentional without permanent styling
- Perfect for people who like the undercut aesthetic but aren’t ready to commit to actually shaving their hair
Quick facts:
- Best on people with thick, textured hair that shows volume easily
- Looks especially striking on natural hair with a defined curl pattern
- Works best with geometric or modern-style clothing
16. The Bouffant Half-Up
This style pulls back your crown section but creates height and volume in the pulled-back portion by teasing or backcombing it before securing it. Instead of a smooth, sleek pull-back, you’re creating a soft, puffy bouffant effect at the crown. This style is more romantic and vintage-inspired than the modern, sleek half-ups.
How to Get the Look
Take your crown section and gently backcomb or tease it at the roots to create volume. Smooth the surface layer slightly with a comb to keep it from looking too fuzzy, but don’t completely flatten the teasing underneath. Gather this voluminous section back and secure it with bobby pins at the crown. The goal is to see height and fullness in the pulled-back section, not a smooth, flat ponytail. Let the rest of your hair flow freely. You can add waves to the bottom section to enhance the romantic vibe.
What Makes It Work Best
- Creates a romantic, vintage-inspired look
- Works on medium to thick hair
- Takes 10-15 minutes
- Pairs beautifully with soft waves in the bottom section
- Perfect for special occasions or when you want a more feminine vibe
Pro tip: Use a teasing brush or an old toothbrush rather than a regular comb—these have tighter bristles that grip the hair better for backcombing. Gently does it; you’re not trying to rip out your hair.
17. The Metallic Wrap Half-Up
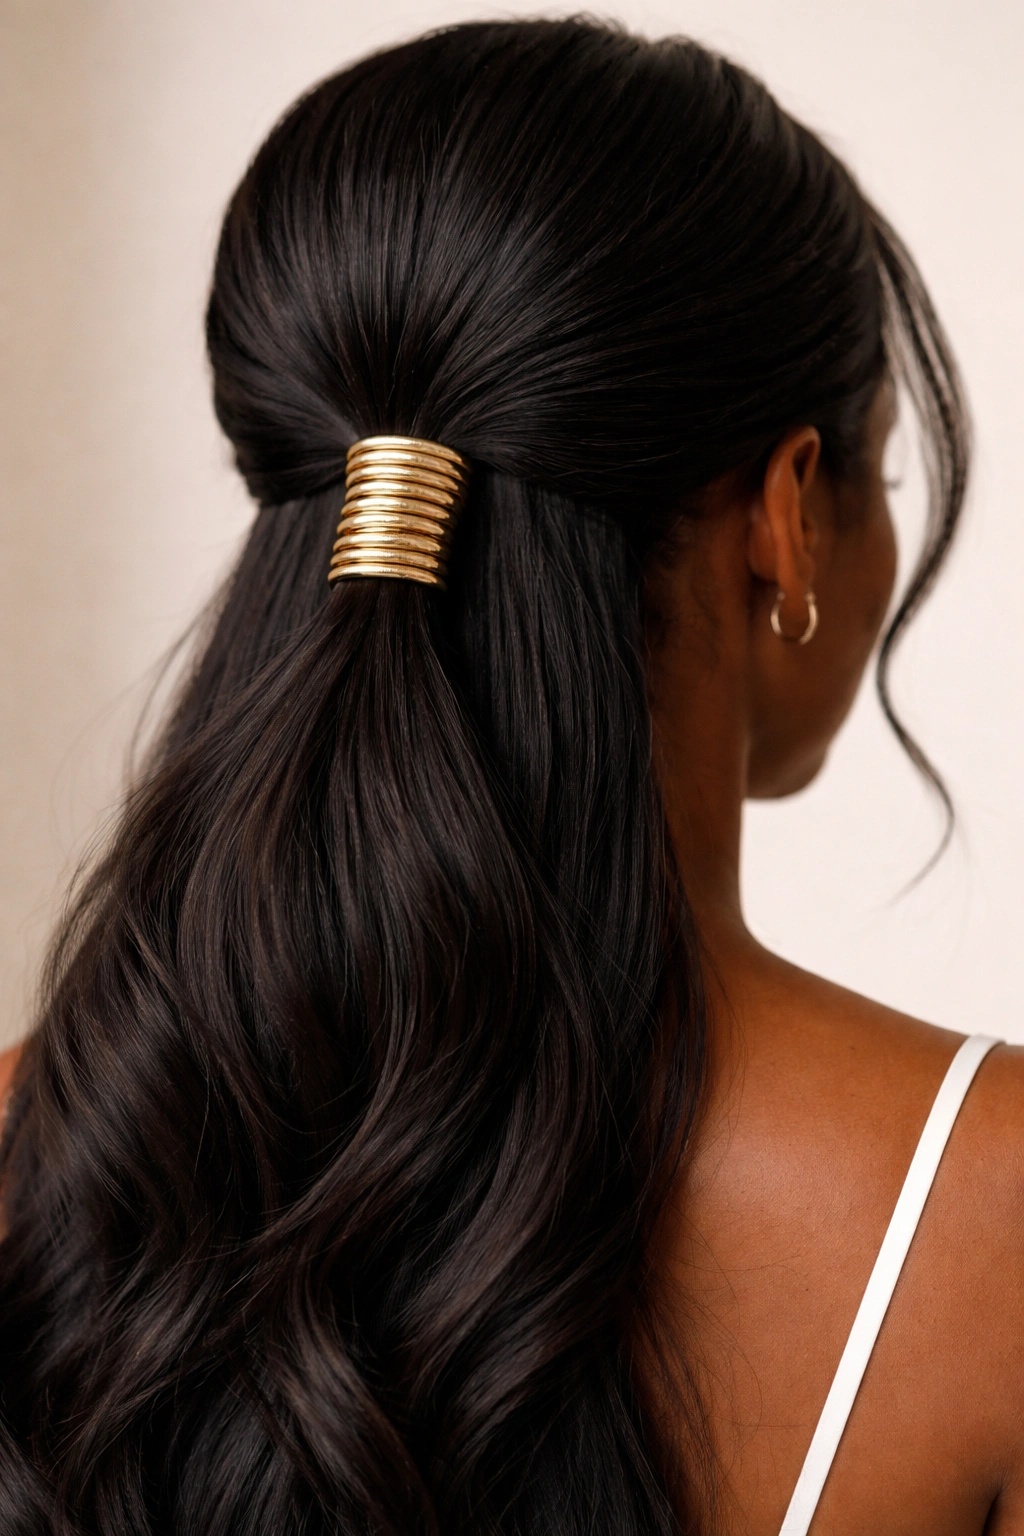
This style secures your half-up using a metallic wrap instead of elastics or bobby pins. A metallic wrap is literally a thin piece of metal or metallic-colored string that you wrap around the base of your half-up section to hold it in place while creating a modern, jewelry-like detail. This is an unexpected way to secure a style and instantly makes it feel more polished.
How to Get the Look
Pull your crown section back into a low ponytail. Instead of using an elastic, wrap a metallic wrap (gold, silver, or copper works best) around the base of the ponytail several times, pulling it tight so it holds the hair securely. Tuck the ends of the wrap underneath the hair so they’re hidden. The wrap becomes a visible accessory and statement piece. For extra security, you can use an elastic underneath the wrap, but if your hair is thick, the wrap alone may hold everything in place.
What Makes It Work Best
- Creates a very modern, intentional look
- Works on all hair types
- Takes about 7-8 minutes
- The metallic wrap coordinates with jewelry and accessories
- Perfect for professional settings or dates where you want something polished and unexpected
What you need:
- A metallic wrap (available online or in beauty supply stores)
- Hair that’s thick enough to hold the wrap securely, or an elastic to go underneath
- Optional: clear nail polish to prevent the wrap from unraveling if it’s not the highest quality
18. The Sculptural Half-Up with Negative Space
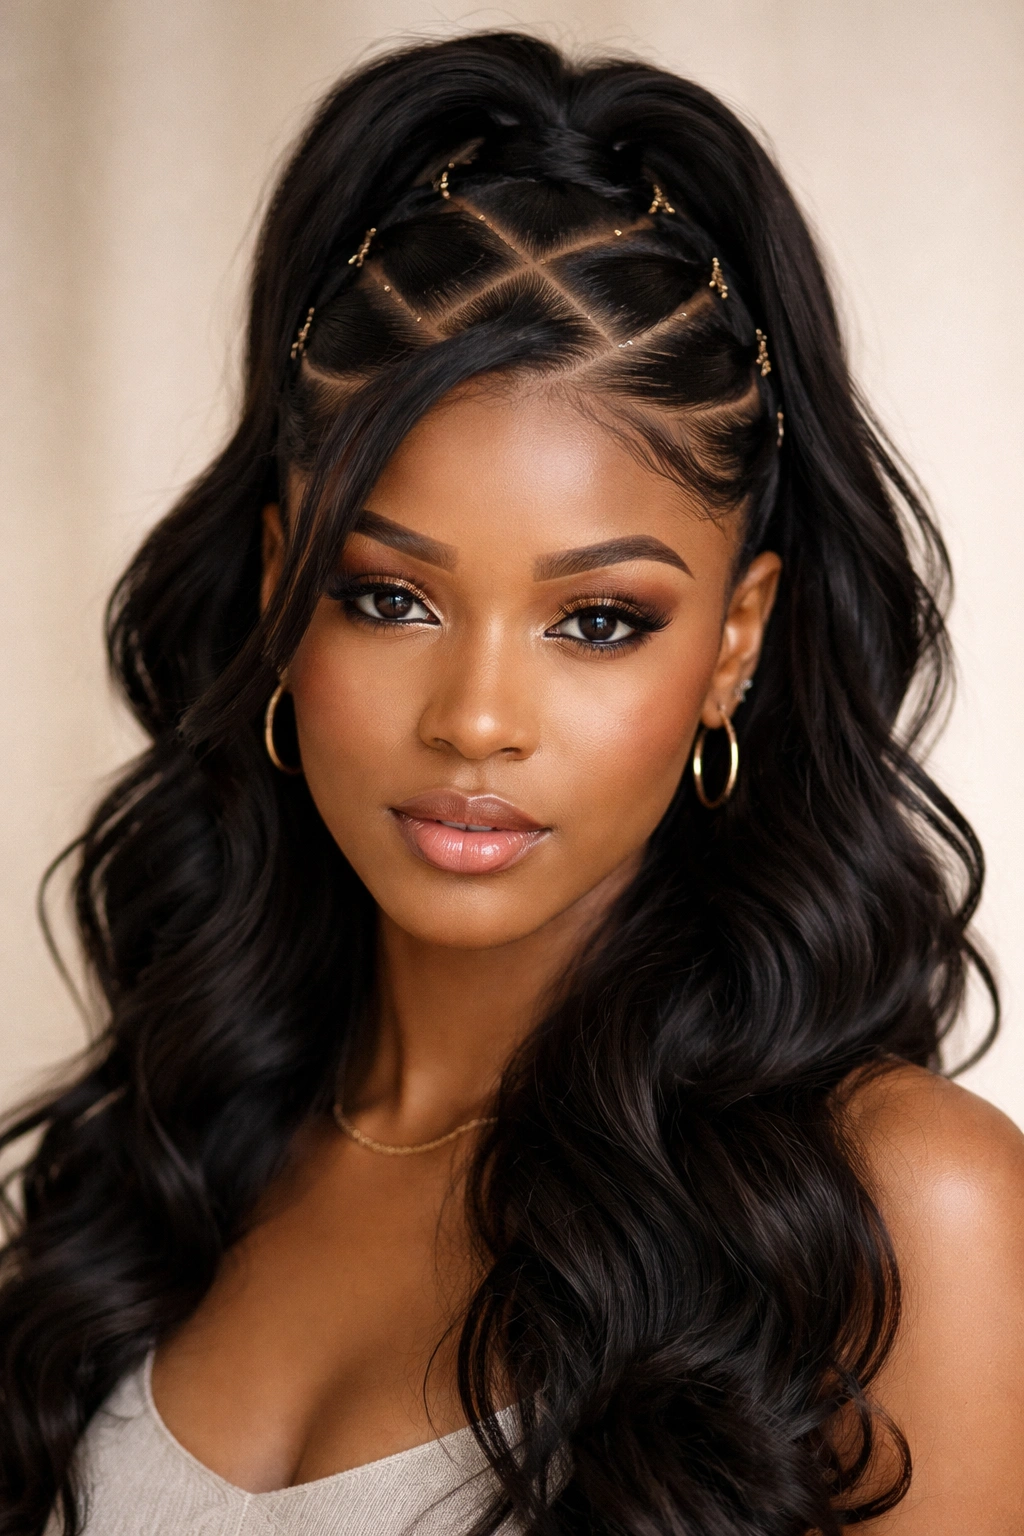
This final style is about creating intentional negative space in your pulled-back section, making a style that looks like art as much as fashion. Instead of pulling back a solid section of hair, you’re pulling back select pieces, leaving gaps and creating geometric patterns. This requires more planning and precision but results in a truly unique, conversation-starting style.
How to Get the Look
Instead of taking a continuous section of hair from ear to ear, divide your crown into geometric zones. Pull back alternating sections, leaving sections unpulled to create a pattern. For example, you might pull back a center section and two small side sections, leaving strips of hair loose between them. Secure each pulled section separately with bobby pins. The effect is sculptural and modern, with negative space as an intentional design element rather than something to cover up.
What Makes It Work Best
- Creates a truly unique, artistic appearance
- Works beautifully for special events or creative settings
- Takes 15-20 minutes because of the precision required
- Works on straight, wavy, curly, and textured hair
- Photographs beautifully from every angle
Pro tip: Sketch out your pattern on a piece of paper before you start styling, or practice on yourself a few times before you do this for an important event. The planning ensures your pattern is symmetrical and intentional.
Final Thoughts
Half up, half down styles work because they solve a real problem—you need your hair out of your face without committing to a full updo. But these 18 styles show that solving a practical problem doesn’t mean settling for boring. From the simple five-minute crown pull-back to the intricate sculptural designs, there’s a half-up style for every hair type, skill level, and occasion.
The truth is that most of these styles get easier the more you do them. Your first twisted crown might take 15 minutes, but by the fifth time, you’re doing it without thinking. That’s the real power of having multiple half-up options in your styling toolkit—you find the ones that feel natural to your hands and your hair, and they become the automatic reach when you’re getting ready.
What matters most is picking styles that work with your hair’s natural texture and behavior, not against it. Whether your hair is naturally coily, loc’d, braided, straight, or textured, these styles adapt. Start with the simpler versions—the crown pull-back, the low ponytail, the twisted crown—and build from there. Once you’re comfortable with the basics, you can experiment with the more intricate braided and sculptural options. Give yourself permission to do imperfect versions of these styles. Your hair doesn’t have to be flawless for the style to work; in fact, a slightly undone vibe often looks more intentional and modern than a perfected-to-death look.