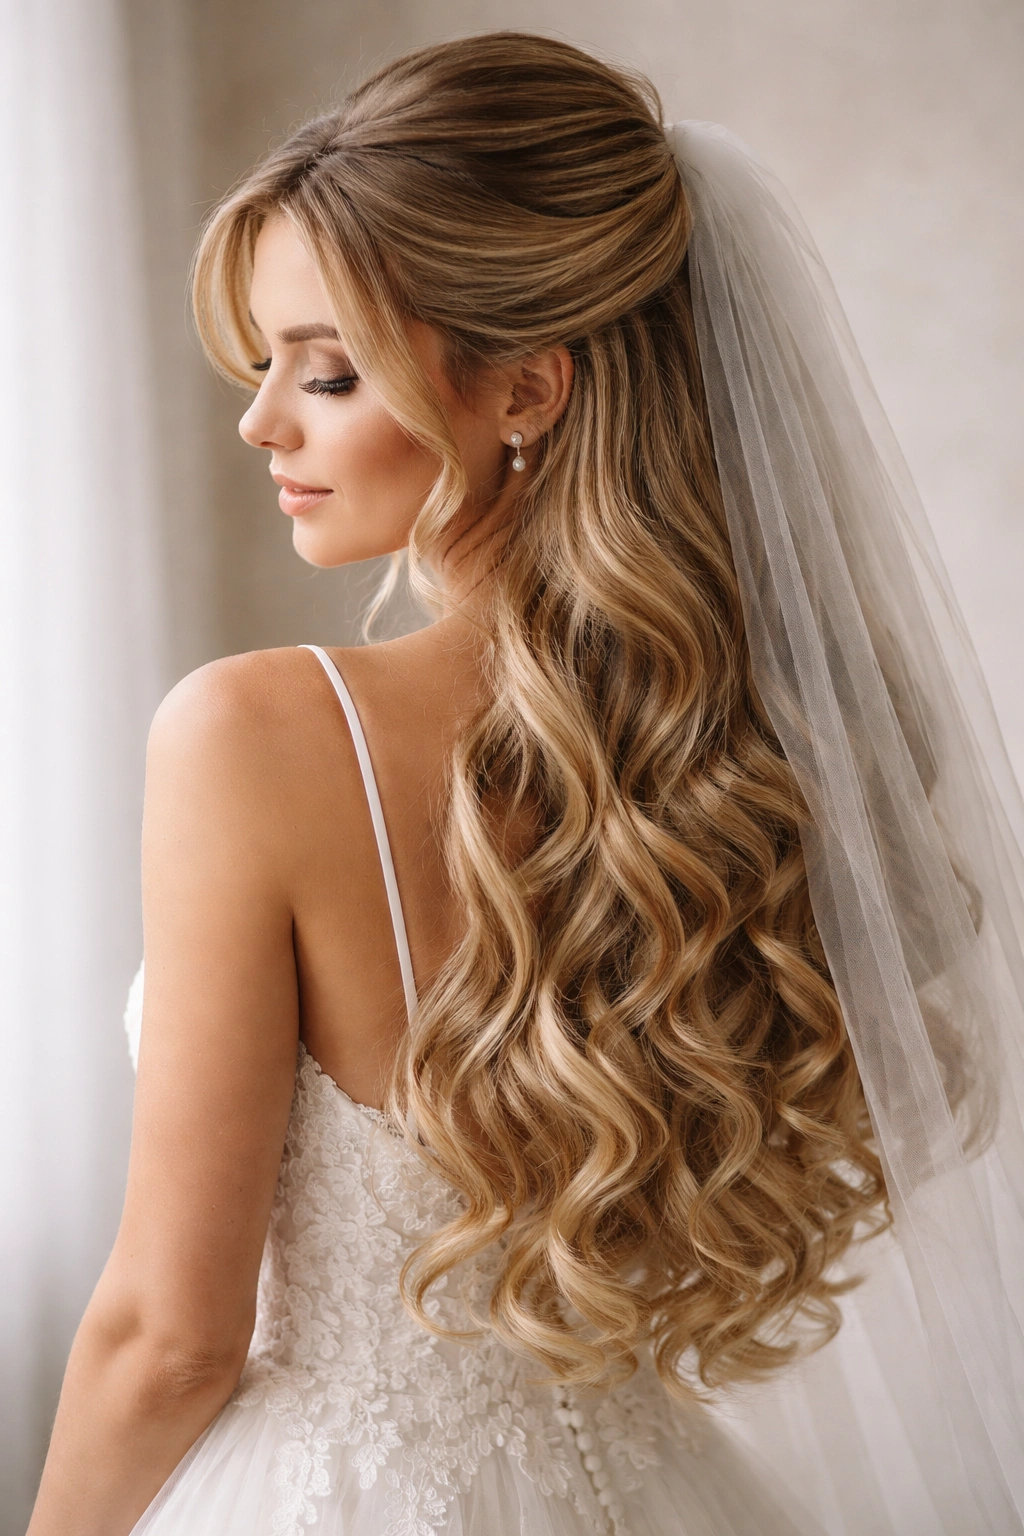
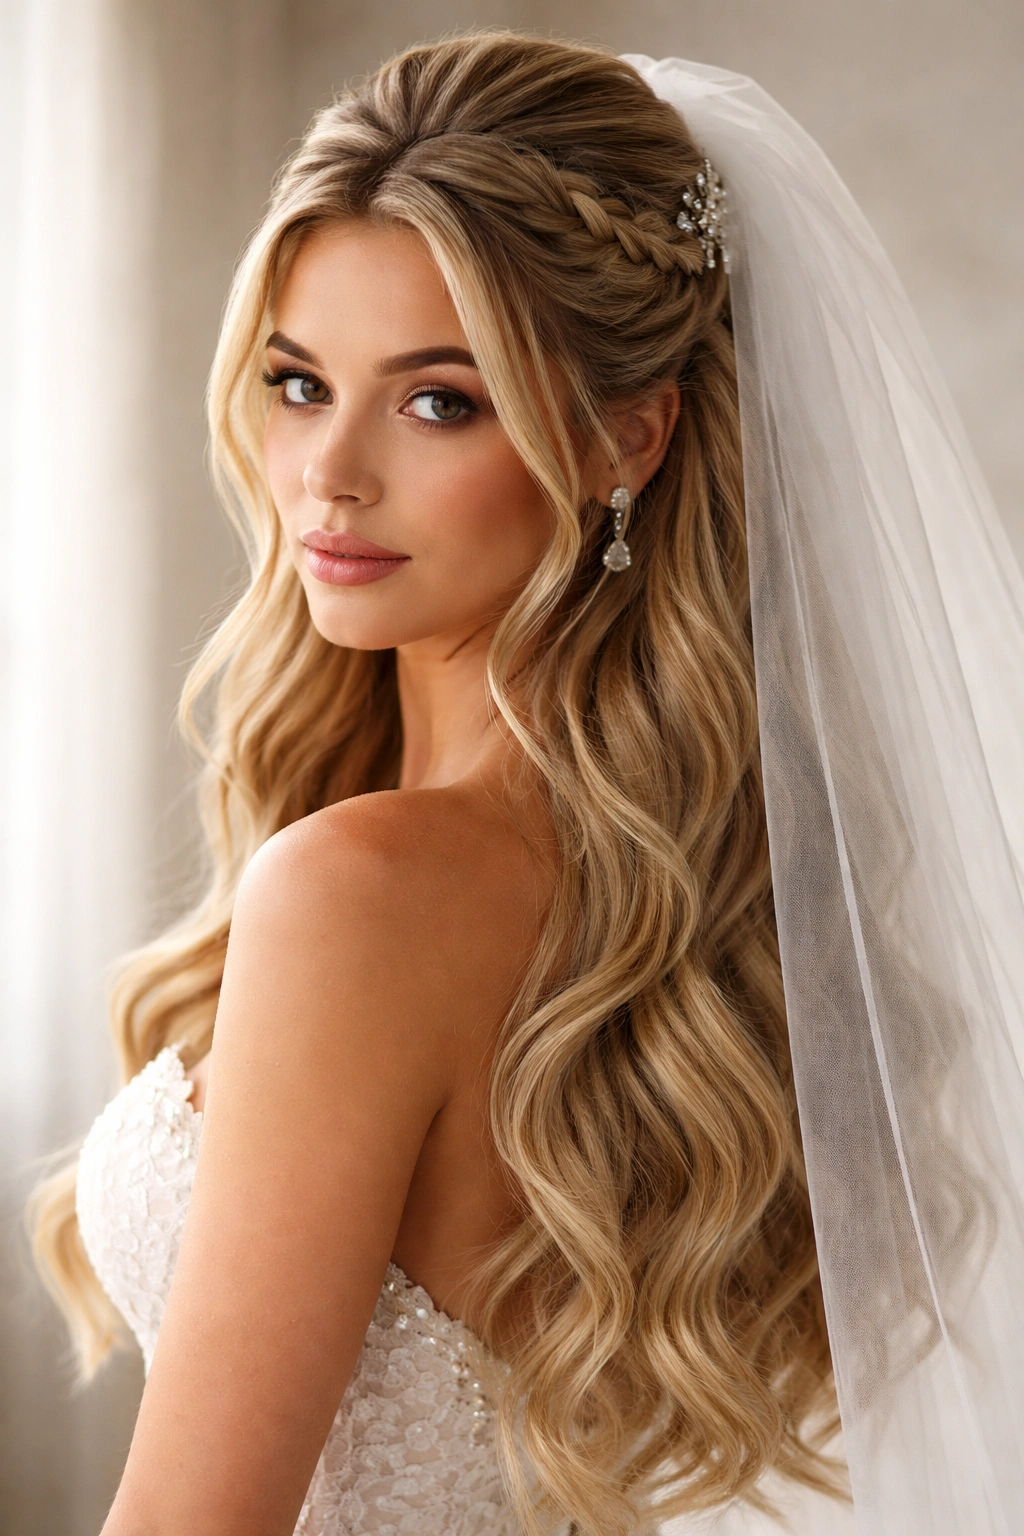
The half up half down hairstyle with a veil represents a perfect marriage of elegance and softness—it’s romantic without being overly formal, and it frames the face beautifully while showcasing the length and texture of your hair. Whether you’re planning a wedding, a formal event, or just exploring sophisticated styles, this combination offers endless versatility. The veil adds drama, dimension, and a touch of tradition that transforms the entire look, while the half up structure keeps hair off the face and neck while maintaining volume and movement. What makes these styles so compelling is that they work across different hair textures, face shapes, and personal aesthetics—from minimalist modern brides to those drawn to ornate vintage charm.
The key to pulling off a half up half down look with a veil is understanding how the two elements interact. The veil placement can anchor the hairstyle or float above it, the half up section can be simple or intricately structured, and the down portion can flow as smooth waves or textured curls. These 15 styles showcase the range of possibilities, each offering a distinct visual impact while maintaining that signature balance between polish and effortlessness.
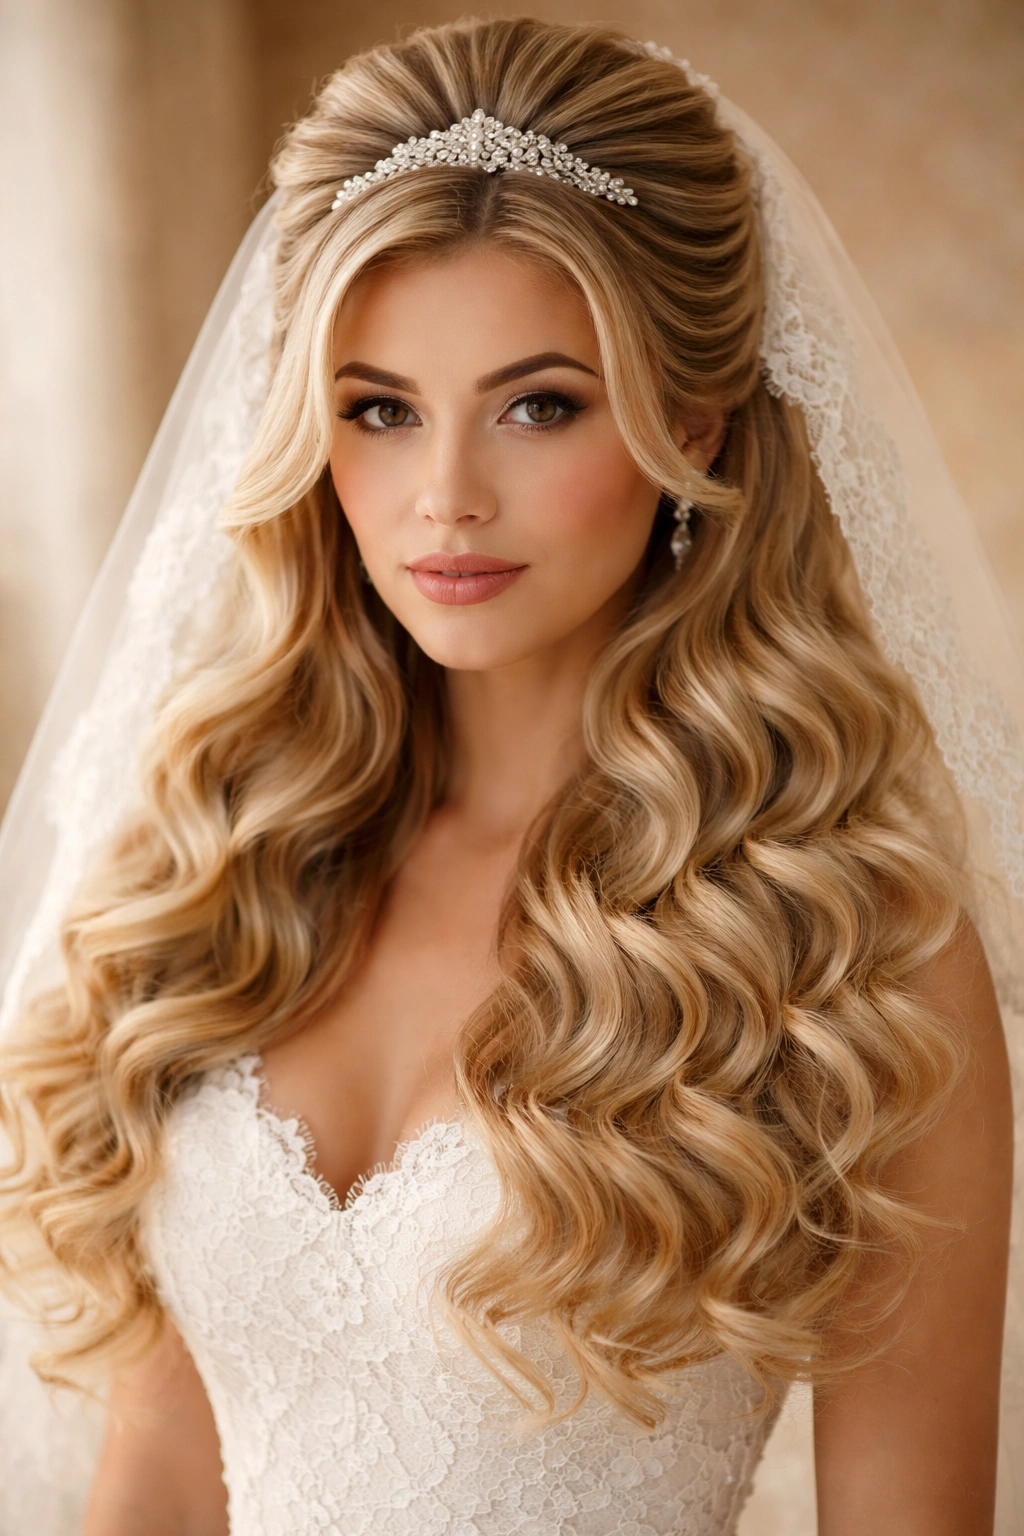
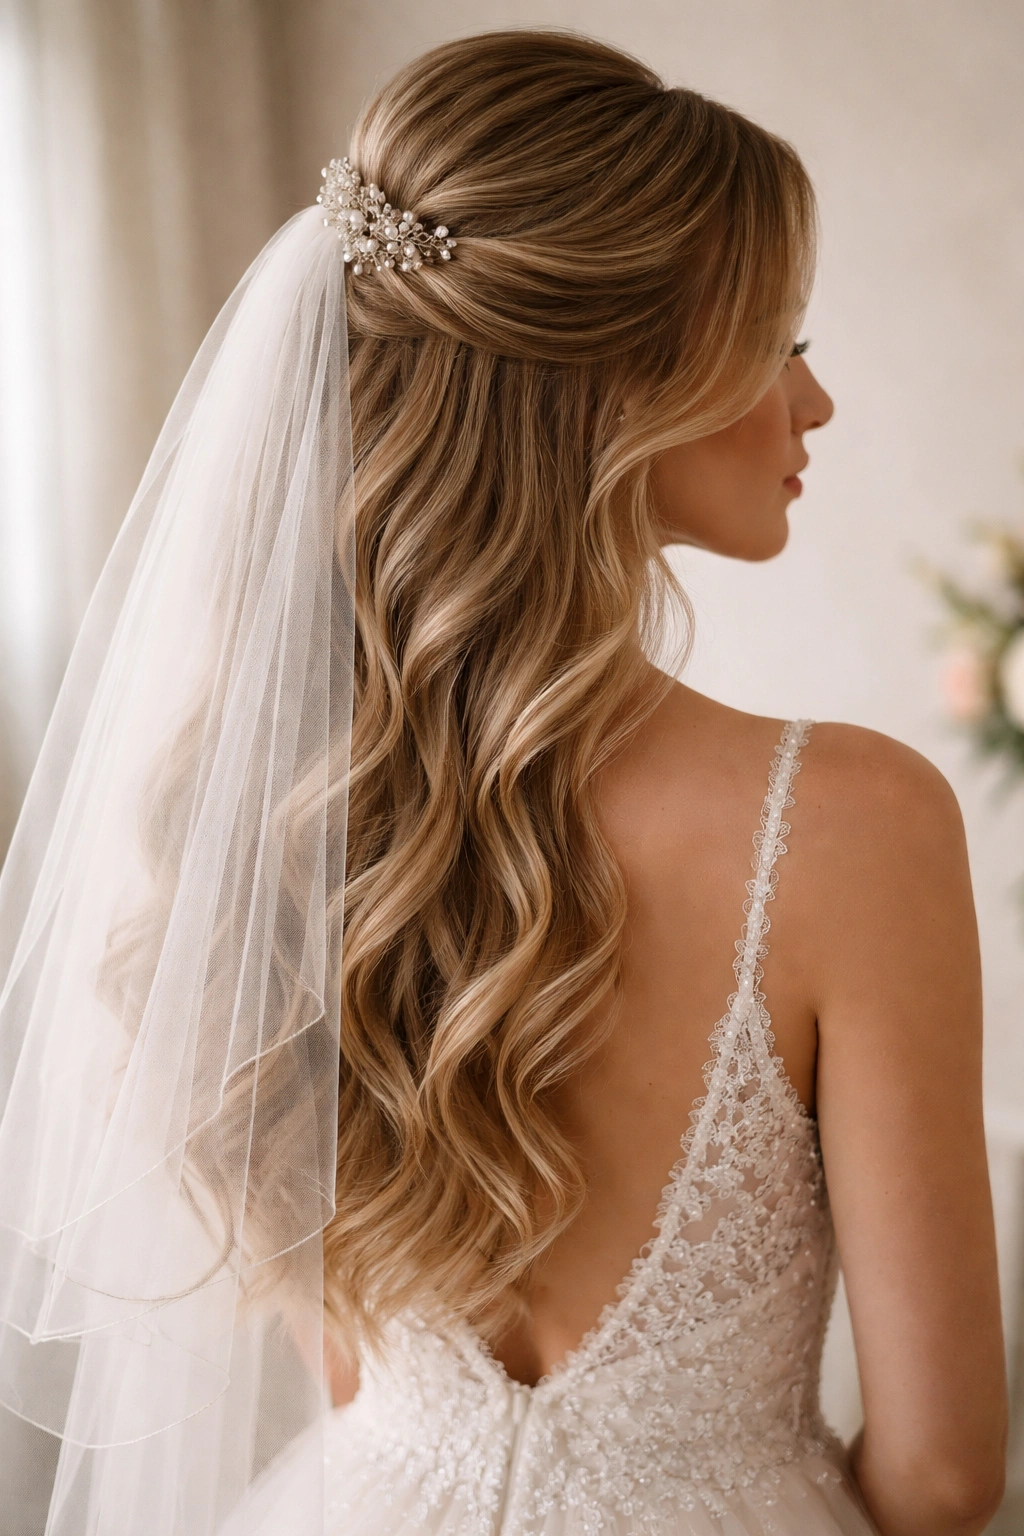
1. Classic Romantic Half Up with Layered Veil
This timeless style pairs soft, full-bodied waves with a half up structure that feels both polished and relaxed. The crown area is gently gathered and secured with an elegant clip or comb, allowing the majority of your hair to cascade down your back. The veil sits just above the gathered section, creating distinct layers that frame the face and add dimension without overwhelming the hairstyle.
Why This Look Endures
The classic romantic style works because it flatters nearly every face shape and complements traditional and modern aesthetics equally. The soft waves catch light beautifully, especially with movement, and the layered veil adds a sense of occasion without looking overly costume-like. This is the go-to choice for brides who want to feel like themselves but elevated.
How to Create It
- Start with clean, dried hair and apply a heat protectant spray throughout
- Create loose waves using a 1.25-inch curling iron, wrapping sections away from the face
- Gather hair from the temples to just behind the crown, twisting gently as you bring the sections together
- Secure with a decorative comb or pearl-studded clip
- Attach the veil to the comb or clip, positioning it so the veil begins just above the gathered hair
- Gently tousle the waves with your fingers to enhance texture and hide any visible bobby pins
Pro tip: Apply a dry texture spray or light sea salt spray to your waves before gathering the half up section—this makes the texture grip better and prevents slipping throughout the day.
2. Sleek Low Ponytail with Voluminous Cathedral Veil
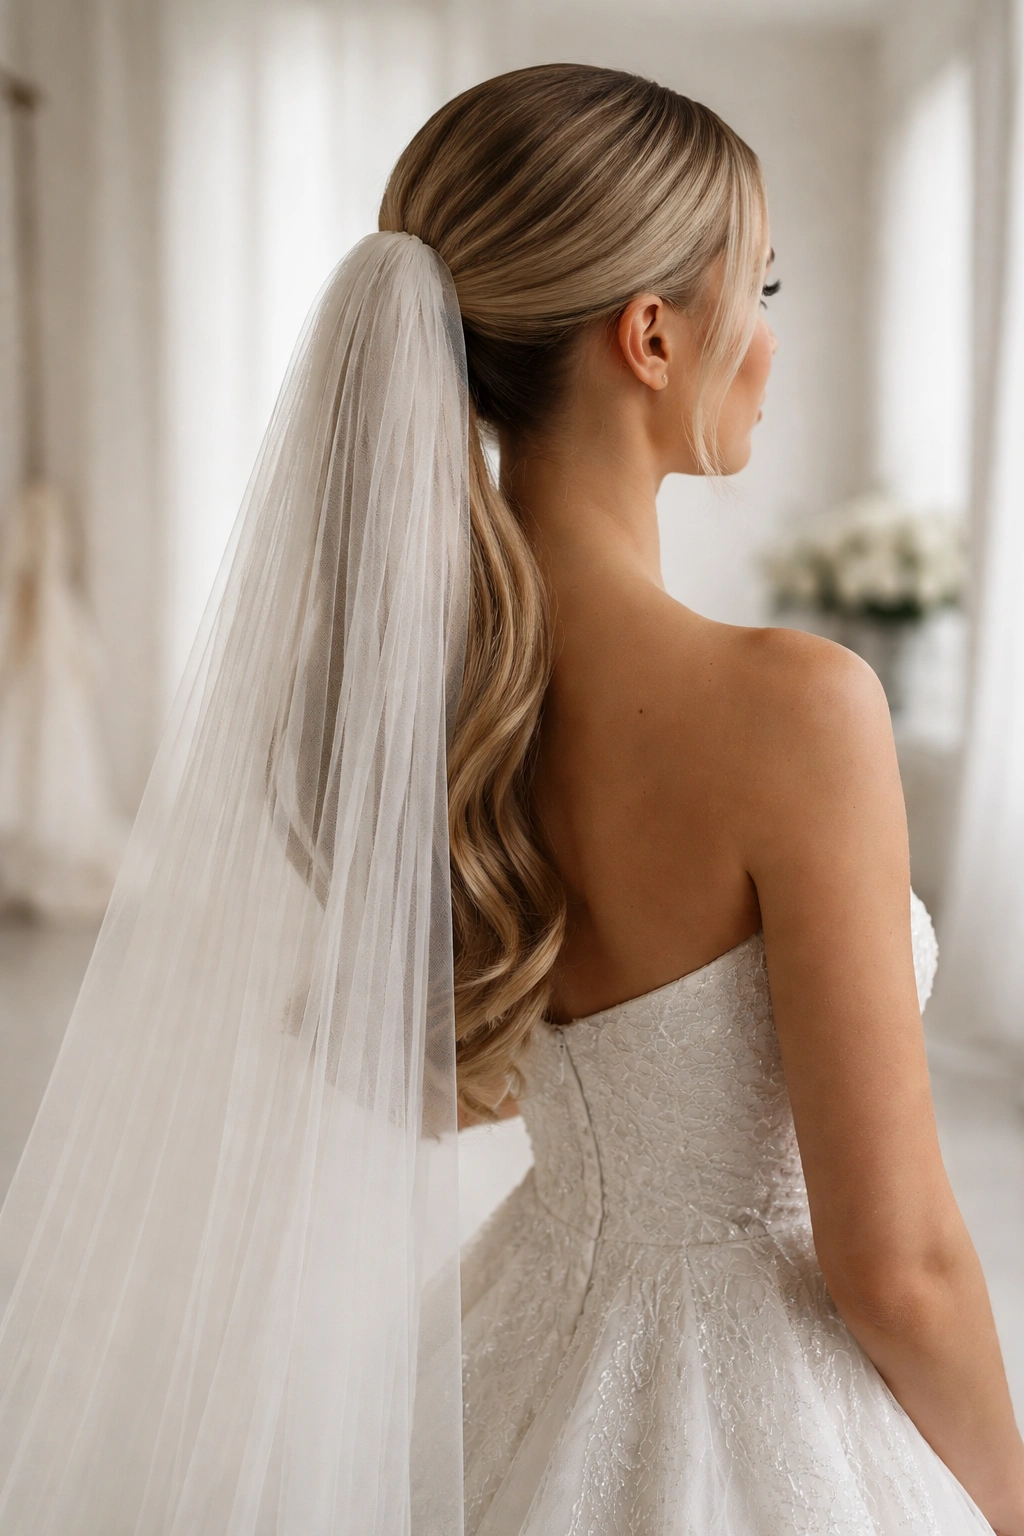
This style creates striking contrast by combining the sharp geometry of a low, smooth ponytail with the romantic drama of a full cathedral-length veil. The hair at the crown is smoothed into a polished base, gathered low at the nape, while the veil attaches directly to the elastic or comb, creating a dramatic waterfall effect from that single anchor point. The voluminous length of the veil becomes the star of the composition.
What Makes It Impactful
The sleekness of the ponytail emphasizes the bone structure of the face and allows the veil to take center stage. This approach works especially well if your veil features intricate beading, lace detailing, or a decorative edge that deserves visibility. The contrast between the refined simplicity of the hair and the grandeur of the veil creates a sophisticated, high-impact effect.
Step-by-Step Application
- Apply smoothing serum to damp hair and blow dry using a paddle brush for a sleek finish
- Use a fine-tooth comb and edge control product to smooth baby hairs and flyaways
- Gather hair into a low ponytail at the base of the skull, twisting slightly to create dimension within the smooth base
- Wrap a small section of hair around the elastic to conceal it
- Secure the veil comb directly into the ponytail base
- Run your fingers through the veil to release any tangles and ensure it falls evenly
Worth knowing: This style requires hair that’s genuinely sleek, so investing in a professional blowout the day before (or morning of) your event ensures the polished foundation this look demands.
3. Half Up Twisted Knot with Delicate Fingertip Veil
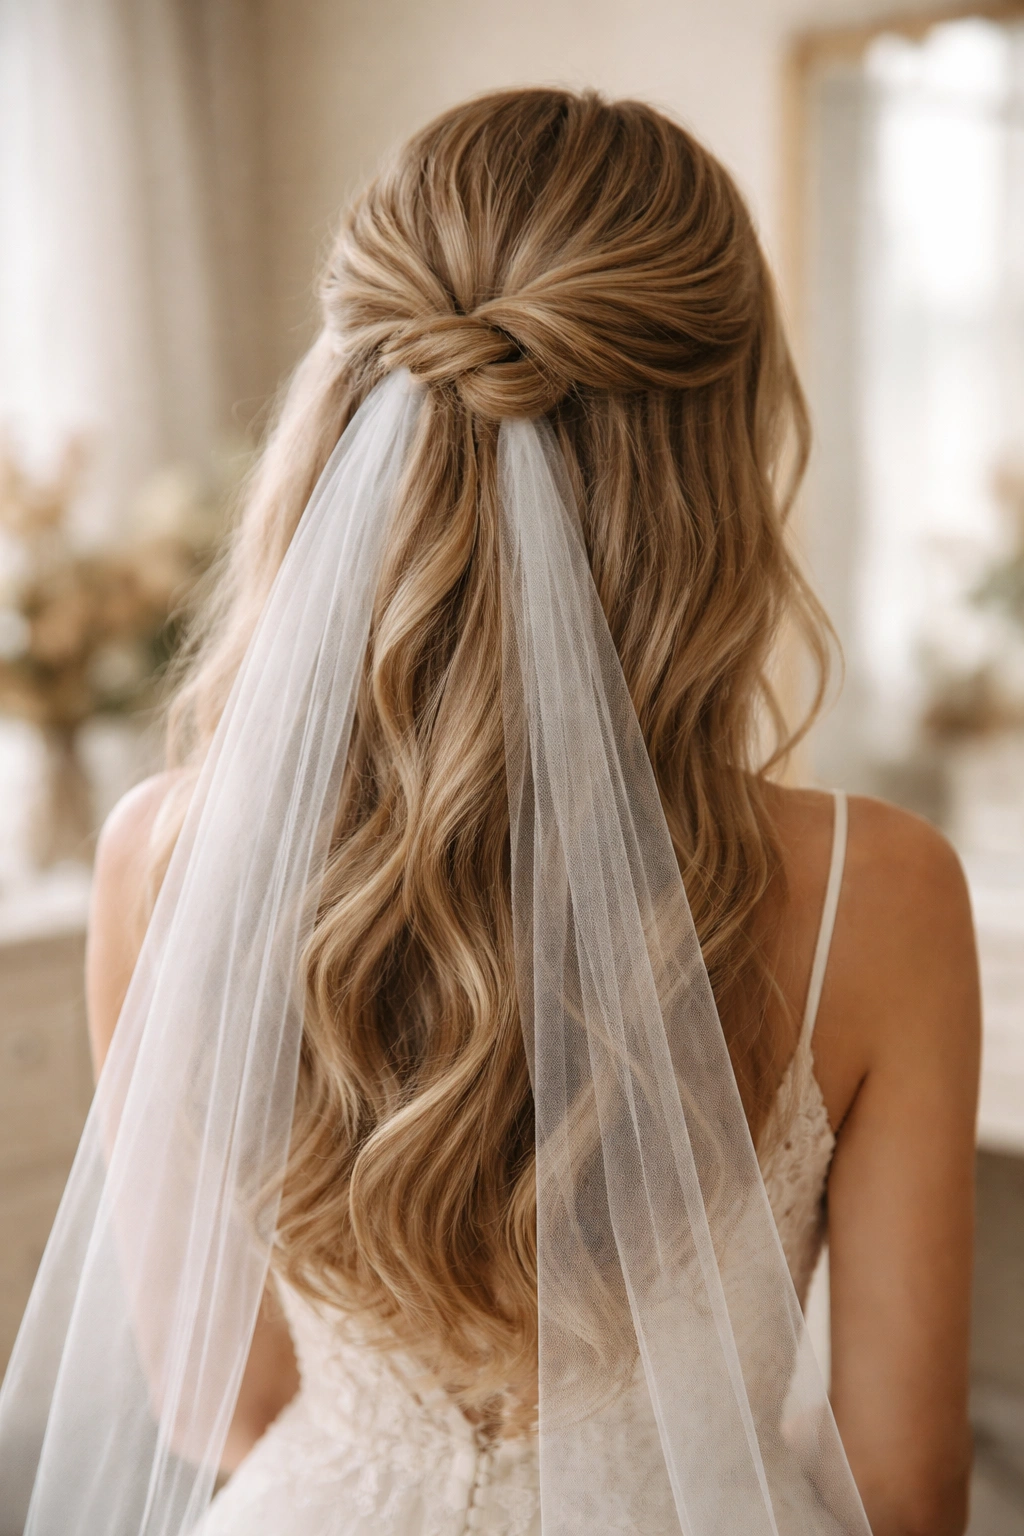
Two sections of hair are twisted from the temples and brought together at the crown, forming a soft knot that serves as the anchor point for an elegant fingertip-length veil. This style bridges the gap between intricate and wearable—it looks more involved than a simple gather but requires no complex braiding skills. The twisted sections frame the face with gentle movement while the knot at the back provides structure.
Why Twists Elevate the Style
Twists catch light differently than straight sections and read as more intentional and refined. They’re also more forgiving than perfectly smooth gathered sections because the texture naturally hides minor imperfections. The knot at the crown creates a focal point that complements the veil placement beautifully, especially if your veil features decorative combs or ornamental detailing.
Building the Twist Knot
- Section off hair from the temple on one side, starting from the hairline
- Twist this section loosely, moving toward the back of the head and gathering additional strands as you twist
- Repeat on the opposite side, twisting in the same direction
- Bring both twisted sections together at the crown and tie loosely into a knot
- Gently pull sections of each twist to create texture and soften the overall look
- Secure with bobby pins placed parallel to the knot so they’re invisible
- Attach the veil comb or clip through the knot structure
Insider note: Fingertip veils (which fall to the tips of your fingers when arms are at your sides) pair perfectly with this style because they don’t overwhelm the intricate work you’ve done with the twists.
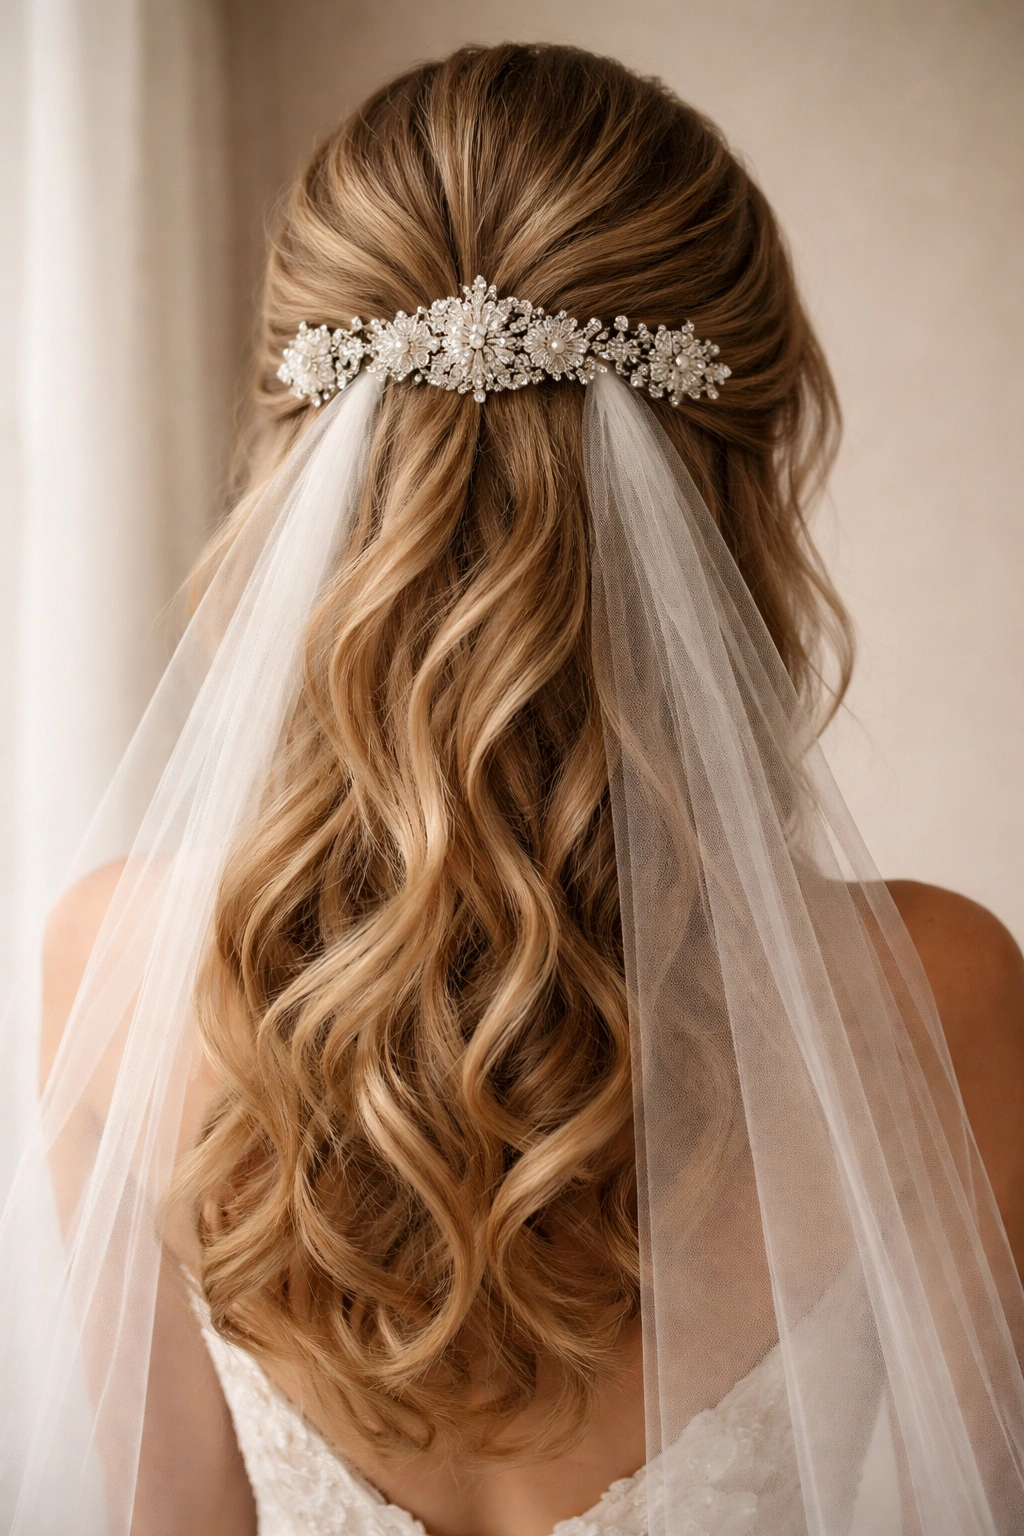
4. Soft Waves with Scattered Pearl-Adorned Half Up
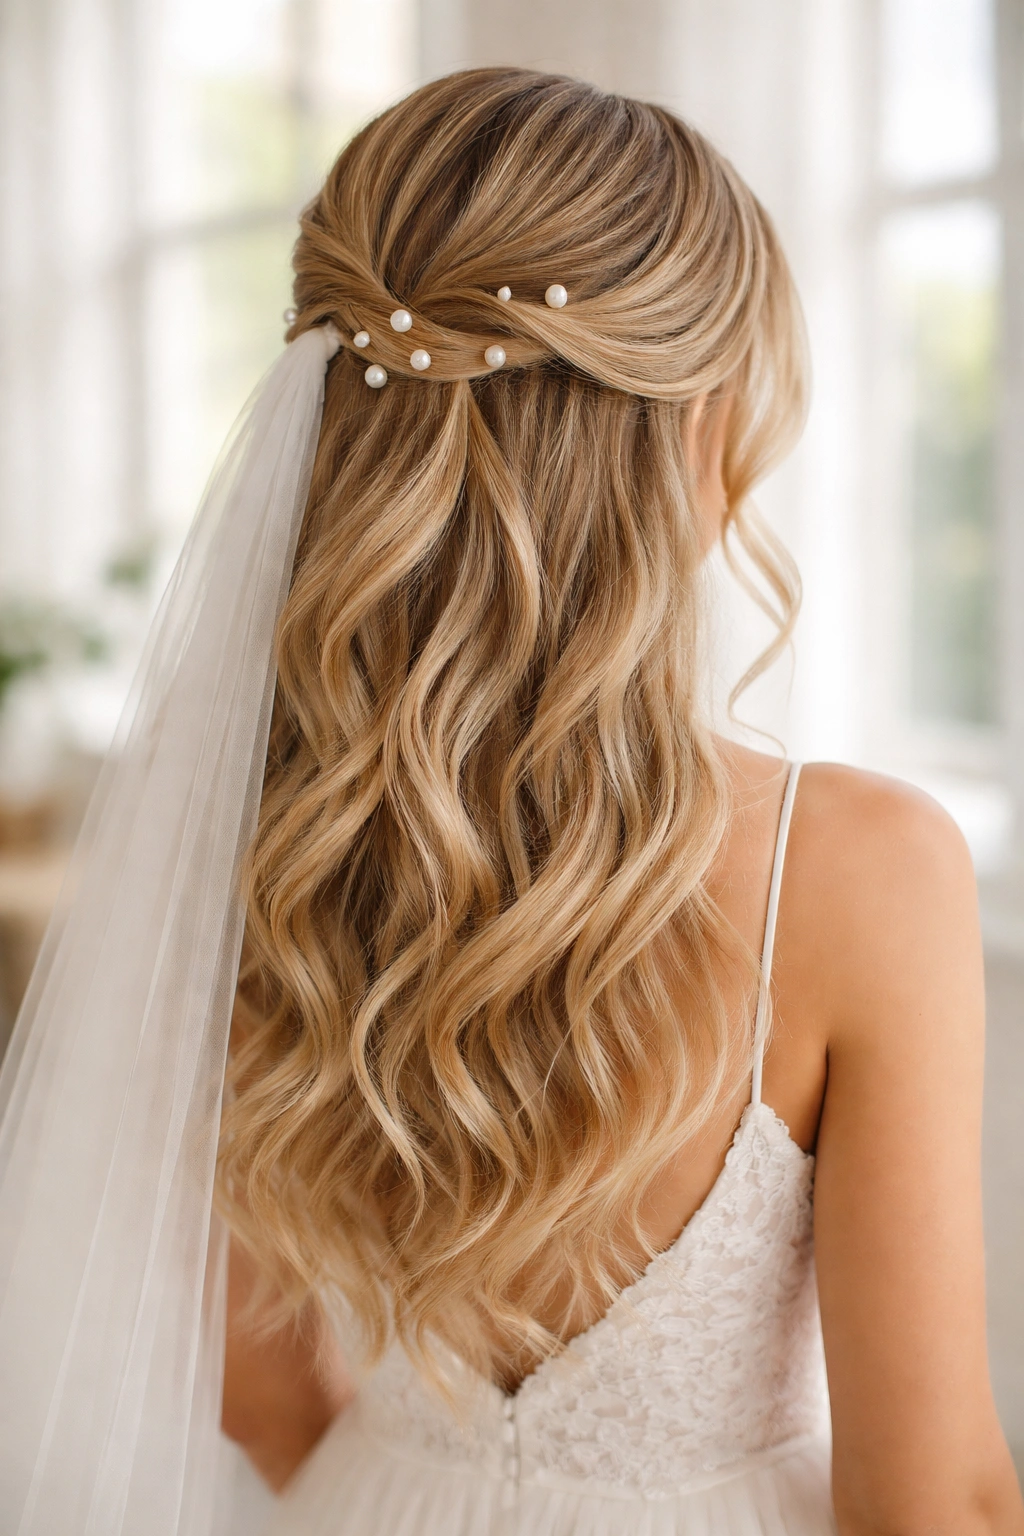
Hair is styled in loose, romantic waves throughout, with the half up section secured using scattered hair pins adorned with small pearls or crystals rather than a single clip. These delicate decorative pins are placed throughout the gathered area, creating a subtle sparkle effect that catches light from multiple points. The down portion remains fully wavy and voluminous, creating an ethereal, dreamy aesthetic.
The Appeal of Scattered Adornment
Rather than relying on a single focal point, this approach distributes visual interest across the entire back of the head. The scattered pearls or crystals add glamour without the graphic weight of a large decorative comb. This style feels contemporary and playful while remaining undeniably elegant. The distributed adornment also photographs beautifully from multiple angles.
Creating Scattered Pearl Placement
- Style your entire head in loose waves using a large barrel curling iron
- Section off hair from the ears back, creating the half up portion
- Twist or braid this section very loosely—or gather it without twisting for maximum softness
- Instead of securing with one clip, use 3-4 pearl-adorned bobby pins placed at intervals throughout the gathered section
- Keep pins parallel to each other so they create a visual line rather than appearing random
- Attach your veil to one of the central bobby pins so it anchors securely without shifting
- Gently pull waves apart with your fingers to enhance texture and volume
Pro tip: Choose pearl pins in varying sizes to create visual rhythm—larger pearls spaced with smaller ones reads more intentional than uniform sizing.
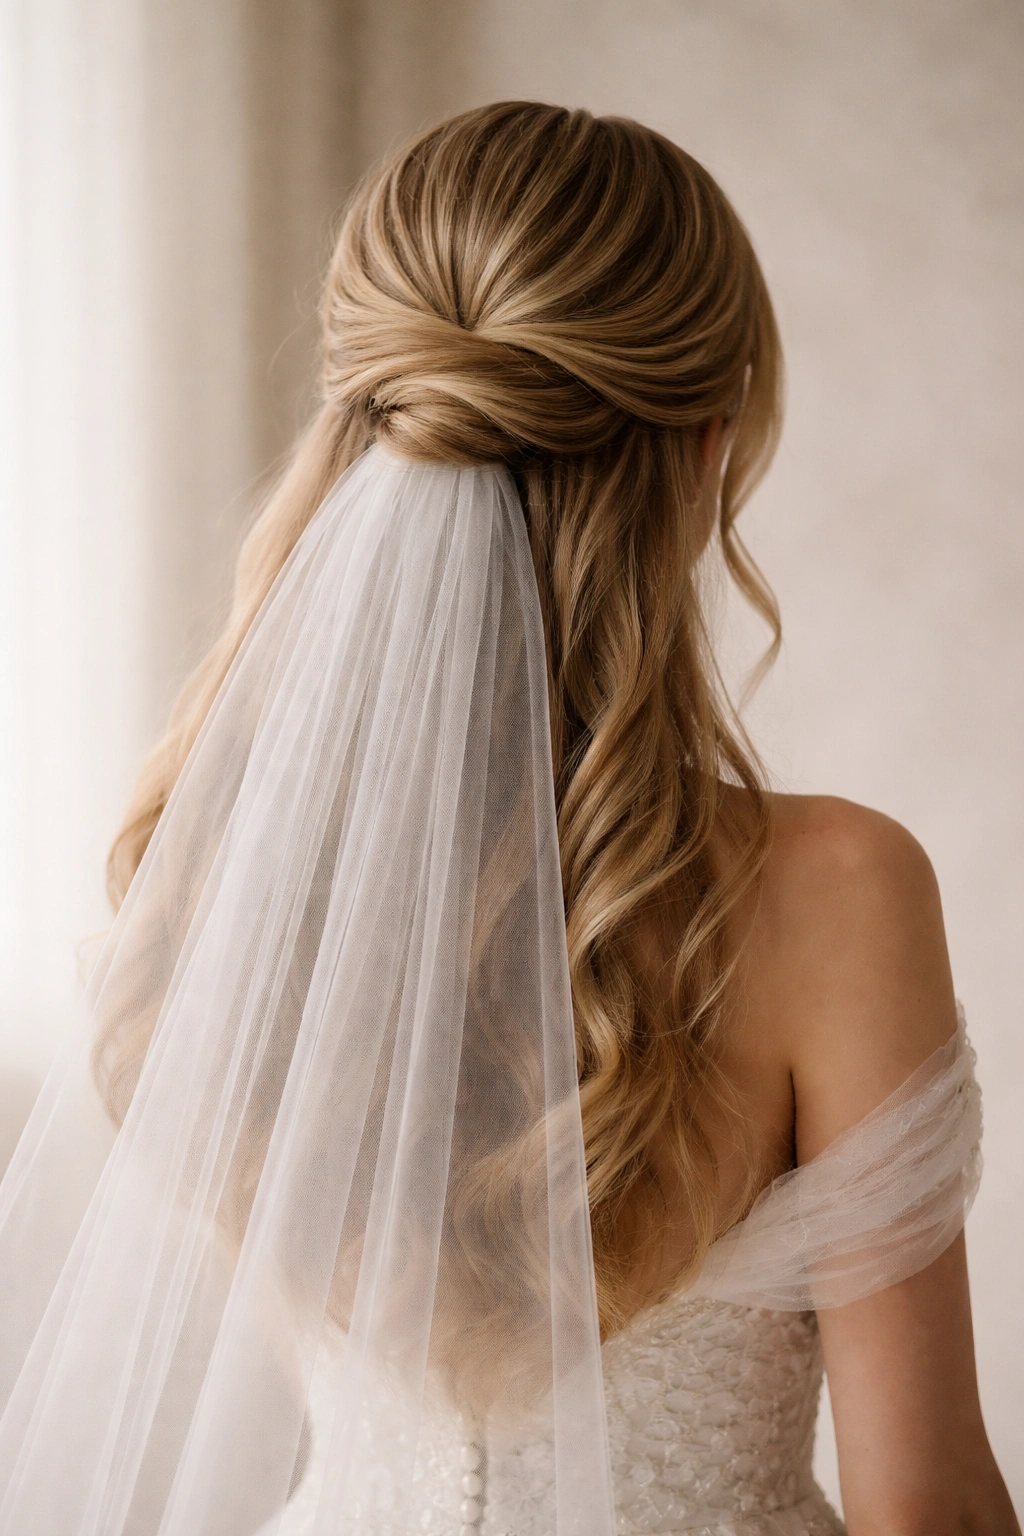
5. High Twisted Half Up with Veil

Hair is gathered at the crown using the same twisted technique as style #3, but positioned considerably higher on the head for a more youthful, energetic aesthetic. The high placement creates the impression of more volume and fullness throughout the down-flowing portion. The veil sits perched high as well, creating a balanced proportion that suits heart-shaped or longer face shapes particularly well.
How Placement Changes the Impact
Moving the half up section higher instantly changes the energy and flatters different features. A high half up works beautifully if you have a longer face and want to create the illusion of proportion. It’s also the right choice if you’re wearing a lower-cut dress or want the focus on décolletage rather than the back of the head. The higher placement makes the overall silhouette feel lighter and more contemporary.
Positioning for the High Half Up
- Start your side sections closer to the top of the ear rather than the temple
- Twist each section toward the back, but gather them higher on the crown—approximately where you’d place the crown of a tiara
- Create a knot or twisted loop at this higher point
- Ensure the remainder of your hair falls freely below this point with maximum volume
- Attach the veil so it begins just above the twisted knot, creating clean layering
- Use volume powder or a texturizing spray underneath the gathered section to make the lower portion appear fuller
Worth knowing: The higher the half up sits, the more important it is that the hair beneath it has substantial volume and texture—smooth, flat hair below a high gather can look thin and sparse.
6. Braided Half Up Crown with Flowing Veil
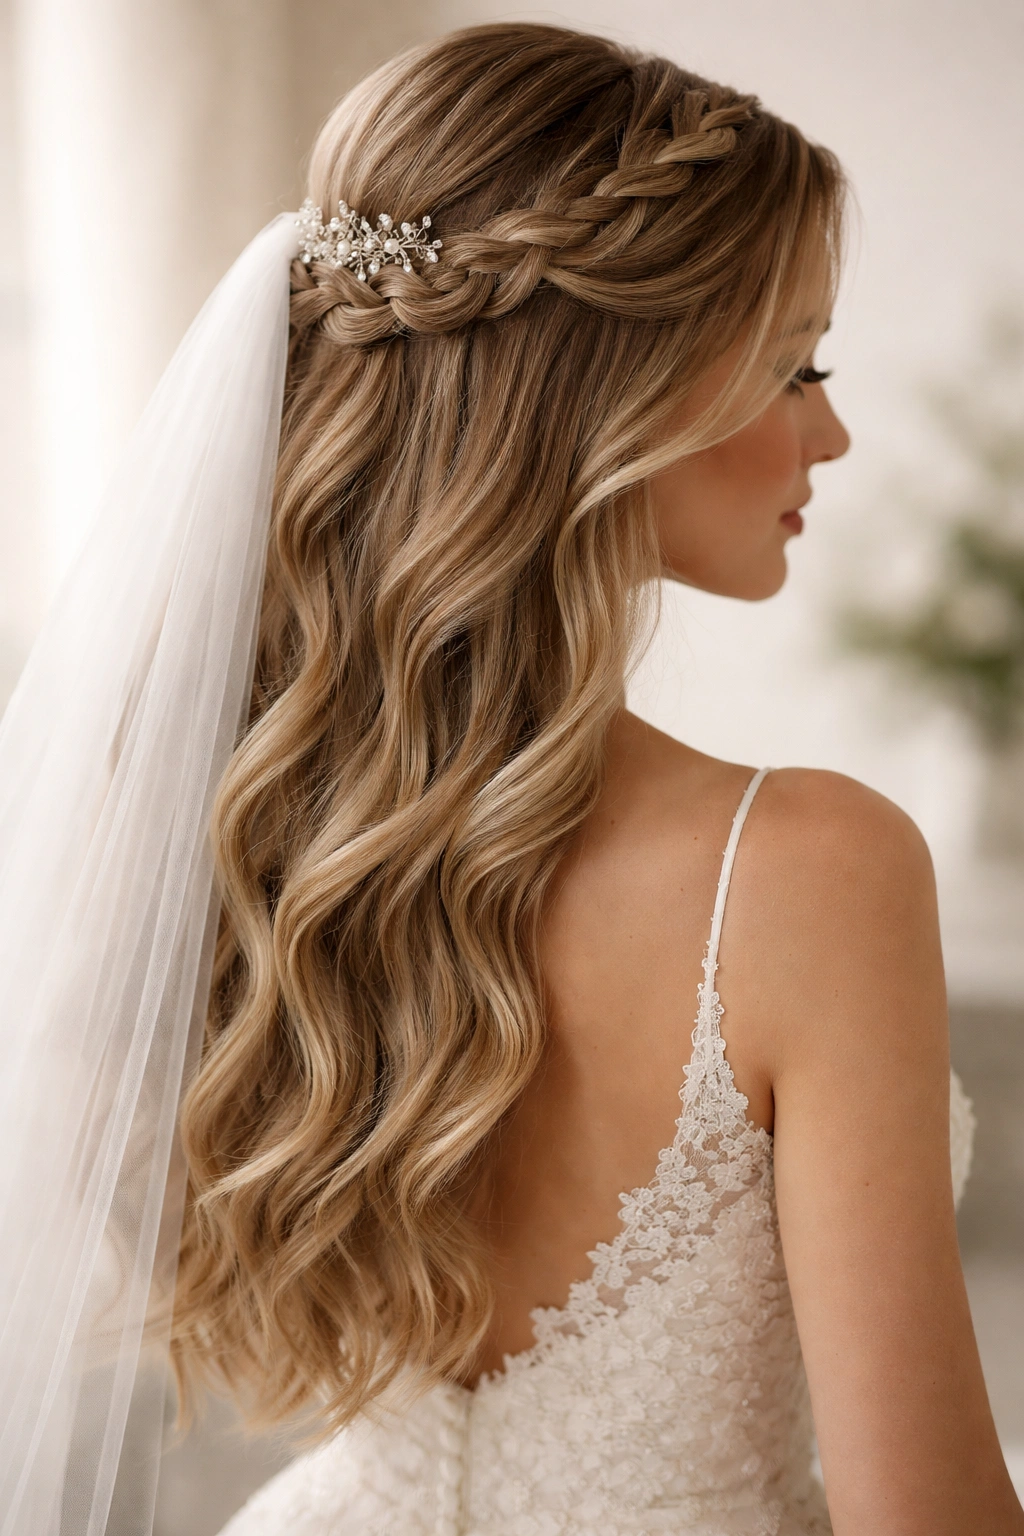
Two Dutch or French braids start at the sides and curve toward the back of the head, meeting at the crown where they’re secured together and anchored with a decorative comb. The braids create an actual crown effect that sits elegantly atop the head while the veil attaches to the comb at the crown meeting point. The down-flowing hair remains in waves or curls, creating beautiful contrast with the structured braids.
The Drama of Braided Crowns
A braided crown reads as more intentional and intricate than other half up styles, making it an excellent choice if you want the hairstyle itself to be a design feature. The braids frame the face and scalp beautifully, and they’re remarkably stable—braid styles hold securely throughout hours of movement and dancing. The structured crown also creates a perfect anchor point for a veil, allowing it to drape gracefully rather than potentially shifting.
Constructing the Braided Crown
- Section off hair starting from one temple, creating a thick subsection
- Begin a Dutch or French braid, incorporating hair as you move toward the back of the head
- Aim for the braid to curve slightly upward, following the natural line of the head
- Repeat on the opposite side with a matching braid
- Meet both braids at the crown and secure together using a decorative comb
- Gently pull the braids slightly to loosen them—this creates a softer, more romantic appearance
- Keep the lower portion of hair in loose waves to soften the structured crown effect
Pro tip: If you’re not confident in your braiding skills, a trial run with your hairstylist before your event is worth every penny—braids look simple but require practice to execute evenly and securely.
7. Half Up Bow with Statement Veil

Hair is gathered at the crown and shaped into a elegant bow using the hair itself—no ribbon required. The gathered section is split into two loops and pinned to create a defined bow shape, while the tail of the bow hangs gracefully down the back. A statement veil (featuring lace, beading, or a decorative edge) attaches near the bow base, complementing rather than competing with the hair design.
Why Hair Bows Command Attention
A bow made from your own hair is inherently more interesting than a standard gathered section, and it works beautifully in both traditional and playful contexts. The bow shape is graphic and memorable, making it an excellent choice if you want your hairstyle to be a focal point of conversation and photography. The bow also creates perfect balance when paired with a veil—the two design elements respect each other’s presence without overwhelming the overall look.
Creating the Hair Bow
- Gather hair at the crown using the same twisting or gathering technique as the classic half up
- Rather than securing tightly, create a loose loop from the gathered section
- Divide this loop into two equal halves on either side
- Pin each half to the scalp, creating a symmetrical bow shape
- Leave a small tail of hair hanging between the two loops—tuck this under and pin it so it anchors the bow
- Gently pull the loops to soften them and create volume within the bow shape
- Ensure the gathered portion remains hidden behind the bow loops
- Attach the veil to the base of the bow where the gathered hair is secured
Insider note: Hair bows photograph beautifully from behind, which is ideal because photographers often capture the back of the head throughout the event.
8. Vintage Curled Half Up with Lace Veil
Hair is set in tight, structured curls throughout using pin curls or a small barrel curling iron. The half up section is gathered from these curls and secured with a vintage-style clip, while the down portion maintains the same curl pattern, creating uniformity and authenticity. A lace veil anchors to the vintage clip, with the lace detailing complementing the texture of the curls.
The Timeless Appeal of Structured Curls
Vintage-style structured curls read as undeniably elegant and feminine. They work beautifully with lace veils because both elements evoke historical romance and formality. The uniformity of pin curls creates a polished, intentional aesthetic that feels notably different from modern loose waves. This style is especially appropriate for vintage-inspired events, historical celebrations, or anyone drawn to classic glamour.
Building Structured Curls
- Blow dry hair straight with a paddle brush
- Using a ½-inch or ¾-inch barrel curling iron, curl hair in sections, working methodically and curling all sections in the same direction
- Pin or clip each curl to the scalp using a clip roller or bobby pin, allowing the curl to cool and set
- Once all curls have set (allow at least 15-20 minutes), gently remove pins and clips
- For maximum hold, use a flexible hold hairspray rather than firm or extra-firm—you want the curls to last but remain pliable
- Gather the half up section gently, allowing curls to remain distinct rather than combing through them
- Secure with a vintage metal comb or clip that complements the era you’re channeling
- Attach the lace veil to the comb, positioning it so the lace detailing is visible
Worth knowing: Structured curls require significantly more time than waves—plan for 45 minutes to an hour for styling. Work with a stylist if you’re not practiced at creating pin curls or rolling sections tightly.
9. Half Up Half Down with Cascading Curls and Veil
A seemingly simple half up section anchors hair that falls in abundant, bouncy curls from scalp to ends. The emphasis here is on volume and movement—the half up is understated so the curls become the star. The veil is delicate and minimal, intentionally secondary to the lush texture below. This style celebrates hair length and full-bodied texture.
Maximizing Volume and Movement
This approach works beautifully for those with naturally thick hair or those willing to invest in extensions or volumizing products. The cascading curls photograph with incredible dimension and catch light dynamically during movement and dancing. Because the half up section is minimal, the entire visual focus rests on the beautiful texture below, making it an excellent choice if you’ve invested time in hair extensions or professional treatments for fullness.
Achieving Cascading Curls
- Use a 1.5-inch curling iron and curl all hair sections away from the face
- Curl in one consistent direction if you want a sleek cascade effect, or alternate directions for more movement
- Work methodically through the entire head, ensuring every section receives the same heat and attention
- Allow curls to cool in your hand or on a roller before releasing them
- Once all curls have cooled, gently brush through them with a paddle brush or large tooth comb to break up the curls and create cascading texture
- Gather a modest section at the crown—just enough to show intentional styling without reducing the cascade of curls below
- Keep the gathered section loose and minimal using a simple clear elastic or barely-visible clip
- Attach a minimalist veil that doesn’t compete with the curl texture
Pro tip: Cascading curls require sufficient hairspray to last through an event, but a light flexible-hold spray works better than firm hold—you want the curls to move and cascade rather than staying rigidly fixed.
10. Sleek Straight Hair Half Up with Modern Veil
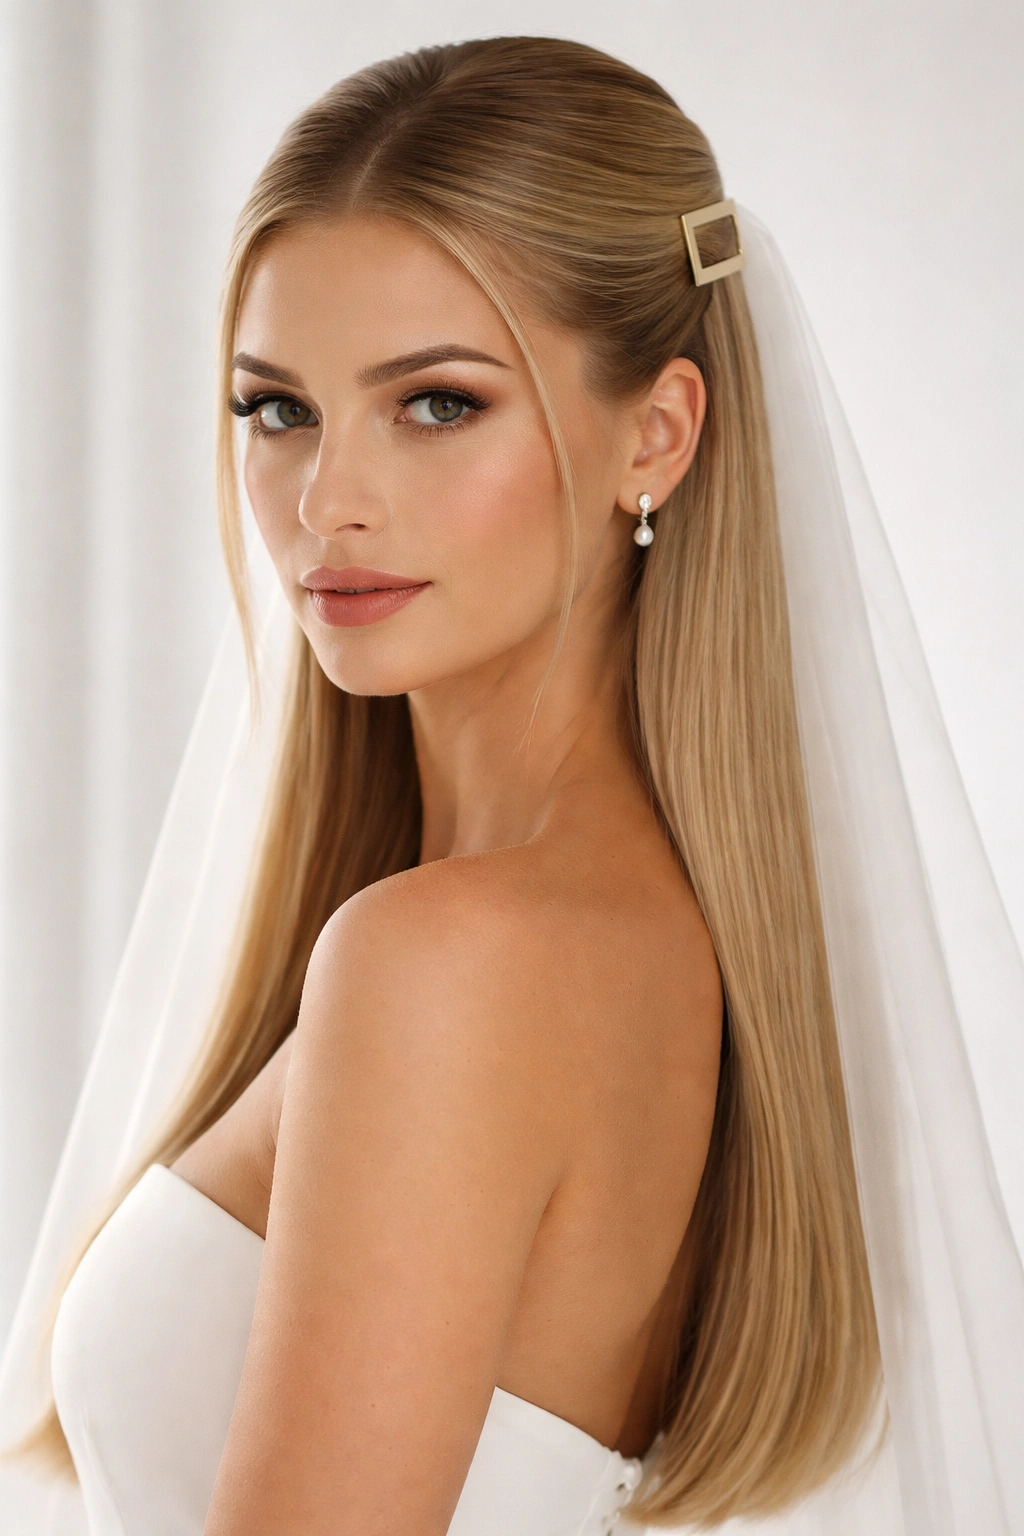
Hair is styled perfectly straight using a flat iron and smoothing products, creating a minimalist, contemporary aesthetic. The half up section is gathered cleanly at the crown and secured with a modern, geometric-shaped comb or clip. A sleek veil with clean lines complements the straight hair without adding softness or romance—the entire look is refined, architectural, and very current.
The Power of Minimalism
Straight hair with a modern veil speaks to current aesthetics that prioritize clean lines and intentional simplicity. This style flatters those who prefer minimalist fashion and appreciate the visual impact of restraint. The geometric clarity of straight hair and modern comb work beautifully together, creating a look that photographs sharply and feels contemporary rather than traditional.
Creating the Sleek Foundation
- Blow dry hair using a paddle brush to create a smooth base
- Run a flat iron through each section once, moving slowly to ensure complete straightness
- Apply a silicone serum or smoothing cream to the surface for shine and to prevent frizz
- Use edge control to smooth any baby hairs or flyaways around the hairline
- Create a center or deep side part, whichever suits your face shape best
- Gather hair at the crown into a clean, tight half up section
- Secure with a modern, architectural comb or clip in a metal finish (silver, gold, or bronze rather than ornate decorative finishes)
- Allow the straight hair below to hang smoothly with no texture or wave
- Attach a veil with clean lines—minimal lace, simple tulle, or a tailored shape rather than romantic flowing fabric
Worth knowing: Perfectly straight hair requires regular touch-ups with the flat iron throughout the event if humidity is present, so keep a compact flat iron handy.
11. Half Up Bun Hybrid with Side Veil
The half up section is twisted and coiled at the crown to create a small, elegant bun rather than a loose gathered or braided section. The veil attaches to the side, cascading from one side of the head rather than straight back, creating an asymmetrical romantic effect. The down-flowing portion remains in waves or curls, while the bun creates a focal point at the crown.
Why Asymmetry Works
Positioning the veil to one side instead of centered creates visual interest and movement. An asymmetrical veil also photographs beautifully, especially from angles, and it’s less likely to obstruct the bride’s face during ceremony moments. The small bun at the crown provides structure and elegance without the formality of an updo, achieving a sophisticated balance.
Building the Side-Pinned Veil
- Style hair in soft waves throughout
- Gather the half up section and twist it as it’s gathered
- Coil the twisted section at the crown, pinning it securely to create a small, neat bun
- Gently pull sections of the bun slightly to soften its appearance
- Attach the veil to the side of the bun (rather than the back or center)
- Adjust so the veil cascades from your chosen side, falling freely down your back and shoulder
- The asymmetry should look intentional, not accidental—ensure the veil is positioned at a distinct angle
Pro tip: Test veil placement before your event to ensure the side attachment doesn’t pull uncomfortably or feel unbalanced—what looks correct in the mirror isn’t always comfortable in motion.
12. Textured Half Up with Dramatic Veil
Hair is styled with intentional texture throughout—using braids, waves, crimped sections, or twisted stands mixed within the overall style. The half up section incorporates this varied texture, creating a rich, dimensional look rather than uniformity. A dramatic veil (floor-length cathedral or chapel length with ornate detailing) anchors this textured foundation, with the veil becoming a strong design counterpoint rather than a secondary accessory.
Layering Texture for Visual Interest
Mixing textures—a braid here, a twisted section there, waves throughout—creates a hairstyle that looks expensive and intentional. The texture also provides excellent grip for securing the veil comb, ensuring it won’t shift throughout hours of wear. A dramatic veil works beautifully against textured hair because both elements are visually rich, creating a look that’s maximalist and glamorous.
Creating Intentional Texture Mix
- Section your hair into distinct portions of the head
- Style each section differently: create a French braid in one section, twisted knots in another, loose waves in a third
- As you create the half up section, incorporate these varied textures rather than smoothing them into uniformity
- Secure the textured half up at the crown using a large decorative comb that accommodates the thickness of the textured section
- Leave the down-flowing portion textured and full, maintaining the theme throughout
- Ensure the dramatic veil’s weight is distributed evenly because the textured hair provides ample secure anchoring
- Allow the veil to flow freely without being overly tucked—let it be a prominent design element
Worth knowing: Textured hair requires more product and more time to style, so allow extra time for your hairstyling appointment and ensure your stylist is comfortable with texture mixing.
13. Half Up with Hair Comb and Veil Combo
The half up section is anchored using both a decorative hair comb in the back and additional bobby pins or smaller combs positioned throughout the gathered section. The veil attaches to the primary comb while secondary combs create visual layering of accessories. This approach is especially effective if you’re using a particularly beautiful comb that deserves to be a visual feature.
Making Combs and Veils Work Together
Multiple combs create visual interest in the back of the head and provide superior security for both the hairstyle and veil. If your comb features intricate detailing, crystals, or precious metal work, using multiple combs (the main veil comb and secondary decorative combs) shows off this craftsmanship. The layered comb approach also allows you to extend the decorative element beyond just the veil attachment point.
Positioning Multiple Combs
- Create your half up section using your preferred technique: twisting, braiding, or simple gathering
- Position your primary decorative comb (the one the veil will attach to) at the center back
- Place secondary combs or ornamental bobby pins on either side of the primary comb, creating a visual triangular arrangement
- Ensure all combs sit at approximately the same height so they create a cohesive accessory line
- The secondary combs should complement the primary comb—coordinate metals and finishes
- Attach the veil to the primary comb only—additional attachment points can create awkward tugging and shifting
- Style the down-flowing portion to complement the comb arrangement—loose waves work better than sleek straight hair with multiple decorative combs
Insider note: If you’re using expensive or heirloom combs, have your stylist check the security and positioning multiple times during your event preparation—ornate combs can sometimes slip with the weight of a veil.
14. Bohemian Half Up with Flowing Veil
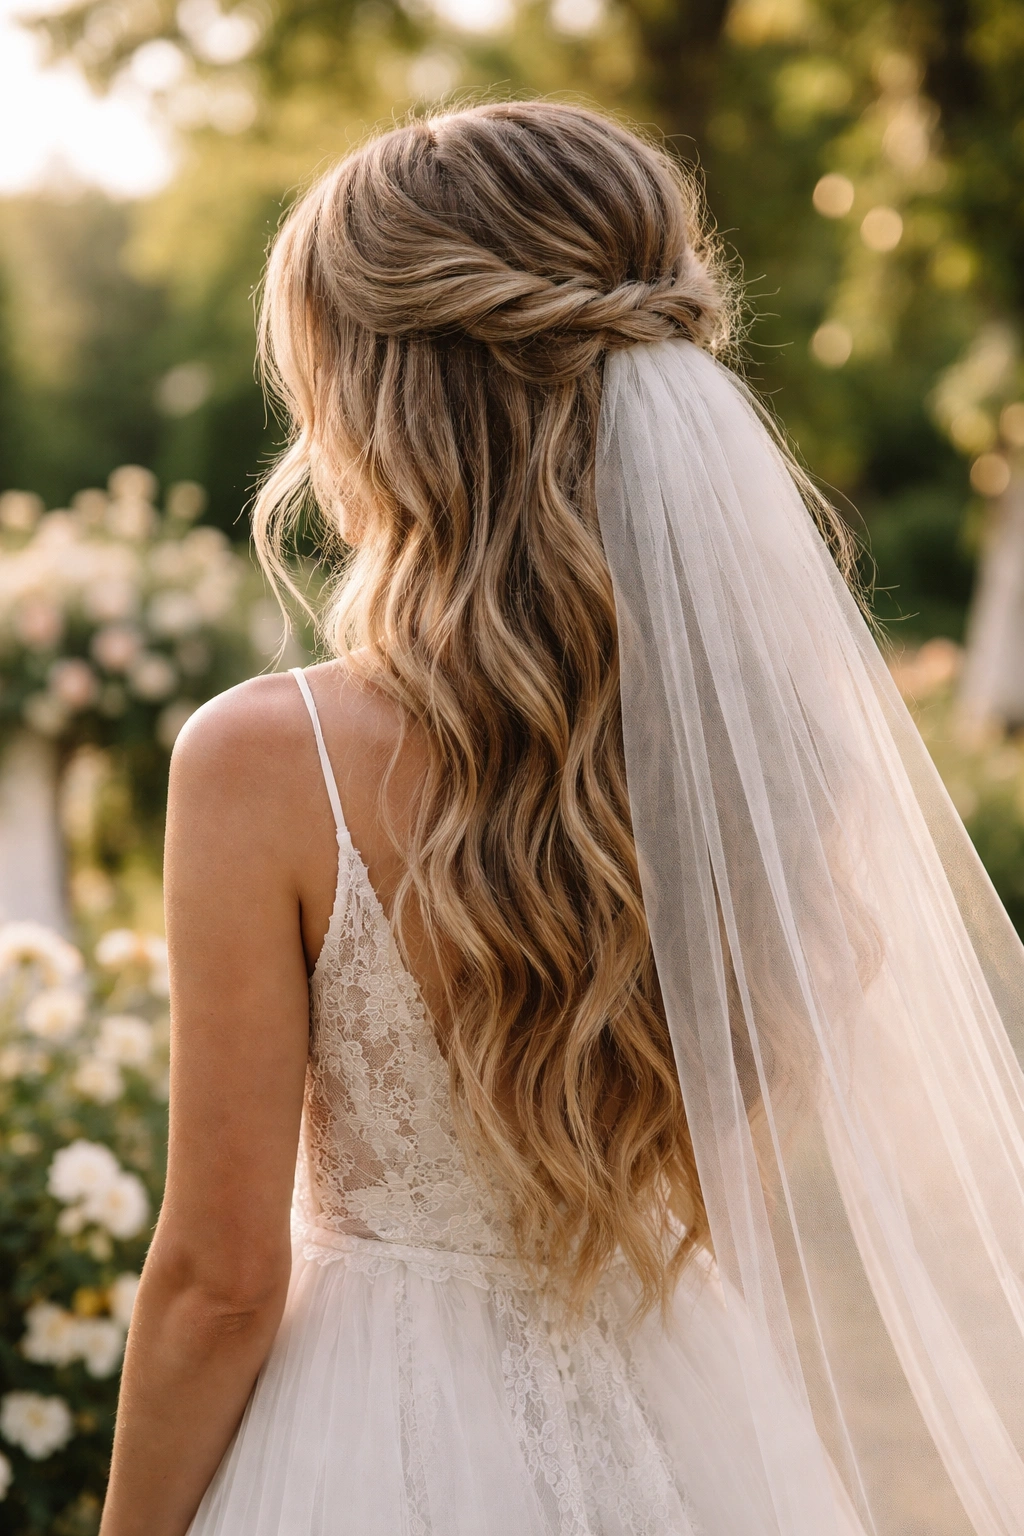
Romantic, undone texture characterizes this style—hair is loosely waved or slightly crimped and styled intentionally messy. The half up section is gathered very loosely, almost carelessly, with pieces intentionally left out to frame the face. A flowing, ethereal veil (often featuring lightweight tulle or fabric rather than lace) drapes from the gathered section, moving freely with the wearer. The entire aesthetic prioritizes movement and ease over polish.
The Boho Aesthetic
Bohemian styling celebrates imperfection and natural beauty. This approach works beautifully if you have naturally textured hair or if you prefer a relaxed, lived-in vibe over formal polish. The boho half up with flowing veil reads as modern, romantic, and fashion-forward rather than traditionally bridal. This style is especially appropriate for outdoor celebrations, casual elegant events, or anyone whose personal aesthetic trends toward earthy, natural, and undone.
Achieving the Boho Look
- Create loose waves using a curling iron, but don’t worry about consistency or perfection
- Rough up the waves with your fingers to create a tousled texture
- Apply a light sea salt spray or texture spray to enhance the undone quality
- Gather hair very loosely at the back of the crown, intentionally leaving pieces around the face loose
- Use a simple elastic or minimal clip—nothing ornate or obviously decorative
- Leave the back gathering quite loose so hair continues to move and shift
- Attach a lightweight flowing veil that will move with you rather than a structured veil
- For added boho flair, consider adding delicate flower stems, greenery, or a thin ribbon woven through the gathered section
Pro tip: Boho hairstyles look better the next day—the texture continues to loosen and shift into an even more romantic appearance.
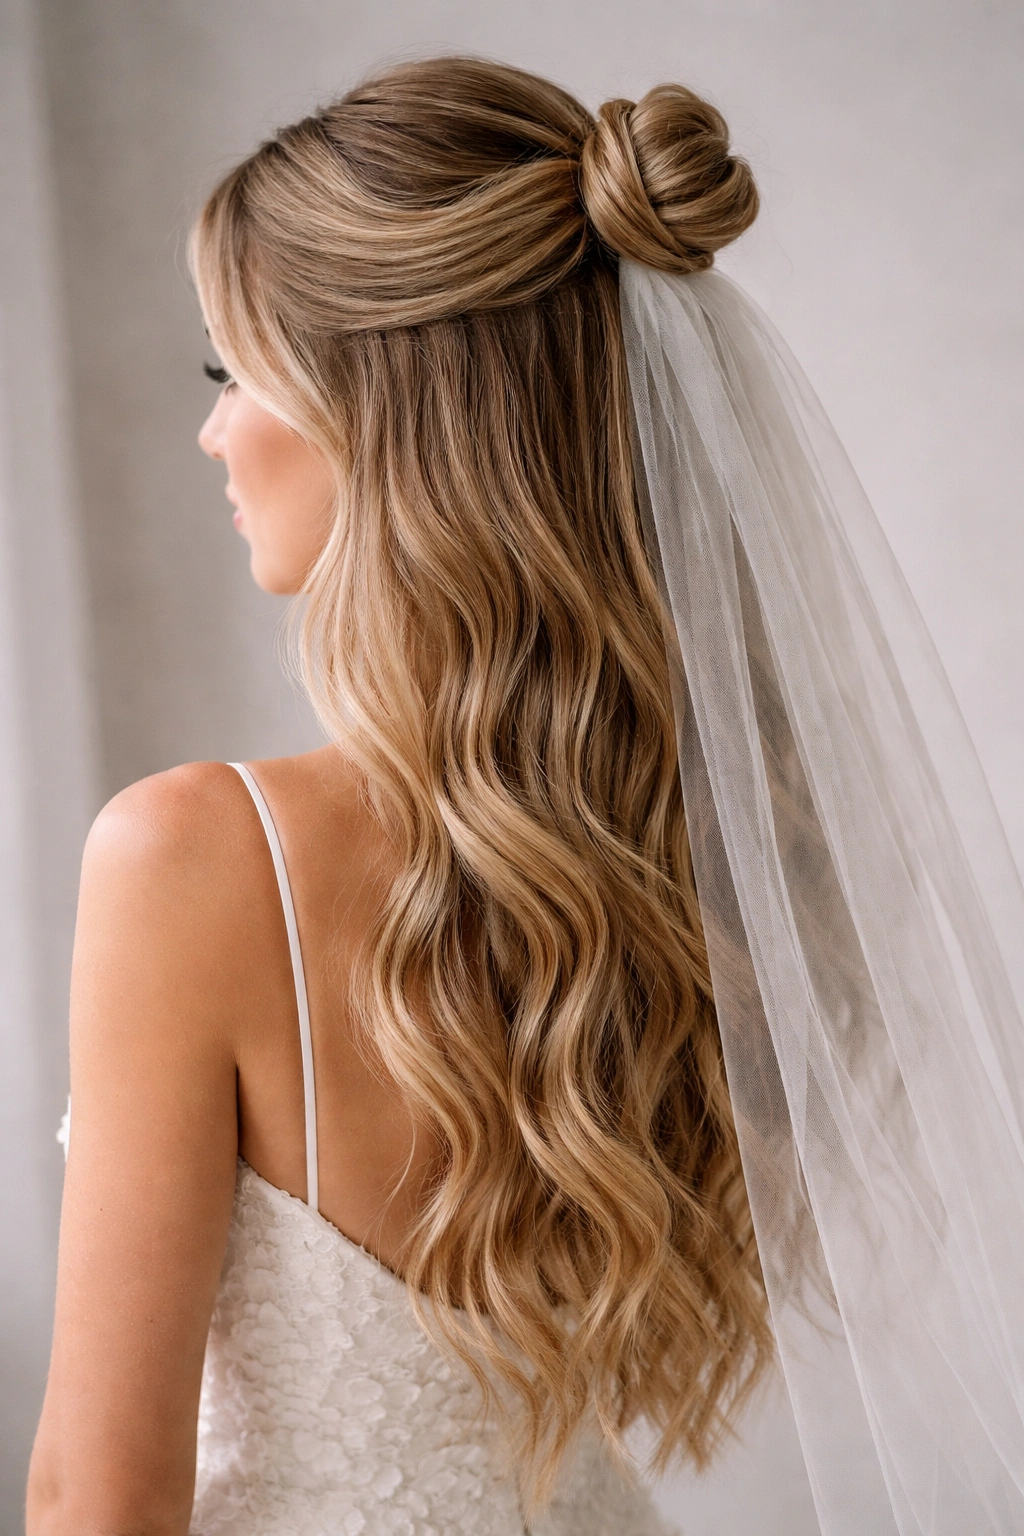
15. Half Up Chignon with Chapel Veil
The half up section is twisted and coiled into a low chignon (twisted bun) at the nape of the neck rather than at the crown. This creates a more formal, structured aesthetic than other half up styles while still maintaining the “half up” classification. A chapel-length veil attaches to the chignon, creating an elegant, traditional appearance that reads as appropriately formal for any significant celebration.
The Chignon Approach to Half Up
A chignon-style half up represents a middle ground between a true updo and a cascading half up style. It’s more formal than loosely gathered hair but less severe than a complete updo. This approach works beautifully if you want the sophistication of a chignon without completely putting your hair up. The chapel-length veil paired with a chignon creates a balanced proportion that flatters most face shapes and reads as elegant without being overly dramatic.
Building the Half Up Chignon
- Style hair in soft waves throughout
- Create the gathering section from the ears back, as with a standard half up
- Twist this section as you bring it back to the nape of the neck
- Coil the twisted section at the nape to create a small, neat chignon
- Pin securely, tucking the ends under the coil and hiding all bobby pins within the twisted section
- Gently pull the chignon slightly to add softness and dimension—it shouldn’t look severe
- Attach the chapel-length veil to the base of the chignon, centering it directly at the back of the head
- The chapel-length veil should fall from the chignon to approximately where the knees are positioned
- Tuck any loose baby hairs at the nape smoothly using edge control product
Worth knowing: A nape chignon requires enough length to coil securely—hair shorter than shoulder-length may not have sufficient length to create an adequate chignon. If your hair is shorter, opt for a crown-positioned half up instead.
Key Takeaways
The beauty of half up half down styles with veils lies in their incredible adaptability to different aesthetics, hair types, face shapes, and event formality levels. Whether you’re drawn to the romantic softness of cascading curls, the modern architecture of sleek straight hair, or the structured elegance of braids and chignons, there’s a variation that speaks to your personal style. The veil transforms the entire composition from a simple hairstyle into a meaningful design feature that commands attention and adds dimension.
Your choice between these 15 styles should ultimately rest on how you want to feel, not just how you want to look. Do you feel best in romantic, touchable softness? Are you more confident in tailored, graphic minimalism? Does the structured formality of braids and chignons appeal to you, or do you gravitate toward the undone ease of bohemian texture? Once you identify the aesthetic that genuinely matches your style, you’ve found your style. From there, it’s simply choosing the specific veil length and detailing that complements your dress, your venue, and your vision.