Ribbon-adorned half-up half-down hairstyles have become a quintessential choice for brides and wedding guests alike—they strike that perfect balance between romantic elegance and easy sophistication that formal occasions demand. There’s something inherently magical about the way a soft ribbon winds through carefully styled waves or braids, catching light as you move, adding dimension and personality to your bridal look without overwhelming your face or requiring hours of styling expertise. Whether you’re searching for a sophisticated updo element with flowing locks below, a delicate braid crown with cascading ends, or something with more dramatic volume and texture, ribbon-enhanced half-up styles offer infinite possibilities for customization that work across different hair types, face shapes, and wedding aesthetics. The best part? These styles translate beautifully across wedding seasons, venues, and dress codes—they’re equally at home in a formal ballroom, a garden ceremony, or a casual outdoor celebration.
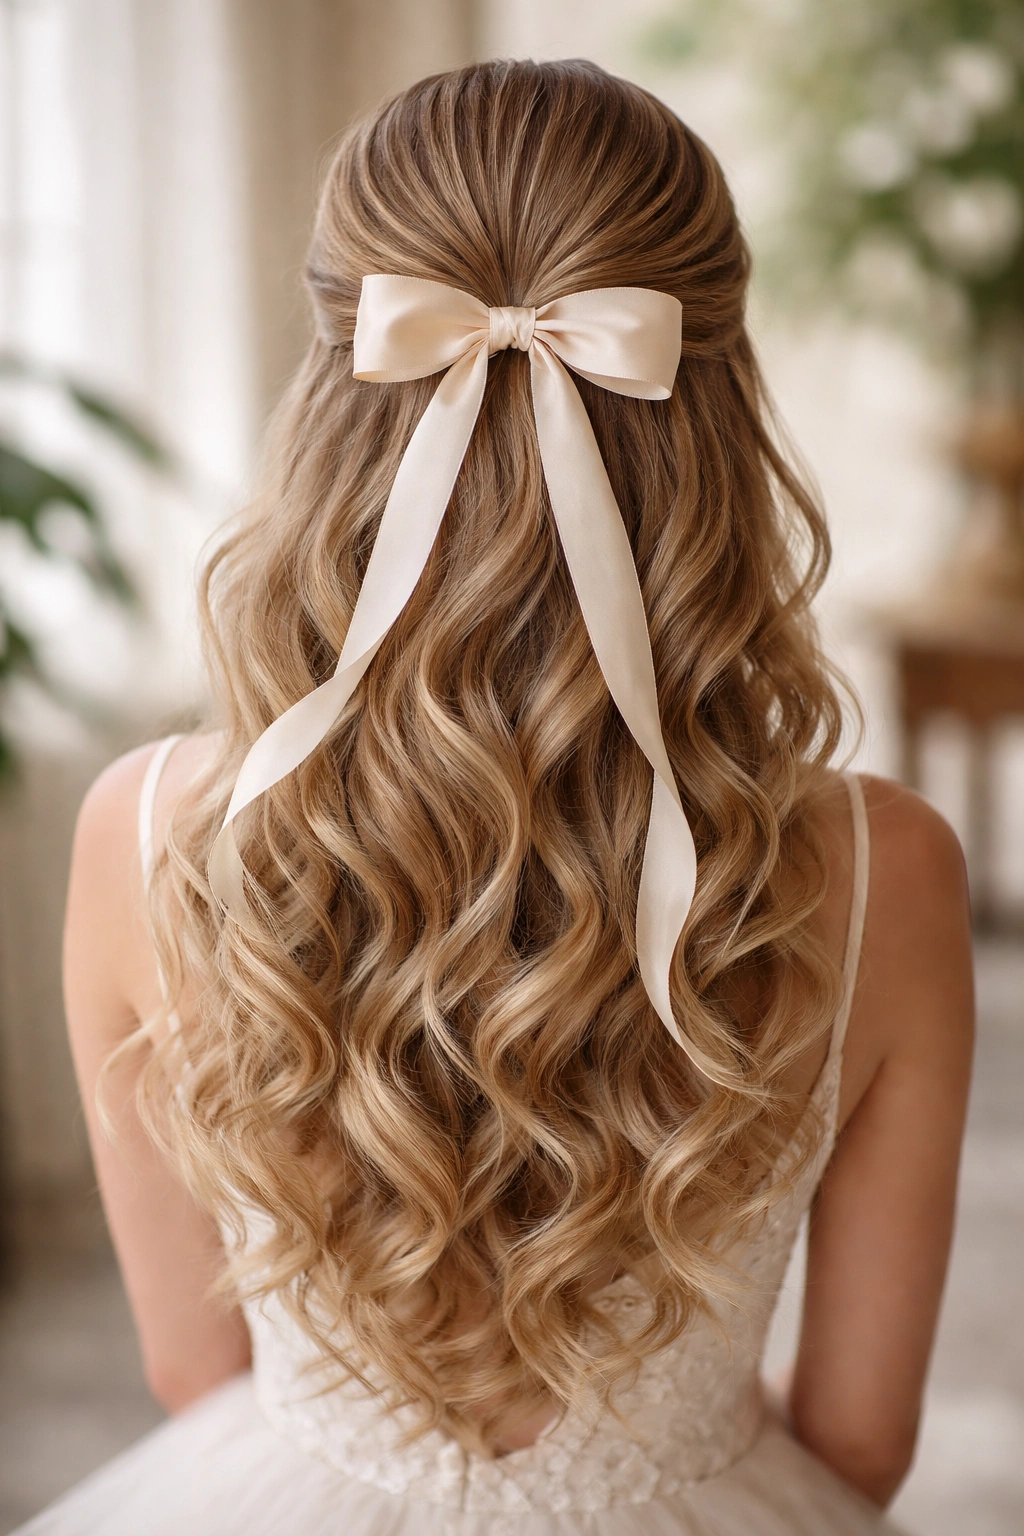
1. Classic Ribbon-Wrapped Ponytail with Loose Waves
This timeless approach takes the simplicity of a half-up ponytail and elevates it through the strategic placement and careful handling of your ribbon. You’ll gather hair at the crown—roughly from ear to ear across the top of your head—securing it loosely with an elastic, then wrap your chosen ribbon around the base where that elastic sits, allowing it to hide the hardware while creating a polished, intentional look. The hair that falls below remains styled in soft, romantic waves that frame the face beautifully without requiring constant adjustment.
Why This Works for Weddings
The genius of this style lies in its restraint and its versatility. You’re not fighting against your hair’s natural texture or creating an overly structured look—instead, you’re using the ribbon as a focal point that draws the eye upward while the waves create movement and dimension. It photographs beautifully from every angle because the ribbon sits at a flattering height and doesn’t overwhelm the proportions of your face, leaving room for your bridal makeup and jewelry to shine.
Key Details to Master
- Choose your ribbon width carefully—wider ribbons (1.5 to 2 inches) make a bolder statement, while narrower ribbons (0.75 inches) feel more delicate and understated
- Wrap the ribbon around your ponytail base at least twice for a finished appearance that doesn’t accidentally slip or shift throughout the reception
- Create your waves before you gather your hair into the ponytail—this ensures maximum volume and prevents the waves from being compressed or flattened by the styling process
- Consider securing the ribbon’s end at the back with a small hidden bobby pin so it doesn’t unravel if you’re dancing or moving around actively during the celebration
Pro tip: If your ribbon’s fabric is slippery (like satin), wrap it around the elastic a third time and secure the end with a small stitch or clear nail polish before your wedding day—this prevents any mid-event slipping that could derail your careful styling.
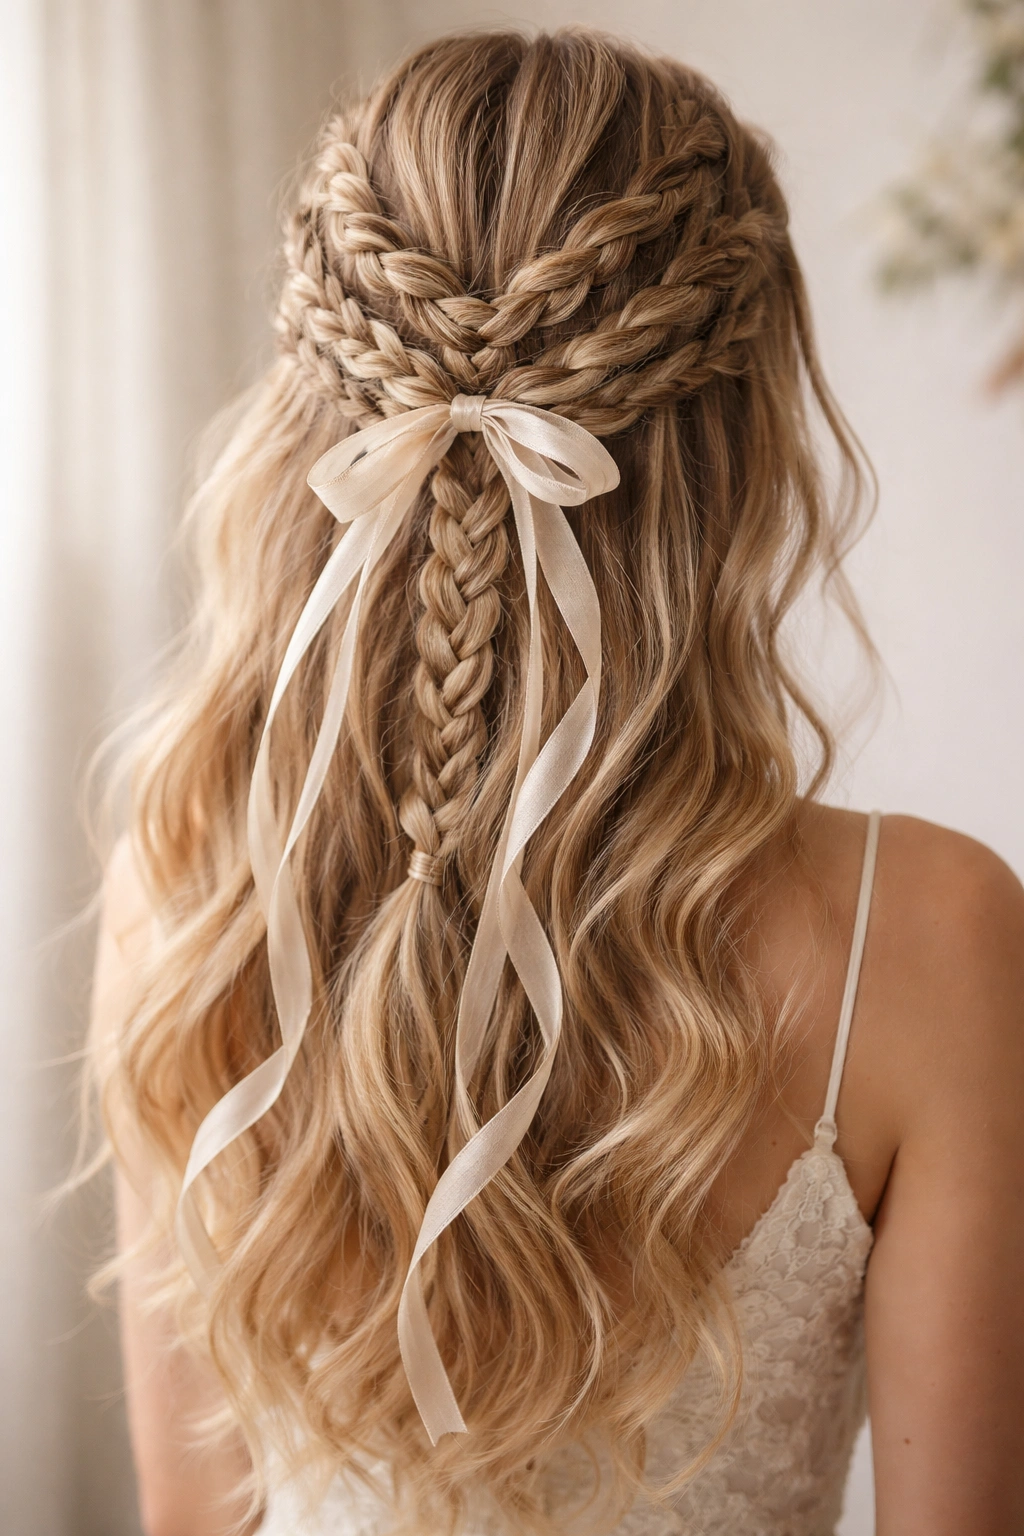
2. Double-Sided Ribbon Braid Crown
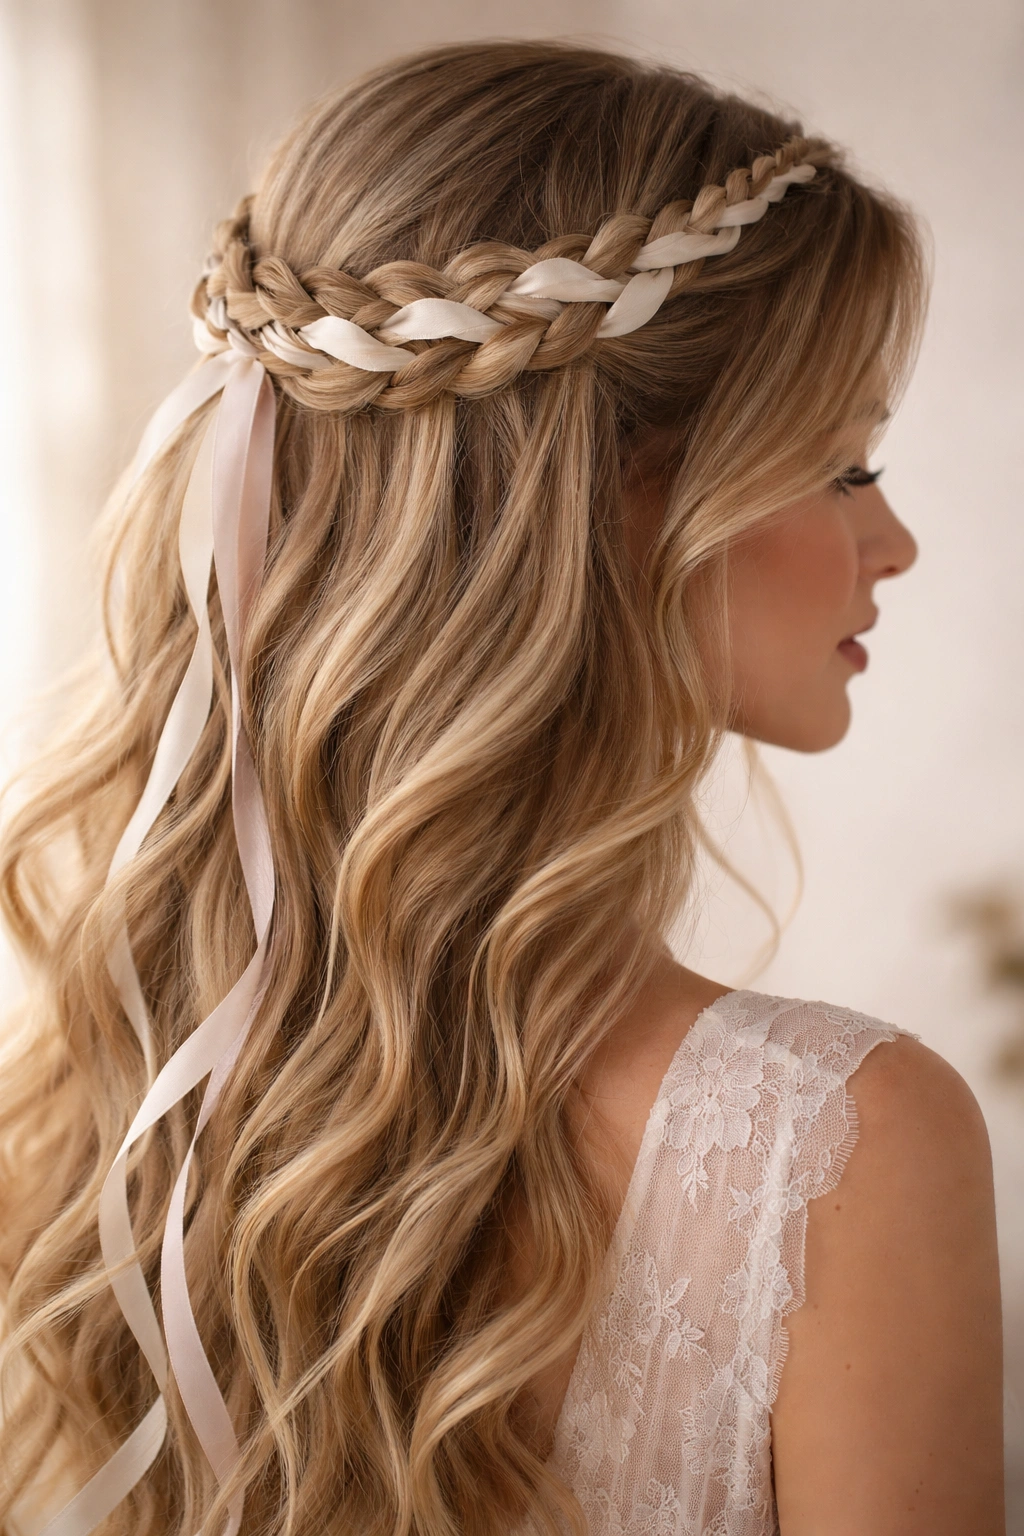
This style creates the visual impression that your hair is literally crowned with ribbon by incorporating two coordinating ribbons directly into a crown braid that travels from one side of your head to the other. You’ll start with three sections of hair at one temple, incorporating one ribbon as a fourth “strand” and weaving everything together as you move toward the opposite side of your head, then finish by securing everything into the half-up ponytail and allowing the remaining hair to cascade in waves or texture below the crown.
What Makes This Elevated and Wedding-Worthy
The double-ribbon effect creates dimension and movement that a single-ribbon style can’t quite achieve—your hairstyle becomes a sculptural element that’s genuinely eye-catching without reading as overly trendy or costume-like. This approach works particularly well if you’re seeking something that photographs as visually interesting as it feels when you’re wearing it, since the intertwined ribbons create a naturally complex texture that translates beautifully to photographs.
Execution Essentials
- Use ribbons in complementary colors or textures rather than matching colors—this creates depth and makes the braid itself more visually interesting
- The braid should travel across the crown of your head in a gentle curve rather than a tight line—this softens the look and prevents it from feeling harsh against your face
- Tease your hair lightly at the base of the braid for extra volume and to help secure the braid more firmly throughout the day
- Leave face-framing pieces loose before you start the braid—these soften the overall effect and provide flattering curves around your face
Worth knowing: This style requires practice with incorporating ribbon into braids, so request a detailed consultation with your stylist beforehand and consider doing a trial run at least one week before your wedding.
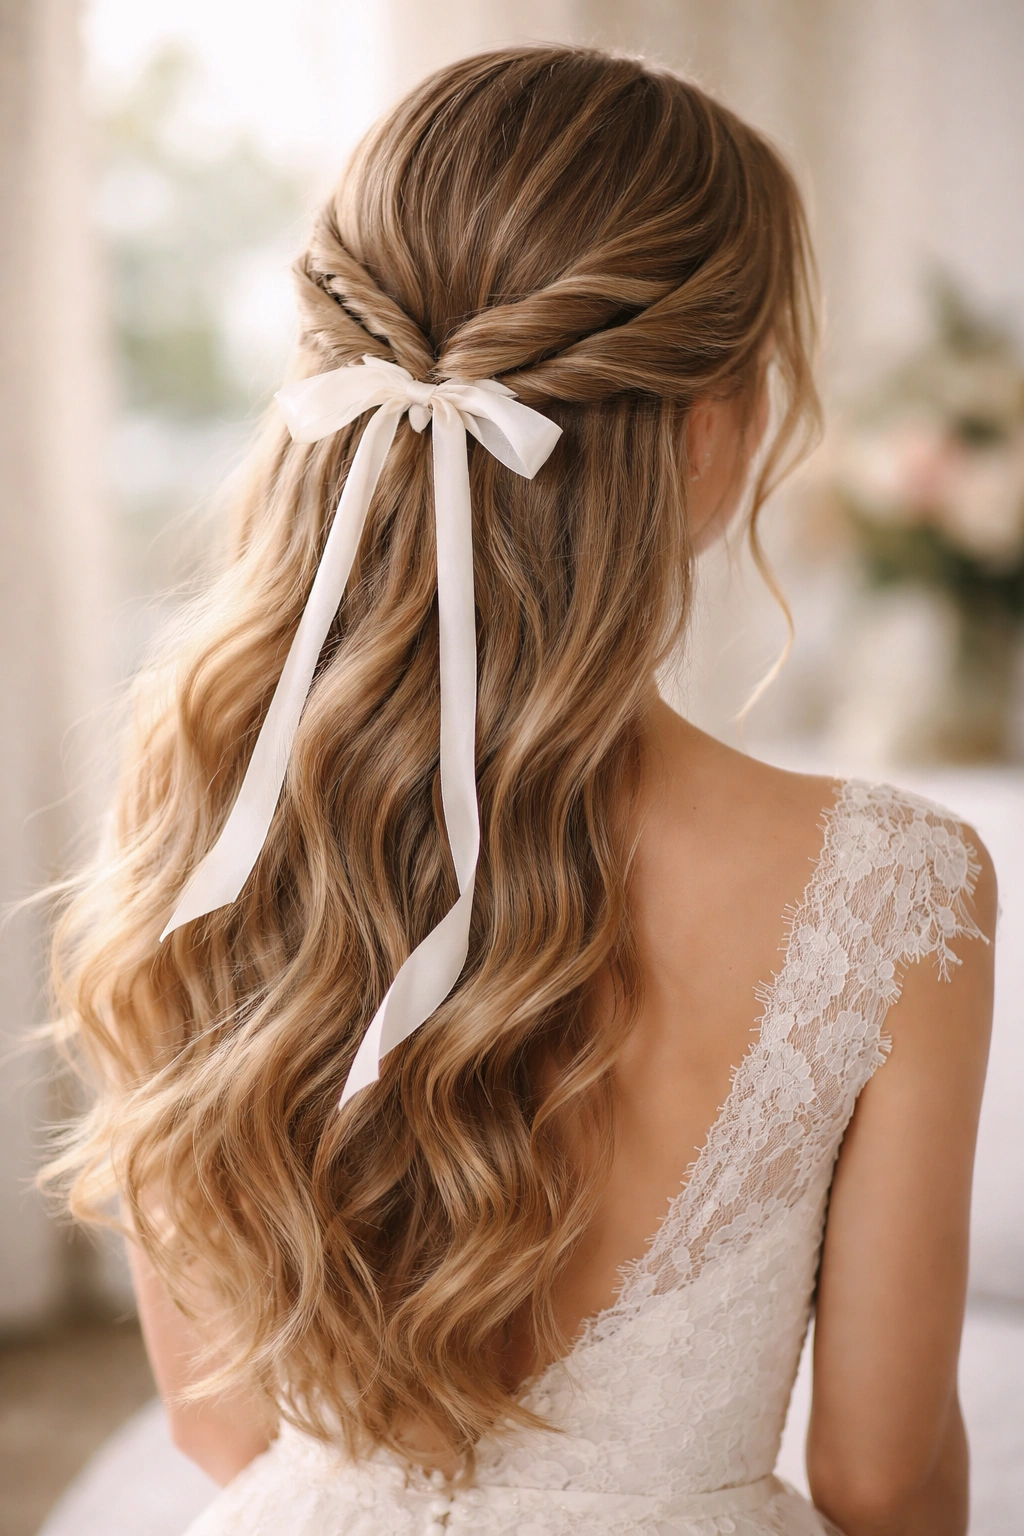
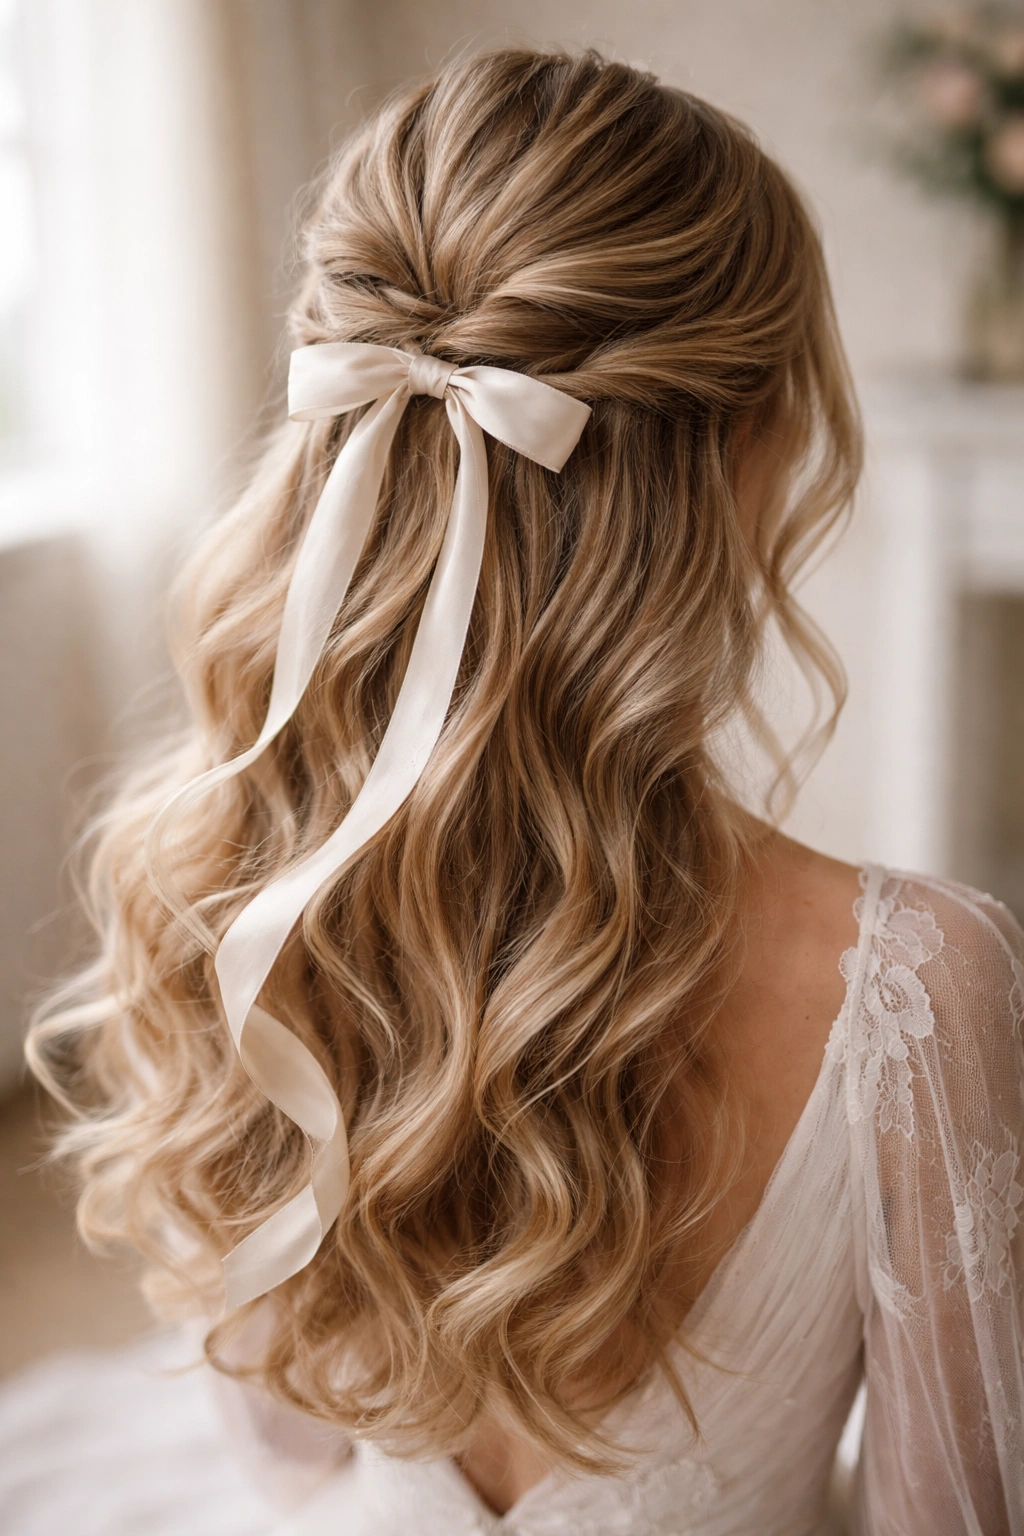
3. Twisted Ribbon Accent with Waterfall Effect
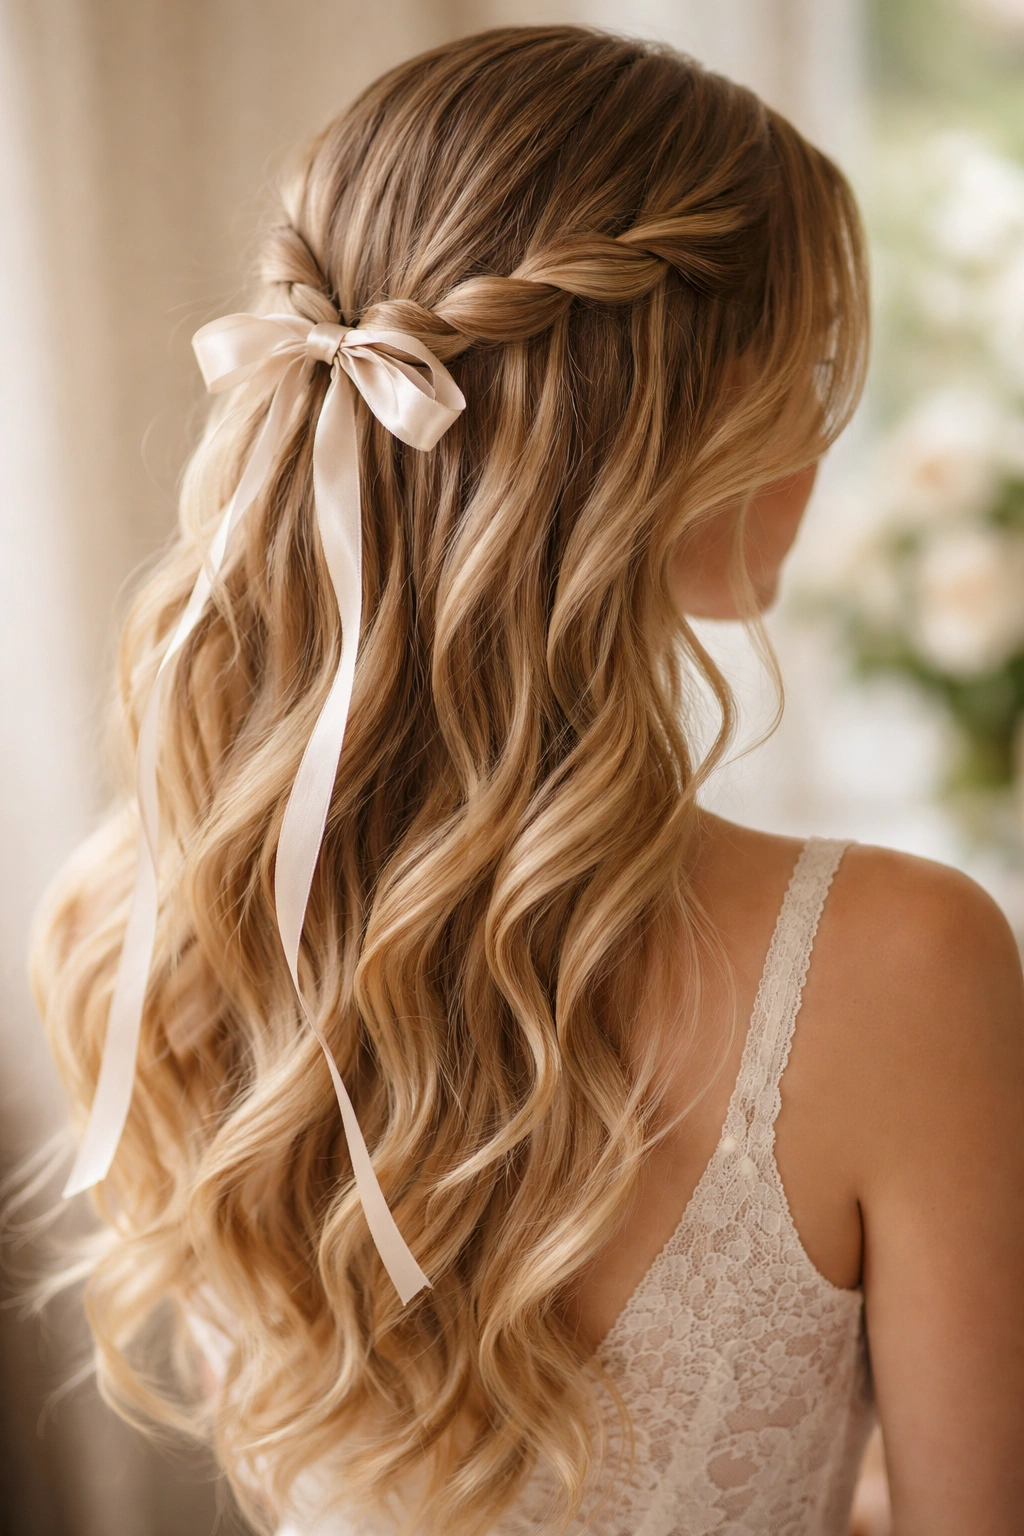
Instead of incorporating ribbon into a braid, this style uses ribbon to enhance a twisted section of hair that sits atop your half-up arrangement, with the waterfall effect created by allowing small, intentional sections of hair to fall forward and intermingle with the main twisted section. The ribbon winds through these twisted sections in a way that makes the hair look naturally intertwined with the ribbon rather than simply having a ribbon added on top as an afterthought.
Why the Waterfall Effect Matters
A true waterfall twist creates layers and visual movement that a simple twisted section can’t achieve—it gives the impression of more volume and complexity while actually being simpler to execute than a crown braid. The effect is inherently romantic and modern simultaneously, which appeals to brides seeking something with personality that doesn’t feel costume-like or dated.
Technical Steps for Success
- Create your waterfall by twisting a small section of hair, releasing a strand, twisting again, and repeating as you move across your head—each released strand will appear to “fall” forward naturally
- Weave your ribbon through the twist as you create it rather than trying to thread it through afterward—threading ribbon through existing hair is tricky and can shift your style out of place
- Keep the twist slightly loose rather than pulling it taut—this prevents a strained appearance and allows the waterfall strands to fall more naturally
- Secure the completed twist with bobby pins hidden underneath and reinforce with a light texture spray rather than heavy hold hairspray, which can make the style feel stiff
Insider note: Practice this on a day when you don’t mind if your hair isn’t perfect—the waterfall effect requires a light touch and it’s one of those styles where practice makes perfect.
4. Ribbon-Threaded Double Braid Half-Up

This approach involves creating two separate braids that start at opposite temples, meeting at the back of your head where they join into a single ponytail, with ribbon threaded through both braids in a coordinating pattern. The effect is symmetrical and structured without feeling overly formal, and it creates multiple focal points that photograph beautifully from the front and back.
Why Double Braids Feel More Intentional
A single braid can sometimes read as casual or underdressed depending on your venue and dress code, but two braids automatically feel more formal and clearly deliberate in their styling. The symmetry also creates a balanced, regal effect that complements white dresses and formal jewelry without overwhelming your overall appearance.
Building This Style Successfully
- Create your braids with slightly more tension than you’d use for a casual braid—this prevents them from shifting as you move and ensures they hold their shape throughout your event
- Use the same type of ribbon in both braids for coherence, or use different ribbons if you’re seeking an intentional asymmetrical look
- Thread the ribbon through the braids before you gather them into the final ponytail—once they’re joined together it becomes much harder to position ribbon precisely
- Consider adding a small, delicate hair comb or decorative clip where the two braids meet at the back for an extra touch of polish and to ensure nothing shifts during the event
Pro tip: This style works beautifully with hair that’s been lightly waved or curled beforehand—the texture makes the braids appear fuller and more intentional rather than flat and spare.
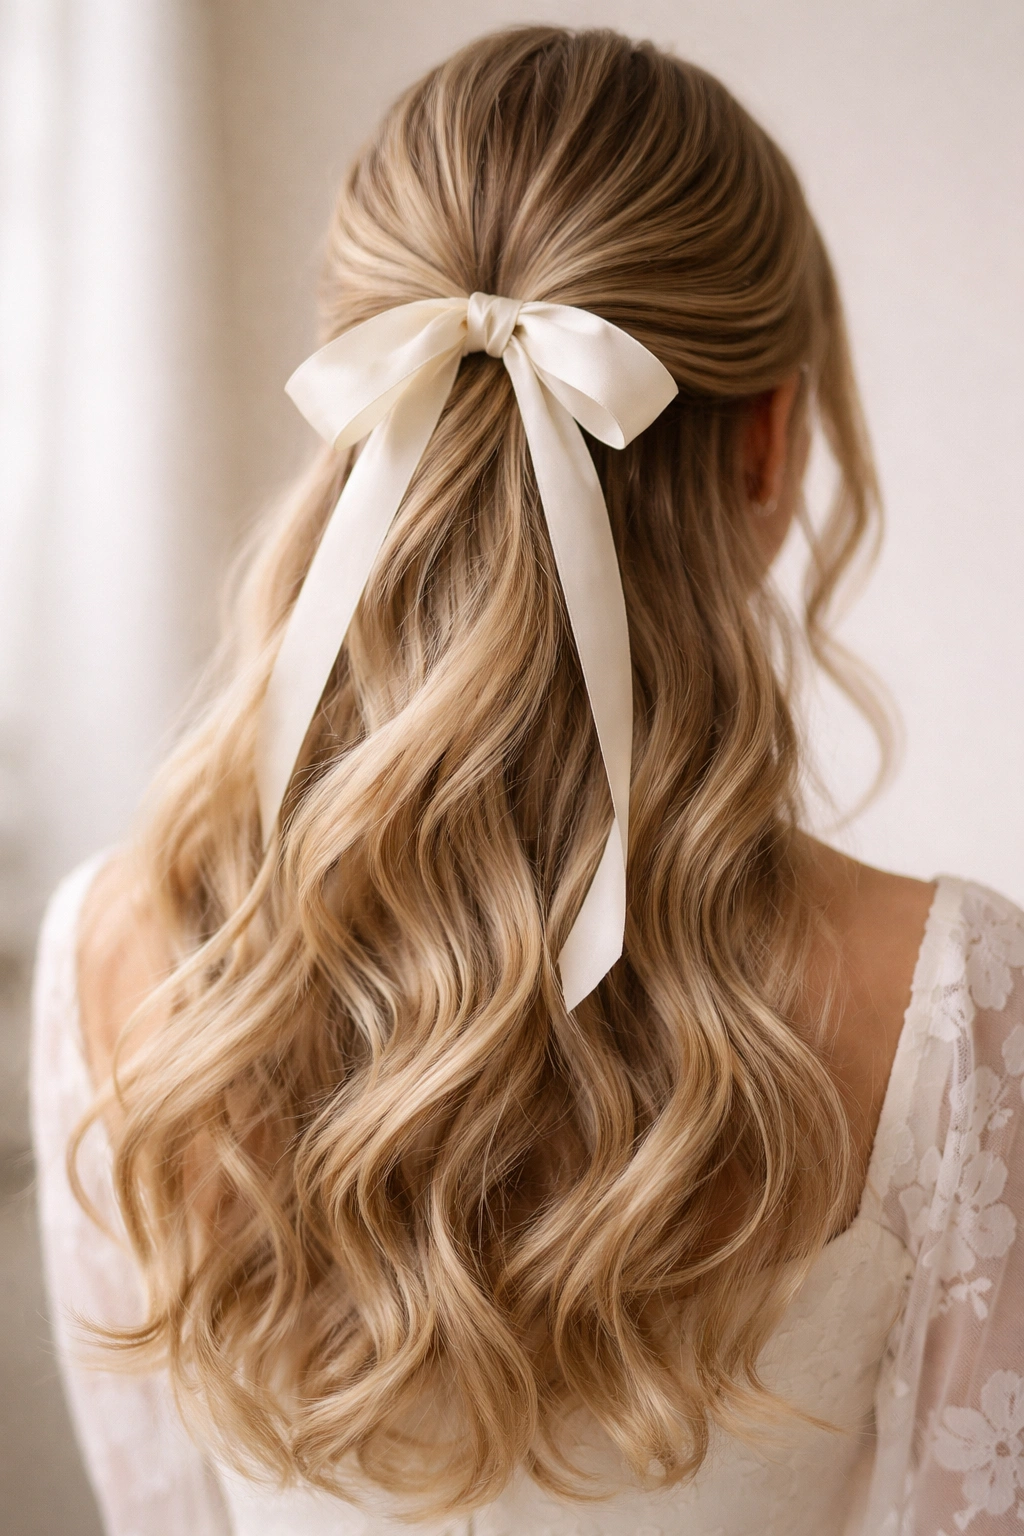
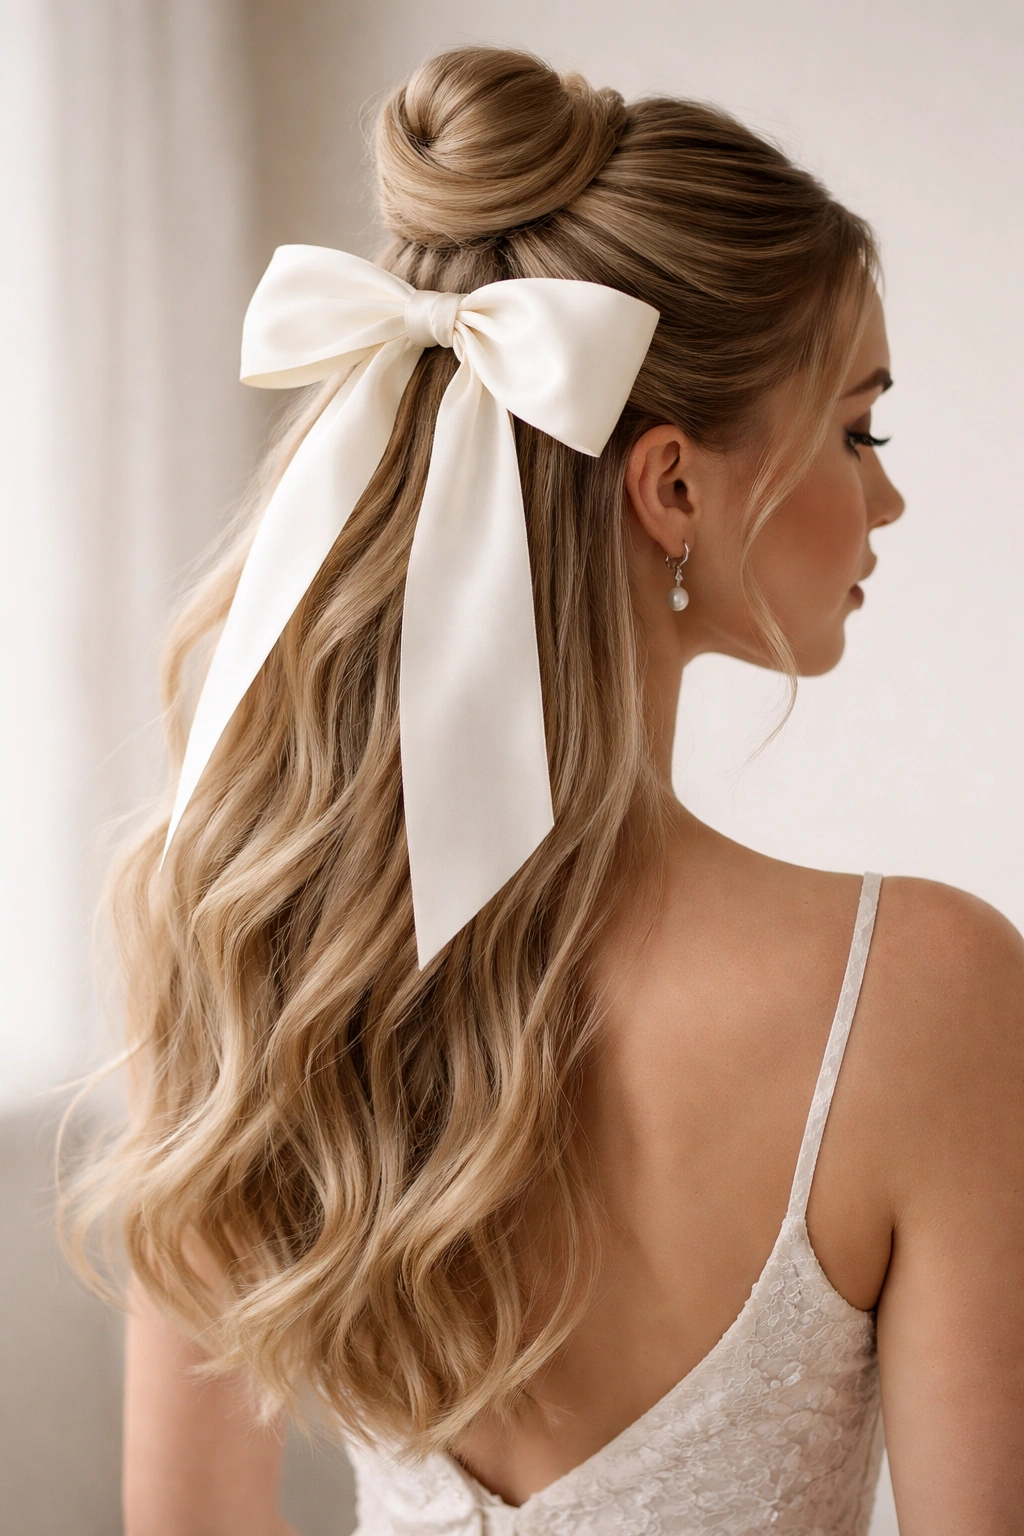
5. Single Ribbon Loop with Cascading Curls
This simpler approach takes just one substantial ribbon and creates a deliberate loop or bow at the back of your half-up section, with the remainder of your hair released into full, bouncy curls that frame your face and shoulders. The ribbon loop becomes the central focus rather than being woven throughout your hair, making this style ideal if you’re looking for something that feels special without requiring intensive braiding skills or significant styling time.
The Appeal of Simplicity Done Well
Sometimes the most impactful styling choices are the simplest ones—a single, well-placed ribbon bow reads as intentional and elegant rather than minimal or underdeveloped. This approach lets your curls and your ribbon equally share the spotlight, and it works across a wider range of hair textures since you’re not trying to execute complicated braiding or twisting.
Making the Ribbon Loop Look Polished
- Gather your half-up section and secure it firmly with an elastic, then tie your ribbon around the base of that elastic to create a bow shape—the ribbon should be full and generous rather than tiny and delicate
- Allow the ribbon tails to fall naturally down the back of your hair rather than pinning them in place—this creates movement and prevents the style from feeling stiff
- Curl all of your remaining hair in large, loose waves rather than tight ringlets—the scale of the curls should balance with the generous size of your ribbon bow
- Use a texture spray or light hairspray to encourage the bow to hold its shape without making the ribbon appear sticky or wet-looking
Worth knowing: The ribbon you choose becomes even more important in this style since it’s so visually prominent—select a ribbon in a color that either matches or beautifully complements your bouquet, your dress details, or your jewelry.
6. Intricate Ribbon Fishtail Braid
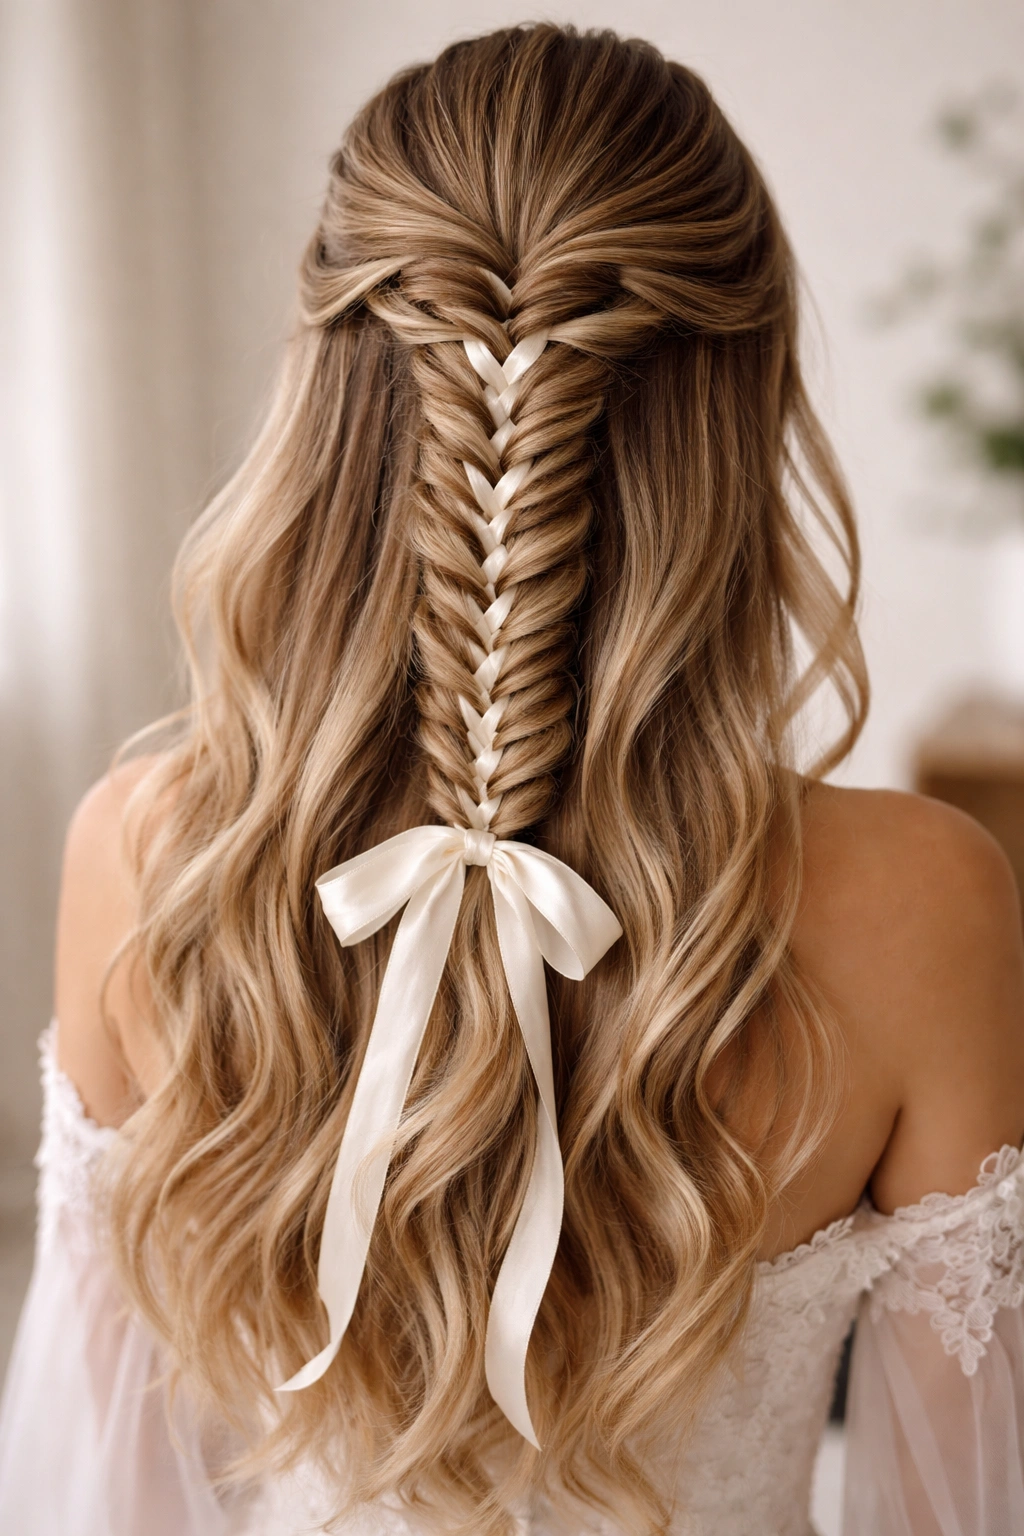
A fishtail braid is naturally more delicate and intricate-looking than a traditional three-strand braid, and incorporating a ribbon into this style takes the visual interest up several notches. You’ll create your fishtail braid using the standard technique (crossing thin outer strands over the top in an alternating pattern) while weaving a matching or complementary ribbon through the braid from start to finish, then securing the completed braid into your half-up ponytail.
What Makes Fishtail Special
The fishtail braid creates an inherently more textured, less structured appearance than traditional braids—it looks romantic and slightly undone in the best possible way. When you add ribbon to this naturally delicate effect, you create something that feels both carefully styled and effortlessly beautiful, which is precisely the aesthetic many brides are seeking for their wedding day.
Execution Expectations and Timeline
- Fishtail braids take longer to execute than traditional braids because you’re working with smaller sections of hair—budget extra time in your styling timeline
- Your hair should have some texture or wave beforehand—fishtail braids on completely smooth, straight hair can look slippery and are harder to keep intact
- Gently pull the edges of your completed fishtail braid to create a fuller, less tight appearance—this is called “pancaking” and it makes the braid look deliberately romantic rather than accidentally undone
- Thread your ribbon through the braid carefully, working from top to bottom, and secure it at the end where the braid joins your ponytail
Pro tip: Practice creating a fishtail braid on a willing friend before trying it on yourself during wedding prep—the technique is straightforward but requires good hand coordination and visibility that you can’t achieve on your own head.
7. Twisted Ribbon with Pearl or Crystal Accent
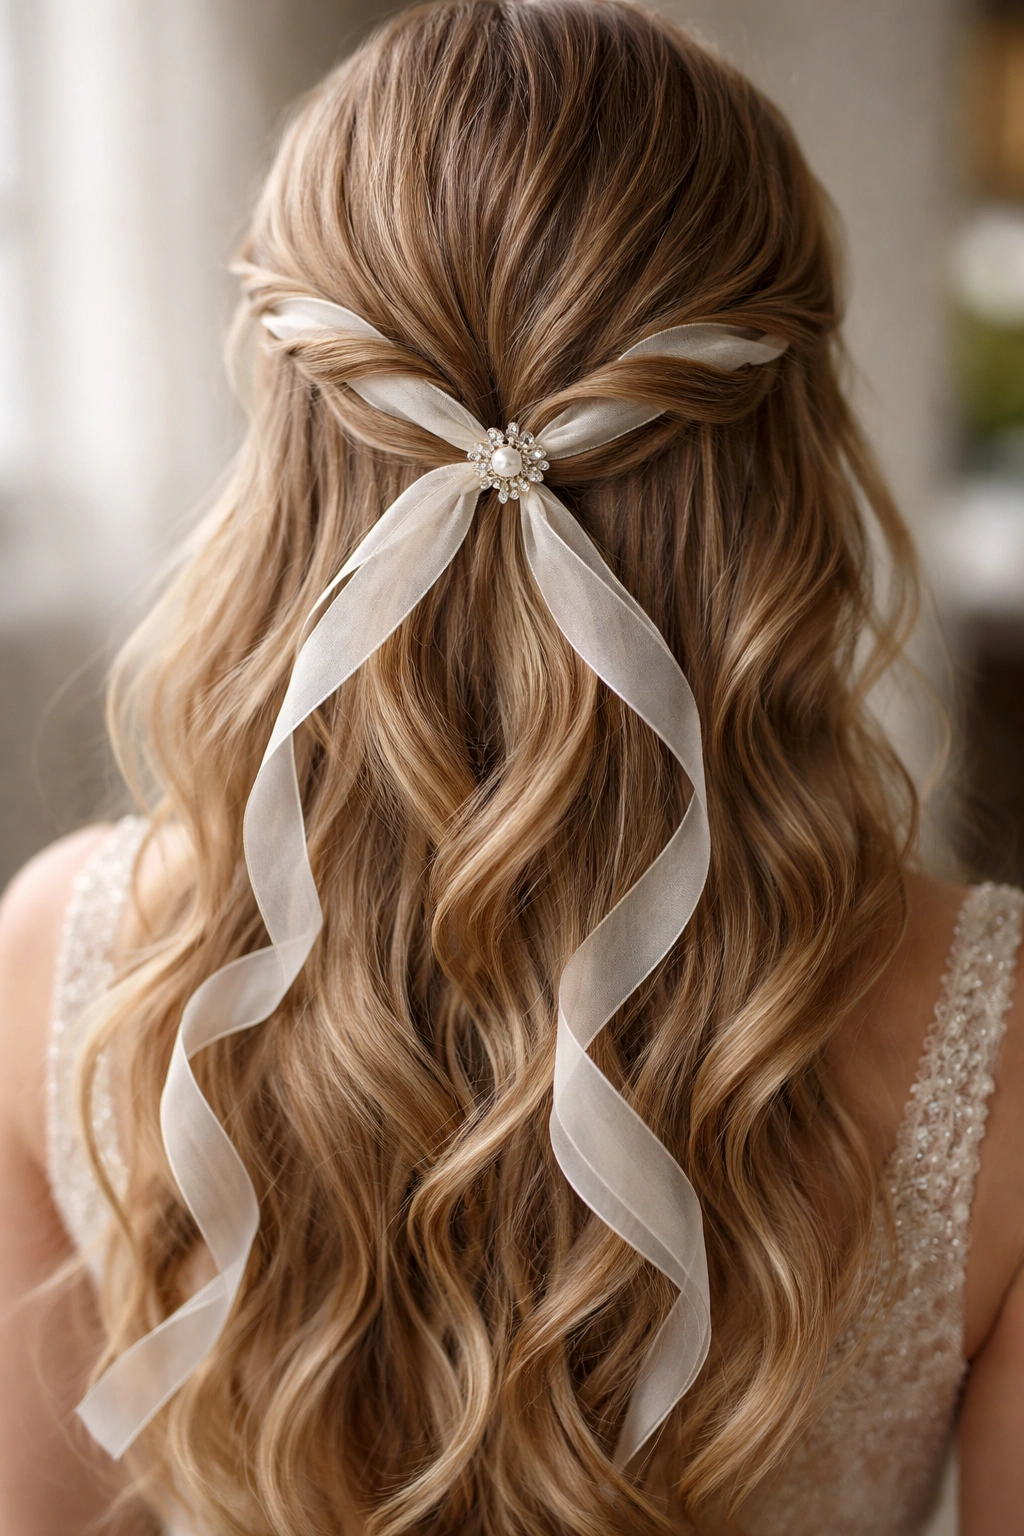
This style combines a twisted half-up section with a strategically placed ribbon and a single decorative element—typically a hair comb, clip, or chain of small pearls or crystals—that sits where the twisted section meets your released hair. The ribbon weaves through or around the twist, and the decorative element catches light and draws attention to this focal point, creating visual interest without overwhelming your overall appearance.
Why Accessory Layering Feels Elevated
Combining ribbon with a second decorative element creates visual depth and richness that a single styling element can’t achieve—it reads as intentional and thoughtfully planned rather than hastily executed. This approach also allows you to incorporate family jewelry or heirloom pieces into your hairstyle in a way that feels naturally integrated rather than awkwardly pinned on.
Strategic Placement for Maximum Impact
- The decorative element should sit directly where your twist joins the rest of your hair—not floating loosely in the middle of your style
- The ribbon and the accessory should complement each other in color and scale—a delicate ribbon paired with a chunky clip looks unbalanced, as does an ornate ribbon with a tiny accent
- Secure the accessory firmly with bobby pins hidden underneath so it doesn’t shift or rotate as you move throughout your event
- Consider whether you want the ribbon to frame the accessory (trailing behind it) or to wind around it—each approach creates a different visual effect
Worth knowing: If you’re using a family heirloom or meaningful piece of jewelry as your accent, bring it to your styling consultation so your stylist can plan the exact positioning and ensure it’s secure throughout your celebration.
8. Ribbon-Wrapped Crown Braid with Undone Texture
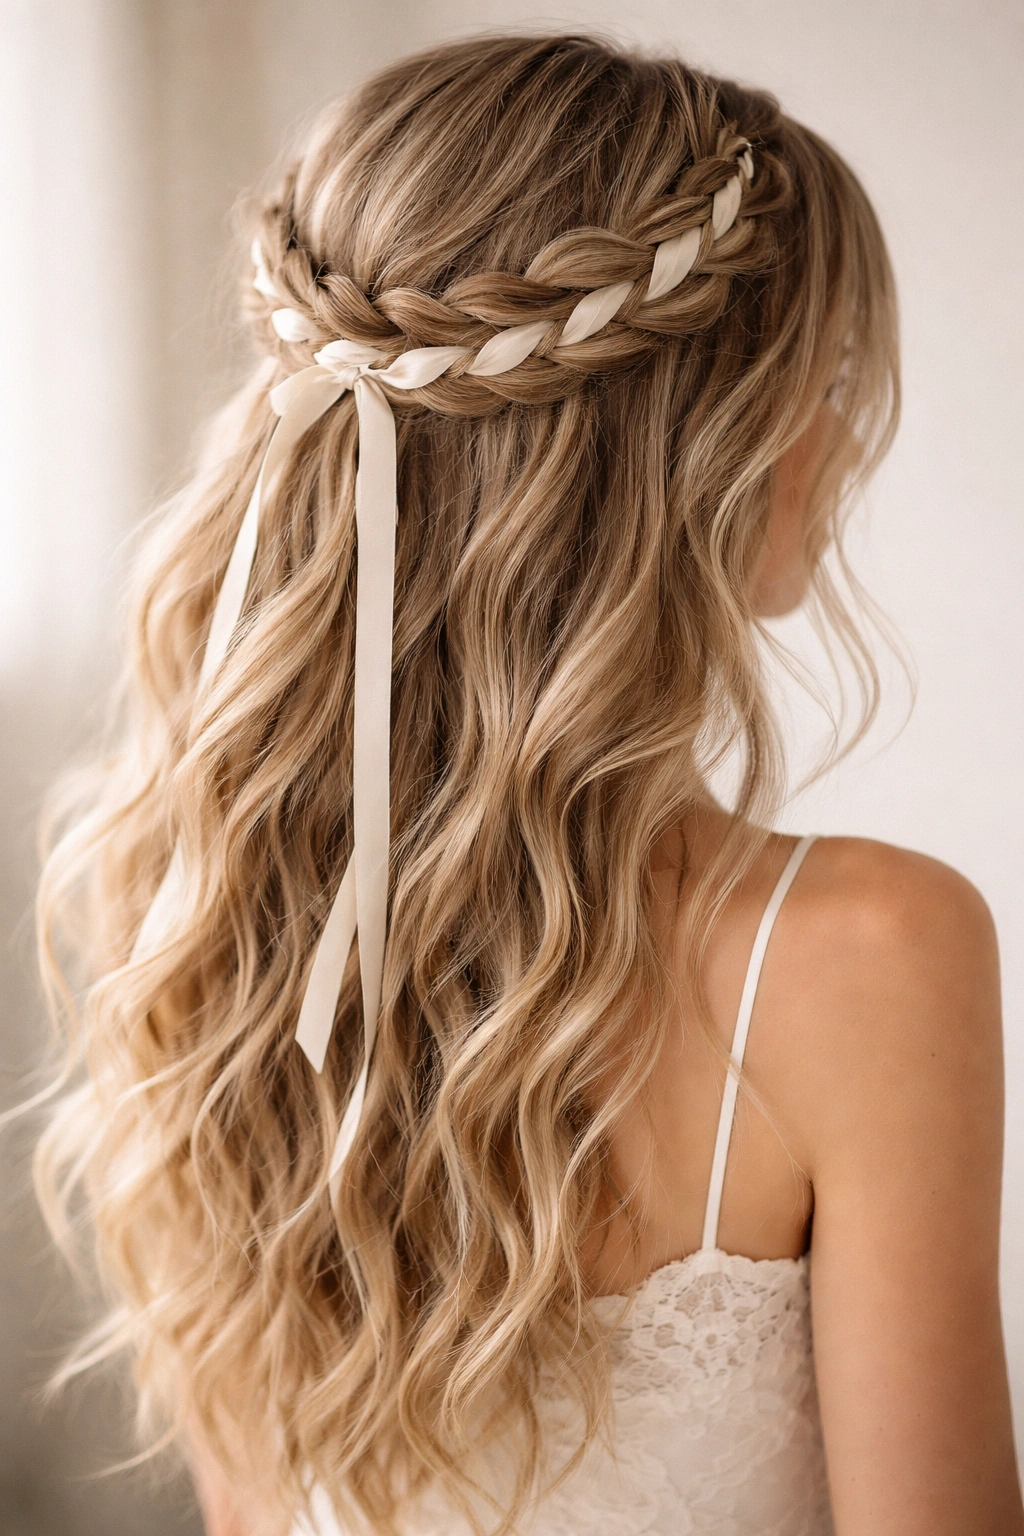
A loose, intentionally undone crown braid travels around the entire perimeter of your head, with a ribbon wrapped around and through it, and the rest of your hair is released into soft, tousled waves or curls that create a relaxed, romantic silhouette. This style bridges the gap between a full updo and a completely down style, providing structure and visual interest while maintaining the soft, approachable femininity of half-up styling.
The Romance of Planned Imperfection
This style embraces a “beautiful mess” aesthetic that appeals to brides seeking something romantic without the rigid perfection of a formal updo. The combination of a structured crown braid with intentionally tousled texture creates visual interest and movement that photographs beautifully while remaining wearable and comfortable throughout a long celebration.
Creating Deliberate Undone Beauty
- Tease your hair at the crown before creating your braid—this adds volume and creates the soft, slightly undone texture you’re seeking
- Create your crown braid with a fairly loose tension, releasing it slightly once complete to create a fuller, more romantic appearance
- Texture your remaining hair with a curling iron using 1.5-inch barrels, creating waves rather than ringlets, and gently tousle with your fingers rather than smoothing with a brush
- Use a light texture spray rather than heavy hairspray to encourage a soft, piece-y appearance rather than a smooth, shellacked effect
Pro tip: Schedule your hair appointment for the morning of your event rather than the day before—this style actually improves as your waves settle throughout the day, and styling it fresh ensures maximum longevity and texture.
9. Dual Ribbon Twist with Asymmetrical Release
This approach uses two different ribbons, each twisted with a separate section of hair gathered from different sides of your head, meeting at a central point at the back where they’re secured together, with the remaining hair released completely on one side and partially on the other for an intentionally asymmetrical effect. The asymmetry creates modern interest while the dual ribbons add visual richness, making this ideal for brides seeking something with personality and contemporary style.
When Asymmetry Feels Intentional Rather Than Accidental
Asymmetrical styling can feel either carelessly unbalanced or deliberately modern, and the difference lies entirely in how consciously you execute it. When you intentionally release more hair on one side, choose complementary but different ribbons, and create visual balance through other elements (jewelry, makeup, bouquet placement), the asymmetry reads as a deliberate, confident styling choice.
Mastering the Asymmetrical Execution
- Create your twists with similar tension and tightness on both sides so they appear intentionally matched even though the ribbons differ
- Gather slightly more hair on the side that will have fuller release—this creates visual balance since longer, fuller hair on one side naturally appears heavier
- Secure your ribbons at the central back point with bobby pins hidden underneath and seal with a small drop of clear nail polish so they don’t accidentally slip
- Consider curling the fully-released side more intensely than the partially-released side to create additional visual interest and balance
Worth knowing: This style requires a confident approach when it comes to explaining your vision to your stylist—bring reference photos showing the specific asymmetrical effect you’re seeking, and discuss whether you want the asymmetry to favor one side based on your face shape or dress details.
10. Ribbon-Threaded Halo Braid with Romantic Waves

A halo braid (also called a crown braid) travels in a circle around your head, starting at one temple and ending at the opposite temple, with a ribbon threaded through the entire braid, and your remaining hair is released below in soft, romantic waves. This style is inherently more formal than a simple crown braid and creates the impression of a princess-like elegance that works beautifully for formal weddings, religious ceremonies, or any event where you’re seeking maximum elegance and romantic aesthetic.
Why Halo Braids Feel Especially Formal
A complete circle around your head creates structural formality and a sense of ceremony that a single-side braid can’t quite achieve—it’s an inherently dressy styling choice that signals intention and care. The halo effect also provides visual interest and texture across a larger area of your head, which is particularly flattering for certain face shapes and hair volumes.
Executing This Technically Demanding Style
- This braid requires more practice than a single-side crown braid because you’re working with sections behind your head where visibility is limited—schedule multiple trial appointments
- Your hair should be slightly damp or have a light texture spray applied before braiding to prevent slipping and to help the braid hold its shape
- Create your braid with even tension throughout, which is more challenging once you move behind your head where you’re working partially by feel
- Thread your ribbon through the entire braid once it’s complete, being careful not to accidentally pull the braid loose as you work
- Pancake the braid once it’s complete to create additional fullness and a romantic, slightly undone appearance
Pro tip: If you have shorter layers around your face, work with your stylist to incorporate those layers into the halo braid smoothly rather than leaving them out, which can create an unfinished appearance.
11. Ribbon-Accented Boho Braid Half-Up with Braided Sections
This style incorporates multiple small braids woven together into a half-up arrangement, with ribbons threaded throughout the various braids, creating a richly textured, bohemian-inspired look that feels romantic and artistic. Unlike more traditional structured braids, this approach intentionally incorporates texture and variation, with some sections tighter and others looser, creating visual interest and personality.
The Aesthetic Appeal of Boho Romance
Bohemian-inspired bridal styling has enduring appeal because it feels less formal and rigid than traditional bridal looks while remaining completely elegant and wedding-appropriate. The layered braids and incorporated ribbons create visual complexity that photographs beautifully and feels special without reading as costume-like or overly trendy.
Building the Boho Layers
- Create 3 to 4 small braids from different sections of your hair—some starting at your temples, others at the crown—rather than creating a single unified braid
- Vary the tightness of the braids intentionally, with some pulled loosely to create a softer effect and others more snug for structure
- Use a single coordinating ribbon threaded through multiple braids rather than a separate ribbon for each braid—this creates visual cohesion
- Gather all your braids together at the back of your head where they join into your half-up arrangement, securing them with bobby pins and tying a ribbon around the base to create a finished appearance
- Allow significant texture and looseness in your remaining hair—curls or waves work beautifully, as does a slightly tousled, piece-y effect
Worth knowing: This style works beautifully with hair that’s been slightly dirty or textured (not freshly washed and smoothly blown out), which means you might actually save styling time by washing your hair the day before your event rather than the morning of.
12. Statement Ribbon Bow with Sleek Half-Up Topknot
This approach creates the most polished, refined variation of ribbon styling by pairing a structured, slightly sleek half-up arrangement with a generous statement ribbon bow that sits at the base. The “topknot” element refers to the half-gathered section being pulled up and back rather than directly at the crown, creating a slightly more sophisticated, less sweet appearance, and the statement bow adds personality and visual impact while maintaining formality.
Why This Works for Modern, Minimalist Brides
If you’re seeking elegance without excessive ornamentation, this style delivers—the ribbon becomes your statement element, allowing everything else to remain refined and streamlined. This approach works beautifully with modern wedding dresses, minimalist jewelry, and clean makeup aesthetics that allow a single statement element to shine.
Achieving the Perfect Balance of Structure and Style
- Gather your half-up section slightly higher and farther back than a traditional half-up arrangement—this creates the topknot elevation and a more polished appearance
- Use a small, firm elastic to secure this section tightly, then wrap your ribbon around the base and tie a generous bow
- Keep the remainder of your hair smoothly styled rather than heavily textured—sleek waves or a polished, shiny finish complements this style better than loose, tousled texture
- Make your ribbon bow full and generous in scale—a tiny, delicate bow looks out of proportion with a more structured style, while a substantial bow reads as intentional and confident
Pro tip: If you’re concerned about your ribbon bow losing its shape throughout your event, lightly spray the bow with a flexible-hold hairspray before your event—this maintains shape without making the ribbon feel stiff or unnatural.
Final Thoughts
Ribbon-enhanced half-up half-down hairstyles offer a beautiful middle ground between the casual accessibility of wearing your hair fully down and the formal structure of a complete updo, and they provide endless room for personalization through ribbon selection, color coordination, and styling technique variation. The ribbon itself becomes a powerful styling tool—it can add softness and romance, create structure and visual interest, incorporate meaningful colors into your overall bridal aesthetic, or simply catch light in a way that makes your hairstyle feel special and intentional without overwhelming your face or requiring impossible styling expertise.
Whether you’re drawn to the simplicity of a single ribbon loop, the complexity of multiple braids with woven ribbons, or something that falls anywhere in between, the key to a successful half-up half-down style is ensuring your hair has the right foundation—adequate volume and texture, proper sectioning, and thoughtful styling products that provide hold without looking heavy or artificial. Most importantly, choose a style that aligns with your overall wedding aesthetic, your personal comfort level with styling maintenance, and a ribbon choice that genuinely excites you, since a hairstyle you feel confident and beautiful wearing always photographs better than a technically perfect style that doesn’t make you feel like yourself. Work closely with a skilled stylist who has experience with ribbon styling, plan multiple trial appointments to finalize your vision, and give yourself permission to make small adjustments based on how the style actually feels and photographs on your unique hair and face.