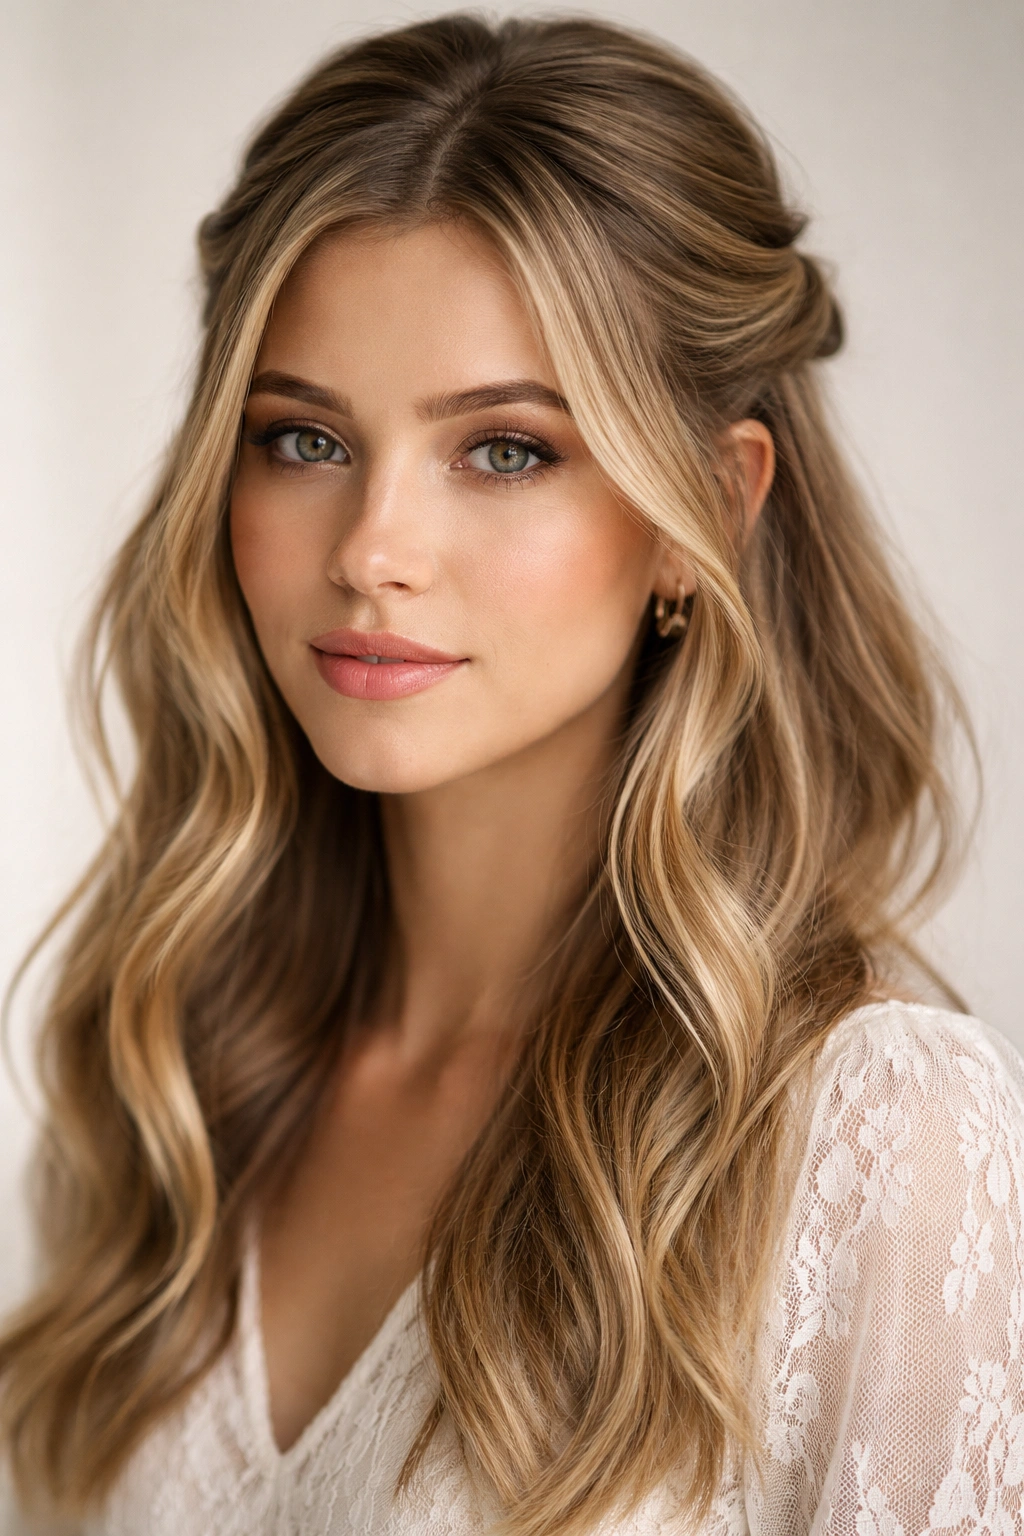
A half up half down hairstyle gives you the best of both worlds—you’ve got the polished pulled-back look paired with the romantic, flowing volume of your hair down. Add braids into the mix, and suddenly you’ve got a style that works for nearly any occasion, from casual weekend plans to weddings and special events. Medium-length hair is honestly the sweet spot for this approach because you’ve got enough length for visible braids but not so much that the style becomes heavy or overly complicated to manage.
The real magic of braided half up half down styles is their versatility. Whether you’re going for effortlessly undone and bohemian or sleek and intentional, a braid can take your look from basic to genuinely Instagram-worthy in just a few minutes. The best part? Most of these styles don’t require a ton of technical skill—you just need the patience to practice once or twice, and soon you’ll be able to create them while half-watching your favorite show.
Medium-length hair sits somewhere around shoulder-length to a few inches below, which is the perfect canvas for experimenting with braids. Your hair’s long enough that the braid stands out visually and holds its shape, but not so long that you’re struggling to work with a massive amount of hair. Plus, if you’re looking for a way to keep hair out of your face on humid or active days while still looking intentional and put-together, these styles deliver exactly that.
Let’s dive into some seriously gorgeous braided half up half down styles that’ll work beautifully with medium-length hair.
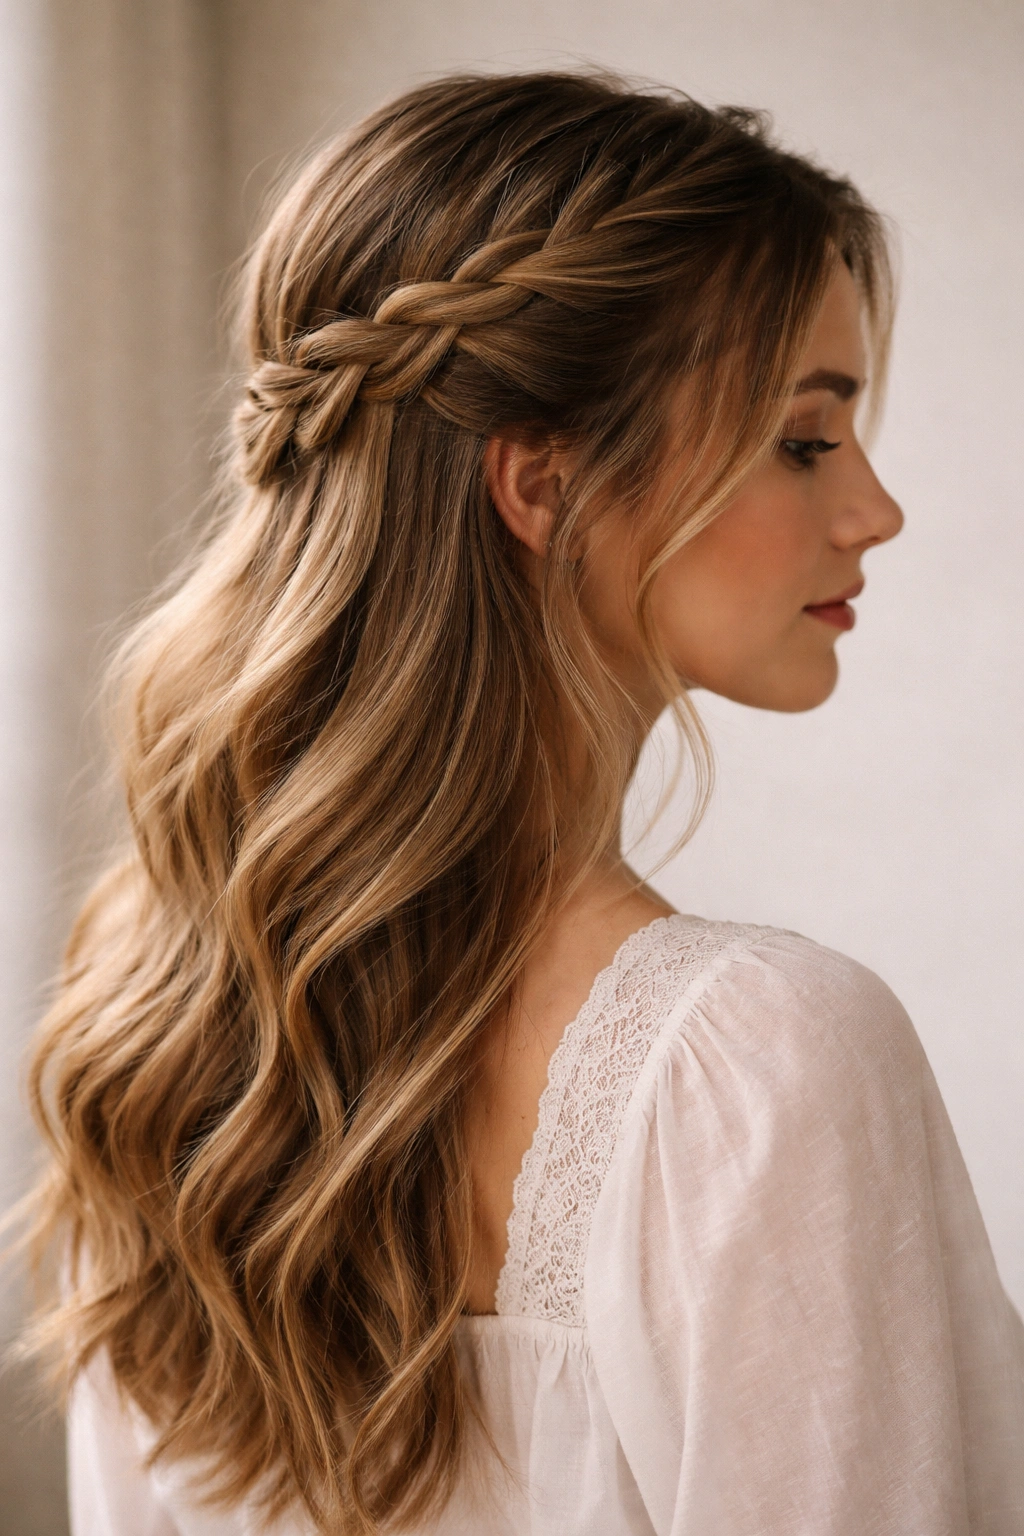
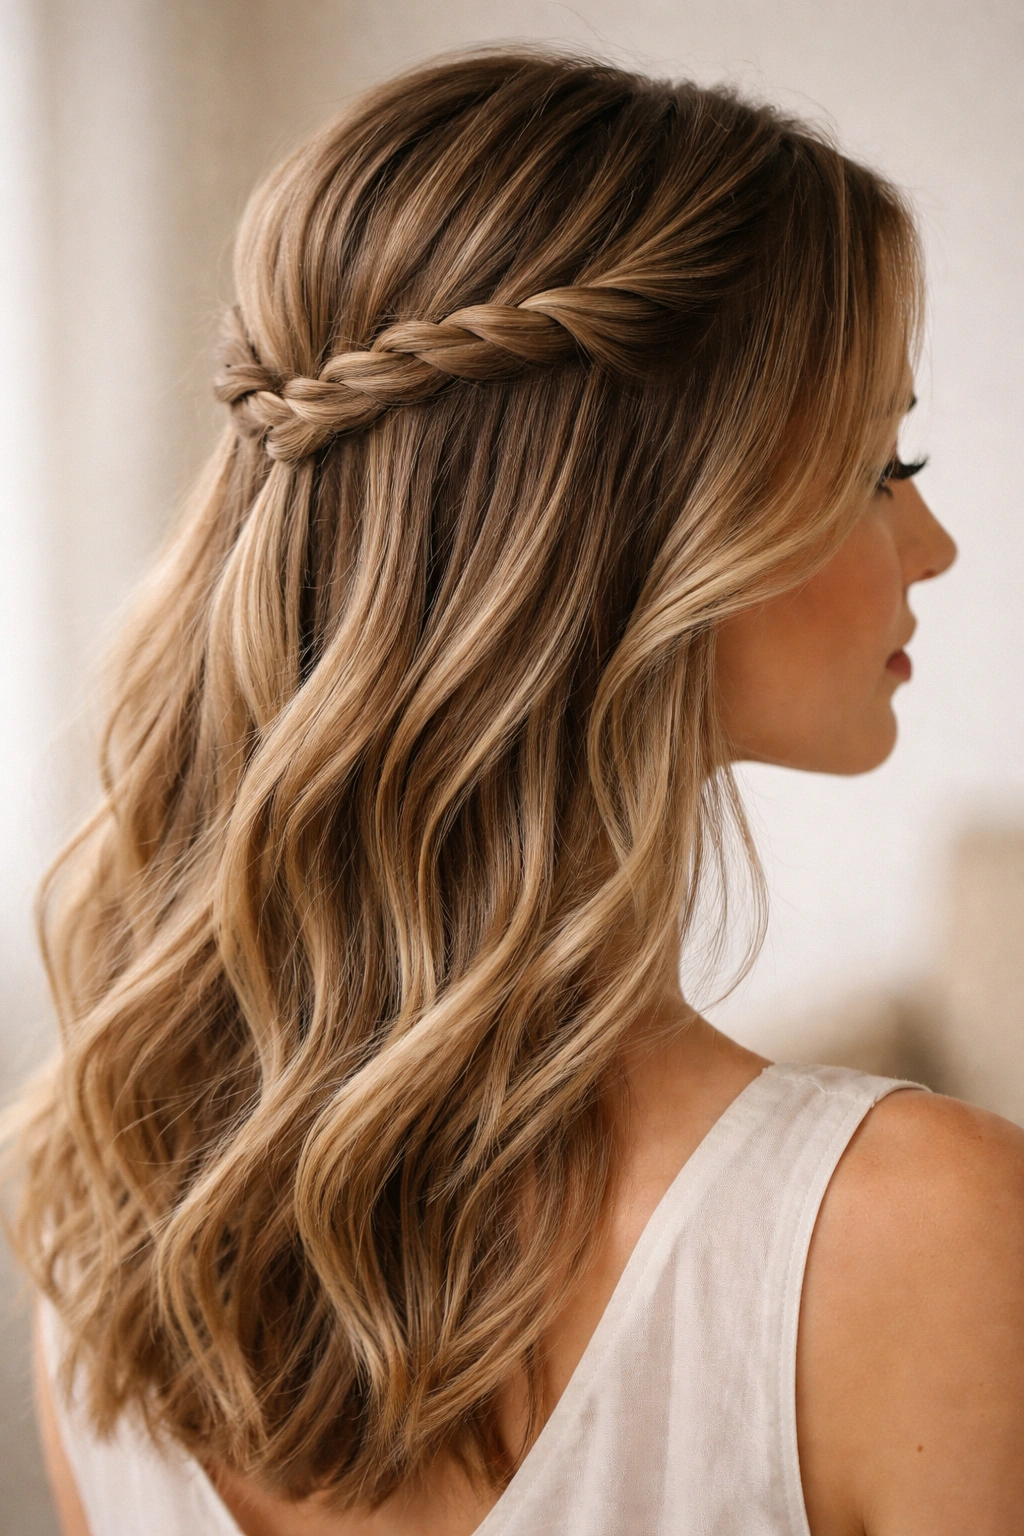
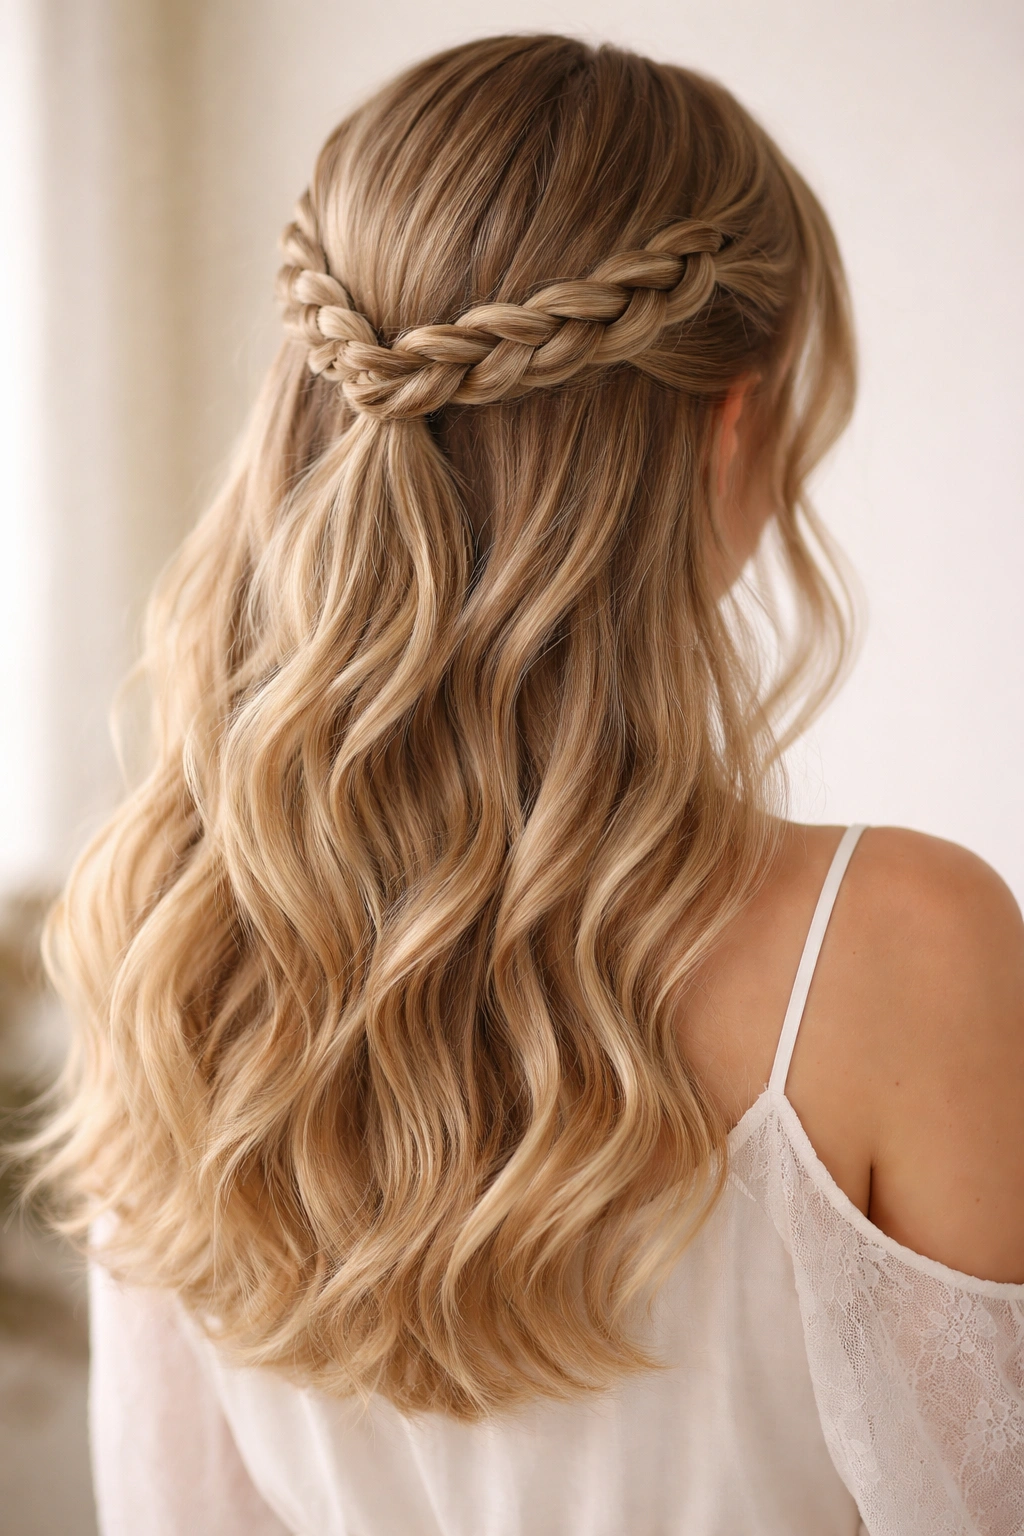
1. Classic French Braid Half Up

This style starts with the most foundational braid technique and uses it in a modern, flattering way. Begin by taking a section of hair from one side of your head at about temple level, then French braid backward toward the crown, picking up pieces from both sides as you go. Once you reach the back of your head, secure the braid with a clear elastic or bobby pin, leaving the rest of your hair down to frame your face and shoulders.
Why It Works for Medium Hair
French braids are forgiving on medium lengths because the braid has enough texture to show its definition without disappearing into your hair. The backward motion creates dimension and keeps the style from looking flat against your head.
How to Perfect It
- Start the braid at your temple rather than at the crown—this creates a more flattering angle and prevents the style from pulling too tightly on your hairline
- Use a light texturizing spray or sea salt spray before braiding for better grip and definition
- Don’t make the braid too tight; slightly loose braids look more romantic and modern than overly controlled ones
- Gently pull at the sides of the braid after securing it to create a fuller, more dimensional look
Pro tip: If your braid looks a bit sad and flat after a few hours, quickly spritz it with dry shampoo and finger-comb it to refresh the texture.
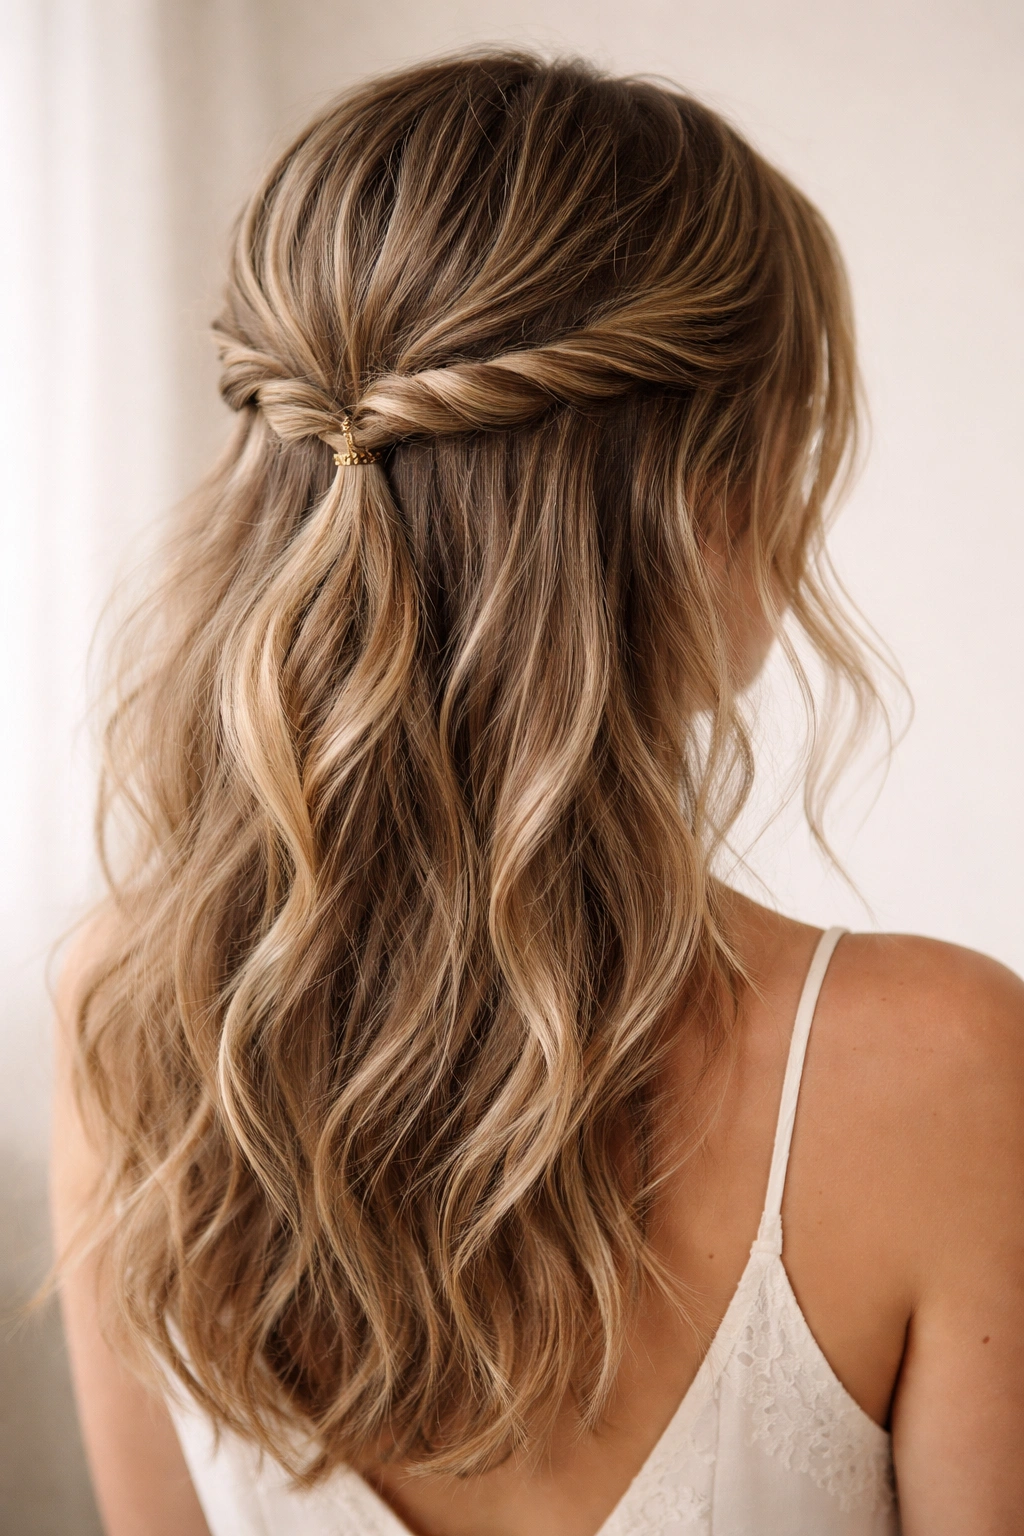
2. Twisted Half-Up Style
Sometimes the simplest approach is actually the most elegant. For this style, take a section of hair from each side near your temples and twist them loosely as you move toward the back of your head, creating two soft spirals. Bring both twisted sections to meet at the crown and secure them together with a bobby pin or elastic. This creates the pulled-back effect of a half up without requiring any braiding skill.
Why Twists Are Underrated
Twists give you all the visual interest of a braid with arguably less technical work. They also tend to look more effortlessly undone, which is perfect if you’re aiming for that “I woke up like this” vibe.
Making It Work
- Use slightly damp or textured hair for better grip—completely smooth, freshly washed hair will slip out quickly
- Twist loosely and in one direction consistently for a cohesive look
- Leave some face-framing strands untwisted to soften the style and prevent it from looking too severe
- Secure with bobby pins that match your hair color so they disappear into the style
Worth knowing: You can make this style hold for an entire day or night by lightly misting each twisted section with hairspray before securing it at the crown.
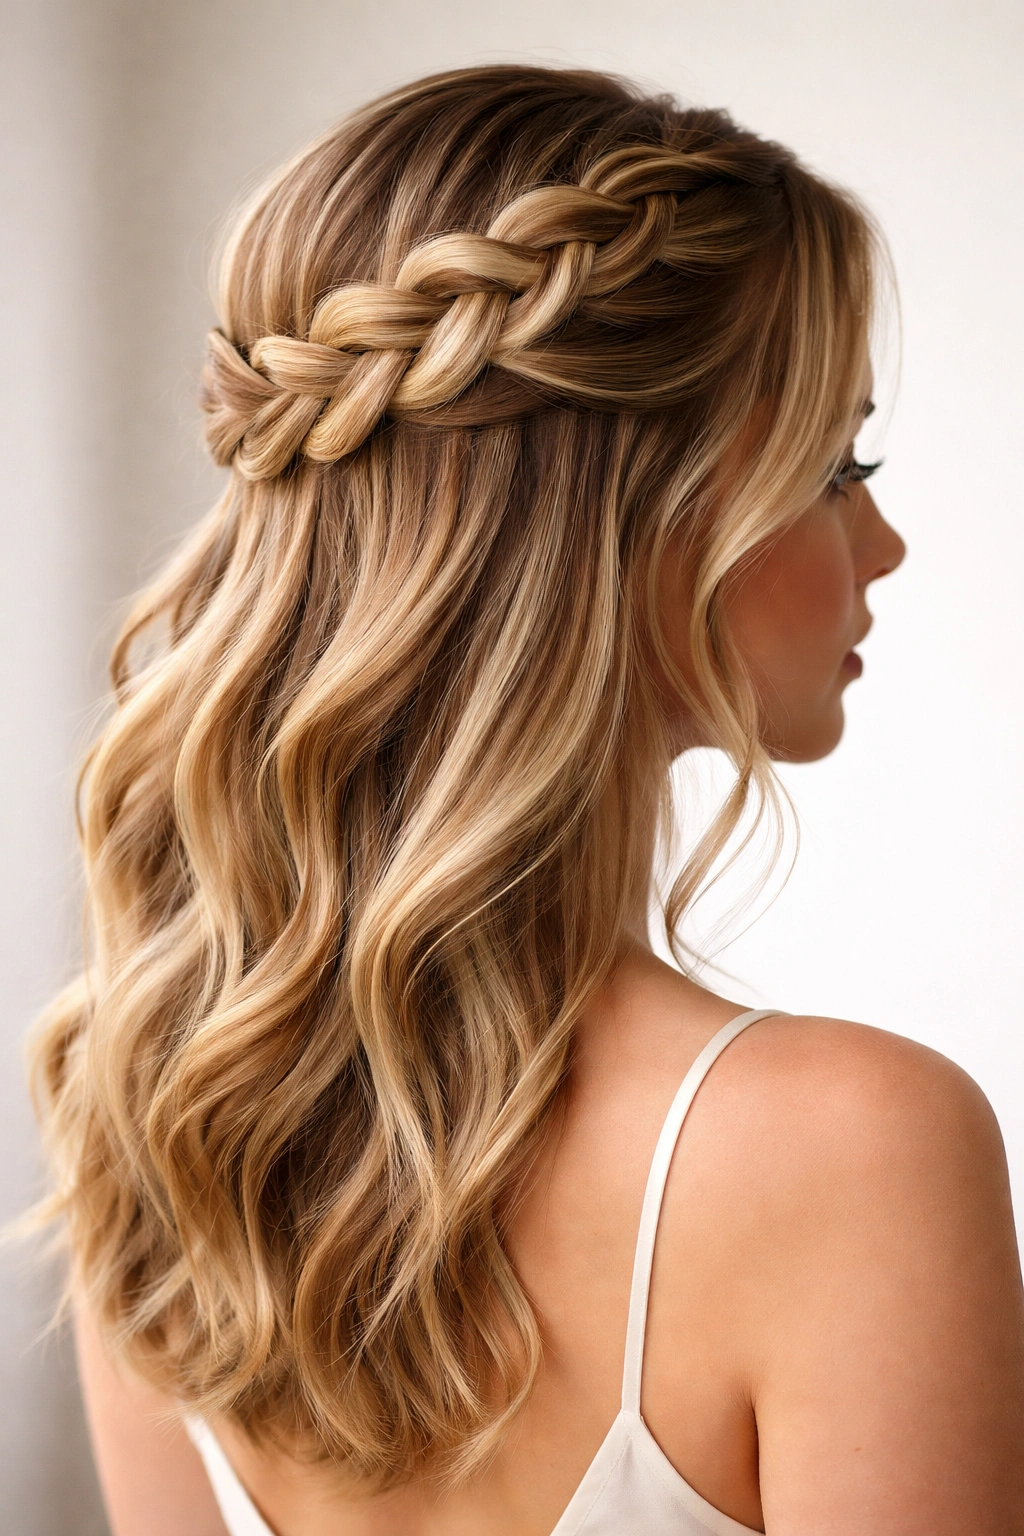
3. Dutch Braid Half Up
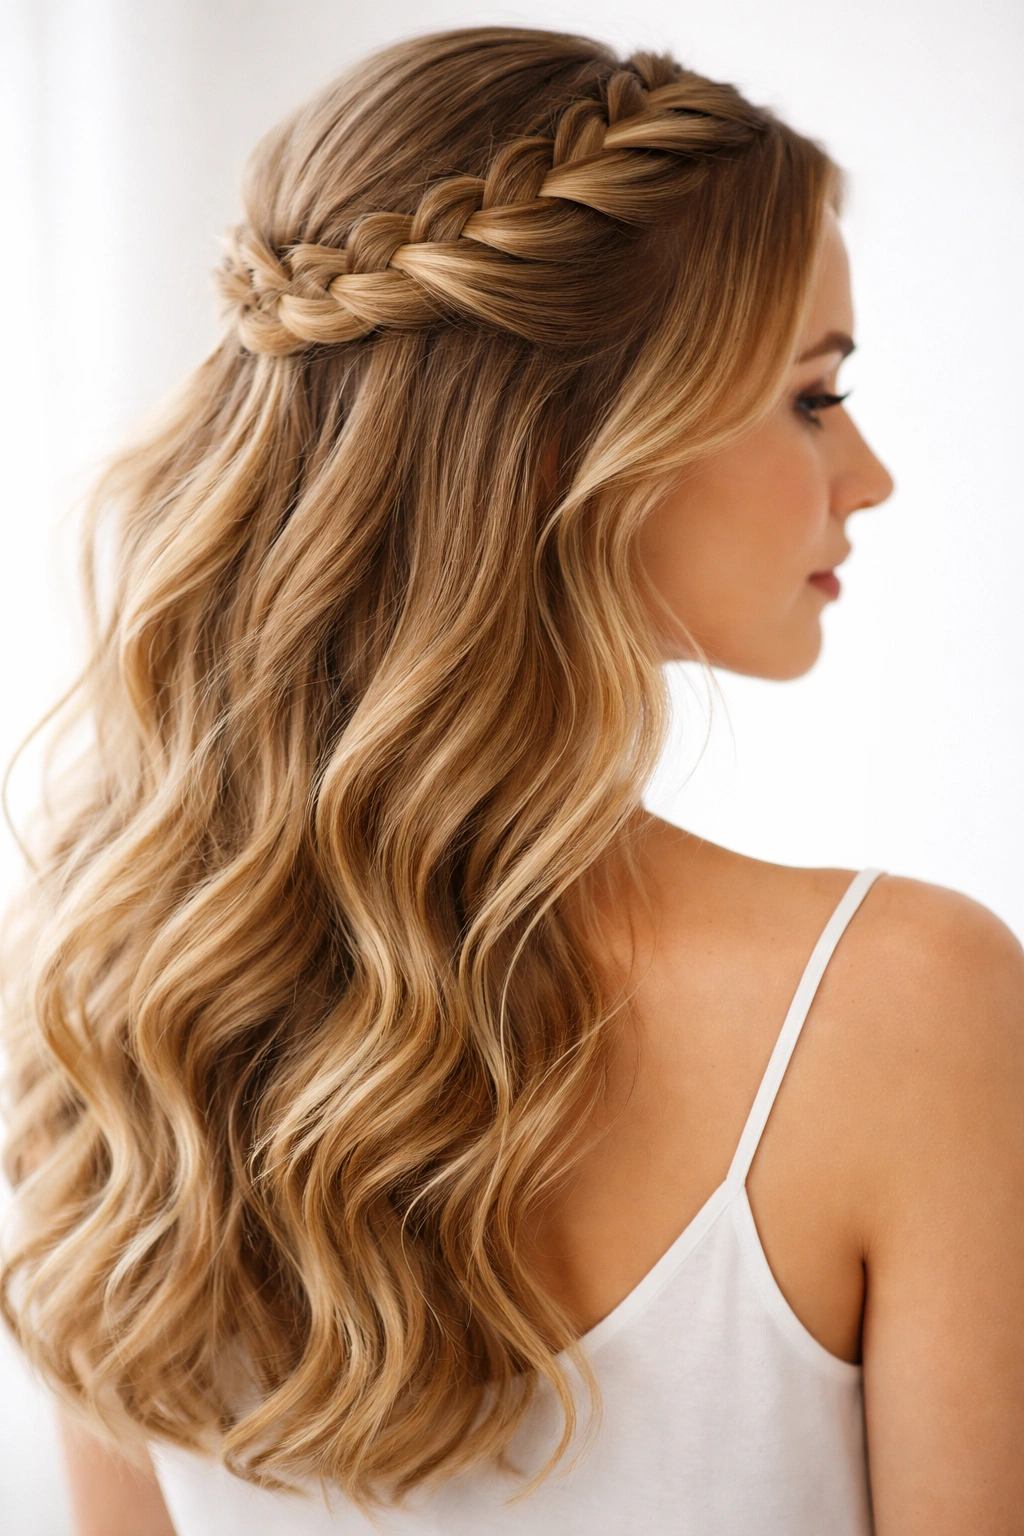
Dutch braiding is essentially a French braid in reverse—instead of crossing strands over the center, you cross them under. This creates a raised, almost embossed appearance that’s incredibly striking and modern. Start the Dutch braid from one side of your head and work backward toward the crown, picking up hair as you go, then secure at the back.
What Makes Dutch Braids Stand Out
This braid style creates more visual texture and stands out more boldly against your hair than a French braid. It’s perfect if you want people to actually notice the braiding work you put in.
Pro Tips for Dutch Braiding
- Practice on dry or slightly damp hair first—wet hair can be slippery and harder to control while you’re learning the reversed motion
- Keep the braid closer to the surface of your scalp rather than deep in your hair for maximum visibility
- Gently underbraid the sections if you want extra texture and dimension
- Pair with loose waves or curls on the bottom for a truly stunning contrast
Real talk: Dutch braids take a few more tries to nail than French braids if you’re new to braiding, but once you get it, you’ll love how much more interesting they look.
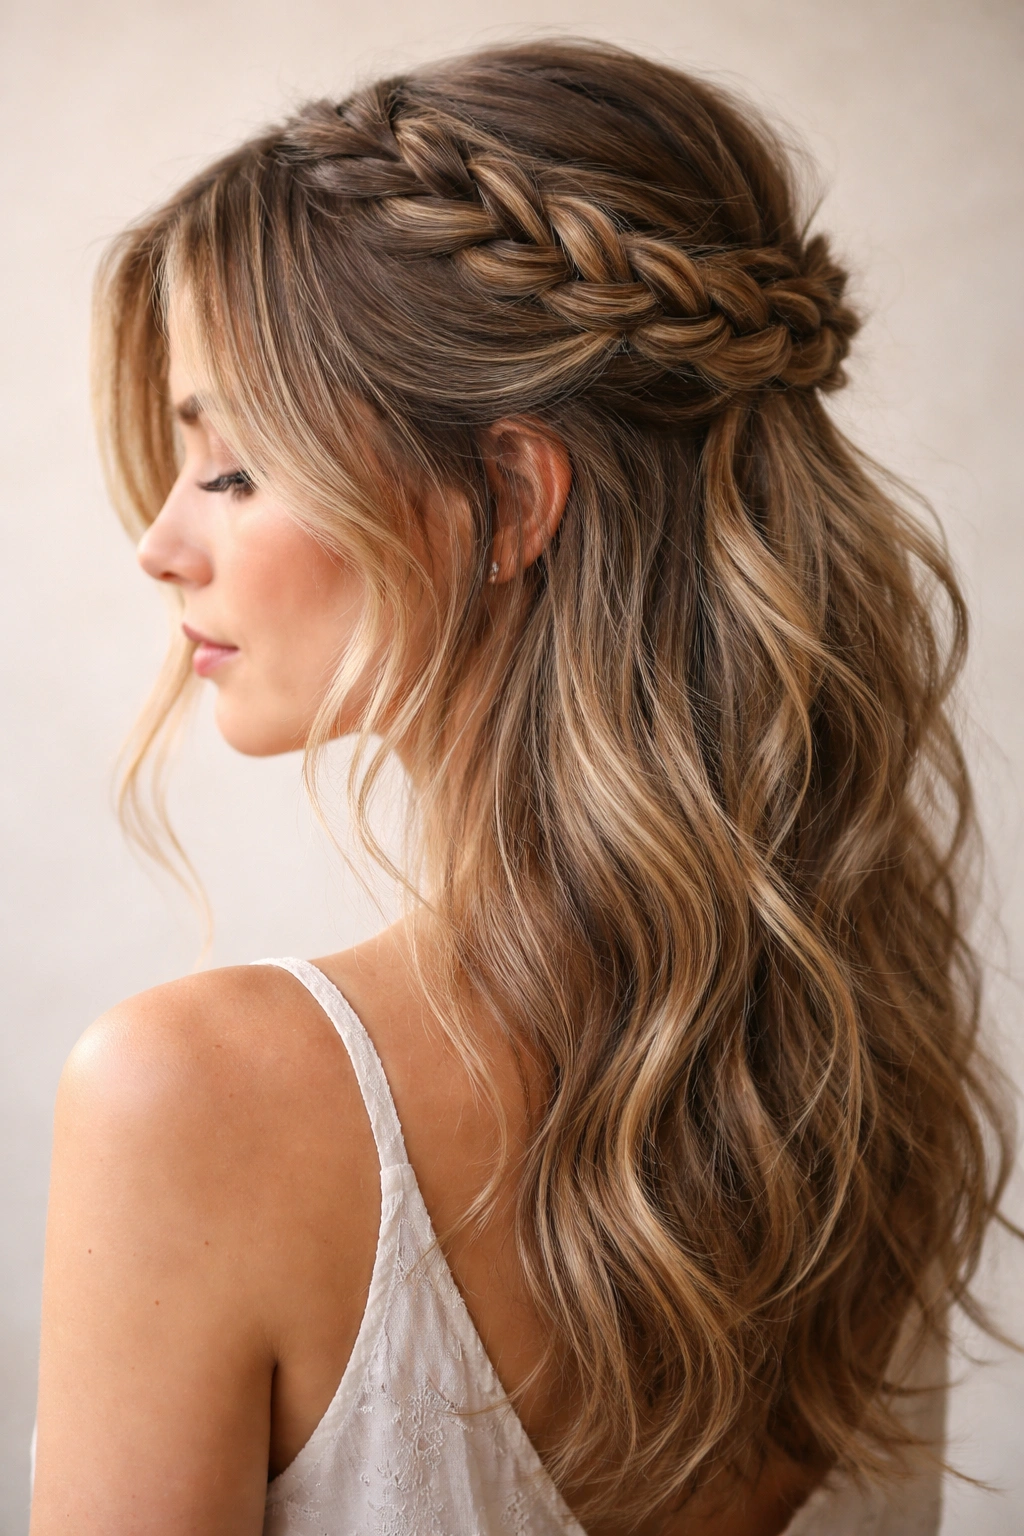
4. Crown Braided Half Up
This style creates the illusion of a full crown braid while only actually braiding the top portion of your hair. Start by creating a Dutch or French braid that begins at one ear, curves across the back of your head, and ends at the opposite ear. Secure it with bobby pins that are hidden by the braid itself, and leave all your hair down below this “crown.”
Why This Works as a Half-Up Style
You get the sophisticated, romantic feeling of an updo without actually pinning most of your hair up. It’s the perfect compromise for people who want that polished look but aren’t ready to commit to a full upstyle.
Creating the Crown Effect
- Make sure your braid is loose enough to sit comfortably around your head for hours without causing tension headaches
- Use a spray to add texture beforehand so the braid holds its shape and doesn’t slip
- Pin the braid at multiple points along the way rather than relying on one elastic to hold everything
- Leave face-framing pieces down on both sides to soften the crown and create dimension
Style tip: This pairs beautifully with soft waves or loose curls in the hair that hangs down—the contrast between the structured braid and the flowing curls is genuinely gorgeous.
5. Fishtail Braid Half Up
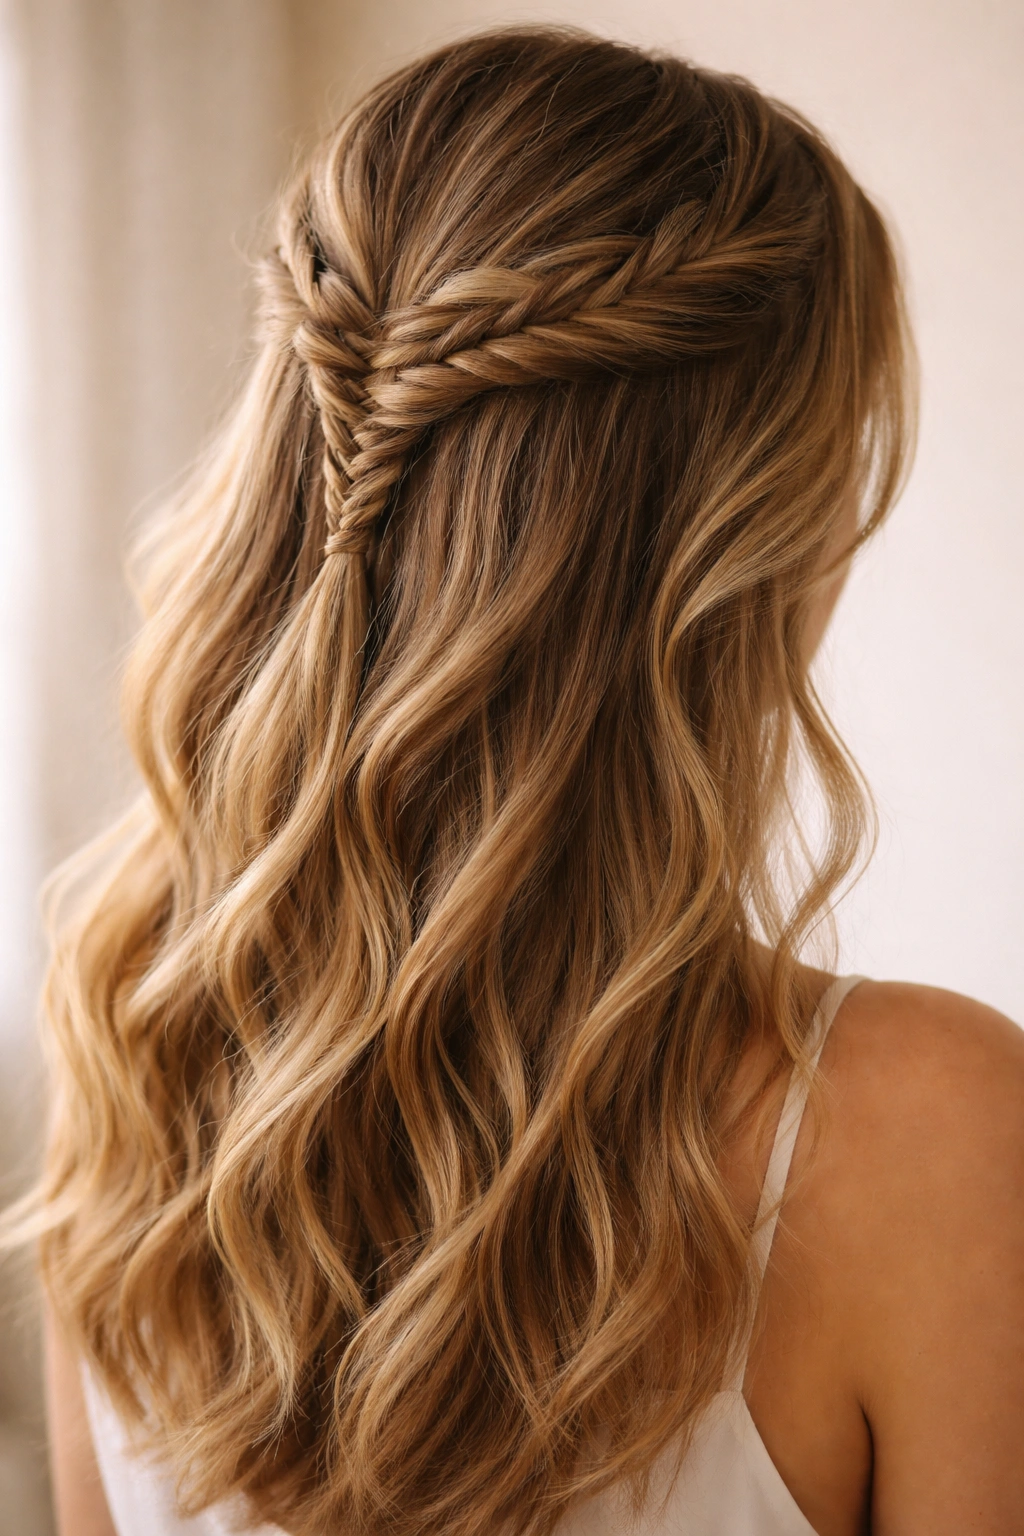
Fishtail braids have that delicate, intricate look that makes people think you spent an hour on your hair, when really they’re one of the fastest braids to create. Take a section of hair from one side at temple height, divide it into two sections, then cross thin pieces from the outside of one section to the inside of the other, alternating back and forth. Once you’ve created the braid, secure it at the back of your head at the crown.
The Fishtail Advantage
This braid looks incredibly detailed and textured because of all the tiny crossing pieces, but it actually moves much faster than traditional three-strand braids. Plus, fishtail braids look amazing slightly undone and tousled.
How to Execute It Flawlessly
- Use textured or slightly damp hair for better grip on the small sections you’re working with
- Don’t stress about making the sections perfectly thin—slightly thicker sections still look great and are easier to control
- After securing, gently pull at alternating sides of the braid to create the signature fishtail look and fullness
- The looser and messier this braid, the better—fishtails improve when they’re a bit undone
Insider note: If you find the traditional fishtail frustrating, try creating it in two separate sections and pinning them together at the crown—it’s actually faster and looks just as good.
6. Side Swept Braid
Instead of pulling your half-up section straight back toward the crown, take a braid or twisted section from one side of your head and sweep it diagonally across the back of your head before pinning on the opposite side. This creates an asymmetrical, romantic look that’s perfect for side-parted hair and adds visual interest and movement.
Why Asymmetrical Is So Flattering
Diagonal lines are inherently more flattering and dynamic than perfectly centered styles. A side-swept braid also works beautifully whether you have a round, oval, square, or heart-shaped face.
Perfecting the Side Sweep
- Start your braid at ear level on one side rather than at the temple for a more dramatic sweep
- Braid fairly loosely so the style maintains that effortless, romantic feel
- Pin behind your opposite ear or slightly lower for a modern, unbalanced look
- Leave longer face-framing pieces on your larger side to balance your features
Pro tip: This style looks absolutely stunning with a deep side part and volume at the crown—it photographs beautifully and feels genuinely special.
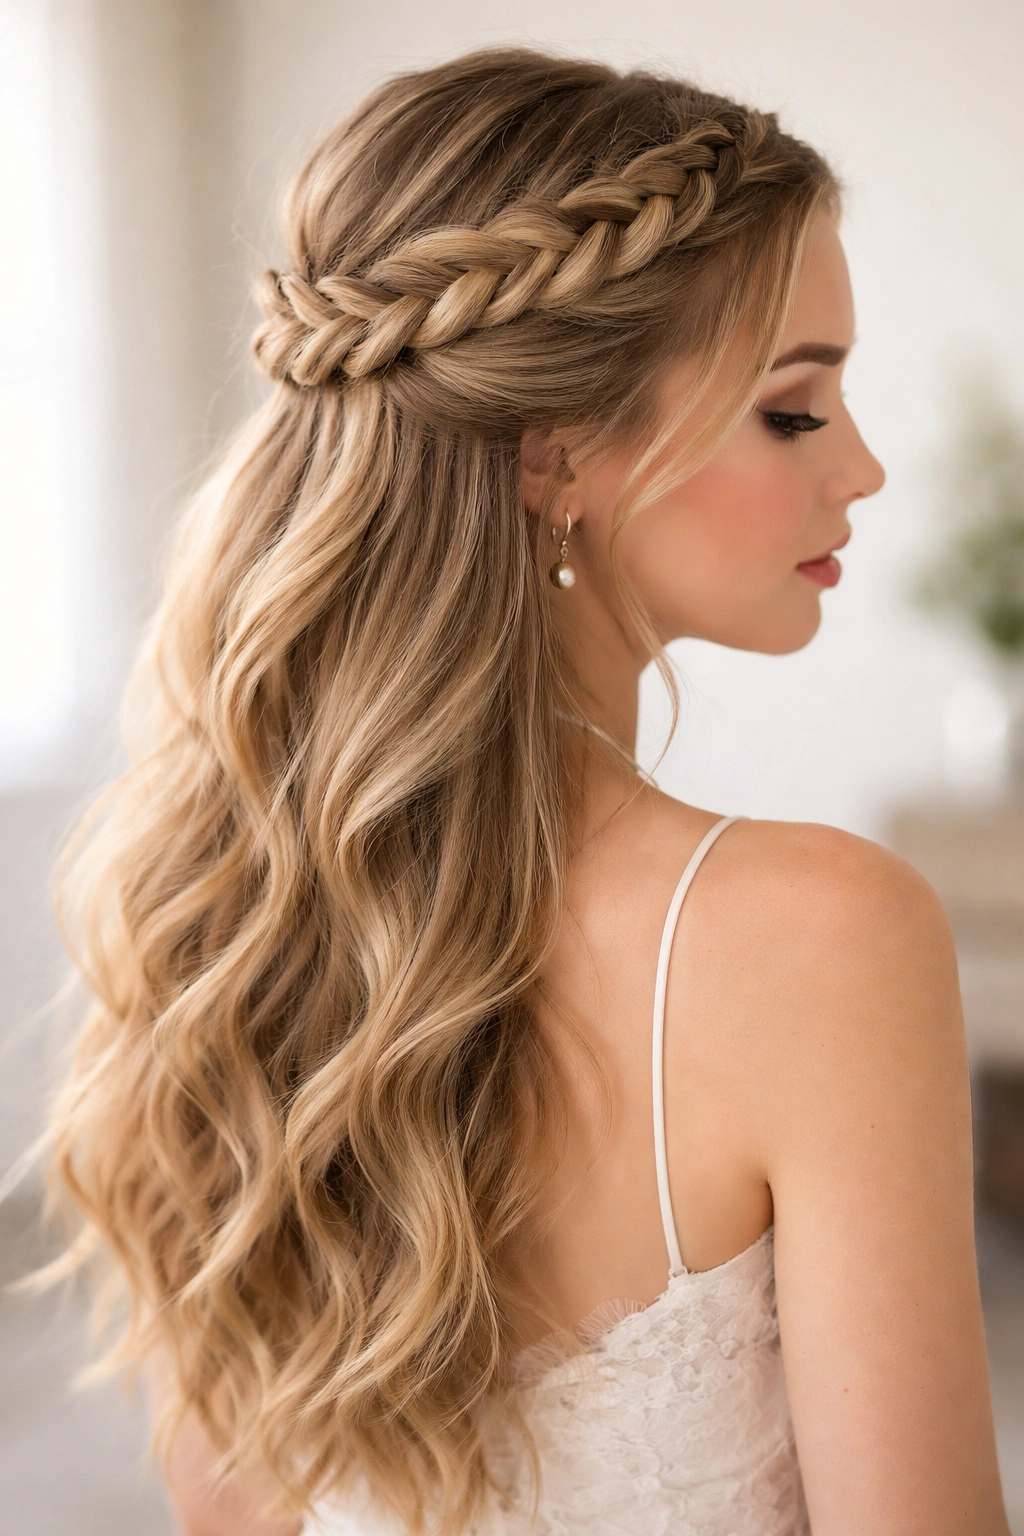
7. Double Braided Half Up
Why settle for one braid when two create even more impact? Create two French or Dutch braids that start on either side of your head near your temples and meet at the crown, where you secure them together with one elastic. This creates a symmetrical, balanced look that’s polished without being overly formal.
The Power of Symmetry
Double braids instantly make a style feel more intentional and put-together. On medium-length hair, two braids also distribute the visual weight better than a single braid.
Making Two Braids Work
- Make sure both braids are equally tight and follow the same path for a balanced, intentional appearance
- Start both braids at the exact same height on either side of your head
- Gently tease both braids after securing for fullness and texture
- Leave a few face-framing pieces down on either side to soften the symmetric look
Worth noting: Double braids work especially well if you have a center part—they frame your face beautifully from both sides.
8. Waterfall Braid Half Up
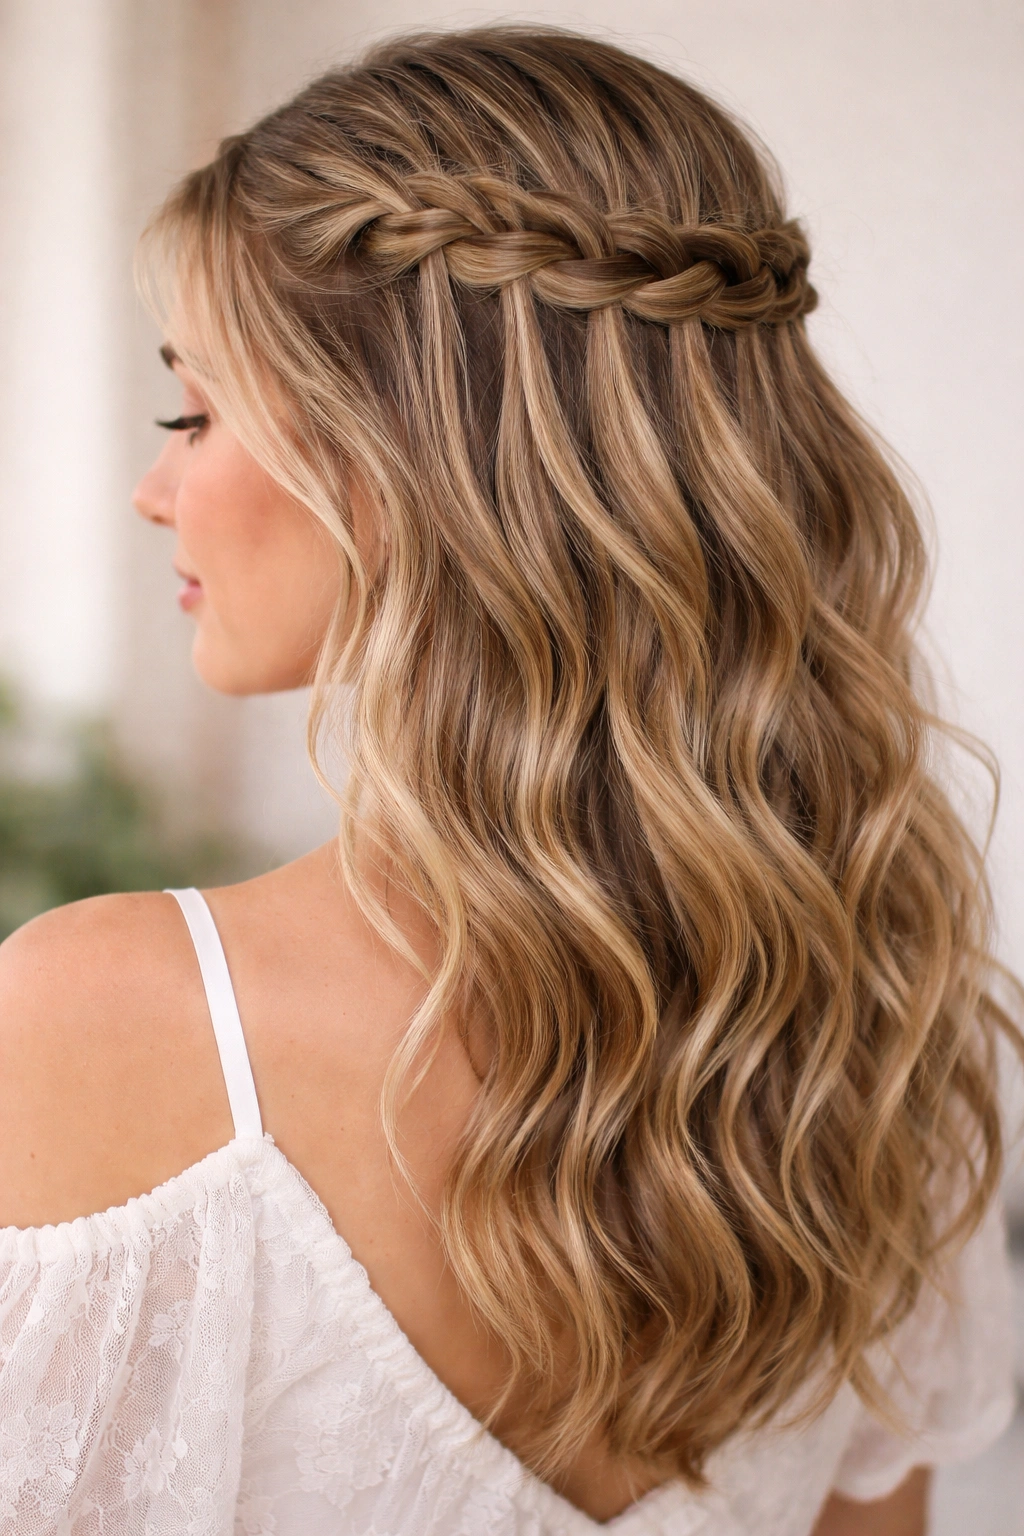
Waterfall braids create that cascading, flowing effect by dropping sections of hair out of the braid as you go. Start a three-strand braid from one side of your head, but instead of picking up a new piece to replace the strand you’d normally use, let that strand fall and pick up a new piece from above instead. This creates the “waterfall” effect of strands flowing down while the braid curves across the back of your head.
The Visual Impact of Waterfall Braids
This braid combines the neat, intentional look of a braid with the romantic, flowing quality of loose hair. It’s genuinely one of the most visually interesting braid styles available.
Nailing the Waterfall Technique
- Practice the basic motion on a friend or on a mannequin head first—it’s easier to visualize when you’re not trying to see the back of your own head
- Use hairspray to add texture and grip before you start
- Don’t worry if some sections fall out unevenly—slight imperfection makes this style look more romantic
- Create the waterfall effect on both sides (left side and right side) for extra impact
Style secret: Pair a waterfall braid with loose waves or curls for maximum romance—the combination of structured braiding and flowing texture is absolutely stunning.
9. Bohemian Twisted Half Up
This is the ultimate effortless, undone-looking style that somehow still feels put-together. Take two sections of hair from either side near your temples and gently twist them together as you move toward the crown, but don’t make them too tight or perfect. Secure at the back with a bobby pin, and make sure some wisps and flyaways escape around your face and at the crown.
The Intentional Imperfection
Bohemian styles work because they look like you didn’t try too hard, even though you absolutely did. The key is leaving plenty of texture, wisps, and intentional looseness throughout.
Creating Authentic Boho Vibes
- Start with slightly textured or wavy hair—boho never works on perfectly smooth, sleek hair
- Use dry shampoo or sea salt spray to add grit and hold without making hair look dirty
- Twist loosely and let sections fall slightly as you work
- Leave multiple face-framing pieces down to create that romantic, slightly undone effect
- Pull at the twists gently to add fullness and dimension
Real talk: This style improves over a day or two as the twists relax and settle, so don’t panic if it’s too tight when you first create it.
10. Messy Half-Up Braid
Not every half-up braid needs to be neat and pristine. A deliberately messy braid actually takes more finesse to create than a tight one because you need to intentionally pull sections out for texture while maintaining enough structure that it doesn’t completely fall apart. Start a French or Dutch braid from one side of your head, then gently pull at alternating sides of the braid as you go to create a fuller, messier appearance.
Why Messy Is Actually Better
Messy braids look more modern, more romantic, and honestly more flattering on most hair types than super-tight, controlled braids. They’re also way more forgiving if you’re having a less-than-perfect hair day.
Executing Intentional Messiness
- Create your braid as normally, but use slightly looser tension throughout
- Begin pulling the braid apart before you’ve even finished braiding—add texture as you go
- Make sure both sides of the braid are equally pulled out so it looks intentionally messy rather than accidentally sloppy
- Don’t be afraid to grab bigger sections—bigger texture reads as more deliberate
Pro tip: The best time to pull apart your braid and add texture is right after you’ve secured it, while it’s still fresh. Wait an hour and it’s much harder to adjust.
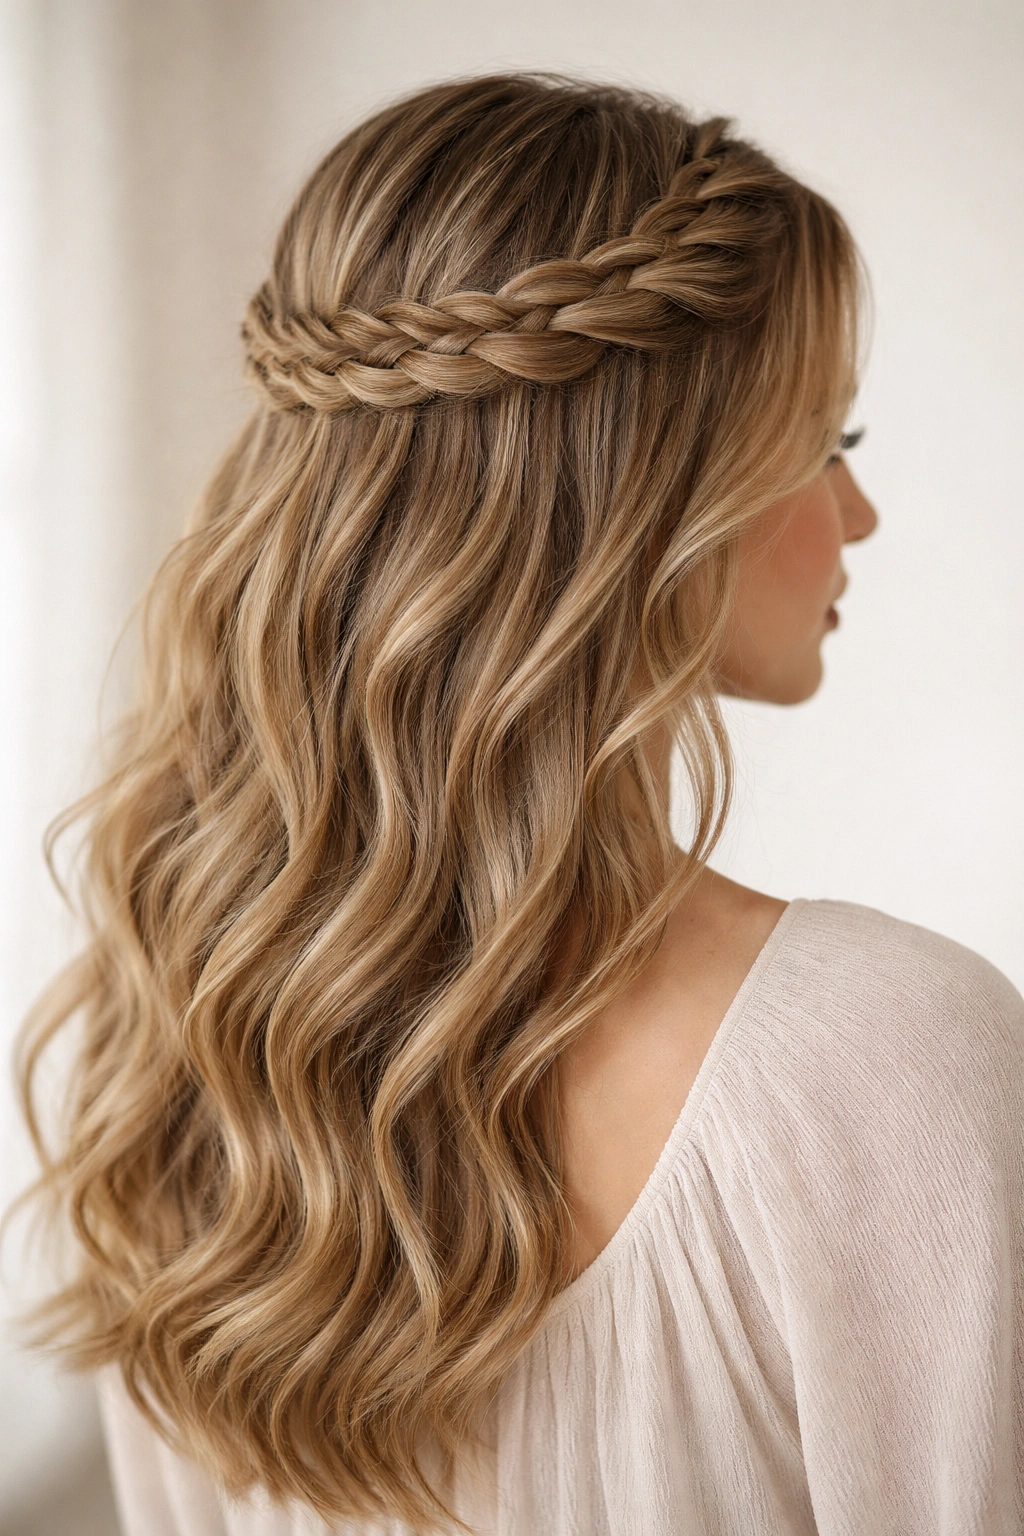
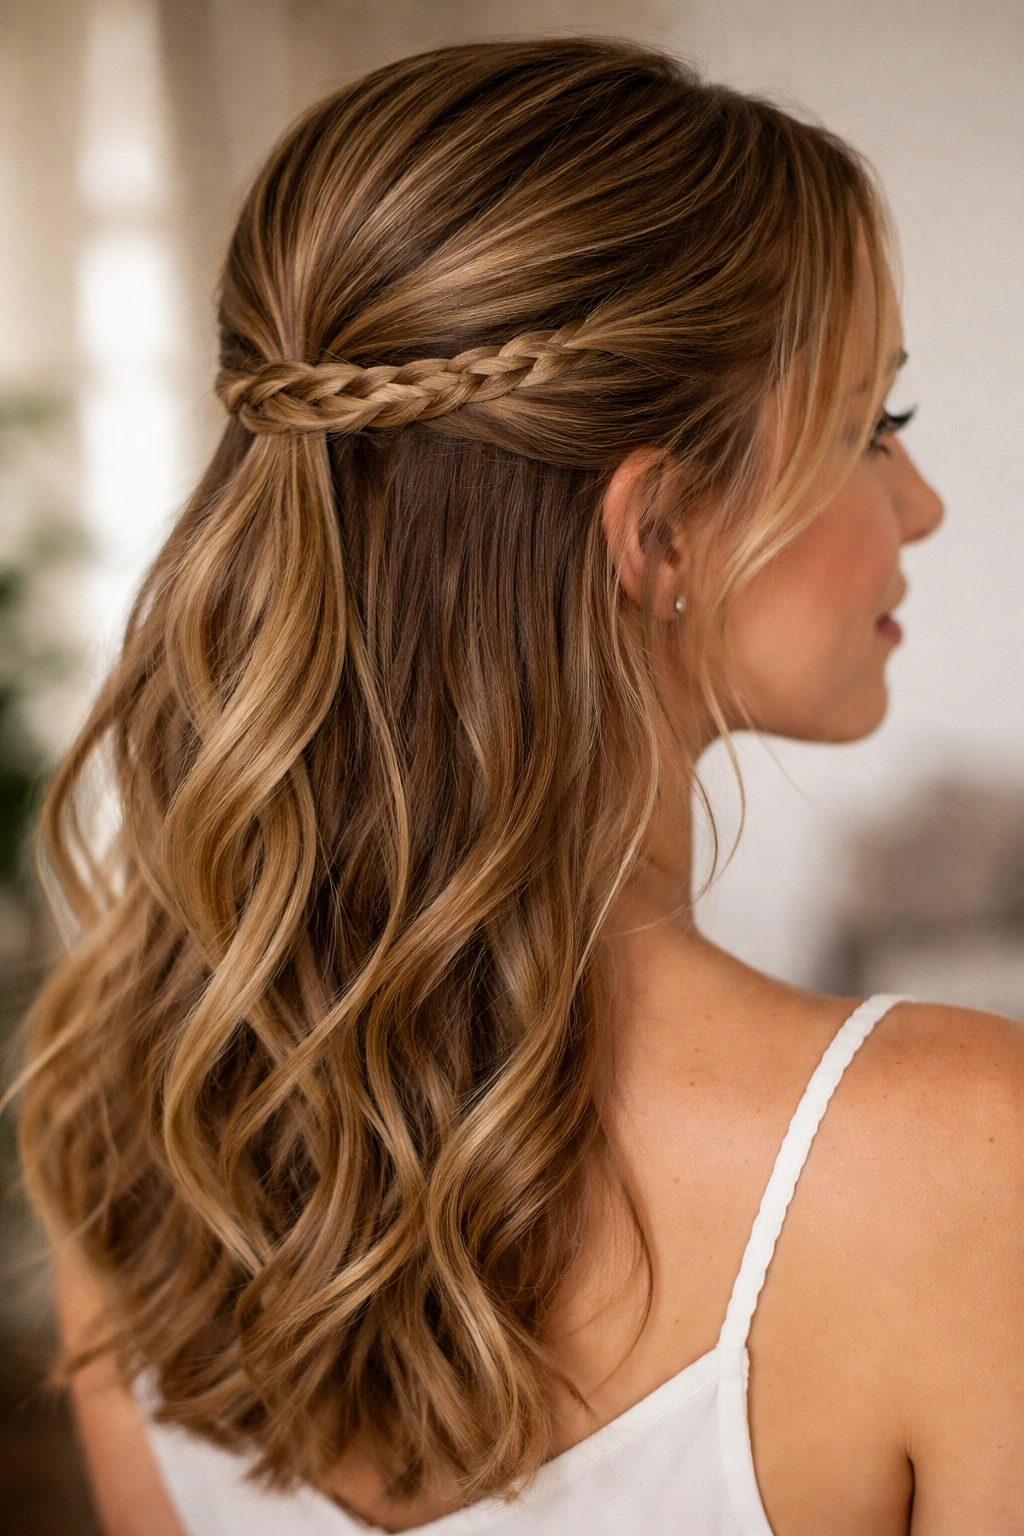
11. Rope Braid Half Up
Rope braids look impossibly intricate but are actually one of the simplest braid variations to execute. Take a section of hair from one side of your head and divide it into two sections. Twist each section individually in the same direction, then wrap the two twisted sections around each other in the opposite direction. Secure at the crown to create a twisted, rope-like braid that looks far more complicated than it actually is.
Why Rope Braids Are Secret Weapons
This braid creates incredible texture and visual interest with minimal effort. It’s perfect if you’re short on time but still want to look intentional and polished.
Getting Rope Braids Right
- Twist each section tightly before wrapping them together—this creates the best definition
- Make sure both initial sections are twisted in the same direction, then wrap opposite
- Pull gently at the final rope to add texture and dimension
- This style works beautifully looser than traditional braids, so don’t stress about perfect tightness
Worth knowing: Rope braids actually work better on slightly textured or second-day hair—slippery, freshly washed hair doesn’t cooperate as well.
12. Three-Strand Braid with Loose Waves

Sometimes the most classic approach is exactly what you need. A simple three-strand braid pulled into a half-up style and paired with loose waves or curls creates that perfect balance of polished and romantic. Start your braid from one side of your head and work it back toward the crown, using a standard braiding motion, then secure it and curl or wave the hair that falls down.
Timeless for a Reason
There’s something eternally beautiful about a classic braid paired with flowing waves. This combination works for everything from casual daily styling to special events.
Making It Work Flawlessly
- Create your three-strand braid slightly loose for a modern, soft feel
- Gently pull the braid apart after securing to create more dimension
- Use a curling iron or wand to create loose waves in the hair that hangs down, curling away from your face
- The contrast between the structured braid and the flowing waves is what makes this style work
Styling secret: Tousle your waves slightly with your fingers after curling them—tight, perfect waves look dated, but relaxed, undone waves feel current and flattering.
13. Half Up Top Knot with Braid
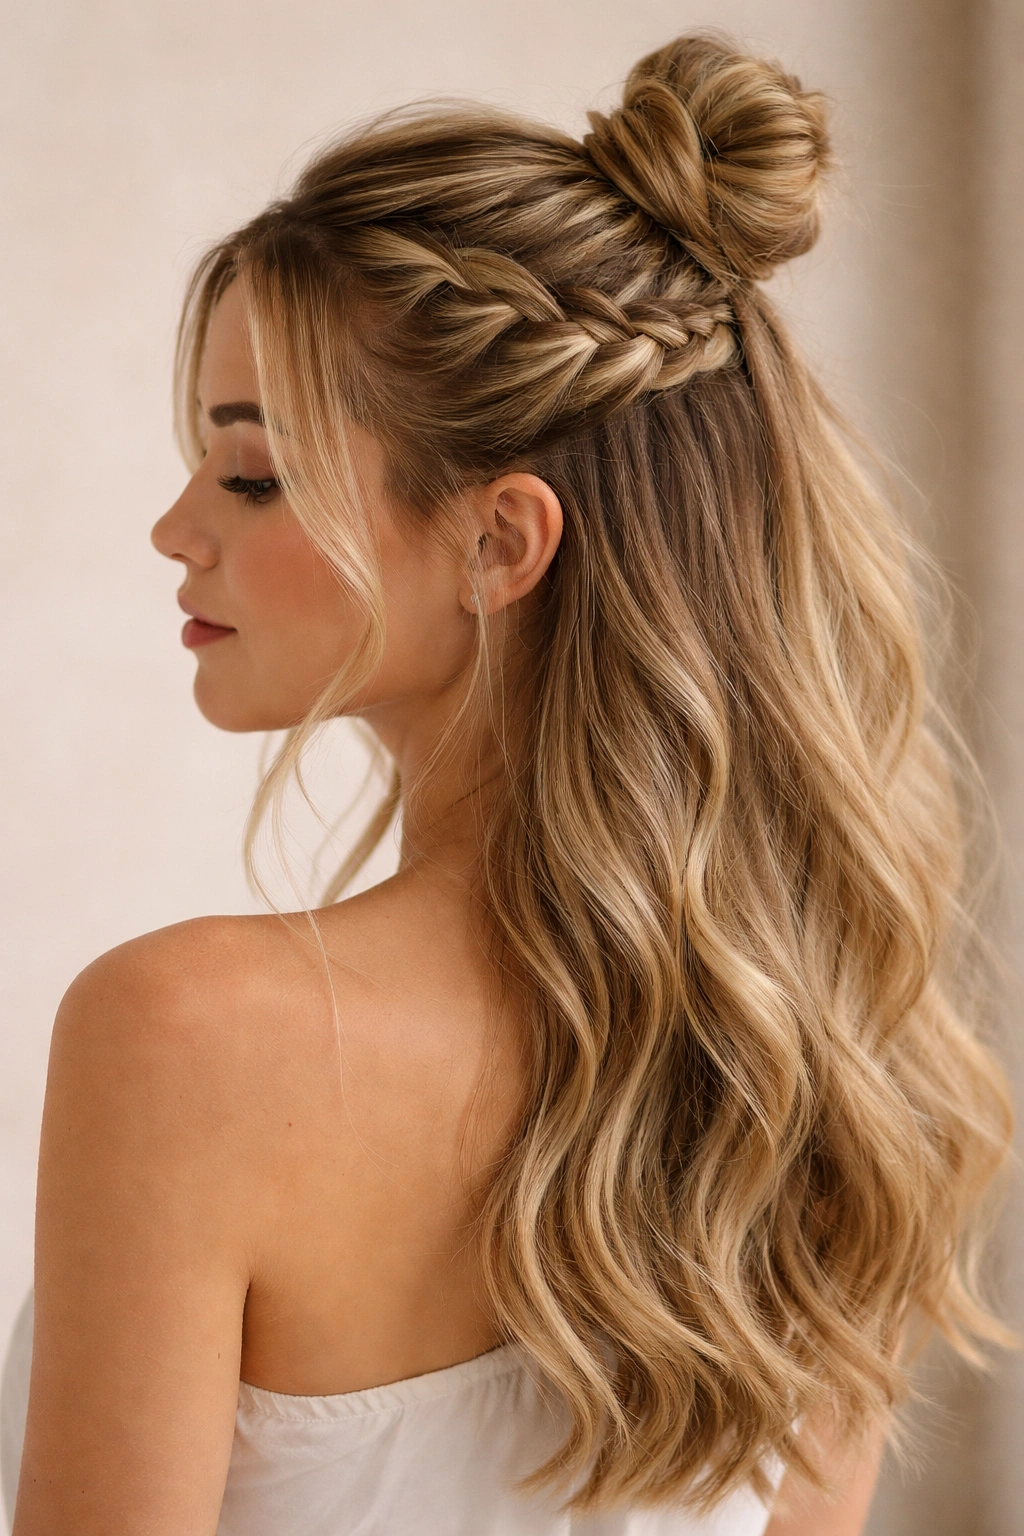
Combine two of your favorite styling techniques by incorporating a braid into a half-up top knot. Create a French or Dutch braid from one side of your head toward the crown, then take that braid plus the rest of your half-up section and twist or wrap it together into a small knot at the crown. Secure everything with bobby pins, leaving the bottom half of your hair down and flowing.
The Best of Both Worlds
This style gives you the intentionality and polish of a bun with the youthful, romantic feel of a half-up style. It’s genuinely sophisticated.
Creating a Braided Top Knot
- Make sure your braid is thick enough and textured enough to wrap into a knot without it being too bulky
- Don’t pull your braid too tight as you’re creating it—you want it to have some give as you wrap it into the knot
- Secure the knot from multiple angles with bobby pins so it absolutely doesn’t move throughout your day
- Leave a few wisps of hair escaping from the knot for a softer, more romantic appearance
Pro tip: Wrap a thin strand of hair around the base of your knot to hide the bobby pins—it looks infinitely more polished.
14. Side Part Braid and Pin

A deep side part immediately changes your face shape and creates a more dramatic, asymmetrical look. Create a Dutch or French braid starting from your smaller side (where you have less hair in your part), braid it back toward the crown, and pin it on the opposite side. This creates a bold, directional style that photographs beautifully.
Why Side Parts Change Everything
A dramatic side part instantly makes you look more intentional and modern. When paired with a braid, it becomes a genuine statement.
Executing the Side-Part Braid
- Create a deep, exaggerated side part rather than something subtle—the drama is what makes this work
- Start your braid on the smaller side of your part near your temple
- Braid toward the back and pin on the larger side of your part for the most flattering effect
- Leave face-framing pieces down to soften the strong line of the part
Styling note: This works especially well if you have shorter layers or pieces around your face—they’ll naturally frame beautifully with a deep part.
15. Braided Crown with Half-Up Style
Create a halo or crown effect using a braid that circles your entire head, but secure it loosely enough that you’re still technically showing half your hair down. Start a braid at one ear, circle around the back of your head, and end at the opposite ear, pinning as you go. This creates a romantic, princess-like look that works for special occasions.
The Crown Effect
There’s something inherently romantic and special about a braid that circles your head. It feels intentional without being overdone.
Building Your Crown Braid
- Use a loose braid rather than a tight one—crown braids should look soft and romantic, not severe
- Start at ear level rather than higher on your head for better proportion
- Pin the braid at multiple points as you circle your head so it doesn’t slip
- Gently pull the braid apart to add fullness and texture throughout
Worth knowing: This style works beautifully with an updo on top—you’ve got a crown braid plus a small bun or knot at the crown for extra definition.
16. Accent Braid Half Up
Not every braid needs to be the main event. Create a simple half-up style with a ponytail or twist, then use a small three-strand braid as an accent that wraps around the base of your ponytail or adds dimension to your twist. This adds interest and detail without the commitment of a full-head braid.
Small Details Make a Difference
An accent braid shows that you pay attention to details and have put thought into your styling. It elevates a simple style to something genuinely special.
Creating Accent Braids
- Make a basic half-up ponytail or twist first, then secure it loosely
- Take a small section of hair from near the elastic and create a thin three-strand braid
- Wrap this braid around the base of your ponytail to hide the elastic and add visual interest
- Secure the accent braid with bobby pins hidden underneath
Pro styling tip: Use a slightly lighter or darker hair extension as your accent braid for extra visual dimension—it makes the detail pop.
17. Milkmaid Half-Up Braid
This style, inspired by traditional milkmaid braids, wraps braided sections around the crown and sides of your head in a softer version of the classic style. Create two braids, one from each side of your head, and pin them across your crown area, leaving the bottom half of your hair down and flowing. The effect is romantic, vintage-inspired, and utterly charming.
Modern Take on a Classic
Milkmaid braids have that effortless, fairy-tale quality. A half-up version keeps it wearable for everyday life.
Making Milkmaid Braids Work
- Create your braids slightly loose so they look romantic rather than severe
- Start your braids at ear level and wrap them across your head toward the opposite side
- Secure with bobby pins hidden within the braids themselves
- Gently pull at the braids to add fullness and texture
- Leave wispy face-framing pieces down on either side
Worth noting: This style photographs beautifully and is genuinely one of the most romantic braided styles available for medium-length hair.
18. Reverse Braid Half Up
A reverse braid is created by crossing strands over the center line instead of under (like a Dutch braid), but in reverse of the direction you’d normally braid. Take a section of hair from one side of your head and create a reverse braid working backward toward the crown, then secure at the back. This creates a look that’s similar to a Dutch braid but slightly different in appearance and incredibly striking.
Standing Out With Reverse Braids
This braid creates maximum visual impact because it stands up from your scalp in a bold, statement-making way. It’s perfect if you want people to actually notice your styling work.
Perfecting the Reverse Braid Technique
- Practice on yourself a few times before wearing it out—the reverse motion takes some getting used to
- Keep the braid close to your scalp for maximum visibility and definition
- Pull gently at the sides after securing to add dimension and fullness
- Pair with loose waves or curls for the best contrast
Real talk: Once you master the reverse braid, you’ll want to wear it constantly because it genuinely looks so cool and more complicated than it actually is.
Final Thoughts

A braided half up half down style on medium-length hair is legitimately the perfect sweet spot between polished and romantic, intentional and effortless. The beauty of these 18 styles is that they range from super simple (like the twisted half-up) to more involved (like the braided crown), so there’s something for every comfort level and occasion.
The thing that makes all of these styles work is starting with hair that has some texture and grip—whether that’s from dry shampoo, a texturizing spray, or just second-day hair that’s been slept on. Smooth, freshly washed hair will slip right out of braids, but slightly textured hair holds everything perfectly and actually looks more modern and romantic.
Your medium-length hair gives you the perfect amount of texture to show off braiding work without so much length that everything gets weighed down. Pick one of these styles, practice it a couple times, and soon you’ll have a signature braided half-up look that you can execute in just a few minutes whenever you need to feel a little more put-together.