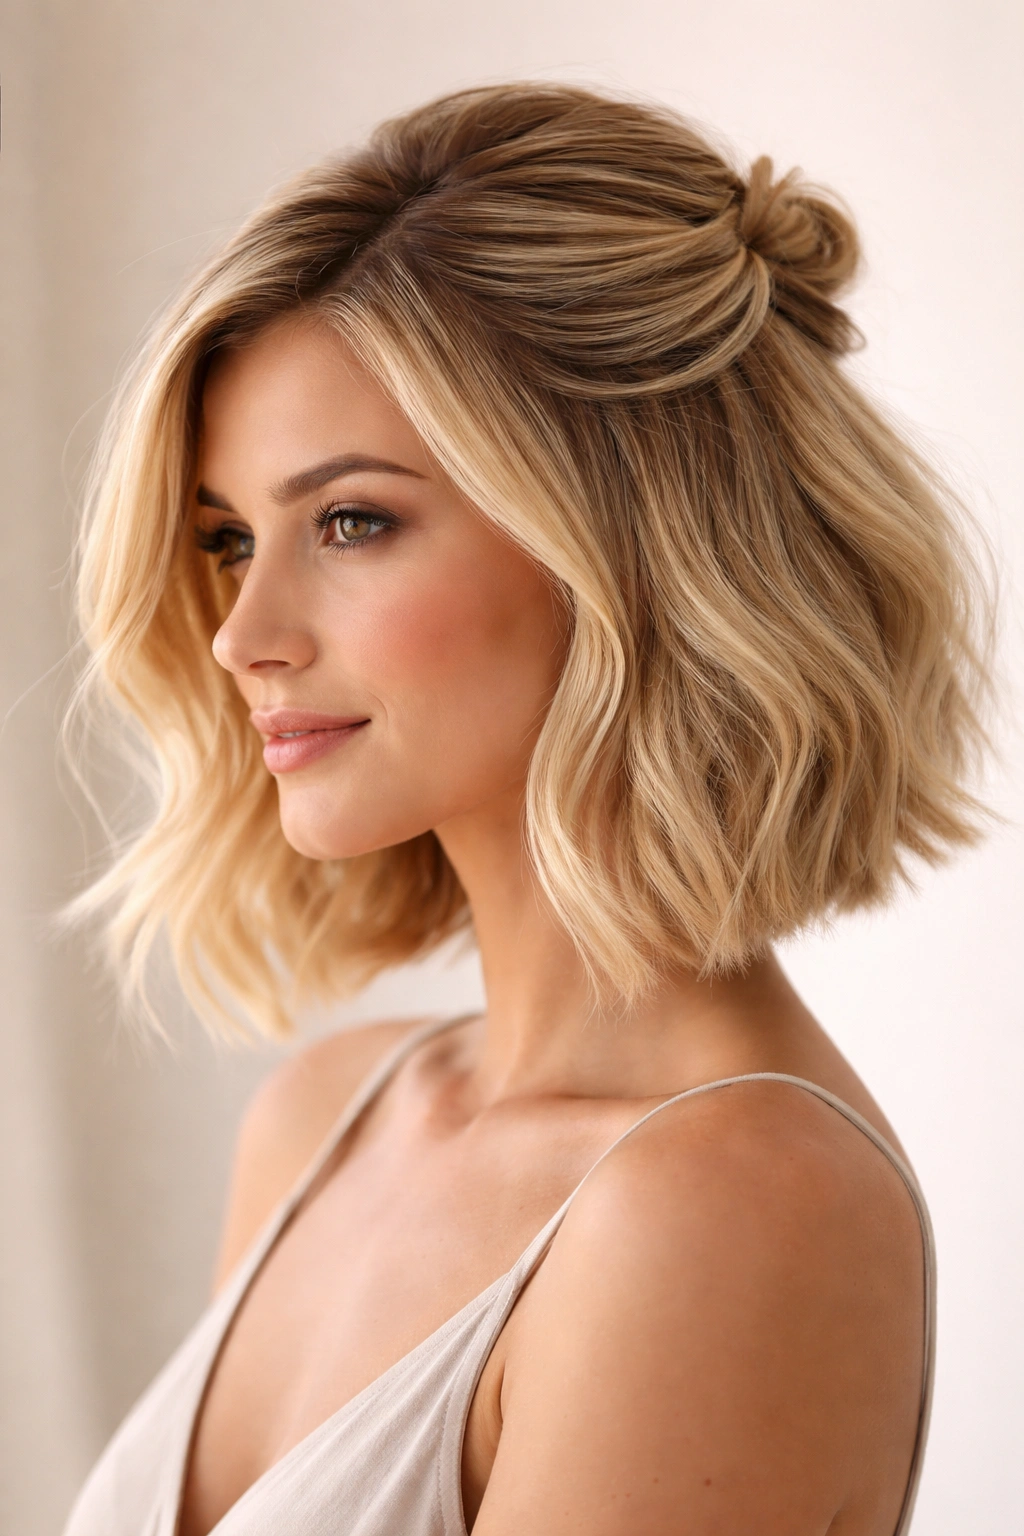
The half up half down hairstyle has become a go-to for people who want the best of both worlds—the polished elegance of an updo with the effortless, romantic appeal of down hair. For blonde bobs, this styling approach is especially versatile because the shorter length gives you more control over how the pieces fall and catch the light. Whether you’re prepping for a casual day out, a professional meeting, or a special occasion, there’s a half up half down variation that’ll work beautifully with your blonde bob.
What makes these styles so appealing is their flexibility. You can dress them up or dress them down depending on your mood, the occasion, and the tools you have available. A sleek half up clip can feel sophisticated and modern, while a tousled, textured version reads more relaxed and effortless. The styling possibilities feel almost endless—twist the crown section, braid a small section, add volume with a tease, or keep it smooth and refined. Your blonde bob becomes the perfect canvas for experimenting with different techniques and looks without having to commit to a full updo or wear your hair down the same way every single day.
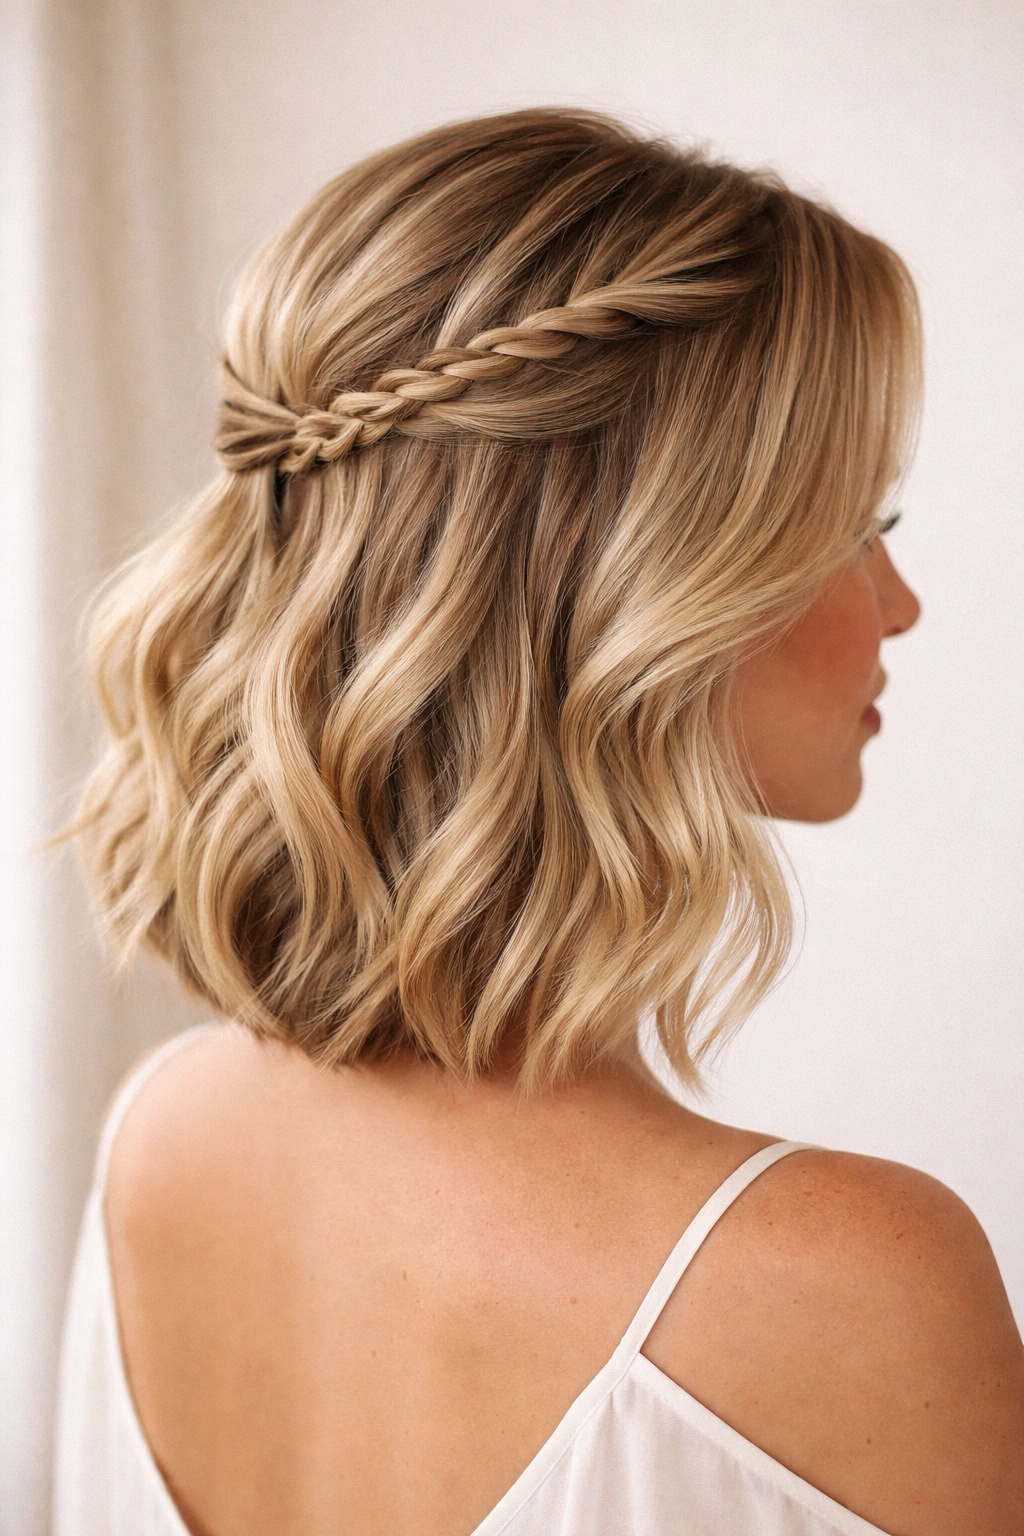
1. The Classic Twisted Crown

The twisted crown is the most timeless take on the half up half down look, and it works beautifully with any blonde bob length. Start by sectioning off a triangle of hair from one ear to the other at the crown. Gently twist this section away from your face, and as you twist, gradually incorporate more hair from the sides to create a fuller, more dimensional effect. Once you’ve twisted all the way around to the other side, secure the twist with bobby pins that match your hair color and tuck the ends under the twist so they’re hidden.
Why This Look Works Instantly
The twisted crown creates an instant polished appearance without looking overly fussy or high-maintenance. Because you’re twisting rather than braiding, the texture feels softer and more romantic, which is perfect if you want to avoid looking too stiff or formal. The twist sits naturally on the crown of your head, which means it’s actually quite comfortable to wear for hours.
How to Perfect Your Technique
- Use a light hairspray or texturizing spray on damp hair before twisting to give yourself better grip and a touchable finish
- Twist slightly looser than feels natural so the twist looks relaxed and intentional, not tight and pulled
- For extra hold, bobby pin the twist in 2-3 different spots rather than just one or two
- Leave some of the shorter face-framing pieces out for a softer, less severe look
Pro tip: If your twist feels too neat or polished, gently pull at the edges of the twist with your fingers to create a slightly messier, more relaxed texture. This tiny adjustment makes the look feel intentional rather than accidental.
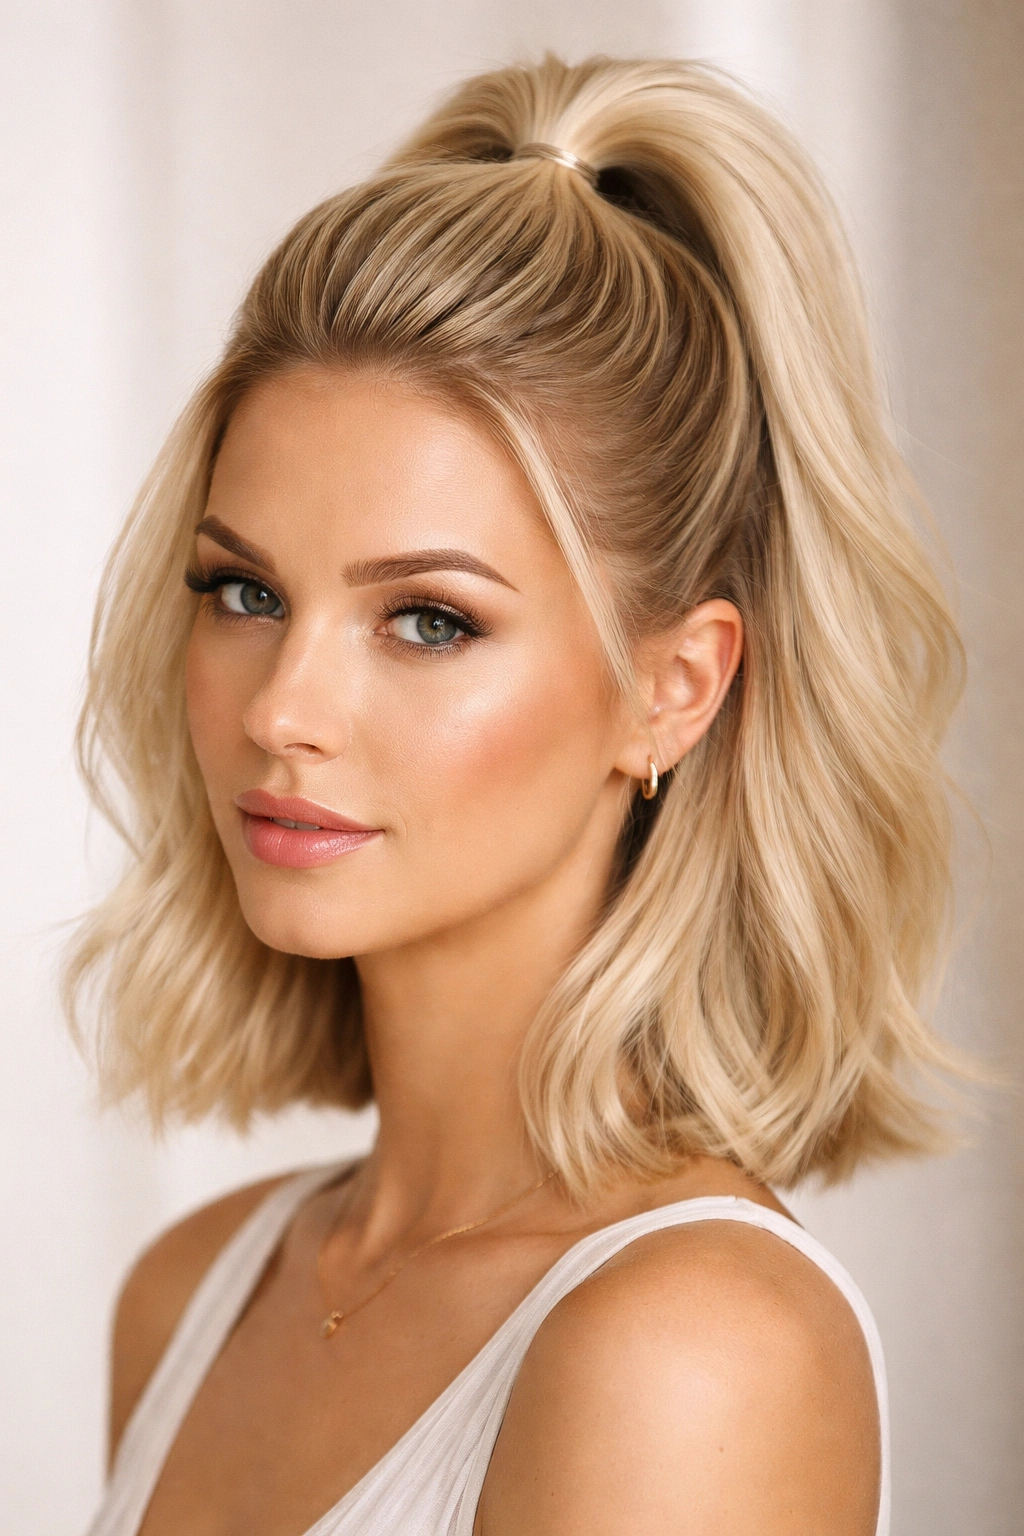
2. The Sleek High Ponytail Half-Up
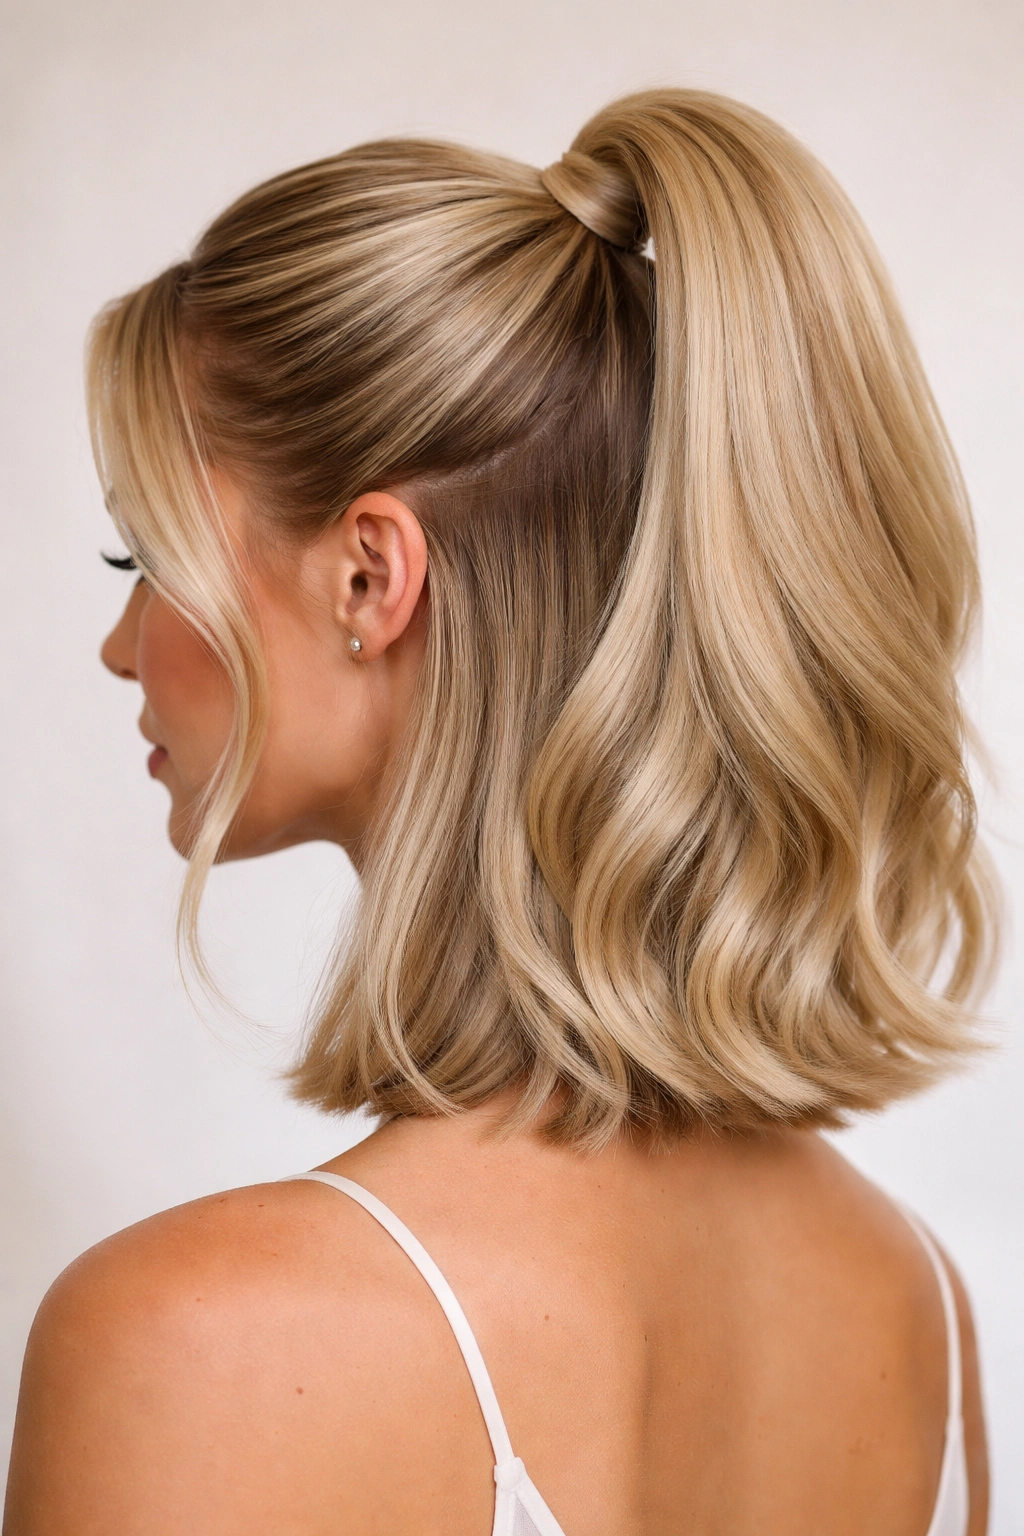
This look takes the half up half down concept and gives it a more contemporary, polished edge by creating a defined high ponytail with the top section, then leaving the bottom section completely loose and glossy. Section off hair from temple to temple across the crown, and use a fine-tooth comb to brush everything backward and upward toward the back of your head. Secure this section tightly with a small, discreet elastic that matches your hair color—the tighter and smoother you can get this ponytail, the more modern and sleek the overall look becomes.
What Makes This Version Stand Out
The high ponytail half-up strikes a perfect balance between “done” and relaxed. Your blonde shows off at the back and sides, catching light beautifully, while the top section looks intentional and elevated. This is the look to choose when you want something that photographs well and holds up throughout the day without looking windswept or undone.
Getting the Sleek Finish Right
- Apply a smoothing serum or lightweight oil to the top section before brushing to create that glossy, wet-look finish
- Use a fine-tooth comb rather than a brush to direct every strand backward without creating flyaways
- Wrap a small section of hair around the elastic base to hide it completely—this instantly elevates the look
- Lock everything in place with a light-hold hairspray that won’t make your hair feel stiff
Worth knowing: The sleeker you go on top, the more casual and beachy you can make the bottom section—consider adding loose waves or just letting your natural blonde texture show for beautiful contrast.
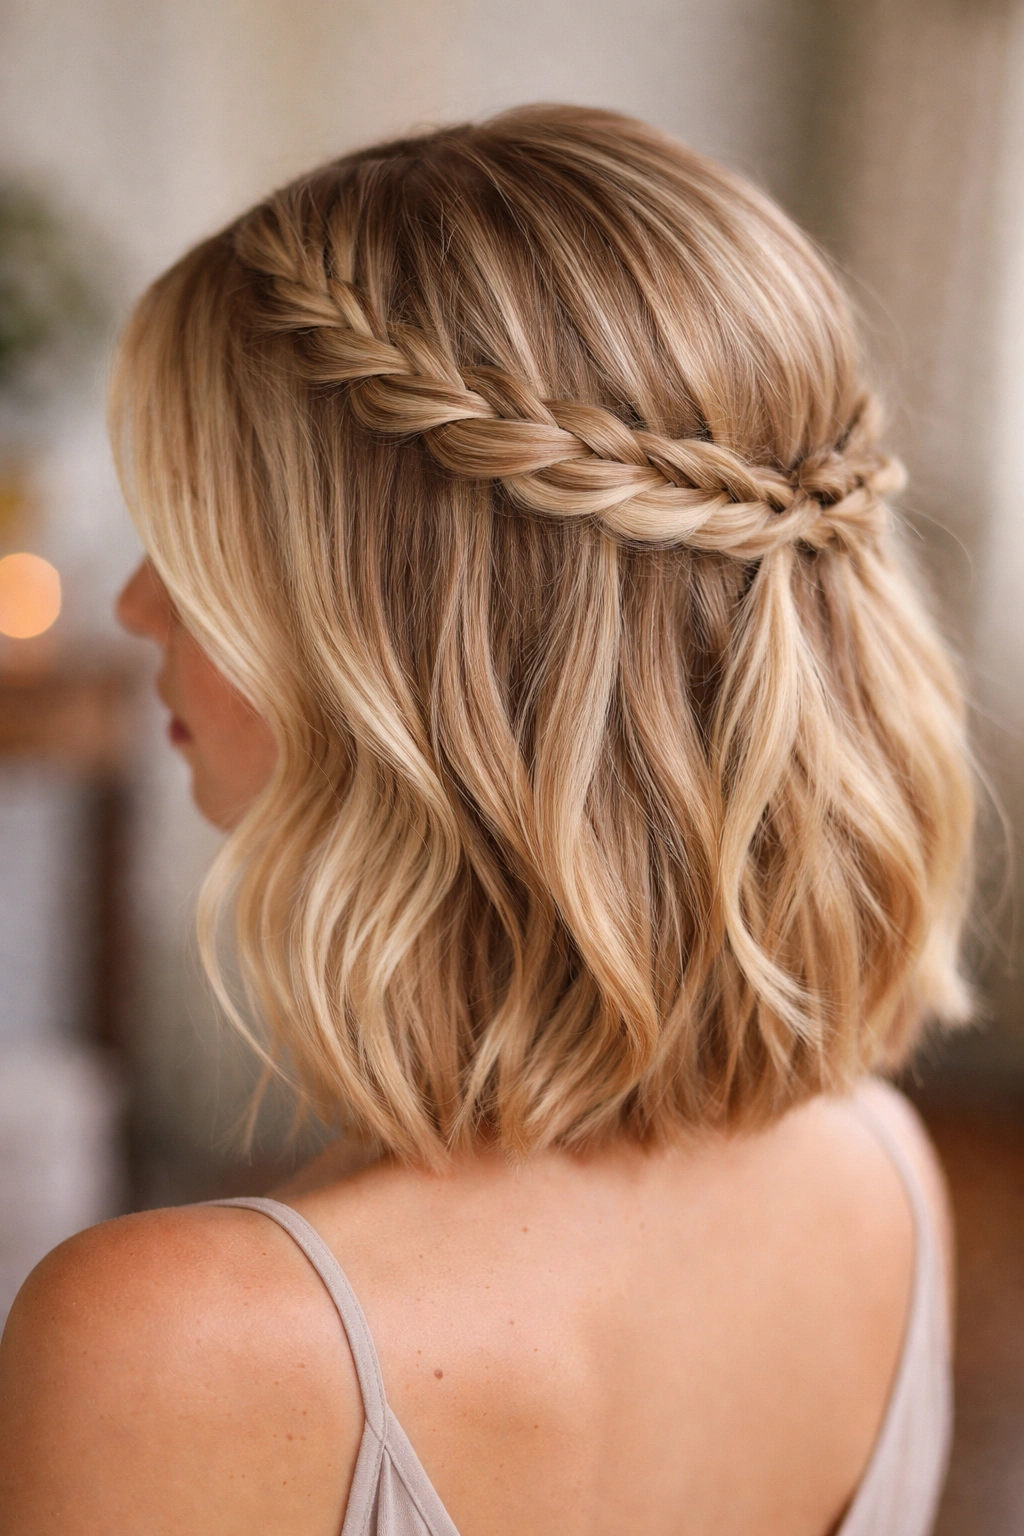
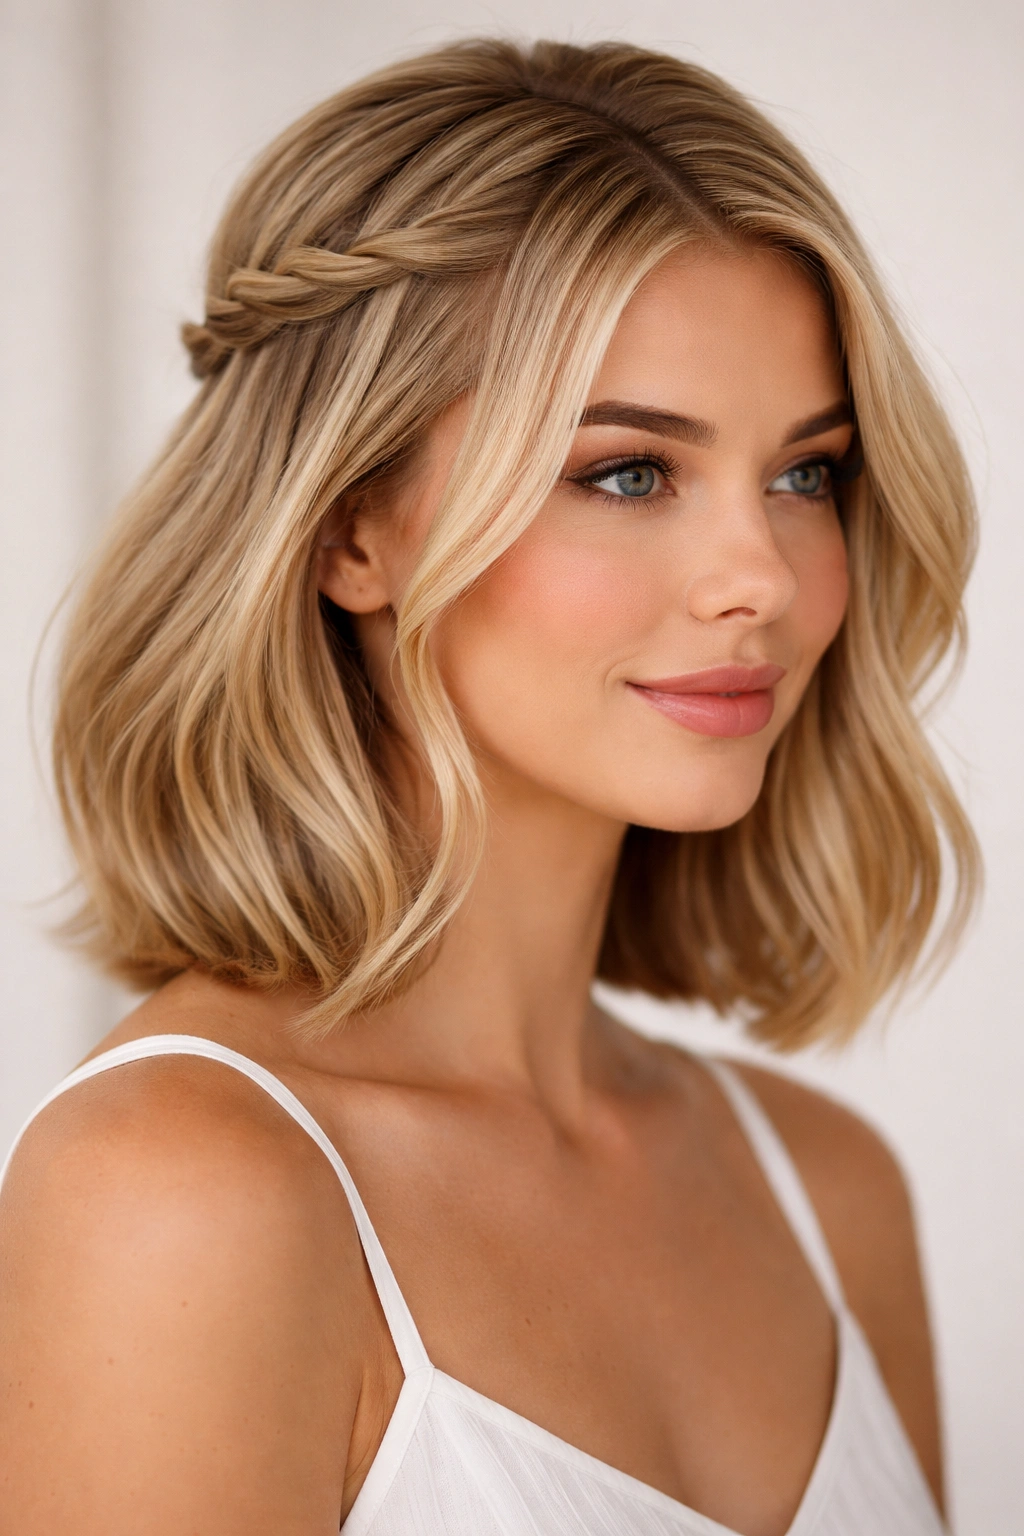
3. The Soft Dutch Braid Half-Up
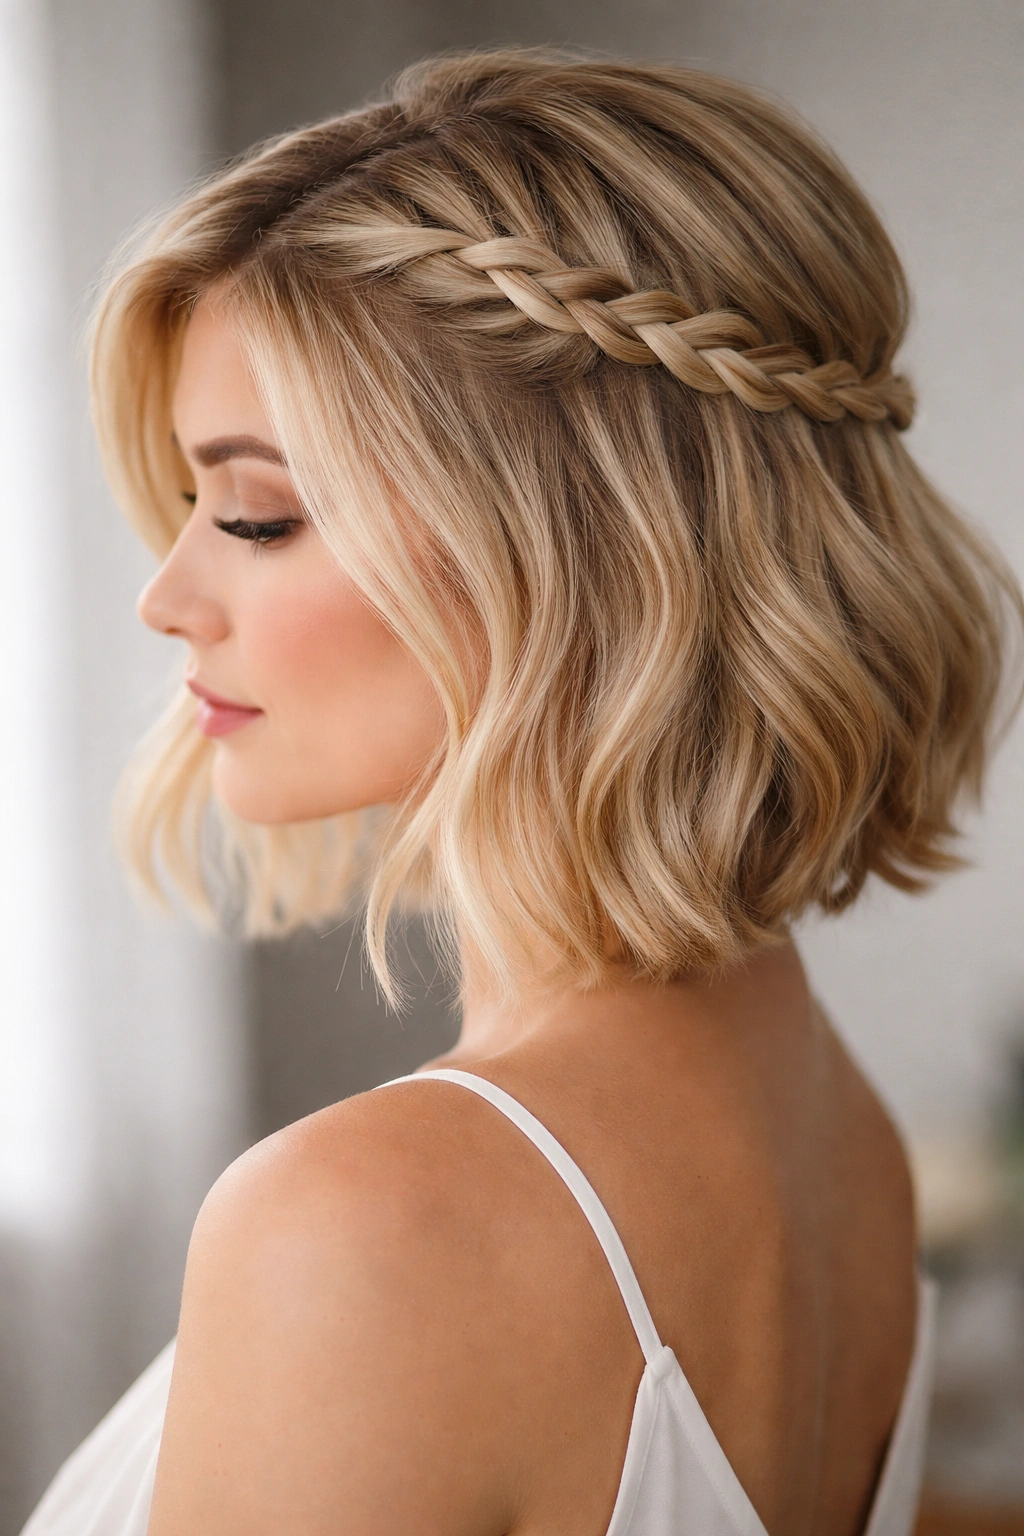
A Dutch braid running from one ear toward the crown and secured at the back gives you a half up half down look that feels intricate without being overly complicated. Start by taking a section of hair at your temple and divide it into three strands. Instead of crossing strands over the center (like a traditional braid), cross them under the center—this is what creates the distinctive raised, dimensional look of a Dutch braid. Continue braiding backward and upward, gradually incorporating hair from the side as you go, until you reach the crown. Secure with bobby pins at the back.
Why Dutch Braids Create Such Impact
Dutch braids sit on top of the hair rather than sinking into it, which means they’re naturally more visible and more interesting to look at. The braided section creates a beautiful frame around your face, and because your blonde is shorter, the braid has a delicate quality that feels current and intentional. The braid also actually holds really well because you’re incorporating more hair as you go.
Technique Tips for Clean Braiding
- Start the braid slightly to the side of center rather than directly at your temple—this gives you more hair to work with and prevents the braid from looking too thin
- Keep your three strands relatively even in thickness as you braid so the braid looks symmetrical and polished
- Dutch braid slightly loose so the final look is relaxed, not tight and pulled
- Use bobby pins that match your blonde in the back to secure both the braid and any hair that’s falling around it
Insider note: If you have naturally wavy or textured hair, Dutch braids actually look even better because the texture makes the braid feel fuller and more dimensional.
4. The Braided Halo Half-Up
A braided halo half-up takes the romantic appeal to its maximum level—you’re essentially creating a halo effect by braiding a section from one side around the back of your crown to the other side, then pinning it in place. Start with a small section at one temple, braid it (you can use a regular three-strand braid), and direct it diagonally back toward the crown rather than going all the way down. Meet that braid with another braid you’ve started at the other temple, then secure both braids together at the back with bobby pins.
The Romance Factor Here Is Off the Charts
Braided halos work especially well on blonde bobs because they’re delicate without being fragile-looking, and they create this ethereal quality that draws focus upward to your face and your hair color. If you’re attending a wedding, celebrating an anniversary, or just want to feel extra pretty on an ordinary Tuesday, this is the style that delivers.
How to Execute the Halo Properly
- Braid loosely from the start so the final effect is romantic and soft, not tight and severe
- Direct each braid more toward the back and center of your head rather than wrapping them straight around the side
- Consider leaving some wispy face-framing pieces out to soften the look even more
- Use light bobby pins and tuck the pin ends completely under the braids so they’re completely hidden
Pro tip: Tease the crown area very lightly before braiding to give yourself a textured base that holds the braids more securely and also adds dimension to the finished look.
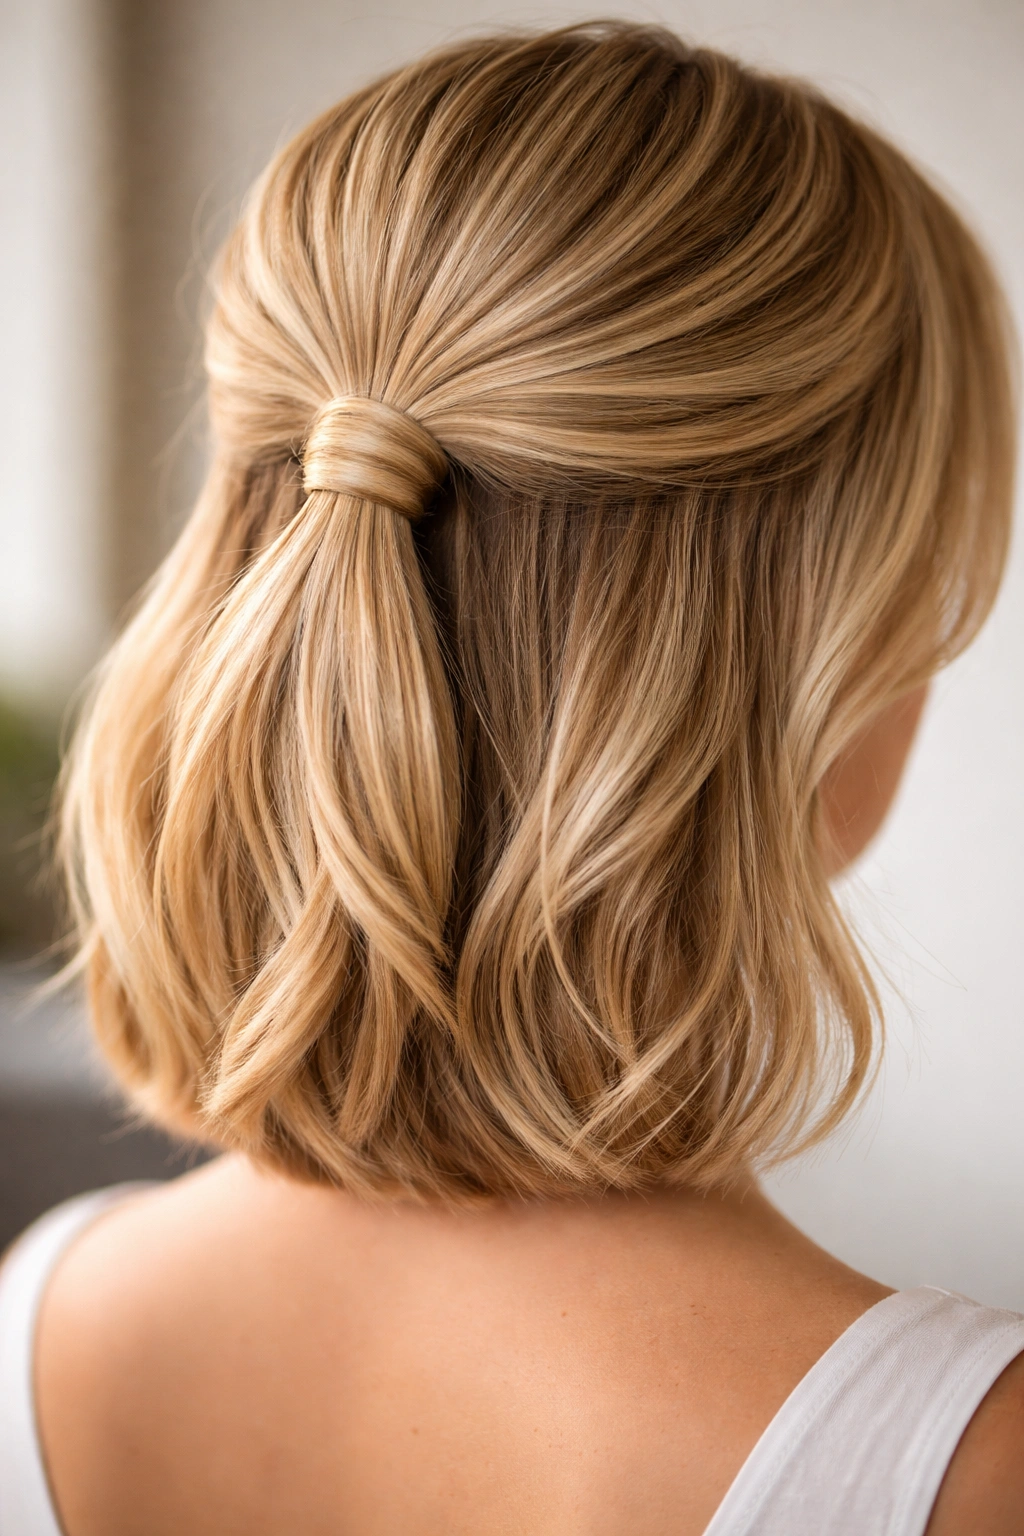
5. The Textured Knot with Loose Waves
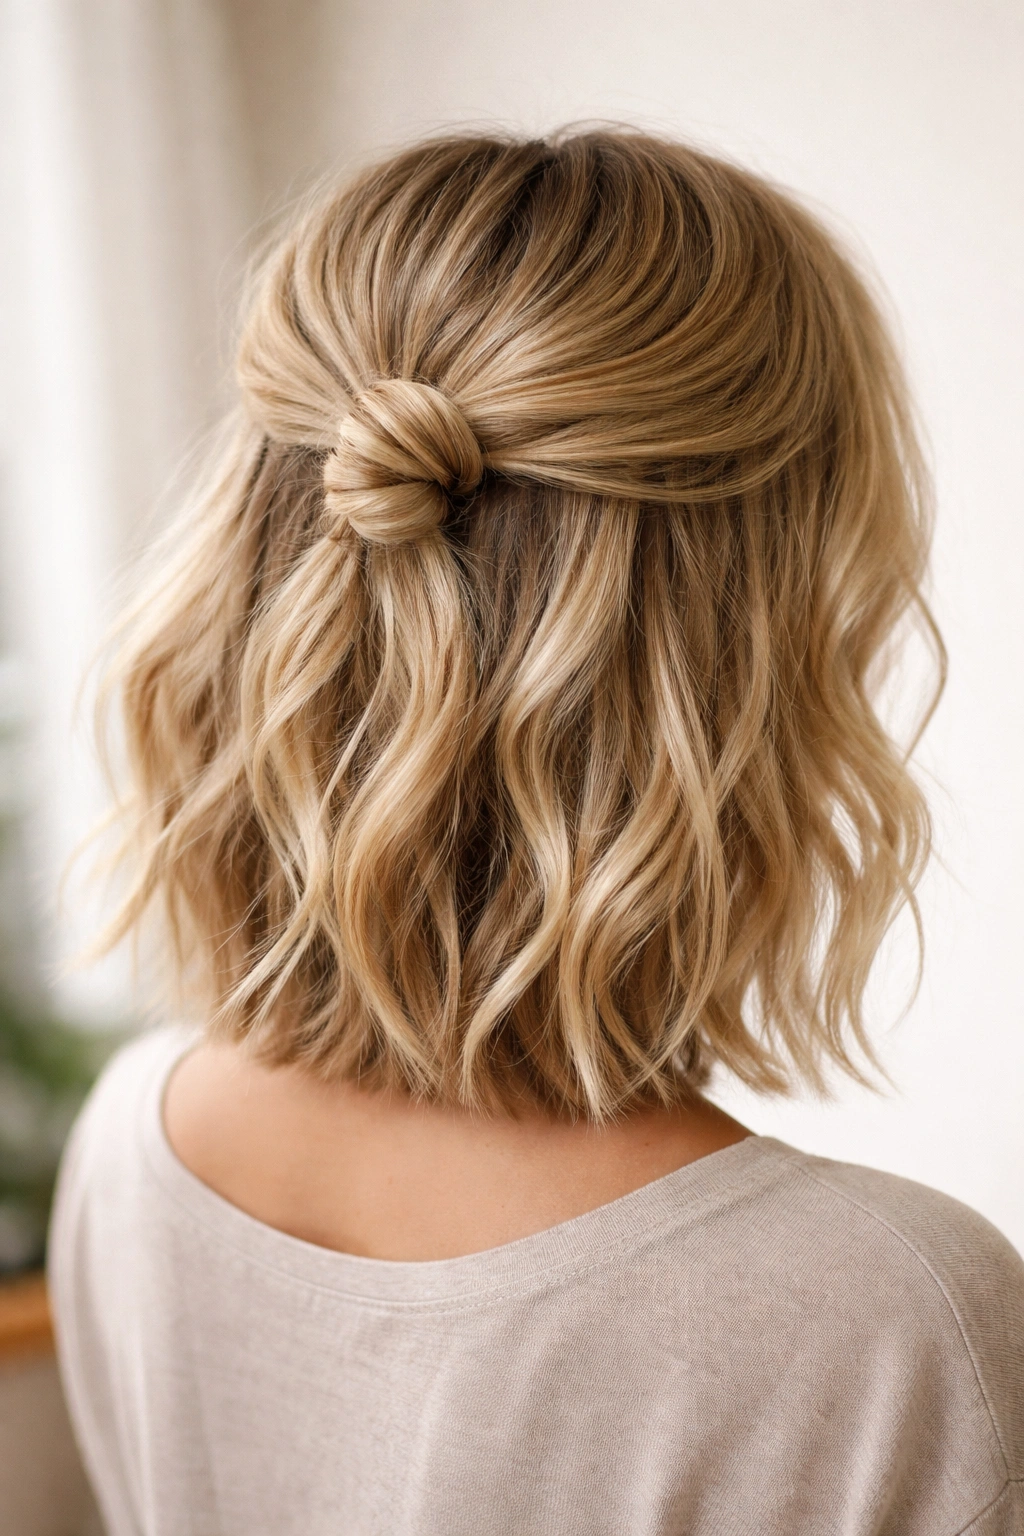
This look combines a soft texture knot (essentially a half-knot) at the back of your crown with completely loose, tousled waves through the rest of your blonde bob. Start with damp or lightly dampened hair, and use a 1.5-inch curling iron to create loose waves throughout—you want these waves to feel completely undone and natural, not uniform or tight. Then take a small section from each side of your face, bring them back to the crown area, tie them together in a loose knot (not a tight one—think more “loose loop” than “secured knot”), and use bobby pins to keep the knot in place.
Why This Works for Casual Days
The textured knot with loose waves is perfect for those days when you want to look like you actually tried but also want to feel completely comfortable. The loose waves catch your blonde’s shine beautifully, and the knot at the back is simple enough that you can recreate it in about two minutes once you’ve mastered the technique. This is the move for running errands, casual coffee dates, or days when you’re working from home but want to feel put together.
Getting the Waves and Knot to Work Together
- Create your waves first, then let them cool completely before you try to secure anything—this ensures they hold
- Make the knot incredibly loose, almost like you’re creating a loop rather than a traditional knot, so the style reads as relaxed
- Use just one or two bobby pins to secure the knot, and make sure they’re hidden underneath
- Leave longer pieces framing your face completely loose so the waves can move around freely
Worth knowing: The more texture you have to work with, the easier it is to secure the knot—if your hair is very fine, consider using a light texturizing spray or dry shampoo to add grip before you attempt the knot.
6. The Sleek Half-Up with Ribbon Detail
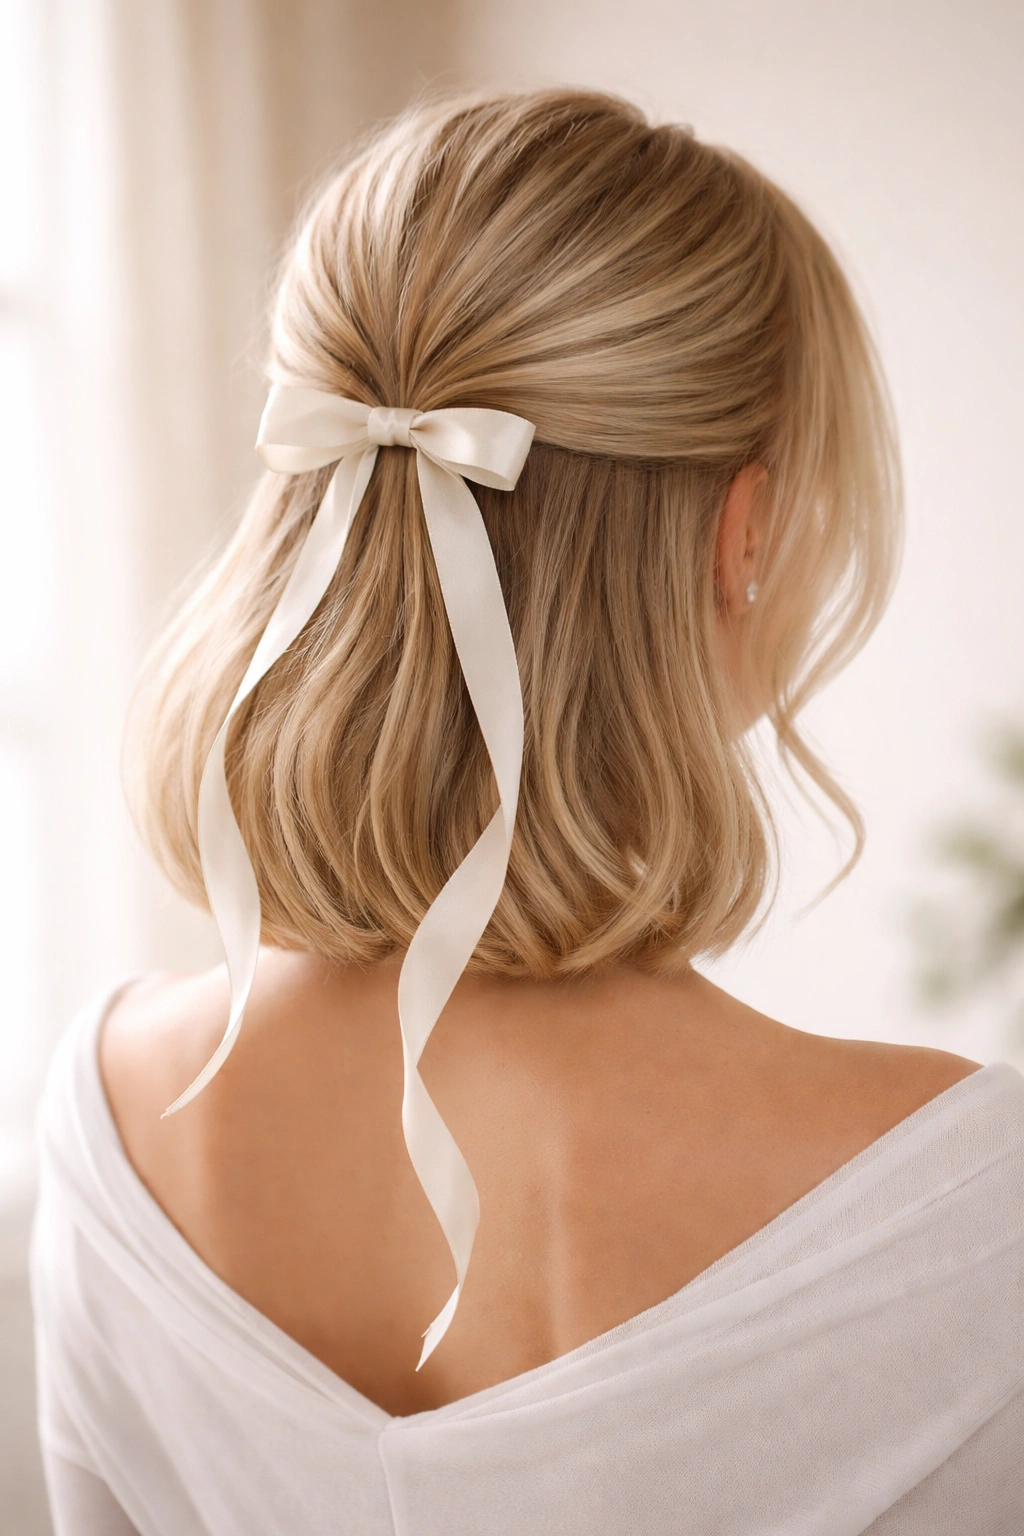
This look is deceptively simple but incredibly impactful—you’re basically creating a clean, sleek half-up ponytail but using a ribbon instead of (or in addition to) an elastic to secure and accent the style. Section off hair from temple to temple, brush it back smoothly, and secure it with an elastic. Then wrap a ribbon that complements your blonde (consider soft pastels, jewel tones, or even metallics) around the elastic and tie it in a small bow at the back or let the ribbon tails flow down through your hair.
Where Ribbons Take Your Look
Adding a ribbon elevates a basic half-up from everyday to genuinely special without requiring any additional styling skill. The ribbon becomes an instant focal point and can be customized completely depending on your mood, your outfit, or the occasion. A silky ribbon reads romantic and refined, while a velvet ribbon feels rich and luxe, and a simple cotton ribbon can read playful and fresh.
Working with Ribbons Effectively
- Choose a ribbon width that feels proportional to your hair length—thinner ribbons generally work better on bobs than wide ribbons
- Wrap the ribbon around the elastic two or three times to make sure it’s secure and to hide the elastic completely
- Let the ribbon ends hang at different lengths for asymmetrical interest, or tie them in a neat bow for a more polished look
- For extra security, use bobby pins to tack the ribbon ends down to the base of your half-up so they don’t slip throughout the day
Pro tip: Use a ribbon that picks up a color from your outfit—this creates an intentional, coordinated look that feels way more elevated than it actually is to execute.
7. The Slicked-Back High Half-Up
For days when you want your blonde to be the star and your styling to be absolutely minimal, the slicked-back high half-up is perfect. Use a smoothing gel or pomade (apply it to damp hair) to slick the top section of your hair straight back from your face, directing everything toward the crown. Secure this slicked section with a small elastic at the crown, and allow all the hair below that point to fall completely loose. The contrast between the sleek, controlled top and the loose, textured bottom is what makes this style so striking.
Why This Works for Busy Mornings
The slicked-back half-up is quick to execute, holds beautifully throughout the day, and looks intentional rather than accidental. Because your blonde is shorter, the slicked-back portion shows off your face and your face shape beautifully, and the contrast with looser hair below is visually interesting. This is your go-to for days when you’re running late but still want to look like you put thought into your hair.
Achieving That Perfect Sleek Finish
- Apply gel or pomade to damp roots and work it through with your fingers rather than a brush for a smoother, more intentional look
- Direct everything straight back, not to the side—this symmetrical approach is what makes the style feel so clean and modern
- Once everything is secured at the crown, use a fine-tooth comb to smooth down any flyaways at the hairline
- Finish with a light hairspray to lock in the smoothness without making hair feel crunchy
Insider note: If you have baby hairs or flyaways around your hairline, this is actually the perfect style to showcase them—the sleek back makes them look intentional rather than messy.
8. The Twisted Sides Half-Up
This variation gives you all the polish of a half-up without requiring you to section off a huge chunk of hair from the top. Instead, you’re taking small sections from each side of your head, twisting them slightly, bringing them back to the crown, and securing them together at the back. The beauty of this approach is that your hair remains largely down, but you’ve created an intentional style line that frames your face and pulls the focus toward your features. The twisted sections should be relatively thin—about one inch wide on each side.
The Elegance of Understated Styling
The twisted sides half-up is perfect when you want people to notice your styled hair without realizing how much work you actually put in. It’s casual enough for everyday wear but polished enough for professional settings or special occasions. Because you’re not pulling a huge section straight up, the look feels modern and slightly edgy rather than traditionally feminine.
Executing the Twisted Sides Correctly
- Start your twist at the temple and direct it backward and slightly upward toward the crown, not horizontally across your head
- Keep the twist loose and relaxed so it doesn’t look tight or severe against the side of your head
- Meet the twists at the crown and secure them together with bobby pins angled so they’re hidden beneath the twists
- Leave some shorter pieces around your face completely loose so you have that soft frame effect
Worth knowing: This style works best when your blonde bob has some texture or wave to it—if your hair is very straight, consider adding texture with a curling iron before you start twisting.
9. The Bubble Ponytail Half-Up
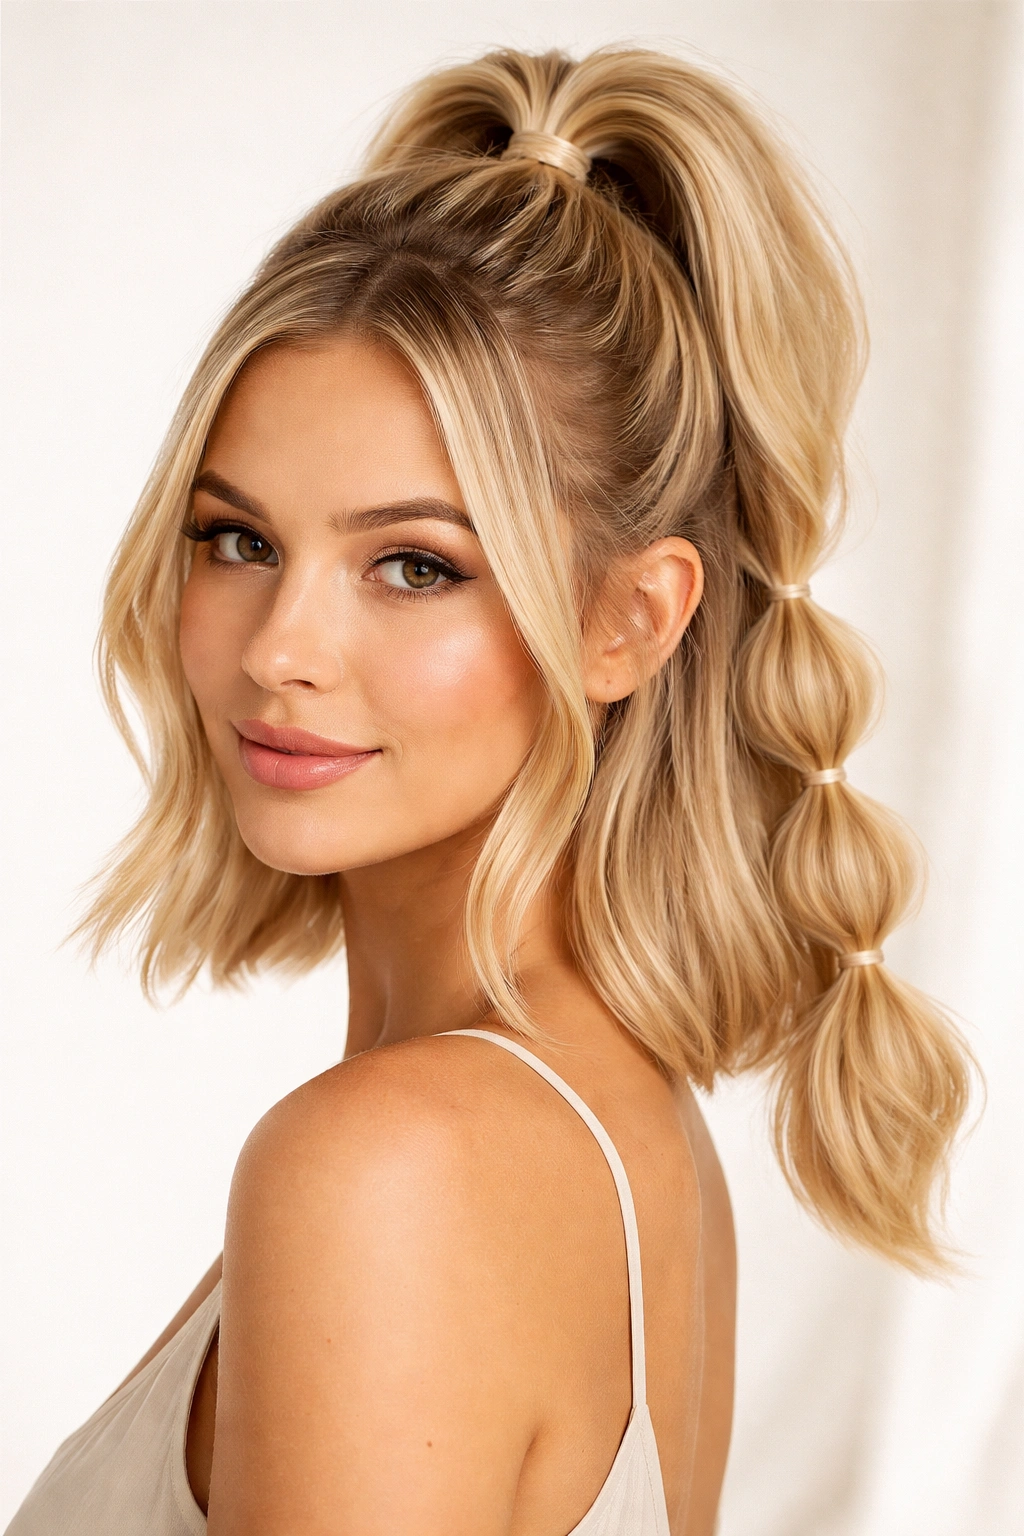
The bubble ponytail half-up takes your half-up game to a playful, dimensional level. Create a small high ponytail at your crown using a small elastic. Then take another elastic and secure your hair about two inches below the first elastic, creating a “bubble” of hair between the two elastics. Continue adding elastics every two inches or so down the length of the ponytail, creating increasingly larger bubbles as you go down. Gently tease out each bubble to make them fuller and more pronounced—this is what transforms a simple segmented ponytail into something with real visual interest.
Why Bubble Ponytails Elevate Your Entire Vibe
The bubble ponytail is fun, dimensional, and honestly a bit unexpected on a traditional blonde bob, which is exactly why it works so well. It’s trendy enough to feel current, but it’s also simple enough that you can execute it with minimal styling products or tools. This is the look to choose when you want your hair to feel fun and youthful without trying too hard.
Creating Full, Dimensional Bubbles
- Use very small, discreet elastics (try clear or blonde-colored ones) so the focus is on the bubbles, not the elastics
- Gently tease the hair between each elastic with a teasing brush before you create the next bubble—this creates immediate fullness
- Make each bubble progressively slightly larger as you go down, which creates a visual hierarchy that’s more interesting than uniform bubbles
- Use bobby pins to tack the elastics to the ponytail base so they don’t slide around during the day
Pro tip: If you want more dimension, consider separating each bubble into two sections with bobby pins down the center—this creates a petal-like effect that’s absolutely stunning.
10. The Side-Swept Half-Up
The side-swept half-up is all about asymmetry and movement. Instead of pulling hair straight back to the center crown, you’re sectioning off hair from one side and directing it diagonally back toward the opposite side of your crown. This creates a beautiful asymmetrical line that’s flattering to almost every face shape, and it feels effortlessly chic. The key is to keep the section you’re pulling back relatively thin—about two inches wide—so the style reads as intentional rather than just your hair falling to the side.
The Flattering Power of Asymmetry
Asymmetrical styles have a way of making people look instantly more interesting and put-together. The side-swept half-up works especially well on blonde bobs because the movement across the back of your head draws focus beautifully, and the loose hair on one side frames your face in a really flattering way. This is perfect if you’re dealing with a bob that’s slightly grown out or if you have shorter layers that you want to show off.
Perfecting the Asymmetrical Sweep
- Start your section about two inches back from your temple and keep it relatively thin—about one to two inches wide
- Direct the section diagonally back and slightly upward toward the opposite side of your crown, not straight back
- Secure with bobby pins that match your blonde, angling them so they’re hidden underneath the swept section
- Leave plenty of hair loose on both sides so the overall look feels balanced despite the asymmetry
Insider note: This style actually works better slightly loose and textured than it does when it’s perfectly sleek—texture gives the asymmetry more dimension and makes the style look intentional.
11. The Pearl-Pinned Half-Up
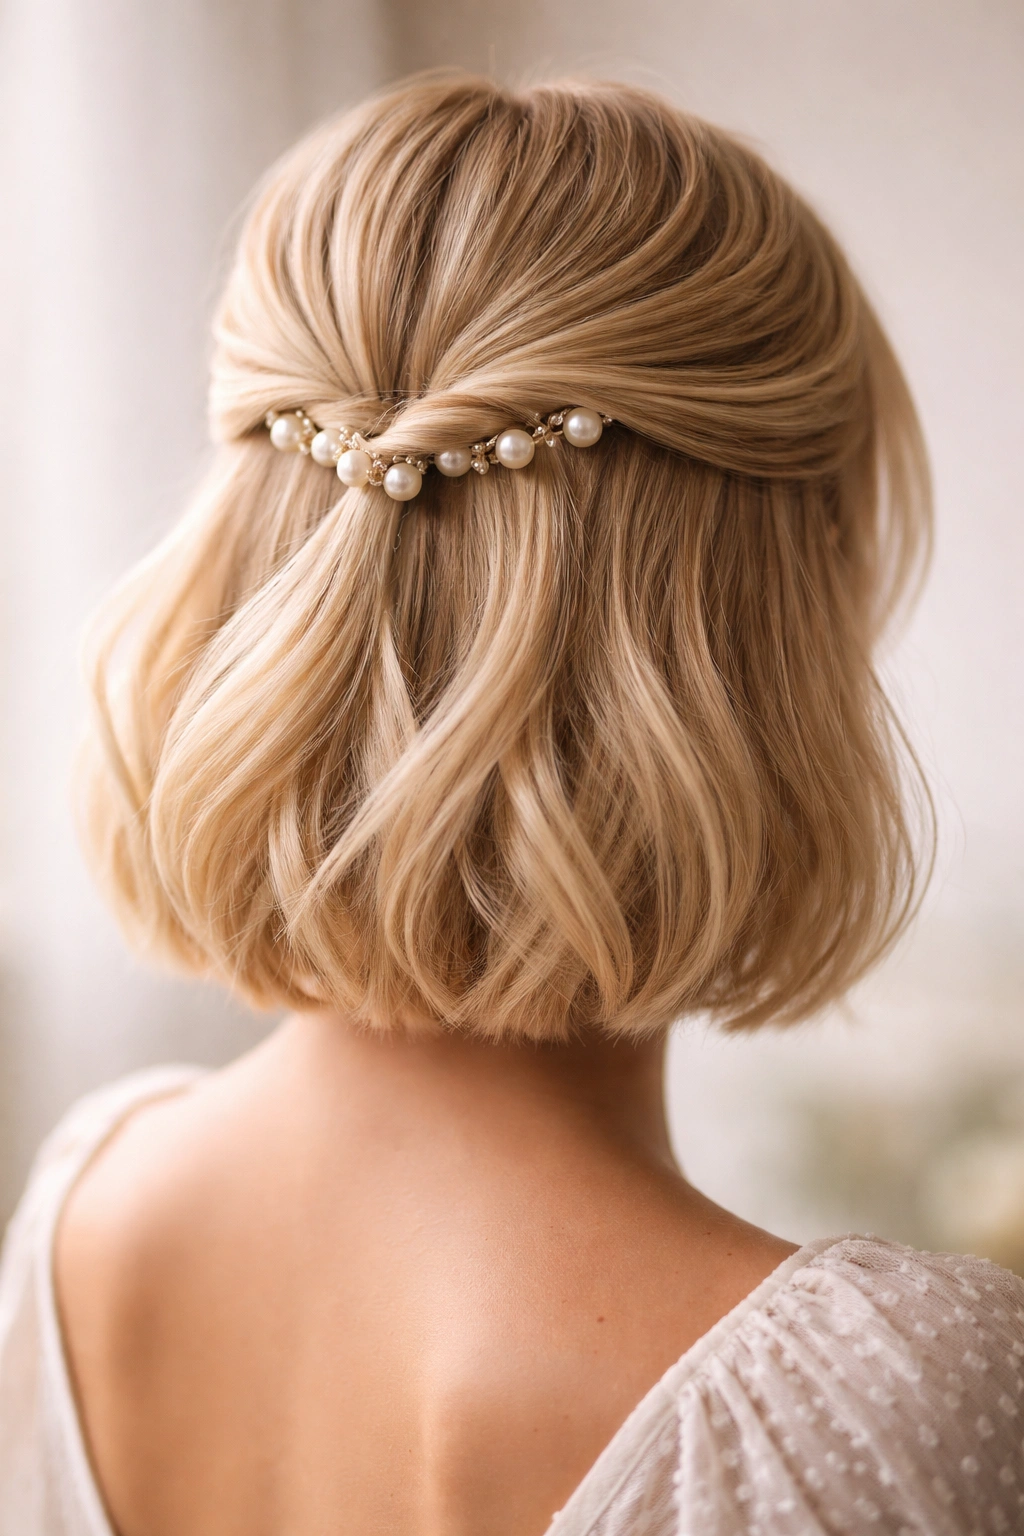
If you want to add just a touch of glamour or dress up your half-up for a special occasion, the pearl-pinned half-up is your answer. Create a simple half-up ponytail or secured section at your crown, then use pearl bobby pins or decorative clips to secure and accent the style. The pearls catch the light beautifully and add instant sophistication without requiring any additional styling complexity. You can use one statement pearl clip or scatter several smaller pearl pins throughout the back section for a more maximalist approach.
Adding Jewelry to Your Hair
Pearl pins take a basic half-up and make it feel special, intentional, and polished. Pearls work beautifully with blonde because they have similar cool undertones—the pins almost look like they’re catching light from within your hair rather than sitting on top of it. This is perfect for rehearsal dinners, bridal events, holiday parties, or any time you want your hair to feel elevated without committing to a complicated updo.
Working with Pearl and Decorative Pins
- Secure your basic half-up first with regular bobby pins, then layer pearl pins on top for maximum hold and a layered, intentional look
- Space pearl pins throughout the back section rather than clustering them all in one spot
- Consider mixing different sizes of pearl pins for more visual interest
- For extra hold and security, use at least three or four pins, even if just one or two would technically hold the style
Pro tip: If your pearl pins are getting lost in your blonde hair, try using a few clear or nude pins first to create a secure base, then layer your pearl pins on top so they’re the focal point.
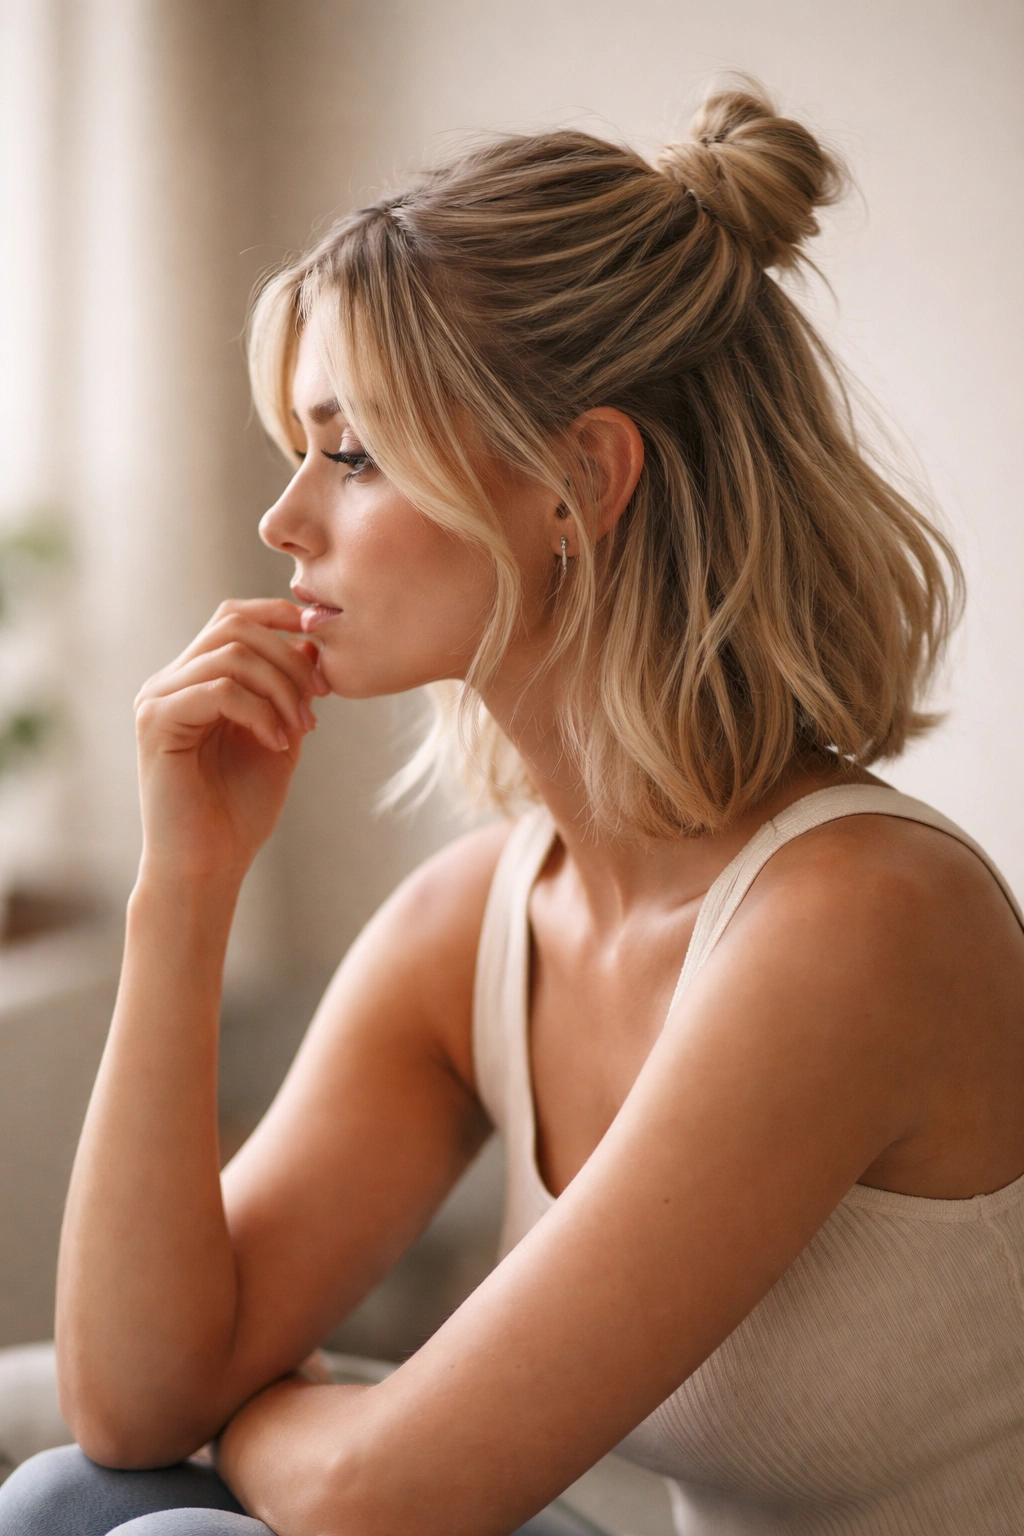
12. The Undone Crown Knot
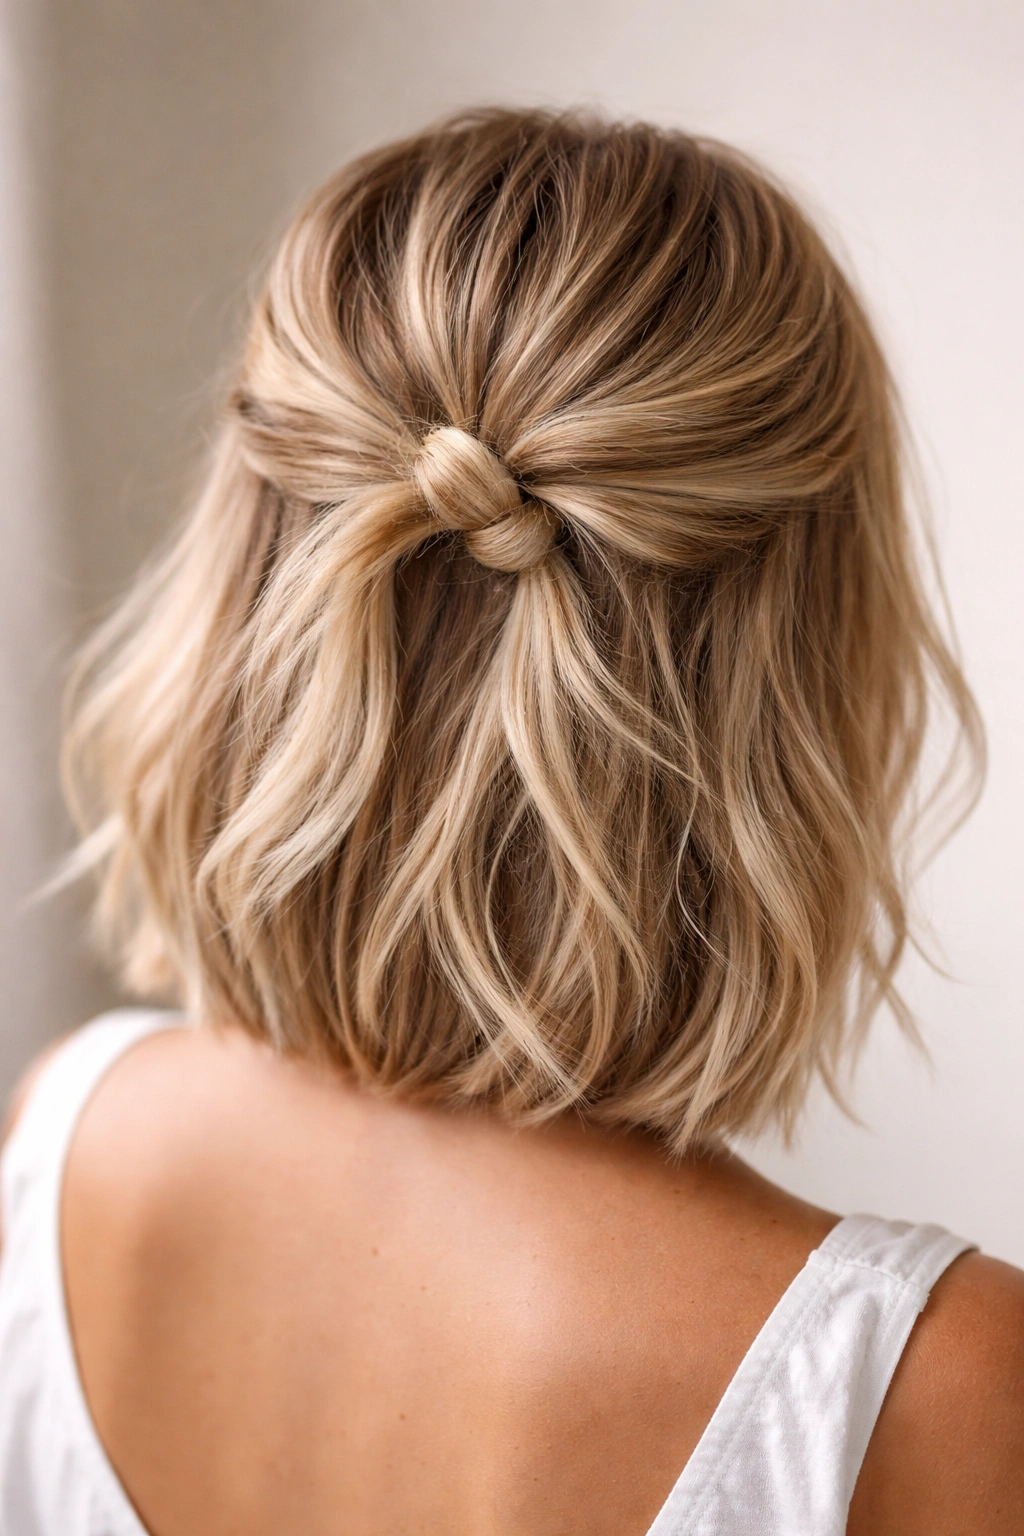
An undone crown knot is even simpler than it sounds—you’re basically creating a very loose, relaxed knot at the crown of your head with some hair, but you’re not worrying about making it perfect or perfectly symmetrical. Take a section from each side of your head, bring them to the back, and tie them together in a loose knot. Don’t pull it tight, don’t stress about it being perfectly shaped, and don’t try to hide the ends. The beauty of this look is that it’s supposed to feel undone and imperfect—almost like you accidentally tied your hair in a knot because it was in your face.
Embracing Imperfection as a Style Choice
The undone crown knot is perfect for days when you want to look effortlessly beautiful without giving off “I spent an hour on this” energy. It’s incredibly quick to execute, holds all day, and reads as intentionally casual rather than sloppy. This is the look for casual weekend days, brunch with friends, or any time you want your styling to feel relaxed and approachable.
Making the Knot Look Intentionally Casual
- Start with already-textured or waved hair rather than starting from scratch—the texture makes the knot look more dimensional
- Make the knot quite loose and leave the ends completely loose and flowing down your back
- Don’t worry about bobby pins sitting perfectly flat—a slightly visible bobby pin actually adds to the undone vibe
- Tease the crown area very lightly before tying to add texture and make the knot look fuller
Worth knowing: This style looks even better on day-two or day-three hair when you have a bit of buildup and texture—you don’t need freshly washed, clean hair for this to work.
13. The Wrap-Around Half-Up
The wrap-around half-up uses the hair itself as a design element—you’re securing a half-up ponytail at your crown, then taking a small section of hair from the bottom of the ponytail and wrapping it around the elastic to hide it completely. This creates a super polished, finished look that appears much more complicated than it actually is. The wrapped section should be about one to two inches thick, and you’re simply spiraling it around the base of the ponytail and securing the end with a bobby pin tucked underneath.
Why This Technique Looks So Elevated
The wrapped-around technique instantly elevates any ponytail or half-up because it hides all the mechanics—the elastic, the bobby pins, all of it—and creates a seamless, polished appearance. It’s the same trick stylists use to make updos look high-end and intentional. On a blonde bob, this technique is especially effective because you can really see the clean line where the wrapping begins and ends.
Executing the Wrap-Around Flawlessly
- Make sure your initial half-up ponytail is very secure before you start wrapping—this is the foundation, so it needs to hold
- Take a thin section from the bottom of the ponytail and wrap it tightly around the base, spiral-style, until you reach the end
- Bobby pin the end of the wrapped section underneath the ponytail base so the pin is completely hidden
- Use bobby pins that match your hair color for the most seamless, invisible finish
Pro tip: For extra hold and polish, wrap the hair around the elastic two full times instead of just once—this creates more coverage and makes the wrapped section look fuller.
14. The Multi-Textured Half-Up
For maximum visual interest, create a half-up by combining multiple texture techniques in one style. Start with loose waves through your entire blonde bob, then create a half-up at the crown by combining a small braid on one side with a twist on the other side, meeting them both at the crown and securing them together. The combination of the loose waves with the mixed braid and twist creates dimensional interest at every angle—from the side, you see the braid and twist, and from the back, you see how they meet and flow into the loose waves below.
Layering Techniques for Complexity
The multi-textured half-up is perfect when you want a look that feels complex and intentional but isn’t actually overly complicated. You’re just combining techniques you already know how to execute—braiding, twisting, and waving—into one cohesive style. This is ideal for special occasions, parties, or any time you want your hair to feel elevated and interesting.
Building a Multi-Textured Look
- Create all your texture (waves) first and let it cool completely before you start securing anything
- Start with the braid on one side and the twist on the other side simultaneously, working toward the back
- Meet them at the crown and secure both sections together with bobby pins, making sure you’re pinning through both the braid and the twist for maximum hold
- The final look should have the braid clearly visible on one side, the twist clearly visible on the other, and loose waves flowing below
Insider note: This style actually looks better slightly imperfect—if some of the waves aren’t perfectly uniform or if the braid is a bit loose, it adds to the intentional, sophisticated vibe.
15. The Half-Up with Face-Framing Waves

This final look is all about flattering your face and showing off your blonde’s shine and movement. Create a simple half-up at your crown—either a small ponytail, a twist, or a knot—but before you secure it, curl your entire head with a 1.5-inch curling iron to create soft waves throughout. The key here is that you’re leaving some of the waves completely loose and face-framing rather than incorporating all of them into the half-up. Let the waves in front of your ears and around your face flow completely loose while the waves at the crown are secured as part of the half-up.
Why Face-Framing Is Essential
Face-framing waves soften any half-up look and ensure that the style is flattering rather than severe or too polished. The loose waves in front of your ears create movement that draws focus to your face and your features, while the secured portion at the back keeps everything else neat and pulled together. This is genuinely the most universally flattering half-up variation because it works on every face shape and every hair texture.
Creating the Perfect Balance of Secured and Loose
- Wave your entire head first, using a 1.5-inch barrel to create consistent, soft waves
- Let the waves cool completely—this is crucial for them to hold throughout the day
- When you secure your half-up, deliberately leave the first two inches of waves on each side of your face completely out of the secured section
- Make sure these face-framing waves are longer than the rest of your bob so they can actually frame your face when they fall
Pro tip: Use a light hairspray to hold the waves, but skip any products in the face-framing sections so they can move naturally throughout the day and create that soft, flattering movement around your face.
Final Thoughts
The beauty of the half-up half-down hairstyle is that it’s endlessly adaptable—whether you’re going for sleek and modern, romantic and textured, playful and undone, or glammed-up and special, there’s a version that’ll work for your blonde bob and your lifestyle. The styles that resonate most with you probably depend on your daily schedule, your styling confidence level, and what kind of vibe you’re going for on any given day.
Start by experimenting with the techniques that feel most natural to you—if twisting comes easily, try the twisted crown or twisted sides. If braiding is your strength, explore the Dutch braid or braided halo options. The more you practice a technique, the faster you’ll become at executing it, and the more you can focus on the details that make each style feel intentional and polished rather than stressing about the basic mechanics.
Once you’ve mastered a few of these looks, you’ll find that you can actually freestyle your own variations. Maybe you’ll combine the bubble ponytail concept with the multi-textured approach, or you’ll adapt the ribbon detail to work with different securing methods. Your blonde bob is genuinely the perfect length for experimenting with half-up half-down styles—long enough that you have plenty of hair to work with, but short enough that securing and styling stays manageable. The key is to keep practicing, keep experimenting, and remember that the “imperfect” details are usually what make a style feel intentionally beautiful rather than overly fussy.