Half Up Half Down Braided Hairstyles for Quinceañera
A quinceanera is one of the most significant moments in a young woman’s life, and the hairstyle you choose deserves just as much thoughtfulness as your dress. Braided half-up half-down styles strike the perfect balance—they’re elegant and sophisticated enough for a formal celebration, yet they offer enough creative freedom to feel personal and uniquely you. Whether you’re drawn to romantic, intricate designs or sleek, modern patterns, a braided half-up half-down style can frame your face beautifully while keeping your hair off your shoulders and away from your tiara or crown.
What makes these styles especially popular for quinceañeras is their versatility. You can customize the braid pattern, incorporate flowers or hair jewelry, adjust the volume and texture, and layer multiple braids to create something that feels both timeless and trendy. The half-up half-down silhouette also photographs beautifully from every angle—whether you’re standing still for formal portraits or dancing with your court during the waltz.
The styles below represent a range of techniques and aesthetics, from soft and romantic to architectural and bold. Each one can be adapted based on your hair type, the intricacy you feel comfortable with, and the overall aesthetic of your quinceañera celebration. Your stylist can adjust tightness, add extensions for volume, or modify the braid patterns to match exactly what you envision.
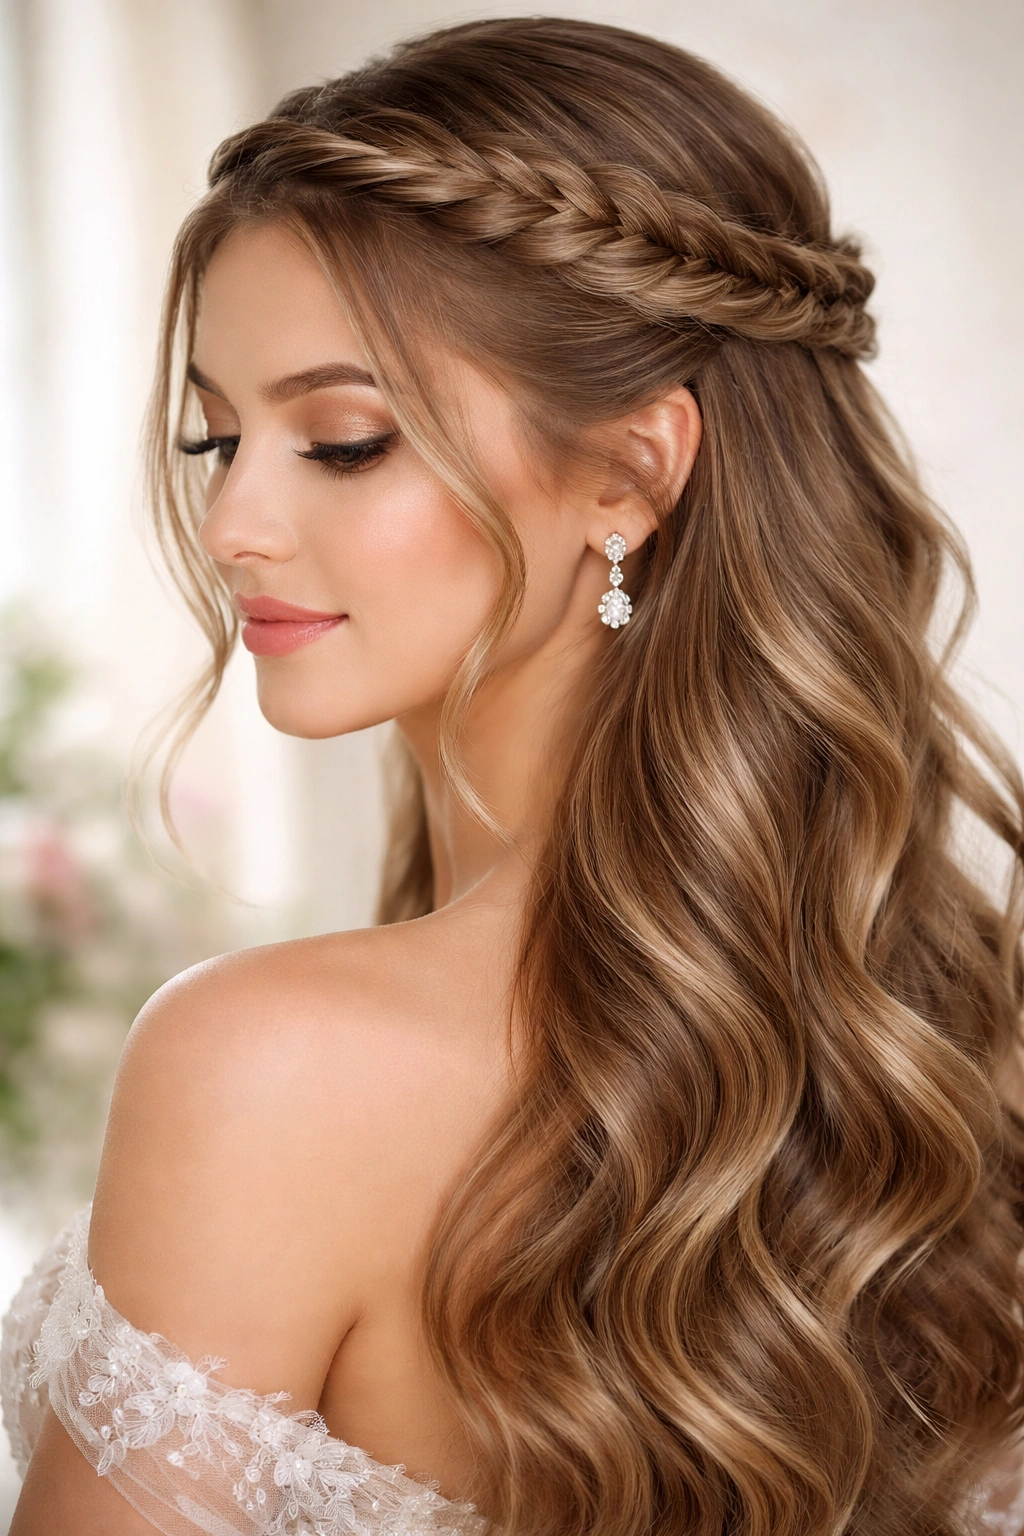
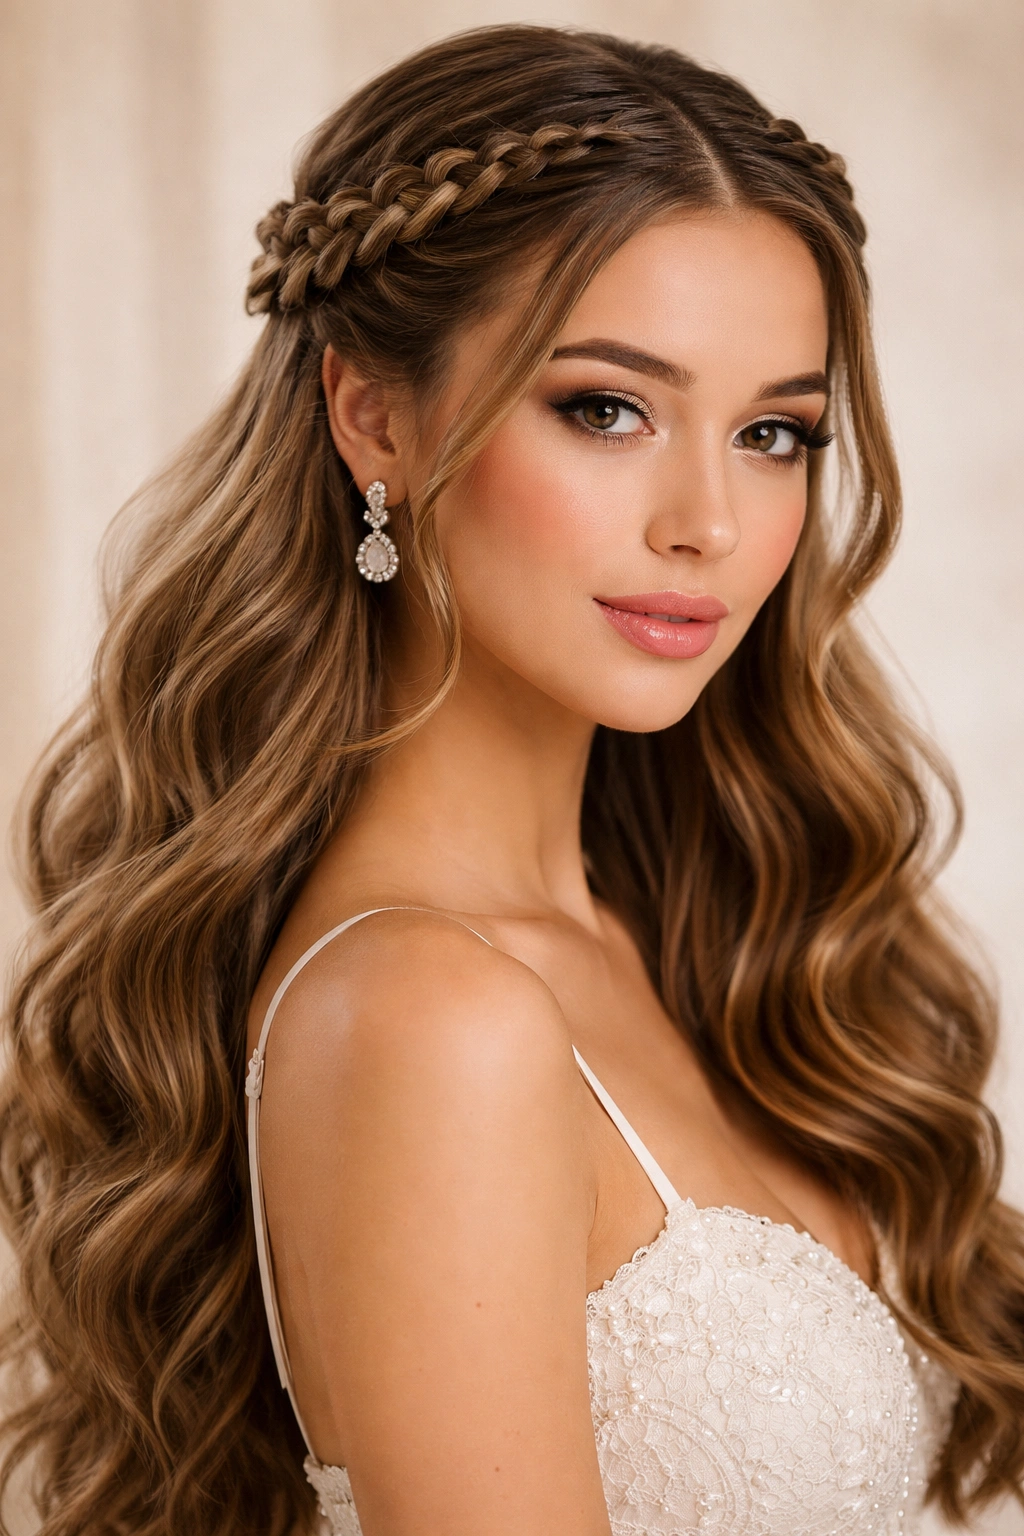
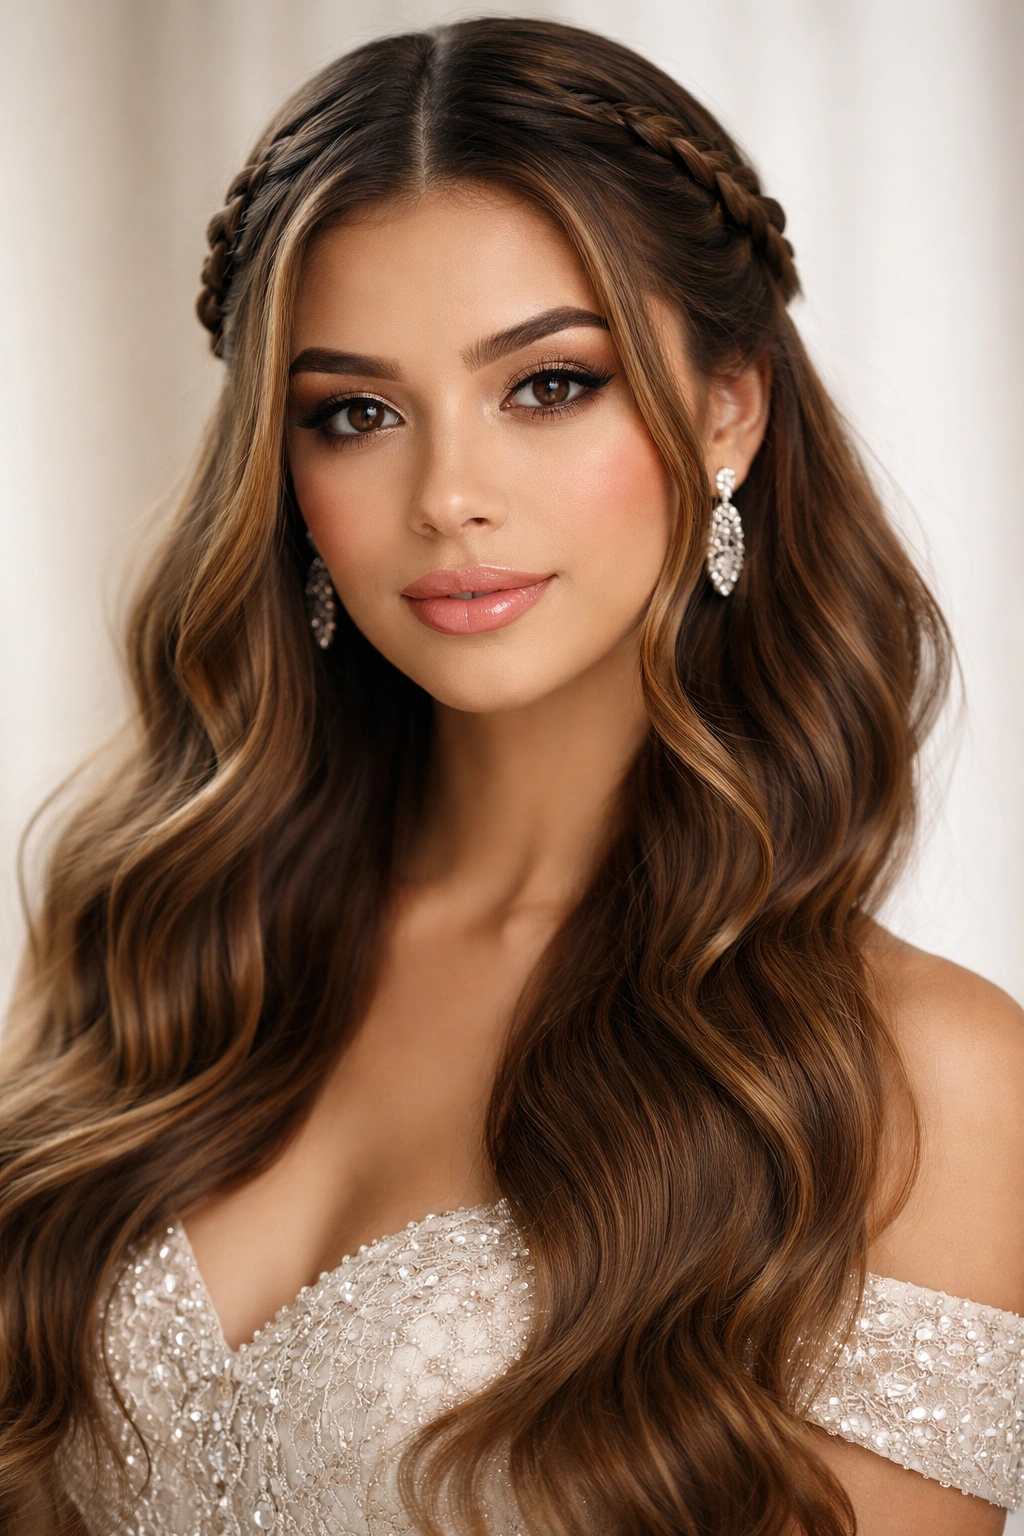
1. Classic Dutch Braid Crown
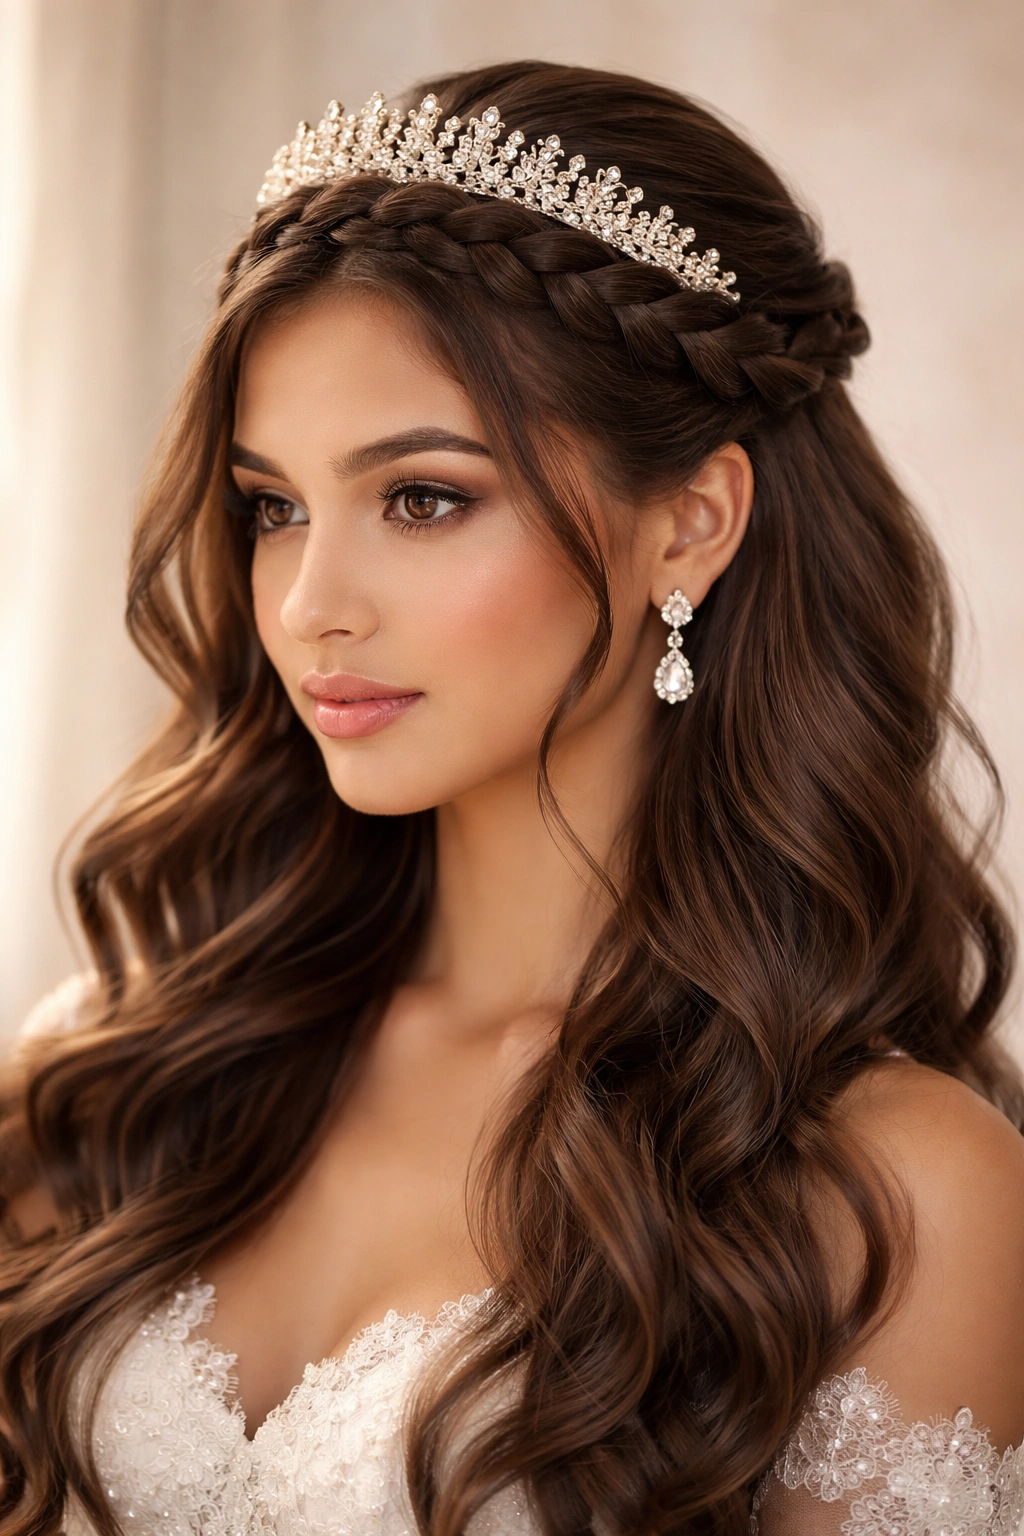
This timeless style features a single Dutch braid (which sits on top of the hair rather than weaving underneath like a French braid) that spans from one temple, across the back of the head, and down to the opposite side. The braid sits like a crown, and the remaining hair falls in soft waves or curls below the braid line. This style works beautifully with traditional quinceanera dresses and pairs perfectly with a delicate tiara nestled just above the braid.
Why This Works for Your Special Day
The Dutch braid crown is instantly recognizable as formal and elegant, making it an ideal choice for a quinceanera’s traditional moments—the formal entrance, the father-daughter dance, and the official portraits. The braid creates a defined structure that keeps the style looking polished throughout the entire event, even as you move and dance. Unlike looser half-up styles, a Dutch braid maintains its shape and doesn’t gradually fall apart as the night goes on.
Key Details to Know
- The braid should begin about 2-3 inches from one temple, at the same height as your eyebrows
- Grip and tension matter—your stylist should braid firmly but not so tightly that it causes discomfort or breaks hair
- This style works best on hair that’s been blow-dried smooth before braiding, creating a polished foundation
- Request that your stylist secure the bottom of the braid with a clear elastic hidden underneath the remaining hair, rather than a visible band
Stylist tip: For added visual interest, ask your stylist to pancake the braid slightly—gently loosening and fluffing each section after braiding—which creates a softer, fuller appearance and adds dimension without looking sloppy.
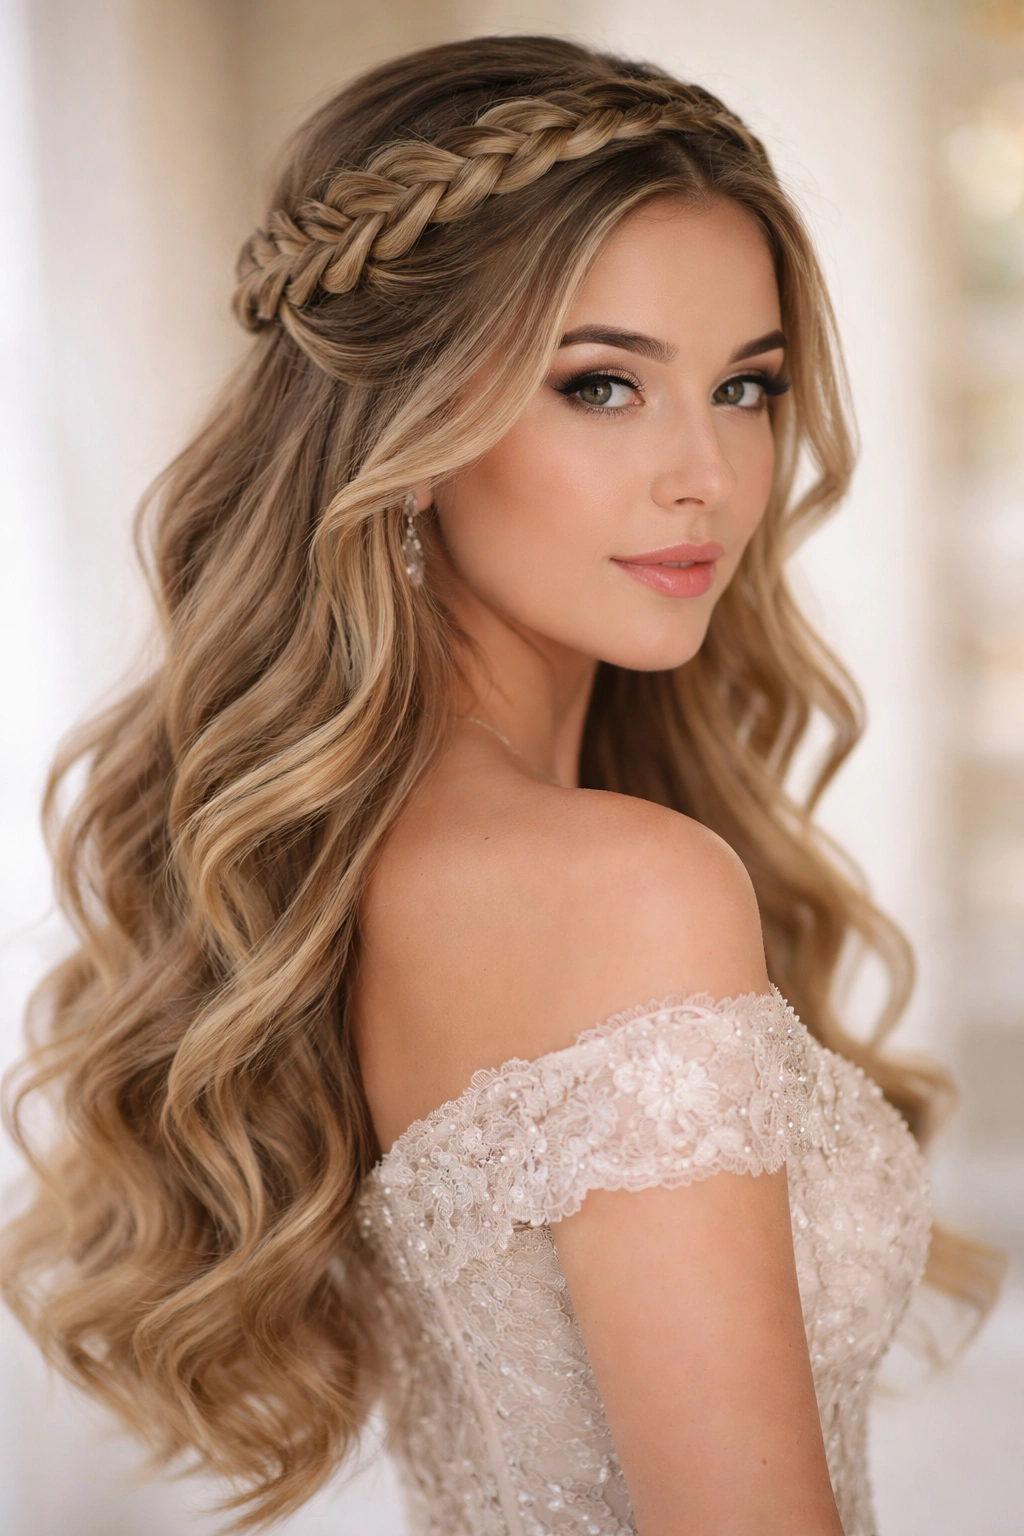
2. Double Dutch Braids with Center Part
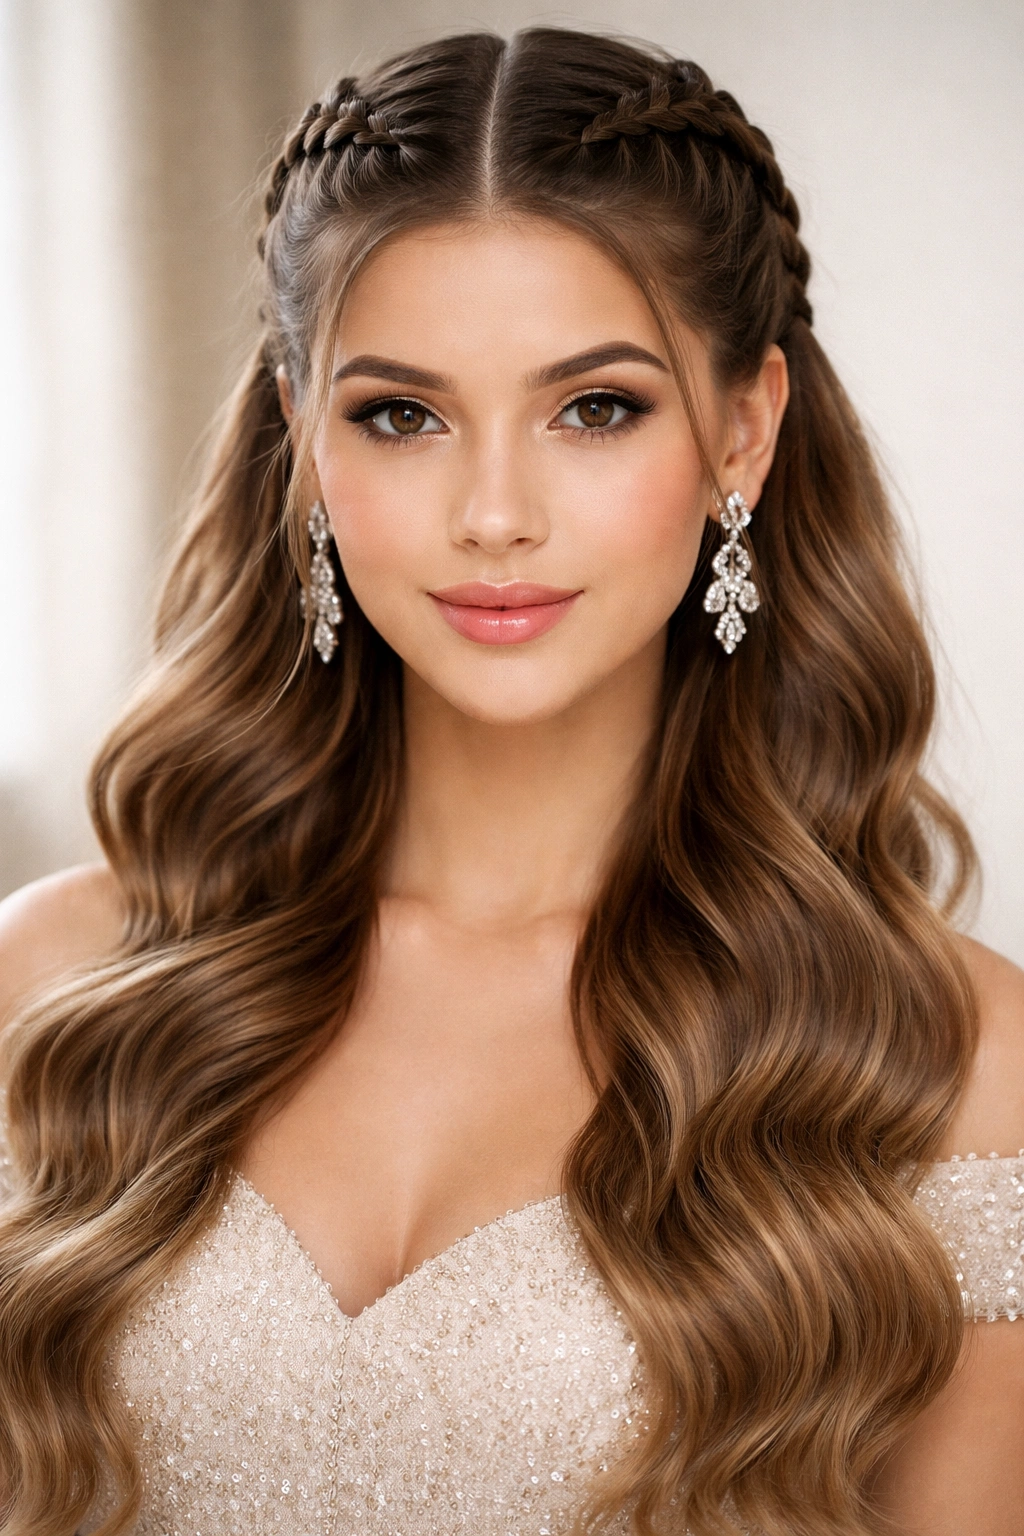
Two matching Dutch braids create a symmetrical, high-fashion look that’s both striking and incredibly flattering. Starting from either side of a center part, each braid travels back to meet at the nape of the neck, where they’re secured together with the remaining hair cascading in waves or curls below. This style feels modern and polished while maintaining the formality expected at a quinceañera.
The Visual Impact
Double braids frame your face with precision and draw attention to your eyes and cheekbones. The symmetry feels intentional and designed, which reads as especially thoughtful and put-together. This style photographs remarkably well from both the front and back, and it’s one of the few half-up styles that looks equally stunning whether your hair is in waves, curls, or straight.
Styling Considerations
- A center part is essential for this style to look balanced and intentional
- The braids should be started 1-2 inches behind your hairline at the temple, creating a clean frame around your face
- Pancaking both braids equally ensures they photograph with the same level of volume and dimension
- The remaining hair should have waves or curls that begin around shoulder level for a cohesive, finished look
Pro note: If your hair is fine or you’re concerned about having enough volume, your stylist can add thin hair extensions specifically to the braids, which adds fullness without compromising the look of your natural hair below.
3. Twisted Dutch Braid with Flowers
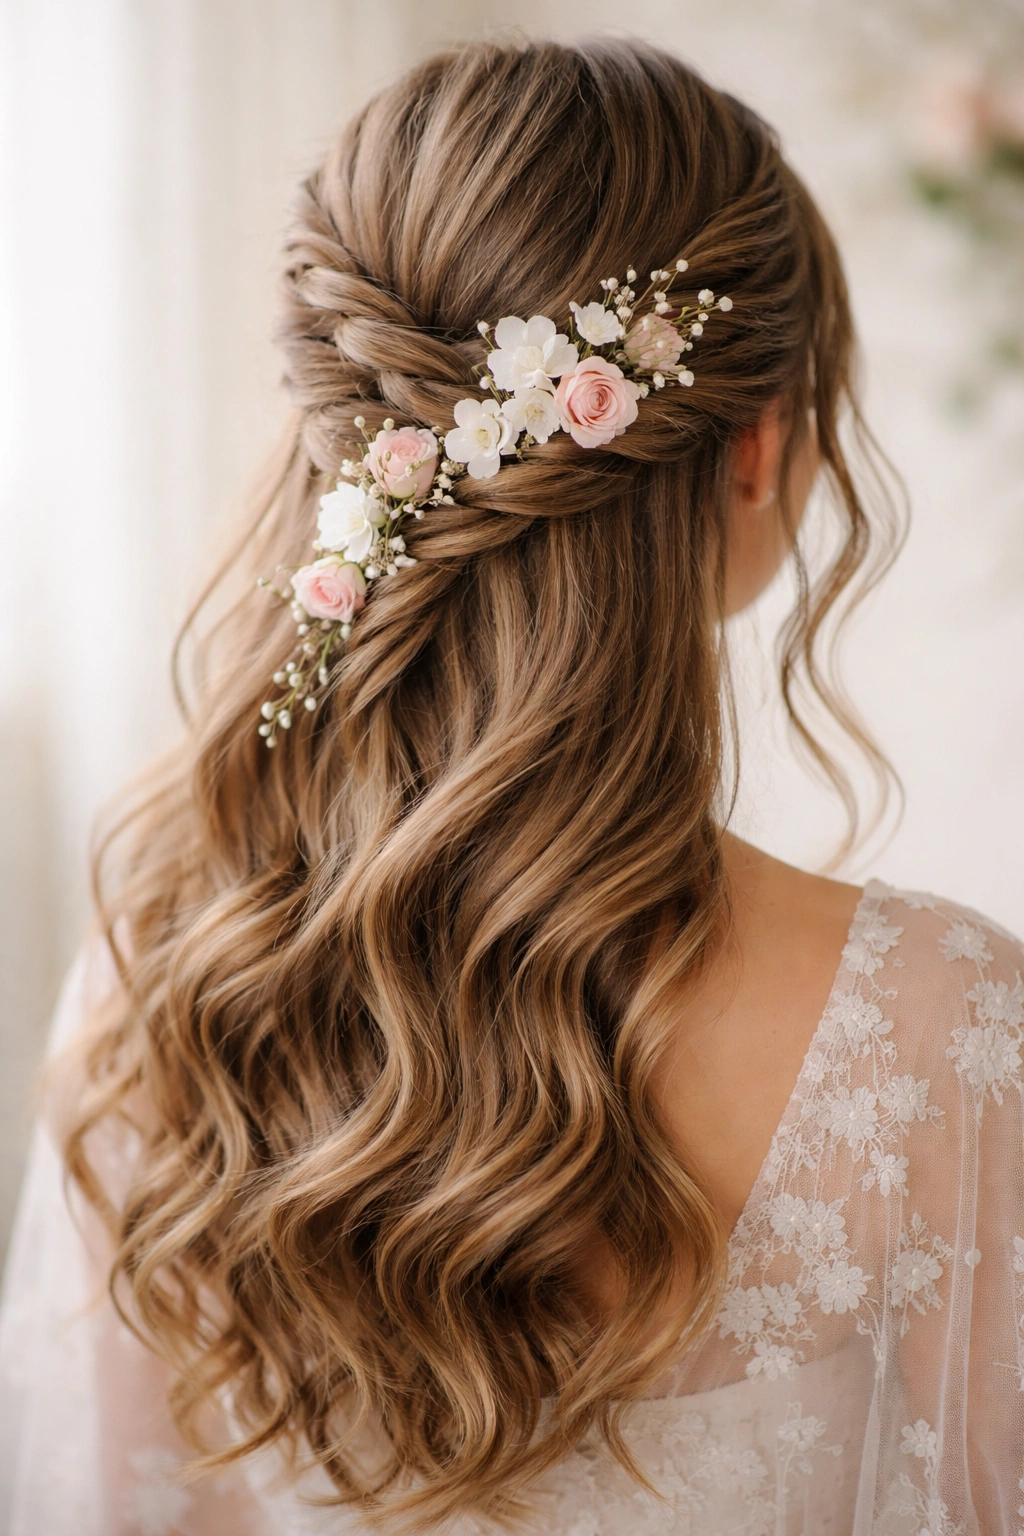
This romantic variation replaces a traditional braid with a twisted pattern—two sections of hair are twisted together—which creates a softer, more delicate aesthetic than a braid. White or blush flowers are woven directly into the twist as it’s created, so the flowers become part of the structure rather than glued on afterward. This style feels especially ethereal and works beautifully with bohemian or romantic gown styles.
Why Flowers Transform the Style
Real flowers woven into the braid add fragrance, visual texture, and a personalized touch that feels luxurious and intentional. The flowers catch light differently than hair alone, and they add a layer of sophistication to an otherwise simple half-up style. This approach is far more durable and secure than hair clips or flowers pinned externally, since the flowers are actually structural components of the hairstyle.
Technical Details Worth Knowing
- The twist should be created tightly enough to hold flowers securely, which is why twisted styles actually work better than traditional braids for floral weaving
- Use sturdy flowers with thick stems—roses, spray roses, hypericum berries, or eucalyptus work beautifully
- Your stylist should wire or tape the flower stems before weaving them in, for security and to prevent stem ends from poking your scalp
- Have backup flowers on hand, since ceremony timing can affect bloom freshness
Insider tip: Ask your florist to prepare the flowers 2-3 hours before your styling appointment, and keep them in water until the moment your stylist begins. This ensures maximum freshness and longevity throughout your celebration.
4. Four-Strand Braid Half-Up
A four-strand braid is significantly more intricate and visually impressive than a three-strand braid, yet it’s entirely manageable for a skilled stylist. This braid starts at the crown and travels back, gathering hair as it goes, creating a thicker, more textured appearance than a simple Dutch or French braid. The remaining hair falls freely, creating beautiful contrast between the structured braid and soft waves below.
The Complexity Factor
Four-strand braiding requires more skill and more time than standard braiding, but the payoff is a genuinely distinctive look that not many people wear. If you want a hairstyle that feels special and shows off the artistry of your stylist’s work, this is an excellent choice. The braid photographs with impressive visual depth and texture, reading as more formal and intricate than it actually is to create.
Making It Work at Your Event
- Schedule an extra 20-30 minutes for styling, since four-strand braids take longer than three-strand
- Ask your stylist to do a trial run before the actual event—this is one style where practice matters significantly
- The braid should be loose enough to look soft and romantic, not so tight that it appears strained
- This style pairs beautifully with minimal hair jewelry, allowing the braid itself to be the focal point
Styling secret: For maximum impact, ask your stylist to pancake the finished braid more generously than usual, fluffing each section quite a bit. A four-strand braid has more surface area, so gentle loosening creates wonderful dimension.
5. Fishtail Braid Crown
A fishtail braid creates a delicate, woven appearance that looks far more intricate than it actually is. Unlike standard braids with thick, obvious sections, a fishtail uses thin strands woven together, creating a fine, lacy texture. When created as a crown from one side of the head to the other, it’s one of the most romantic hairstyle options available for formal events.
The Delicate Sophistication
A fishtail braid feels ethereal and artistic in a way that traditional braids don’t. The intricate woven pattern catches light beautifully in photographs, especially in formal portrait lighting. This style works exceptionally well if you have long, thick hair, since the thin strands still create impressive visual impact with volume to work with.
Creating the Perfect Fishtail
- The braid should begin at one temple and travel to the opposite side, roughly following the line where your half-up section would normally end
- Fishtail braids require slightly damp hair (not wet, but with some texture) to prevent flyaways and breakage during creation
- The finished braid should be secured with a small, delicate elastic hidden beneath the remaining hair
- This is one braid style where less pancaking is often better—the delicate weaving is the visual feature, so overdoing it can obscure that detail
Important note: Fishtail braids require more time to create than standard braids, so discuss timing carefully with your stylist. The intricate work is worth it, but plan accordingly on the day of your event.
6. Braided Halo with Curled Bottom
This ethereal style features a braid that travels around the back of the head like a halo—typically starting at one temple and ending at the other, traveling behind the ears. The hair is left down in the front, then curled into romantic waves or ringlets that fall over the shoulders. The contrast between the structured braid and the flowing curls creates a dreamy, princess-like effect.
Why This Style Feels So Special
A halo braid creates the impression of a crown or tiara without actually wearing one, making it feel both formal and imaginative. The style is flattering on virtually all face shapes, since the braid follows the natural curve of your head rather than drawing straight across. The combination of the braid’s structure with loose curls creates a silhouette that’s instantly recognizable as bridal or celebratory.
Achieving the Hairstyle
- The braid path should follow roughly where your ear naturally sits, creating a gentle U shape from temple to temple
- Request that your stylist curve the braid slightly rather than creating a perfectly symmetrical arc—this follows your natural head shape and looks more organic
- The front sections left down should frame your face, not cover it, so ask your stylist to leave approximately 2-3 inches on either side of your face unbraided
- Curls should be set with heat-styling tools before the braid is created, so they last throughout your event
Practical detail: Ask your stylist to use lightweight hairspray (not heavy-hold) so curls look bouncy and touchable rather than stiff. Your curls should move when you move, which photographs beautifully and feels more comfortable when dancing.
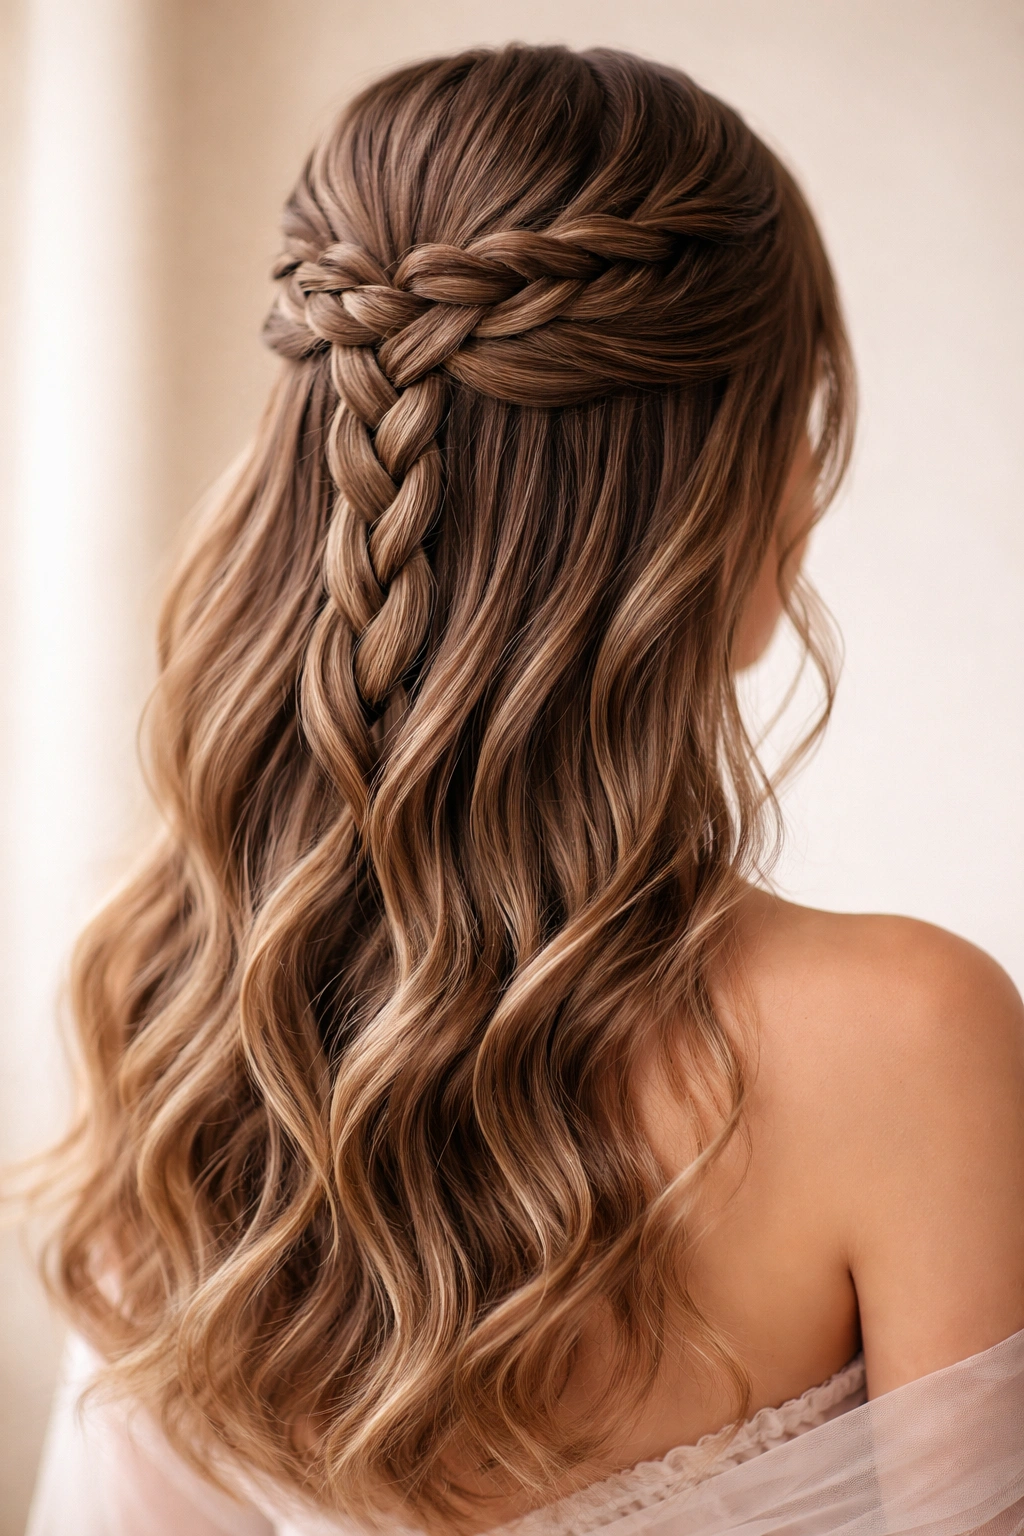
7. Reverse French Braid Half-Up
A reverse French braid (also called a reverse Dutch braid by some stylists) sits on top of the hair instead of underneath, creating a raised, dimensional appearance. When created as a half-up style starting from the crown and traveling back, it creates a subtle centerline detail that adds visual interest without overwhelming the look. This is an excellent choice if you want something sophisticated but not overly complex.
The Subtle Elegance
The strength of this style is its understatement—it doesn’t announce itself loudly, but a trained eye recognizes it as a deliberate, well-executed choice. The braid sits naturally at the top of your head, following the curve of your crown, which is more flattering than a braid that travels harshly across the side of your head. This style works beautifully with upswept portions of your quinceanera dress neckline.
Technical Considerations
- The braid should start at your crown (not your hairline) and travel straight back toward the nape of your neck
- The braid should sit on top of your natural hair structure, not pulled so tightly that it distorts your scalp
- Ask your stylist to leave a few delicate face-framing pieces unbraided, softening the overall effect
- The remaining hair can be curled, waved, or left straight, depending on your dress style and personal preference
Insider secret: If you’re concerned about the braid showing against your hair color, ask your stylist to use a ribbon or thin fabric strip woven through the braid. This adds color, dimension, and a finished detail without requiring additional hair styling.
8. Waterfall Braid Half-Up
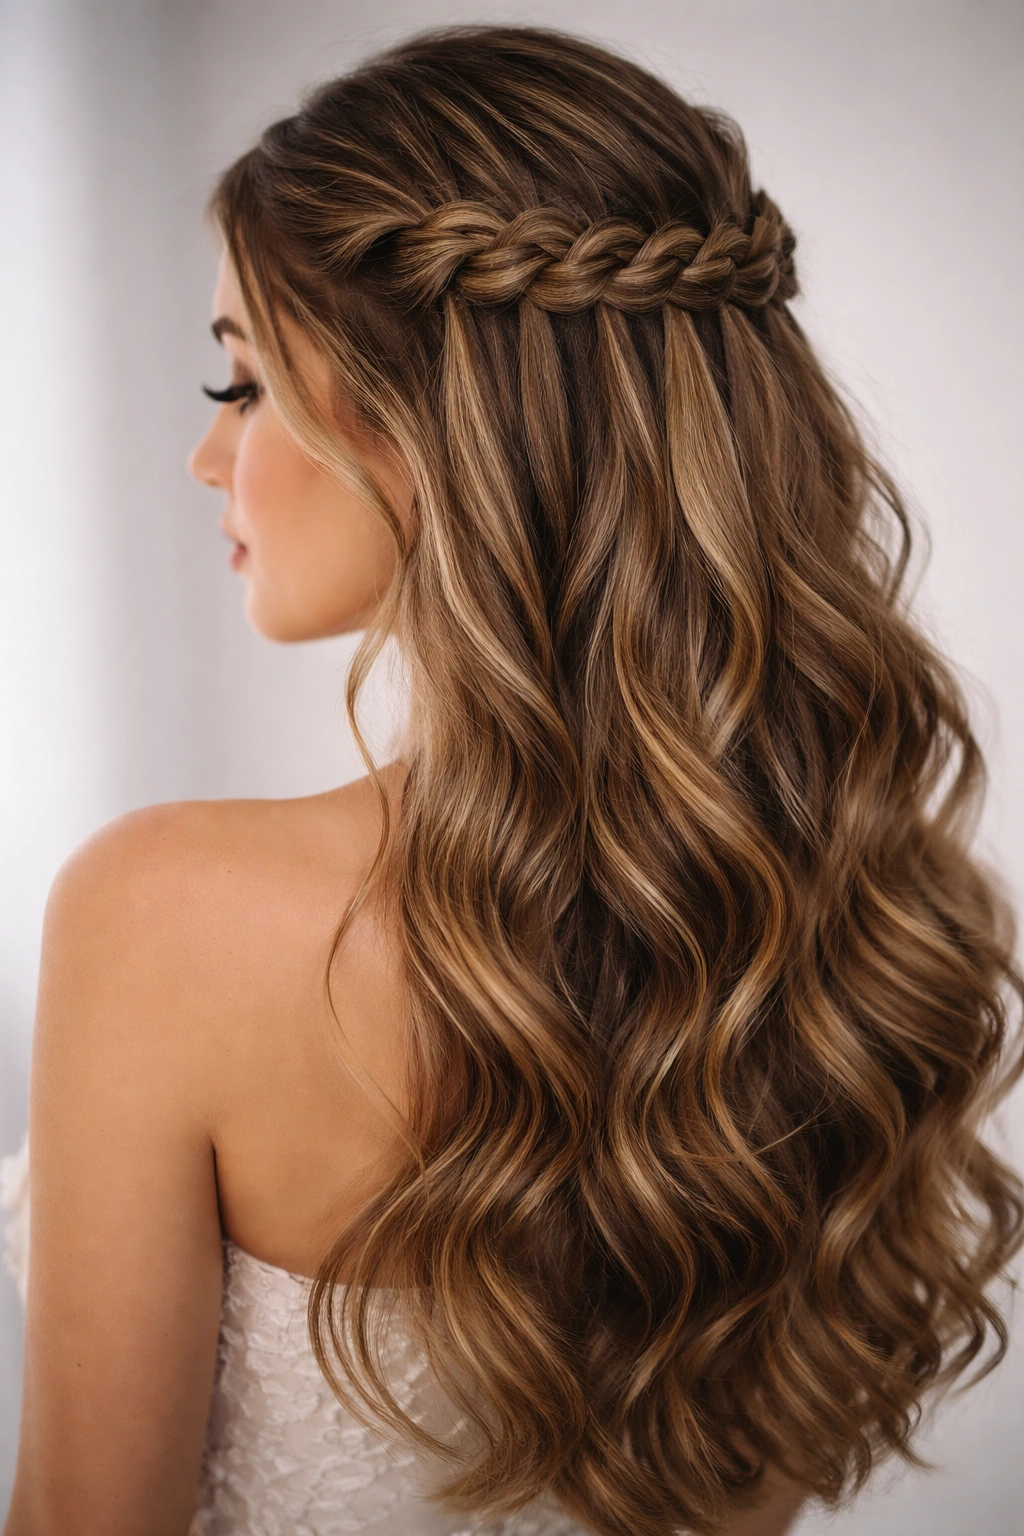
A waterfall braid creates the effect of flowing water—hair is braided while intentionally dropping sections, creating a cascading effect. When incorporated into a half-up style, the waterfall portions flow down the sides of your face and blend with the lower hair, creating a romantic, organic look. This style is especially beautiful on straight or slightly wavy hair where the “waterfall” strands are clearly visible.
The Romantic Flow
The appeal of a waterfall braid is its movement and fluidity. Unlike styles where hair is secured firmly in place, the waterfall effect suggests softness and femininity. This style photographs beautifully in motion—when you’re walking down the aisle, dancing, or turning your head, the waterfall portions catch light and create lovely visual movement.
Making It Look Effortless
- The waterfall should begin at the temple and travel back toward the opposite ear, dropping strands in a regular pattern
- The dropped sections should blend seamlessly with the lower hair, so request that your stylist match the wave pattern
- This style requires your stylist to plan the drop pattern carefully—not too frequent (which looks disjointed) or too sparse (which loses the waterfall effect)
- Light hairspray is your friend here; heavy product will weigh down the delicate dropped sections
Tip: Discuss with your stylist whether you want a single waterfall (traveling down one side) or a double waterfall (one on each side). A single waterfall is often more flattering and easier to manage throughout the evening.
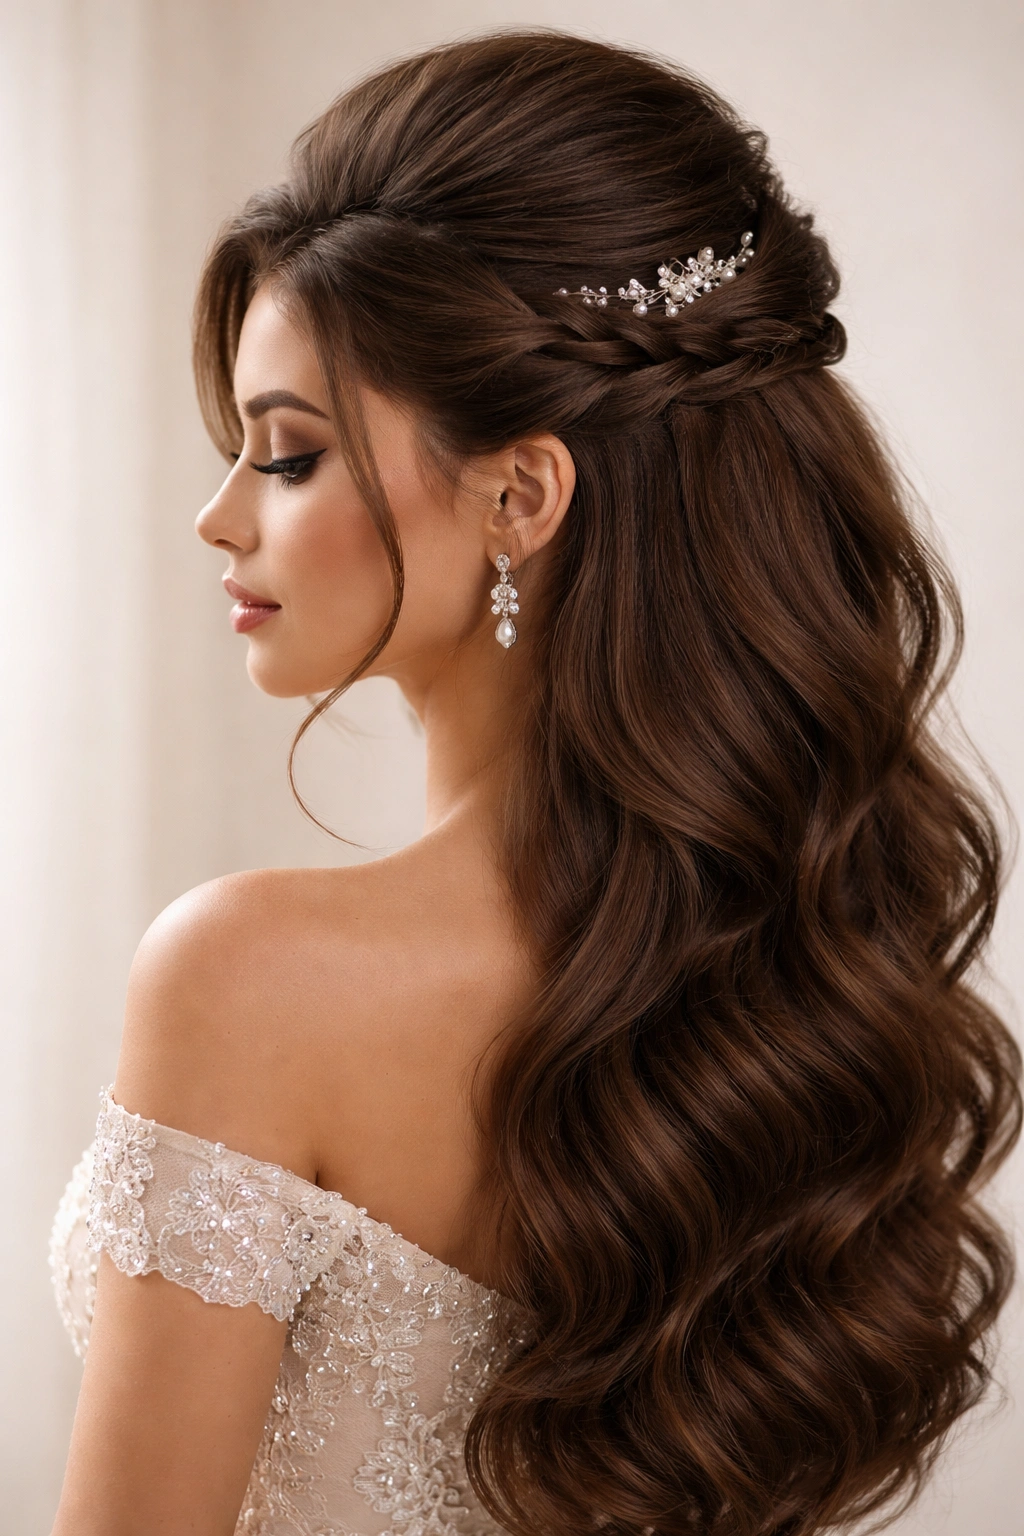
9. Crown Braid with Pearl Details
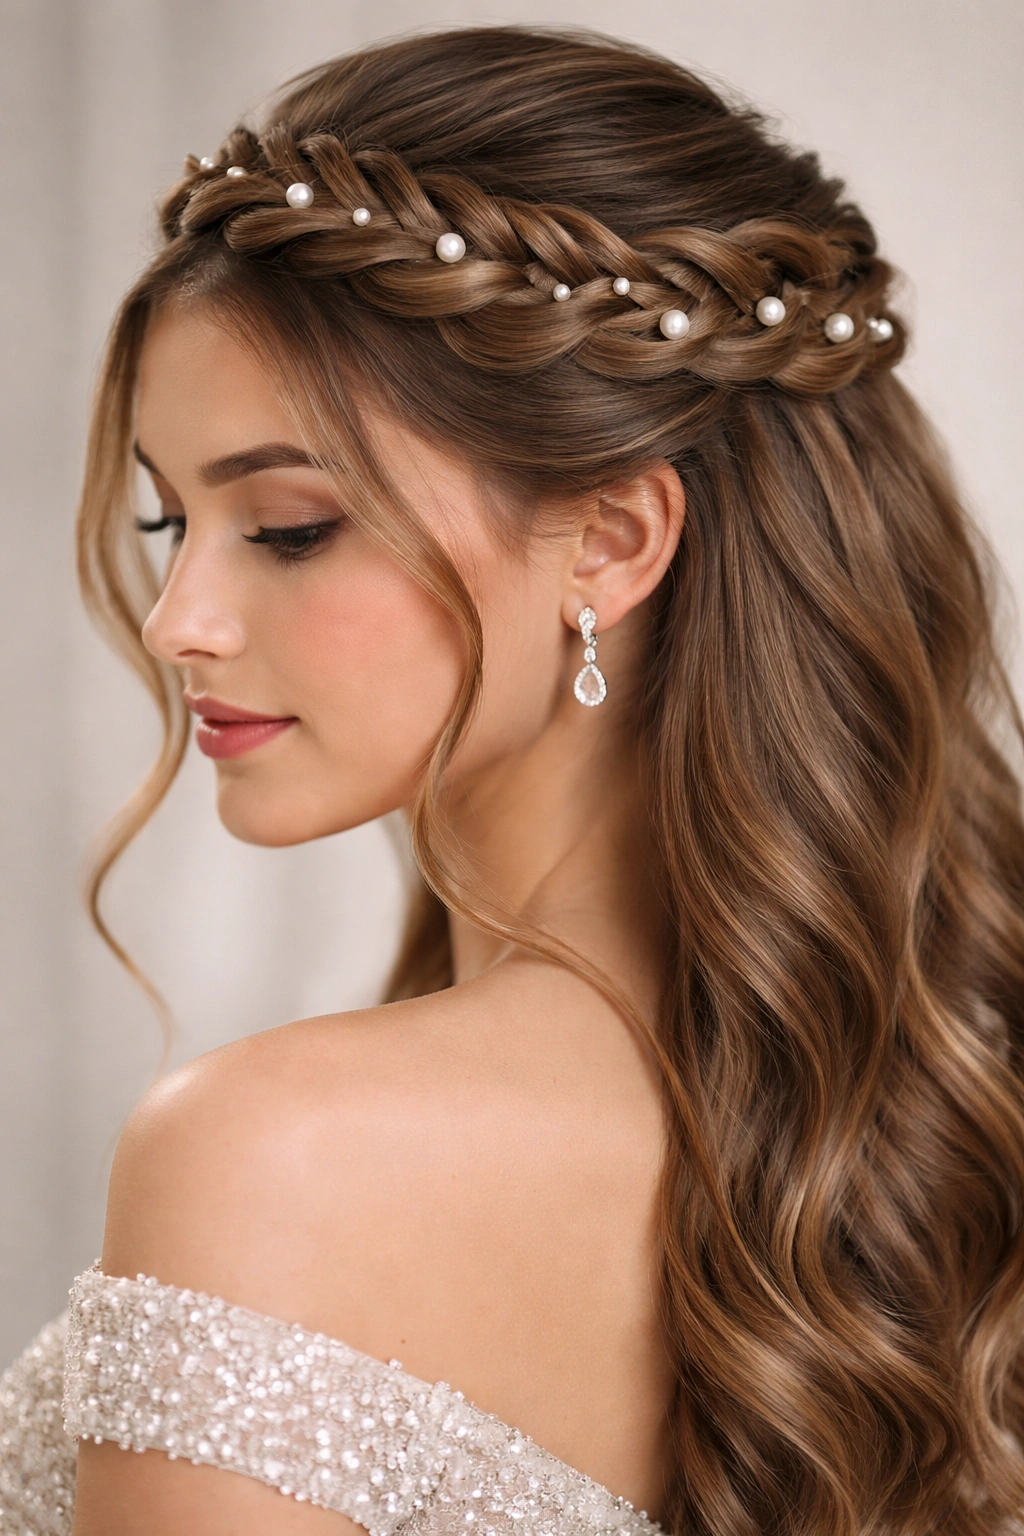
This style features a thick, visible braid that circles the crown of your head like a crown or halo, with small pearl hair clips or pearl-studded combs woven into the braid or positioned at intervals. The combination of the braid structure and the reflective, glowing quality of pearls creates an incredibly formal, luxurious appearance. The remaining hair falls below in waves or curls.
Luxury Through Details
Pearls are a traditional choice for formal celebrations, and when used as functional elements of your hairstyle (not just decorative clips stuck on top), they elevate the entire look. The pearls catch light in your photographs and create a cohesive visual story with your jewelry and accessories. This style is especially stunning if you’re wearing a pearl necklace or pearl earrings—the repetition of the pearl element creates intentional coordination.
Technical Requirements
- The braid should be thick enough that pearl clips sit securely without slipping—ask your stylist to braid quite firmly for this style
- Pearls should be genuine or high-quality faux pearls; cheap imitation pearls read as costume-y in formal photographs
- Space pearls evenly throughout the braid, rather than clustered in one section—typically one pearl clip every 1-2 inches of braid
- The remaining hair should have some volume and movement to balance the structured braid
Investment note: If you don’t own pearl hair accessories, this is an excellent time to invest in a quality pair of pearl hair clips or combs that you can wear again for future formal events.
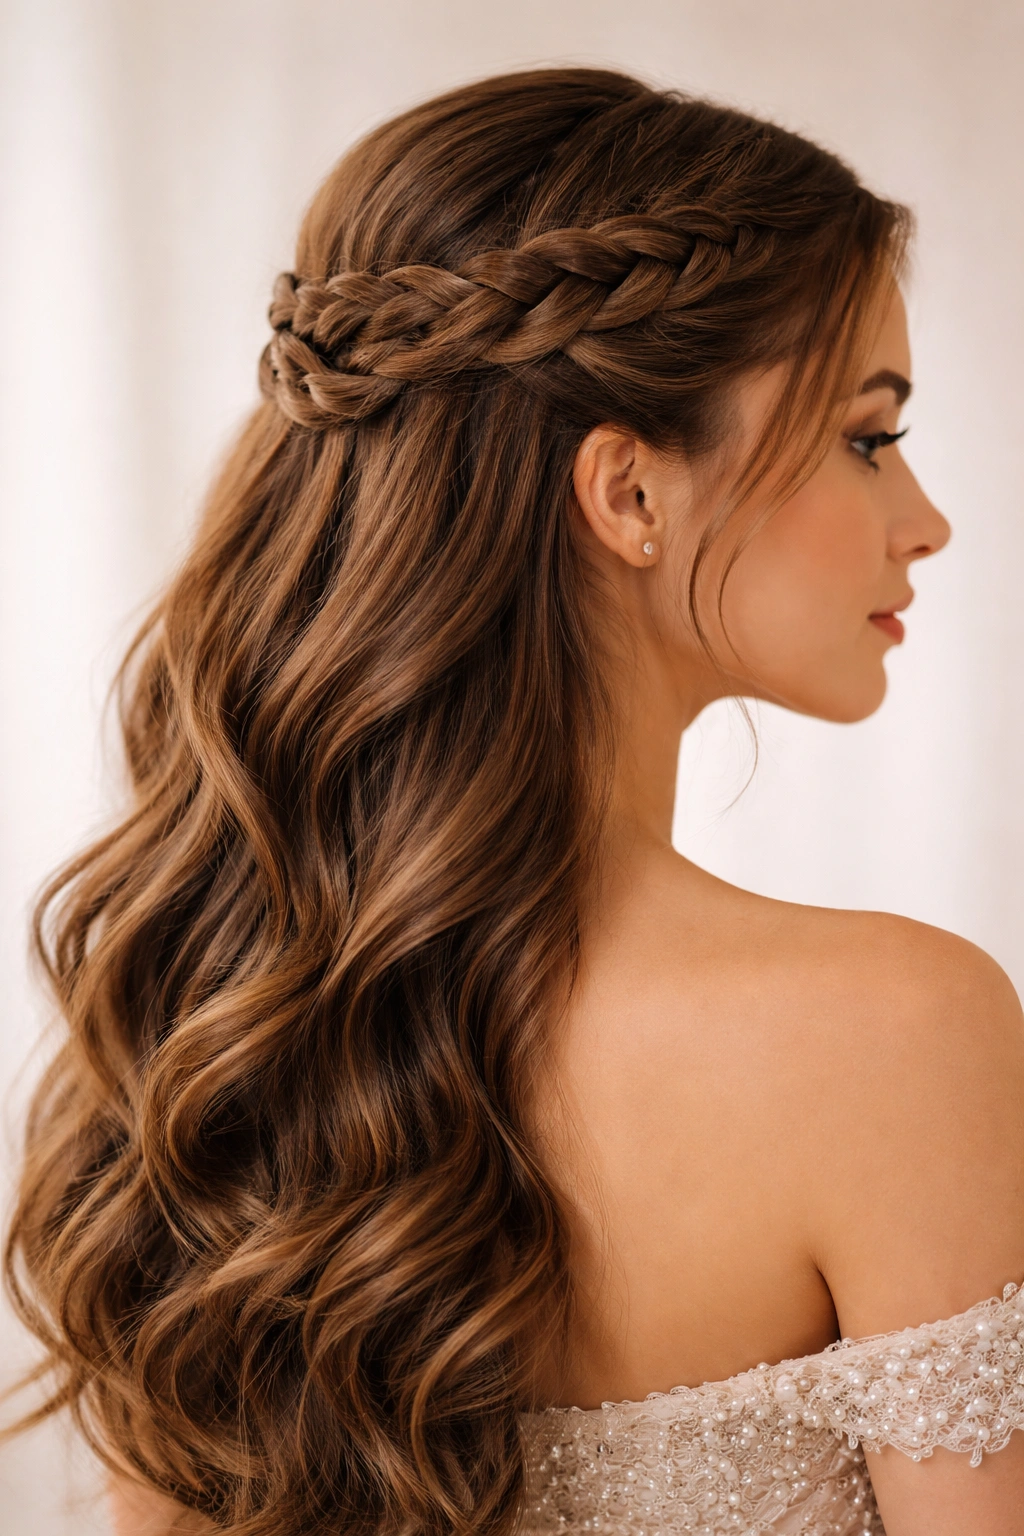
10. Double Braids Wrapped Around Crown
Two braids are created separately, then wrapped around your head to meet at the back, creating a wrapped-crown effect. Each braid starts at the temple on its side and travels back, then the two braids are twisted or wrapped around each other at the nape of the neck, with hair falling loosely below. This creates an architectural, high-fashion appearance that feels both modern and romantic.
The Fashion-Forward Look
This style requires skilled execution and looks genuinely impressive when done well. The wrapped effect at the back is creative and unexpected—it’s not a style you see on every person, which makes it feel special and thoughtfully designed. The style works exceptionally well with more contemporary or fashion-forward quinceanera dresses.
Making It Work
- Each braid should be sized proportionally—if one is thicker than the other, the style will look unbalanced
- The wrapping at the back should be secure but not so tight that it looks strained or uncomfortable
- Request that your stylist leave some softness or looseness in the wrapped portion; too-tight wrapping looks severe
- The remaining hair falling below should have waves or curls that create softness and balance the structured top
Timing consideration: This style takes longer than a simple half-up look, so allocate extra time in your styling appointment. The complexity is worth it, but you want your stylist to feel unhurried while creating it.
11. Rope Twist Half-Up with Ribbon
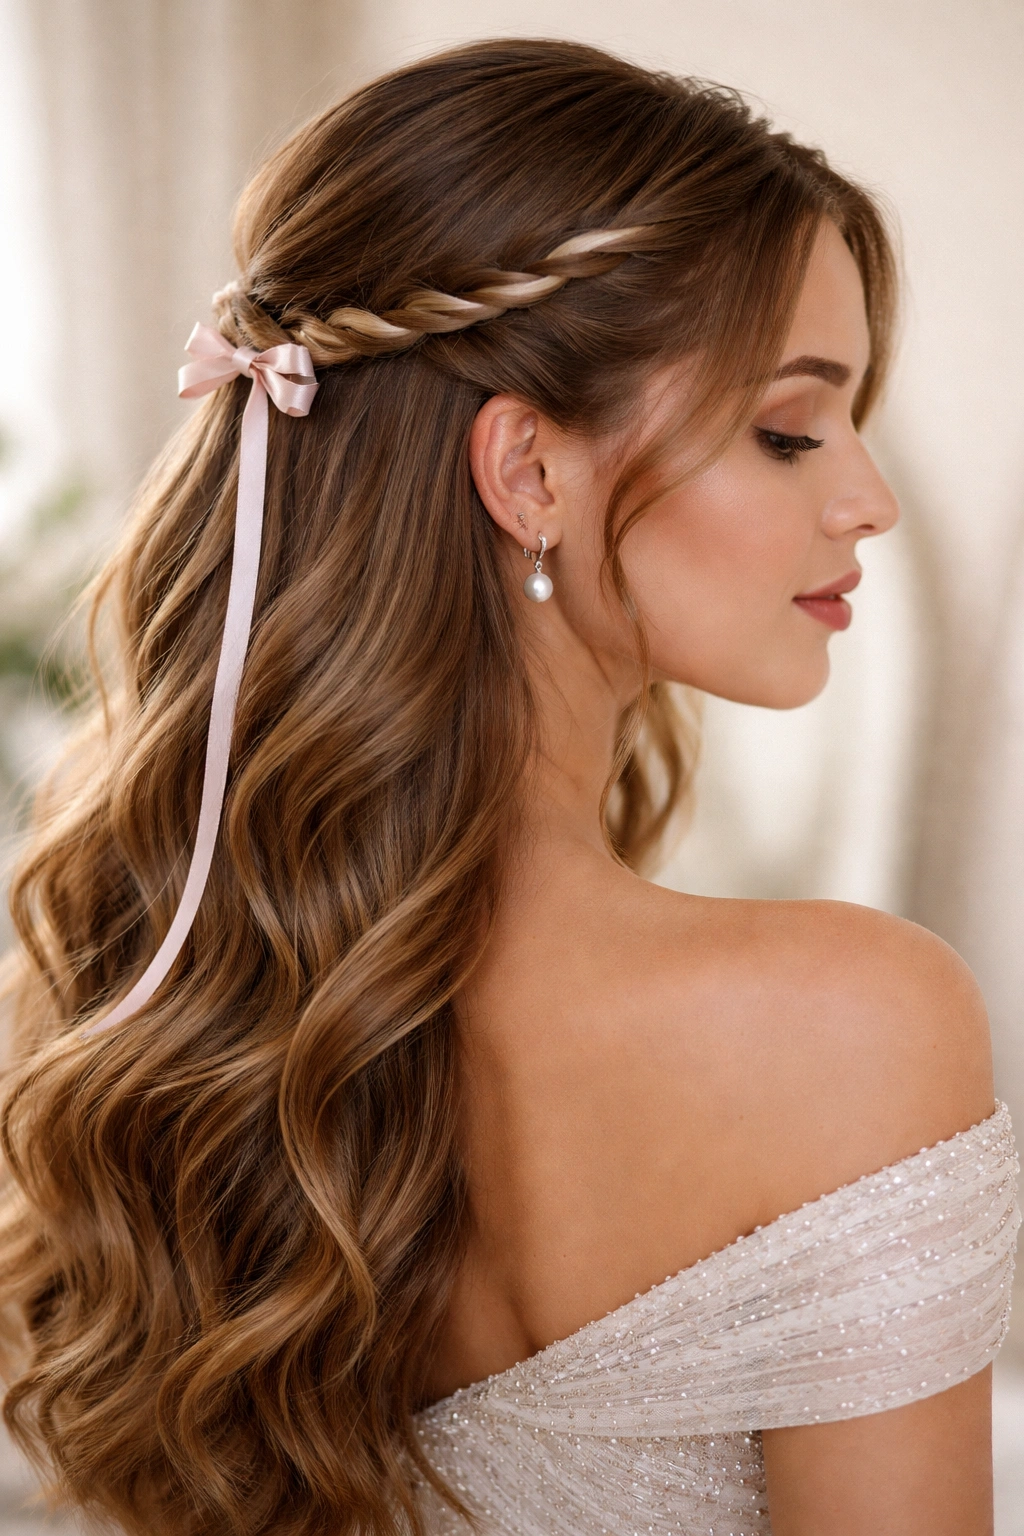
A rope twist (created by twisting two sections of hair together rather than braiding three or more sections) creates an elegant, simple line that travels from one side to the other. A thin ribbon or fabric strip is threaded through or wrapped alongside the twist, adding color, texture, and visual interest. This style is easier to create than braids but reads as equally formal and intentional.
The Understated Sophistication
Rope twists are underrated in formal styling, perhaps because they’re simpler to create than braids. But this simplicity is part of their charm—the result is clean, elegant, and effortlessly polished. A ribbon running alongside the twist adds dimensionality and allows you to coordinate with your dress, veil, or bouquet color.
Execution Details
- The twist should begin at the temple and travel in a slight curve toward the opposite ear, roughly following where your half-up section would naturally end
- The ribbon should be thin enough that it doesn’t overpower the twist, but visible enough to be noticed in photographs
- Wrap the ribbon smoothly alongside the twist, securing both the twist and ribbon with a single clear elastic at the endpoint
- The remaining hair should be curled or waved to soften the clean lines of the twist
Color consideration: Choose a ribbon color that either matches your dress closely or contrasts boldly with your dress, veil, or bouquet. A color that’s almost-matching-but-not-quite often reads as accidental.
12. Braided Curtain Style with Center Part
This modern style features a center part with two braids beginning at either side of the part, traveling back toward the back of your head but not quite meeting. The braids sit like “curtains” framing your face, while the hair in the center remains unbraided. Below the braid line, all the hair falls freely in waves. This style is flattering on most face shapes and works beautifully with modern, sleek dress styles.
Contemporary and Flattering
The curtain effect of the braids creates a modern, editorial feel while still being formal and appropriate for a quinceañera. The braids frame your face without framing it too heavily—your face remains the focal point rather than being surrounded by structured styling. This style is especially flattering if you have a face shape you want to highlight.
Creating the Look
- The center part should be razor-straight for a modern effect, or slightly softer if you prefer a less severe aesthetic
- Each braid should start about 1 inch away from the center part, at the temple
- The braids should travel back but stay somewhat close to the sides of your head—not too far forward (which would cover your face) or too far back (which would be a standard crown braid)
- Both braids should be finished at approximately the same point along the back of the head
- The remaining hair falls fully, creating length and movement
Styling note: The contrast between the structured braids and the loose, flowing hair is the key to this style working well. Don’t compromise on either element—the braids need to be neat and defined, and the lower hair needs to have beautiful waves or curls.
13. Infinity Braid Half-Up
An infinity braid is created by intertwining two braids that wrap around each other, creating an interlocking, woven effect. When positioned as a half-up style traveling from one temple to the opposite side of the head, it creates a sophisticated, intricate visual. This is a more advanced braid style that requires significant skill from your stylist, but the result is genuinely stunning.
The Technical Masterpiece
An infinity braid looks complex (and it is), so it reads immediately as the work of a skilled stylist. If you want a hairstyle that displays real artistry and technical skill, this style delivers. The interlocking pattern catches light beautifully and photographs with impressive depth and detail.
What to Expect
- Your stylist will create two separate braids, then weave or wind them around each other, creating the infinity effect
- The process takes longer than a simple braid—plan for extra time in your styling appointment
- The final style should look cohesive, not like two separate braids placed next to each other
- This style works best on thick or long hair, since thin hair can look sparse when creating multiple separate braids
Stylist communication: Show your stylist photos of infinity braids beforehand and discuss exactly how you want the two braids positioned relative to each other. There are several ways to create an infinity braid, and visual reference helps ensure you get the look you want.
14. Dutch Braid with Undercut Details
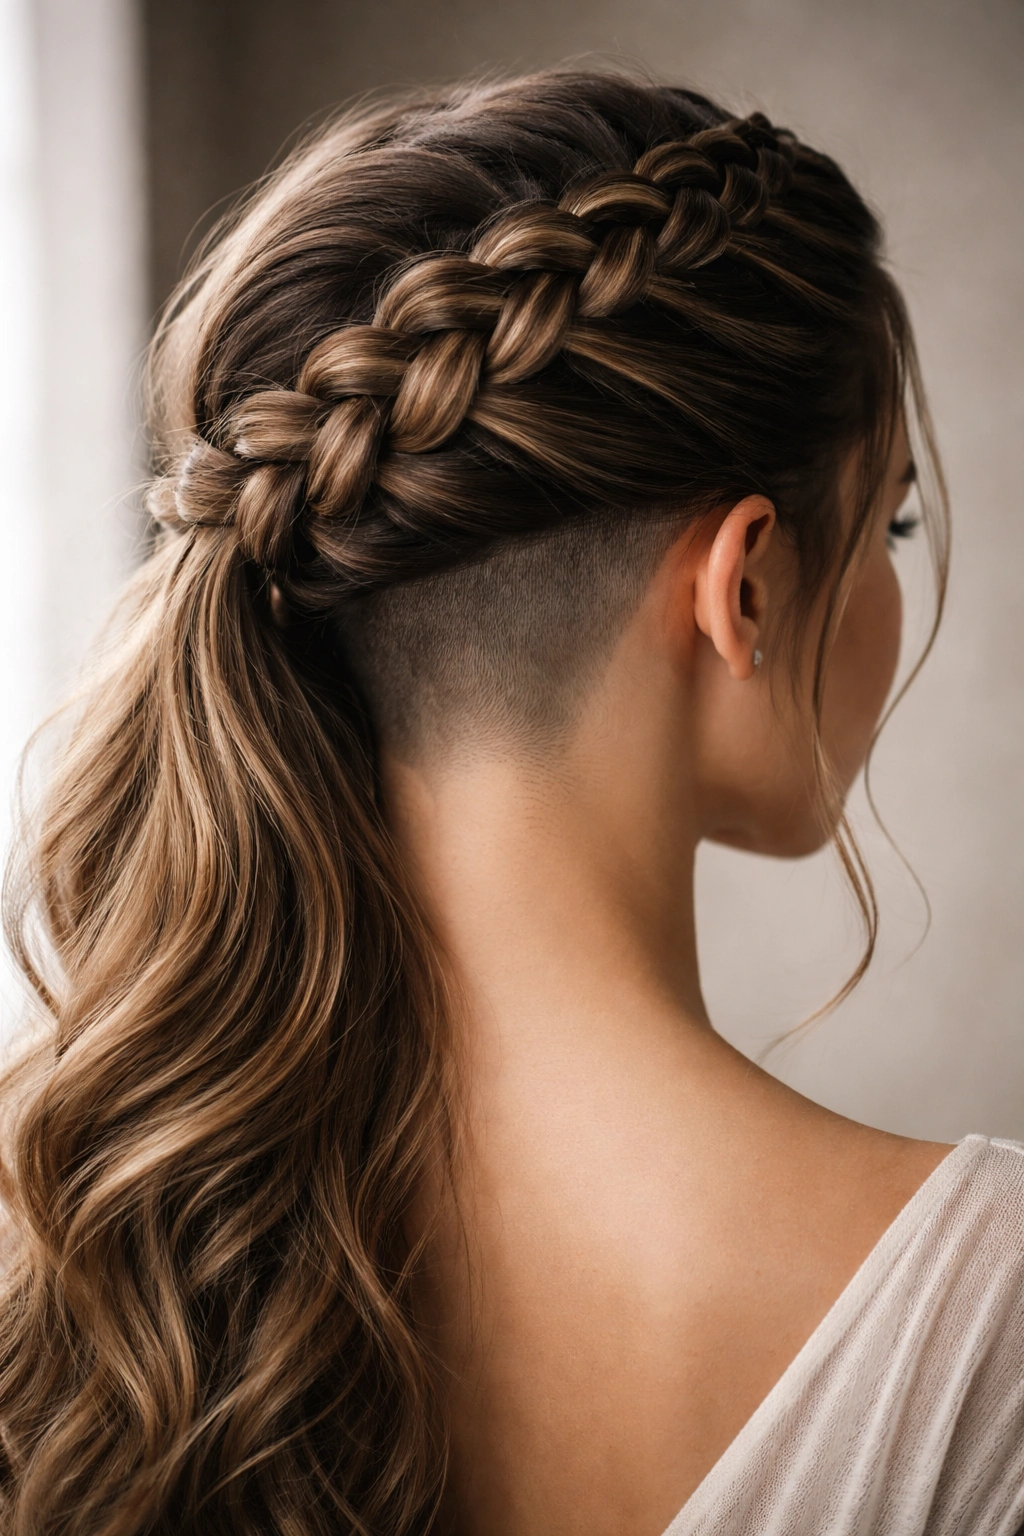
A single Dutch braid travels from one side of the head to the other, and the remaining hair is styled into an undercut effect—the back of the head is left relatively smooth and close to the head, while the sides around the face maintain fuller length. This creates dramatic contrast and a very modern, fashion-forward silhouette. The style feels daring while the braid provides the formal, traditional element.
Bold and Fashion-Forward
If you want a quinceañera hairstyle that feels current and fashion-forward rather than traditionally feminine, this is an excellent choice. The undercut creates an edgy element that contrasts beautifully with a formal dress, creating an interesting tension between classic and modern. This style photographs beautifully from the back, creating a strong visual silhouette.
Styling Considerations
- The undercut sections should be smoothed or even slicked slightly for a polished, intentional appearance rather than looking like messy hair
- The braid should be clear and well-defined—not too loose or soft, since the style is meant to be architectural and bold
- The sections around your face should remain fuller and longer, creating flattering frame-like effect
- Ask your stylist about using hair gel or pomade to achieve the smooth, slicked appearance of the undercut sections
Professional consideration: This is a very fashion-forward style, so consider your venue and dress style carefully. It’s stunning on the right quinceanera, but it’s distinctly modern and might not suit a very traditional celebration.
15. Spiral Braid Wrapped Half-Up
This style features a braid that’s twisted into a spiral shape rather than a simple linear path. The spiral is positioned at the side of the head, creating a sculptural, three-dimensional effect. The remaining hair falls below in waves, and the contrast between the spiraled structure and soft waves creates an interesting balance. This is a true statement-making hairstyle choice.
Sculptural and Artistic
A spiral braid is genuinely unusual, which means your hairstyle will feel personal and distinctive rather than looking like every other formal style. The spiral can be positioned differently depending on your preference—tighter to your ear, larger and more prominent, positioned higher or lower on your head. This offers creative customization possibilities.
Technical Execution
- The spiral should be created using a standard braid or twist, then the finished braid is coiled and secured to form the spiral shape
- The spiral should sit at roughly ear level, though your stylist can position it higher or lower based on your face shape and preference
- The size of the spiral determines the visual impact—larger spirals make a bolder statement, while smaller spirals are more subtle
- Secure the spiral with bobby pins that match your hair color, and secure the tail of the spiral where it meets the lower hair
Practice important: This style should absolutely be practiced before your event. The creation process is different from standard braiding, and your stylist needs to work out sizing and positioning beforehand.
16. Multi-Strand Braid with Layered Look
This style incorporates multiple smaller braids positioned at different heights on the back of the head, creating a layered, cascading effect. Each braid is created separately, then positioned so they appear to flow into each other. The lower hair is left down in waves, and the multiple braid layers create impressive visual complexity without looking chaotic.
Visual Depth and Intricacy
Multiple smaller braids create more visual interest and textural depth than a single braid. The layered positioning also means that this style looks impressive from multiple angles—the back of your head is genuinely detailed and artful. This is an excellent choice if you want maximum impact and visual interest throughout your celebration.
Creating the Layered Effect
- Typically, this style features 3-5 braids positioned at different heights, starting from the crown and moving downward
- Each braid should be the same thickness and style, creating visual repetition and harmony
- The braids should be positioned close enough to create a cohesive look, but distinct enough that each braid is clearly visible
- The point where the lowest braids meet the remaining loose hair should be secure but seamless-looking
Styling requirement: This style requires a very skilled stylist, since creating multiple separate braids and positioning them artfully is genuinely complex. Discuss your vision clearly and show reference photos.
17. Braided Half-Up with Volume at Crown
A simple braid is created from one temple to the opposite side, but extra volume is teased or created at the crown area before the braid is positioned, creating an elevated, voluminous half-up effect. The braid sits lower than the teased crown area, and the contrast between the voluminous crown and the refined braid line creates a flattering, high-fashion silhouette. This works beautifully on thinner hair because the teasing creates visual fullness.
Elegant and Proportioned
The addition of crown volume transforms a simple braid from basic to elevated and architectural. The teased area reads as intentional height and glamour, while the braid itself provides structure and polish. This style is especially flattering on face shapes that benefit from having volume lifted away from the face.
Creating the Volume
- Tease gently at the crown area using a fine-toothed tease brush and light backcombing technique
- Once teased, smooth the outer layer gently so the teasing doesn’t show, but the volume remains underneath
- The braid should sit below this teased volume, so the crown area puffs out above the braid line
- Light hairspray helps maintain the volume without making it look stiff or helmet-like
Important note: Teasing can be damaging if done too aggressively. Discuss with your stylist to ensure the teasing is gentle enough to protect your hair while creating the desired volume effect.
18. Braided Half-Up with Jeweled Comb Detail
This style features a simple braid positioned as a half-up style, with a jeweled comb or decorative hair clip placed at the point where the braid ends and the remaining hair begins. The jeweled comb should be ornate and striking—it becomes a focal point rather than simply a functional element. This adds instant glamour and creates a gorgeous visual detail in photographs.
Jewelry for Your Hair
A jeweled comb serves double duty: it’s functional, securing your hair, while also being a beautiful accessory that adds sparkle and sophistication. Unlike flowers or small accessories, a jeweled comb is immediately visible and makes a definite statement. This choice works beautifully if your dress features jeweled details that your comb can coordinate with.
Selecting and Positioning the Comb
- Choose a comb that matches your dress embellishments, tiara, or other jewelry for a cohesive look
- The comb should be high-quality—costume-y comb details can cheapen an otherwise elegant hairstyle
- Position the comb where the braid ends, so it secures the base of the braid and prevents it from moving or loosening throughout the evening
- The comb should be sized in proportion to your head and the quantity of hair—not so small that it disappears, not so large that it looks cartoonish
Pro styling choice: Request that your stylist positions the comb slightly off-center rather than dead center at the base of your braid. Off-center positioning often photographs more flatteringly and looks less rigidly symmetrical.
Final Thoughts
Your braided half-up half-down hairstyle is one of the most visible and important styling choices you’ll make for your quinceañera. The right style will make you feel confident, beautiful, and true to yourself as you celebrate this significant milestone. Whether you choose an intricate infinity braid, a romantic waterfall braid, or a bold spiral creation, your hair will be an important part of your overall look.
The key is choosing a style that speaks to you—that makes you feel like yourself but also like the best, most polished version of yourself. Work closely with an experienced stylist, schedule a trial appointment if possible, and don’t hesitate to bring reference photos and detailed descriptions of exactly what you’re envisioning. Your stylist’s job is to make your vision real, and good communication makes that possible.
Remember that your hairstyle will evolve slightly throughout the evening—some softening and loosening is normal and actually creates a more romantic effect. Plan for touch-ups if needed, but embrace the way your style will relax and soften as you move, dance, and celebrate. The memories of your quinceañera aren’t about your hair being perfectly frozen in time; they’re about you feeling beautiful and confident as you mark this transition into womanhood.