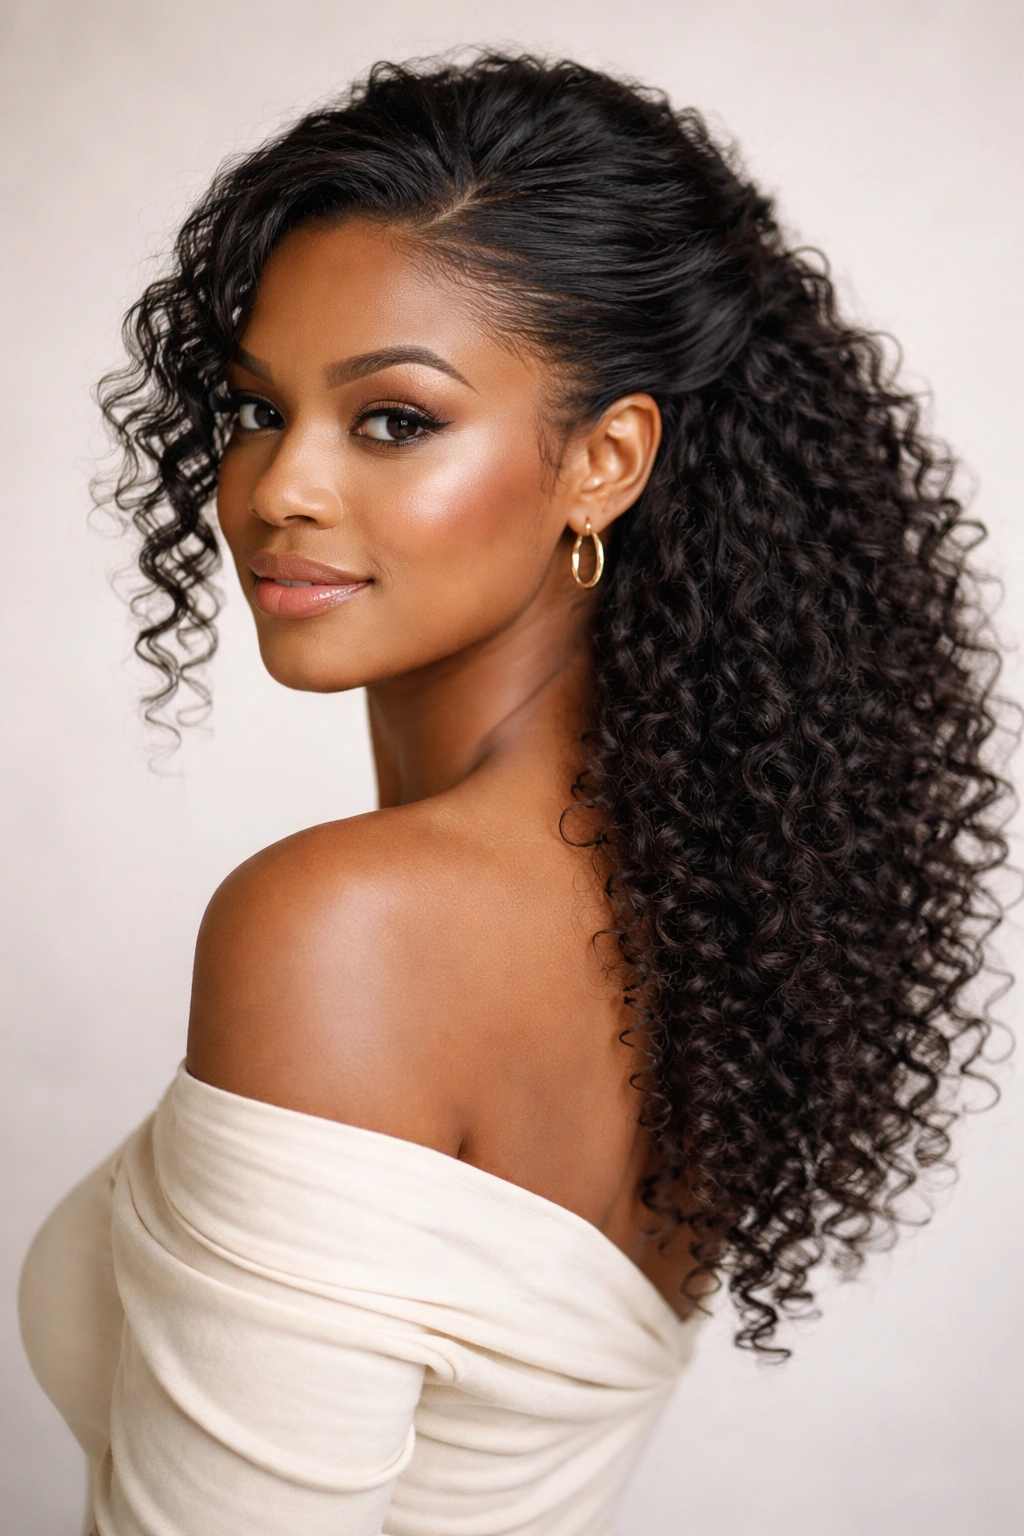
Half up half down hairstyles have become a go-to for people with natural hair who want to strike that perfect balance between letting their texture shine and creating polished, intentional styling. There’s something undeniably appealing about this look—you get the movement and dimension of wearing your hair down, while the pinned-up section keeps things off your face and adds structure. Whether you’re heading to work, a casual hangout, a wedding, or just a regular Tuesday, half up half down styles work for practically any occasion.
The beauty of this style for natural hair specifically is how it works with your curl pattern rather than against it. You’re not trying to transform your texture into something it isn’t. Instead, you’re using your natural curls, coils, and waves as the foundation, then adding intentional styling on top. The versatility is honestly unmatched—you can do a sleek pulled-back section paired with voluminous curls below, you can add braids, twists, or coils to the top half, you can incorporate accessories, or you can keep it incredibly simple. And the best part? Most of these styles take anywhere from 5 to 20 minutes once you get the hang of them.
I’ve pulled together 18 styles that actually work beautifully on natural hair textures. Each one has its own vibe, but they all share that sweet spot of being both effortless-looking and polished enough for any situation. Some are great for when your hair is freshly styled, and others are perfect for reviving second-day or third-day curls. Let’s dive in.
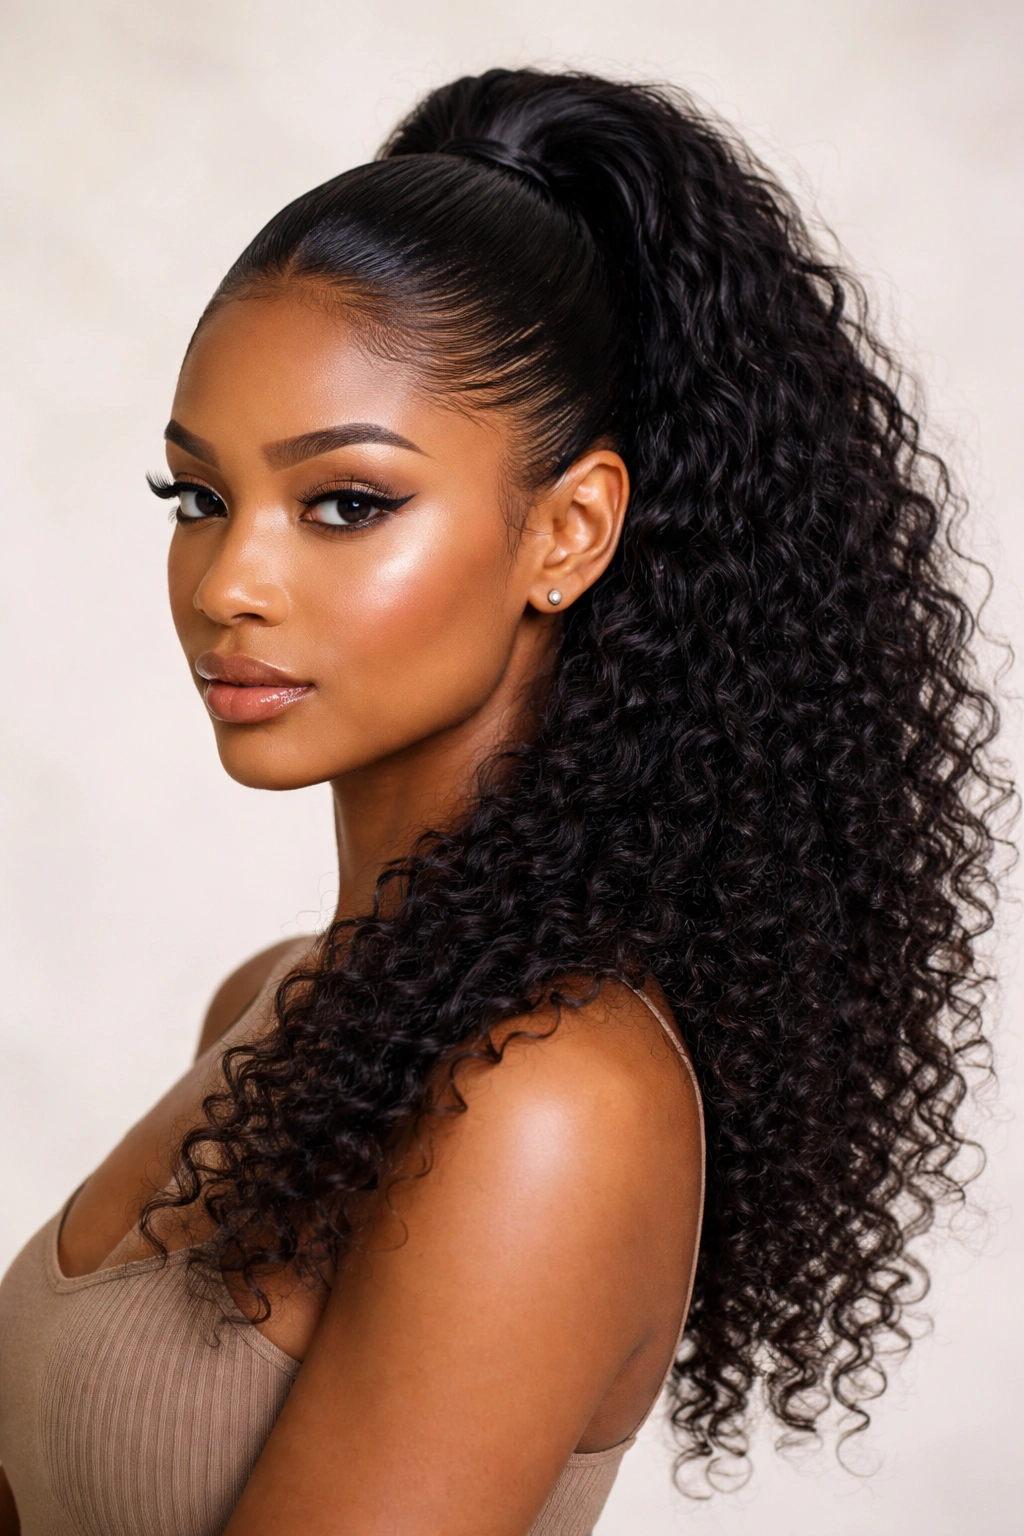
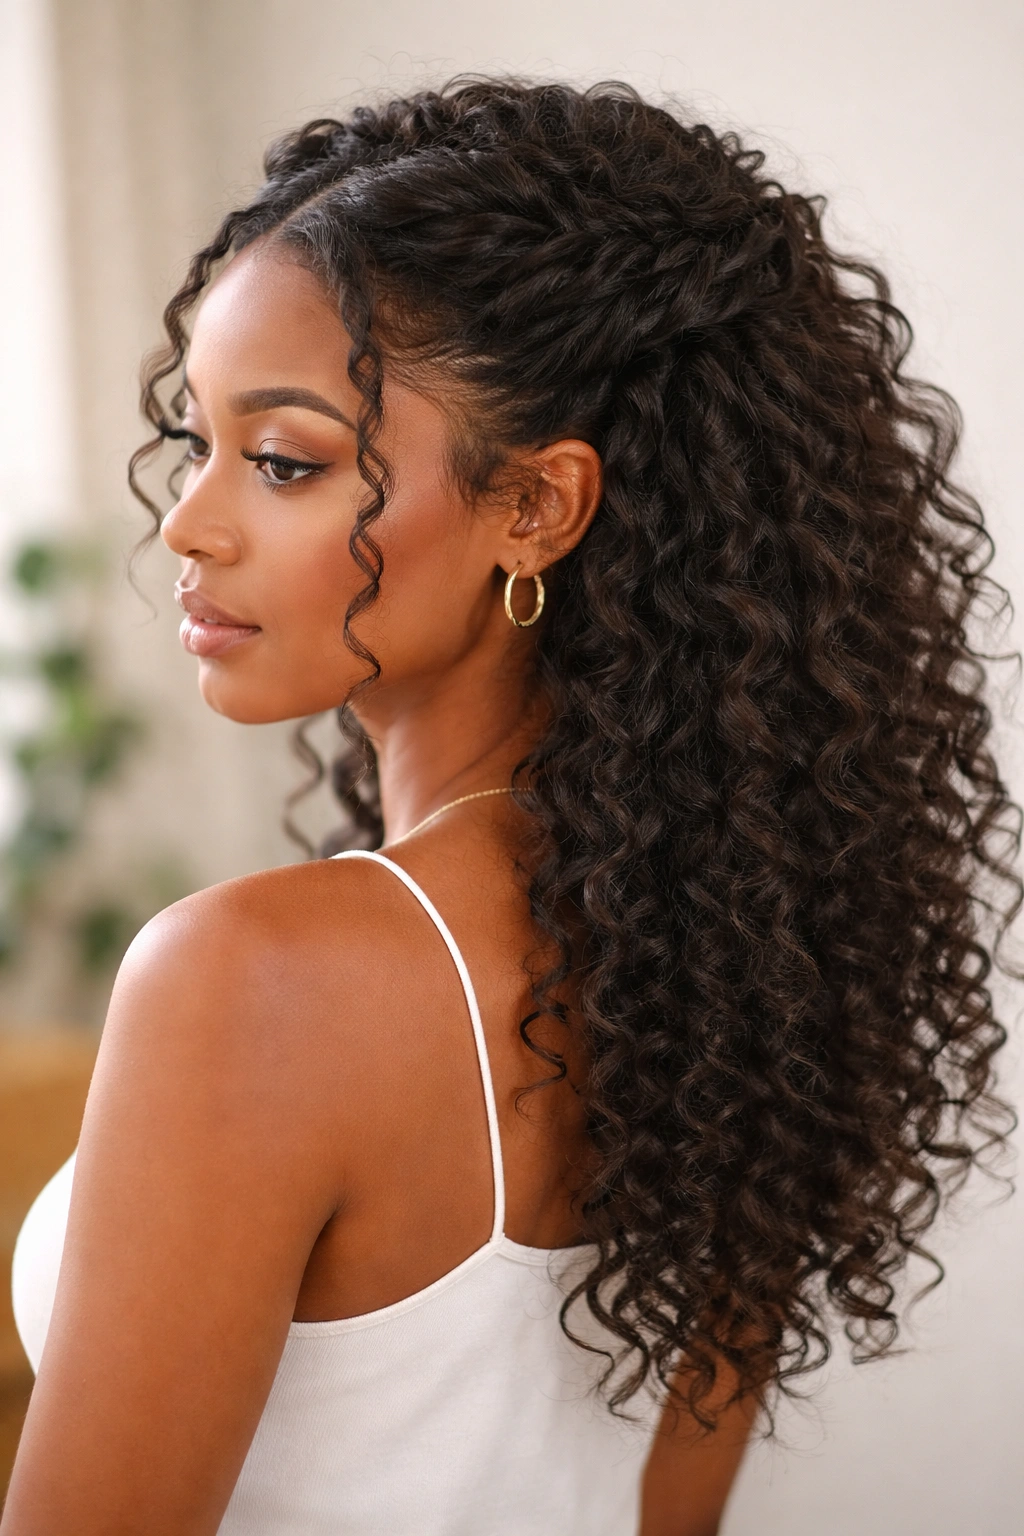
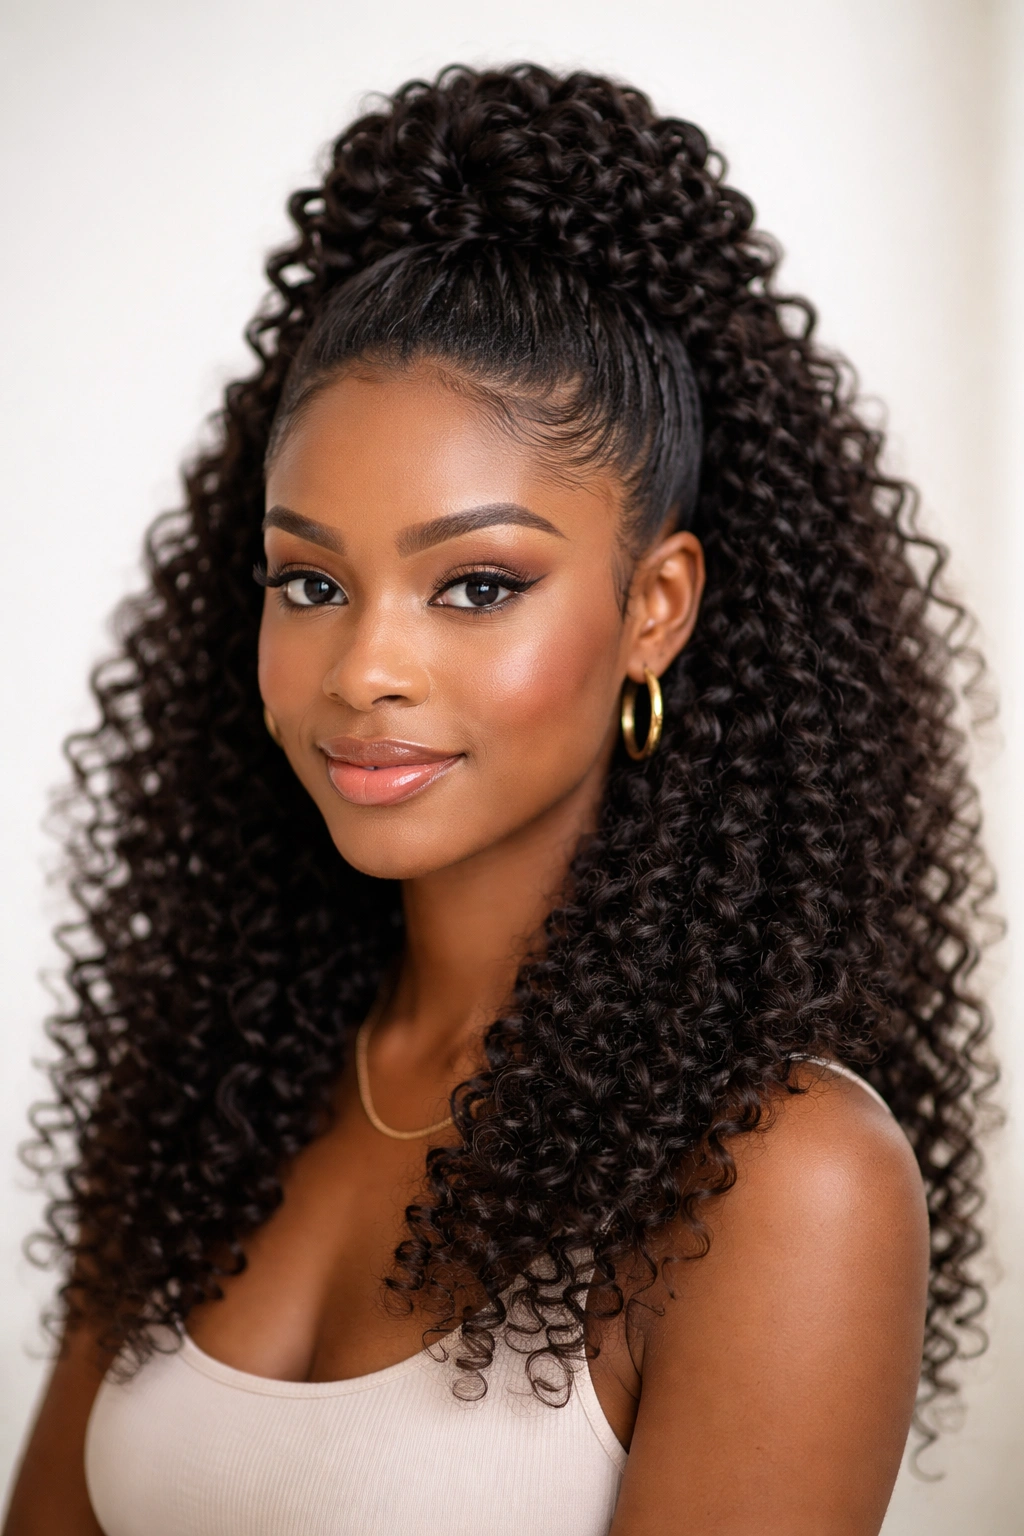
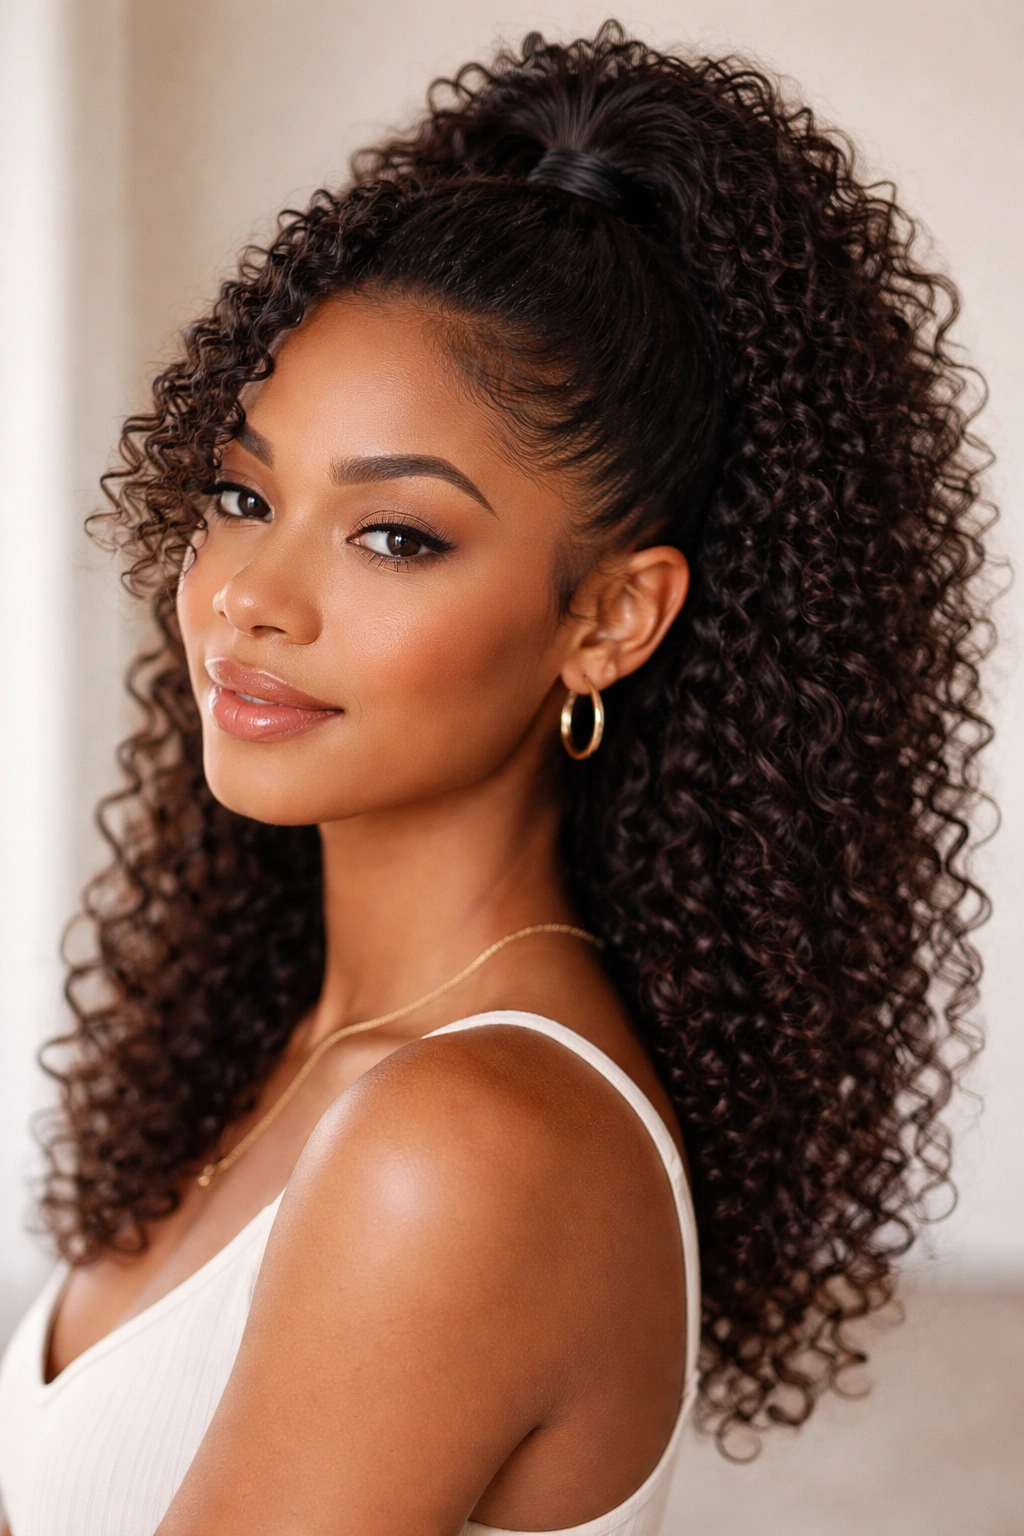
1. The Classic High Pony Half-Up
This is the foundational style that works as a template for almost everything else. You’re taking the hair from the crown area—think from about ear level up—and securing it into a small ponytail at the back of your head. The result is clean, sophisticated, and works whether you have tight coils, loose waves, or anything in between. It’s one of those styles that looks casual enough for daily wear but polished enough that you could wear it to a professional setting without question.
Why This Works on Natural Hair
The beauty of the high pony half-up is that it demonstrates your curl pattern without requiring any manipulation beyond the securing section. When you pull just the top portion back, you’re framing your face with your natural texture, which tends to be most defined and beautiful right around the hairline. The gathered section at the crown actually helps anchor your hair and can reduce frizz by containing the smallest, most delicate curls in one place. You’re working with your hair’s natural weight distribution rather than against it.
How to Get It Right
- Start with hair that’s been refreshed or is at least one day old—freshly washed and super soaked hair will be harder to secure neatly
- Use a paddle brush or your fingers to gently gather hair from both sides of your head, starting at about temple level
- Bring the section to the back crown area and secure with a hair tie or clip—a small elastic or a claw clip both work beautifully
- For extra polish, pull out a few face-framing pieces before securing, or take a small section from the secured pony and wrap it around the base to hide the elastic
- Keep the gathered section relatively smooth by using a brush before securing, or embrace a softer, more textured look by gathering with just your fingers
Pro tip: This style actually works better if you don’t try to make it too perfect—the slightly undone texture actually reads as intentional and chic on natural hair.
2. The Twisted Crown Half-Up
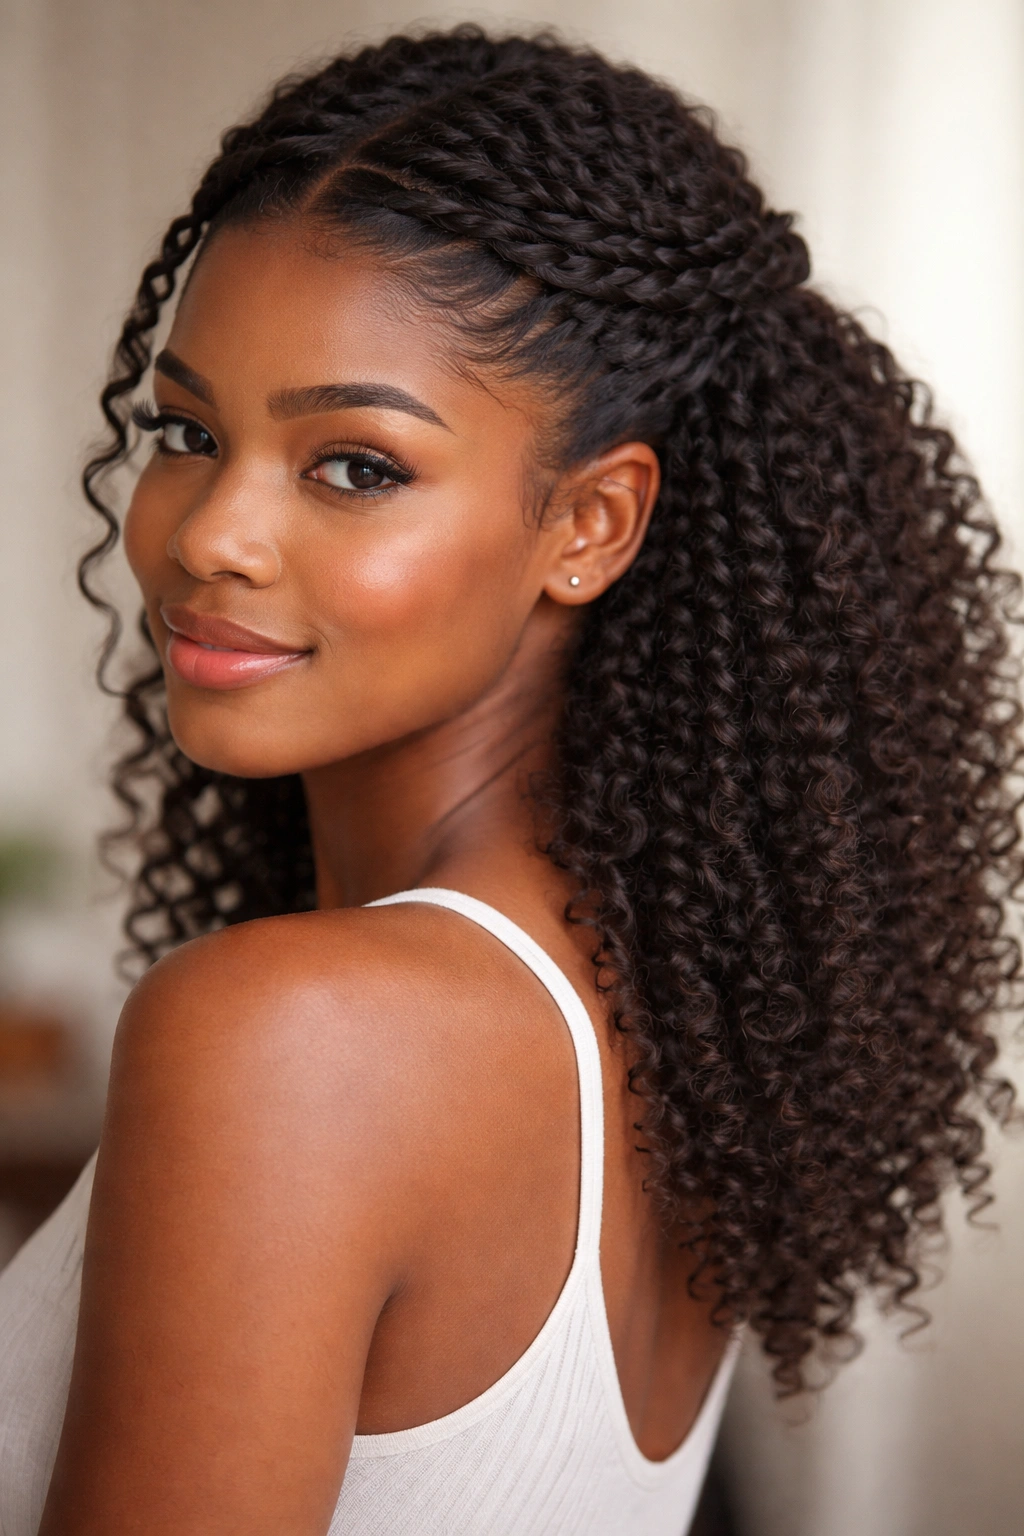
Instead of a simple ponytail section, you’re creating two twisted sections that wrap around the back of your head and meet at the crown. Each side gets a gentle two-strand twist that sits right at the hairline, then they meet in the middle and get secured together. It adds visual interest and a more intricate feel without actually being difficult to execute. This is the style you wear when you want people to think you spent way more time on your hair than you actually did.
Why It’s Perfect for Defined Curls
Twists are a natural friend to curl patterns because they follow the way your hair naturally wants to coil and spiral. When you create twisted sections instead of just gathering smooth hair, you’re actually enhancing your texture rather than smoothing it down. The twists also help define individual curl clumps, which means each curl reads more clearly and the overall style looks more intentional. Plus, the slight tension from the twist actually helps reduce frizz by keeping the curl pattern compact.
Creating the Look Step by Step
- Section off the hair from one temple, taking a diagonal section up toward the crown
- Divide that section into two pieces and twist them around each other, moving from the temple toward the back
- Secure that first twisted section to the back of your head with a bobby pin
- Repeat on the other side, creating a mirror-image twist
- Meet both twisted sections in the middle and secure them together with a small elastic or additional bobby pins
- You can leave the twisted sections as is, or gently pull on them to create a softer, more relaxed look
- Add a decorative clip or hair cuff over the secured base if you want extra polish
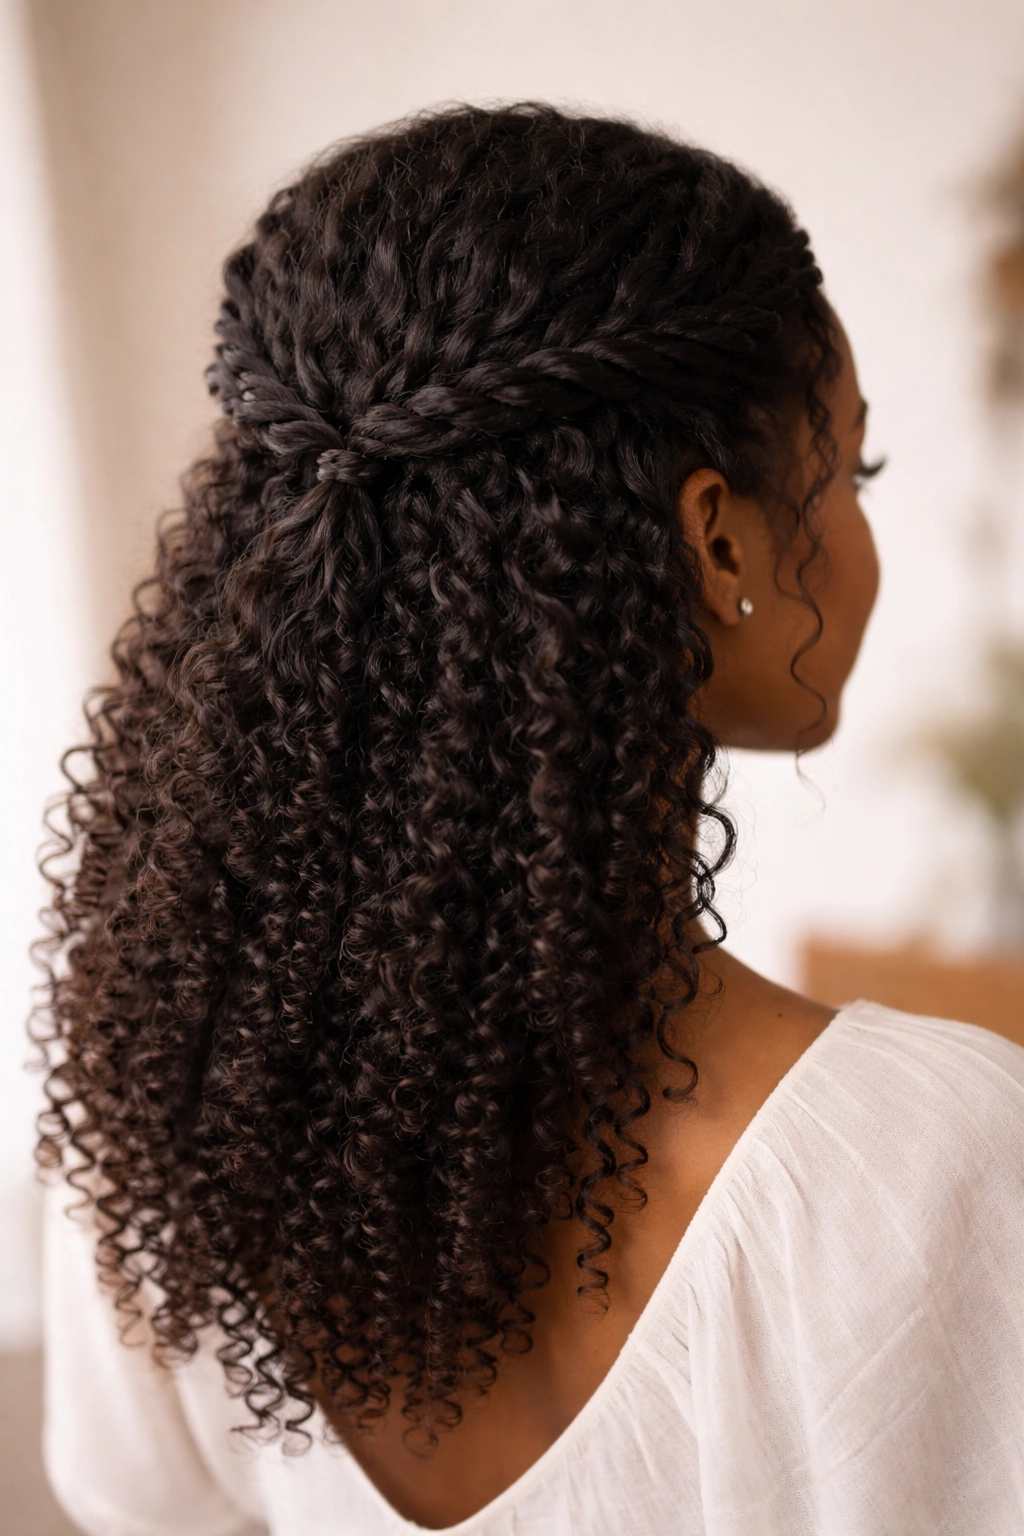
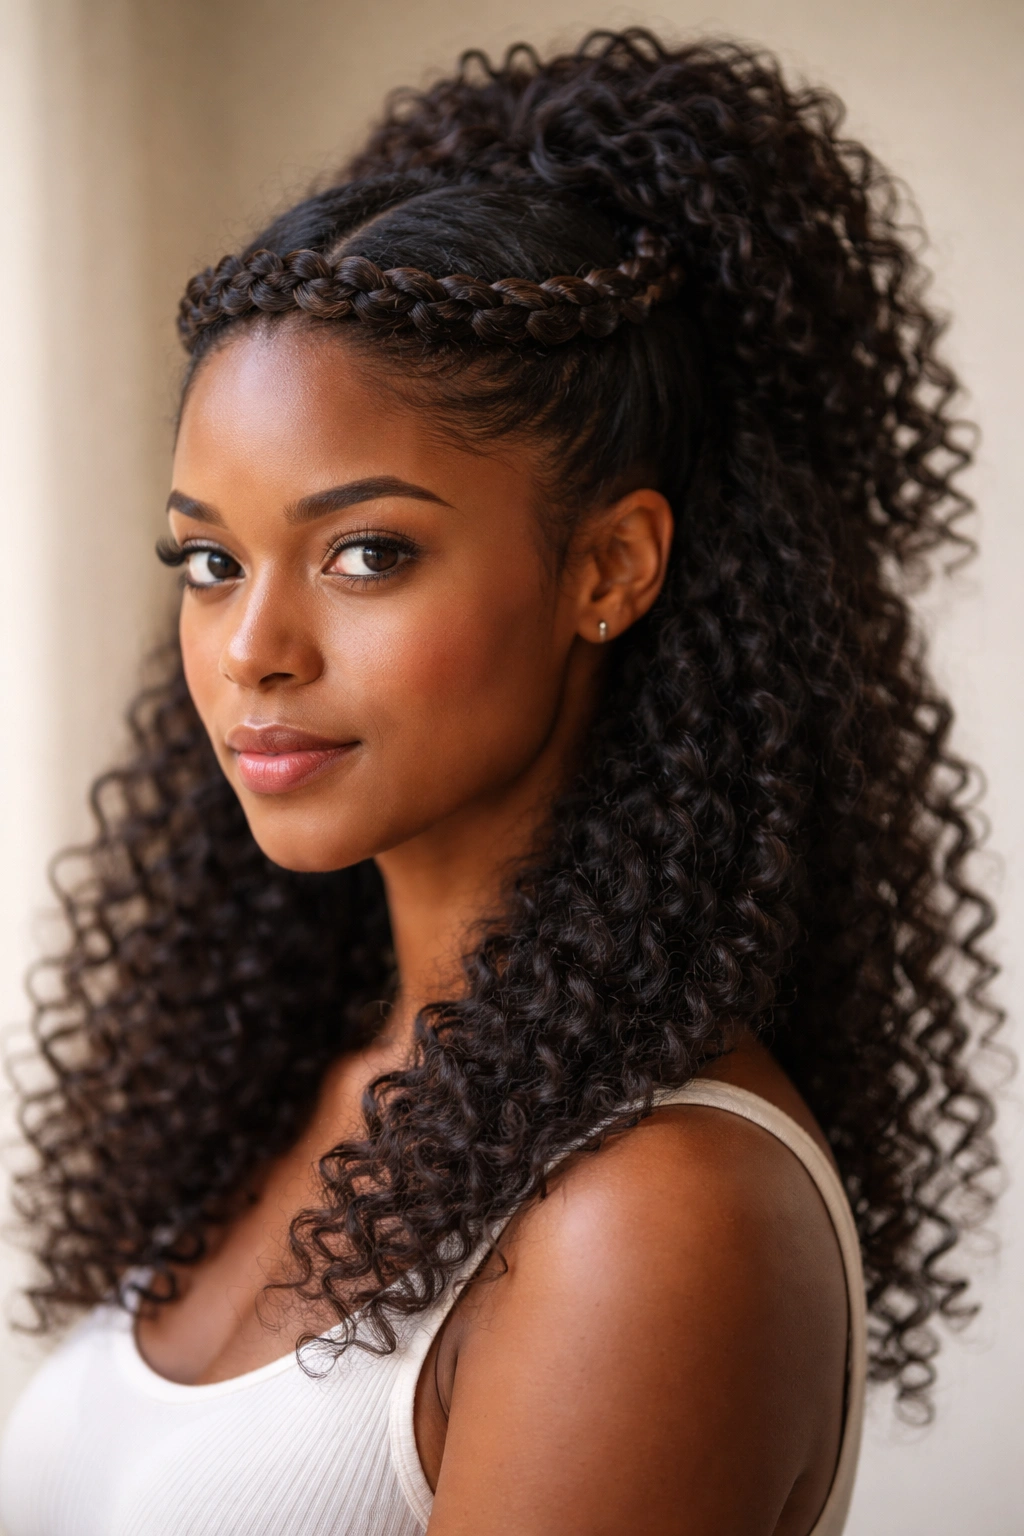
3. The Braided Crown Half-Up
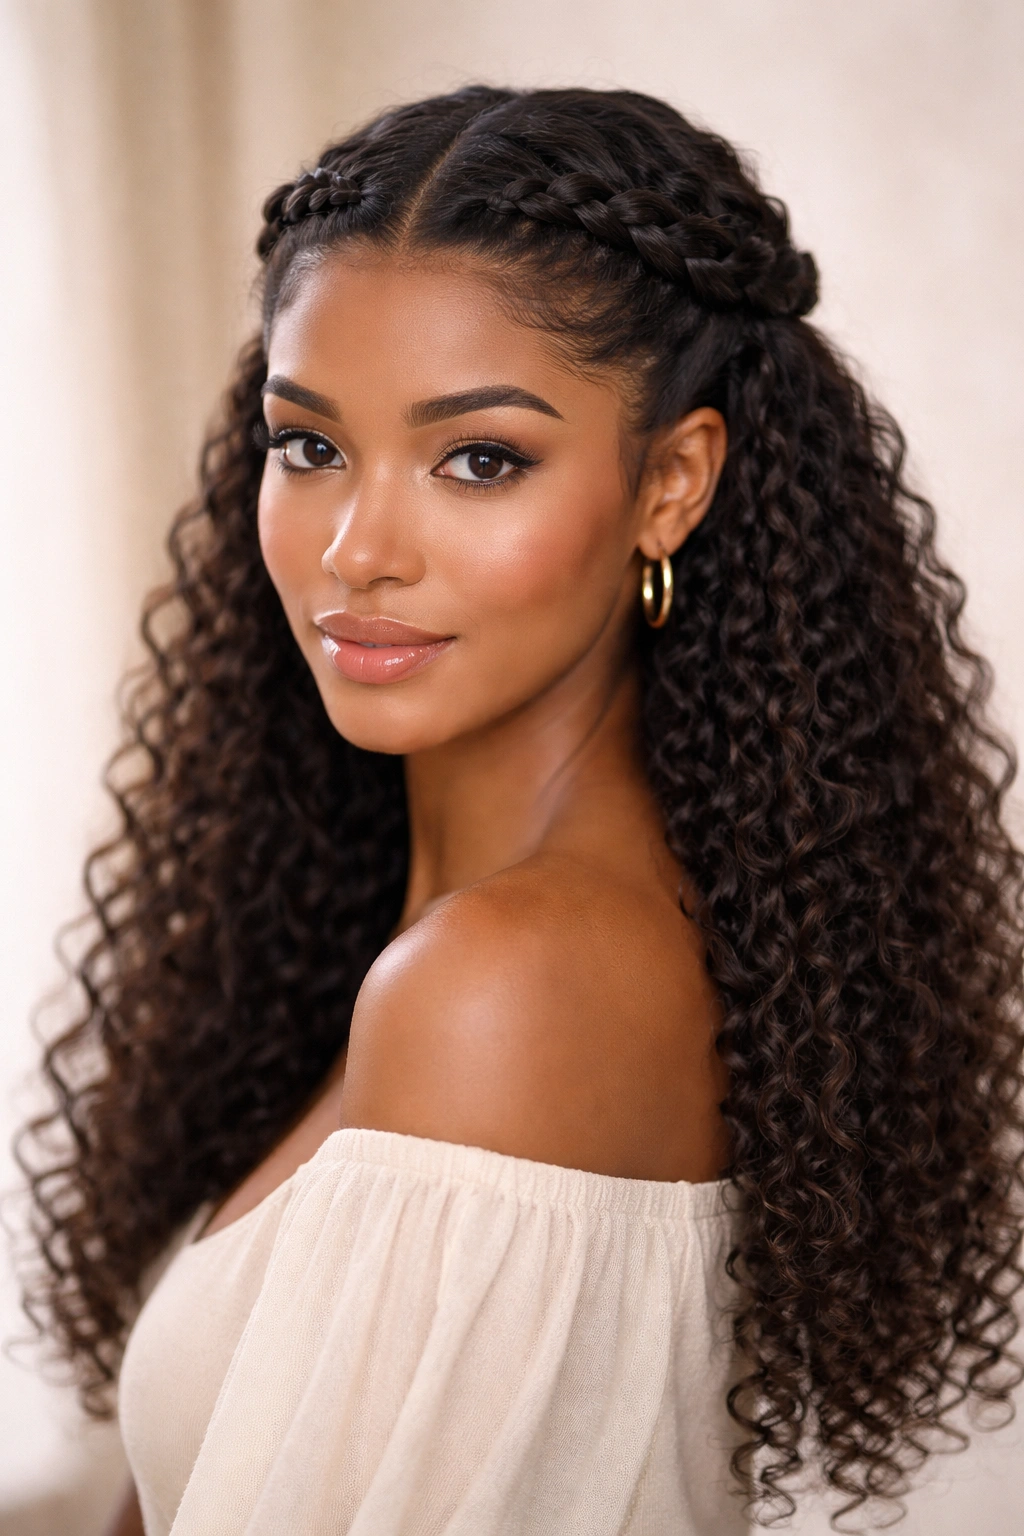
Three-strand braids, Dutch braids, or even French braids frame the face and meet at the back in this style. You’re essentially creating a bridal-looking crown without going full updo. One braid on each side, or even a more complex arrangement with multiple braids woven together, all work beautifully. This is the style that photographs exceptionally well and works for everything from brunch with friends to a garden party to a low-key formal event.
How Braids Enhance Natural Texture
Braids are one of the rare hairstyling techniques that actually celebrate curl patterns rather than fighting them. Your individual curl clumps become building blocks for a more defined braid structure. Fine, thin braids get intricate and beautiful against coily hair, while thicker braids show off wave patterns and texture variations. The key is using your natural curl pattern as part of the braid’s visual texture rather than trying to smooth it into submission.
Braiding Techniques That Work
- Start one braid at each temple if you want symmetry, or create one thick braid and one thinner accent braid for asymmetry
- Dutch braids (where you braid the sections underneath instead of on top) tend to sit flatter and look sleeker against natural hair
- French braids work beautifully if you braid loosely and gently pull the sections apart afterward to create a fuller, softer appearance
- Knotless braids, if your hair is long enough, create a more fluid look that blends seamlessly with your natural curls
- Secure both braids at the back with bobby pins or a small elastic, and gently tug the braid sections to create texture and soften the look
Worth knowing: Braids actually protect the ends of your hair and can help with moisture retention, so this style is genuinely good for hair health, not just aesthetically pleasing.
4. The Sleek Gel Half-Up
This is the style when you want major contrast—the top section gets smoothed down with gel into a polished, almost wet-look finish, while the bottom half stays in its natural, bouncy state. It’s modern, it’s definitely intentional, and it’s become increasingly popular. The style walks that fine line between editorial and wearable, looking like something you’d see in a magazine but still totally doable for everyday life. It’s particularly stunning on people with highly textured coils or tight curls.
The Appeal of Sleek Meets Textured
The juxtaposition of smooth and textured actually makes both textures more visually interesting. Your eyes notice the contrast, which means they notice the definition of your curls below even more. The sleek section also creates a visual anchor that makes the voluminous curls below feel even more impactful. This style is especially effective if you have density because it balances out the volume by controlling the crown area.
Achieving the Sleek Finish
- Use a smoothing gel or edge control that gives you the level of hold you want—gel varies in strength and finish from product to product
- Apply the gel to damp or dry hair, depending on your preference (damp often gives a more polished wet-look effect)
- Use a fine-tooth comb or a brush to smooth the hair back into a half-up section at the crown
- Secure with a hair tie or clip, making sure the gathered section is very smooth and the gel is worked through
- The longer you want the sleek section to last, the stronger the gel you’ll want to use
- You can flatten any remaining flyaways with extra gel or a light hairspray for added hold
5. The Puff Half-Up
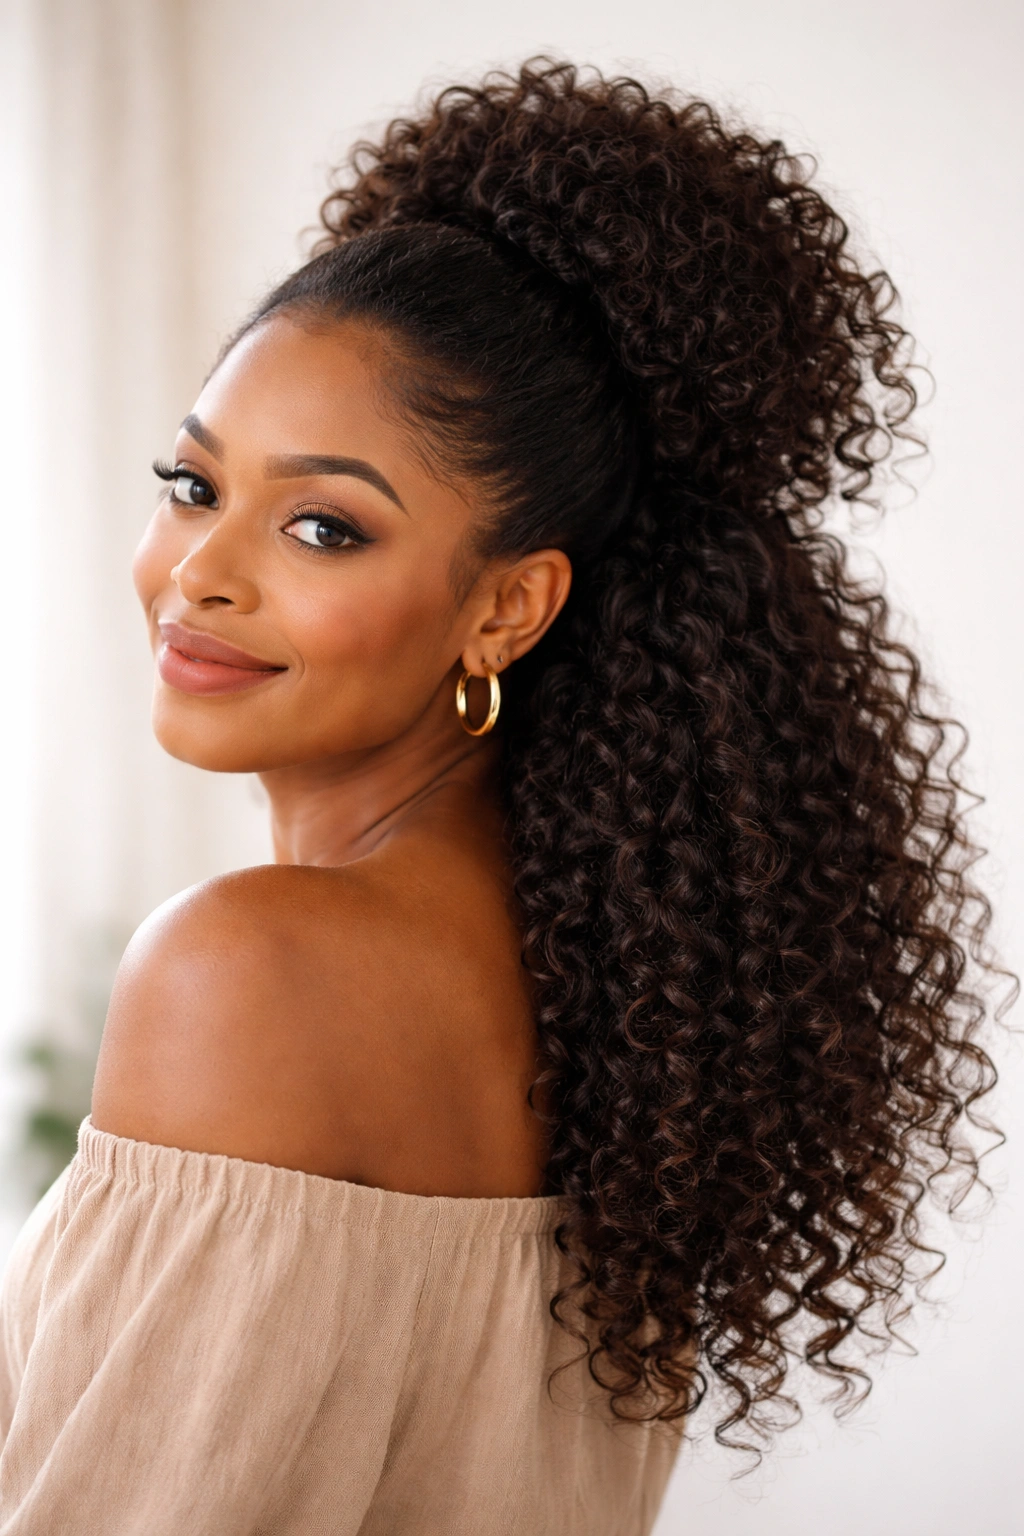
Take your hair, create a gathered puff or bun at the crown, and let the rest cascade down in its full, natural texture. This style is essentially a combination of two popular looks—the puff sits on top, adding height and visual interest, while your curls flow freely below. It’s fun, it’s playful, and it works beautifully for both casual outings and more put-together occasions. The style works on virtually any curl pattern because you’re creating volume and shape through gathering, not through any specific texture requirement.
Building the Perfect Puff
A puff is basically a ponytail that you’ve puffed out and secured to itself. You’re creating a rounded, voluminous shape right at your crown, which instantly adds height and presence to the whole look. The gathered section naturally sits at the top of your head, which means the rest of your hair falls from a higher point and has more room to move. This actually creates more visual dimension than a flat half-up because your hair isn’t all starting from the same height.
Puff Creation and Customization
- Gather hair into a high ponytail at the crown and secure with an elastic
- Instead of leaving it as a straight ponytail, flip the tail back up toward the base
- Gently tug sections of the ponytail to create a rounded, puffed-out shape
- Use bobby pins to secure the puff to itself and to the base elastic if needed
- Leave some hair loose around the base to hide the elastic and make the transition smoother
- You can make the puff tighter and more compact, or loose and very voluminous—both look intentional
- Add a decorative clip, scarf, or headband around the base for a more styled look
Pro tip: The puff style actually looks best when it’s slightly undone and textured—trying to make it too neat actually makes it look less intentional on natural hair.
6. The Twisted Half-Up with Loose Texture
This combines the twisted sections from style #2 but with a focus on keeping the overall vibe softer and less structured. You’re creating the twists for visual interest, but you’re not pulling them tight or trying to make them perfectly neat. Instead, you’re gently pulling on the twist sections to loosen them up, and you might even add a little product for texture and definition. The result is polished but soft, structured but still clearly natural.
Balancing Structure and Softness
The trick here is using the twists as a framework rather than trying to create something perfectly geometric. Your twists should follow your curl pattern and be pulled loose enough that individual curls poke through. This creates a softer silhouette while still keeping the style visually organized and intentional. The looseness also makes the style more forgiving—if your twists aren’t perfectly even or precise, that’s actually the whole point.
Creating Loose, Textured Twists
- Create your twists as you would in the twisted crown style, but use less tension and don’t pull the hair super taut
- Once both twists are secured at the back, gently and deliberately pull each twist section apart, creating a softer, fluffier appearance
- This pulling-apart technique is called “distressing” the twist and is key to getting that effortless look
- Use your fingers rather than tools to pull the sections apart—this gives you more control and creates a more organic texture
- If you want extra definition or hold, apply a light mousse or curl cream to the secured section before or after twisting
- Don’t worry about the twists being perfect—bumps, loose pieces, and texture variation are features, not bugs
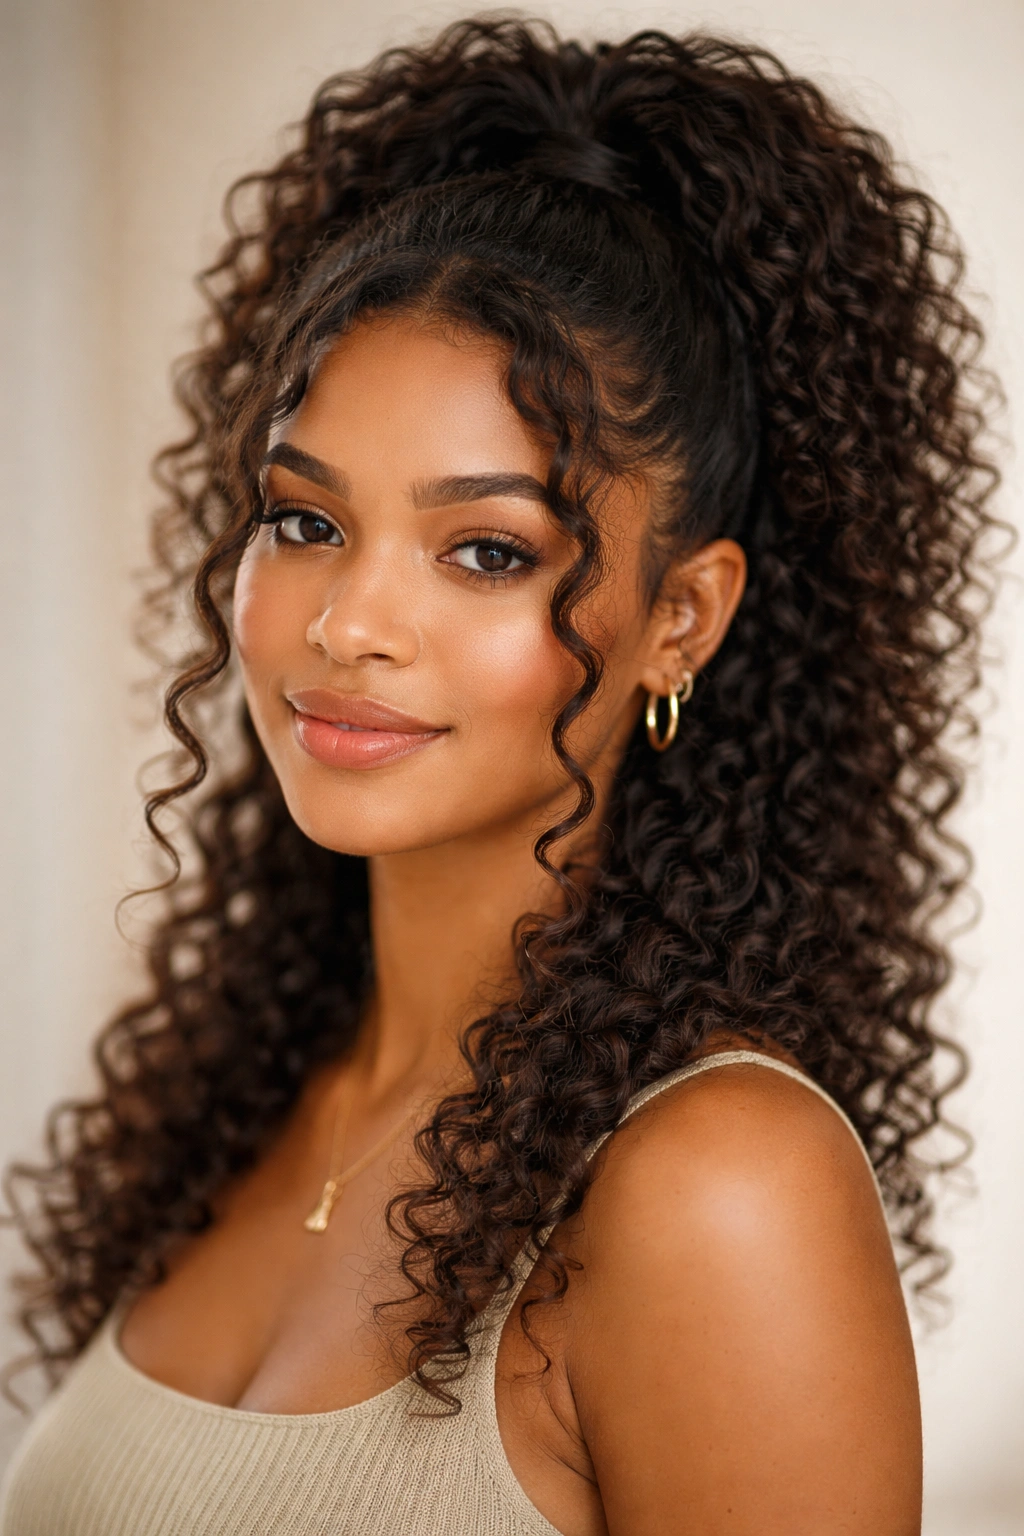
7. The Ponytail with Face Framing
This is a half-up style where you secure the top section into a ponytail, but intentionally leave small, face-framing pieces loose on either side of your face. The framing pieces can be twisted, curled, or left completely natural, but they’re key to making this style feel soft and intentional rather than severe. It’s a style that works for absolutely any occasion and is so easy to execute that you’ll probably do it on days you’re not even really trying to have a hairstyle.
Why Face Framing Matters
Face-framing pieces soften the entire look and create dimension around your face. Even if the rest of your hair is in a tight ponytail, those loose pieces keep the style from reading as too severe or pulled-back. For natural hair, those framing pieces also allow your curl pattern to be on full display right where people are looking—at your face and around your hairline. This is where your curls tend to be most defined anyway, so you’re strategically placing your most beautiful texture exactly where you want attention.
Getting the Face-Framing Right
- Before gathering your half-up section, identify which pieces you want to leave loose—typically one on each side, starting from about temple level
- Create your half-up ponytail with the remaining hair, securing it at the crown or back of your head
- The face-framing pieces should be about 1 to 2 inches wide and should fall naturally from your face
- You can leave them completely as-is, or you can give them extra definition by lightly twisting them, applying product, or even creating a tiny braid
- The most important thing is that the transition between the frame pieces and the secured section looks intentional and clean
- Use bobby pins on the underside if needed to secure the frame pieces in the exact position you want
Worth knowing: This simple addition of face-framing pieces is what transforms a basic half-up from looking casual to looking intentionally styled.
8. The Side-Swept Half-Up
Instead of centering your gathered section at the crown, you’re pulling it to the side and securing it at the back of your head on one side. This creates an asymmetrical look that’s slightly more editorial and interesting than a centered half-up. One side of your hair flows down while the other side stays up, which creates interesting movement and angles. It photographs beautifully and works for occasions ranging from casual to dressy.
The Visual Impact of Asymmetry
Asymmetrical styles read as more intentional and modern than perfectly centered ones. They also create dynamic movement through your hair because the weight distribution is uneven. For natural hair, this asymmetry can actually help balance out curl patterns if one side of your head tends to be curlier or denser than the other. Plus, there’s something a little bit more sophisticated about an asymmetrical style—it shows you’re confident enough to do something that isn’t perfectly symmetrical.
Creating the Side Sweep
- Decide which side you want to sweep toward—typically the side with less density or the side your hair naturally parts toward
- Gather your half-up section and pull it toward the side you’ve chosen
- Secure the gathered section with bobby pins or a small clip on the opposite side from where you’re sweeping
- The secured section should be at the back of your head but offset toward one side
- You can pull the secured section tight and sleek, or leave it a bit softer and more textured—both styles look intentional
- Let the bottom half of your hair fall naturally; you can curl or wave it, or leave it in its natural pattern
- Add a decorative clip, scarf, or wrap around the secured section for extra polish if desired
9. The Cornrow Crown Half-Up
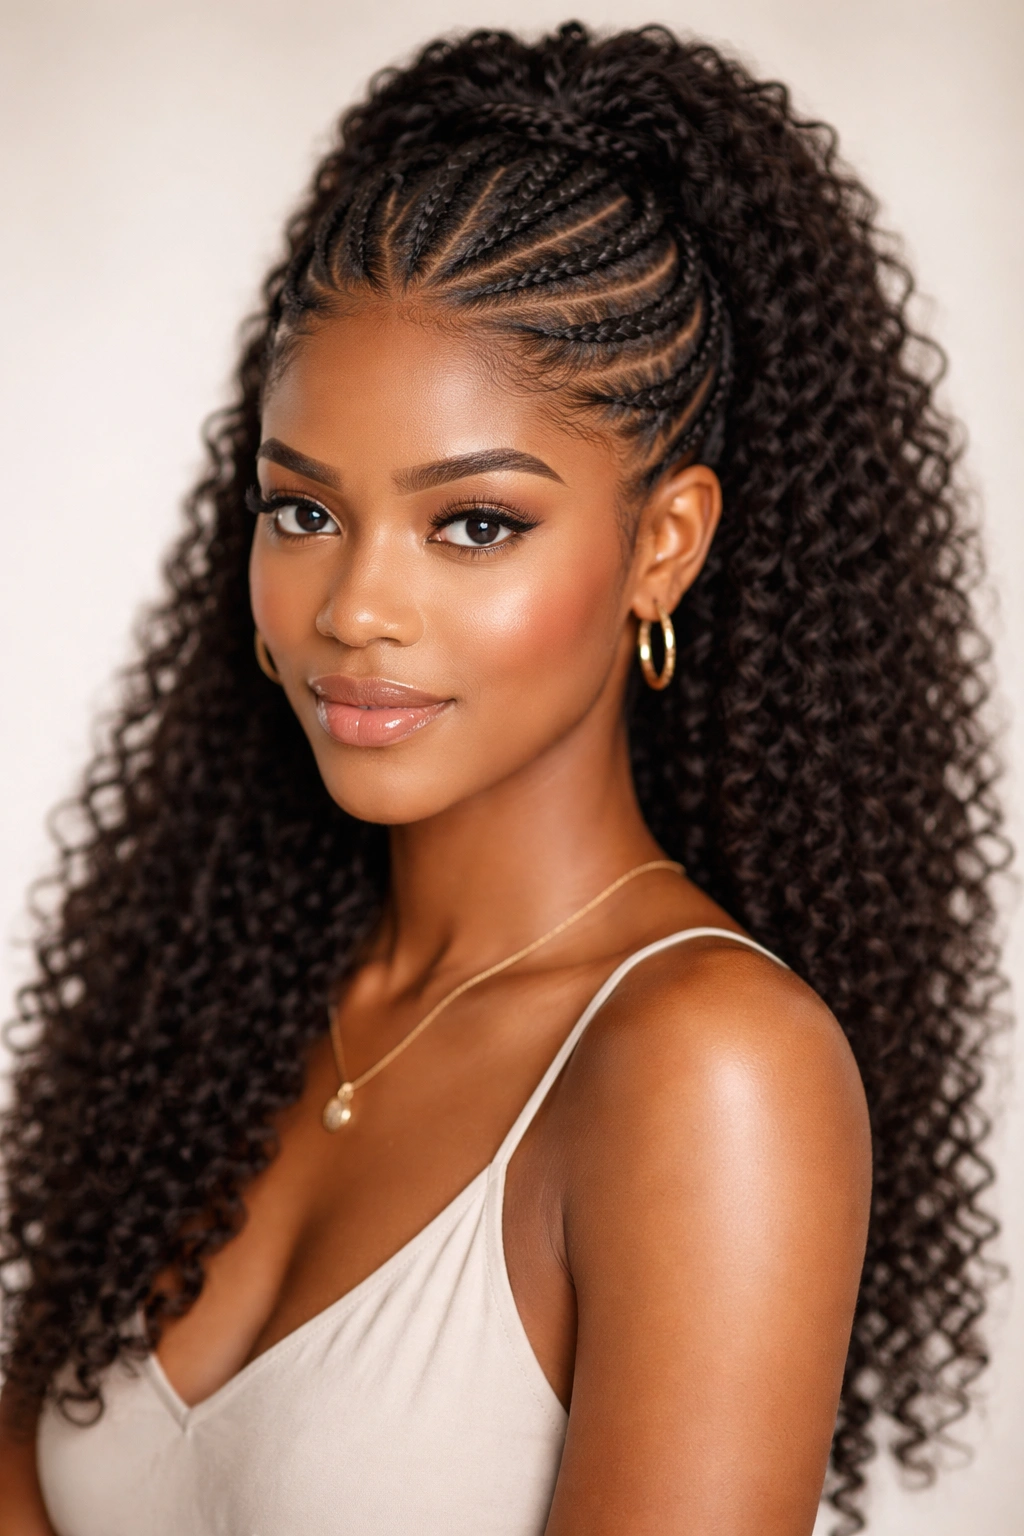
Instead of three-strand braids, you’re using cornrows as your half-up element. One or two cornrows create the structure, meeting at the back of your head to secure the rest of your hair. Cornrows have a more intricate, geometric look than regular braids and work particularly beautifully on tighter curl patterns. This is the style when you want something that looks intentional and sculptural, with visual texture and interest that lasts for days.
Why Cornrows Are Ideal for This Style
Cornrows are essentially braids that sit close to the scalp, which means they create clean lines without taking up a lot of space. They’re also incredibly durable—this style can last for multiple days without needing much touch-up. The geometric pattern of cornrows creates visual interest even when you’re looking at your hair from the front, unlike regular braids which mostly show their detail from the back or sides. For natural hair, cornrows actually help define your curl pattern and can reduce frizz in the braided sections.
Executing Cornrows for a Half-Up
- Start one cornrow at your temple on each side, braiding toward the back of your head
- Feed sections of hair into the cornrow as you braid (this is what creates the raised braid effect)
- Try to create a symmetrical pattern if you want a balanced look, or offset the cornrows for asymmetry
- Bring both cornrows to meet at the back of your head where you’d normally secure a half-up
- Secure the cornrows and the remaining loose hair together with bobby pins or a small elastic
- Gently pull and distress the cornrows if you want them to look softer, or leave them tight and neat for a cleaner look
- This style works beautifully with the rest of your hair in a puff, in curls, or left completely natural
10. The Spiral Half-Up
You’re creating spiral sections or coils on the top half of your head that then get gathered and secured. This involves either using your natural coil pattern if you have one, or creating temporary spirals using a tool or by twisting damp hair and allowing it to set. The result is textured, visually interesting, and definitely has a fun, playful energy. It’s a style that works best when you fully commit to the spiral texture rather than trying to smooth anything down.
Building Spiral Texture
Spirals can be created through several methods: if you have natural coils, you can enhance them with product and then gather them up. If you don’t have natural coils, you can create them by twisting damp hair around your finger or a tool, allowing it to dry, and then releasing it. You can also use flexi-rods or perm rods on damp hair, let them dry, and remove them to create spiral curls. Any of these methods creates that distinctive springy, coiled texture that reads as fun and intentional.
Making Spirals Work for Your Half-Up
- If creating temporary spirals, do this on damp hair the night before and allow everything to dry completely
- Once spirals are set, gather the top section and secure at the crown, being careful not to disrupt the spiral texture
- You can leave some spiral pieces loose around the face, or gather all of them
- The key to this style looking good is using a light-hold product that maintains the spiral texture without making it crunchy
- Don’t comb or brush the spirals once they’re set—use your fingers to separate them if needed
- You can combine different textures, like tight spirals on top with your natural curl pattern below, for visual variety
Pro tip: This style looks even better on day two or three when the spirals have relaxed slightly and gained dimension.
11. The Claw Clip Half-Up
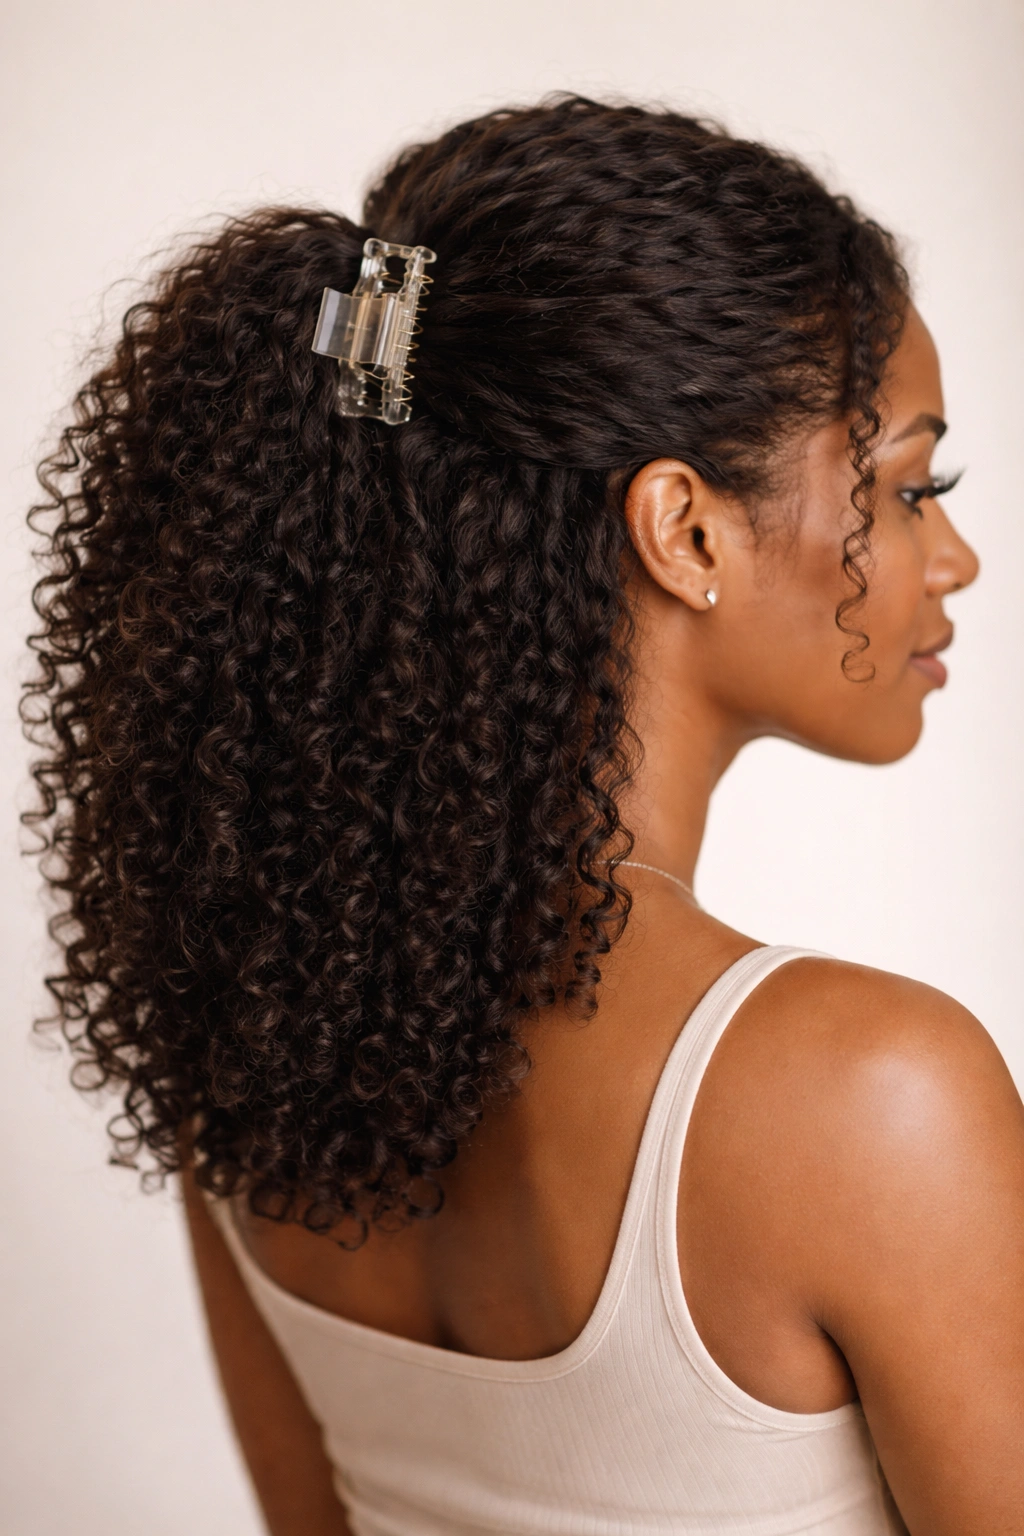
Using a claw clip instead of a traditional hair tie to secure your half-up section gives you instant visual interest and a very current, fashion-forward look. The clip becomes part of the style rather than just a functional element. Claw clips come in countless colors, patterns, and sizes, which means you can coordinate them with your outfit or use them as a statement accessory. This is the easiest possible half-up to execute because it literally requires zero hair manipulation beyond gathering.
Why Claw Clips Elevate the Look
A claw clip immediately adds a styling element that reads as intentional. Even the most basic half-up suddenly looks more put-together when you use a cute clip instead of a plain elastic. The clip also holds your hair securely without needing to be super tight, which means less tension on your hair and less stress to your edges. Plus, you can change your clip throughout the day or from day to day, which means you can refresh the look without actually redoing your hair.
Styling with a Claw Clip
- Gather your half-up section as you normally would, from about ear level up to the crown
- Bring the gathered section back and slightly to one side—claw clips look most flattering when positioned slightly off-center
- Slide the claw clip onto the gathered section, positioning it so that the clip is fully secure but not so tight that it pulls uncomfortably
- You can gather the hair tightly for a sleek look, or loosely for a softer vibe—both work beautifully with a claw clip
- Leave face-framing pieces loose if you want them, or secure everything with the clip
- Position the clip so that the curved or decorative part of the clip is visible and facing forward, not hidden under gathered hair
12. The Wraparound Scarf Half-Up
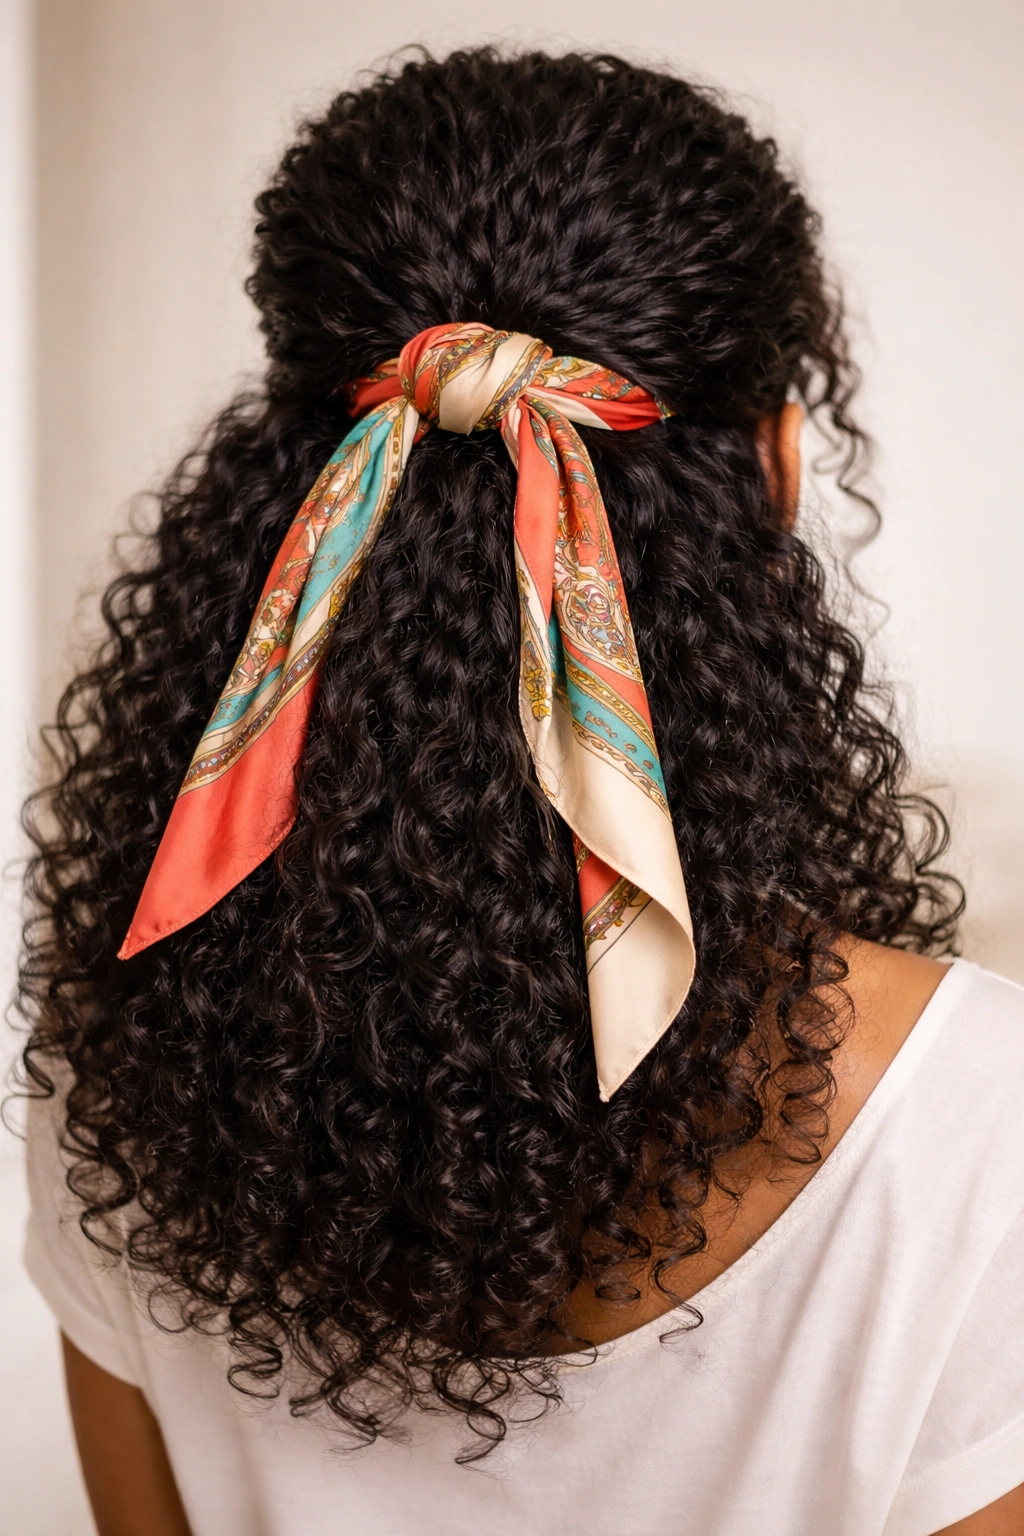
You’re securing your half-up section with an elastic or clip, then wrapping a silk or satin scarf around the base to hide the elastic and add visual interest. The scarf can be wrapped tightly for a polished look, or loosely for a more bohemian vibe. This style is both functional and beautiful—the scarf protects your hair, adds a pop of color or pattern, and instantly elevates even a basic half-up into something special.
The Protective and Aesthetic Benefits
Silk or satin scarves are gentler on your hair than cotton elastics and don’t create creases or breakage. They also add moisture, which is huge for natural hair. From a purely aesthetic perspective, a wrapped scarf turns a simple half-up into a curated look. You can choose scarves that match your outfit, your skin tone, or your mood. The scarf also helps contain flyaways and frizz, which means the style actually looks better and lasts longer.
Wrapping a Scarf Beautifully
- Create your half-up as you normally would, securing it with an elastic or clip
- Take a long silk or satin scarf (a traditional bandeau-style or a long rectangular scarf both work)
- Position the middle of the scarf at the base of your gathered section
- Wrap one end of the scarf around the base, covering the elastic completely
- Bring the other end of the scarf around and tie or tuck it, depending on your preference and the length of your scarf
- Adjust the scarf so that the knot or tuck is positioned at the back or side of your head, not directly visible from the front
- You can wrap the scarf tightly for a neat, polished look, or wrap it more loosely for a softer, more bohemian appearance
13. The Double Twist Half-Up
This style involves creating two smaller twisted sections instead of one large gathered section, then securing them together at the back. Each twist is lighter and less heavy than a single larger twist would be, which creates a more delicate, interesting-looking style. The two twists can be the same thickness and positioned symmetrically, or you can make them different sizes for asymmetry. This is perfect when you want something more intricate than a basic half-up but not as involved as a full braided crown.
Building Visual Interest with Double Twists
Two twists create more visual texture and movement than a single ponytail or twist. They also look more intentional and styled without requiring significantly more effort than a basic half-up. The space between the two twists adds dimension, and the way each twist catches light as your hair moves creates visual interest. On natural hair, double twists also allow your curl pattern to shine through on both sides of your face since the twists frame rather than cover.
Creating Double Twists
- Section your hair into two parts, starting from each temple and meeting at the back
- Create a two-strand twist on the left side, starting at the temple and twisting toward the back of your head
- Create an identical twist on the right side, mirroring the first twist
- Bring both twists to meet at the back of your head and secure them together with bobby pins or a small elastic
- You can leave the twists tight and neat, or gently pull on them to create a softer, more relaxed appearance
- The twists can be positioned higher on the head for a more dramatic effect, or lower for a subtler look
14. The Halo Braid Half-Up
A halo braid wraps around your head like a crown, and when you combine it with a half-up style, you’re creating a romantic, almost bridal look that’s actually wearable for everyday. You’re braiding a section from one side of your head, bringing it across the back, and securing it on the other side, then gathering the top-back section into a half-up. The braid frames the entire top of your head while keeping everything off your face and neck.
The Romantic Appeal of a Halo
A halo braid creates an incredibly soft, beautiful frame for your face. The braid sits at the hairline, so it doesn’t interfere with the volume and bounce of your curls below. The style works for virtually any occasion because it reads as romantic and intentional but not overly formal. For natural hair, the halo braid also works beautifully as a way to contain hair around your face and edges while still celebrating your curl pattern everywhere else.
Creating a Halo Braid Half-Up
- Start a braid on one side of your head, beginning at the temple or ear
- Braid diagonally across the back of your head, bringing it to the opposite temple or ear
- Secure the end of the braid with a bobby pin, tucking it under and securing it in place
- Once the halo braid is secured, gather the remaining hair (the part that wasn’t braided) into a half-up ponytail or puff at the crown
- Secure the gathered section, making sure it sits neatly against the halo braid
- Gently pull and distress the halo braid if you want it to look softer, or leave it neat and structured
- The halo braid doesn’t need to be tight or neat—a slightly textured, relaxed braid actually looks more intentional on natural hair
Worth knowing: This style actually looks better when the halo braid is a bit soft and undone—you’re not going for sleek here; you’re going for romantic.
15. The Accessorized Half-Up
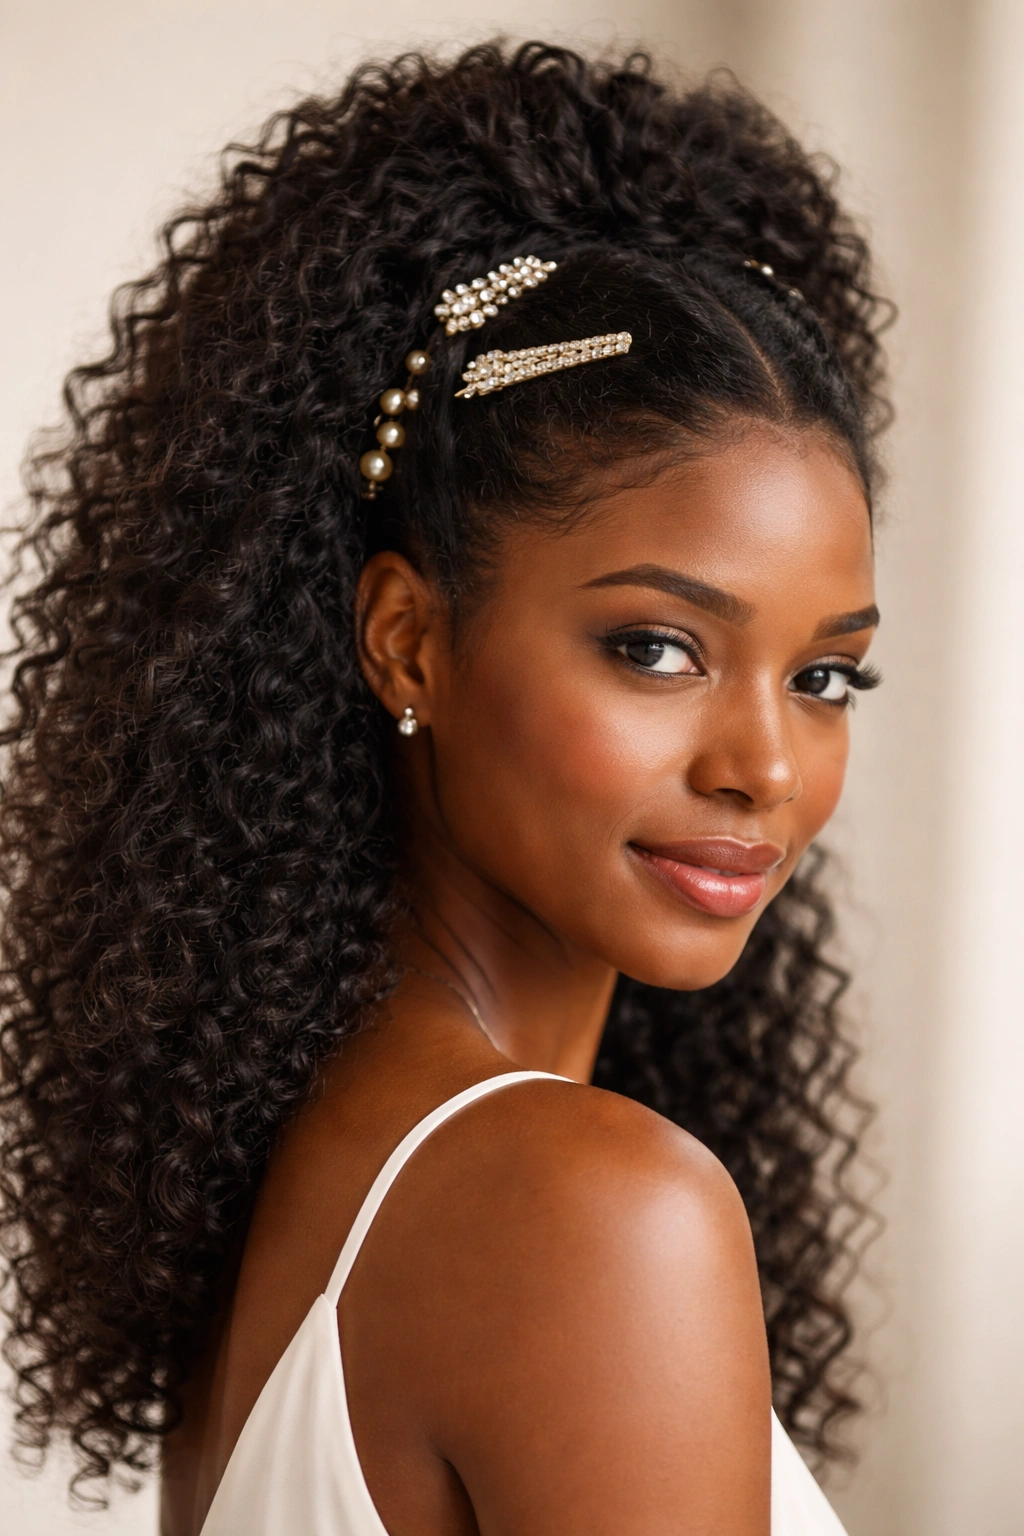
You’re doing a basic half-up and then elevating it with strategic accessories: hair clips, pearls, beads, or hair rings. The accessories become the focal point, so you don’t need to do anything super complicated with the actual hair structure. A simple gathered section gets instantly more interesting and intentional when you add something sparkly, dangly, or fun. This is the style when you want to make a statement without actually doing a complicated hairstyle.
Accessory Power for Half-Ups
Accessories take a basic half-up from looking like you just threw your hair up to looking intentionally styled. They also let you express personality and style without needing to invest significant time or effort. Hair clips can add a pop of color or shine, beads add texture and weight, and hair rings create visual interest. The key is not overdoing it—one or two strategic accessories look intentional; three or four start looking busy.
Styling with Accessories
- Create your basic half-up section as you normally would
- Secure it with an elastic or clip, or use your accessories to do the securing
- Hair clips can be clipped directly onto the gathered section or onto the surrounding hair for a different effect
- Beads or hair rings can be slid onto a small braid or twist section, or threaded onto individual curls
- Pearls or gemstone clips look instantly upscale; holographic or metallic options look fun and playful
- Position your accessories so they’re clearly visible and frame your gathered section nicely
- Test different positions to see what balances your face and overall look
16. The Clip Curl Half-Up
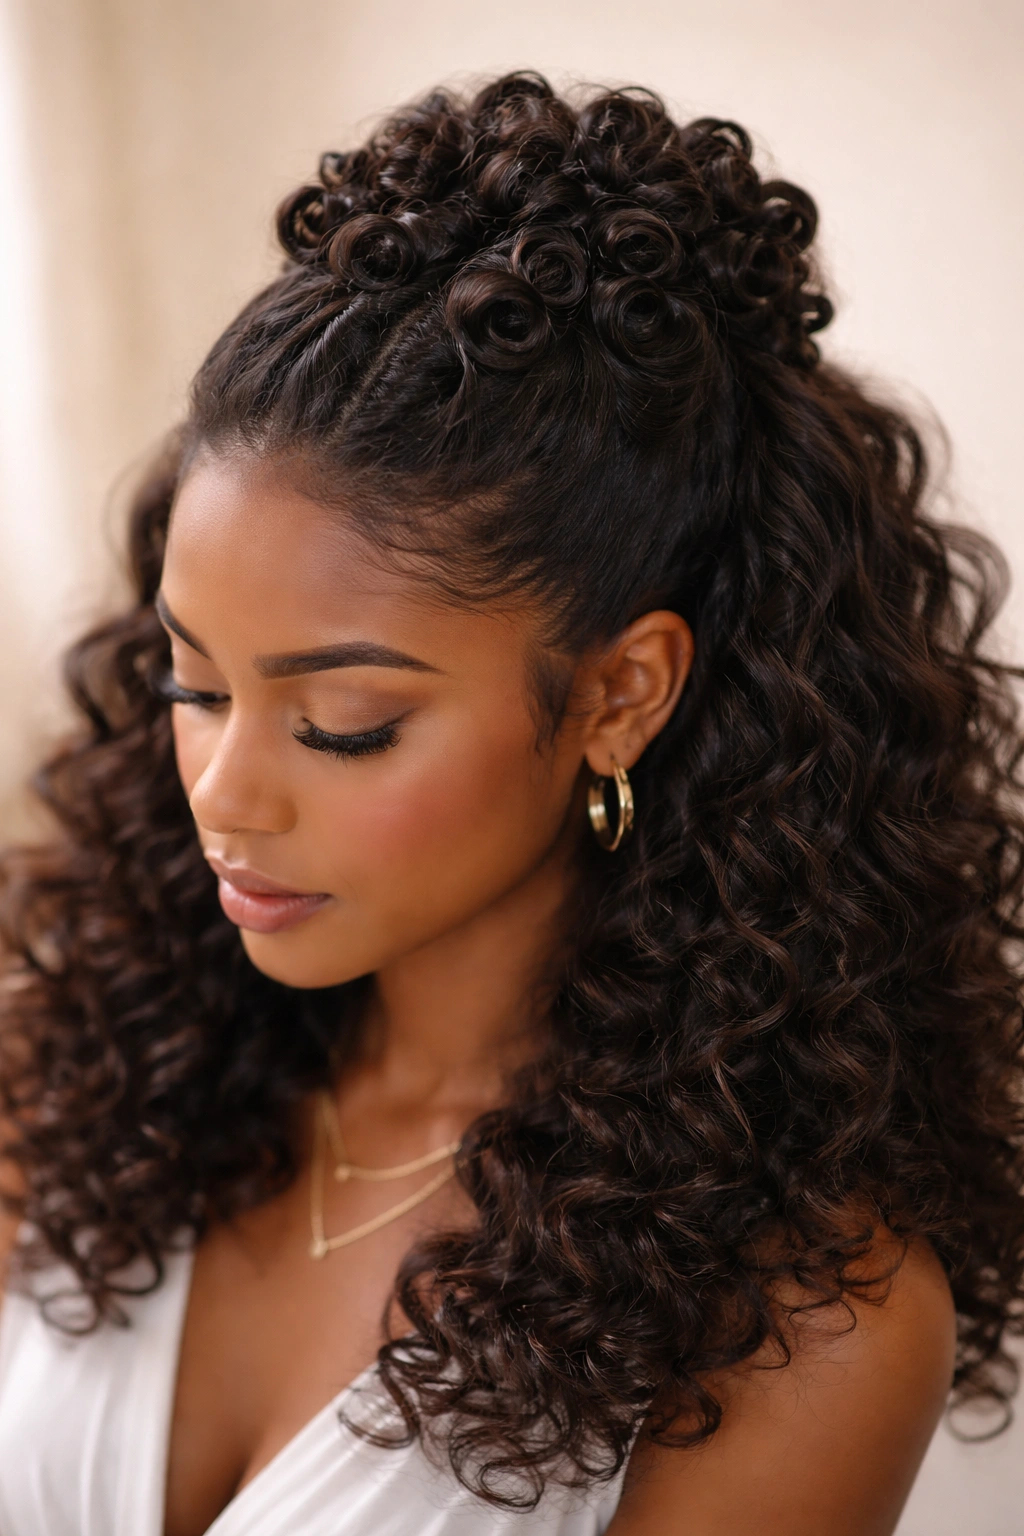
This style uses pin curls or clip curls on the gathered section, creating a retro-inspired look that feels both vintage and current. You’re gathering your half-up as usual, then creating small coiled curls on the secured section and leaving them to set. Once you release the clips, you have cascading curls on top and loose texture below. It’s a style that takes some time to execute properly but creates a really visually interesting and romantic result.
Creating Retro Texture with Clip Curls
Clip curls are a vintage styling technique that creates intentional, defined curl patterns. When you apply them to just the gathered section of a half-up, you’re creating decorative texture that sits on top and draws the eye. The defined curls also protect the hair beneath them, making this actually a fairly gentle styling method. This style works best on hair that can hold a curl, whether that’s through natural coil pattern or through temporary setting.
Executing Clip Curls on Your Half-Up
- Create your half-up section and secure it tightly with an elastic
- Take small subsections of the gathered hair and coil them around your finger or a tool
- Hold each coil in place while sliding out your finger or tool, then secure the coil to your head with a hair clip
- Create multiple clip curls across the secured section, working methodically
- Allow the clips to stay in for at least 30 minutes (longer if possible) so the curls set
- Once set, carefully remove the clips and gently separate or arrange the curls as desired
- Finish with a light-hold hairspray to keep everything in place
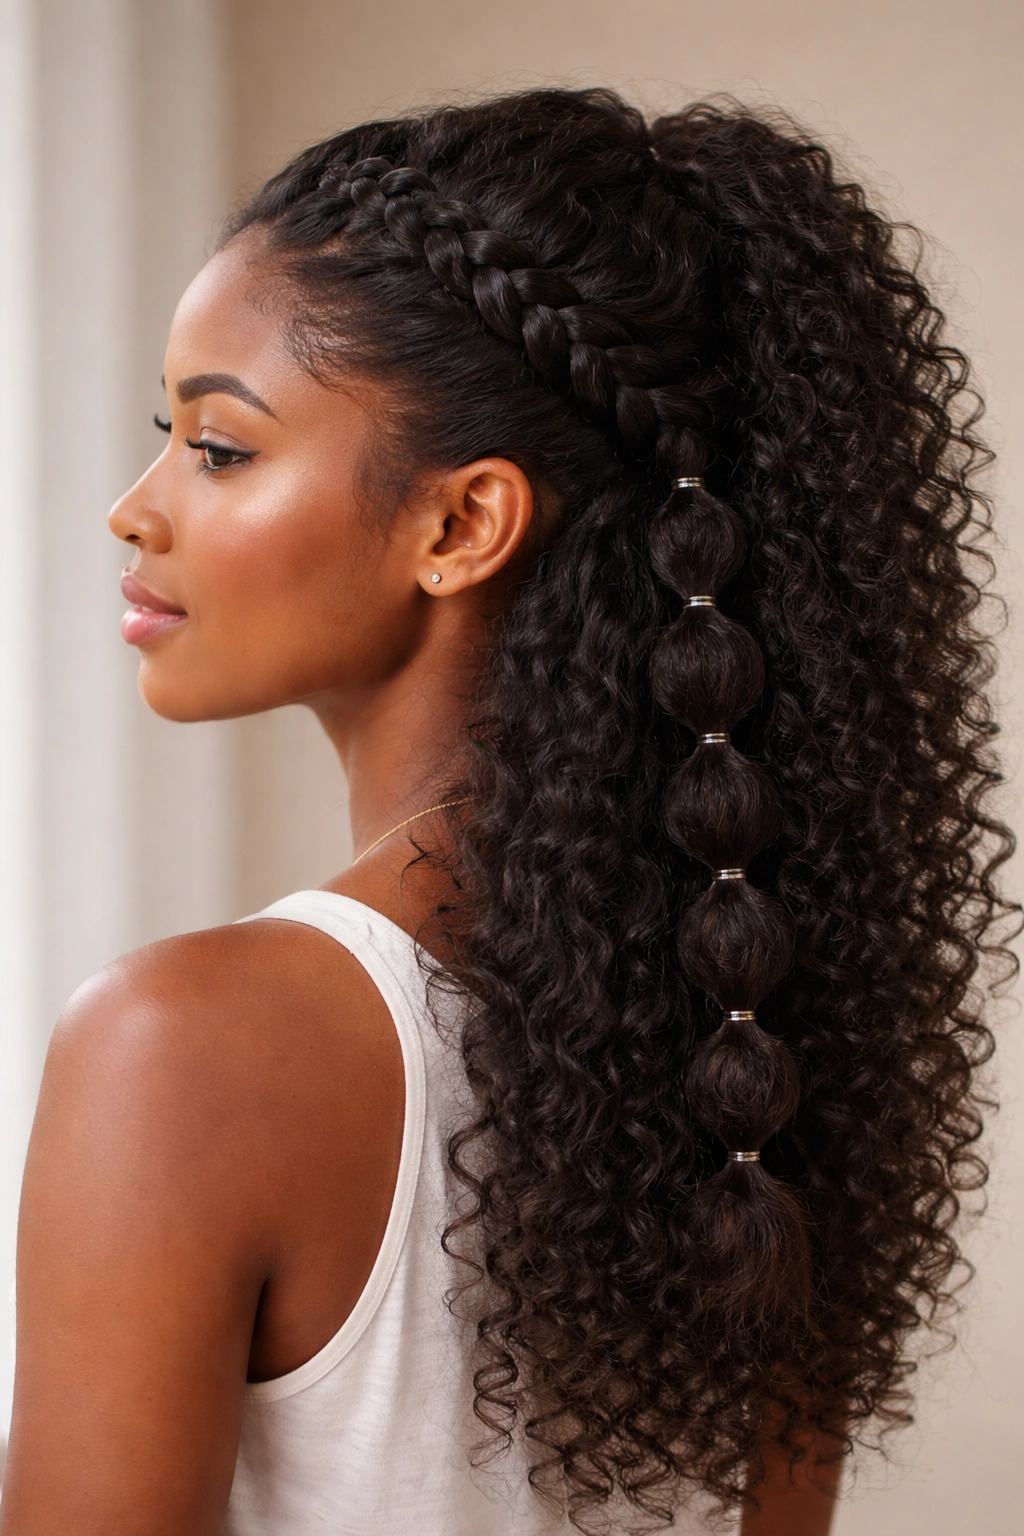
17. The Bubble Pony Half-Up
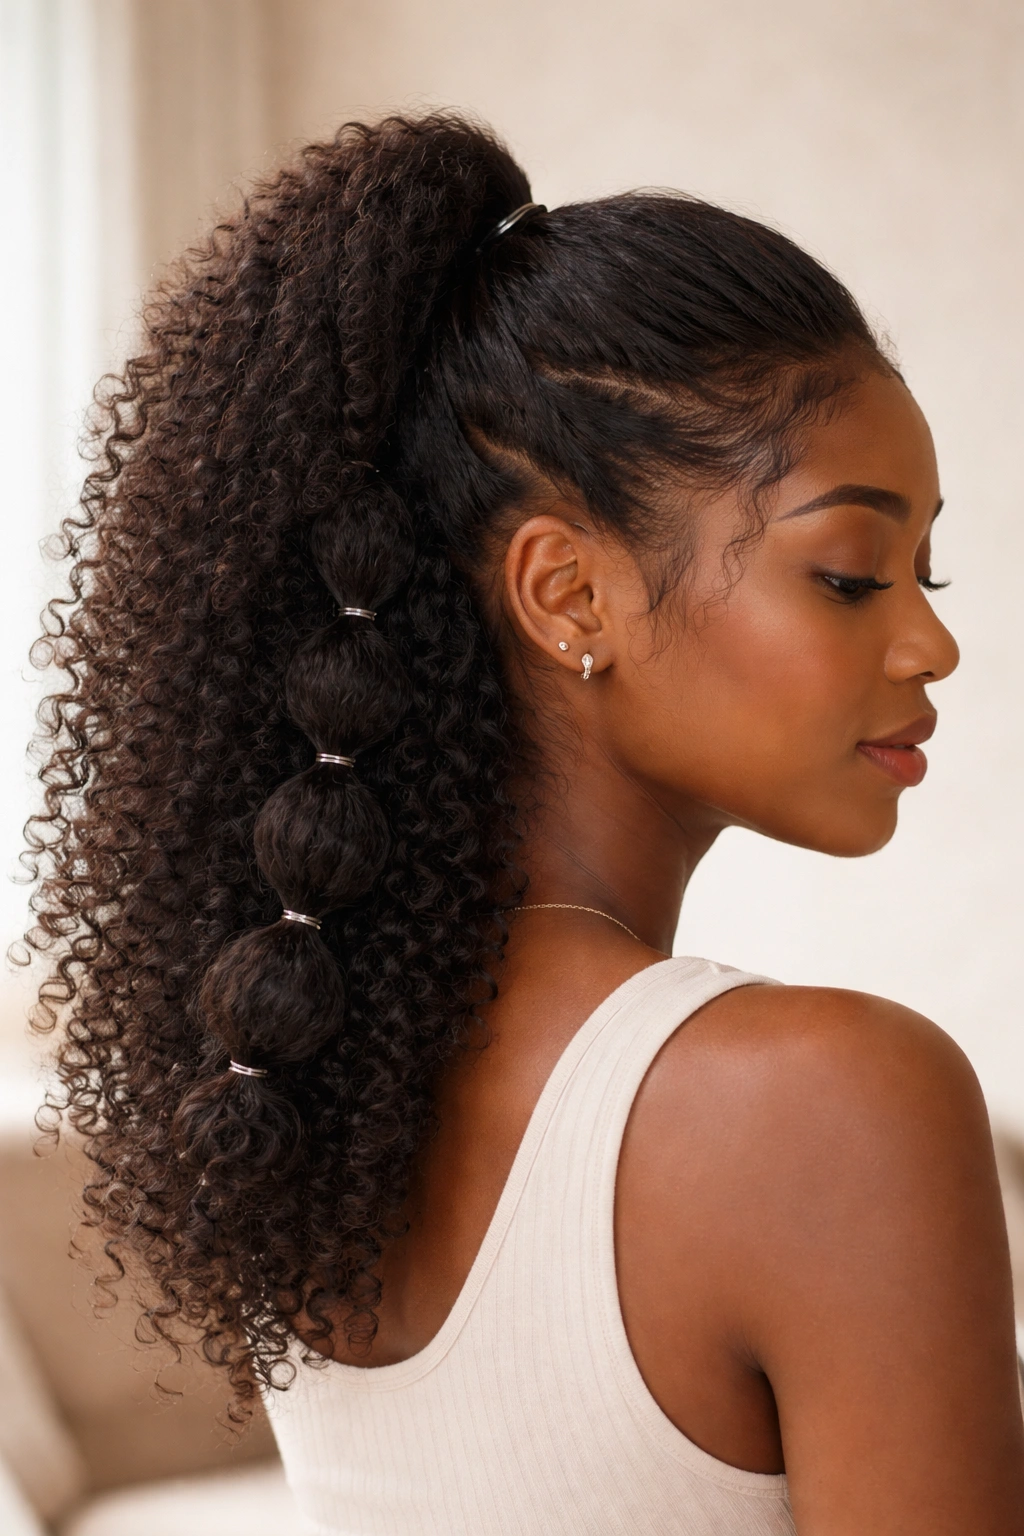
You’re creating a gathered half-up section, then using elastics spaced down the length of the resulting ponytail to create bubble sections. Each section between the elastics gets gently pulled and fluffed out, creating a bubble or balloon effect. This style is playful and fun, works on virtually any curl pattern, and is surprisingly easy to execute once you understand the concept.
The Playfulness of Bubble Ponytails
Bubble ponytails immediately read as fun and not overly serious. They work for casual settings, fun events, and anywhere you want to show personality through your hair. The bubbles also create texture and volume, which means fine hair can look fuller and dense hair has interesting dimension. This is one of those styles that looks complicated but is actually quite simple—which is the best kind of styling trick.
Creating Bubble Sections
- Create your half-up ponytail and secure it with an elastic at the crown
- Take an elastic and position it about 2 inches down the ponytail, securing the hair at that point
- Gently grasp the ponytail between the two elastics and pull upward, creating a puffed-out bubble section
- Secure the bubble in place with a bobby pin if needed
- Continue this process down the length of the ponytail, creating evenly-spaced bubbles
- Once all bubbles are created, gently fluff and arrange them so they look full and intentional
- Finish with hairspray to keep everything in place, especially if your hair is fine or slippery
Pro tip: The bubbles actually look better when they’re not perfectly uniform—varying sizes and fullness looks more intentional and playful.
18. The Braided Bubble Half-Up
This is the most intricate style on this list, and it combines elements of multiple techniques. You’re creating a braid or twist as your half-up element, but instead of leaving it flat, you’re creating bubbles along its length by securing it with elastics at intervals and pulling the sections out. The result is incredibly visually interesting and looks like you spent hours on your hair, even though it’s actually just a combination of straightforward techniques.
The Visual Impact of Textured Bubbles
Braided bubbles create incredible dimension and texture. Each bubble catches light differently, and the overall effect is very dimensional and visually rich. This style photographs beautifully because there’s so much going on visually. On natural hair, this style also celebrates your texture by creating defined sections and pockets where your curl pattern shows through. It’s one of those styles that genuinely impresses people while still being manageable.
Building Your Braided Bubble Section
- Start a braid on one side of your head, working from your temple toward the back
- Alternatively, create a twisted section using the same starting point
- Instead of braiding all the way down and then creating bubbles, create the bubbles as you go
- Secure the braid or twist with a small elastic at your crown
- About 2 inches down the braid, add another elastic
- Gently pull the braided section between the two elastics outward and upward, creating a bubble
- Continue down the length of the braid, adding elastics and creating bubbles
- Secure the braided bubble tail with a final elastic
- Once complete, you can gently fluff each bubble and adjust them to your liking
- Leave the rest of your hair down in its natural pattern or style it however you prefer
Worth knowing: This style is genuinely easier than it sounds once you do it once or twice—it just looks incredibly complicated, which is the whole point.
Final Thoughts
The magic of half up half down styles for natural hair is that they honor your curl pattern while still allowing you to create intentional, polished looks. You’re not fighting against your texture; you’re working with it, enhancing it, and celebrating it. Whether you’re going for sleek and sophisticated, playful and fun, romantic and soft, or bold and statement-making, there’s a half up half down style on this list that matches your vibe.
The truth is that the best style for you depends on your specific curl pattern, hair density, and how much time you want to invest. If you’re just starting to explore these styles, begin with the basic high pony half-up or the simple face-framing version—they’re both incredibly forgiving and take five minutes once you’ve done them a few times. As you get more comfortable, you can layer in braids, twists, accessories, and more complex techniques.
The other beautiful thing about half up half down styles is that they’re incredibly flexible. You can do a sleek version on day one, a twisted version on day two, and a braided version on day three, all using the same basic foundation. Your hair doesn’t need to be freshly washed, your curls don’t need to be perfectly defined, and you don’t need fancy tools or products. What you actually need is the willingness to experiment a bit, the patience to practice, and the confidence to try something and adjust it until it feels right for you.