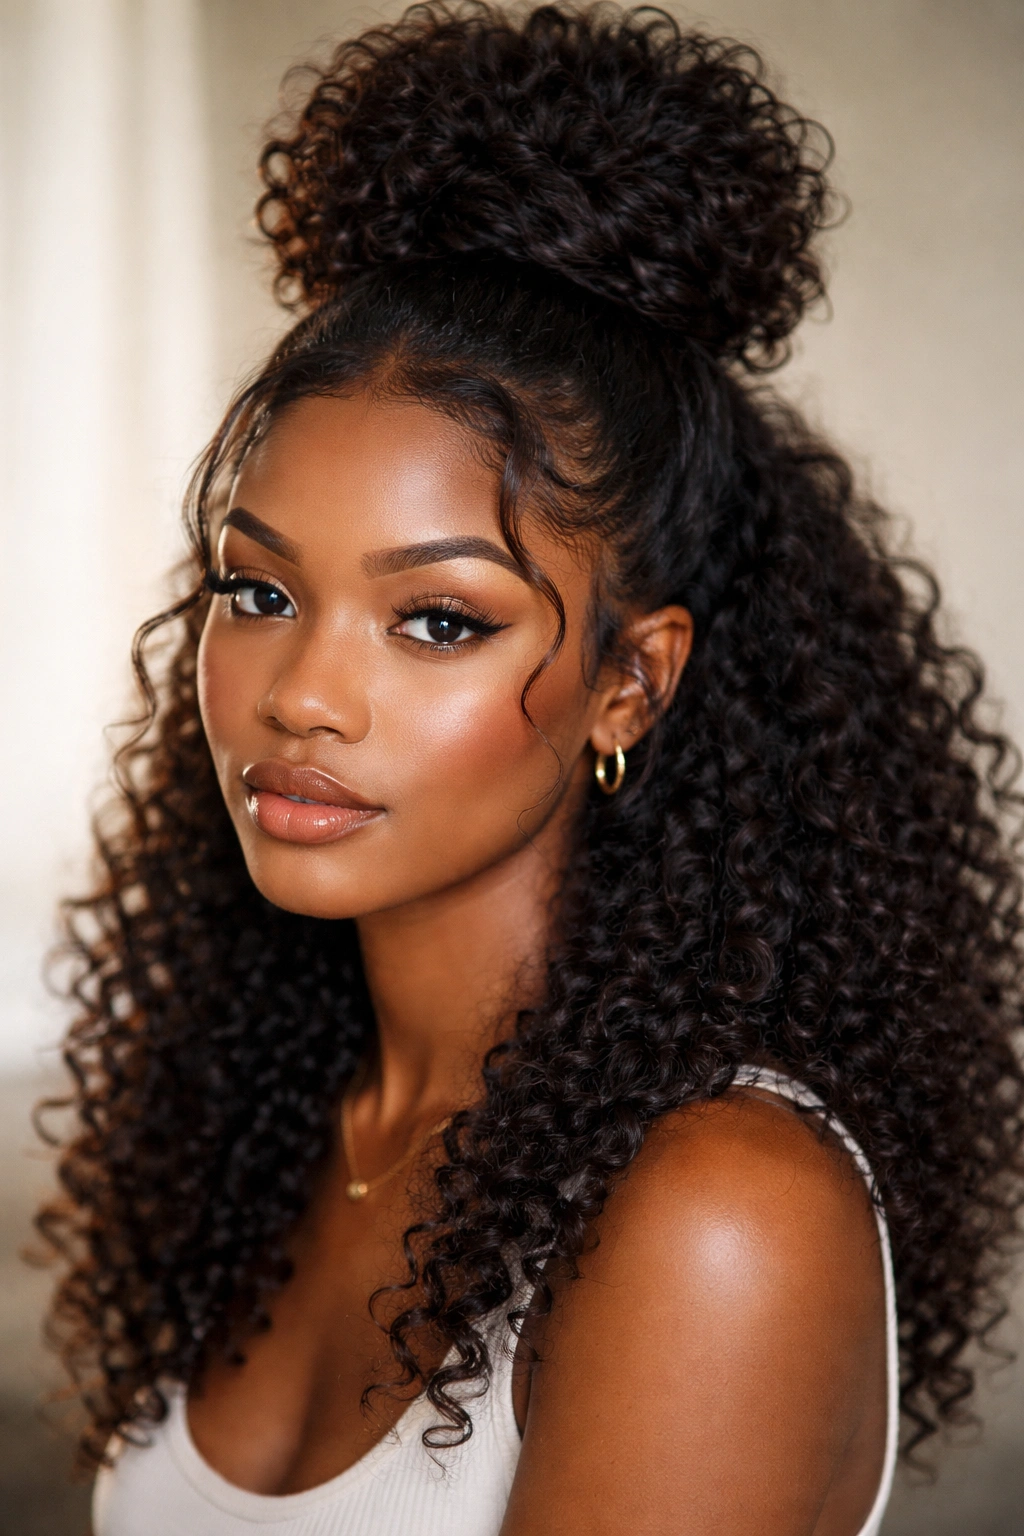
Y2K fashion is undeniably back, and one of the most iconic trends making a serious comeback is the half up half down hairstyle. This effortlessly chic look bridges the gap between polished and casual, giving you movement, dimension, and that nostalgic early-2000s vibe without looking costume-y or dated. For Black women with textured hair, the half up half down style is particularly versatile—it works beautifully with natural curls, locs, braids, twists, and extensions, making it an endlessly customizable option that celebrates your hair’s unique texture.
What makes these styles so magnetic right now is their perfect balance of sophistication and playfulness. You’re not committing your entire head to an updo, but you’re still creating structure and intentionality with your styling. The half up portion can be sleek or textured, adorned with clips and accessories, or left naturally voluminous, while the bottom half flows freely—either curled, straightened, braided, or left natural. This duality is exactly what made Y2K fashion so captivating, and it translates beautifully to hair.
Whether you’re aiming for a more polished everyday look, prepping for an event, or just want to switch up your styling routine without a dramatic change, half up half down hairstyles deliver. The best part? Most of these styles work across all hair types and lengths, and many can be achieved with minimal heat styling or commitment. You can rock them for days on end, adjust them as your hair settles, and reinvent them with different accessories or textures each time you style.
1. Classic Sleek Half Up with Center Part
This is the foundation Y2K look that kicked off the entire trend—clean, minimalist, and impossibly chic. The style starts with a center part that runs from your forehead straight back through your crown, creating a balanced, face-framing foundation. The top half is gathered into a sleek ponytail or bun right at your crown, pulled tight enough to look intentional but not so tight that you’re straining your hairline.
Why This Works for Textured Hair
Sleekness on textured hair requires a bit of prep but looks absolutely stunning when executed well. Start with hair that’s been moisturized and either blow-dried smooth or flat-ironed for that polished finish the style demands. Use a smoothing cream or gel to tame flyaways and create that glossy look that defined the Y2K era. The contrast between the controlled top and the free-flowing bottom half is what makes this style iconic.
How to Style It
- Apply a smoothing product to damp hair and blow-dry using a paddle brush or flat-iron for a sleek base
- Create a clean center part using a rattail comb, dividing your hair from your forehead to the nape of your neck
- Section off the top half of your hair, gathering it at your crown into a low or mid-height ponytail
- Secure with a clear elastic or silk hair tie to prevent breakage
- Take a small section from the ponytail and wrap it around the base to hide the elastic for a polished finish
- Smooth any flyaways with gel or edge control
- Leave the bottom half down and style however you like—curled waves, straight, or textured
Pro tip: Use a silk or satin hair tie instead of traditional elastic. These gentler options prevent breakage and creasing, especially important when your hair is pulled tight.
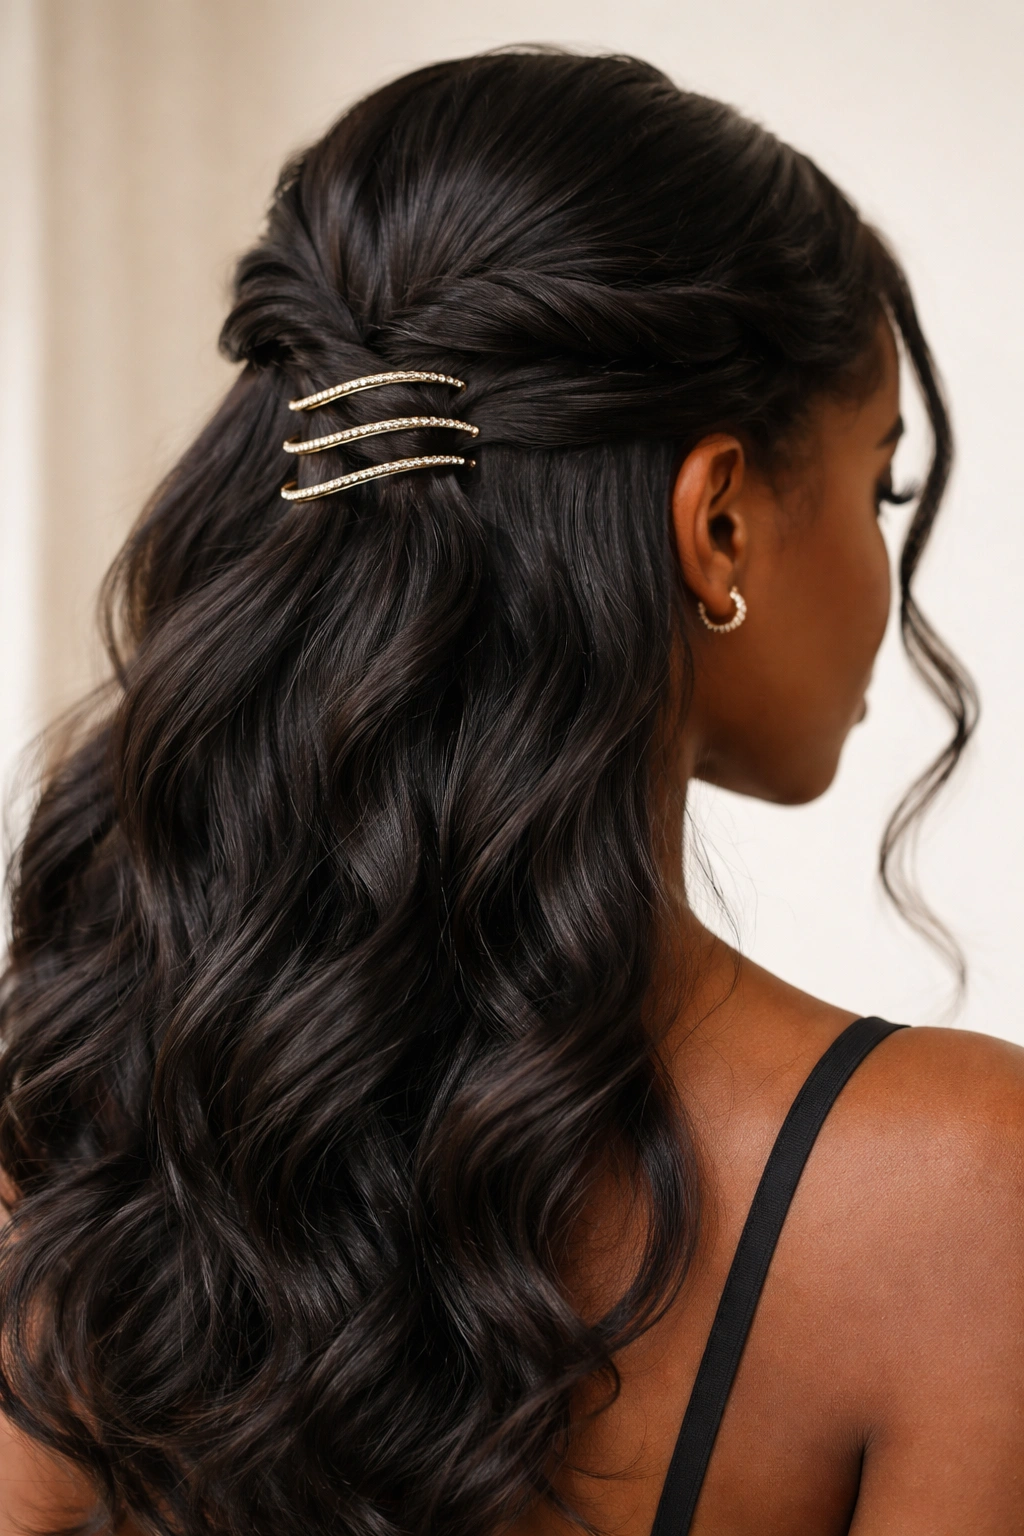
2. Chunky Clip Half Up Half Down
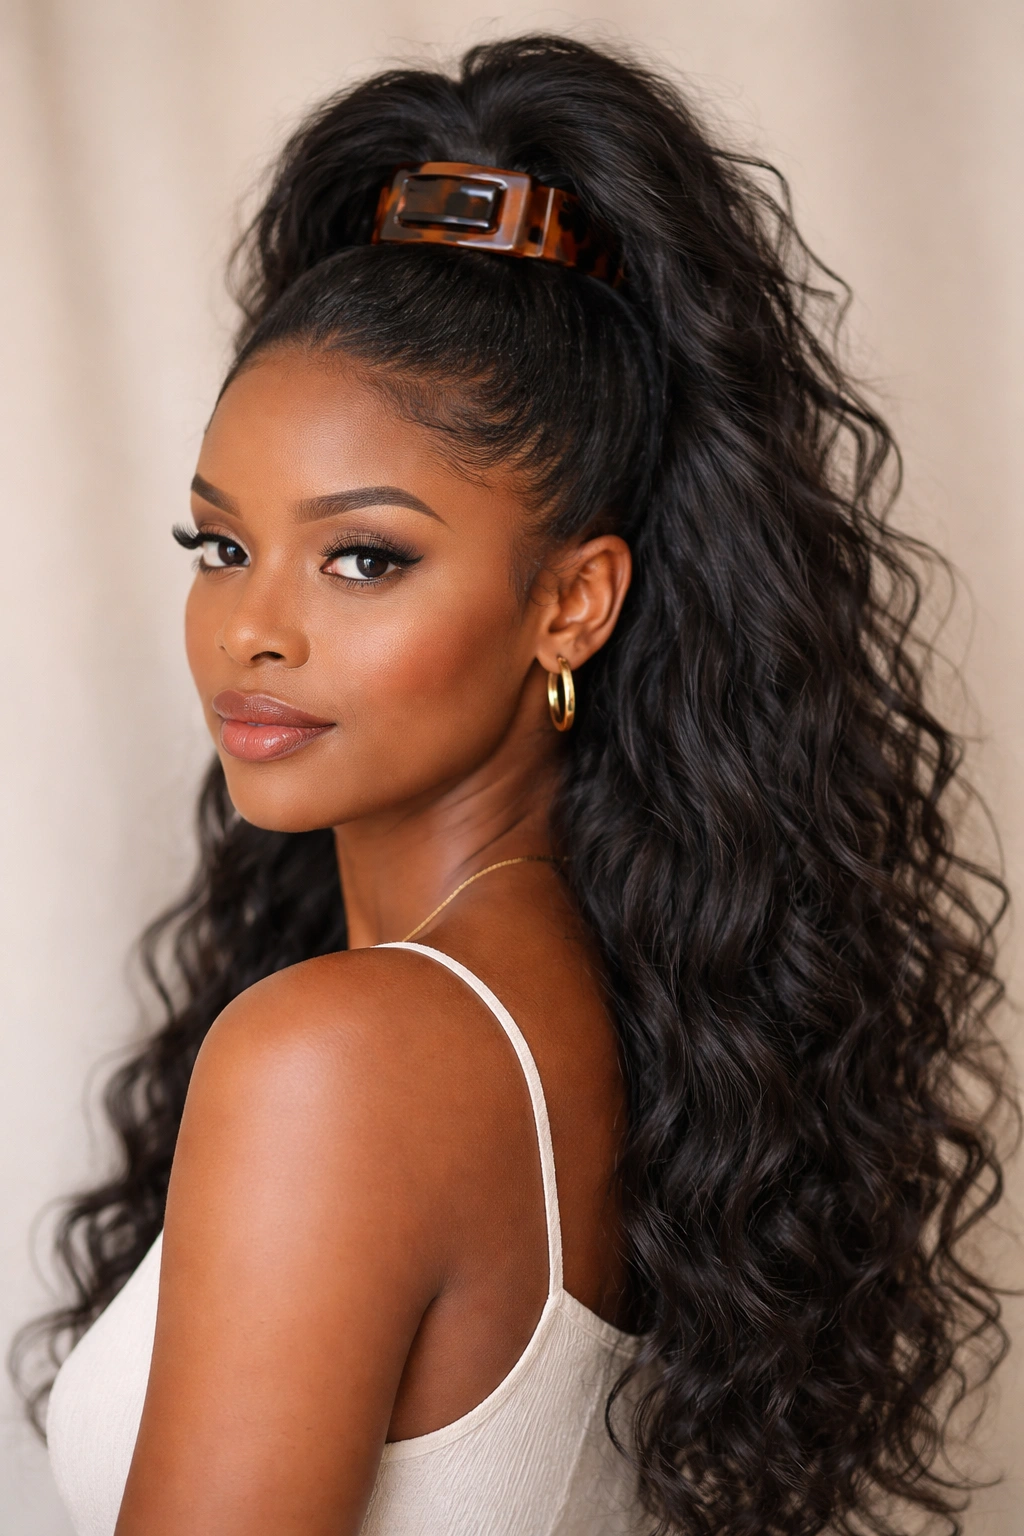
This is the statement-making version of the half up style, and it’s where Y2K fashion really shines. Instead of a subtle elastic, you’re using a chunky rectangular clip—think tortoiseshell, metallic gold, holographic, or even clear acrylic—to gather your top half. The clip sits prominently at the back of your head, making it a focal point of your whole look rather than trying to hide it.
The Accessory Matters
The clip you choose completely changes the vibe of this style. A tortoiseshell or brown clip reads earthy and casual, while a metallic gold or silver clip feels more polished and editorial. Clear or holographic clips have a Y2K-specific nostalgic quality that feels directly pulled from early-2000s fashion magazines. The size of the clip also matters—bigger clips create more visual impact and work better with thicker hair volumes, while smaller clips suit finer textures or looser sections.
How to Style It
- Section your hair by taking a horizontal line from ear to ear across the back of your head
- Gather all hair above this line, creating a loose to medium-tight bundle at the base of your crown
- Clip it in place using your chosen statement clip, positioning it so the clip itself is visible and centered
- Leave the bottom half completely down—this creates the classic half up half down silhouette
- For extra Y2K energy, leave a few face-framing pieces down on either side of your face
- Style the bottom half with curls, waves, or leave it in its natural texture
Worth knowing: If your hair is very thick or densely textured, section the top half into two parts and use two smaller clips for better hold and to avoid discomfort at the roots.
3. Twisted Half Up with Gold Cuffs
This style combines movement, texture, and jewelry-like accessories in a way that feels both effortless and elevated. Instead of a standard ponytail, you’re creating two twisted sections from either side of your head that meet at the back and are secured with decorative gold (or silver, rose gold, any metal) hair cuffs. The twists add dimension and visual interest while still keeping the hair off your face, and the metallic cuffs take it from casual to intentional.
Creating Defined Twists
Twists on textured hair are naturally beautiful because your hair’s curl pattern creates the definition without extra effort. For smoother hair types, you can either create tighter twists using gel or a twisting cream, or work with looser, more relaxed twists that lean into a softer aesthetic. The key is consistency—both twists should be roughly the same size and tension so the style looks balanced.
How to Style It
- Part your hair down the center from your forehead to the nape of your neck
- On one side, take a section of hair from your temple and begin twisting it back toward your crown, incorporating more hair as you go
- Twist until you reach the back of your head, then secure with a small clear elastic
- Repeat on the opposite side, creating a mirror-image twist
- Gather both twisted sections at the back of your head and secure them together with another elastic
- Slide decorative hair cuffs over the elastic to hide it and add visual pop
- Leave the bottom half down with your natural curl pattern, or add waves and curls for extra texture
Insider note: Gel-based twisting cream works beautifully on textured hair and gives twists longevity—they can last 5-7 days before you need to restyle, making this a great protective style option.
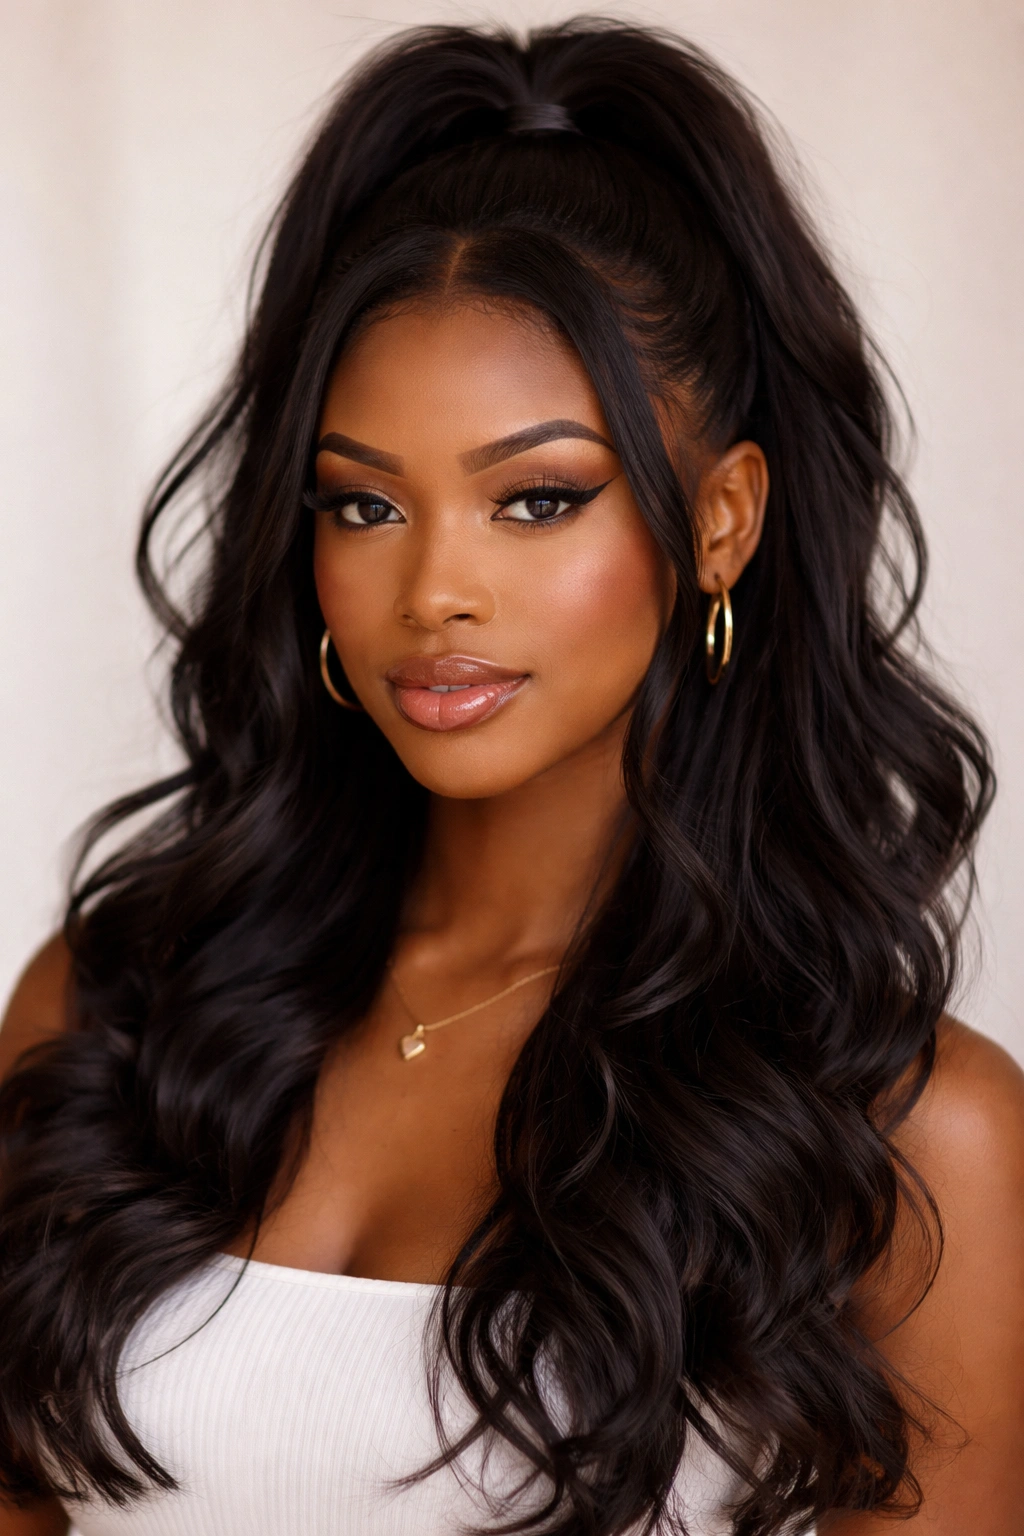
4. Slicked Back High Pony Half Up
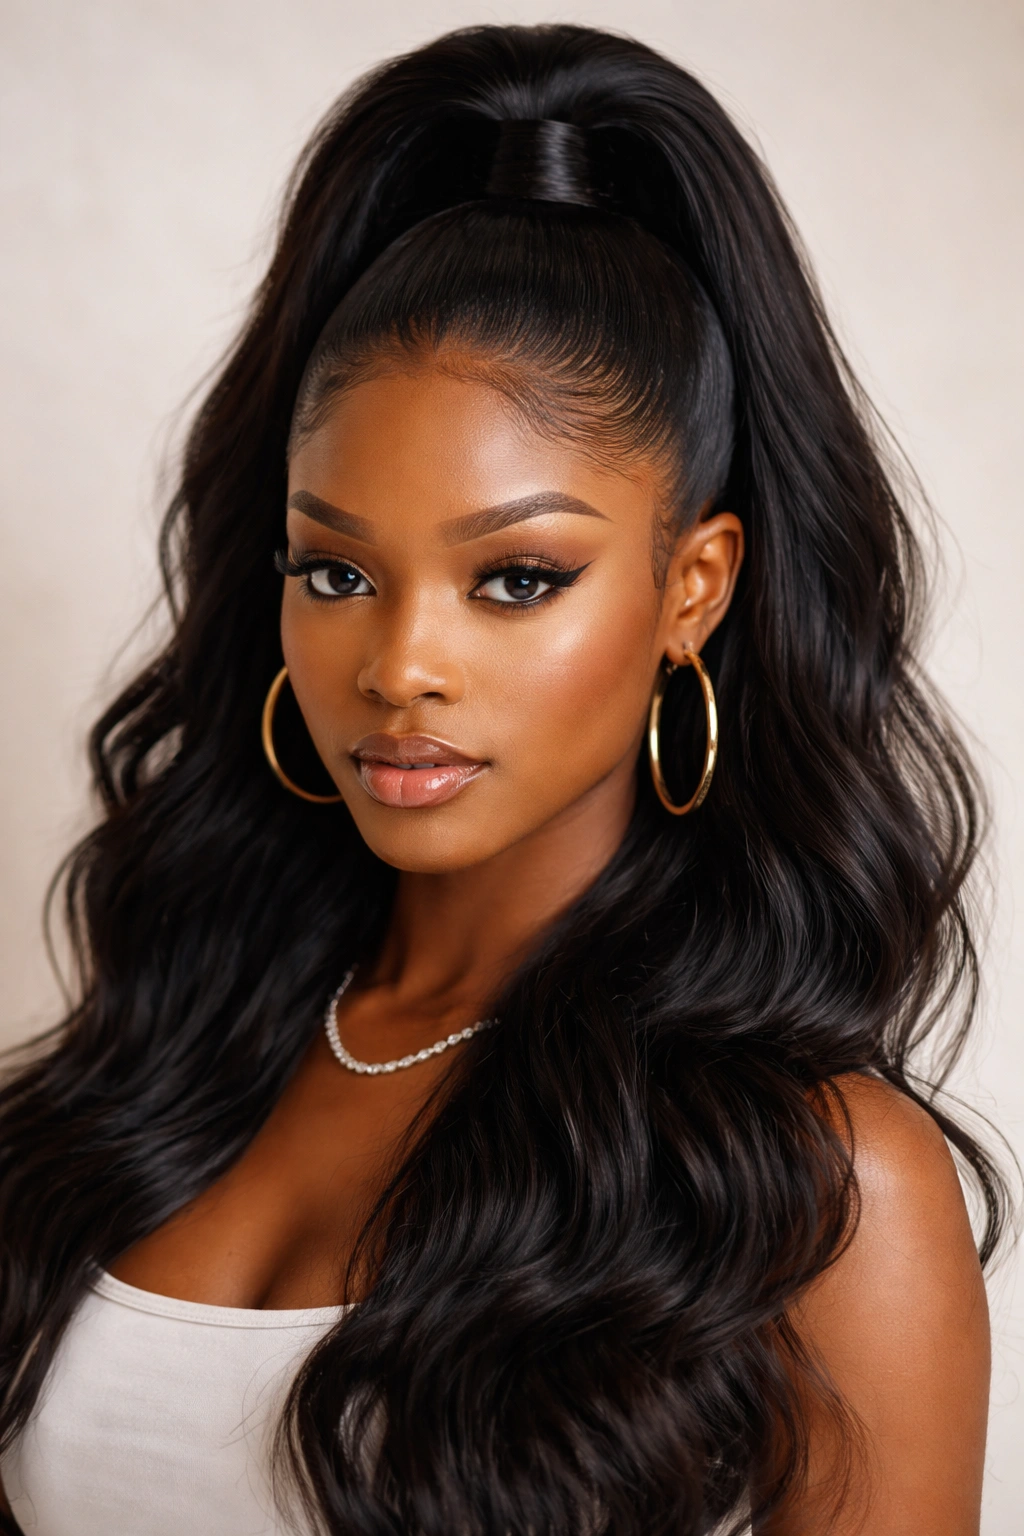
For when you want more drama and height, the slicked-back high pony half up delivers maximum Y2K energy. This version pulls the top half of your hair into a high, tight ponytail positioned at the crown, using gel or edge control to create that polished, almost wet-look finish that was everywhere in the early 2000s. The back half flows down in contrast, creating striking visual separation between the controlled top and the free bottom.
Achieving That Signature Slicked Look
The slicked aesthetic requires product and technique. You’re looking for a strong-hold gel or edge control that won’t flake or feel crunchy. Apply it to your hairline and the front sections as you’re gathering the top half, smoothing everything back against your head. This creates that sleek, intentional look that defines the style. The slickness should extend all the way to where the ponytail sits for a cohesive finish.
How to Style It
- Apply gel or edge control to the front and sides of your hair, using a fine-tooth comb to smooth the hair back
- Gather the top half of your hair into a high ponytail at your crown, keeping tension consistent
- Secure with a clear elastic or silk tie
- Smooth any flyaways and add more edge control around your hairline for definition
- Leave the bottom half completely down—contrast is everything here
- Curl or wave the bottom half if desired, or keep it in its natural texture
Pro tip: Wet your hair slightly before applying gel—this helps the product distribute evenly and reduces flaking or dryness.
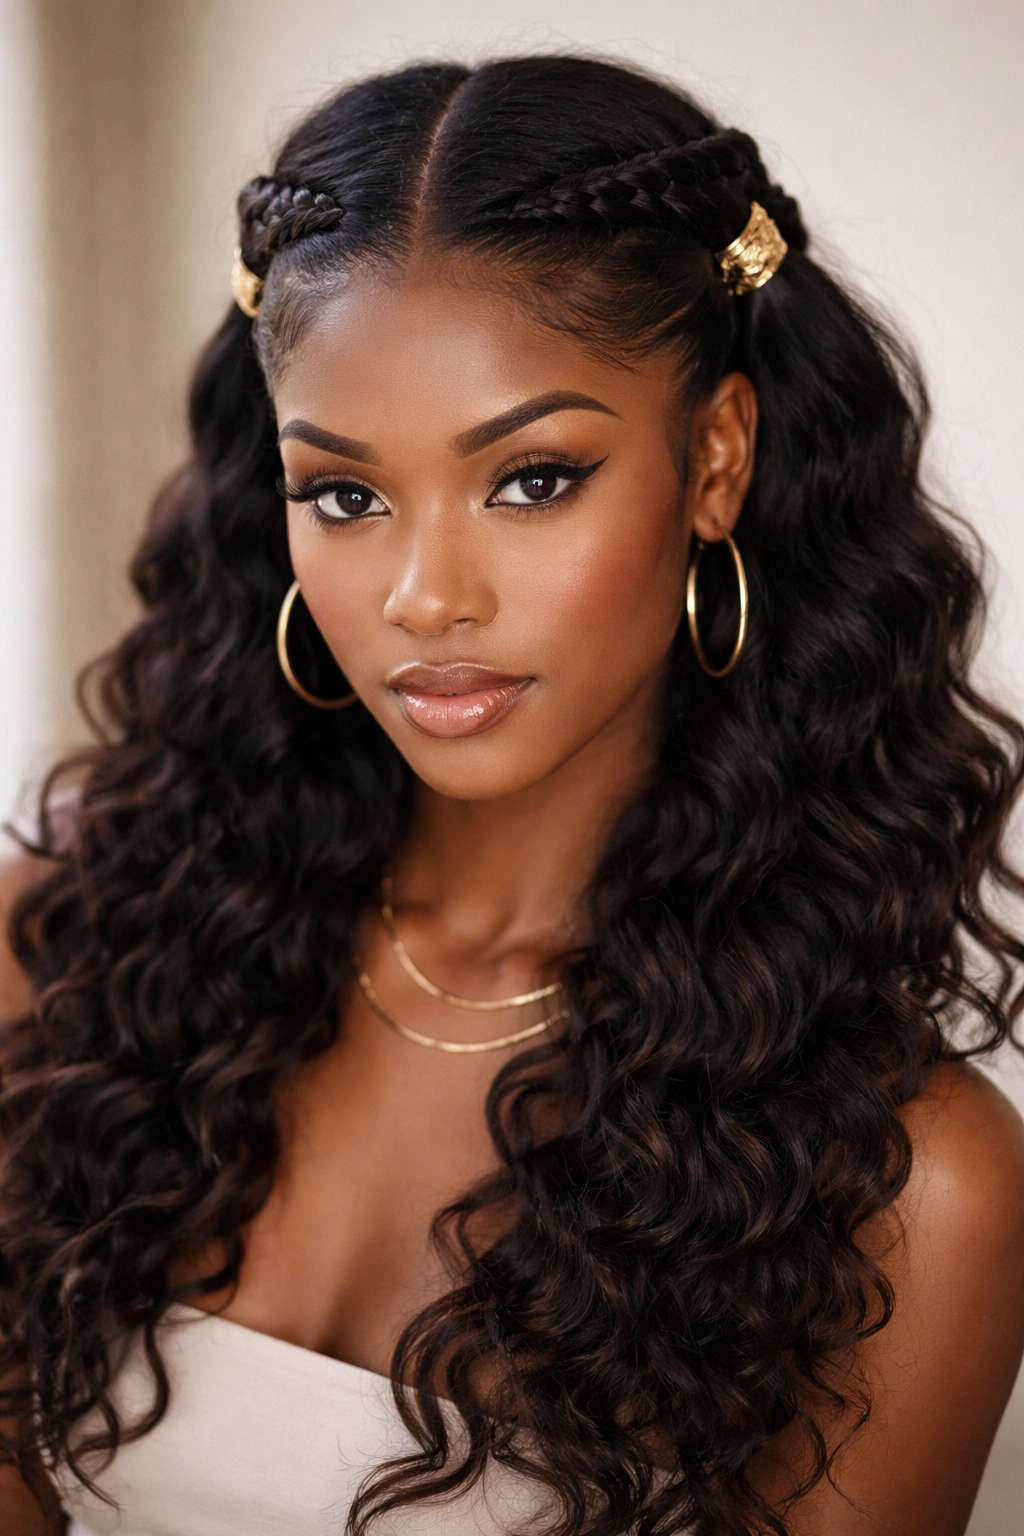
5. Braided Half Up Half Down with Beads
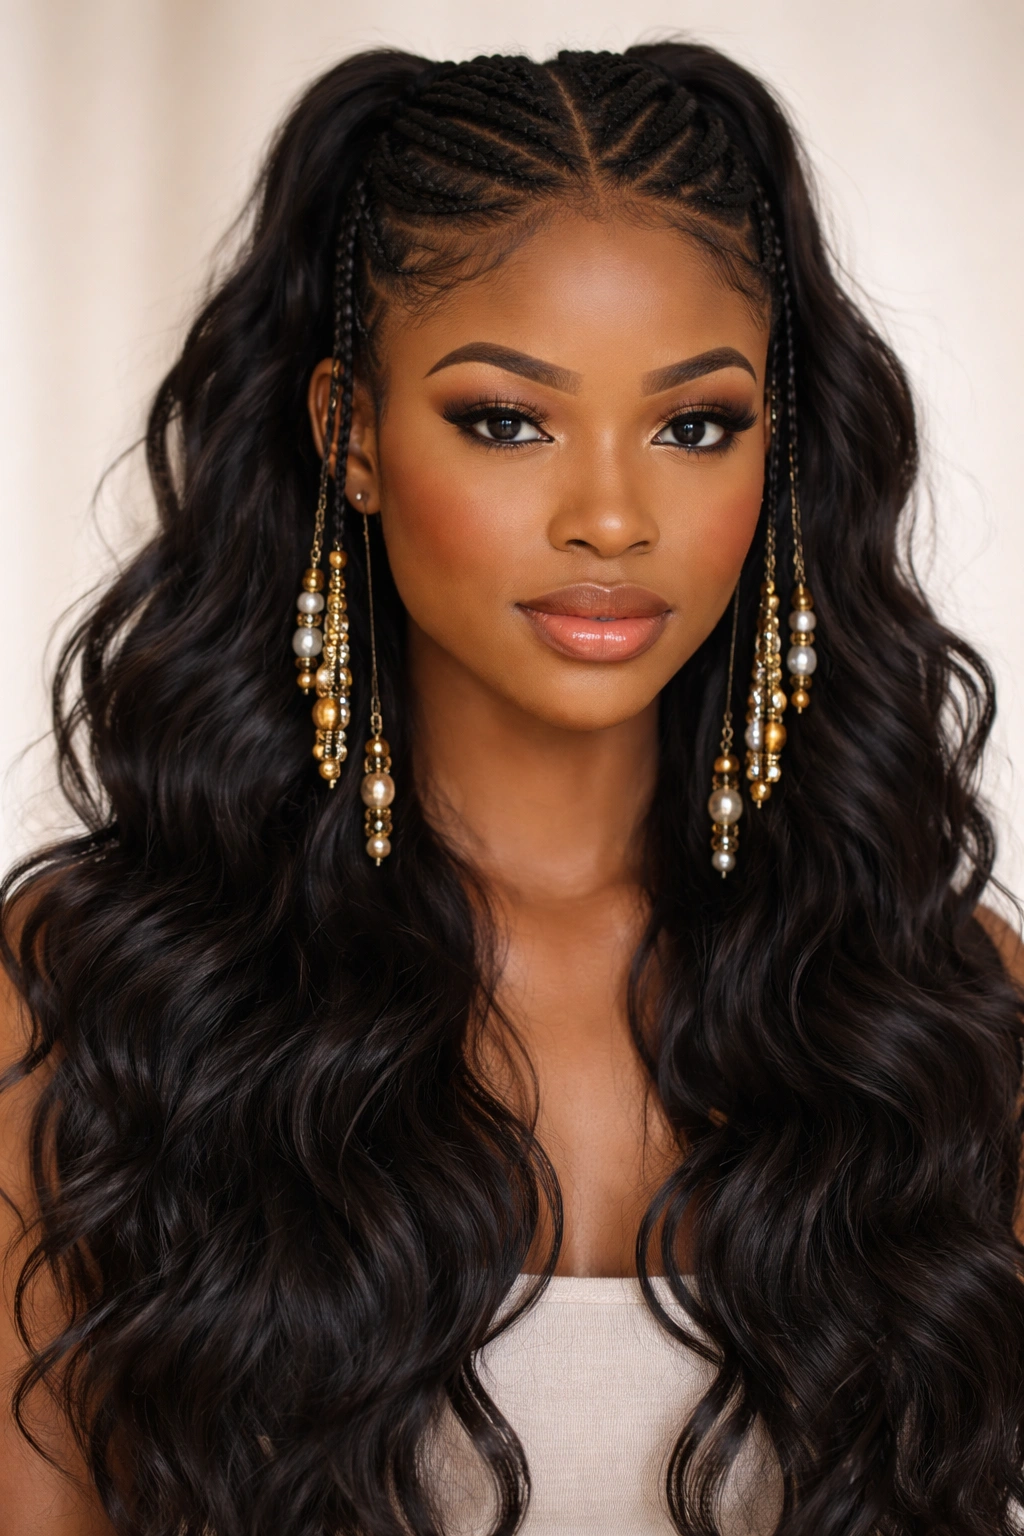
Bring braids into the half up half down format and you’ve got a style that’s both protective and undeniably stylish. This version takes the top half of your hair and creates one, two, or three braids (cornrows, box braids, or loose braids depending on your preference) that gather at the back of your head. The braids can be adorned with colorful beads, brass cuffs, or left simple for a cleaner look. The bottom half hangs free, creating beautiful contrast and movement.
Braid Placement and Volume
Braids in a half up style can be positioned in endless ways. You might create two braids that start near your temples and meet at the back, or one thicker braid down the center, or even three thinner braids arranged side by side. The placement affects the overall vibe—braids starting further back look more casual, while braids beginning right at your hairline feel more intentional and editorial.
How to Style It
- Section the top half of your hair horizontally from ear to ear
- Decide on your braid placement—center, sides, or multiples
- Create your braids using your chosen technique (cornrows, box braids, feed-in braids, or loose three-strand braids)
- Add beads, cuffs, or threads to the braids as you work for decorative flair
- As you complete each braid, secure the ends with small elastics
- Gather all braids at the back of your head and secure them together with a larger elastic or clip
- Leave the bottom half completely down—this can be braided, twisted, curled, or left in its natural texture
Worth knowing: If you’re adding beads, slide them on as you braid rather than trying to thread them after. This is faster and creates a more secure, polished look.
6. Textured Bun Half Up with Soft Edges
This style celebrates natural texture by creating an intentionally soft, slightly undone bun at the crown while keeping the bottom half down and natural. Instead of aiming for sleekness, you’re embracing volume, curl definition, and that lived-in aesthetic that still reads as deliberately styled. The bun can be wrapped with a section of your own hair or your favorite hair accessory, and soft, wispy face-framing pieces make the whole look feel romantic and effortless.
Building the Perfect Textured Bun
A textured bun is built from curls and coils, not from slicked-back hair. You want to gather your top half and then gently twist or coil it around itself, allowing natural texture to show rather than tightening everything flat. A bit of frizz and softness is the whole point—this is anti-perfectionism styling that still looks completely intentional. Use a light-hold product so you’re enhancing your natural curl pattern, not fighting it.
How to Style It
- Moisturize your hair and define your curl pattern with a curl cream or gel
- Let your curls set and dry completely (or use a diffuser if blow-drying)
- Section the top half of your hair from ear to ear across the back of your head
- Gather this section loosely at your crown—you want volume, not tightness
- Gently twist the section around itself, creating a loose, organic bun shape
- Secure with a silk clip, claw clip, or hair stick, allowing some pieces to fall loose
- Leave face-framing pieces down on either side of your face
- Let the bottom half of your hair hang in its completely natural state, or enhance the curl definition with more product if desired
Pro tip: This style works beautifully overnight—create the bun before bed, sleep on a silk pillowcase, and release it in the morning for even more texture and volume.
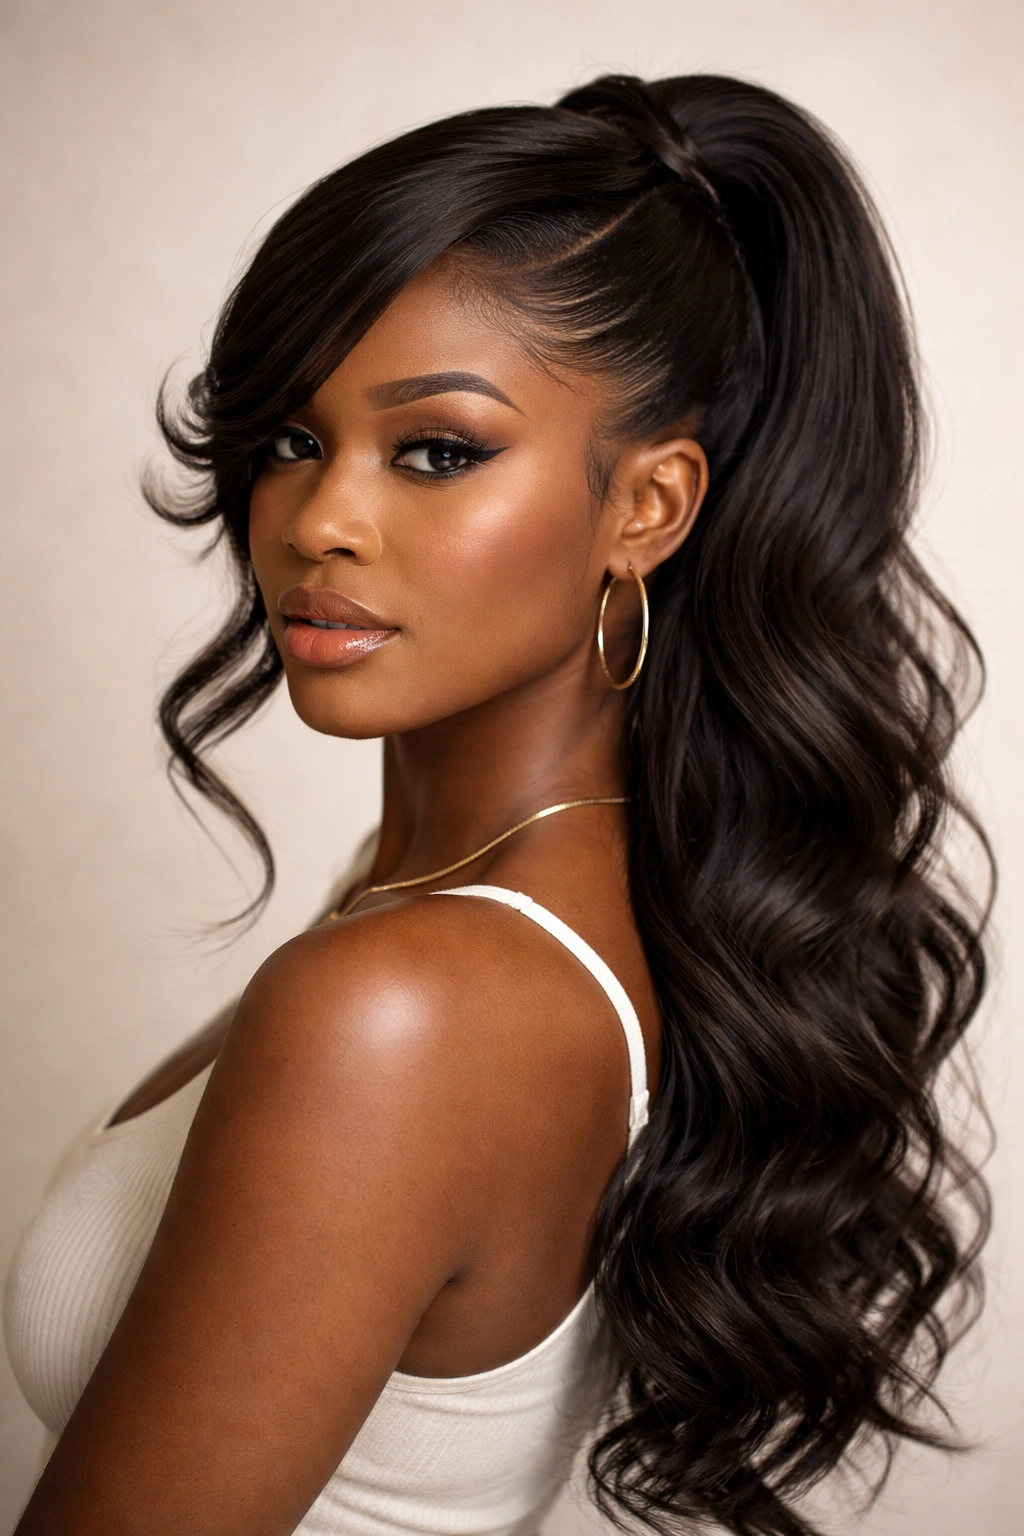
7. Sleek Low Ponytail Half Up with Metallic Accents
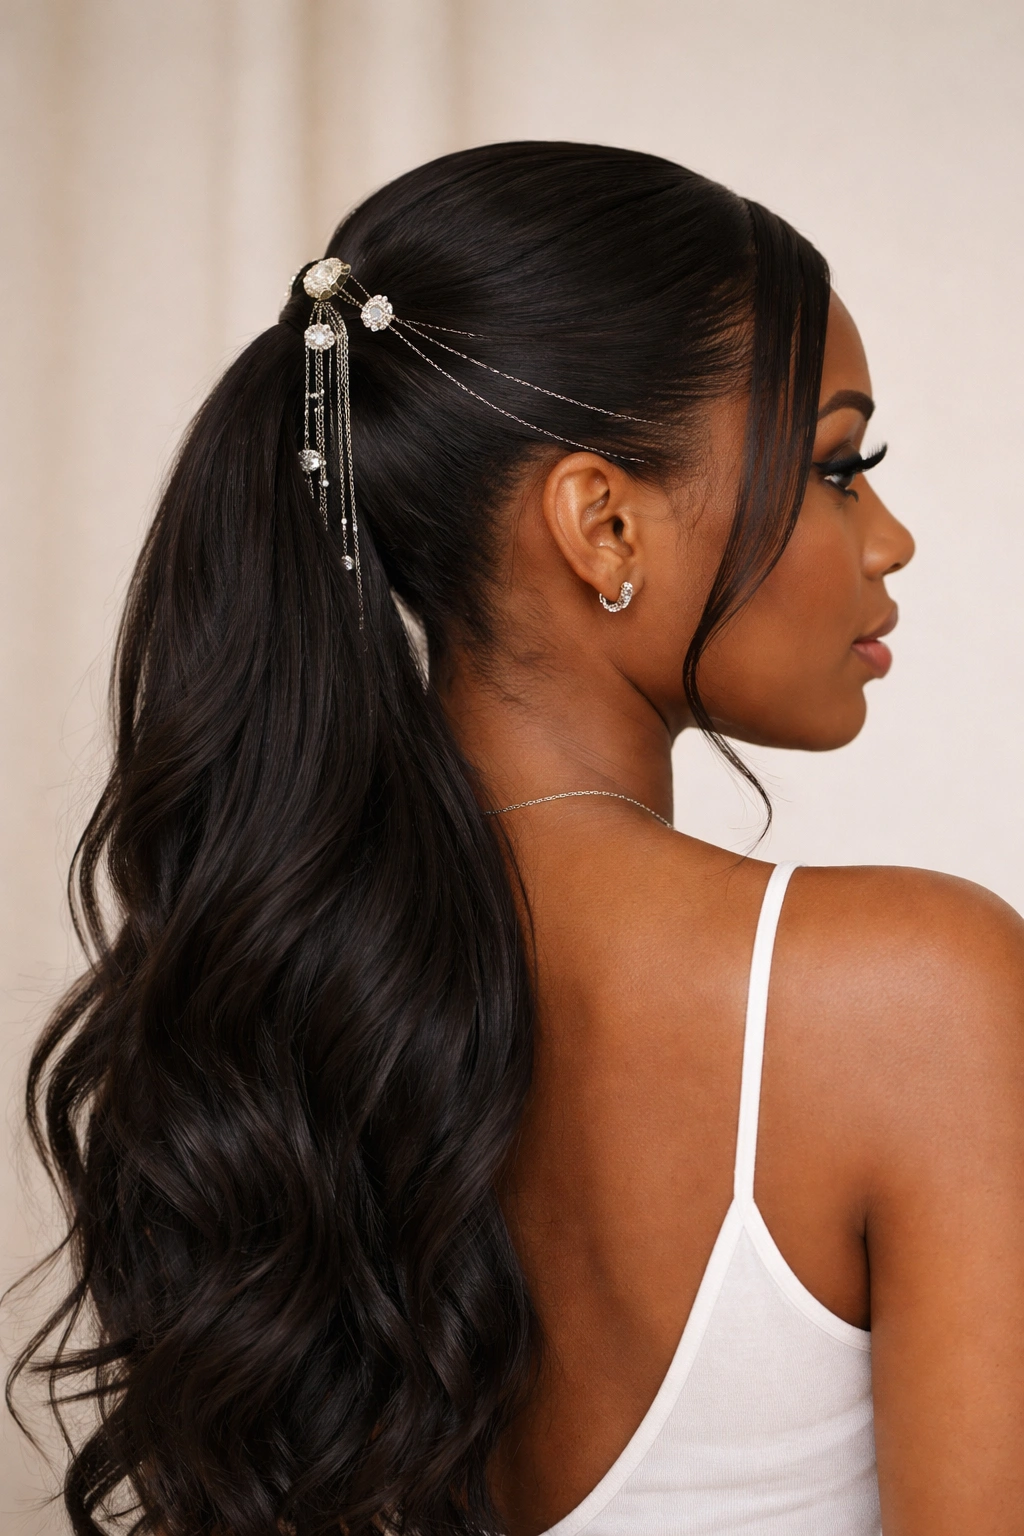
For a more sophisticated take on the half up half down, try pulling just the top portion into a sleek low ponytail positioned lower on your head, then accessorizing it with metallic hair jewelry. This version skews polished and modern while still maintaining that Y2K sensibility. The lower placement gives it a more grown-up feel than traditional high ponytails, and the metallic accents—hair cuffs, chains, or decorative clips—add luxury without looking overdone.
Positioning for Visual Balance
A low ponytail sits anywhere from mid-crown to the nape of your neck. The lower you go, the more hair you’re leaving down, which changes the proportions of the style. Positioning it at mid-crown creates a nice middle ground where you’ve clearly gathered hair but left substantial volume below. This positioning also tends to be more comfortable for all-day wear, especially if you’re not pulling hair tight.
How to Style It
- Apply a smoothing product to create a sleek base
- Use a rattail comb to create a clean, even section dividing your top half from your bottom half
- Gather only the top portion of hair into a ponytail positioned at mid-crown or lower
- Secure with a silk elastic
- Take a small section from the ponytail and wrap it around the base to conceal the elastic
- Slide metallic hair cuffs, chains, or rings over the wrapped section for visual interest
- Leave the bottom half completely down and style as desired—waves, curls, or natural texture all work beautifully
Insider note: Layer multiple thin metallic cuffs of different widths and finishes for a more editorial, high-fashion look.
8. Half Up Half Down with Face-Framing Layers
This style is all about creating dimension and movement by intentionally leaving strategically placed layers down even in the “up” section, creating a softly face-framing effect. Rather than gathering all top hair, you’re isolating the hair closest to your hairline and leaving it down in soft waves or curls, then gathering the hair behind it into a clip or ponytail. The result is romantic, flattering to your face shape, and genuinely wearable for both casual and more polished occasions.
Strategic Section Placement
The key is deciding how much face-framing you want. You might leave just two thin pieces on either side of your face, or take larger sections from your temples for more substantial framing. The gathered portion should sit behind these pieces, so when you look at the style head-on, you see face-framing pieces first, then the gathered section behind them. This creates depth and keeps the look from looking too severe.
How to Style It
- Identify which sections you want to leave down as face-framing pieces—typically thin sections on either side near your temples
- Set these sections aside with clips and apply curl cream or styling product
- Gather the remaining top hair and secure it into a ponytail or bun at the crown
- Secure with a clip or elastic
- Release the face-framing pieces and style them with waves, curls, or loose braids using a curling iron or by twisting and pinning overnight
- Smooth down any flyaways with edge control or light gel
- Leave the back half completely down with your chosen texture
Worth knowing: This style works beautifully as a compromise if you’re growing out your hair—it keeps things looking polished and intentional while you wait for length.
9. Double Buns Half Up Style
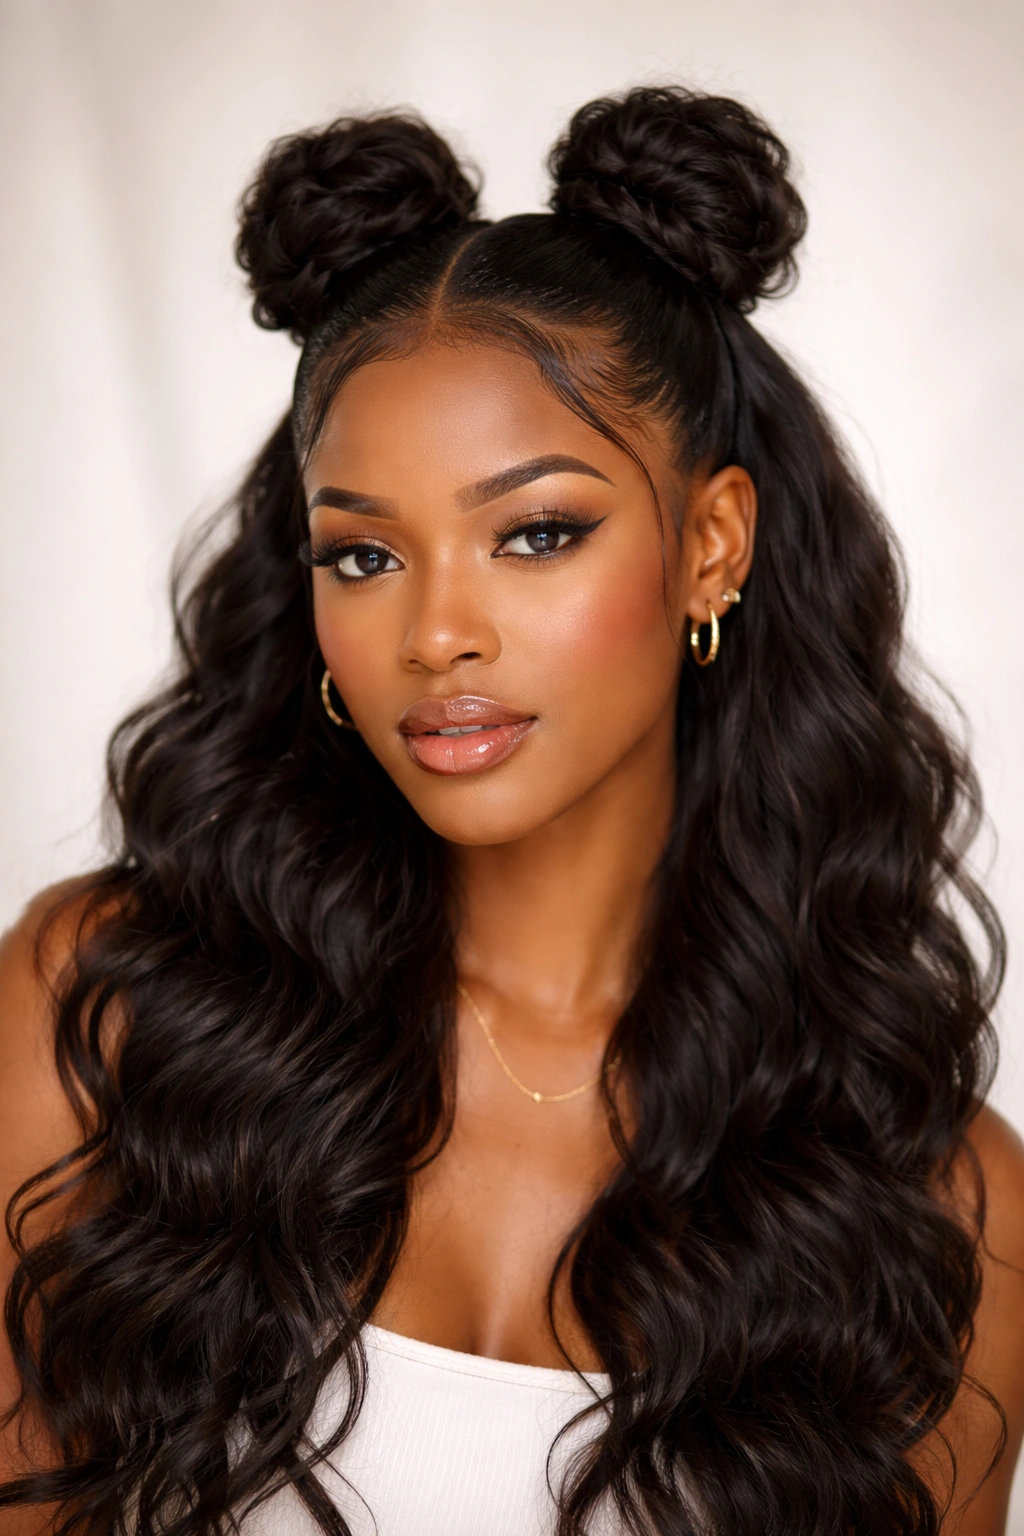
Take the half up concept and split it into two buns positioned on either side of your crown for a playful, statement-making Y2K look that’s equal parts cute and cool. This style works particularly well on textured hair because you can embrace natural volume in the buns rather than fighting it. The two buns create symmetry and visual interest, and the bottom half hangs down for contrast. This is the style that says you’re having fun with your fashion while still looking intentionally put-together.
Bun Size and Positioning
The buns can be tight and compact or loose and voluminous depending on your vibe. Tighter buns read more playful and youthful, while looser buns feel more editorial and fashion-forward. Positioning them closer to the crown creates a balanced look, while positioning them further back on your head creates a different silhouette entirely. Experiment to see what feels right for your face shape and hair volume.
How to Style It
- Create a clean center part from your forehead to the nape of your neck
- Section off the top quarter of your hair horizontally from ear to ear
- Divide this top section down the middle along your center part, creating two even sections
- Gather the first section into a bun at the top of that side of your head
- Secure with a clip or elastic
- Repeat on the opposite side, creating a mirror-image bun
- Wrap a small section of hair around each bun base to hide the elastic
- Leave the bottom three-quarters of your hair completely down
- Style the bottom half with curls, waves, or natural texture as desired
Pro tip: This style looks even more striking with coordinating clips, scrunchies, or hair accessories on each bun.
10. Twisted Half Up with Curved Bobby Pins
For a more subtle, understated approach, try creating loose twists from either side of your head and securing them at the back using decorative curved bobby pins instead of traditional elastics. The curved pins become a design element rather than something to hide, and they hold the twists securely while adding a delicate, jewelry-like quality to the style. This works beautifully on all hair types and reads polished without feeling overdone.
Using Pins as Design Elements
Curved bobby pins come in countless finishes—gold, silver, rose gold, tortoiseshell, pearl, and more. By using them visibly instead of hiding them, you’re turning a practical hair tool into a stylistic choice. You might use one larger decorative pin, or cluster three to five smaller pins together for more impact. The positioning of the pins affects the overall look—one centered pin reads minimalist, while multiple pins scattered create a more layered aesthetic.
How to Style It
- Apply a light hold product to your hair for definition without crunch
- Take a section of hair from one temple and create a loose twist, incorporating more hair as you work back toward your crown
- Repeat on the opposite side
- Bring both twists to the back of your head, crossing them or placing them side by side as preferred
- Secure with curved bobby pins, positioning them so they’re visible and styled
- Leave the bottom half down completely
- You can add a second layer of twists or leave the style as is for a simpler look
Insider note: Twisted styles hold beautifully overnight, so this is a great style to create in the evening and wear fresh the next day without any reworking.
11. Half Up Half Down with Ribbon Weave
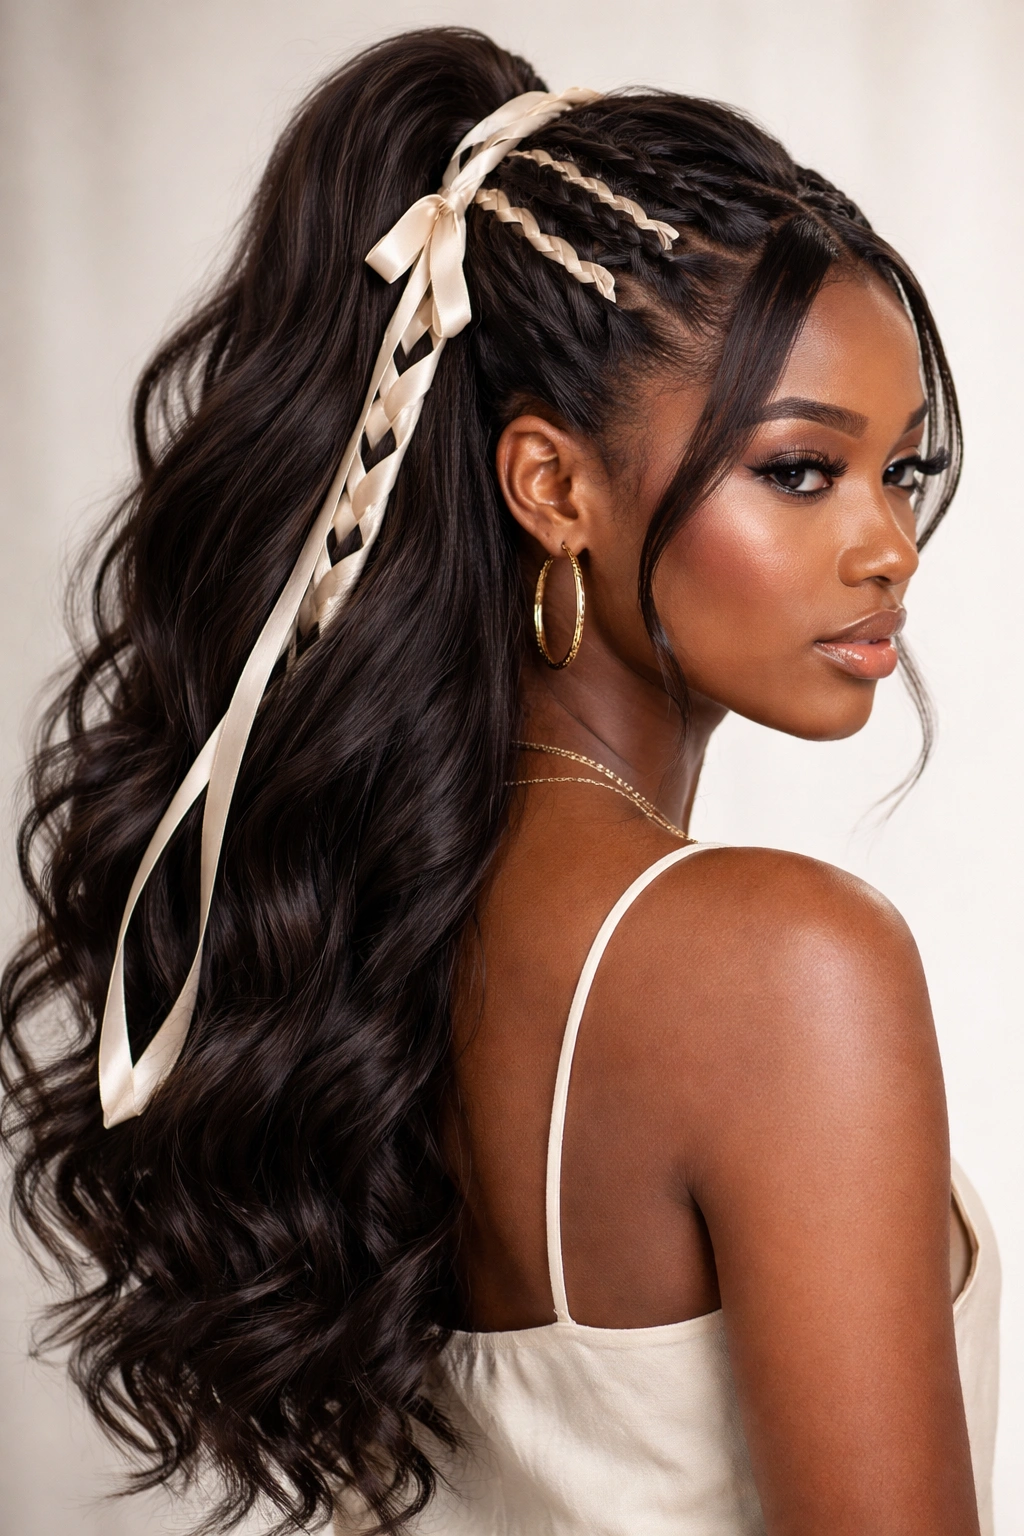
Weave a ribbon, yarn, or thin fabric strip directly through your gathered top section for a romantic, fashion-forward take on the classic half up style. The ribbon can match your hair, coordinate with your outfit, or be a contrasting pop of color—the possibilities are endless. This style has nostalgic Y2K charm while feeling elevated and editorial, and it works on all hair types. You’re creating texture and visual interest without adding heat or commitment.
Choosing Your Ribbon
The ribbon you choose completely changes the vibe. A delicate silk ribbon reads romantic and soft, while a metallic or holographic ribbon feels more Y2K-specific and statement-making. You might use a single ribbon woven through a ponytail, or multiple thinner ribbons for a more layered effect. The width of the ribbon matters too—thinner ribbons feel more delicate, while wider ribbons create more visual impact.
How to Style It
- Gather the top half of your hair into a ponytail at your crown
- Secure with a clear elastic
- Take a length of ribbon (about 24-30 inches depending on your hair volume)
- Tie it around the base of the ponytail
- Gently separate the ponytail into two sections
- Weave the ribbon between these sections, working your way down the length of the ponytail
- Continue weaving until you reach the ends, then secure the ribbon with a small clear elastic at the bottom
- Leave the bottom half of your hair down and style as desired
Worth knowing: This style looks particularly striking when you use contrasting colors or metallic ribbons that catch the light as you move.
12. Side-Swept Half Up with Curved Section
This final style plays with asymmetry by creating a half up section that sweeps to one side of your head rather than staying centered. A curved section from the front of one side sweeps back and is gathered at the opposite side, creating movement and visual interest. The style feels modern and intentional, and it’s particularly flattering for people who want to emphasize one side of their face or create a more dramatic, fashion-forward silhouette.
Creating Smooth Curves
The curved section is what makes this style different from a standard half up. Rather than a clean horizontal line dividing your top and bottom half, you’re following the natural contours of your head and face to create a diagonal or curved division. This requires a bit more intentionality in the sectioning but creates a much more sophisticated final look.
How to Style It
- Start by applying a smoothing product to create a sleek base
- Create a deep side part, positioning it further to one side than you normally would
- From the side with more hair, take a curved section that starts at your temple and follows a curved line back toward the opposite ear
- Gather this curved section and secure it on the opposite side of your head with a clip or elastic
- Leave some pieces down in front for face-framing
- Leave the bottom half and the opposite side of your top half down completely
- Style the down sections with your chosen texture—curls, waves, or natural
Pro tip: This style works beautifully with sleek waves on the bottom half and a polished top, creating nice contrast between the controlled gathered section and the flowing free sections.
Final Thoughts
The beauty of the half up half down style is its versatility—it’s a format that adapts beautifully to your personal style, hair texture, and the occasion you’re dressing for. Whether you’re going full Y2K with chunky clips and metallic accents, or keeping things minimal with soft twists and natural texture, half up half down hairstyles give you structure and intentionality without requiring a complete commitment to an updo. They work on short hair, long hair, fine hair, thick hair, natural hair, braided hair, and everything in between.
The Y2K resurgence has given us permission to embrace the playful, slightly over-the-top accessories and styling choices that defined early-2000s fashion, but you can also take these styles in a more modern, minimalist direction. The point is that you’re creating a look that works for you—something that makes you feel confident, comfortable, and genuinely like yourself. These styles are meant to be played with, customized, and made your own, so experiment freely and see which variations feel the most natural and flattering.