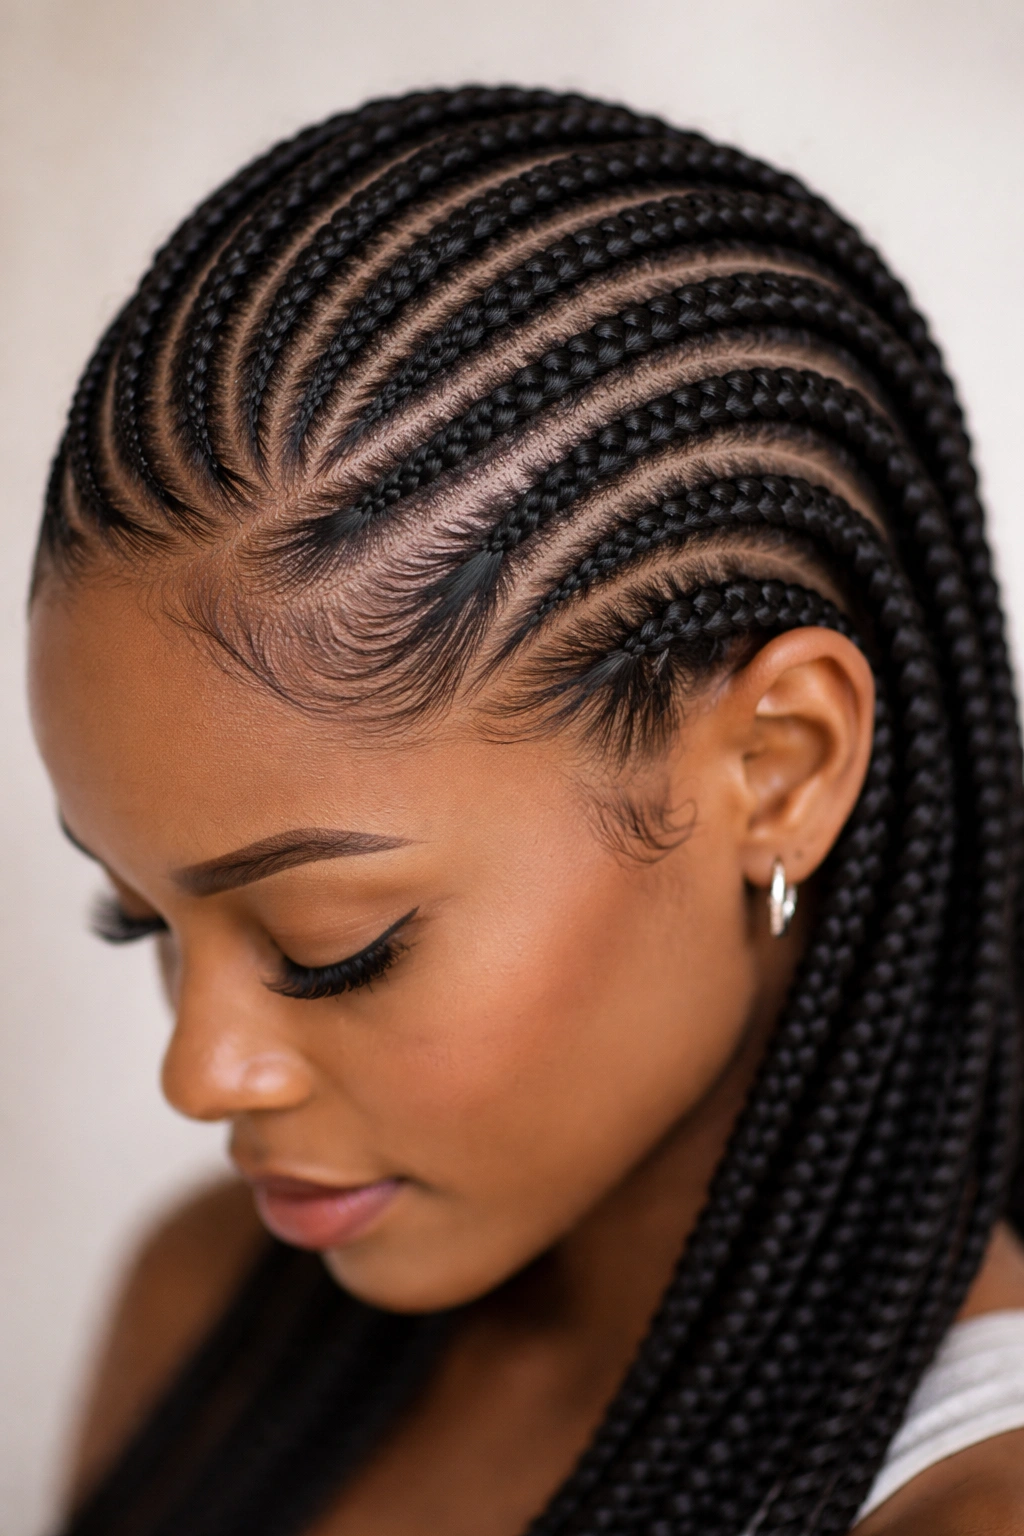
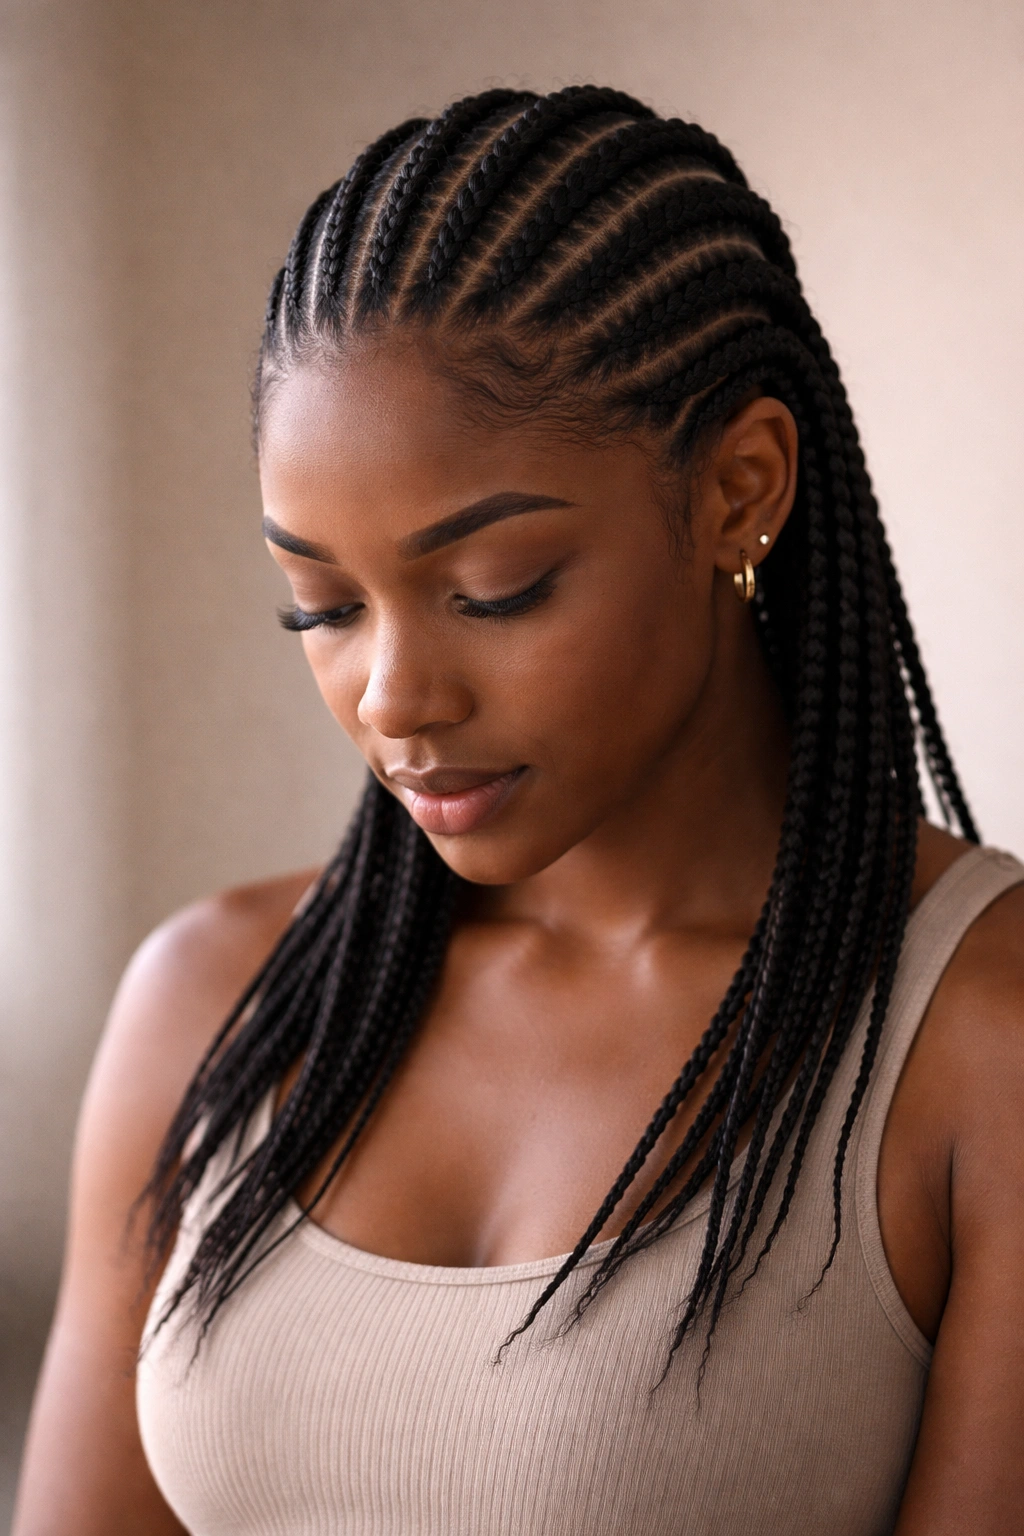
Cornrows have been a beloved protective hairstyle for centuries, offering both cultural significance and practical benefits for natural hair. Unlike many intricate braiding techniques that require years of practice, cornrows are surprisingly achievable for beginners when you understand the fundamental braiding motion and practice with patience. The beauty of cornrows lies in their versatility — you can wear them sleek and polished for professional settings, style them playfully with beads and colorful thread, or arrange them creatively to frame your face and enhance your natural features.
If you’ve been intimidated by cornrows because you think they’re too advanced or that your hair texture won’t cooperate, think again. The real secret isn’t having a specific hair type — it’s understanding the basic three-strand braid, learning how to incorporate hair as you braid downward, and giving yourself grace while you develop the muscle memory. Most beginners can master a simple two-strand or three-strand cornrow within a few practice sessions, and once you nail that foundation, everything else builds from there.
The styles in this guide progress from the absolute simplest versions that require minimal sectioning and technique, to slightly more complex patterns that introduce curves, texture variations, and styling elements. Each one is genuinely beginner-friendly, meaning you won’t need special tools beyond basic hair elastics and bobby pins, and the instructions work whether your hair is loosely coiled, tightly coiled, or anywhere in between. You’ll gain confidence quickly, and within a few attempts, you’ll be creating styles that look intentional and polished rather than accidental.
Let’s explore fourteen cornrow styles that are perfect for building your skills, protecting your hair, and expressing your personal style.
1. Basic Two-Strand Cornrow
The two-strand cornrow is the gentlest entry point into cornrow braiding and honestly, it’s a perfect style on its own. Instead of using three strands like traditional cornrows, you simply take two sections of hair and twist them around each other while continuously picking up hair from each side of your part. This technique creates a tighter, more refined look than loose twists but requires less coordination than managing three strands simultaneously.
Why It’s Perfect for Your First Cornrow
Two-strand cornrows demand significantly less attention to tension and hand positioning than their three-strand counterparts. You only need to keep track of two strands instead of three, which means you have fewer opportunities to drop a section or create uneven tension. The twisting motion is more intuitive for most people — you’re basically doing what you’d do when twisting your hair naturally, just incorporating sections from the scalp as you go. This style also works beautifully on fine hair, textured hair, and everything in between because the two-strand technique doesn’t pull as intensely at the roots.
Getting Started With Two-Strand Cornrows
- Section hair into a clean, straight line using a rattail comb — this creates your guide and makes the final cornrow sit evenly
- Take a small subsection at the top, divide it into two strands, and twist them around each other once, pulling slightly away from the scalp
- As you complete each twist, pick up a thin section of new hair into one strand, then pick up an equal amount into the other strand
- Continue twisting and incorporating hair until you reach the nape of your neck
- Secure the end with a small elastic and smooth any flyaways with a light hold product
- Two-strand cornrows look their best when you keep tension even and avoid pulling so tightly that you see scalp between the braids
Pro tip: This style is ideal for wearing for 3–5 days comfortably, making it perfect if you want a protective style without the commitment of a two-week installation. You can sleep on two-strand cornrows without worrying about them unraveling, and they’ll maintain their definition throughout the week.
2. Single Thick Cornrow Down the Center
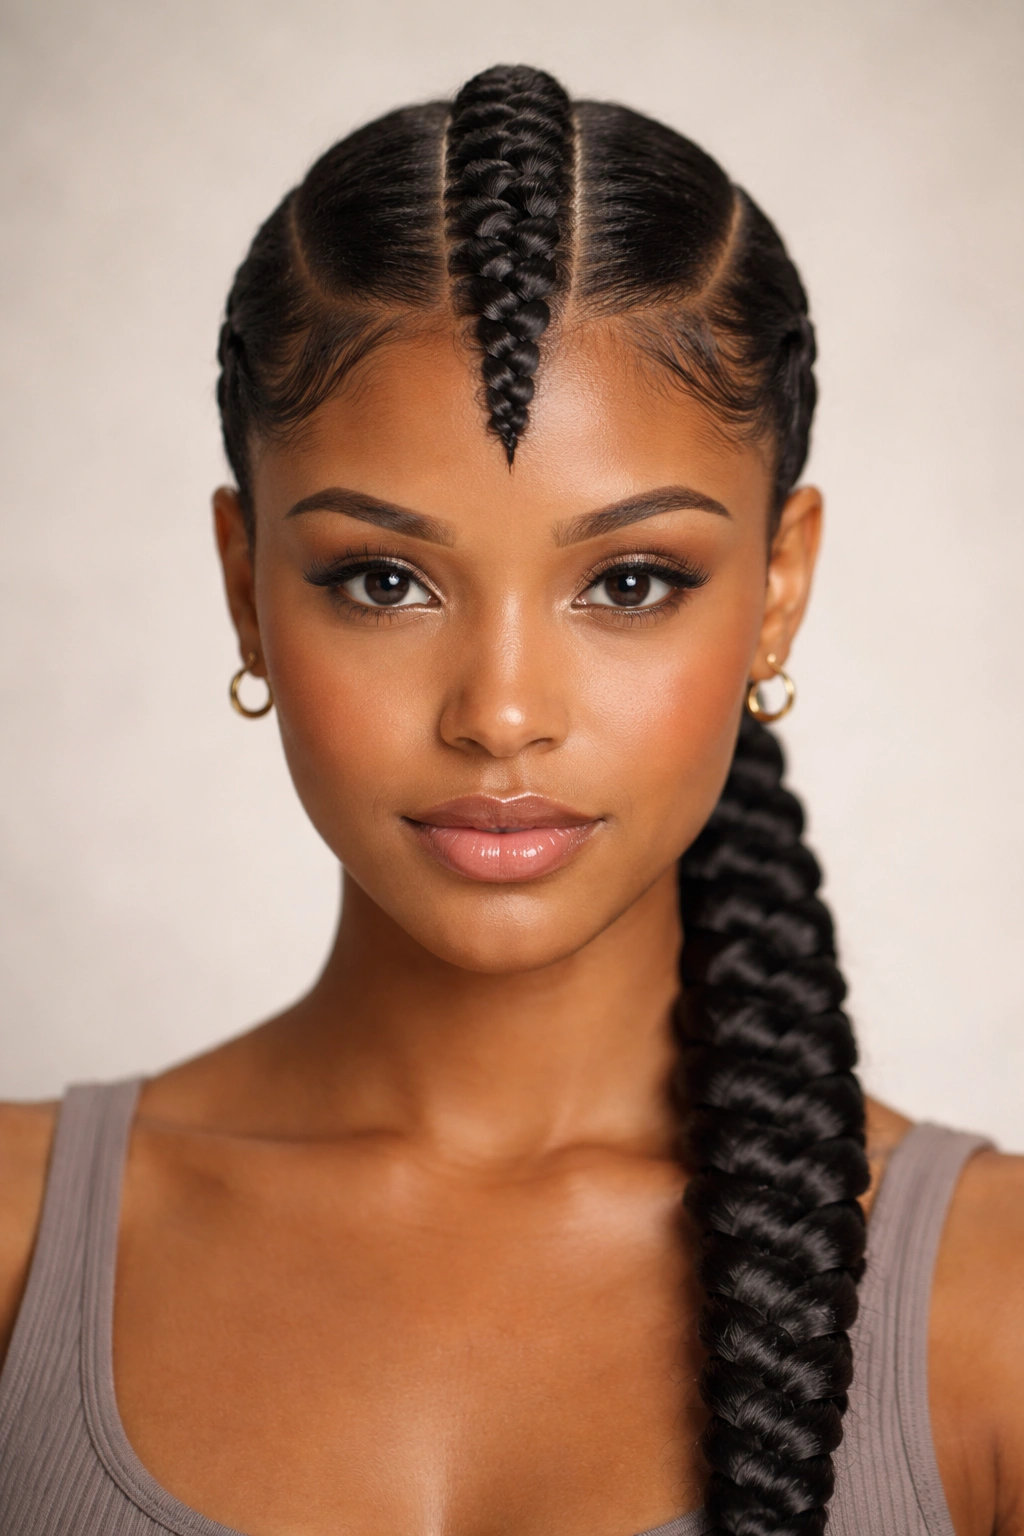
A single center cornrow running from your crown to the nape creates an elegant statement that frames your face beautifully and requires minimal sectioning. This style works especially well if you’re still developing your braiding confidence because you’re only managing one braid rather than multiple sections, and you can take your time perfecting the technique without pressure.
Why This Style Is Beginner-Friendly
Creating one thick cornrow means you’re focusing all your attention on achieving consistent tension, neat hair incorporation, and clean edges — rather than dividing your concentration between multiple braids. You’ll immediately see whether your tension is even because any unevenness will be visible along that single line. This built-in feedback helps you improve faster than if you were braiding eight thin cornrows simultaneously. Additionally, the single cornrow complements almost every face shape and works across all hair textures, so you don’t have to worry about whether this style “suits” you.
How to Create a Center Cornrow
- Use your rattail comb to draw a perfectly straight line down the center of your head from your hairline to your nape
- Clip one side of hair away so it doesn’t interfere with your braiding
- Starting at the top with a larger subsection than you’d use for thin cornrows, divide into three strands and create your first three-strand braid motion
- Incorporate sections of hair evenly from both sides of the part line as you braid downward
- Keep checking your tension by feeling the braid with your fingers — it should feel snug but not painful
- Braid all the way to the nape and secure with an elastic
- Release the clipped hair and smooth everything with edge control cream
Pro tip: A single thick cornrow works beautifully with loose waves or curls cascading down the rest of your hair, creating a mixed texture look that feels intentional and modern. You can also tuck the end of the cornrow under and secure it with bobby pins for a low bun effect.
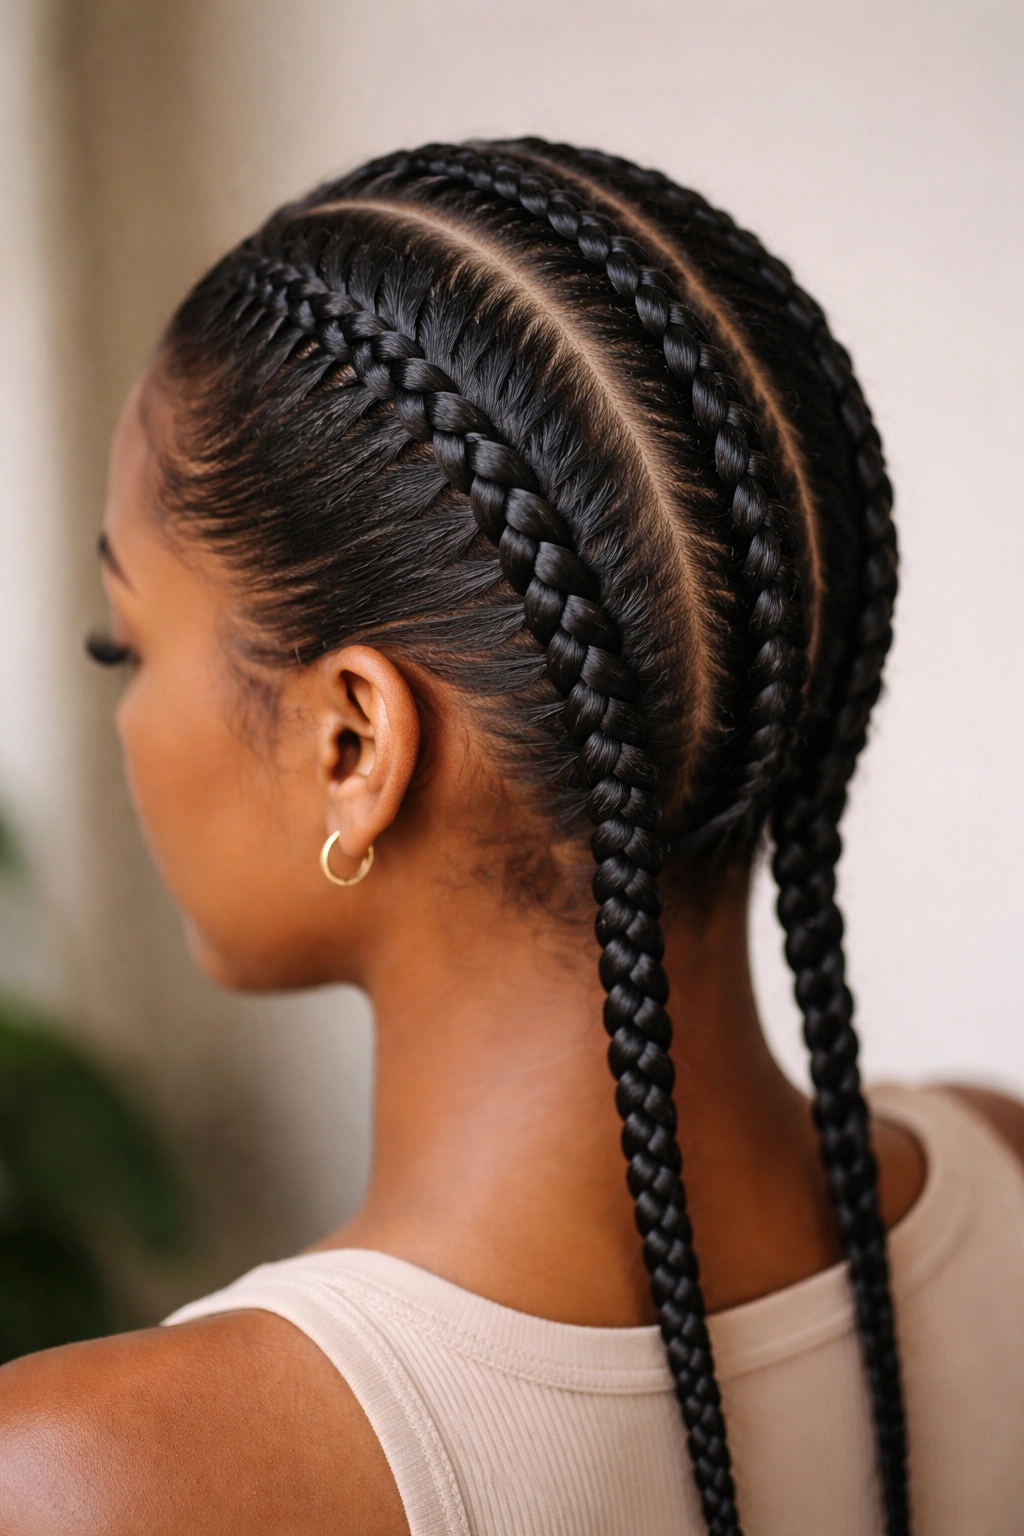
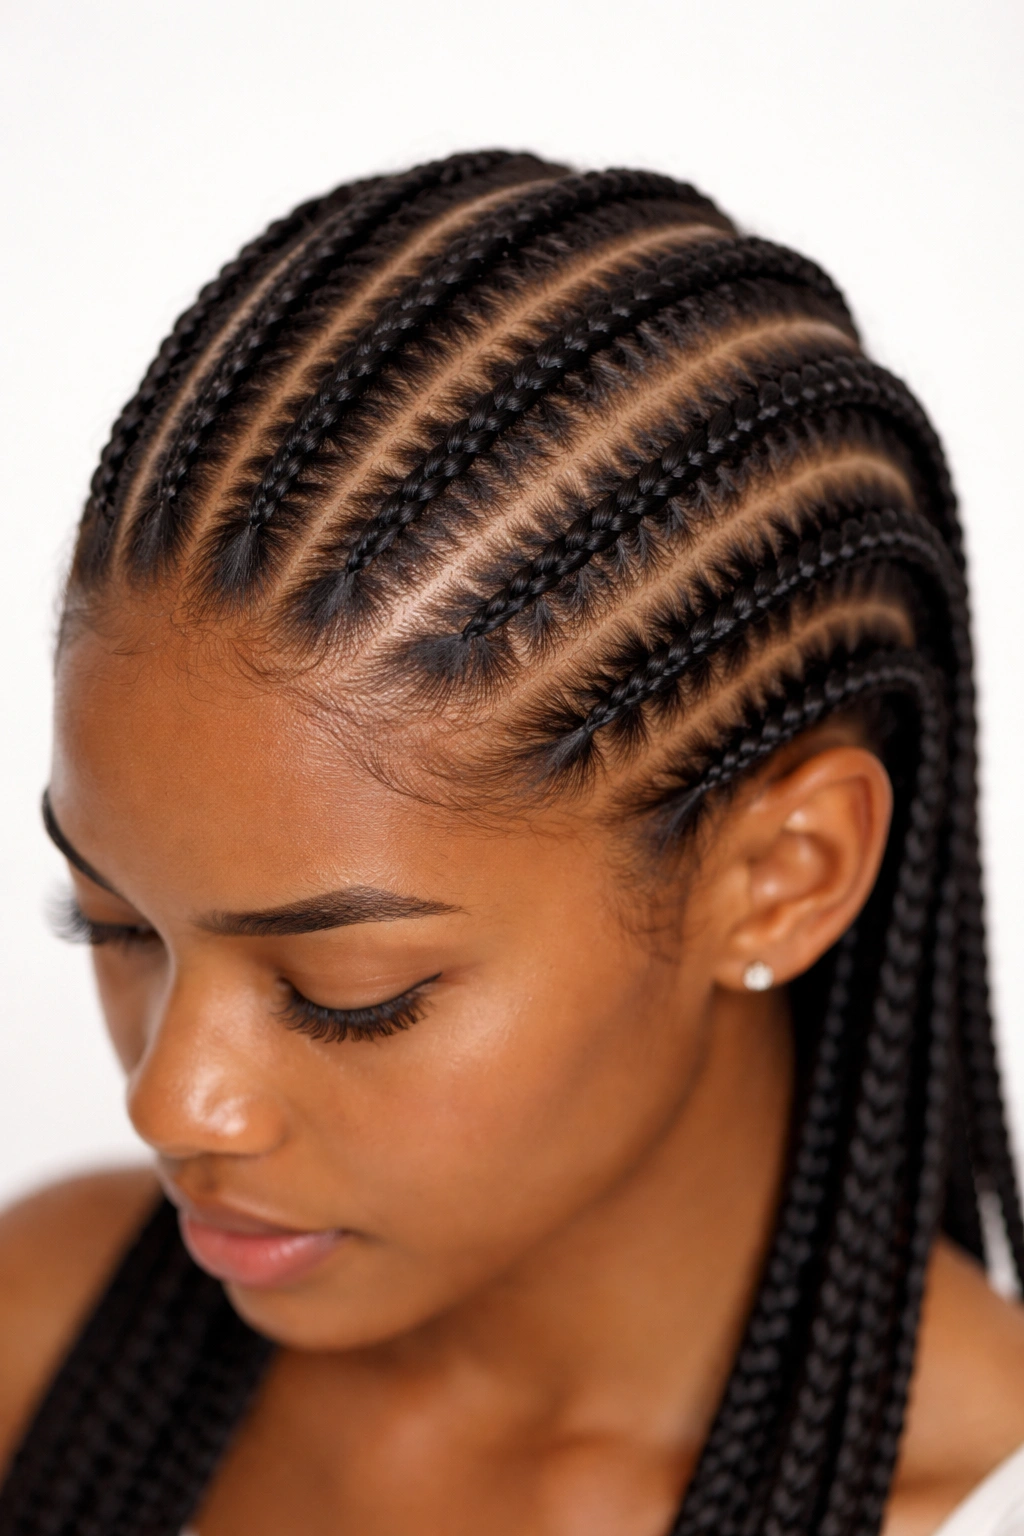
3. Double Cornrows (Traditional Pair)
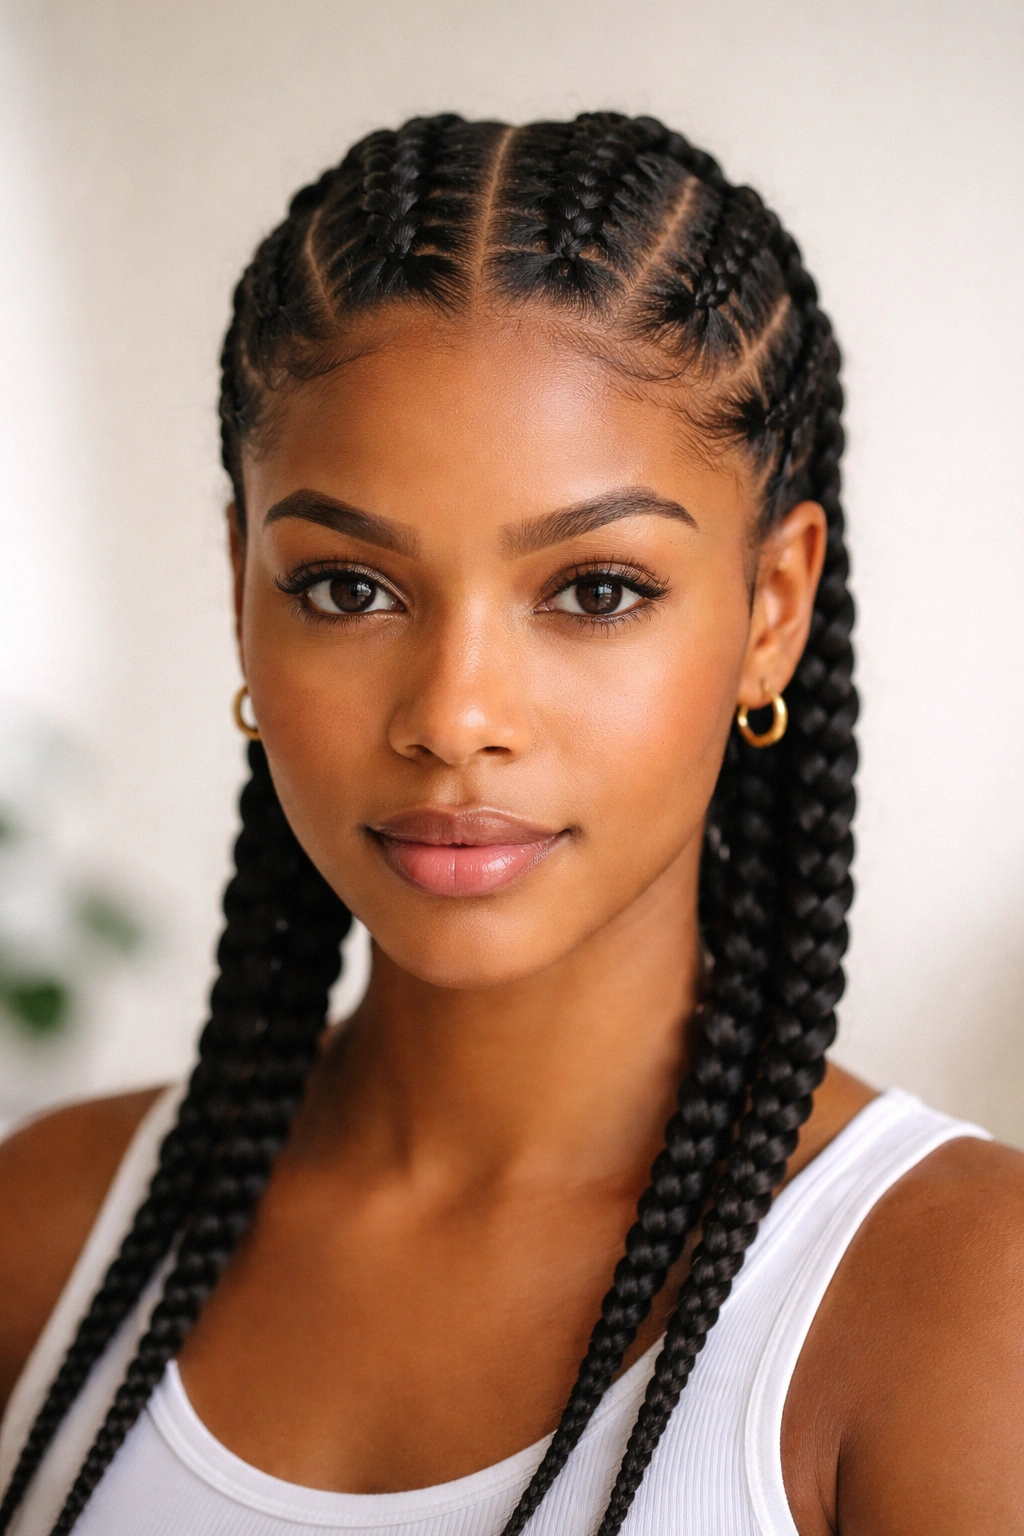
Two equally-spaced cornrows running parallel down your head is the classic cornrow look that’s been worn for generations. This style marks a step up in complexity because you’re managing two separate sections and need to keep them equidistant from each other, but the skill building is invaluable and the final result looks beautifully symmetrical.
What Makes Double Cornrows Work for Beginners
The dual-cornrow structure forces you to slow down and be intentional about your sectioning and spacing, which actually builds better braiding habits. Because you have the visual feedback of comparing one braid against the other as you work down your head, you’ll instantly recognize if one is too tight or too loose and can adjust in real time. Many beginners find that having two cornrows is actually less frustrating than managing four or six because the symmetry is easier to achieve without overthinking it.
Creating Perfectly Spaced Double Cornrows
- Section your hair down the middle with a rattail comb from hairline to nape, creating two equal halves
- Using the same middle part, create a vertical line approximately 1.5 to 2 inches away from the center part on each side — this gives you three vertical sections
- Start with the section on one side of your head, divide the subsection at the crown into three strands, and create your first braid motion
- Incorporate hair continuously as you move down the head, keeping the braid about an inch away from the center part
- Repeat the exact same process on the other side of your head, trying to mirror the tension and thickness of the first cornrow
- Braid both all the way down and secure with matching elastics
- Run your fingers down both braids to ensure they’re even in thickness and tension
Pro tip: If your two cornrows aren’t perfectly spaced, don’t be discouraged — even professional stylists spend years perfecting symmetry. With each practice session, your spacing will improve naturally. The first time you do double cornrows, focus on getting the braiding technique smooth rather than achieving perfect spacing.
4. Cornrows With Beads and Cuffs
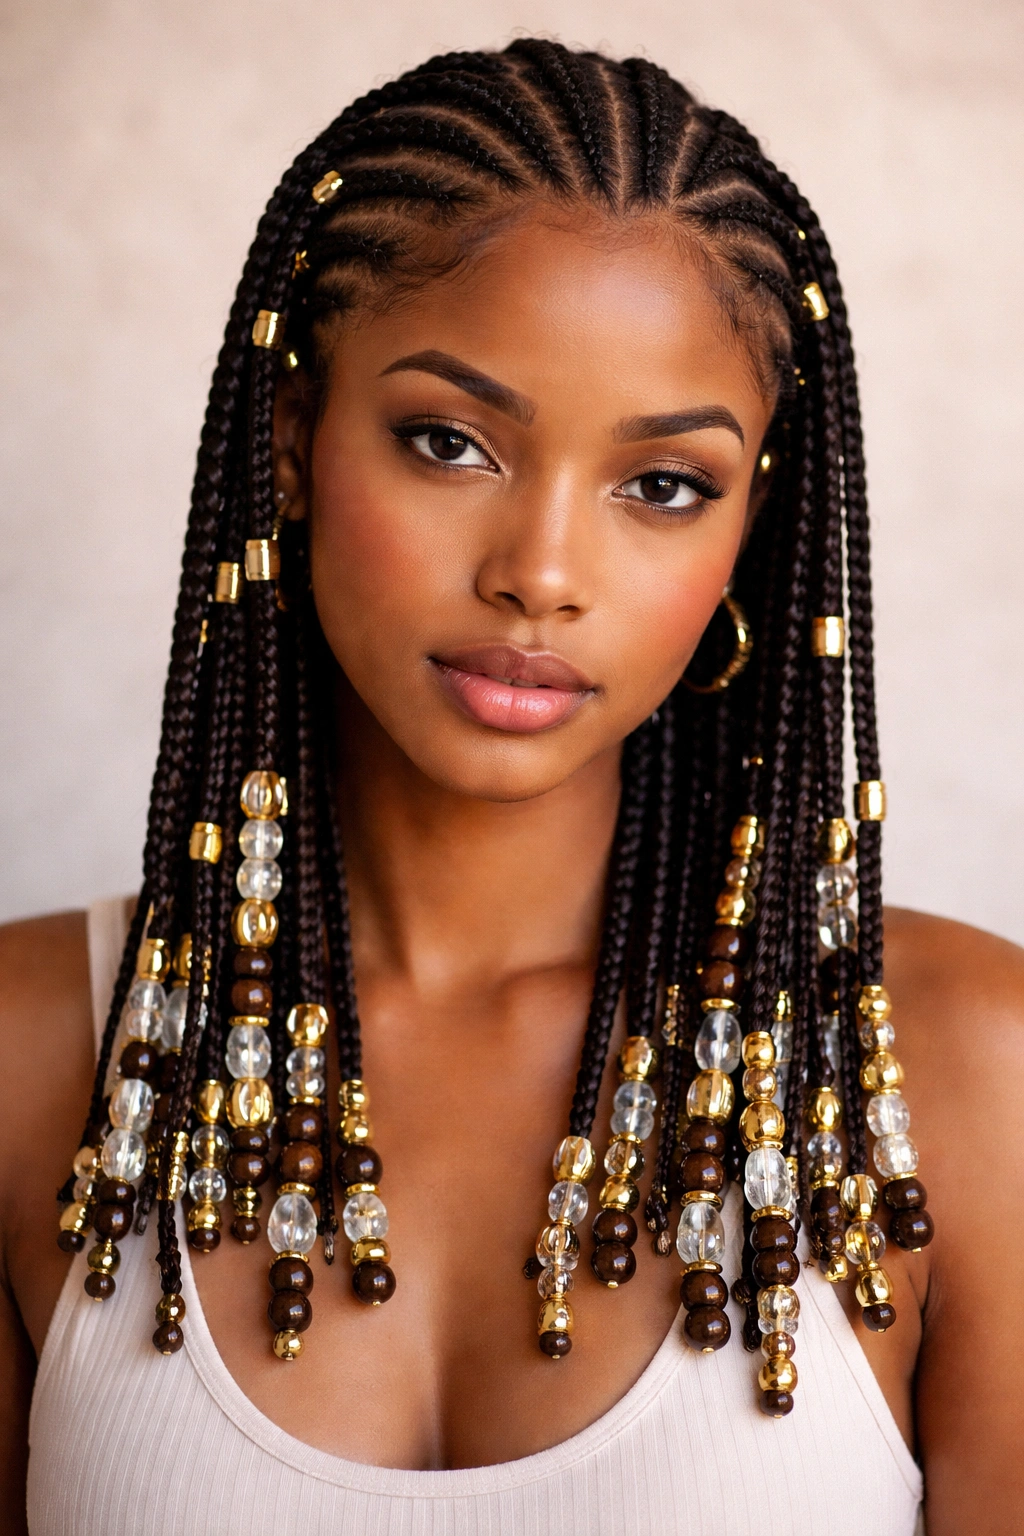
Adding beads to the ends of your cornrows or throughout the braids is one of the most rewarding beginner modifications because the beads instantly elevate the look and require zero additional braiding skill. Beads come in countless colors, materials, and sizes, letting you customize your style completely while keeping the braiding foundation simple.
Why Beads Make Cornrows Extra Special
Beads serve a practical purpose — they secure the elastic ends of your braids so they’re less likely to slip off — while simultaneously adding visual interest and cultural expression. You can choose beads that match your outfit, your mood, your heritage, or your favorite color scheme, making each cornrow installation feel uniquely yours. The tactile element of threading beads onto your braids is also surprisingly satisfying and meditative, turning the finishing touches into a creative act rather than a chore.
How to Bead Your Cornrows
- Braid your cornrows using any of the techniques mentioned in this guide, but leave about 1 to 2 inches of unbraided hair at the ends
- Select beads with openings large enough to fit your braided hair through (or slightly larger than the diameter of your braid)
- Hold a bead up to the end of your braid and gently thread the unbraided hair through the bead opening until the bead sits at the base of your secured braid
- You can add one large bead per cornrow, multiple smaller beads, or a combination of sizes and colors
- For extra security, twist the hair around itself a few times before threading through the bead, creating a knot that won’t slip
- Some beads have decorative cuffs attached; others are plain and let your hair shine through
- You can use wooden beads for a natural look, metal cuffs for an edgy vibe, or colorful acrylic beads for playfulness
Pro tip: Keep several backup beads handy because one of your initial attempts will definitely fall off (this happens to everyone). As you practice threading beads, you’ll develop a feel for how tight to slide them and how much unbraided hair you need at the end.
5. Zigzag Cornrows
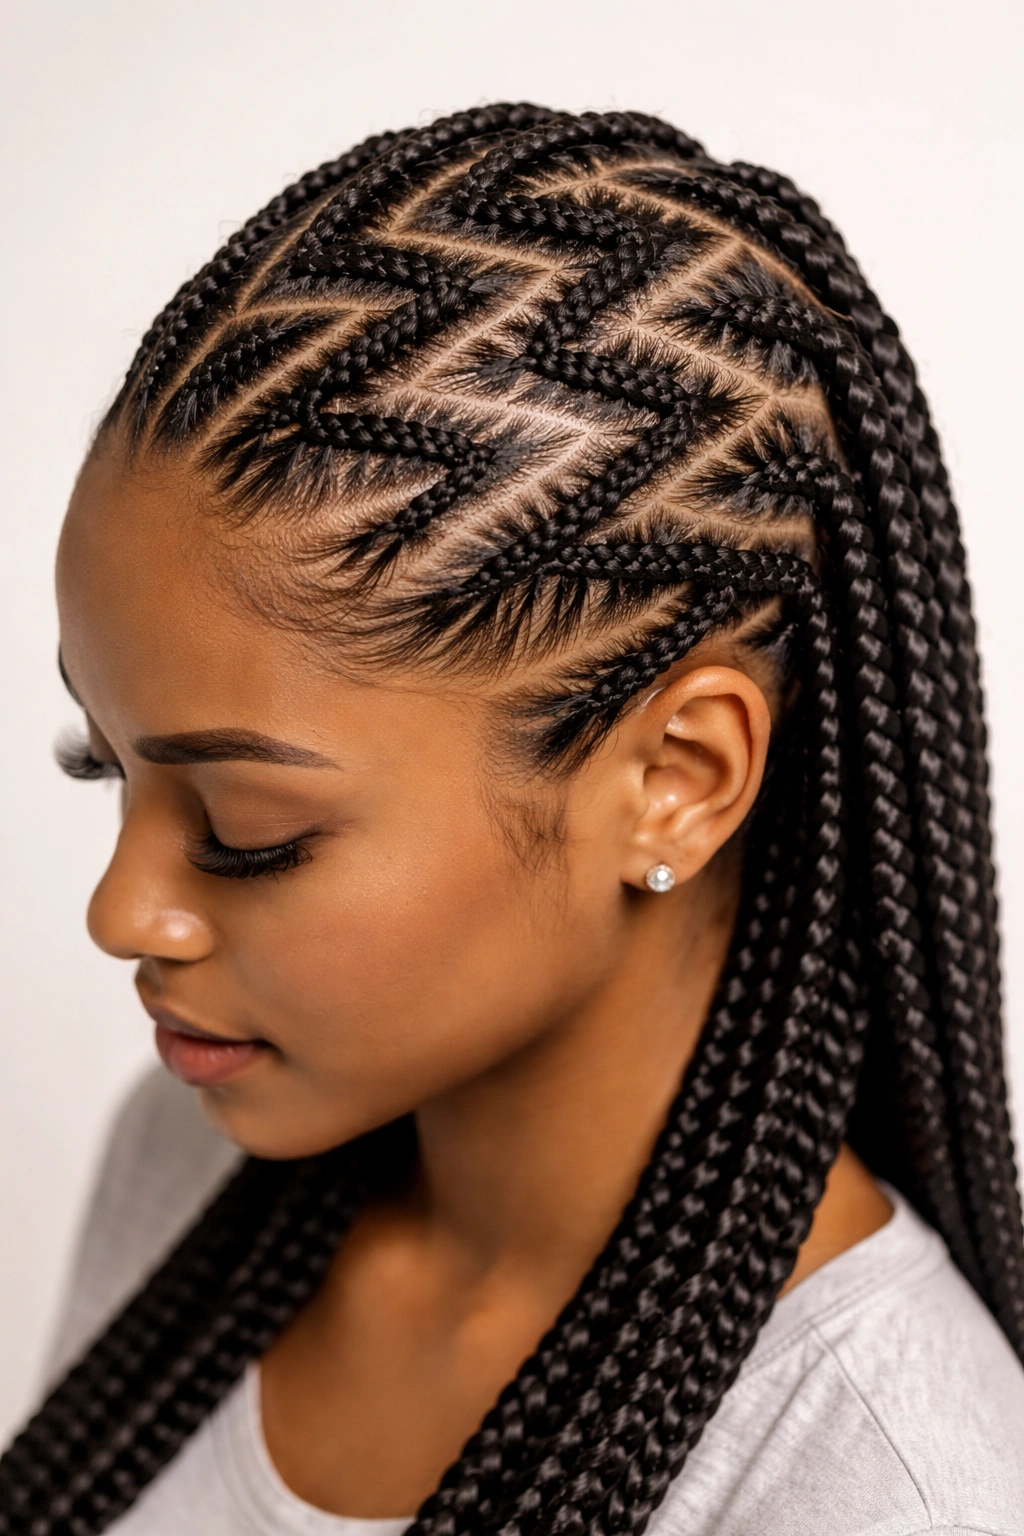
Instead of braiding straight down your head, you create a diagonal or zigzag pattern by adjusting where you part your hair and how you position each cornrow. This style looks intricate and artistic while using the exact same braiding technique you’ve already learned — you’re just changing the direction.
Why Zigzag Patterns Upgrade Your Look
Zigzag cornrows immediately read as more intentional and artistic than straight braids, which makes them feel like you’ve invested serious effort (even though you haven’t — you’re just using a different part pattern). The diagonal lines create visual interest and movement across your head, which can complement different face shapes and head shapes in unique ways. Once you nail the basic cornrow braid, creating a zigzag pattern is simply a matter of adjusting your part line, which is an incredibly accessible next-level skill.
Creating a Zigzag Pattern
- Instead of parting your hair in straight lines, use your rattail comb to create a diagonal line that goes from your left temple toward your right ear, or vice versa
- Follow that diagonal line with your braid, incorporating hair along both sides just as you would with a straight cornrow
- Once you reach the point where your diagonal line ends, create another diagonal line going in the opposite direction and start a new braid
- The braids should look like they’re creating a W or Z pattern across your head
- Take your time with the angled parts because they require slightly more precision than straight parts, but the technique remains identical
- Each individual braid is still a standard three-strand cornrow; you’re just changing the direction
Pro tip: Zigzag cornrows photograph beautifully and tend to get compliments because they stand out visually. If you’re planning a special event or occasion where you want your hairstyle to be a standout element, this is your go-to pattern.
6. Cornrows With a Crown Braid
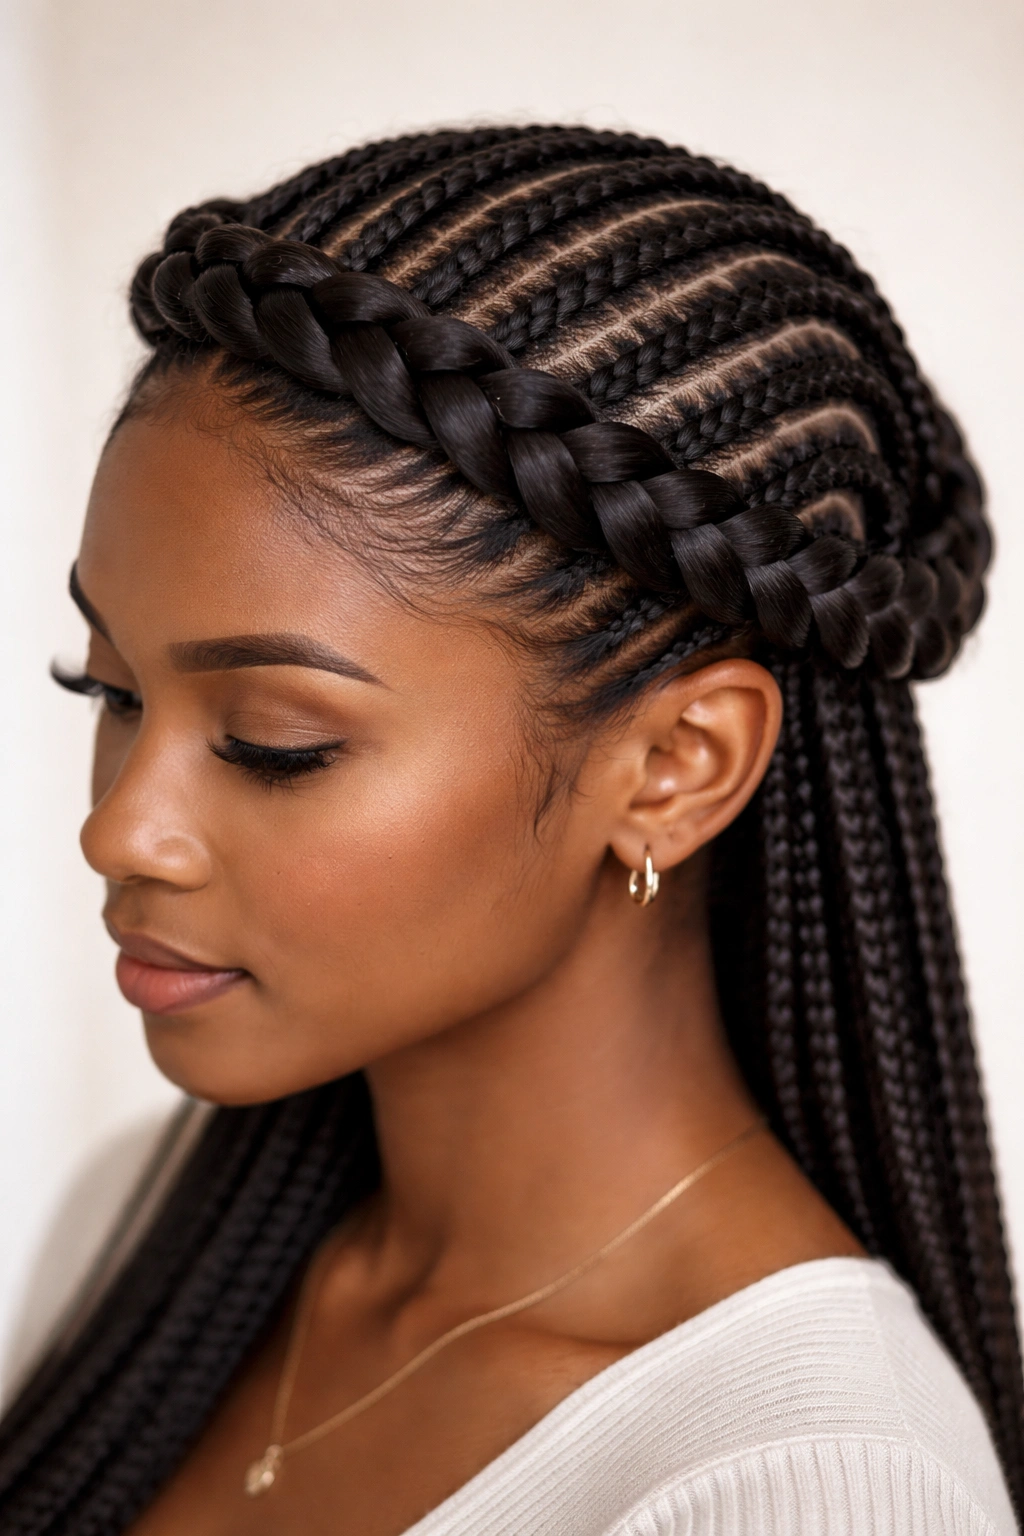
Start with a crown braid that circles your head (like a halo), then add thinner cornrows beneath or woven through it for a romantic, ethereal vibe that’s perfect for special occasions or when you want something with extra flair.
What Makes Crown Braids + Cornrows Work Together
A crown braid frames your face and creates natural definition for a sophisticated look, while the cornrows below add texture and prevent the crown element from looking sparse. The combination gives you the polished elegance of a crown braid with the practical protection and texture of cornrows. This style is particularly stunning if you have face-framing texture or if you’re trying to create a look that feels both deliberate and effortless.
Building a Crown + Cornrow Hybrid
- Create a large three-strand braid (not a cornrow yet — just a regular braid with no incorporated hair) that will become your crown
- Start at one temple, work the braid around your head following the natural crown line, and end at the opposite temple
- Secure the crown braid loosely with bobby pins positioned where they’ll be hidden by cornrows
- Create 2-4 thin cornrows beneath the crown braid, working in the open space below and incorporating hair as usual
- You can angle the cornrows to be parallel to the crown or have them at different angles for visual interest
- The crown braid will sit on top and pull the cornrows together, creating a unified, polished aesthetic
Pro tip: This style works beautifully for wedding events, graduation parties, or any occasion where you want a hairstyle that feels dressy but still protective. The crown braid alone would eventually slip and need re-securing, but the cornrows beneath anchor everything and keep it looking fresh throughout the day.
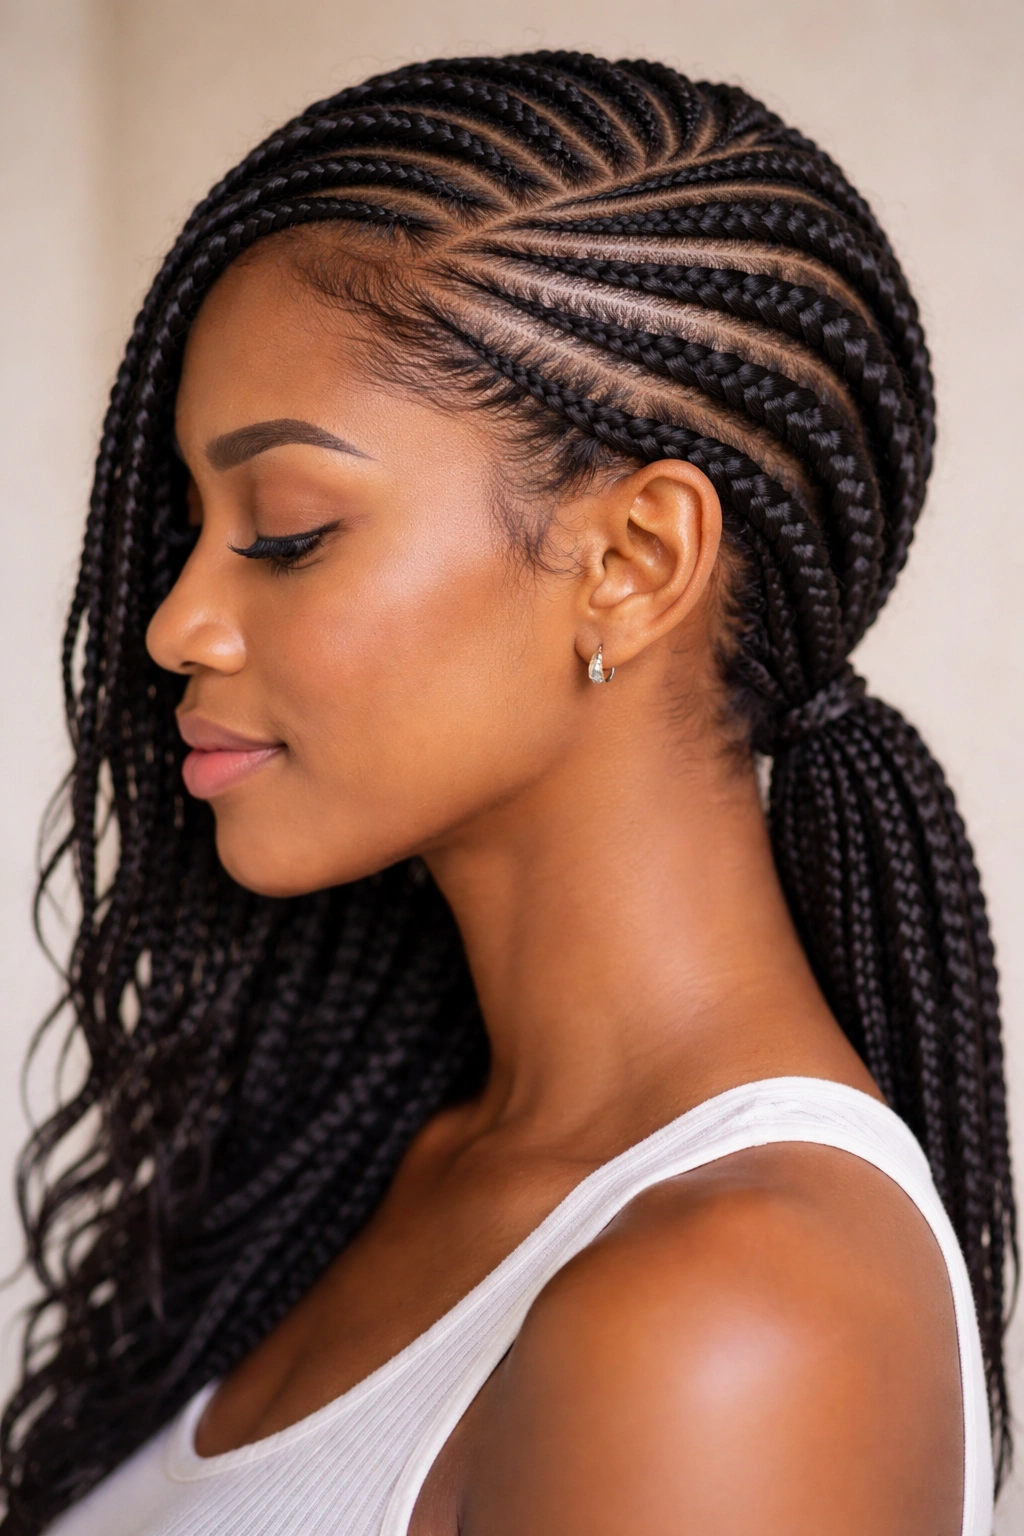
7. Feed-In Cornrows
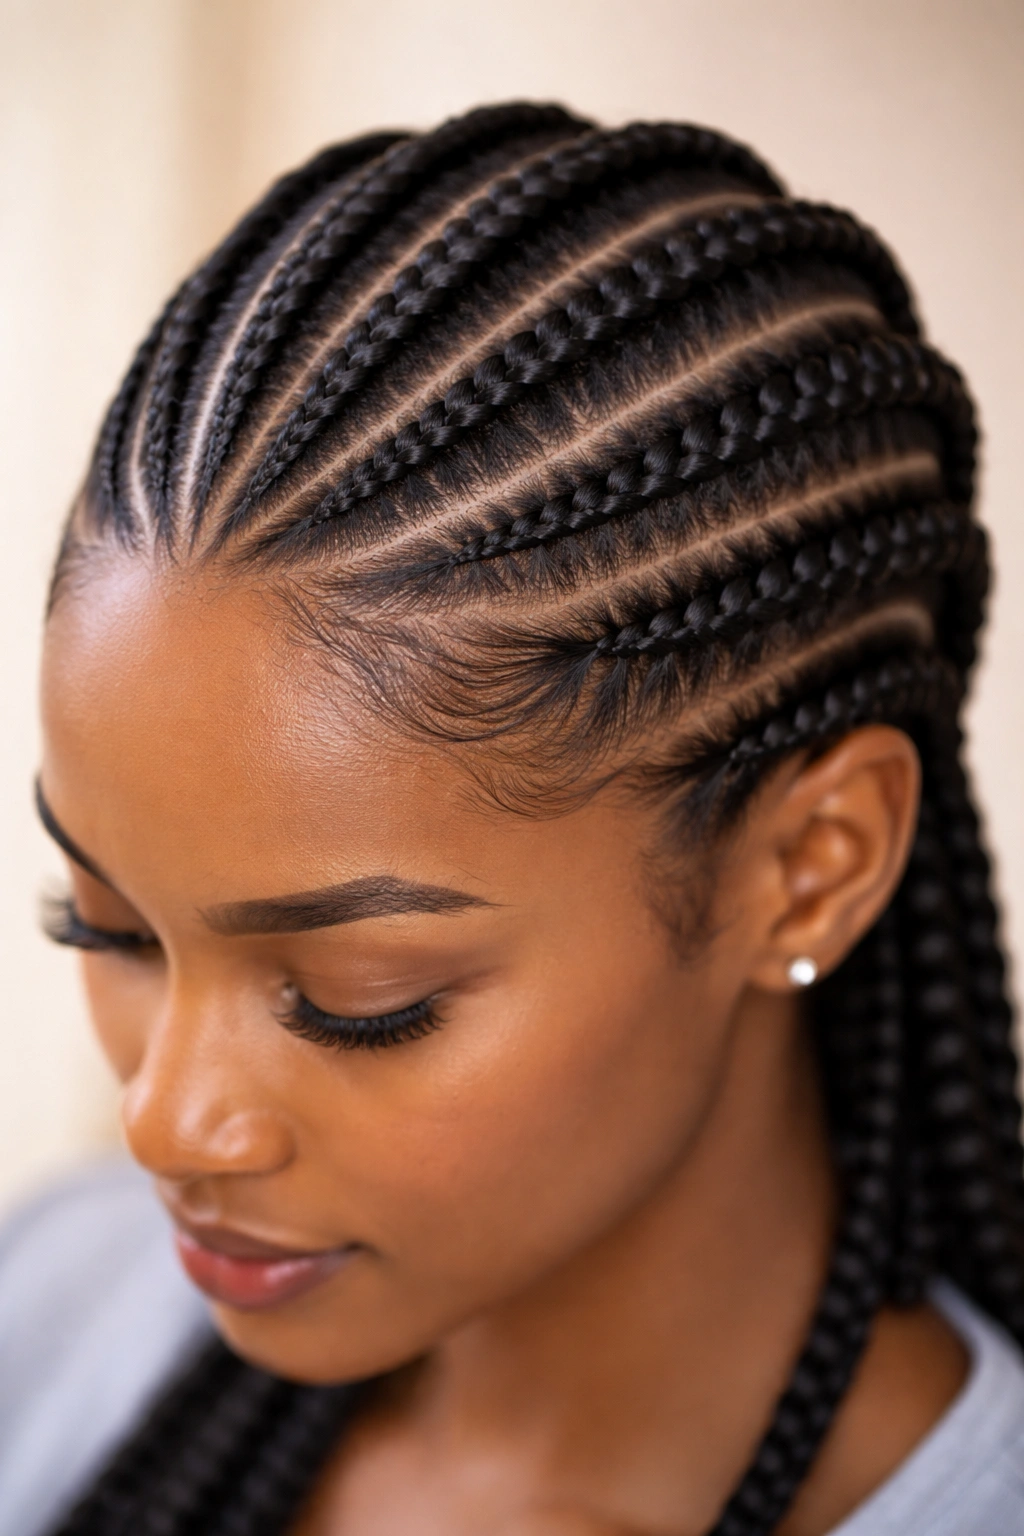
Feed-in cornrows are created by introducing hair gradually rather than grabbing large chunks from the very beginning. This creates a flatter, more refined appearance and is significantly less harsh on your hairline — making it an excellent choice if you’re concerned about tension or hair loss around your edges.
Why Feed-In Method Is Gentler
Traditional cornrows grab a larger amount of hair at the crown, which creates immediate tension at the hairline. Feed-in cornrows start with a very small, thin braid at the top and gradually add more hair as you move down, distributing tension more evenly across your entire scalp. This method is especially important if you have a sensitive hairline, fine hair around your edges, or if you’re recovering from previous styles that pulled too tightly.
How to Execute Feed-In Cornrows
- Start at the top of your section line with an extremely small subsection — just enough to create a three-strand braid that’s no thicker than a pencil
- Create your first few braid motions with only this tiny subsection, without incorporating any additional hair yet
- After you’ve braided 3-4 times with just the original section, begin incorporating very thin strands of hair from the sides
- Continue incorporating hair gradually — a tiny bit at a time — as you move down your head
- By the time you reach the middle of your head, your cornrow should be noticeably thicker than it was at the start
- By the time you reach the bottom, it should be full-sized and match the thickness of a traditional cornrow
- The key difference from traditional cornrows is that you’re introducing hair incrementally rather than aggressively
Pro tip: Feed-in cornrows feel looser than traditional cornrows while you’re braiding, but they maintain their integrity just as well. If they feel like they’re sliding too much while you work, add hair slightly more frequently — the gradual incorporation technique requires finding the rhythm that works for your hands and hair texture.
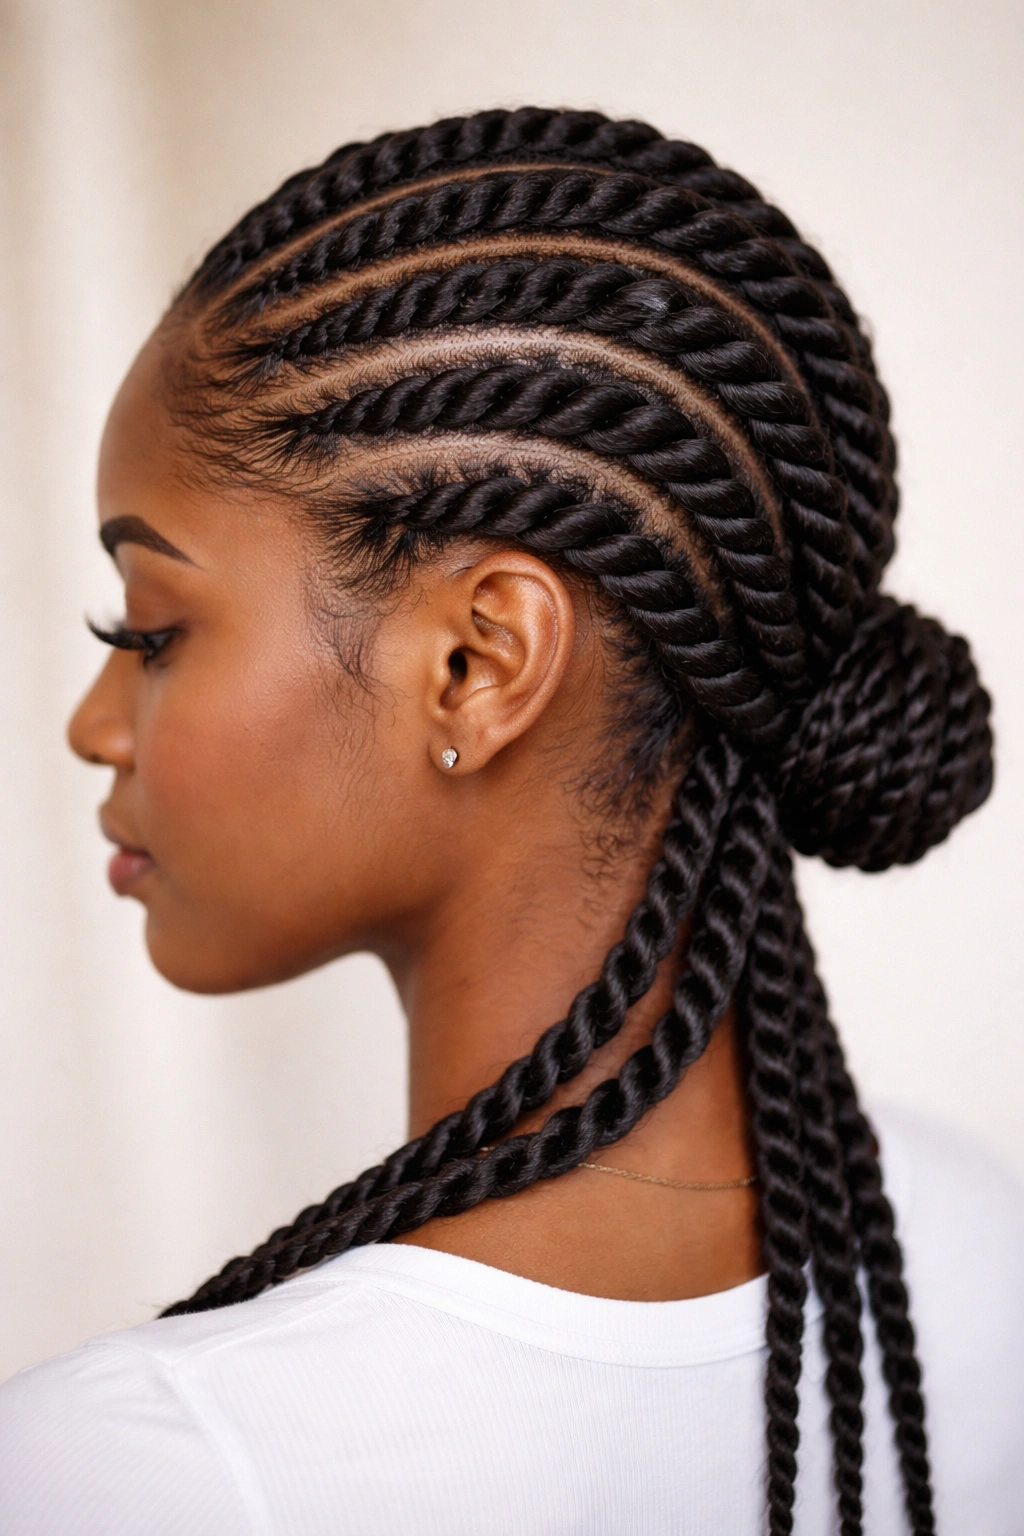
8. Braided Bun With Cornrows
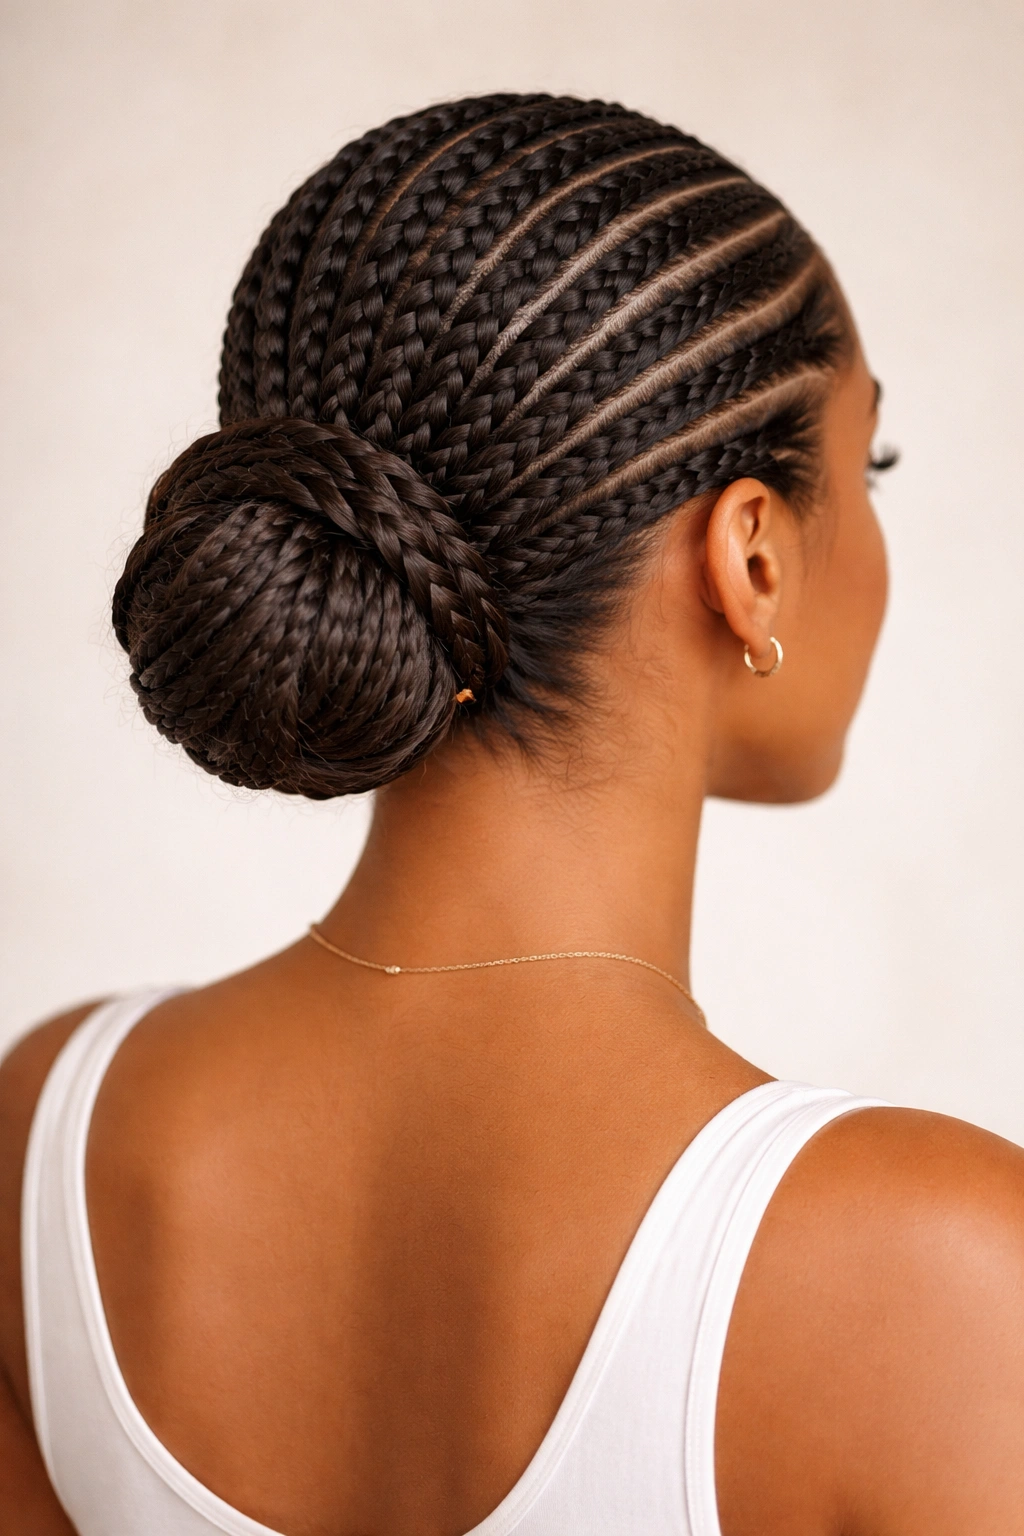
Transform your cornrows into an updo by braiding them down your head and then gathering the braided ends into a bun at the nape of your neck. This creates a completely finished, polished look that’s appropriate for work, formal events, or whenever you want a protective style that’s also undeniably elegant.
Why This Style Is Protective and Versatile
A braided bun concentrates your braided hair at the back of your head and secures it, meaning the style will hold beautifully even through active days, exercise, or sleep. The updo aspect means your ends are tucked away and protected, which is one of the primary goals of protective styling. Depending on how you gather your braids and whether you use additional bobby pins, elastics, or decorative accessories, this single base can look casual, professional, or formal.
Creating a Braided Bun
- Create 2-4 cornrows running down the back of your head toward the nape, depending on how full you want your bun
- Gather the ends of all your braids together at the base of your neck
- Wrap the gathered braids around each other to form a circular bun shape
- Secure the bun tightly with bobby pins and a strong-hold elastic
- You can wrap additional hair around the base to hide the elastic, or leave it clean and simple
- For a more polished version, use a bun shaper or crocheted bun cover to create a smooth, rounded shape
- Finish with edge control cream along your hairline and any flyaways
Pro tip: This style looks sophisticated when you use sleek, tight cornrows and a neatly formed bun, but it can also look deliberately relaxed and textured if you braid loosely and allow some texture to show. Choose your approach based on the vibe you’re going for and the occasion.
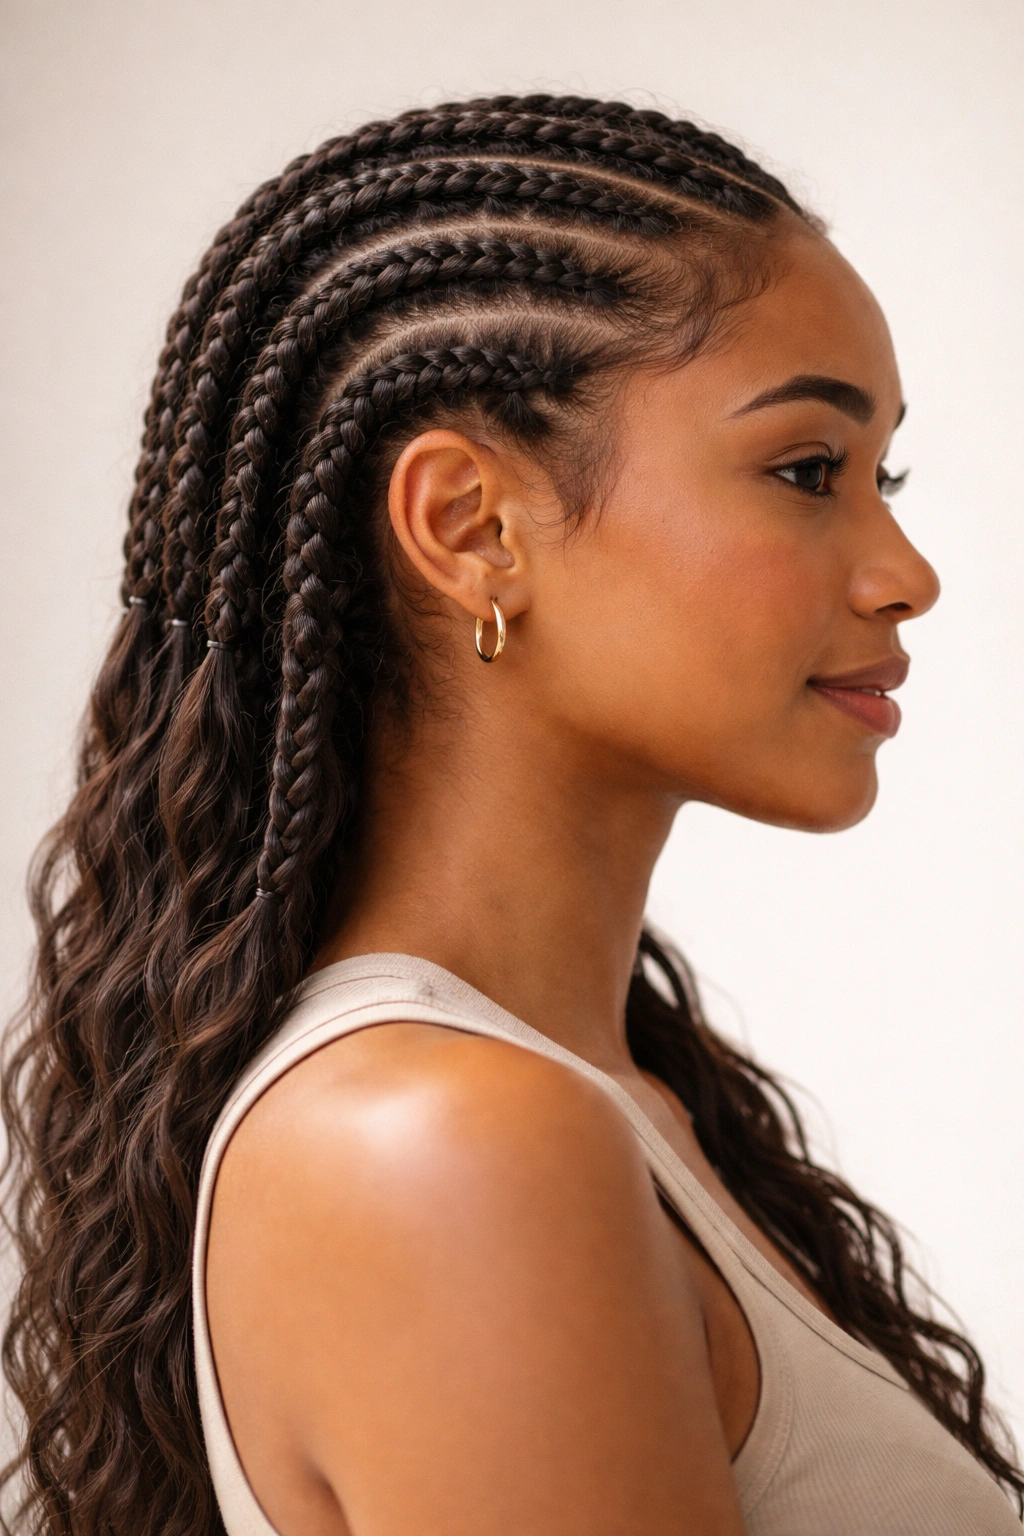
9. Twisted Cornrows
Instead of crossing three strands over each other in the traditional cornrow motion, you create twists by taking two sections and wrapping them around each other. Twisted cornrows look similar to regular cornrows but have a slightly different texture and movement, and some people find the two-strand twisting motion more intuitive than managing three strands.
How Twisted Cornrows Differ Visually
Twisted cornrows create a rounder, chunkier appearance compared to the flatter, tighter look of traditional three-strand braids. The twist pattern shows more texture and movement, giving the style a somewhat softer, more relaxed vibe. If you prefer a bolder, texture-forward look over sleek precision, twisted cornrows might become your go-to style. They’re also slightly faster to create once you find your rhythm, since you’re managing two strands instead of three.
Creating Twisted Cornrows
- Section your hair as you would for regular cornrows
- Divide your starting subsection into two strands instead of three
- Twist the two strands around each other once, creating a spiral effect
- Immediately pick up a thin section of new hair into one strand
- Twist that modified strand around the stationary strand
- Pick up new hair into the opposite strand on your next twist
- Continue this alternating pattern of twisting and incorporating hair all the way down
- The result should look like a spiraling braid that incorporates hair along the entire length
- Secure the ends with an elastic just like you would traditional cornrows
Pro tip: Twisted cornrows are often slightly looser than three-strand cornrows, which can be either a benefit or a drawback depending on your preferences. If you like a tighter hold, twist more firmly and pick up slightly more hair with each rotation. If you prefer a softer appearance, use a lighter touch.
10. Cornrows With Space Between
Create cornrows that have intentional gaps between each braid rather than placing them close together. These spaces show off your scalp and natural hair texture in the gaps, creating a striking visual contrast and a style that looks completely different from densely packed cornrows.
Why Spacing Creates a Modern Aesthetic
Cornrows with space between them feel more contemporary and minimalist compared to the densely braided styles that fill the entire head. The visible gaps allow your scalp and the natural texture of your hair to be part of the design, which creates visual interest and movement. This spacing style is particularly stunning if you have rich skin tones because the contrast between your scalp and the braided sections becomes a beautiful design element.
Creating Intentional Spacing
- Plan your cornrow placement by visualizing how many cornrows you want and how far apart they’ll be
- If you want 4 cornrows with equal spacing, divide your head into 5 sections — the cornrows will occupy 4 of them, and the gaps will be between them
- Create your cornrows in these designated sections, leaving 1 to 2 inches of unbraided hair between each one
- The unbraided sections should remain as natural texture (curls, coils, waves) or you can gently brush them out for a softer look
- Keep the spacing consistent from front to back for an intentional, geometric appearance
- This style works beautifully with 3-6 cornrows; fewer than 3 can look sparse, and more than 6 defeats the purpose of showing space
Pro tip: Cornrows with space between them are perfect if you want to protect most of your hair while still allowing some of it to breathe and remain in its natural texture. The combination of braided and unbraided sections creates dimension and prevents that “all braids, all the time” feeling.
11. Cornrows Wrapped in Thread or Yarn
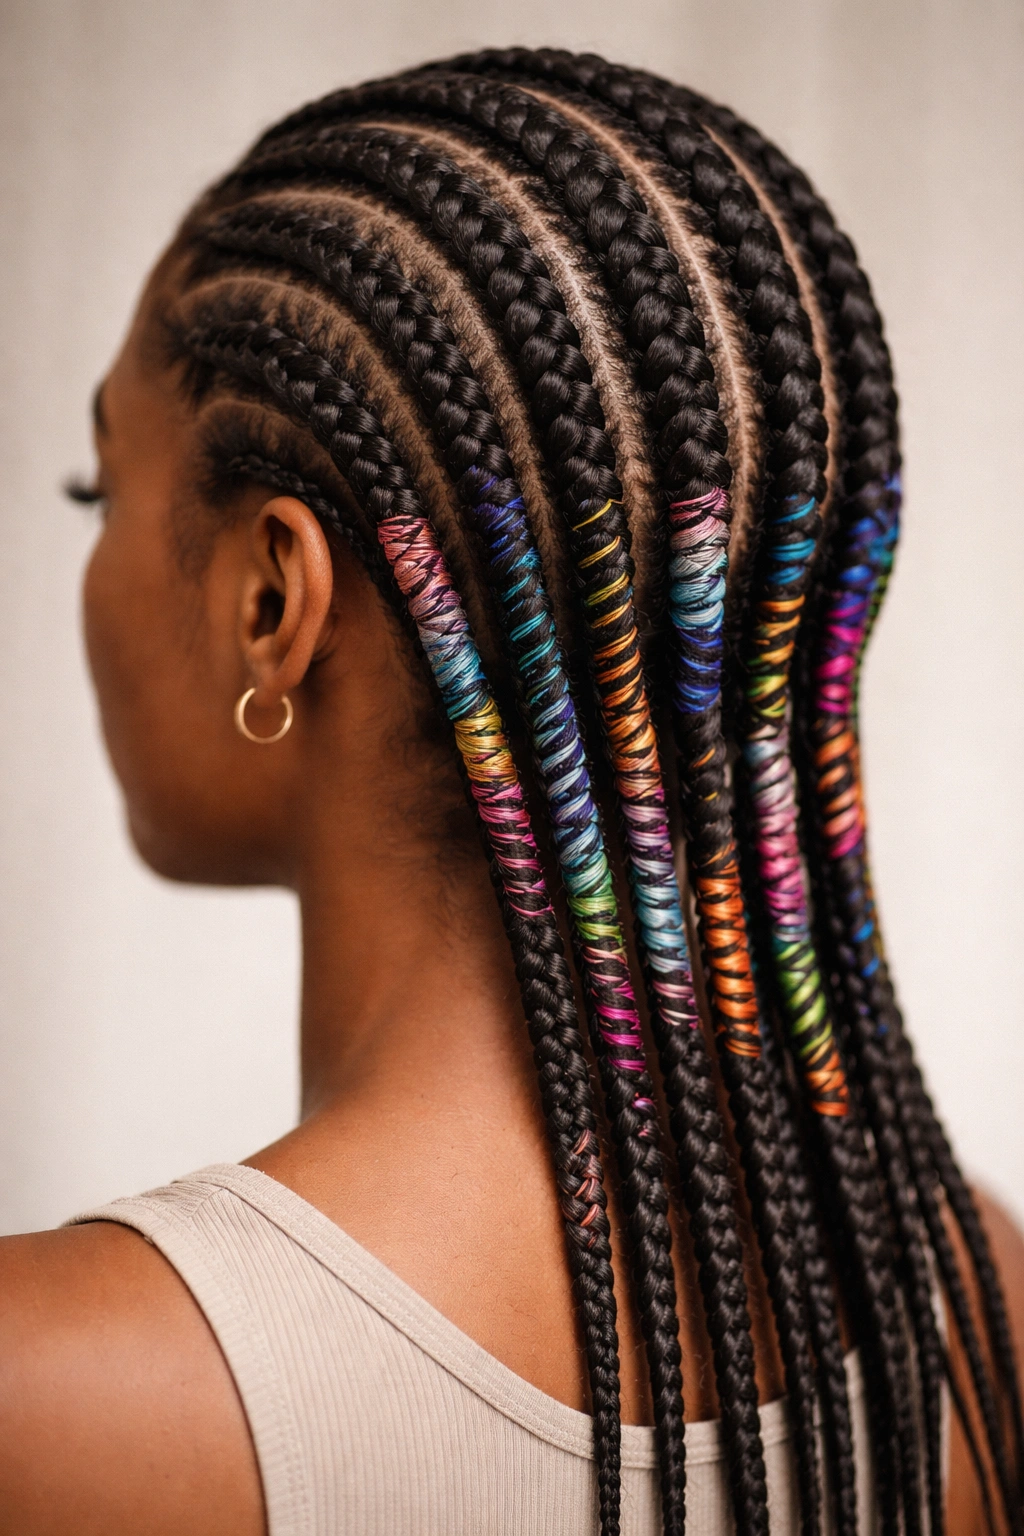
Take standard cornrows and wrap colorful thread, yarn, or decorative string around each braid to add color, texture, and visual complexity without using your hair itself as the only design element.
Why Thread Wrapping Elevates Your Style
Thread wrapping allows you to add color to your hair without dyes or colored extensions, and the thread can be changed or removed anytime you want a different look. You can wrap each cornrow in a different color, create ombre effects by gradually changing colors down the length, or use coordinating shades for a cohesive aesthetic. The wrapped texture adds dimension and makes even basic cornrows feel elaborate and intentional.
How to Wrap Cornrows With Thread
- Braid your cornrows using any of the techniques mentioned in this guide
- Select thread, yarn, embroidery floss, or decorative string in your chosen color(s)
- Starting at the top of your first cornrow, tie the thread securely around the base of the braid
- Wrap the thread around the cornrow in a spiral motion, working your way down to the ends
- You can wrap tightly (creating neat, visible stripes) or loosely (for a more relaxed appearance with thread showing in the gaps)
- When you reach the end of the cornrow, wrap the thread around the elastic and tie it off securely
- Repeat for each cornrow, using the same color or switching colors as desired
- The thread is completely removable without affecting your braids
Pro tip: Metallic threads, rainbow-patterned yarns, or contrasting colors create the most striking effects. Solid-colored thread matching your hair tends to blend and can feel understated, though it still adds nice texture. Save your favorite thread combinations and try them again in future styling sessions.
12. Side-Swept Cornrows
Instead of running straight down the back of your head, create cornrows that sweep across one side of your head and gather at the opposite side. This diagonal arrangement creates movement and frames your face asymmetrically, which is flattering for many face shapes.
What Makes Side-Swept Layouts Work
Side-swept cornrows draw attention toward one side of your face while creating visual movement across your head. This arrangement works beautifully if you have one side of your face or head that you prefer to emphasize, or if you simply want an asymmetrical, directional style. The sweeping motion feels modern and intentional, and it’s easier to achieve than you might think because you’re simply adjusting your part lines rather than learning a new braiding technique.
Creating Side-Swept Cornrows
- Part your hair diagonally from one temple toward the opposite side of your head (e.g., from your right temple toward your left ear)
- Create cornrows that follow this diagonal trajectory, incorporating hair as you braid down and across
- You can create 2-4 cornrows depending on how much coverage you want
- All the cornrows should sweep in the same direction, following your initial diagonal part
- Gather all the cornrow ends on one side of your head and secure them together with an elastic for a ponytail effect, or let them fall loose
- For extra security and polish, use bobby pins to tuck some of the braid ends under and create a gathered look
- The hair on the unbraided side can remain in its natural texture or be styled separately
Pro tip: Side-swept cornrows photograph beautifully and look particularly striking in profile. If you’re getting photos taken or want to feel extra polished for an event, this directional style is a fantastic choice.
13. Curved Cornrows
Create cornrows that follow the natural curves of your head rather than straight lines. These curved braids follow the contours of your skull and look sculptural and intentional.
Why Curved Patterns Feel Natural
Rather than forcing your hair into geometric straight lines that fight against the shape of your head, curved cornrows work with your head’s natural contours. This can actually be more comfortable because the braids aren’t pulling against the curves of your scalp; they’re flowing along them. The curved effect also looks incredibly artistic and gives off an intentional, sophisticated aesthetic that reads as someone who knows exactly what they’re doing with their hair.
Creating Curved Cornrows
- Instead of using a straight-line part, use your rattail comb to create curved or wavy part lines across your head
- Begin your cornrows at these curved sections and braid following the curved path rather than straightening it out
- The braids should naturally follow your curved parts without you having to force them
- Curved cornrows look best with 3-5 braids because the curves are more visible with moderate spacing
- Take your time mapping out your curves before you start braiding so your pattern is intentional rather than accidental
Pro tip: If you struggle to maintain curves while braiding, create the curved parts several hours before you start braiding and sleep on them or secure them with temporary clips. The hair will “remember” the curve, making it easier to follow while you braid.
14. Beginner-Friendly Loose Cornrows
Create cornrows with relaxed, looser tension that prioritize comfort and ease over sleekness. This style is perfect for beginners because it’s forgiving — slight unevenness in tension is less noticeable, and the looser hold means you’re less likely to create traction alopecia or discomfort.
Why Loose Cornrows Are Perfect Starting Points
When you’re learning to braid, maintaining consistent, moderate tension is actually harder than pulling tightly. Loose cornrows allow you to focus on the braiding technique itself without worrying about tension perfection. You can also achieve loose cornrows more quickly than tight ones because you’re not spending extra time perfecting the tension. As your confidence grows, you can gradually tighten your tension in future styling sessions, but for now, loose cornrows remove one variable from the equation.
Creating Comfortable, Loose Cornrows
- Section your hair as you would for any cornrow style
- Divide your subsection into three strands and begin braiding with a relaxed hand position — your hands shouldn’t be tense or gripping
- Incorporate hair with each braid motion, but don’t pull aggressively on the incorporated hair
- Braid all the way to the nape, keeping your movements smooth and unhurried rather than tight and controlled
- The finished cornrow should feel secure when you gently tug on it, but it shouldn’t feel like it’s pulling on your scalp
- You can tighten individual sections after you’ve finished braiding if you notice any particularly loose areas
- Loose cornrows may not hold their definition quite as long as tight ones (5-7 days versus 7-14 days), but they’re infinitely more comfortable
Pro tip: Loose cornrows are genuinely easier to take down at the end of the style’s life because you’re not fighting against tight tension and potential matting. If you prioritize comfort and ease of removal, this approach is absolutely valid and creates a beautiful, relaxed aesthetic.
Final Thoughts
Cornrows become easier and more intuitive with every single attempt you make, so be patient with yourself during your first few tries. The most important thing isn’t achieving perfection on your first cornrow ever — it’s showing up consistently and practicing the fundamental three-strand braid motion until it becomes muscle memory.
Start with whichever style feels most approachable to you, whether that’s a single center cornrow or a set of loose double cornrows. As you complete that first style, you’ll build confidence and understanding of how your hands move, how your hair behaves, and where your tension naturally settles. Each new style you try will feel progressively easier because you’re not learning the core braiding technique again — you’re just varying the pattern, number, or direction of the braids you already know how to create.
Remember that cornrows are genuinely protective when done correctly and worn comfortably. Your scalp shouldn’t hurt, your hairline shouldn’t feel strained, and the style should feel secure without feeling suffocating. If something hurts or feels too tight, take it down and redo it with less tension. Protecting your hair is the entire point, and that protection is only worthwhile if it’s not damaging your edges or causing discomfort in the process.