Cornrows have protected and beautified hair for centuries, and straight back cornrows remain one of the most elegant, practical protective styles available. Unlike styles that pull hair in multiple directions or create tension at angles, straight back cornrows distribute weight evenly down the center and sides of the scalp, making them genuinely protective when installed and maintained correctly. The key difference between a style that nourishes your hair and one that causes damage comes down to tension, installation technique, and how long you leave it in—and straight back styles get these variables right.
If you’re looking to give your hair a break from daily styling while maintaining a polished appearance, straight back cornrows are an excellent choice. They work for virtually every hair type and texture, from fine, loosely coiled hair to thick, tightly coiled strands. You can wear them sleek and simple, dress them up with beads and jewelry, or style them for professional settings. The beauty of straight back cornrows is their versatility paired with genuine protective benefits—your hair stays tucked away, moisturized, and unbothered while you go about your life.
The following 14 straight back cornrow styles showcase different interpretations of this classic protective look. Each one offers its own visual appeal while keeping your hair’s health and integrity front and center. Whether you prefer minimal, low-maintenance styling or something that makes more of a statement, you’ll find options that suit your lifestyle, hair goals, and aesthetic.
1. Classic Tight Straight Back Cornrows
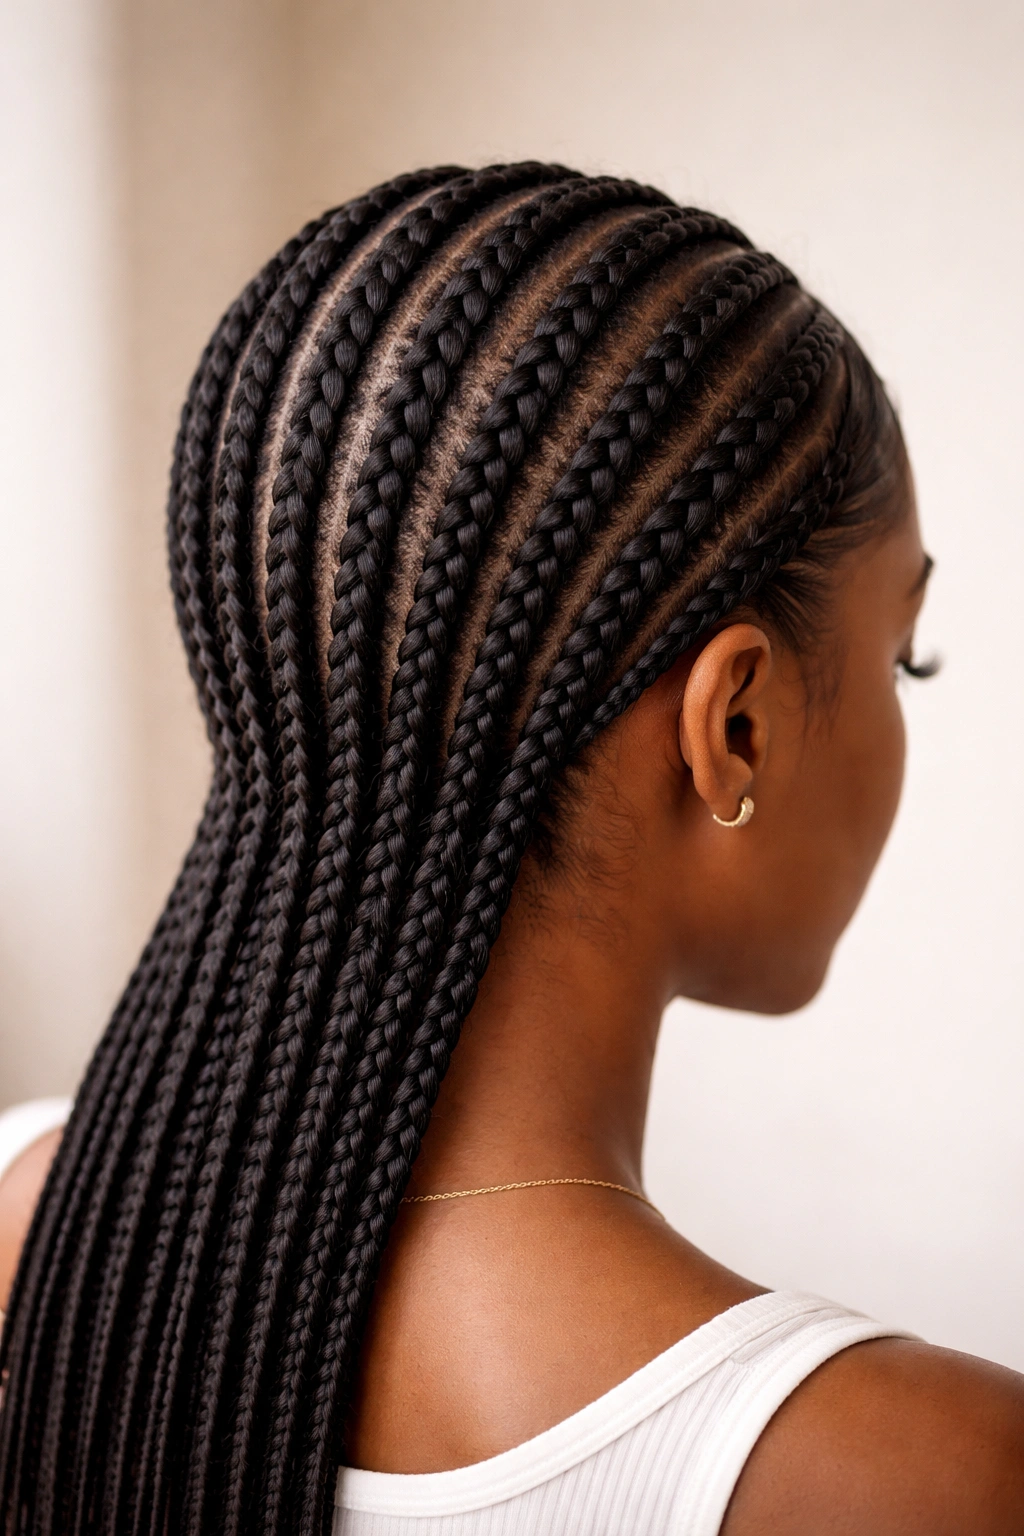
This is the foundational straight back style—multiple cornrows braided tightly down the center and sides of the scalp, creating clean parallel lines from front hairline to nape. The cornrows are typically the same width, evenly spaced, and finished with simple elastic bands or tucked ends. This style works beautifully on its own or as a base for other protective styling choices down the road.
Why This Style Protects Your Hair
The tight, even tension of properly installed classic cornrows keeps hair ends sealed and protected from friction and environmental damage. When braided at the right tension—snug enough to hold but not so tight that you feel constant scalp pressure—cornrows create a low-manipulation environment. Your hair isn’t rubbing against pillows, collars, or anything else that would normally cause breakage. The closed braid structure itself protects delicate strands and the curl pattern from weather and humidity fluctuations.
What Makes It Work Best
- Install 4–8 cornrows depending on your hair density and width preference—more cornrows mean thinner, less heavy braids
- Start each braid at least ½ inch from the hairline to avoid tension alopecia (hair loss from excessive pull)
- Leave cornrows in for 4–6 weeks maximum, then take them down gently and give hair 1–2 weeks of rest before reinstalling
- Moisturize the scalp and braid edges every 3–4 days with a lightweight oil or leave-in spray
- Sleep on a silk or satin pillowcase or bonnet to minimize friction and preserve the braids
Pro tip: This style looks effortlessly chic with a simple gold or silver band looped around the base of a few cornrows for a subtle accent.
2. Straight Back Cornrows With Beads
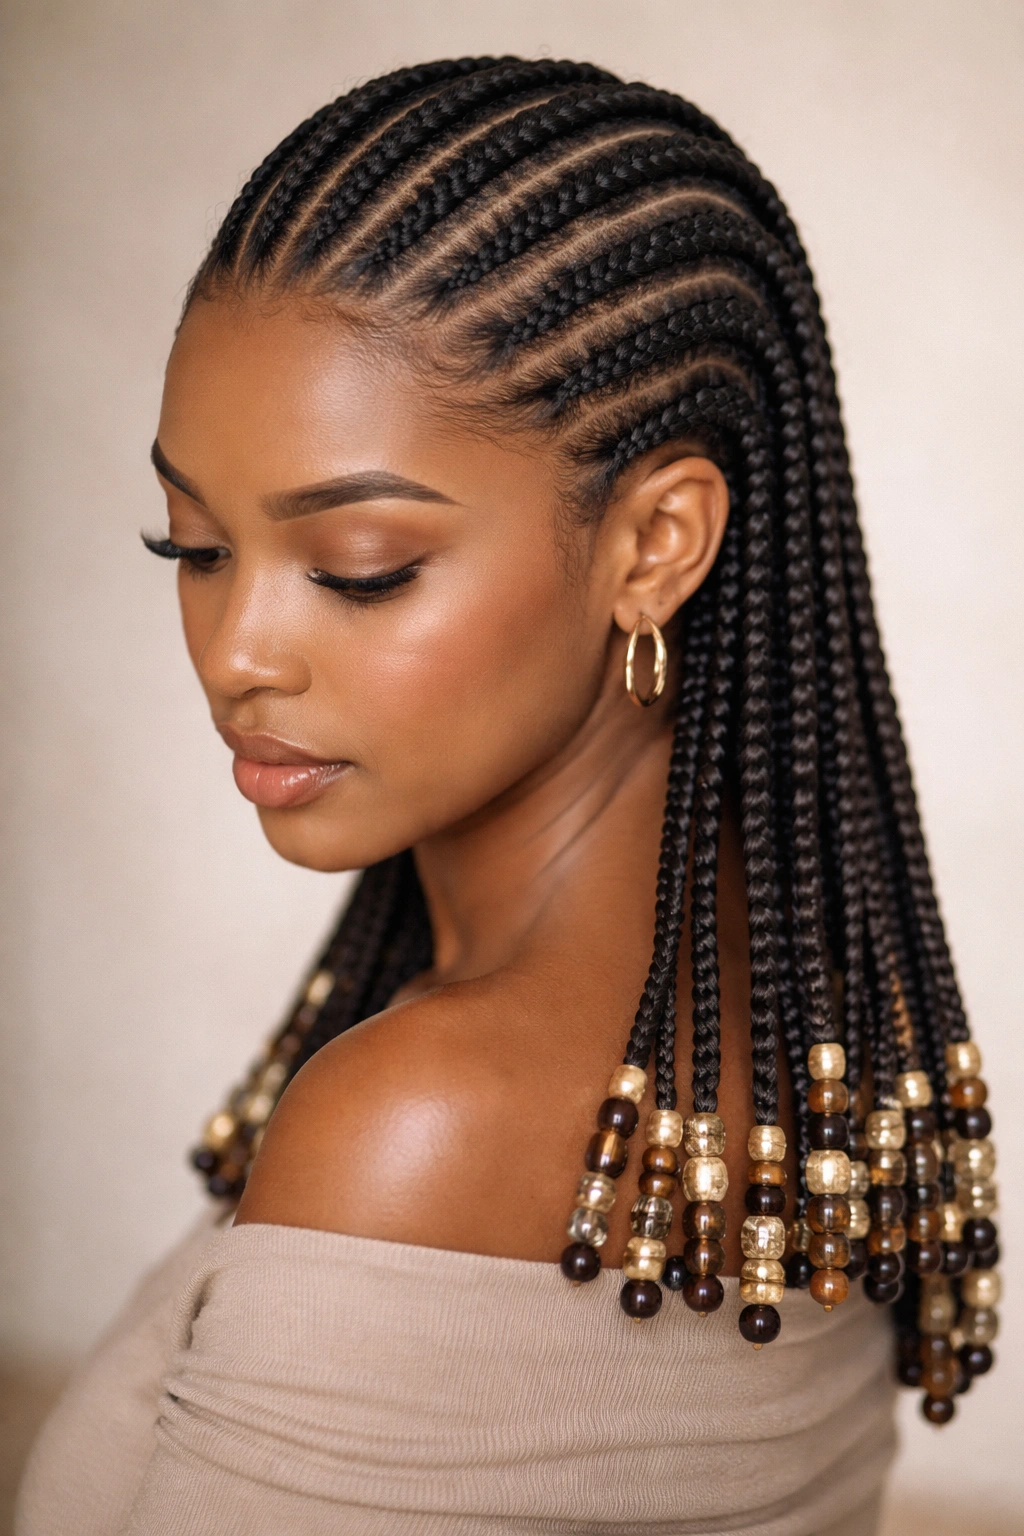
Add small glass, wood, or gold-filled beads to the bottom third of each cornrow for texture, visual interest, and a touch of personality. Beads can be spaced evenly down the length or clustered near the ends, depending on your preference. This variation maintains all the protective benefits of standard cornrows while adding an element that feels intentional and styled.
The Protective Advantage of Beaded Cornrows
Beads serve a practical purpose beyond aesthetics—they help seal and weight the ends of the cornrows, preventing the braid from unraveling and protecting the delicate hair ends from fraying or breaking off. The slight additional weight also helps the braids hang cleanly without bunching or folding. When you eventually take the cornrows down, sealed ends mean your hair unbraids more smoothly, reducing the number of hairs lost to tangling during removal.
Installation and Care Details
- Use beads with smooth, sealed holes to avoid snagging hair as you slide them on
- Secure beads with a small elastic band under each bead to keep them from slipping during wear
- Choose bead colors that complement your skin tone or coordinate with your daily wardrobe
- Clean beads weekly by gently wiping with a damp cloth to remove buildup from moisturizing products
- The bead-sealed ends may feel slightly heavier—support this weight by not leaving cornrows in longer than 6 weeks
Worth knowing: Wooden beads are lightweight and breathable; glass and metal beads create a more polished, formal look.
3. Double-Layer Straight Back Cornrows
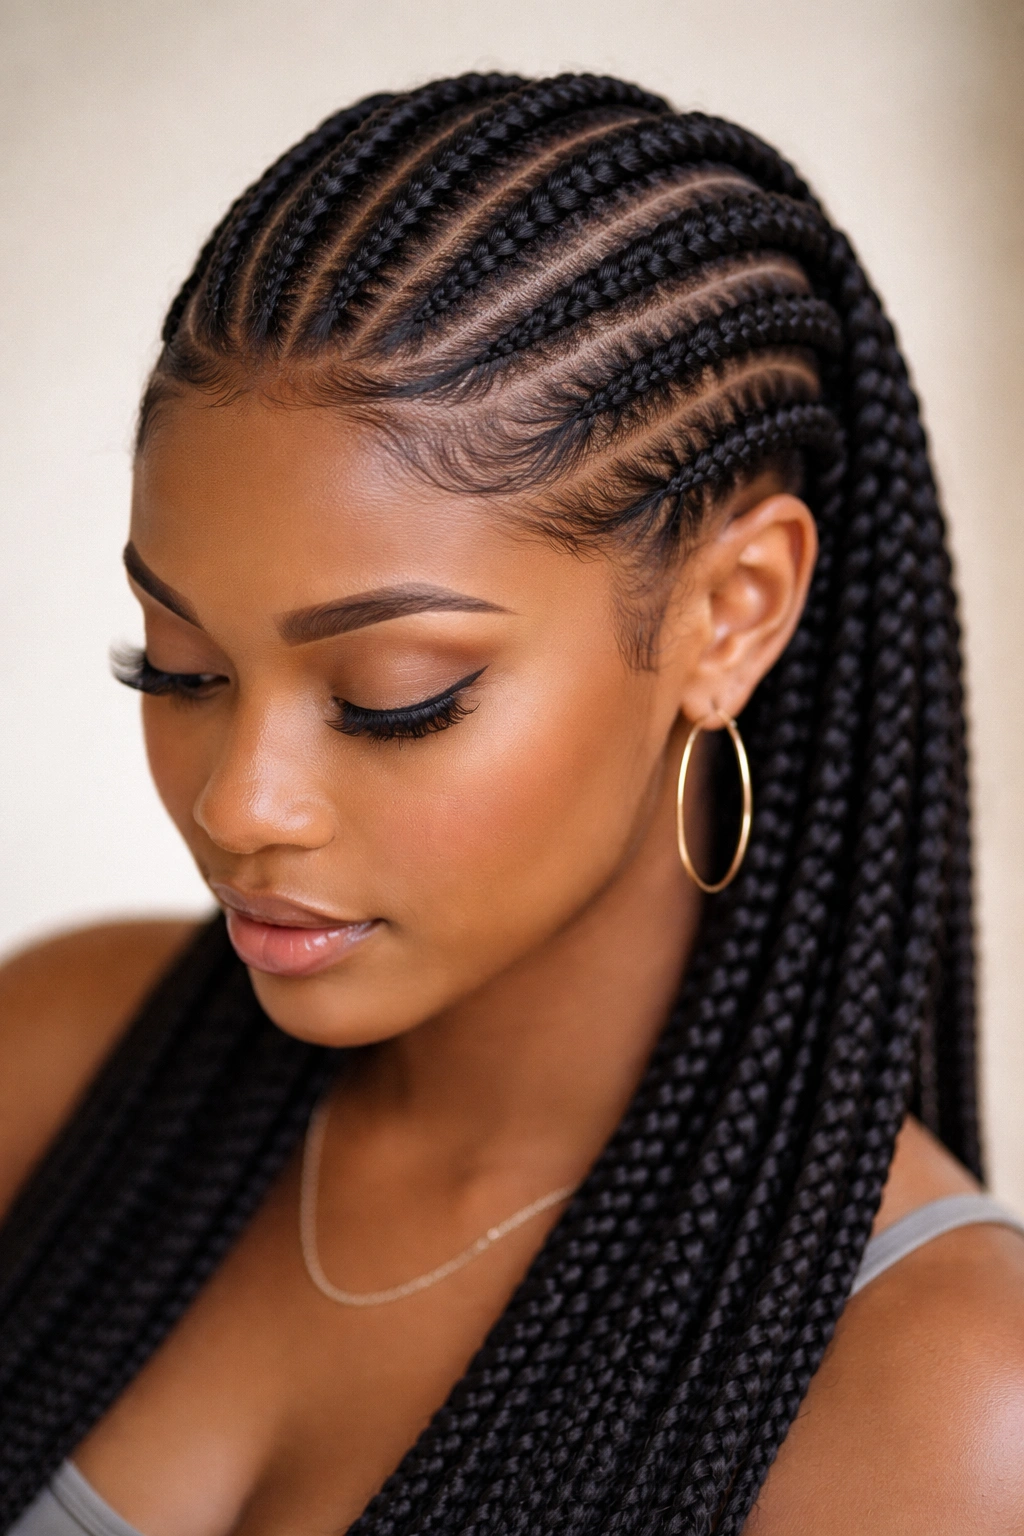
This style features two distinct layers of cornrows going straight back—a smaller set braided closer to the hairline and a larger set braided underneath or offset slightly. The two layers create depth and visual movement while keeping all the hair protected and neatly contained. This works especially well if you have thicker hair and want a style that shows more detail without looking chaotic.
Why Layering Adds Protection
Double-layer cornrows distribute the weight of the style more evenly across the scalp, which actually reduces overall tension compared to fewer, thicker braids. The additional visual complexity means the style reads as more intentional and designed, which makes it feel special without requiring you to carry extra styling products or spend additional time on maintenance. The protective benefits are identical to single-layer cornrows, but the finished look suggests more effort than it actually demands.
Styling the Double-Layer Look
- Space the front layer about ¾ inch from the hairline for a defined frame around the face
- Keep both layers parallel and evenly spaced—a mirror and firm hand are essential for clean lines
- Vary the number of rows in each layer based on hair density (for example, 3 rows in front, 4–5 rows underneath)
- This style pairs beautifully with minimal accessories; skip the beads if you choose multiple layers, as it can feel visually overwhelming
- Install this version only if you’re comfortable with slightly longer braiding sessions—expect 2–3 hours depending on hair length and density
Insider note: This is an excellent option if you’re going from longer hair to shorter hair but aren’t ready to cut yet—the layering makes medium lengths look intentional and well-styled.
4. Straight Back Cornrows Wrapped Around the Crown
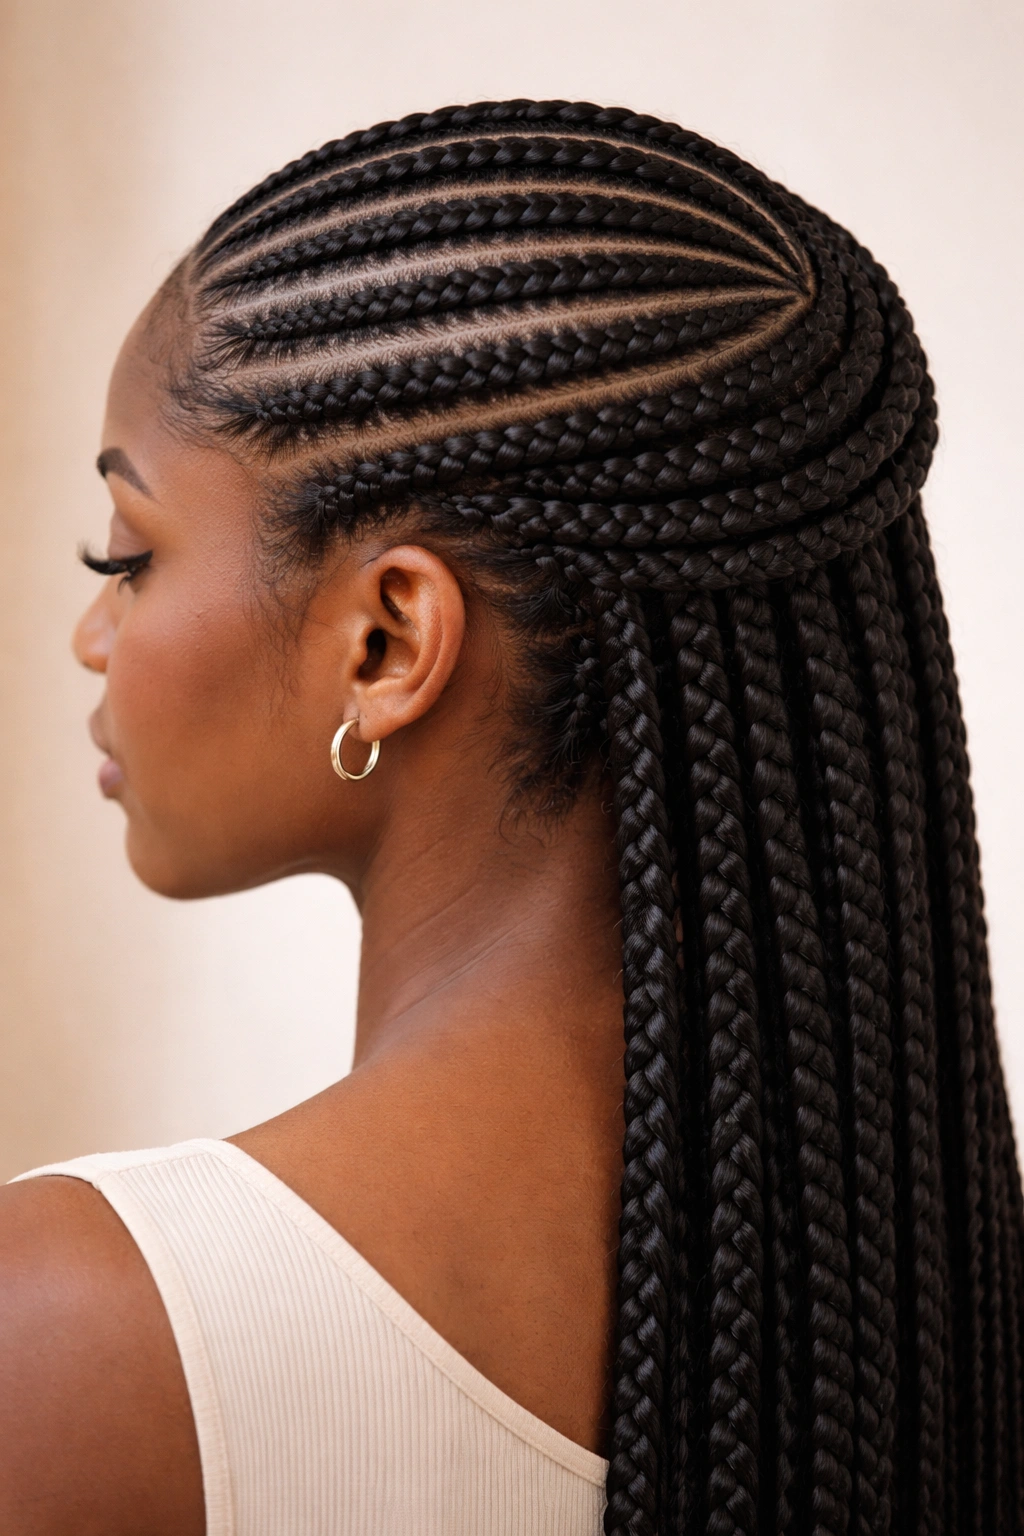
This style takes the classic straight back cornrows and continues them around the crown area in a halo-like pattern, creating a circular or crown-shaped protective style. The braids follow the natural contours of the head rather than stopping at the nape, and they can finish with beads, wrapping, or woven-in thread. This version offers a regal, styled appearance while maintaining protection.
Crown-Wrapping for Extended Protection
Bringing cornrows around the crown and down the back creates more enclosed protection for hair at the nape and the most vulnerable areas. This variation is excellent if you frequently tie your hair back in other styles or wear clothing that rubs against the nape area—the crown wrapping eliminates the friction points that normally cause breakage. The continuous braiding also ensures that all your hair is equally protected and moisturized throughout the protective period.
How to Achieve the Crown Effect
- Start cornrows at one temple, move straight back, then curve around the back of the head and finish at the opposite temple
- Alternatively, begin at the center hairline and work two braids back and around in a symmetrical pattern
- Use small elastic bands or gold thread wrapped around the finished ends to create a seamless, intentional look
- This style requires planning and a stylist who understands the crown-wrapping technique—it’s not a beginner installation
- Plan to wear this for 5–6 weeks maximum; the crown area experiences less tension than traditional straight-back styles, so it can stay in slightly longer safely
Pro tip: This style is stunning when photographed from above or at an angle—it’s excellent for special occasions or professional headshots.
5. Thick Straight Back Cornrows for Maximum Protection
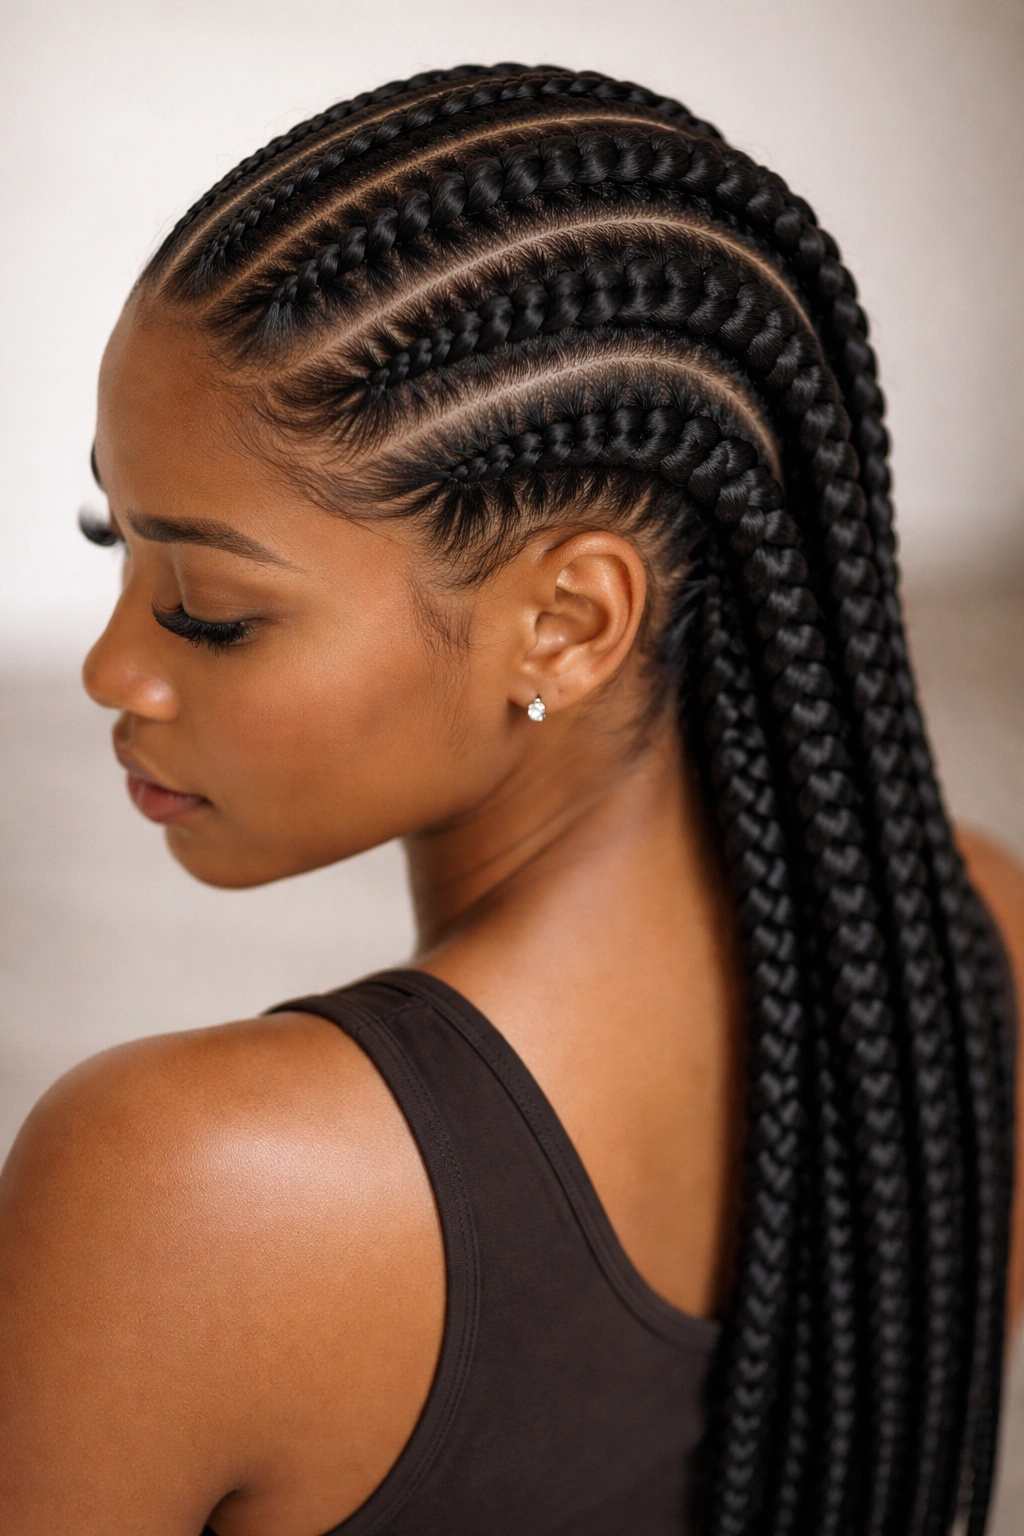
Use thicker-than-average cornrows (about ¼ inch wide or wider) braided straight back with significant space between each row. This creates a bold, sculptural look while concentrating protection on fewer, heavier braids. Thick cornrows finish faster, require less maintenance, and offer simplicity that works for busy lifestyles.
Why Thicker Braids Protect Differently
Thicker cornrows mean less total hair is manipulated during installation, which translates to less tension on individual strands and less time under stress. The broader braid structure also protects more hair within each single braid, so fewer braids overall cover your entire head. This style works beautifully for people with lower hair density, fine hair, or anyone who finds that many thin braids feel too tight. The protection is still excellent—you’re still creating an enclosed, low-manipulation environment—but the approach is gentler.
Best Practices for Thick Cornrows
- Keep the space between braids at least ½ inch wide to prevent them from pressing into the scalp
- Expect thicker braids to be heavier; wear them for no longer than 5–6 weeks to avoid scalp fatigue
- Thick cornrows look most intentional with minimal additional styling or decoration—let the braid texture speak for itself
- This style suits all hair types, but it’s especially effective for coily, textured, or thick hair that benefits from bold, simple styling
- Moisturize more frequently (every 2–3 days) because thicker braids can trap less moisture access to the scalp
Worth knowing: Thick cornrows can be dressed up with a single bold earring or colored thread wrapped around the base of a few braids without overwhelming the style.
6. Straight Back Cornrows With Colored Yarn or Thread
Weave colored yarn, embroidery thread, or synthetic hair extensions through each cornrow to add color, texture, and visual interest. This is a simple way to create dimension without adding beads, jewelry, or length. The yarn or thread blends seamlessly with the braids while offering your preferred pop of color—metallic, bright, pastel, or earth-tone options all work.
Protection Plus Personalization
Weaving yarn or thread adds texture and visual weight to thinner cornrows, making the braids look fuller and more intentional. It doesn’t change the protective properties of the cornrows themselves, but it does allow you to refresh your look without taking the style down and reinstalling. If you choose a color or texture you love, you’ll be more likely to wear the style confidently and keep it in for the full protective window.
Yarn and Thread Selection
- Use yarn or thread specifically designed for hair braiding—regular craft yarn can snag and tangle
- Synthetic braiding hair creates more volume and visual impact; embroidery thread or thin yarn gives a more subtle, refined look
- Weave the yarn in one continuous spiral down each braid or alternate colors for a striped effect
- Metallic or pearl-finish yarn creates an elegant, dressy look; matte yarn feels casual and editorial
- Thread colors that match your skin tone create a longer-looking appearance; contrasting colors are bolder and more playful
Pro tip: This is an excellent way to test whether you like a particular color without committing to permanent dye or expensive hair extensions.
7. Straight Back Cornrows With Wraparound Style
Install straight back cornrows and wrap thin silk ribbon, metallic thread, or contrasting hair around the entire length of each braid after installation. This creates a smooth, polished, intentional finish that looks sophisticated and well-executed. Wrapping is optional—you can do it to all cornrows or just a few for accent.
Why Wrapping Changes Protection Dynamics
Wrapping the completed cornrows doesn’t add weight or change the braids themselves, but it does create a visually sealed, finished appearance that feels more special and intentional. Wrapping also helps keep the braid structure pristine throughout the wearing period—the outer layer of wrapping absorbs friction from pillows and clothing rather than the braid itself. If you take the cornrows down after several weeks and notice the wrap has frayed while the braids underneath remain intact, you’ve just proven that the wrapping added an extra protective layer.
Wrapping Technique and Materials
- Start wrapping from the base of the braid and work downward in a spiral or flat pattern
- Use silk ribbon (¼ to ½ inch wide) for a smooth, luxe finish; thin yarn creates texture; metallic thread adds shine
- Secure the wrap at the top with a small elastic or by tying it into the base of the cornrow
- Finish the bottom by tucking or tying the wrap end neatly inside the braid
- Wrapped cornrows require gentle handling during sleeping and washing—sleep on a bonnet or silk pillowcase to prevent the wrap from unraveling
Insider note: Wrapping is a detail that transforms straight back cornrows from casual to ready-for-anywhere polished in about 30 minutes.
8. Straight Back Cornrows With Minimal Spacing
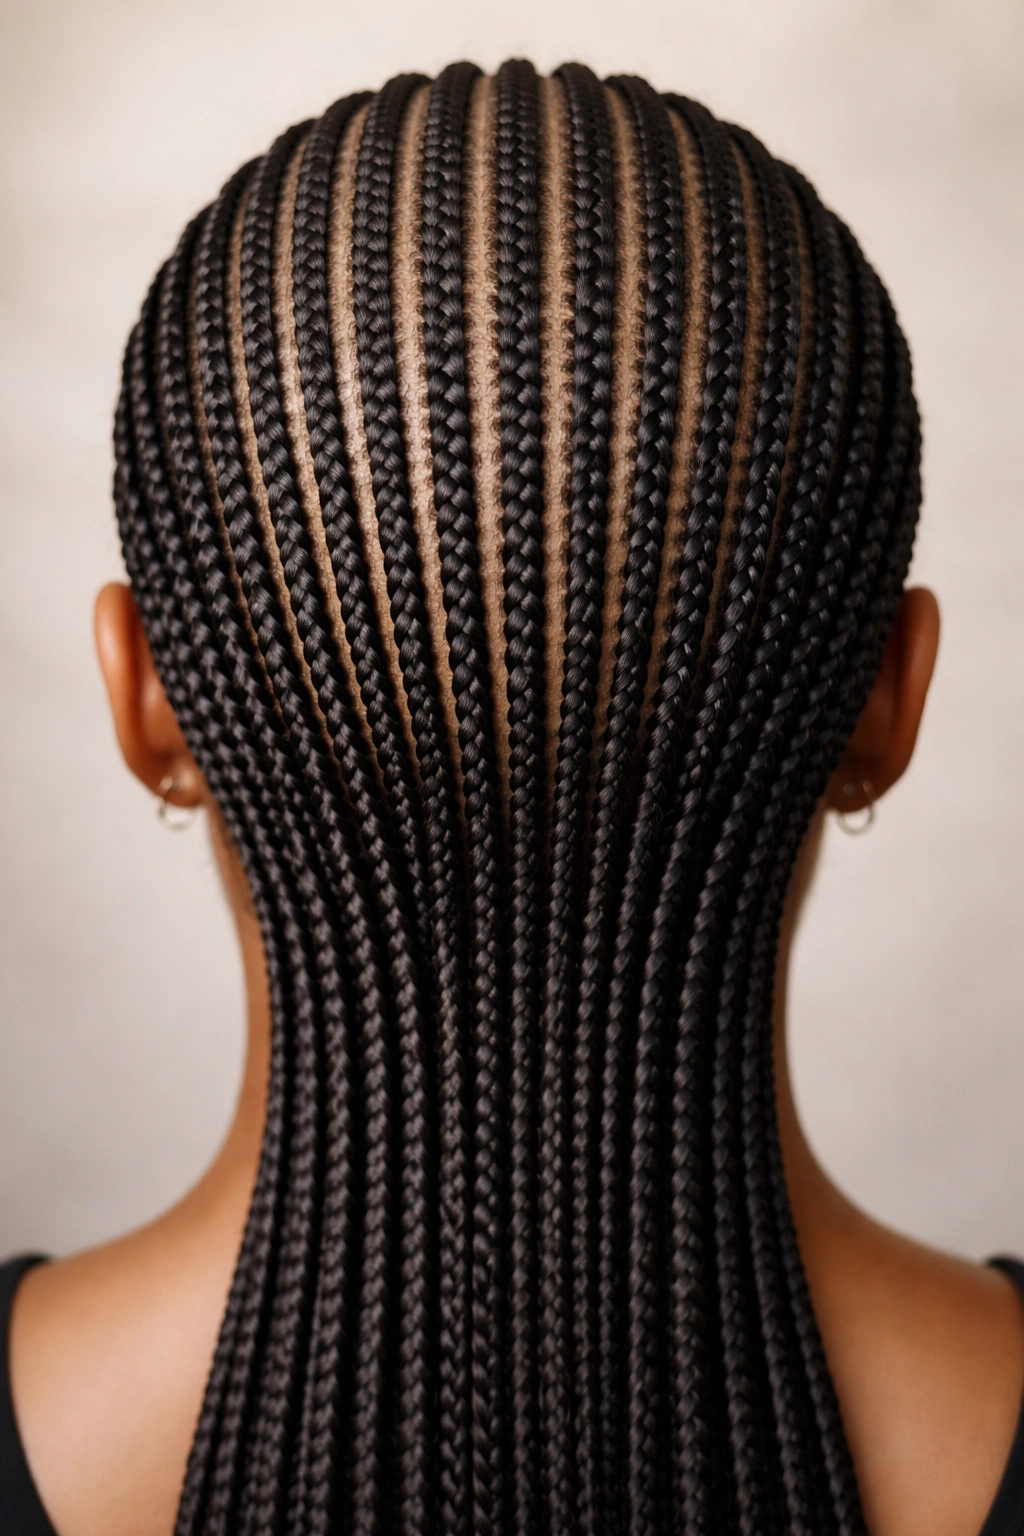
Create very close, evenly spaced straight back cornrows with minimal space between each row—sometimes just ⅛ inch apart. This creates a packed, sculptural look that emphasizes the clean lines of the braids and creates a streamlined appearance from the front. This variation is more about aesthetics than protection, but it works beautifully for specific occasions or looks.
The Precision Protection of Tight Spacing
Cornrows spaced very close together create less exposed scalp area overall, which means even more consistent moisture retention and less direct sunlight exposure to your scalp. The braids are individually thinner when spaced this closely, which some people find more comfortable than fewer, thicker braids. However, tight spacing requires exceptional scalp care—the scalp can feel more compressed, so consistent moisturizing and cleansing are essential to prevent buildup or irritation.
Installation and Maintenance Requirements
- This style requires exceptional technical skill and patience from your braider—expect installation to take 4–5 hours depending on hair length
- You’ll likely have 12–18+ cornrows, which sounds like a lot but actually distributes weight more evenly
- Wash your scalp and braids more frequently (every 5–7 days) because buildup is more likely with close spacing
- Use a spray bottle with water and light oil to moisturize between the braids throughout the wearing period
- Wear this style for no longer than 5 weeks; the density can create scalp fatigue if worn longer
- This style photographs beautifully because the clean lines read as more artistic and intentional
Worth knowing: Very closely spaced cornrows are sometimes called “loc braids” because the density creates a look reminiscent of locs.
9. Straight Back Cornrows With Geometric Patterns
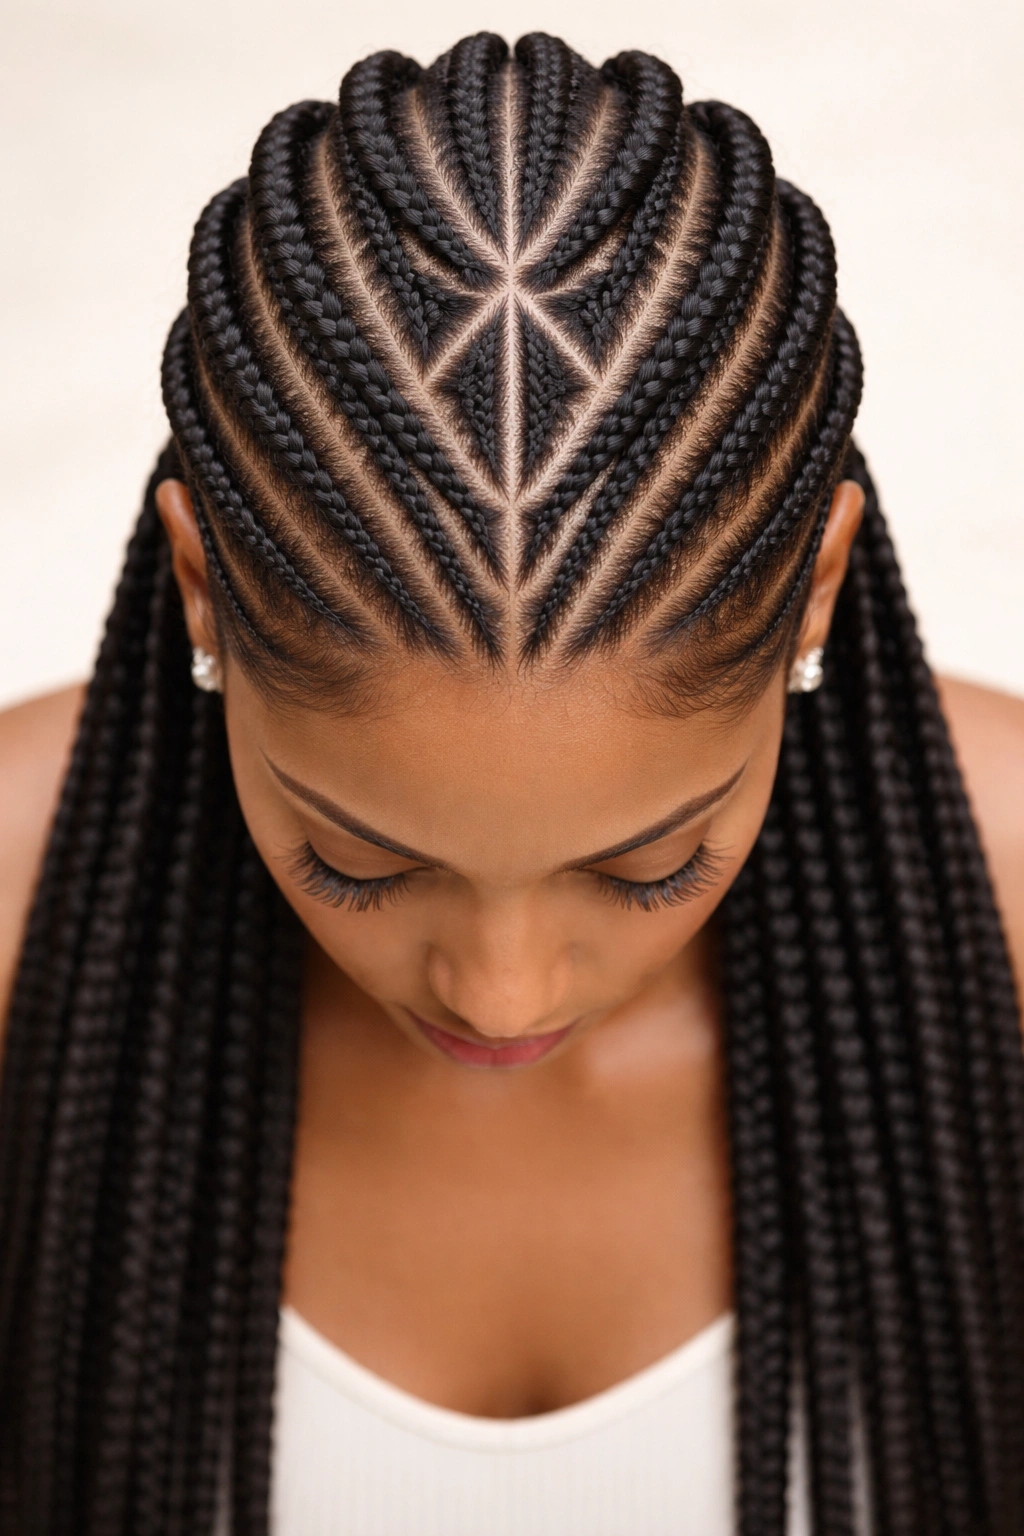
Instead of simple parallel lines, create a geometric pattern with the cornrows—a triangle, diamond, or abstract design that moves straight back but follows a planned visual pattern. This requires your braider to map out the design beforehand and maintain it throughout installation. The protective benefits remain the same, but the visual impact is significantly bolder.
Protection Through Intentional Design
Geometric patterned cornrows distribute weight and tension in the same way as traditional straight-back cornrows, but the visual distinctiveness means you’re wearing a true style statement rather than a utilitarian protective base. The planning and precision required for geometric cornrows mean they’re often installed with more care and attention to detail than standard styles. This can actually result in better protection because your braider is focused on creating precise lines rather than rushing through a standard installation.
Design Ideas and Execution
- A triangle pointing down from the crown creates elegant visual balance and frames the face beautifully
- A diamond or box pattern across the entire head creates a modern, architectural look
- Concentric circles or spiraling patterns work if you have the skill level and patience required
- Start simple—a subtle asymmetrical variation is more achievable than a perfect geometric shape
- Work with a stylist who sketches the pattern before installation so you both understand the vision
- Geometric patterns look striking with minimal additional accessories—let the braiding pattern itself be the statement
Pro tip: Document the geometric pattern with a photo immediately after installation so you can recreate it in future protective styling sessions.
10. Straight Back Cornrows With Braided Accents
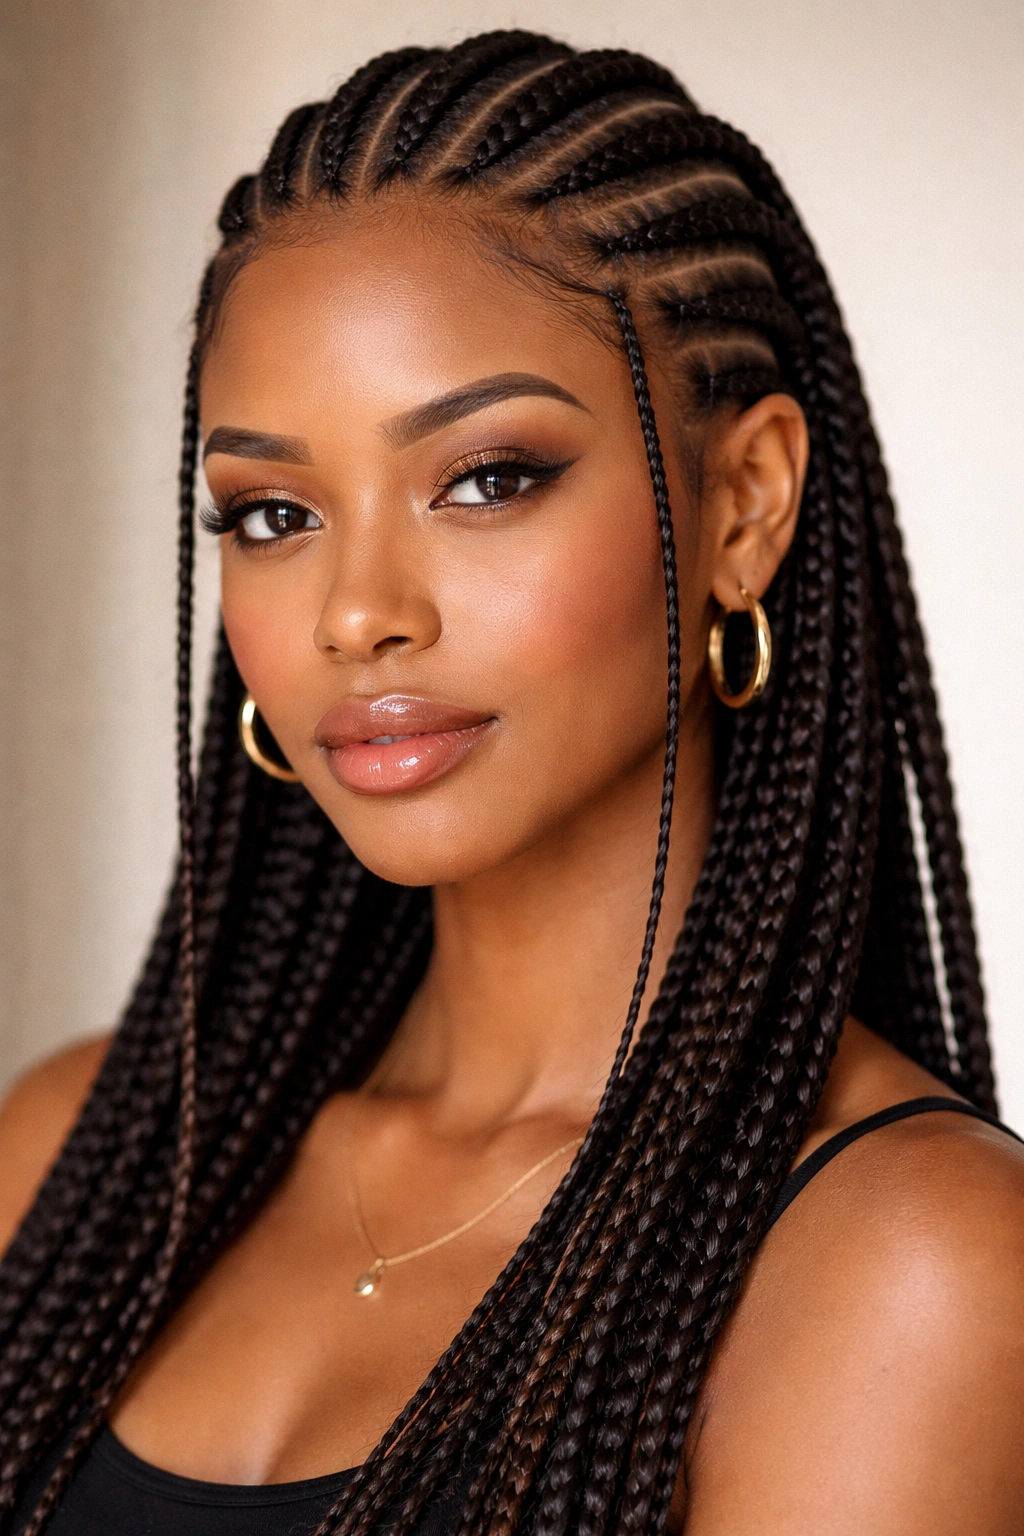
Install classic straight back cornrows and add small, delicate braids on either side of the face or scattered throughout as accents. These can be thin three-strand braids, two-strand twists, or smaller cornrows that weave between or around the main braids. The accents add visual interest and movement while maintaining the protective straight-back structure underneath.
Why Accent Braids Enhance Protection
Accent braids don’t change the protective properties of the main cornrows, but they do create a more complete, intentional aesthetic that makes the style feel special enough to wear longer. When a style feels beautiful and intentional, you’re more likely to maintain it properly and keep it in for the full protective window. Accent braids also create natural framing around the face, which makes the overall look feel more polished and editorial.
Creating Accent Details
- Small braids framing the face (one or two on each side) create a romantic, softened look
- Scattered small braids throughout create a playful, creative aesthetic
- Varying the braiding pattern (three-strand, two-strand twist, or thin cornrow) creates visual texture
- Keep accent braids thin (about ⅛ inch wide) so they don’t compete with the main cornrows
- Finish accent braids with small beads or thread to distinguish them from the main style
- This style requires 30–45 minutes of additional installation time beyond traditional cornrows
Worth knowing: Accent braids are an excellent option if you want your protective style to feel more like a deliberate fashion choice than a practical necessity.
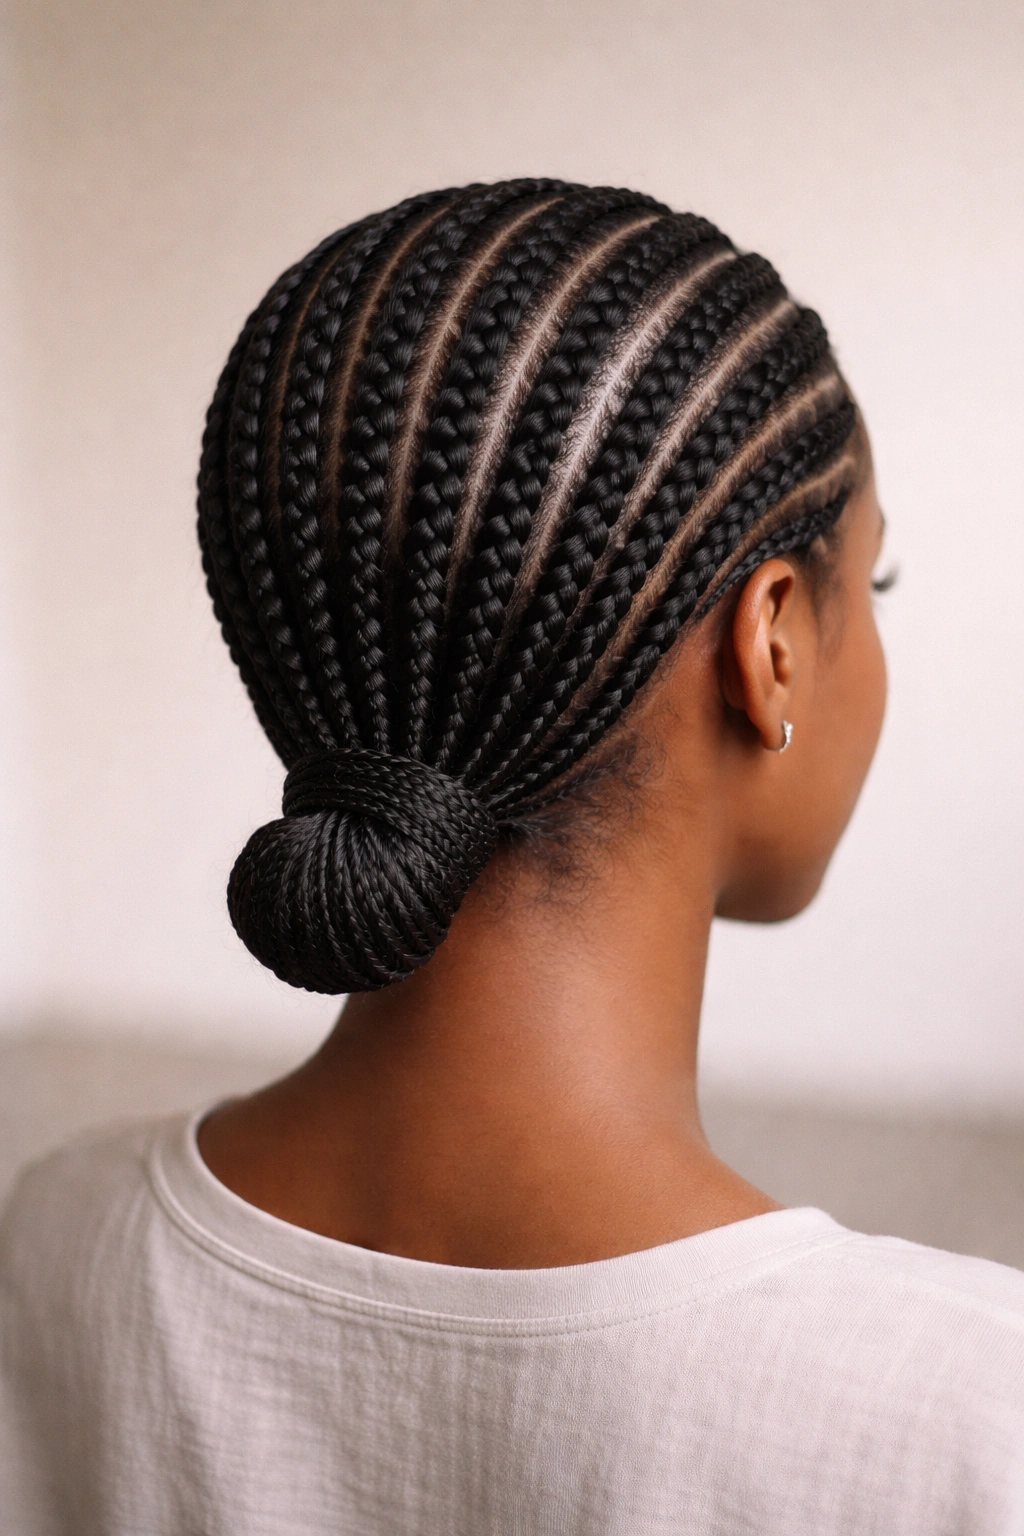
11. Straight Back Cornrows Tucked Underneath
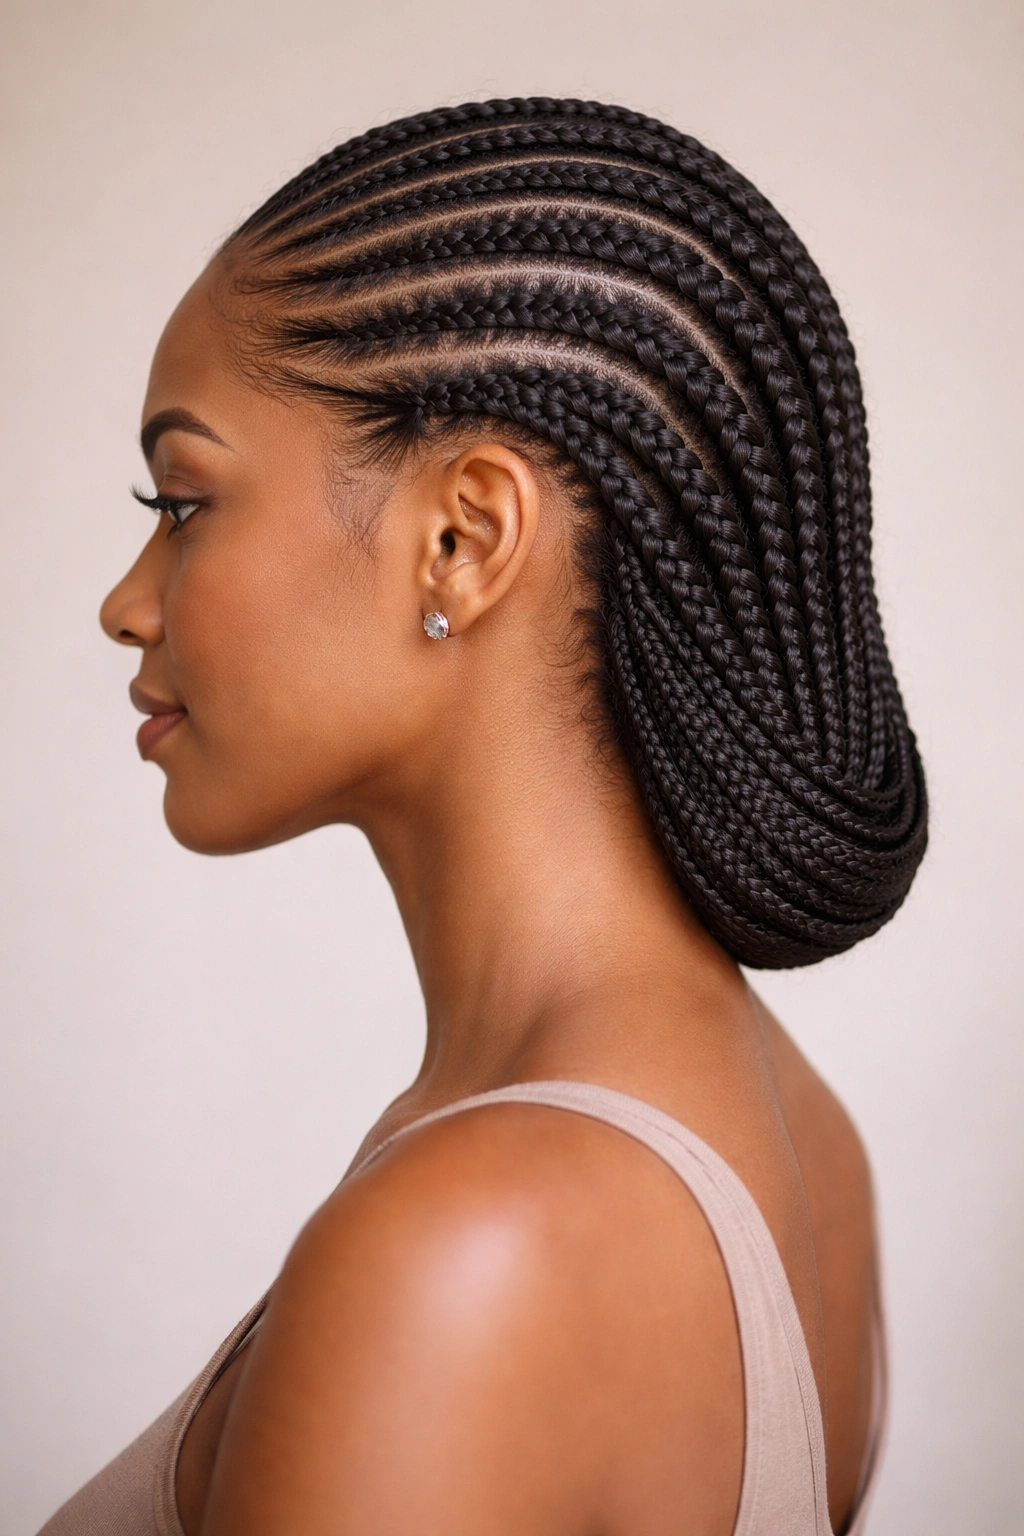
Instead of finishing cornrows at the nape and letting them hang or be pinned up, continue them underneath and tuck the ends into your hair at the crown or sides. This creates a sleek, continuous protective style with no visible braids from certain angles. The braids are woven and anchored throughout the protective period.
The Invisible Protection Advantage
Tucking cornrows underneath creates a protective style that looks like your natural hair from the front or sides—excellent if you want the protective benefits without the visible braided aesthetic. The braids themselves remain protected throughout the style period because they’re woven into the hair and less exposed to friction, styling, or environmental stressors. This variation is particularly excellent for professional environments where you want protection without a bold statement style.
How to Tuck and Secure
- After braiding straight back, continue each braid slightly past the nape and tuck it horizontally under the hair at the crown or sides
- Use small bobby pins matching your hair color to secure the tucked portions—typically you’ll need 3–5 pins per braid
- This works best with thicker hair or longer hair that has enough volume to hide the tucked braids
- Check security daily, as the tucked portions can slip if not secured tightly
- This style can be worn for 6–8 weeks because the tucked braids experience less friction and tension
- Moisturize the tucked areas by gently lifting and spraying underneath with water and lightweight oil
Insider note: This is a favorite protective style among people with professional or conservative dress codes who still want their hair protected.
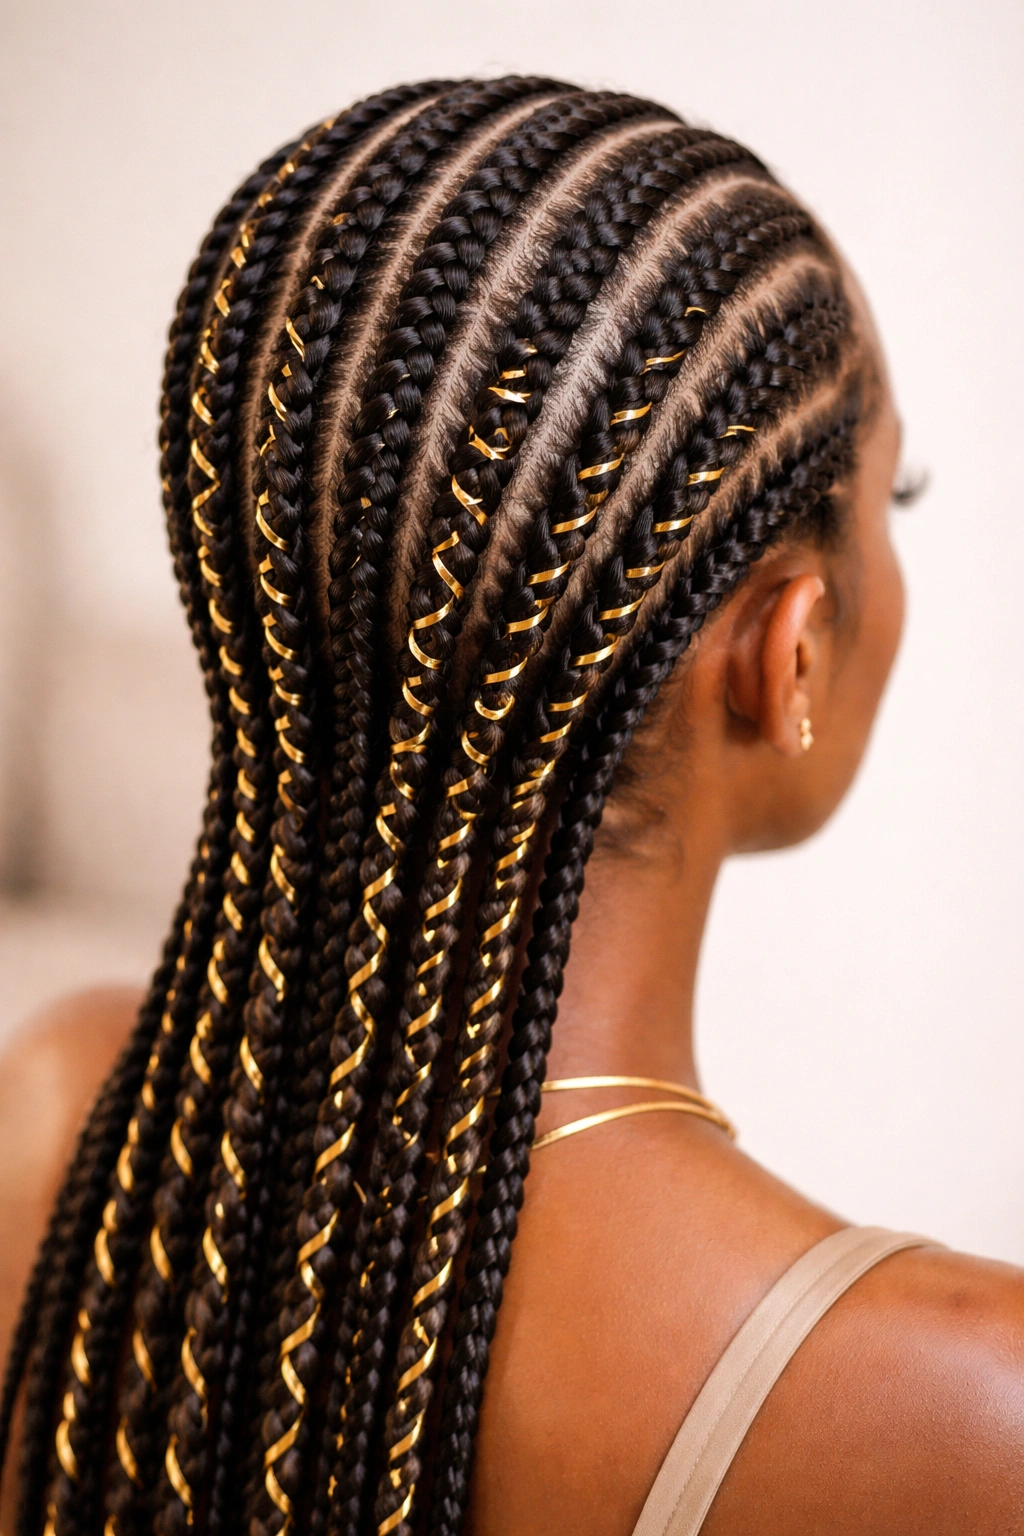
12. Straight Back Cornrows With Gold or Silver Foil Accents
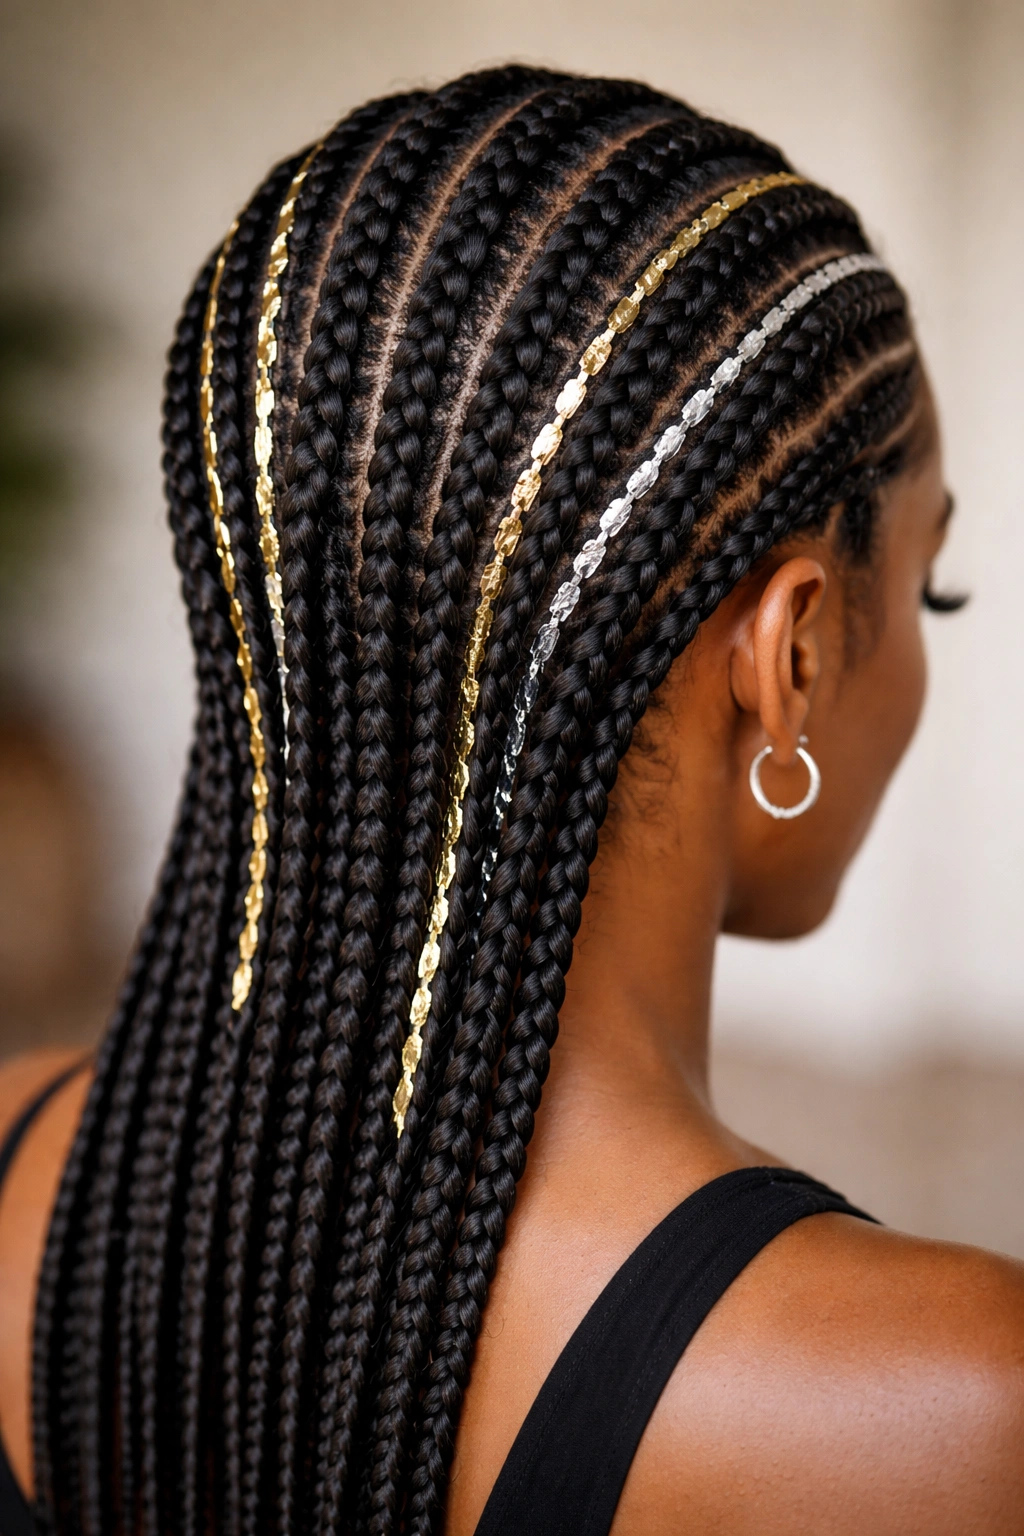
After braiding cornrows, wrap metallic foil (gold or silver) around selected braids or sections of braids to create a luxe, glamorous aesthetic. This is a temporary accent that adds shine and visual interest without changing the braids themselves. Metallic foils are thin enough that they don’t add significant weight.
How Metallic Accents Complement Protection
Gold and silver foil accents don’t change the protective properties of cornrows, but they do transform the style from everyday practical to event-ready glamorous. If you’re planning to wear your cornrows for several weeks, adding metallic accents midway through can refresh the look and make you feel like you’re wearing something new. The foil catches light beautifully in photos and creates a statement without requiring additional installation time or skill.
Application and Care
- Use ultra-thin metallic foil designed specifically for hair—regular craft foil is too thick and heavy
- Wrap foil around entire braids or just the lower thirds depending on your preference and available hair length
- Smooth the foil carefully to avoid crimping or creating rough edges that could snag
- Metallic-wrapped cornrows reflect light beautifully in photos; consider scheduling photos or special events while the foil is fresh
- The foil will gradually tarnish or fray as the weeks pass, which adds to the vintage-luxe aesthetic—or remove and rewrap for a refresh
- Be gentle when moisturizing foil-wrapped areas to avoid unraveling the foil; use a spray bottle rather than applying oil with hands
Pro tip: Gold foil feels warm and luxe; silver foil reads as cooler and more modern. Choose based on your typical color preferences and skin tone.
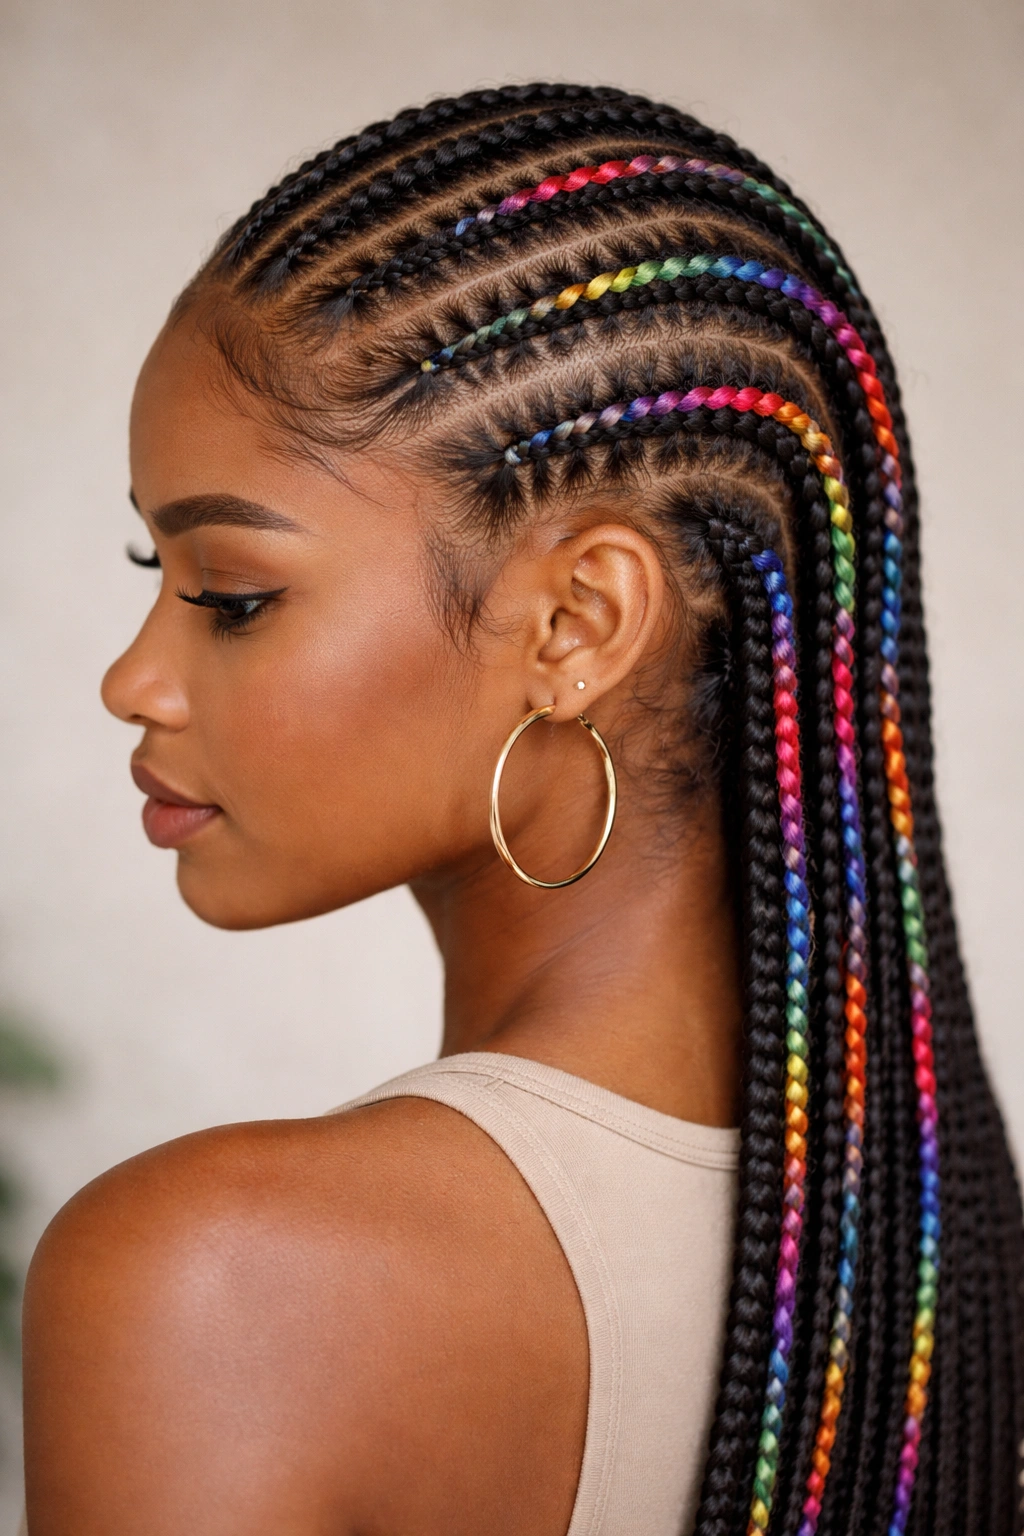
13. Straight Back Cornrows With Patterned or Colored Extensions
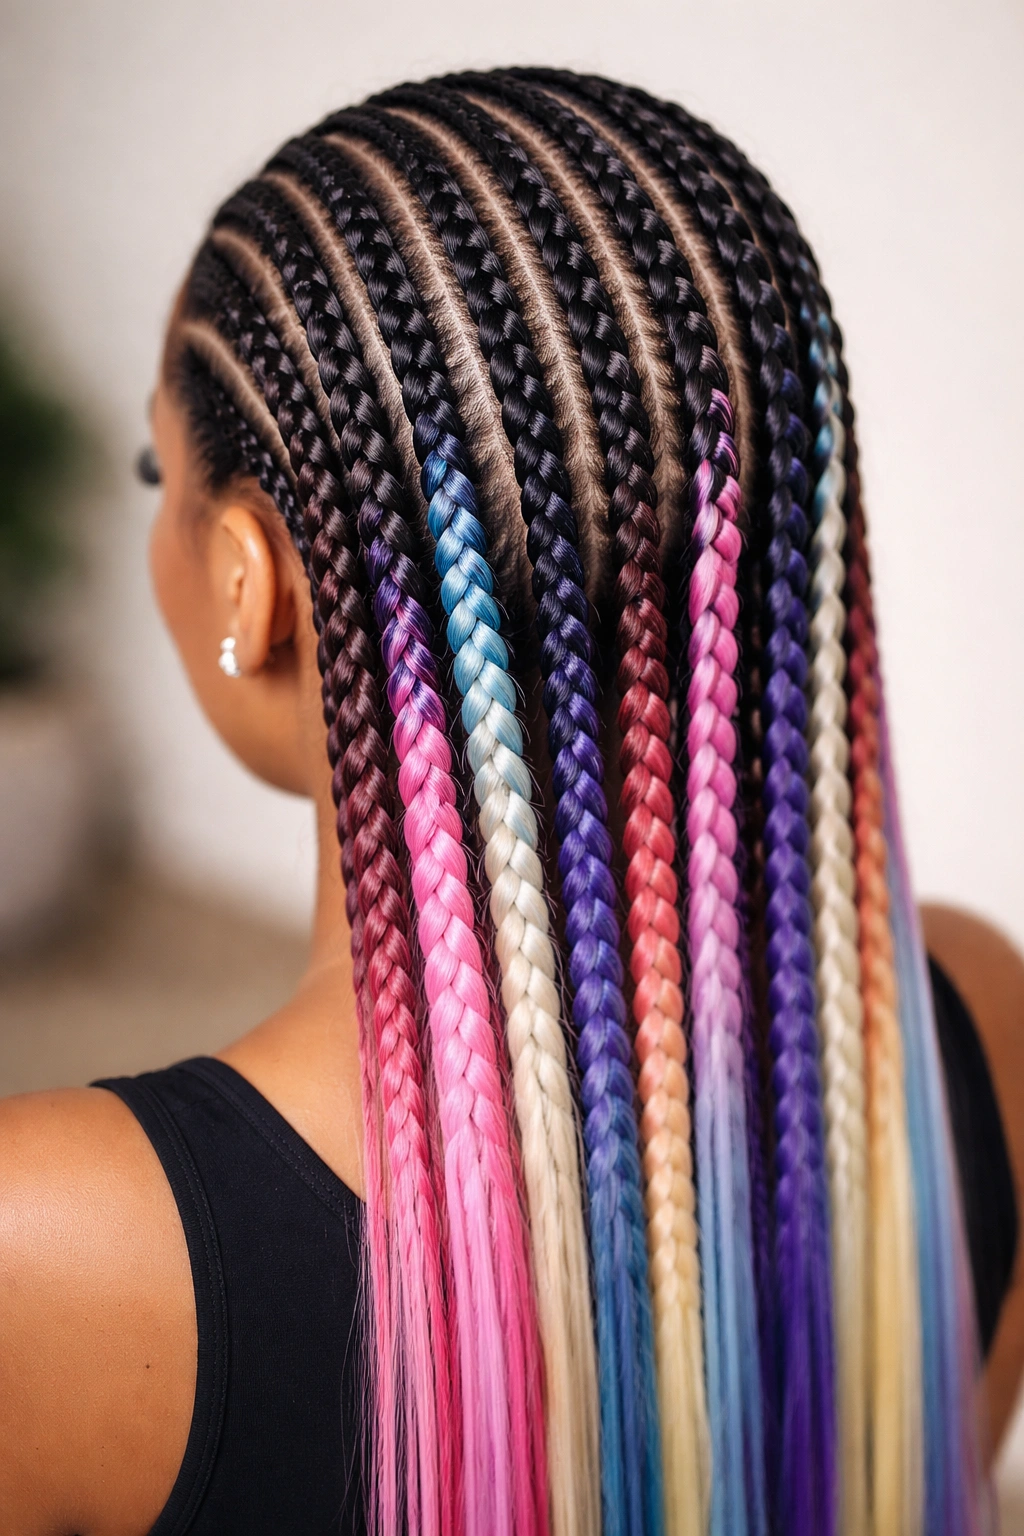
Braid with pre-dyed colored hair extensions, ombré extensions, or patterned extensions (like animal print or tie-dye synthetic hair) woven directly into the cornrows from installation. This creates color, length, and pattern without limiting your options to what’s naturally growing from your scalp. The protective benefits remain identical—you’re still creating low-manipulation enclosed braids.
Extension-Enhanced Protection and Length
Weaving extensions directly into cornrows during installation means the extensions are braided in continuously and secured throughout the protective period—they’re not clipped or pinned on and can’t slip. This technique actually strengthens the braids and creates a heavier, more substantial protective style. Extensions add length and visual interest without requiring your natural hair to provide all the volume and coverage; this can feel less heavy and less dependent on your hair’s thickness.
Extension Selection and Application
- Choose extensions specifically designed for braiding (typically pre-stretched synthetic or human hair)
- Colored extensions offer options ranging from natural tones to vivid jewel tones and pastels
- Ombré extensions (color-faded from darker to lighter) create visual depth and movement
- Pattern extensions (animal print, metallic, tie-dye) read as more artistic and editorial
- Extensions add 30–45 minutes to installation time because each braid requires careful placement and blending
- Wear extension-heavy cornrows for no longer than 6 weeks; the added weight can create scalp fatigue
- Moisturize extensions as well as your natural hair and scalp to maintain the style throughout the protective period
Worth knowing: Pre-twisted or pre-braided extensions (where the extension hair comes in a braid format) save significant installation time compared to loose extension hair.
14. Sleek Straight Back Cornrows With Smooth Gel Finish
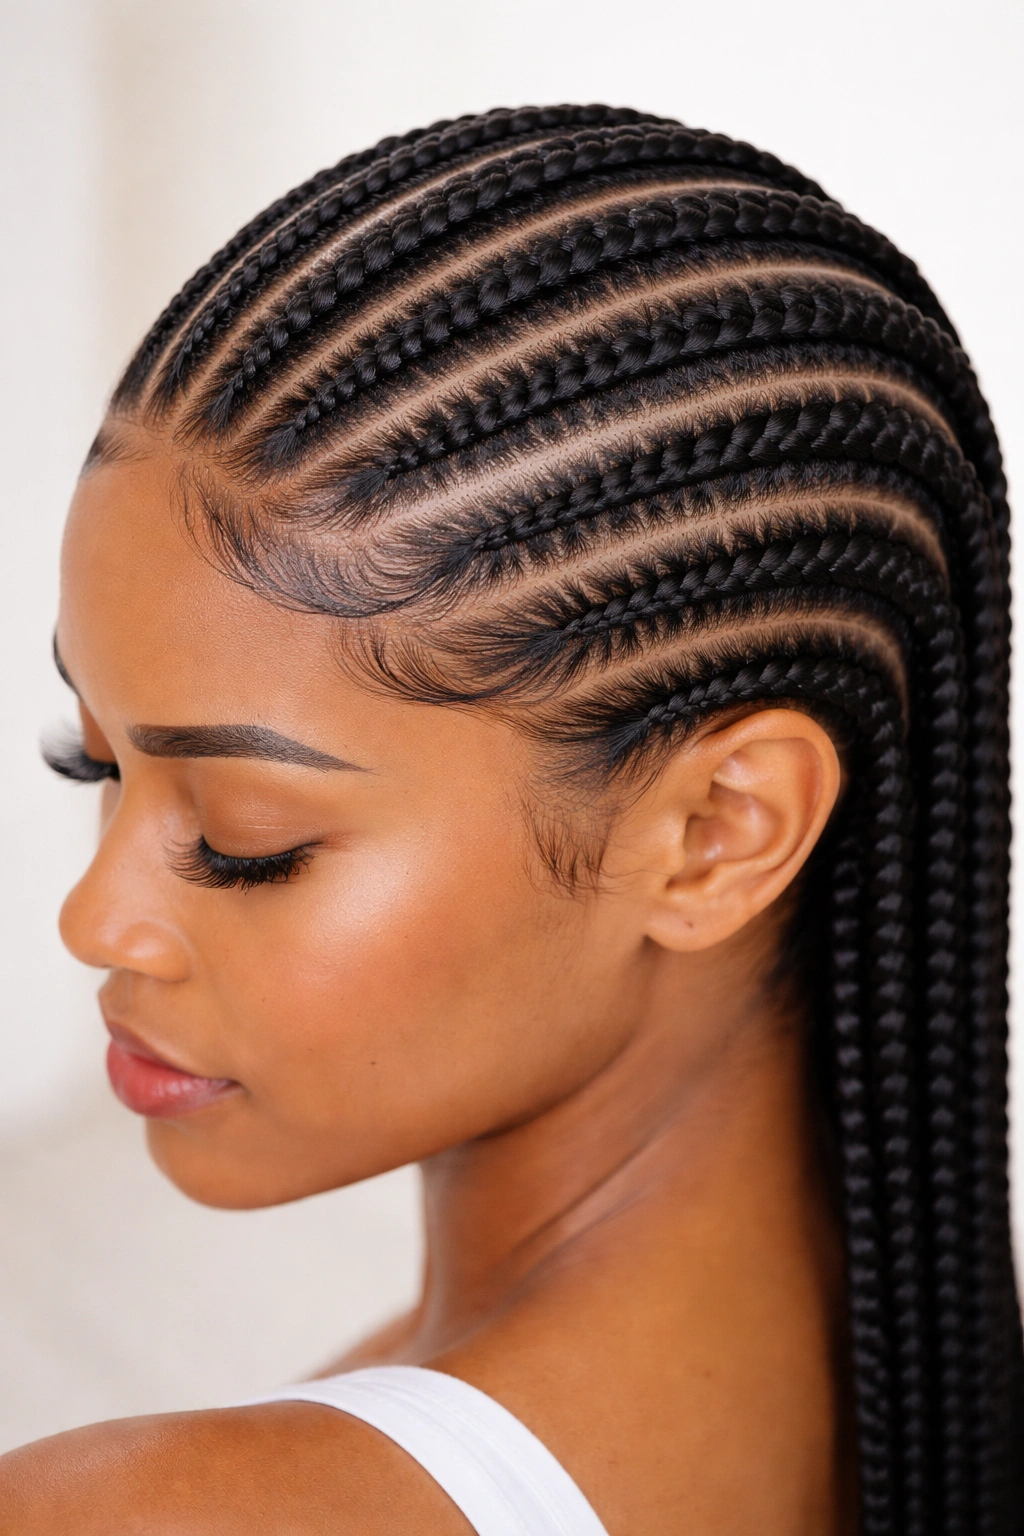
Install traditional straight back cornrows with an emphasis on sleek, smooth edges. Use a light smoothing gel (not heavy or greasy products) to set the hairline and edges, creating a polished, refined appearance. This is the most minimal variation—straightforward protection with attention to finish and presentation.
The Refined Protection of Sleek Styling
This style represents the pure protective benefits of cornrows with zero additional complications. The focus on smoothing and edges means you’re paying attention to every detail of the installation, which often results in better-executed, more comfortable braids. The gel finish creates a sealed, polished appearance that works for virtually any setting—professional, casual, athletic, or formal. The simplicity also means maintenance is minimal—just moisturize the scalp and braids every few days and let the style do its work.
Achieving the Sleek Finish
- Use a lightweight edge control gel or defining gel specifically formulated to be smooth, not crunchy
- Apply gel only to the hairline and edges, not throughout the braids themselves
- Use a firm brush or your fingertips to direct hair smoothly into the cornrow pattern before the gel sets
- The gel should set within minutes and feel soft, not stiff or heavily coated
- Reapply gel around the edges weekly to maintain the sleek appearance throughout the protective period
- This style is perfect for anyone who wants protection without any additional styling or accessory commitments
- Wear sleek cornrows for 4–6 weeks depending on how well the edges hold and your scalp comfort level
Pro tip: A sleek cornrow style with minimal edge product looks effortless but sophisticated—it’s a favorite among people with professional or minimalist aesthetics.
Final Thoughts
Straight back cornrows represent one of the most authentic, accessible, and genuinely protective styling options available for textured hair. Each of the 14 variations outlined here offers a different visual or practical approach while maintaining the core protective benefits—reduced manipulation, sealed ends, moisture retention, and minimal friction. The style that’s right for you depends on your lifestyle, aesthetic preferences, hair density, and how much styling maintenance you’re willing to commit to during the protective period.
The most important factor in protecting your hair with cornrows isn’t the specific variation you choose—it’s the quality of the installation, your commitment to scalp and braid maintenance, and respecting the timing boundaries of how long to wear them. A perfectly installed classic straight back cornrow style will protect your hair more effectively than an elaborate, poorly executed variation. Start with whichever version appeals to you most visually, find a skilled braider who understands protective styling principles, and commit to consistent moisturizing and gentle handling throughout the wearing period.
When you take cornrows down after several weeks, your hair should look and feel nourished, your ends should be intact and healthy-looking, and your scalp should feel relieved rather than damaged. If you’re experiencing any discomfort, seeing breakage, or noticing that your hairline has thinned, those are signals to reduce tension during the next installation, wear the style for a shorter period, or incorporate rest weeks between protective styles. Your hair will thank you for the consistent protection, and you’ll likely find that cornrows become a reliable, go-to protective strategy that fits seamlessly into your hair care routine.