If you’ve been wearing your natural hair in the same style for weeks and you’re craving something fresh, cornrow updos might be exactly what you need right now. There’s something uniquely satisfying about taking protective braids you already have and transforming them into an elegant, pulled-together look — especially when you’re heading somewhere that calls for a polished appearance. The beautiful thing about cornrow updos is that they work with hair that’s already protected, textured, and full of personality, and they allow you to showcase the skill and artistry of your braids in ways that simple down-style wearing never could.
What makes cornrow updos particularly appealing is their versatility. Whether your braids are thick and chunky, thin and delicate, styled with color, or adorned with beads and rings, there’s an updo method that’ll make them shine. You can create a sleek, minimalist aesthetic or go bold and sculptural. You can wear them casual enough for everyday life or dress them up for formal events. The incredible range of possibilities means you can literally reinvent your look without taking down a single braid or spending money on a new style.
The best part? Most of these updos require minimal additional styling products and take just a few minutes to execute once you know the technique. You’re working with hair that already has structure and definition, which means you can create polished looks without the damage that comes from heat styling or daily manipulation. Let’s walk through 13 stunning cornrow updo styles that showcase the full potential of your braided protective style.
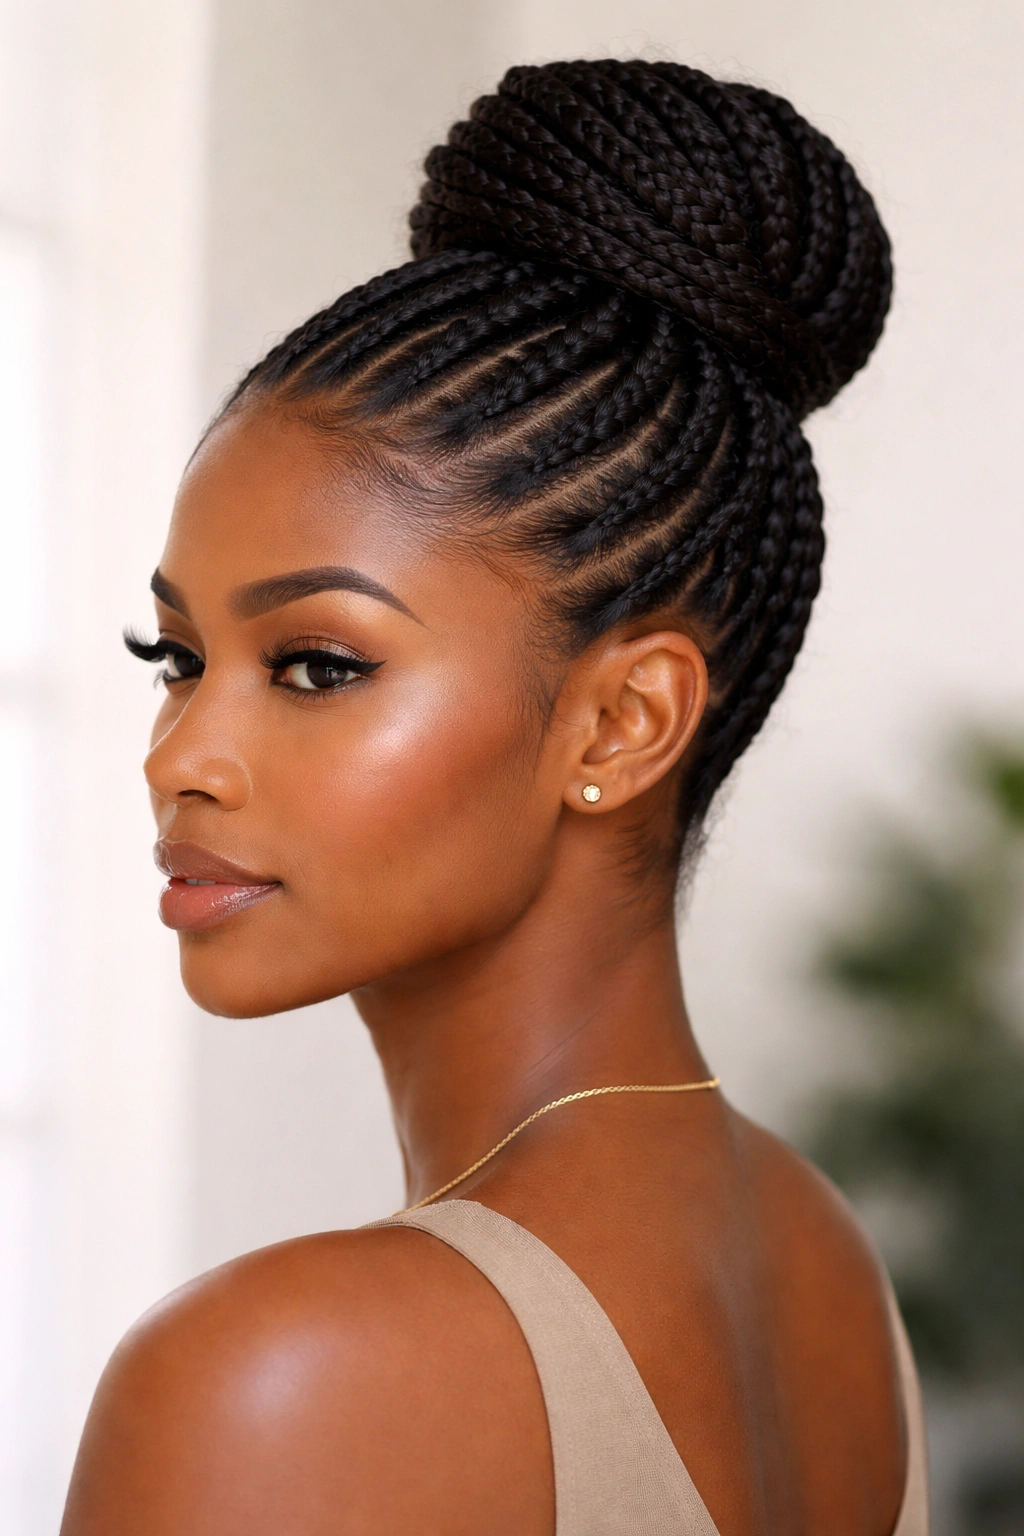
1. The Classic High Bun
This is the foundation updo that works in virtually any setting — professional, casual, athletic, or formal. You’re simply gathering all your cornrows at the crown of your head and wrapping them into a compact, rounded bun shape. The magic is in how polished it looks, even though the execution is straightforward. A high bun keeps your braids completely off your face and neck, making it perfect for hot weather or when you want maximum visual focus on your features.
Why This Style Works
The high bun is timeless because it’s fundamentally flattering to most face shapes and works with cornrows of any thickness or length. It transforms your braids into a sculptural crown element that draws the eye upward and creates the impression of length and elegance. The style is also incredibly practical — it’s secure enough for physical activity yet refined enough for professional settings.
Quick Style Details
- Gather braids at the very top of your head, roughly where you’d draw a line from ear to ear across the crown
- Twist the gathered braids together gently as you coil them into a rounded bun shape
- Secure with bobby pins inserted horizontally through the bun for maximum hold
- Leave a few face-framing pieces loose if you prefer softness, or keep it completely sleek for maximum polish
- A light smoothing serum or gel on baby hairs creates definition without crunchiness
Pro tip: If your bun looks flat, gently tease it at the base before securing — this gives you more volume and dimension without adding bulk.
2. The Romantic Low Side Bun
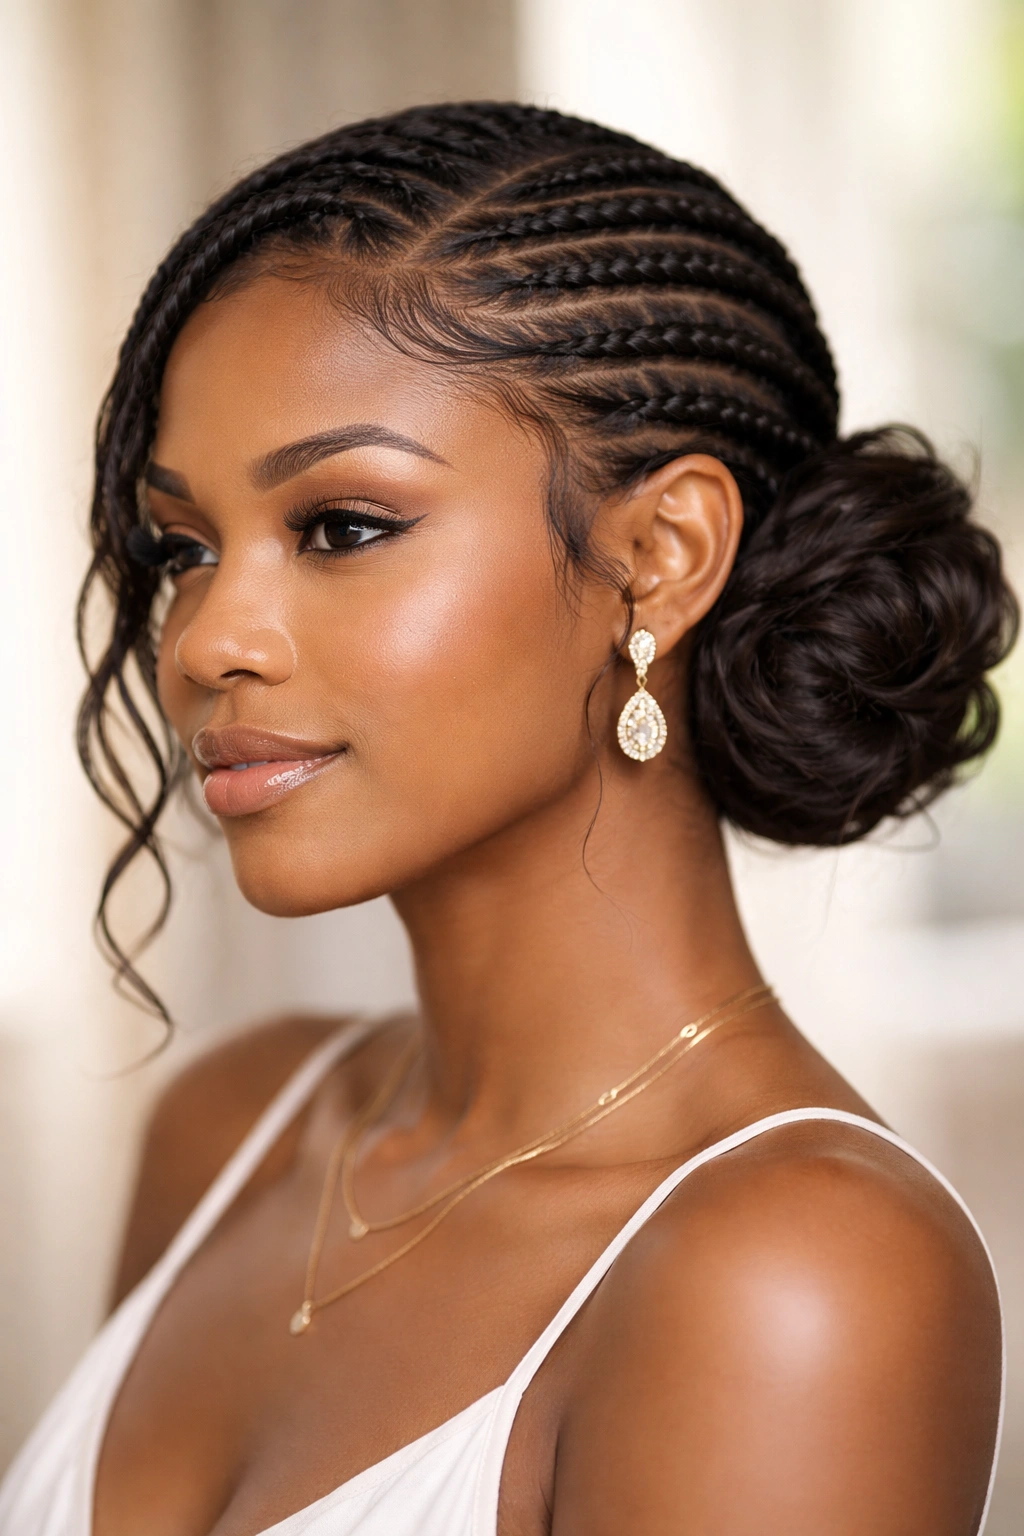
For a look that feels effortlessly elegant, the low side bun gathers all your braids to one side at roughly ear level or slightly lower. This placement creates an asymmetrical, softer vibe than a centered high bun while still keeping hair completely off your face and neck. The side bun is particularly flattering if you have a longer face, as the horizontal positioning adds visual width.
Why This Style Works
A low side bun reads as both casual and intentional — you could wear it to brunch with friends or to a date night dinner. The asymmetry makes it feel more interesting than a centered bun while maintaining the same polished simplicity. It’s also much easier to execute than it appears, which is always a bonus.
Quick Style Details
- Sweep all braids to one side, gathering at approximately ear level or an inch or two below
- Twist the braids together gently and coil into a loose, relaxed bun shape
- Secure with bobby pins, allowing a few braids to fall softly around the bun perimeter for movement
- You can leave a few pieces loose near your ear and cheekbone if you want softness
- A small decorative clip or claw can anchor the style and add visual interest
- This style benefits from slightly undone texture — don’t aim for perfect sleekness
Worth knowing: This style shifts throughout the day as you move, which adds to its charm — it looks intentionally relaxed rather than trying too hard.
3. The Crown Bun with Face-Framing Braids
This is a high bun variation that deliberately leaves 2-4 braids loose and framing your face before gathering the rest into an updo. The face-framing pieces create softness and dimension while keeping most of your hair up and off your neck. This style is stunning for date nights, photography, or when you want to look put-together without feeling severe.
Why This Style Works
Face-framing braids soften the geometry of the bun and create visual interest that a solid, completely-gathered bun doesn’t have. They also allow you to show off the detail and texture of your cornrows, which is especially beautiful if your braids have color, beads, or intricate patterns woven through them. The style reads as intentional and fashion-forward rather than purely functional.
Quick Style Details
- Before gathering anything, select 2-4 braids near your face — typically one on each side and potentially one or two in front
- Gather the remaining braids at the crown and form your high bun, securing with bobby pins
- Leave the face-framing pieces loose, allowing them to fall naturally along your cheekbones and jaw
- You can curl or wave the loose pieces very gently with your fingers for movement, or leave them straight for graphic definition
- The loose pieces should look like they’re part of the updo, not like you forgot to gather them
- Smooth any baby hairs at the hairline with a light gel
Pro tip: This works particularly well if your cornrows are alternating colors or have beads — the loose pieces become decorative elements that draw attention to the artistry of your braids.
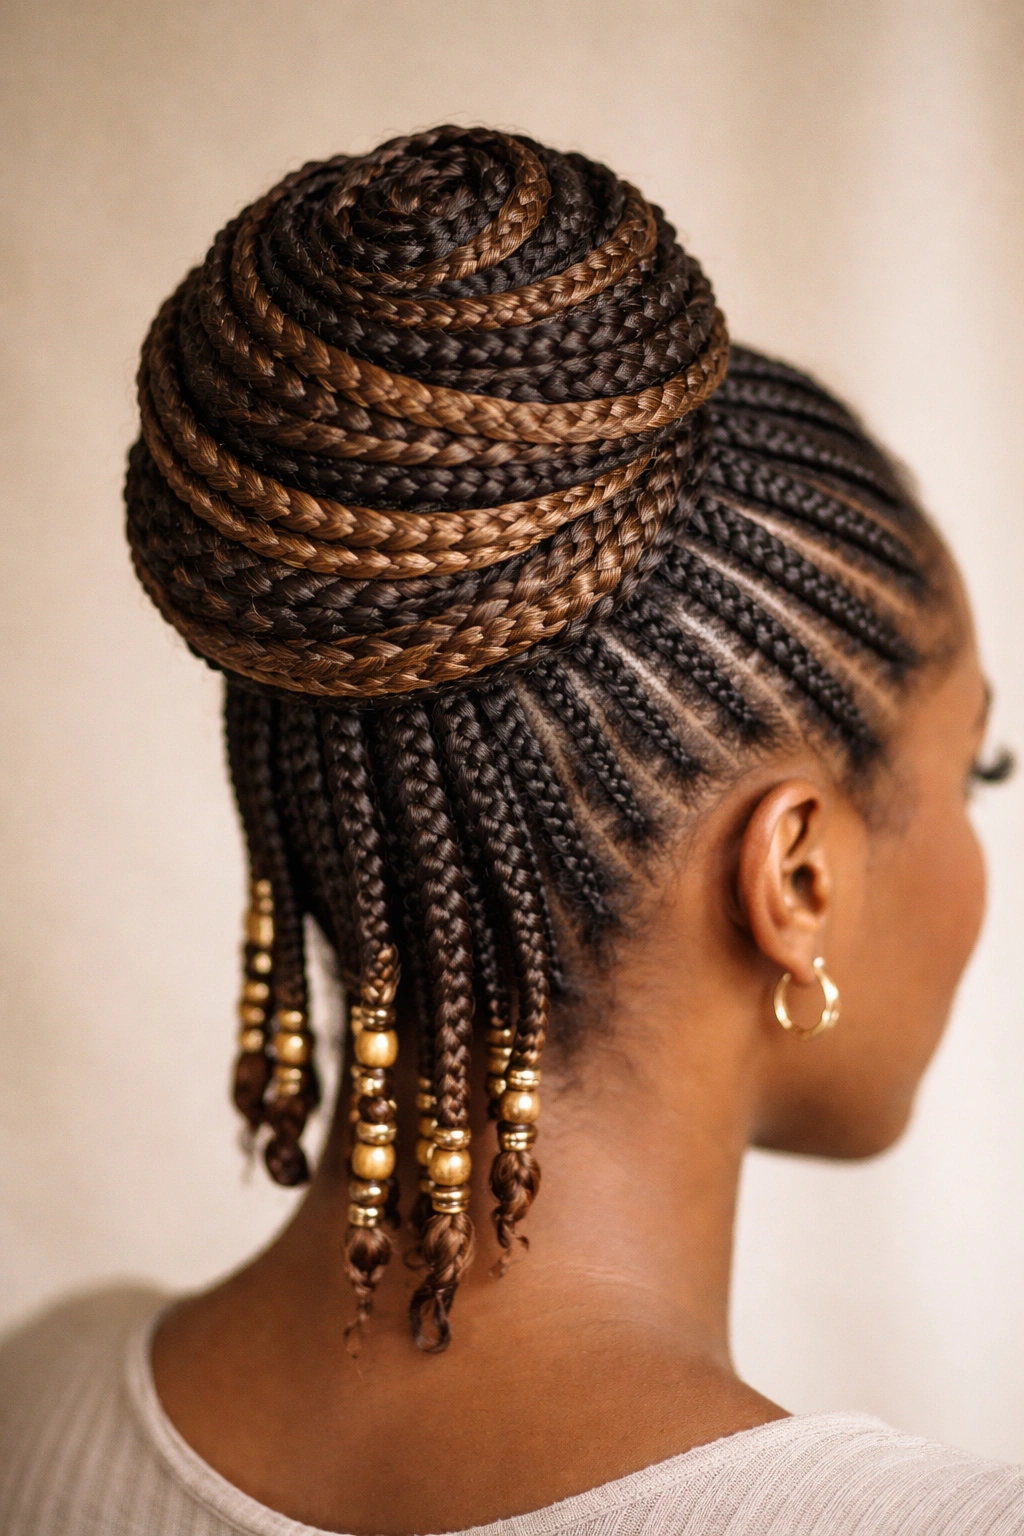
4. The Spiral Bun with Wrapped Base
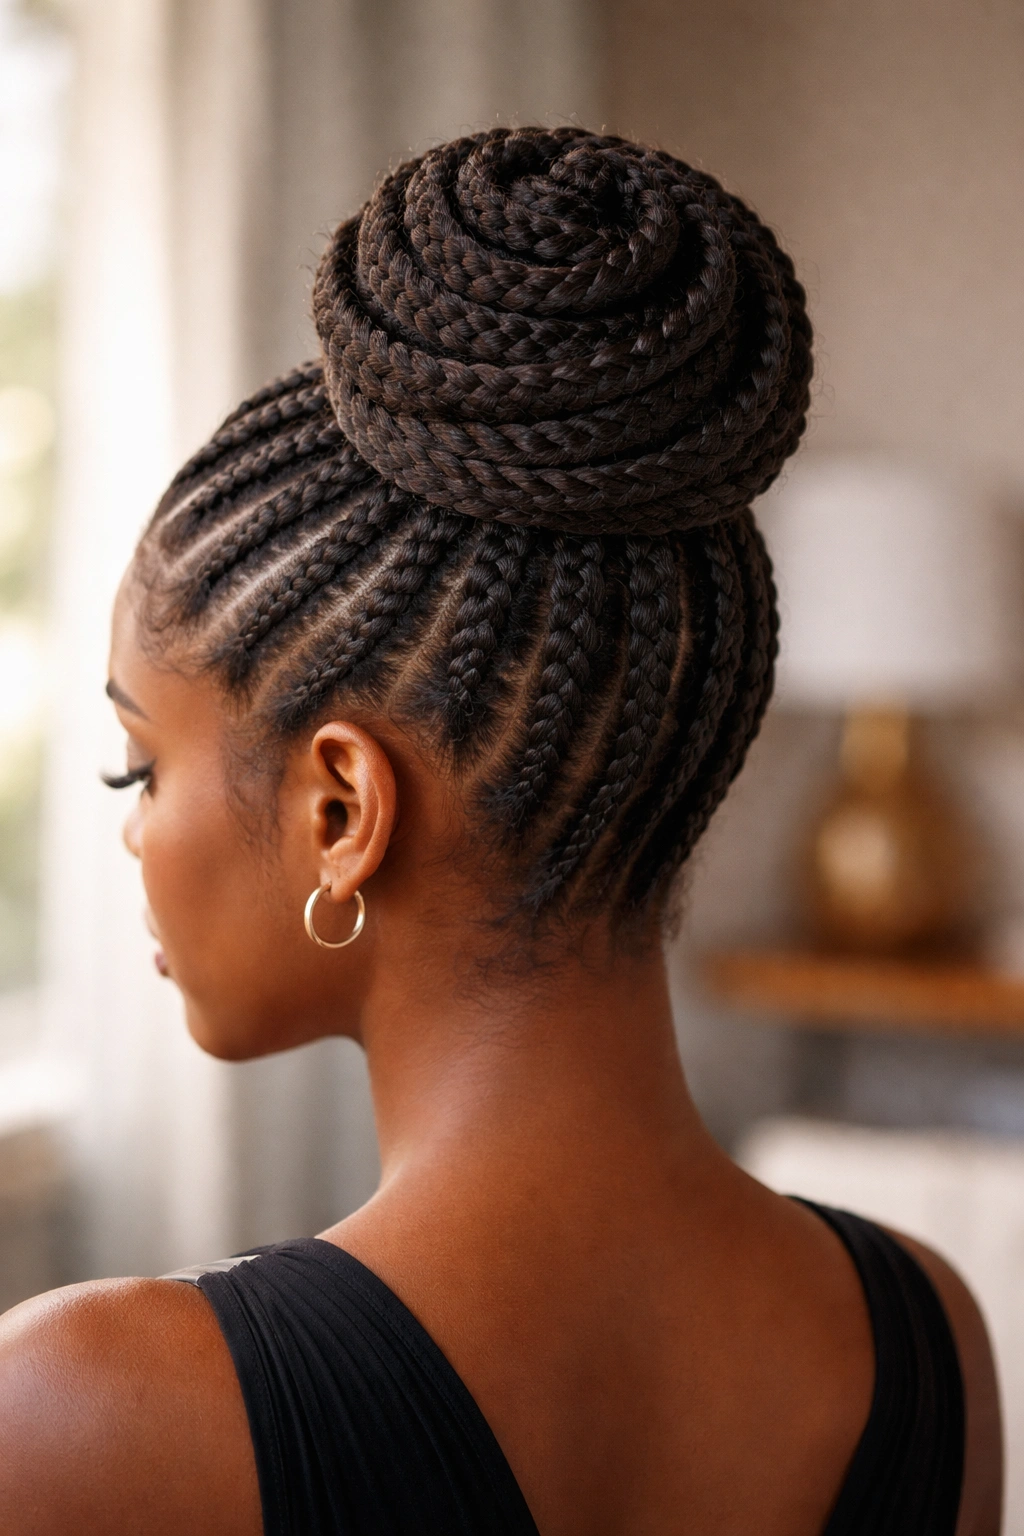
Instead of simply twisting your gathered braids, you’ll coil them into a tight spiral that wraps around itself, then wrap an additional braid (or section of hair if you have loose curls) around the base. This creates architectural dimension and a polished, high-fashion appearance. The wrapped base catches light differently and gives the illusion of much more complexity than the execution requires.
Why This Style Works
The spiral bun with a wrapped base looks like you spent an hour styling when you actually spent about five minutes. It’s striking without being fussy, and the wrapped element adds visual weight that makes the style look more intentional. This is an excellent choice if you want to feel extra put-together or if you’re attending an event where you want heads turning.
Quick Style Details
- Gather all braids at the crown into a high ponytail hold (literally just hold them in your hand, don’t secure yet)
- Begin coiling the braids around the base of the gathered ponytail, wrapping around itself in a spiral
- As you coil, secure with bobby pins pressed through the spiral into the base
- Once the spiral is formed and secured, select one braid and wrap it around the base of the bun horizontally, tucking the end underneath
- Secure the wrapped braid with bobby pins hidden beneath the wrap
- The result should look like a bun that’s sitting in a circular frame
Insider note: If you have any loose, flyaway pieces, a tiny spritz of lightweight hairspray keeps them smooth without crunchiness.
5. The Goddess Crown Updo
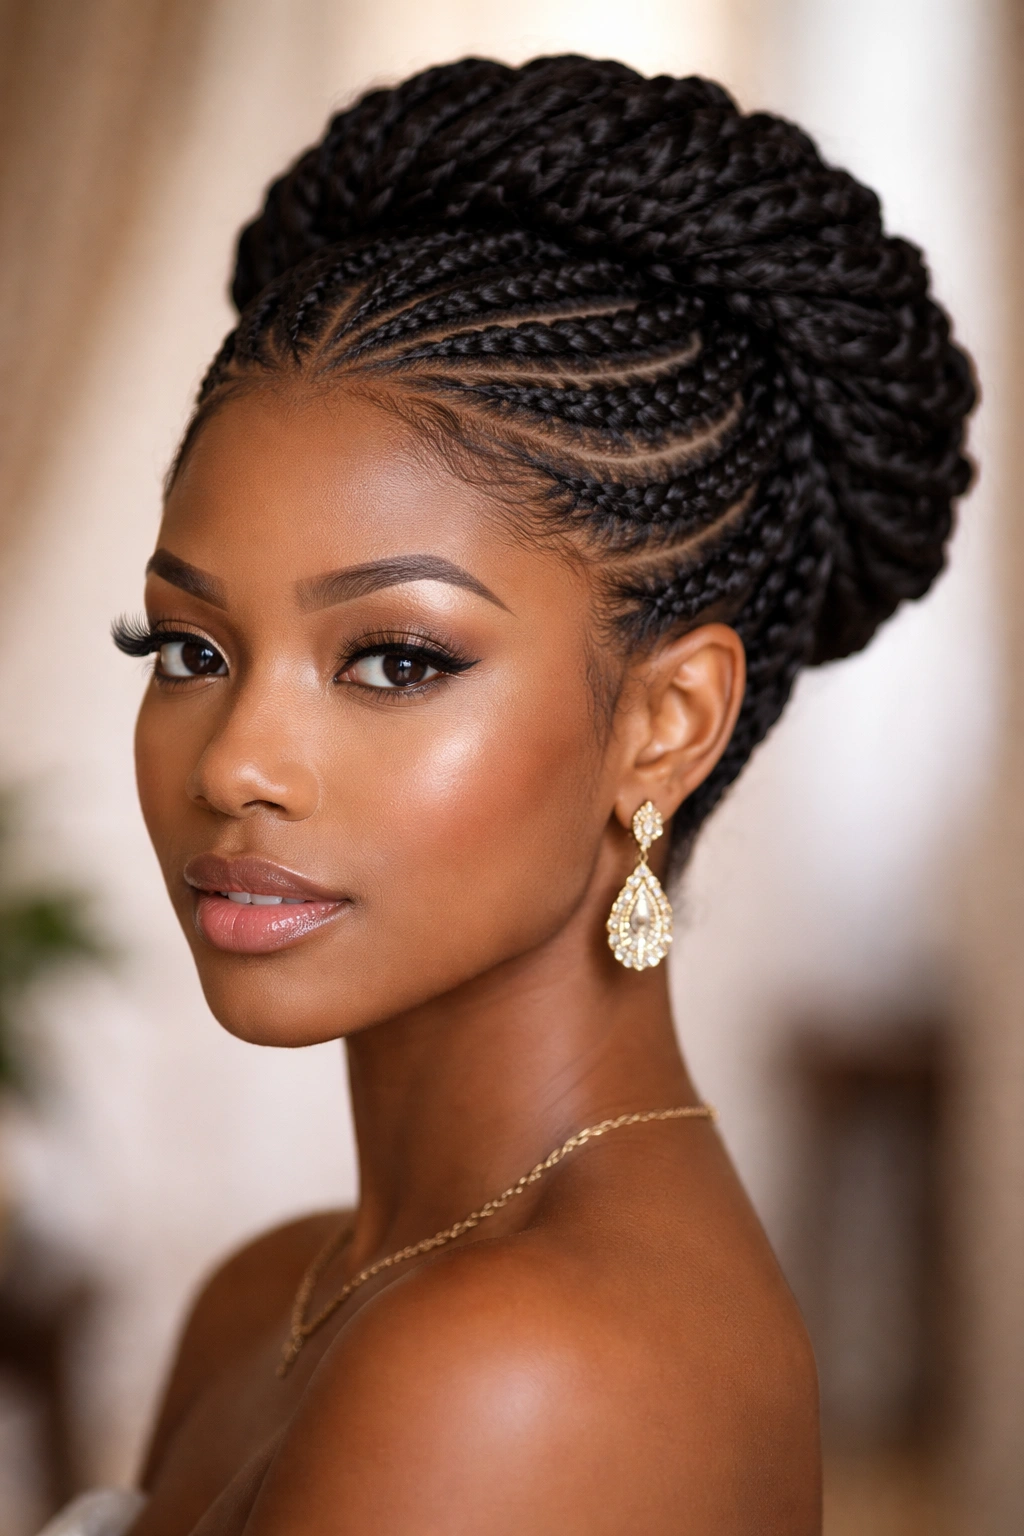
This style gathers braids in a circular pattern around the entire crown of your head, creating an actual crown-like appearance. Rather than gathering at one point, you’re creating a halo of braids that circles your head, with the height concentrated at the top center. It’s visually dramatic and absolutely stunning for special occasions, photography, or when you simply want to feel like royalty.
Why This Style Works
The goddess crown reads as ceremonial and intentional — it’s the kind of style that makes a statement. It’s particularly striking on longer braids that have enough length to circle your head with dimension and movement. The style also beautifully showcases cornrows because the circular arrangement highlights the pattern and artistry of each braid.
Quick Style Details
- This style works best with longer braids or a large number of thinner braids
- Begin gathering braids from one temple, working around the back of your head to the opposite temple
- As you gather, loosely coil and pin braids to create a circular crown formation
- The goal is height at the top center and braids arranged in a loose crown around your head
- You want dimension and slight loose-ness — too-tight pinning makes it look uncomfortable
- Leave the braids that circle your crown slightly loose for a more romantic, goddess-like appearance
- This style often looks better with a few braids falling down the back
Worth knowing: Goddess crowns photograph beautifully, so this is an excellent choice for special events where you’ll have pictures taken.
6. The Twisted Crown Updo
This style involves twisting pairs of braids together as you move around your head in a circular pattern, then pinning the twisted sections to create a crown effect. Each twist adds visual complexity and catches light differently, creating a multi-dimensional appearance. It’s more intricate than a simple gathered bun but still achievable in under ten minutes once you understand the technique.
Why This Style Works
Twisted crown updos create movement and dimension that make your style look more sophisticated and intentional than straightforward gathering. The twisting motion distributes your hair around your crown rather than concentrating it at one point, which can be more comfortable if you have thicker hair or a heavy braid count. This style also works beautifully with braids of varying lengths.
Quick Style Details
- Start at one temple and select two adjacent braids
- Twist these two braids together loosely, then pin the twisted section to your head
- Move to the next two braids and repeat, working around your head
- Continue this twisting and pinning process until you’ve incorporated all your braids
- The pinned sections should create a crown pattern that circles your head
- Some sections can wrap around the back while others sit along the sides
- Leave slight looseness in the twists for an elegant, non-severe appearance
Pro tip: If you have an uneven number of braids, work three braids together for the last section — the result is still beautiful and balanced.
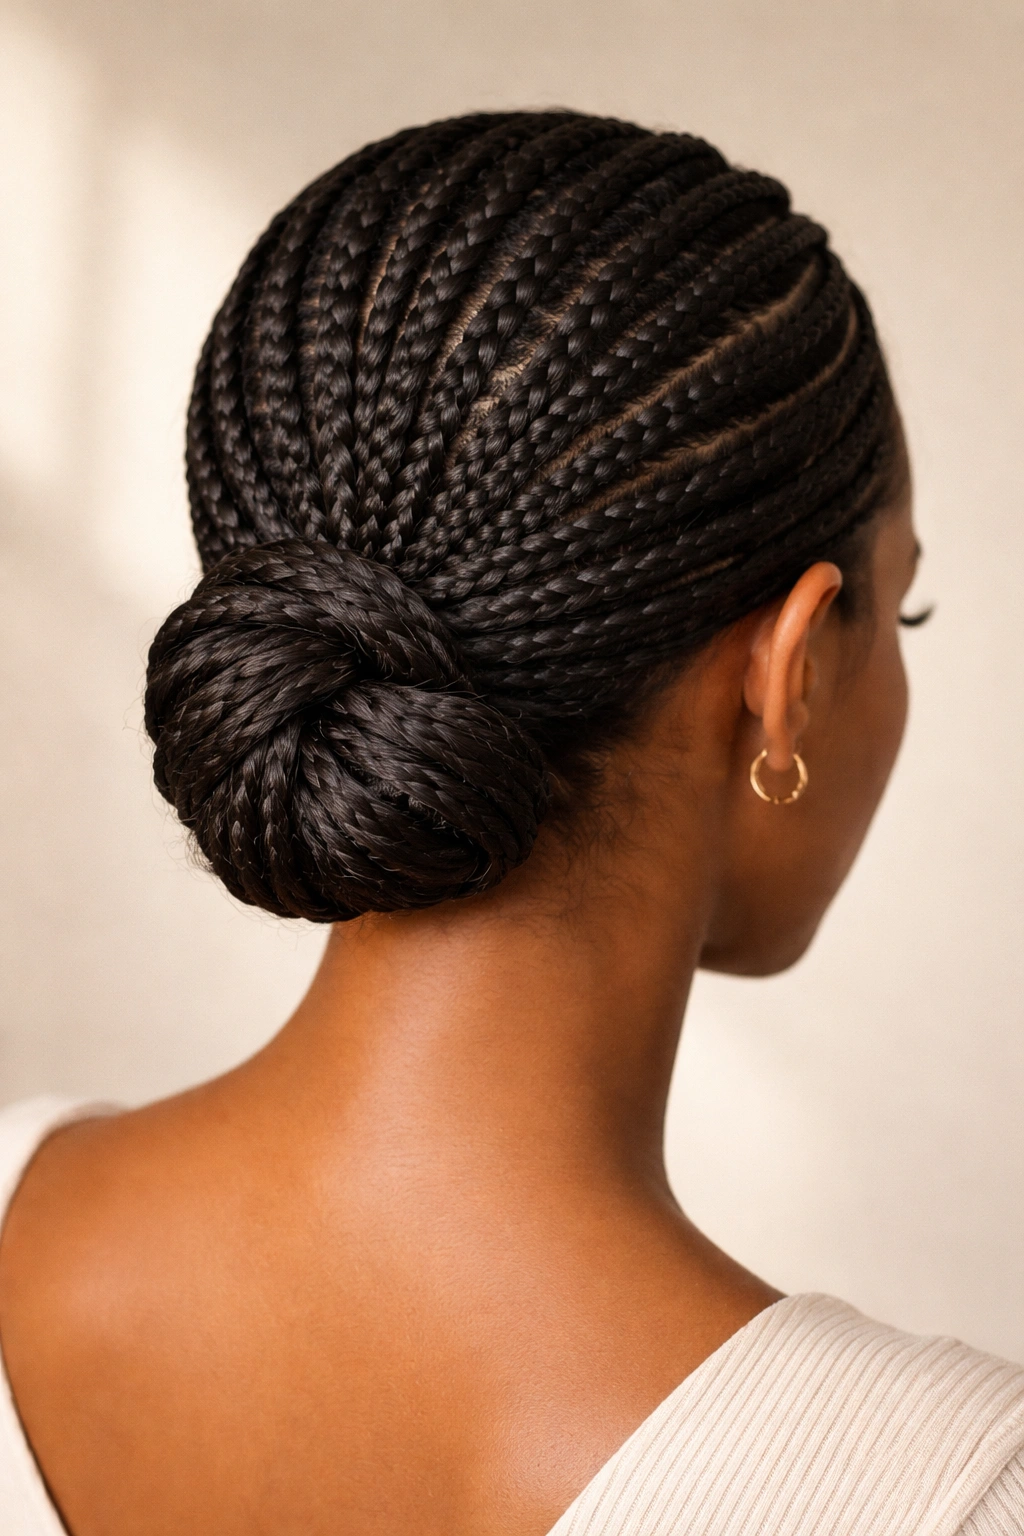
7. The Low Twisted Bun
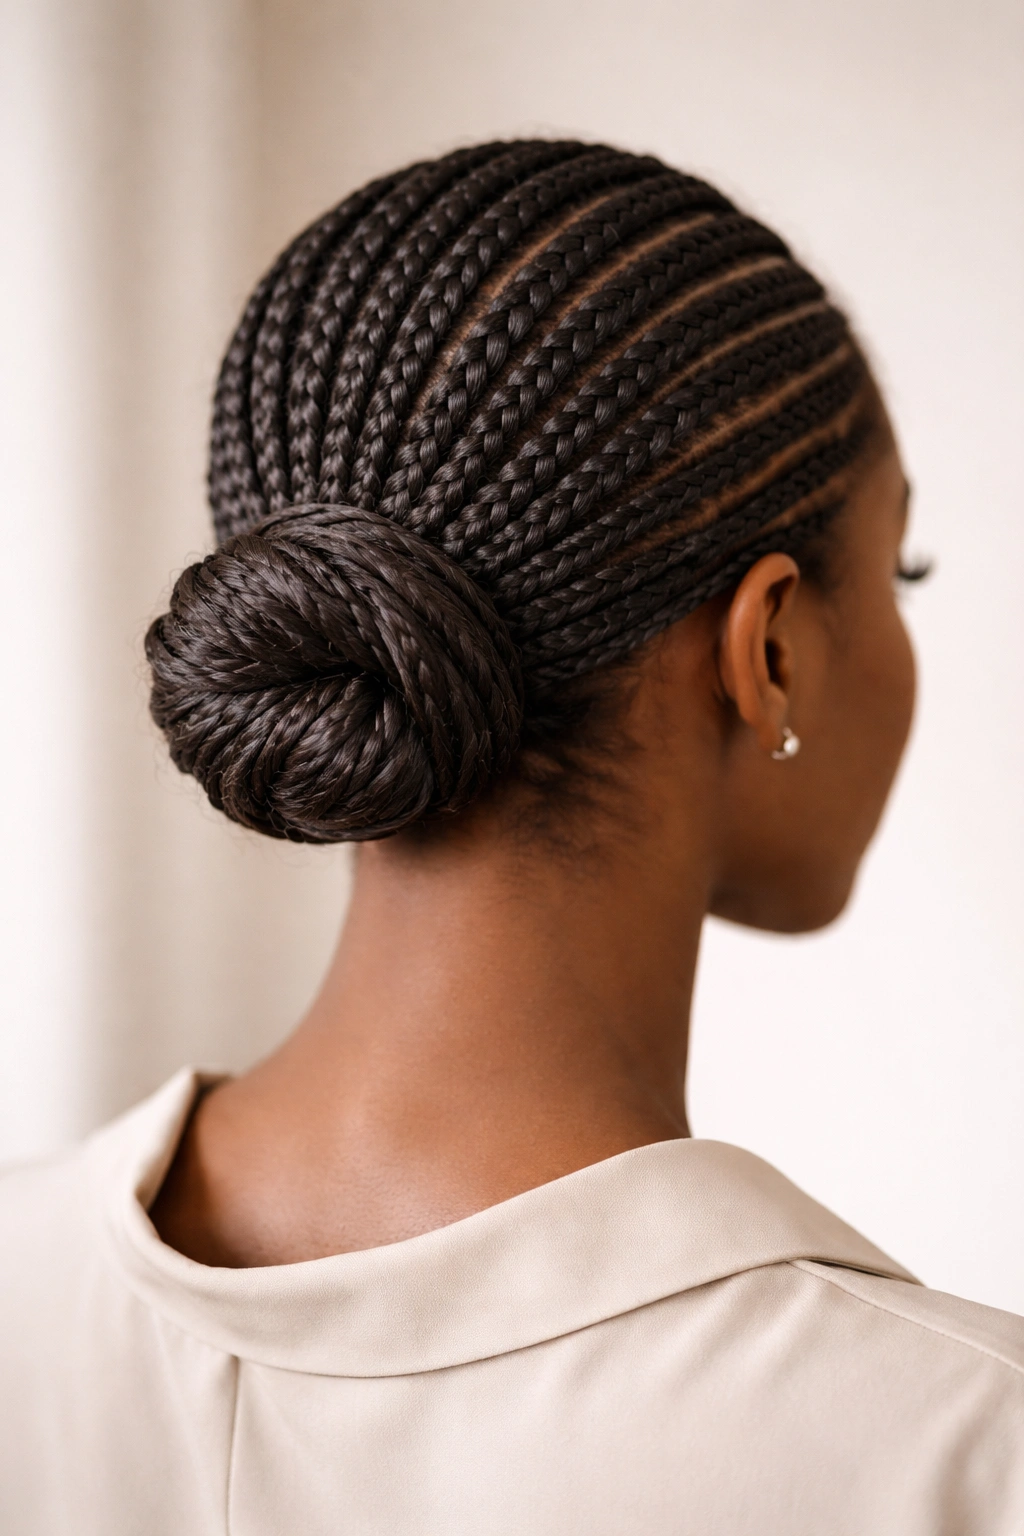
This variation gathers braids at the nape of your neck and twists them together before coiling into a bun. The low placement is sophisticated and works beautifully for professional settings, formal events, or when you want a sleek look without the height of a crown placement. The twisted element adds visual interest while maintaining the simplicity of a gathered bun.
Why This Style Works
Low buns are instantly professional and timeless — they work in corporate offices, at formal dinners, and everywhere in between. The twisted component elevates the style beyond a simple gather, making it feel more intentional and polished. This placement also works well if you have a longer face or if you simply prefer the aesthetic of lower styling.
Quick Style Details
- Gather all braids at the nape of your neck, roughly an inch or two above where your neck meets your shoulders
- Twist the gathered braids together in one direction, creating a spiral effect
- Coil the twisted braids into a compact bun at the nape
- Secure with bobby pins hidden within the twists and coils
- Smooth any baby hairs at your hairline and lower neck with light gel
- Keep this style fairly sleek and neat for maximum polish
- You can leave one very thin braid hanging loose near your neck if you prefer a touch of softness
Worth knowing: This is the style to wear when you want maximum professionalism and sophistication — it never reads as casual or underdone.
8. The Multi-Bun Updo
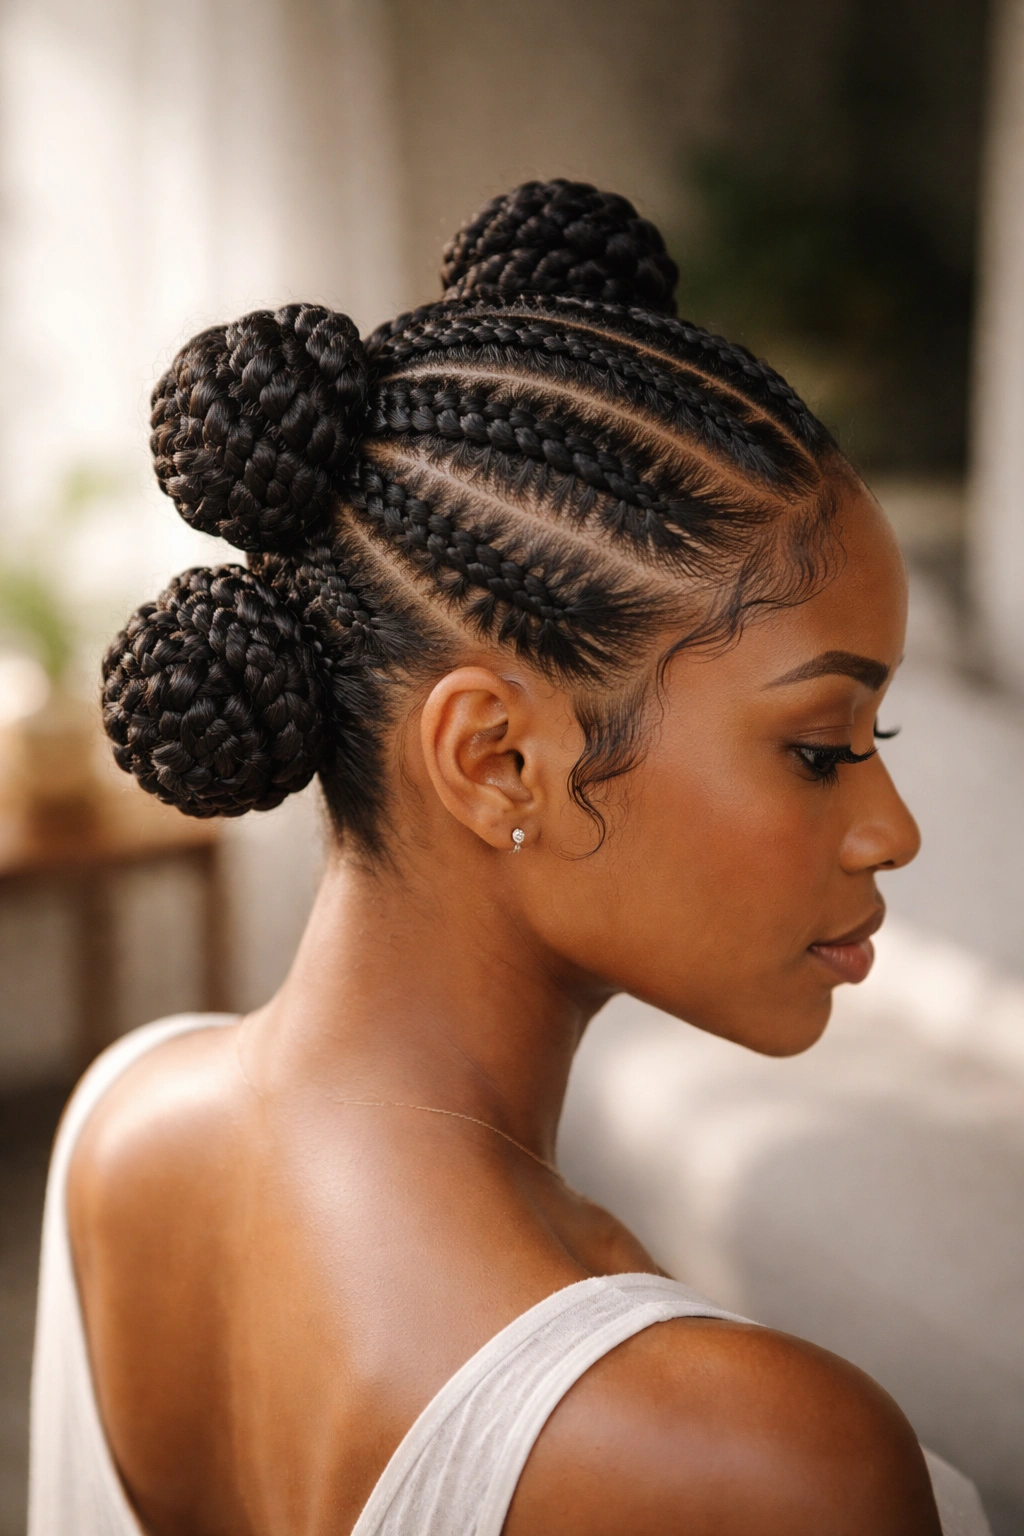
Rather than gathering all braids into one central bun, you’ll create multiple smaller buns distributed across your crown and upper head. This could be two buns on either side, three buns arranged in a triangle, or four small buns positioned in a square formation. The multi-bun approach is playful while still being completely polished and intentional.
Why This Style Works
Multiple buns create visual interest and architectural dimension that a single bun doesn’t achieve. The style feels contemporary and creative without being impractical or difficult to execute. It’s an excellent choice if you want something that feels distinctive and fashion-forward but still appropriately professional for most settings.
Quick Style Details
- Divide your braids into 2, 3, or 4 sections depending on the look you want
- For a two-bun arrangement, create one bun on each side of your head at roughly ear level height
- For a three-bun arrangement, create one centered high bun and one on each side
- For a four-bun arrangement, create buns at four points on your scalp (think of a square or diamond pattern)
- Keep each bun compact and secure with bobby pins
- The buns should sit at varying heights for visual interest
- This style benefits from slight looseness in each bun — too-tight buns can look uncomfortable
Pro tip: You can make each bun slightly different by varying how tightly you coil the braids — some tight and compact, others slightly looser and more relaxed.
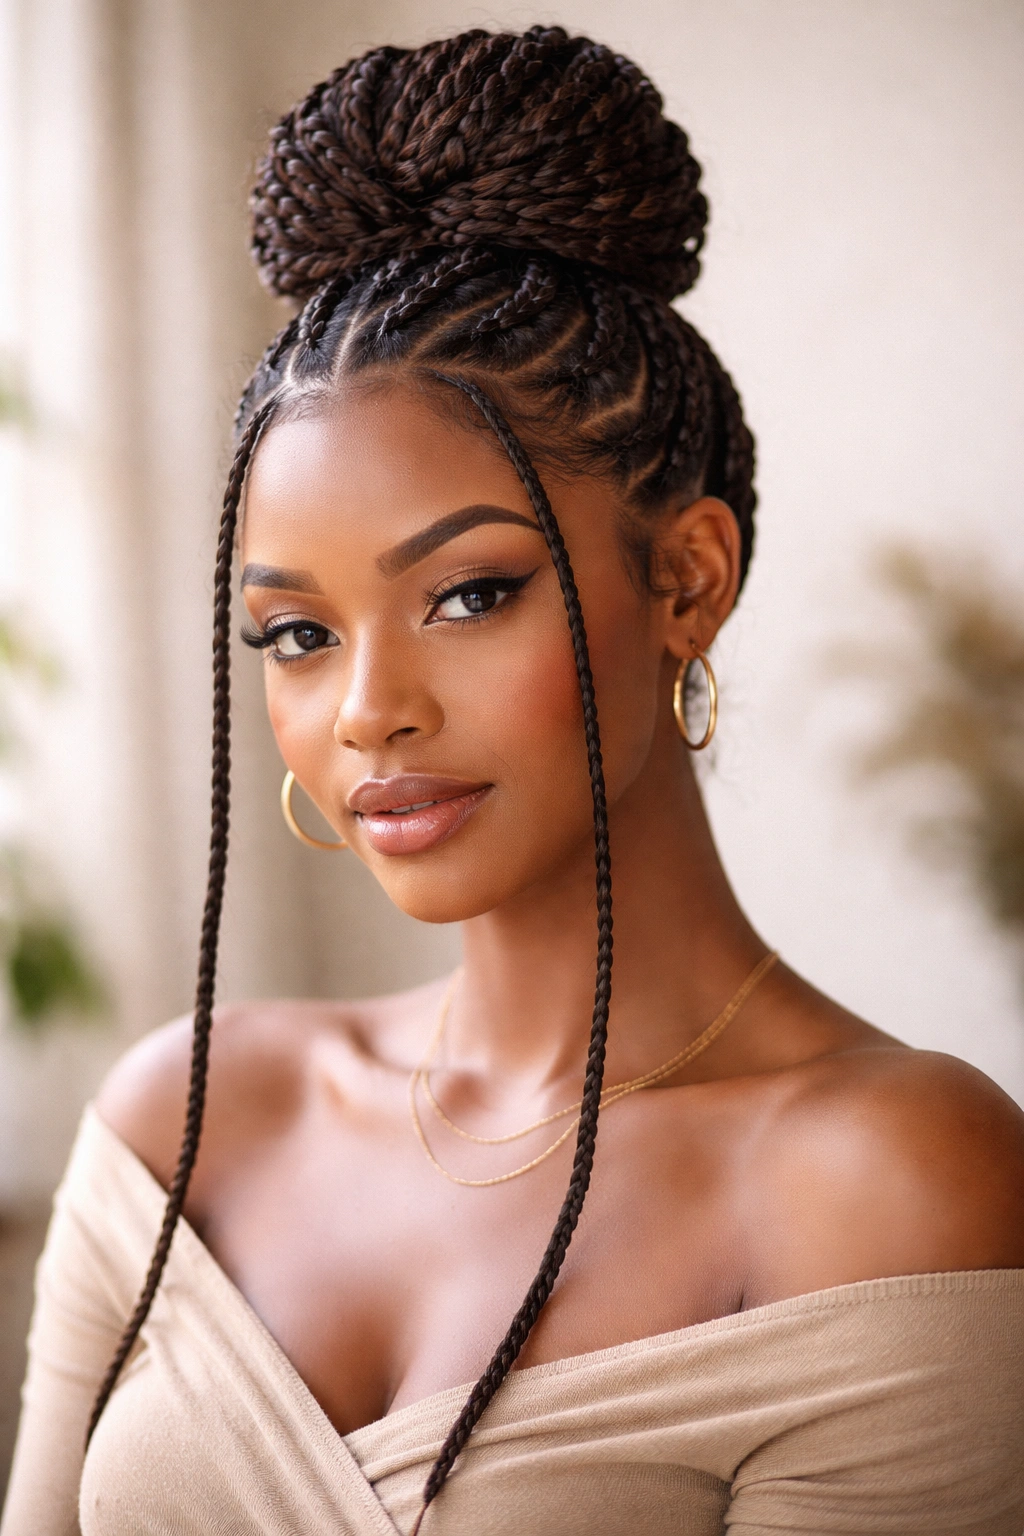
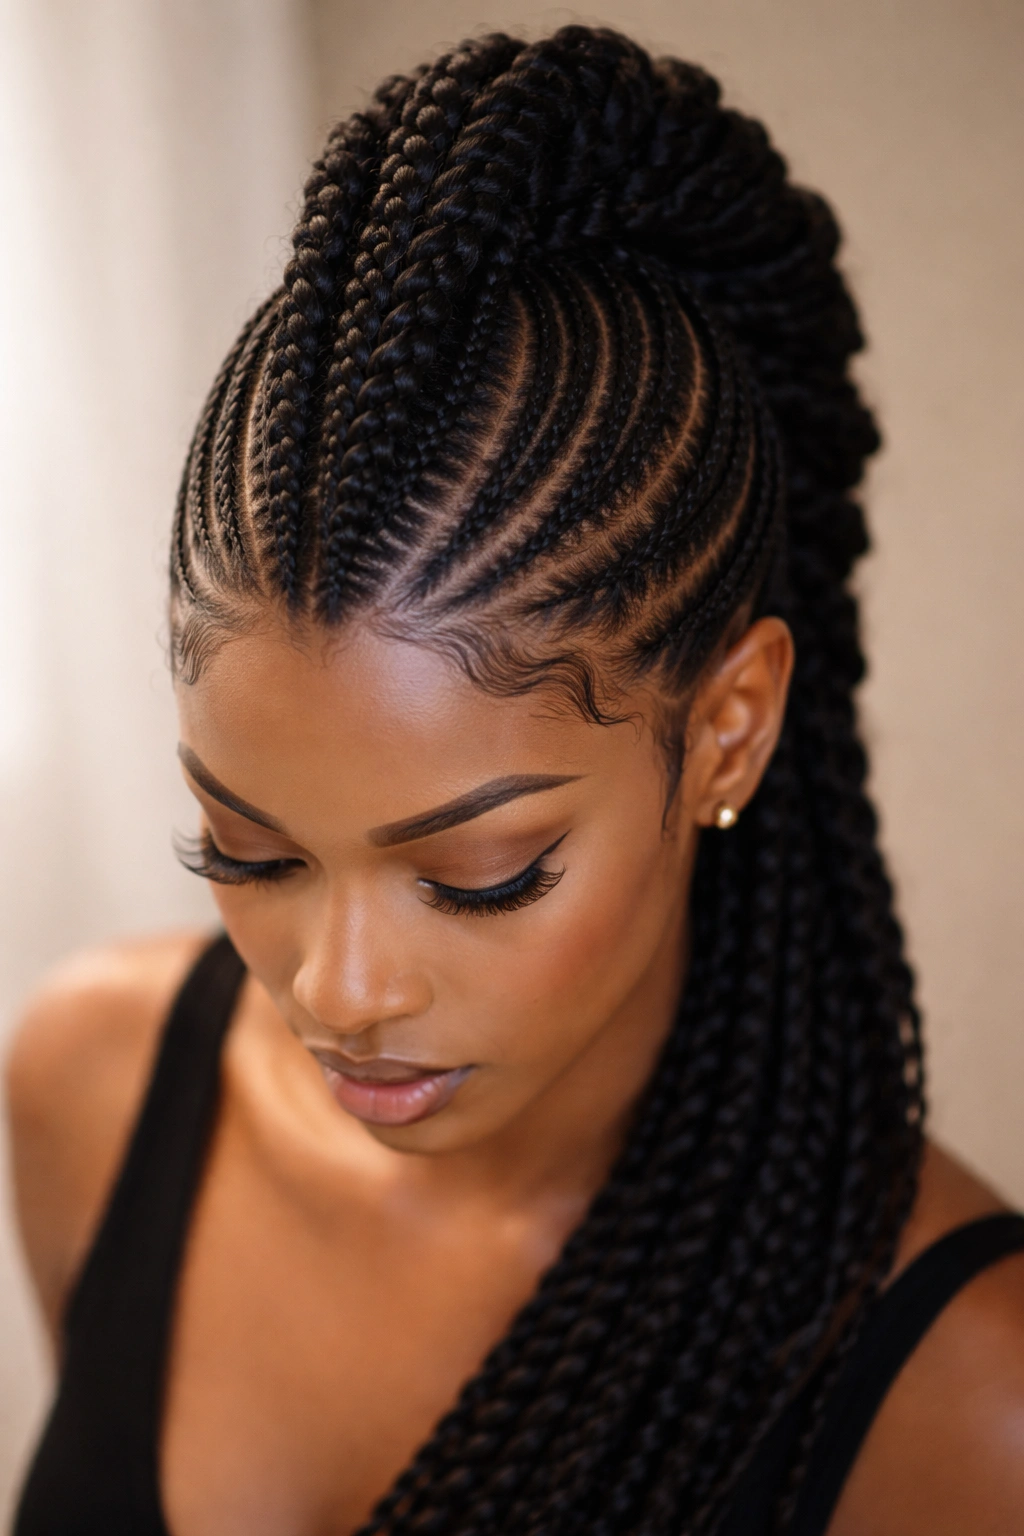
9. The Half-Up, Half-Down Updo
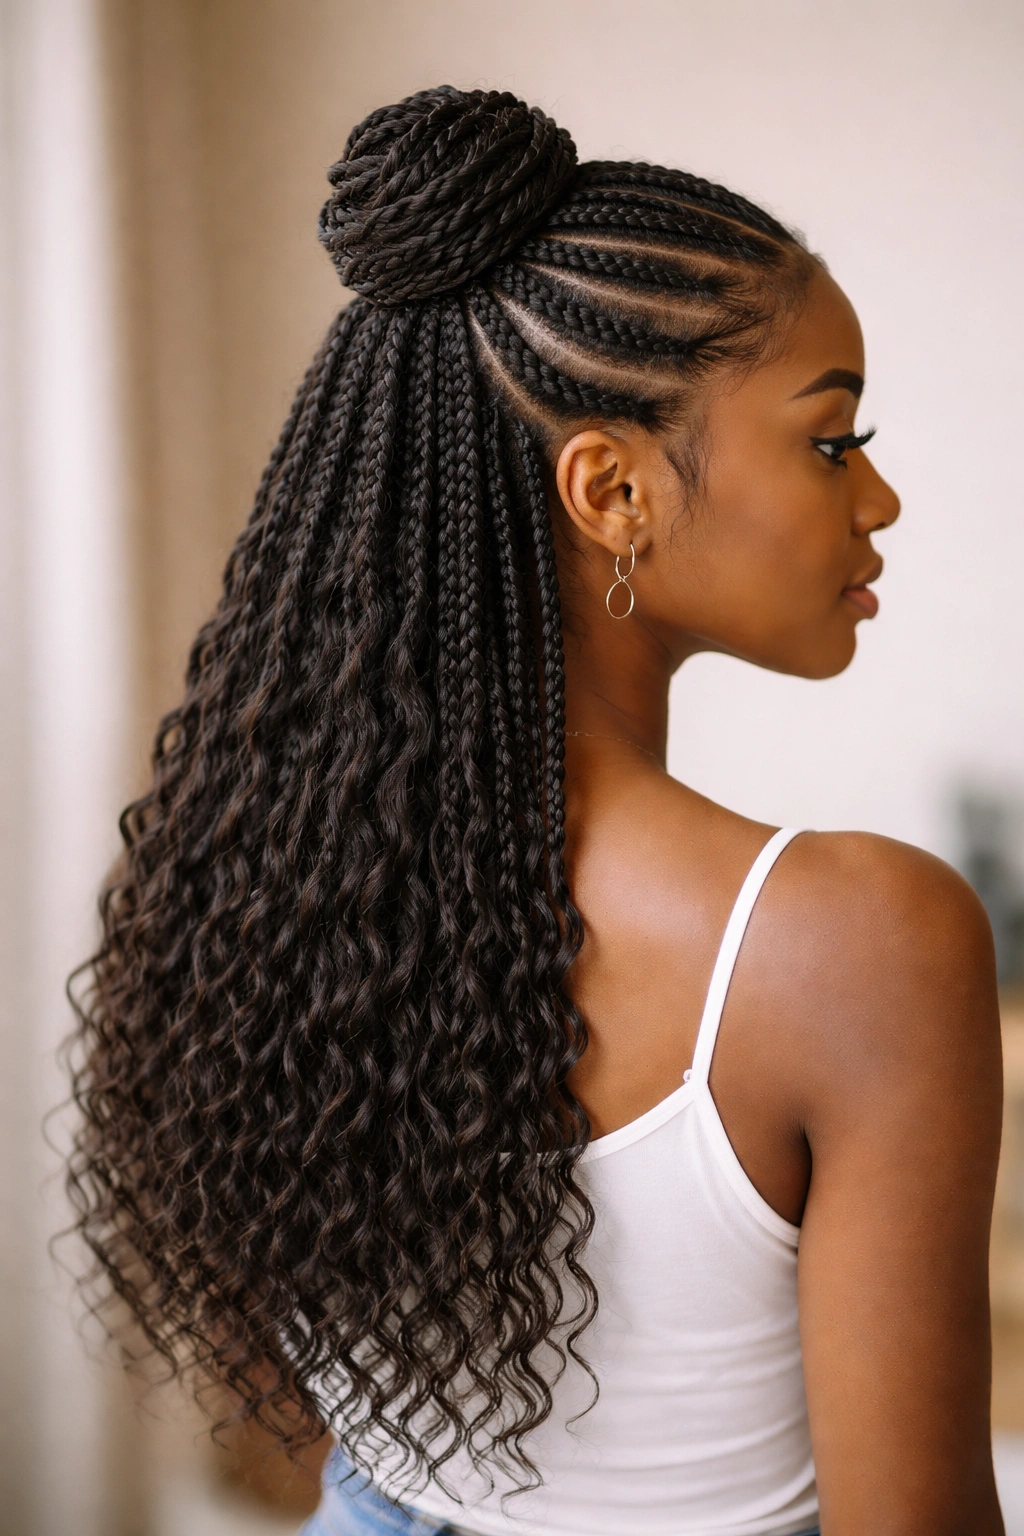
This style gathers only the upper half of your braids into an updo while leaving the lower half loose and flowing. The gathered section might be a high ponytail, a twisted crown, or a small bun at the top of your head. The half-up approach keeps hair off your face and neck while still showing off the full length and texture of your braids.
Why This Style Works
The half-up look provides the best of both worlds — you get the polished, put-together feel of an updo with the flowing softness of wearing your hair down. It’s an excellent option if you’re not in the mood for a full updo but still want some hair managed. The style also works beautifully if your braids are particularly long or if you love the visual impact of displaying their full length.
Quick Style Details
- Gather the top third or half of your braids, starting from your hairline and moving back
- Secure this section in a ponytail, twist it, or coil it into a small bun
- Leave the lower section completely loose and flowing
- You can smooth the gathered section for sleekness or leave it slightly textured
- The transition between gathered and loose should feel intentional, not like you simply didn’t finish styling
- Face-framing pieces work beautifully with this style
- Smooth baby hairs at your part and hairline
Worth knowing: This style is perfect for busy days when you want polished but not fussy — it takes about three minutes and looks intentional.
10. The Braided Crown with Loose Waterfall
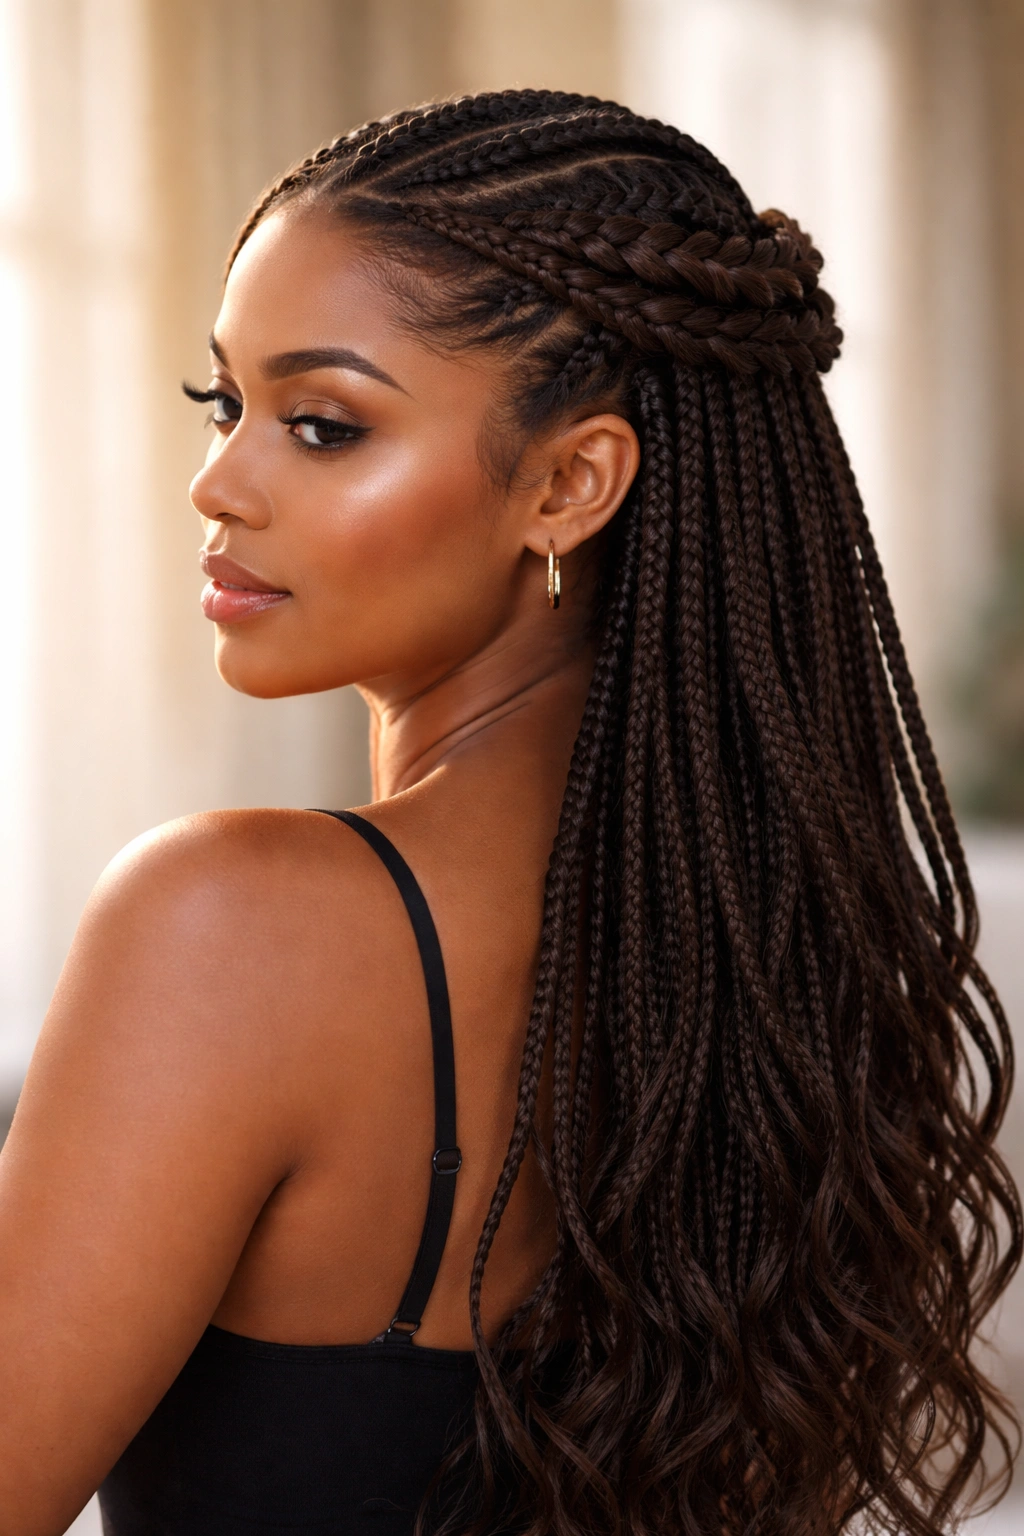
This style creates an actual braided crown by braiding several of your cornrows together, then allowing the remaining braids to fall loose and flow down your back like a waterfall. The braided crown section can be simple (three cornrows braided together) or complex (incorporating multiple cornrows into an elaborate design). The loose section creates romance and movement while the braided crown maintains polish.
Why This Style Works
The braided crown with waterfall creates an ethereal, romantic appearance while still being completely practical and secure. It showcases the artistry of your cornrows in two distinct ways — the braided crown element and the flowing braids below. This is an excellent choice for special events, romantic occasions, or any time you want to feel particularly beautiful.
Quick Style Details
- Select 3-5 of your cornrows that you’ll braid together to form the crown
- These selected braids should run from one temple, across the back of your head, to the opposite temple
- Braid these cornrows together loosely, allowing them to curve along the crown of your head
- Secure the braided crown with bobby pins as you work, creating a curved, crown-like effect
- Allow all remaining braids to fall loose down your back and shoulders
- The loose braids should cascade naturally, creating a waterfall effect
- Pin the braided crown securely enough that it won’t slip as you move
Pro tip: This style photographs beautifully and feels especially special — it’s worth trying for occasions where you want to feel confident and stunning.
11. The Sleek Mohawk Updo
This style gathers braids into a narrow, central line running from your forehead to the nape of your neck, creating a mohawk formation. The braids along the sides are either pinned close to your scalp or secured underneath, creating clean definition. It’s edgy, sculptural, and absolutely striking — perfect if you want a bold statement and have thicker or more numerous braids to work with.
Why This Style Works
The mohawk updo is modern and bold without being inappropriate for most settings. It creates clean lines and architectural interest that make your style feel intentional and fashion-forward. The style showcases cornrows beautifully because the tight side sections make the braids across the top stand out with maximum definition and presence.
Quick Style Details
- Gather braids into a narrow center section running from your forehead back to your neck
- Pin these central braids up and back, creating a raised, defined line
- The braids on either side should be pinned close to your scalp or tucked underneath
- The result is a clean, narrow strip of braids running down the center with clean sides
- You can make this style sleeker by smoothing side sections with gel, or leave slight texture for a more relaxed edge
- The central braids should have height and presence — avoid lying them flat
- This style requires enough braids and thickness to look intentional rather than sparse
Worth knowing: The mohawk updo feels bold but is actually quite practical — it keeps all hair secure and off your face completely.
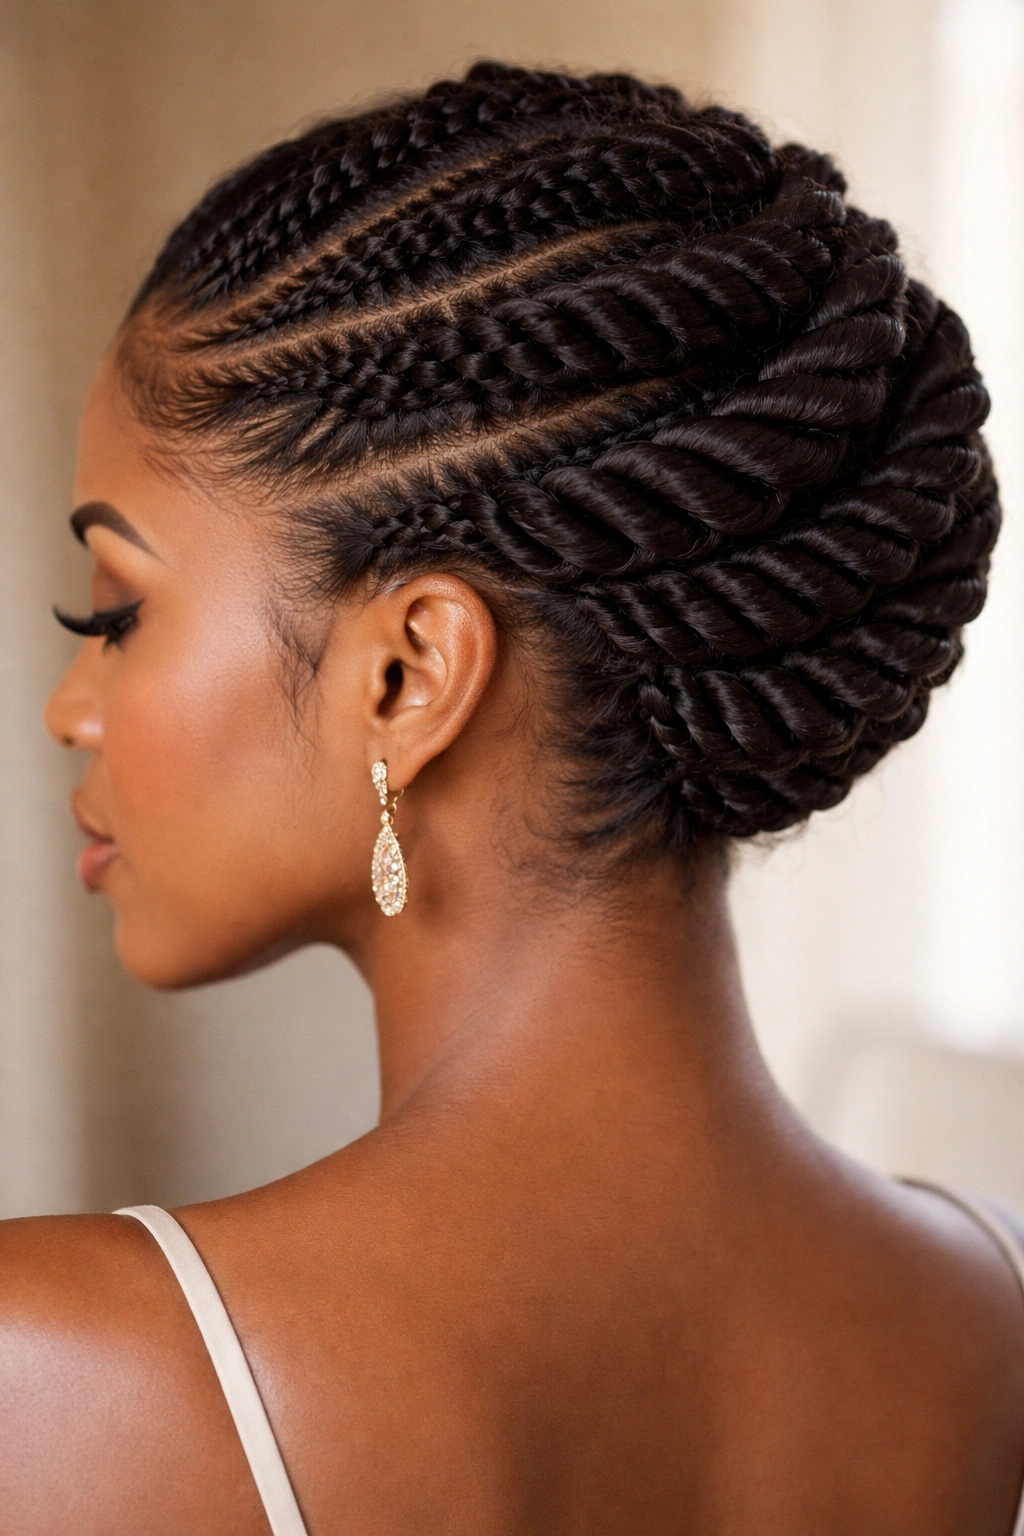
12. The Coiled Rope Bun
This style involves wrapping your entire gathered braid section around itself in a rope-like, coiled formation rather than a traditional spiral. The coils sit close together, creating a textured, dimensional bun that catches light beautifully. It’s more sculptural than a traditional bun and works particularly well if your braids have beads or color that you want to showcase.
Why This Style Works
The rope-coiled bun has more visual presence and dimension than a simple twisted bun. The coiling technique creates surface texture that makes the style look more interesting and intentional. It’s an excellent choice if you want your updo to be a focal point rather than a background element.
Quick Style Details
- Gather all braids at your desired height (high crown, side, or nape)
- Rather than twisting, begin wrapping the gathered braids around the base point in rope-like coils
- Each coil should sit adjacent to the previous one, creating rows of texture
- Secure each coil with bobby pins as you work, inserting them horizontally through the rope
- The finished bun should look like stacked rope coils rather than a smooth spiral
- The texture and dimension are the point — don’t smooth it into a sleek appearance
- This style works beautifully with beaded braids because the beads sit on top of the coils
Pro tip: If you have space, you can create coils that are slightly loose and layered for maximum dimension and visual interest.
13. The Elegant Low Knot Updo
This final style gathers braids at the nape of your neck and ties them into an actual knot formation, then secures the knot in place. The knot element creates visual interest while maintaining simplicity, and it’s distinctly different from twisted or coiled bun styles. It’s sophisticated, modern, and has an effortless elegance that works from casual to formal.
Why This Style Works
A knotted updo feels contemporary and distinctive without being complicated to achieve. The knot creates a focal point and shows off your braids’ texture and character. It’s the kind of style that looks like it took intention and skill, even though it’s actually quite straightforward once you understand the knot technique.
Quick Style Details
- Gather all braids at the nape of your neck in a low ponytail (hold, don’t secure yet)
- Divide the gathered braids into two sections
- Tie these two sections together in an actual knot — this takes a bit of practice but becomes easy quickly
- Once the knot is formed, tuck the ends back and under the knot to hide them
- Secure the entire knot firmly with multiple bobby pins inserted through the layers
- The knot should sit snugly against your neck without any loose, dangling pieces
- Smooth your hairline with light gel for a polished finish
- The knot can sit very close and tight, or slightly looser for a more relaxed appearance
Worth knowing: This style feels modern and is perfect if you want something distinctive that doesn’t require significant styling skill — just the ability to tie a knot, which you already have.
Final Thoughts
The beauty of cornrow updos is that they transform a protective style you’re already wearing into something that looks and feels completely fresh. Whether you choose a timeless high bun, something more adventurous like a braided crown, or anything in between, you’re working with hair that already has structure, style, and personality built in. The time investment is minimal — most of these styles take five to fifteen minutes once you’ve done them a time or two — while the impact is significant.
The real power of these updos is flexibility. Wear the same braids five different ways throughout the month and your style feels completely different each time. You can adapt any of these approaches to match your mood, your schedule, and what you’re doing that day. A casual half-up bun works for errands, while a twisted crown feels special for dinner out. Professional low buns command the boardroom, and braided crown waterfall styles make you feel absolutely stunning.
The most important thing is to choose styles that make you feel confident and beautiful. Your cornrows are already doing important protective work for your natural hair — transforming them into updos means you’re getting maximum versatility from that investment. Pay attention to which styles make you feel most like yourself, which ones are easiest for your skill level, and which ones work best with your specific braid pattern and length. Then rotate through them, have fun with the styling process, and enjoy how something as simple as an updo can completely change how you feel.