Cornrows have been a cultural staple and practical styling choice for generations, offering durability, versatility, and undeniable style—but there’s a persistent myth that they require half a day at the salon to create. The reality is far more accessible. Whether you’re working with your own hair or helping someone else get braided up, some of the sharpest cornrow looks can actually be done in well under two hours. The key is knowing which styles work with your natural texture, which patterns braid fastest, and which finishing touches make the biggest visual impact on tight timelines.
The styles that braid quickest share common traits: they work with your hair’s natural curl pattern rather than against it, they rely on clean sectioning instead of complexity, and they often embrace strategic placement rather than full-head coverage. A sleek two-cornrow look down the back of the head braids up in 20 minutes. A three-part style takes maybe 45. Even more intricate designs with turns and geometric patterns stay well under the two-hour mark when you understand the technique and have decent practice. You’ll notice the styles that make this list are chosen specifically because they balance visual impact with real-world timing—no elaborate 20-cornrow installations or styles that demand perfectionistic precision on every single row.
The other factor that matters enormously is preparation. Detangling takes time. If your hair is already in good condition and properly moisturized, braiding speed increases dramatically. Fresh hair that’s been washed and conditioned days before (not hours before—you want some texture to grip) braids faster than freshly washed, slippery hair. The difference between a rushed session and a smooth one often comes down to whether you took 10 minutes to properly prep and section before you ever picked up a comb.
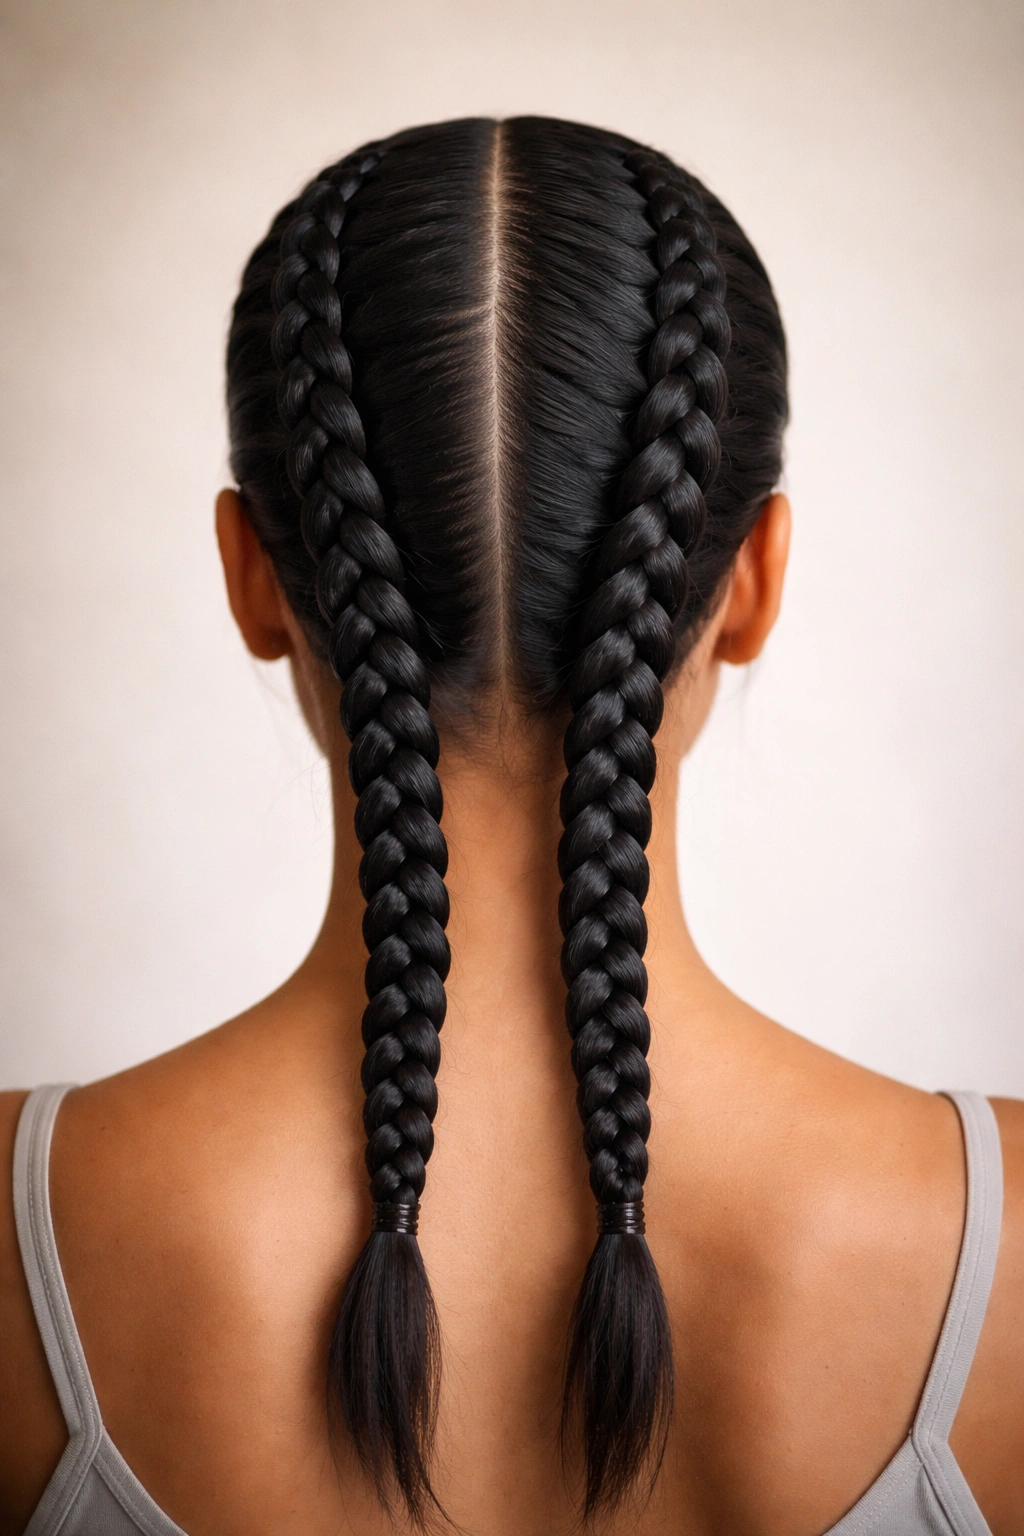
1. Two-Cornrow Classic Down the Back
This is the quickest style in the entire cornrow repertoire, and it’s a look that never goes out of style. You’re creating two evenly-sized braids that run straight down the center-back of the head, typically parting the hair down the middle from the crown to the nape. The braids work best when you start them at roughly the same point on the crown and keep them parallel as they descend.
Why This Works for Speed
Two cornrows eliminate the complexity of multiple sections and turns. Because you’re not trying to cover the entire head or coordinate a bunch of individual braids, the skill required drops significantly. Even if your braiding technique isn’t flawless, the simplicity of the design forgives minor inconsistencies. The straight-down pattern means you can braid on autopilot once you find your rhythm, which is where speed actually comes from—muscle memory, not rushing.
The Fast-Track Technique
- Section hair down the middle from crown to nape using a rattail comb and create a clean line
- Start at the crown on one side and braid downward, keeping the braid snug and consistent in width from root to tip
- Repeat on the other side, matching the thickness and tightness of the first braid
- Secure both braids at the ends with small elastics; optional to wrap thread around the base for a finished look
- Total time: 25-35 minutes
Pro tip: Slightly damp hair braids faster and holds its shape better than bone-dry hair. Lightly spritz with water and let it absorb for three minutes before you start.
2. Three-Cornrow Side-by-Side Pattern
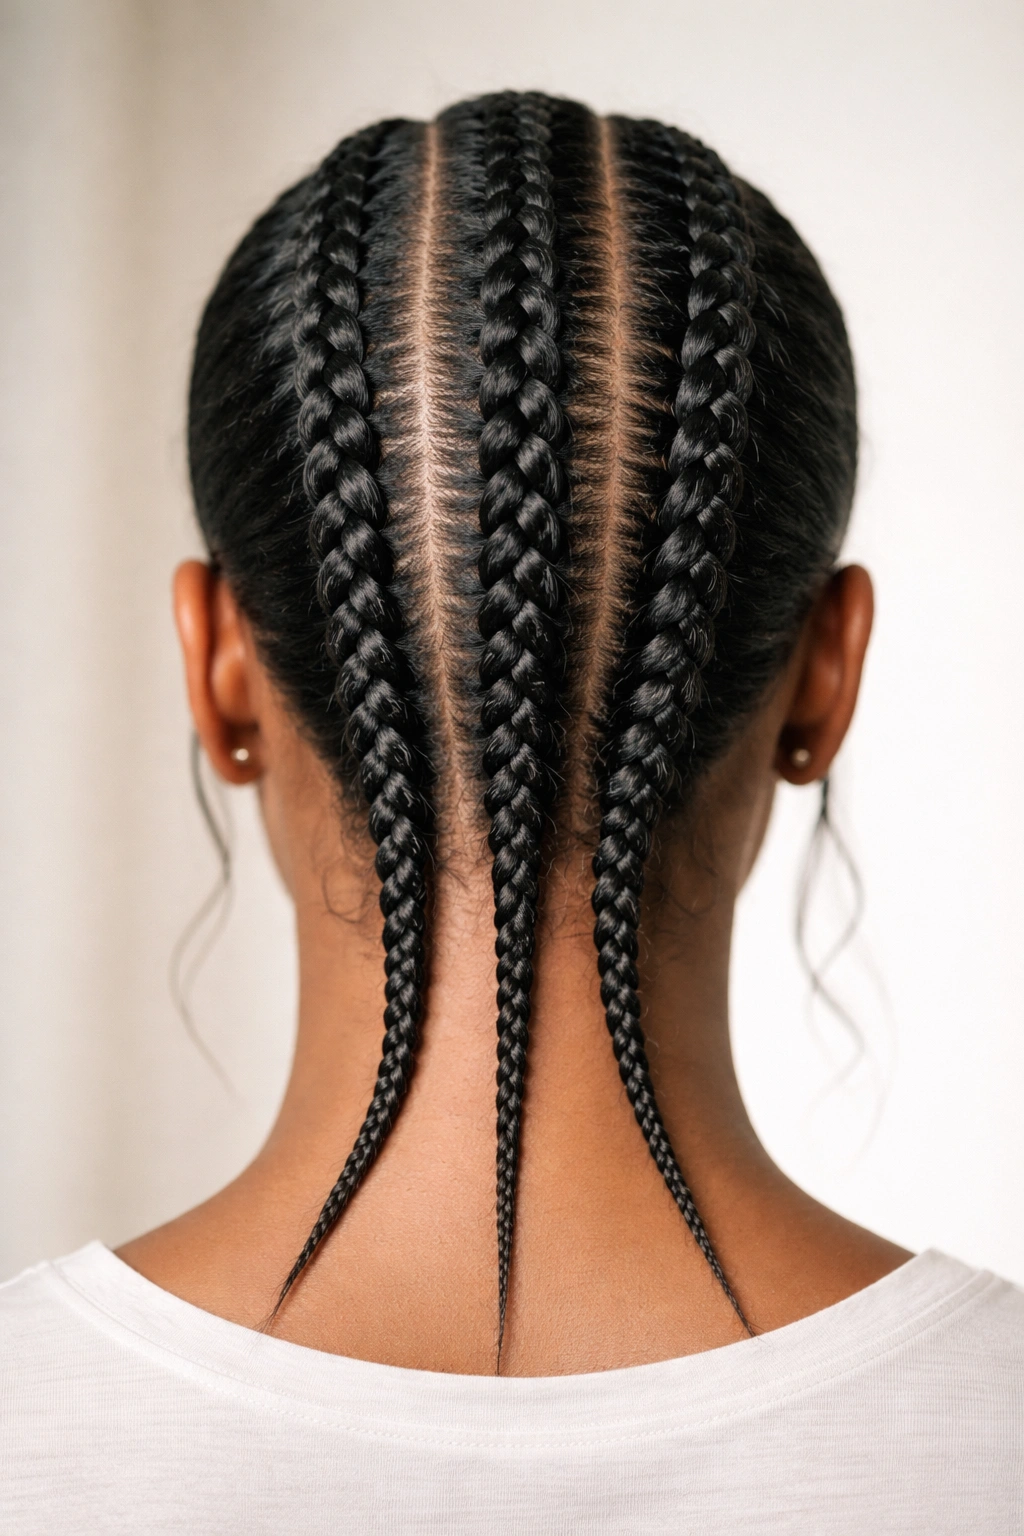
This style covers more head real estate than the two-cornrow version while staying remarkably quick because each braid is thinner and easier to manage. You’re creating three equally-spaced, parallel cornrows that run down the back of the head—essentially dividing the back half of your head into thirds.
Why Thin Braids Speed Up the Process
Thinner braids braid significantly faster than thick, chunky ones. Your hands move through the motion quicker, and there’s less hair to manage at each crossing. The tradeoff is that you’re doing more braids, but because individual braiding time is shorter, the total session stays remarkably quick. Three braids take about 50-70 minutes total, which is still well within a two-hour window and leaves time for other styling steps.
Creating Even Spacing
- Create three parallel lines from crown to nape by sectioning the hair into three vertical sections using a fine-tooth comb
- Start each braid at the crown and work downward; braid one completely, then move to the next rather than bouncing between them
- Keep consistent tension throughout each braid—uneven tension makes braids look sloppy and often takes longer as you’re correcting it
- Secure all three at the nape with small elastics
- Time estimate: 50-65 minutes
Worth knowing: If you’re braiding someone else’s hair, this pattern is easier to execute than on yourself because you have better angles and visibility.
3. Goddess Braids (Thick and Sculptural)

Goddess braids are cornrows with major visual presence—they’re thicker, often slightly raised away from the scalp for dimension, and they look undeniably polished. The term “goddess braids” sometimes refers to braids that are braided loosely and then gently pulled at intervals to create a fuller, more textured appearance. Despite their dramatic look, they’re surprisingly fast because you’re typically doing just two or three of them.
The Illusion of Thickness
Goddess braids create impact through sheer visual weight, not through intricate complexity. A single thick braid down the side of your head creates more presence than five thin braids running down the center. Because you’re doing fewer braids but keeping them visibly thick, you actually save braiding time compared to multi-braid styles. The loosening and fluffing afterward adds maybe five minutes but completely transforms the aesthetic.
How to Build Goddess Braids
- Part the hair to create one or two thick sections depending on your style preference
- Braid normally at a slightly looser tension than you’d use for sleek cornrows
- As you finish the braid, gently pull and fluff each loop along the length to create dimension
- This pulling-and-fluffing step is what makes them look “goddess-like” rather than just chunky
- Time: 45-75 minutes depending on hair length and thickness
Pro tip: Slightly damp, textured hair fluffs better than completely dry or freshly-washed slippery hair. The texture helps the fluffed sections hold their shape.
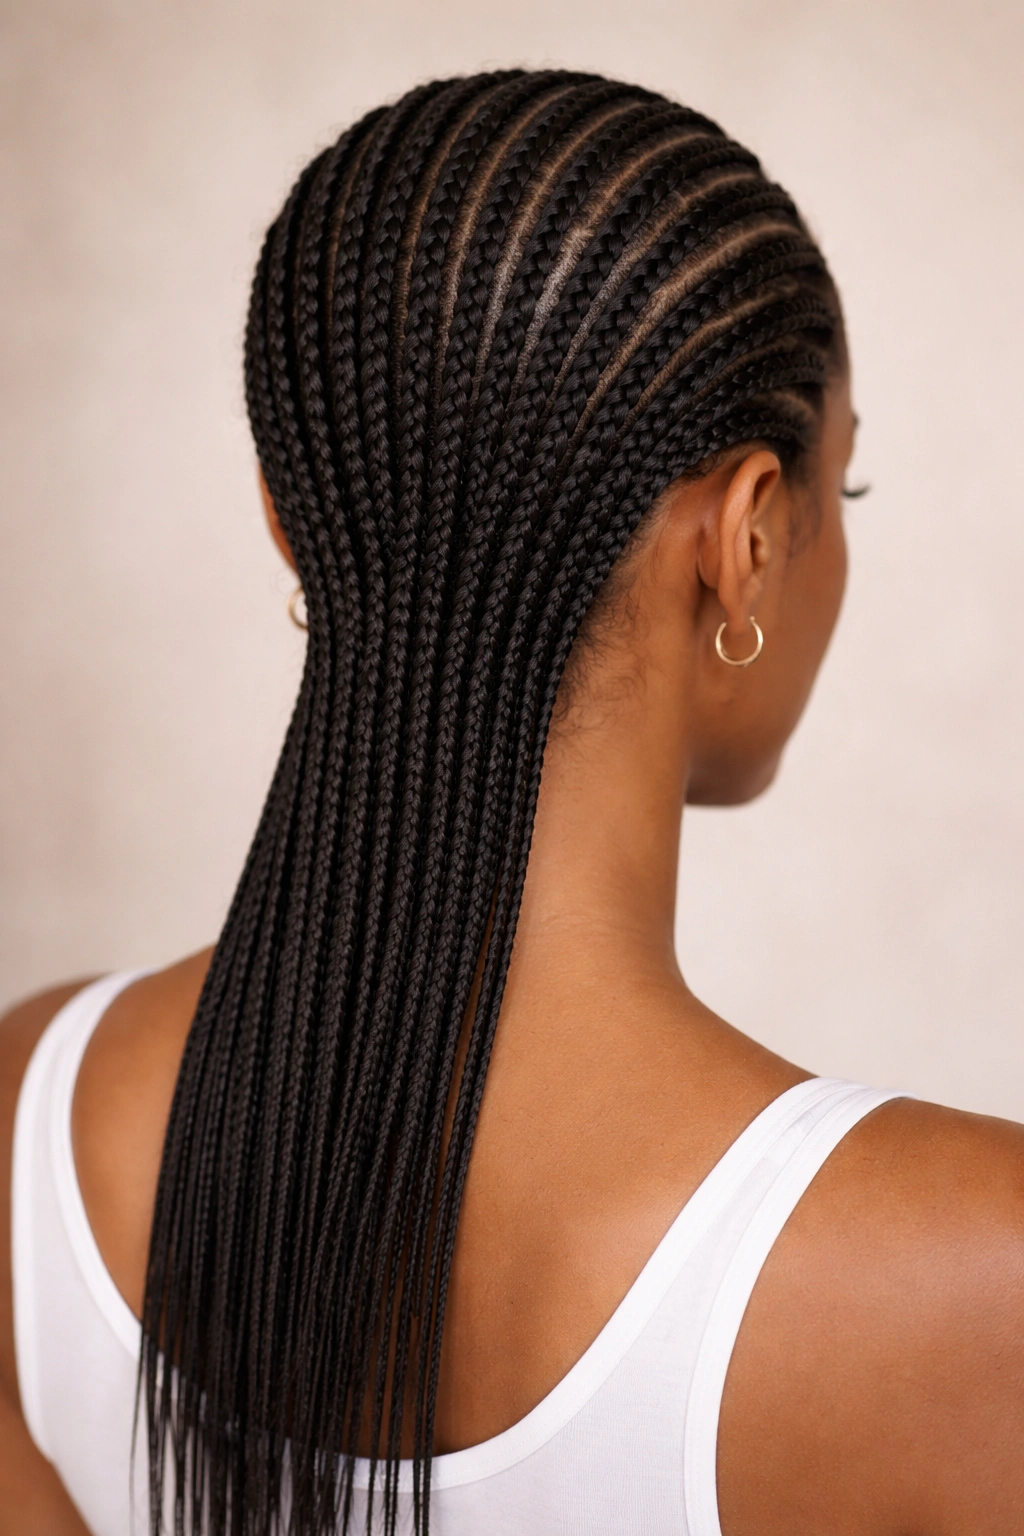
4. Feed-In Braids (Sleek Version)
Feed-in cornrows look like regular cornrows but involve a subtle technique difference: you’re feeding small amounts of hair into the braid at each cross, which creates a braiding pattern that looks thinner and more refined at the base and fuller toward the ends. The sleek version means keeping them close to the scalp without the loose, fluffy texture of goddess braids.
Why Feed-In Braids Look Premium
Feed-in braids have a refined, intentional quality that read as high-effort even though the technique isn’t objectively harder—just slightly different. You’re creating visual interest through the gradient of the braid rather than through complex patterns. This is a style that photographs well and works for every occasion from professional settings to casual.
The Feed-In Technique Broken Down
- Start with a small three-strand braid at the crown (skip the cornrowing motion initially)
- Once you have a small starter braid, begin the cornrowing motion, feeding in small sections of new hair at each cross
- Keep the fed-in hair subtle and consistent to maintain the refined look
- Create as many rows as your timeline allows; three to five feed-in braids typically takes 60-80 minutes
- Total time: 60-85 minutes for three to five braids
Insider note: Feed-in braids look best when the fed-in sections are very consistent in size. Uneven feeding makes them look accidental rather than intentional.
5. Zigzag Cornrow Pattern
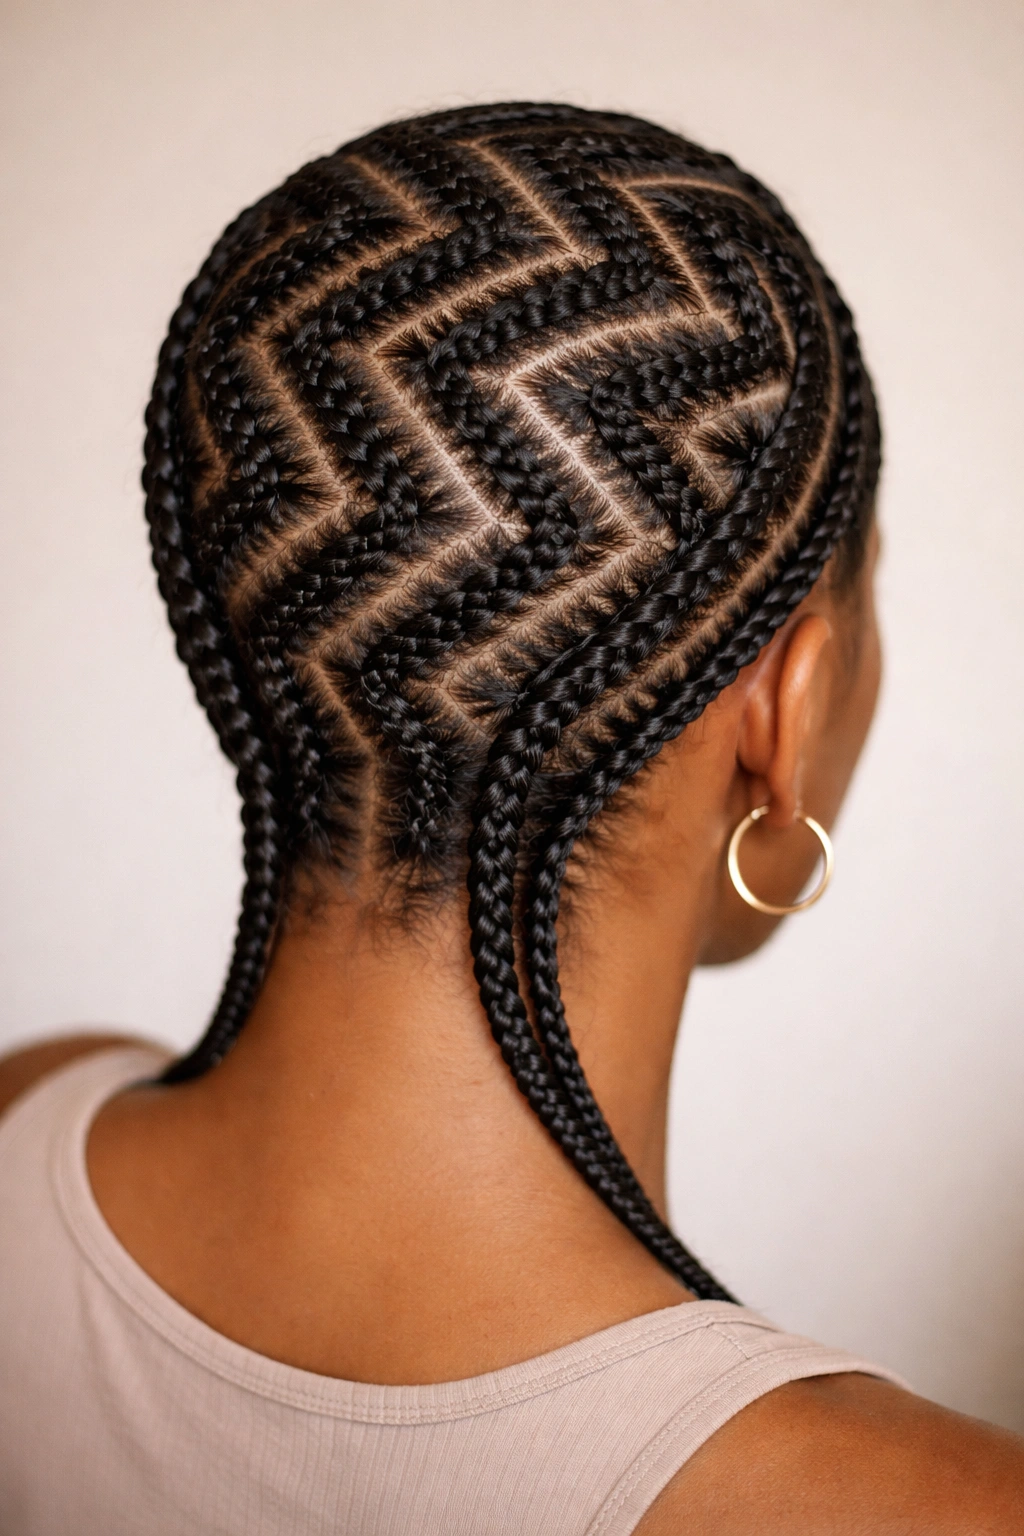
Instead of running your cornrows straight down the back, you’re creating a zigzag path—one braid runs from the crown downward and to the right, the next starts at the crown and goes downward and to the left, creating a chevron or lightning-bolt effect when viewed from above. This style has major visual impact and honestly looks harder to execute than it actually is.
Why Zigzag Patterns Create Impact
Geometric patterns automatically read as more intentional and stylistically advanced. A zigzag cornrow looks like you spent twice the actual time. The good news is that braiding a diagonal or angled line takes no longer than braiding a straight line—your hands do the same motions, just starting from slightly different points on the crown. The time savings come from the fact that two large zigzag braids cover the entire head, whereas two straight braids cover only the center.
Creating Clean Zigzag Sections
- Part hair into diagonal sections that create the zigzag path you want (this is where precision matters most)
- Start your first braid at the crown on one side and braid diagonally across to the opposite nape corner
- Start the second braid at the crown on the other side and mirror the path of the first
- These two braids will form a clear chevron or lightning-bolt when viewed from above
- Total time: 60-75 minutes for two zigzag braids
Remember: The sharpness of your part determines how crisp the zigzag looks. A thick, sloppy part creates a sloppy-looking chevron. Take the extra two minutes upfront to section cleanly.
6. Curved Cornrows (C-Shape or S-Shape)
Rather than straight or angular lines, you’re curving your cornrows in organic waves or S-shapes across the head. This style requires more spatial planning than straight rows but surprisingly doesn’t add much braiding time. The curves work well with the natural contours of the head and create a very soft, intentional aesthetic.
The Curved Path Advantage
Curves create visual softness without sacrificing the sleekness that cornrows are known for. Because you’re following a preset path (the curve), once you commit to your part line, the actual braiding motion is straightforward. The curve is established by how you section the hair, not by complicated braiding technique. The time investment is mostly in planning the curve; the actual braiding is standard cornrow technique.
Mapping Your Curves
- Decide whether you want C-curves (one side of the head), S-curves (flowing across the full head), or multiple gentle waves
- Use a rattail comb to section the curved path lightly into the hair as a guide
- Braid along this curved line from crown to the destination point (nape, ear, side of neck depending on the curve)
- Two large curved cornrows take about 55-70 minutes
- Experiment with whether you want the curves to curve toward your face or away from it depending on the look
Quick truth: Curved sections are slightly harder to visualize than straight ones. If you’re new to this, practice the section with a dry comb a few times before you actually braid.
7. Cornrows with Twist-Out Texture (Unraveled Ends)
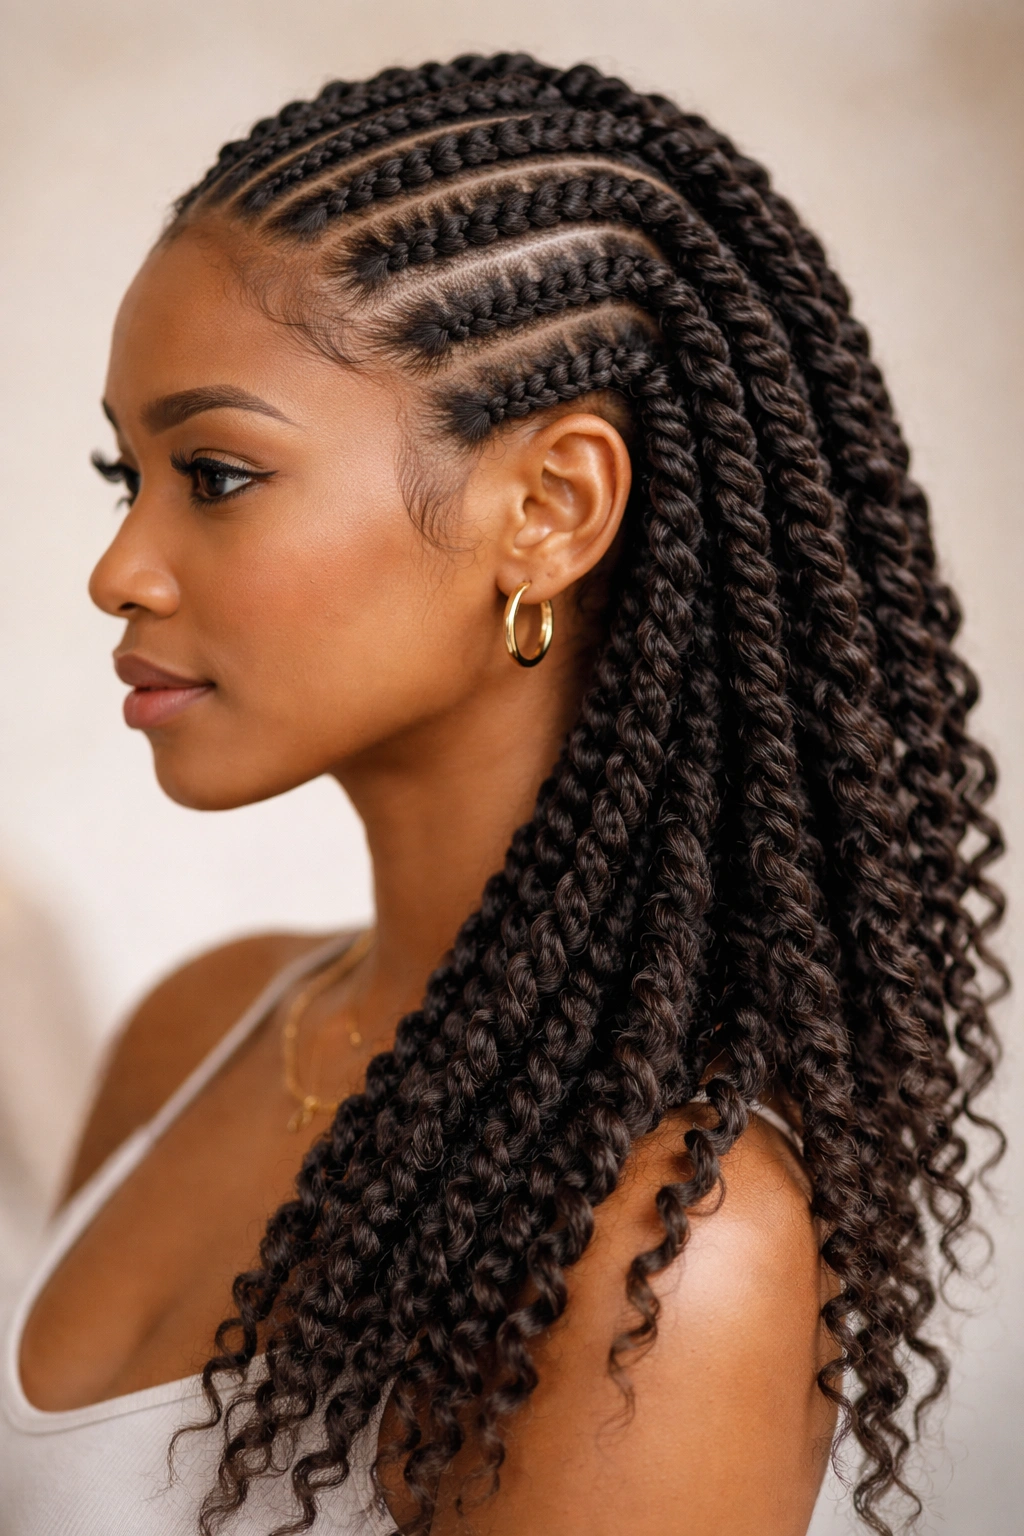
This hybrid style is cornrows for the first 4-6 inches of the hair, and then the braid is unraveled into two strands and twisted together for the remaining length. The result is a style that looks like cornrows in the front and has movement and texture in the back. It’s fast because you’re only fully cornrowing a short distance, and the twisted portion braids faster than full-length cornrows.
Combining Cornrows and Twists for Speed and Style
You get the sleekness of cornrows with the texture and movement of twists—the best of both worlds with a timing advantage. The transition point (where you go from cornrow to twist) becomes a design element, and you can play with how far down the head you run the cornrows. Shorter cornrowed sections mean faster installation; longer twist-out sections add movement.
The Hybrid Braiding Process
- Cornrow the first 4-6 inches of each braid normally from the crown downward
- At your chosen transition point, stop the cornrowing motion and switch to a simple two-strand twist
- Continue the two-strand twist all the way to the ends
- Two-strand twists move faster than cornrows, so this saves time overall
- Total time: 45-65 minutes for two to three hybrid braids
Pro tip: The transition is smoother if you ensure the last cornrow stitch naturally feeds into the two-strand twist setup—don’t abruptly change; let it flow.
8. Box Cornrows (Small Grid Pattern)

Box cornrows—also called block braids—divide the head into small square or rectangular sections, and each section becomes its own cornrow. This creates a grid effect when viewed from above and is a classic protective style that’s also surprisingly quick to execute if you keep individual boxes modest-sized (roughly the width of your pinky finger).
Why Box Braids Are Faster Than You’d Think
Box braids look complex because of the pattern, but individually each braid is thin and quick to execute. If you have decent hand speed, three to four small box cornrows down the back of your head takes 45-60 minutes. The time investment is mostly in creating precise sections; the actual braiding of thin cornrows is rapid.
Sectioning for Boxes
- Use a rattail comb and box ruler (a comb with grid lines) to create uniform square or rectangular sections
- Start from the crown and work backward, creating a neat grid
- Box size should be consistent—aim for roughly ½-inch square boxes
- Braid each box individually, keeping braids snug and uniform
- Five to seven boxes across and two to three rows deep: 50-70 minutes
Real talk: Box braids take longer to section than to braid. If you spend 15 minutes on precise sectioning, the actual braiding becomes faster and looks infinitely sharper.
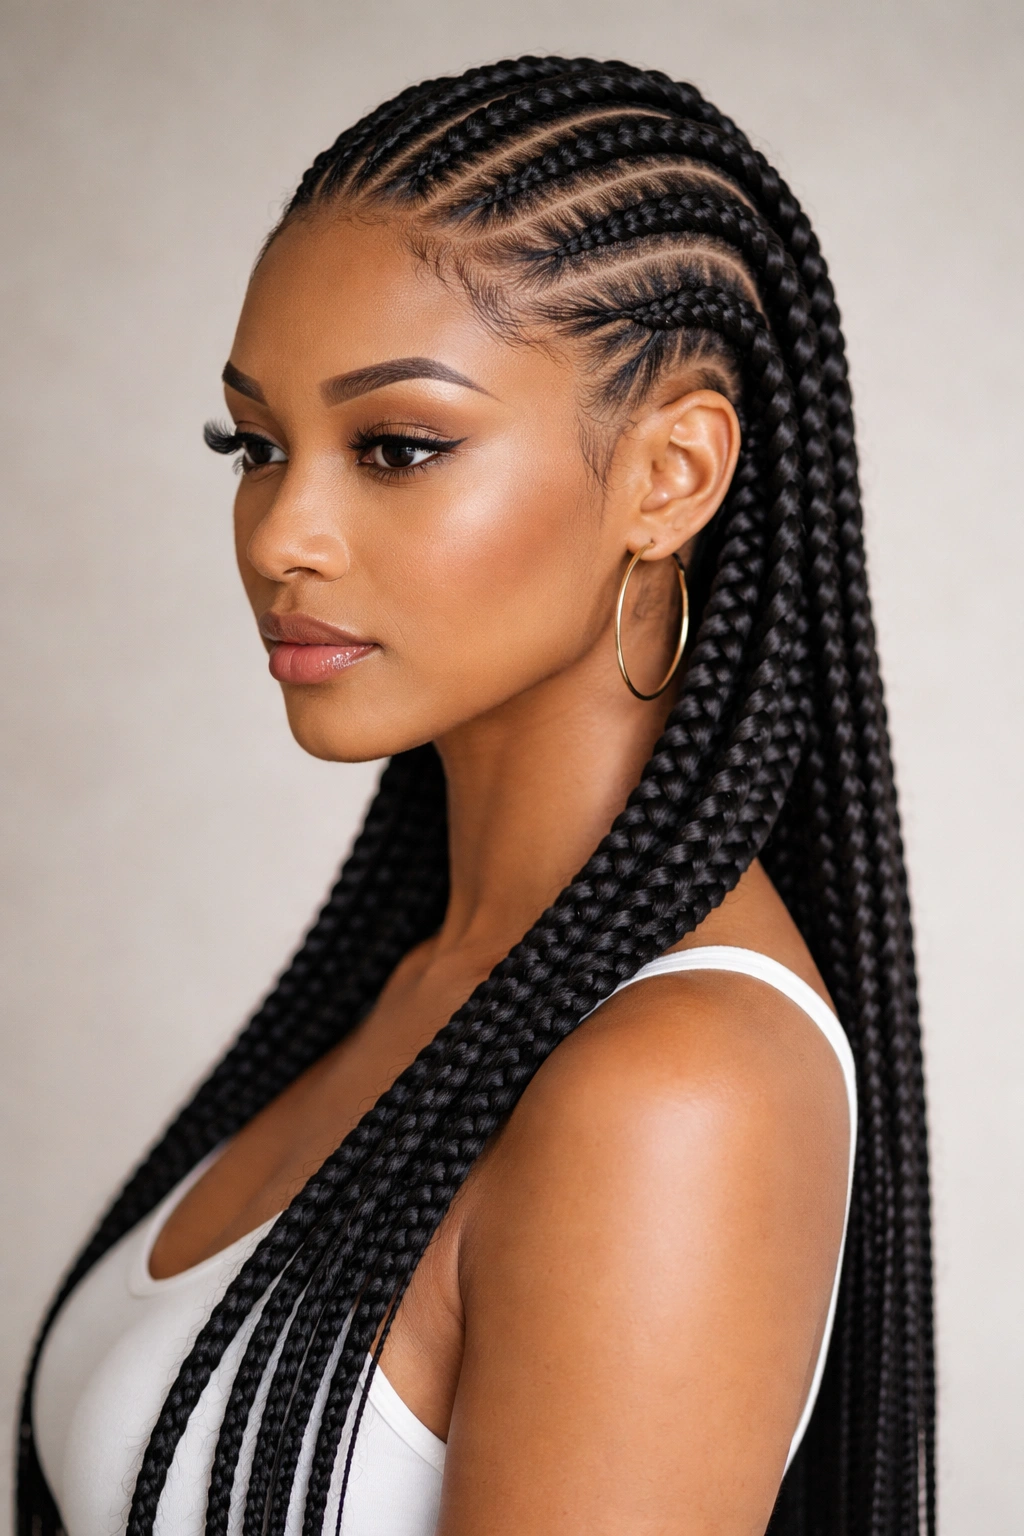
9. Side Braids (Cornrows Swept to One Side)
Instead of centering your cornrows or running them straight down the back, you’re creating them along one side of the head—typically starting at the temple, traveling across the crown, and ending at the opposite nape. You might do two or three side-running cornrows, all on one side. This creates an asymmetrical, fashion-forward look.
The Asymmetry Advantage
Side cornrows draw attention to one side of your face and create visual interest through asymmetry. They’re fast because you’re only cornrowing one side of the head rather than covering it fully. The rest of your hair can be left out in its natural texture or loosely gathered. Three cornrows swept to one side takes about 40-55 minutes and leaves plenty of room for additional styling if you want it.
Mapping Side Cornrows
- Decide whether you want cornrows running from temple to nape or following a different path
- Start the first cornrow at your temple or hairline and braid along the chosen path
- Create additional parallel cornrows if desired, keeping them spaced evenly across the side
- Leave the rest of the hair unbraided; optional to twist it, curl it, or leave it out
- Time: 40-55 minutes for two to three side cornrows
Consider this: Side cornrows photograph beautifully and work well if you have an undercut or shaved side—the contrast is striking.
10. Cornrows with Bead Details (Quick Embellishment)
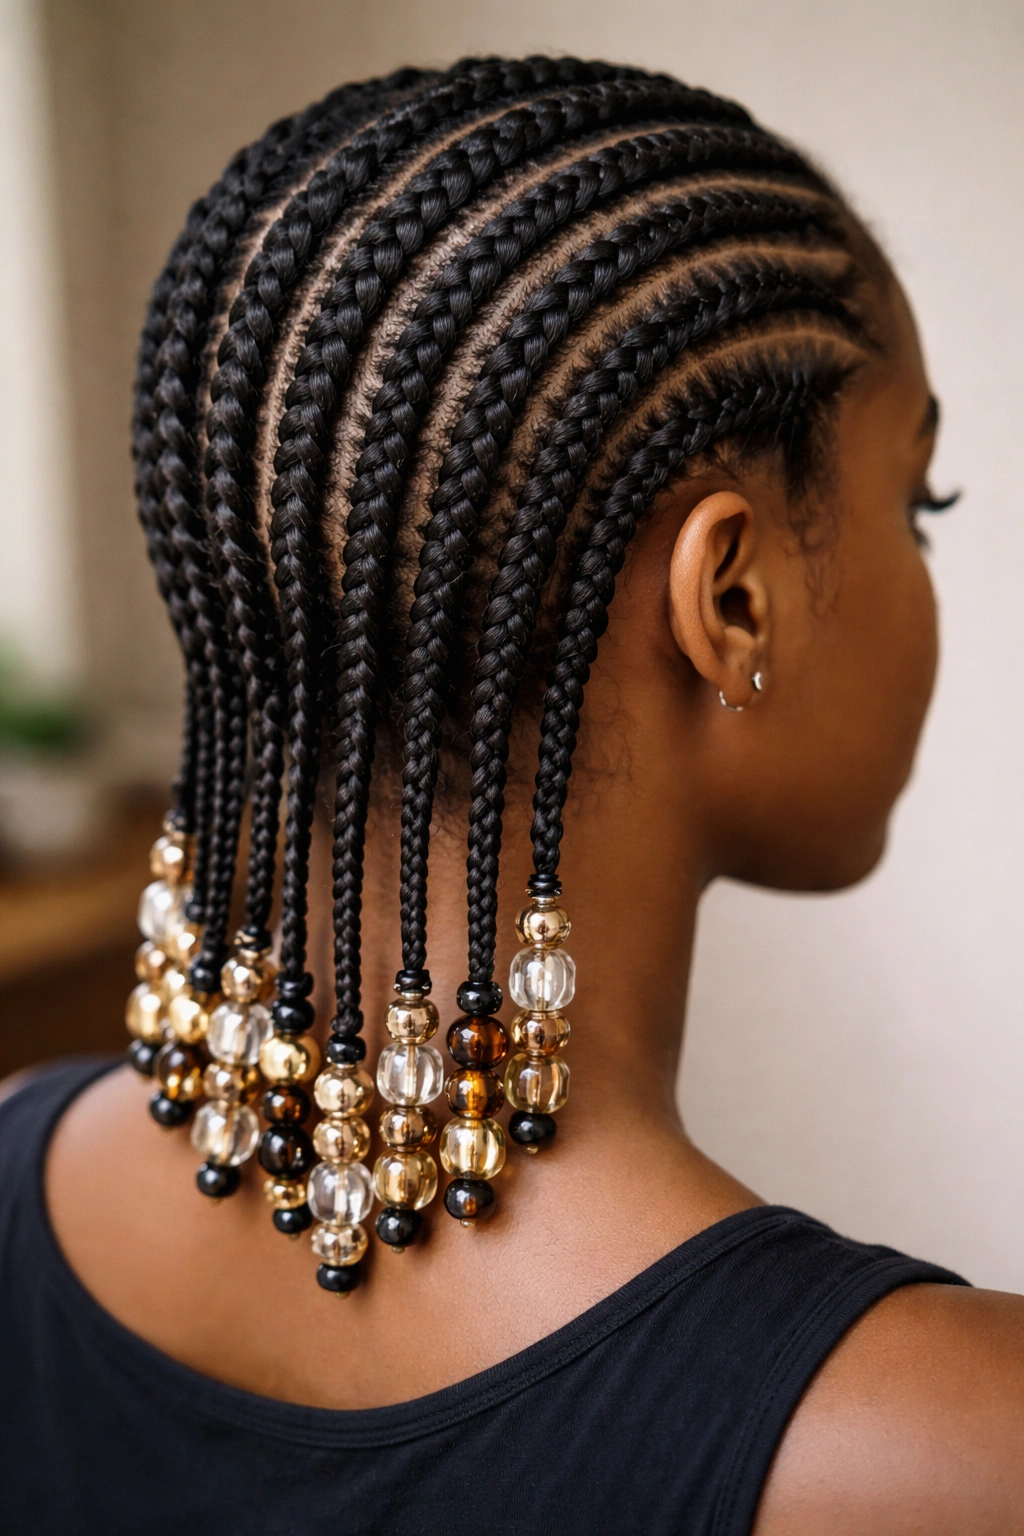
Standard cornrows with gold, wooden, or colored beads threaded onto the ends create visual interest and a finished appearance. The beading takes only a few extra minutes but elevates the entire look from simple to intentionally styled. You’re still doing basic cornrows; the beads are the statement.
Beads as a Time-Efficient Detail
Adding beads takes roughly five extra minutes total (depending on how many braids you’re beading) but makes a significant visual impact. Beads catch light, add color contrast, and make the style feel special without requiring additional braiding complexity. This is an excellent strategy if you’re trying to maximize impact within a strict two-hour window.
Beading Your Cornrows
- Complete your cornrows first
- Thread a large-hole bead onto the end of each braid at the point where you’ve secured the elastic
- Slide the bead up so it rests against the elastic; it’ll hold in place via friction
- Optional: add one or two additional beads spaced along the braid
- Use beads that complement your skin tone or outfit
- Time for two to four braids with beads: 5-10 minutes additional
Note: Beads that are too small slip off; beads that are too large make the braid end look disproportionate. Medium-sized beads with holes roughly ¼-inch in diameter work best.
11. Cornrows Wrapped with Contrasting Thread
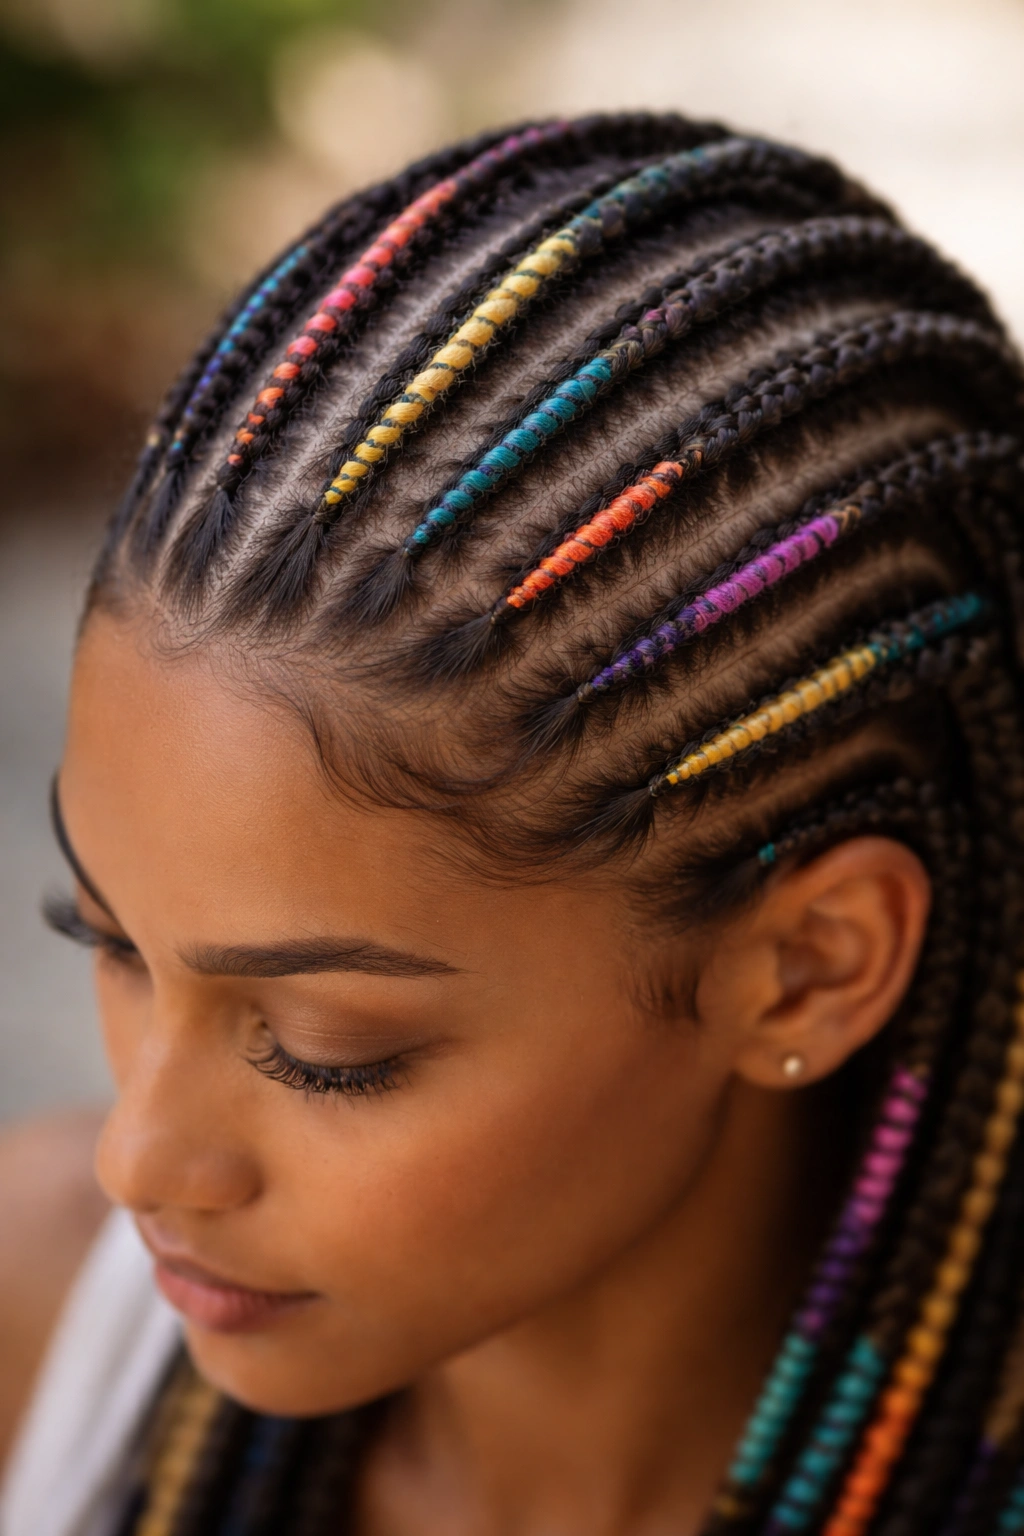
Instead of beads, you’re wrapping each cornrow or sections of each cornrow with coordinating embroidery thread, yarn, or thin twine. The wrapping creates color contrast and a handmade, intentional aesthetic. Gold, copper, or colored thread wrapped around natural hair reads as high-effort styling but takes minimal actual time.
Thread Wrapping for Major Visual Impact
A single color of thread wrapped around the base of cornrows or in sections along their length transforms a basic style into something visually distinctive. The wrapping takes maybe 10-15 minutes total for multiple braids, and it costs essentially nothing. This is a low-investment, high-payoff embellishment that works especially well if you’re working with limited time and budget.
How to Wrap with Thread
- Choose thread or yarn in a color that contrasts with or complements your hair
- Starting at the base of a cornrow (right at the scalp), wrap thread tightly around the braid multiple times
- Wrap for about ½ to 1 inch of the braid’s length, or wrap intermittently along the entire braid
- Tie off the thread by threading the tail under the wrapped section and tightening
- Repeat on all braids
- Time: 10-15 minutes for multiple braids
Creative idea: You can wrap the base of each braid, wrap in a specific pattern (every inch, for example), or wrap only the bottom third of each braid.
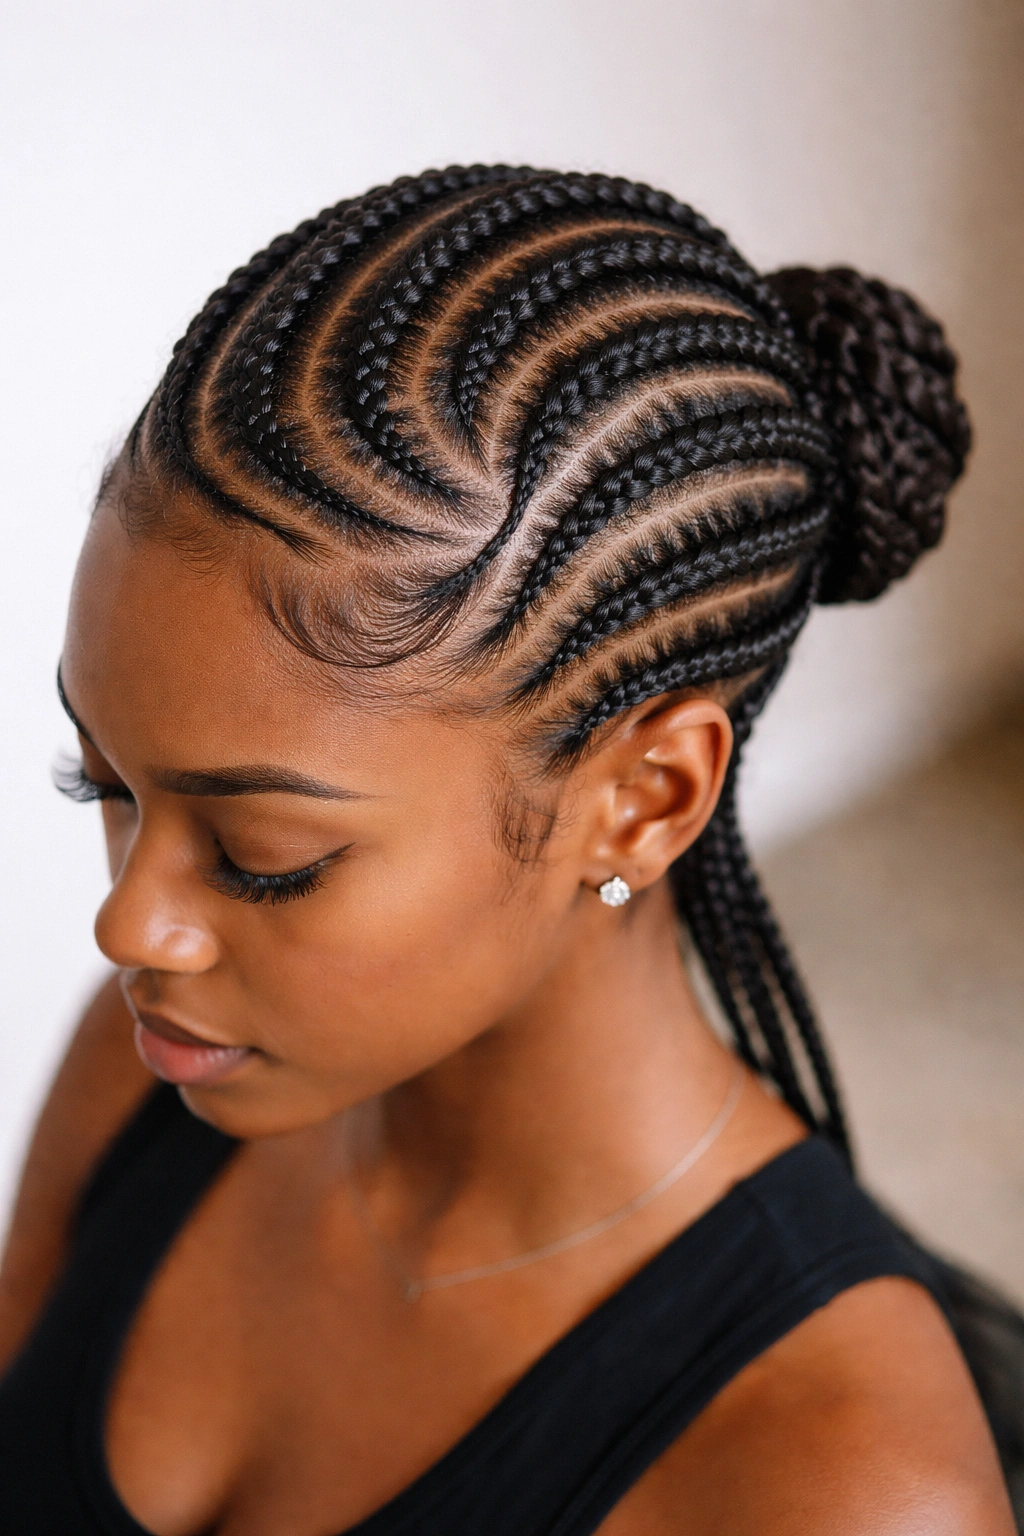
12. Cornrows with Hairstyle Combinations (Braids Plus Bun)
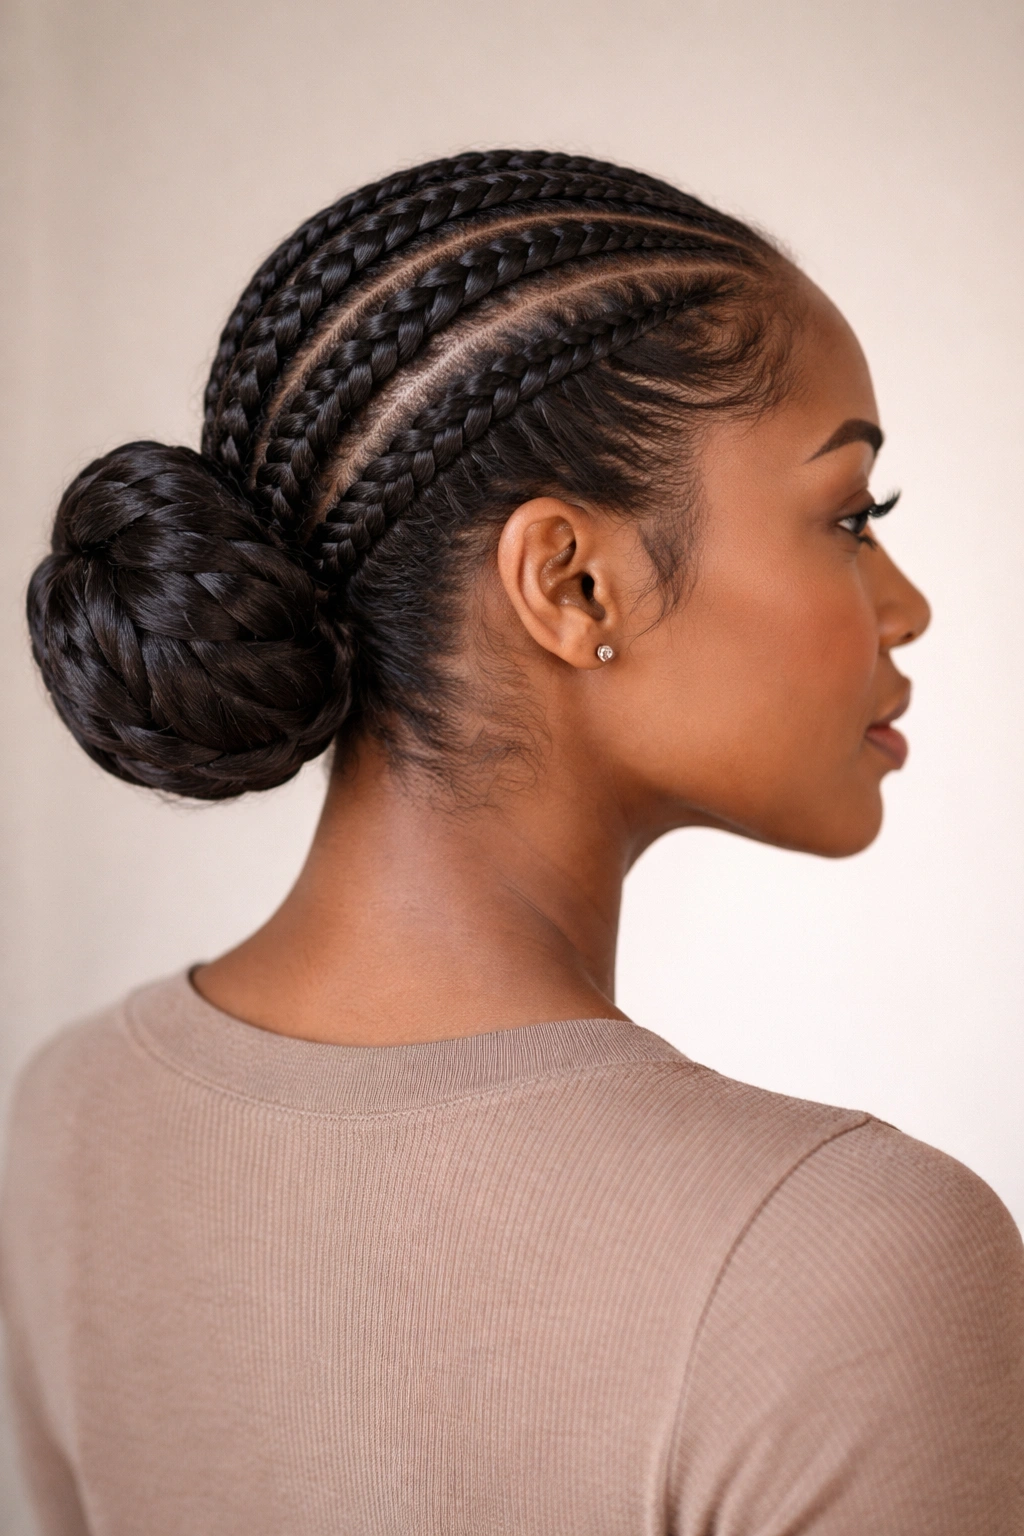
This style uses cornrows as the top portion of a hairstyle, typically two or three cornrows running from the crown toward the nape, with the remaining unbraided hair gathered and styled into a bun, ponytail, or twisted knot at the back. The braids frame the face and create a polished top, while the gathered hair creates a cohesive, elegant look.
Why Combination Styles Maximize Impact
By combining braids with other styling techniques, you create visual richness without additional braiding time. Two or three cornrows at the crown take 40-50 minutes; styling the remaining hair into a bun takes another 10-15. You end up with a style that looks quite involved but was completed efficiently. The braids serve as visual anchors that make the entire hairstyle read as intentional.
Building a Braids-Plus-Bun Style
- Cornrow two or three rows from the crown toward the nape (these set the tone for the style)
- Leave the remaining hair out and unbraided
- Gather all the hair (braided and unbraided) at the nape and secure into a low bun using bobby pins and an elastic
- Optional: wrap a piece of hair around the bun base to hide the elastic for a finished look
- Total time: 55-65 minutes for two to three cornrows plus bun assembly
Design note: Cornrows that are slightly offset (not perfectly centered) combined with an off-center or low bun create the most flattering, modern aesthetic.
13. Reverse Cornrows (Braided Underneath)
Standard cornrows braid outward and sit on top of the scalp. Reverse cornrows braid inward and sit underneath the hair surface, creating a raised, sculptural line. They require a slightly different hand technique but take roughly the same amount of time as standard cornrows once you understand the motion.
The Sculptural Quality of Reverse Braids
Reverse cornrows create dimension and movement that forward cornrows can’t. The braids appear to be raised off the scalp because they’re actually braiding in the opposite direction. If you’re comfortable with standard cornrow technique, reverse braids are worth learning because they dramatically change the visual of your hairstyle without adding time.
Executing Reverse Cornrows
- Part and section exactly as you would for standard cornrows
- Instead of braiding away from your body, braid toward your body, pulling each strand under rather than over
- This creates the reverse or “inverted” braid that sits lifted on the scalp
- Keep tension consistent with standard cornrows to avoid distortion
- Time: 50-70 minutes for two to three reverse cornrows
This takes practice: Reverse braiding feels unnatural the first few times. Practice on a section of unbraided hair first to get the hand motion correct.
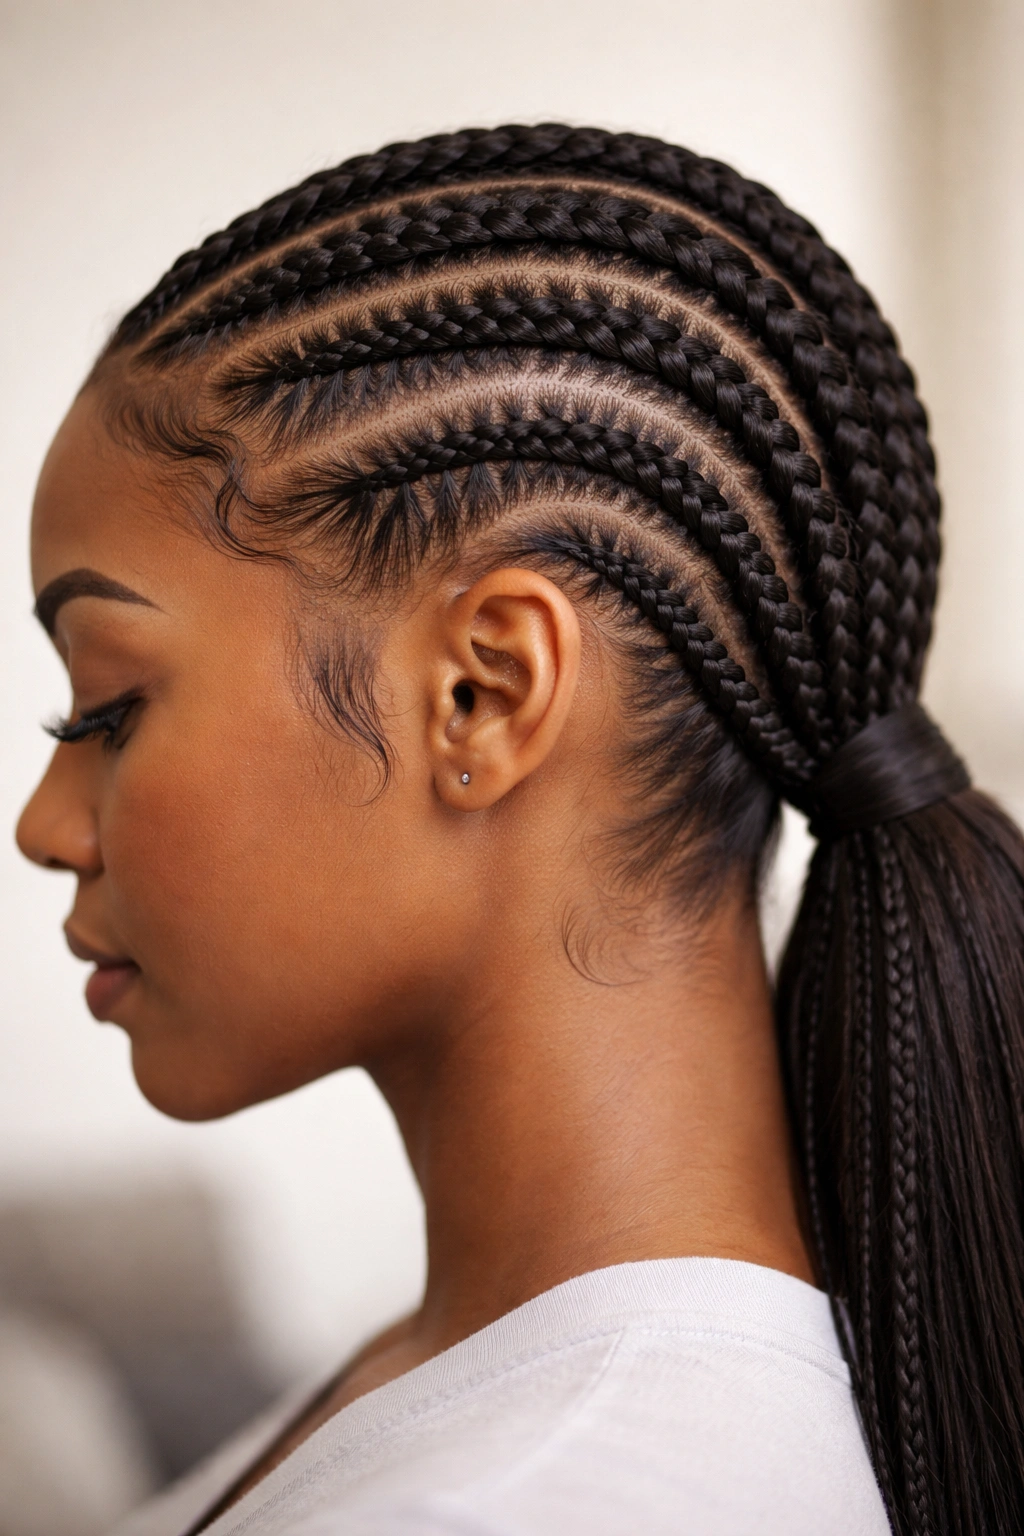
14. Stacked Cornrows (Multiple Small Braids Tightly Grouped)
Rather than spacing cornrows evenly across the head, you’re creating five to seven thin cornrows packed closely together, typically down the back center of the head. They’re braided so they sit directly adjacent to each other with minimal space between them. The effect is a bold, statement-making installation that reads as significant protective styling.
Density Creates Visual Impact
Stacking cornrows tightly together creates visual density and weight. Individually each braid is thin and quick to execute, but the overall effect is bold and impressive. Five thin stacked cornrows take about 70-85 minutes to complete and create a much more dramatic look than three spaced-out cornrows that take the same amount of total time.
Creating Tight Stacking
- Create five to seven evenly-spaced vertical sections down the back half of your head
- Sections should be very narrow—roughly the width of a pencil
- Braid each section from crown to nape, keeping braids tight and close to the scalp
- Adjacent braids should touch or nearly touch, creating a unified block of braids
- Space them evenly so the entire stack appears intentional
- Time: 70-85 minutes for five to seven stacked braids
Styling note: Stacked cornrows work best with the hair gathered up and away from the face, showing the detail.
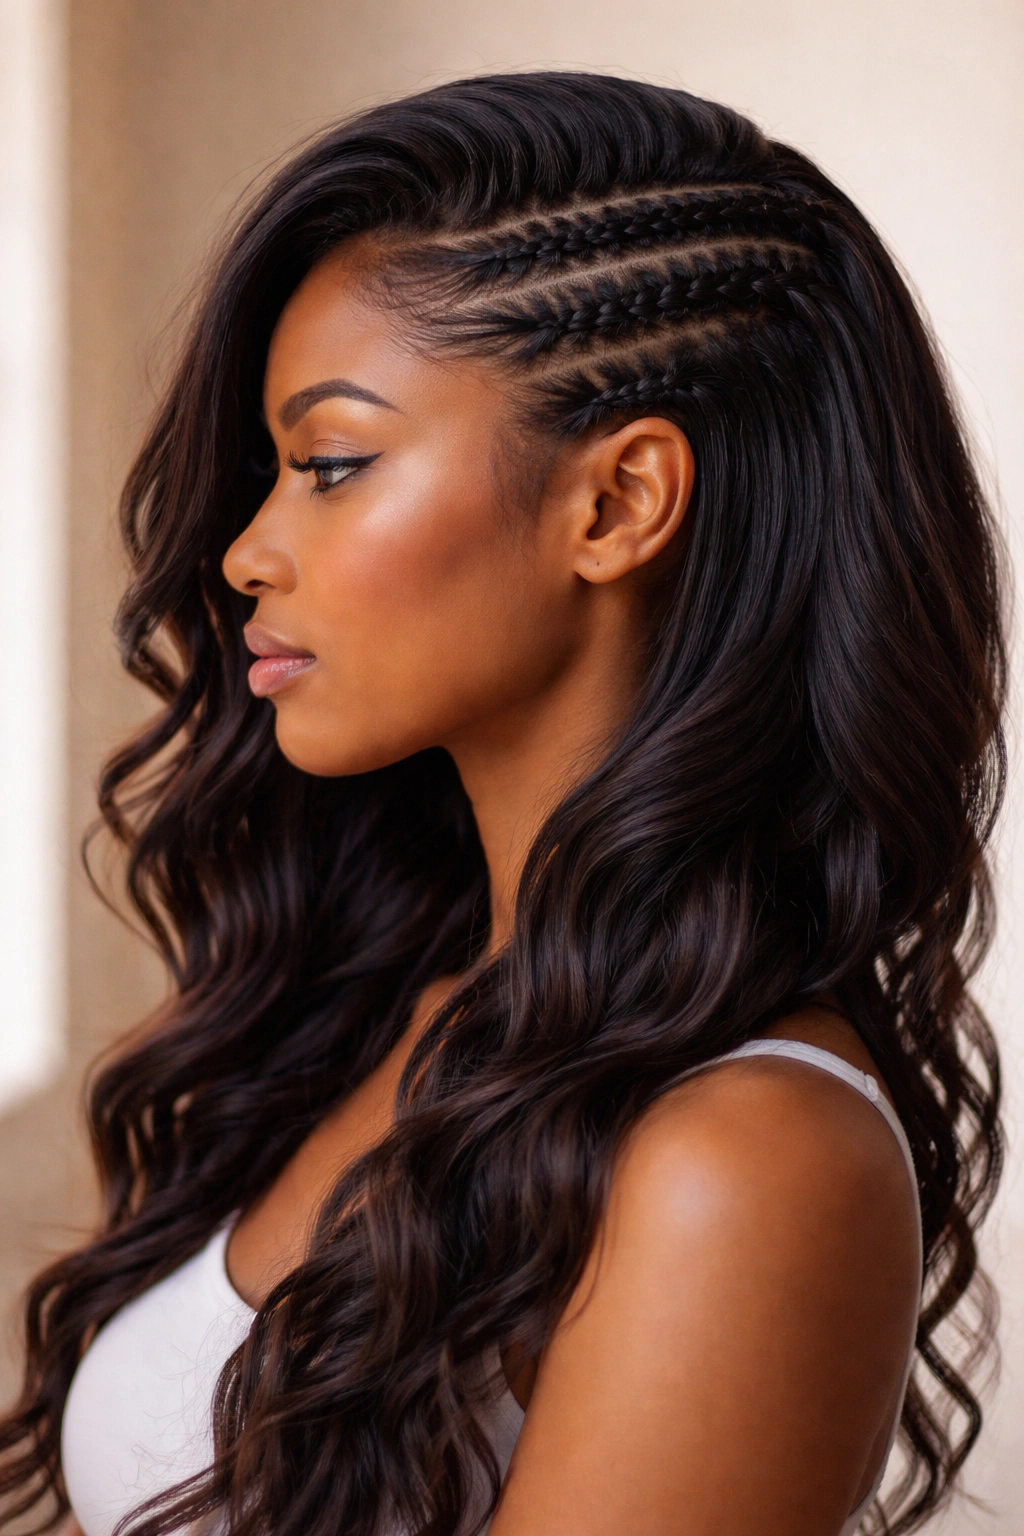
15. Cornrows with Loose Waves (Braids Release Into Curls)
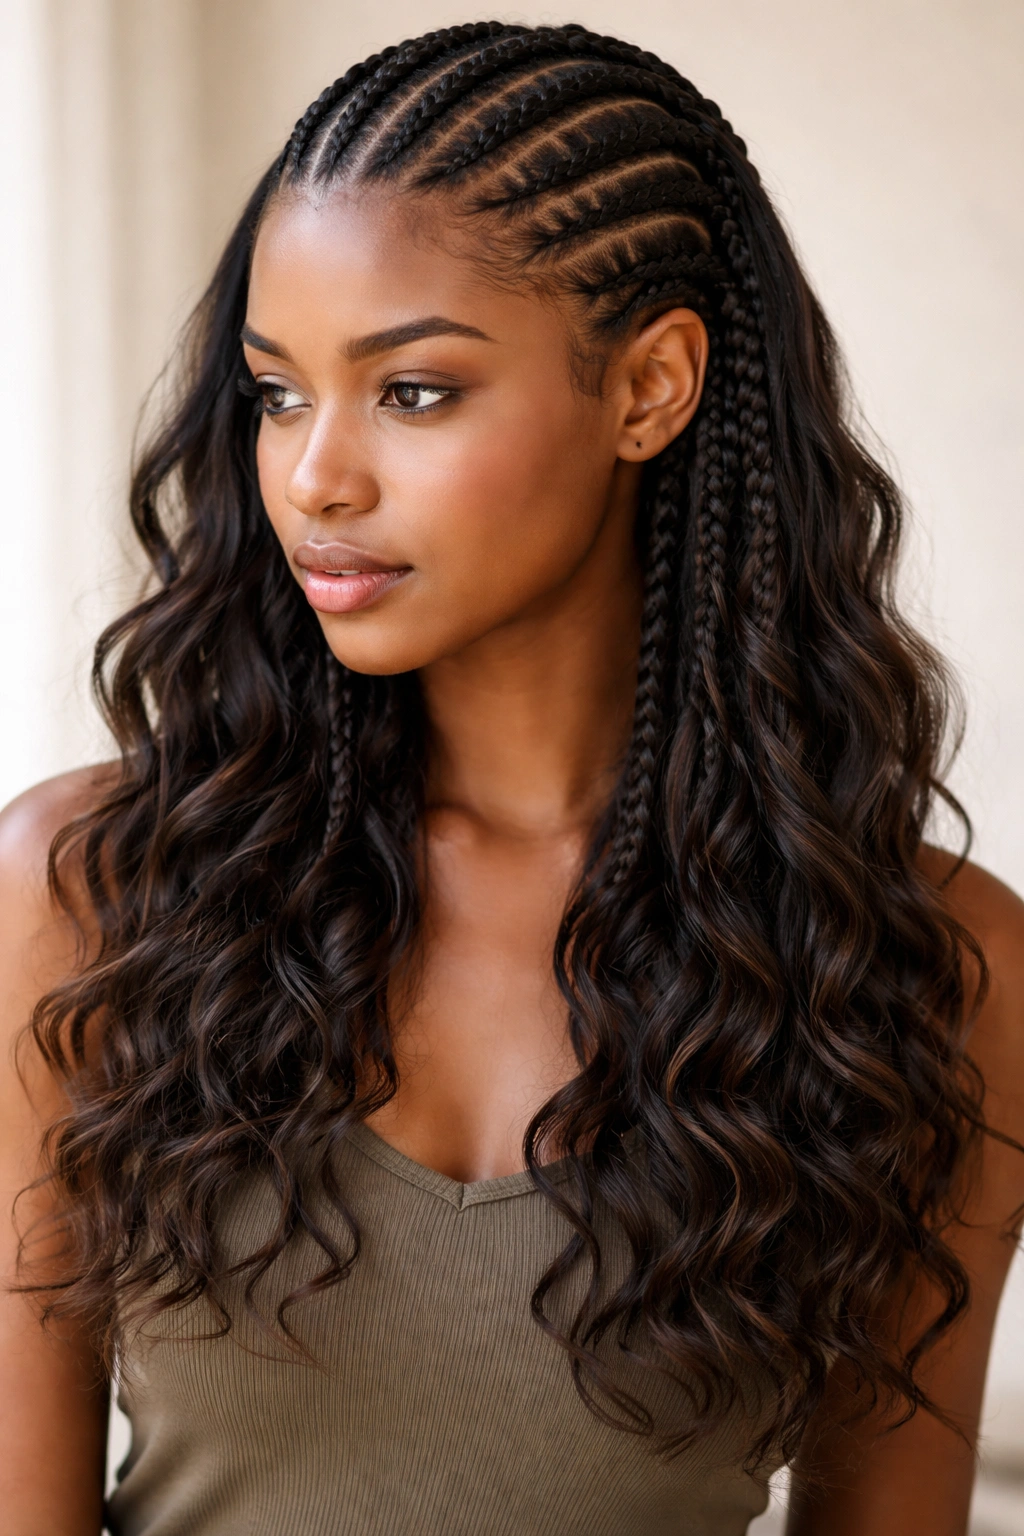
This style involves braiding the hair for the first half of its length and leaving the bottom half unbraided, allowing the released hair to form waves or curls from the pressure of being braided. It’s a hybrid that combines the sleekness of braids with the movement of natural texture. It’s also fast because you’re only braiding half the hair length.
Speed Through Half-Length Braiding
Only braiding the first half of the hair length means you’re spending half the time braiding compared to full-length cornrows. The bottom half of the hair is released and either air-dries into natural waves or is styled with curling tools. This creates a style with both control and freedom, and the timing is remarkably efficient.
Creating Braids-to-Waves Transition
- Braid from the crown down to roughly the midpoint of your hair length
- At the transition point, stop braiding and unraveling the last braid stitch, allowing the hair to fall free
- The hair below the braids will have a natural wave from the braid imprint
- Leave unbraided or lightly style the bottom section
- Two to three half-length braids: 40-55 minutes
Timing advantage: The time you save by braiding only halfway is significant—this style legitimately tops out around 50 minutes for multiple rows.
16. Cornrows with Undercut Exposure (Braids Showing Shaved Design)
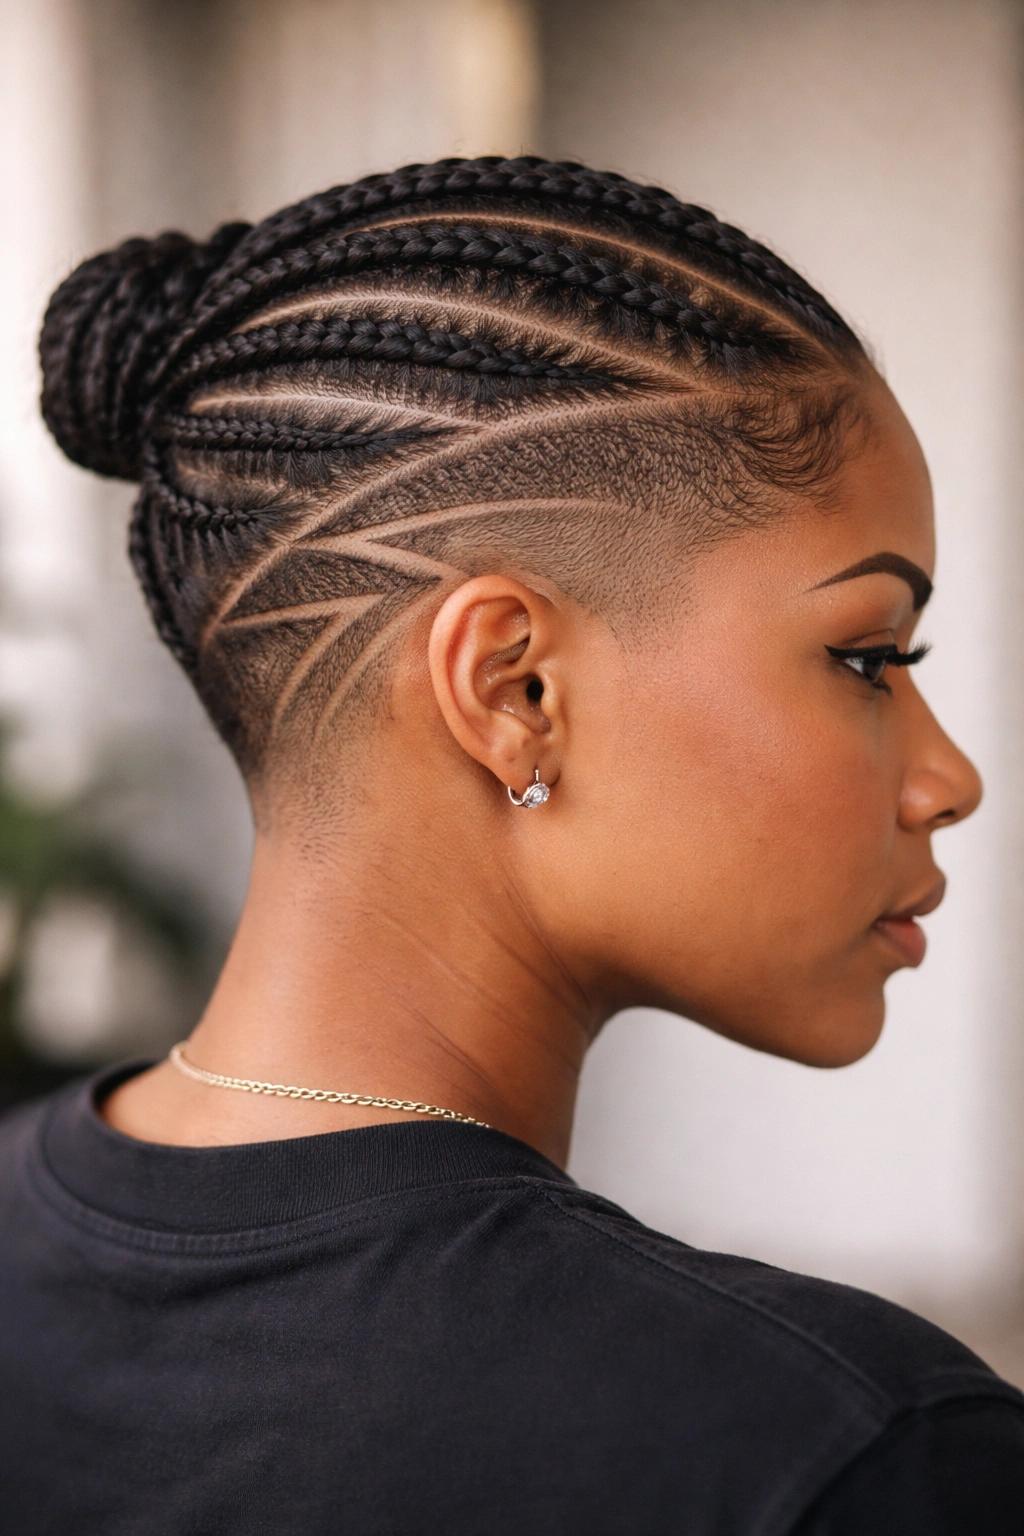
If you have an undercut, shaved side, or shaved design on the back of your head, cornrows become a way to frame or highlight that design rather than cover it. You might run cornrows along one side while leaving the shaved undercut completely exposed, or braid cornrows that curve around the perimeter of a geometric shave design.
Design as Styling Element
Cornrows become styling when they’re used to complement an existing design or texture. If you have a shaved undercut, two side-swept cornrows paired with the exposed undercut creates a bold, modern look that’s instantly striking. The cornrows themselves are the same basic style you’d do anyway, but the context transforms the entire appearance.
Cornrows Framing Shaved Designs
- If working with an undercut, cornrow the top section of the head while leaving the shaved area fully visible
- Create cornrows that curve along the natural line of the shaved area, or run perpendicular to it depending on the effect you want
- The contrast between braided and shaved sections creates visual drama automatically
- Two to four cornrows positioned strategically: 45-70 minutes depending on placement
Consider the contrast: Shaved designs read most dramatically when framed by the presence of braids, not when surrounded by loose hair. Position cornrows to create that frame.
Final Thoughts
The truth about quick cornrows is that speed comes from strategic choices rather than rushing or sacrificing quality. Thinner braids braid faster than thick ones, fewer braids covering more head space saves time compared to many thin rows, and clean sectioning is worth the upfront investment because it actually accelerates the entire braiding process. Every style on this list reaches completion well within two hours because it prioritizes either efficiency in braiding technique or visual impact per minute of installation time.
The other factor that determines speed is your own braiding familiarity. Styles that take 45 minutes on your fifth time braiding them might take 75 minutes the first time you attempt them. Don’t be discouraged if your first installation of a new style runs longer than expected—it’s normal. Your hands are literally learning the motion, and that takes repetition. By the second or third time, you’ll notice your speed increasing naturally.
Start with whichever style appeals to you most visually, because you’re more likely to practice and improve with something you actually want to wear. Speed develops through repetition, not through deliberate rushing. Keep your sectioning clean, keep your tension consistent, and keep your hands in rhythm, and you’ll find that gorgeous cornrow styles that look like they took all afternoon are actually achievable in a refreshingly short window of time.