Feed-in cornrows are one of the most beautiful, protective hairstyles you can wear—and they’re incredibly beginner-friendly once you understand the basic technique. The magic of feed-in cornrows lies in their name: you’re literally feeding small sections of new hair into the braid as you go, creating a fuller, more defined look than traditional box braids or regular cornrows. The result is a sleek, elegant style that can last anywhere from two to six weeks depending on your hair care routine and how well you maintain it.
What makes feed-in cornrows so appealing for someone just starting out is that they don’t require complex parting patterns or advanced hand dexterity. Whether you’re braiding your own hair or getting them done at a salon, understanding the foundational styles and patterns gives you confidence and helps you communicate clearly with your stylist about what you want. The versatility is stunning too—you can do tight, sleek versions for a polished look, loose, wavy versions for a softer aesthetic, or mix parting styles to create truly unique patterns that reflect your personality.
The real power of feed-in cornrows for beginners is that you’re not locked into one look. You can start simple with basic three-row braids, then gradually experiment with curved patterns, zigzags, diagonal lines, and creative color placement. Each style builds on the same fundamental braiding skill, so once you master the feeding technique, you’ve got the foundation to create dozens of different looks. Let’s explore eighteen beautiful feed-in cornrow styles that are perfect for someone new to this protective styling technique.
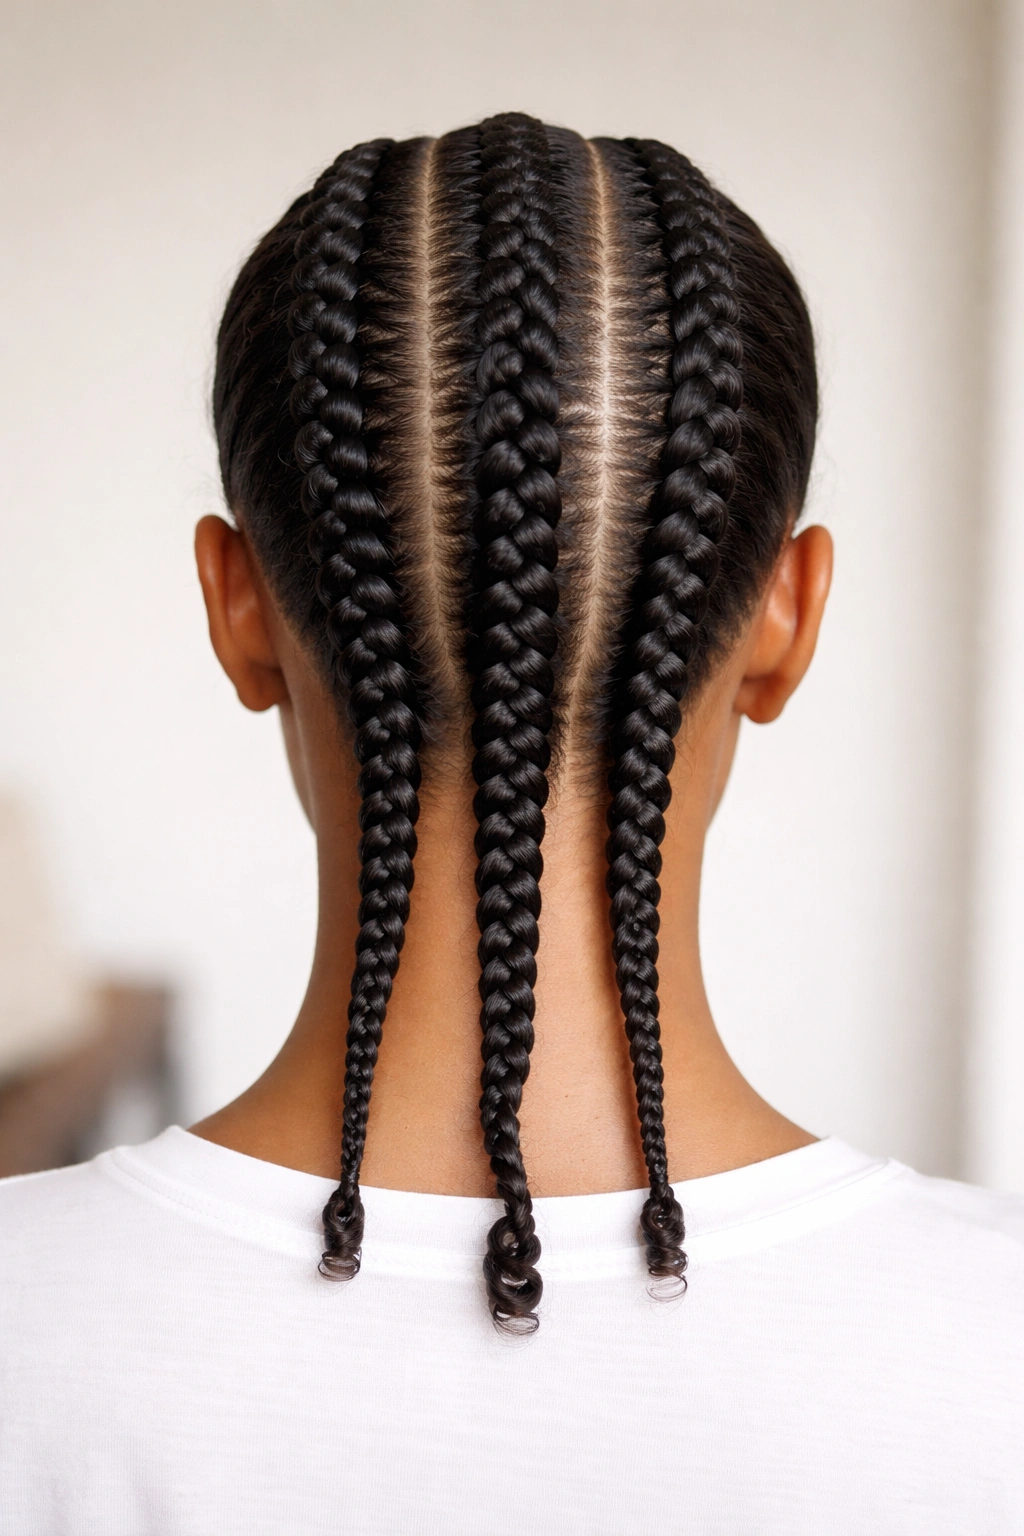
1. Classic Three-Row Feed-In Cornrows
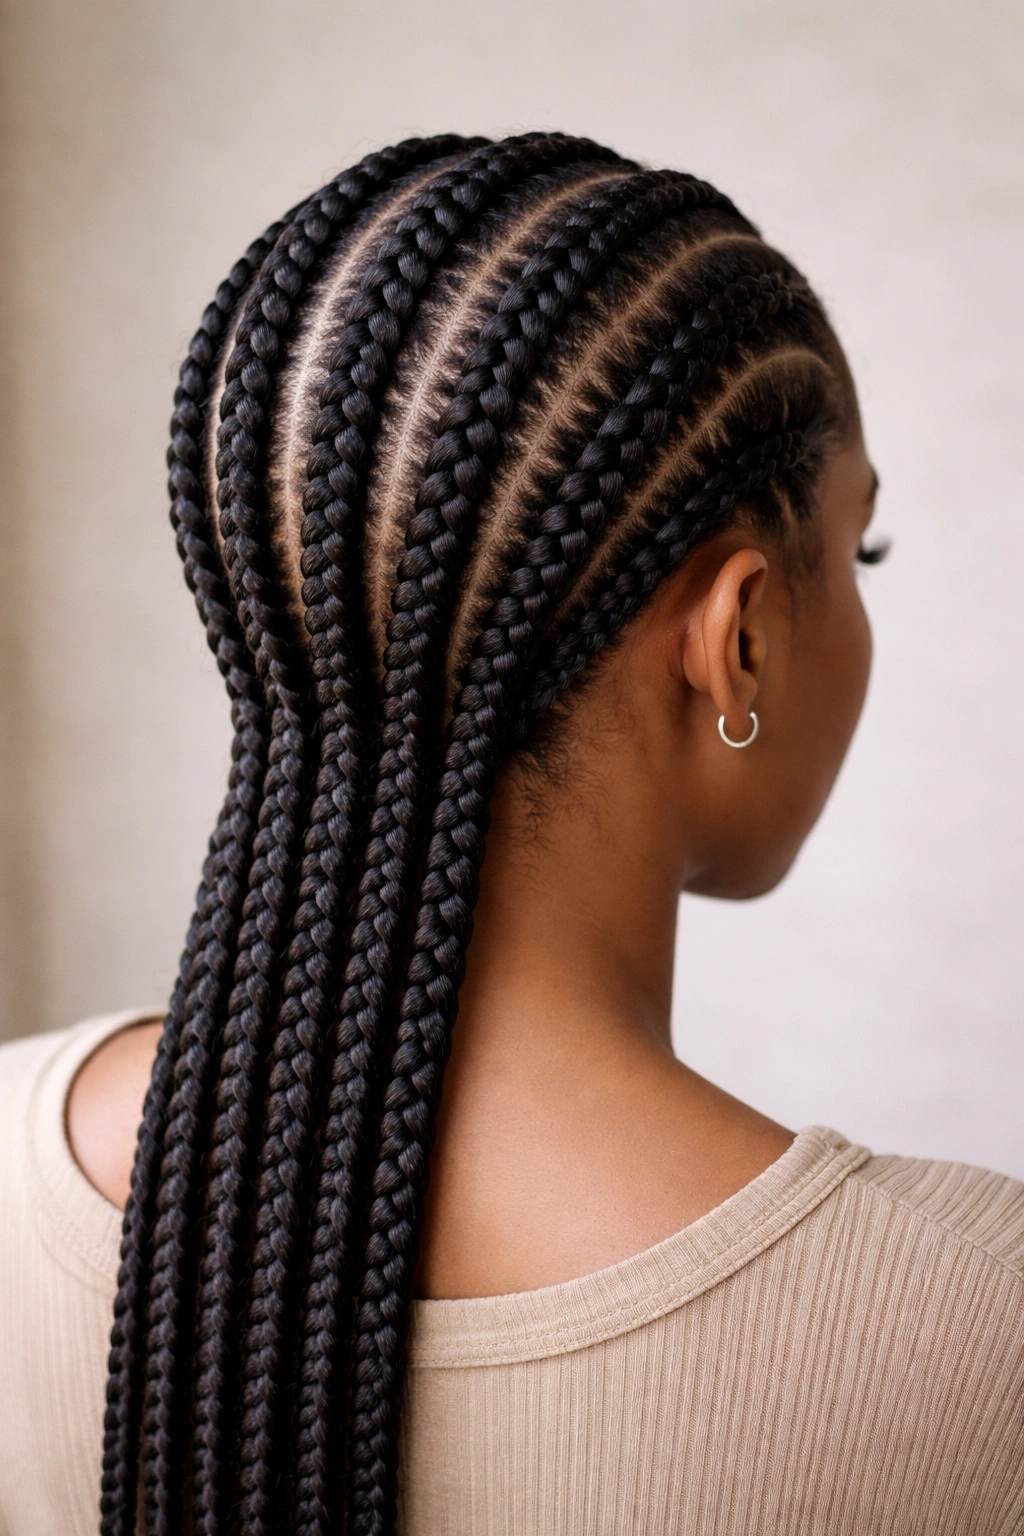
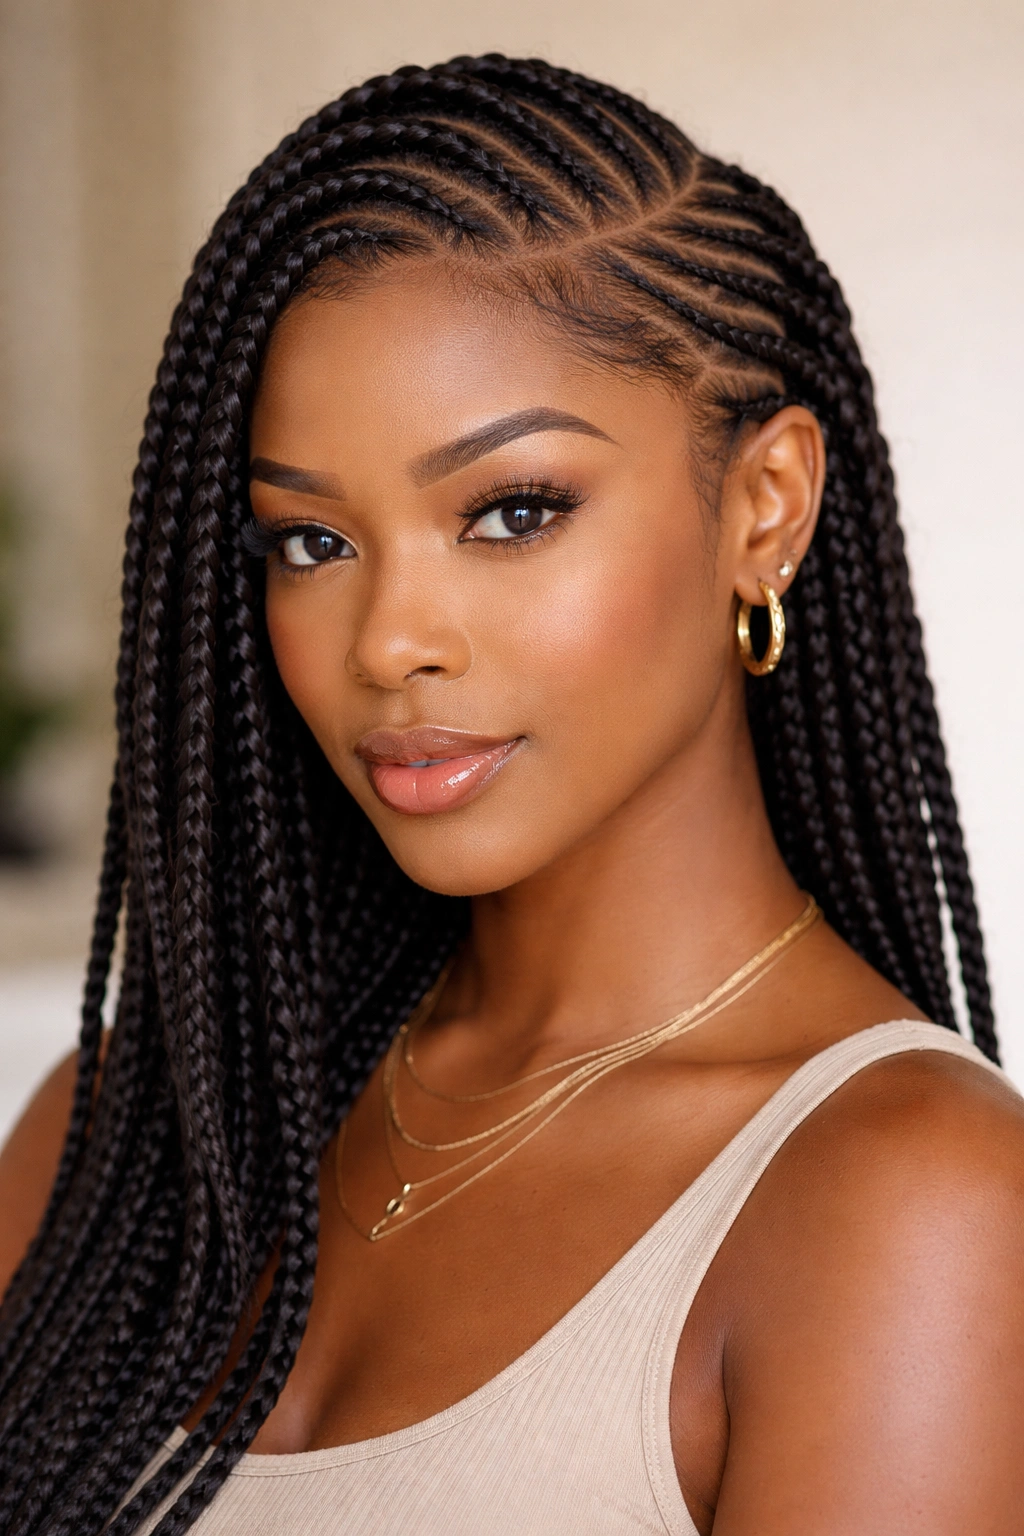
The three-row straight style is the absolute foundation of feed-in cornrows and where most beginners should start. You’re parting your hair into three vertical sections from your forehead back to your nape, creating three parallel braids that run straight down the back of your head. This style looks clean, simple, and infinitely more intentional than undone hair—which is exactly why it’s a beginner favorite. The simplicity means you can focus entirely on perfecting your feed-in technique without worrying about complex patterns or curves.
Why This Works for Beginners
The straight three-row pattern is forgiving because it follows a natural parting guideline—straight lines are easy to maintain visually, and you’re not fighting against any curves or angles that might throw off your braid rhythm. You can see exactly what you’re doing, and if one braid is slightly thicker or tighter than the others, it’s not immediately obvious because they’re all the same style. This gives you room to learn without feeling like you’ve failed if your work isn’t absolutely perfect.
Making It Work for Your Hair Type
- This style works beautifully on medium to thick hair types, where the three sections are substantial enough to create visibly full braids
- If you have finer hair, space the three rows slightly farther apart to avoid gaps in your scalp coverage
- Use lightweight oils or edge control to smooth flyaways and create definition between the rows
- Consider adding hair extensions if you have very fine or short natural hair—this makes the braids appear fuller and last longer
Pro tip: The three-row style is perfect for testing your feed-in tension. If your braids are too tight, you’ll feel it immediately; if they’re too loose, they’ll slip. Once you nail this basic pattern, every other feed-in cornrow style becomes easier.
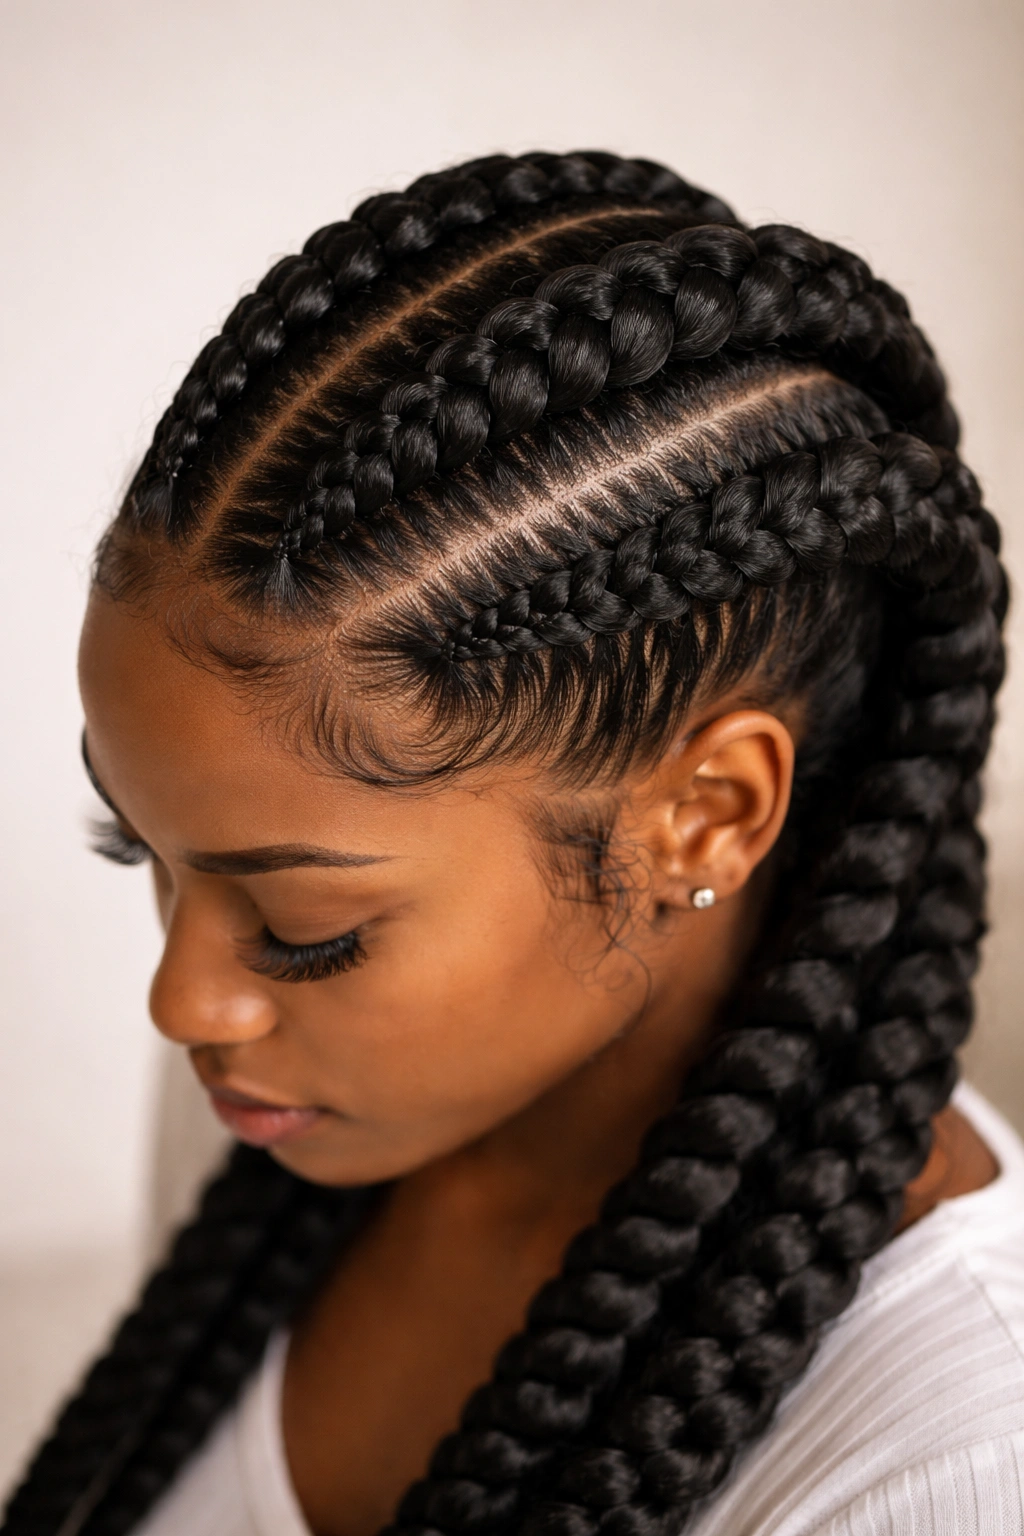
2. Five-Row Feed-In Cornrows for Maximum Coverage
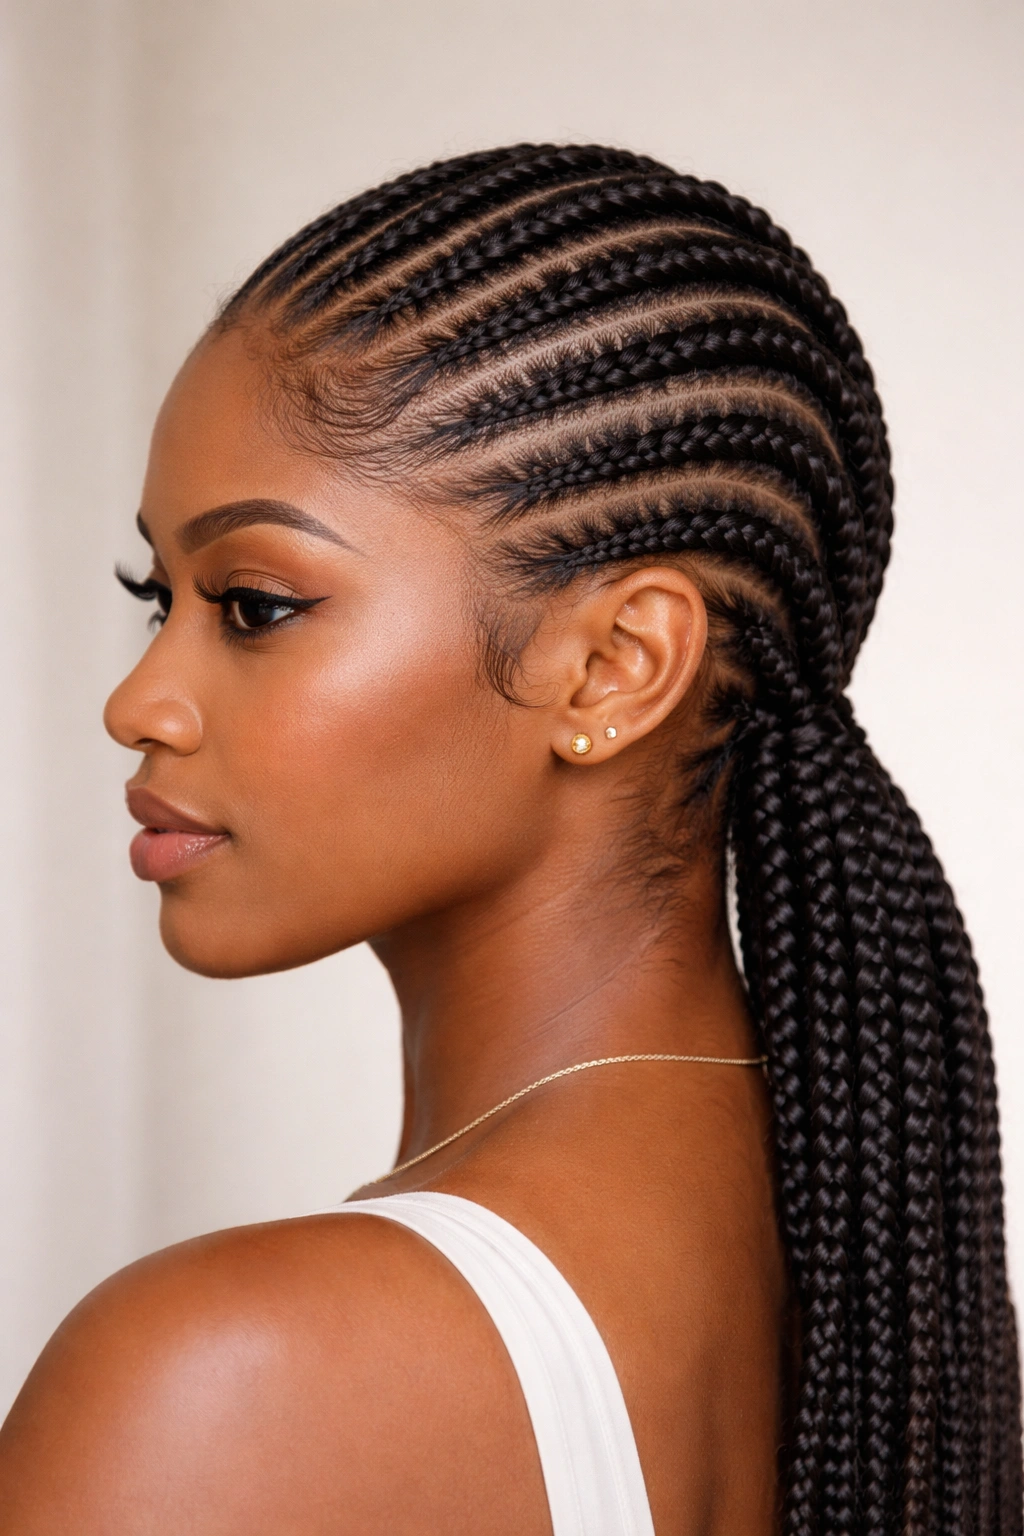
Once you’ve mastered three rows, five rows is the natural next step because it provides fuller coverage of your entire scalp with more defined braids. Five evenly spaced rows create a balanced, symmetrical look that covers your head from temple to temple and back. This style still follows straight lines, so you’re using the same braiding technique you’ve already learned, but you’re scaling it up. The increased number of rows means more braids to work with, which creates more visual interest and a fuller overall appearance.
What Makes Five Rows Different
With five rows, you’re working with narrower sections of hair, which means each individual braid will be slightly thinner than your three-row version. This requires a bit more precision in your parting—you need to make sure each row is evenly spaced so they look intentional rather than random. The advantage is that five rows create beautiful texture and movement, especially as the style settles and any loose flyaways create a softer halo effect around your braids.
How to Part for Five Rows
- Start by creating a center part from your forehead to your nape—this gives you a reference line for symmetry
- Divide the space from the center part to your right ear into two sections; repeat on the left side
- You now have a center row plus two rows on each side, all evenly spaced
- Use a rattail comb and edge control to define each parting line before you start braiding
- Mark your rows lightly with bobby pins or small clips if you’re a visual learner
Worth knowing: Five rows take noticeably longer than three rows, but they also create a much fuller, more polished finish. This style is worth the time investment if you’re looking for maximum coverage.
3. Diagonal Feed-In Cornrows
Diagonal cornrows introduce your first curved pattern, which might sound intimidating but is actually very manageable once you understand the principle. Instead of parting your hair in straight lines, you’re angling your sections from one corner of your head to another—typically starting at your temple and angling down toward your opposite ear or nape. This creates a dynamic, modern look that’s much more interesting visually than straight rows. Diagonal patterns are incredibly flattering because they create the illusion of width and can beautifully frame your face.
The Geometry of Diagonal Braids
The key to diagonal cornrows is that your parting lines (and therefore your braids) are simply straight lines that run at an angle rather than vertically. You’re not actually doing anything harder technically—you’re just changing your reference lines. Start by visualizing the angle you want, then part your hair along that diagonal, and braid straight down the angle just like you would a vertical braid. The feeding technique remains identical; only the direction changes.
Creating Balance with Diagonal Rows
- Plan an odd number of diagonal rows so you have a center reference point
- If you’re doing five diagonal rows, create a center diagonal from the crown toward your nape, then mirror two rows on each side
- Ensure each row is the same distance apart; uneven spacing is the biggest mistake beginners make with diagonal patterns
- Consider your face shape—diagonals that angle away from your face elongate it, while diagonals that angle toward your face widen it
Insider note: Diagonal cornrows are especially stunning when you finish with a small topknot or high bun at the crown—the angle of the braids naturally guides the eye upward.
4. Zigzag Feed-In Cornrows
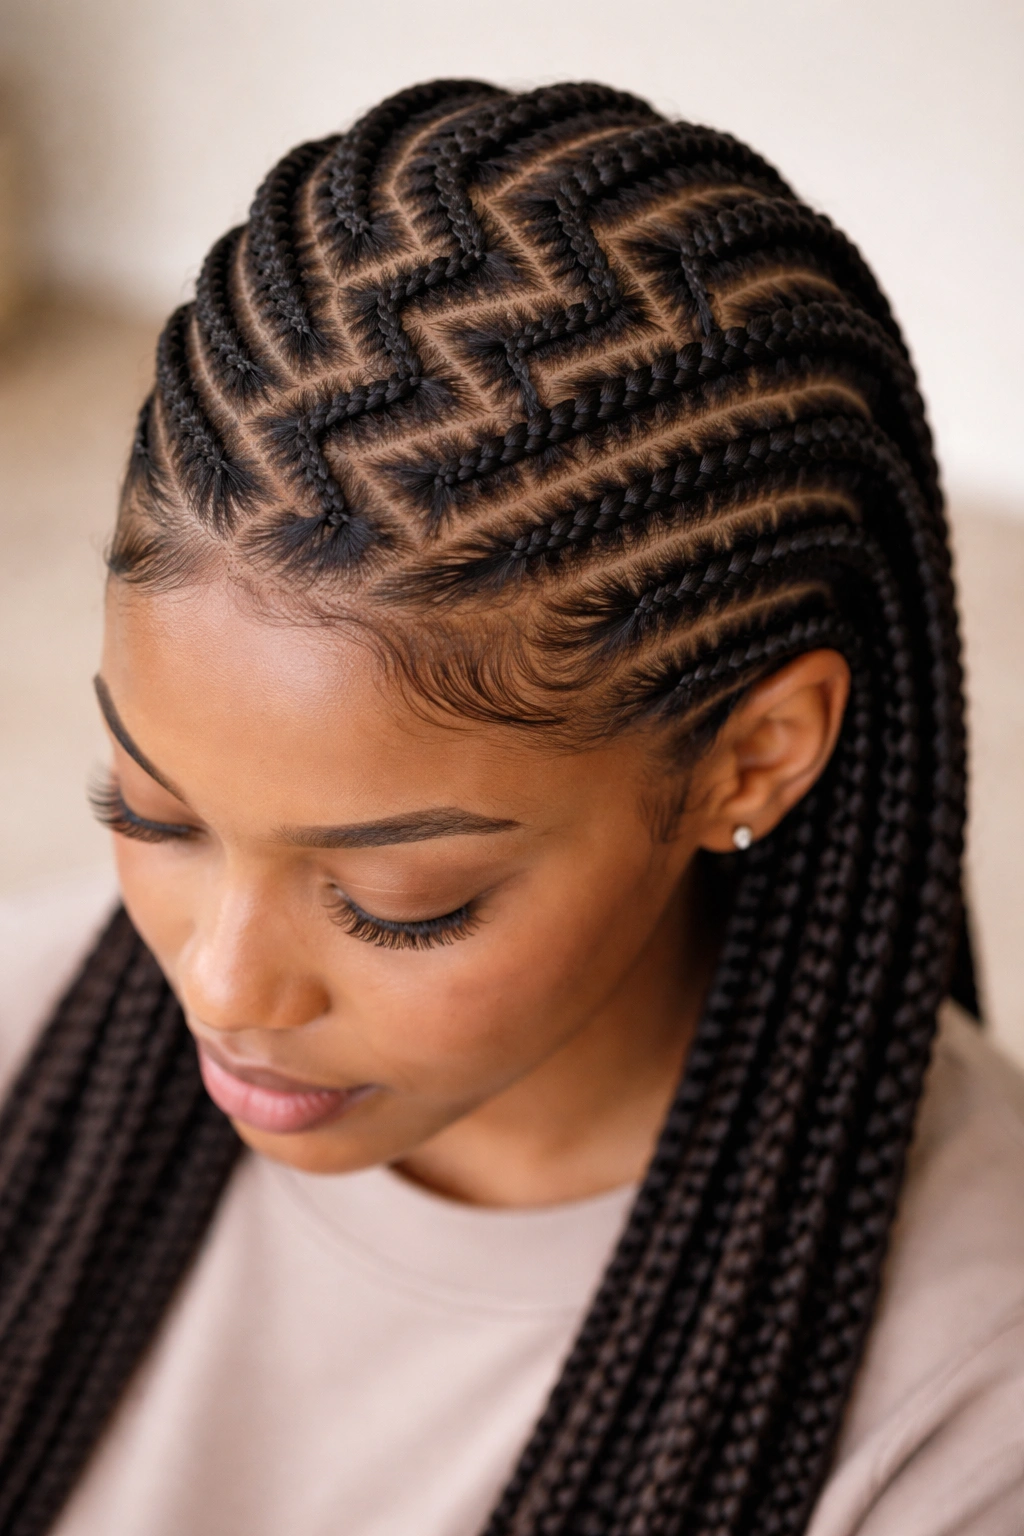
Zigzag cornrows are where your braiding adventure gets genuinely creative, and despite their dramatic appearance, they’re surprisingly achievable for beginners. Instead of following a straight or simply diagonal line, your braids curve back and forth across your head in a zigzag pattern. Start with a braid that angles from one side of your head toward the center, then your next braid angles from the center back toward the other side, creating that distinctive zig-and-zag effect. The pattern creates incredible visual movement and looks far more intricate than it actually is.
Understanding the Zigzag Pattern
The secret to successful zigzag braids is understanding that you’re creating two alternating diagonal directions. If your first braid angles from right-center to left, your second braid angles from left-center to right. You’re not making curved braids—you’re making angled braids that change direction, which is much easier to execute. Your parting lines are still technically straight; they just change angle between each section.
Styling Tips for Zigzag Success
- Start with three or five rows rather than seven—fewer rows are easier to keep aligned and more forgiving if your angles aren’t perfect
- Use a fine-tooth rattail comb and take time with your parting—zigzags are all about the precision of those initial lines
- Consider adding colored extensions or beads along the zigzag pattern to emphasize the shape and create additional visual interest
- This pattern photographs beautifully, so it’s a great choice if you love sharing your style on social media
Real talk: Zigzag cornrows do take longer to create than straight rows because of the precision required, but the dramatic effect is worth every extra minute.
5. Two-Tone Feed-In Cornrows
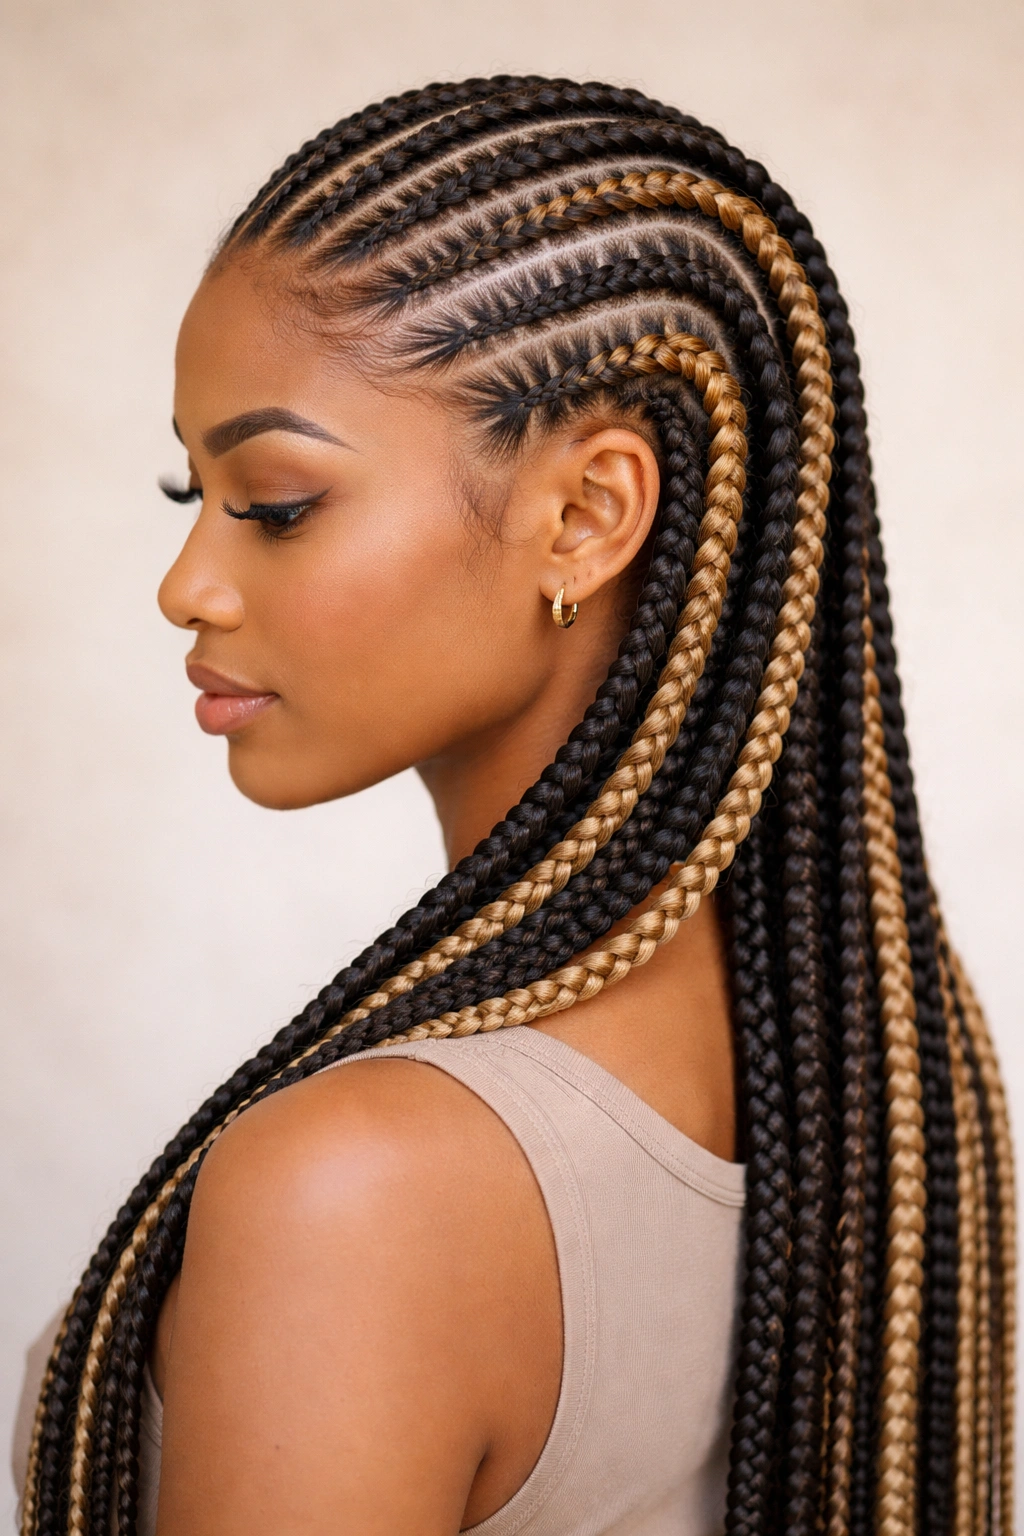
Two-tone cornrows combine your braiding skills with color, creating a stunning visual effect without requiring you to permanently alter your hair. You’re creating feed-in cornrows using two different colors of hair extensions—your natural color for some braids and a contrasting color for others. Common combinations include black and burgundy, black and honey blonde, black and copper, or natural brown and caramel. The contrast between the two tones creates depth and makes each individual braid pop, even if your pattern itself is simple like straight rows or a basic zigzag.
Choosing Your Two Colors
The most important aspect of two-tone cornrows is selecting colors that complement each other and suit your skin tone. Warm undertones in your skin usually look better with golden, copper, or warm red extensions, while cooler undertones suit ash blonde, platinum, or cool burgundy shades. Don’t be afraid to go bold—the beauty of extensions is that you can experiment with colors you’d never dye your actual hair. Many beginners find that alternating colors (one braid in color A, next braid in color B) creates the most striking effect.
Installation and Maintenance for Two-Tone Styles
- Separate your extensions by color before you begin braiding, so you’re grabbing the right color for each row
- Keep your extension colors organized in separate sections—mixing them up mid-braid is the easiest mistake to make
- Two-tone braids sometimes show more wear at the roots because the color contrast emphasizes where your natural hair ends, so maintain your edges carefully
- This style works beautifully with curved patterns like zigzags or diagonals because the color contrast emphasizes the geometric design
Pro tip: If you’re nervous about committing to a two-tone style, start by adding just one row of a contrasting color to an otherwise monochromatic braid pattern. It’s a lower-stakes way to experiment with color.
6. Stacked Feed-In Cornrows
Stacked cornrows are thicker, bolder versions of traditional feed-in braids, and they’re incredibly beginner-friendly because they follow the exact same technique—you’re just using larger sections of hair. Instead of five or seven thin rows covering your whole head, you might do just two or three very thick, substantial braids. This style is all about impact: bold, statement-making braids that look impressive and are relatively quick to install. Stacked cornrows work beautifully on all hair types and are especially stunning on textured hair where the contrast between the braids and the natural hair texture creates beautiful depth.
When to Choose Stacked vs. Multiple Rows
Stacked cornrows are ideal if you have thick, voluminous natural hair that looks best in fewer, larger sections rather than many thin ones. They’re also perfect if you’re short on time—fewer braids to create means faster installation. On the flip side, if you have finer hair or prefer maximum scalp coverage and a fuller look overall, multiple thinner rows might suit you better. There’s no right answer; it’s entirely about your personal preference and what makes you feel confident.
Creating Visual Balance with Stacked Braids
- For a symmetrical, classic look, do three stacked rows (one down the center, one on each side)
- For a bolder, edgier look, do two thick stacked braids that angle across your head
- Use the feeding technique to make sure your stacked braids are super clean and defined—the simplicity of the style means any unfinished edges will be visible
- Stacked braids pair beautifully with decorative elements like beads, cuffs, or wrapped thread around the base of each braid
Worth knowing: Stacked cornrows often last longer than thinner braids because the thicker sections are more robust and less prone to unraveling or breaking at the edges.
7. Side-Swept Feed-In Cornrows
Side-swept cornrows are angled braids that sweep from one side of your head toward the opposite side or nape, typically starting above your ear and flowing diagonally back. This style is incredibly flattering because it has a softer, more face-framing quality than straight-back cornrows, and it creates lovely asymmetrical visual interest. If your face is round, side-swept braids that angle downward can elongate your features. If your face is long, side-swept braids that angle more horizontally can widen and balance your proportions.
The Flattering Angle for Your Face
Side-swept cornrows work because they’re deliberately styled to complement your face shape, not fight it. The braid that starts closest to your face sets the tone—if it angles down and back, it creates a lengthening effect. If it angles more horizontally, it creates width. Experiment with one or two angled braids first to see what feels most flattering, then you can scale up to a full head of side-swept rows once you understand what works for your features.
Styling a Side Sweep Pattern
- Begin your first braid just above your temple or in the front third of your head
- Angle it back at approximately 45 degrees, heading toward the opposite ear or nape
- Create additional braids parallel to your first braid, maintaining the same angle
- Use one side of your head as your reference—this is the “sweep” direction, and consistency makes it look intentional
- Finish with a cute hair tie, bead, or wrap at the nape where your braids end
Insider tip: Side-swept cornrows are perfect if you’re doing a half-up style. You can sweep your braids around to the back or side and secure them together for extra visual impact.
8. Feed-In Braids with Loose Ends
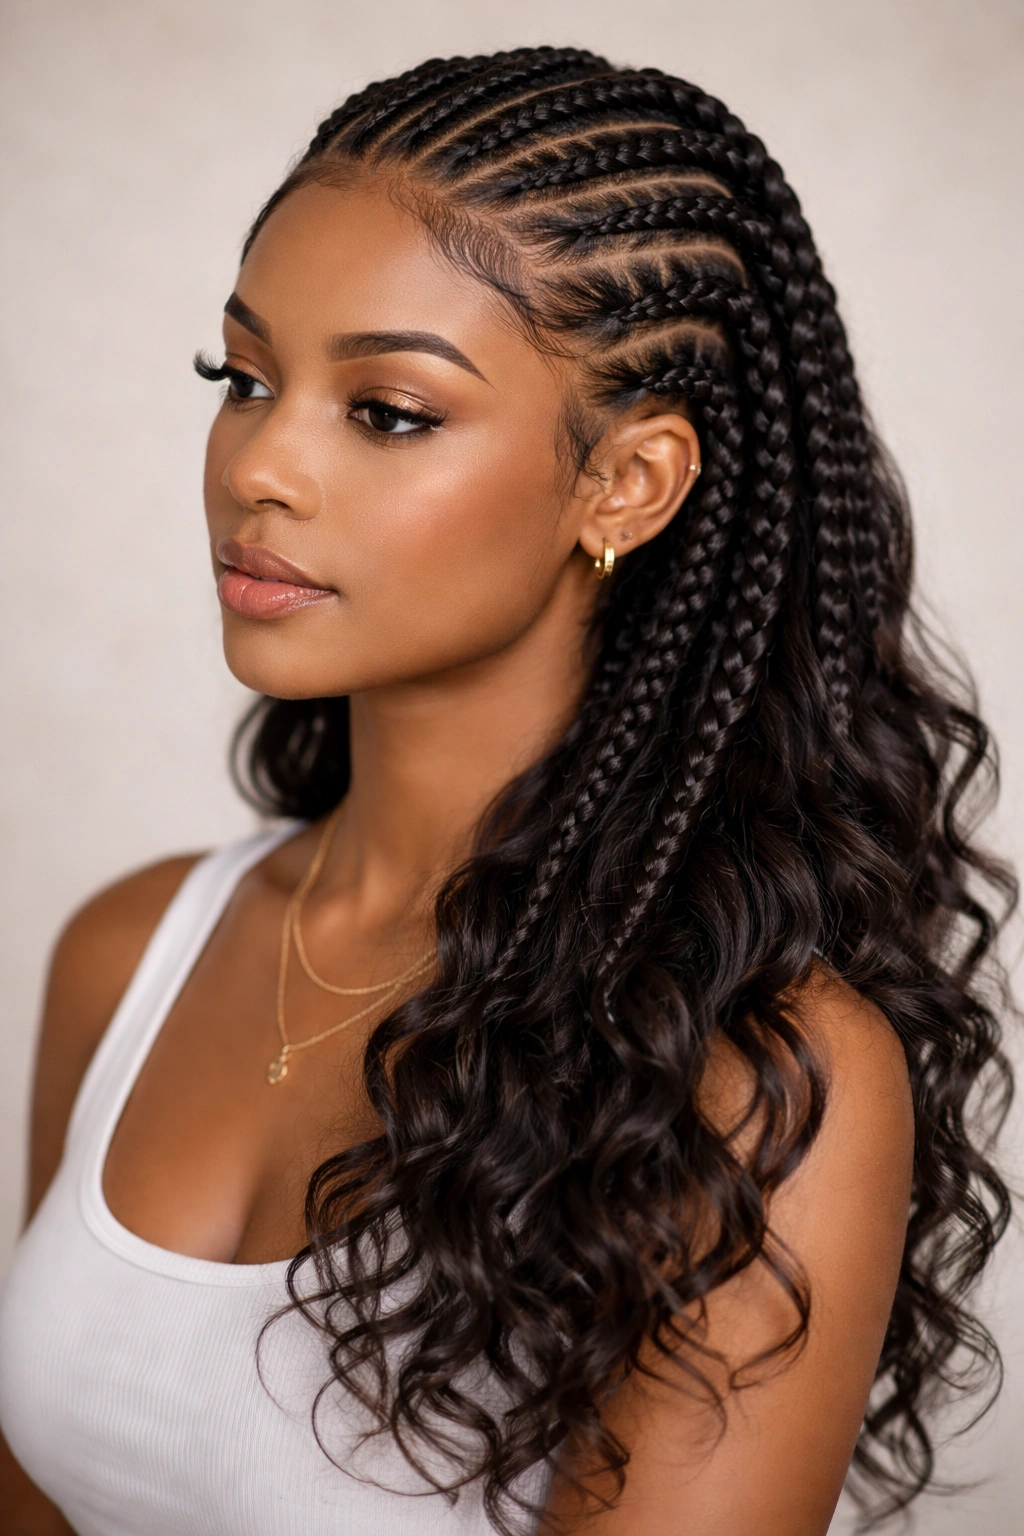
Feed-in cornrows with loose ends—sometimes called braids flowing into twists or braids fading into curls—combine the polished look of cornrows with the freedom and texture of loose hair at the bottom. You’re creating feed-in braids as usual, but instead of braiding all the way to the ends of your extensions, you stop about two to four inches from the ends and let the remaining hair hang loose and curly or wavy. This creates a beautiful contrast between the structured, neat braids at the top and the free-flowing, textured hair below.
The Dual Aesthetic Appeal
What makes this style so beginner-friendly is that it looks intentional and beautiful even if your loose ends aren’t perfectly uniform or if some curls are looser than others. In fact, that variation is part of the charm. The loose ends soften the overall look compared to braids that go all the way to the tip, which is why this style is particularly flattering if you prefer a less severe aesthetic. You get the protective benefits of cornrows where it matters most (the scalp area) but enjoy the freedom of loose, moveable hair at the bottom.
Creating Perfect Loose Ends
- Use quality hair extensions that curl or wave naturally when released from the braid
- Braid about 75 percent of the extension length, leaving the bottom 25 percent loose
- Once you’ve installed all your braids, gently separate and fluff the loose sections to encourage curl pattern
- Apply a curl cream, moisturizing gel, or styling mousse to the loose ends to enhance definition and hold
- Sleep with the loose ends in a protective pineapple style (hair gathered at the crown in a loose ponytail) to preserve curl definition
Pro tip: If you want more curl in your loose ends, try two-strand twisting the last inch or two before releasing them, which creates tighter, more defined curls than straight loose hair.
9. Curved Cornrows Following Your Hairline
Curved cornrows that beautifully follow your natural hairline are a true art form, and they’re also one of the most stunning beginner styles because the curve is natural rather than an imposed pattern. Instead of making your cornrows go straight back from your hairline, you’re allowing them to follow the contour of your hairline itself—curving around your temple, your ear, and the back of your neck. This creates a custom-fitted, ultra-polished look that appears sophisticated without being complicated.
Understanding Hairline Curves
Your hairline isn’t actually straight—it has natural curves and contours that are unique to your head shape. Following those curves rather than fighting them makes your cornrows look like they were custom-designed just for you. The technique is identical to your regular feed-in cornrows; you’re simply adjusting your parting lines to follow your hairline curves rather than making them perfectly straight. This often creates a subtly different look that’s much more personalized and flattering.
Creating Curves That Follow Your Head Shape
- Look at your hairline in a mirror and notice where it curves naturally
- Start your parting lines so they begin at a point on your hairline and follow its natural contour
- Use a fine rattail comb and edge control to define these curved parting lines clearly before braiding
- Take your time with the first inch or two of each braid—precision at the hairline sets the tone for the whole braid
- If you have baby hairs or a delicate hairline, use extra-gentle tension in the first section to avoid pulling stress
Worth knowing: Cornrows that follow your hairline naturally are less likely to cause tension alopecia (hair loss from pulling) because you’re working with your natural hair growth pattern rather than against it.
10. Asymmetrical Feed-In Cornrows
Asymmetrical cornrows reject the idea of perfect bilateral symmetry and instead create visual interest through intentional imbalance. You might have three braids on one side of your head and two on the other, or your braids might have different thicknesses, angles, or patterns on each side. This style is bold, modern, and incredibly flattering because asymmetrical designs naturally draw the eye and create movement. For beginners, asymmetrical cornrows might seem complicated, but they’re actually forgiving because perfect symmetry isn’t the goal.
The Beauty of Intentional Imbalance
Asymmetrical designs work because they’re clearly deliberate—you’re not trying to create perfect symmetry and failing. Instead, you’re creating a style where imbalance is the entire point. This takes the pressure off your need for absolute precision and lets you focus on making your braids look beautiful and clean, which is always more important than achieving mathematical symmetry. Asymmetrical styles are especially flattering if you have an asymmetrical face shape or if one side of your face is a feature you particularly like.
Designing Your Asymmetrical Pattern
- Sketch your design on paper first or in a mirror with washable markers to visualize the pattern
- Create more braids on the side you want to draw attention to, or make those braids thicker
- Vary your braid angles between the two sides—if the left side has straight rows, try diagonals on the right
- Consider adding beads, rings, or color to one side only for additional visual interest
- This style gives you freedom to play with patterns you might not normally try
Insider tip: Asymmetrical cornrows photograph beautifully from the side because the imbalanced design creates more visual depth and interest than symmetrical braids.
11. Wrapped and Beaded Feed-In Cornrows
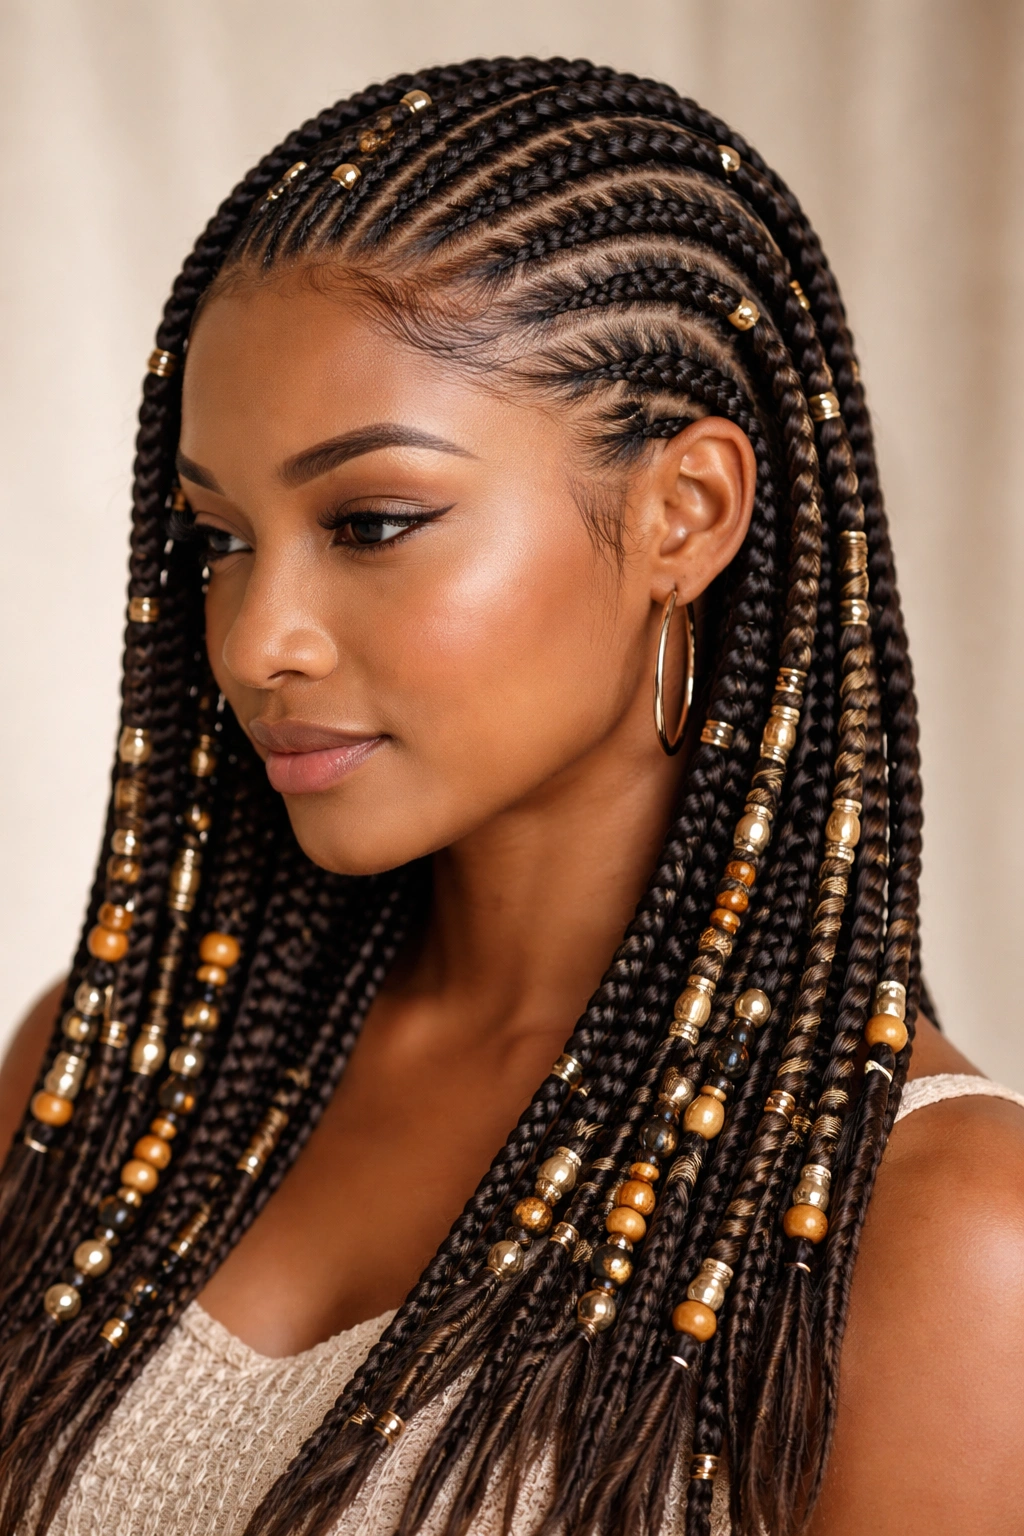
Wrapped and beaded cornrows take your basic feed-in braids and elevate them with decorative elements that add personality, sparkle, and dimension. You’re wrapping each braid with thread, wire, or yarn in contrasting colors, and threading decorative beads onto the braids themselves. This transforms simple cornrows into a statement style that feels custom and intentional. The wrapping and beading can be done during installation or added afterward, making it perfect for beginners who want to experiment with different looks without committing to a completely new braid installation.
Choosing Your Wrapping and Bead Materials
Quality matters when you’re selecting wrapping thread and beads because materials that are too heavy, rough, or cheap can damage your braids or cause discomfort. Look for lightweight embroidery thread, thin yarn, or specialized hair wrapping thread in colors that complement your skin tone and braid color. Beads should be smooth, with large enough holes that they slide on easily without requiring force. Avoid heavy metallic beads on thin braids—the weight can cause tension and stress on your hair. Gold-tone, silver-tone, pearl, and clear glass beads work beautifully on most styles.
Installation and Maintenance for Wrapped Braids
- Wrap thread around your braids tightly and evenly, spacing wraps about a half-inch apart for clean definition
- Thread beads onto the braids at random intervals or in a specific pattern for visual cohesion
- Secure thread ends by tucking them under existing wraps or using a clear nail polish to seal the knot
- The wrapping and beading add visual weight, so be gentle with your braids to avoid unraveling
- When removing wraps and beads, take your time to avoid accidentally pulling hair
Pro tip: Mix metallic and gemstone beads on the same braid for an eclectic, artistic look, or keep each braid to one bead style for a more cohesive appearance.
12. Colored Kanekalon Extensions in Feed-In Cornrows
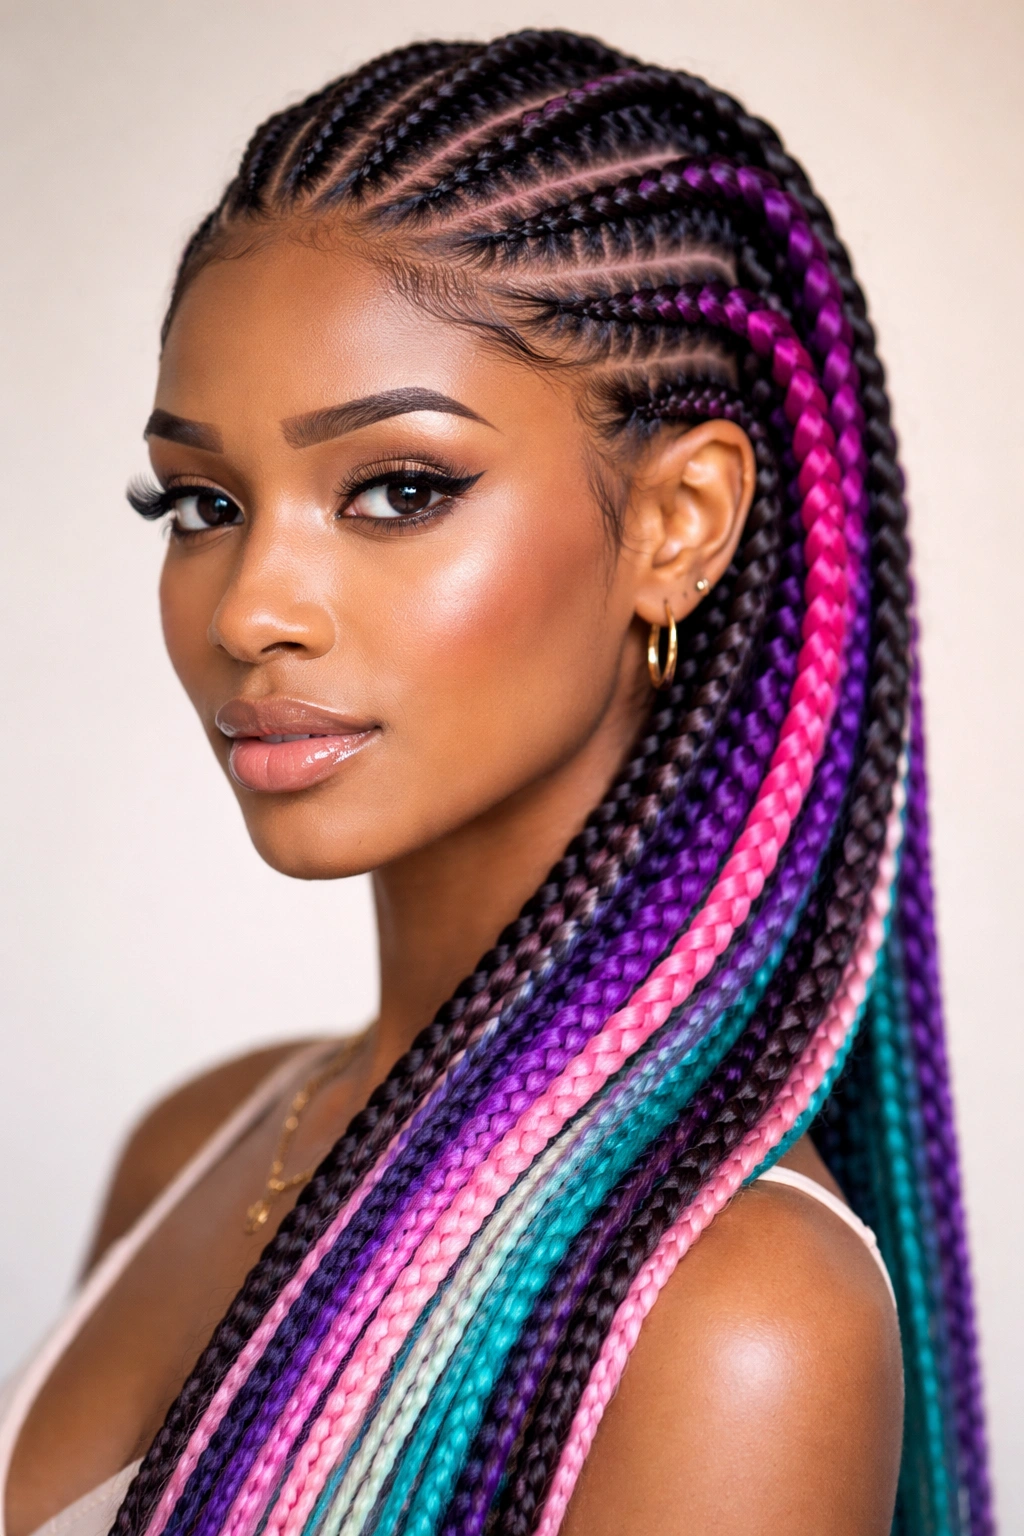
Using colored Kanekalon extensions in your feed-in cornrows is one of the easiest ways to create a stunning, multi-tonal style that suits different skin tones and personal aesthetics. Kanekalon is the synthetic hair most commonly used for braiding extensions—it’s lightweight, affordable, durable, and available in virtually every color imaginable. Whether you choose a single bold color like deep purple or forest green, or you blend multiple colors within the same braids, colored extensions instantly elevate your style and let you express your personality.
Selecting Colors That Flatter You
Your undertone—the subtle color beneath your skin’s surface—determines which Kanekalon colors will make you glow. Cool undertones (veins that appear blue or purple) usually look stunning with burgundy, cool blonde, platinum, or jewel tones like sapphire and emerald. Warm undertones (veins that appear greenish) flatter golden blonde, copper, warm browns, warm reds, and bronze. Neutral undertones can wear virtually any color, but you might find you feel most confident in colors that match your natural hair tone or colors that are just a few shades lighter or darker.
Blending Multiple Colors Smoothly
- Use two or three colors maximum to avoid looking chaotic—often a dark base color plus one or two accent colors is ideal
- Distribute colors evenly throughout your head so the style looks intentional rather than random
- Consider fading colors—start with a dark tone at the roots and gradually transition to a lighter tone toward the ends
- Separate your extensions by color before installation to avoid mixing them up mid-braid
- Kanekalon colors fade over time with sun exposure and washing, which can create an ombré effect that’s actually quite beautiful
Worth knowing: Kanekalon extensions hold their color better than human hair extensions, though they’ll fade slightly over the life of your style.
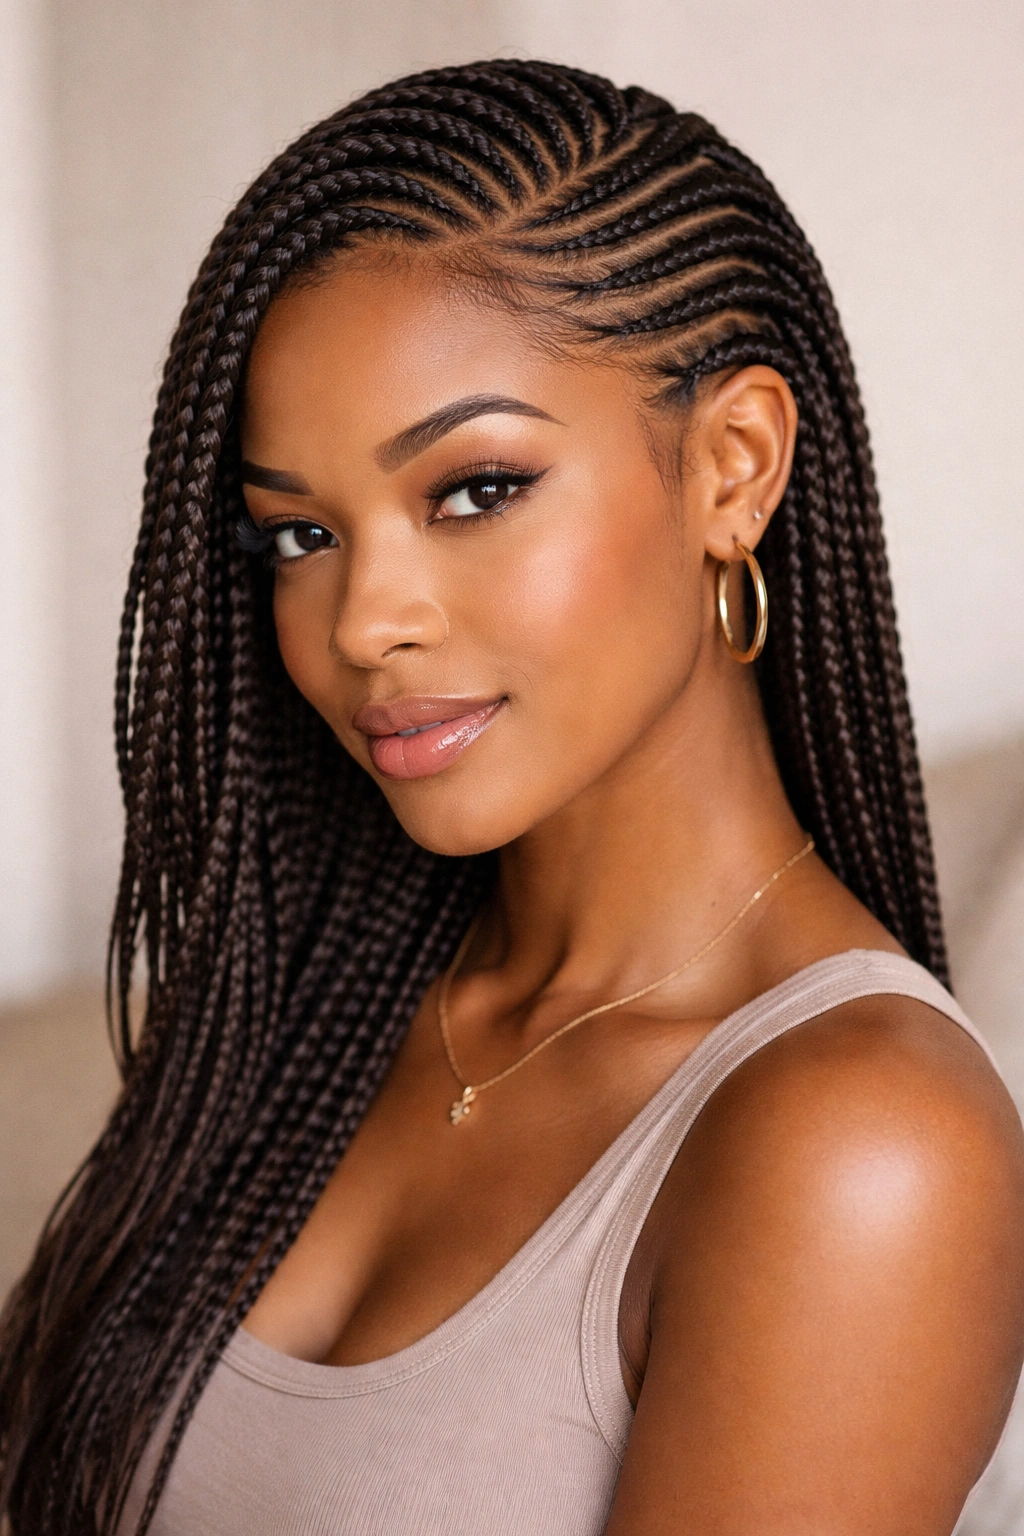
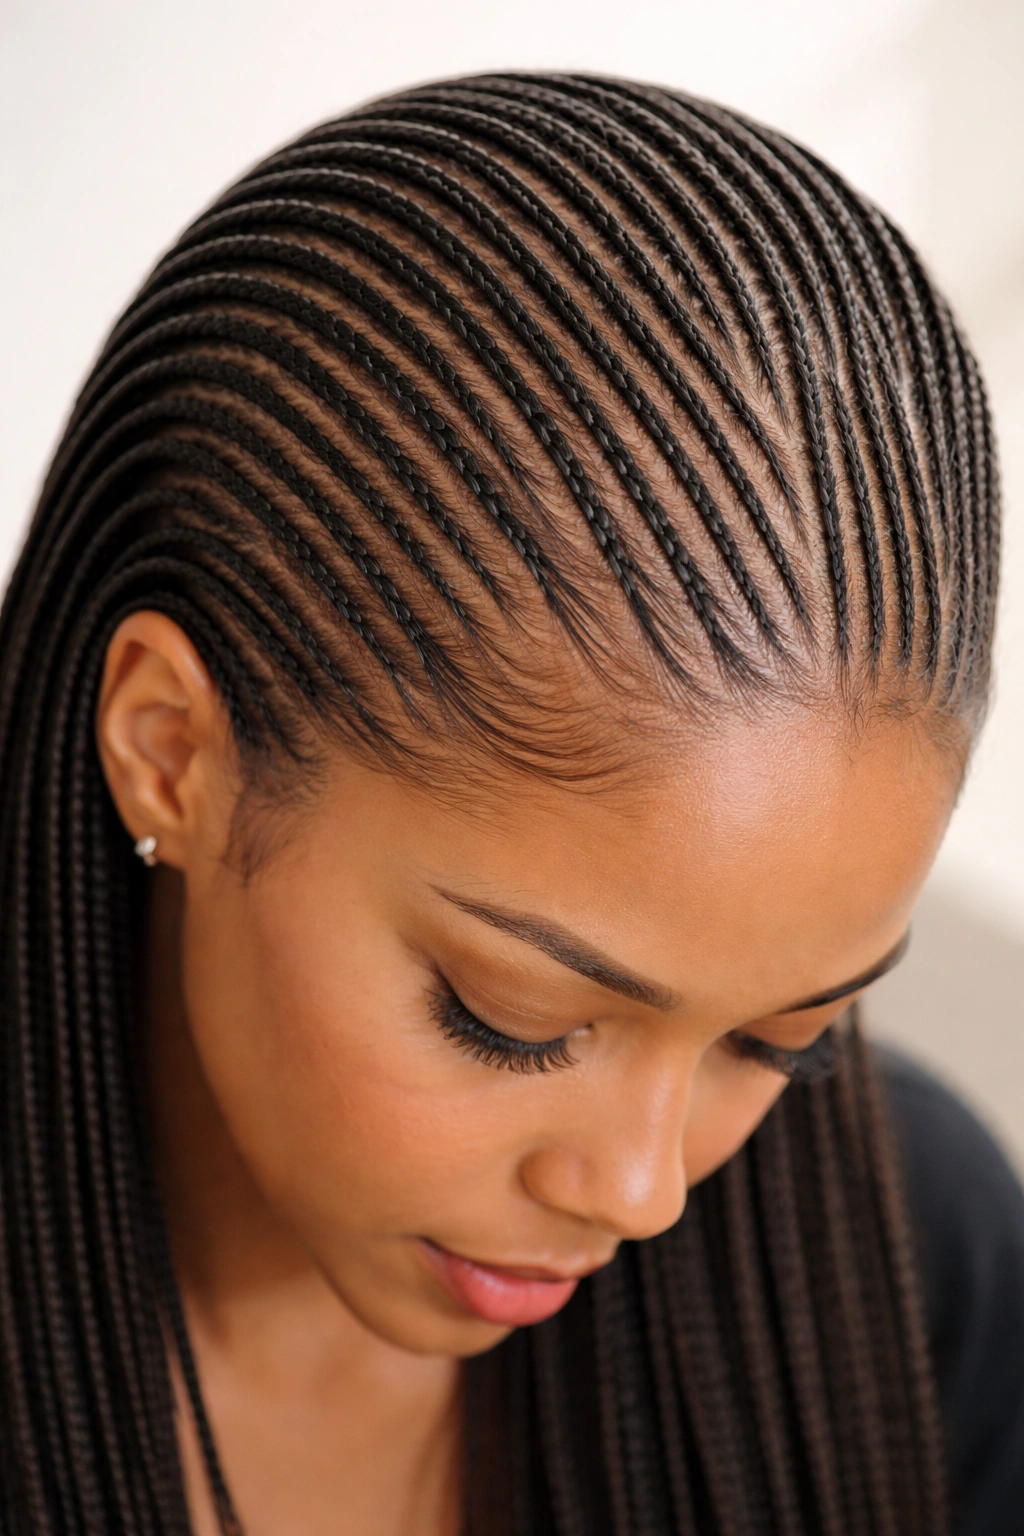
13. Sleek Feed-In Cornrows with Defined Edges
Sleek, defined-edge cornrows are the epitome of polished and put-together. You’re creating cornrows that are super tight, super clean, with every edge sharp and perfect, finished with a beautifully laid hairline. This style requires precision and practice, but it’s absolutely achievable for beginners who are willing to take their time with parting and edge control. The payoff is a style that looks expensive, professional, and intentional—the kind of cornrows that make people ask who braided your hair.
Achieving That Sleek, Polished Finish
The difference between regular cornrows and sleek cornrows is entirely in the details: tighter tension, more precise parting, and pristine edge work. You’re using the same braiding technique but being extra careful about consistency, tightness, and smoothness. This is where edge control products become your secret weapon. A quality edge control holds flyaways, creates definition, and allows you to sculpt your edges into perfect lines that stay put.
Products and Techniques for Sleek Edges
- Use a heavy-hold edge control like Jamaican Mango & Lime, Creme of Nature, or a similar product designed for edge definition
- Apply edge control to your natural hairline before creating your parting lines—this keeps everything smooth and defined
- Use a fine-tooth comb and edge control together to smooth down flyaways and create sharp parting lines
- Braid with slightly tighter tension than you normally would, being careful not to pull so tightly that you cause discomfort or strain
- Lay your edges with a wave brush or toothbrush using edge control to create perfect waves and definition
Insider tip: Sleek cornrows maintain their definition longer when you sleep in a bonnet or silk scarf, which prevents friction and keeps your edges laid.
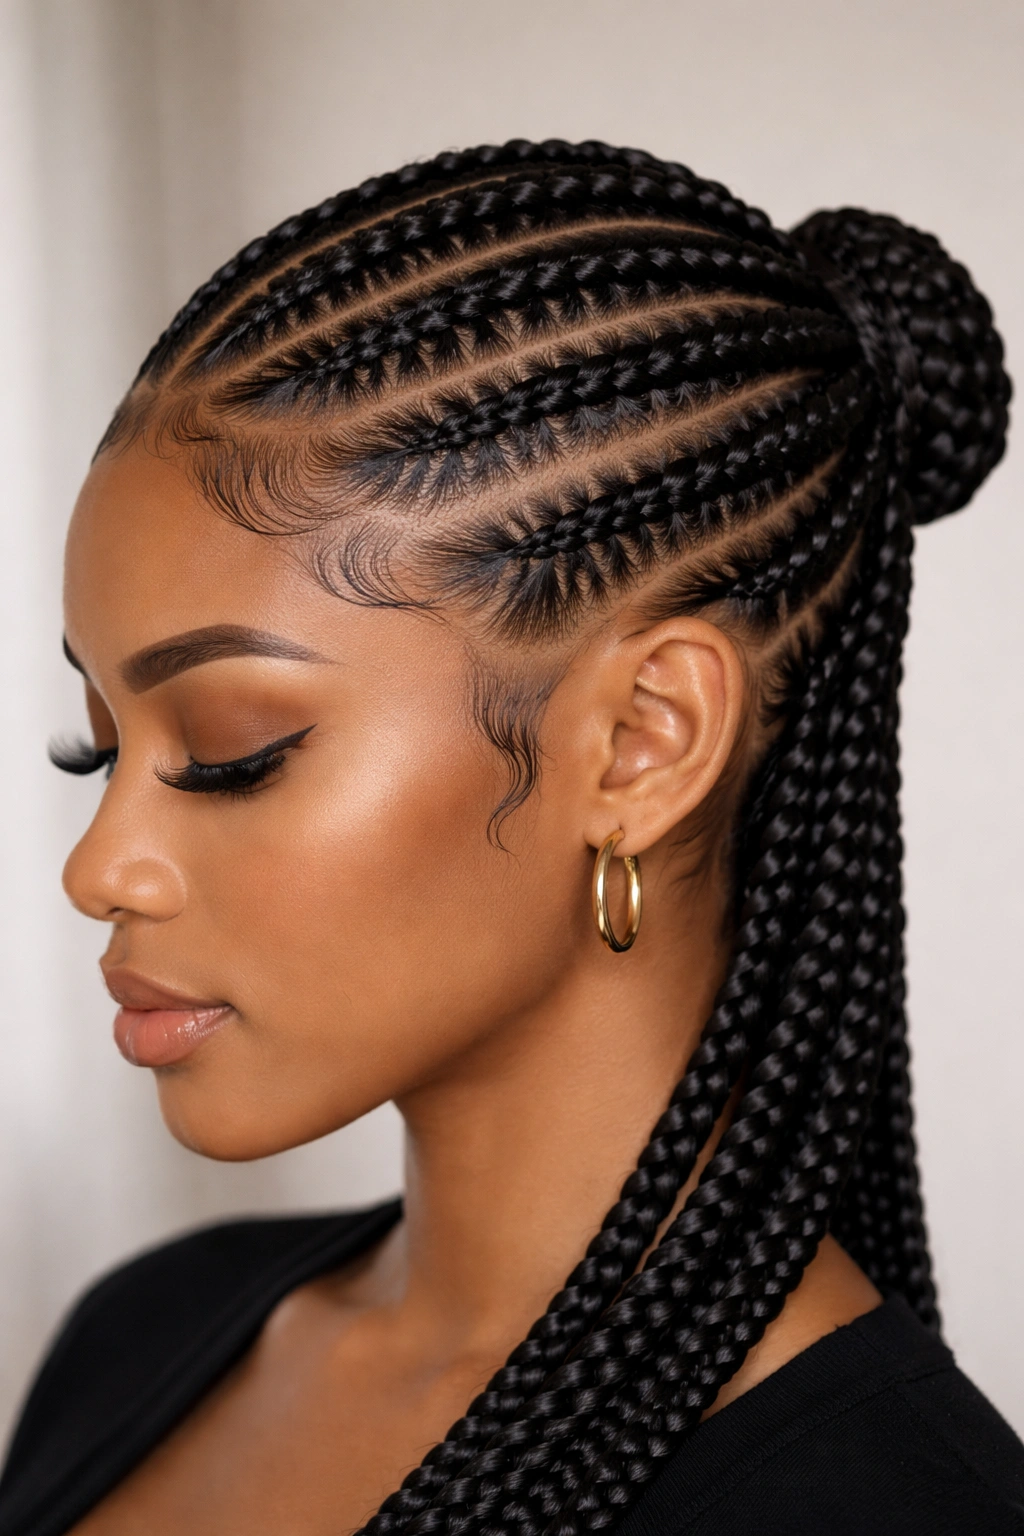
14. Feed-In Cornrows into a Bun or Updo
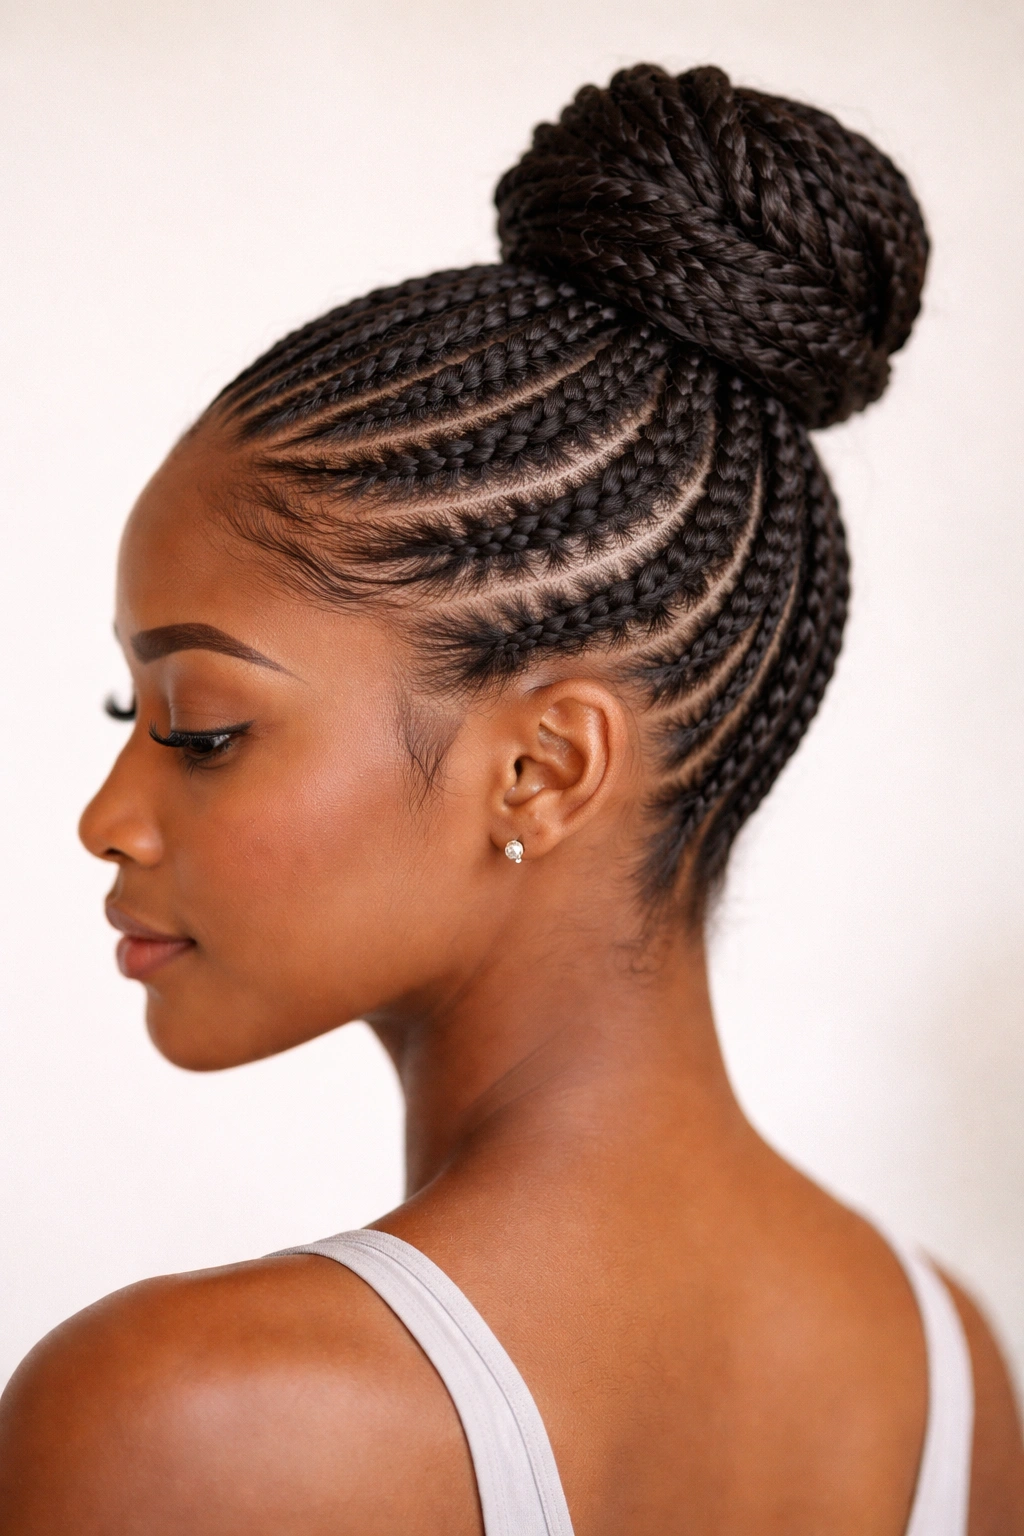
Feed-in cornrows that transition into a bun or updo are functional, beautiful, and endlessly versatile. You’re creating feed-in cornrows that travel from your hairline up and over your head toward the crown, where they finish off into a gathered bun, twisted bun, or wrapped updo. This style is perfect for keeping hair off your face while still maintaining the protective benefits of cornrows. It’s also brilliant for activity because the updo keeps everything contained and in place, whether you’re working out, working, or going out.
Planning Your Braid-to-Bun Transition
The key to a successful braid-to-bun style is planning where you want your braids to end and how they’ll flow into the updo. Most commonly, you’d create one, two, or three feed-in braids that angle toward the crown, with loose hair and additional braids gathering at the top to form your bun base. Alternatively, you can braid all the way to the crown and use the finished braid ends as your bun material. The technique is the same; only the finishing differs.
Creating Different Updo Styles
- A single braid curled into a bun at the crown creates a romantic, Audrey Hepburn-inspired style
- Multiple braids feeding into a gathered twist or wrap at the crown creates a bohemian, textured updo
- Cornrows that angle from your front hairline toward your crown can feed into a high, sleek bun for a sporty, polished look
- Adding loose twists or curls around the bun base softens the style and creates a halo effect
- This style works beautifully with decorative hair sticks, vintage clips, or metallic hair cuffs
Pro tip: Braid-to-bun cornrows are one of the easiest ways to create a style that looks complicated and intentional while being totally achievable for someone still learning.
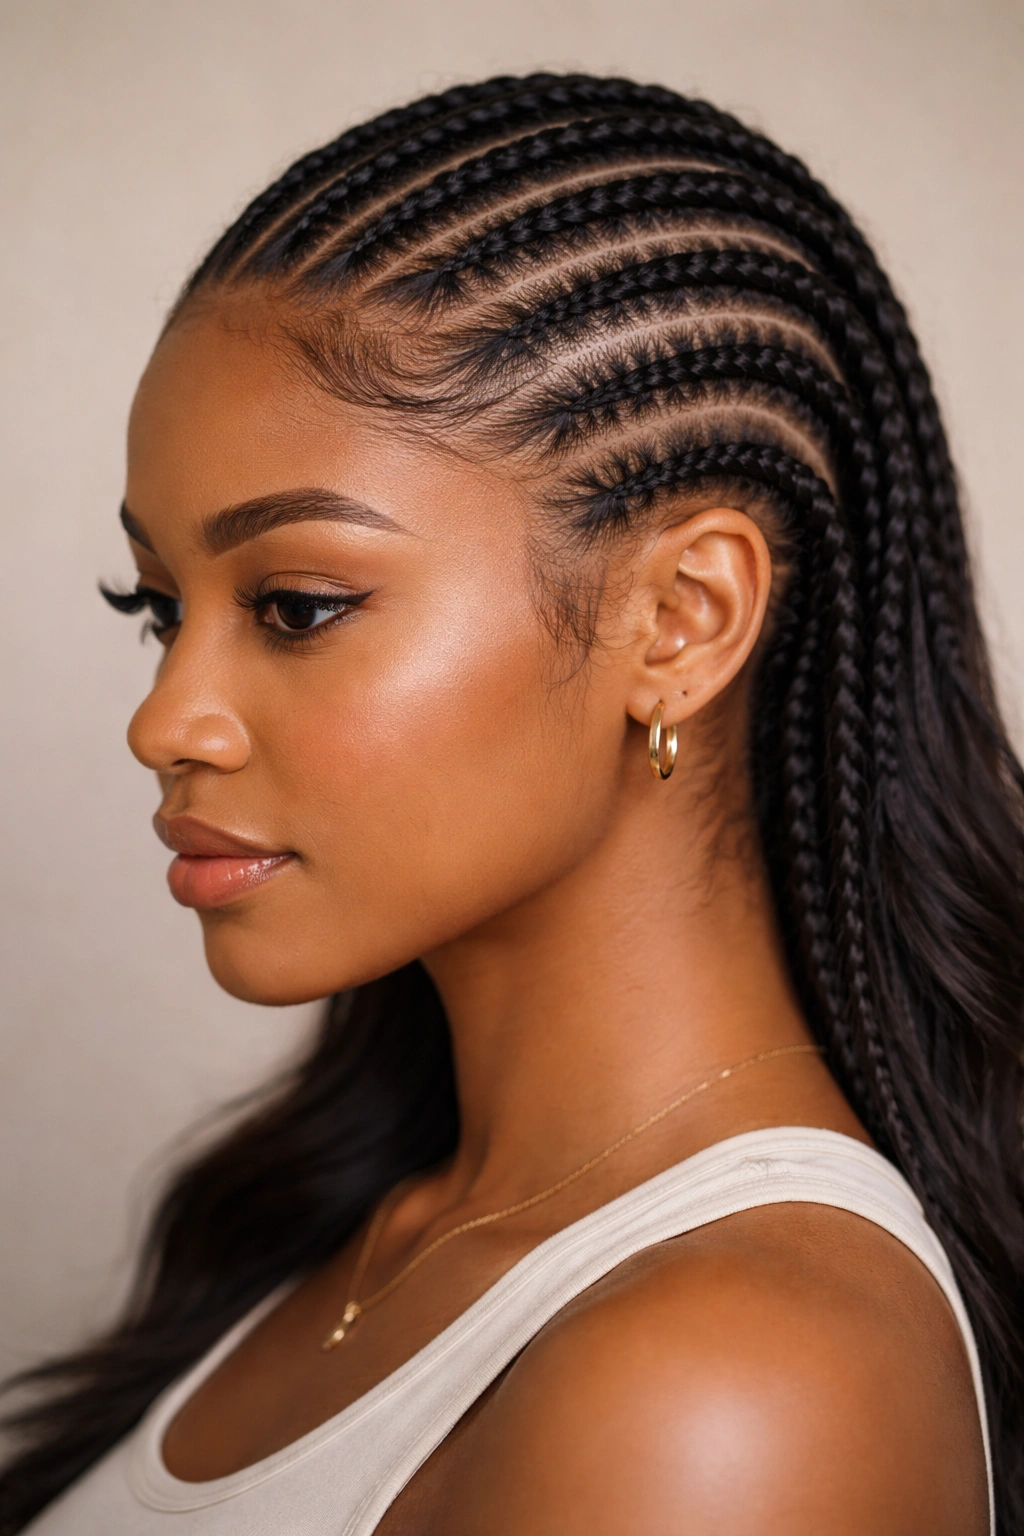
15. Micro Feed-In Cornrows for Delicate, Detailed Work
Micro cornrows are ultra-thin, delicate braids that create an intricate, detailed aesthetic. Instead of creating five to seven braids, you might create fifteen or twenty much thinner braids that cover your entire scalp. These are technically more challenging than thicker braids, but they’re a natural progression if you’re already comfortable with feed-in technique. Micro cornrows require more time and patience, but the result is an incredibly detailed, artistic style that photographs beautifully and lasts longer because the finer braids experience less tension stress.
The Advanced Skill Set for Micro Braids
Micro cornrows require steady hands, excellent parting precision, and consistent, controlled tension. Because you’re working with smaller sections of hair, there’s less room for error—thicker braids are more forgiving of small inconsistencies. That said, if you’ve mastered the feed-in technique on regular-sized braids, you already have the fundamental skill. You’re just scaling it down and being extra meticulous. Many beginners find that starting with five or six micro braids rather than twenty is a good way to practice before doing a full head.
Building Your Micro Braiding Skills
- Start with just two or three micro braids mixed with regular-sized braids to build confidence
- Take extra time with parting—thinness magnifies any parting mistakes, so your lines need to be super clean
- Use a very fine rattail comb and work with small amounts of edge control at a time
- Maintain consistent, even tension—inconsistency is more noticeable on thinner braids
- Consider adding decorative elements like beads every few inches, as they break up the visual space and add interest to the fine braids
Worth knowing: Micro cornrows take significantly longer to install than regular-sized cornrows, but they last much longer and create stunning visual detail.
16. Straight-Back Feed-In Cornrows with a Modern Twist
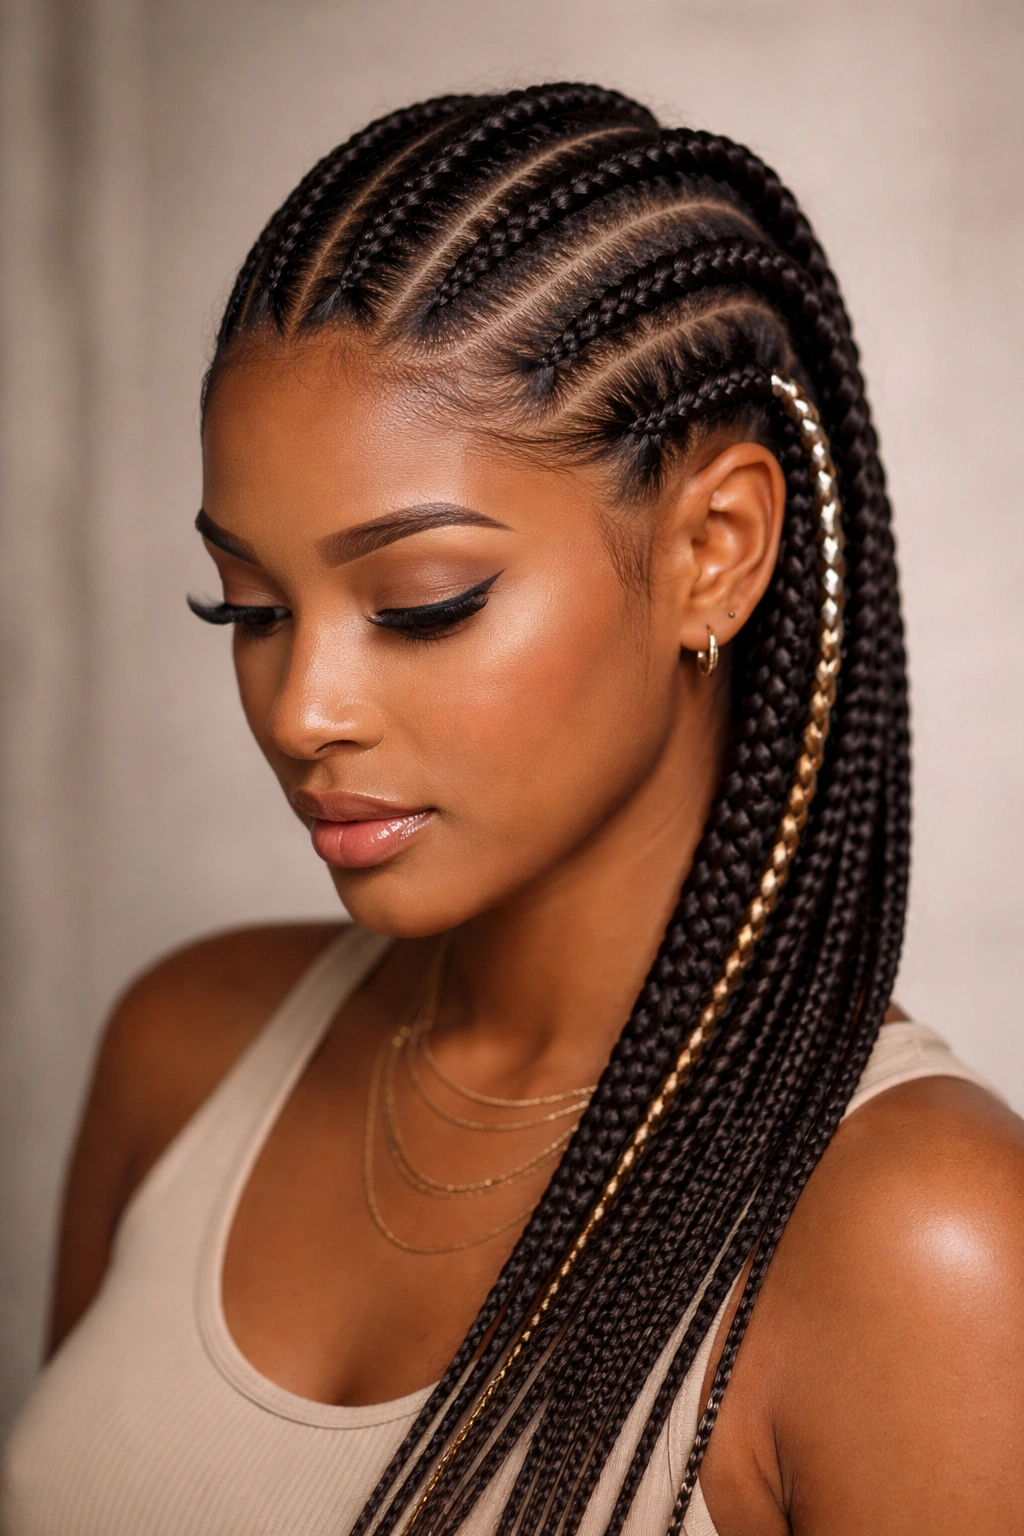
Classic straight-back cornrows with a modern twist keep the traditional aesthetic while adding contemporary elements that feel fresh. You’re creating three to five traditional vertical cornrows from your front hairline straight back, but you’re adding elements like blonde highlights in just one or two braids, metallic wrapping on specific braids, or beads at strategic points. The twist is whatever speaks to your personal style—maybe it’s a contrasting color, maybe it’s texture variation, or maybe it’s shaved or undercut sides paired with full cornrows on top.
Maintaining a Timeless Base with Modern Elements
The beauty of this style is that you’re building on a foundation that’s been beautiful for decades. The straight-back cornrows are inherently flattering and protective, and the modern elements you add are just your personal signature. This approach lets you experiment with trends and personal style without completely reinventing your braids. If you add temporary elements like colored beads or wraps, you can change your style between installations without committing to permanent changes.
Modern Additions That Feel Fresh
- Add geometric beads, minimalist metal cuffs, or high-fashion hair jewelry to just one or two braids
- Incorporate a single contrasting color braid among several neutral tones
- Use a very fine gold or silver wrap on just the first inch of each braid, creating a sophisticated accent
- Pair cornrows with shaved or undercut designs on your sides or temples for an edgy contrast
- Finish your braids with a sleek, modern hairstyle like a low bun, slicked-back ponytail, or twisted topknot
Insider tip: Straight-back cornrows never go out of style, which means this classic-with-a-twist approach gives you a timeless base that you can adapt to your mood and mood forever.
17. Cornrow Braids Mixed with Twists and Coils
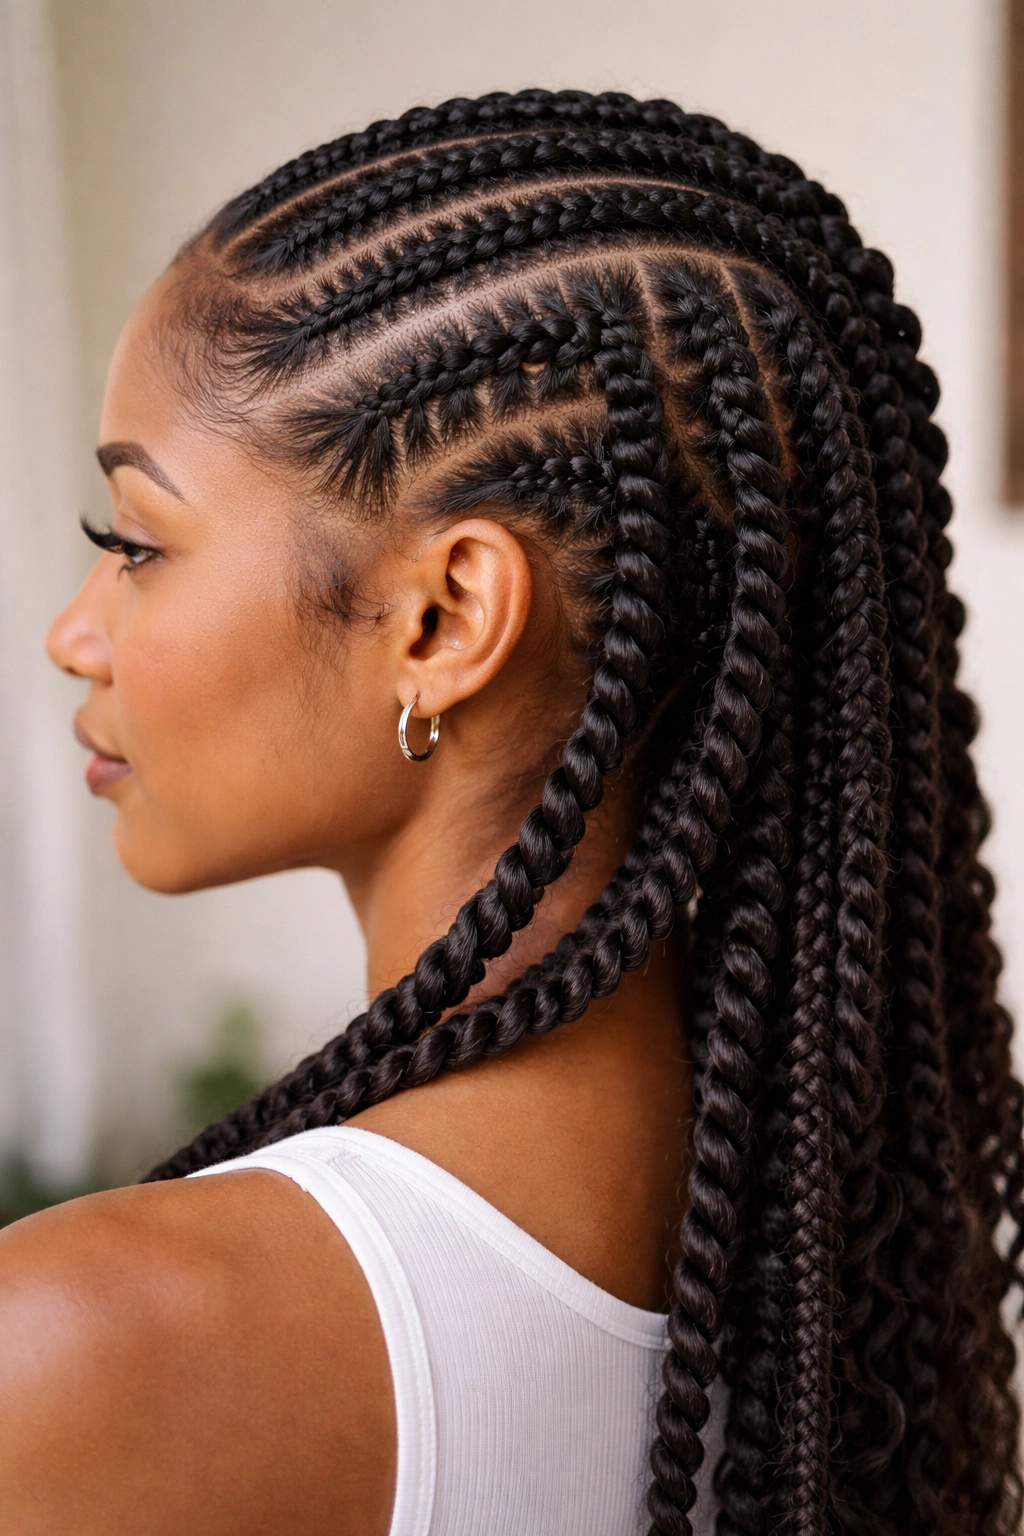
Mixing cornrows with other protective styles—like two-strand twists, three-strand twists, or coils—creates a textured, artistic style that’s visually interesting and technically exciting. You might create two thick cornrows on one side and four twisted sections on the other, or you could alternate cornrows and twists across your entire head. This mixed-texture approach is incredibly beginner-friendly because it breaks up the monotony of all cornrows and allows you to create visual interest without needing to master complex braid patterns.
Combining Different Protective Styles Effectively
The key to successfully mixing styles is ensuring they work together visually and that your transitions between styles are clean and intentional. A cornrow next to a twist creates beautiful contrast because the braid and the twist have different textures and definitions. If you’re adding coils, they create another layer of visual texture. The result is a style that looks more intricate and artistic than a single repeated pattern.
Installation Tips for Mixed Styles
- Plan your pattern before you begin—decide which sections will be cornrows and which will be twists or coils
- Complete all cornrows first, then move to your twists or coils; this prevents confusion mid-installation
- Use the same high-quality extensions for all sections to ensure consistent appearance and longevity
- Make sure your transitions are clean—the space between a finished cornrow and a started twist should look intentional
- Mixed-texture styles often need more deliberate edge work because you have more transitions where edges might be less defined
Pro tip: Mixed-texture styles are perfect for showcasing your creativity without requiring you to master every single protective style first.
18. Statement Feed-In Cornrows with Jeweled Accents

Statement cornrows are bold, attention-getting braids adorned with jeweled accents, metallic elements, or crystalline adornments that transform your cornrows into wearable art. Rather than subtle beads, you’re incorporating larger statement pieces: jeweled hair cuffs, crystal clips, rhinestone-adorned rings, or even temporary tattoo designs placed strategically near your braids. This is the ultimate expression of personal style and works beautifully if you love fashion, jewelry, and making a bold statement with your hair.
Selecting Jeweled Accents That Coordinate
The most important aspect of statement cornrows is ensuring your accents coordinate with each other and with your overall aesthetic. If you’re using rhinestone-adorned cuffs, pair them with similar sparkle elsewhere—maybe rhinestone-topped bobby pins at your edges or a coordinating headwrap. Mixing too many different types of embellishments can look chaotic rather than intentional. Choose a color story: all gold, all silver, all rainbow, or complementary jewel tones.
Securing Heavy Embellishments Safely
- Use decorative cuffs designed specifically for hair that have smooth, secure locking mechanisms
- Avoid placing all your heavy adornments in one area, as concentrated weight creates tension and stress on your braids
- Distribute jeweled accents evenly so they feel like intentional design rather than random decoration
- Check your accents regularly to ensure they’re secure and not damaging your braids
- Sleep carefully with statement cornrows, supporting your head on a silk pillow to prevent the weight from pulling your hair
Worth knowing: Statement cornrows are perfect for special occasions, performances, festivals, or days when you’re feeling your absolute most confident and fabulous.
Final Thoughts
Feed-in cornrows offer incredible versatility, and the eighteen styles above barely scratch the surface of what’s possible once you master the fundamental technique. The beauty of starting with one of these beginner-friendly styles is that you’re not locked into a specific look—each installation teaches you something new, and each time you braid, you build confidence and skill. Whether you choose classic straight-back cornrows, bold statement styles, or something in between, the care you take with parting, tension, and edge work is what transforms cornrows from nice to absolutely stunning.
The best part about feed-in cornrows as a beginner is that they’re incredibly forgiving. A braid that’s slightly uneven isn’t a failure; it’s character and proof that you made something with your own hands. Your edges don’t need to be perfect to be beautiful. Your braids don’t need to be mathematically symmetrical to be flattering. What matters most is that you’re caring for your hair, protecting your natural texture, and expressing your personal style. Start with whichever style calls to you, take your time learning the basics, and give yourself grace as you develop your skills. Every braider you admire started exactly where you are now.