Your prom night deserves a hairstyle that’s elegant, secure, and absolutely unforgettable. Cornrow buns deliver all three in one stunning package, and they’re far more versatile than most people realize. Unlike loose styles that fall apart during dancing, slow songs, and photo sessions, a well-crafted cornrow bun keeps your hair flawless from the moment you arrive until the final dance. The beauty of this protective style lies in its ability to work with virtually any dress, makeup look, or personal aesthetic—whether you’re going classic, edgy, romantic, or experimental.
The real advantage? Cornrow buns solve the “what do I do with my hair for eight hours” problem completely. Your braids create a secure foundation that not only looks polished but actually protects your ends from damage. You won’t spend the night worrying about flyaways, loosening braids, or hair in your face. Plus, the intricate braid patterns themselves become part of your beauty—they’re not just functional, they’re genuinely stunning as a standalone design element.
What makes choosing the right cornrow bun style so important is that it sets the tone for your entire look. A sleek, geometric pattern reads sophisticated and understated. Thicker, more dramatic braids paired with volume and texture feel bold and statement-making. Smaller, detailed patterns work beautifully with an updo that showcases your face and neckline. The style you choose communicates something about how you want to feel that night, and when it’s executed well, it makes every single person want to know who did your hair.
1. The Sleek Center-Part Crown Bun
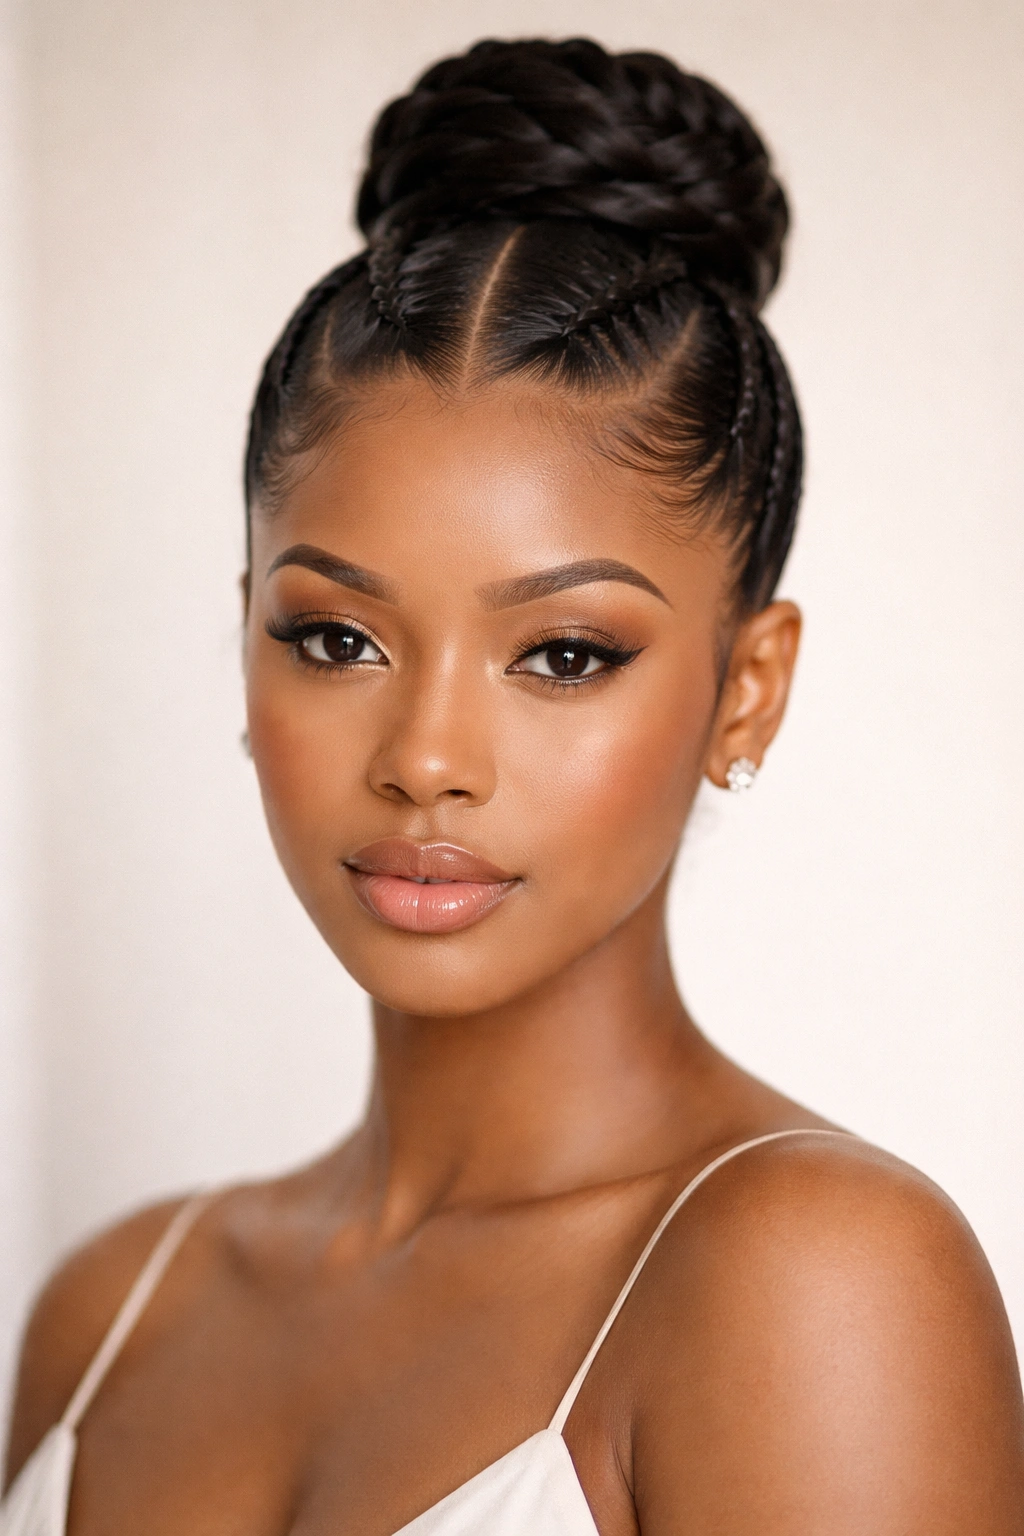
This style starts with a perfectly straight center part running from your forehead to the nape of your neck, with two thick cornrows braiding toward the back and meeting in a smooth, high bun at the crown. The sleekness of this design is what makes it so sophisticated—it requires careful braiding and a firm hand with edge control, but the payoff is extraordinary. The bun itself can be wrapped with your own hair, a matching hair wrap, or even a decorative piece that coordinates with your dress.
Why It Works for Prom
The center-part crown bun is timelessly elegant because it elongates your face and shows off your features beautifully. Your forehead, eyes, and cheekbones become the focal point, making it perfect if you’ve invested in a flawless makeup look. The symmetry of the style reads polished and intentional rather than casual—judges at any prom court or photo opportunity will see someone who put real thought into their presentation.
Styling Details to Consider
- Braid thickness: Medium to thick braids work best here—they appear more substantial and elegant than thin, delicate braids
- Bun placement: A high crown placement makes you appear taller and more regal; a mid-back placement feels more relaxed and modern
- Edge control: Invest time in smooth, gel-laid edges along the part line—use a fine-tooth comb and a slicking gel to create a sharp, defined line
- Bun finish: A wrapped bun with a decorative gold or pearl cuff coordinates beautifully with most prom dresses and adds an extra touch of glamour
Pro tip: Take time the morning of prom to refresh your edges with a small brush and edge control gel—the look will feel sharper and more polished in photos.
2. The Twisted-Braid Mohawk Bun
Imagine a faux-hawk design created with alternating braids and twists running from your hairline straight back to a high bun. This style uses cornrows as the structured base but swaps in flat twists in between, creating a stunning striped visual effect that’s both bold and intricate. The contrast between the braided sections and twisted sections catches light beautifully and photographs exceptionally well.
Why It Works for Prom
This style announces that you’re confident and willing to take a fashion risk—it’s perfect for someone who wants their hairstyle to be the statement piece of the entire outfit. The alternating textures create visual depth and movement that reads sophisticated rather than juvenile. It works especially well with sleeker, more minimalist dress designs because your hair becomes the decoration.
Construction and Maintenance
- Twist technique: Two-strand twists are easier to execute than cornrows and actually hold beautifully throughout the night when done tightly enough
- Pattern spacing: Alternate one cornrow, one twist, one cornrow for maximum visual impact—symmetry is what makes this design sing
- Bun design: A round, full bun at the back (achieved by gathering all braids and twists and wrapping them around each other) works better than a sleek bun for this style
- Texture enhancement: Add subtle highlights using gold thread woven through the twists, or use a shimmery edge control on the twists to catch light
Worth knowing: This style works beautifully with long, shoulder-blade-length hair or longer, but can be adapted for shorter lengths by creating fewer braids and twists.
3. The Double-Bun Crown
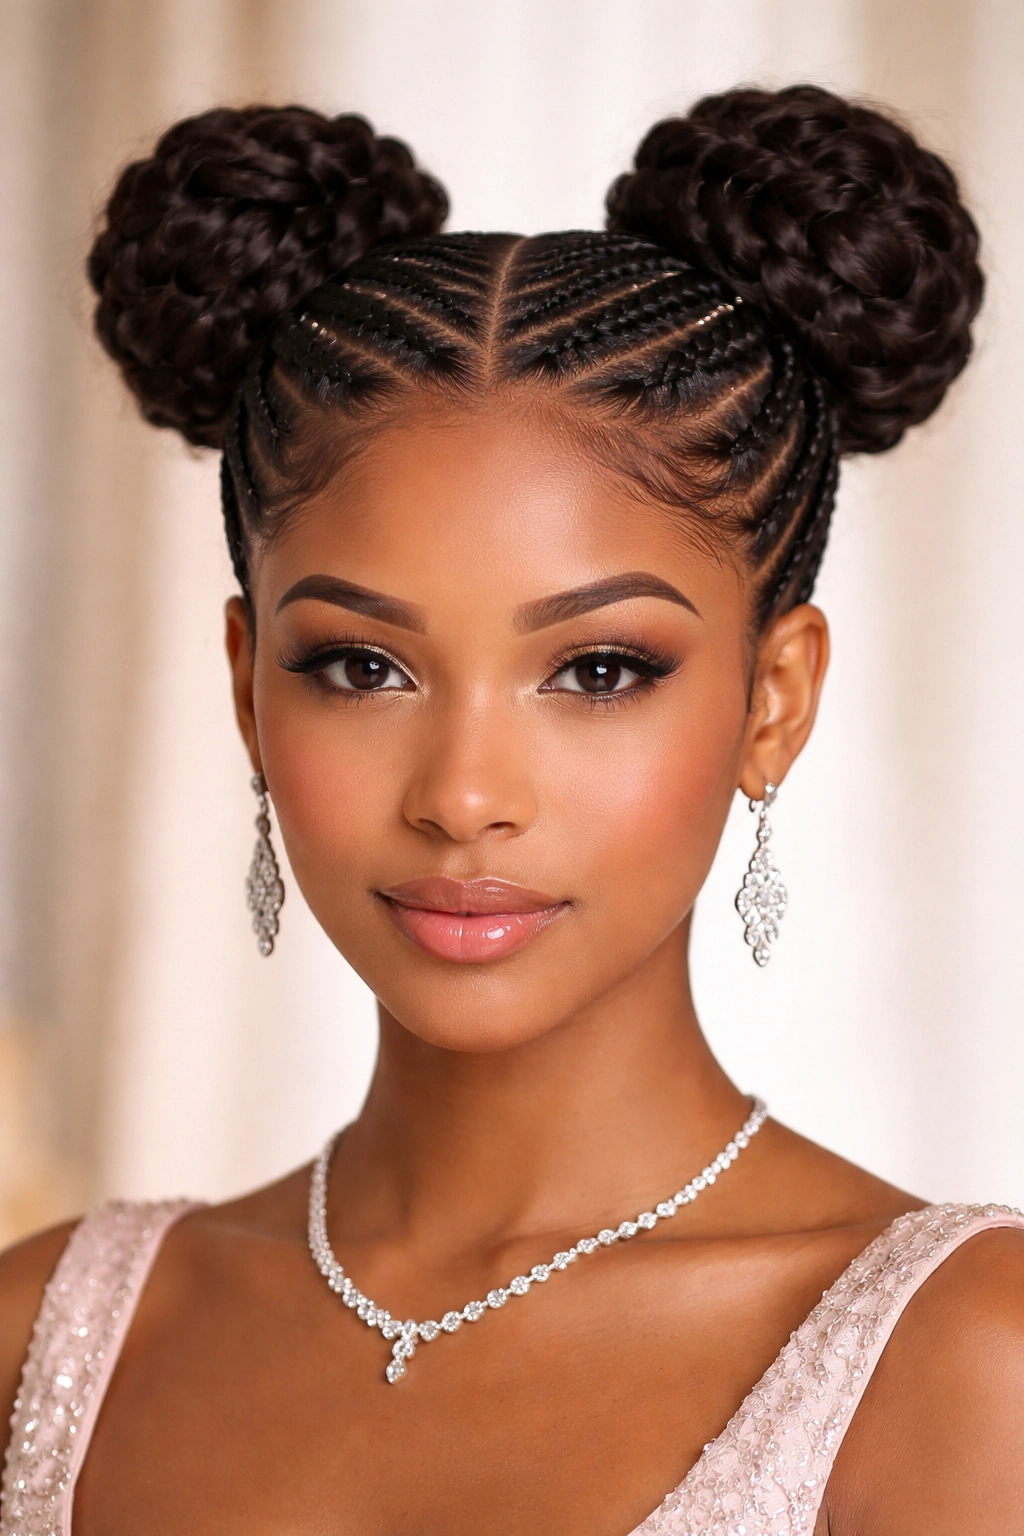
Two perfectly matched buns positioned symmetrically on either side of your head, connected by cornrows that wrap around the sides. This playful-yet-polished design creates a modern, fashion-forward look that’s become increasingly popular with prom-goers who want something unexpected. The two buns can be the same size for perfect symmetry or slightly different sizes for a more organic, artistic feel.
Why It Works for Prom
Double buns challenge the traditional “one updo” expectation and show creative confidence. This style works beautifully with ornate earrings (since your ears are exposed) and draws attention to your neckline and shoulders in the most flattering way. The design feels youthful without being immature, modern without being trendy in a way that will look dated in photos.
Execution Tips
- Bun placement: Position the buns roughly where your ears are, slightly higher than ear-level—this creates the most flattering proportions for most face shapes
- Cornrow positioning: Run cornrows from the center-back, along the sides of your head toward each bun location—this keeps everything anchored and secure
- Bun fullness: Fluff out your buns gently so they appear round and voluminous rather than flat and tight—this takes 30 seconds but makes an enormous visual difference
- Hair wrapping: Use a contrasting color hair wrap (burgundy, gold, or even glittery) around each bun base to add visual interest
Insider note: If your hair texture doesn’t naturally create full buns, add a faux bun base (a donut-shaped hairpiece) under your gathered hair for instant volume and a more polished look.
4. The Low Side-Sweep Bun with Lace Braids
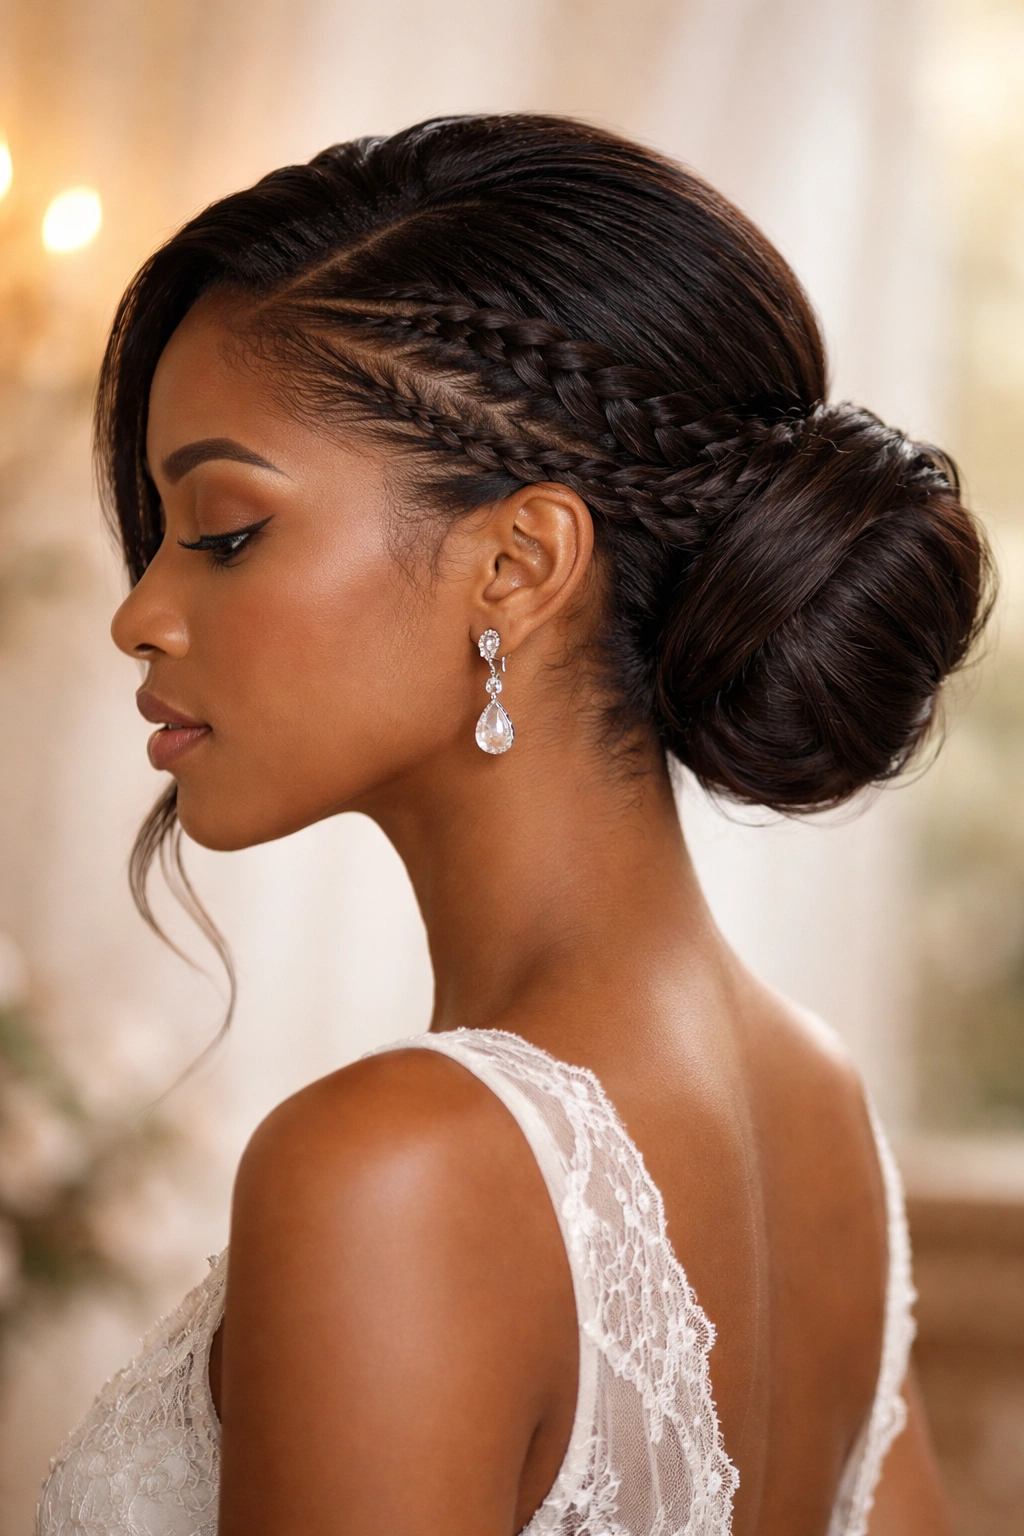
A romantic, feminine option where delicate cornrows are braided along one side of your head, gathering all your hair and sweeping it to a low, side-positioned bun. Lace braids (a technique where you only add hair to one side of the braid, creating a thin, delicate appearance) create an ethereal, almost floating effect along the sides, making this style feel less structured and more dreamy than other cornrow bun options.
Why It Works for Prom
This style is pure romance. The off-center bun lengthens your silhouette and the side-sweep exposes one side of your face and your neck completely, which is incredibly flattering for dancing and photos. The lace-braid technique adds intricate detail that people won’t notice immediately—they’ll just know something about your hair looks hauntingly beautiful and that you’re clearly not someone who takes fashion lightly.
Creating the Lace-Braid Effect
- Lace braiding technique: Take three sections of hair at your temple and begin braiding; instead of picking up hair from both sides with each pass, only add hair from one side—the outer side of the braid path
- Progression: Continue this lace braiding pattern along the side of your head until you reach the back, where you gather all loose hair and secure it into a bun
- Texture variation: Use the thinnest cornrow technique possible for any remaining braids in the back—thin braids paired with the lace braid create beautiful visual hierarchy
- Bun style: A soft, slightly undone bun works better here than a sleek wrapped version—this complements the ethereal vibe
Pro tip: Use a light hairspray rather than heavy gel for this style so flyaways float delicately around your face instead of being locked down completely.
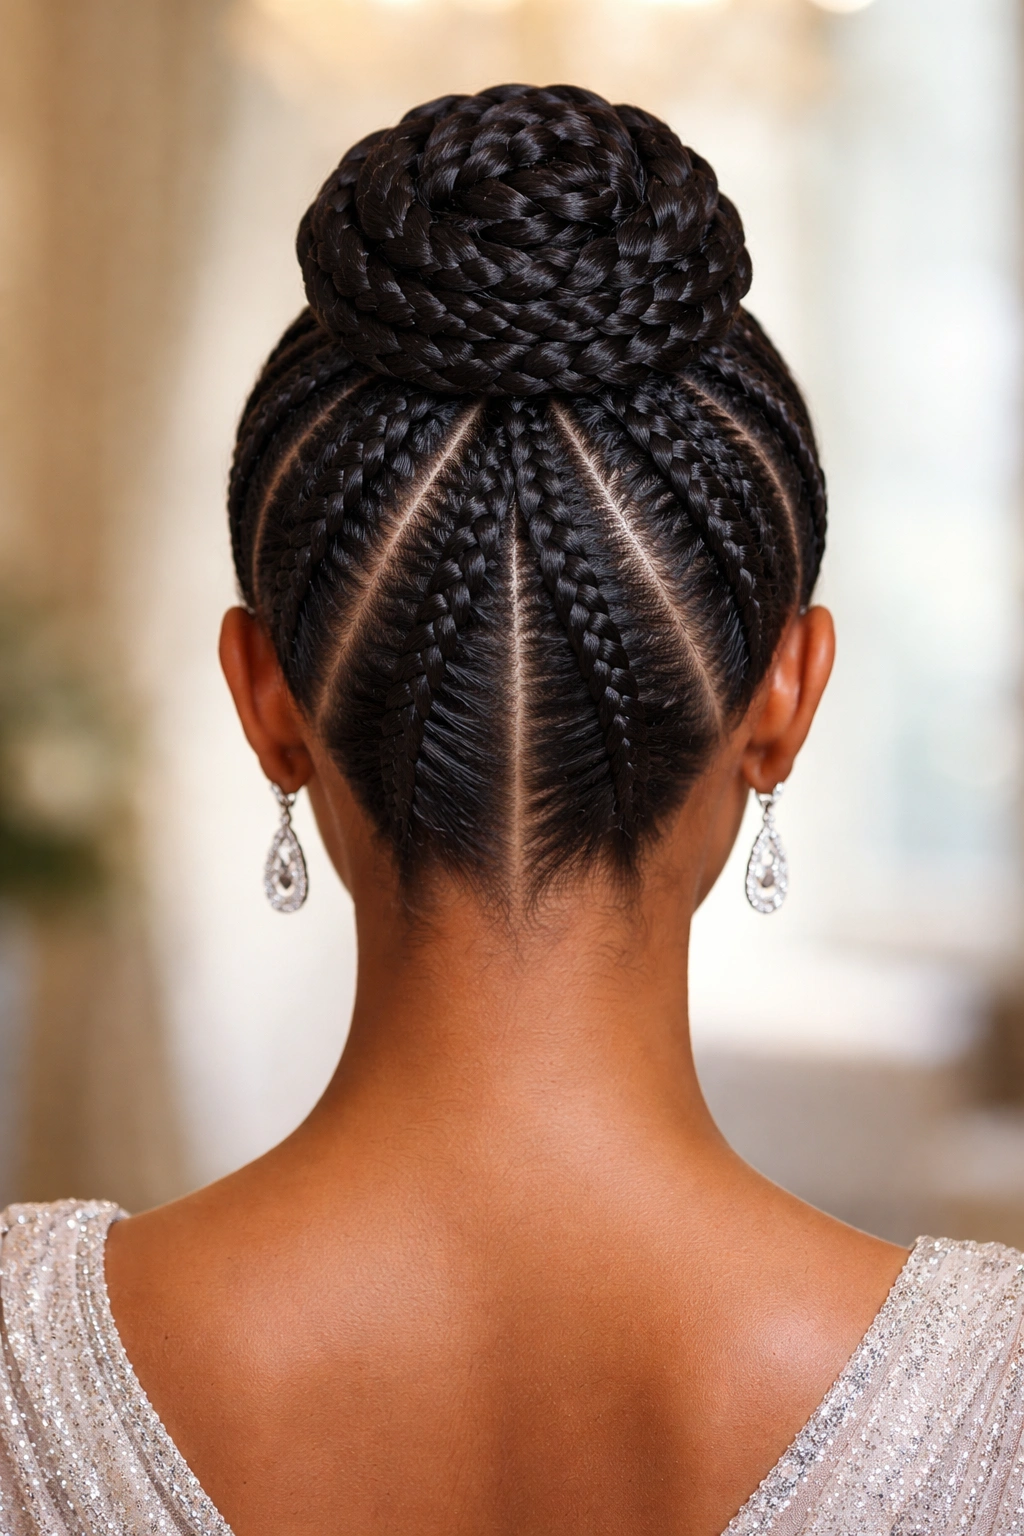
5. The Geometric Grid Cornrow Bun
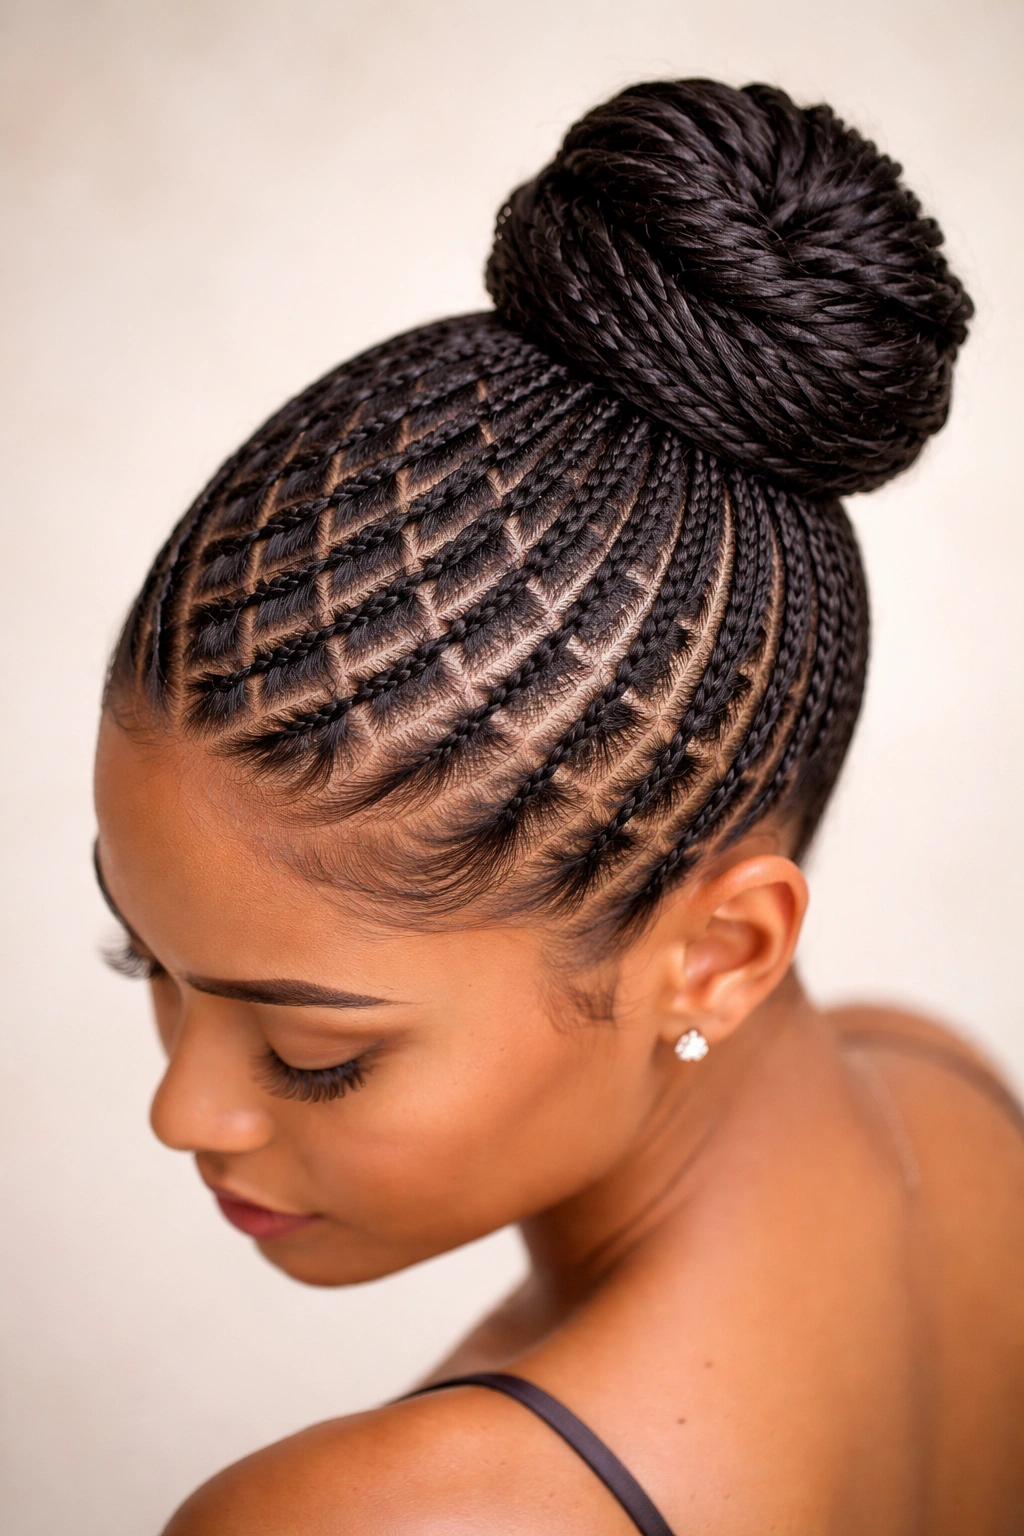
Multiple thin cornrows creating a geometric pattern across your entire head, all braiding back and gathering into a bun at the crown or nape. The grid pattern can be completely symmetrical (creating perfect squares or diamonds) or more organic and artistic. Each cornrow is distinct and visible, making the braid pattern itself the primary design element—the bun is almost secondary to the intricate weaving.
Why It Works for Prom
Geometric designs read modern and artistic, suggesting that you’re thoughtful about aesthetics and willing to commit to something ambitious. The multiple-braid pattern is sophisticated in a way that feels completely fresh compared to traditional single or double braid updos. This style works beautifully with photos since every angle reveals new layers of the geometric pattern.
Pattern Planning and Execution
- Grid design options: True grid (perfectly even boxes), diamond pattern (rows of braids create diamond shapes), or artistic asymmetry (geometric but not symmetrical)
- Braid thickness: Thin to medium braids work best for geometric patterns—thick braids don’t create the same visual impact because the pattern becomes harder to read
- Bun placement: A high, round bun positioned at the crown works best to showcase the geometric pattern behind it, or a low, sleek bun at the nape if you want to emphasize the pattern more than the bun itself
- Edge detail: Sharp, clean edges along your hairline emphasize the geometric precision—spend extra time on edge control for this style
Worth knowing: Geometric cornrow patterns take longer to execute (2-3 hours for intricate designs), so if you’re getting this done professionally, book well in advance and bring reference photos.
6. The Spiral-Wrap Side Bun
A single thick cornrow spiraling from your crown down and around toward one side of your head, where it wraps around itself to create a beautiful spiral or circular bun. This sculptural style is more organic and artistic than geometric—it looks almost like your braid is a rope that’s been coiled into a decorative form. The result is undeniably striking and photographs magnificently from every angle.
Why It Works for Prom
The spiral wrap style is absolutely unique—most people won’t see another version at prom, which makes it memorable in the best way. The sculptural nature of the spiral reads sophisticated and intentional. The side positioning exposes your neck and one shoulder completely, which is ideal for strapless or one-shoulder dress designs. The bun itself becomes three-dimensional art rather than just a practical gathering of hair.
Creating the Spiral Effect
- Starting point: Begin your cornrow at the crown and braid down at a slight angle, moving toward the side of your head where you want the bun positioned
- Spiraling technique: As you approach the back of your head, instead of securing the braid into a traditional bun, continue the braid in a circular, spiraling motion—wrapping the braid around and around itself
- Securing the spiral: Secure the spiral bun carefully with bobby pins placed throughout the coils, ensuring it’s anchored so it won’t unravel during dancing
- Texture and shine: Use a light oil or edge control to define the spiral shape and add shine—this makes the coils more visible and adds dimension
Pro tip: Practice the spiraling motion on a friend or mannequin before your actual prom day—it takes practice to get the coil tension consistent.
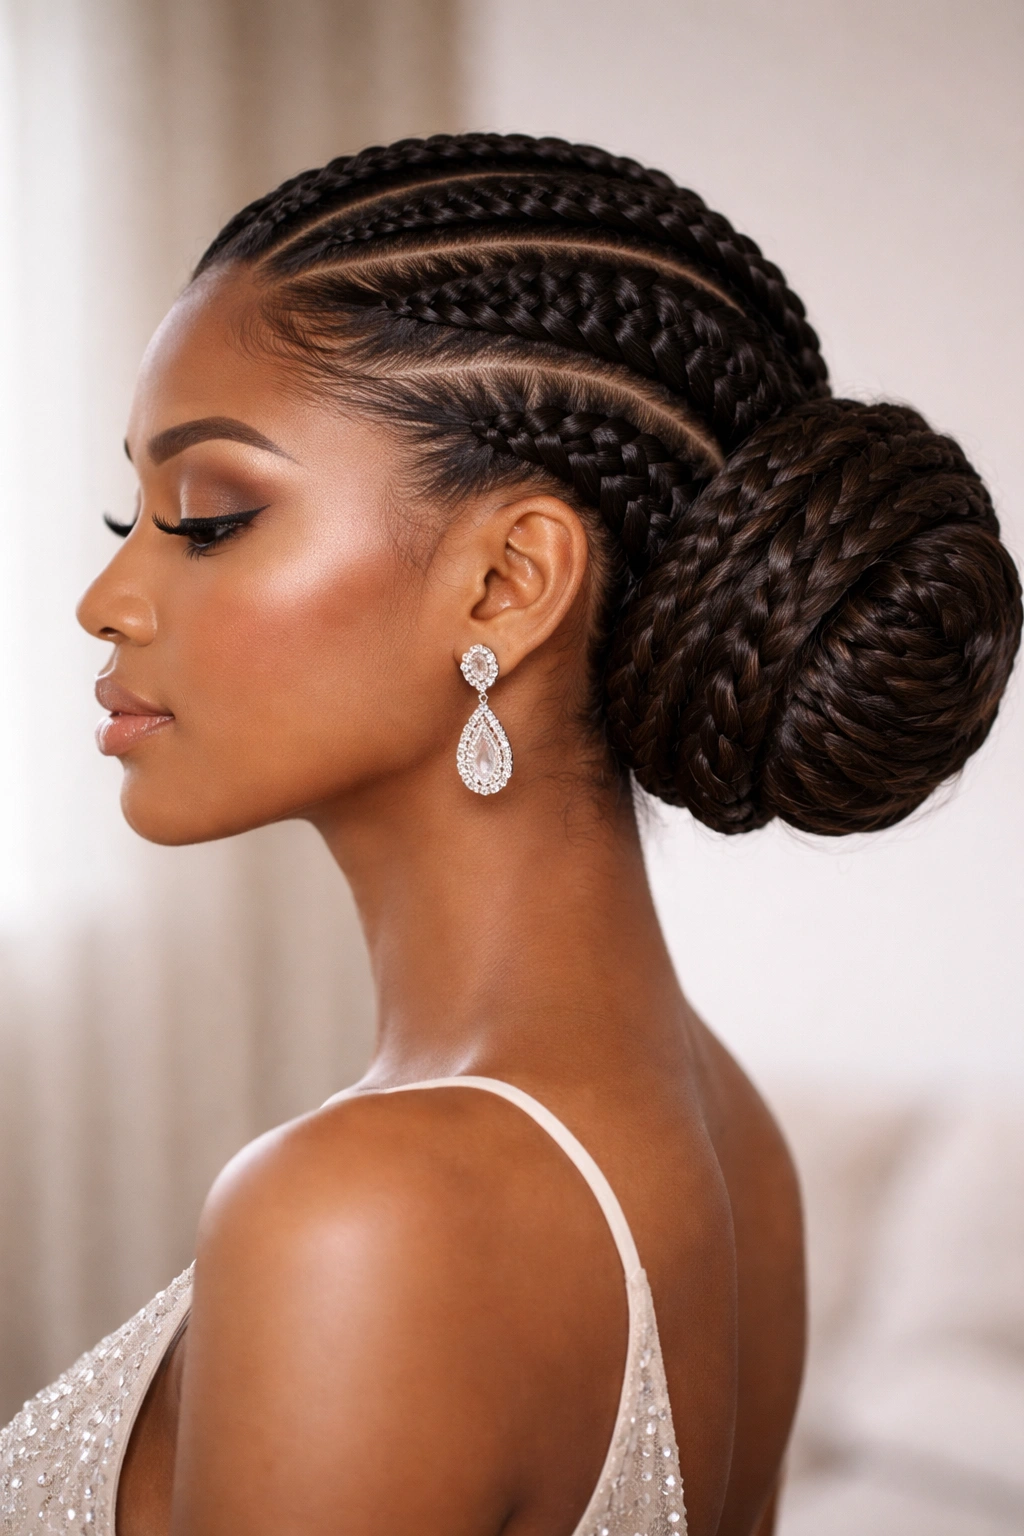
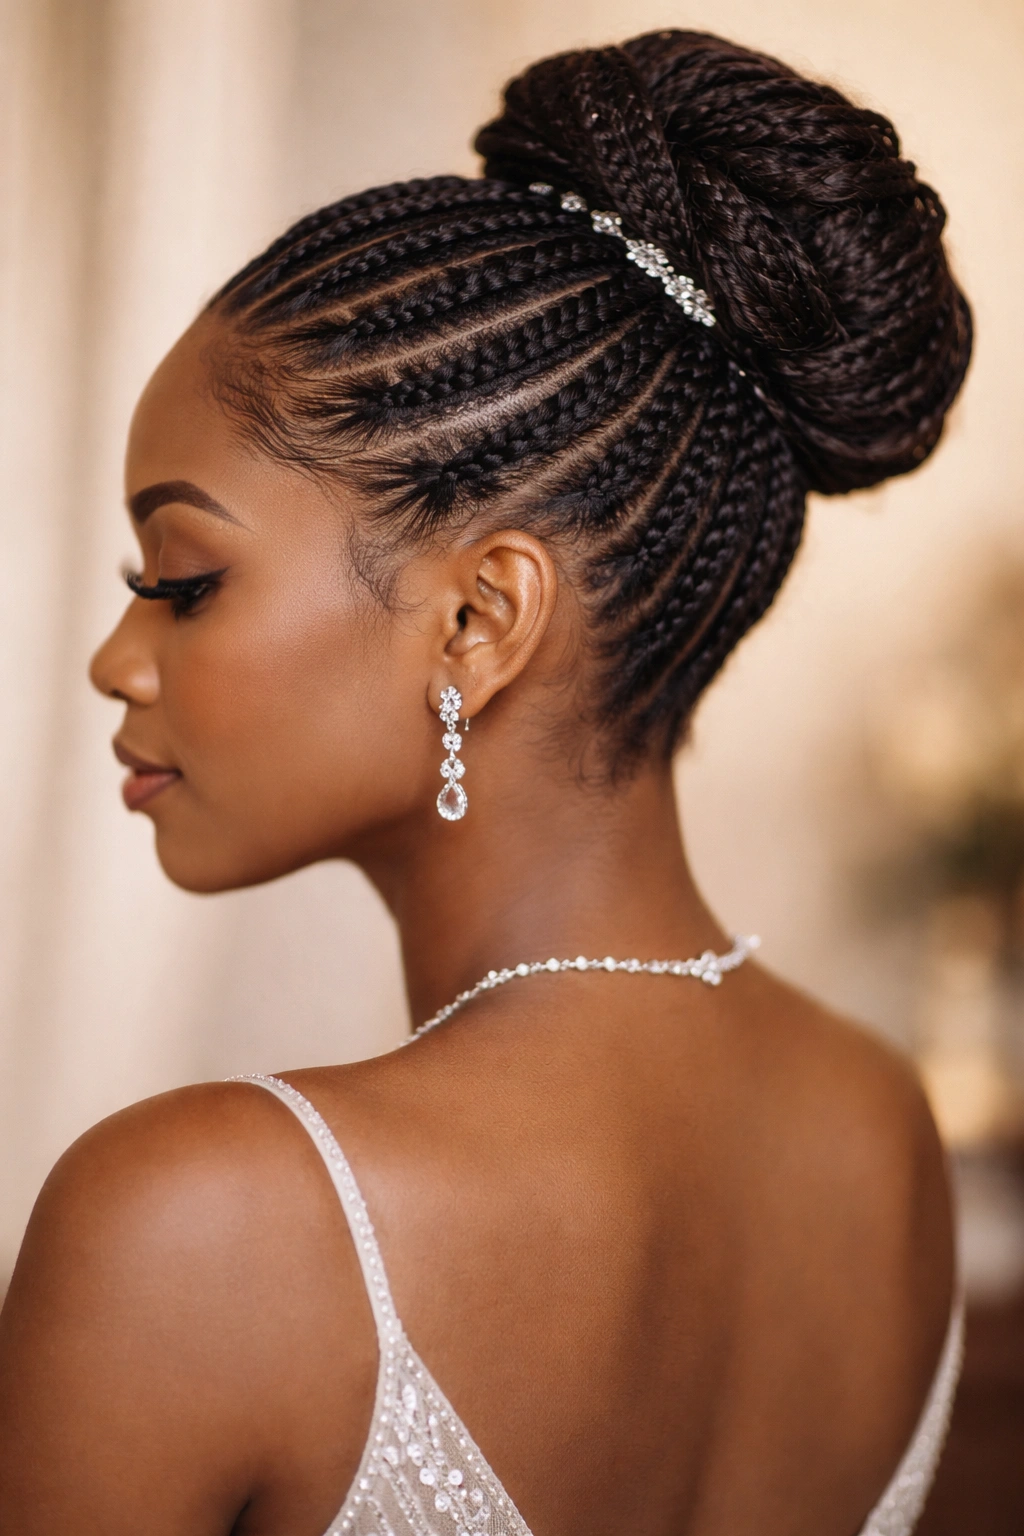
7. The Crown-and-Gather Cornrow Bun
Cornrows that crown the very top of your head (running front to back or in a curved pattern across the crown) with all remaining hair gathered and loosely piled into a textured bun at the back or side. This style combines the polished, protective benefits of cornrows with the romantic volume and texture of a looser bun—it’s the best of both worlds.
Why It Works for Prom
This style reads sophisticated but not severe. The cornrow crown element keeps everything anchored and polished, while the looser bun elements feel romantic and soft. You get the benefits of protective styling (your cornrows are tightly braided and secure) paired with the femininity of a romantic updo. This style works beautifully for someone who wants security and elegance without feeling overly done or rigid.
Building the Crown
- Crown placement: Design 2-4 cornrows that run across the crown of your head from temple to temple, or in a curved arc from ear to ear—this is the visible “crown” element
- Braid styling: Keep crown braids smooth and sleek, or add texture by gently pulling the braid sections apart after braiding for a fuller appearance
- Remaining hair: All hair not incorporated into the crown cornrows is gathered into a bun at the back—you can tease this section lightly for volume
- Bun texture: Aim for a rounded, romantic bun that looks intentional but not overly structured—slightly undone is perfect here
Insider note: If your bun feels too flat or thin, create a faux bun base by wrapping some of your gathered hair around a small cushioned ring, then add your remaining hair around that base for instant fullness.
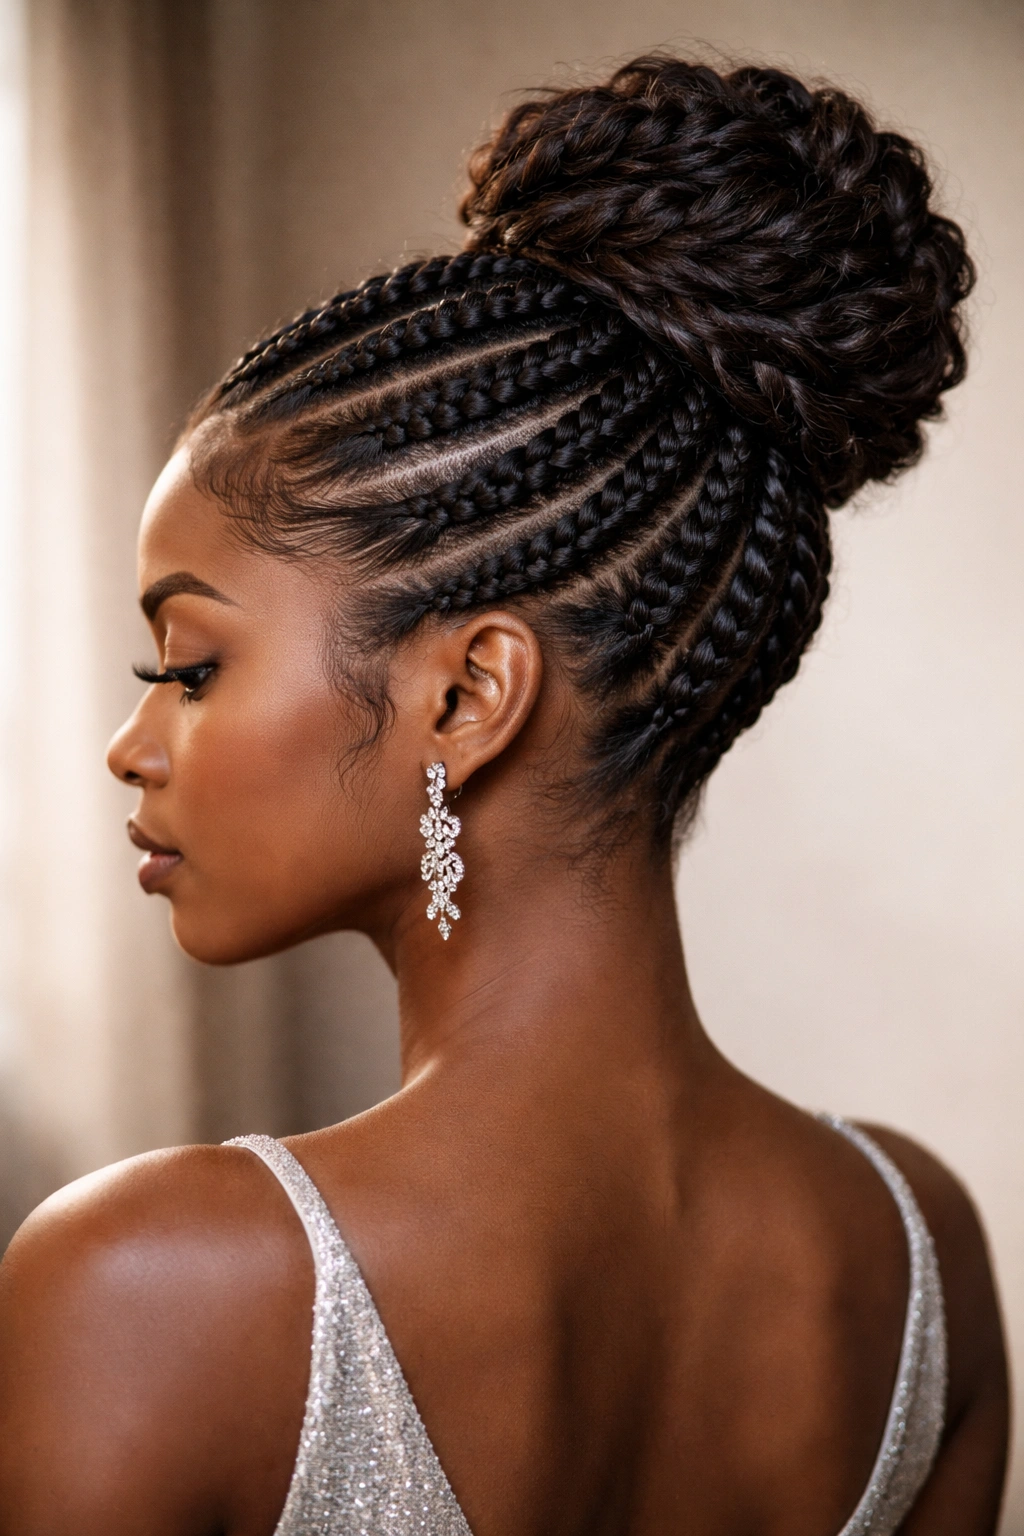
8. The Floating-Braid High Bun
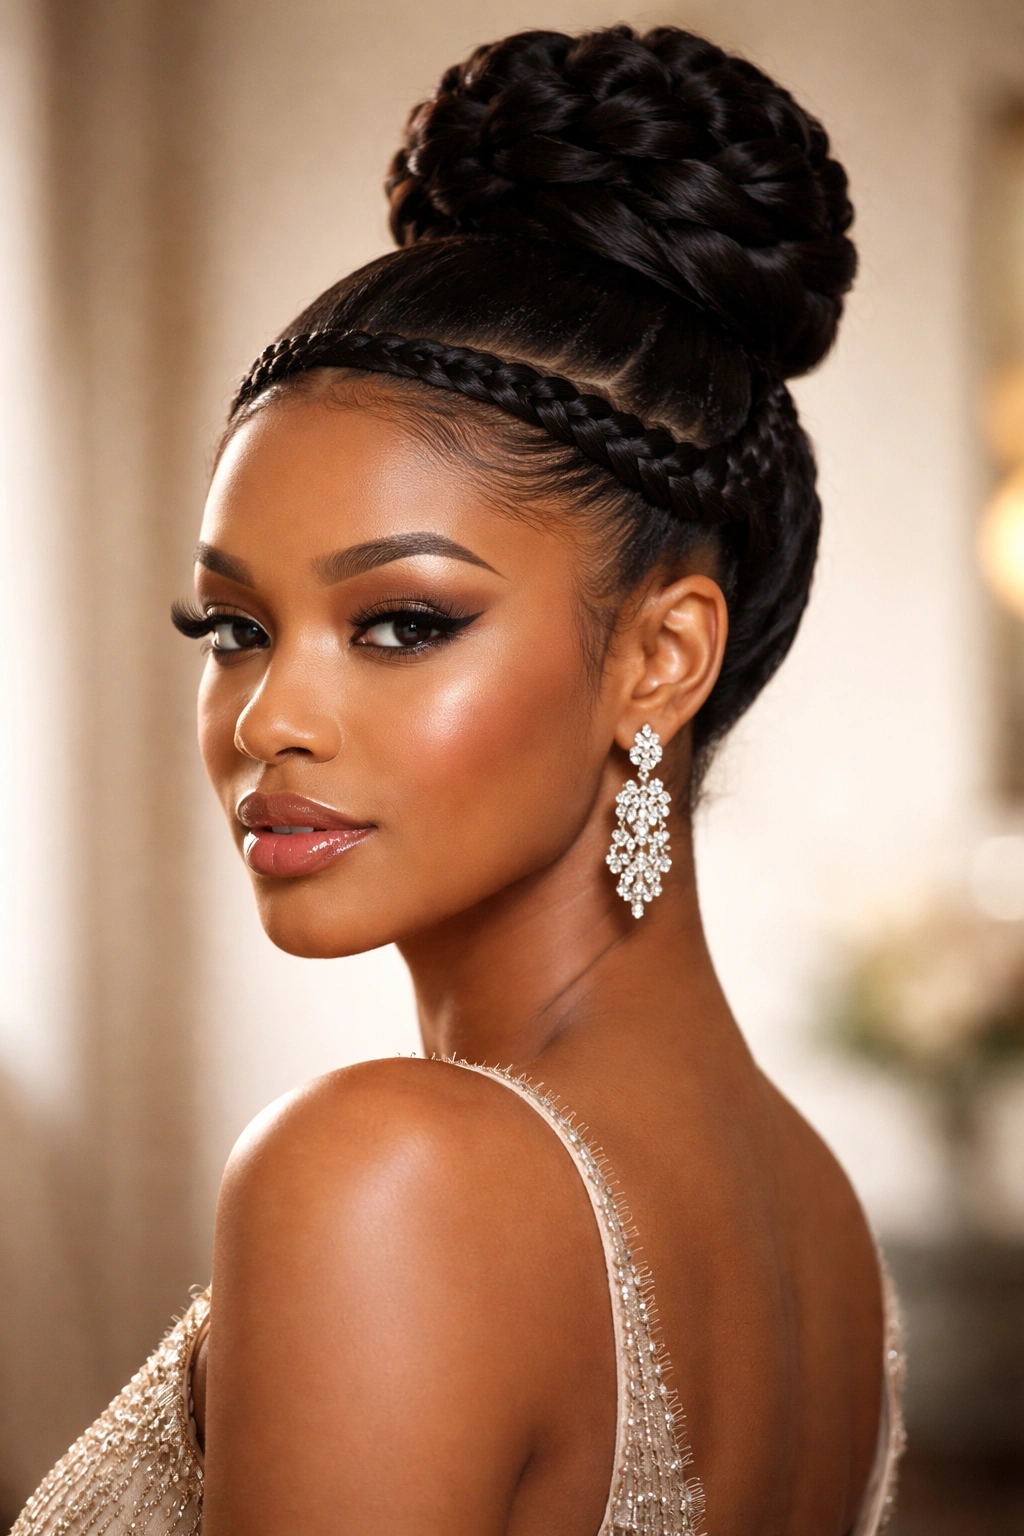
A single thick, statement-making cornrow that floats around your head’s perimeter (starting at one temple, traveling along the sides and back) before all hair gathers into a dramatic high bun. The cornrow itself floats freely rather than being braided all the way down, creating an almost ethereal effect. This style is pure luxury—it looks complicated and requires serious skill to execute perfectly.
Why It Works for Prom
The floating-braid style is show-stopping. The single, prominent cornrow draws the eye and becomes a jewelry-like element of your hairstyle. The high bun positioned at the very crown of your head is ultra-flattering and modern. Combined, these elements create a look that reads haute couture—like you just stepped out of a high-fashion editorial. It’s perfect if you want your hair to be the main focus of your entire appearance.
Execution Details
- Cornrow placement: Start at one temple and braid diagonally toward the back of your head, then let the braid continue around to the other side—it should frame your entire head like a decorative crown
- Thickness: A thick, substantial braid (using thick-twist or double-strand techniques) reads more polished than a thin braid in this particular style
- Bun height: Position your bun as high as possible at the crown—this elongates your neck and is incredibly flattering
- Bun texture: A sleek, smooth, wrapped bun balances the texture of the prominent cornrow—contrast in texture is what makes this style work visually
- Decorative elements: A delicate gold cuff wrapped around the base of your bun, or a small decorative pin positioned in the cornrow, elevates this style even further
Worth knowing: This style requires someone with real braiding skill to execute—the cornrow needs to be perfectly smooth and consistent in thickness, and the bun placement needs to be exactly right for maximum impact.
9. The Multi-Color Braided Bun with Accent Thread
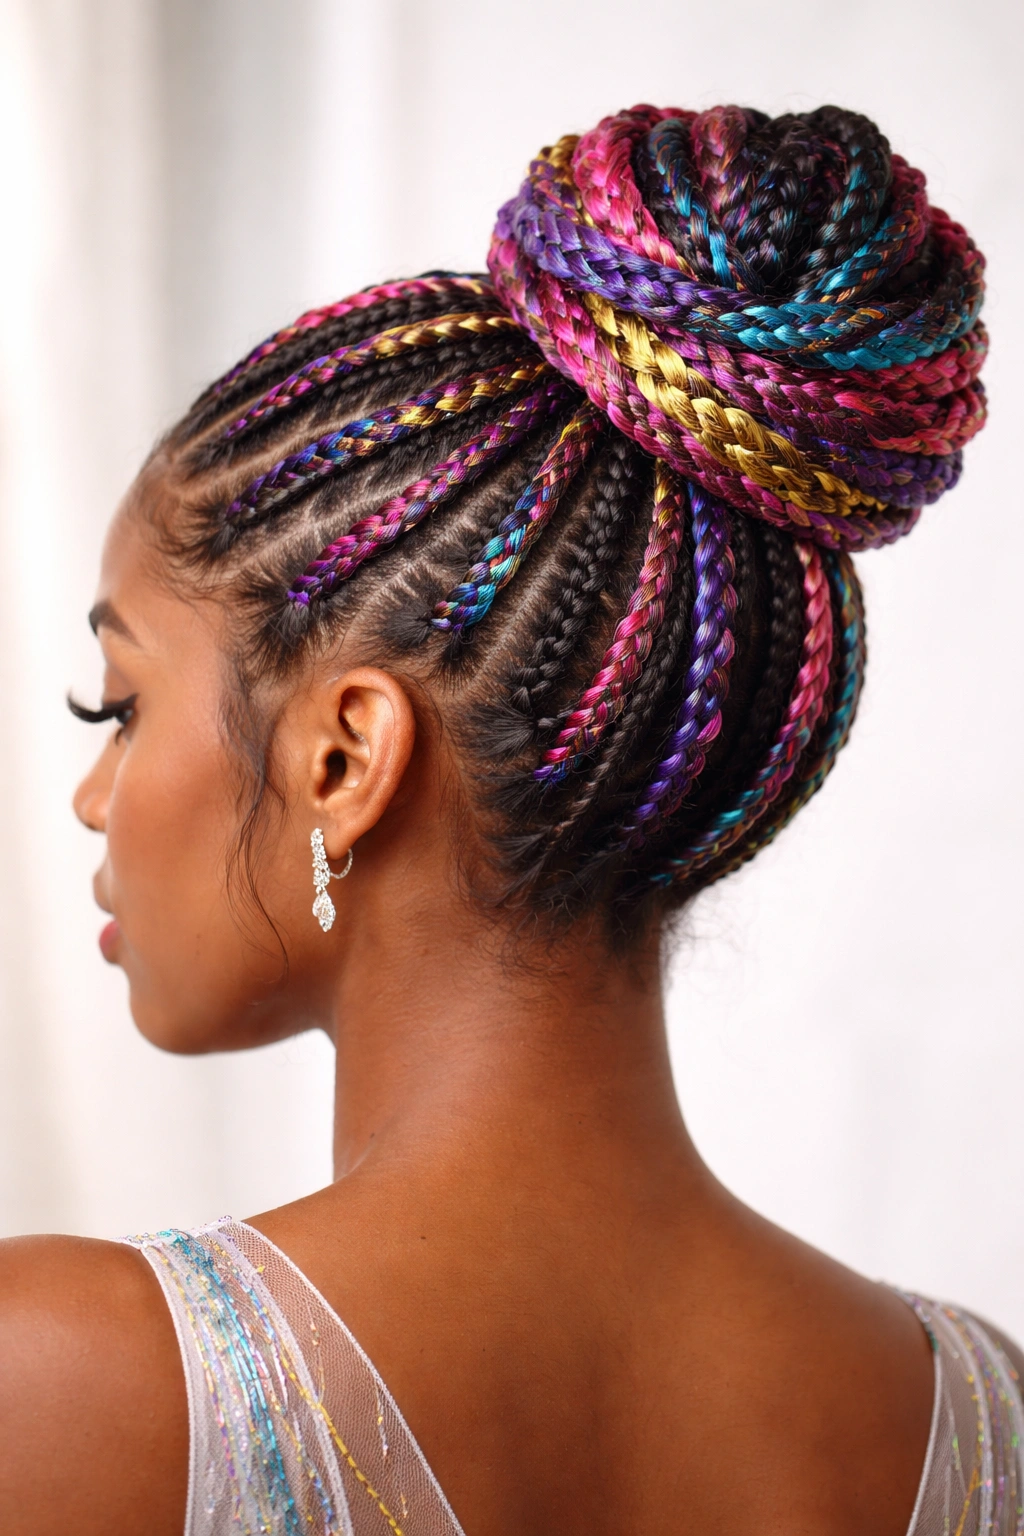
Multiple cornrows braided with colored hair extensions or decorative thread woven through the braids, creating visual interest and allowing you to coordinate your hair with your dress colors. The braids gather into a bun (high or low, depending on preference) and the colored elements continue throughout, making the whole style feel coordinated and intentional. This is where creativity becomes your biggest advantage.
Why It Works for Prom
Color coordination between your hair and dress reads extremely polished and thought-out. The accent color adds dimension and catches light beautifully, especially in photos and under prom lighting. The technique allows you to match your hair to your dress’s primary color, accent color, or even create contrast that complements your skin tone perfectly. This is a style that feels personalized and uniquely yours rather than generic.
Choosing Color and Technique
- Color selection: Choose a color that either matches your dress (for cohesion) or contrasts beautifully with it (for drama)—avoid colors that are too similar but not quite matching, as that looks unintentional
- Thread types: Synthetic hair extensions create bold, visible color; metallic thread creates subtle sparkle; yarn creates a unique artistic effect
- Placement options: Weave color through every cornrow for maximum impact, or use it in alternating braids for a striped effect
- Bun incorporation: Continue the accent color through the bun itself by wrapping it around, or let it disappear into the bun’s center for a subtle reveal when photographed from above
Pro tip: Bring a photo of your dress to your braiding appointment and discuss color options with your stylist—they can suggest shades that will complement your specific shade and skin tone.
10. The Wrapped Bun with Braided Bands
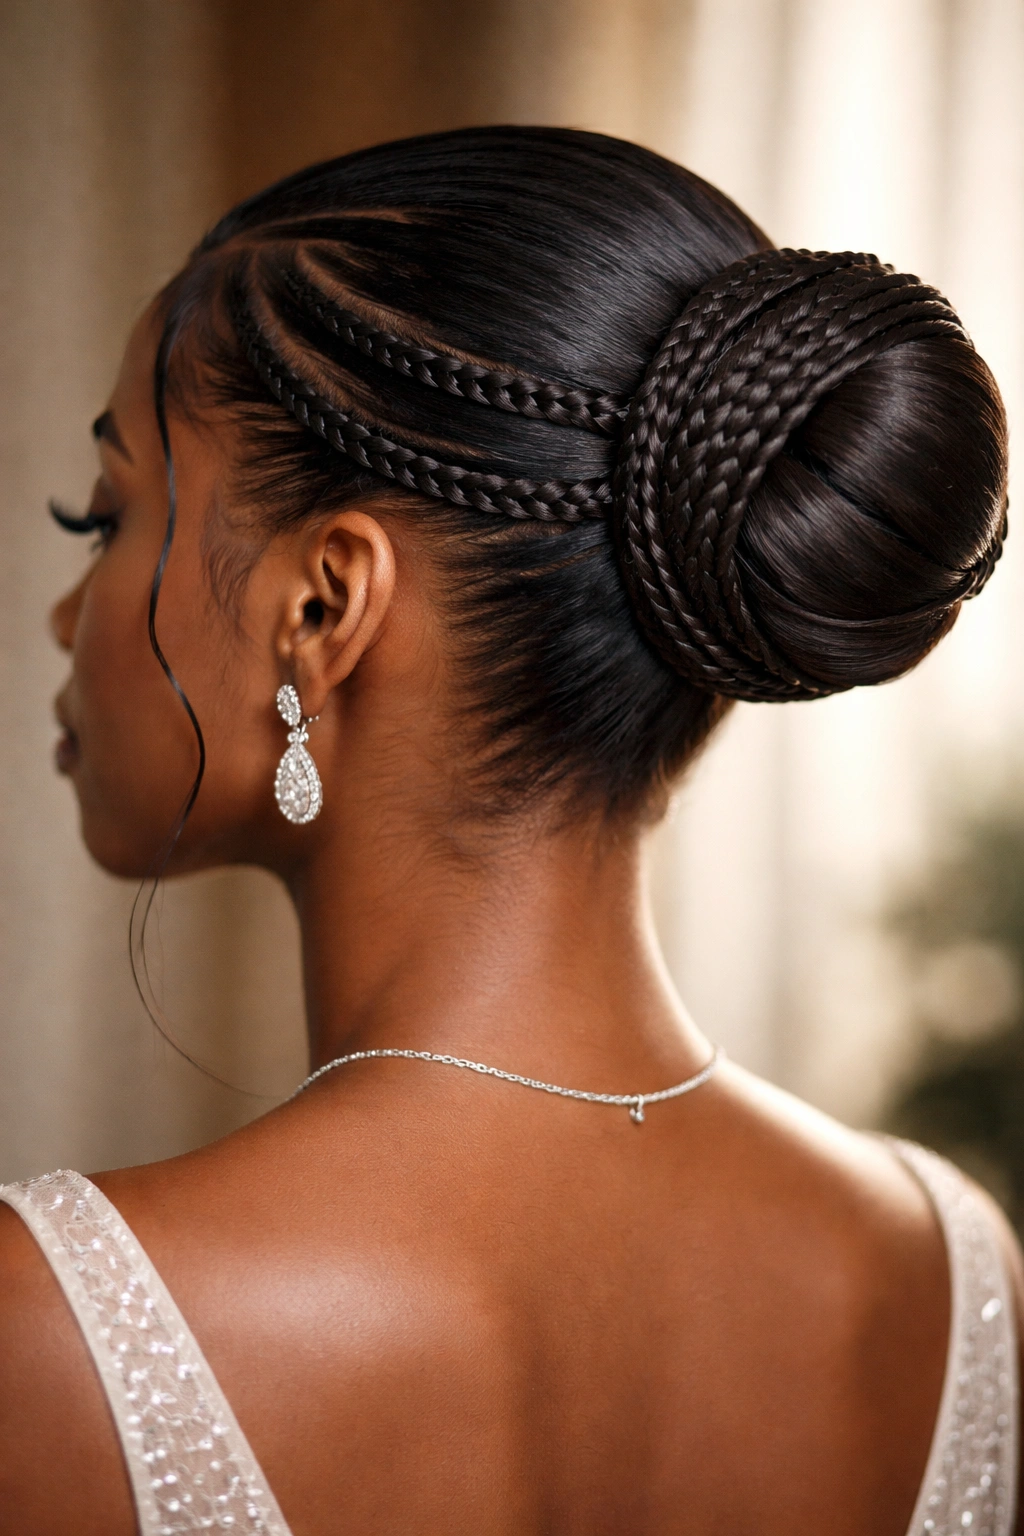
A sleek, smooth bun at the back or crown, wrapped multiple times with thin cornrows or two-strand twists that encircle the bun like decorative bands. The bands themselves become the design element—imagine a perfectly round bun with 3-4 thin braids wrapped around it horizontally or in a spiral pattern. This style is elegant, modern, and feels fashion-forward without being trendy.
Why It Works for Prom
The wrapped-bun-with-braided-bands approach transforms a simple bun into something special and designed. The braided bands catch light and add dimension, making the style feel more interesting and intentional than a plain bun. The technique is sophisticated without being overly complicated, and it photographs beautifully from all angles since the detail is visible from the back and sides.
Wrapping Technique and Placement
- Base bun: Start with a smooth, secure bun gathered at your preferred location (high crown or low nape)
- Braid bands: Using thin cornrows or two-strand twists, wrap your bun horizontally—start at the base and wrap around and around, working your way up, or create one thick band wrapped multiple times
- Band spacing: Space your bands approximately 1-2 inches apart for visual balance—too close together looks crowded, too far apart loses the design effect
- Band finish: Secure each band’s end underneath or into the bun so no loose ends are visible—this takes extra bobby pins but is worth the polish
- Optional: Mixed textures: Use cornrows for some bands and two-strand twists for others, alternating textures for added visual interest
Insider note: This style is easier to execute than some other options if you’re getting it professionally done—be sure your stylist understands that the braided bands are the visual focus, so they should be neat and perfectly placed.
11. The Triangle-Divided Bun
Hair divided into three sections creating a triangular pattern with cornrows, each section braiding back toward a bun at the crown. The three cornrows create a striking geometric triangle, with the apex (point) at the nape and the base of the triangle at your hairline. This style is artistic and architectural—it’s for someone who wants their hair to be visually interesting and undeniably unique.
Why It Works for Prom
The triangle division is bold and modern without being trendy. It’s the kind of geometric design that looks incredible in photos from every angle. The style works beautifully with sleek, architectural dress designs and with bold, artistic makeup looks. If you’re the kind of person who sees fashion as art, this hairstyle communicates that immediately.
Creating the Triangle Pattern
- Division technique: Divide your hair into three sections at your hairline, creating two outer sections (one on each side) and one center section that will form the triangle’s apex at the nape
- Braid pattern: Cornrow each section separately, starting at your hairline and working back toward the crown, where all three braids gather into one bun
- Line precision: Keep the dividing lines between sections clean and precise—use a rattail comb to create sharp part lines that define the triangle
- Bun gathering: Gather all three braids at the crown and secure into a bun—keep it sleek and small so the triangle pattern remains the visual focus
Worth knowing: This style requires someone with strong braiding skills and a steady hand to keep the dividing lines perfectly straight—if they’re even slightly uneven, the geometric effect is lost.
12. The Twisted Turban-Wrap Bun
Hair gathered into a high bun, then wrapped with thick two-strand twists that spiral around and around the bun like a turban, completely covering the bun base. The result looks like sculptural headwear while still being entirely made of your own hair. This style is dramatic, elegant, and absolutely eye-catching—it’s haute couture prom hair.
Why It Works for Prom
The turban-wrap effect is statement-making without being costume-like. It reads sophisticated and artistic, perfect for someone with strong personal style. The wrapped effect creates visual height and drama, making the style feel luxurious and special. This is absolutely the hairstyle to choose if you want every person at prom wondering who does your hair.
Building the Turban Effect
- Base bun: Create a high, round bun at the crown of your head—this becomes your foundation
- Twist preparation: Create thick two-strand twists using sections of your hair (or pre-twisted hair that you’ve set aside) long enough to wrap around your bun multiple times
- Wrapping technique: Starting at the base of your bun, wrap your thick twist around and around, securing it with bobby pins as you go—each wrap should completely circle the bun
- Coverage: Continue wrapping until your entire bun base is covered and no regular hair is visible—you want a completely smooth, sculptural turban effect
- Finish option: Secure the final twist end underneath everything so it’s completely hidden, or leave it visible as a design element if it looks intentional
Pro tip: This style works best with longer hair or when you have access to pre-twisted hair to add to your own—it requires substantial length to create the wrapping effect without running out of hair.
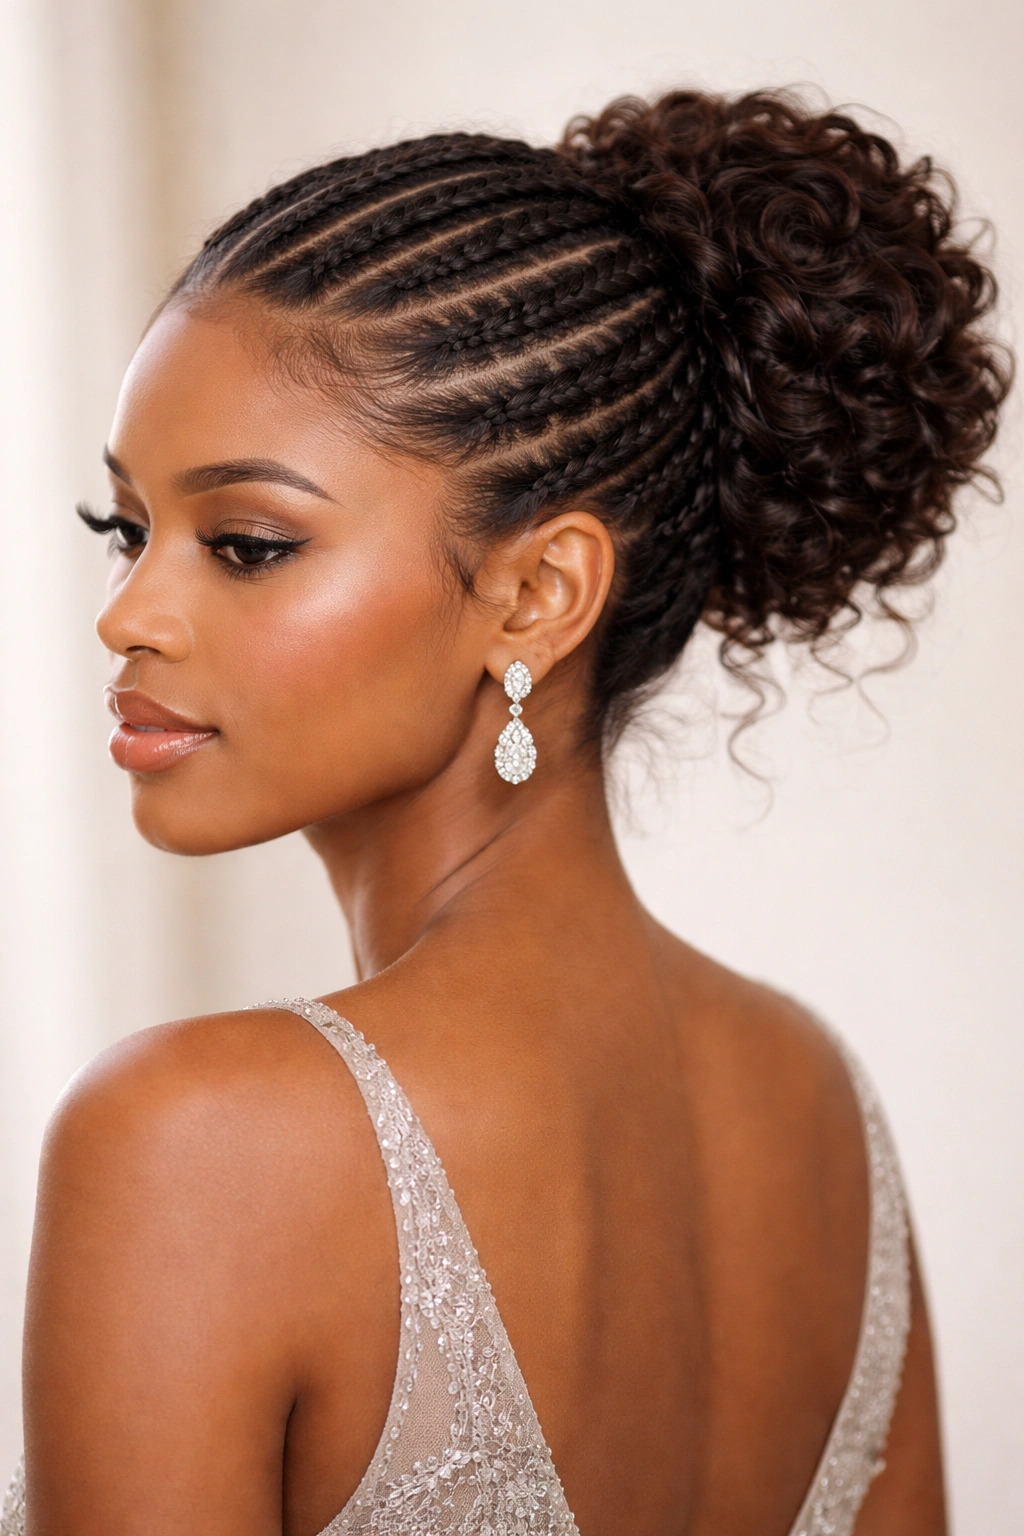
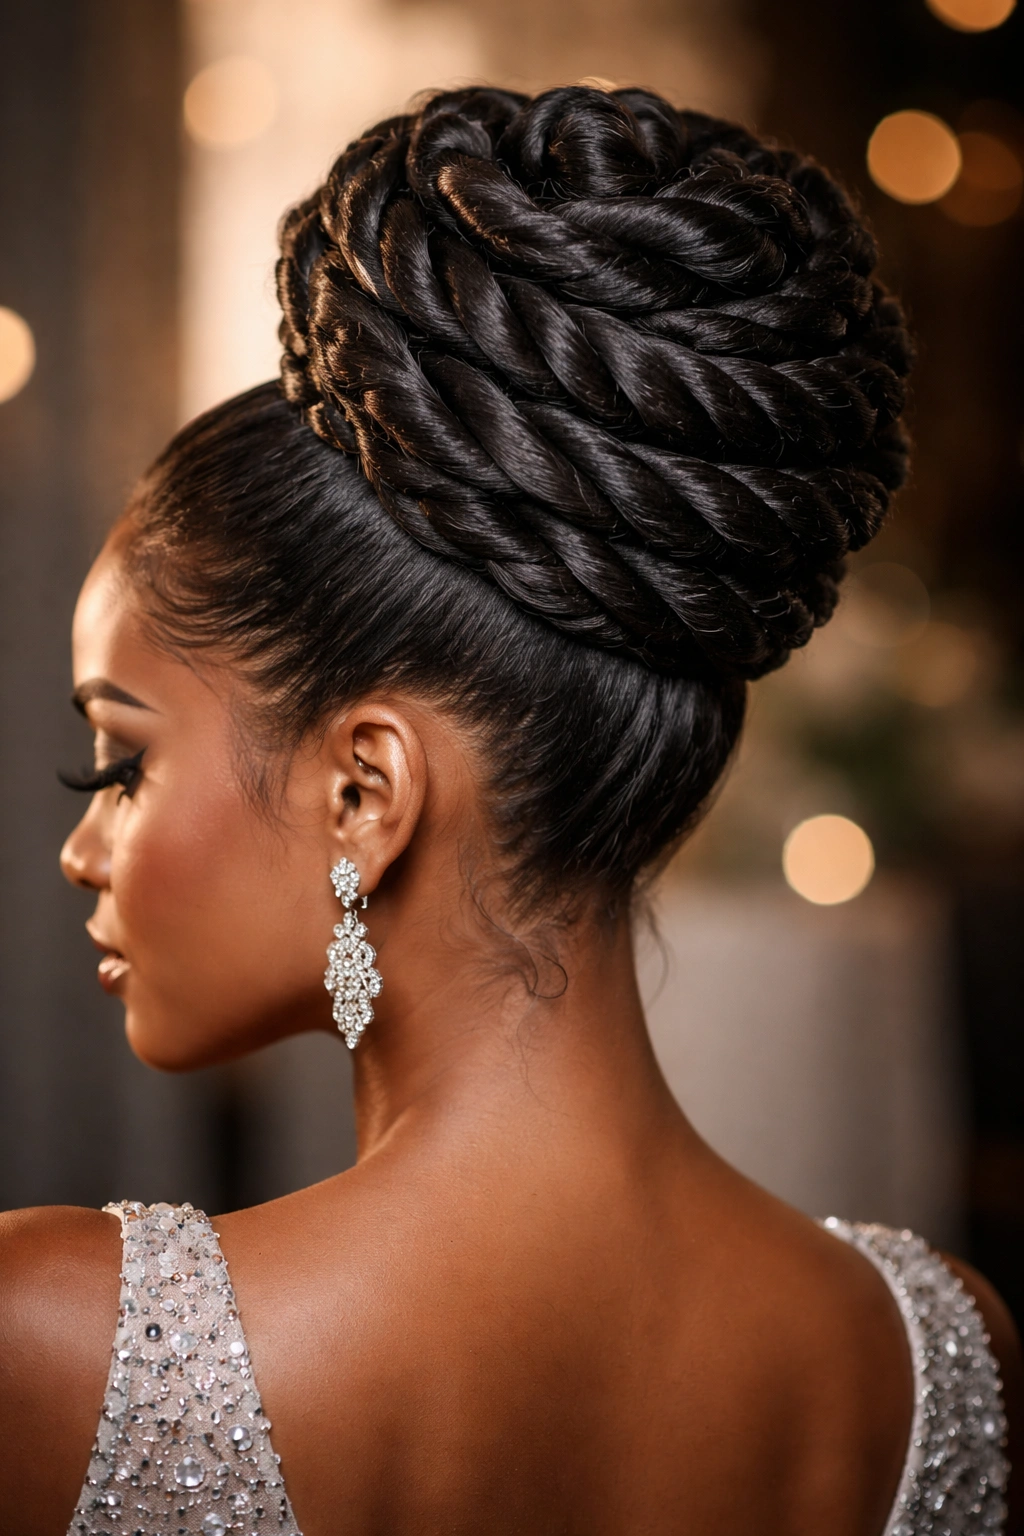
13. The Soft Rope-Braid Crown Bun
Soft, thick rope braids (created by twisting two thick strands together, one on each side of your head) that crown your head from ear to ear, with all remaining hair gathered into a romantic, slightly undone bun at the back. The rope braids are thicker and softer than cornrows, creating a completely different aesthetic—less geometric, more romantic and touchable. This is the style to choose if you want sophistication with a softer, less structured edge.
Why It Works for Prom
The rope-braid crown creates an almost halo effect around your face, which is incredibly flattering. The soft braids feel romantic and elegant rather than sharp or architectural. The loose bun at the back balances the texture—it’s structured enough to stay secure all night but soft enough to feel natural and not overly done. This style works beautifully with any dress style and coordinates well with delicate, romantic jewelry.
Creating the Rope-Braid Effect
- Rope braiding technique: Instead of traditional three-strand cornrows, create rope braids by taking two thick sections of hair and twisting them around each other (not over and under, but twisting)—this creates a completely different texture
- Braid path: Create two thick rope braids starting at your temples and traveling along your hairline toward the back, creating a crown effect that frames your entire face
- Braid thickness: Make your rope braids thick and substantial—they should be noticeably thicker than traditional cornrows for maximum visual impact
- Bun creation: Gather all remaining hair (including the rope braid ends) into a soft, rounded bun at the back of your head—tease gently for volume and allow a few wisps to fall around your face and neck
- Finishing touches: A delicate hair accessory (comb, pin, or decorative piece) positioned in the bun adds elegance without overwhelming the style
Insider note: Rope braids are actually easier to execute than cornrows if you’re doing them yourself—the twisting motion is more intuitive for many people, making this a great DIY option if you’re skilled with your own hair.
Final Thoughts
Choosing your cornrow bun style is about matching your aesthetic to the design and then trusting a skilled stylist (or your own hands if you’re experienced) to execute it perfectly. The difference between a good cornrow bun and an exceptional one lies in the details: braid tension consistency, clean edge control, secure bun anchoring, and thoughtful finishing touches. Each of these 13 styles offers something distinct, whether you’re drawn to geometric precision, romantic softness, bold statement-making, or timeless elegance.
The absolute best part about cornrow buns for prom is that they’re protective styling in disguise. While you’re looking absolutely gorgeous and feeling confident, your hair is actually being cared for—your ends are protected, your strands are held secure, and you’re not creating unnecessary stress on your hair through the night of dancing and movement. That’s the win-win that makes protective styles so smart for formal events.
Book your appointment well in advance, bring clear reference photos of the style you want, and don’t hesitate to discuss concerns or preferences with your stylist. Arrive with clean, moisturized hair, get a good night’s sleep before prom, and take a moment to really appreciate how incredible your hair looks—because it will be. You’re going to feel absolutely stunning, and that confidence will be the most beautiful thing about you all night long.