Type 4 hair comes with incredible styling potential, and cornrows are one of the most versatile, protective, and stunning options available. But let’s be real—if you’re working with tightly coiled, coily, or kinky hair texture, not every cornrow style is created equal. Some designs work beautifully with your natural texture, enhance volume, reduce breakage, and let your hair’s natural character shine. Others can be uncomfortable to wear, tough on your hairline, or just don’t showcase what makes Type 4 hair so beautiful in the first place.
The trick is finding cornrow styles that genuinely complement your specific curl pattern, texture, and face shape—while also being protective enough to give your hair a real break from daily styling. Whether you’re looking for something sleek and polished, intricate and artistic, or casual and low-maintenance, there are cornrow options that work specifically well with coily and kinky hair textures. The right style isn’t just about what looks good in a photo; it’s about what feels good to wear, keeps your hair healthy, and makes you feel confident walking out the door.
I’ve put together a collection of cornrow styles that are proven to work beautifully with Type 4 hair. Each style comes with specific tips on how to prep your hair before braiding, what tools and products work best, and how to maintain the braids so they stay fresh and your hair stays healthy underneath. Whether this is your first time trying cornrows or you’re already a braiding veteran, you’ll find detailed guidance on adapting each style to your exact needs.
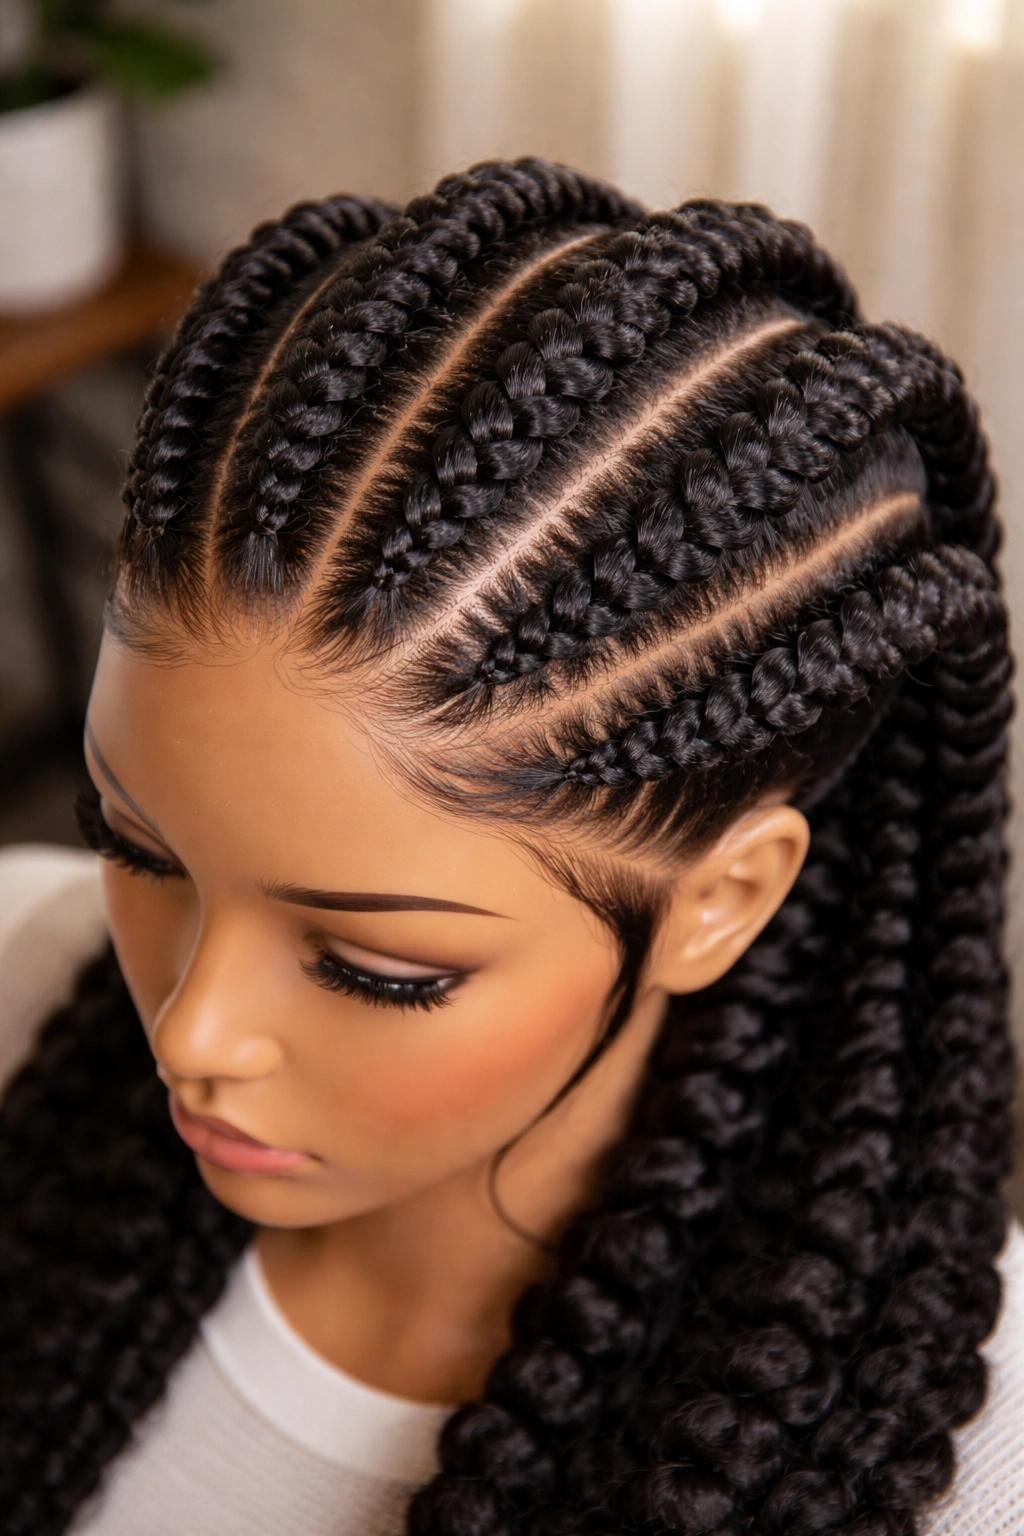
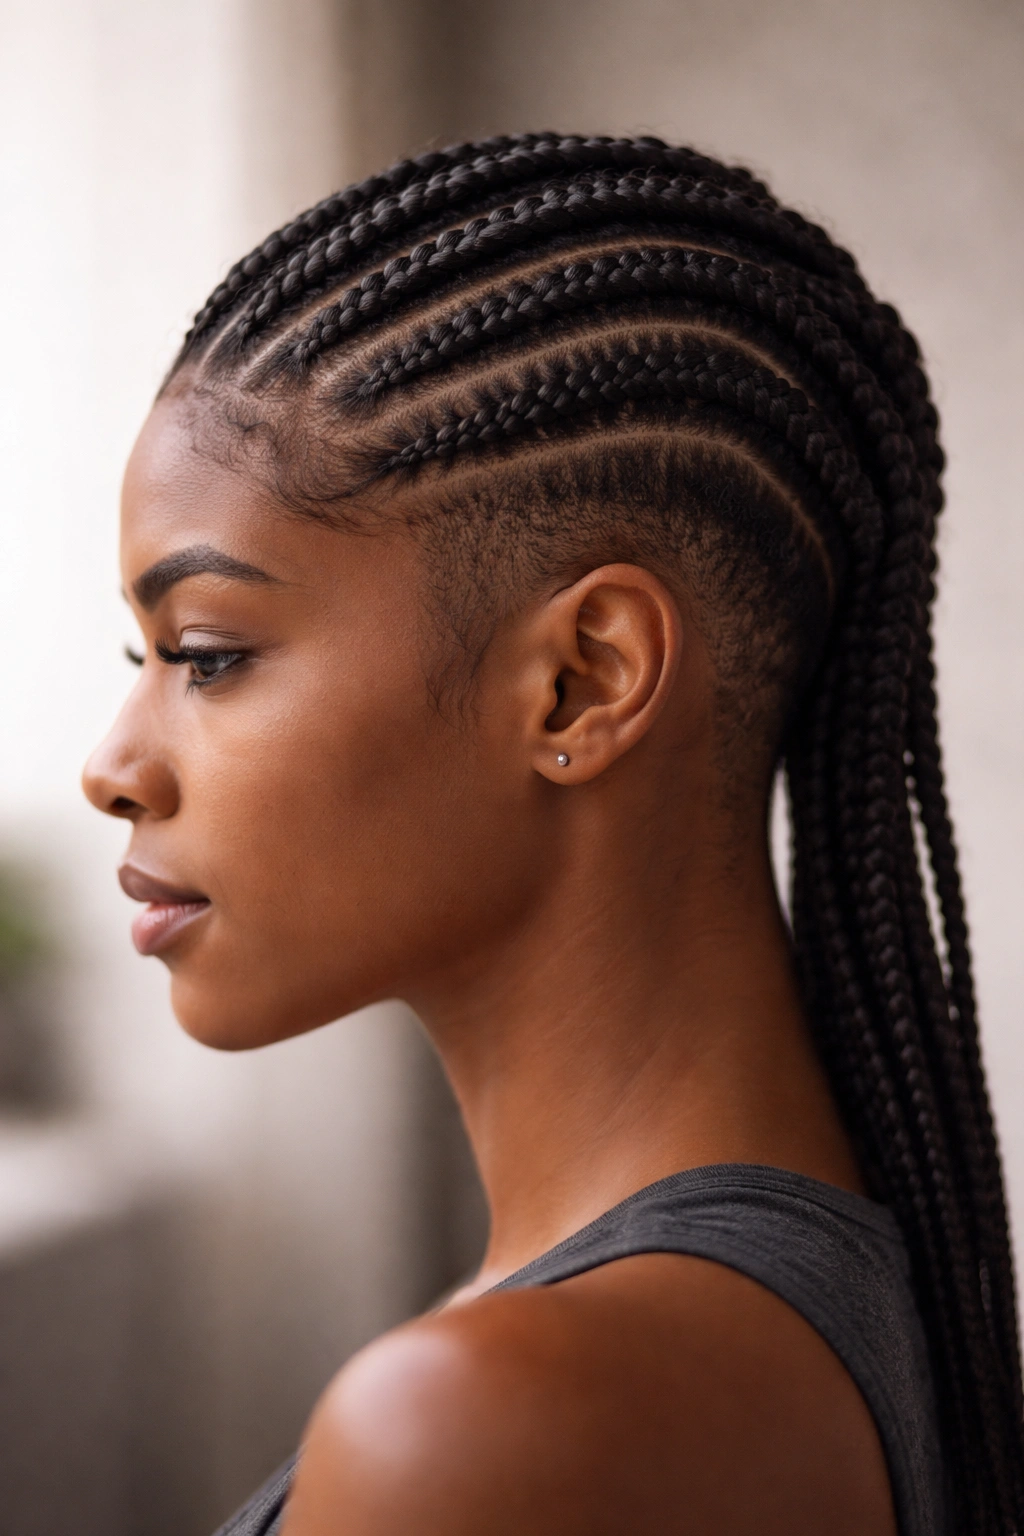
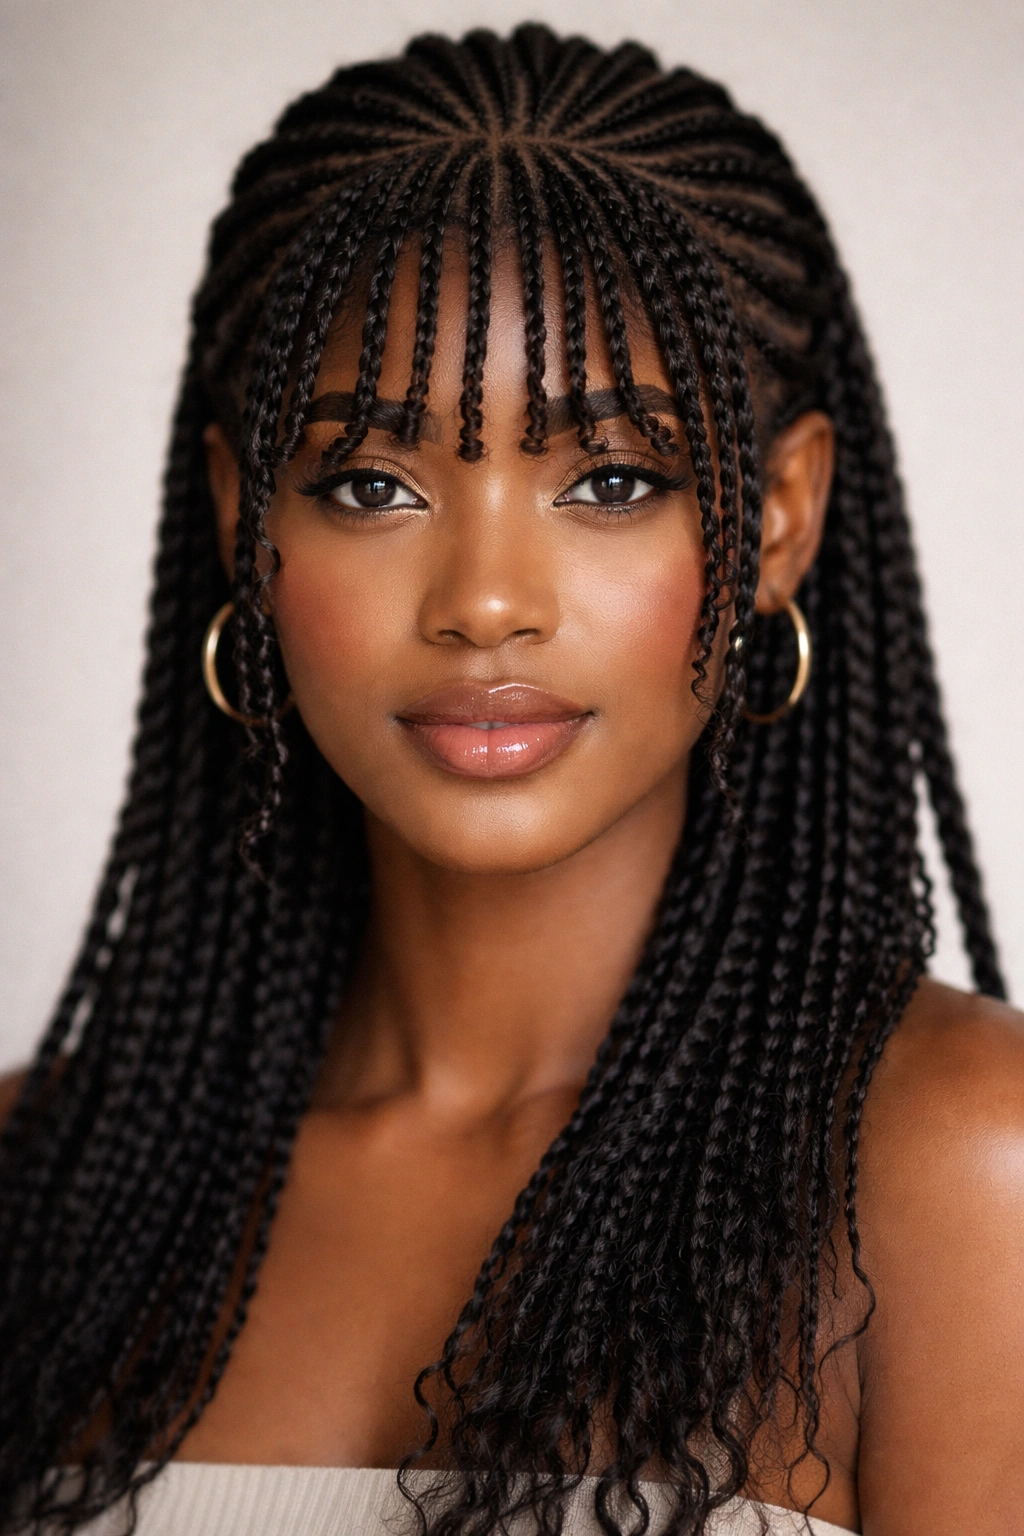
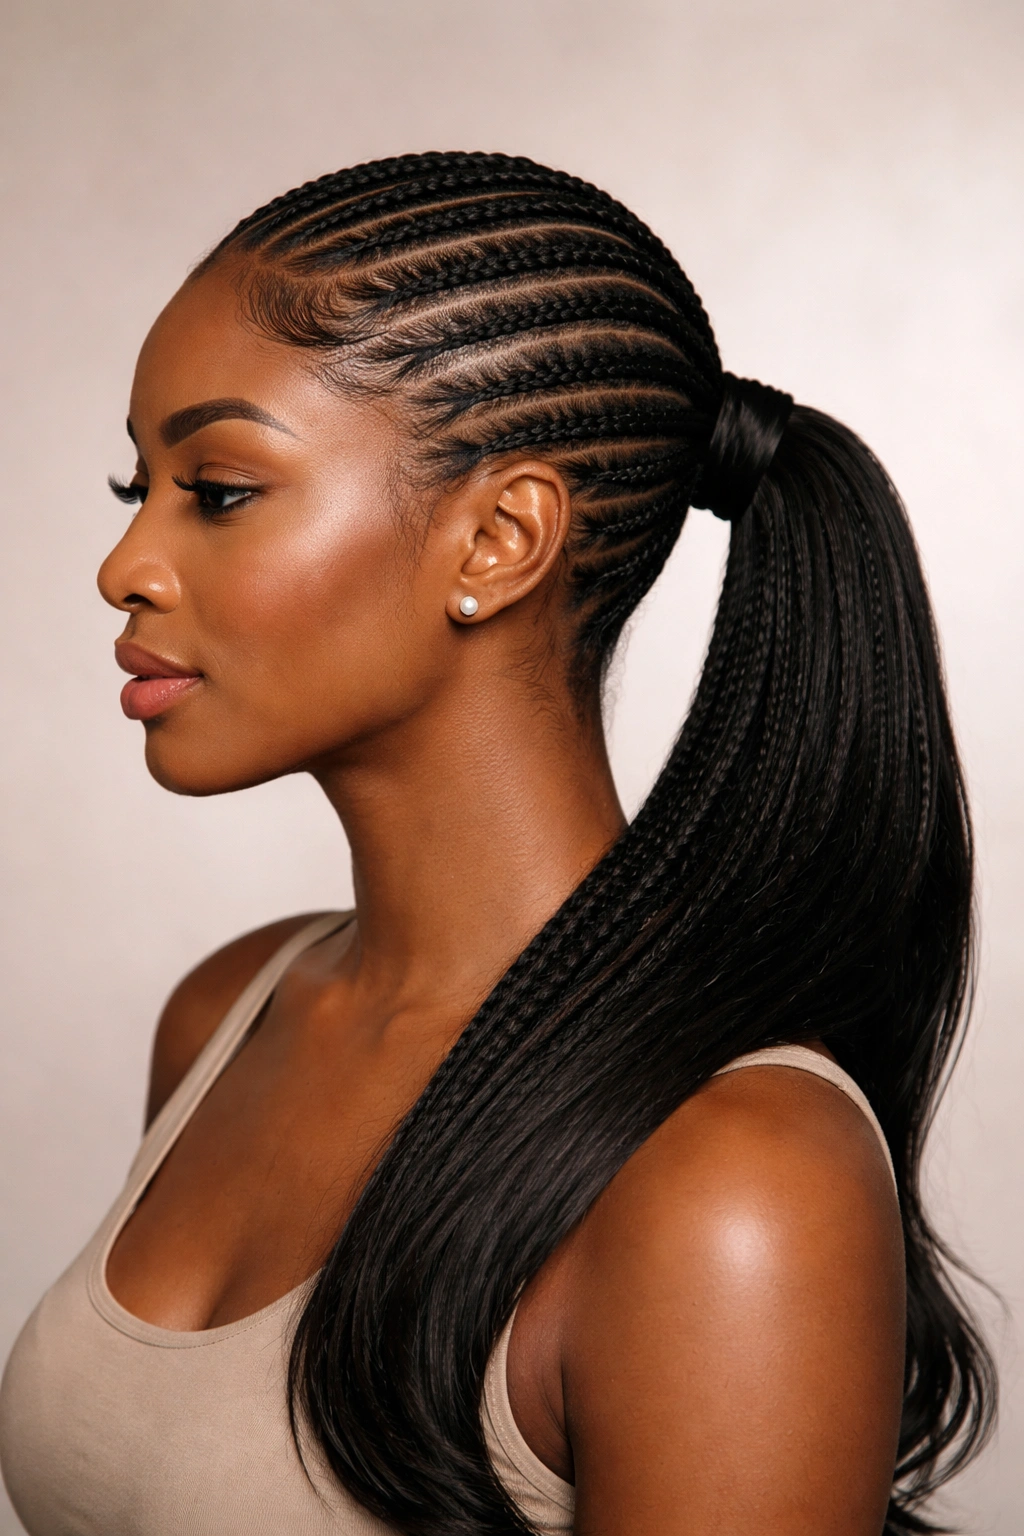
1. Classic Two-Strand Cornrows with Deep Parts
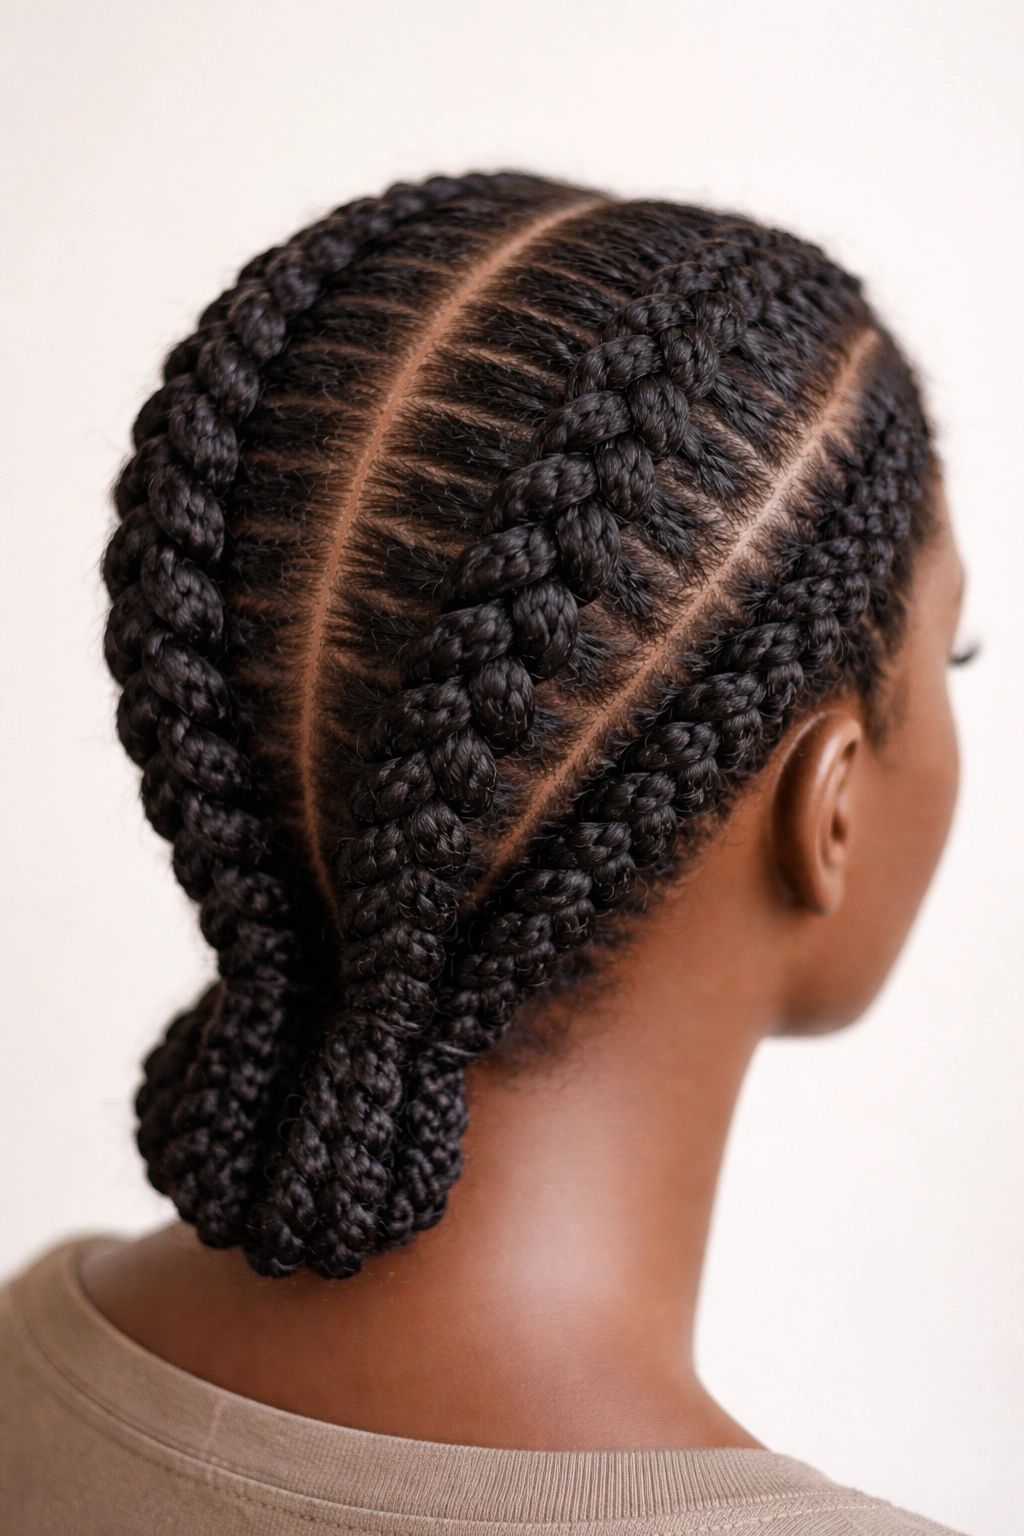
Two-strand cornrows are the foundation of everything else you’ll see here, and they’re absolutely timeless for a reason. With Type 4 hair, the beauty of two-strand cornrows lies in how they hug your natural coil pattern without forcing your hair into an unnaturally straight line. The texture actually helps the braids hold their shape naturally, meaning less tension and a longer-lasting style.
Why This Works for Coily Hair
Two-strand cornrows move with your natural curl pattern rather than against it. Unlike traditional three-strand braids that can feel tight and create more tension on the scalp, two-strand cornrows are gentler and more forgiving with tightly coiled hair. The individual strands stay defined, your coils remain visible within the braid, and the overall look is sleek without being rigid. This style also tends to last longer on Type 4 hair because the texture naturally grips and supports the braid structure.
How to Create Defined Parts
- Use a rattail comb with a pointed end to create clean, straight sections from your hairline to the nape of your neck
- Part deeply enough that you can see your actual scalp—this creates visual contrast and makes the braids pop
- Space your parts ¼ to ½ inch apart, depending on how thick you want each braid and how much time you’re willing to spend
- Use a lightweight mousse or gel on the parts to keep them clean and prevent frizz from surrounding hair
- Braid down to the ends and seal by dipping in hot water (if your hair is long enough) or wrapping the ends tightly with thread
Pro tip: If your edges are sensitive, skip the braids closest to your hairline and start slightly further back. This gives your edges a break while the braids still look intentional and styled.
2. Zig-Zag Cornrows for Texture and Movement
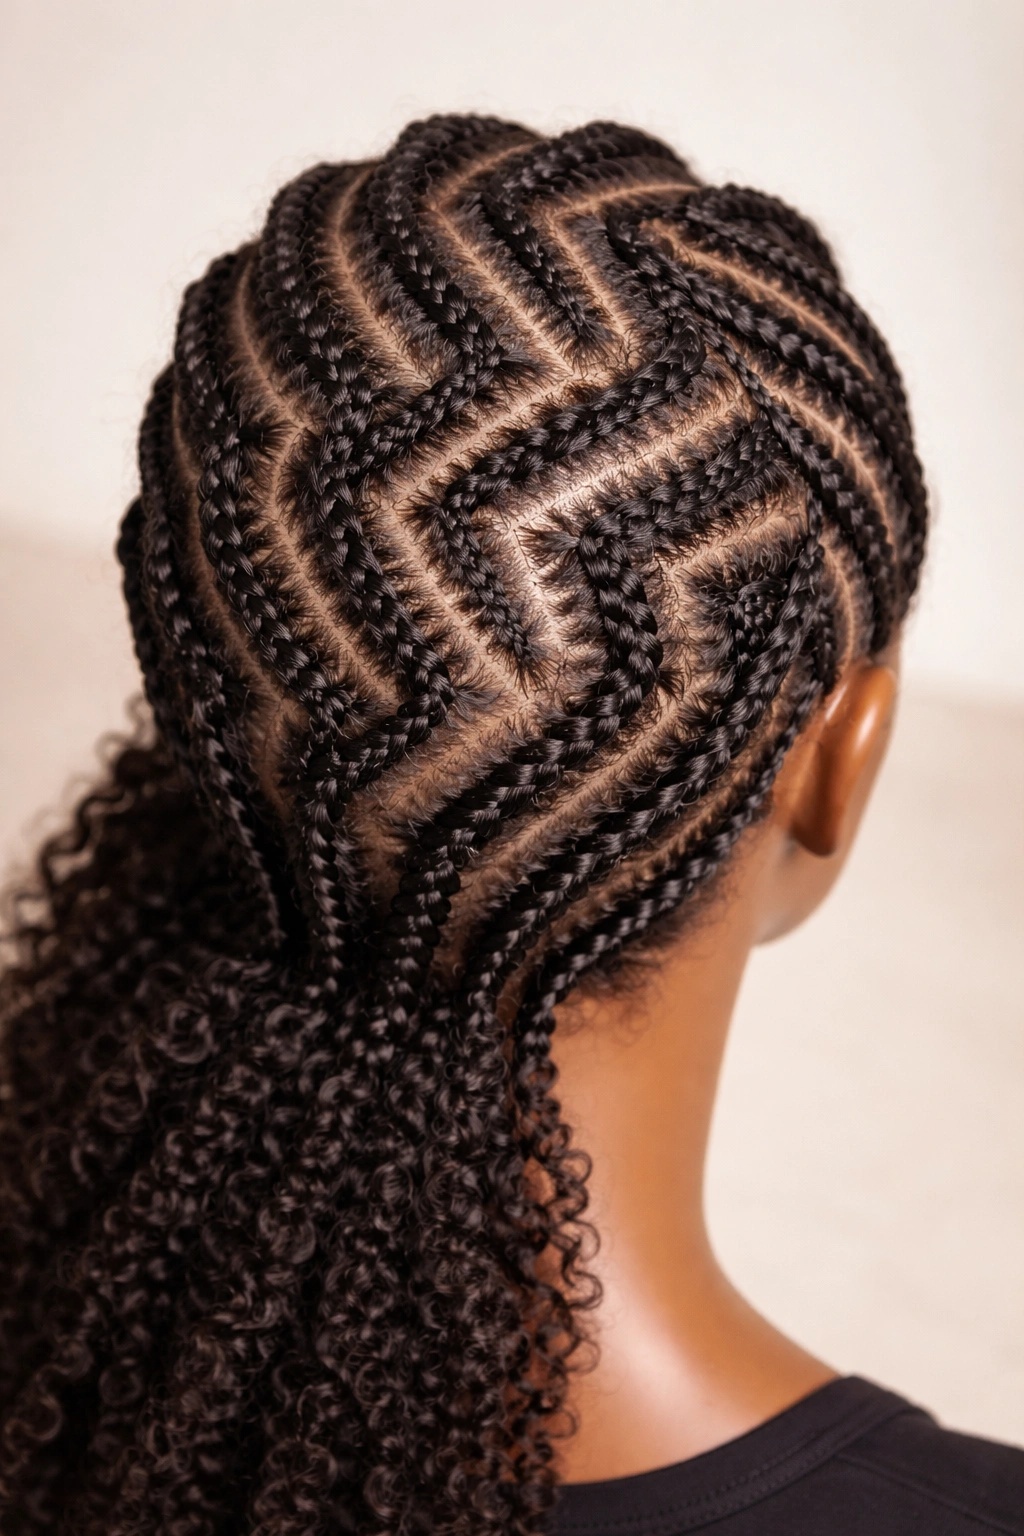
Zig-zag cornrows take the two-strand concept and add a geometric twist that feels modern and visually striking. Instead of straight lines down the scalp, your cornrows follow a zigzag pattern, creating diagonal movement across your head. With Type 4 hair’s natural texture, this style actually photographs beautifully because the coils add extra visual interest to the geometric pattern.
The Technique Behind Zig-Zags
Creating zig-zag cornrows requires planning your parts before you start braiding. Map out where your pattern will zig and zag—you can do this freehand or use thin lines of gel to mark your path. Start at one side of your head, braid diagonally across, then angle back in the opposite direction for the next row. The key is keeping your angles consistent so the pattern looks intentional rather than uneven.
What Makes This Style Special for Type 4 Hair
- Creates the illusion of more texture and dimension because of how light hits the angled braids
- The geometric pattern is modern and eye-catching without requiring extra-long hair
- Works beautifully whether you’re doing your whole head or just a few accent rows mixed with straight cornrows
- Easier to maintain than you might think—once the braids are installed, the pattern stays put
Worth knowing: Zig-zag cornrows work best when you have at least two to three inches of hair length. If your hair is shorter, stick with straight rows or consider a different protective style.
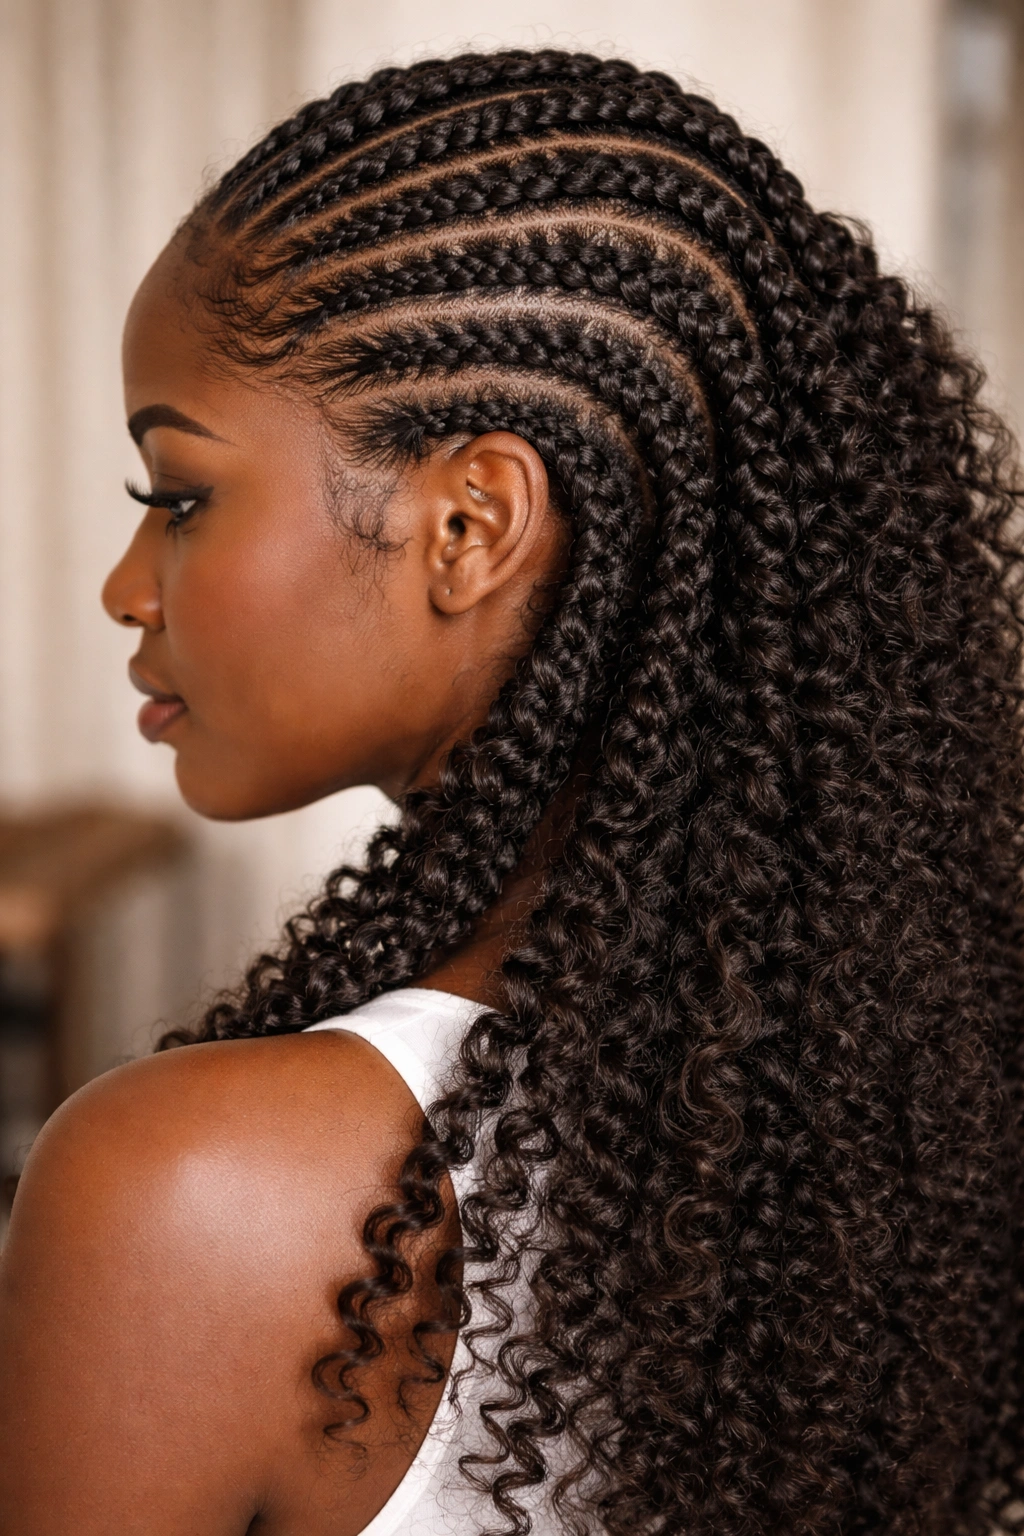
3. Cornrows with Loose Coils at the Ends
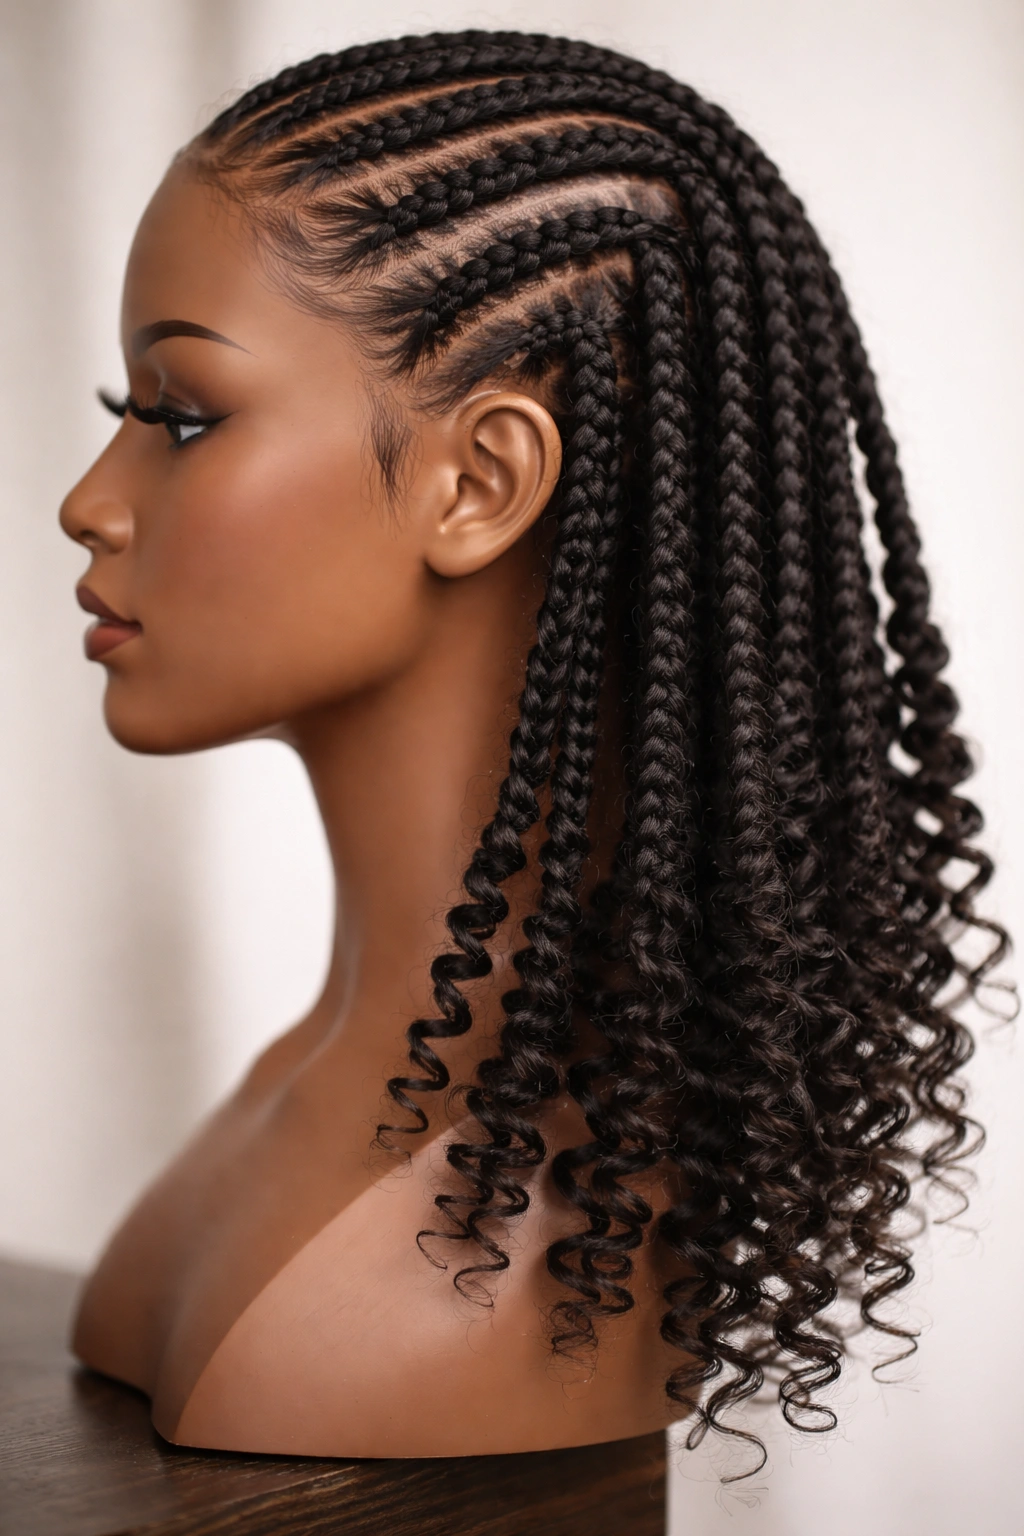
This style combines the protective benefits of cornrows with the softness and movement of loose coils. You cornrow from your roots, then leave the ends unbraided so they can curl and coil naturally. It’s the perfect middle ground if you want something protective but also want to show off your natural texture.
Installing Loose Ends the Right Way
Braid your cornrows down to about two to three inches from the ends of your hair. This gives you enough length to create full, bouncy coils. Once you’ve reached your stopping point, gently unravel the braid and let those last few inches form their natural curl pattern. The contrast between the structured cornrows and the free-floating coils is genuinely stunning, especially on Type 4 hair with well-defined coils.
Styling and Care Tips
- Use a curl-enhancing gel or cream on the loose ends to define the coils and reduce frizz
- Pineapple your coils at night (loosely gather them on top of your head) to preserve the curl pattern
- The loose ends dry faster than cornrows, so you can refresh those sections without redoing the entire braid
- This style lasts 2–3 weeks typically, depending on how active you are and how well you maintain the loose coils
Insider note: If your coils tend to frizz easily, use a silk or satin pillowcase and a bonnet when you sleep. The loose ends are more vulnerable to breakage than cornrows, so protect them at night.
4. Feed-In Cornrows for a Natural Hairline
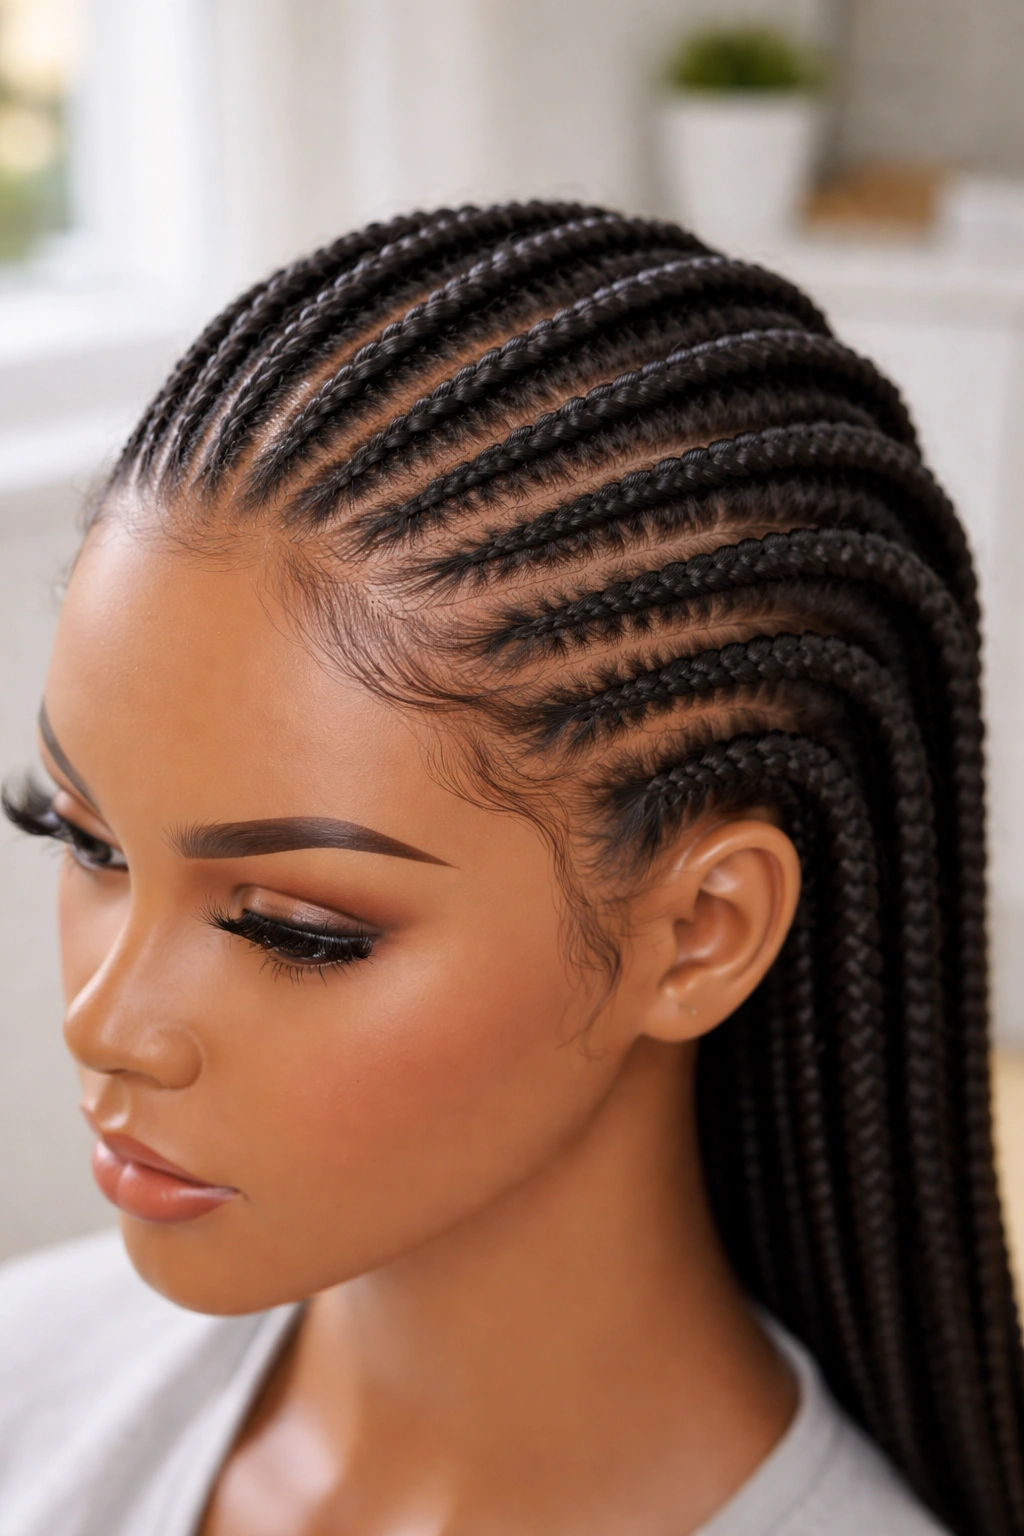
Feed-in cornrows are a game-changer if you care about protecting your edges and maintaining a soft, natural-looking hairline. Instead of cornrowing all the way to your scalp, you gradually add small sections of hair as you braid, creating cornrows that blend seamlessly into your edges rather than pulling on them directly.
The Protective Advantage
Feed-in braids are categorically gentler on your edges because they don’t start pulling tension from the moment you braid. Each new section of hair is incorporated gradually, distributing tension across more hair strands rather than concentrating it on a single line. For Type 4 hair, where edges can be fragile and prone to breakage, this approach is genuinely protective when done correctly.
How to Create Feed-Ins
- Start your braid at least a quarter inch away from your hairline with just three small strands
- As you braid downward, add tiny sections of hair from the sides as you cross over
- These added sections should be very small—think toothpick-thin—so the hair is gradually incorporated rather than suddenly grabbed
- Continue feeding in hair for the first three to four inches of the braid; after that, you’re just doing a regular cornrow
Pro tip: Feed-in cornrows take longer to install than regular cornrows, but they’re worth every extra minute if edge protection is your priority. Your edges will thank you after eight weeks of wearing this style.
5. Goddess Braids (Larger Feed-In Cornrows)
Goddess braids are the chunkier, more dramatic cousin of regular feed-in cornrows. They use larger sections of hair and follow the same feeding technique, but the final braids are thicker, bolder, and more visually striking. They require less installation time than thin cornrows and still offer excellent scalp protection.
Why Type 4 Hair Looks Exceptional in Goddess Braids
The texture of coily hair actually works to your advantage with goddess braids because each strand of hair creates definition within the braid. You don’t need the braid to be as tight as it would be on straighter hair textures—your natural coils do the grip work for you. The braids look thick and full even though they’re not pulling aggressively on your scalp.
Installation and Styling Notes
- Use four to six larger sections across your head instead of 10–15 thin sections
- Each braid should be roughly the width of a pencil or marker
- Goddess braids typically last three to four weeks depending on manipulation and hair growth
- They work beautifully with added accessories like gold cuffs, beads, or thread wrapped around the braids
- Sleeping on a silk or satin pillowcase keeps the braids fresher longer
Worth knowing: Goddess braids create more scalp visibility than some other styles, so if you prefer your scalp to be fully covered, this might not be your best choice. But if you love the bold, sculptural look, the protective benefits and ease of maintenance make them incredibly worth trying.
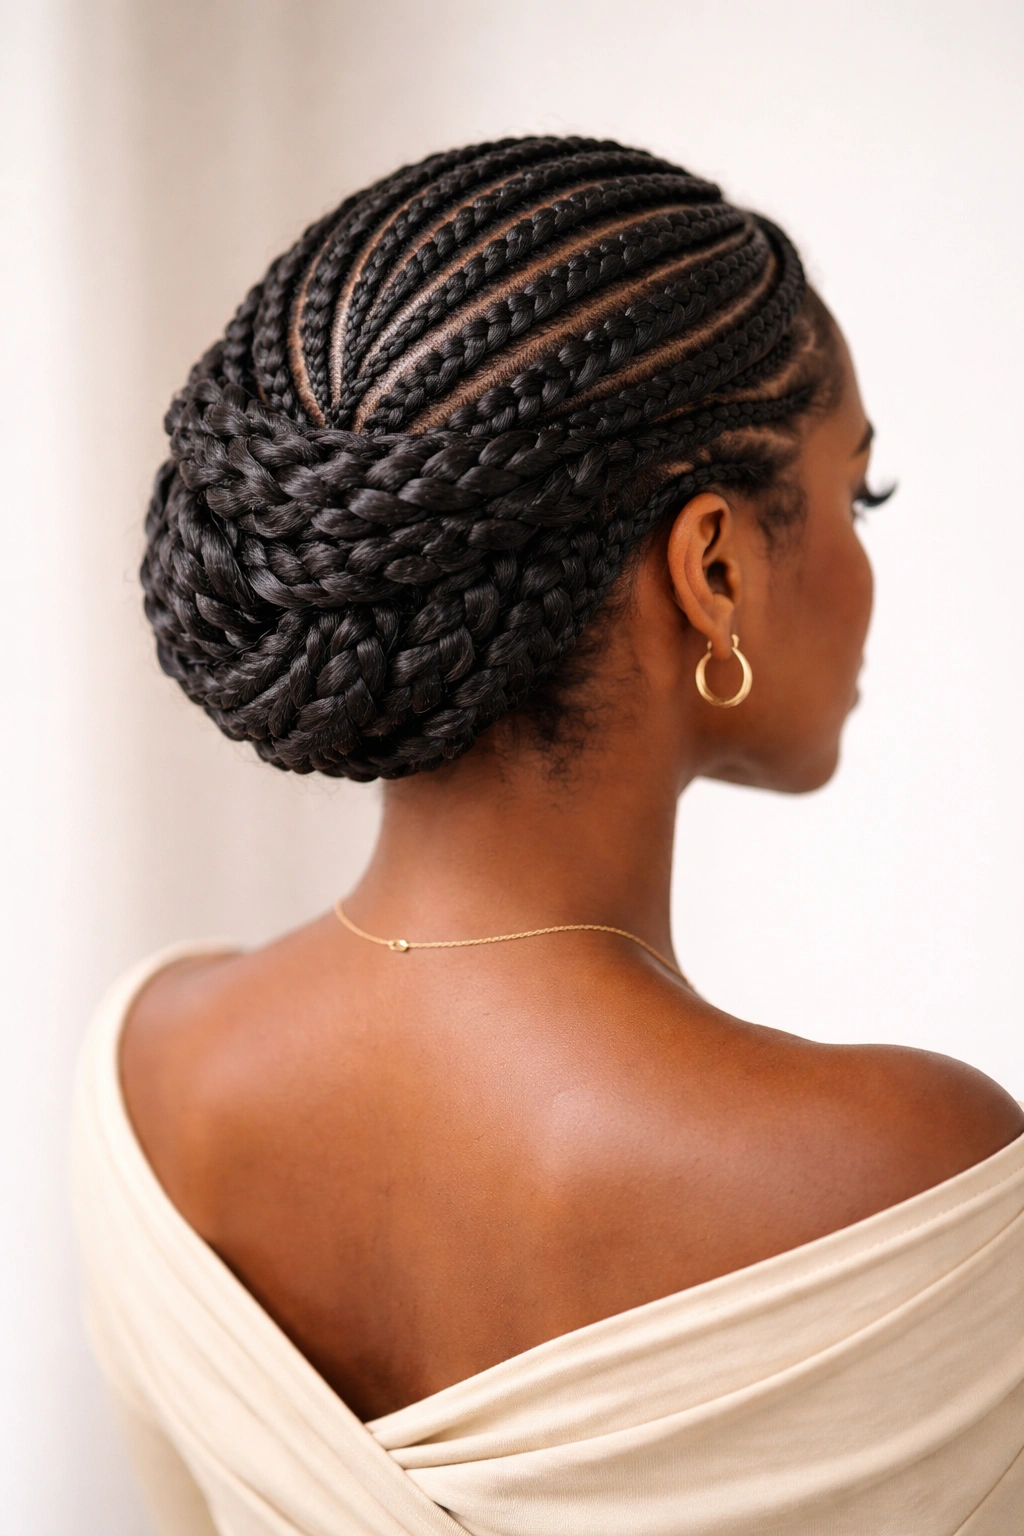
6. Cornrows into a High Bun
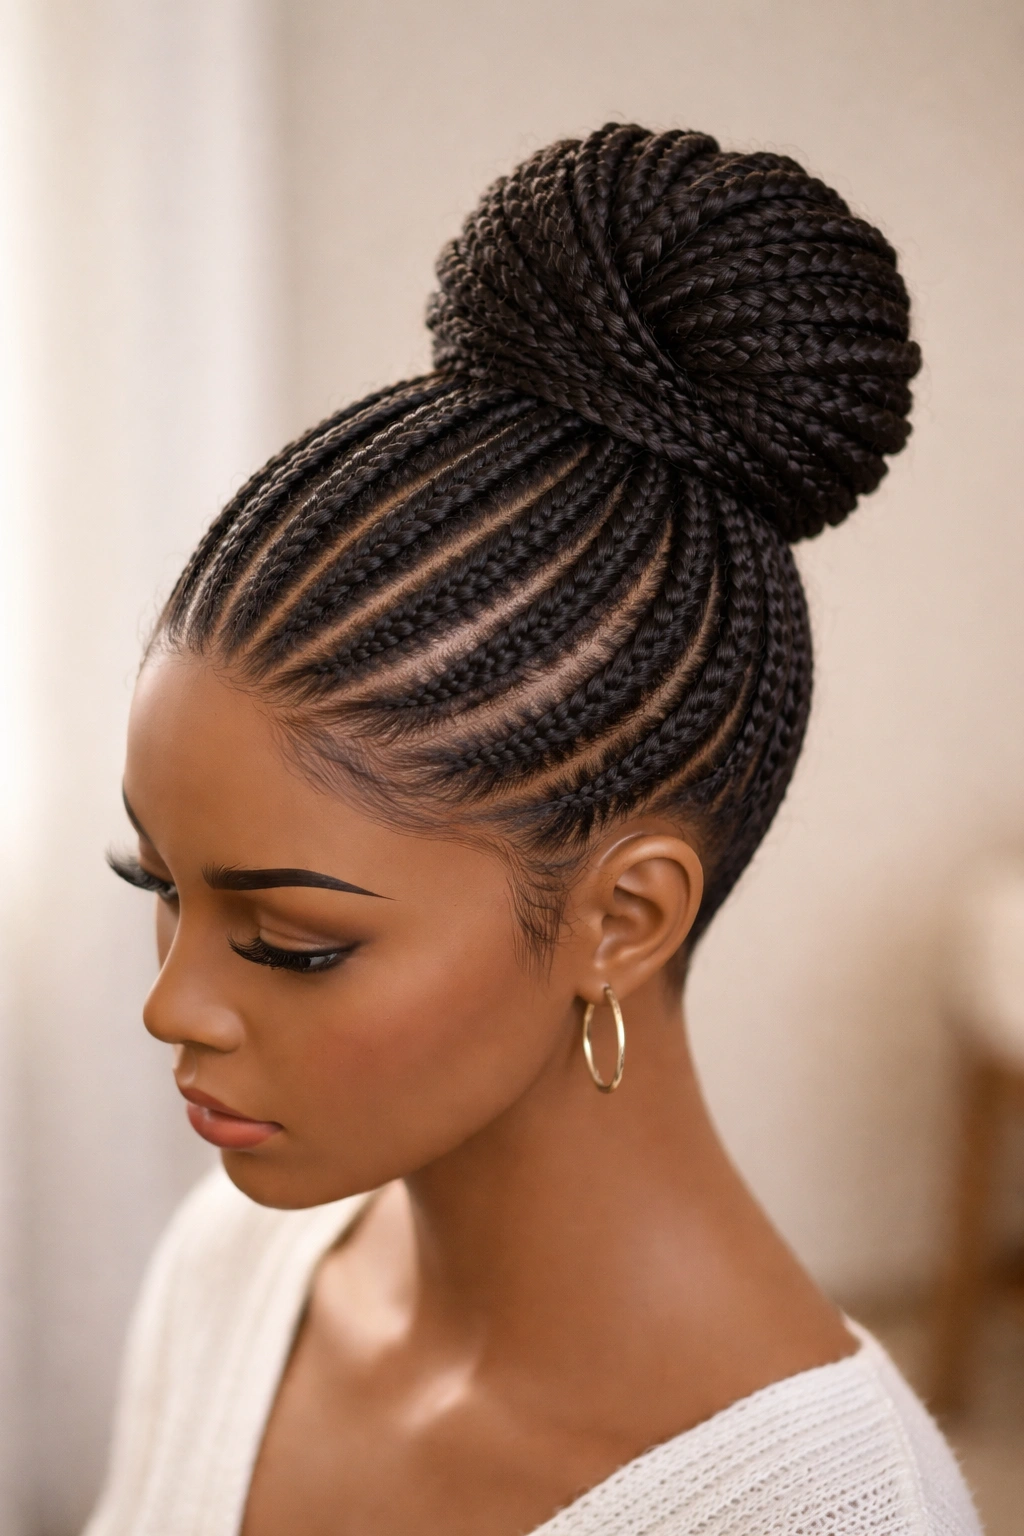
This style takes your cornrows beyond just a braid style and turns them into a complete updo. You cornrow your entire head (using however many rows you prefer), then gather the braids at the crown and bundle them into a voluminous bun. It’s protective, it’s elegant, and it works for everything from casual to formal.
Creating a Bun That Actually Stays Put
Cornrow your head using your preferred pattern—some people do straight lines converging toward the crown, others do cornrows that all travel toward the center point where the bun will sit. Once your cornrows are complete, use a hair tie to bundle the ends together at the crown or high on your head. Wrap additional hair around the base of the bun for a finished look, or leave the braids showing for a more textured appearance.
Styling for Every Occasion
- A high bun with cornrows works beautifully for work, gym sessions, date nights, or formal events—just adjust the accessories and your outfit
- Add a scarf, headwrap, or headband across your forehead for a polished, intentional look
- Use metallic or decorative hair cuffs on the bun for extra glamour
- This style is incredibly practical because it gets all your hair off your neck and face while still protecting it
Pro tip: Install your bun on day three or four after getting your cornrows done, when the braids have settled but aren’t yet frizzy. This timing prevents the braids from looking too stiff while keeping everything neat.
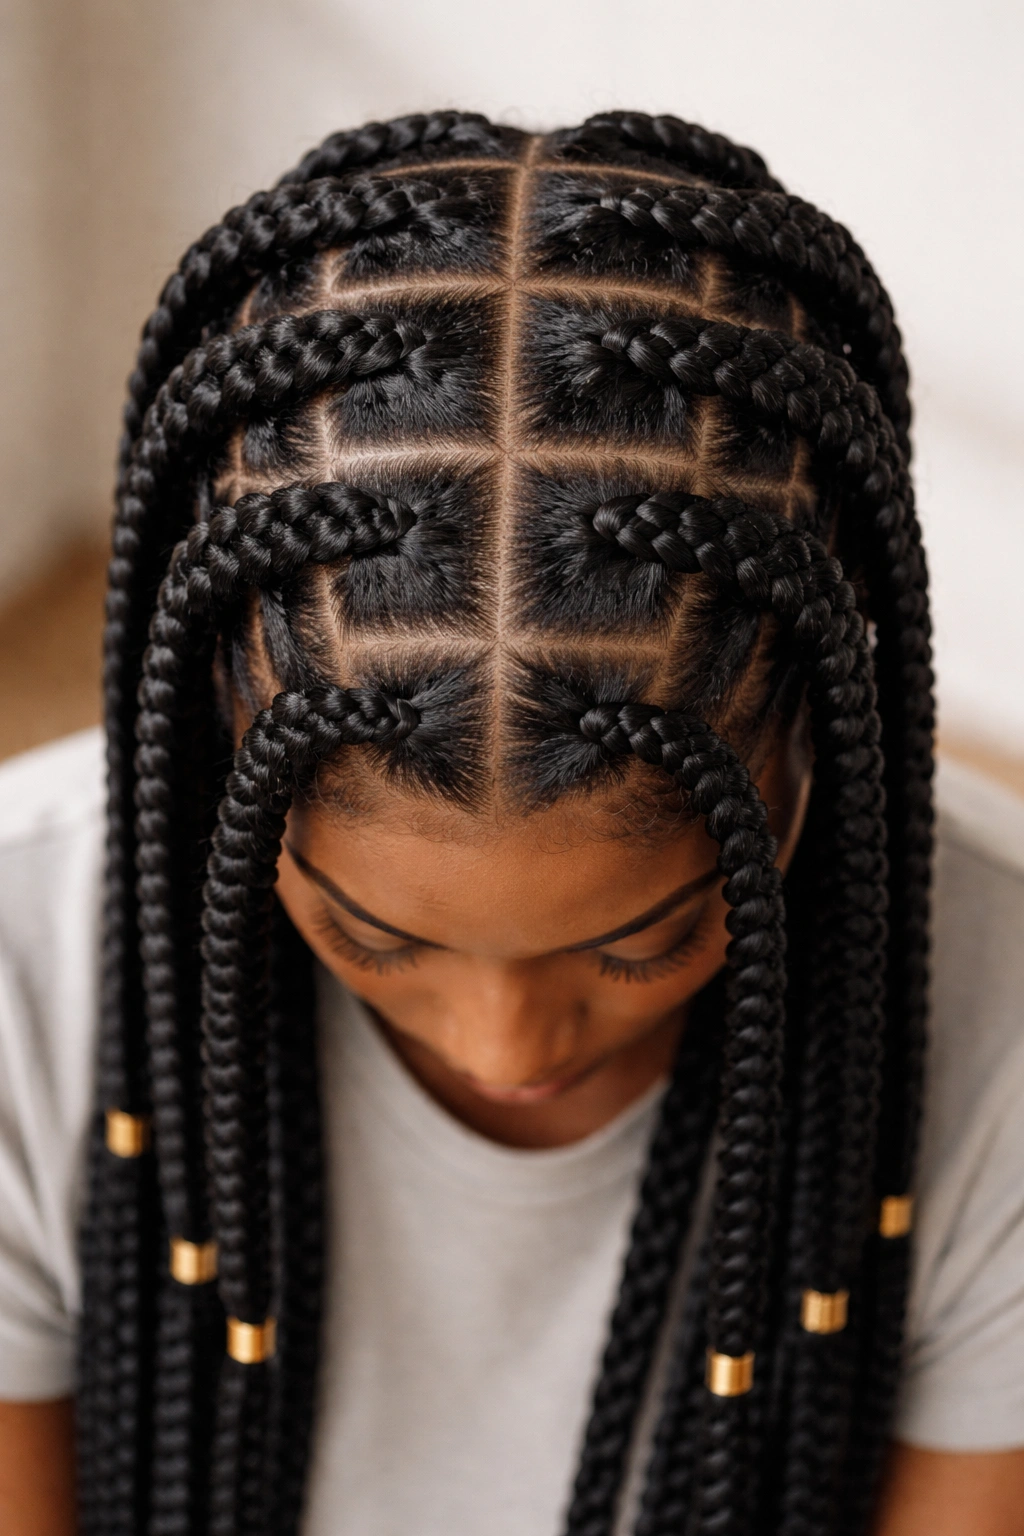
7. Cornrows with Added Curly Hair Extensions
Adding curly hair extensions to your cornrows instantly creates volume, allows you to wear the style longer than your natural hair length, and gives you options for different textures and colors. Type 4 extensions specifically designed for kinky and coily hair blend seamlessly with your natural texture.
Choosing the Right Extensions
- Select human hair extensions with a texture that matches or complements your natural hair—kinky, coily, or textured extensions blend much better than straight hair on Type 4 base hair
- Synthetic curly extensions designed for protective styles work too, but human hair feels more natural and lasts longer
- Choose a length that excites you—extensions free you from your current length limitations
- Color-match carefully; even a slight mismatch becomes obvious once the braids are installed
Installation Technique
- Braid your cornrows as usual, but leave them slightly thicker than normal to accommodate the extensions
- Attach extension hair to your braids using thread, beads, or pre-glued attachment methods (research what’s safest for your scalp)
- The extensions should wrap around each braid, creating a fuller, thicker braid than your natural hair alone could achieve
- Seal the ends of the extensions in hot water to prevent unraveling
Insider note: Extensions add weight and length to your braids, so be extra conscious of tension on your scalp. If anything feels too tight, loosen it immediately—excess weight can cause traction alopecia over time.
8. Box Braids Styled as Cornrows (Chunky Grid Pattern)
This hybrid style uses the protective benefits of cornrows while incorporating the sculptural look of box braids. You create a grid pattern of thick sections across your scalp, then braid each section in the cornrow style (following the curve of the scalp). The result is chunky, bold, and distinctly beautiful.
What Makes This Style Unique
Instead of braiding straight lines across your scalp, you’re creating a grid of individual braided sections. Each square of the grid gets braided independently, creating separate braids that start at the scalp and go straight down. It’s less densely packed than traditional cornrows but more protective than loose braids worn down.
Benefits for Type 4 Hair
- The texture of your hair actually helps each braid hold its shape because of the natural grip of coils
- You get the aesthetic versatility of box braids with more scalp protection than traditional loose braids
- This style dries faster than tightly packed cornrows because of increased air circulation
- It’s easier to moisturize your scalp because the braids are separated, allowing product penetration
Pro tip: This style works beautifully with or without extensions. Your natural hair alone can create thick, full-looking braids in this grid pattern, especially if you have dense Type 4 hair.
9. Cornrows with Shaved or Tapered Sides
This style combines protective cornrows with a clean, modern aesthetic. You cornrow the top and crown of your head while keeping the sides shaved, faded, or tapered short. It’s a bold statement that works beautifully on any face shape and lets your cornrow artistry become the focal point.
Why This Look Works So Well
Shaved or tapered sides create stark contrast with your cornrows, making the braids appear more sculptural and intentional. It’s a genuinely protective style because you’re not putting any tension on the hair you do have, and the clean sides look polished and intentional. The low-maintenance sides also mean less styling time overall.
Maintenance Considerations
- Your sides will need touch-ups every two to four weeks depending on how fast your hair grows and how defined you want the fade
- The cornrows on top last longer (three to four weeks) because they’re not being disturbed by styling the sides
- Protect your edges with a nighttime bonnet or scarf, especially the hairline where the cornrows meet the tapered sides
- Keep the tapered areas moisturized with a lightweight oil or cream to prevent dryness
Worth knowing: If you’re nervous about cutting your hair that short, start with a taper rather than a full shave. A taper gives you the visual impact while preserving some length as it grows back.
10. Cornrows with Bangs
Cornrows styled with bangs create a playful, youthful vibe that works whether you’re going for edgy and bold or soft and romantic. You can create bangs in several ways: by leaving a section of unbraided hair in front, by braiding that front section into mini cornrows, or by creating a braided bang accent.
Creating Bangs That Work with Type 4 Hair
Leave a three to four-inch section of hair unbraided across your forehead, parallel to your hairline. Let this section curl naturally in its own coil pattern, or braid it into mini cornrows that sit above your regular cornrows. The bangs create a frame for your face and add visual interest to the overall style. You can style them sleek with gel or let them be textured and free.
Styling Options
- Straight, defined bangs using a smoothing gel create a sleek, polished contrast to your regular cornrows
- Textured, coily bangs that match your natural curl pattern feel soft and romantic
- Mini cornrows in the bang section create an intricate, artistic look
- You can cover the bangs with a scarf or headwrap if you want to switch up the look without redoing your entire braid
Pro tip: Bangs are a great way to experiment with the cornrow style if you’re not sure about committing to a full head of braids. You can have bangs with cornrows for a few days, then style your whole head of cornrows without them. It gives you flexibility.
11. Spiral Cornrows for Texture and Dimension
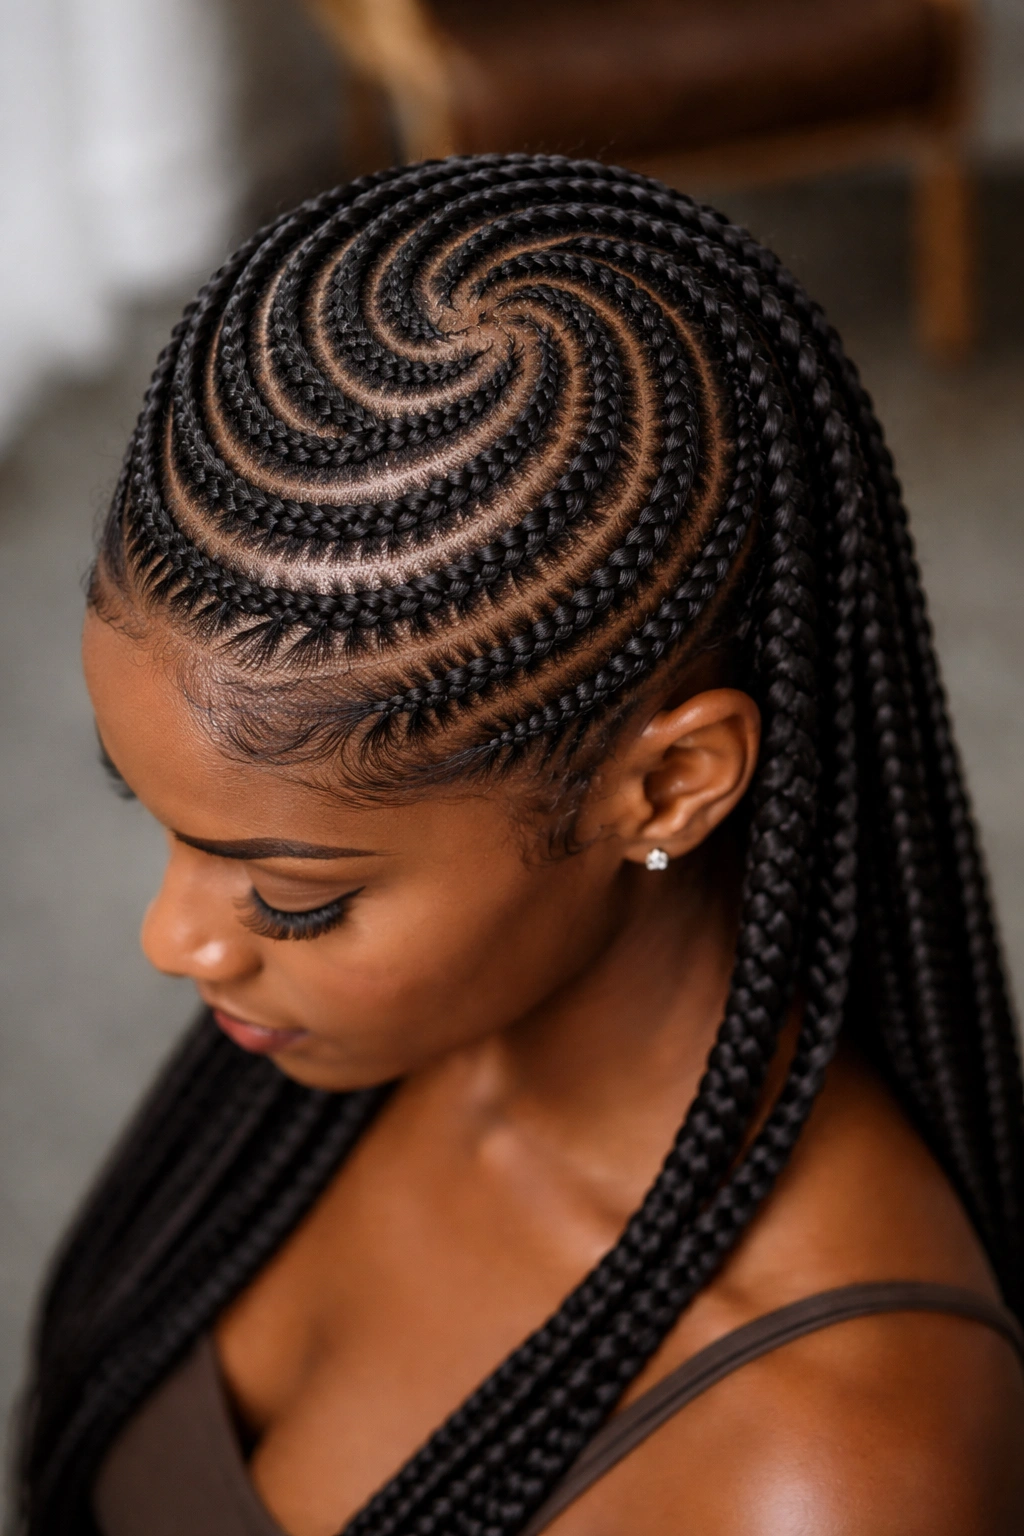
Spiral cornrows follow a twisting, circular pattern instead of straight lines down the scalp. They’re more intricate and require more skill to execute, but the result is absolutely stunning—especially on Type 4 hair where the texture adds extra visual depth to the spiraling pattern.
How Spiral Cornrows Are Created
Instead of braiding straight down your scalp, you braid in a circular or spiral motion around a central point. You might start at the crown and spiral outward, or start at the edge of your head and spiral inward toward the center. Each spiral is its own contained braid, creating a unique three-dimensional effect.
Why Type 4 Hair Benefits from Spirals
The coily texture of Type 4 hair makes spiral cornrows look more defined and dimensional than they would on straighter hair. The natural curl pattern adds movement and visual interest to the already intricate spiral design. Light hits the spirals differently than it would hit straight cornrows, creating more shadow and dimension in your hair.
Installation Reality Check
- Spiral cornrows take significantly longer to install than straight cornrows (often two to three times longer)
- You definitely need an experienced braider to execute this style well—it’s not a beginner braid
- The payoff is a genuinely artistic, conversation-starting style that looks like wearable sculpture
- Spirals last about three to four weeks depending on how tightly they’re braided
Insider note: If you’re considering spirals, budget both time and money accordingly. This is a skilled art form, and skilled braiders should be compensated for the expertise and hours involved.
12. Cornrows into Twisted or Braided Crowns
This style creates a crown effect by cornrowing sections around your head like a halo, then gathering the ends into a twisted or braided crown at the back. It’s elegant, protective, and genuinely stunning—perfect for special occasions or whenever you want to feel polished.
Creating the Crown Effect
Cornrow sections starting at one temple and following the curve of your head toward the other temple. You can do two parallel rows or several rows that converge toward the back. Once your cornrows reach the nape of your neck, take all the braid ends and twist or braid them together, forming a crown at the back of your head. Secure with bobby pins and style the twisted crown however you like.
Occasion Versatility
- Wedding guest? This style is elegant and clearly intentional
- Date night? The crown gives you a romantic, special-occasion vibe
- Work presentation? Cornrows into a crown reads polished and professional
- Festival or event? You can add beads, gold cuffs, or colorful thread to make it more festive
Pro tip: Add a few small flowers or decorative pins to your crown for extra glamour. The braided texture of cornrows is the perfect foundation for delicate accessories.
13. Cornrows with Colorful Thread Accents
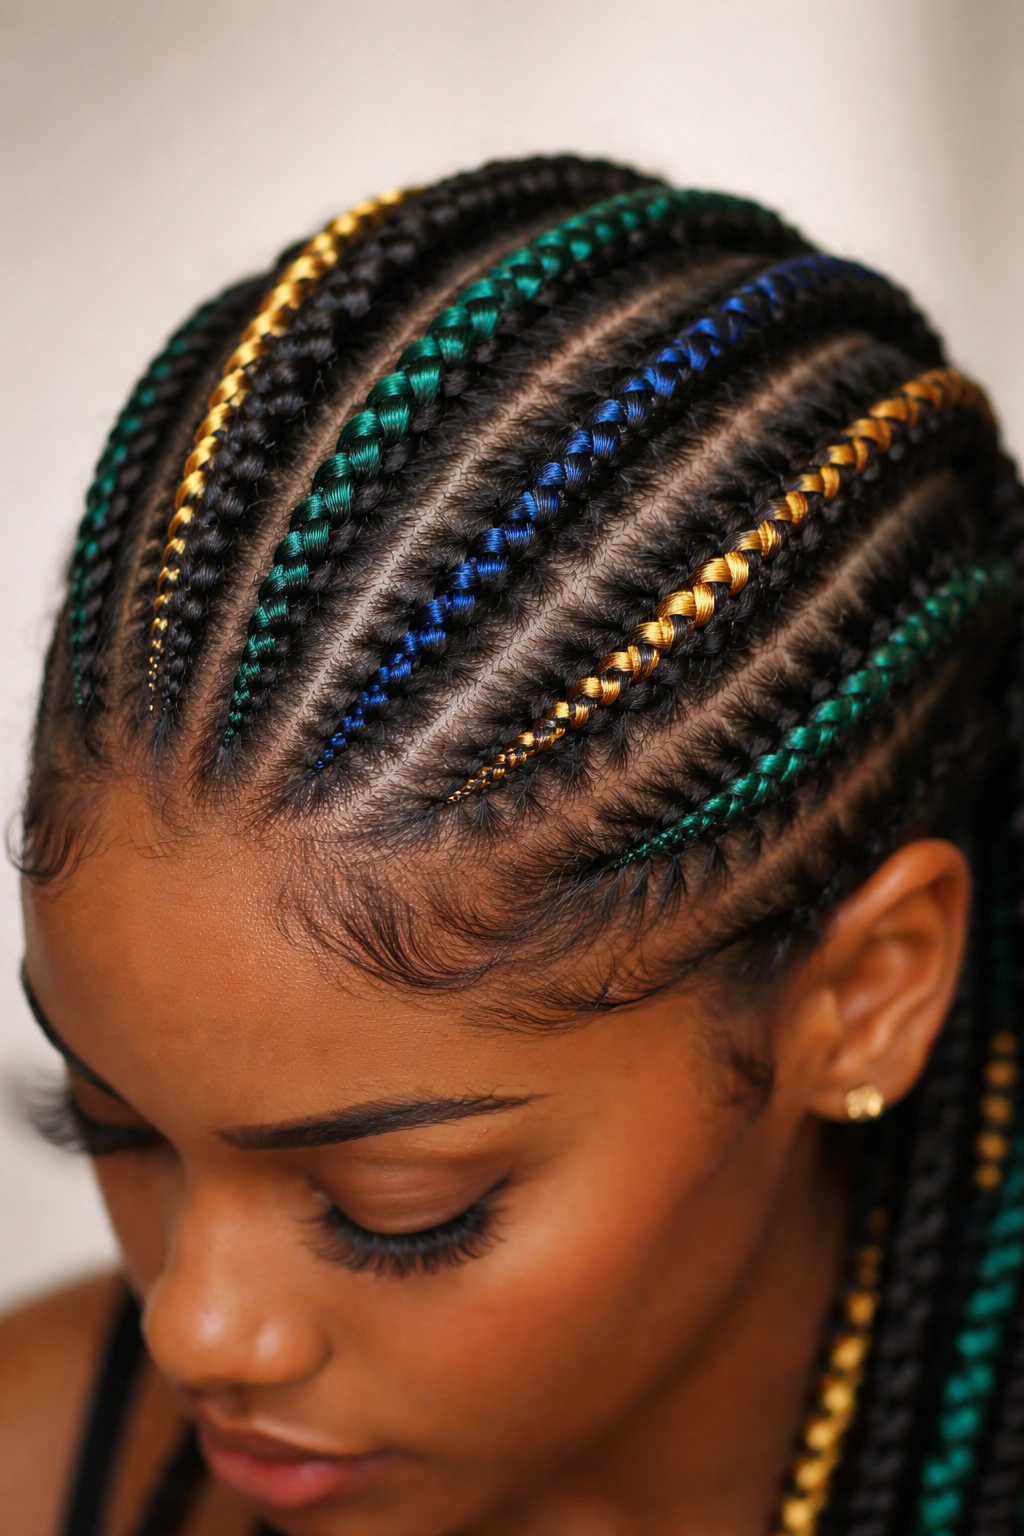
Wrapping thread, yarn, or embroidery floss around your cornrows is one of the easiest ways to customize your style, add visual interest, and express your personal taste. Type 4 hair with cornrows provides the perfect textured foundation for thread accents—they stay in place beautifully and create striking color contrast.
Selecting and Applying Thread
Choose embroidery floss, yarn, or specialized braiding thread in colors that complement your complexion or match your outfit. Wrap the thread tightly around each cornrow as you’re braiding (so it’s integrated into the braid), or wrap it around completed cornrows by threading a needle and weaving the thread through the braid structure. You can wrap the entire braid or just certain sections.
Color Combinations That Pop
- Gold or bronze thread on natural dark hair creates timeless elegance
- Jewel tones (emerald, sapphire, ruby) add richness and depth
- Pastels (rose gold, lavender, pale pink) create a softer, dreamy aesthetic
- Multicolored thread woven throughout creates a playful, artistic vibe
- Metallic threads catch light beautifully and make your braids sparkle
Worth knowing: Thread adds minimal weight and doesn’t require you to leave it in indefinitely. You can remove it whenever you want, or replace it with new colors to refresh your look without redoing your braids.
14. Sleek Low Cornrows into a Side Ponytail
This final style is understated, elegant, and genuinely protective. You cornrow your entire head using sleek, tight braids, then gather all the braids on one side of your head into a low ponytail. The result is polished, wearable for any occasion, and takes advantage of cornrows’ protective benefits.
Installation for the Sleek Look
Create cornrows using a lightweight gel to smooth your hair and keep everything sleek. You want each braid to be smooth and close to the scalp, without flyaways or frizz. Depending on your head size and preference, create four to eight cornrows. Once complete, gather all the braids on one side of your head (usually at ear level or slightly lower) and secure them into a low ponytail with a hair tie.
Why This Works as Your Go-To Style
- Genuinely versatile—you can wear it to the gym, to work, on a date, or to a casual hangout
- The cornrows stay protected longer because the ponytail positioning doesn’t create additional stress points
- Sleeping with a silk or satin bonnet keeps everything neat, and the style looks fresh for days
- You can adjust the height and side of the ponytail to suit different outfits and occasions
Pro tip: Wrap a piece of thread or a thin scarf around the base of your ponytail for a finished, intentional look. This small touch elevates a simple style into something that looks deliberately styled.
Final Thoughts
Cornrows for Type 4 hair are so much more than a protective style—they’re a genuine canvas for creativity, self-expression, and celebrating the beauty of your natural texture. The right cornrow style makes your hair feel secure, allows your scalp to breathe, and can last weeks while looking fresh and intentional. Whether you’re drawn to classic two-strand simplicity, intricate spiral designs, colorful thread accents, or protective feeding techniques, there’s absolutely a cornrow style that matches your aesthetic and your hair’s specific needs.
What matters most is finding a skilled braider who understands Type 4 hair, understands protective styling, and genuinely cares about the health of your edges and scalp. A good braider won’t braid so tight that your head aches, won’t pull aggressively on your hairline, and will take the time to create braids that work with your texture, not against it. If you’ve had bad experiences with cornrows in the past, it might have been the braiding technique rather than the style itself.
Take your time choosing which style calls to you, save reference photos to show your braider, and don’t hesitate to communicate about comfort level and concerns. Your hair’s health always comes first, and any style—no matter how beautiful—isn’t worth the damage. Once you find your favorite cornrow style and the right braider, you’ll have a protective, gorgeous, low-maintenance look that you’ll want to wear again and again.