Cornrow updos are having a major moment, and for good reason—they’re protective, stylish, and incredibly versatile for medium-length hair. The beauty of combining cornrows with an updo is that you get the best of both worlds: intricate braiding that keeps your ends protected while elevating your look from casual to elegantly polished. Whether you’re heading to a special event, want a hairstyle that lasts through the week, or simply need something that keeps your hair off your face without sacrificing style, cornrow updos deliver.
The thing is, medium-length hair sits in this sweet spot where updos actually work beautifully. Your hair has enough length to create volume and dimension, but not so much that updos become heavy or feel like too much. Medium hair also gives you real flexibility—you can experiment with different braid thicknesses, incorporate additional texture, add accessories, and play with crown placement in ways that shorter or longer hair sometimes can’t quite pull off.
What makes cornrow updos special is how they transform a protective style into something you’d genuinely want to wear even if you weren’t thinking about hair health. These aren’t just functional braids tucked away—they’re statement hairstyles that showcase your creativity, your confidence, and your willingness to invest time in looking polished. If you’ve been scrolling through inspiration and feeling overwhelmed by where to start, these 20 styles will give you concrete options to try, complete with the specific techniques and styling tips that actually make a difference.
1. The Crown Cornrow Bun with Loose Curls
This style wraps cornrows around your crown like a tiara, with the remaining hair released into soft, bouncy curls at the back. It’s elegant without feeling overdone, making it perfect for brunches, work events, or date nights. The contrast between the sleek braids and the texture of the curls creates visual interest that photographs beautifully.
Why This Works for Medium Hair
Medium length gives you enough hair to create that full, voluminous cloud of curls at the back without it looking sparse or unbalanced. The cornrows act as an anchor, keeping everything in place throughout the day while the curls move freely and add dimension. This balance is harder to achieve with shorter hair and feels less intentional with longer hair.
How to Style It
- Divide your hair into three sections: cornrows that will wrap the crown, and the remaining hair that becomes curls
- Create two to three cornrows that start at one temple, wrap around the back of your head, and end near the opposite ear
- Release the bottom section and apply heat with a curling iron, creating spirals that sit at the nape and fall down the back
- Secure with bobby pins tucked under the cornrows so they’re invisible
- Finish with light hairspray to hold curls without crunchiness
Pro tip: Prep the section you plan to curl with heat protectant spray and a light mousse the night before—your curls will hold longer and look bouncier.
2. Cornrows into High Pony Knot
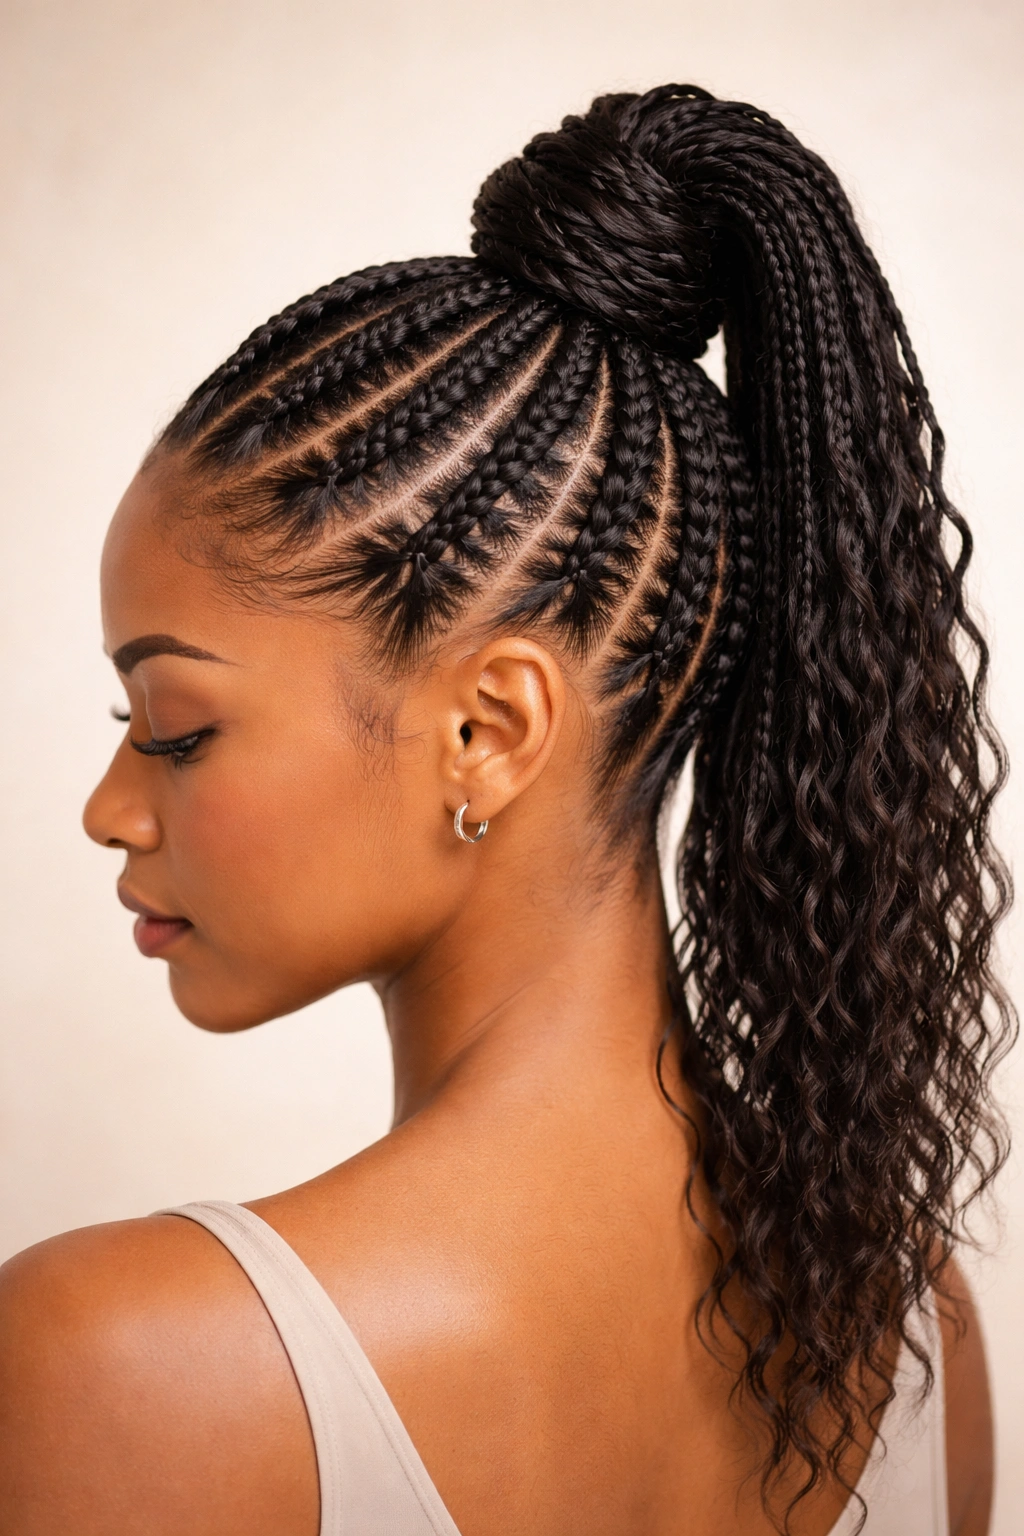
This style braids the hair away from the face in multiple cornrows that feed directly into a high ponytail, then you twist or knot that ponytail at the base for dimension. It’s sporty meets elegant, surprisingly easy to execute, and works for everything from gym sessions that turn into errands to casual office days.
What Makes It Stand Out
The knot at the base of the ponytail does serious visual work—it transforms a simple pony into something intentional and styled. You’re not just pulling hair back; you’re creating a focal point that draws the eye upward and makes the whole style feel more deliberate.
Styling Steps
- Create cornrows from your front hairline toward the crown, angling them so they all meet at one high point
- Gather all the braided sections plus loose hair into a high elastic
- Divide the ponytail in half and wrap one section around the other, creating a knot shape
- Pin the knot down with bobby pins and tuck them under the wrapped section
- Leave one or two face-framing pieces loose if you want softness
Worth knowing: This style holds better if you use a thicker elastic and weave bobby pins through the knot itself rather than just securing from underneath.
3. Side-Swept Cornrow Updo with Twisted Tail
Cornrows create a diagonal pattern across the head, meeting at the back where they’re twisted and wrapped into a low bun on the side. This asymmetrical approach feels modern and flattering on most face shapes because the diagonal lines are naturally lengthening.
The Real-World Advantage
Side-swept styles photograph incredibly well and feel special enough for events while being casual enough for everyday wear. The twisted tail element means your bun won’t be completely tight at the base—there’s movement and texture that read as less severe than a standard bun.
Building This Look
- Section your hair diagonally from one temple toward the opposite ear
- Create thick cornrows that follow the diagonal pattern from front toward back
- At the nape, gather all the braided hair plus the remaining loose sections
- Twist the entire gathered section and wrap it around itself to create a side bun
- Secure with bobby pins and add a decorative pin or cuff for polish
- Pull a few face-framing pieces to soften the overall look
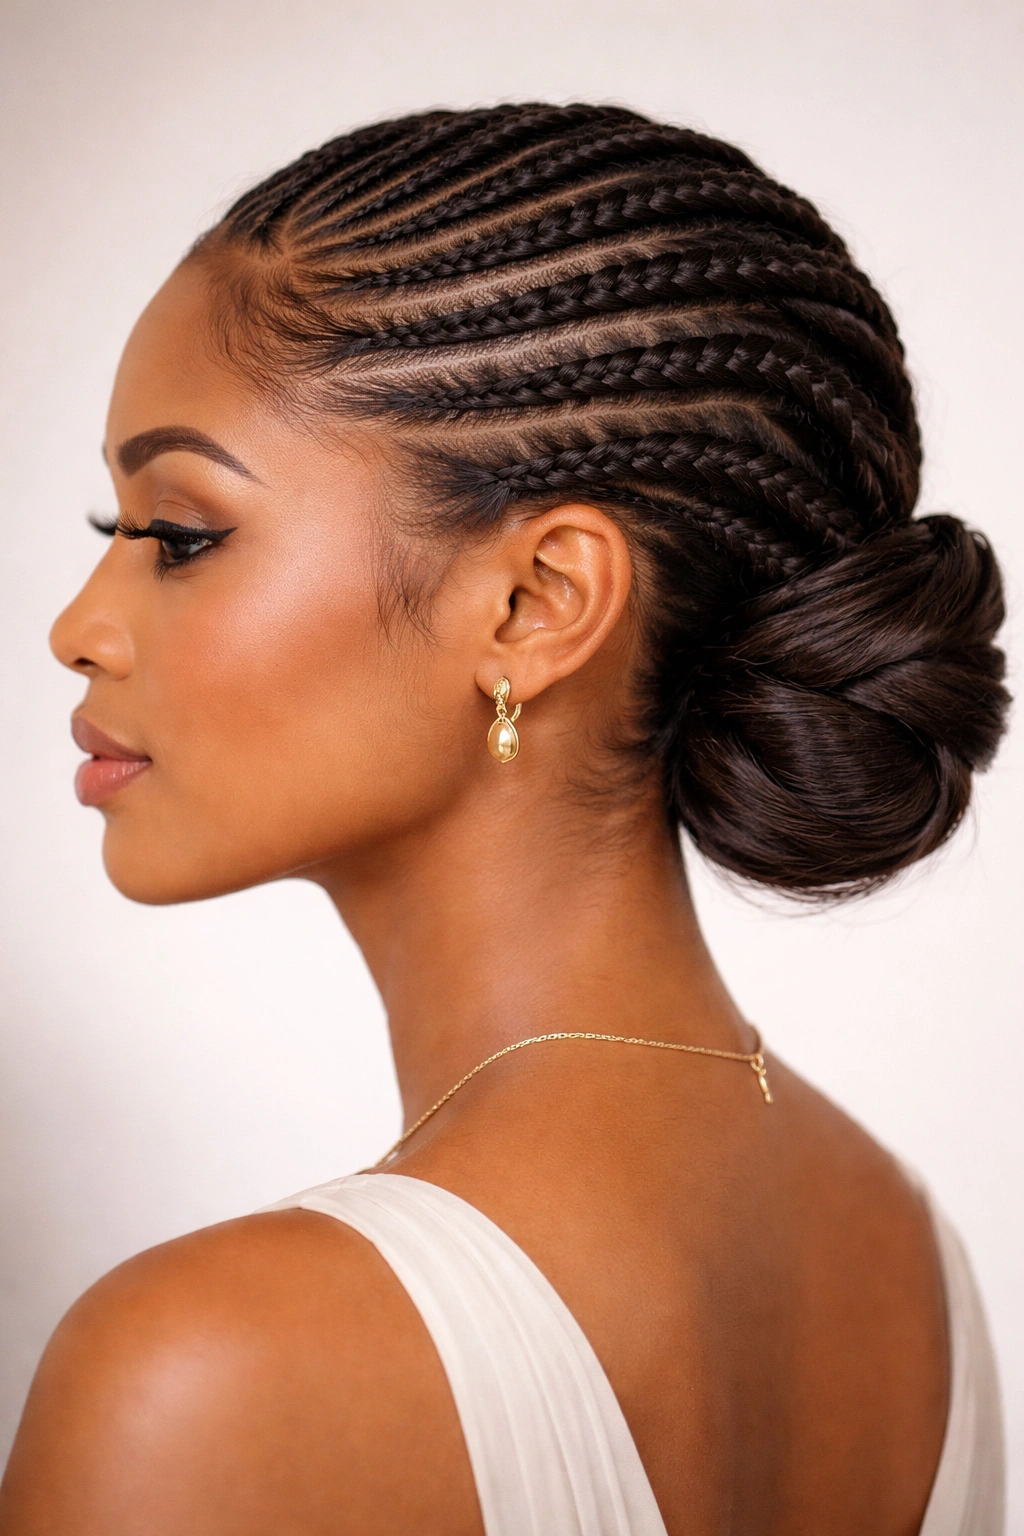
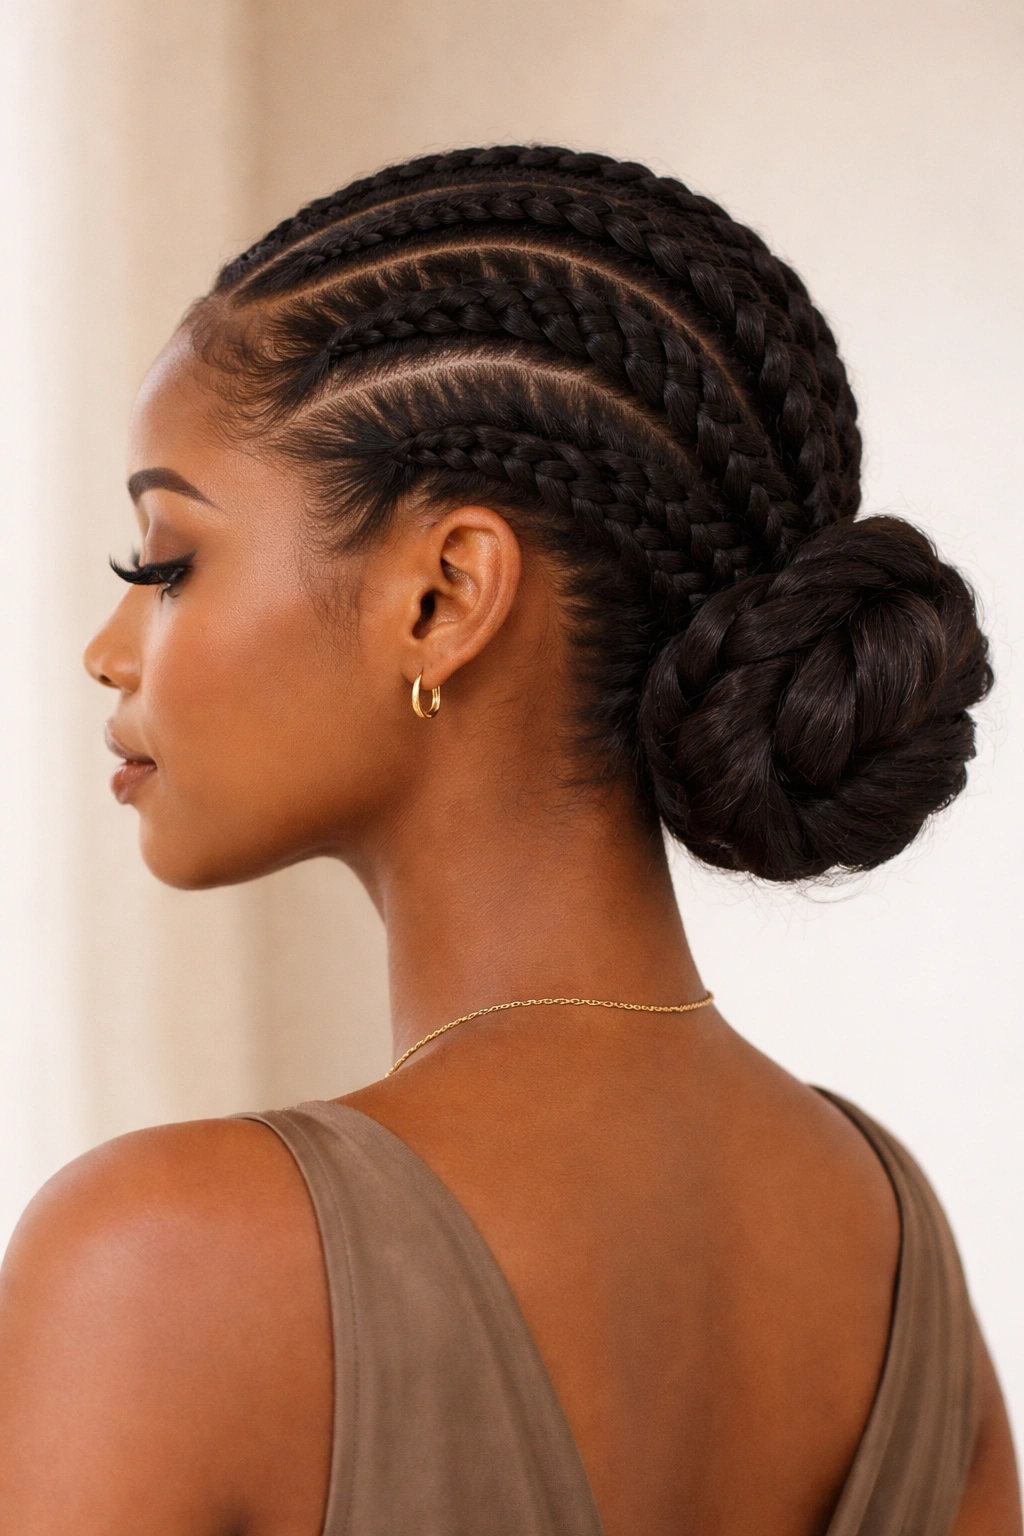
4. Double Cornrow Updo with Center Part
Two thick cornrows run from your front hairline down the center and back of your head, where they’re released and loosely coiled into a low bun at the nape. The center-part placement is inherently balanced and works beautifully as a frame for your face.
Why This Approach Works
Double cornrows down the center create a clear focal line that’s visually grounding. For medium hair, this thickness reads as intentional rather than sparse, and the two-braid symmetry feels structured without being rigid. It’s the kind of style that looks more complex than it actually is, which is always a win.
Step-by-Step Process
- Create a clean center part from your hairline to the crown
- Braid two thick cornrows, one on each side of the part, starting at the front and moving straight back
- Let both braids end around mid-crown and release the remaining length
- Gather all the unbraided hair at the nape and twist it loosely
- Wrap the twisted section around itself and pin into a low, relaxed bun
- Let some of the twisted texture show—don’t make it too neat
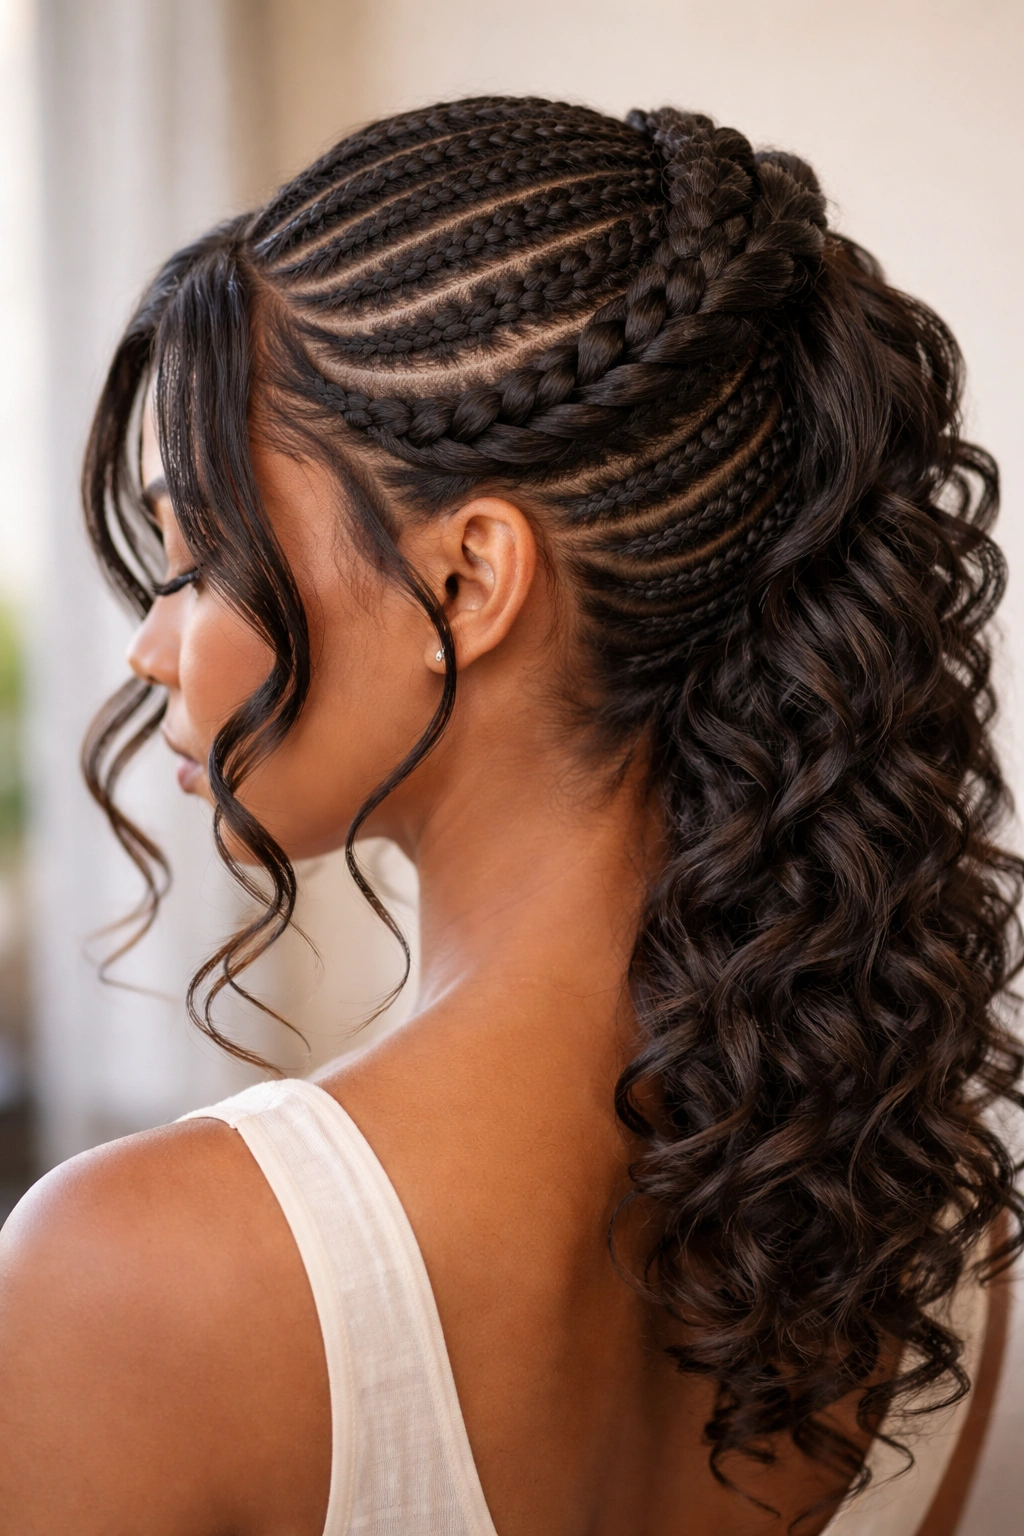
5. Feed-In Cornrows to Bubble Bun
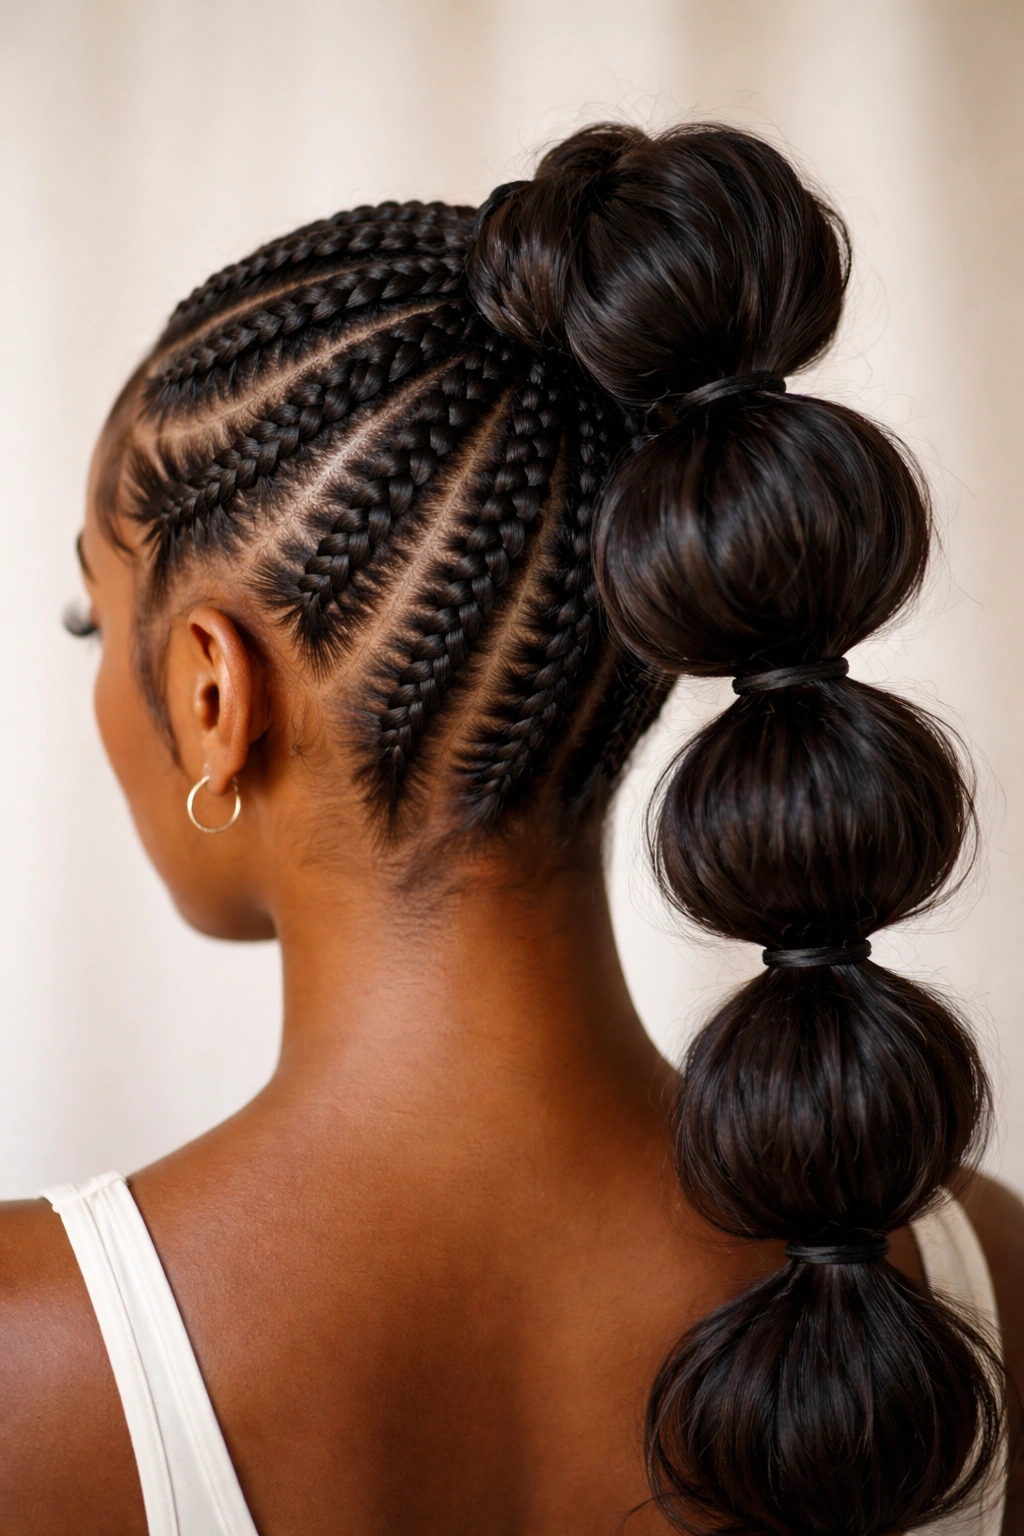
Feed-in cornrows, where you gradually incorporate loose hair as you braid, create a softer look than traditional cornrows. These feed into a high ponytail that you’ll divide into three or four sections, binding each with a small elastic to create “bubbles” of hair.
What Makes It Different
Feed-in cornrows feel lighter and less severe because they don’t start at the scalp—the loose hair at the base makes them blend seamlessly with your natural texture. The bubble sections at the top add a playful dimension that’s trending and genuinely pretty without being precious.
Creating the Look
- Decide how many cornrows you want (typically two to four)
- Create feed-in cornrows by holding a small section of loose hair alongside your braid strand and incorporating it gradually as you work downward
- Bring all cornrows to a high point and secure with an elastic
- Divide the ponytail into even sections—ideally three or four
- Wrap a small elastic around each section, positioned about two inches apart
- Gently pull each bubble section upward and outward to create volume
- Pin secured bubbles down if needed to keep them in place throughout the day
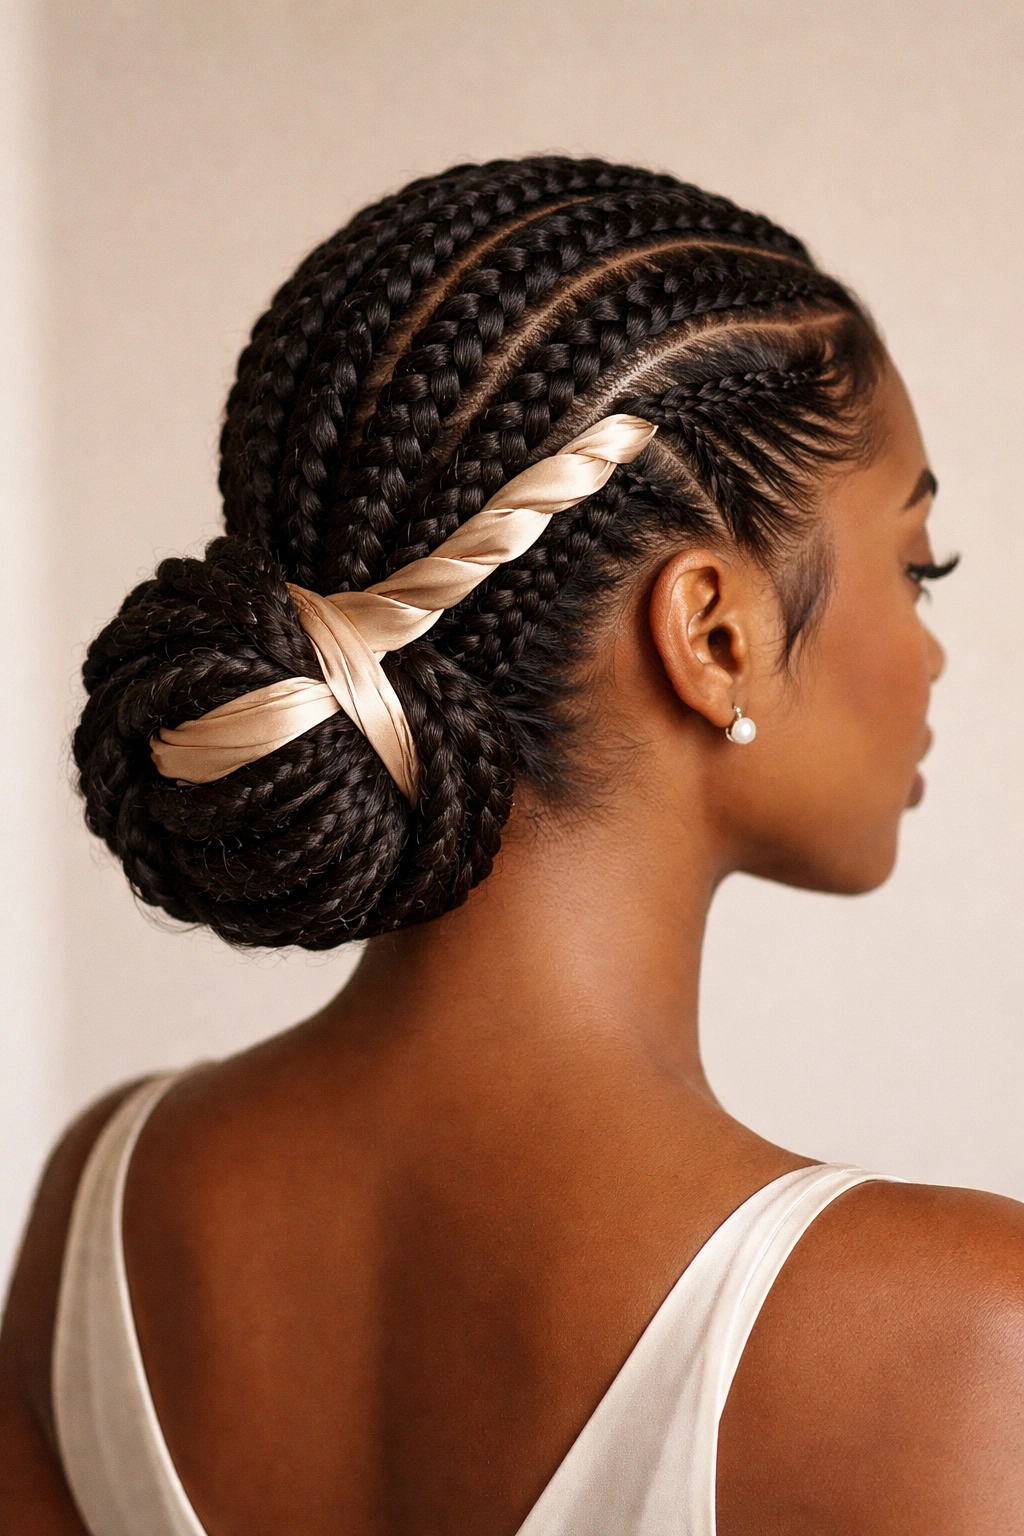
6. Cornrows with Wraparound Low Bun
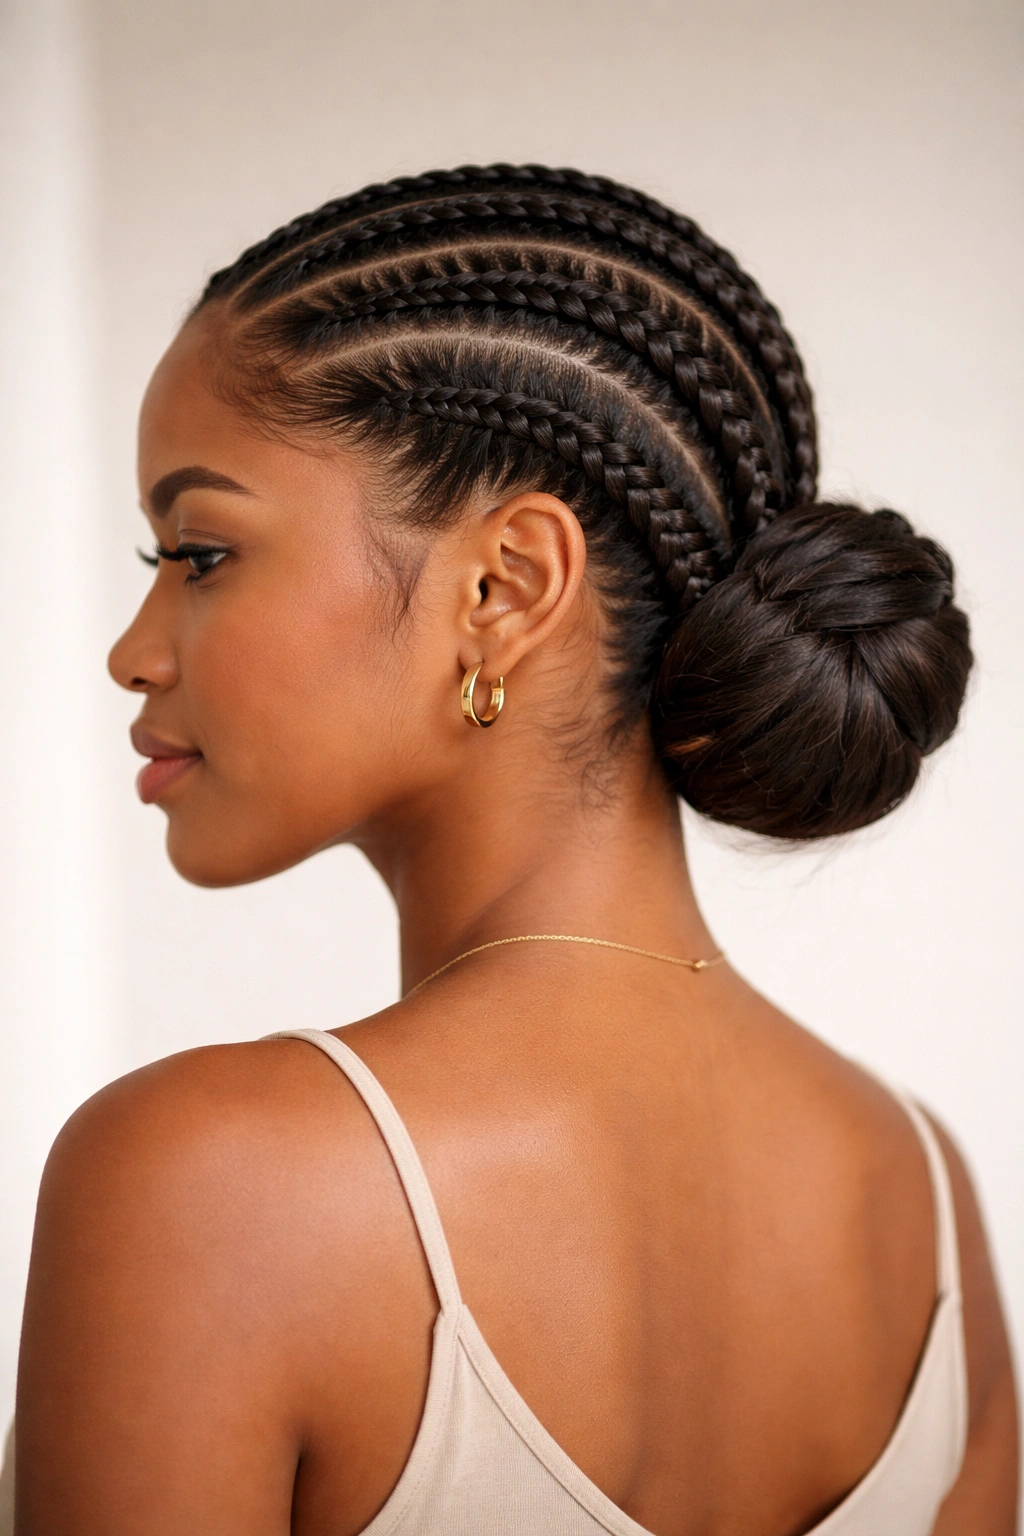
This style creates one or two thick cornrows that frame the sides of your face, then all hair is gathered into a wrapped low bun where the remaining length is wound around the base. It’s romantic without being fussy, and the bun feels sculptural rather than flat.
How It Compares to Other Styles
Unlike simple cornrow buns where braids feed directly into a bun, this version emphasizes the wrap—the texture of that wound hair becomes part of the design. It takes the same amount of effort but reads as more intentional and fashion-forward.
Building Your Wrapped Bun
- Create one thick cornrow on each side of your head, starting near the temple and braiding straight back
- Gather all hair at the nape, including both braids, into a low, loose ponytail
- Divide the ponytail into two sections
- Twist both sections around each other, creating a rope effect
- Coil the rope around the base of the ponytail and pin securely
- Tuck the end of the rope underneath and pin so it’s hidden
- Add bobby pins as needed to maintain the spiral shape
Insider note: The looser your initial ponytail, the fuller and more beautiful your wrapped bun will be.
7. Starburst Cornrow Crown with Bun
Imagine cornrows radiating outward from a center point at the crown, all meeting at the base of your head where they’re coiled into a bun. It’s geometric, bold, and completely unique. Medium hair has just enough length to make this pattern clear without the bun being unwieldy.
The Science Behind It
When you create lines that radiate from a central point, you’re creating movement and visual interest even though the style is technically low-maintenance. The bun at the base becomes a natural gathering point rather than feeling like an afterthought.
Execution Details
- Divide your head into six to eight sections radiating outward from a point at your crown (imagine slicing a pie)
- Create one thick cornrow in each section, braiding from the crown outward toward your hairline
- Gather all the braids at the nape and secure with a sturdy elastic
- Take the entire gathered section and twist it loosely
- Coil the twisted hair around the elastic to form a bun
- Use bobby pins to secure the bun shape and tuck any loose ends underneath
- This is great for events because the geometric pattern is really striking
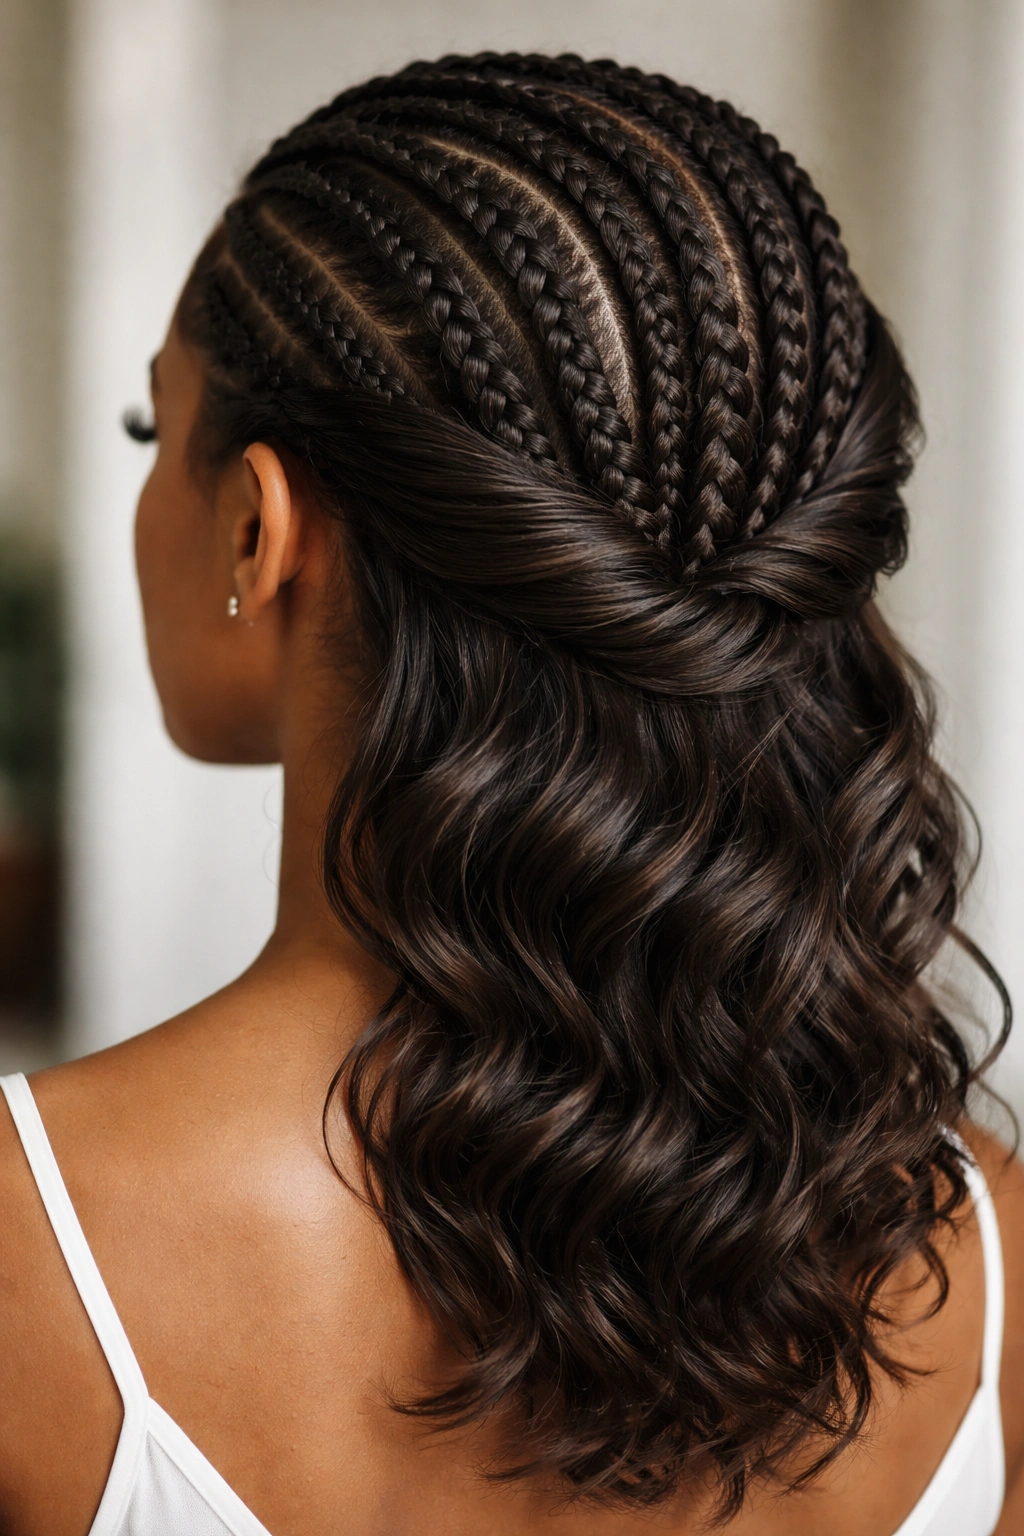
8. Cornrows with Half-Up, Half-Down Release
Two or three cornrows frame your face and gather into a half-up section at the back of your crown, leaving the lower portion of your hair down and wavy. It’s the perfect balance for days when you want control without committing to a full updo.
Why This Works
Half-up styles extend the lifespan of whatever length you have because they don’t pull all your hair back. With medium hair, you get the visual benefit of cornrows framing your face while maintaining softness and movement through the ends. It reads as polished without feeling formal.
How to Build It
- Create two or three cornrows starting at your hairline and braiding them straight back
- Bring the braids to a half-up gathering point about two inches below your crown
- Secure with an elastic that matches your hair color
- Leave all hair below this point down and loose
- Style the down section with waves or curls depending on your preference and hair texture
- Pull out a few face-framing pieces around your temples for softness
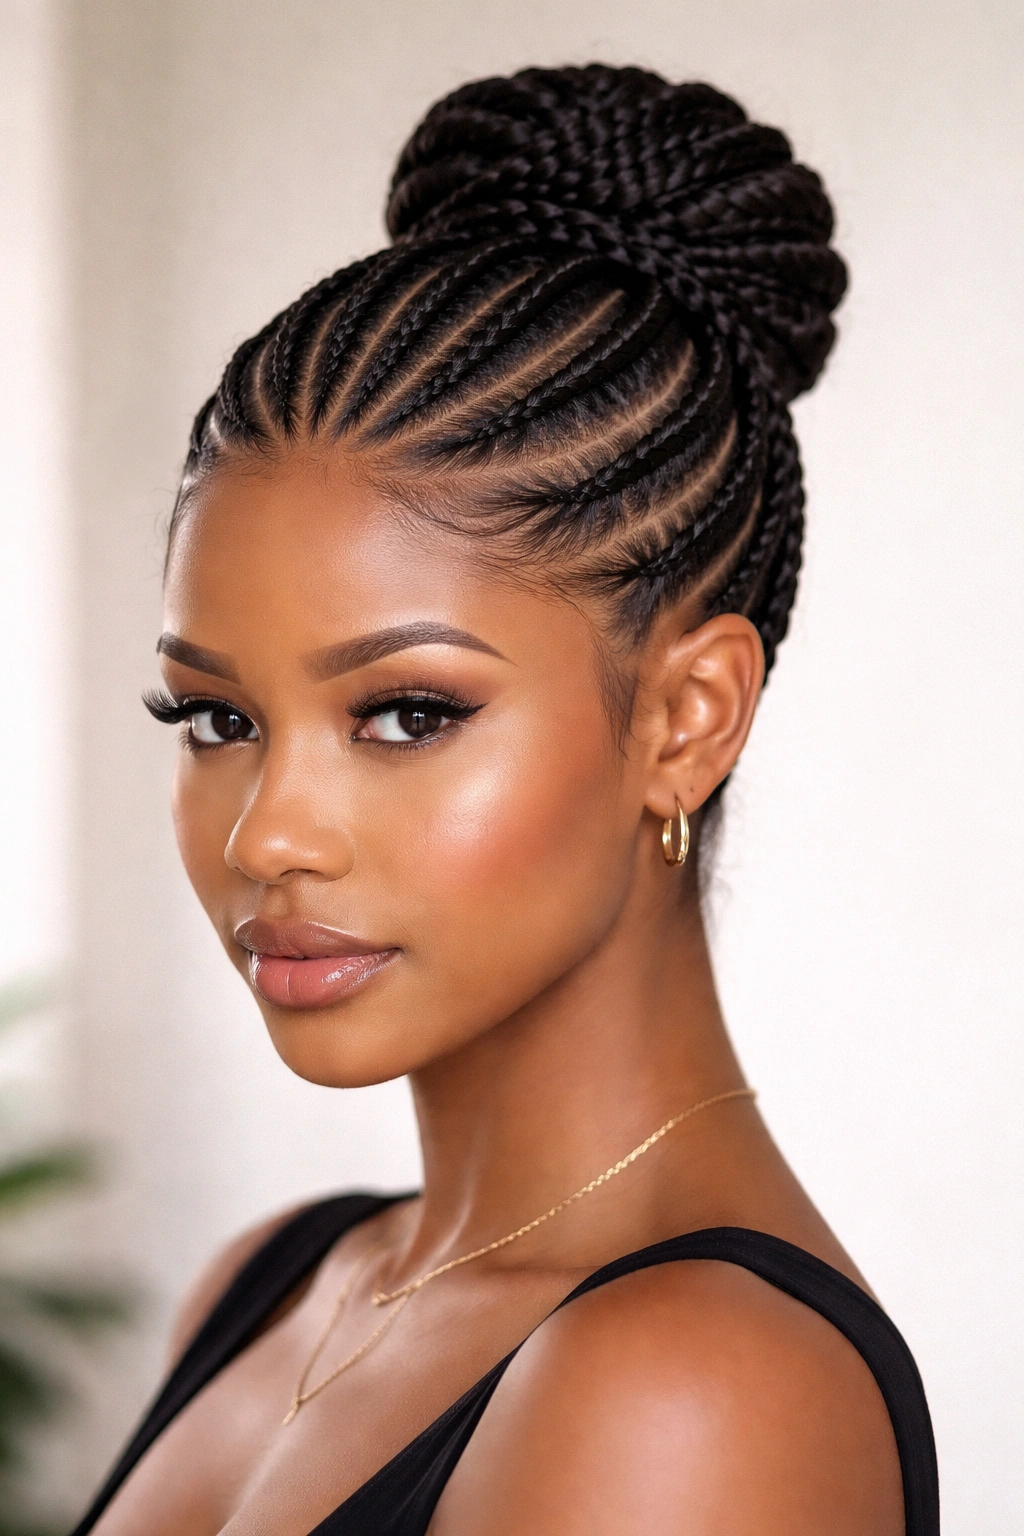
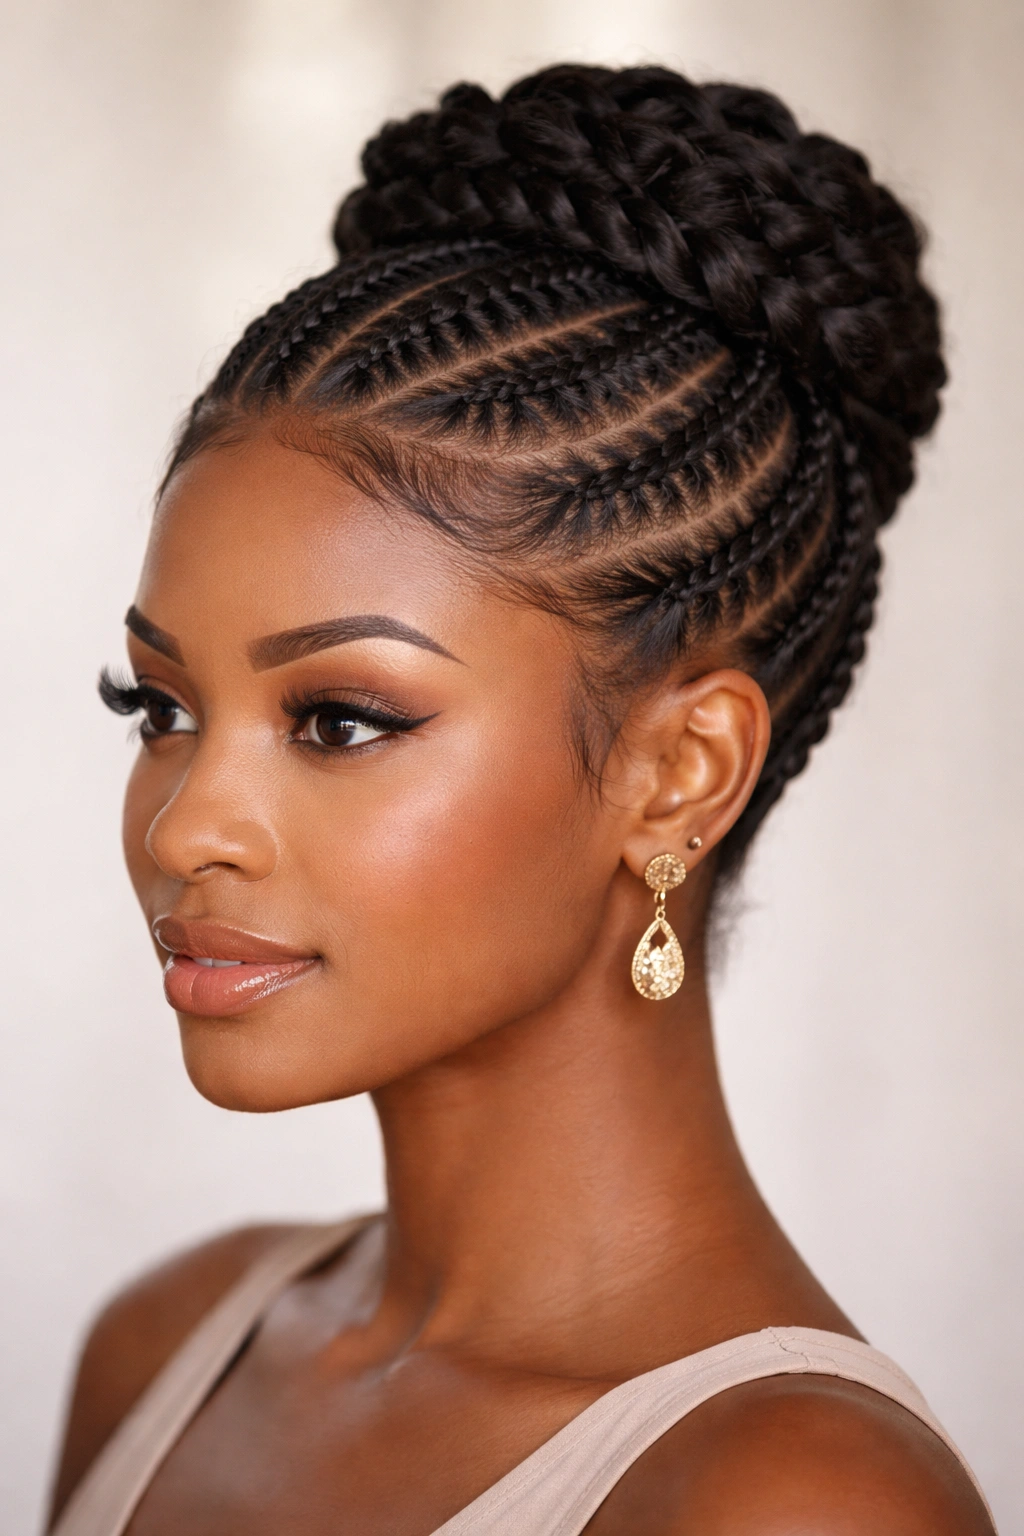
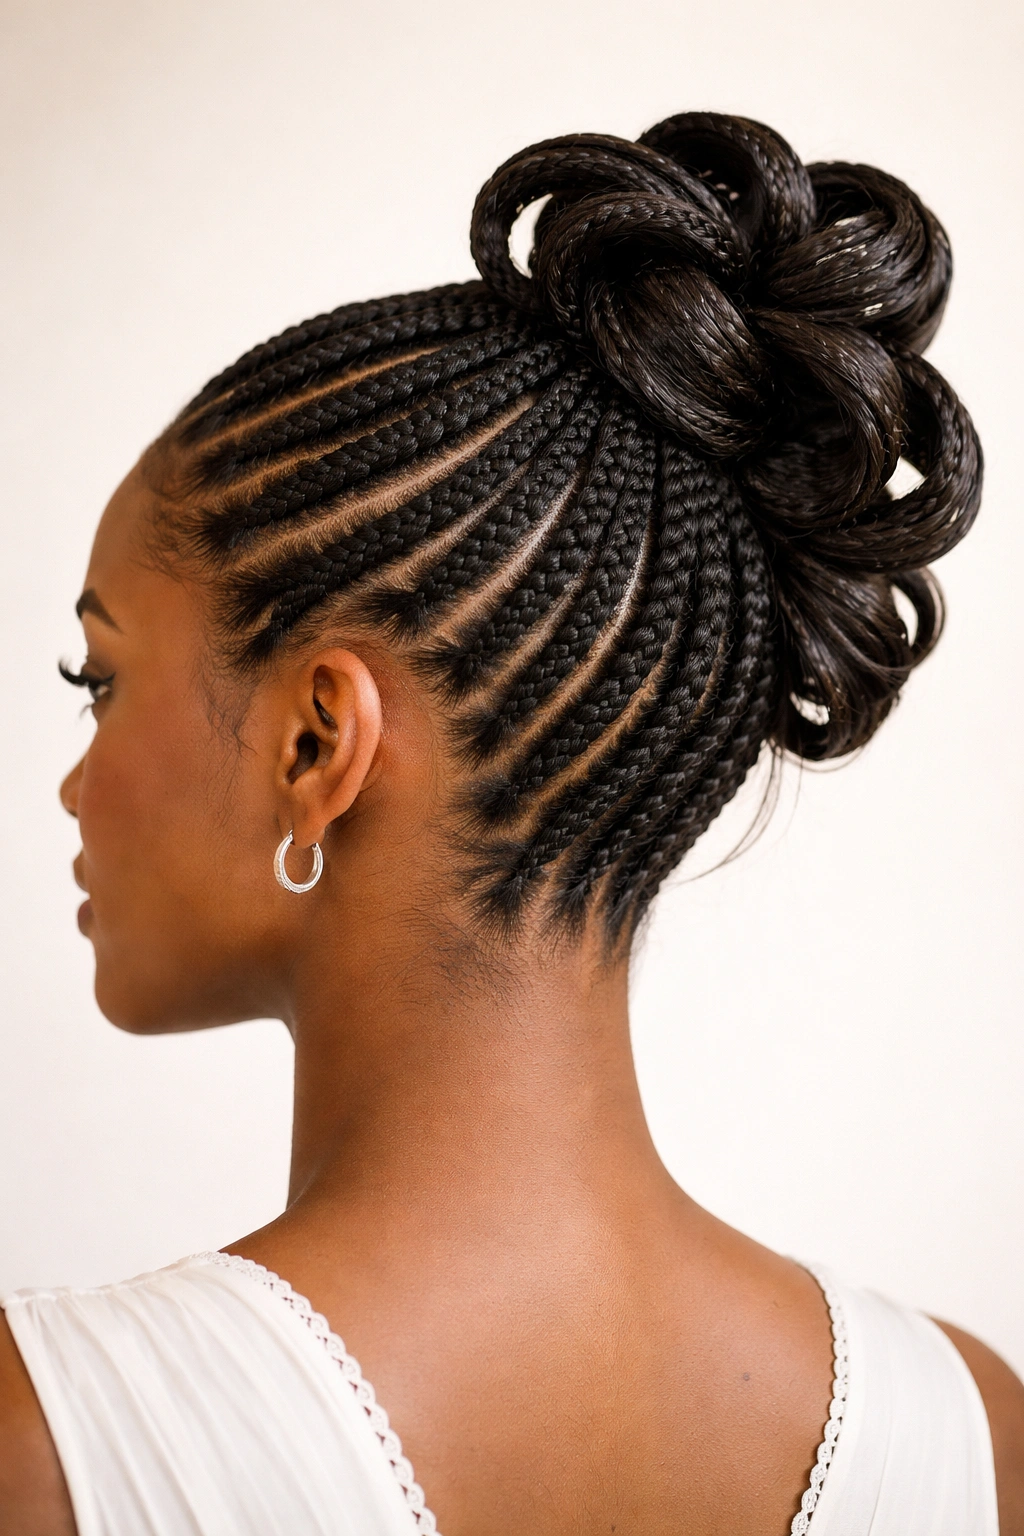
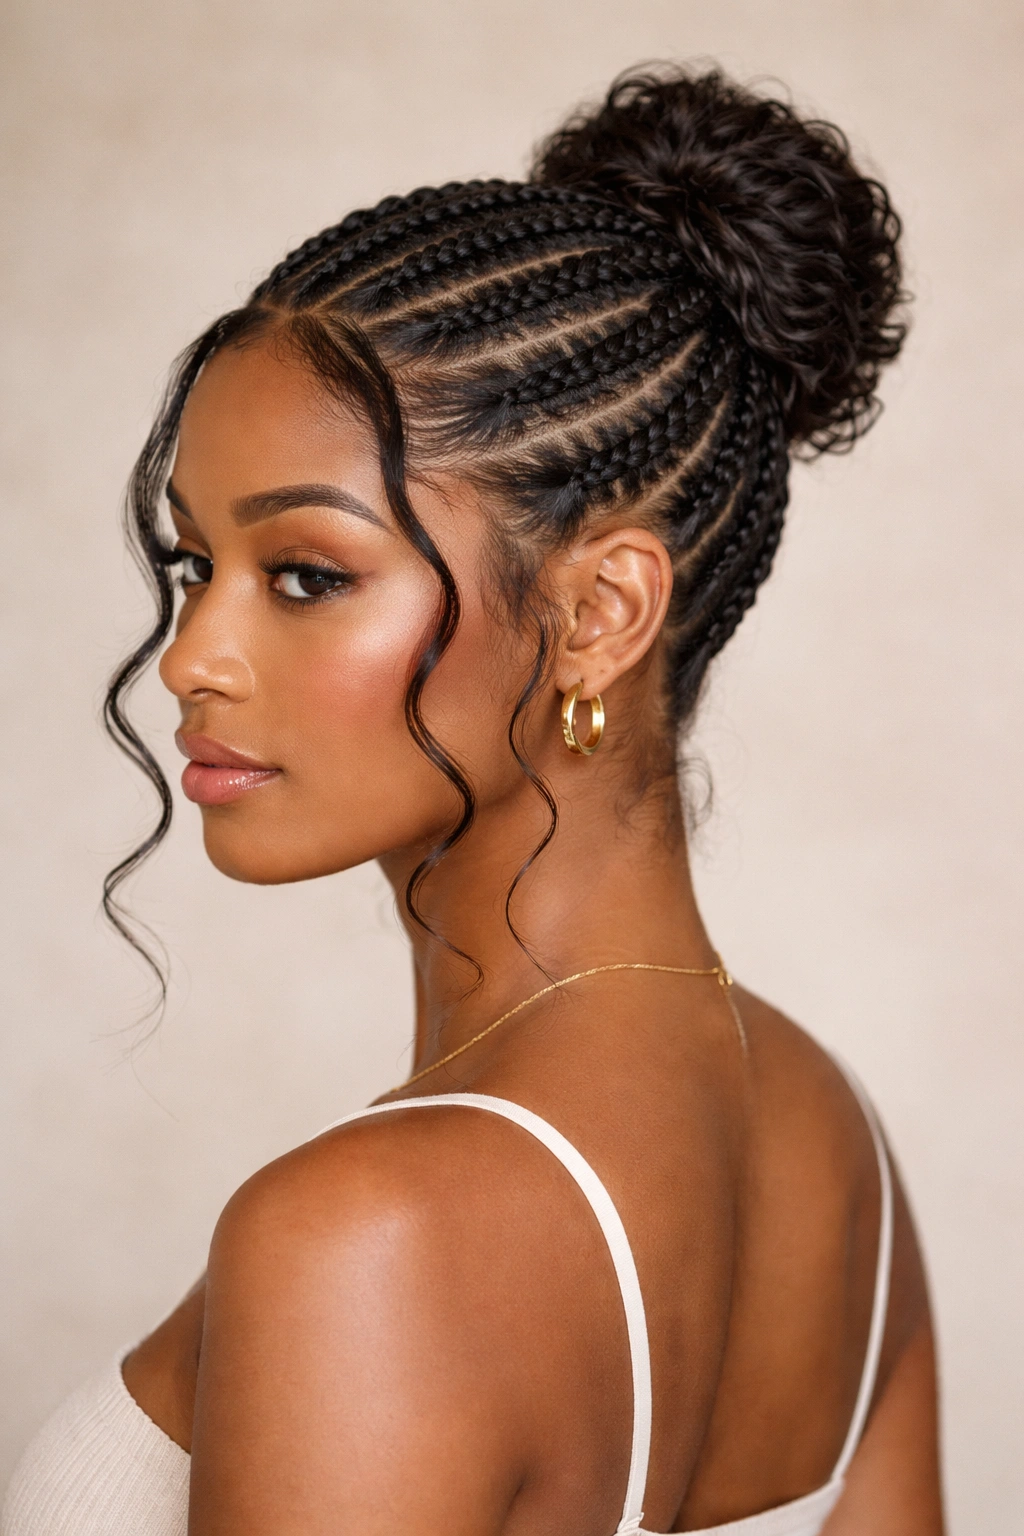
9. Cornrow Spiral into Coiled Topknot

Imagine a single thick cornrow that spirals around your entire head, starting at one temple and gradually moving upward until it reaches the crown, where the remaining hair is coiled into a topknot. This is architectural and modern, perfect for anyone who wants to look effortlessly polished.
What Makes It Stand Out
This style has clear visual movement—your eye follows the spiral pattern from start to finish. The topknot placement at the very crown makes it read as intentional and styled, not like you just threw your hair up.
Creating the Spiral
- Start your cornrow at the front of your head near your temple
- Braid in a spiral pattern, gradually moving backward and upward around your head
- As you spiral, you’re naturally incorporating more hair and moving toward the crown
- Once you reach the crown, release the remaining length and coil it into a tight topknot
- Pin the entire coil down with bobby pins positioned at multiple angles for security
- Use a small elastic under the coil to anchor it before pinning
- This style is perfect when you want height because the topknot sits right at the crown
10. Zigzag Cornrows Meeting at a Low Pony
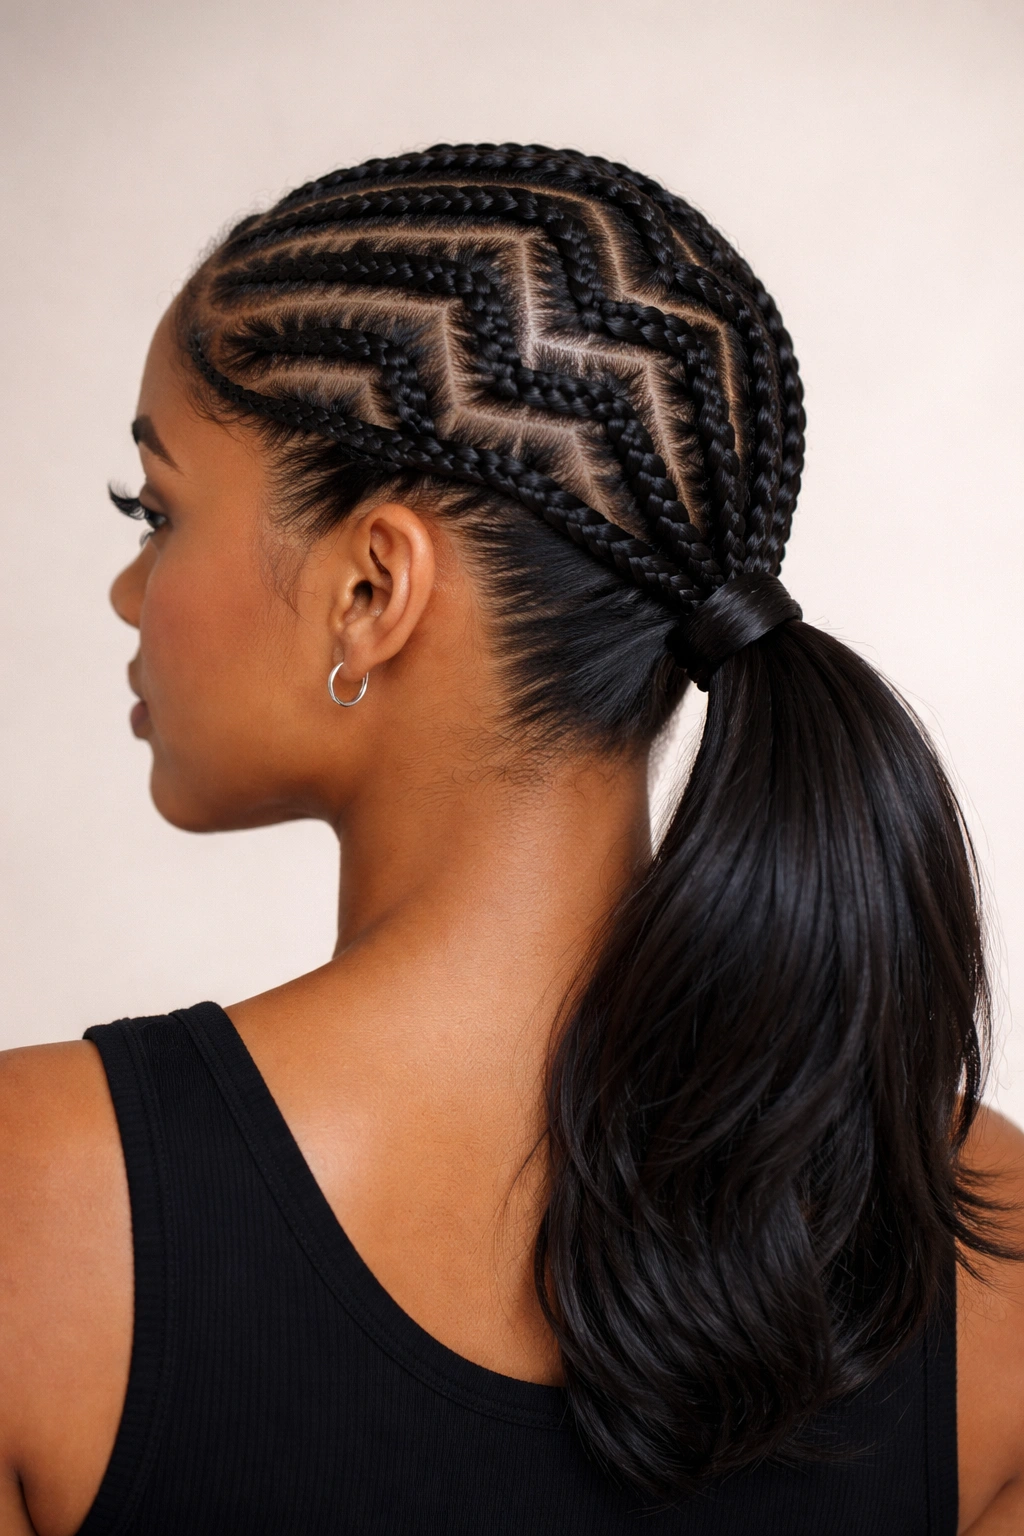
Instead of braiding straight back, create cornrows that zigzag across your head—angling left, then right, then left again. All the zigzags converge into a low ponytail at the nape. It’s playful and eye-catching without being overdone.
How It Compares
Straight cornrows are classic, but zigzagged patterns feel more contemporary and creative. They also create the illusion of more volume because the lines aren’t parallel—your eye perceives more dimension and movement.
Styling the Zigzag
- Section your hair into three to four vertical sections from front to back
- Create your first cornrow in a zigzag pattern: angle it to the left for the first few braids, then to the right, then to the left again
- Follow this zigzag pattern with each subsequent cornrow
- All cornrows should naturally converge at the nape
- Gather everything into a low, loose ponytail at the back
- You can leave the ponytail straight, curl it, or coil it into a bun—all look stunning
- The zigzag braids are the star here, so let them be visible
11. Reverse Cornrows with Braided Crown
Reverse cornrows (where you braid under instead of over) create a different texture and visual line than traditional cornrows. Create them around the perimeter of your head, then gather them into a braided crown at the top.
Why Reverse Cornrows Are Worth Trying
They raise slightly off the scalp differently than traditional cornrows, creating more dimension. If you have textured hair or want cornrows to read as more dimensional and less flat, reverse braiding is your answer. The raised effect also makes updos feel fuller.
Building the Crown
- Create reverse cornrows starting at one side of your head near your temple
- Braid them back and slightly upward, creating a frame around your hairline
- Bring cornrows to the crown where you’ll start a traditional three-strand braid
- The reverse cornrows feed into this crown braid, creating a braided halo effect
- Secure the crown braid at the back with bobby pins
- Leave the bottom section loose or gather it into a low ponytail—either works beautifully
- Gently pull the braids slightly for volume and texture
12. Cornrows with Twisted Halo and Curled Ends
Cornrows start at the nape and spiral upward around the back of your head toward the crown, while the front-facing hair is left loose and curled. It’s a variation that keeps your face completely open while still protecting the majority of your hair length.
The Real-World Advantage
This approach works brilliantly if you have a face shape you want to showcase or if you prefer having your face frame completely clear. The spiraling cornrows add visual interest at the back while the loose curls keep things romantic and soft.
Creating This Style
- Separate your hair into a front section (everything in front of your ears) and a back section
- Create cornrows in the back section, spiraling them from the nape upward toward the crown
- These back cornrows create a kind of basket weave pattern when done correctly
- Leave all front-facing hair loose and curl it with a curling iron
- You can secure the front curls with bobby pins tucked behind if needed
- Add a hair cuff or decorative ring at the crown where the braids end for extra polish
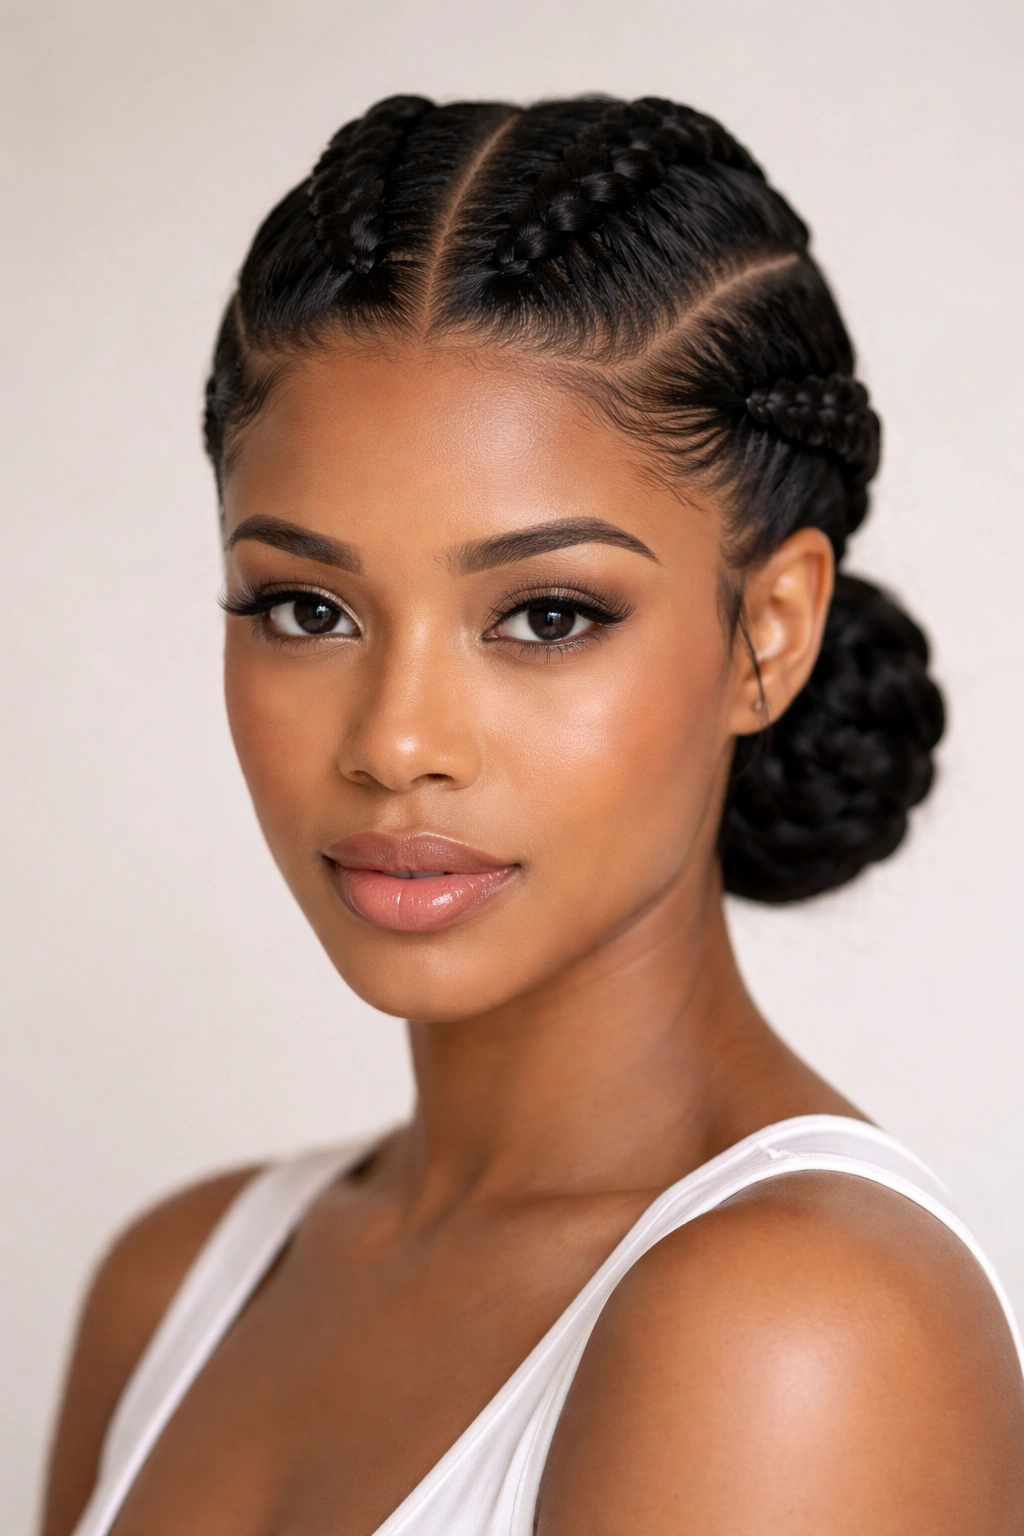
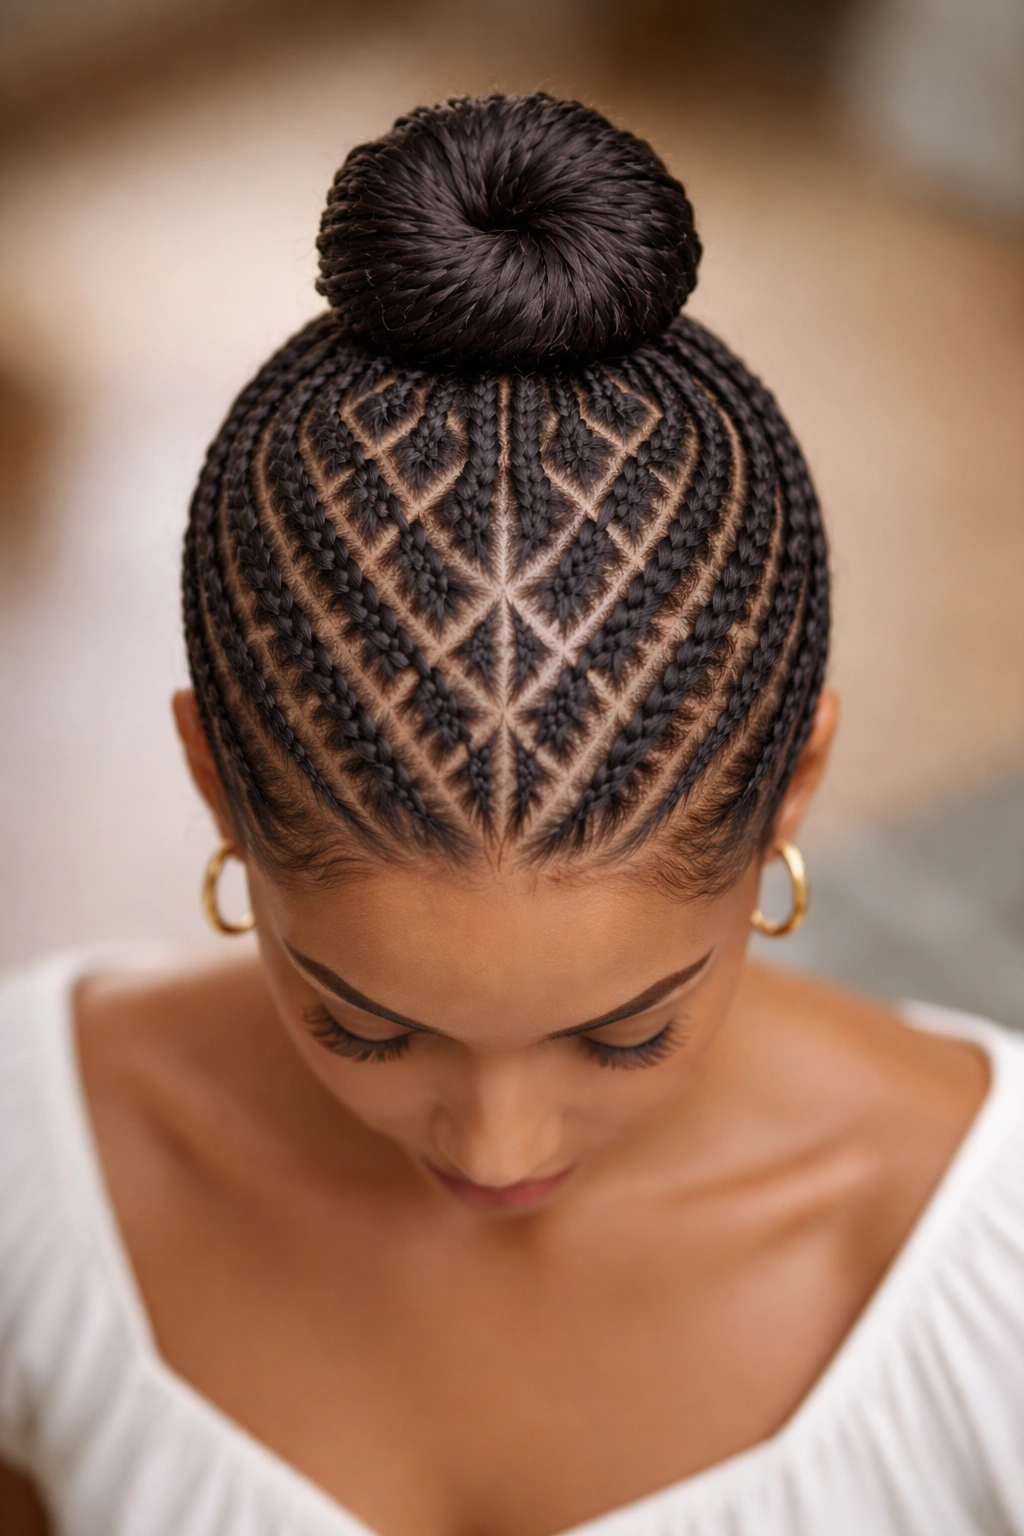
13. Thin Cornrows in Geometric Grid Pattern with Low Bun
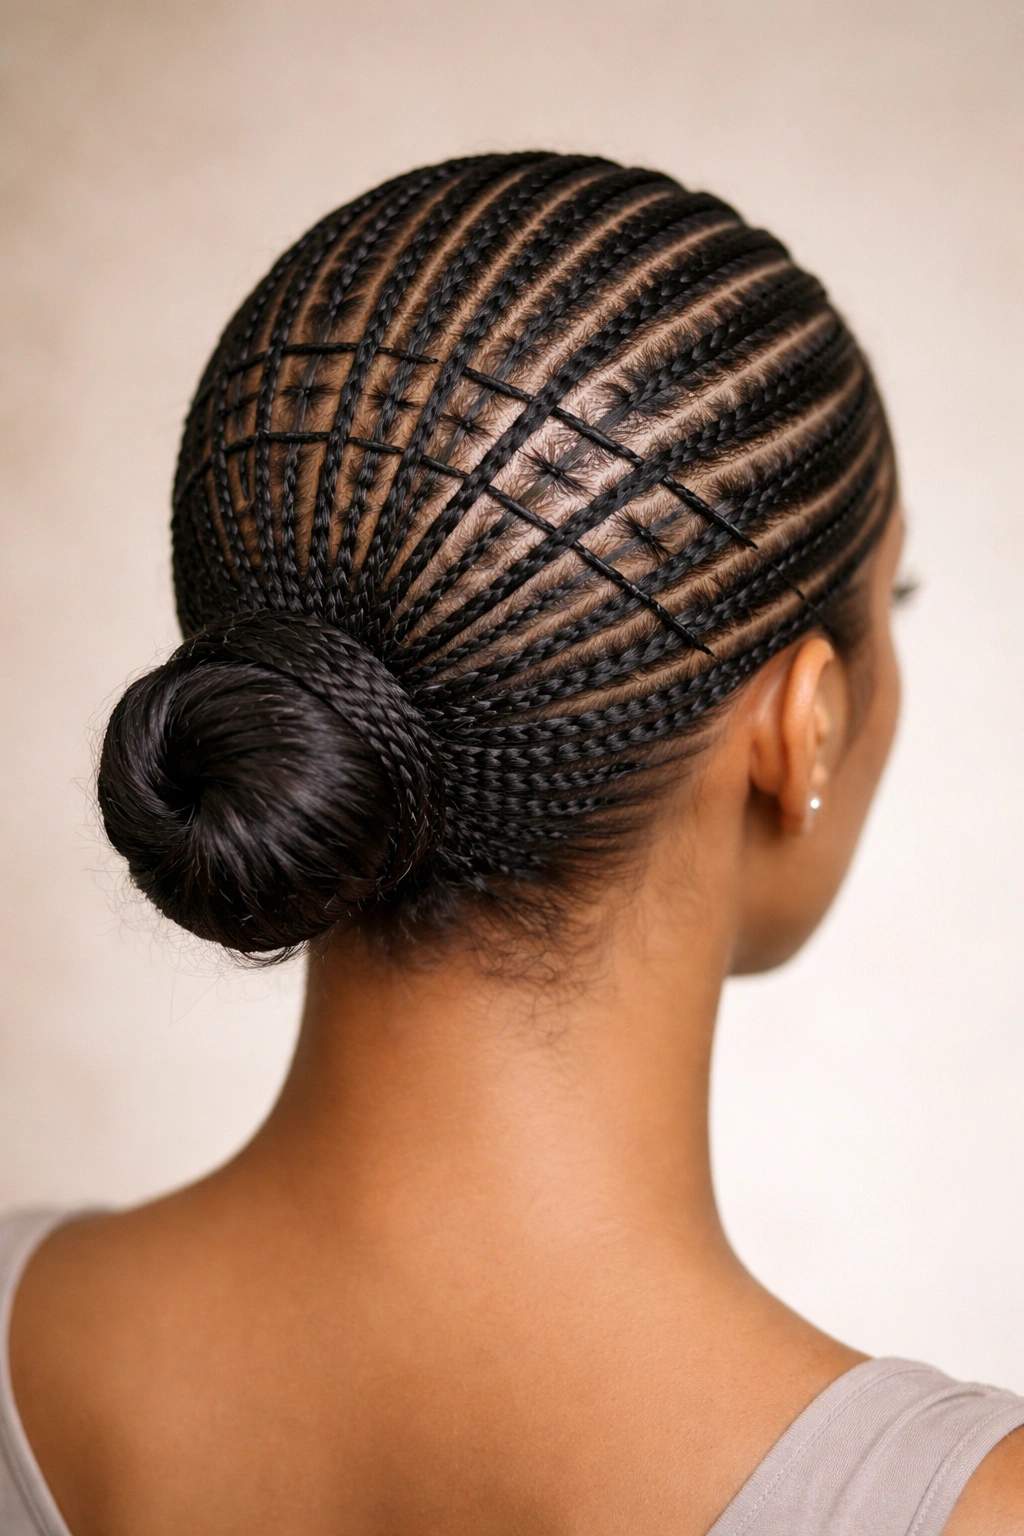
Create multiple thin cornrows in a grid or checkerboard pattern across your entire head, all converging at a low bun at the nape. The geometric precision of this style is genuinely striking, and it works because medium hair has enough volume to support the multiple braids without looking overwhelming.
Why This Approach Works
Grid patterns are inherently visual and architectural. Because of medium hair’s length, you can create enough cornrows to make the pattern clear without the braids being so thin they look fragile. It’s a style that photographs extraordinarily well.
Execution Tips
- Divide your head into a grid, typically four to six sections across and three to four sections front to back
- Create one thin cornrow in each grid square, keeping them as parallel as possible
- All cornrows should angle slightly backward and converge at the nape
- Gather all the cornrows at the back and secure with an elastic
- Twist or coil the gathered section into a bun and pin securely
- The grid pattern will be most visible from above and from the back, so this is perfect for events where people will see you from all angles
- Use bobby pins that match your hair color throughout—they’ll blend with the cornrows
14. Side Cornrows with Twisted Rope Updo
Two thick cornrows braid from behind your ears toward the center back of your head, where they meet and twist together like a rope before coiling into a side bun at the nape. It’s soft, romantic, and has movement.
What Makes It Different
Instead of the braids running parallel, they’re working toward each other and merging. This creates a sense of intentionality and design that feels elevated compared to straightforward styles.
Creating the Rope Effect
- Create one thick cornrow starting behind your left ear, braiding straight back
- Create another starting behind your right ear, also braiding straight back
- Bring both cornrows to a meeting point at the center back of your head
- Release any remaining loose hair and gather everything together at that center point
- Divide the gathered section into two parts and twist them around each other like a rope
- Coil the rope toward the left or right to create a side bun
- Pin the bun securely and tuck the rope end underneath
- Pull a few face-framing pieces to soften the look
15. Cornrows with Nested Loops Updo
Instead of a traditional bun, create cornrows that feed into a ponytail, then divide that ponytail into loops and pin them at varying heights, creating a dimensional, sculptural effect. It’s the kind of style that makes people ask “how did you do that?”
How It Compares to Other Updos
A nested loops updo reads as more editorial and fashion-forward than a bun. Each loop becomes part of the design, creating height and movement even though everything is secured. It also tends to hold better throughout the day because each loop is independently pinned.
Building the Loops
- Create cornrows that converge at a high ponytail point
- Secure the ponytail with a sturdy elastic
- Divide the ponytail into three to five sections
- Create a loop with each section by folding the hair back and securing the end with a bobby pin
- Vary the height of each loop—some sitting higher, some lower—to create dimension
- Pin each loop independently to the scalp
- Adjust loops so they’re evenly distributed and the overall shape feels intentional
- Add decorative pins or jewels in the center of each loop for sparkle
16. Cornrows into Fishtail Braid Updo
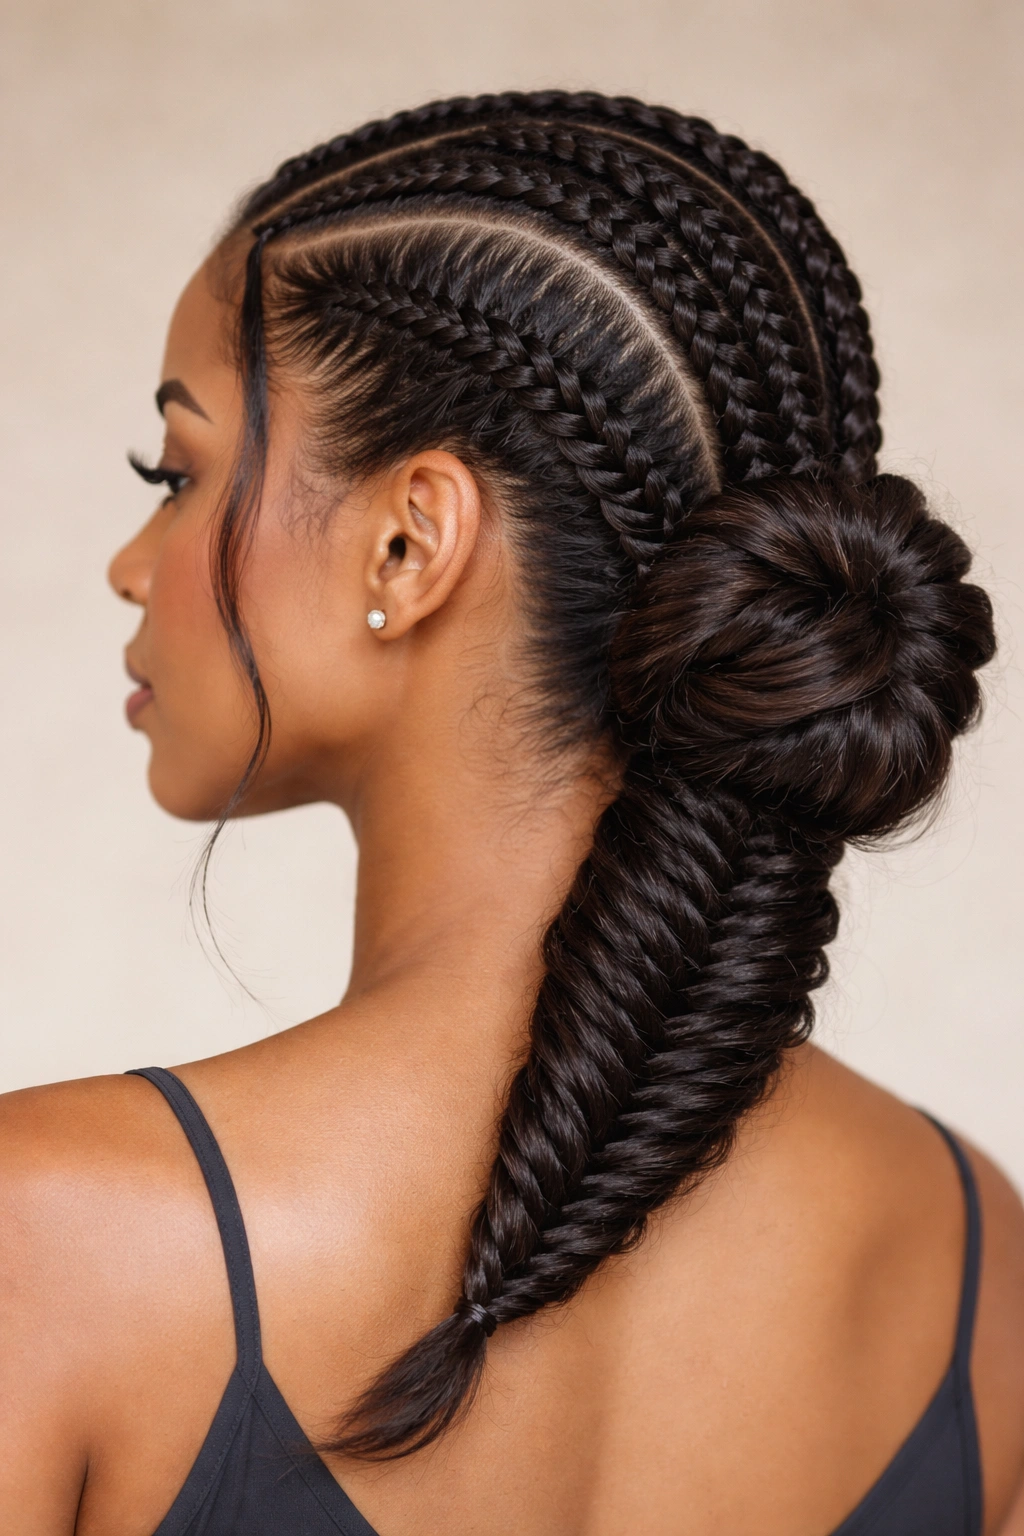
Two thick cornrows frame your face and meet at the back, where they transition into a fishtail braid that’s then coiled into a bun. It’s the perfect combination of structure and flowing texture.
Why This Works for Medium Hair
The transition from the neat, controlled cornrows to the textured fishtail creates visual interest without the style being heavy. Medium hair has enough length to make the fishtail obvious and beautiful without it looking wispy.
Achieving the Transition
- Create two thick cornrows, one on each side of your head, starting near your temples
- Braid them straight back and bring them to meet at the nape
- Release the remaining length and combine it with the cornrow ends
- Divide the gathered hair into two thick sections
- Create a fishtail braid by taking small pieces from the outer edge of each section and crossing them over the center
- Continue the fishtail pattern all the way down or halfway down, depending on how much hair you have
- Coil the fishtail braid into a bun at the base and secure with bobby pins
- This style is gorgeous because you see the neat braiding plus the textured fishtail in one look
17. Cornrow Waterfall with Pinned Wave
Cornrows create a waterfall effect where some hair is braided while other sections flow free beneath them. All of this is gathered into a low, pinned wave that creates an elegant silhouette. It feels romantic and formal without being old-fashioned.
The Real-World Advantage
Waterfall cornrows are inherently dimensional because you’re alternating braided and loose sections. This creates the illusion of length and volume even on medium hair. When you add the pinned wave element, it becomes a statement style.
Creating the Waterfall Effect
- Decide on the number of sections you want to alternate braided and loose
- Create cornrows in alternating pattern: braid, leave loose, braid, leave loose, and so on
- As you create each cornrow, let sections of loose hair flow out from underneath—this is what creates the waterfall
- Bring all the braids and flowing sections to the nape
- Gather everything and gently twist it, creating a wave shape
- Pin the twisted section into a low wave at the back of your head, securing with bobby pins at multiple points
- Gently pull the braids to create more texture and dimension
18. Cornrows in Diamond Pattern with Center Bun
Create multiple thin cornrows in a diamond or lozenge pattern across your head, with all cornrows converging at a center point where they coil into a bun directly at the crown. It’s geometric, modern, and instantly recognizable as intentional.
What Makes It Stand Out
Diamond patterns are more visually complex than grids, and they naturally draw the eye toward the center point. When that center point is a bun, you’re creating a focal point that’s both functional and decorative.
Pattern and Execution
- Divide your head into diamond-shaped sections
- Create thin cornrows that follow the diamond outlines
- All cornrows should angle toward the center of the head
- Gather all the cornrows at the crown and coil them into a centered bun
- Secure with bobby pins positioned all around the bun base
- Use hair color-matched bobby pins so they blend seamlessly with the braids
- This style is perfect for anyone who wants to make a statement because the geometric pattern is genuinely striking
- Photograph beautifully from above
19. Multi-Textured Cornrow Updo with Ribbon Weave
Create thick cornrows and weave a decorative ribbon through them as you braid, adding color and texture. All cornrows converge into a low bun at the nape, with the ribbon weaving through the bun as well. It’s embellished without being costume-y.
Why Ribbon Works
Ribbons instantly elevate a style and allow you to add color without changing your actual hair. The ribbon sits on top of or within the braid, catching light and creating dimension that a plain braid won’t.
Adding Ribbon to Your Braids
- Choose a ribbon in a color that coordinates with your hair or your outfit
- Create thick cornrows as your base
- As you braid, position the ribbon to run alongside one of your three braid strands (it becomes like a fourth element)
- Continue braiding with the ribbon woven through, securing it loosely so it doesn’t pull
- At the bun, position the ribbon so it wraps around the base or weaves through the coil
- Secure the ribbon end with bobby pins or a small knot
- This adds visual interest without requiring extra time or complexity
20. Cornrows to Textured Knot Bun with Face-Framing Spirals
Create cornrows from the crown backward, then release remaining hair into loose spirals around your face and at the nape. Gather everything at the back into a knotted bun where two sections of hair twist around each other. It’s polished but has enough texture to feel modern.
How It Compares
This style breaks the rule that updos have to be neat—the face-framing spirals add softness and movement that keeps the style from feeling severe. The knotted bun has more visual interest than a standard coil.
Creating the Full Effect
- Create one to three cornrows starting at your crown and braiding straight back
- Release the front section and create two spiral curls on either side of your face using a curling iron
- Leave these spirals loose—don’t pin them yet
- Gather all hair at the nape, including braids and spirals
- Divide the gathered section into two parts
- Twist each part around the other to create a knot shape
- Pin the knot securely and position the face-framing spirals to frame your face
- This works because the soft spirals balance the neat braids
Final Thoughts

Cornrow updos give you the protective benefits of braided styles with the polished look of an updo—honestly, it’s hard to beat that combination. With medium hair, you have the perfect canvas for experimenting with different patterns, braid thicknesses, and finishing techniques. Whether you go geometric and bold, romantic and textured, or somewhere in between, the key is choosing a style that feels genuinely like you.
The investment in learning these styles pays off because once you nail the technique, you can recreate it repeatedly. Start with whichever style calls to you most, and don’t get discouraged if it takes a few tries to get it perfect. Your hands will learn the rhythm of the braids, you’ll develop a feel for how tight to make each section, and before long, you’ll be creating these looks without thinking about the steps.
The beauty of cornrow updos is that they work for any occasion—work meetings, casual hangouts, weddings, vacations, or just a regular Tuesday when you want to feel put-together. Medium hair lets you wear them with confidence, knowing you have enough length for impact without the weight becoming uncomfortable. Grab your favorite parting tool, recruit a friend or use a hand mirror if you need help with back sections, and choose your first style.