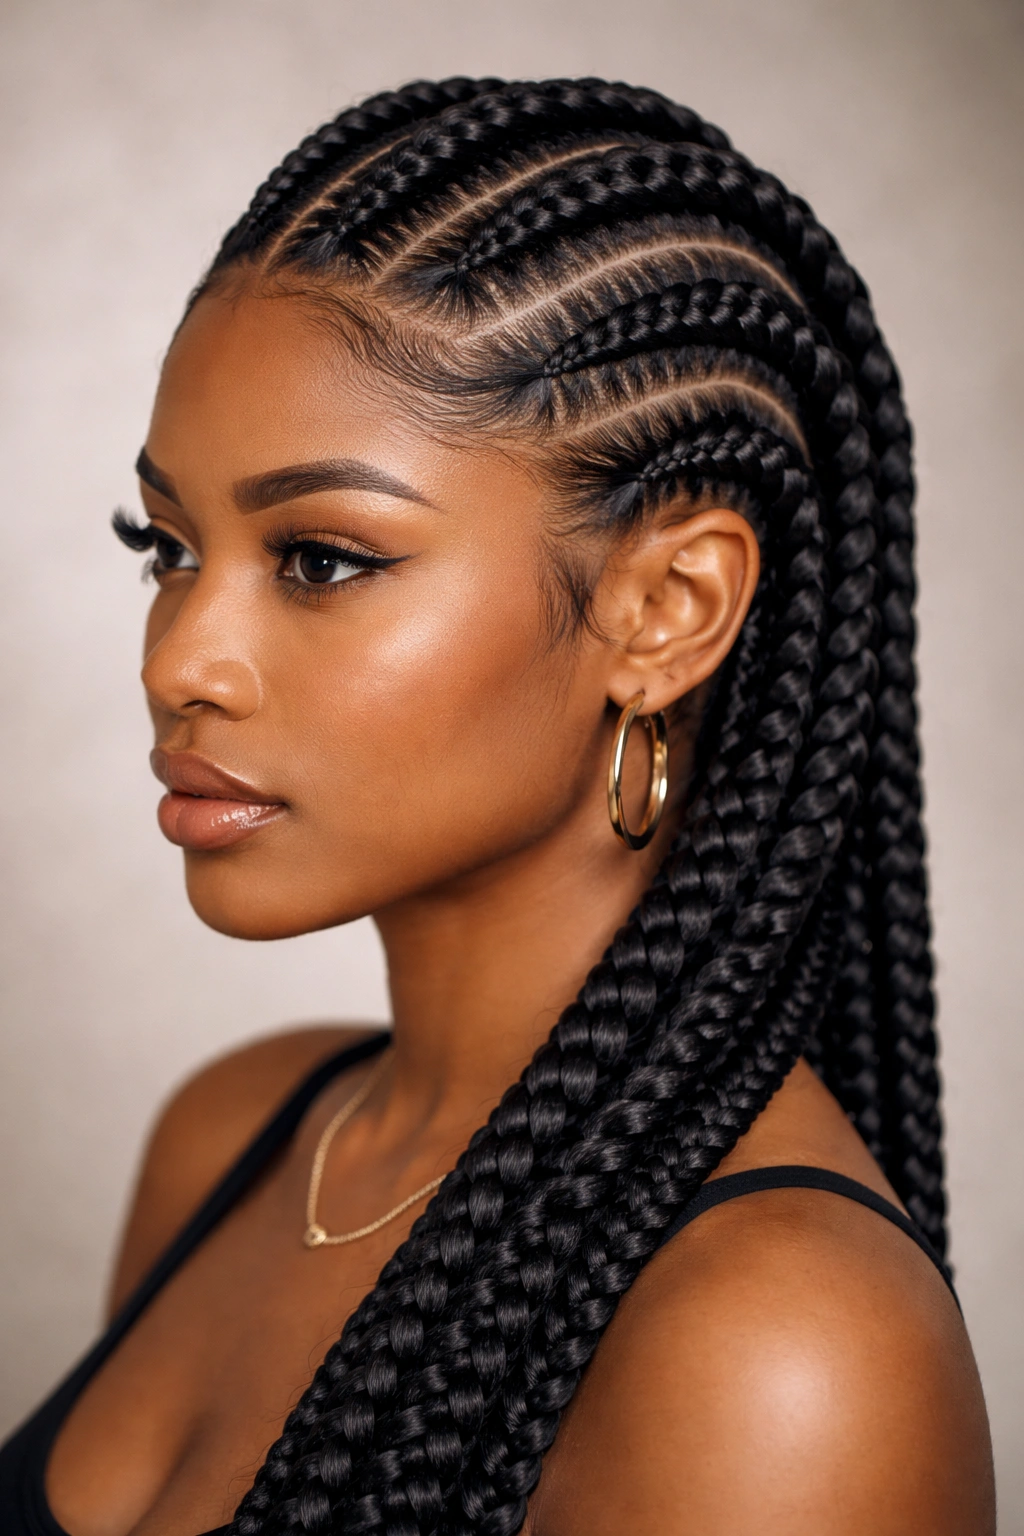
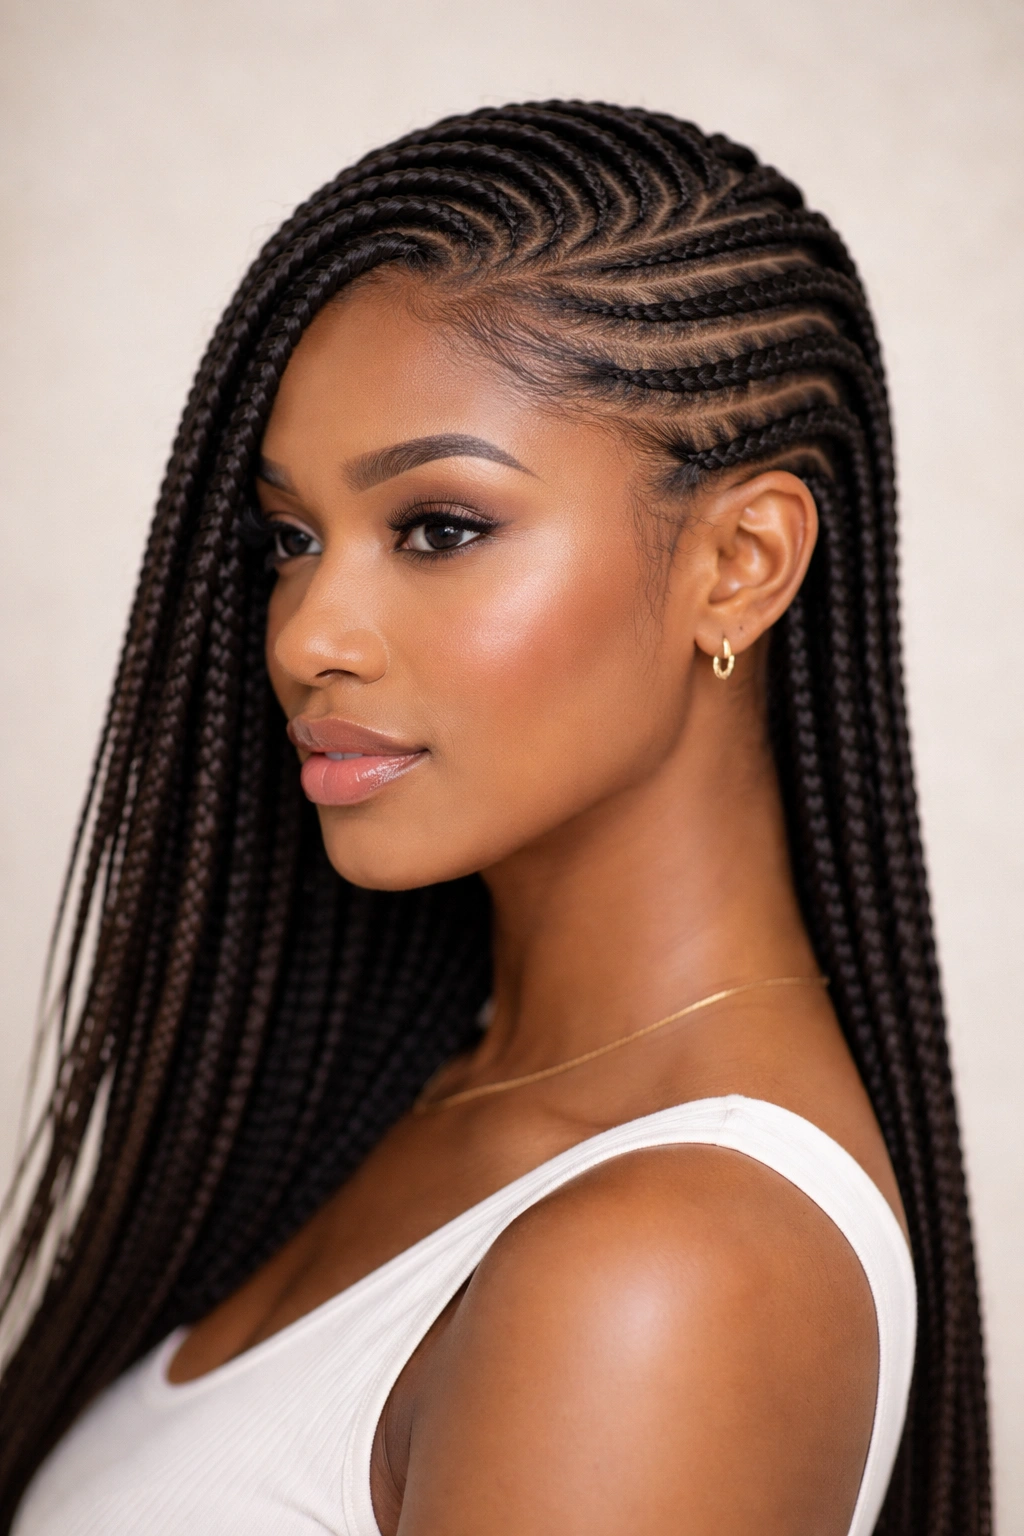
Straight-back cornrows are a timeless protective hairstyle that works beautifully with natural hair of any texture. Whether you’re looking to protect your hair while it grows, need a style that keeps you neat through a busy week, or simply love the clean, sculpted look that straight-back cornrows deliver, this braiding technique offers endless possibilities for personalization and creativity.
The appeal of cornrows lies in their versatility and practicality. They’re comfortable to wear, manageable during sleep, and require minimal daily styling once installed properly. For natural hair specifically, cornrows offer the best of both worlds: they’re a protective style that shields your edges and ends from manipulation and environmental stress, while also allowing you to express your personal style through variations in thickness, patterns, adornments, and styling.
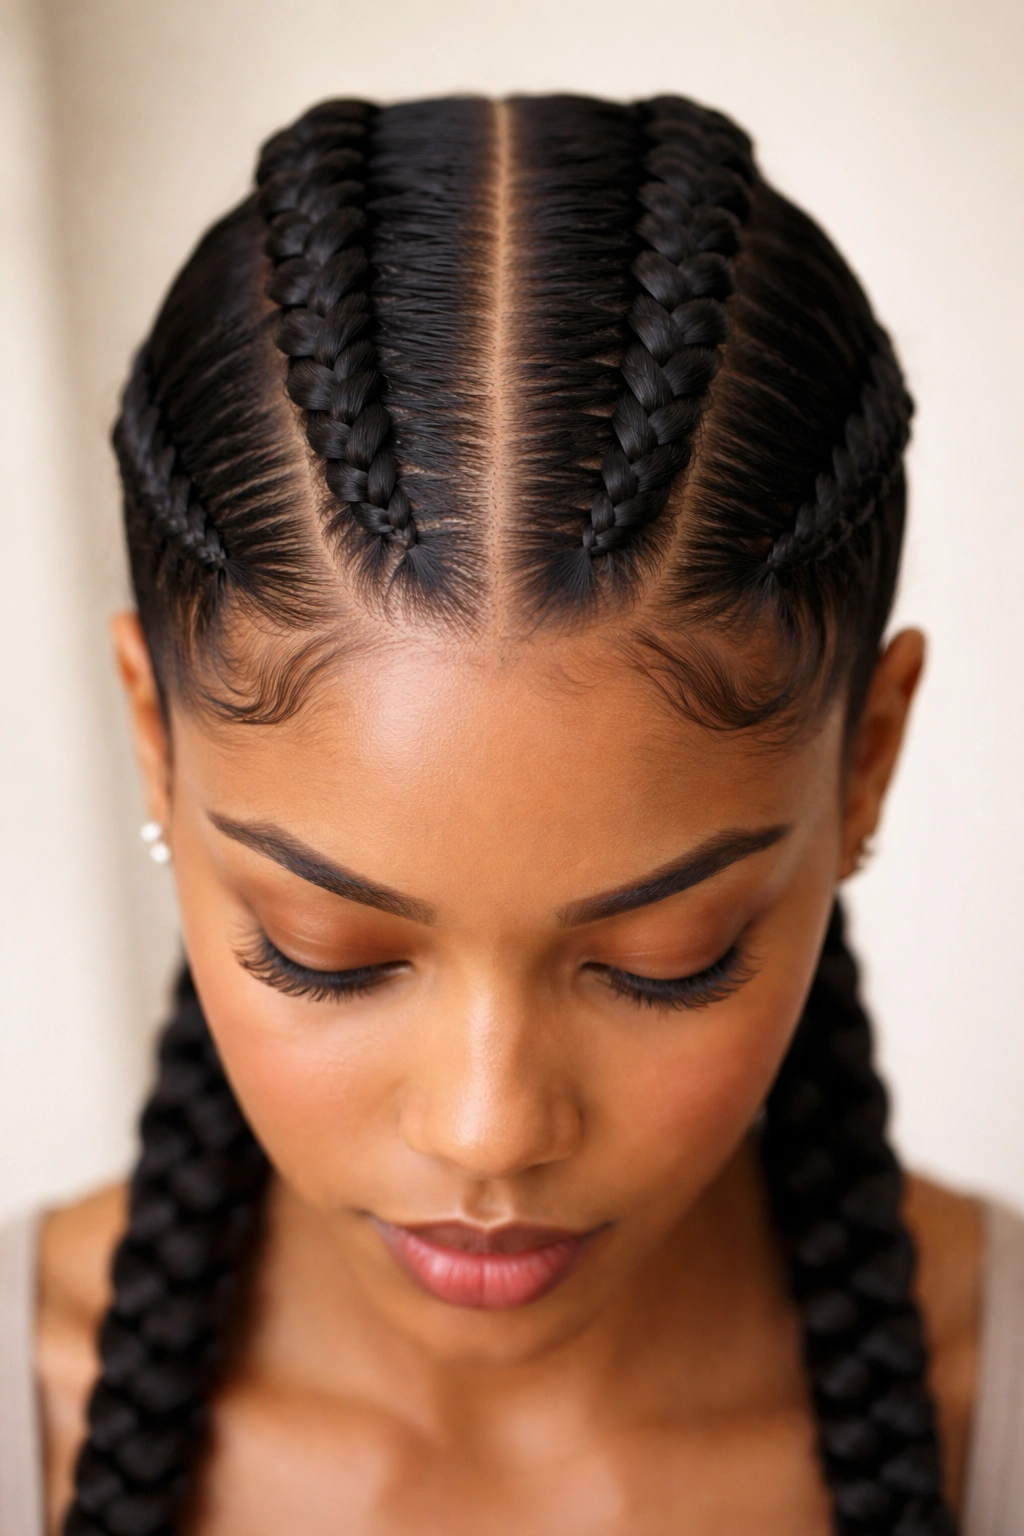
What makes straight-back cornrows particularly striking is their structured, intentional appearance. Unlike braids that sweep across the head or wind in complex patterns, straight-back cornrows travel directly from the front hairline straight back toward the nape of the neck. This creates a polished, deliberate look that flatters nearly every face shape and works for both casual and formal occasions. The key to great straight-back cornrows is precise tension—tight enough to last and look polished, but never so tight that you feel constant pulling or your edges become strained.
Here are ten distinct approaches to straight-back cornrows that will help you find the style that matches your aesthetic, hair texture, and lifestyle.
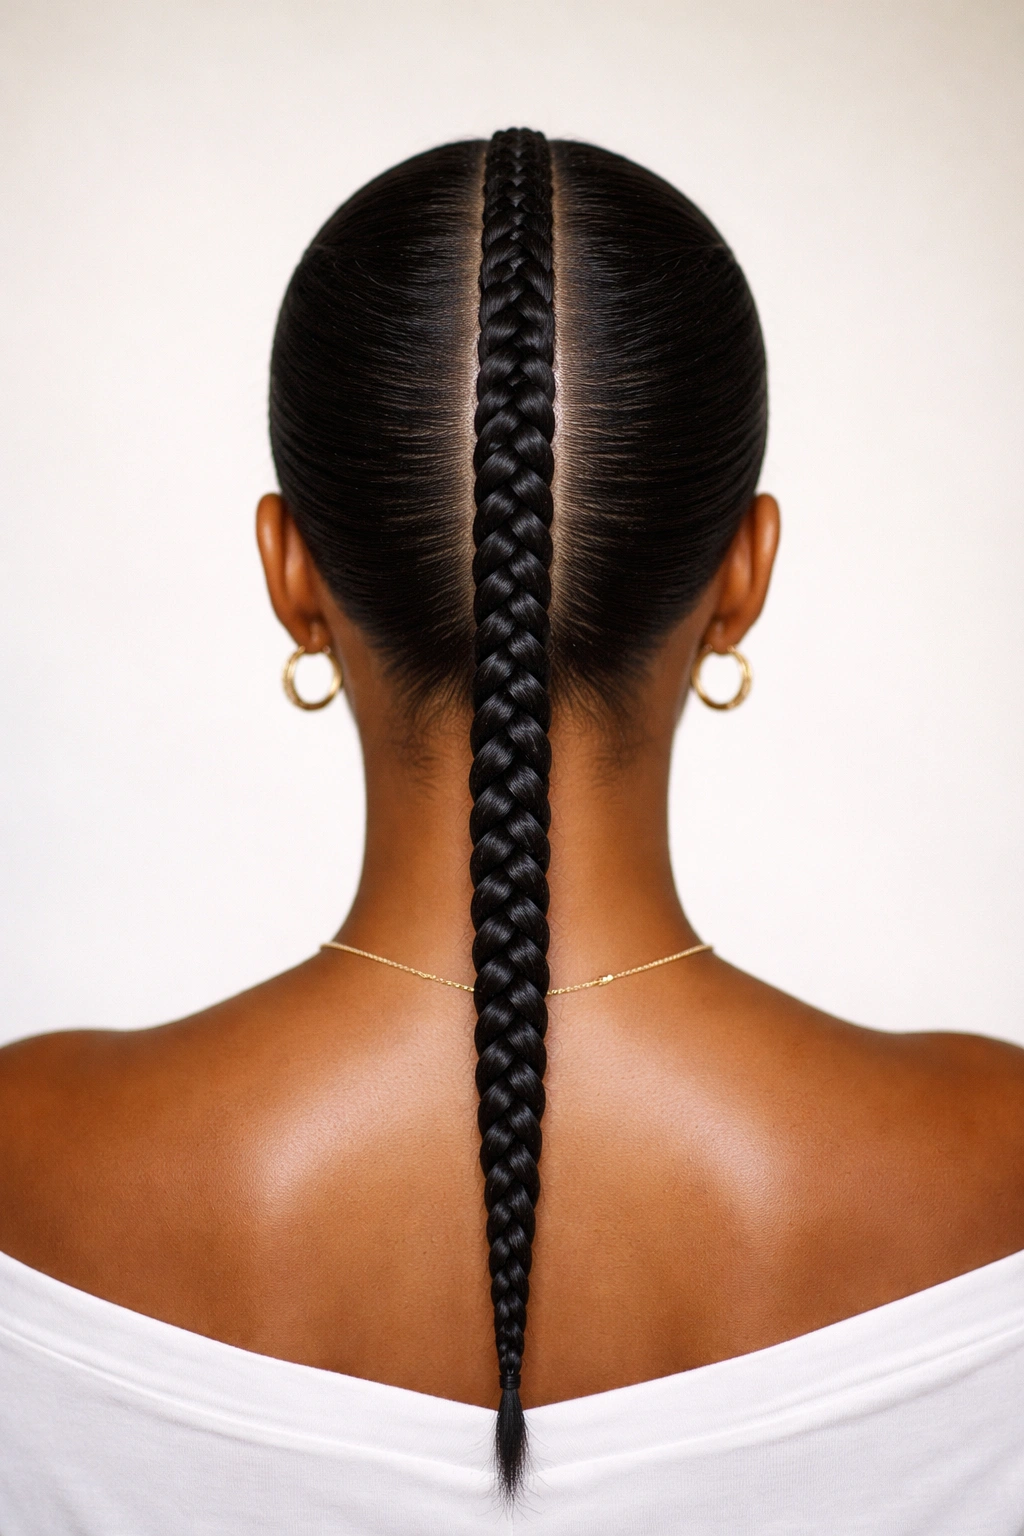
1. Classic Straight-Back Single Cornrows
Single straight-back cornrows create an elegant, minimalist look that showcases your face and allows for a graceful line down the center back of your head. This style works whether you’re braiding with your natural hair alone or adding extensions for length, thickness, and styling longevity.
Why This Style Remains Timeless
A single row of cornrows down the center back is deceptively simple but incredibly striking. The singular line draws attention to your facial features rather than competing with intricate patterns, making it an excellent choice for professional environments, special events, or any occasion where understated elegance matters. The geometric precision of the braid catches light beautifully and creates visual interest without feeling overdone. This style also tends to be the easiest to maintain since you have only one braid to monitor for fraying or loosening.
How to Achieve the Perfect Single Row
- Start by creating a clean center part from your front hairline all the way back to the nape of your neck using a rattail comb
- Section out the hair directly along this part line, working with strips about ½ inch to ¾ inch wide depending on how thick you want the single braid to be
- Begin the cornrow at your hairline, incorporating small sections of hair as you move backward
- Maintain even tension throughout to keep the braid straight and prevent it from curving to either side
- If using extensions, use a single strand or bundle of Kanekalon or similar braiding hair in your chosen length and color
Pro tip: A single cornrow looks even more sophisticated when you leave a small section of hair unbraided at the very end for a softer finish, or you can fold the braid up and secure it into a low bun for a completely different look.
2. Straight-Back Double Cornrows with Center Part
Two parallel straight-back cornrows create beautiful symmetry while doubling the visual impact compared to a single row. This style is often called “twins” or “double cornrows,” and it’s one of the most versatile variations because it reads as both youthful and polished depending on how you style it.
The Appeal of Symmetrical Cornrows
Double straight-back cornrows offer visual balance that single rows can’t quite match. The two parallel lines frame your face and create a sense of intentional design. This style is practical for holding your hair secure longer than a single braid would—the weight is distributed across two braids rather than concentrated in one, which means less stress on your edges and roots. Double cornrows also give you the flexibility to style the ends differently: you can braid them all the way down, leave the last few inches loose, wrap them into buns, or add beads to the ends.
Steps for Creating Symmetrical Double Rows
- Create a clean center part from your hairline straight back, using a rattail comb to ensure precision
- Divide the left section in half, creating a smaller section directly against the center part that will become your left cornrow
- Repeat on the right side so you have two equal sections ready for braiding
- Start both cornrows simultaneously (or one at a time—whatever maintains your focus better) at the hairline
- Keep consistent thickness and tension on both sides to ensure they remain truly parallel and identical in appearance
- Check your progress frequently by looking in a mirror to catch any drift toward the center or sides before it becomes too pronounced
Worth knowing: The most common mistake is making one cornrow thicker or tighter than the other, which makes them look unintentional. Taking extra time at the hairline to match your starting thickness pays off dramatically in the final appearance.
3. Thick and Bold Straight-Back Cornrows
Thick, statement-making cornrows make a confident declaration and tend to be more comfortable to wear since the hair isn’t pulled as tightly. They’re also quicker to install and typically last longer before needing touch-ups because the braid is more substantial and resistant to loosening.
Why Thickness Changes the Entire Feel
Thick cornrows feel modern, bold, and intentional in a way that delicate braids don’t quite match. They work beautifully for natural hair that has volume and texture, as the braid showcases rather than minimizes your hair’s natural character. From a practical standpoint, thicker cornrows are gentler on your edges because the tension is spread across a wider area of your scalp. They’re also easier to install and take down, which matters if you’re braiding your own hair or working with a stylist who charges by the hour.
Creating Bold, Substantial Cornrows
- Start with sections that are 1 to 1.5 inches wide rather than the typical ½ to ¾ inch sections
- Use thicker strands of extensions if you’re adding hair—a full bundle rather than a single strand or split bundle
- Maintain relaxed but controlled tension as you braid; thick cornrows don’t need to be pulled as firmly to stay in place
- Braid all the way to the ends of your hair for maximum impact, or leave the last 2-3 inches unbraided for a softer, more textured finish
- For true boldness with three thick cornrows straight back, space them evenly across your head from side to side
Insider note: Thick cornrows are especially striking when installed over freshly washed, moisture-rich hair, as the natural curl pattern and shine of well-hydrated natural hair shows beautifully against the structured braid.
4. Thin Delicate Straight-Back Cornrows with Beads
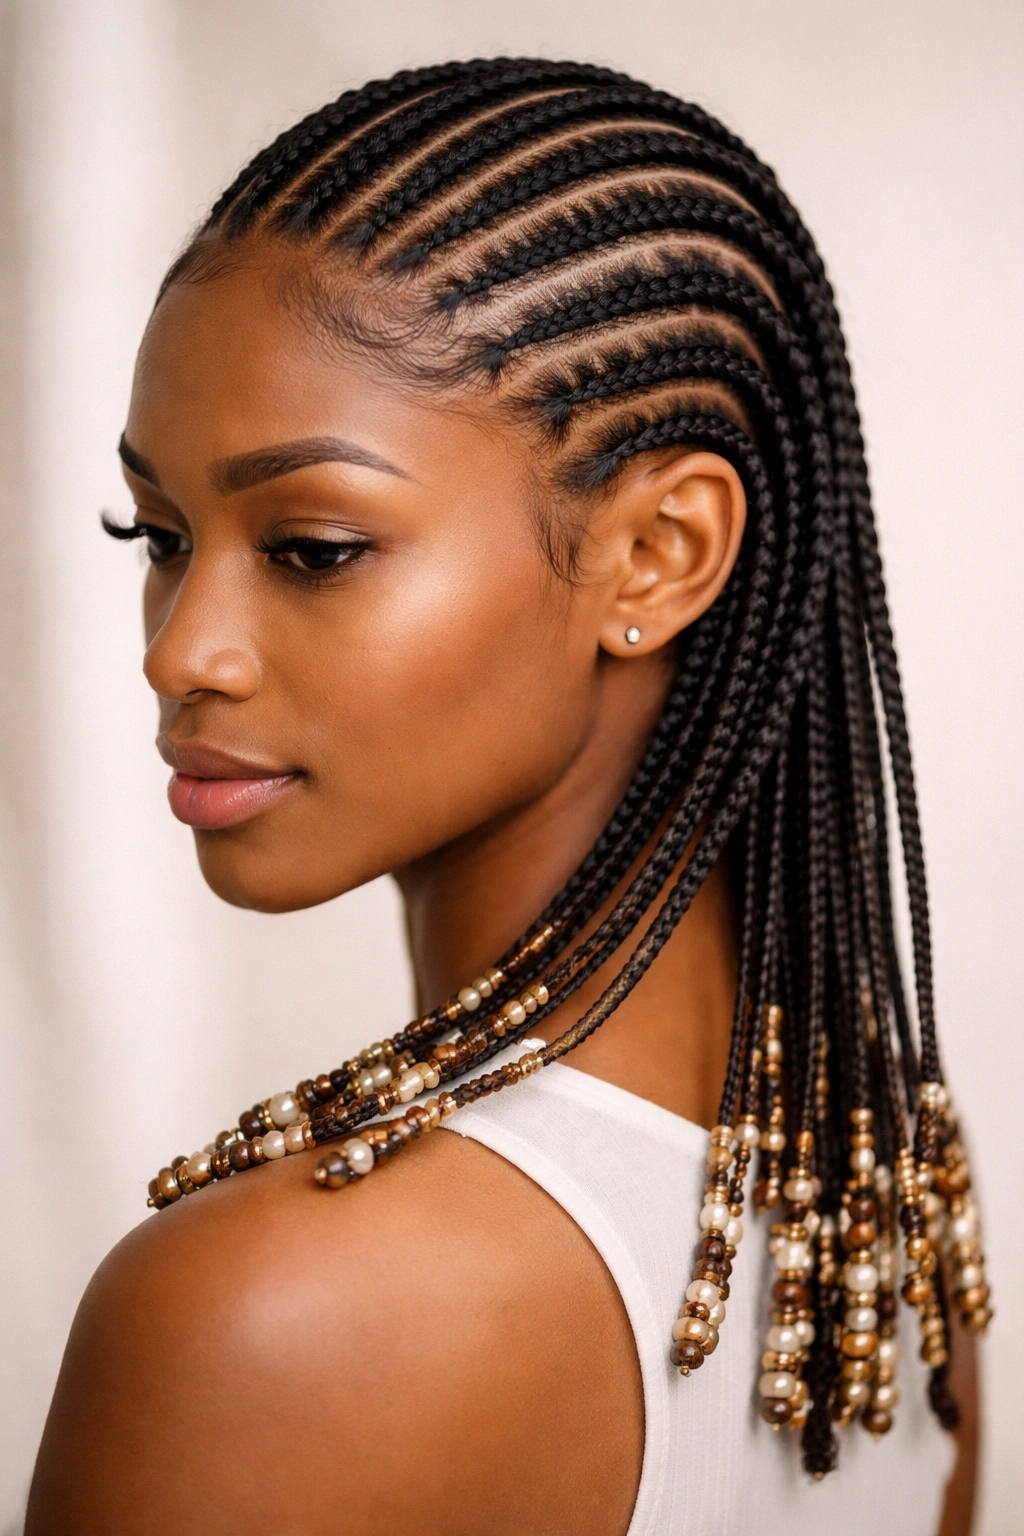
Thin cornrows offer a different aesthetic altogether—graceful, intricate, and delicate while still being protective and long-lasting. When adorned with beads, shells, or rings, thin cornrows become a statement piece that expresses personal style and cultural connection.
The Elegance of Intricate, Detailed Braids
Thin cornrows appeal to people who love precision and detail. The braids showcase your patience and creativity, and they offer unlimited possibilities for adding embellishments. Because each braid is smaller, you can include many more of them across your head—creating an intricate, almost tapestry-like appearance. Thin cornrows also tend to feel lighter and less heavy on your head, which some people prefer for comfort, especially if they wear cornrows for extended periods.
Installing Thin Cornrows with Beads
- Work with sections that are ¼ to ½ inch wide, depending on how delicate you want the final look
- Use single strands of braiding hair for truly thin cornrows, or split a bundle into finer pieces
- Cornrow straight back as you would normally, maintaining even tension to keep the braids uniform in appearance
- As you near the bottom of each braid or after completing it, slide beads (wooden, metal, acrylic, or ceramic) onto the end
- Secure beads with a small rubber band or thread if they seem loose, and knot off the braid end beneath the bead
- Consider adding beads only to every other braid, or only to the lower section of each braid, for a less-heavy appearance
Real talk: Thin cornrows with beads require more maintenance than thicker plain cornrows, but many people feel the visual payoff is absolutely worth it. The beads won’t stay perfectly in place forever—they’ll shift and migrate as you sleep and move—but that slight imperfection is part of the charm.
5. Straight-Back Cornrows with Colored Extensions
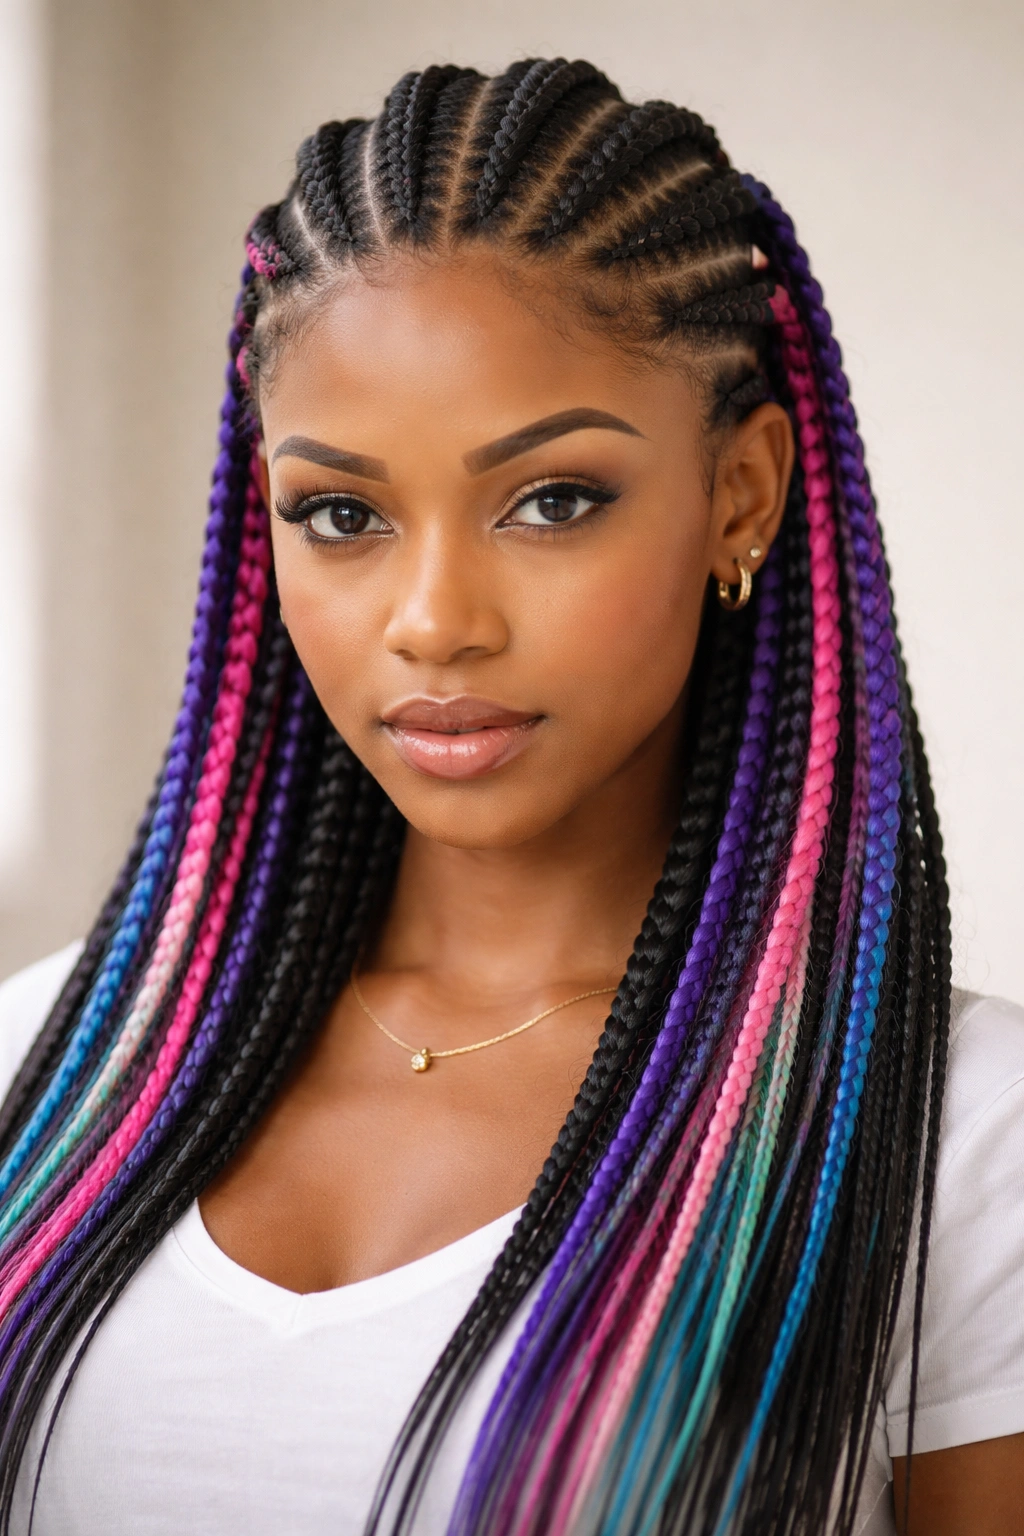
Introducing color through braiding extensions transforms straight-back cornrows from understated to eye-catching. Whether you use a contrasting shade, a complementary tone, or creative colors entirely, colored extensions open up expressive possibilities without damaging your natural hair.
Using Color to Personalize Your Cornrows
Colored extensions let you experiment with shades you might not dye into your natural hair permanently. You could use rich jewel tones like deep burgundy, sapphire, or emerald; warm tones like copper or gold; cool tones like silver or platinum; or bold statement colors like hot pink, turquoise, or purple. The extensions come out when you remove the braids, so there’s zero permanent commitment. This approach is especially popular for seasonal changes, special occasions, or whenever you want a temporary style shift.
Selecting and Installing Color Extensions
- Choose braiding extensions in your desired color; brands like Kanekalon offer hundreds of shades
- Consider whether you want a subtle blend (a slightly lighter or darker version of your natural hair color) or a bold contrast
- If using multiple colors, decide on a pattern: all braids in one color, alternating colors, or a gradient from darker to lighter as you move back
- Install colored extensions following the same cornrowing technique, ensuring the extension color is visible throughout the braid
- For the most professional appearance, match the color at your roots to your natural hair or use the colored extension as the primary visible strand in the braid
Pro tip: Ombré or balayage-style color in braiding extensions (where the shade gradually transitions from one color to another) creates depth and visual interest that a solid color sometimes can’t achieve.
6. Side-Swept Straight-Back Cornrows
A slight variation on the classic straight-back cornrow, side-swept cornrows begin at an angle rather than down the dead center. They travel from one side of your head toward the back, creating an asymmetrical, modern look that flatters different face shapes differently than centered cornrows.
Why Asymmetry Changes the Aesthetic
Side-swept cornrows create a sense of movement and flow that centered braids don’t offer. They’re particularly flattering for people who prefer to show one side of their face more than the other, or for those whose hairstyle naturally falls to one side. The angled beginning point softens your overall appearance compared to the stark symmetry of center-parted cornrows. This style also feels more fashion-forward and editorial—it’s a choice that signals thoughtfulness about your personal style.
Creating a Compelling Side-Sweep
- Create your part line at an angle rather than straight down the center; start about 1 to 2 inches from the center at your hairline and angle toward the nape
- This creates two unequal sections; you’ll braid the smaller section that runs along your angled part
- The smaller section will naturally create a side-swept path that travels from one side of your head toward the back
- Maintain consistent tension as the angle progresses backward
- You can create a single side-swept cornrow, or pair it with additional cornrows in the larger section for more complexity
Worth knowing: Side-swept cornrows work beautifully with a defined edge on the opposite side of your head where the braid doesn’t travel—the contrast between the braided section and the sculpted, sleek edge enhances the overall modern aesthetic.
7. Straight-Back Cornrows into a High Bun

Rather than leaving cornrows hanging loose, tucking the ends into a high bun transforms them into an entirely different style that’s equally practical and visually striking. This variation works for any number of straight-back cornrows and allows you to go from casual to polished in seconds.
The Versatility of Cornrows-to-Bun
Straight-back cornrows styled into a high bun offer the protective benefits of cornrows with the polished appearance of an updo. This style keeps all your hair secured away from your face and neck, making it excellent for workouts, humid weather, or any time you need your hair completely out of the way. The bun can be tight and structured or soft and romantic depending on how you manipulate the gathered ends. You can create this style the day you install the cornrows, or you can wear your cornrows loose for several days and then bun them when you’re ready for that different look.
Steps for Creating Cornrows into a Bun
- Braid your straight-back cornrows as usual, taking them all the way to the ends of your hair
- At the nape of your neck where all the braids meet, gather all the braid ends together
- Use a hair tie, silk scrunchie, or elastic band to secure them at the point where you want the bun to sit (high, mid, or low)
- Gently twist or wrap the gathered braid ends around the base to form a bun shape
- Use additional bobby pins or another elastic to secure the bun so it doesn’t unravel
- For a fuller bun, gently pull on sections of the braid to create texture and volume in the bun itself
Insider note: If you have thin hair or your cornrows feel loose in this bun style, adding a bun-shaped hair accessory (a bun cage, a donut, or a spiral) underneath the gathered braids creates a fuller appearance and keeps everything secure.
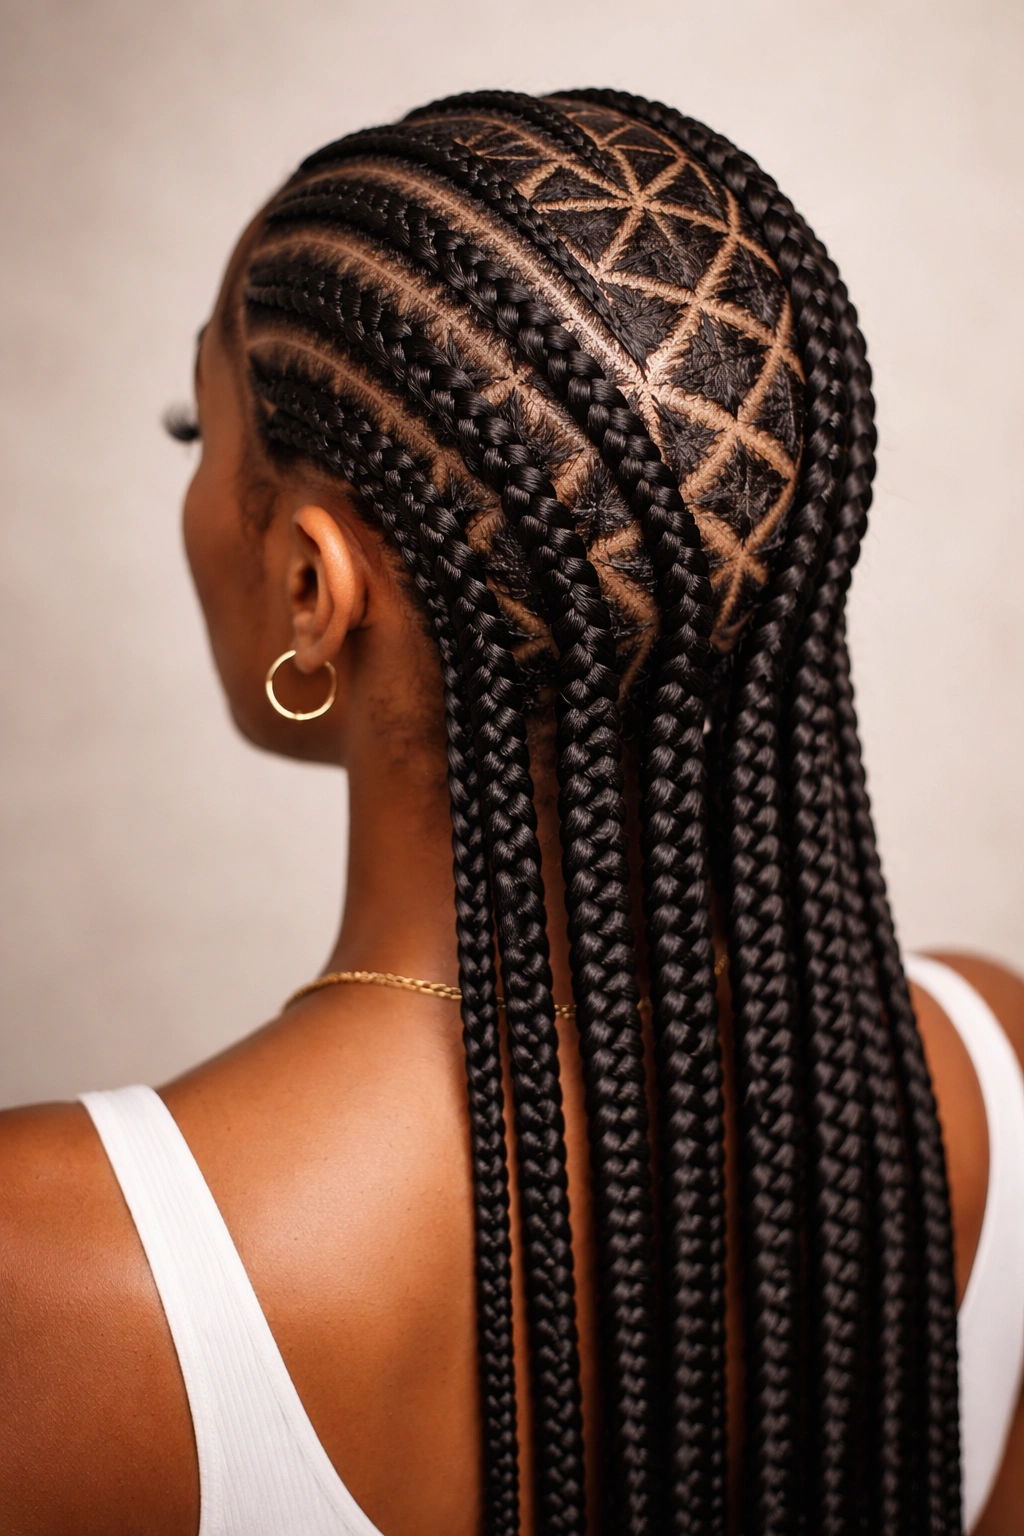
8. Straight-Back Cornrows with Geometric Designs
Adding geometric patterns through your cornrow layout—using the space between braids, the width of braids, or the number of braids in different sections—creates a sophisticated, almost architectural look that signals advanced braiding skill.
The Art and Precision of Pattern-Based Cornrows
Geometric designs in cornrows move beyond simple braiding into the realm of hair art. You might create a diamond pattern using thicker and thinner braids alternating, a checkerboard effect by varying the space between braids, or a gradient where cornrows gradually get thicker or thinner as they progress backward. These designs are eye-catching from behind and create a sense of intentionality and creativity that elevates the style beyond a basic protective hairstyle into genuine artistic expression.
Creating Geometric Patterns with Cornrows
- Plan your design ahead by sketching it out or looking at reference images to understand the pattern you want to create
- Decide whether your pattern will be based on braid thickness, spacing between braids, or a combination of both
- For a diamond pattern: create thicker cornrows with wider spacing, then thinner cornrows with narrower spacing in alternating sections
- For a checkerboard: create cornrows of consistent thickness but vary the width of the space between them in a deliberate pattern
- For a gradient: start with thicker cornrows at the top and progressively make them thinner as you move backward, or vice versa
- Sketch light guide lines on your scalp with a comb if you’re learning this technique—these wash away but help you stay precise
Pro tip: Geometric patterns look especially striking when you photograph them from above or have someone photograph you from behind, as the pattern is most visible from those angles.
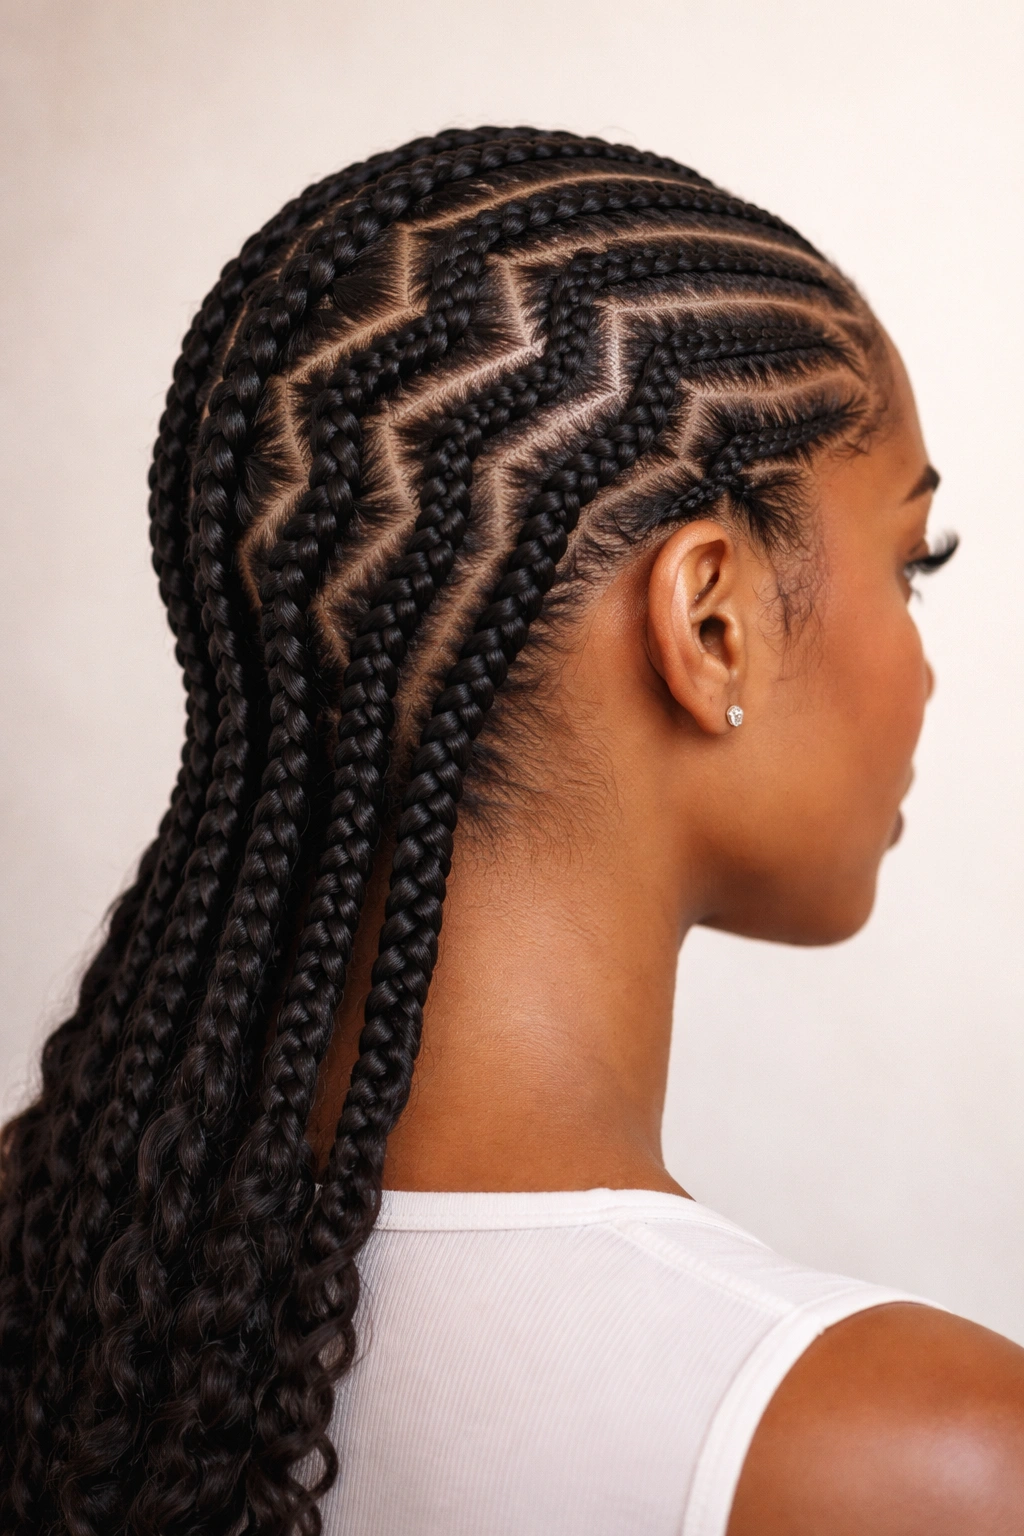
9. Zigzag Straight-Back Cornrows
A playful variation that adds movement to the straight-back concept, zigzag cornrows follow a serpentine path rather than traveling in a perfectly straight line. This style maintains the protective benefits of cornrows while creating visual rhythm and motion.
Adding Movement While Maintaining Structure
Zigzag cornrows challenge the “straight” in their name but honor the spirit of the style by creating cornrows that begin at the front hairline and end at the nape, just not in a dead-straight line. Instead, each cornrow travels diagonally to the right for a few inches, then angles left, then right again, creating a zigzag or wavy pattern. This approach is slightly more complex than perfectly straight cornrows but creates a more dynamic, modern aesthetic. Zigzag cornrows work beautifully when you’re using multiple braids—the pattern repeats across your head for a cohesive look.
Braiding Zigzag Cornrows Successfully
- Create a zigzag guide line using a rattail comb from your hairline to your nape, marking the angle changes clearly
- Begin braiding at your hairline, following the angled line carefully
- At each angle change point, adjust your grip and direction slightly to follow the new angle of your guide line
- Maintain consistent tension even as you’re changing direction—this is trickier than straight braiding and requires focus
- For multiple zigzag cornrows, space them evenly and ensure each one follows the same angle pattern for visual harmony
- You can create just one zigzag cornrow straight back, or multiple zigzags across your head
Worth knowing: Zigzag cornrows are noticeably more time-consuming to install than straight ones, so plan extra time and be patient with yourself if you’re learning this technique.
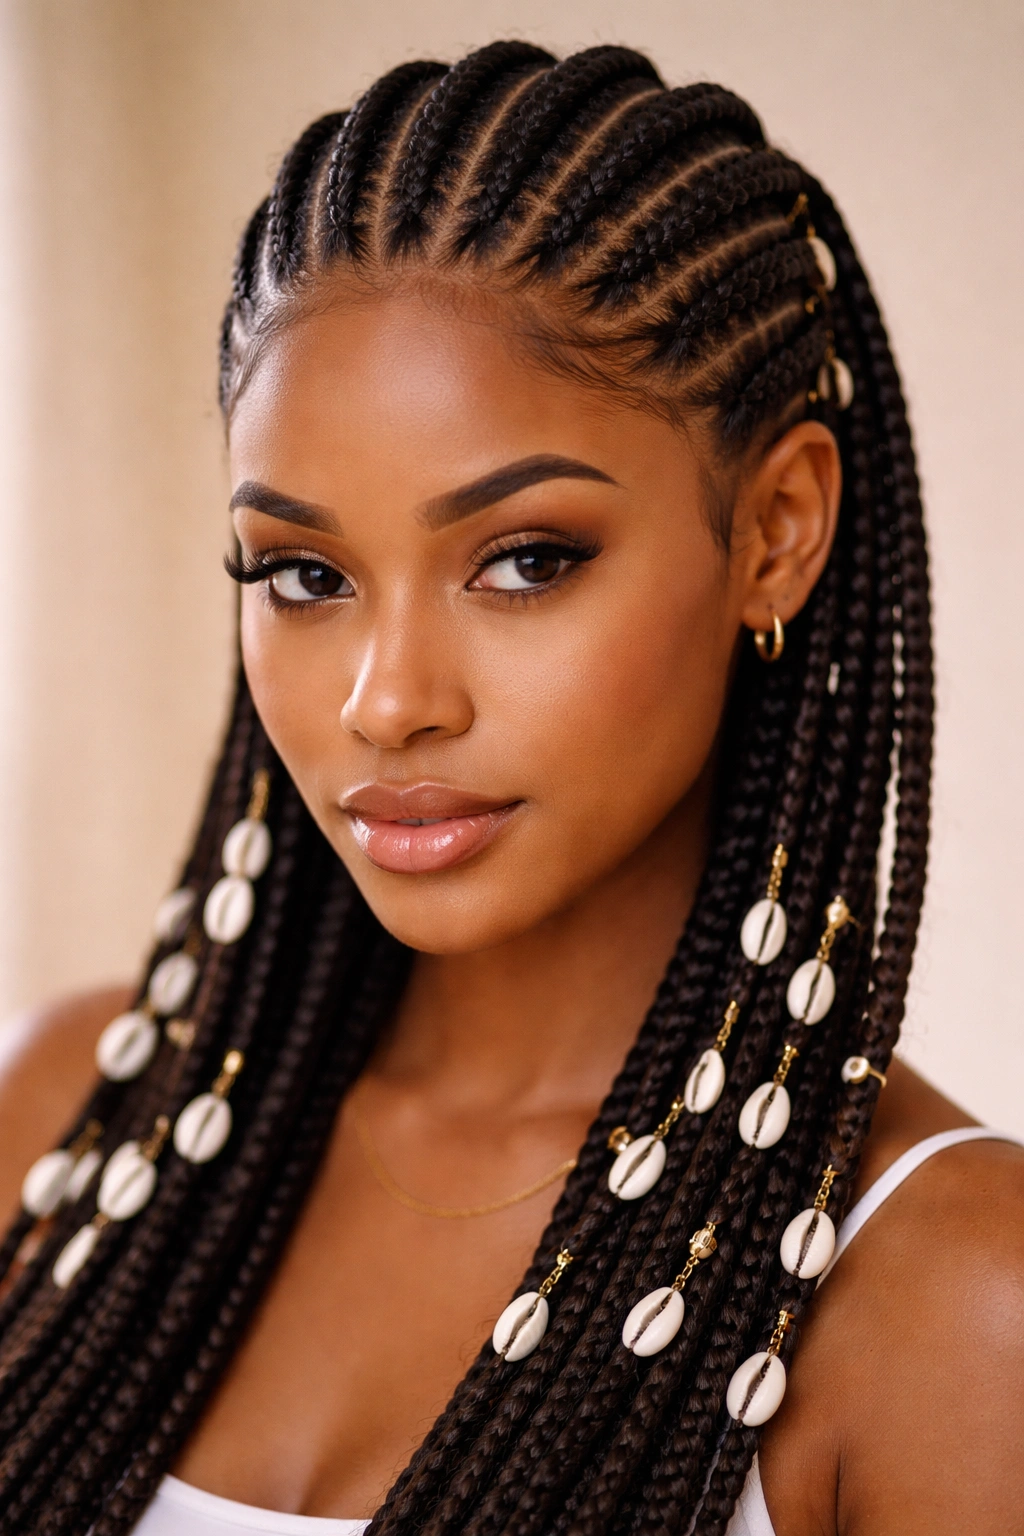
10. Straight-Back Cornrows with Cowrie Shells
Cowrie shells have been used in African hairstyling for centuries, and adding them to straight-back cornrows connects your style to this rich cultural heritage while creating a uniquely beautiful and ornamental look.
The Cultural Significance and Beauty of Cowrie Shells
Cowrie shells were historically used in African and African-diasporic hairstyling as both adornment and symbol. They represented wealth, protection, and cultural identity. Modern cowrie shells used in braids are typically polished to a high shine and can be gold, natural tan, or dyed in various colors. The way light catches on the smooth shell surface creates a sophisticated shimmer that adds luxury to your style. Cowrie shells also add gentle weight to your braids, which helps them hold their shape longer.
Installing Cowrie Shells in Straight-Back Cornrows
- Choose cowrie shells in your preferred size (smaller shells create a delicate look, larger shells make a bolder statement) and finish (natural, gold-plated, or colored)
- Braid your straight-back cornrows as you would normally, taking them all the way to the ends or leaving 2-3 inches unbraided at the bottom
- For each cornrow, thread the braided hair through the opening in the cowrie shell near where the braid ends
- Secure the shell in place with thread, a small rubber band, or by braiding over the opening to lock the shell firmly
- Space multiple shells along a single cornrow for maximum visual impact, or place one shell at the end of each braid
- Arrange shells so they catch light and hang attractively when you move
Real talk: Cowrie shells are delicate and can crack if you pull on them too hard or if they get caught on things, so handle them gently and be mindful when brushing near them or sleeping on that side.
Final Thoughts
Straight-back cornrows offer a foundation for endless creative expression while serving the essential purpose of protecting your natural hair. Whether you choose the classic simplicity of a single cornrow, the bold statement of thick braids, the intricate beauty of thin braids with beads, or the artistic complexity of geometric patterns and zigzags, each variation tells its own story about how you see yourself and your style.
The most important element across all these approaches is maintaining healthy tension that keeps your cornrows looking polished without straining your edges or scalp. Take time to choose a style that genuinely excites you—the confidence you feel wearing something you love always shows.
Remember that cornrows are a protective style, but protection only works when the hairstyle itself is well-executed and well-maintained. Keep your scalp moisturized, tie a silk scarf around your edges at night, and don’t leave cornrows in longer than eight to twelve weeks. Your natural hair underneath is doing the real work of growing and thriving while your braids keep it safe—honor that process by caring for both your braids and your hair beneath them.