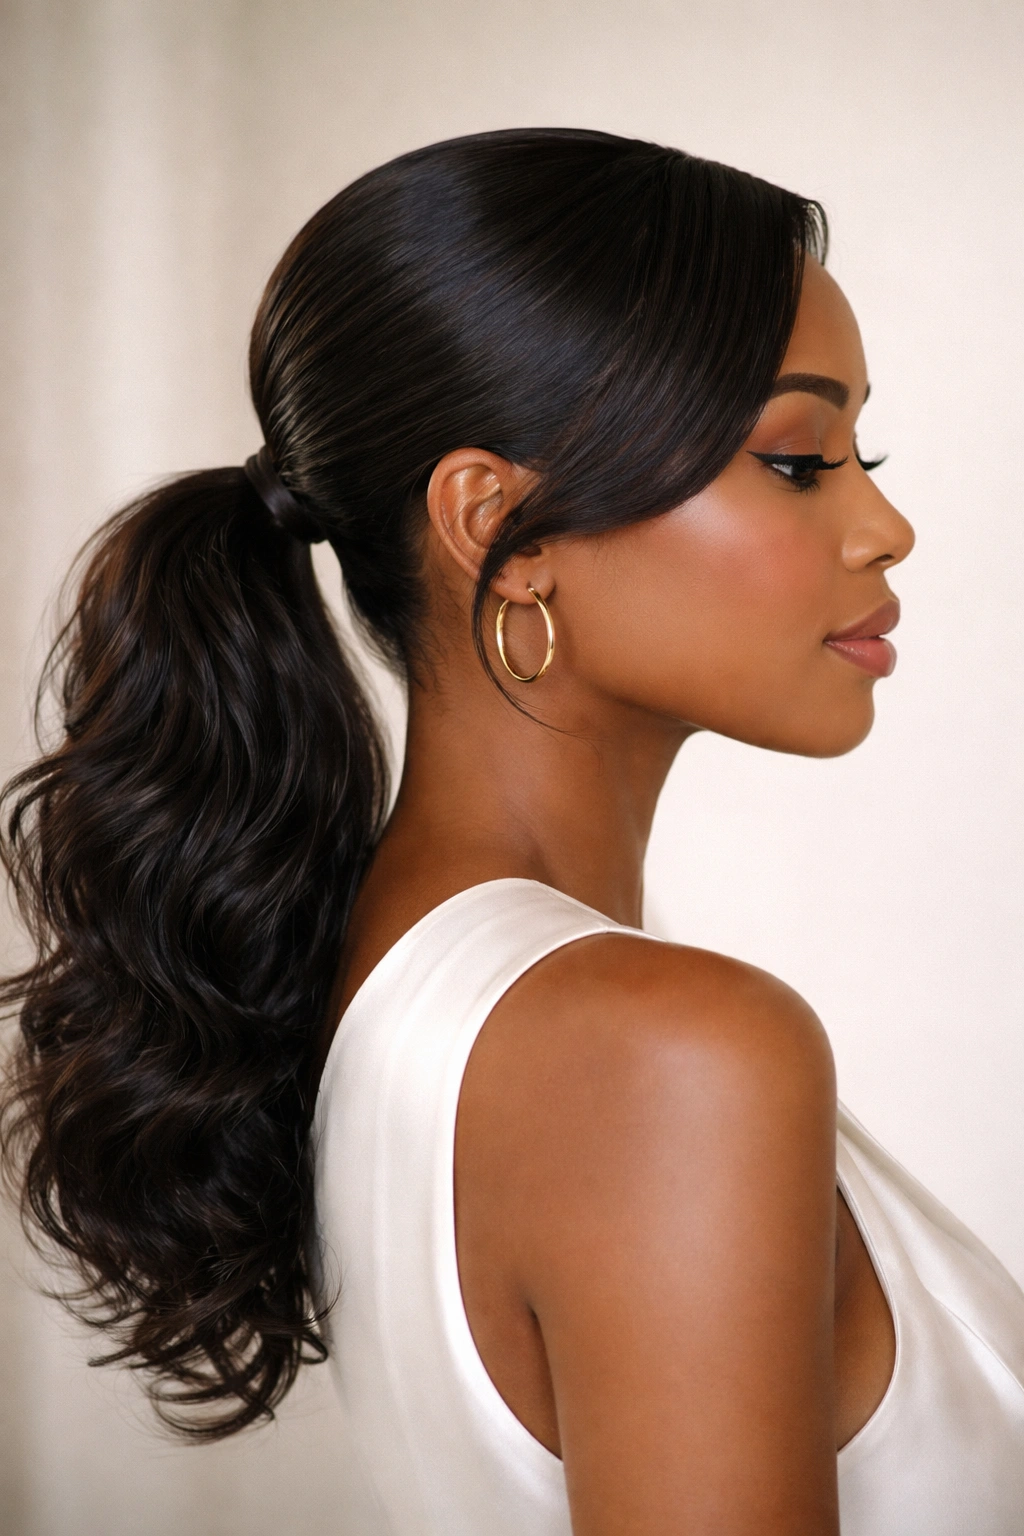
The swoop ponytail is the ultimate power move for natural hair—it’s polished enough for any professional setting, stylish enough to turn heads, and incredibly flattering on virtually every face shape and hair type. What makes the swoop technique so special is its versatility: it works whether your texture is tightly coiled, loosely wavy, or somewhere in between, and it actually celebrates the natural dimension and movement of textured hair rather than fighting against it. The defining feature is that smooth, sculpted swoosh of hair that frames one side of the face before flowing back into the ponytail—it adds sophistication and visual interest while keeping hair secured and manageable.
If you’ve ever felt stuck rotating between the same basic ponytails or struggled to find styles that honor your natural texture while looking refined, you’re about to discover that the swoop ponytail has far more range than you probably realized. Each variation takes the core swooping technique and adapts it—with different textures, placement heights, accent techniques, and finishing details—so you can match the style to your hair density, your personal aesthetic, and the occasion you’re dressing for. Whether you’re prepping for a presentation at work, heading out for date night, or just wanting to feel extra confident on a regular Tuesday, there’s a swoop ponytail here that’s going to become your new go-to.
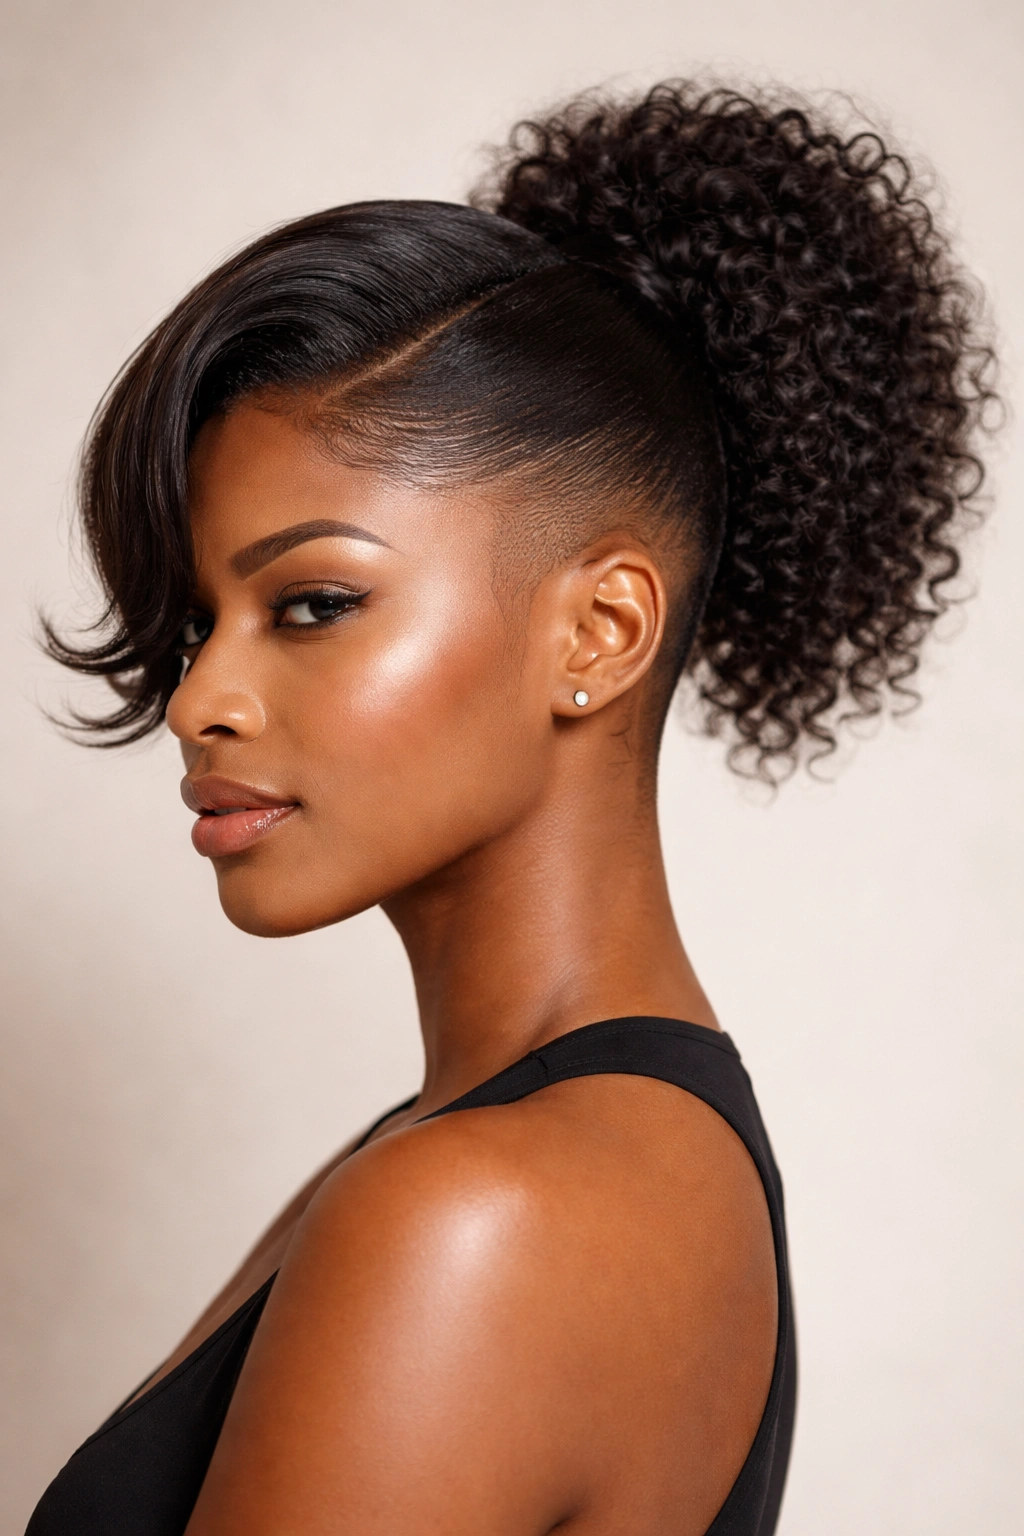
1. Sleek Textured Swoop with High Volume
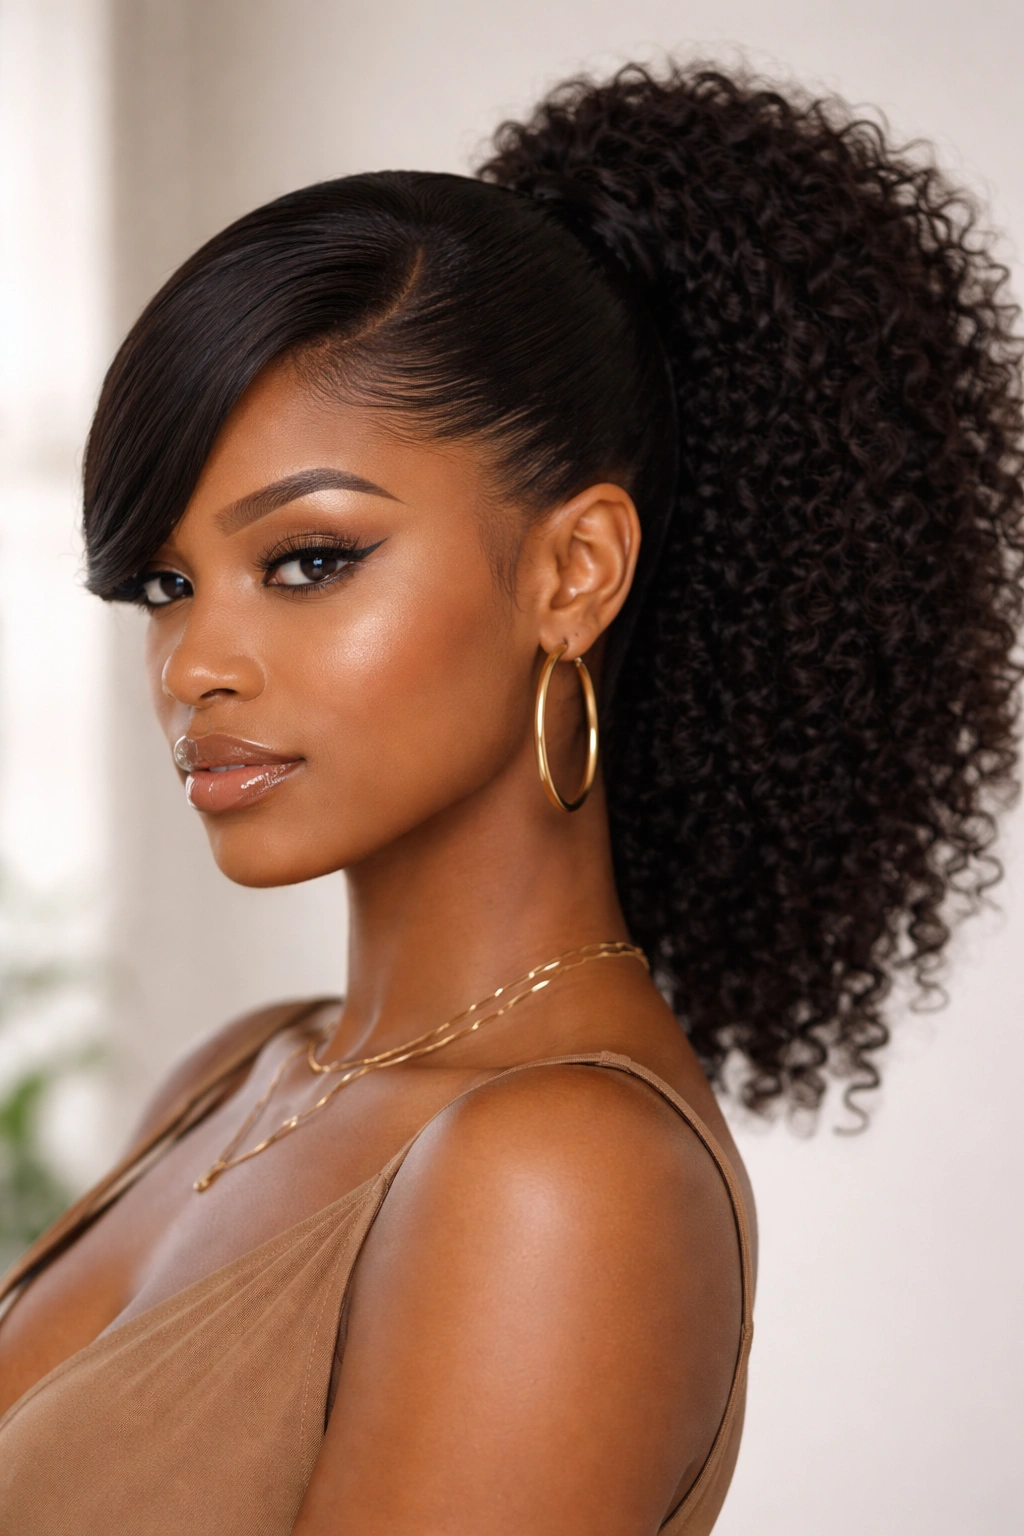
This is the style that says “I woke up like this but also completely have my life together”—it combines a smooth, defined swoosh on one side with genuine textured volume at the base of the ponytail, creating contrast that feels both effortless and intentional. The sleekness comes from smoothing one section of hair firmly back and to the side, while the bulk of your natural texture remains loose and full in the ponytail itself, usually positioned fairly high on the crown.
How to Build This Look
The secret to pulling this off is using a combination of styling products and sectioning. Start with damp hair and apply a lightweight gel or edge control to the section of hair you want to swoop—this is usually a triangular section from the temple, up and back toward the crown. Use a fine-tooth comb or brush to smooth this section firmly against your head, directing it toward the opposite side of your face. As you smooth it back, you’re creating that signature curved line that hugs your head. Secure this swooped section at the crown where it naturally falls, then gather the rest of your hair into a ponytail at your preferred height, allowing the unsmoothened hair to maintain its natural texture and volume.
Best For and Key Details
- Works beautifully on all texture types, from coils to waves—the key is that you’re only smoothing one section, not your entire head
- The high ponytail placement elongates the neck and suits round or square face shapes particularly well
- Use products sparingly on the swooped section so it looks polished rather than slicked
- The contrast between the smooth swoop and textured ponytail is what makes this style visually striking—don’t over-smooth your ponytail or you’ll lose that dynamic quality
Pro tip: This style actually looks better on the second day of hair when your waves or coils have had time to set and define themselves. If you’re working with freshly washed hair, let it air-dry for at least a few hours before attempting the swoop for the best texture payoff.
2. Bubble Swoop with Defined Coils
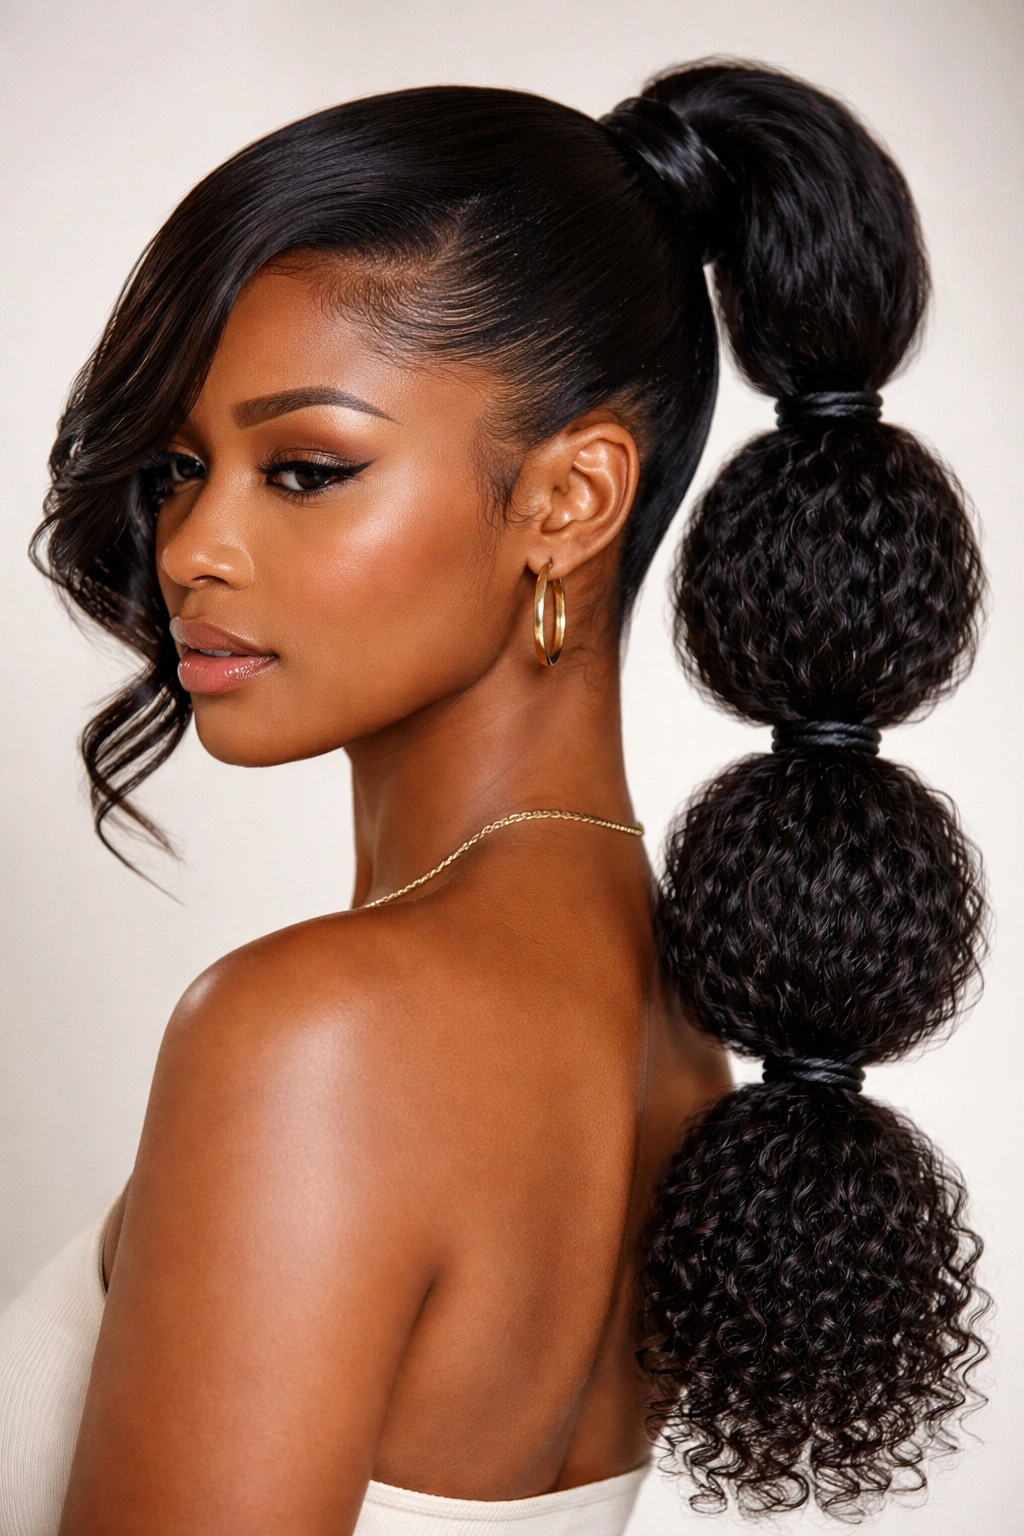
The bubble ponytail—those sectioned, stacked elastic moments of visual drama—becomes something completely different when you add a swoop, transforming it from playful to genuinely sophisticated. By incorporating a swooped frame and then dividing your ponytail into 3-4 distinct bubbles separated by smaller elastics, you’re creating a style that reads as high-effort while actually being quite straightforward to execute and maintain.
Creating the Bubble Structure
After you’ve created your sleek swoop and secured your ponytail at the back, the bubbles come next. Divide your ponytail into 3-4 sections using small elastics spaced about 1.5 to 2 inches apart, depending on your hair length and how defined you want each bubble to be. Gently smooth each section slightly and fluff it out to create that bubble shape—use your fingers rather than a comb here, as you want to emphasize the natural texture. The swoop frames the first bubble beautifully, drawing attention upward before the eye travels down the bubbles.
What Makes It Work
- The bubbles are an excellent way to add visual interest and height without complicated braiding
- Each bubble should be slightly fuller than the one below it, creating a natural visual flow
- This style works especially well for coily and tightly textured hair that holds shape beautifully
- The swoop takes about 2-3 minutes longer than a regular bubble ponytail, but the payoff in polish is massive
Worth knowing: The tension you use when securing those elastics matters—too tight and you risk breakage, but too loose and the bubbles won’t hold their shape. Aim for “snug but comfortable” and check that you can slip a single finger under each elastic.
3. Twisted Swoop Ponytail
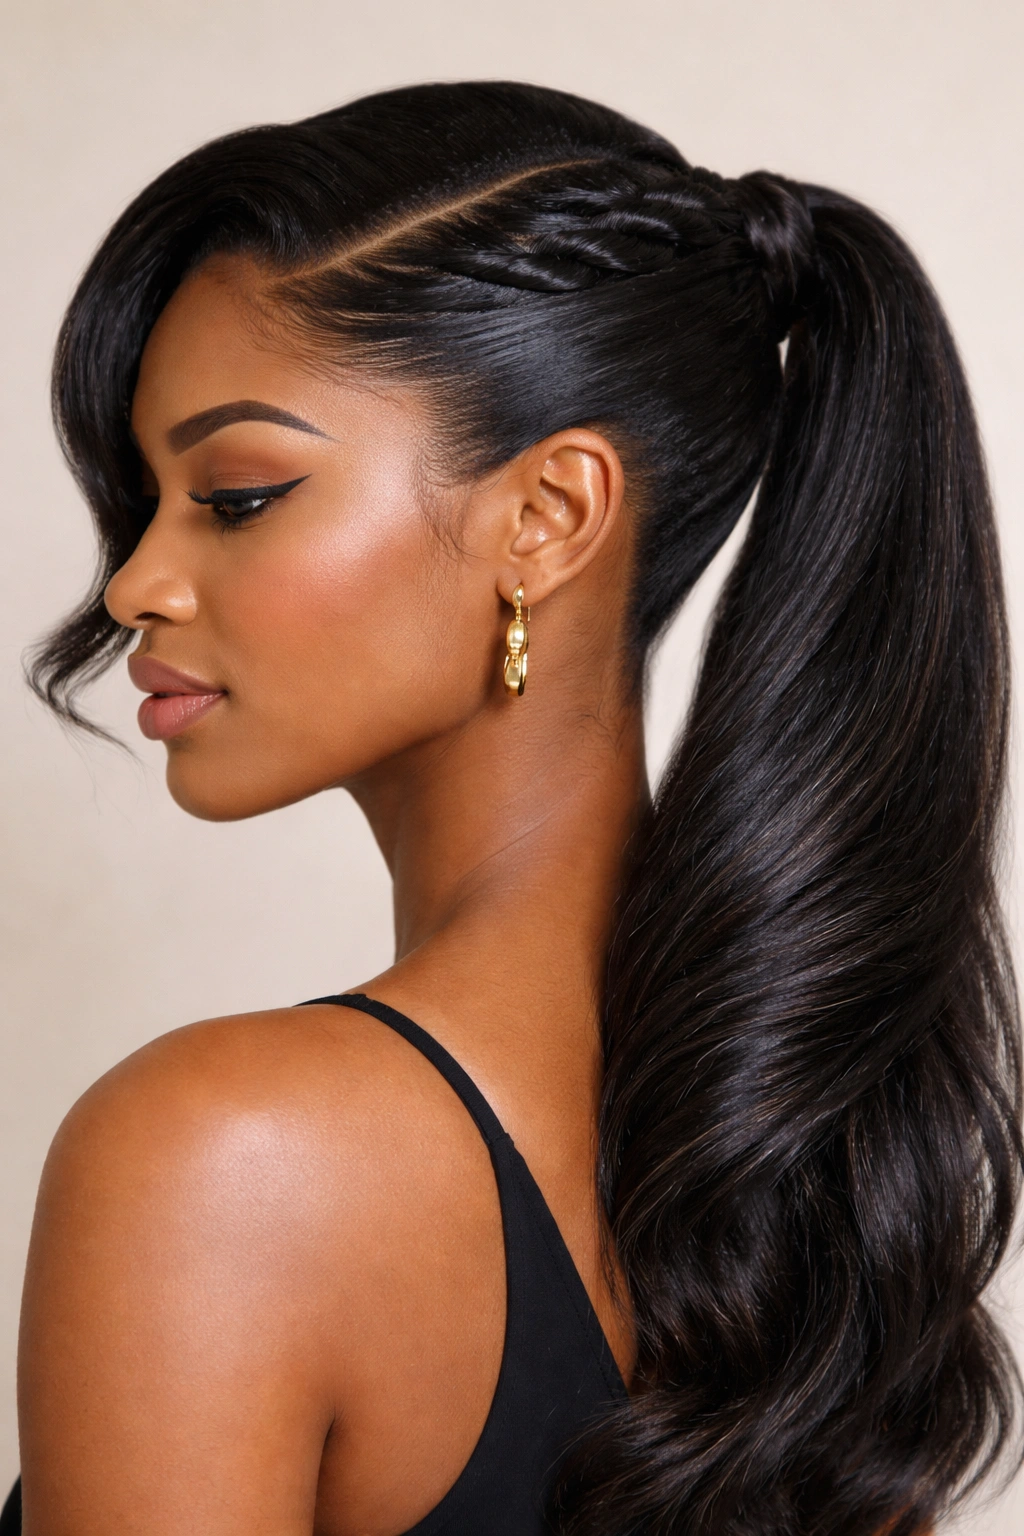
This variation adds an elegant spiral element that catches light beautifully and works especially well if your natural texture has wave or gentle curl to it. Instead of just smoothing your swoop section straight back, you’re twisting it as you move it backward, creating a ropelike effect that adds dimension and visual texture to the swooped frame.
The Twisting Technique
Begin with your swoop section and divide it into two strands. Twist these two strands around each other as you move them back and slightly upward toward the crown, maintaining steady tension so the twist stays tight and defined. The twist should follow the natural curve of your head and end where you’ll be securing your ponytail. You can twist both strands in the same direction (creating a rope) or in opposite directions for a more intricate look. Once you’ve twisted back to your securing point, gather the rest of your hair into your ponytail.
Why Twists Elevate the Style
- Twists create visual texture and movement that plain smoothed sections can’t match
- The spiral catches light in a way that makes the style photograph beautifully
- Twists are more forgiving than perfectly smooth sections if you’re working with textured hair
- This style offers a nice middle ground between “sleek” and “textured”—you get polish without austerity
Quick detail: Two-strand twists held in a swooped position need to stay hydrated to maintain definition, so a light hair oil or moisturizing spray applied before twisting helps them hold their shape throughout the day.
4. Braided Swoop Accent
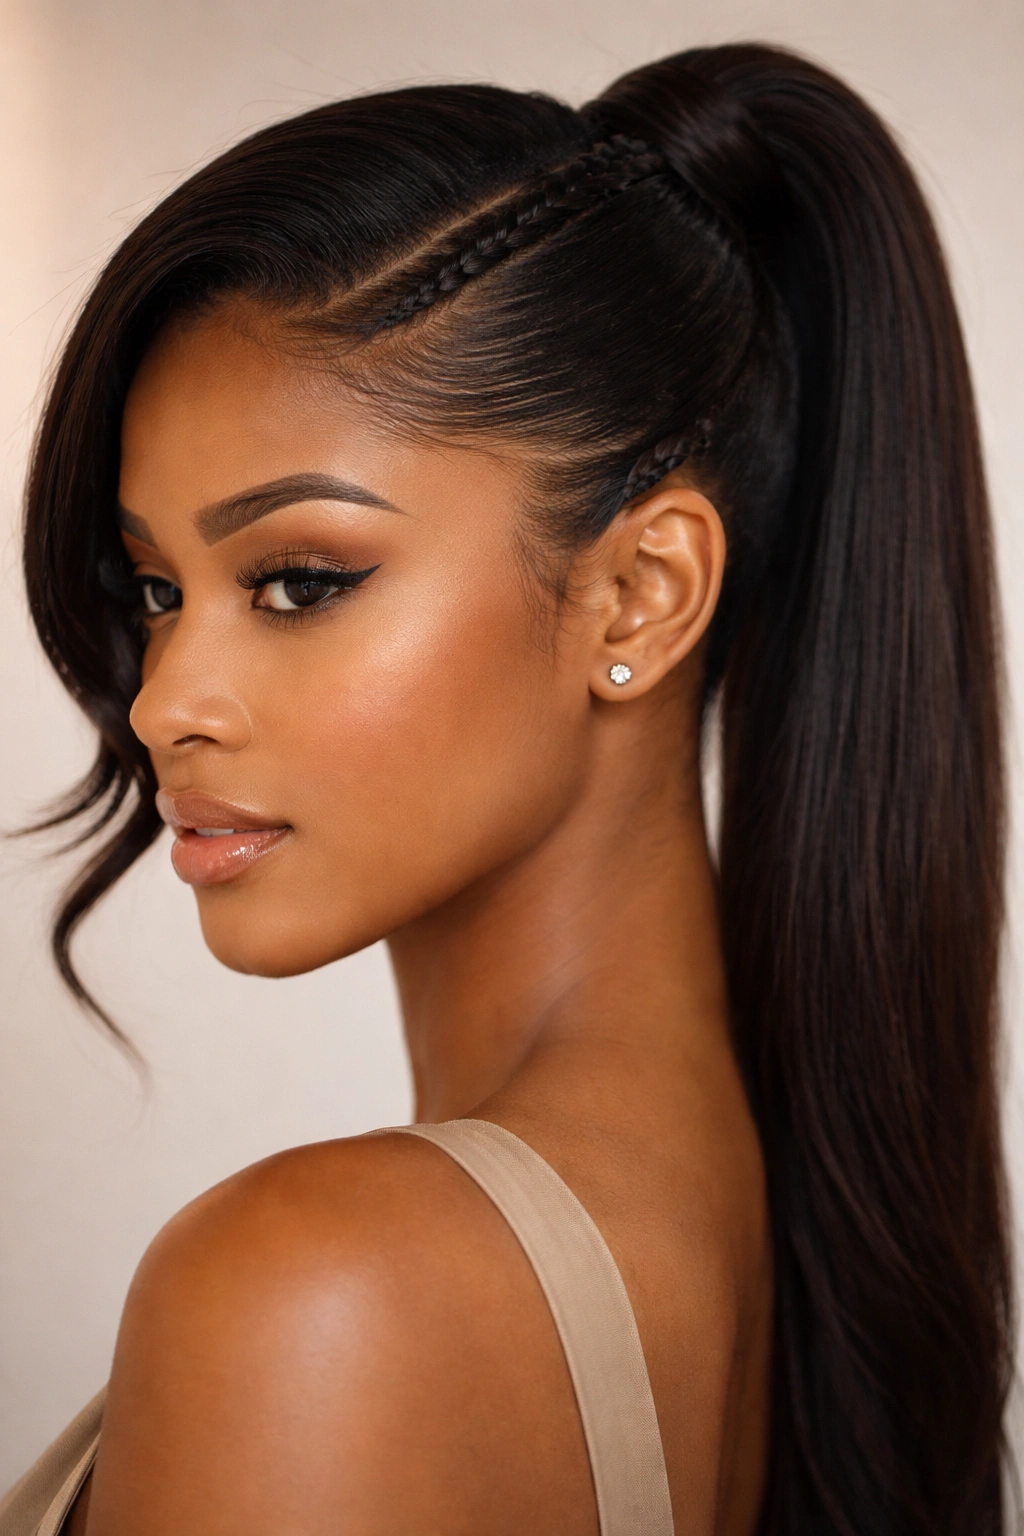
For days when you want maximum texture and visual interest, a braid running through your swoop section transforms the look from modern to genuinely artistic. A single thin braid woven through the swooped section, or even two delicate braids running parallel, adds complexity without overwhelming the overall style.
Incorporating Braids into Your Swoop
Divide your swoop section into three thin strands and braid these strands as you move them back and across your head, following the same path your swoop would take. Keep the braid tight enough to maintain definition but loose enough that your natural texture shows through the gaps of the braid. Once you’ve braided back to where you want to secure your ponytail, secure the braid tip with a small elastic or bobby pin, then gather your remaining hair into your main ponytail. The braid becomes a beautiful accent that frames your face and draws attention upward.
Design Considerations
- Braids work better on hair that’s at least shoulder-length and has enough texture to hold the braid’s shape
- A single braid is more refined and minimal; multiple braids create a more intricate, artistic look
- Thin braids read more elegant than thick ones—aim for braids no thicker than a pencil
- This style really shines on coily and tightly textured hair where the natural texture adds dimension to the braid itself
Real talk: If your hair is very fine or slippery, you might need to use a small amount of mousse or curl cream on the section you’re braiding to help the braid hold. Apply it to damp hair before braiding for best results.
5. Low Textured Swoop
Not everyone loves a high ponytail, and the low swoop offers elegance and sophistication with a more relaxed placement that suits different face shapes and personal styles. By positioning your ponytail lower on the back of your head—usually at the nape or just slightly above—while still incorporating a swooped frame at the crown level, you create a style that feels effortlessly polished and age-appropriate across the entire spectrum.
Building a Low Swoop
Create your swoop exactly as you would for a high version, smoothing that front section back and securing it where your swoop naturally ends. However, instead of gathering your ponytail at the crown, gather it lower—at the base of your head where your natural hairline ends or just slightly above. This lower placement means your swoop is more prominent and frames your face more dramatically. The lower ponytail also gives the illusion of a longer neck and works beautifully if you have a longer face shape.
When to Wear This Version
- Professional settings where you want polish without the “high on the crown” prominence
- Everyday wear that needs to feel put-together but not over-the-top
- Any occasion where you’re wearing a formal top or dress—the lower ponytail balances the visual weight better
- If you have a rounder face shape, the lower placement with the swooped frame is incredibly flattering
Pro insight: A low swoop shows off the back of your neck and upper back, so this is the perfect time to make sure your neckline flatters you or to consider a piece of jewelry that complements the style. The lower placement also tends to last longer throughout the day without loosening.
6. Swoop with Statement Accessories
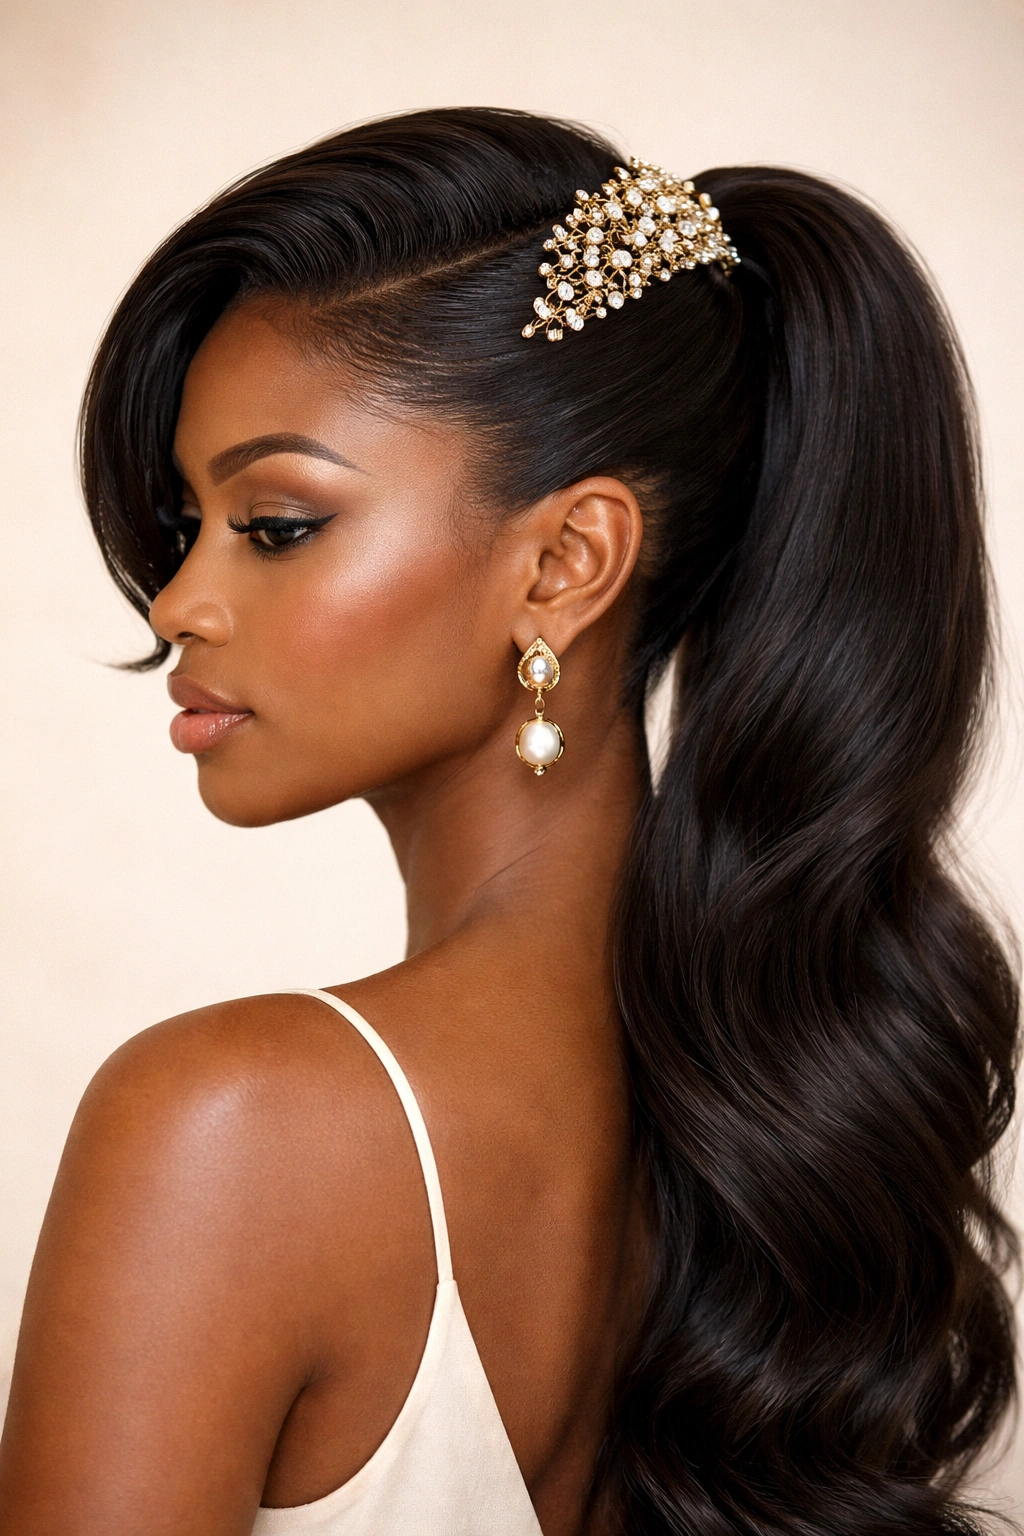
Elevate any swoop ponytail instantly by incorporating hair accessories that sit in or near your swooped section—a cuff, a jeweled pin, a chain, or even a silk scarf woven through the swoop. The accessories catch light and add a finishing-touch elegance that takes the style from “everyday put-together” to “intentionally styled.”
Placement and Selection
The most impactful placement is usually where your swoop meets your secured ponytail—right at the crown. A single jeweled or metallic cuff worn over the elastic creates a polished focal point. Alternatively, position a decorative pin or clip where your swoop curves, using it to anchor the style while also serving as a visual statement. If you prefer something more fluid, a thin chain or beaded strand woven through the swoop section before you secure it adds dimension and catches movement beautifully.
Accessory Ideas That Actually Work
- Metal cuffs in gold, silver, or bronze blend beautifully with any skin tone
- Silk scarves or ribbons woven through a swoop add color and personality without weight
- Pearl or gold pins positioned at the swoop apex feel timeless and refined
- Delicate chains looped through the secured ponytail base add unexpected elegance
- Decorative elastics in metallic or jewel tones replace your regular hair tie with style
Honest detail: More isn’t always better with accessories—one well-placed piece reads as intentional and editorial, while multiple competing accessories can feel chaotic. Choose one focal-point accessory and let your swoop and ponytail texture provide the rest of the visual interest.
7. Faux Hawk Swoop
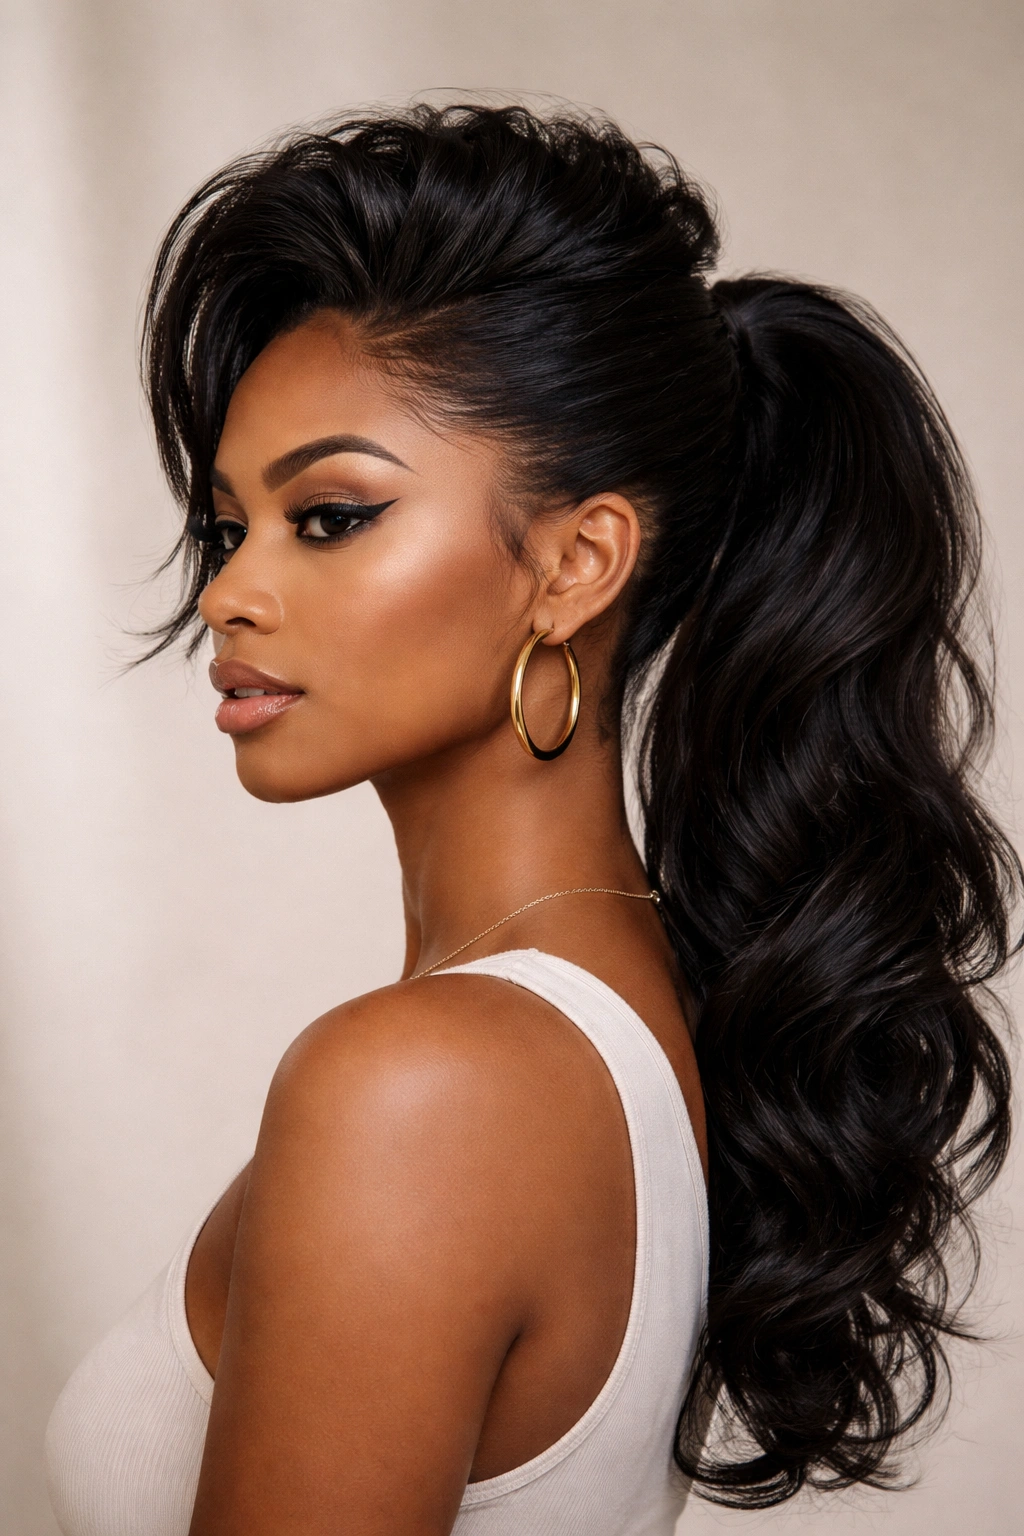
If you love the attitude of a mohawk but want something that reads as professional and wearable, a faux hawk incorporated into a swoop structure gives you edge and personality without requiring an actual shaved cut. By creating volume down the center of your head with smoothed sides that swoop, you’re playing with proportion and visual drama in a sophisticated way.
Creating the Center Volume
Section your hair into three parts: a wider center section and two narrower side sections. Smooth each side section backward into a swoop formation (you’ll have one swoop on each side of your head, which is different from the one-side swoop in other variations). Gather everything into a ponytail, but before securing, tease or backcomb the center section of your ponytail for height and volume at the crown. This creates an elevated center line that reads like a faux hawk while your swooped sides keep it polished and wearable.
Making It Work on Natural Hair
- This style works best on denser hair types that can support the teased volume without looking thin
- You’ll need either a lot of natural shrinkage or some blow-drying with a round brush to create the height needed
- The faux hawk effect is stronger if your natural texture is coily or tightly curled—waves alone may not hold the visual separation
- This is a higher-maintenance style that requires re-teasing if you’re wearing it for more than a few hours
Important note: Teasing or backcombing should be done gently to avoid unnecessary breakage. Always use a wide-tooth comb and work in small sections, focusing on the mid-length and ends rather than at the scalp.
8. Chunky Curl Swoop
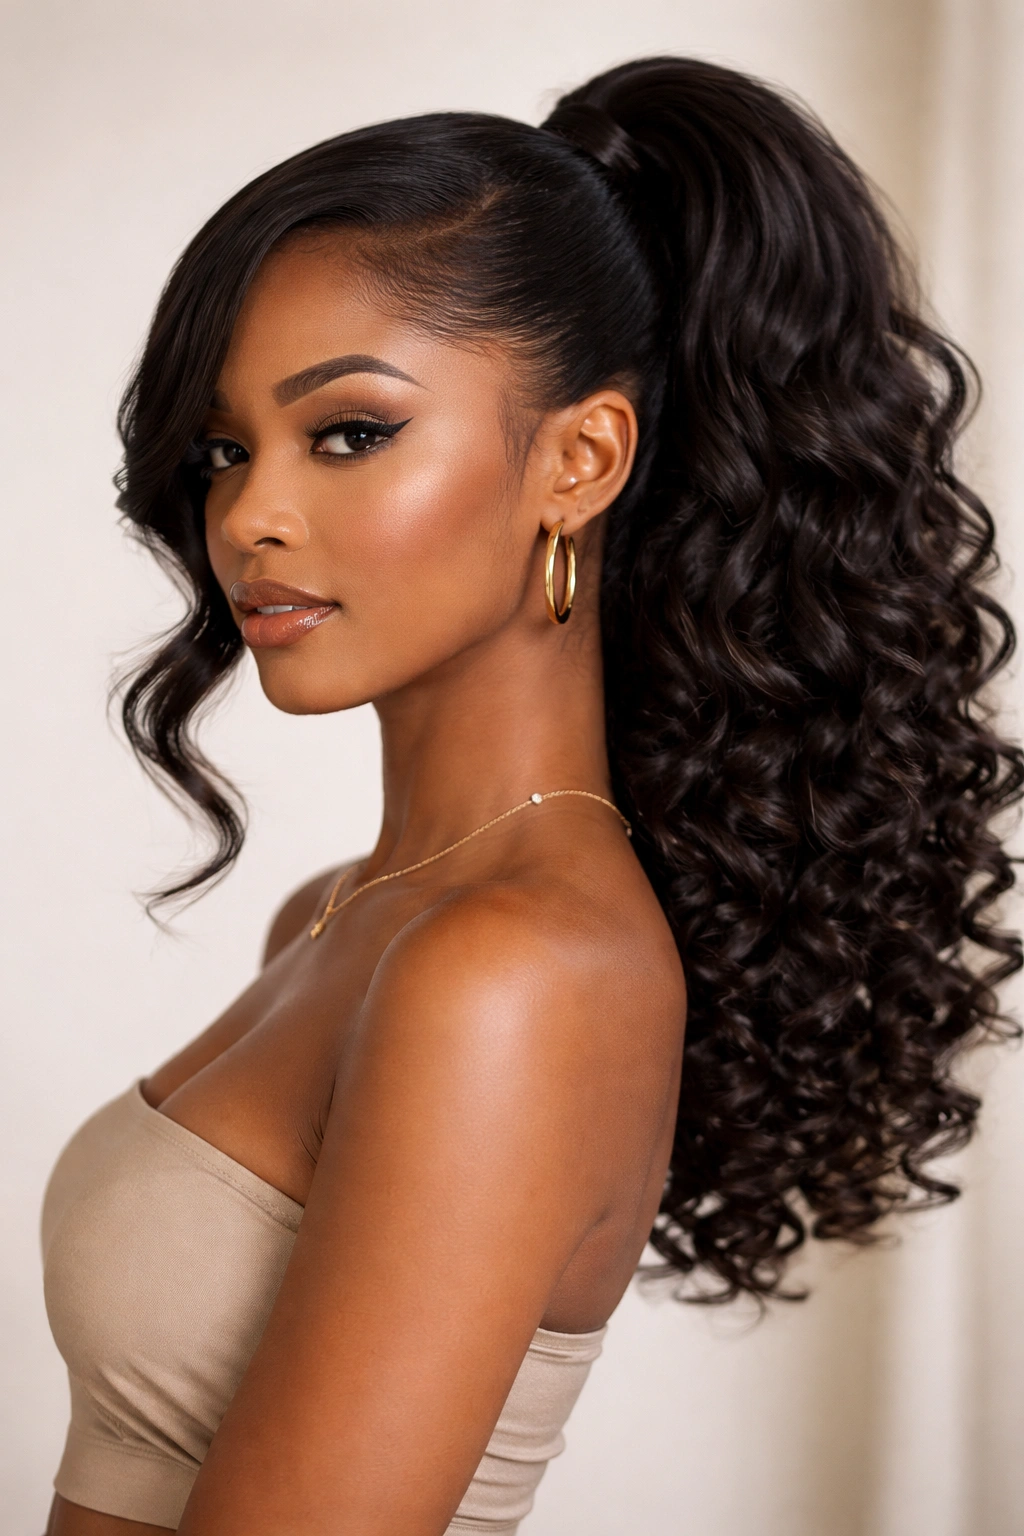
This variation celebrates maximum texture by incorporating loose, defined curls throughout your ponytail while maintaining the sleek swoop frame. It’s the style that says “I absolutely love my natural curls and I’m not trying to minimize them”—the swoop just adds a touch of polish to frame them beautifully.
Enhancing Natural Curl Definition
After creating your smooth swoop, you’re going to emphasize the curl pattern in your ponytail rather than taming it. Apply a curl-defining cream or gel to damp hair before styling, focusing on your ponytail section. Once you’ve secured the ponytail, use a curling cream or curl enhancer on individual curl clusters to define and separate them, encouraging them to coil outward and upward. Your goal is curls that spiral clearly, with visible separation between each curl or cluster, creating visible texture and volume that contrasts beautifully with your smooth swoop.
The Texture Balance
- The contrast between the smooth swoop and the chunky defined curls is what makes this style visually compelling
- Curls should be damp when you apply defining products, and you may want to let them air-dry or use a diffuser to set them
- This style looks especially stunning on coily and tightly curled hair where curl definition is naturally pronounced
- The looser and bouncier your curls, the more dramatic and eye-catching this style becomes
Pro move: If your curls need a little help bouncing and separating, try finger-coiling small sections of your ponytail—wrap each curl cluster around your index finger in the direction it’s already curling, then gently release it. This encourages bouncy, defined curls without requiring heat styling.
9. Tapered Swoop with Fade
For those with taper fades, undercuts, or shaved sides, a swoop becomes a beautiful way to emphasize and celebrate that cut while keeping the longer hair on top styled and secured. The contrast between the smooth, faded sides and the full swoop with textured ponytail on top is genuinely striking.
Working with Tapered Sides
Your swoop takes on new meaning when you have shaved or closely cut sides—the smooth swoop line actually mirrors and emphasizes the lines of your fade. Create your swooped section as usual, directing it smoothly back and securing it. The tight swoop becomes part of your overall architectural silhouette, working in concert with your faded sides to create clean lines. Your ponytail sits full and textured on top, making the contrast between the shaped sides and the loose hair even more dramatic.
Why This Works
- The shaved or faded sides actually make it easier to create a sleek, defined swoop because there’s no hair competing for space
- The style reads as intentional and high-fashion in a way that standard ponytails can’t
- Your ponytail texture is the hero here—because the sides are defined, you can let your curls or waves be as full and textured as they naturally are
- This combination is incredibly flattering on elongated and oval face shapes
Detail to know: If your fade is very fresh and clean, you might want to let it grow in just slightly (a week or two) to provide a tiny bit of texture for the swoop to grip. A completely freshly faded side can sometimes feel too slippery for a swoop to sit perfectly, though it’s absolutely doable.
10. Sleek Wave Swoop
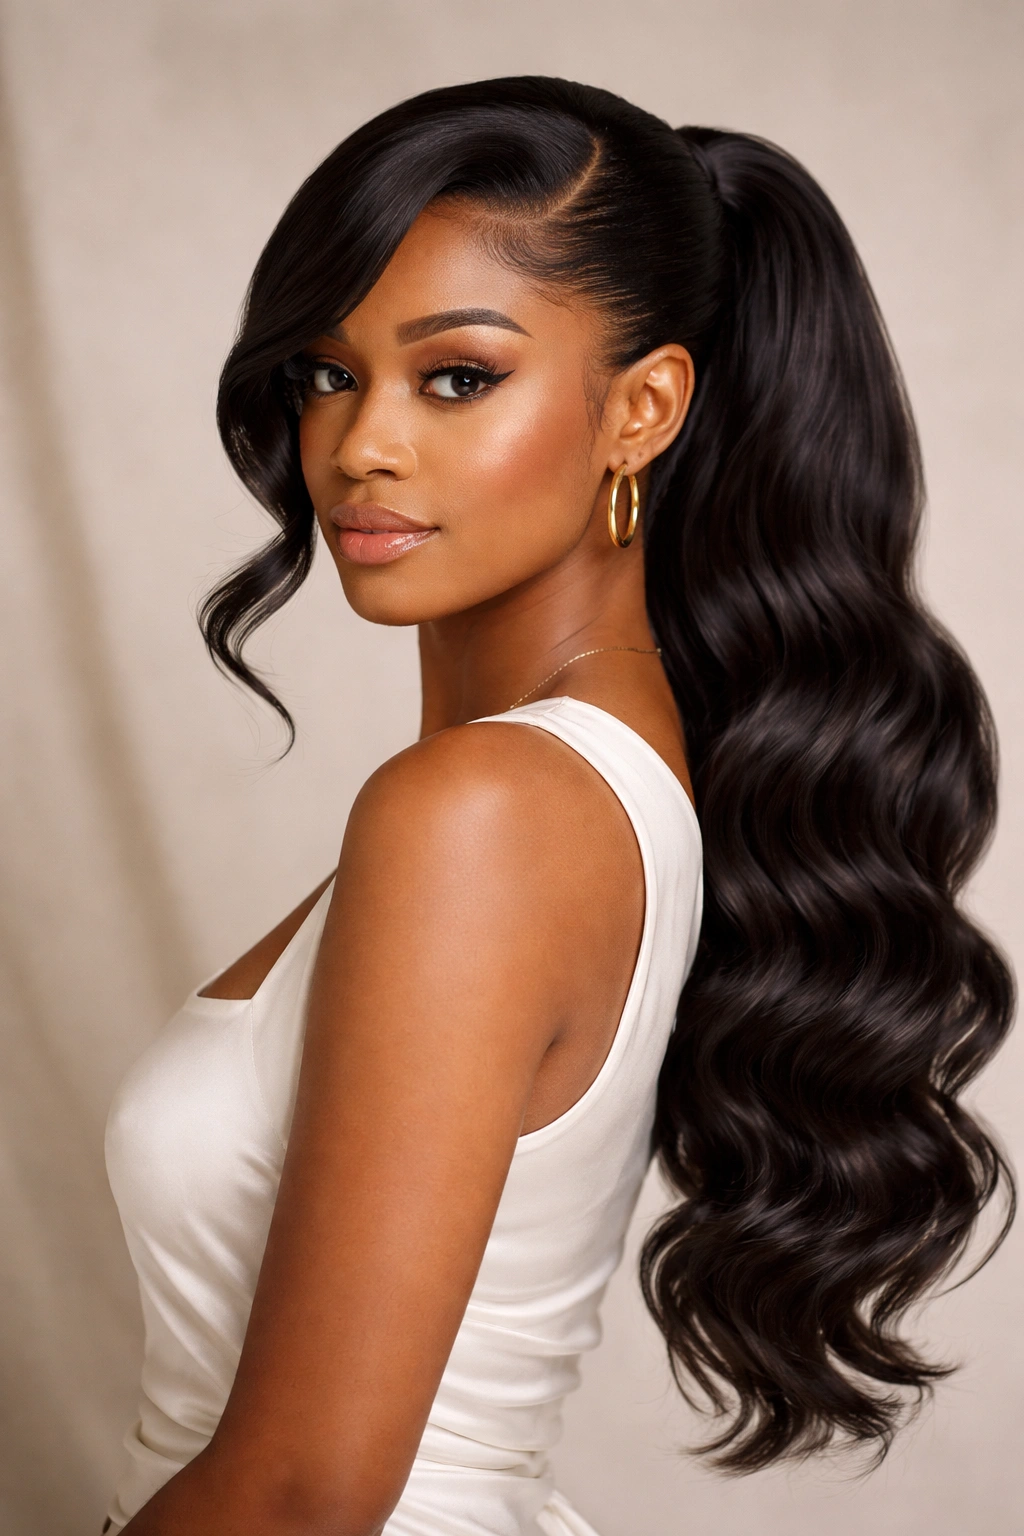
For those with beautifully textured waves or curls that read as wavy, a swoop that emphasizes the wave pattern in your swooped section while maintaining defined waves throughout your ponytail creates a cohesive, elegant style. The waves are enhanced rather than tamed, creating movement and sophistication simultaneously.
Creating Wave Definition
Begin with hair that’s damp or lightly moisturized with a leave-in conditioner. Apply a mousse or lightweight styling cream to your swoop section and use a wave brush or your fingers to encourage the wave pattern, directing it backward and upward along the curve of your head. Your goal is waves that are defined and directional, following the path of your swoop. In your ponytail, apply the same styling product and encourage the same wave pattern, so your entire head feels cohesive—one movement of wave from front to back.
Making Waves Photograph and Perform Well
- Waves are more forgiving than coils if you need your swoop to stay smooth—slight texture actually adds dimension rather than disrupting the line
- This style works beautifully with any wave pattern, from loose S-waves to tighter curl patterns with wave-like appearance
- You can enhance waves with a large-barrel curling iron or simply by finger-coiling damp hair and letting it air-dry
- The swoop with defined waves reads as effortlessly sophisticated—that “I just threw this together” energy that’s actually quite polished
Styling tip: If you’re using heat to define waves, wrap each section gently around a large barrel curling iron (2-2.5 inches) and hold for 10-15 seconds, then release and allow to cool. The cooling-down time is when the curl actually sets, so don’t assume because it looks curly when hot that it will hold. Let each wave cool completely before moving to the next section.
Final Thoughts

The swoop ponytail isn’t just one style—it’s a framework that adapts beautifully to your texture, your personal aesthetic, and the specific occasion you’re dressing for. What makes it so powerful is that it works with your natural hair rather than against it, honoring the texture and movement that make natural hair so distinctive while adding just enough polish and intention to feel completely refined.
The variations here represent a full spectrum from minimal-effort-but-elegant to high-impact-and-intentional, so you’ve got options whether you’re rushing out the door or spending time perfecting a special-occasion look. Start with whichever variation speaks to you most strongly, but know that as you get comfortable with the basic swoop technique, experimenting with twists, braids, different placements, and texture emphasis becomes intuitive. Your swoop ponytail will evolve with your growing confidence and your mood.
The most important thing is that you’re choosing a style that makes you feel capable and beautiful—because that energy is what really matters when you walk out the door. These swoops are tools to help you get there, and once you find the variation that becomes your signature move, you’ll understand why so many people return to the swoop again and again.