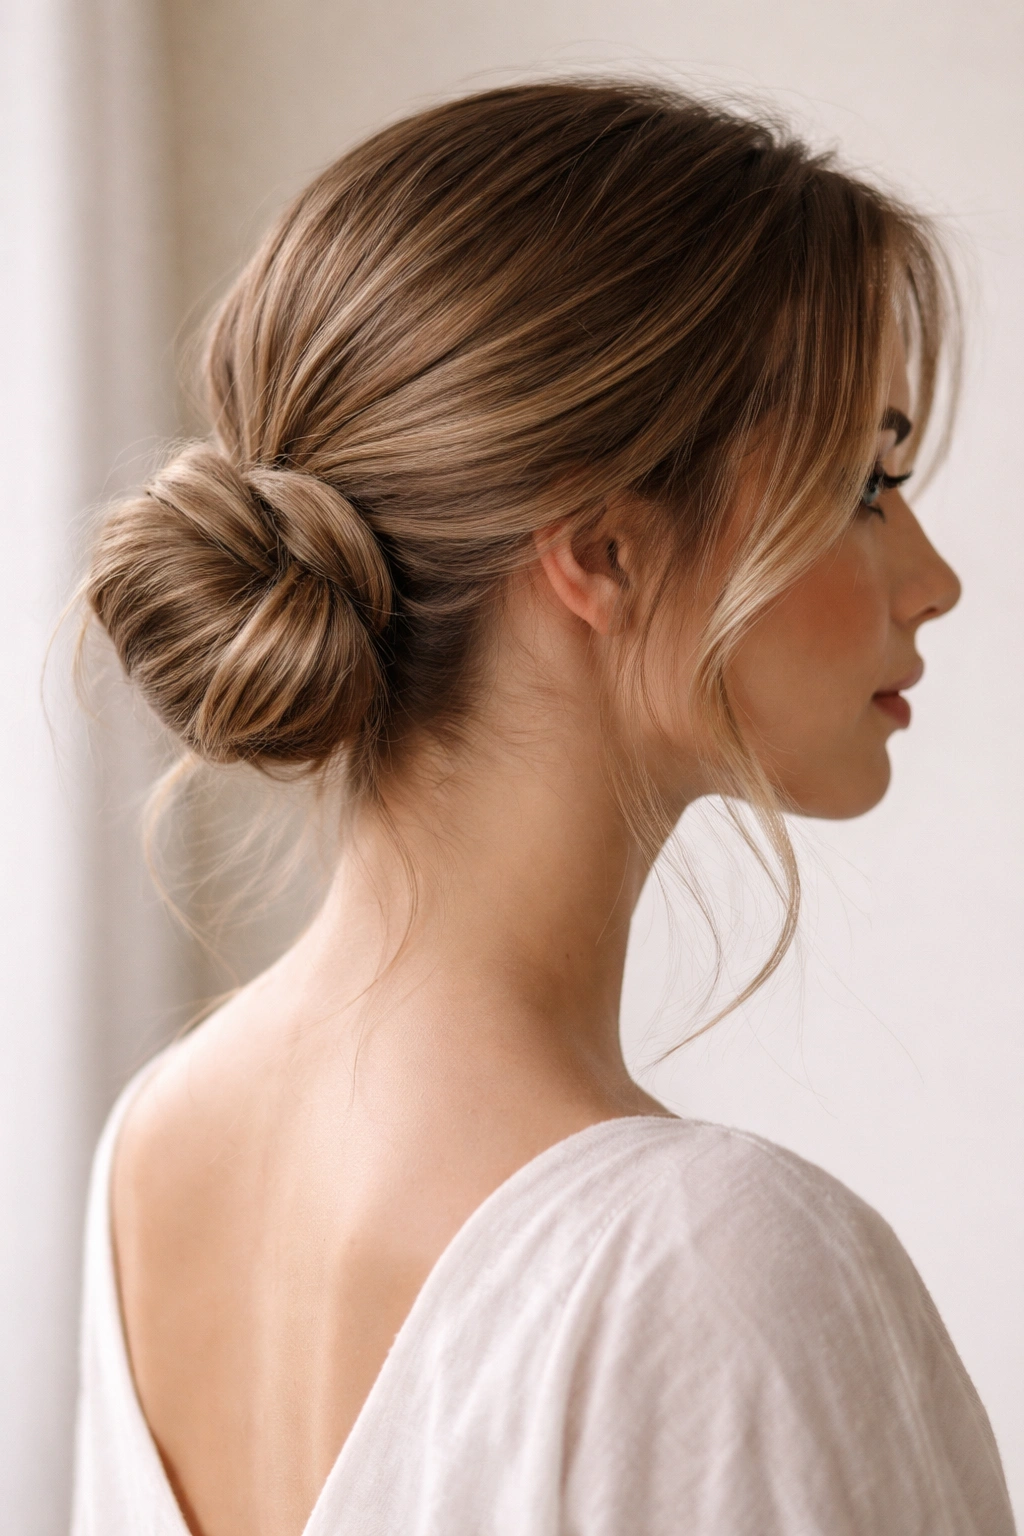
A low ponytail bun sits somewhere between undone and intentional—close enough to your neck to feel structured, but relaxed enough that it never reads as overly formal. This is precisely why the style has become a go-to for people who want their hair to look put-together without signaling that they spent an hour styling. The best low buns strike that balance between effortless and elegant, making them suitable for everything from a casual Tuesday at the office to a Saturday dinner with friends.
The magic of a polished low bun lies in the details. It’s not just about pulling your hair back—it’s about how you position the base, how you secure it, and what texture and finish you create at the ends. A loose, romantic bun reads differently than a sleek, architectural one, but both can absolutely look polished when executed with intention. Hair texture, length, whether you’re working with natural curl or straight strands, and even the occasion all influence which variation will serve you best.
What makes certain low buns look effortlessly polished rather than sloppy comes down to a few key factors: a secure base that doesn’t slide down as the day goes on, a finish that looks intentional (even if it appears undone), and the right degree of texture or smoothness for your hair type and the occasion. A bun that works for someone with thick, wavy hair might require different technique adjustments for fine, straight hair—and that’s okay. The point is understanding your hair’s strengths and working with them rather than against them.
Whether you’re styling for work, a date, a casual gathering, or simply because your hair needs a break from wearing down, one of these 12 low bun styles will solve the problem while keeping you looking genuinely polished rather than like you threw your hair up in desperation.
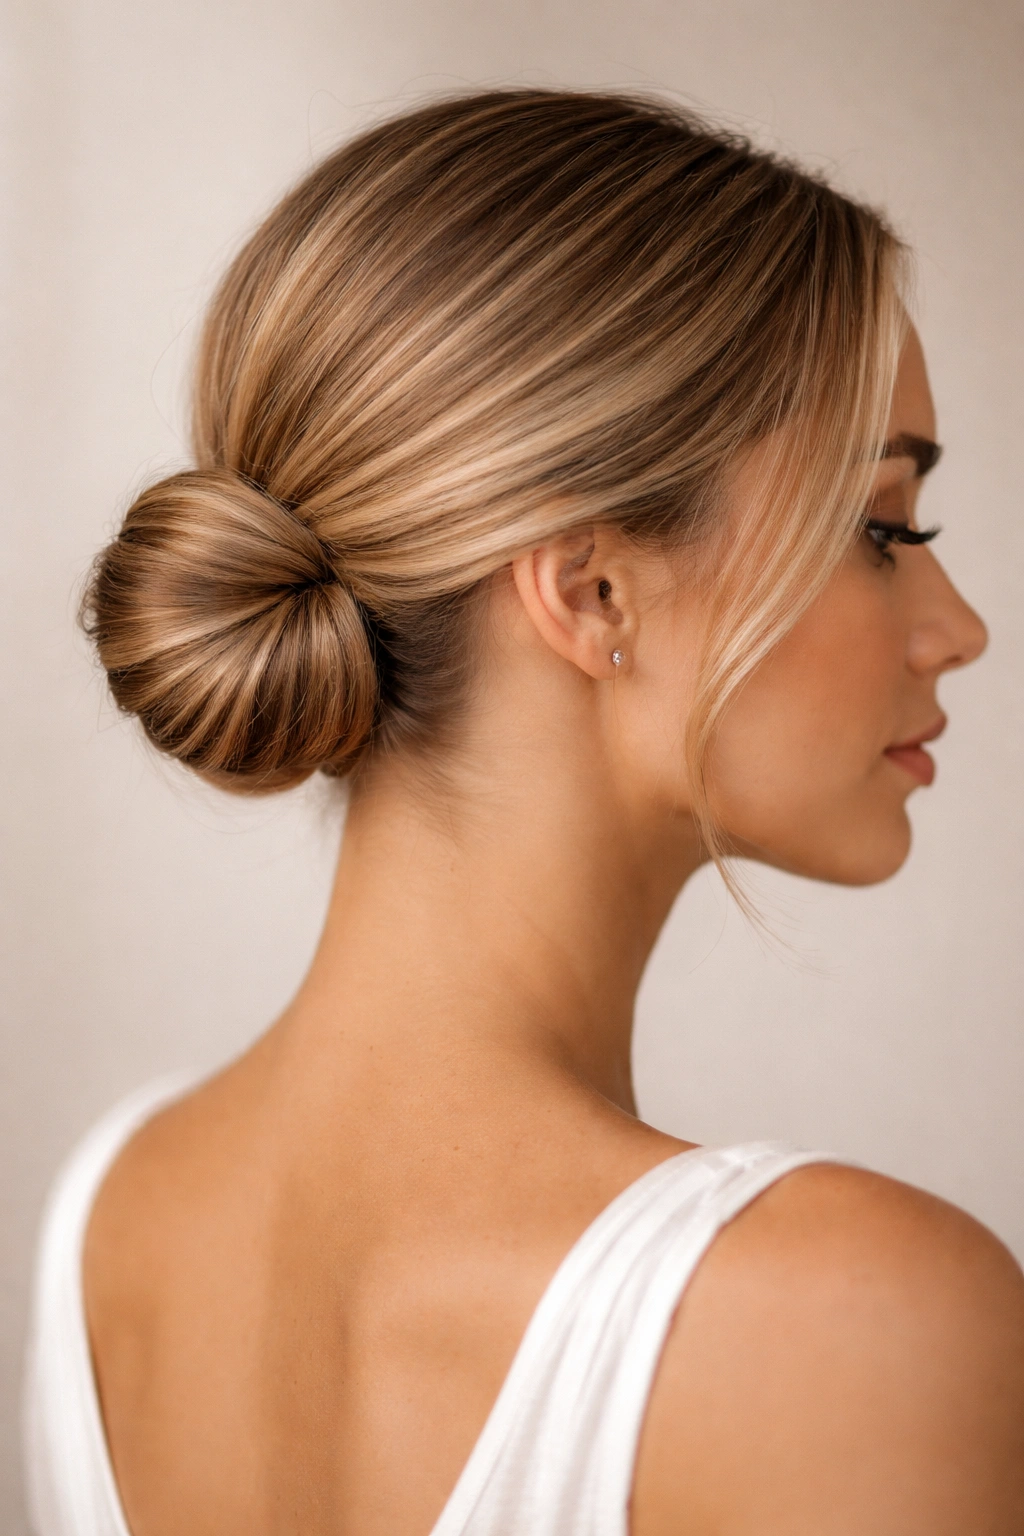
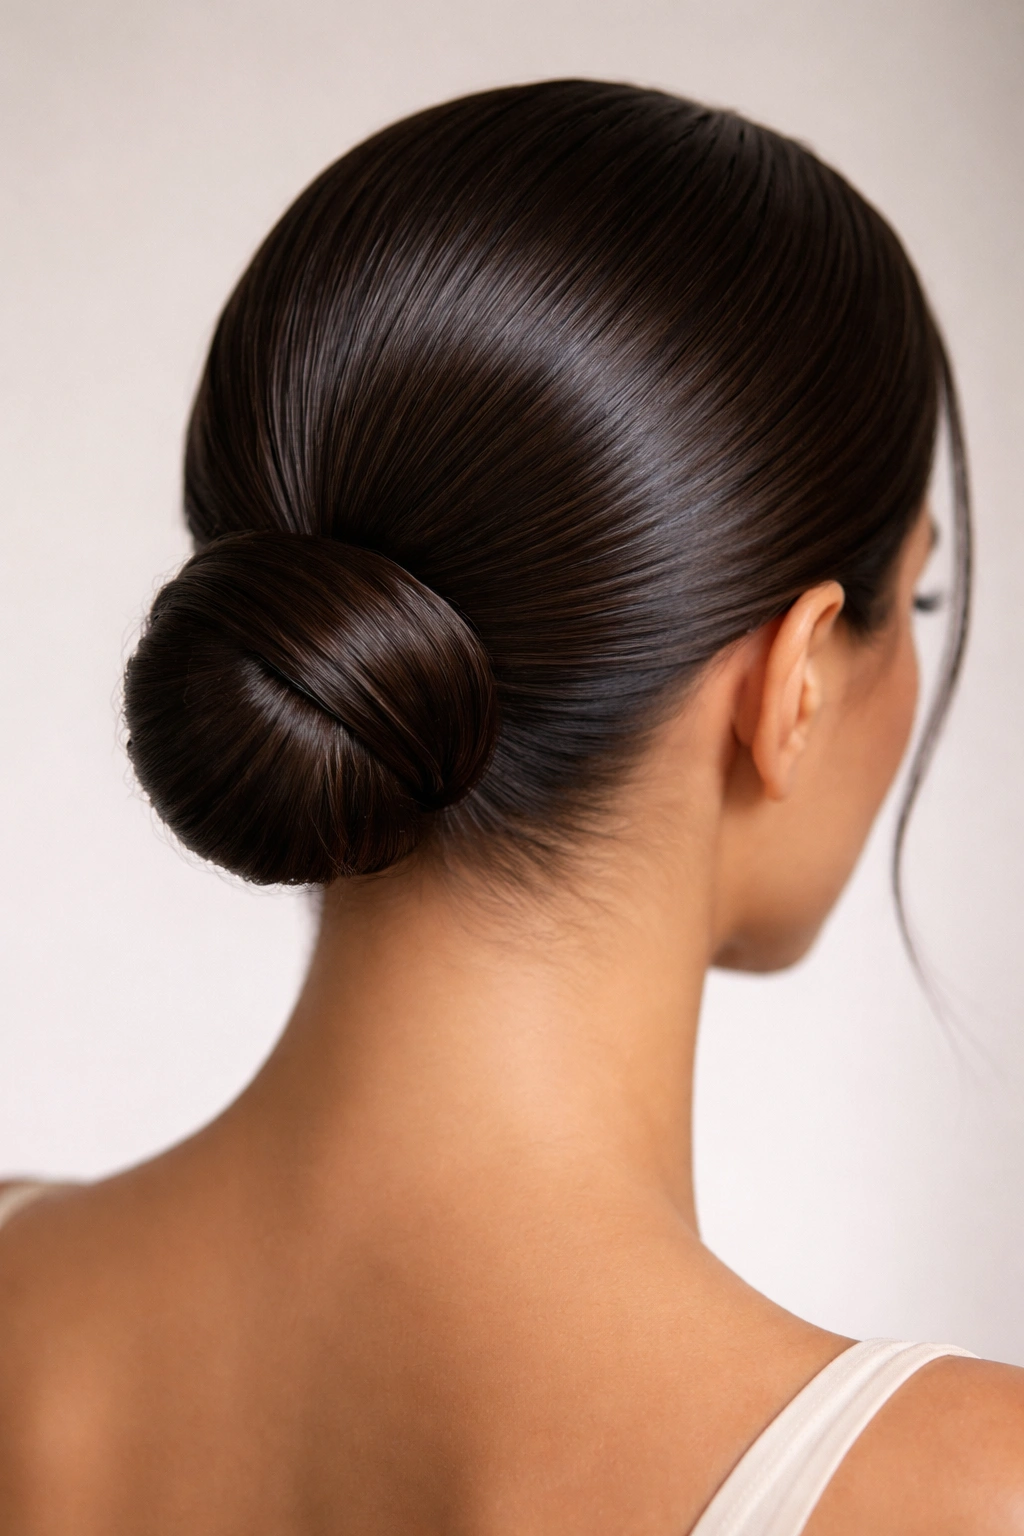
1. The Classic Sleek Low Bun

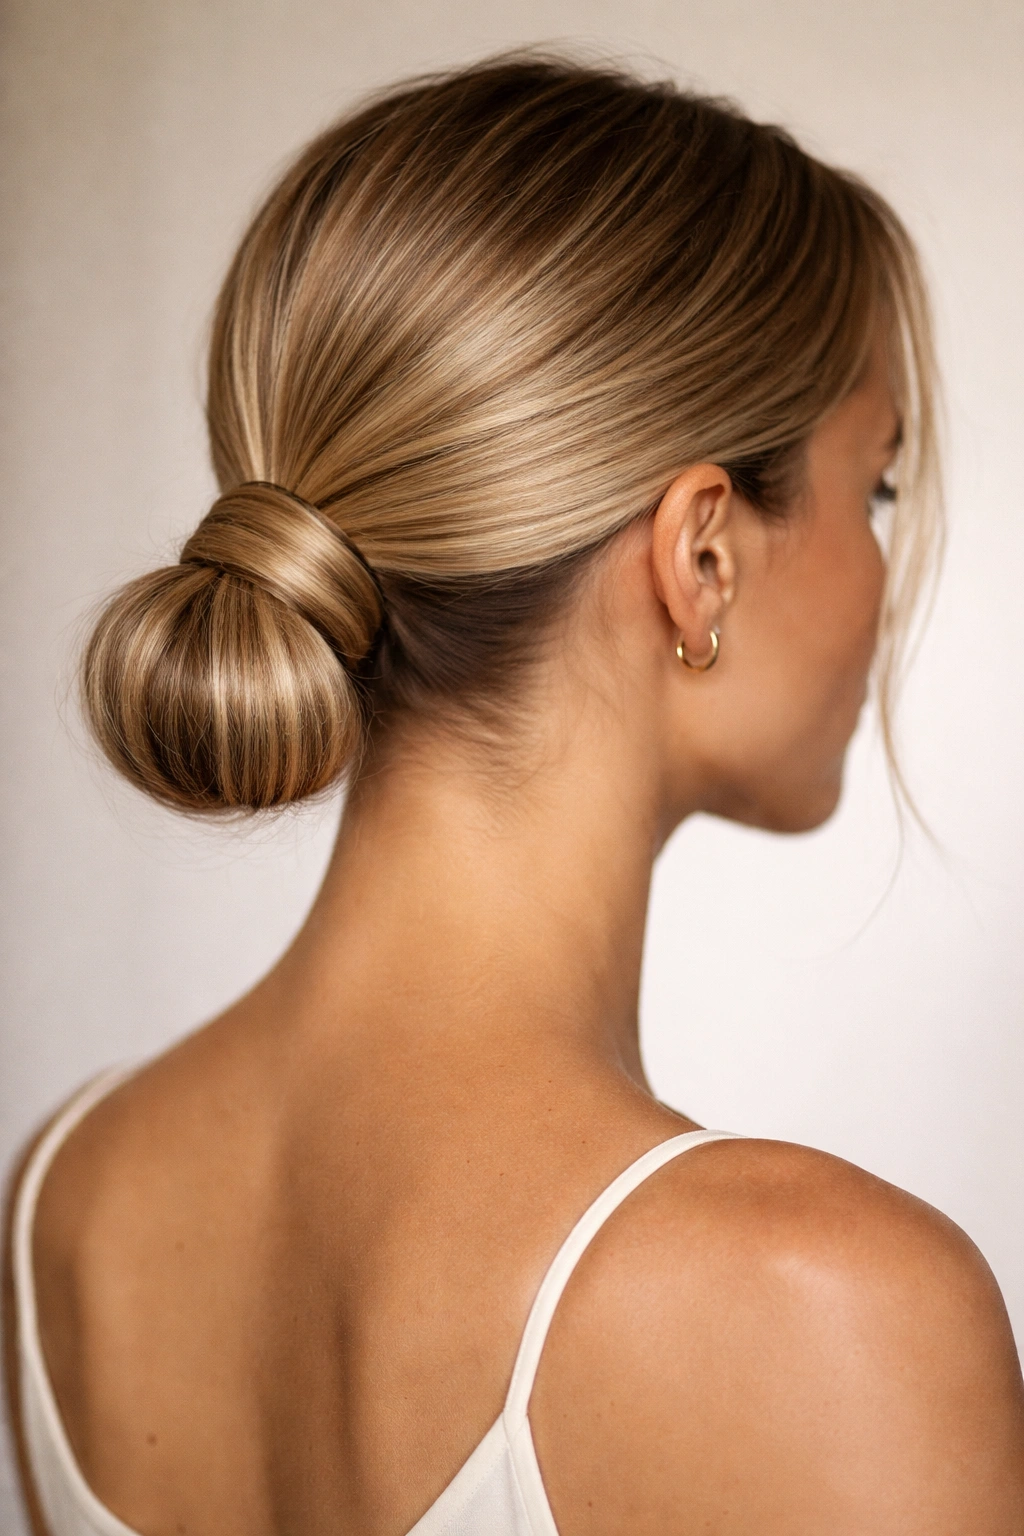
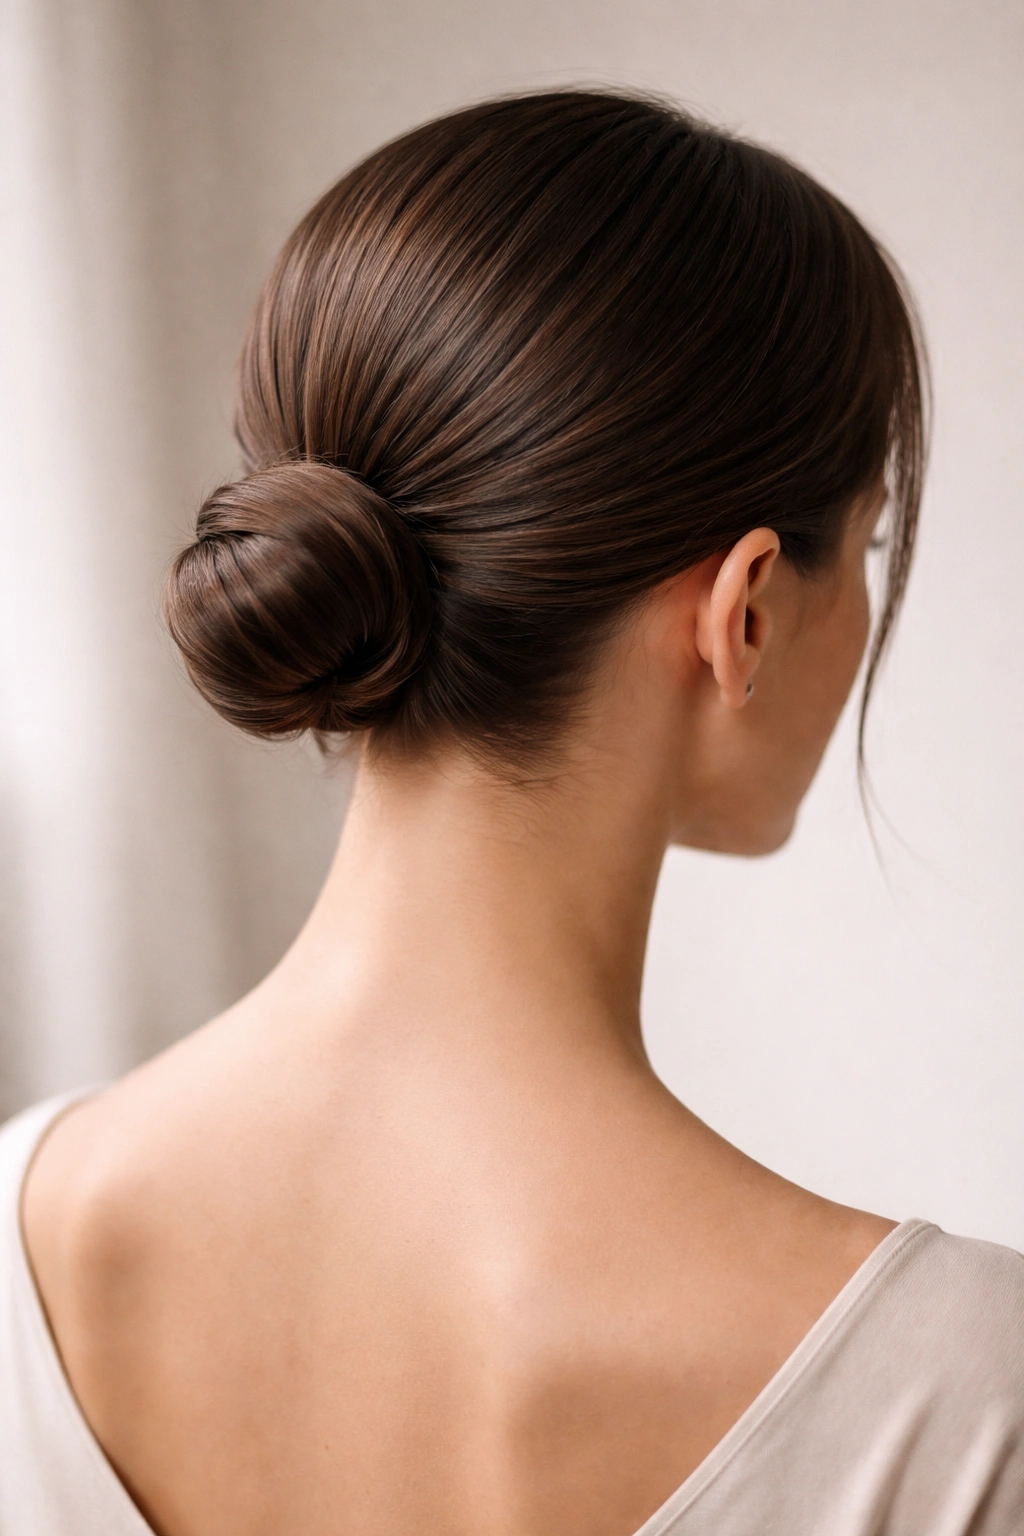
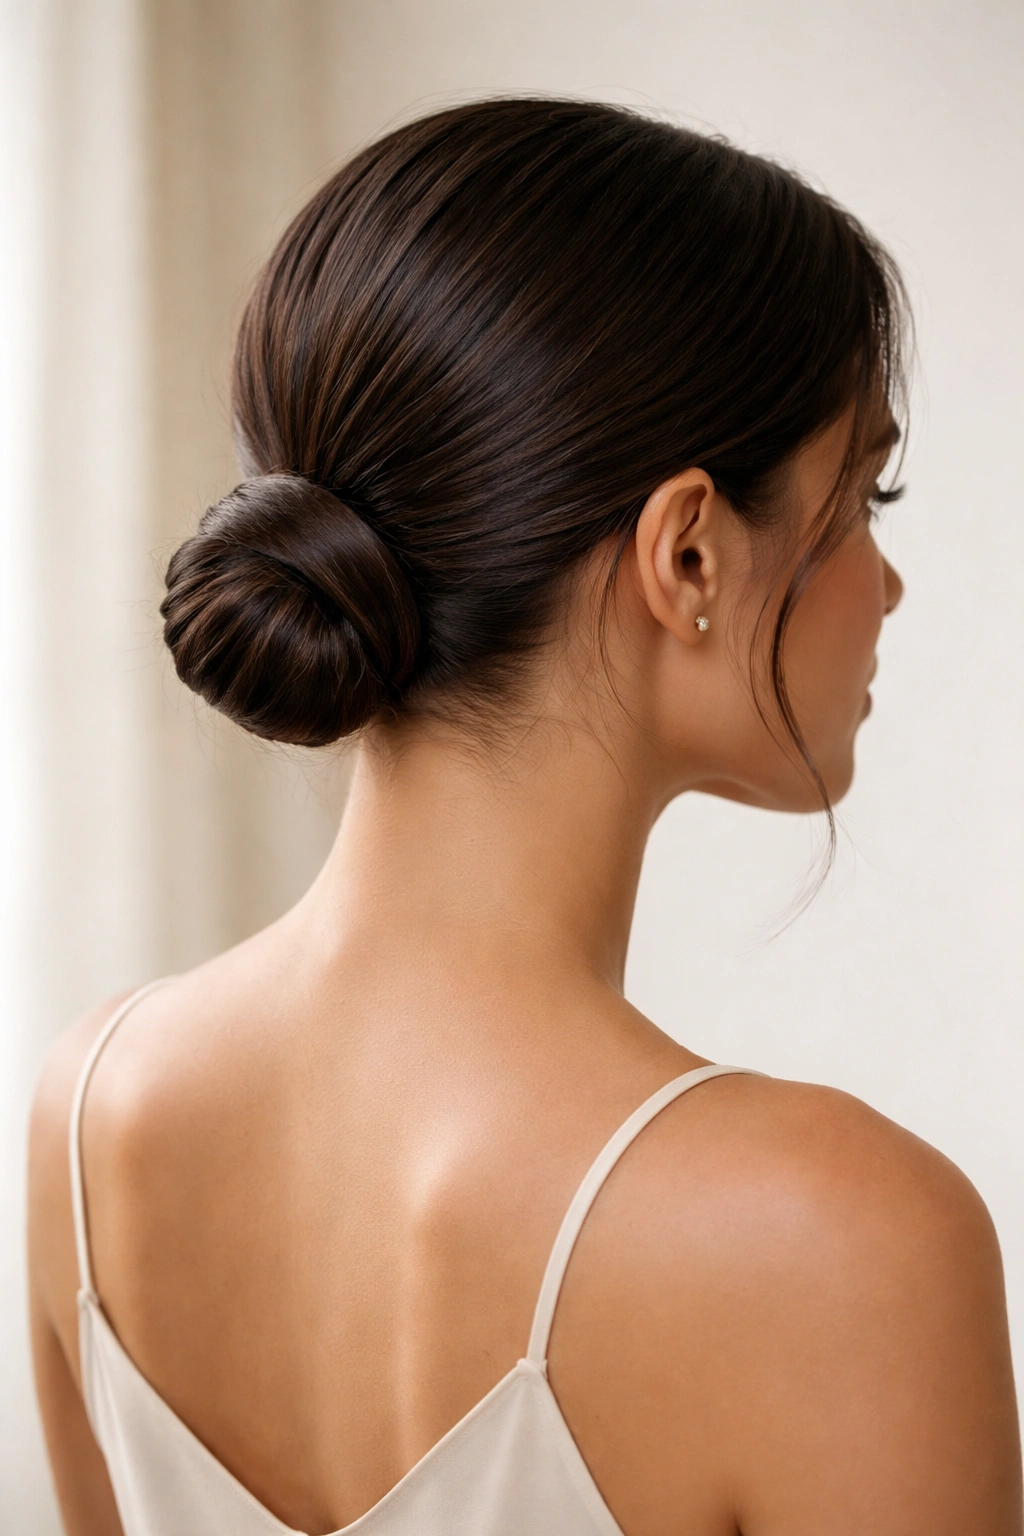
This is the foundation that every other low bun variation builds on. A sleek low bun sits just at the nape of your neck, pulled smooth and tight from the crown, twisted into a compact disc, and pinned so firmly that it won’t budge until you take it down. The polish comes from the absolute smoothness—not a single flyaway, every strand accounted for. This works especially well if you’re heading into a professional setting, a formal event, or any moment where you need hair completely out of your face and neck.
Why It Reads as Instantly Polished
A sleek bun signals precision and control. It photographs well, it looks intentional, and it communicates that you’ve put thought into your appearance even if the whole process took five minutes. The very tightness that makes it work also makes it read as more formal than a relaxed bun, which is useful to understand when choosing between styles for different occasions. The smoothness catches light differently than textured hair does, giving it an almost sculptural quality that feels elevated.
How to Create Maximum Hold
- Use a boar bristle brush or a paddle brush to smooth your hair back without creating frizz—the natural oils from the bristles help calm flyaways
- Apply a smoothing serum or gel to damp hair before blow-drying if your hair tends toward frizz, or dry shampoo if your hair is very slippery and won’t hold pins
- Twist the ponytail tightly rather than loosely wrapping it into a bun—a tighter twist means the structure holds better all day
- Secure with bobby pins that match your hair color, crossing them in an X pattern at the base of the bun for maximum grip
- Use a light hairspray mist after pinning, not before, to avoid product buildup at the base that would make your hair slippery
Pro tip: If you have very fine hair, roughing up your hair slightly with a texturizing spray before creating the ponytail gives you something to grip onto. Fine hair needs friction—smoothing products work against you in this case.
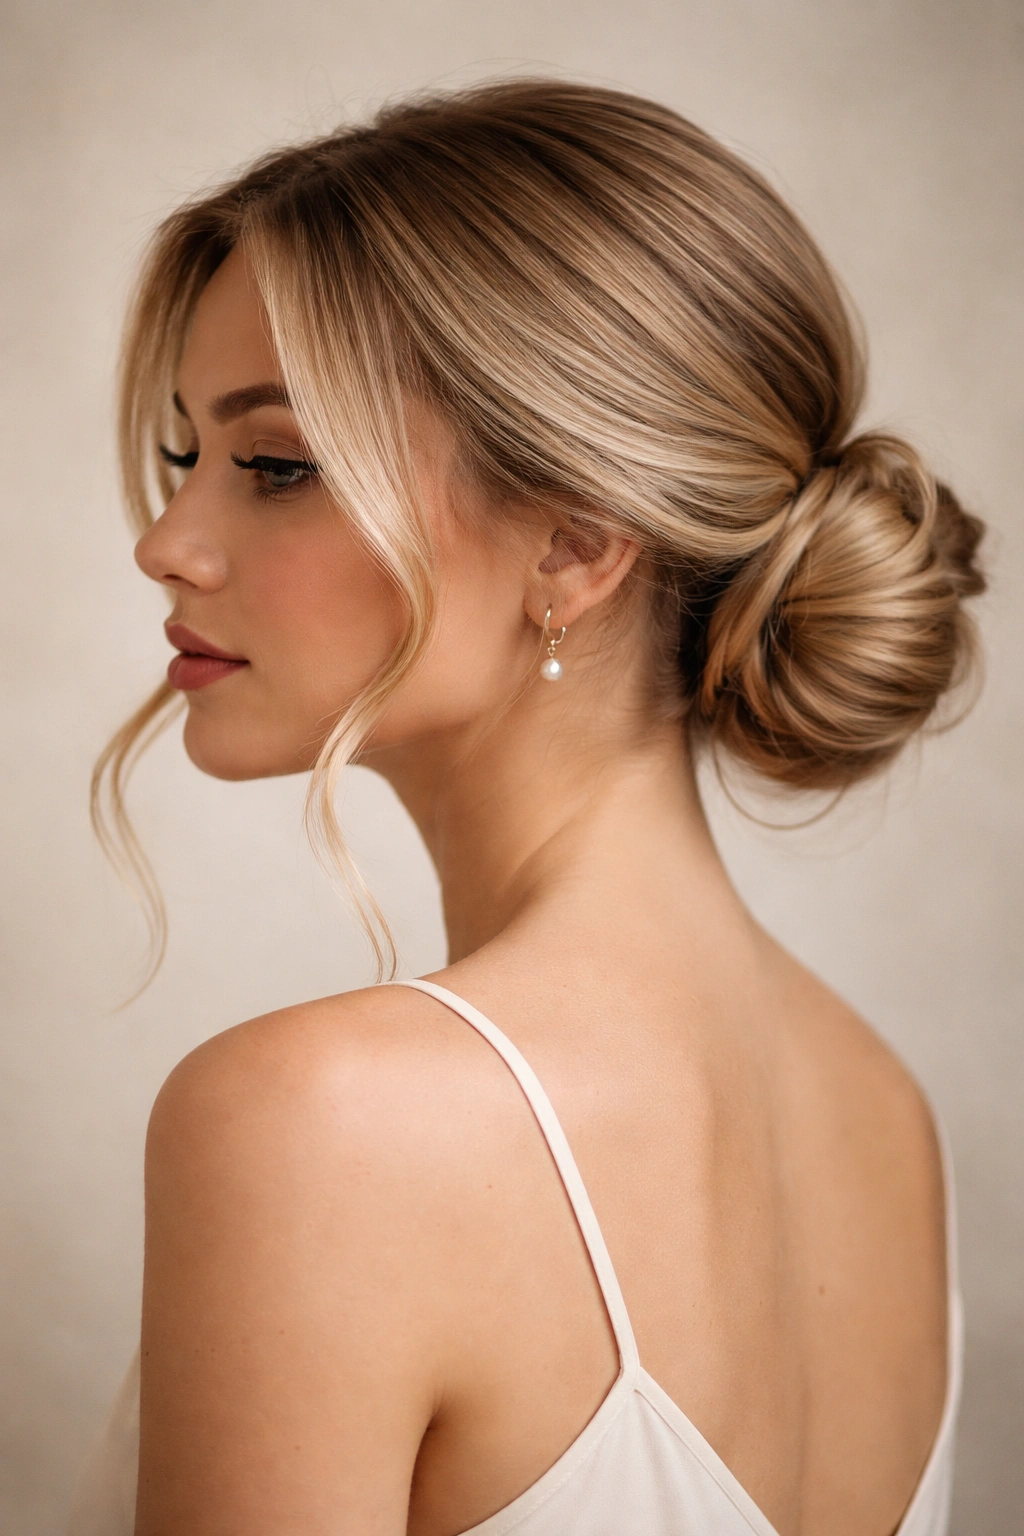
2. The Twisted Low Bun with Soft Flyaways
Take the classic sleek bun and soften it just slightly by deliberately leaving a few face-framing pieces loose before you twist. These softening pieces should be intentional, not accidental—pull them out as the final step after your bun is pinned, and curl them loosely around your face with a small-barrel curling iron. This variation keeps the polish of a contained low bun while adding the approachability of a few romantic strands.
What Makes This Version Feel Polished Rather Than Messy
The difference between “polished with intention” and “didn’t finish getting ready” comes down to whether those flyaways are placed deliberately and shaped intentionally. A chaotic frizz cloud reads as unfinished. Two or three smooth, gently curled pieces framing the face? That reads as a deliberate style choice. The bun itself stays sleek and secured, keeping the overall look contained and professional, while the soft pieces add movement and personality.
Steps for Placed Flyaways That Actually Stay Put
- Pin your bun completely first—make sure it’s secure and won’t move
- Take a small section (about ½ inch) from the front of each temple area with a fine-tooth comb, and gently pull it forward and out
- Use a small-barrel curling iron (¾ inch or 1 inch) to curl each piece loosely away from the face
- Apply a light hairspray to each curl individually to hold the shape without making the pieces stiff
- Check throughout the day—these pieces will naturally relax, which is fine; just give them another light curl touch-up if needed
Worth knowing: This works beautifully if you’re working with any hair texture. Straight hair benefits because the curl adds dimension. Textured or curly hair benefits because you’re intentionally shaping the pieces rather than letting them stick out randomly.
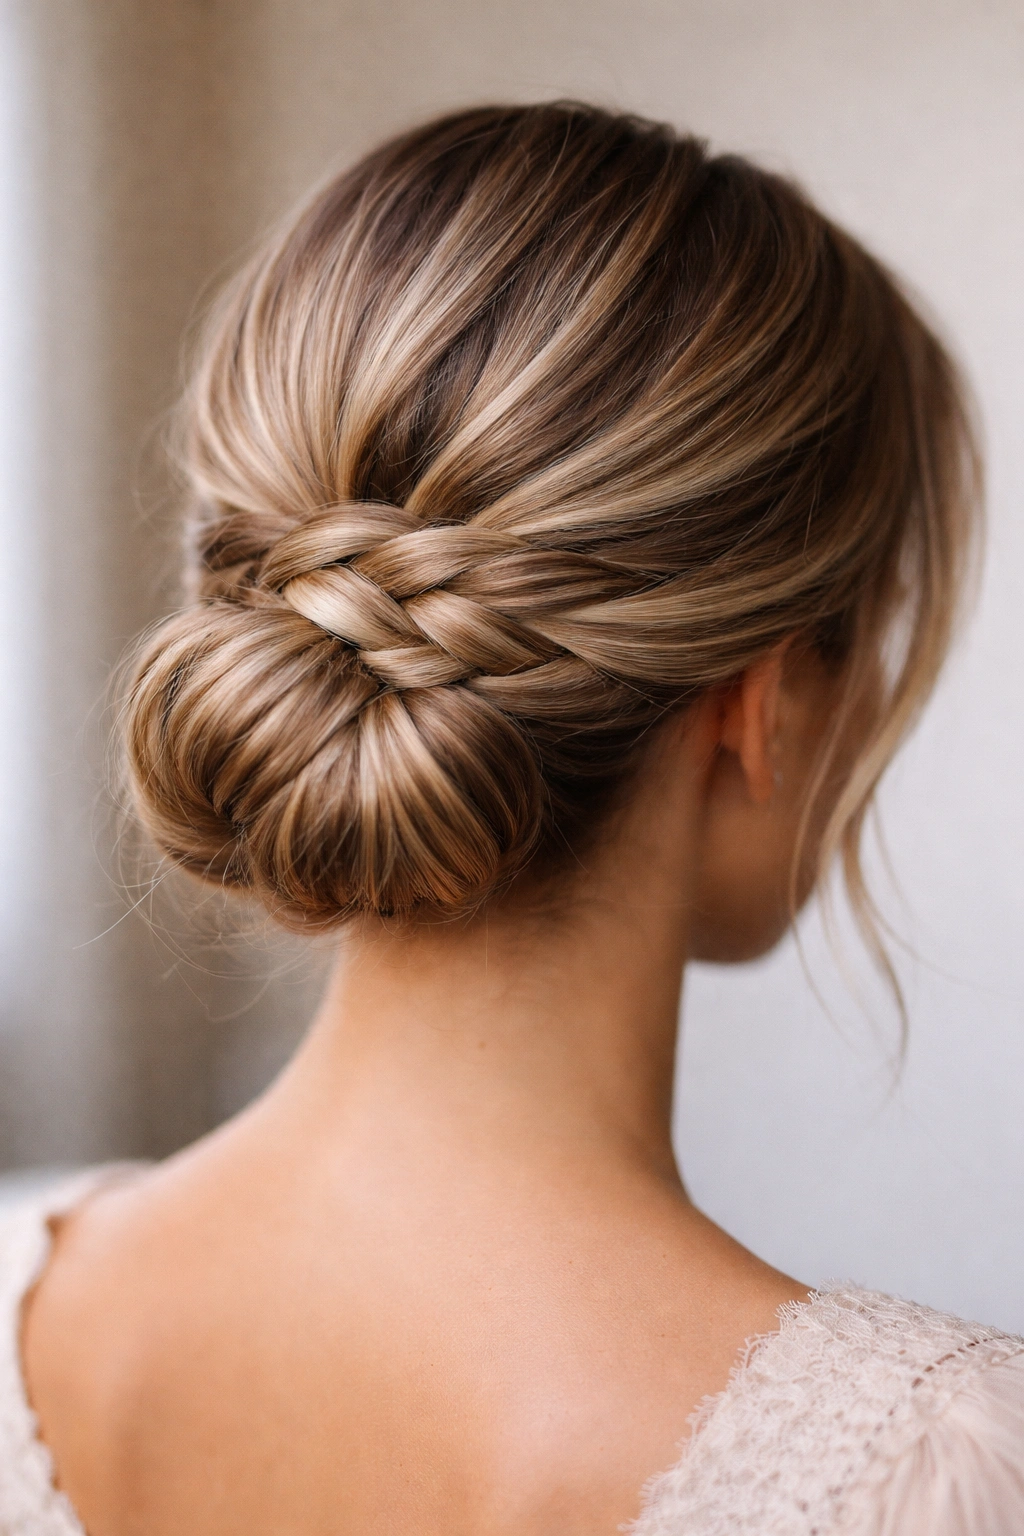
3. The Braided Low Bun
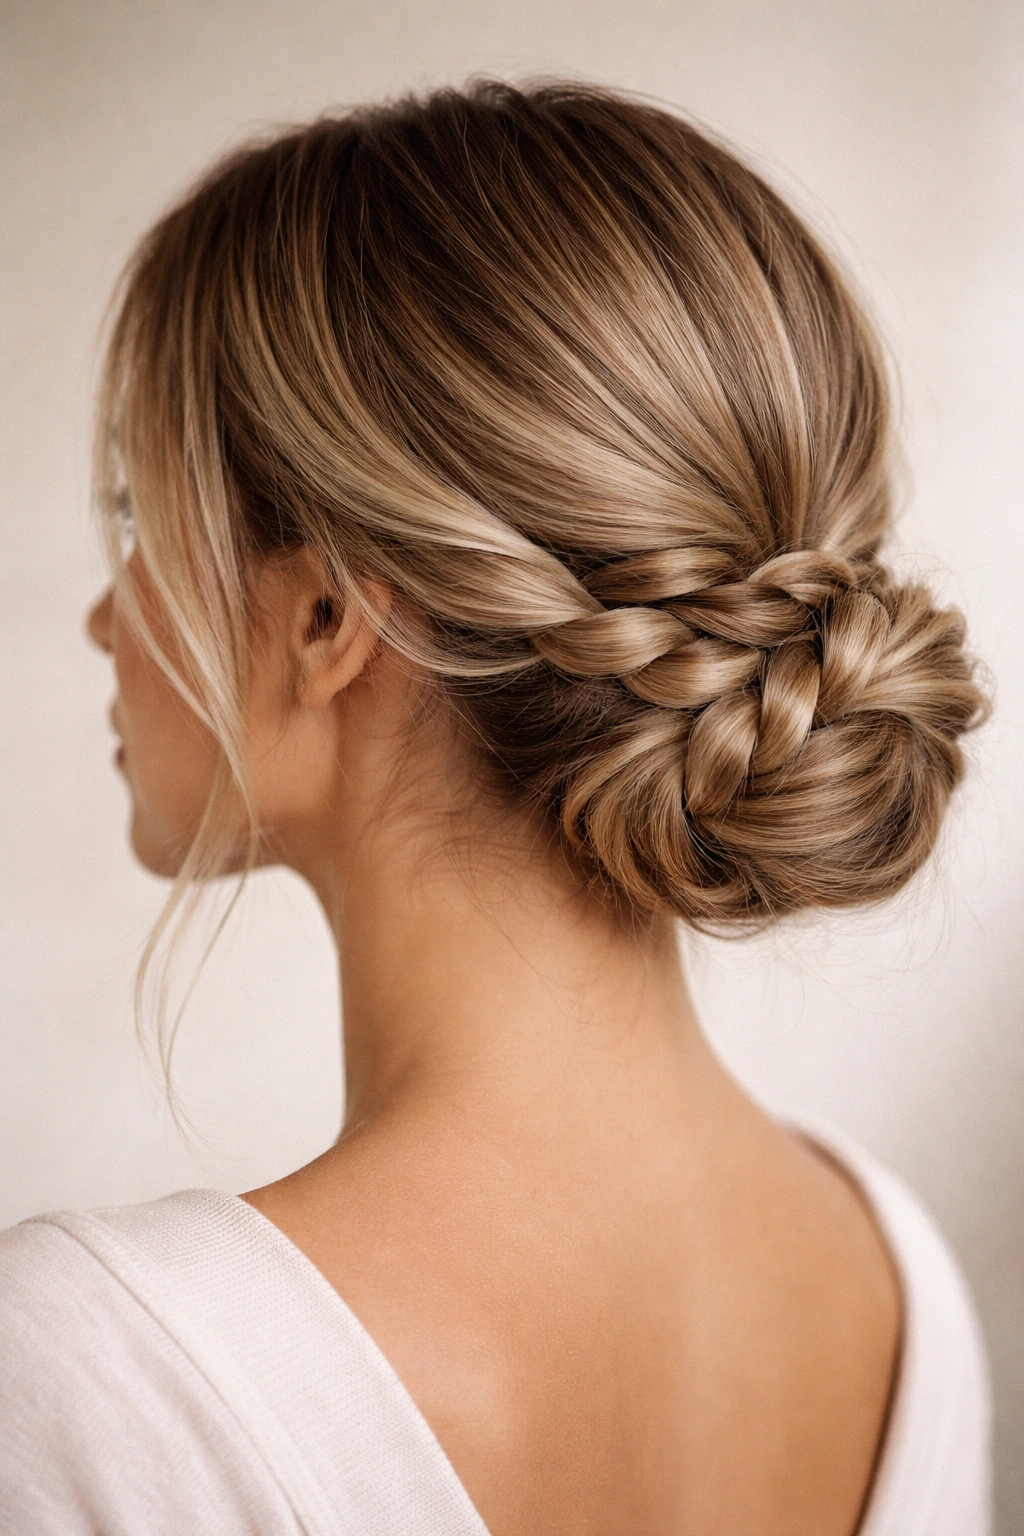
Instead of simply twisting a ponytail into a bun, braid it first—a simple three-strand braid running the length of your ponytail—then wrap that braid into a low bun shape and pin it. The braid adds visual texture and interest while maintaining structure, and the finished bun looks far more intentional and styled than a plain twist.
Why the Braid Elevation Works
A braid is immediately recognizable as a deliberate technique, not something that happened by accident. It signals that you’ve put effort into styling while also being fast enough that you can realistically do it on a weekday morning. The braid also adds grip—the interlocking structure holds better than a simple twist, so your bun will stay exactly where you pin it all day. This is especially valuable if you have slippery hair or if you’re styling for an active day.
The Braiding Technique That Holds All Day
- Create a low ponytail first—not too tight, but secure enough to hold while you work
- Divide the ponytail into three even sections and braid tightly and evenly down the length
- Once you reach the bottom, you can either wrap the entire braid around the base of the ponytail to form the bun, or gather all the hair into the final bun shape first, then braid what’s gathered
- Secure the end of the braid before wrapping it, and use bobby pins that catch the braid strands themselves, not just the base
- A light hairspray over the finished braid will keep it looking crisp and intentional
Insider note: A Dutch braid (braiding under rather than over) sits more visibly on the head than a regular three-strand braid, making it ideal if you want the braid itself to be a featured detail of your style. A regular braid looks more hidden within the bun and works better if you want the emphasis on the bun shape itself.
4. The Textured Low Bun with Beachy Waves
Start with textured, wavy hair—either naturally, or created by curling your hair with a 1¼-inch barrel wand or crimping iron the night before and leaving it to set overnight. Create your low ponytail with this textured hair, then gently twist and wrap it into a bun without trying to smooth it. The texture gives you natural volume and an organic, undone aesthetic that still reads as completely polished because the bun itself is contained and secured.
The Appeal of Intentional Imperfection
A textured low bun occupies the sweet spot between “I got dressed up” and “this is just my hair.” It looks effortless but structured, casual but intentional. This style works especially well for weekend events, creative industry settings, or any occasion where you want to look put-together without appearing stiff or overly formal. The texture also photographs beautifully because light plays across the waves, adding dimension that a smooth bun doesn’t have.
Creating Waves That Hold and Look Polished
- Curl your hair the night before using a 1¼-inch curling iron, curling sections away from your face and leaving the iron in for 8-10 seconds per section
- Don’t brush your curls out in the morning—instead, use your fingers to gently separate the curls into larger, looser waves
- Apply a light sea salt spray to add grip and texture before you create your ponytail
- Keep your low ponytail slightly loose (not tight) to allow the natural texture to shine through
- Don’t try to smooth the bun itself—let the waves exist as they are, and just secure them in place with pins
- A dry shampoo spray can help set the texture and add grip for all-day hold
Pro tip: This style actually improves if you wear it for a full day. The longer you wear it, the more natural and relaxed it becomes. If you have it done by evening, it looks more polished and intentional than it did when you first pinned it.
5. The Wrapped Low Ponytail Bun
This variation starts with a low ponytail but doesn’t twist it into a bun. Instead, you wrap a section of hair around the base of the ponytail to cover the elastic and create the bun shape. Pull your low ponytail, take a thin section from the underside of the ponytail, and wrap it tightly around the base, pinning it in place. This technique creates a very clean, finished look because you’re covering the elastic completely, and it also tends to be more stable because you’re essentially building a structure rather than twisting a single mass of hair.
The Structural Advantage
The wrapped technique creates a bun that sits more neatly and compactly because you’re controlling exactly how the hair is positioned. It also looks exceptionally polished because there’s no visible elastic and no chunky twist—just a smooth, intentional shape. The wrap itself can be braided for added interest, twisted, or left smooth depending on how much visual texture you want.
How to Wrap for Maximum Neatness
- Create your low ponytail and secure it with a clear elastic
- Take a thin section (about ½ inch) from the underside of the ponytail base and gently pull it up and away from the ponytail
- Wrap this section tightly around the ponytail base, covering the elastic completely, and pin the end to itself with bobby pins
- If you want the wrap to be braided, braid this section before wrapping it around the base
- Make sure your pins are secure but not so aggressive that they show or create bumps in the wrap
- A light hairspray keeps the wrap smooth and prevents any wisp of hair from escaping
Worth knowing: If your hair is very thick, you may need to take a thicker section to wrap—experiment to see how much hair you need to cover the elastic while still keeping the wrap looking neat and not bulky.
6. The Chic Low Bun with Hidden Bobby Pins
This is essentially about creating a low bun so clean and intentional that the bobby pins themselves aren’t visible or noticeable, which is a hallmark of polish. The technique involves pinning the bun in layers—one layer of pins securing the twisted structure, and then additional pins smoothing down any edges or creating a seamless finish. The pins should cross each other, slot into the bun shape itself (not just poke through the surface), and be completely hidden from every angle.
Why Hidden Pins Change the Entire Aesthetic
Visible bobby pins read as rushed or incomplete. Hidden pins read as intentional and finished. This isn’t about being precious—it’s about the practical difference between a hairstyle that looks like it stopped mid-process and one that looks like it was completed with care. A polished low bun should look seamless, as if the structure simply held together on its own.
The Pinning Technique for Invisible Security
- Use bobby pins that match your hair color exactly—this alone makes a huge difference
- Create your twisted bun and pin it first with your primary pins, crossing them in an X pattern
- Do a second pass where you smooth down any edges with additional pins, sliding them horizontally into the bun structure
- Pins should go in at an angle, following the direction of the twisted hair, so they sit flush against the bun
- Check from multiple angles—front, back, sides—to ensure no pins are visible
- Test the security by gently tugging on the bun from different directions; it should feel solid and immobile
Pro tip: Investing in flat bobby pins (the kind with a slight curve to them) rather than completely straight pins makes a difference. The curve helps them grip the twisted hair better and stay more hidden because they follow the natural contours of the bun.
7. The Romantic Low Bun with Delicate Hair Pins
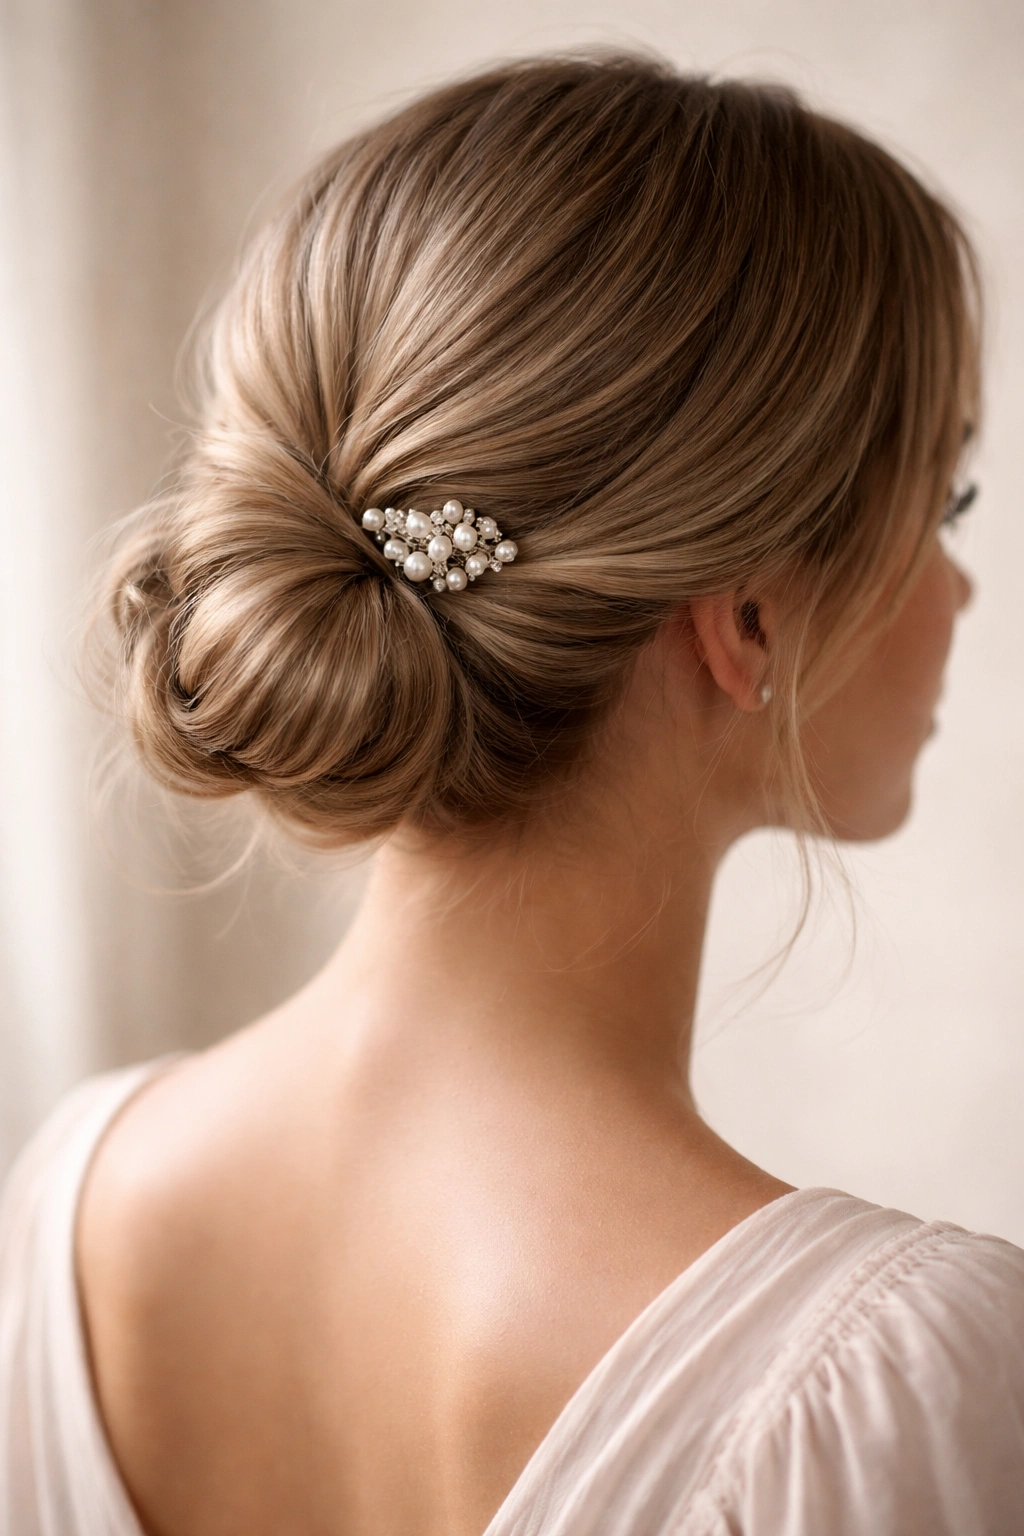
This version maintains the polished structure of a classic low bun but introduces decorative hair pins—the kind with delicate metal designs, pearls, or crystals—as a featured element rather than a hidden one. These aren’t thick practical bobby pins; they’re designed to be seen. You’d typically use two or three of them positioned visibly in the bun, creating a touchpoint of jewelry and elegance.
When the Decoration Elevates Rather Than Distracts
A well-placed decorative pin looks intentional and adds a jewelry-like finishing touch. The key is not overdoing it—two or three pins are elegant, while a dozen of them looks costume-y. The pins should coordinate with your outfit and overall aesthetic, and they should be positioned so they’re visible but not so prominent that they distract from the bun’s overall shape.
Styling with Decorative Pins for Maximum Impact
- Complete your low bun with the standard pinning technique first
- Choose hair pins in finishes that complement your outfit—gold for warm tones, silver for cool, rose gold as a neutral
- Position pins vertically or horizontally depending on the design, but in the area where the bun meets the base of your neck
- Make sure your bun is absolutely secure before adding decorative pins; they’re for visual interest, not structural hold
- Coordinating the pins with earrings or other jewelry creates a cohesive, polished look
- Pearl pins work beautifully with formal occasions, while simpler metal designs work for everyday wear
Worth knowing: This style works particularly well for events like weddings, date nights, or any occasion where you’re dressing up beyond your everyday. It signals that you’ve made intentional choices about your appearance.
8. The Sleek Gel Low Bun for Maximum Hold
This is the low bun for people who need it to absolutely not move under any circumstances—think athletic events, all-day activities, or any situation where your hairstyle needs to stay perfect without maintenance. The technique uses a strong-hold gel or mousse applied to damp hair before blow-drying, then creating the low ponytail and bun on top of that smoothed foundation.
Why the Gel Foundation Changes Everything
A gel base creates a smooth, almost lacquered finish that holds far better than unstyled hair. The product coats each strand and helps them grip together, so your bun stays in place even if you’re sweating, moving around, or dealing with humidity. This isn’t about looking wet or sticky—a smoothing gel applied to damp hair and blow-dried looks natural while providing professional-grade hold.
Applying Gel for a Natural-Looking Polished Finish
- Apply smoothing gel to damp hair, working it through from roots to ends
- Blow-dry your hair smooth, section by section, using a paddle brush to direct the airflow downward and seal the cuticle
- Your hair should feel smooth and controlled but not crunchy or visibly product-heavy
- Create your low ponytail on this smoothed foundation
- The bun twist and securing happens the same way as usual, but the base is far more cooperative
- A light hairspray over the finished bun adds an additional layer of hold if needed
Pro tip: For extremely strong hold, smooth your hair with gel, blow it dry, let it cool completely (which helps it set), and then create your bun. The cooling step allows the product to fully set, which increases longevity throughout the day.
9. The Elegant Low Bun with Face-Framing Tendrils
Similar to the twisted low bun with soft flyaways, but more deliberately romantic and intentional. This version involves creating a structured, polished low bun as the main event, then deliberately releasing two small sections from near your temples and curling them softly away from your face to create delicate tendrils. These are placed with intention, shaped carefully, and maintained throughout the day—they’re a designed feature, not an accident.
The Romantic Polish Factor
Tendrils work because they add softness and movement to an otherwise structured style. A completely smooth low bun can read as severe in the wrong light or situation, while a sleek bun with intentional tendrils reads as romantic and elegant. This style suits anyone but works particularly beautifully for people who like the idea of an updo but don’t want to sacrifice all softness or approachability.
Creating Tendrils That Look Intentional All Day
- Start with a sleek, secure low bun pinned tightly
- Take a small section (about ½ inch thick) from near each temple, selecting hair close to the face
- Curl each tendril loosely around a ¾-inch curling iron, curling away from the face
- The curls should be loose and flowing, not tight ringlets—hold the curling iron for only 5-7 seconds per section
- Gently run your fingers through the curls to soften them slightly, creating an undone wave rather than a tight spiral
- Secure with a light spray to help them hold shape
- These will naturally relax and soften throughout the day, which is part of the charm—they should look increasingly romantic as time passes
Insider note: The contrast between the structured bun and the soft tendrils is what creates the polish. If you left tendrils too loose or chaotic, it would read as unfinished. The bun has to be absolutely solid and controlled for the tendrils to read as intentional rather than sloppy.
10. The Low Bun with Woven Sections
This technique involves creating a low ponytail, braiding it, but then weaving the braid through itself or through additional sections of the ponytail before wrapping it into a final bun. It’s more complex than a simple braided bun, but the result is a bun with visible texture and architectural interest that looks far more sophisticated than a plain twist.
The Visual Impact of Structural Detail
A woven bun is immediately recognizable as the product of intention and skill. It’s not complicated enough to read as overly elaborate, but it’s detailed enough that it clearly took more than five seconds to create. This style works beautifully for occasions where you want to look special without appearing to be in full formal mode.
Creating a Woven Bun Structure
- Create a low, secure ponytail
- Divide the ponytail into two sections
- Braid each section separately down the full length
- Take one braid and weave it through the other braid, threading one over-and-under the opposite braid repeatedly
- Wrap the woven structure into a bun shape, pinning it so the weave pattern remains visible
- This creates a bun that has visible detail and texture while still being compact and controlled
- A light hairspray holds everything in place and emphasizes the woven pattern
Worth knowing: This works best with medium to thick hair—thin hair might make the weaving pattern too subtle to be visible, which defeats the purpose of the technique.
11. The Sleek Low Bun with Exposed Nape
A variation that emphasizes the nape of the neck by pulling the bun slightly away from it, creating a visual break between the bun and the neck. This might not sound like much, but it changes the entire silhouette and makes the style feel more intentional and contemporary. The bun itself stays sleek and polished, but by sitting perhaps ½ to 1 inch away from the nape, it creates a more elegant line.
Why the Nape Detail Matters
The way a bun sits relative to the neck influences how formal and polished it reads. A bun that sits directly on the neck feels traditional and classic. A bun with a little breathing room between it and the neck feels more modern and intentional. This small variation is one of the reasons why certain low buns feel more contemporary and polished while others read as more traditional.
Positioning Your Bun for the Exposed Nape Look
- Create your low ponytail, but instead of positioning it at the very base of your neck, position it about ½ to 1 inch above the nape
- You’ll feel the difference immediately—your neck will feel more open and exposed
- Twist and pin the bun as usual, keeping it in this slightly-higher position
- The bun should still sit low enough to be considered a “low” bun, not a mid-height one
- This positioning works particularly well with the sleek, smooth bun aesthetic because it creates clean lines
- Wearing your hair styled this way with a low neckline or an open back creates an elongated, elegant silhouette
Pro tip: This positioning works beautifully if you have a long, graceful neck you’d like to emphasize. It’s less successful if you prefer to minimize the nape area, which some people do.
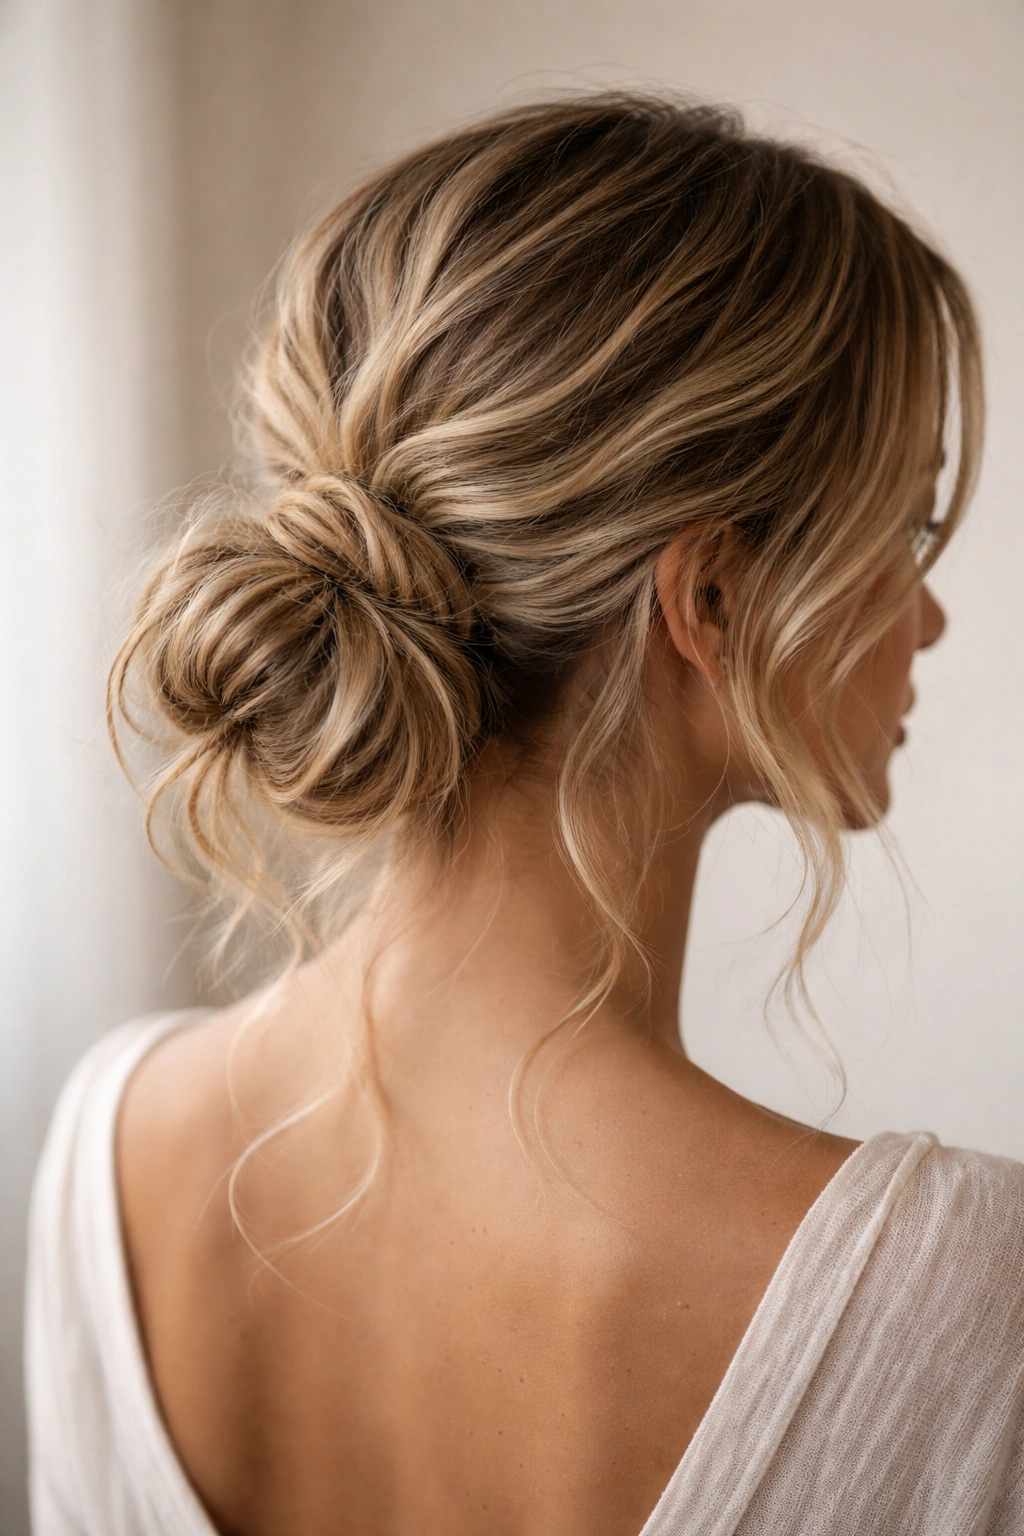
12. The Low Messy Bun That Looks Deliberately Undone

The final version is the one that looks the most relaxed while still reading as completely polished and intentional. This is created by starting with textured hair or creating texture with waves, making a low ponytail that’s not pulled super tight, twisting it loosely, and pinning it in a way that allows some of the twisted texture to show rather than creating a completely smooth surface. A few wisps are allowed to escape, but they’re placed deliberately, and the overall shape remains controlled.
The Paradox of Polished Messiness
This style walks a fine line—it has to look intentionally undone rather than actually messy or unfinished. The difference comes down to three factors: the bun shape is still visible and controlled (not a chaotic cloud), any escaped strands are placed intentionally rather than chaotic, and the overall finish reads as relaxed and modern rather than rushed or sloppy. Done right, this is perhaps the most wearable of all the low bun styles because it works with many hair types and occasions.
Executing the Undone But Polished Approach
- Start with textured or waved hair, either natural or created with heat
- Create a low ponytail but don’t pull it super tight—leave some give so the texture shows
- Twist the ponytail loosely rather than creating a tight spiral—the looser twist allows texture to remain visible
- Wrap it into a bun shape and pin it, but don’t try to smooth every piece down; let some of the twisted texture show on the surface
- Pull out a few strategically placed wisps from the front hairline and secure them with a small amount of hairspray
- The overall effect should be controlled but relaxed, intentional but seemingly effortless
- A dry shampoo or texturizing spray applied before creating the bun helps the style hold its undone texture all day
Worth knowing: This style requires the least-tight elastic and the loosest handling of all the bun variations. If you pull it tightly, you defeat the purpose—the whole point is that the structure remains visible and the overall aesthetic reads as relaxed. Test the security gently, but don’t panic if it feels looser than your other bun styles; that’s intentional.
Final Thoughts
The beauty of the low ponytail bun is its versatility—within this single category, you have styles that work for boardroom meetings, casual weekends, formal events, and everyday wear. The key to looking polished in any of these variations comes down to understanding your hair’s texture and tendencies, committing to proper pinning techniques, and remembering that polish is really just intentionality made visible.
A polished low bun doesn’t have to be complicated or time-consuming. Even the simplest sleek version reads as put-together when your base is smooth, your pins are secure, and you’ve taken a moment to check your work from multiple angles before heading out the door. The best style for you will depend on your hair type, how much time you want to spend styling, and what occasions you’re dressing for most often—but the principle remains the same across all of them: structure, intention, and clean execution create that effortlessly polished appearance that makes people think you’ve spent far more time on your hair than you actually have.