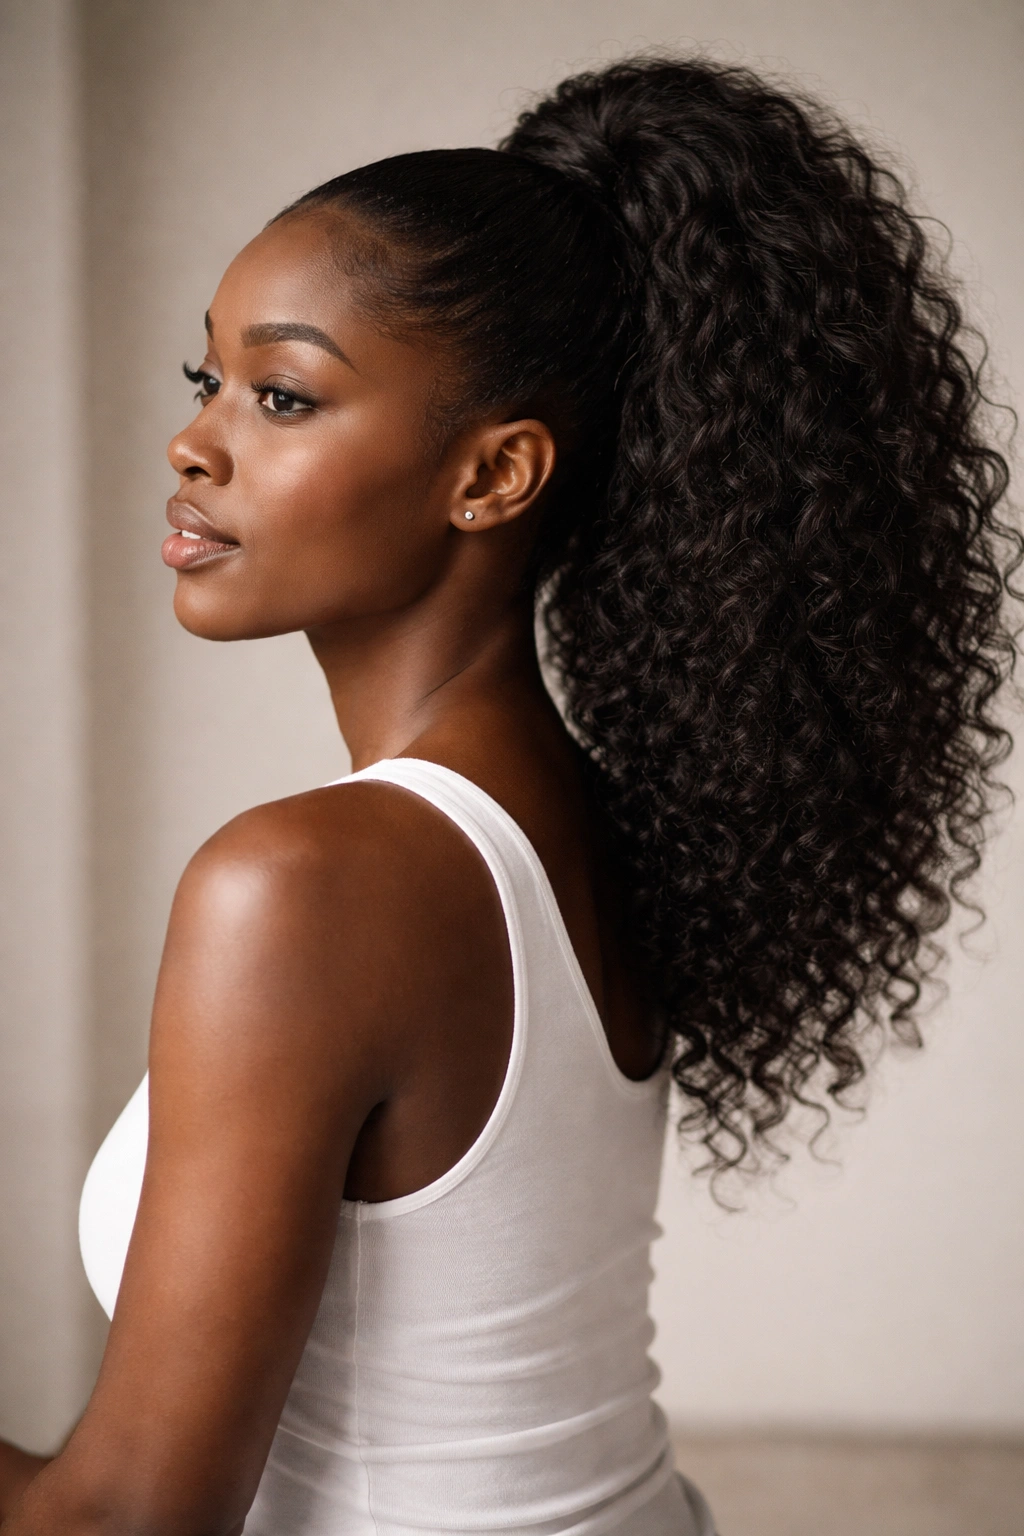
A voluminous ponytail isn’t just a hairstyle — it’s a statement. For Black women with textured, coily, or curly hair, volume is often a natural advantage, but styling it in ways that look intentional, polished, and protective requires technique, the right products, and inspiration. The beauty of voluminous ponytails is that they work for everything: a casual day, professional settings when styled sleekly, weekend outings, and protective styling that keeps your hair healthy while looking undeniably fierce.
What makes a ponytail truly voluminous isn’t just thickness — it’s how you build dimension, texture, and movement. A great voluminous ponytail uses your hair’s natural texture, strategic placement, and sometimes clever layering to create a look that reads as full, intentional, and impossible to ignore. The good news is that Black hair’s natural curl pattern, coil structure, and density are essentially built for volume. You’re not fighting against your hair type; you’re working with it to create something spectacular.
The styles that work best are the ones that embrace texture instead of fighting it, that build height strategically, and that feel comfortable enough to wear for days or weeks without damage. Whether you’re looking for a quick everyday style, something that makes an entrance at an event, or a protective style that keeps your ends safe while letting your edges breathe, there’s a voluminous ponytail approach that fits. Let’s walk through 12 styles that deliver serious volume, genuine wearability, and that hair-flipping confidence that only a truly voluminous ponytail can give you.
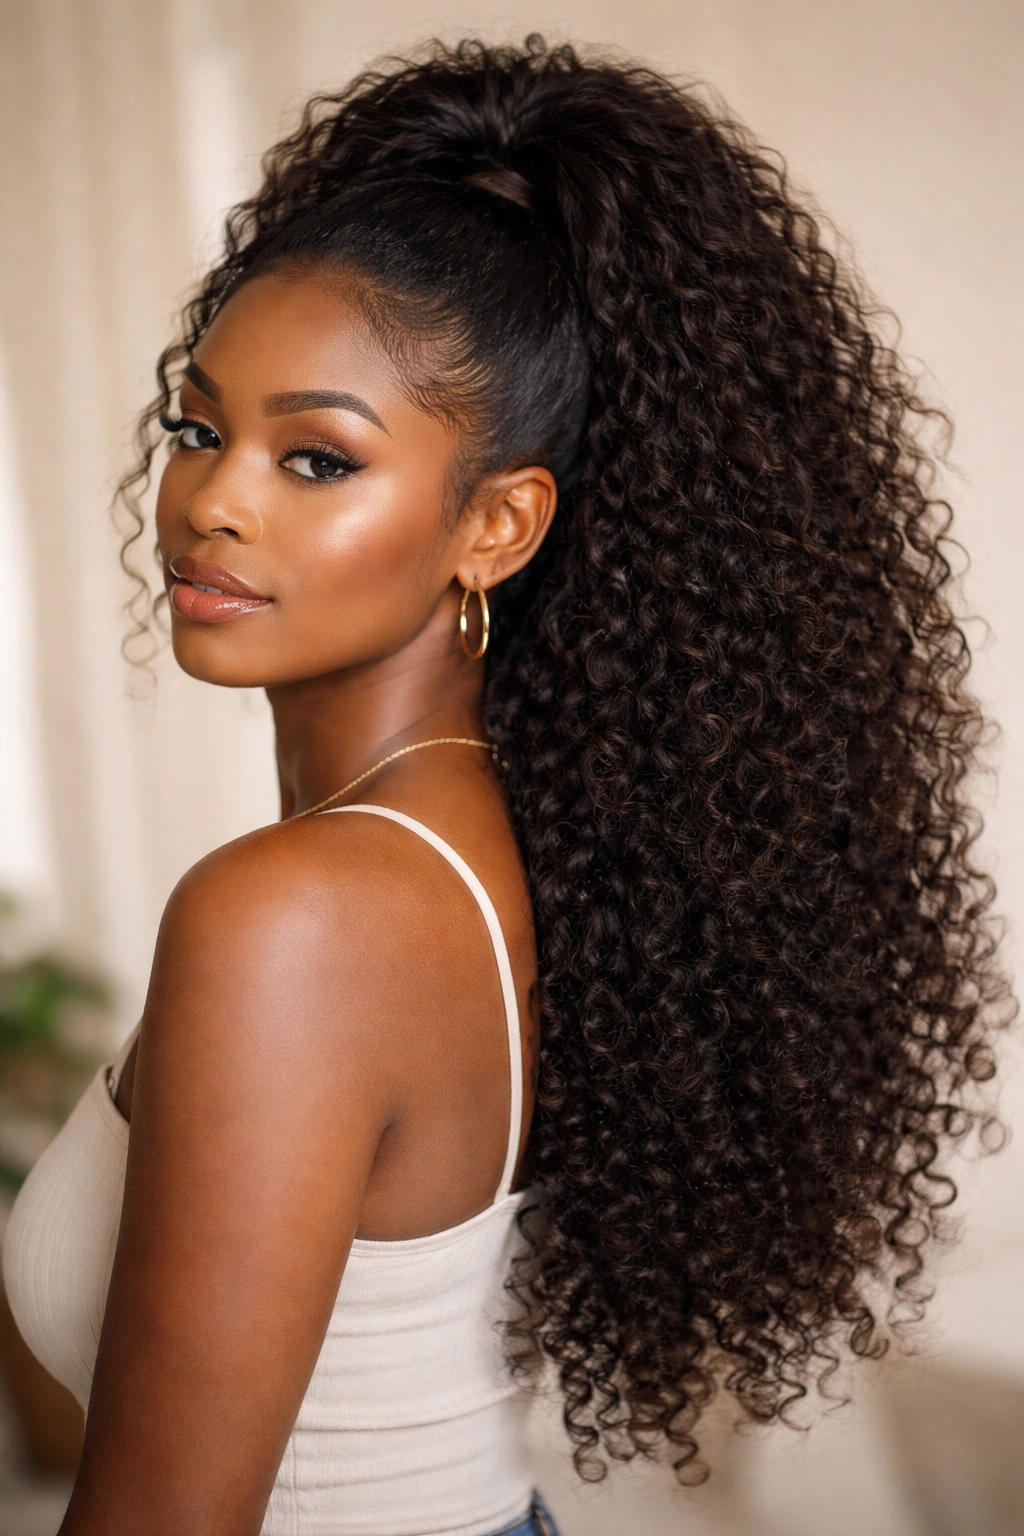
1. The High Statement Puff Ponytail
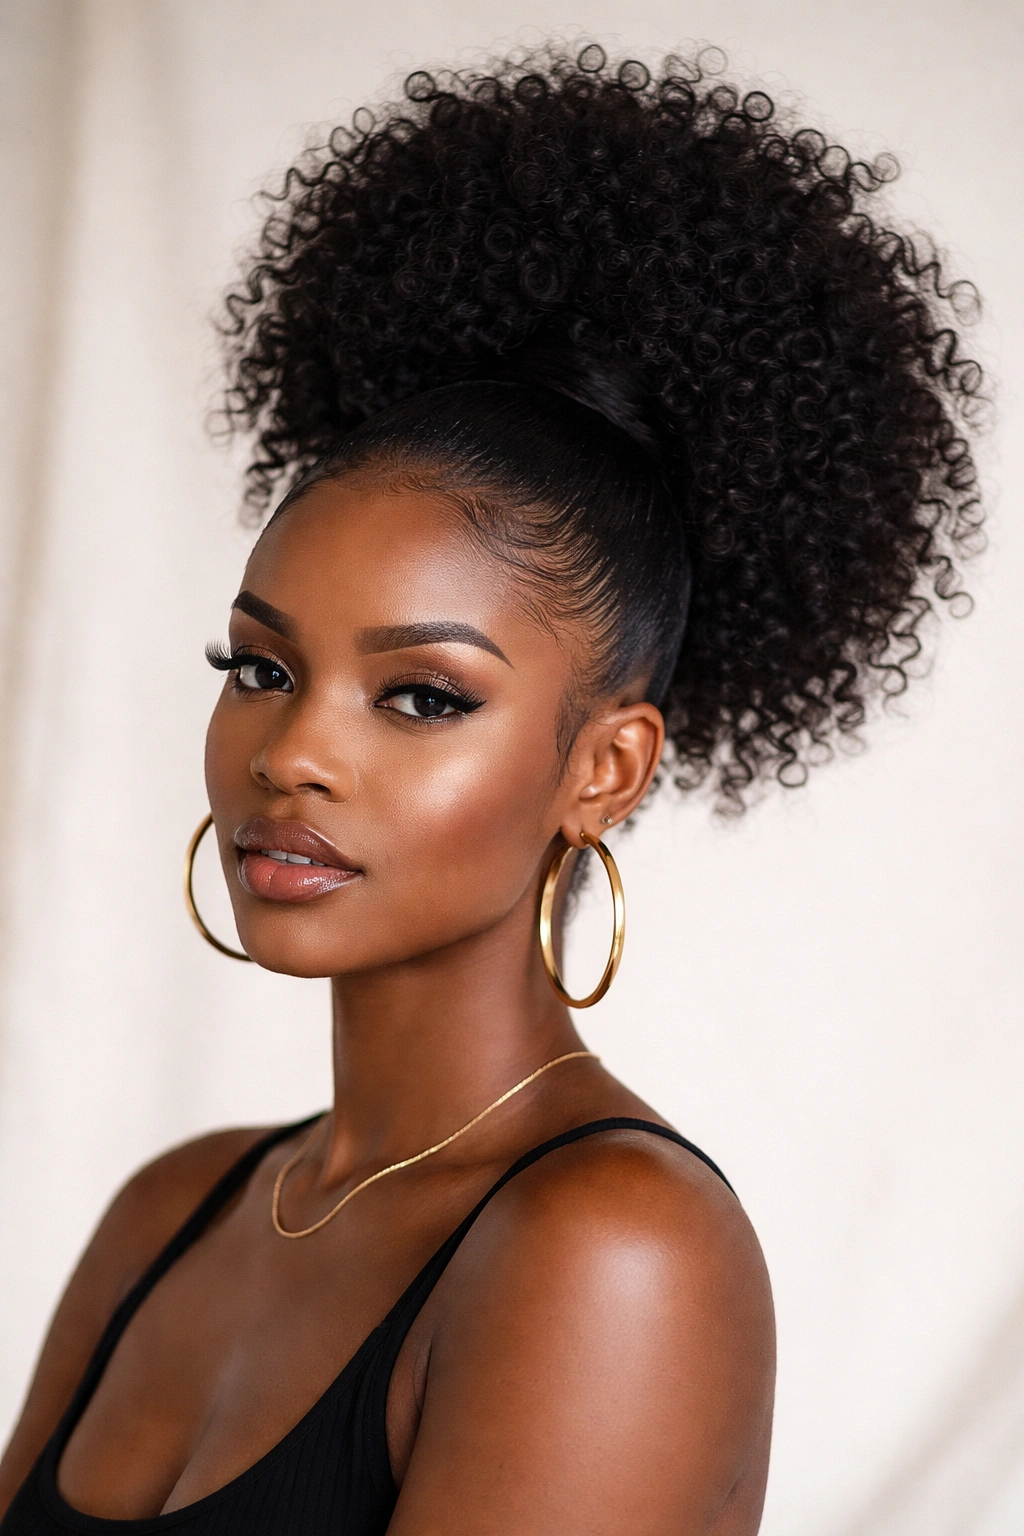
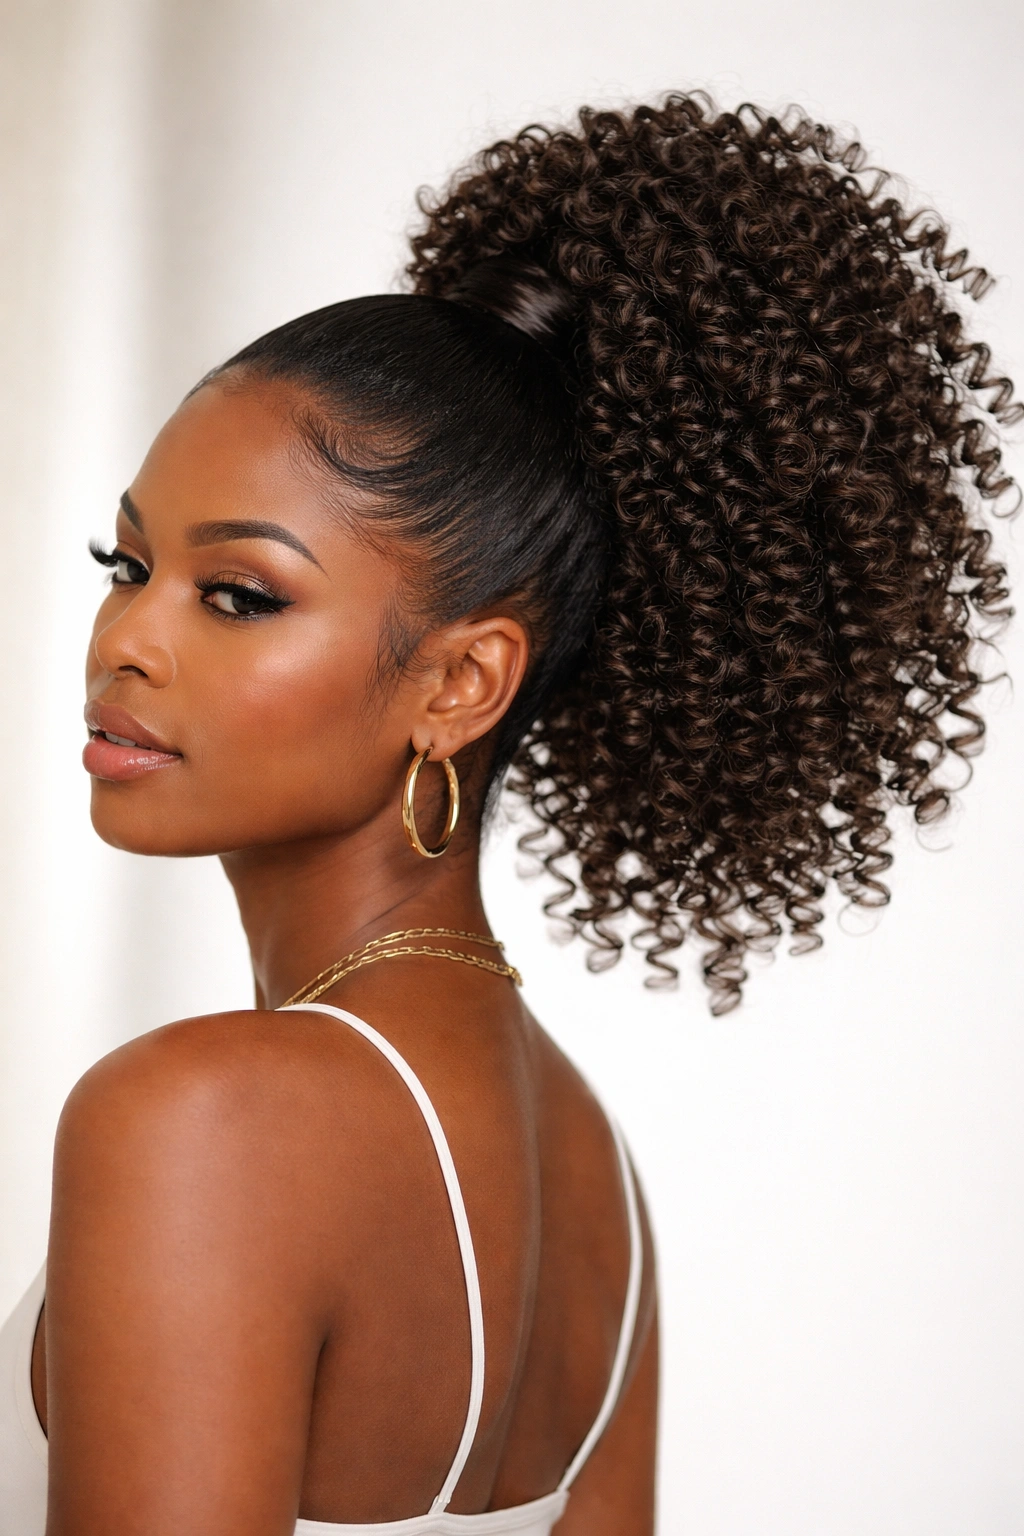
This is the OG voluminous ponytail — the one that says you’re not afraid of height, texture, or taking up space. A high statement puff ponytail places the bulk of your hair at the crown or upper back, creating maximum visual volume and movement. The key to getting this right isn’t just gathering your hair high; it’s about how you arrange it once it’s there.
How to Build Maximum Height
Start with hair that’s either freshly washed and air-dried, a second-day wash-and-go, or a coil-out that’s had time to set overnight. If your curls are a bit soft from a few days of wear, that actually helps because the texture grips better when you’re twisting. Apply a lightweight styling cream or gel to your edges and the nape of your neck — you want them controlled but not crunchy. Use a flexible hair tie or a scarf-wrapped elastic to secure the ponytail high on your crown, roughly where your natural crown sits. Don’t pull it so tight that it creates tension; you want it secure but comfortable enough to wear for hours without a headache.
Once the ponytail is secured, use your fingers to gently lift sections of hair away from the base, fluffing strategically along the sides and front to increase the visual circumference. The puff should look round and full, not completely smooth. If you want more height at the crown, try using a lightweight volumizing mousse before styling, or tease gently at the base of the ponytail to create lift.
What Makes This Style Stand Out
- Works with any curl pattern: coils, waves, tight curls, or loose curls all hold volume beautifully
- Can be worn sleek at the edges for a polished look or soft and fuzzy for a more relaxed vibe
- Takes 5-10 minutes to style once you have the ponytail technique down
- Works as both an everyday style and an event-ready look depending on how you finish the edges
Pro tip: If your puff feels flat by mid-week, flip your head upside down and gently massage the roots for 20 seconds, then flip back. The movement resets the curl pattern and brings volume back.
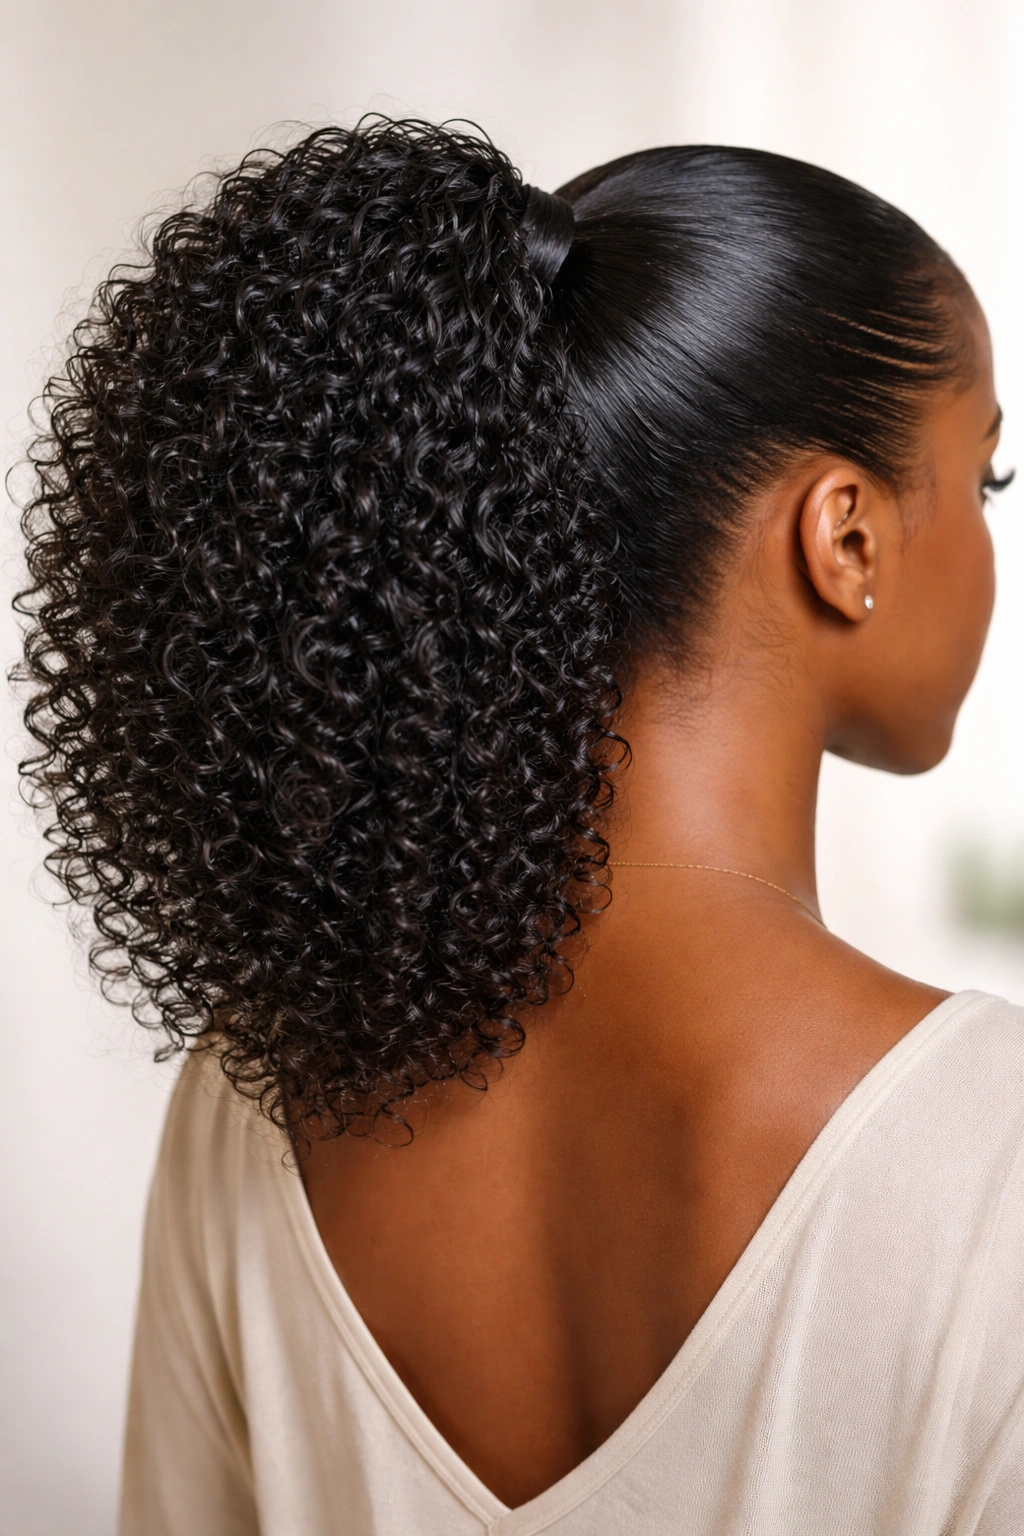
2. The Sleek High Bun with Voluminous Crown
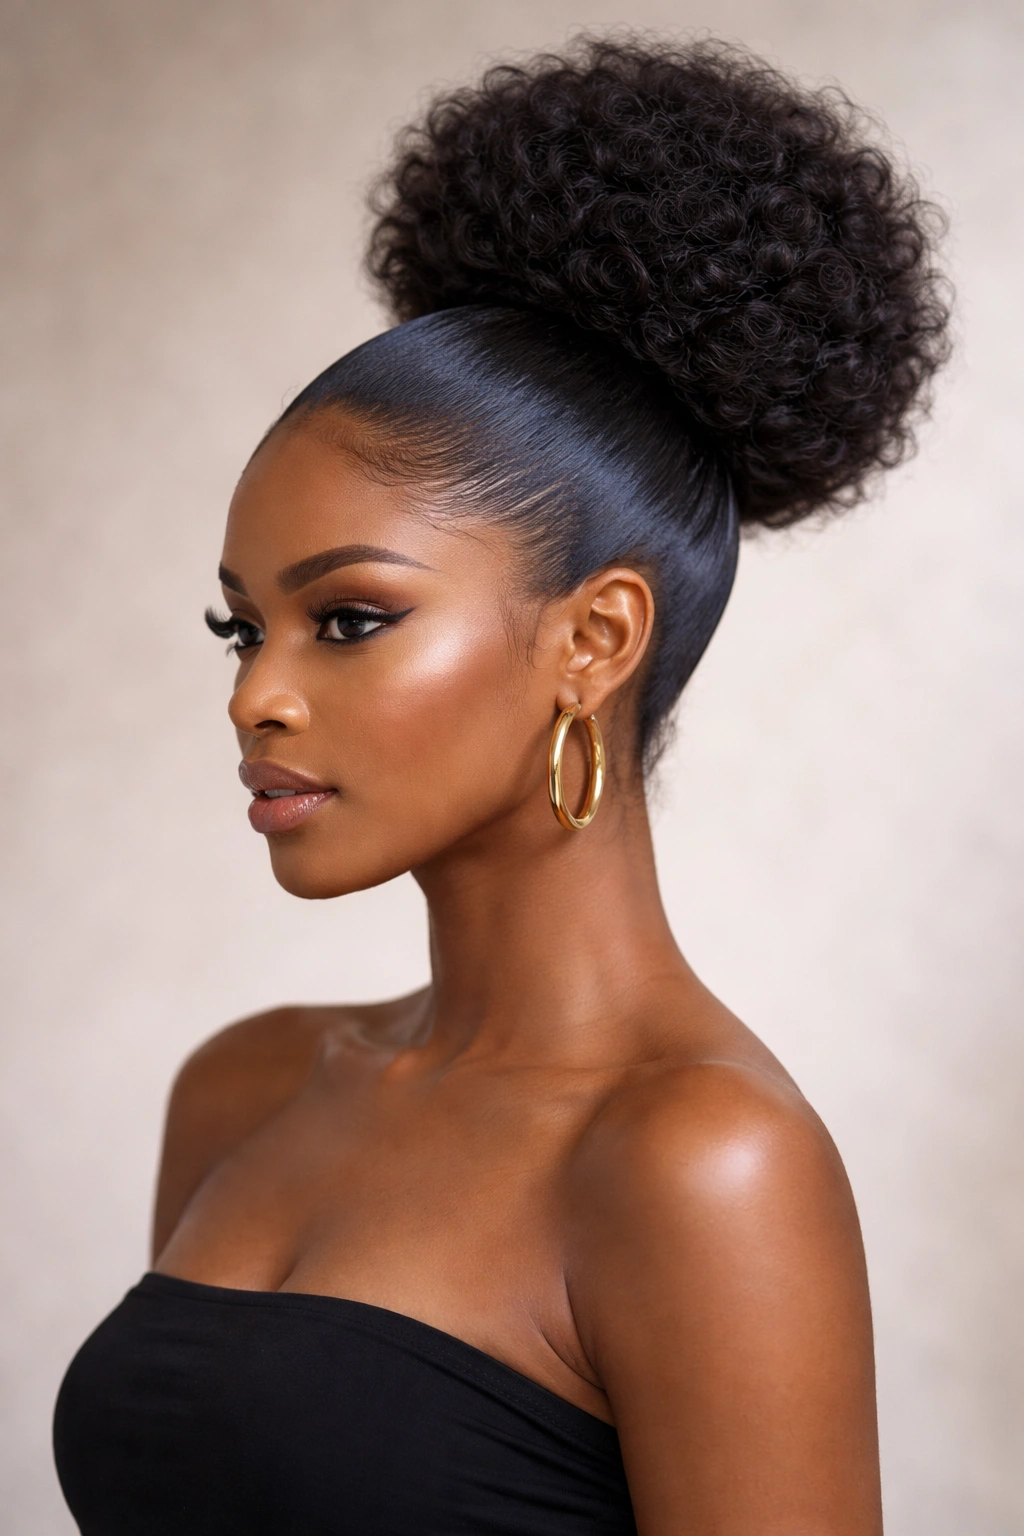
This style combines the polish of a sleek bun with the drama of a voluminous crown — it’s sophisticated, protective, and undeniably eye-catching. The contrast between the smooth, controlled back section and the full, textured crown creates visual interest and professional elegance simultaneously.
Creating the Sleek-to-Volume Transition
Smooth the bottom three-quarters of your hair into a high ponytail using a smoothing cream or gel, keeping it as neat as possible. Use a fine-tooth comb or edge brush to smooth any flyaways and create clean lines from your hairline to the ponytail point. Once the smooth section is secured, the top quarter of your hair — the crown area — stays loose and voluminous. Twist or coil the smooth ponytail section into a bun and secure it with bobby pins, then fluff the crown section outward to create maximum volume at the top of your head.
The contrast is what makes this style work. The sleekness reads as intentional and professional, while the voluminous crown prevents the overall look from feeling too severe. You end up with something that works in corporate environments, creative spaces, casual settings, and anywhere in between.
Style Elements to Get Right
- Use a smoothing product specifically formulated for your hair type — if you have looser curls, a lightweight serum works; if you have tighter coils, a gel or edge control is better
- Keep the crown section loose and unproduct-heavy so it can fluff naturally without looking weighed down
- The bun at the back should be compact and smooth — this balance is what creates the visual pop of the crown volume
- Secure the bun with 4-6 bobby pins in an X or crosshatch pattern for maximum hold
Worth knowing: This style typically lasts 7-10 days before you need to refresh the sleek sections and re-fluff the crown. You can sleep on it by using a silk bonnet or pineapple method to keep the crown intact.
3. The Textured Side Ponytail with Face-Framing Curls
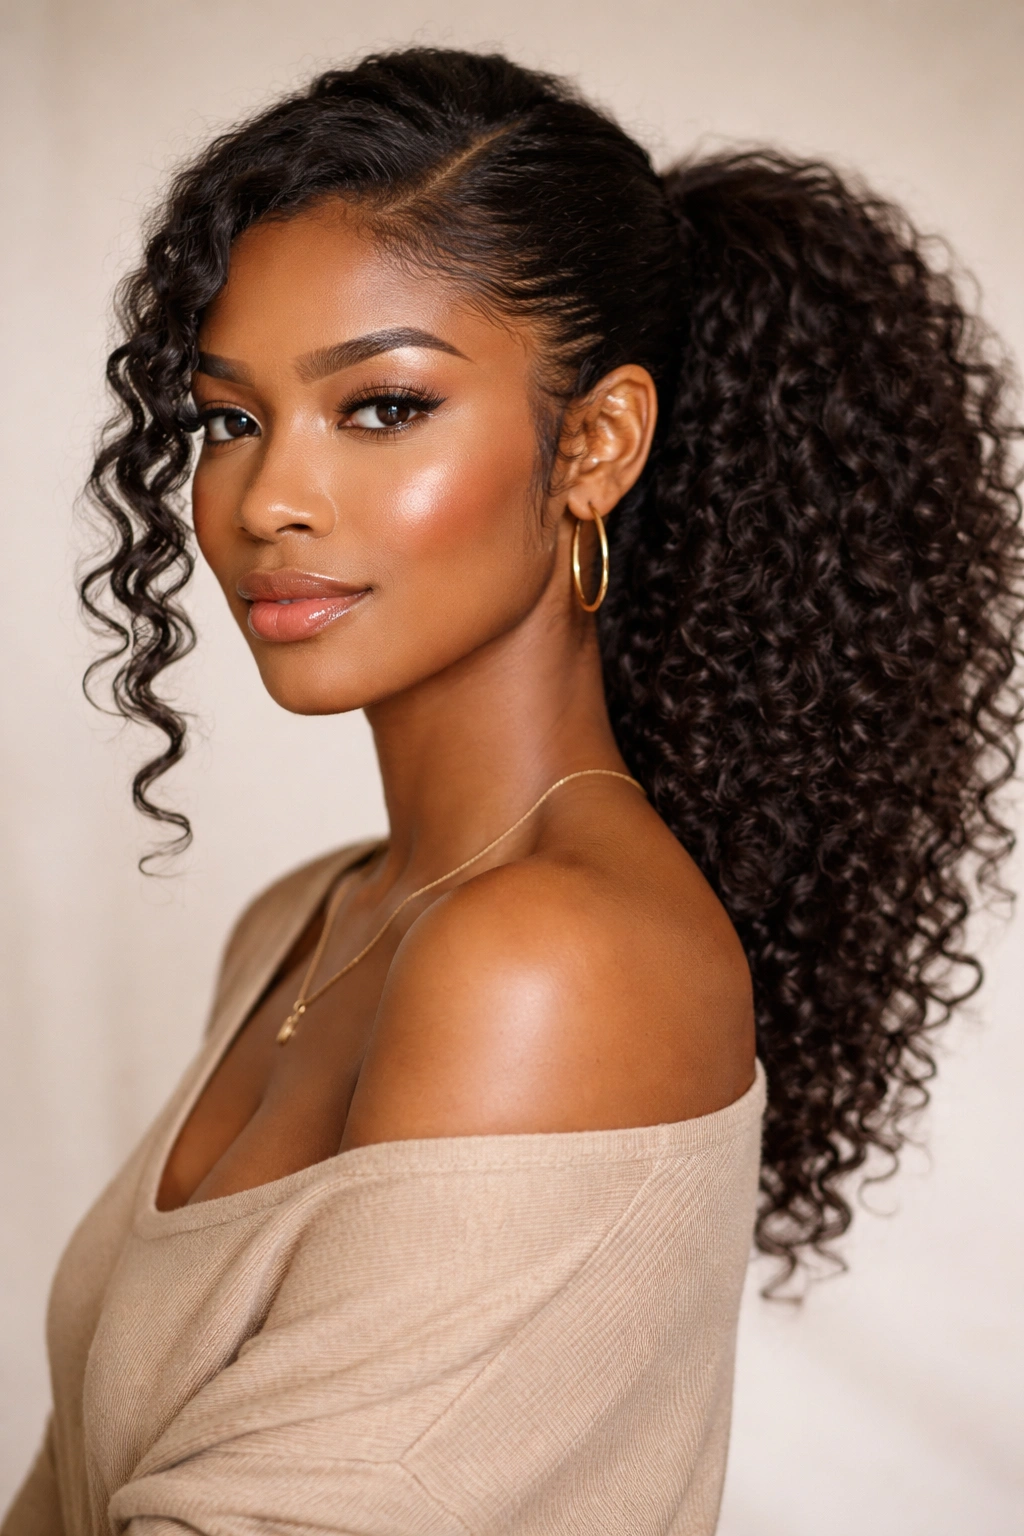
A side ponytail pulls your hair to one side — usually ear level or slightly lower — and creates asymmetrical volume that’s perfect for showing off your face and shoulders. Adding face-framing curl sections makes it feel intentional, fashion-forward, and incredibly flattering for all face shapes.
Building the Side Ponytail Structure
Determine which side you want the ponytail on, then use your fingers to sweep your hair to that side, leaving 2-3 small sections of curls loose around your face. These frame pieces should be about pencil-thick and come from your hairline or temple area. Gather the bulk of your hair at the side of your head — roughly at ear level — and secure with a flexible hair tie or scarf-wrapped elastic. The ponytail should sit lower and more to the side than a traditional high ponytail, which creates a different visual weight and a softer overall aesthetic.
Once the ponytail is secured, manipulate the frame pieces around your face. Wrap one gently around the elastic to hide it, or let them hang loose and curl naturally. The key to this style’s polish is ensuring the face-framing pieces feel intentional, not like you forgot to gather them up.
Technical Details That Matter
- The side ponytail should start from a point roughly between your ear and the side of your head, not directly in front of your ear
- Face-framing curls work best if they’re separated from the main ponytail cleanly — there should be clear space between them and the secured hair
- Fluff the side ponytail itself to maximize volume and prevent it from looking thin or stringy
- Use a lightweight curl cream on the face-framing sections so they define nicely without appearing crunchy
Insider note: This style looks particularly striking when you add a metallic cuff, decorative hair clip, or silk scrunchie in a contrasting color just below the elastic.
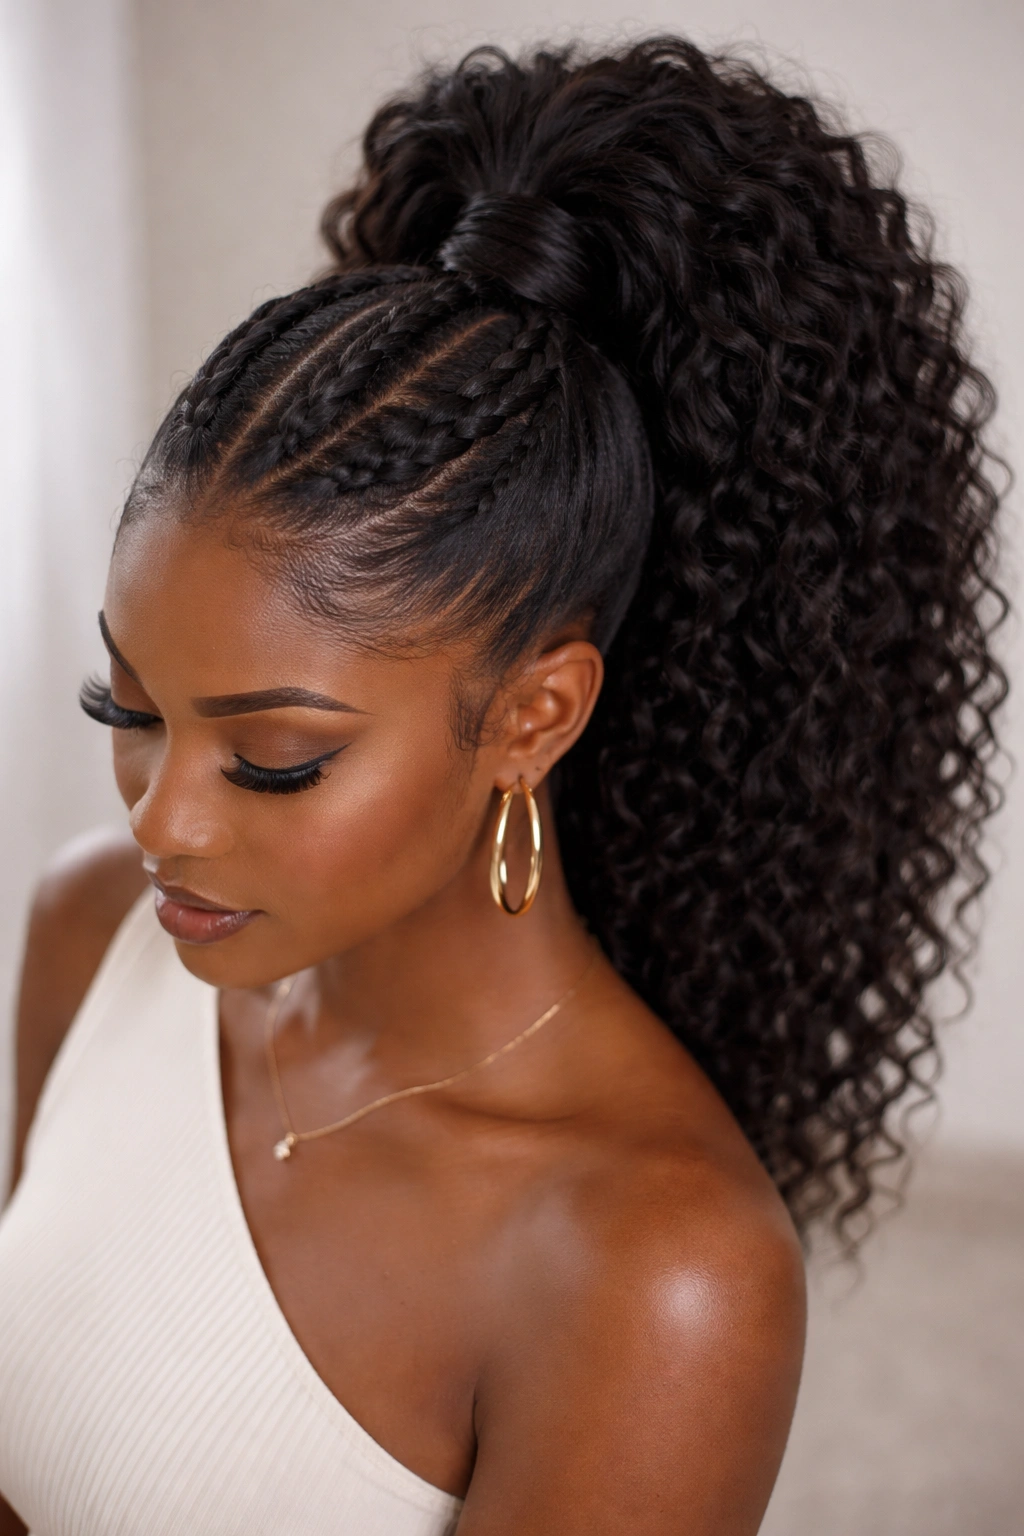
4. The Wrap-Around Braid Voluminous Ponytail

This style uses a braid wrapped around the base of a voluminous ponytail, creating a finished, intentional look that reads far more complex than it actually is. It’s the perfect style for anyone who wants volume but also wants something that feels slightly more put-together than a plain puff.
How to Braid and Wrap
Create a voluminous high ponytail first, securing it with a clear elastic. Then take a small section of hair from the ponytail itself — about the thickness of a marker — and three-strand braid it loosely down the length. Once the braid reaches the end of your ponytail, wrap it around the base of the ponytail, covering the elastic, and pin it in place with a bobby pin hidden inside the braid. The wrapped braid should sit snugly around the base, and it adds dimension and visual interest that makes the whole style look intentional.
Some people prefer a simple, tight braid; others like a textured braid that’s been loosened after braiding for a softer look. You can even create two smaller braids and wrap them in opposite directions for a more complex effect. The beauty is the flexibility.
Why This Styling Technique Works
- The braid disguises the elastic, making the whole style look polished and finished
- It prevents the ponytail from looking too casual or simple — the braid elevates it instantly
- The technique works regardless of your hair’s curl pattern, density, or length
- You can create completely different vibes by varying braid thickness and tightness
Pro tip: If you don’t have enough hair length for a long braid that can wrap around, create a smaller braid and position it to cover just the elastic area. Even a braid that’s 2-3 inches long adds sophistication to the base.
5. The Layered Bubble Ponytail
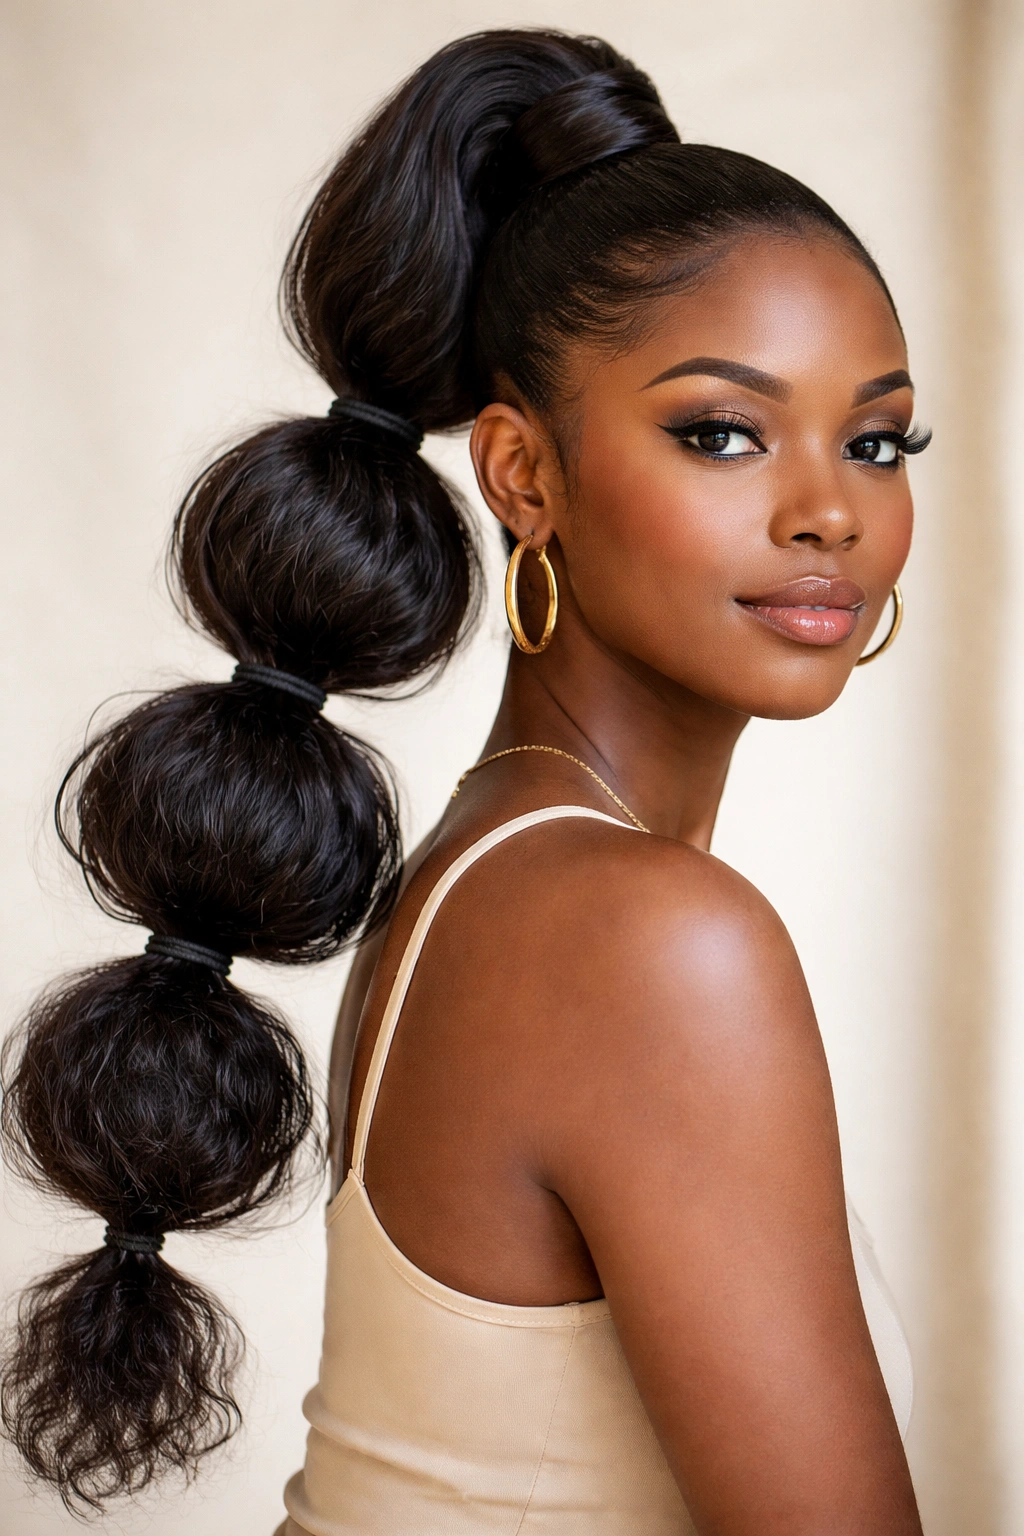
A bubble ponytail uses multiple elastics spaced down the length of the ponytail, creating distinct puffy sections that look voluminous, playful, and undeniably stylish. When you layer these bubbles — meaning each one is slightly larger or fuller than the one above — you create dimension and visual movement.
Creating the Bubble Effect
Secure your ponytail high with your first elastic. About 2-3 inches down, place a second elastic and fluff the hair between the two elastics outward to create the first bubble. Continue this pattern down the length of your ponytail — elastic, fluff, elastic, fluff — creating 3-5 bubbles depending on your hair length. The key is that each bubble should feel plump and intentional, not flat or stringy. You can make each bubble progressively larger as you move down, or keep them uniform for a more geometric look.
The elastics themselves become a design element, so choose ones that coordinate with your outfit or use metallic, patterned, or colored elastics for added visual interest.
Making Bubbles Look Full and Intentional
- Use flexible or fabric-covered elastics rather than thin rubber bands, which can be harsh on your hair
- Don’t skip the fluffing step — this is what transforms a segmented ponytail into an intentional bubble style
- The distance between elastics affects how the style looks; closer spacing creates more bubbles with smaller volume, while wider spacing creates fewer, fuller bubbles
- Tighter curls and coils often create more defined bubbles, while looser waves might create a softer, less structured bubble effect
Worth knowing: Bubble ponytails are particularly striking with jewels, beads, or metallic hair cuffs placed at each elastic point. This turns a playful style into something truly eye-catching.
6. The Twisted Crown Voluminous Ponytail
This style uses twists that wrap around the crown of your head, feeding into a voluminous high ponytail. It’s protective, visually stunning, and works beautifully for both everyday wear and special occasions.
Building the Twisted Crown
Start by creating two or more twisted sections that originate at your temples or the sides of your crown and travel across your head toward the back. Each twist should be about half an inch thick — thick enough to be visible and intentional. As you twist, gradually pick up more hair from the surrounding area, building the twist into a rope-like section. Feed these twists into a high ponytail at the crown or upper back of your head. The twists become decorative elements that add visual complexity while the ponytail itself remains voluminous and full.
You can create just two large twists, three medium twists, or more smaller twists depending on the look you want. More twists create a more intricate appearance; fewer twists create a cleaner, more minimal look.
Technical Execution
- Twists hold better when you use a light styling cream or gel on the sections you’ll be twisting
- The twists should be visible and defined in the finished look — if they’re disappearing into your regular hair, they’re either too thin or not twisted tightly enough
- The ponytail itself should still look full and voluminous despite the twists feeding into it
- This style is excellent for protecting new growth and your hairline because it gathers hair away from your face without tight pulling
Pro tip: Experiment with different twist placements — originating from your hairline creates one aesthetic, while twists that begin higher on your crown create a completely different vibe.
7. The Curly Gel-Defined Puff Ponytail
This style celebrates your curl pattern by using a gel or defining product to create crisp, intentional curls throughout your ponytail. Rather than a smooth puff, you get a textured, defined look where each curl is visible and polished.
Applying Gel for Definition
Wash and condition your hair, then apply a leave-in conditioner while your hair is still wet or damp. Use a curl-defining gel — one that’s formulated for your specific curl pattern and texture — and apply it in sections throughout your hair. You can use a praying hands method (smoothing the product down the curl), a scrunching method (scrunching the product upward into your curls), or a combination of both, depending on your hair’s thickness and curl type.
Once your gel is applied, allow your hair to air-dry or use a diffuser on a low heat setting. Once completely dry, gather your hair into a high ponytail and secure it with a flexible hair tie. The individual curls remain defined and visible rather than melting into an amorphous puff.
Product and Technique Considerations
- Not all gels work equally for all curl patterns — you may need to test a few to find the one that defines your curls without crunchiness or flaking
- Application technique matters enormously; product applied the right way creates definition, applied too heavily creates crunchiness
- The drying method affects the final curl definition; air-drying typically gives softer results than diffuser drying
- This style works best when your curls are freshly moisturized and product-assisted
Insider note: If you notice crunchiness in your gel-defined curls by day two or three, try scrunching them gently with your hands while holding them under running water for a few seconds. This reactivates the gel and softens the crunch while maintaining definition.
8. The Half-Up Half-Down Voluminous Look
A half-up half-down style gathers the top or crown portion of your hair while leaving the bottom portion loose. This creates the illusion of a ponytail while maintaining the full texture and volume of your entire head of hair, perfect for showcasing length and curl pattern simultaneously.
Sectioning and Securing Properly
Determine your half-up line — roughly at ear level or slightly above, depending on how much volume you want at the top. Gather the top half of your hair using your fingers or a comb, keeping it clean but not overly smooth. Secure this section with a flexible hair tie, leaving the bottom half of your hair completely loose and unstyled. The key is ensuring that the gathered section feels secure and intentional while the loose section flows naturally without blending into the tied section.
You can wear the gathered section as a smooth, polished top and leave the bottom section textured and full, or style both sections uniformly for a cohesive look.
Design Elements That Maximize Volume
- The gathered section should sit high enough that it creates lift and height
- The elastic used to secure the gathered section becomes visible, so choose one that coordinates with your hair or outfit
- You can add braids, twists, or decorative elements to the gathered section for extra interest
- The loose bottom section should be fluffed and separated so it reads as intentionally voluminous, not stringy
Pro tip: Wrap a small braid or a decorative element around the elastic to disguise it and add polish to the gathered section.
9. The Flat-Twisted Voluminous Ponytail
Flat twists are two-strand twists that sit flush against your scalp, and using them as a foundation for a voluminous ponytail creates a style that’s protective, visually interesting, and structurally sound. The flat twists direct your hair toward the ponytail point while the ponytail itself remains full and dimensional.
Creating Flat Twists That Feed Into Your Ponytail
Start by creating one, two, or three flat twists that originate at different points on your scalp and travel toward the back of your head. A flat twist is created by taking two sections of hair and twisting them around each other while continuously picking up new hair from your scalp as you twist, similar to a cornrow but with a twisted rather than braided appearance. Each flat twist should travel smoothly toward a central gathering point at your crown or upper back where your ponytail will be positioned.
Once the flat twists reach your desired ponytail point, gather them along with your remaining loose hair into a secure ponytail. The flat twists become decorative elements that lead to the full, voluminous ponytail.
Execution Tips for Clean Twists
- Use a light styling product on the sections you’ll be twisting — too much product weighs them down, too little makes them slip
- Flat twists should be consistent in thickness and tightness for a professional appearance
- Keep the twists close to your scalp so they sit neatly and don’t stick out at odd angles
- The ponytail itself should be noticeably fuller and more voluminous than the directed twists, creating visual contrast
Worth knowing: Flat twists are one of the most protective ponytail styles because they keep your hairline and edges away from rubbing and tension, while the loose ponytail portion still allows full volume and styling freedom.
10. The Coil-Out Statement Ponytail
A coil-out is when you create intentional spiral curls using the two-strand twist method and then unravel them after they set, creating a defined, bouncy curl pattern. Using coil-outs within or as part of your ponytail creates a statement style with serious personality and movement.
Creating Defined Coils
Wash and deeply condition your hair, then apply leave-in conditioner and a curl cream while your hair is still damp. Divide your hair into sections — anywhere from 8 to 20 sections depending on how thick you want each coil — and two-strand twist each section from root to tip. Secure the end of each twist with a small elastic or by tucking it under itself. Allow the twists to dry completely, either air-dried overnight or using a diffuser on low heat.
Once the twists are completely dry, unravel each one by gently pulling the two strands apart, and you’ll be left with a head full of defined spirals. Gather this into a high ponytail while the coils are still fresh and bouncy.
Product and Technique Nuances
- The thicker your twists, the looser and bouncier your coils will be; thinner twists create tighter, more defined coils
- Using a curl cream or styling mousse before twisting helps define and hold the coil shape
- The coils look best when freshly unraveled, so styling your coil-out ponytail on the day you unravel them creates the most dramatic effect
- This style is excellent for showing off multiple curl patterns if your hair has natural variation
Pro tip: If you want your coils to last longer than a few days, use a light gel in addition to your curl cream when creating the twists. The gel helps the coil shape hold even as you wear the style.
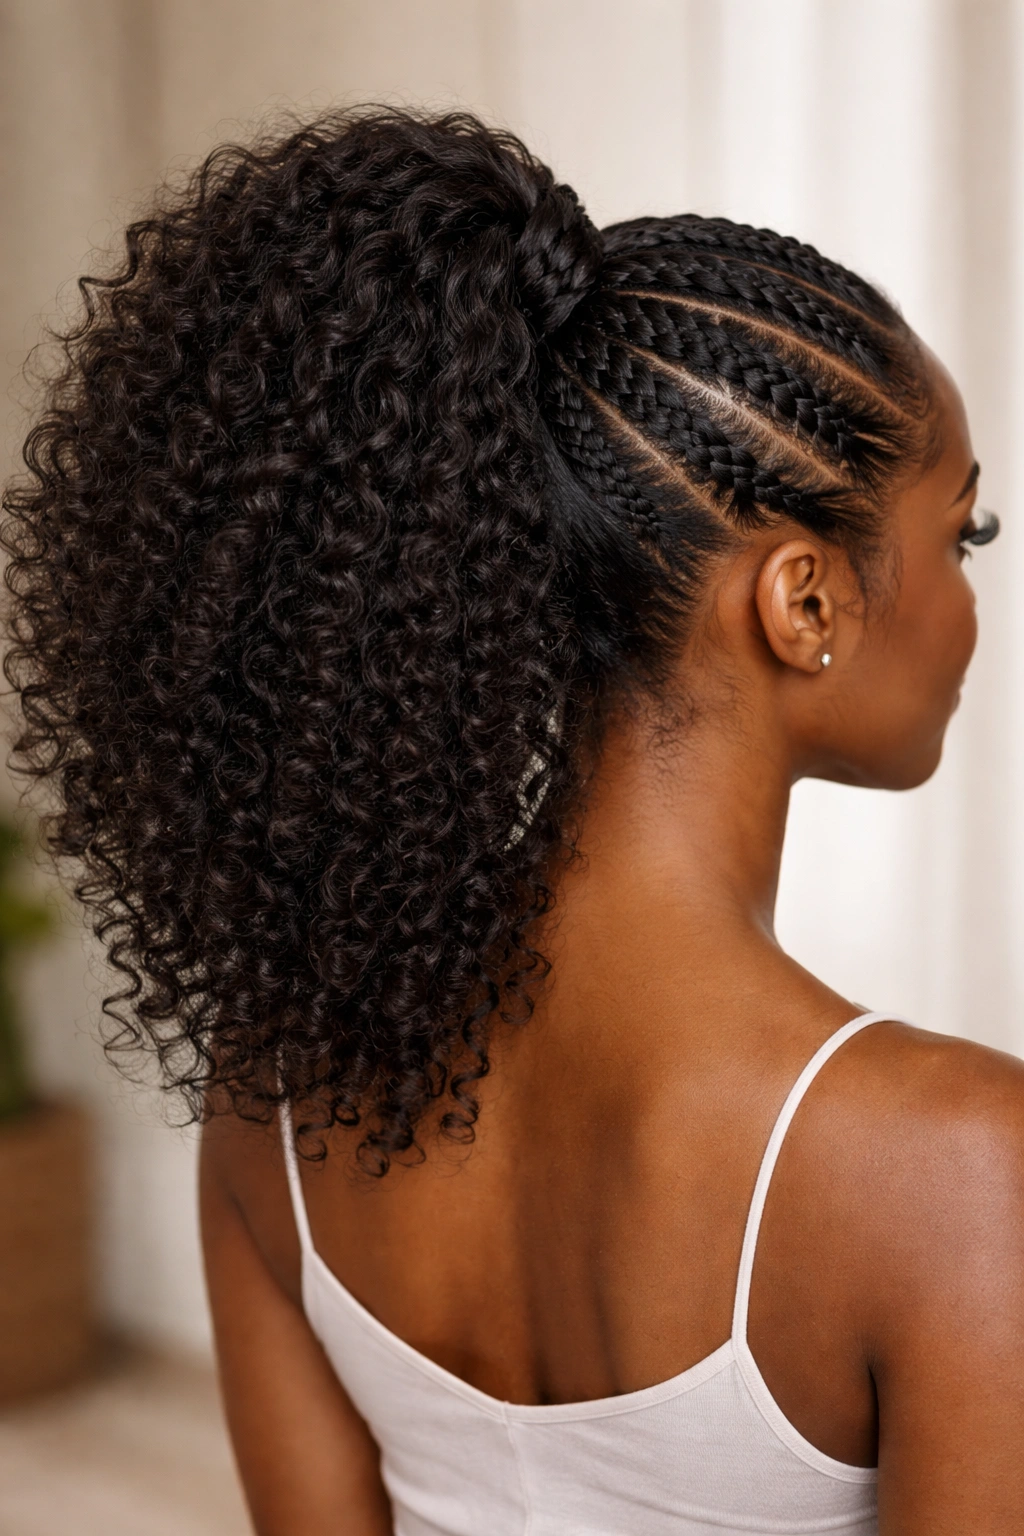
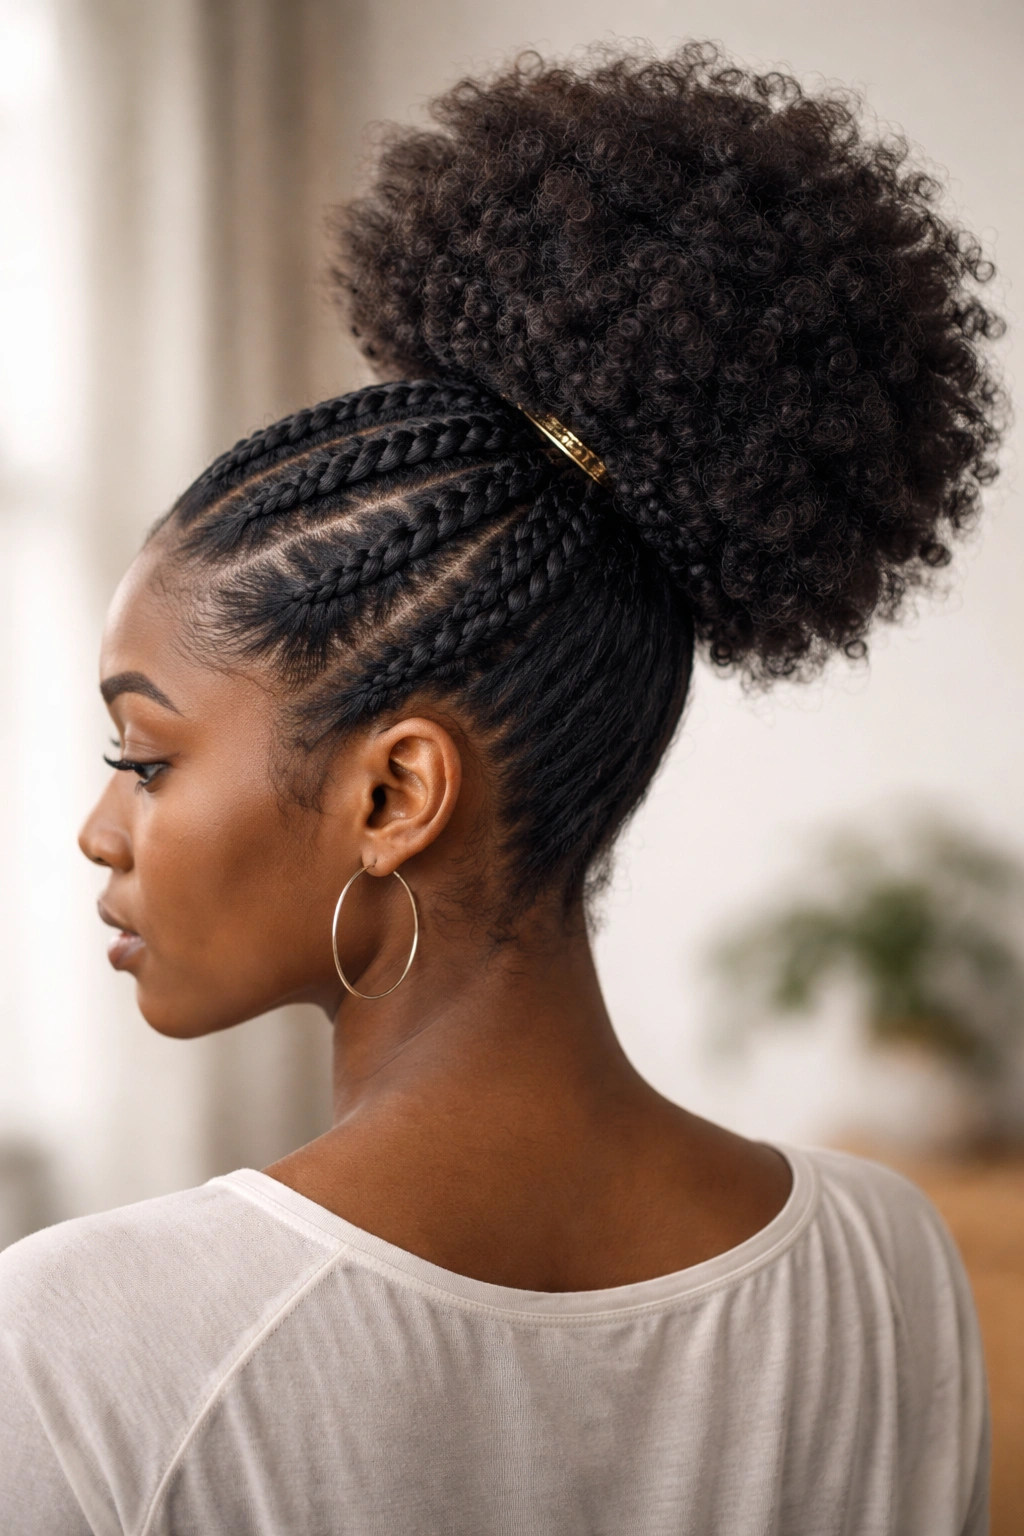
11. The Braided Base Voluminous Puff
This style uses braids as a foundational base that leads to a voluminous puff ponytail. The braids are structurally important — they help distribute tension and create a secure foundation — while the puff remains the focal point.
Building the Braided Foundation
Create two, three, or four braids that originate at different points on your scalp and travel toward a central gathering point, similar to the flat twist technique but using traditional three-strand braids instead. The braids should be thicker and looser than cornrows — you want them visible and intentional. Once each braid reaches your desired gathering point, pin the end and gather all the loose hair plus all the braid ends into a high ponytail.
The braids become a decorative framework that leads your eye toward the voluminous puff, and they also help the ponytail stay securely in place without requiring excessive tension.
Structural Considerations
- The braids should be loose enough that they don’t create tension on your scalp but tight enough that they look intentional and defined
- You can use contrasting colors of braiding hair to make the braids more visually prominent, or match your own hair color for a more subtle appearance
- The braids should all converge at the same point so the gathered ponytail has a clean, centered appearance
- The puff itself should puff outward dramatically, creating visual contrast with the structured braids
Insider note: If you’re using braiding hair to create the braids, you can use longer braiding hair than your own natural hair, which gives you the option to create very long braids that travel dramatically across your head before reaching the ponytail point.
12. The Faux Hawk Voluminous Ponytail
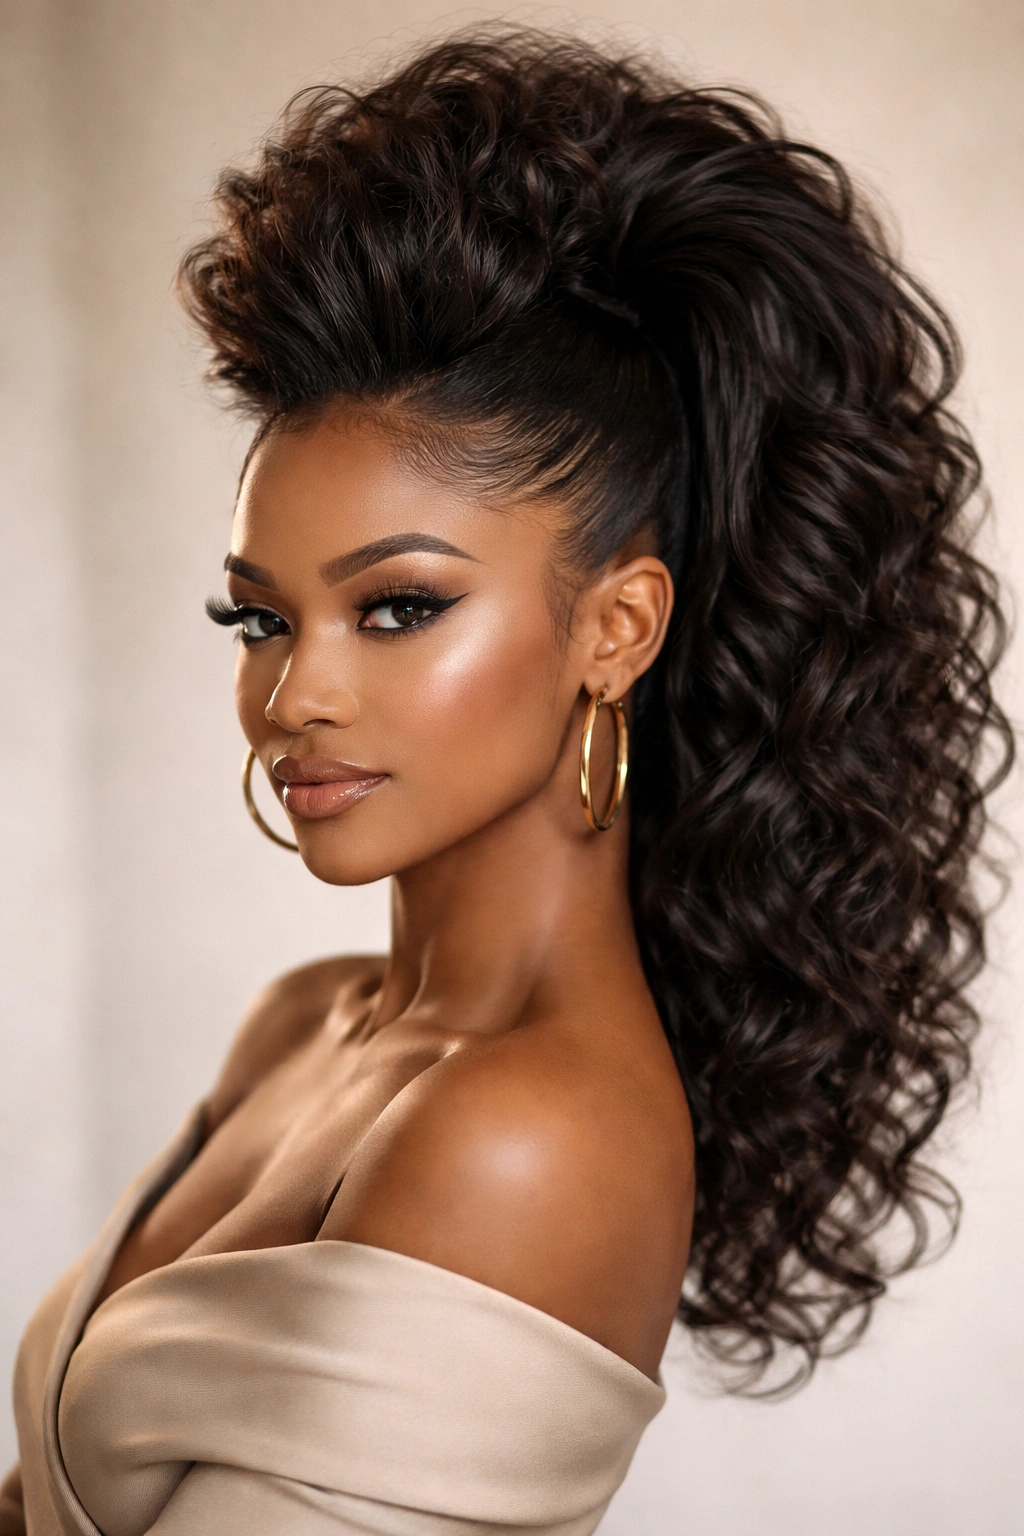
A faux hawk ponytail creates height at the crown while pulling the sides back, mimicking a hawk silhouette but with a full ponytail rather than short, spiky hair. It’s edgy, bold, and incredibly striking.
Creating the Faux Hawk Effect
Smooth the sides and back of your hair down and to the sides using a smoothing cream or gel, creating clean, controlled sections. The crown area — roughly from your forehead to the back of your head along the center — stays voluminous and loose. Gather this crown section into a high, centered ponytail and secure it. The contrast between the smoothed sides and the voluminous center creates the hawk silhouette.
You can wear the edges completely smooth and sleek, or use edge control to create clean lines while allowing slightly more texture than a fully pressed edge. The main goal is defining the difference between the smooth side sections and the voluminous center.
Design and Styling Details
- The smoothed sections should be visibly smooth and controlled — use a gel or smoothing cream to ensure they stay in place
- The crown section should be dramatically voluminous so the faux hawk silhouette is unmistakable
- You can add twists or braids to the smooth side sections before pulling hair back for added visual interest
- This style works best with edges that you’ve prepared, either with edge control or by blow-drying them smooth
Pro tip: Take a photo of the style before and after you add products to the edges — seeing the visual difference helps you decide how smooth you want to go. Some people love an extremely sleek faux hawk with almost wet-looking edges, while others prefer a softer, more natural-looking edge control.
Final Thoughts
A voluminous ponytail is about so much more than just tying your hair back. It’s about intentional styling, celebrating your hair’s natural texture and density, and creating a look that makes you feel confident and powerful. The 12 styles here each approach volume differently — some through strategic fluffing, others through braids and twists, some through product definition, and others through clever sectioning and contrast.
The most important part of any voluminous ponytail is that it actually feels good to wear. If a style creates tension, discomfort, or requires excessive manipulation that risks your hair’s health, it’s not the right style for you no matter how striking it looks. The best voluminous ponytail is one that keeps your hair secure and protected, feels comfortable for extended wear, and makes you feel authentically yourself.
Experiment with these styles, try different products and techniques, and pay attention to what works best for your specific hair type, thickness, texture, and lifestyle. Your perfect voluminous ponytail is out there — it might be one of these 12 styles exactly, or it might be a combination or variation that you discover through playful styling.