Your wedding day calls for a hairstyle that looks gorgeous in photos and feels comfortable throughout the ceremony and reception. If you’re planning to wear a veil, a ponytail might be your perfect solution—but not all ponytails work equally well with this traditional bridal accessory. The right style needs to balance the weight and placement of your veil, flatter your face and neckline, and hold up beautifully under the inevitable stress of a full day of celebration.
The key challenge with pairing ponytails and veils is creating enough structure at the base to anchor the veil securely without creating awkward bumps or a heavy, unbalanced look. A veil attached to a loose, thin ponytail can slide around throughout the day, while a ponytail positioned too low might clash visually with how your veil sits. The right technique involves strategic placement, proper sectioning, and often a few hidden tricks that professional bridal stylists use to make the combination work flawlessly.
What makes this hairstyle category so appealing for brides is the versatility it offers. Whether you’re drawn to sleek, modern elegance or soft, romantic waves, there’s a ponytail-and-veil combination that complements your wedding vision and your face shape. Some styles work beautifully with statement veils that demand attention, while others keep the focus subtle and understated. Your ponytail choice also affects how much of your hair is visible (important if you’ve invested in special styling) and how the overall silhouette looks in your dress.
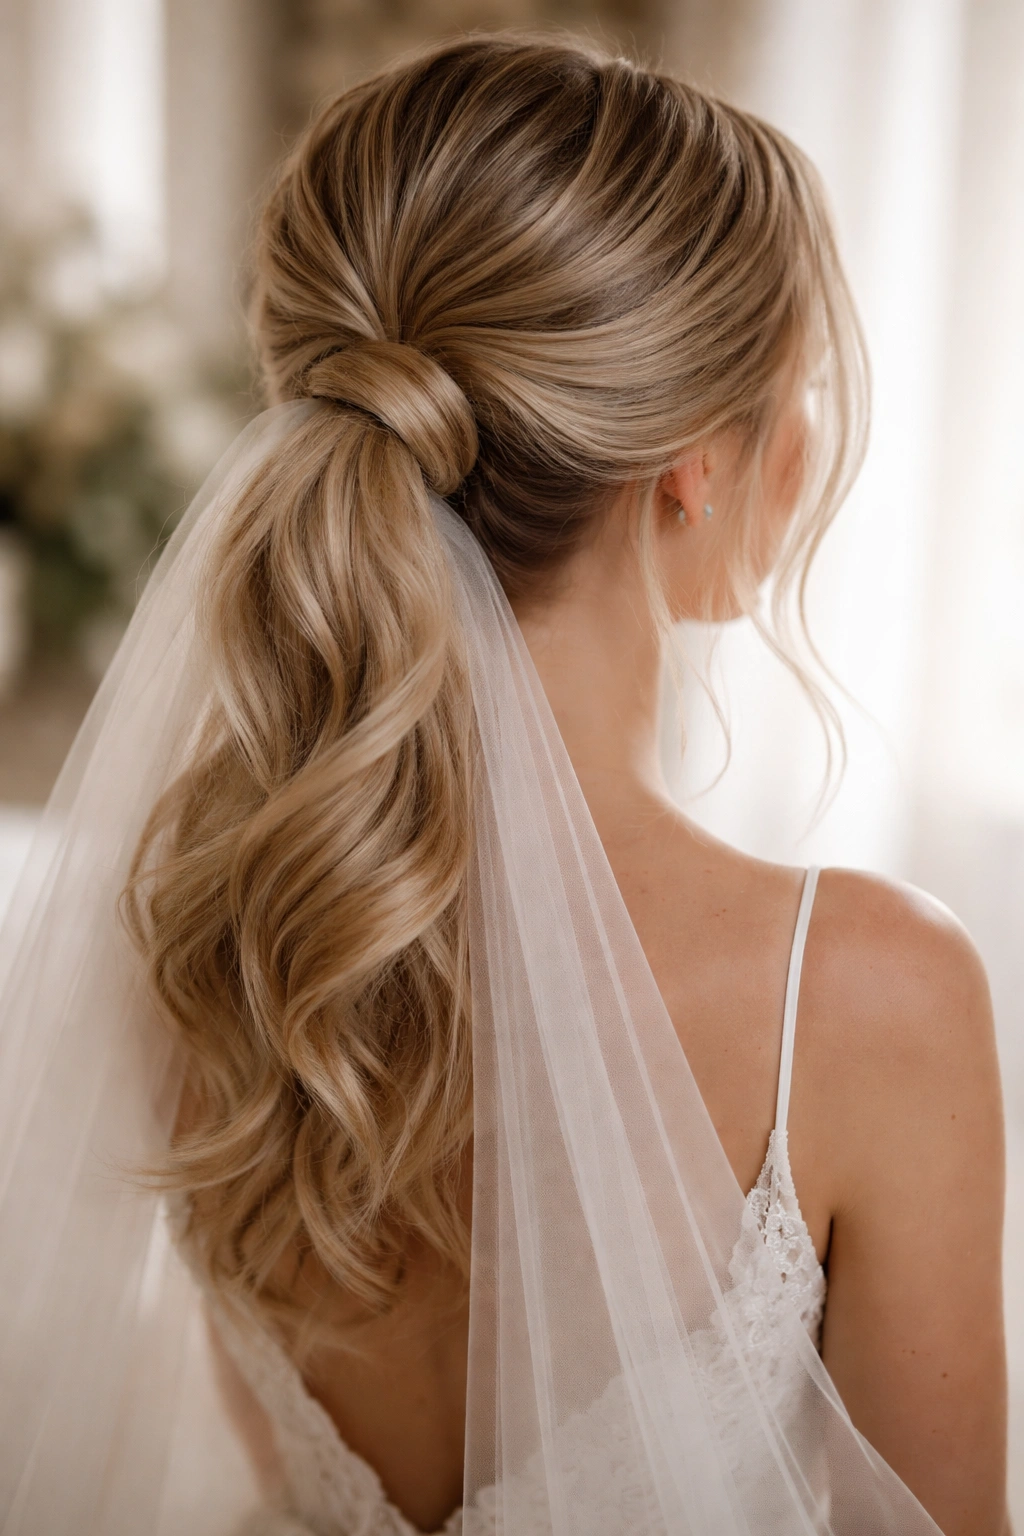
1. Classic Low Ponytail With Wispy Bangs
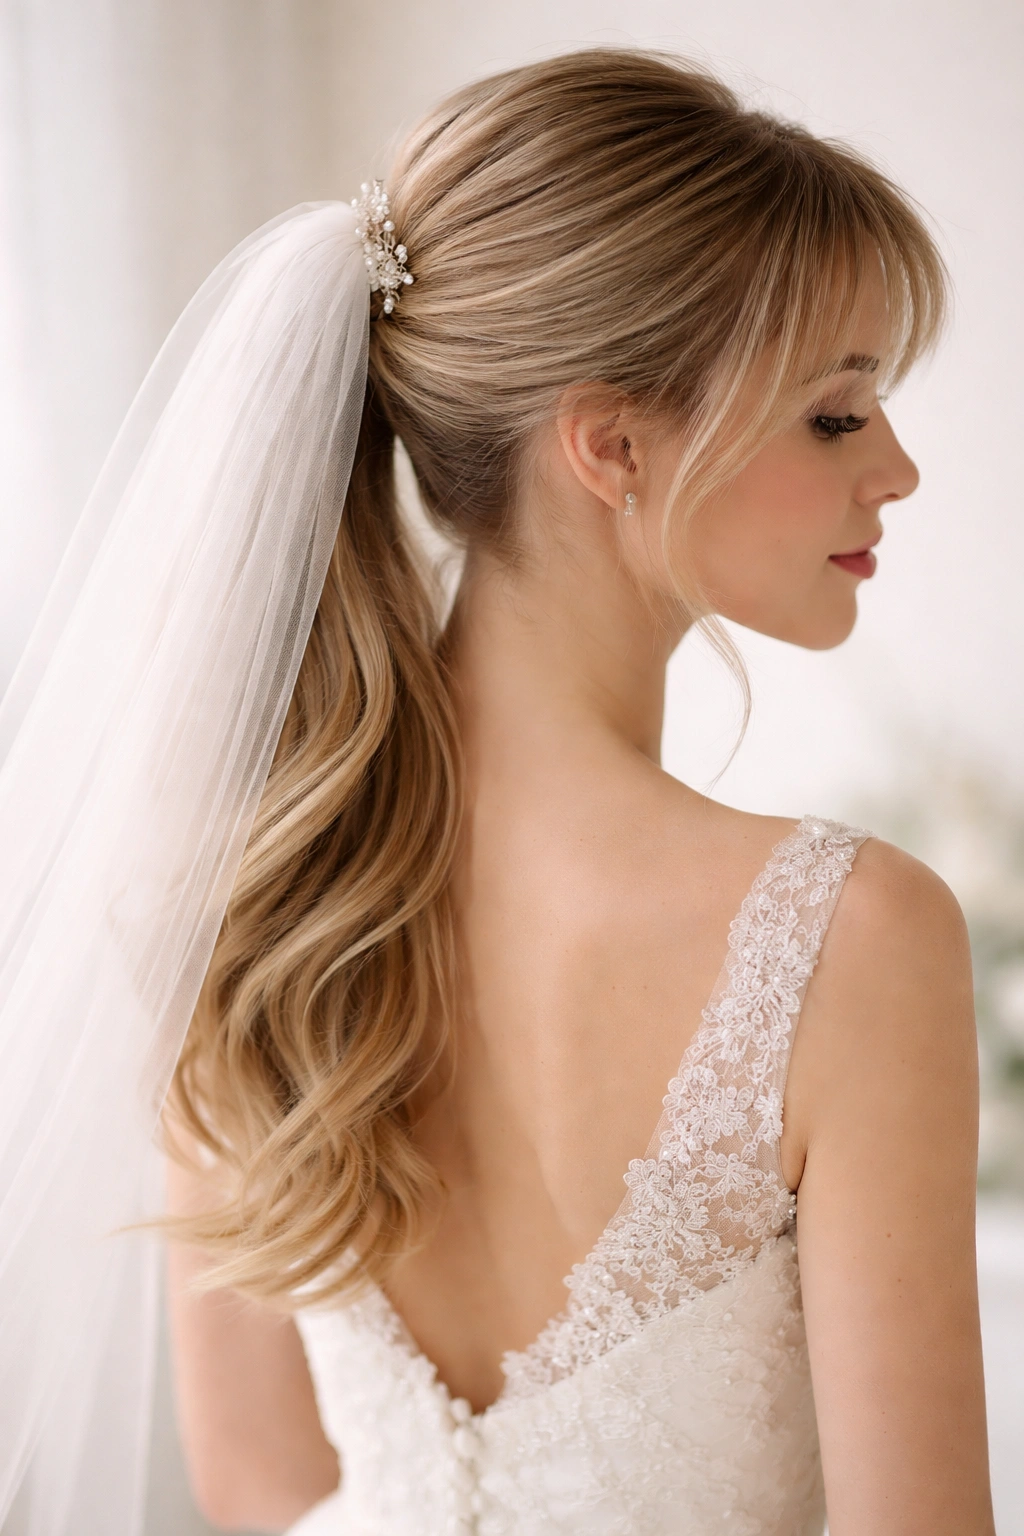
This timeless pairing combines a sleek, refined ponytail positioned at the nape of your neck with soft face-framing pieces that soften the overall look. The wispy bangs or baby hairs create a romantic quality that prevents the style from feeling too austere, making it equally at home at a casual garden wedding or a formal ballroom celebration. The low placement means your veil can sit gracefully at the crown without competing for visual space.
Why It Works With Veils
A low ponytail creates the perfect foundation for veil placement because the bulk of your hair sits below where the veil attaches. This positioning prevents the veil from pulling your hair or creating uncomfortable tension. The wispy pieces frame your face beautifully in photos while allowing the veil to be the secondary focal point, not a clashing accessory. The streamlined silhouette also means your dress and veil details remain the stars of the show without hair bulk distracting from your neckline and shoulders.
How to Create It
- Blow-dry your hair smooth or slightly wavy using a paddle brush for a polished base
- Take a section of hair at the front hairline on each side and lightly curl or tease for those signature wispy pieces—pull these gently forward to frame your face
- Create a low ponytail starting about 2 inches above the nape of your neck by gathering the remaining hair into a smooth section, using a fine-tooth comb to smooth flyaways
- Secure with a clear elastic, then wrap a small section of hair around the base to conceal the elastic and create a finished look
- Finish with a light hairspray that holds without feeling stiff—you want movement, not a helmet of hair
Best For
This style flatters most face shapes and works beautifully with long veils, birdcage veils, or simple combs. It’s especially striking on brides with strong jawlines or prominent cheekbones because it doesn’t compete with your facial features. If you’re wearing a lace dress with intricate neckline details, this ponytail keeps the focus where it belongs. It’s also ideal if you’re nervous about hairstyle maintenance during a long day—the structure is simple but elegant enough to hold throughout eight hours of dancing and celebration.
Pro tip: Ask your stylist to leave the first inch or two of your ponytail slightly loose before securing it with the elastic. This creates a softer, less severe line that photographs better and feels more comfortable.
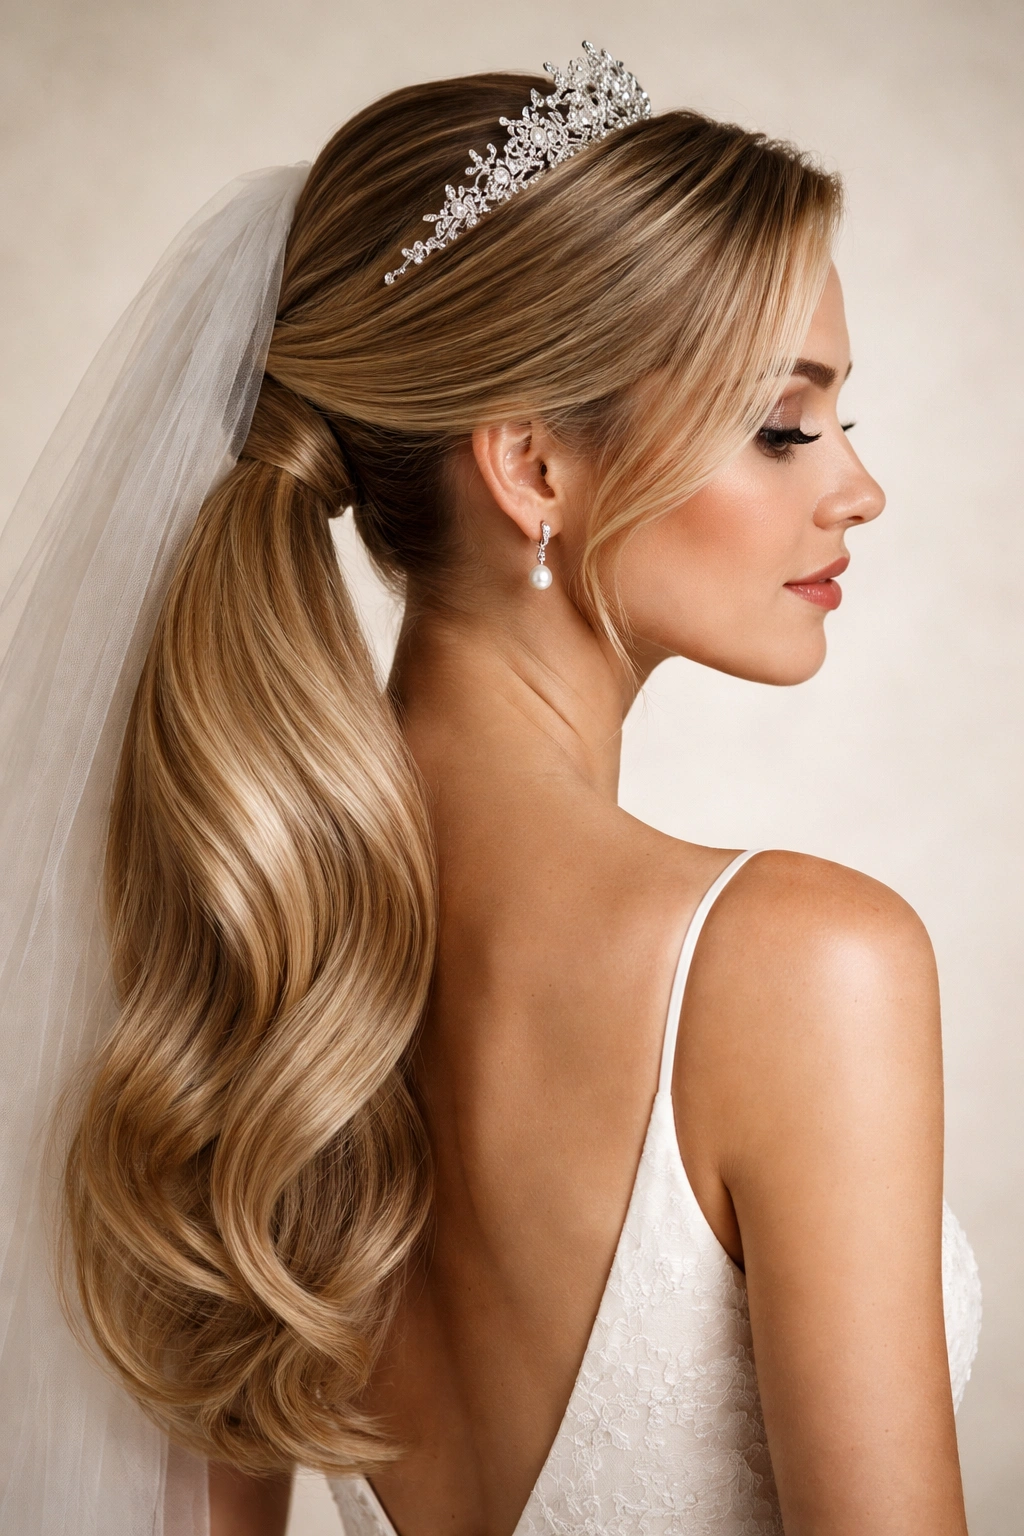
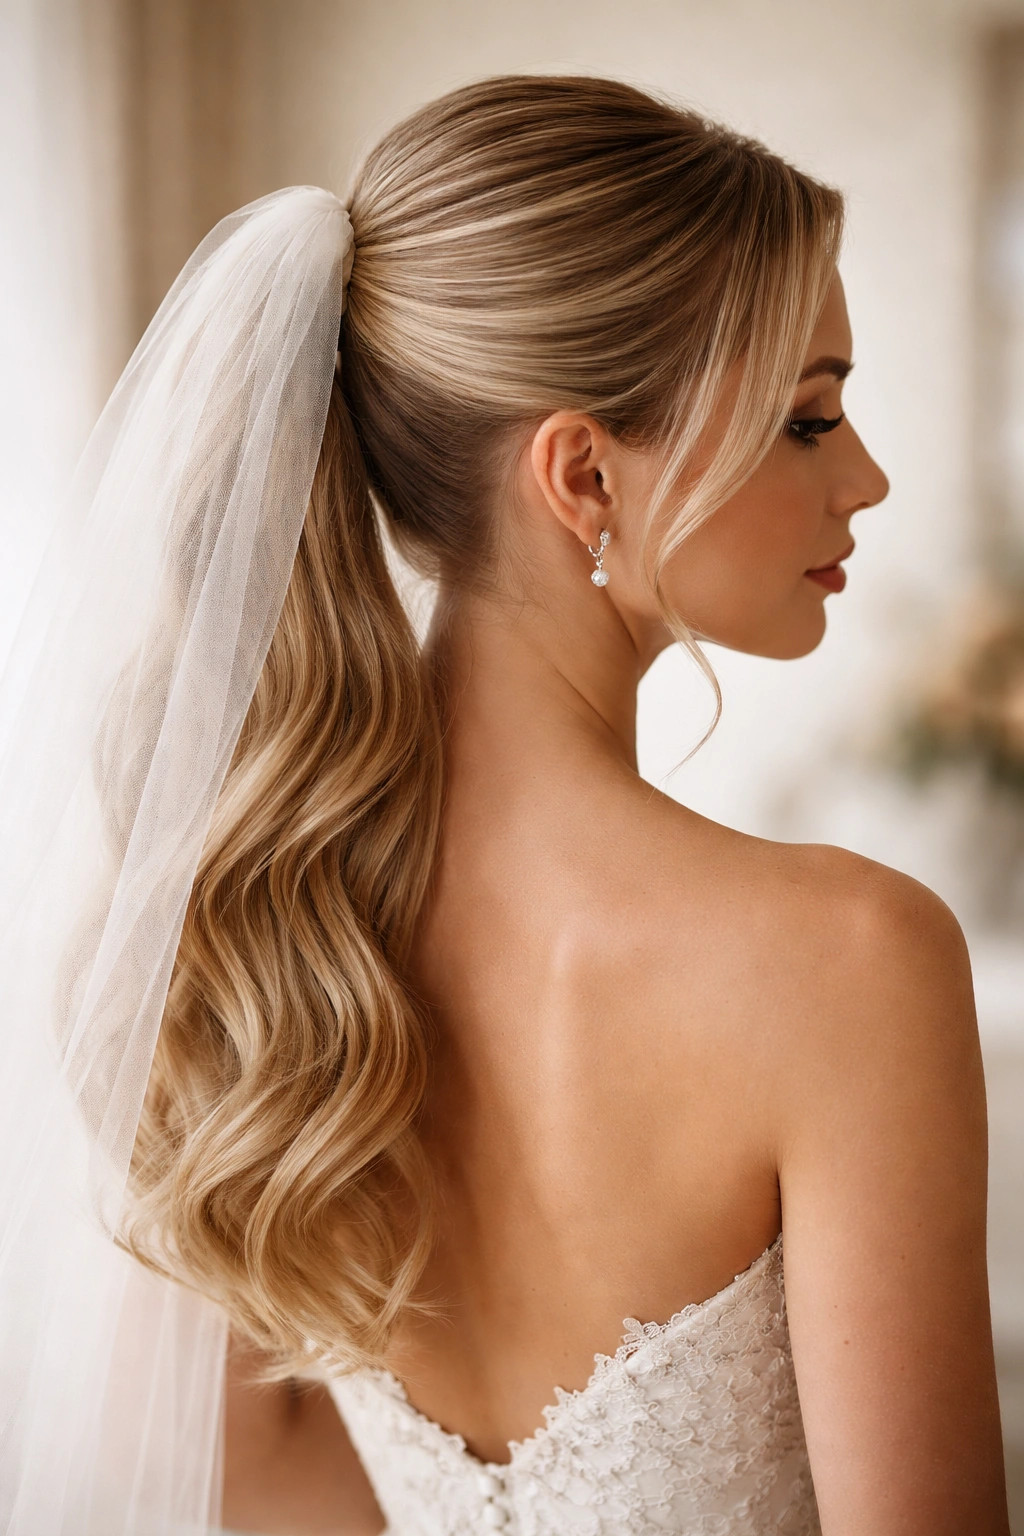
2. Sleek High Ponytail With Pearl Pins
A polished high ponytail positioned at the crown creates a modern, energetic look that works surprisingly well with veils when styled with intention. The key is creating enough height and structure at the crown that your veil has a secure anchor point without your ponytail looking too sporty or casual. Pearl pins or delicate hairpins woven through the base add bridal elegance and help secure both your ponytail and veil in place.
Why It Works With Veils
The high placement creates a natural spot for veil attachment that feels balanced and intentional rather than accidental. Since the veil sits at the same height as your ponytail base, the two accessories work together as one statement rather than competing for attention. The pearl or metallic pins serve both function and fashion—they secure your veil while adding sparkle that coordinates beautifully with bridal jewelry. This style also elongates your neck and creates a clean line that photographs exceptionally well from the back.
How to Create It
- Start with smoothly blow-dried hair or apply a smoothing serum to tame texture
- Backcomb or tease at the crown to create a solid foundation that prevents sliding throughout the day
- Gather all your hair into a high ponytail, positioning it at the crown rather than directly on top of your head—this angle is more flattering and prevents the “cheerleader” effect
- Secure tightly with a thick elastic, then wrap a small section of hair around the base
- Insert pearl pins or delicate hairpins through the wrapped section in a crisscross pattern, ensuring they’re firmly anchored into the hair beneath
- Use a smoothing brush to sleek any baby hairs at your temples and hairline
Best For
This style shines on brides with long, thick hair and confident personalities. It’s perfect if you love the look of your hair and want maximum visibility—a high ponytail shows off length, texture, and any special treatments or coloring you’ve had done. If you’re wearing a strapless or sweetheart neckline, the high ponytail creates an elegant vertical line that draws eyes upward. This style also works beautifully with shorter veils or decorative combs that don’t need extensive anchoring.
Worth knowing: This style requires more maintenance throughout the day than lower styles. Pack bobby pins and a small mirror in your bridal emergency kit so you can quickly secure any loose pieces during the reception.
3. Romantic Twisted Ponytail

Twisting sections of your hair as you gather them into a ponytail creates visual texture and movement that feels far more romantic than a simple smooth version. The twisted technique breaks up the line of the ponytail, adds dimension, and creates the illusion of fuller hair—a real benefit if your hair is fine or thin. Your veil becomes a perfect complement to this textured style rather than an addition that requires special accommodation.
Why It Works With Veils
The twisted sections create natural grip points for bobby pins and decorative elements, which means your veil stays securely anchored without feeling heavy or pulling. The texture of the twisted style also hides any visible gaps between your veil attachment and your hair, creating a seamless, polished appearance. The romantic quality of the twists pairs beautifully with softer veil styles—lace, tulle, or flowing lengths that mirror the gentle movement of the twists. In photographs, the twists create visual interest that makes the overall look more memorable.
How to Create It
- Begin with slightly textured or wavy hair; if your hair is freshly washed and slippery, apply a texturizing spray
- Take a section of hair from one side of your head near the ear and twist it loosely, moving toward the back
- Repeat on the opposite side, twisting a similar-sized section and moving it toward the back as well
- Gather both twisted sections along with any remaining hair into a ponytail at your chosen height (low, mid, or high depending on your preference)
- Secure with an elastic, then gently pull at the twisted sections to loosen and widen them—this creates a fuller, more romantic appearance
- Wrap a small piece of hair around the base and secure with pins
Best For
This style is especially beautiful on brides with medium to long hair and works wonderfully for outdoor or garden weddings where the soft texture feels appropriate. If you’re incorporating flowers into your hair (either in the twists or around the ponytail base), this technique gives you multiple places to tuck blooms. The twisted style photographs beautifully from both the front and back, making it ideal if you want your hair to look intentional and special in every angle of your wedding photos.
Pro tip: Have your stylist create the twists slightly tighter than you want the final result to be. As you move throughout the day, the twists will naturally loosen and relax, creating an effortlessly romantic look by the time you reach the reception.
4. Braided Base Ponytail
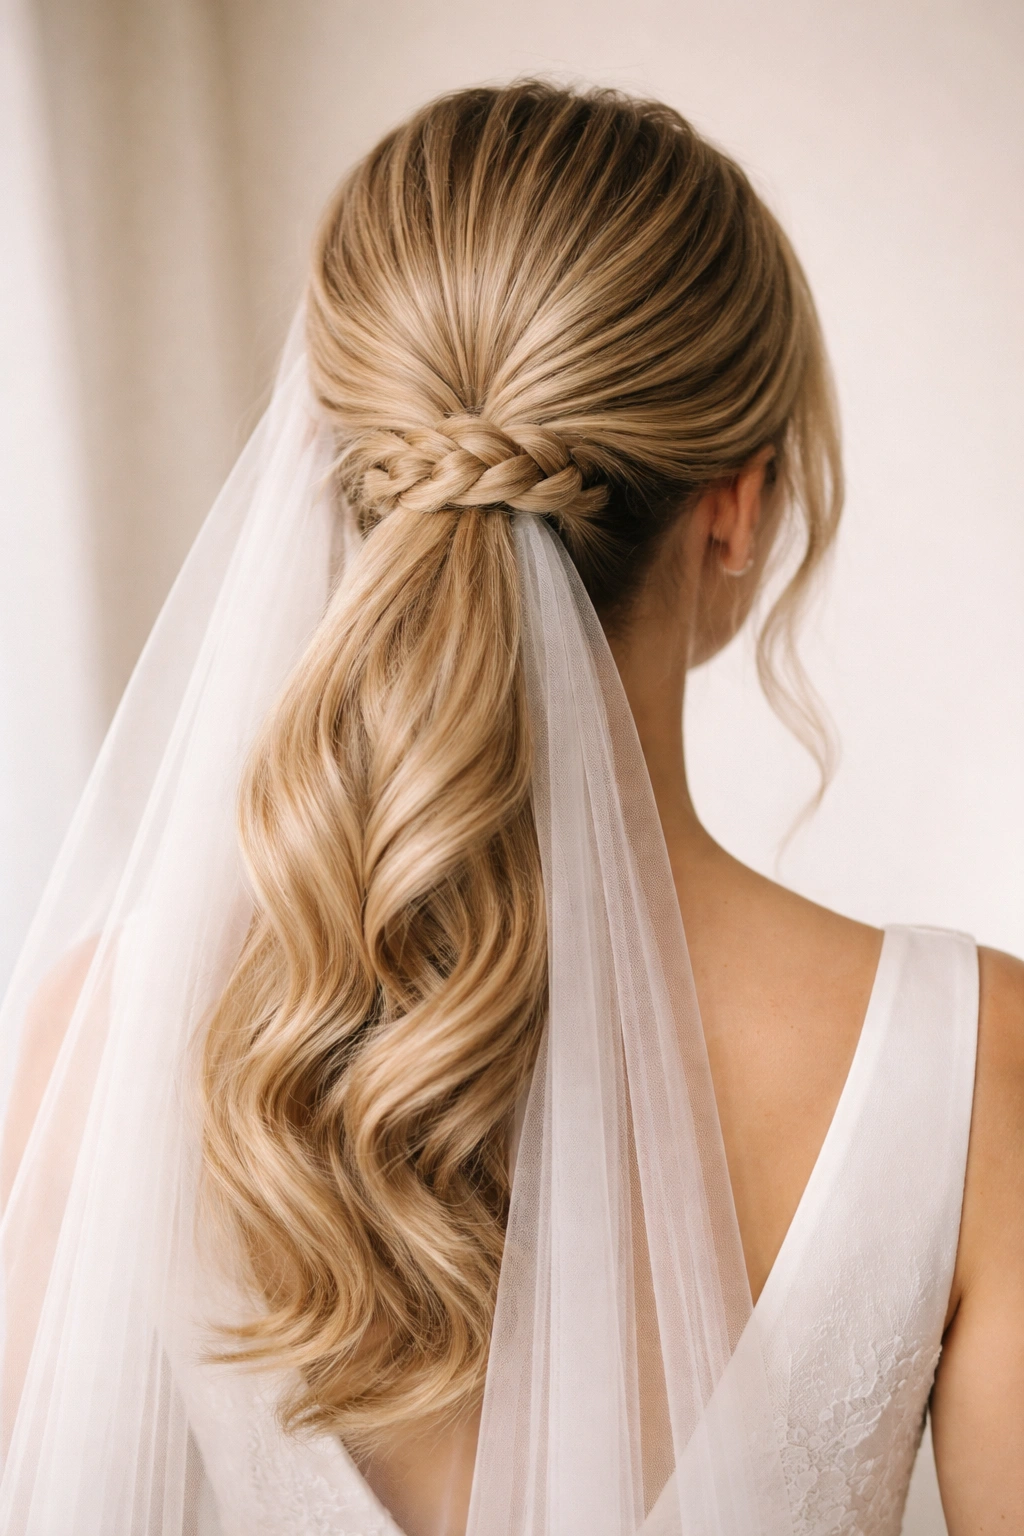
Creating a braid or multiple braids as the foundation of your ponytail adds sophisticated structure while distributing the weight of your veil more evenly across your scalp. This technique is particularly practical for brides concerned about comfort—the braid acts as a cushion that prevents the veil from pulling uncomfortably on any single section of hair. The braided base also creates a stunning visual detail that’s visible from behind and in profile photos.
Why It Works With Veils
A braided foundation provides multiple anchor points for securing your veil, meaning it stays completely stable throughout hours of movement and celebration. The braid also creates visual interest at the back of your head, making your overall bridal look feel more intentional and detailed. Because the braid distributes weight, wearing a heavier veil becomes comfortable rather than a potential headache trigger—quite literally. The structured nature of braids also photographs exceptionally well, adding dimension and movement to photos taken from behind or the side.
How to Create It
- Begin with textured or wavy hair; blow-dry smooth if you prefer a polished look, or keep it slightly wavy for a softer effect
- Divide your hair into two or three sections at the crown, depending on how dramatic you want the braided effect to be
- Create a Dutch braid (braid facing upward) or French braid (braid facing downward) with each section, starting at the crown and moving toward the back
- Allow the braids to converge at the nape of your neck or slightly higher, depending on your preferred ponytail height
- Gather the ends of the braids along with any remaining hair into a ponytail
- Secure with an elastic, then gently pull at the braids to loosen them and create a fuller, more romantic appearance
- Wrap a small section of hair around the base to conceal the elastic and secure your veil attachment
Best For
This style works beautifully on brides with medium to thick hair and creates a look that feels both modern and romantic. If you’re planning a destination wedding or any celebration where your day will involve activity or movement, this style is your best friend—it’s secure, comfortable, and looks intentional even if a few pieces come slightly loose. The braided base also works well if you’re wearing your hair down during the reception (after removing your veil) and want the transition to look seamless and intentional.
Worth knowing: Ask your stylist to practice this style at your trial run. Depending on your hair texture and thickness, you might want one central braid, two side braids, or three braids that braid into each other. Your stylist can help determine what looks best with your hair and face shape.
5. Half-Up Ponytail With Curls
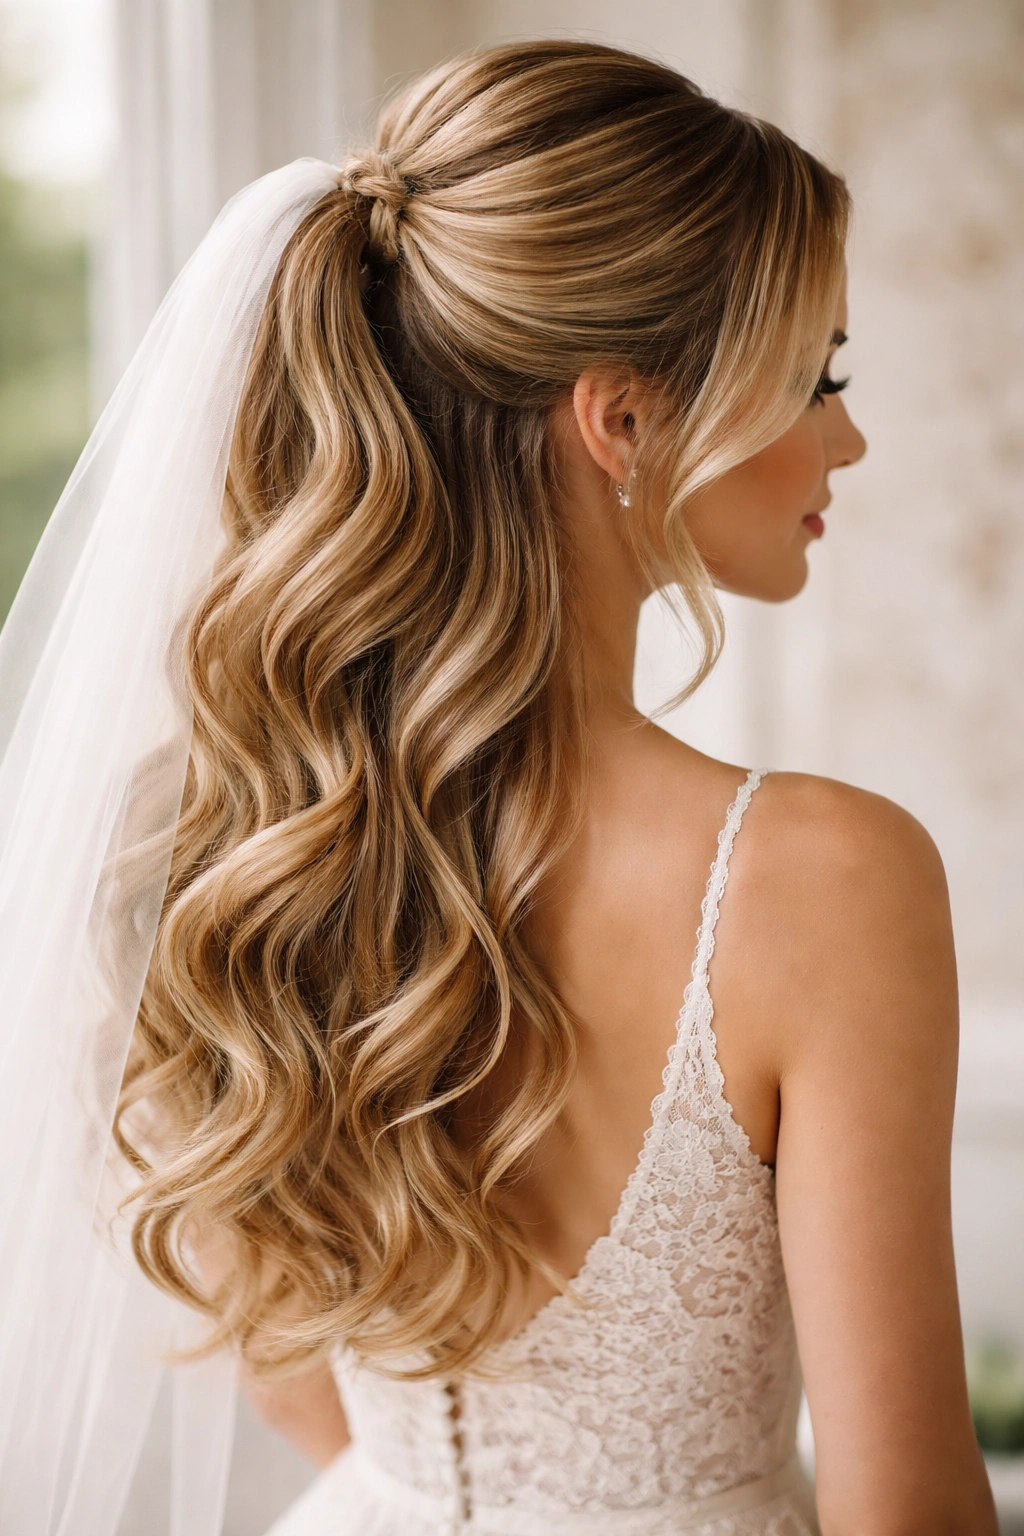
A half-up style that transitions into a ponytail gives you the best of both worlds—hair off your face with softness and movement that flows down your back. This style lets you show off length and curls while keeping hair controlled enough for veil placement. The half-up section creates natural volume at the crown that serves as the perfect anchor for your veil, while the loose curls below add romance and movement.
Why It Works With Veils
The gathered half-up section gives your veil a secure, stable anchor point while the loose curls below remain visible and mobile. This combination creates a look that feels intentionally styled without appearing rigid or overly controlled. Your veil can sit gracefully at the crown without competing visually with your hair, since the curls occupy a different visual space. This style also works beautifully with tousled, undone waves because the structure of the half-up section prevents the overall look from appearing messy.
How to Create It
- Begin with curled or wavy hair; use a curling iron or wand to create loose waves throughout the length if needed
- Take a section of hair from one side of your head near the temple and twist or braid it loosely toward the back
- Repeat on the opposite side, creating a matching twisted or braided section
- At the crown, gather these sections along with the hair at the nape of your neck into a ponytail
- Secure with an elastic, then gently loosen the braided or twisted sections to create a fuller appearance
- Leave the lower half of your hair completely loose, with curls undisturbed to frame your shoulders
- Wrap a small piece of hair around the ponytail base and secure with pins
Best For
This style is perfect for brides who want visible curls and movement but need hair controlled enough for practical veil placement. It works beautifully with tea-length or shorter veils that don’t require extensive anchoring, and it’s ideal if you’re incorporating flowers or delicate bridal combs into your hair design. The half-up style also flatters brides with longer faces or those who want to create a softer frame around their face while showing off hair length.
Pro tip: Have your stylist curl your hair in larger sections than usual to create bouncy waves rather than ringlets. Larger curls look more sophisticated in bridal photos and move more gracefully throughout the day.
6. Textured Low Ponytail With Flowers
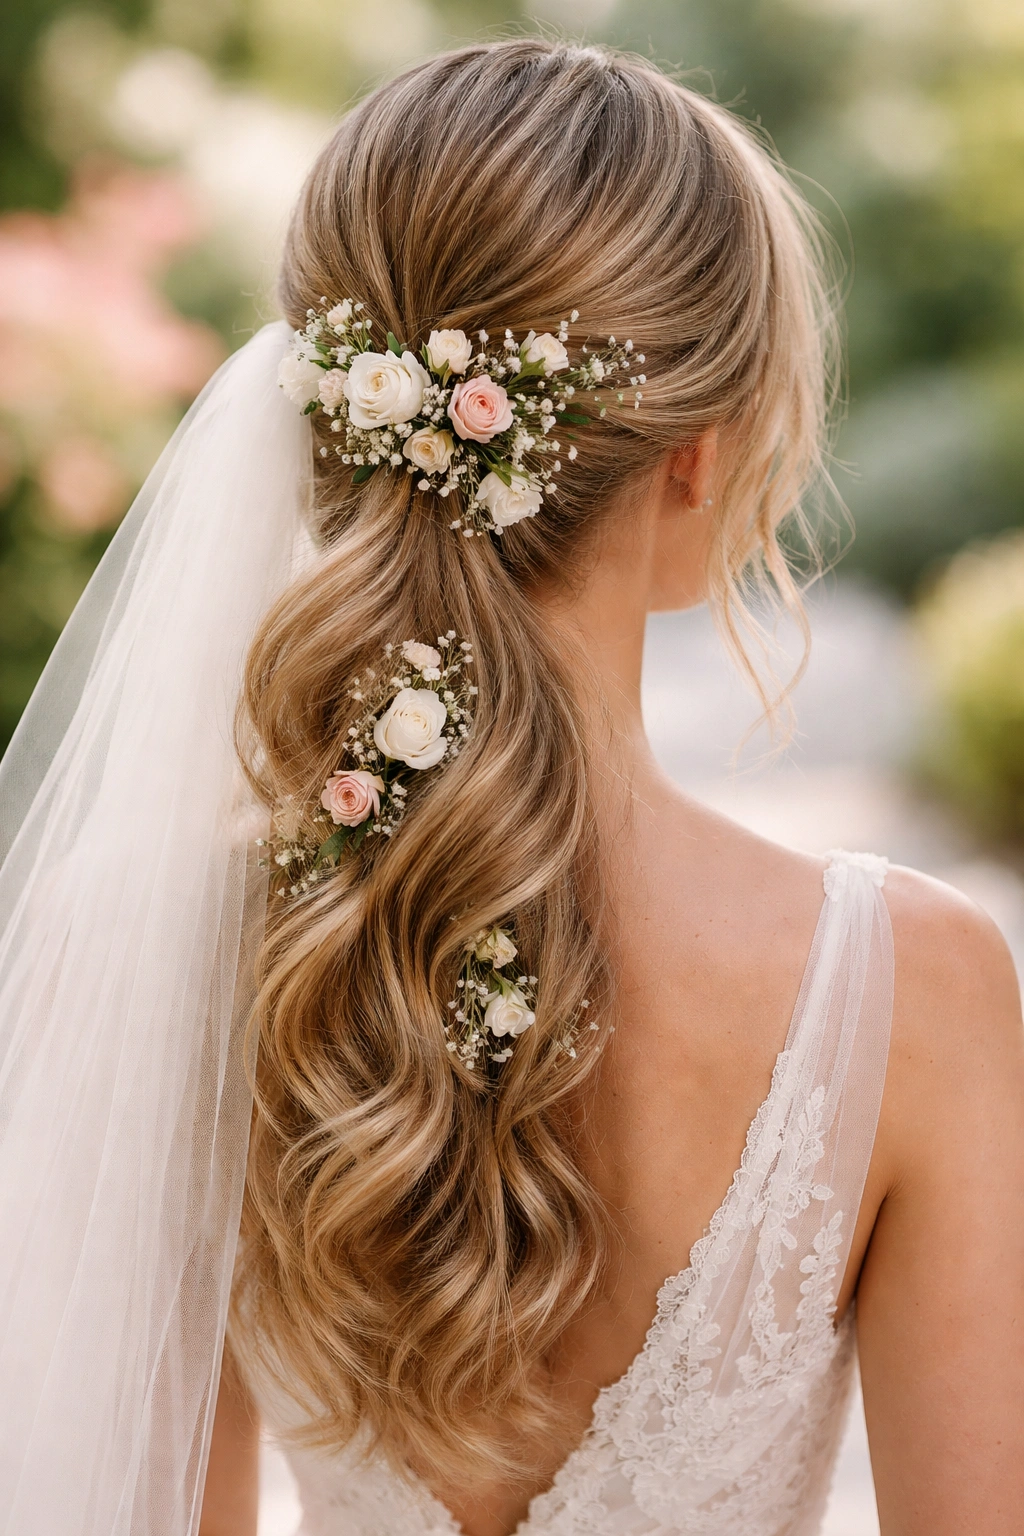
A low ponytail filled with dimension and visual texture provides the perfect canvas for fresh or silk flowers woven throughout. The textured approach means flowers don’t sit on a flat, simple surface—instead, they nestle into waves and texture, creating a more organic, garden-inspired look. This style is particularly stunning for outdoor or summer weddings and creates a soft, romantic aesthetic that photographs beautifully.
Why It Works With Veils
The textured surface of this ponytail allows your veil to sit naturally without looking stark or out of place. Flowers and veil work together as complementary romantic elements rather than competing accessories. The texture also conceals the anchor points where your veil attaches, creating a seamless, polished appearance from every angle. If you’re combining flowers and a veil, this style makes the combination feel intentional rather than accidental—both elements appear thoughtfully placed.
How to Create It
- Start with textured or wavy hair; apply a texturizing spray if you have straight hair that needs grip for styling
- Create a low ponytail at the nape of your neck, gathering all your hair into a smooth section
- Secure with a clear elastic, then gently pull at sections of the ponytail to create texture and fullness—this technique is called “pancaking”
- Wrap a small section of hair around the base to conceal the elastic
- Tuck fresh flowers (babies’ breath, spray roses, eucalyptus, or greenery) into the textured sections of your ponytail, securing each flower with a bobby pin
- Arrange flowers so they look natural and organic, not stiffly placed in a line
- Finish with hairspray that holds without feeling stiff
Best For
This style shines for outdoor ceremonies, garden receptions, or any wedding with a natural, organic aesthetic. It’s perfect if you want to incorporate seasonal flowers into your hair design and create a look that feels personal and unique. The textured, flowered approach also works beautifully if you’re wearing a soft, romantic dress with delicate details—the overall aesthetic feels cohesive and intentional.
Worth knowing: If using fresh flowers, coordinate with your florist so they can provide small sprays that coordinate with your bouquet. Have your stylist create the textured base at least 30 minutes before your ceremony, then add fresh flowers just before photos begin—this prevents wilting and keeps flowers looking dewy and fresh.
7. Sleek Side-Swept Ponytail
A dramatically side-swept ponytail creates an asymmetrical, modern look that feels unexpected in the best way. Rather than centering your ponytail, you gather all your hair to one side, creating a sleek line that works beautifully with veils positioned at the crown. This style is particularly striking in profile photographs and creates an elegant, sophisticated aesthetic that reads as intentionally styled rather than casual.
Why It Works With Veils
The side positioning of this ponytail creates visual balance when paired with a veil at the crown—the off-center ponytail and centered veil create an interesting dynamic that photographs beautifully. Since the ponytail sits to the side, your veil has clear, unobstructed space at the top and back of your head. This style also works wonderfully if you’re incorporating your veil into the side-swept direction—allowing it to flow along the same visual line as your ponytail.
How to Create It
- Blow-dry your hair with a slight wave or smooth texture, depending on your preference
- Apply a smoothing serum or light hairspray to tame flyaways and create a polished appearance
- Using a fine-tooth comb, sweep all your hair to one side of your head—if you prefer a dramatic sweep, go further toward the side; for a more subtle effect, position it slightly off-center
- Gather your hair into a smooth ponytail at the side (positioning it at the ear level or slightly lower)
- Secure tightly with an elastic, then wrap a small section of hair around the base
- Use bobby pins to secure the wrapped section and ensure your veil attachment stays stable
- Smooth any baby hairs on the opposite side of your head with a fine-toothed comb
Best For
This style works beautifully on brides with heart-shaped or round faces—the asymmetry creates visual balance and prevents the hairstyle from emphasizing round features. It’s perfect if you have one side that photographs better than the other or if you’re wearing asymmetrical bridal jewelry or veil details. The dramatic side-swept look also reads as modern and intentional, making it ideal for contemporary or minimalist wedding aesthetics.
Pro tip: Practice the side-sweep direction at your trial appointment. Some brides find sweeping to the right most flattering, while others prefer the left—the angle of your face will help determine which direction photographs best.
8. Voluminous Bubble Ponytail
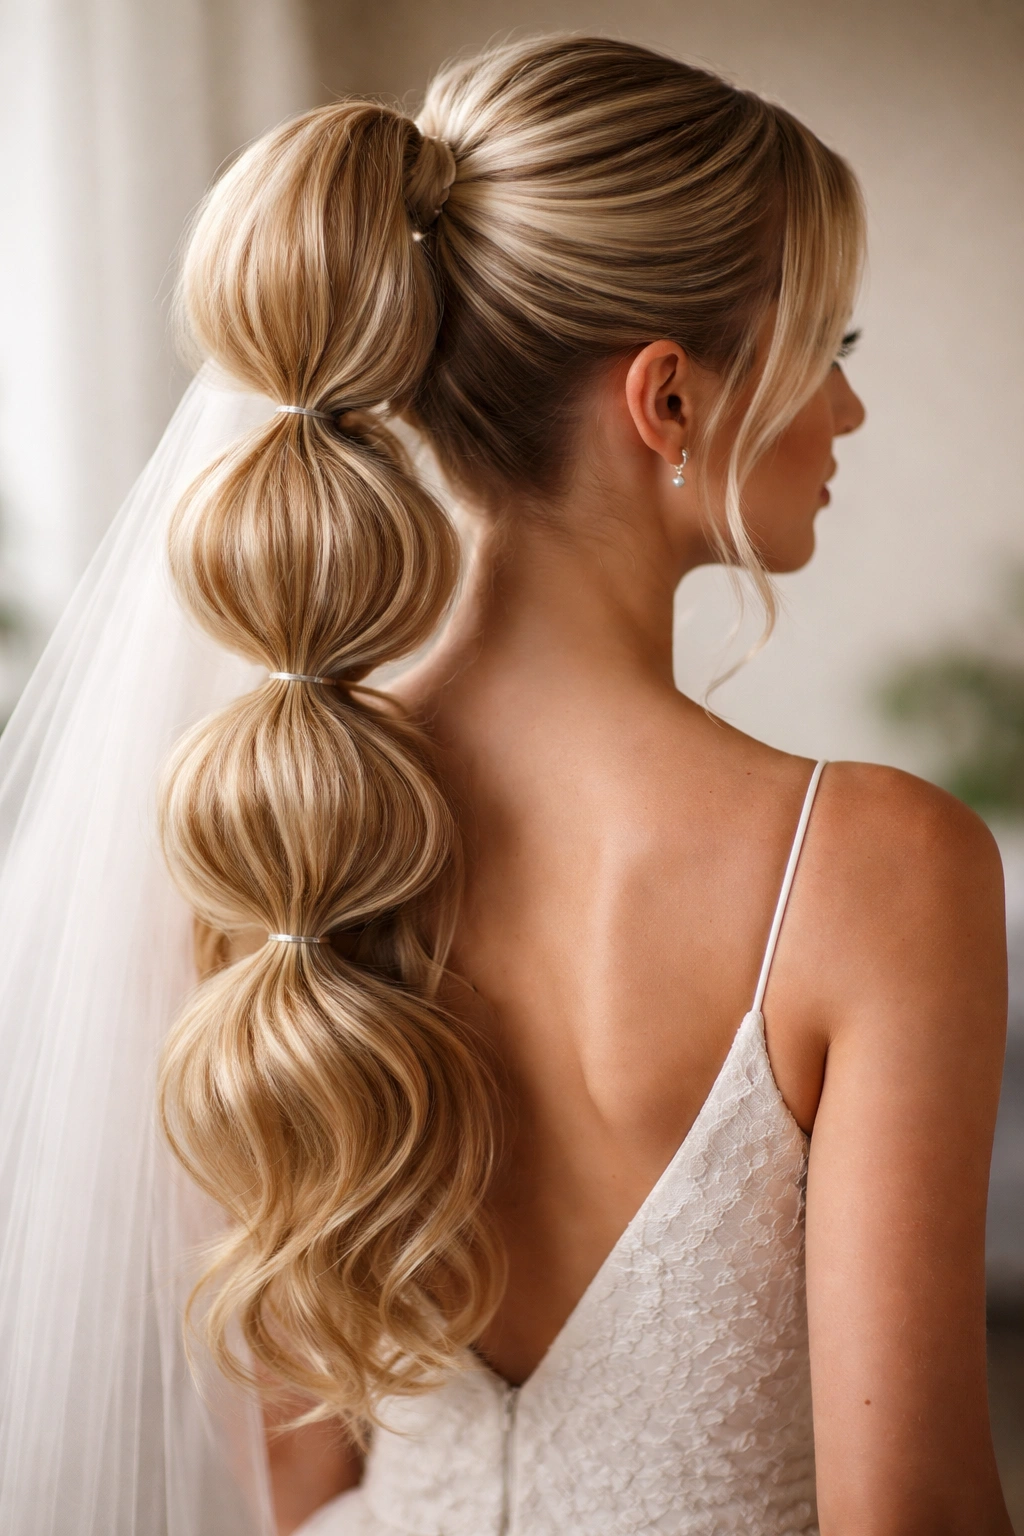
A bubble ponytail creates dramatic volume and visual interest by gathering your hair into multiple sections, each secured with small elastics and then gently pulled to create bubble-like sections. This playful, modern style is surprisingly elegant when executed with intention and paired with the right veil. The multiple sections add texture and dimension that work beautifully in photographs and create a look that feels fresh and fashion-forward.
Why It Works With Veils
The structured nature of a bubble ponytail creates multiple anchor points for your veil, ensuring it stays secure and stable throughout your day. The bubbles also create enough visual interest that your veil feels like a complementary element rather than an add-on. The style reads as intentionally designed and modern, making it perfect if you want a hairstyle that makes a statement. Bubble ponytails also photograph exceptionally well from behind and in profile, showing off the technical skill and artistry of your styling.
How to Create It
- Start with smooth or lightly textured hair
- Create a high ponytail at the crown and secure with an elastic
- About 2-3 inches down from the first elastic, place another elastic around your ponytail, gathering some of the hair above it
- Gently pull at the hair between the two elastics to create a bubble shape
- Continue placing elastics every 2-3 inches down the length of your ponytail, creating a bubble between each one
- After placing all elastics, gently pull at each bubble section to create fullness and dimension
- You can leave the ends of your ponytail loose and curled, or secure them with a final elastic and curl for added drama
- Finish with a light hairspray to hold the bubbles without making them feel stiff
Best For
This style is stunning on brides with long, thick hair and a personality that matches the bold, fashion-forward aesthetic. It’s perfect for modern weddings, outdoor celebrations, or any event where you want your hairstyle to be a focal point and conversation starter. The bubble ponytail also works beautifully if you’re wearing a shorter veil or no veil at all—it’s striking enough to stand on its own but also works well as an accessory base.
Worth knowing: This style requires more maintenance throughout the day and may need touch-ups if elastics slip or bubbles flatten. Have your stylist show you how to quickly re-fluff bubbles if needed, and keep bobby pins handy for any emergency adjustments.
9. Wrapped Ponytail With Veil Comb
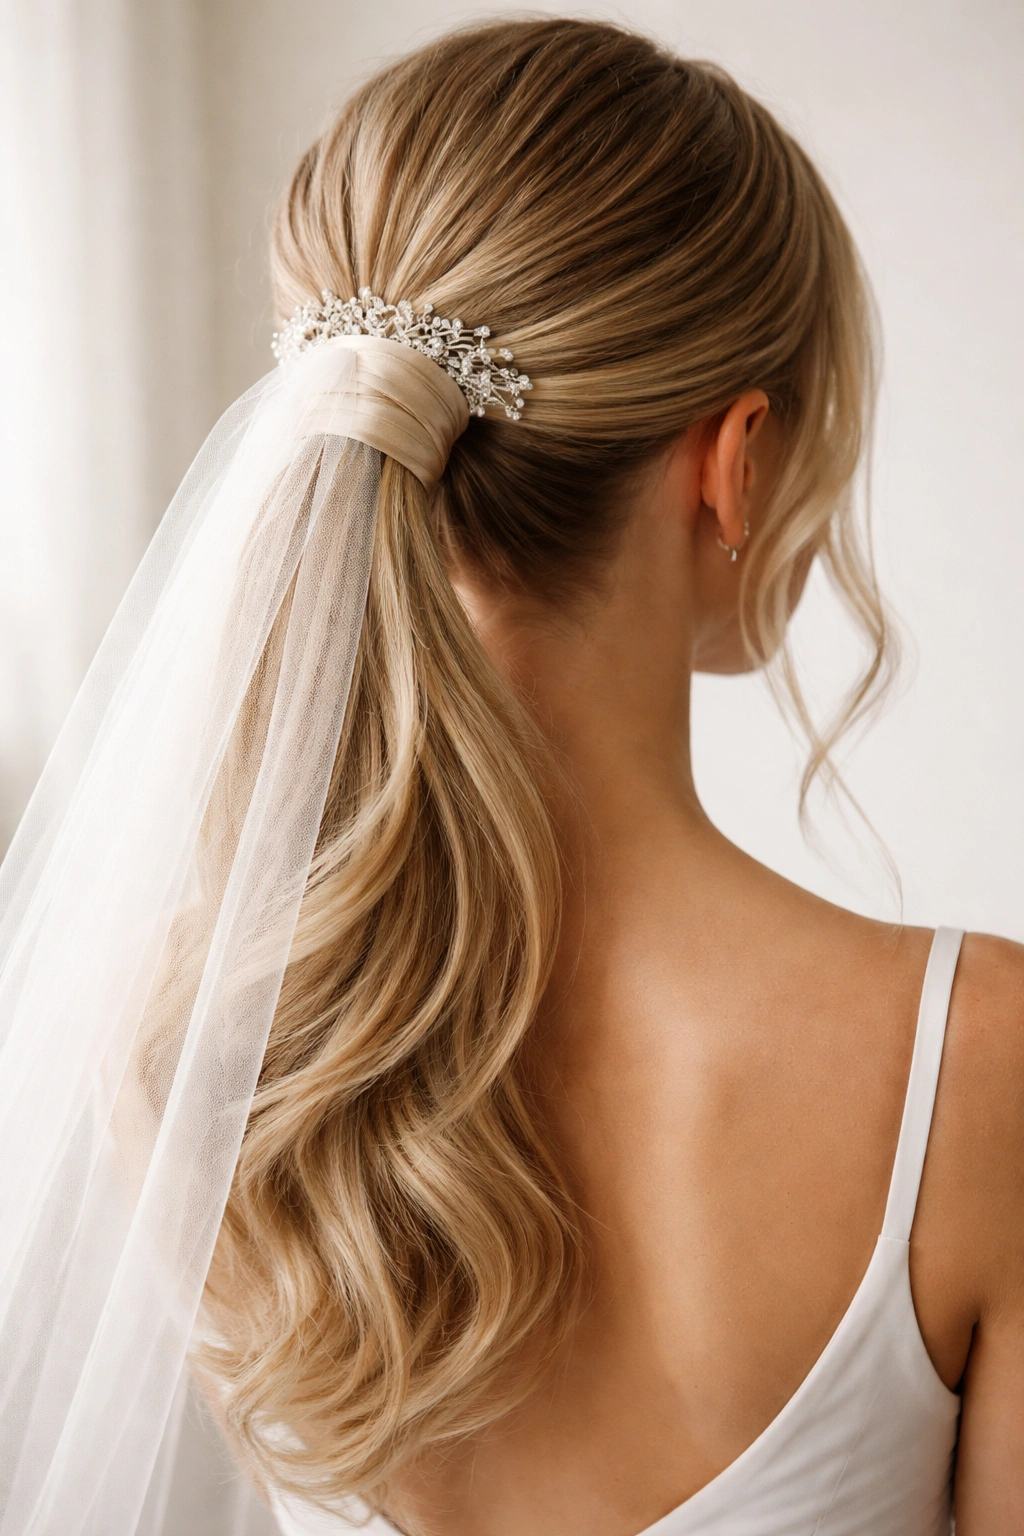
A ponytail wrapped with decorative ribbon, silk cord, or even a small braid creates an intentionally designed base that works seamlessly with a veil comb. The wrapping serves both practical and aesthetic purposes—it conceals the elastic, adds sophistication, and creates a beautiful detail visible in back-view photographs. When paired with a veil comb, the wrapped base becomes part of your overall bridal design rather than a hidden structural element.
Why It Works With Veils
The wrapped ponytail creates a decorative, intentional-looking base that makes veil attachment feel purposeful rather than practical. The wrapping can coordinate with your wedding colors, dress details, or bridal jewelry, creating visual cohesion across your entire look. A veil comb inserted into or secured near the wrapped section sits beautifully and feels stable. This styling approach is particularly effective if you prefer a more decorated, ornate aesthetic—the wrapped base sets the tone for a detailed, thoughtfully designed bridal look.
How to Create It
- Create a smooth, sleek ponytail at your preferred height (low, mid, or high)
- Secure tightly with an elastic, ensuring the base feels sturdy and won’t shift throughout the day
- Select your wrapping material—silk ribbon, cord, or even a thin braid work beautifully
- Starting just below the elastic, begin wrapping your chosen material around the base of the ponytail, moving downward
- Wrap tightly enough that the material stays in place but not so tight that it cuts off circulation or feels uncomfortable
- Secure the end of your wrapping material with a bobby pin tucked underneath so it’s not visible
- Insert a decorative veil comb just above or into the wrapped section, securing it with bobby pins to ensure it won’t shift
- Finish with hairspray to hold all elements in place
Best For
This style works beautifully on brides who love detail, ornamentation, and a more formal, intentionally designed aesthetic. It’s perfect if you’re wearing a decorative comb, vintage veil, or any accessory that deserves to be showcased rather than hidden. The wrapped ponytail approach also works wonderfully if you want to incorporate your wedding colors into your hair design—a ribbon in a complementary shade becomes a design element that ties your look together.
Pro tip: Choose a wrapping material that coordinates with your bridal jewelry or dress details. A silk ribbon in a metallic shade works beautifully with gold or silver jewelry, while a satin cord in a jewel tone can tie together your color palette.
10. Soft Looped Ponytail
A looped ponytail creates a romantic, feminine silhouette by gathering your hair into a ponytail, then creating a soft loop or loops with a portion of the hair before securing the ends. This style is reminiscent of vintage Hollywood elegance while maintaining a modern, fresh appeal. The looped sections add height at the back of your head and create a soft, textured look that photographs beautifully from every angle.
Why It Works With Veils
The looped structure creates a naturally voluminous shape at the back of your head that serves as a perfect anchor point for your veil. The loops create enough height and dimension that your veil sits gracefully without appearing to sit on a flat, simple base. The soft, romantic quality of the loops complements most veil styles beautifully, from delicate lace to flowing tulle. This style is particularly stunning in profile photographs, where the loops create visual interest and elegance.
How to Create It
- Begin with slightly wavy or textured hair; if your hair is straight, apply a texturizing spray before styling
- Create a low or mid-height ponytail at the back of your head, leaving about 4-6 inches of hair at the ends
- Divide the ponytail into two sections (or three, if you want multiple loops)
- Create a loop with each section by pulling the hair upward and pinning it to the base of the ponytail with bobby pins, leaving the ends of the hair loose
- Gently tease or pancake the looped sections to create fullness and a softer appearance
- Allow the loose ends to flow naturally or curl them slightly for added romance
- Secure your veil into or above the looped sections, ensuring it sits stably on the foundation of your loops
- Finish with hairspray that allows movement without feeling stiff
Best For
This style is perfect for brides who love vintage-inspired details and want a hairstyle with romantic, nostalgic appeal. It works beautifully with lace gowns, vintage accessories, or any wedding aesthetic that leans toward classic elegance. The looped style also flatters most face shapes and photographs beautifully from behind—a key consideration if you’re planning to include back-view shots in your wedding portraits.
Worth knowing: This style requires a bit more bobby pins and patience to secure properly, but the result is absolutely worth the effort. Have your stylist do a practice run at your trial appointment to ensure you’re both happy with the number of loops and the overall proportion relative to your face and frame.
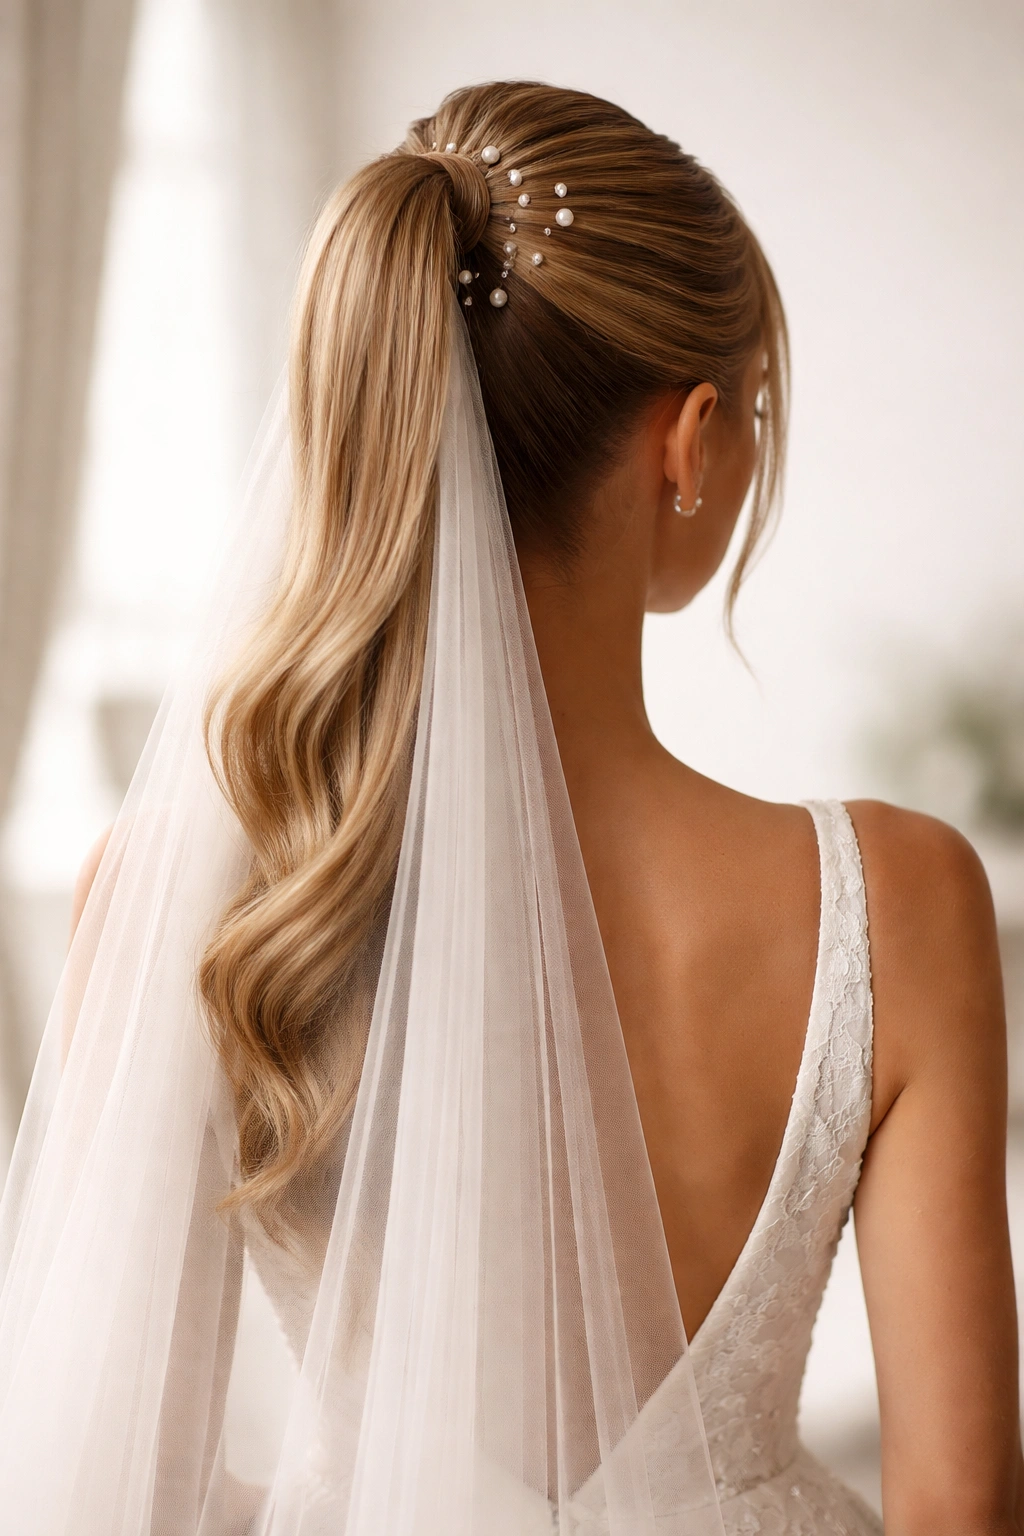
11. Faceted Ponytail With Embellishments
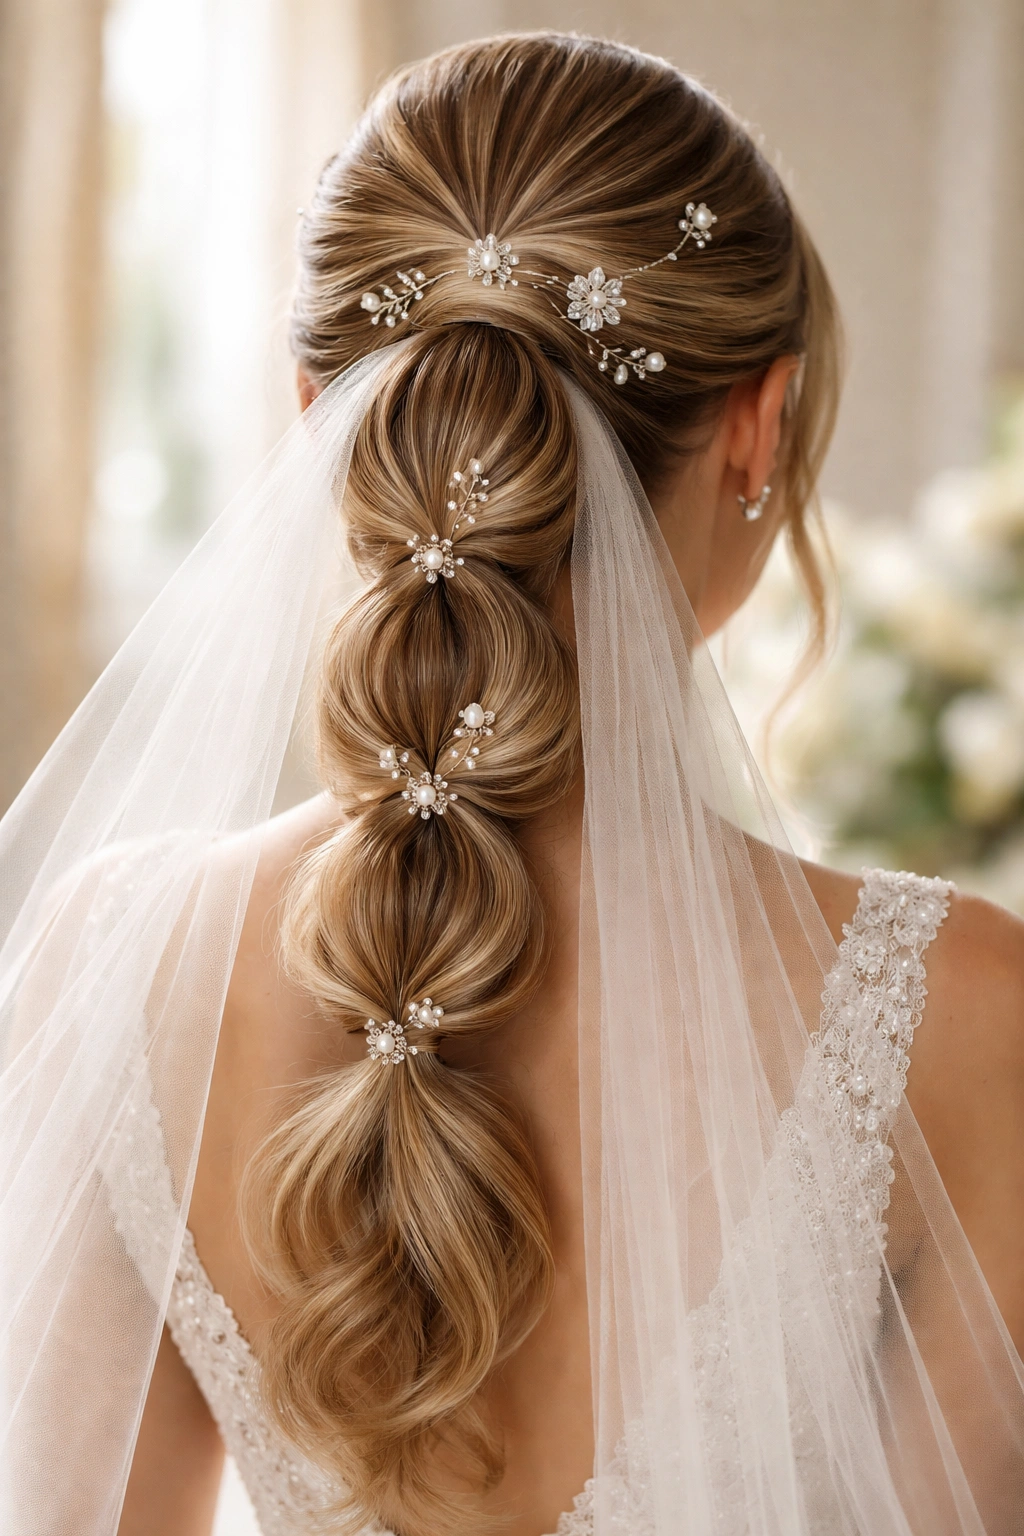
A faceted ponytail incorporates multiple plaited or twisted sections that converge into a single ponytail, creating a complex, architectural look that photographs remarkably well. Adding embellishments—pearl pins, delicate hairpins, silk flowers, or bridal combs—transforms this already interesting style into a showstopping focal point. This approach is ideal for brides who want their hairstyle to feel special, intentionally designed, and worth the investment in professional styling.
Why It Works With Veils
The faceted, multi-sectioned structure creates numerous anchor points for your veil while the embellishments add sparkle and visual interest that complements rather than competes with your veil. The complexity of the styling makes it feel like a cohesive bridal design rather than a simple hairstyle plus an accessory. The faceted approach also creates enough visual interest at the back of your head that your overall bridal silhouette reads as polished, intentional, and expertly styled.
How to Create It
- Begin with textured or slightly wavy hair for better grip and control
- Take three sections of hair from the crown area and create a Dutch braid, French braid, or twisted section with each
- Allow these braided sections to converge at the mid-back of your head
- Gather the ends of the braids along with any remaining hair into a low or mid-height ponytail
- Secure with a strong elastic, then gently loosen each braided section to create fullness and dimension
- Insert pearl pins, decorative hairpins, or small silk flowers throughout the braided sections, securing each embellishment with bobby pins
- Wrap a small section of hair around the ponytail base to conceal the elastic
- Position your veil at the crown or just above where the braids converge, securing it firmly with bobby pins and additional pins for stability
Best For
This style is ideal for brides who have professional styling expertise available and want a hairstyle that feels like a piece of wearable art. It works beautifully with formal, elaborate gowns and wedding aesthetics that emphasize detail and craftsmanship. The faceted, embellished approach also works wonderfully if you want your hairstyle to be noticed and appreciated—it’s complex enough that guests will genuinely admire the styling artistry.
Pro tip: This style requires a skilled stylist and takes longer to create than simpler options. Book your bridal trial well in advance and give yourself extra time on your wedding morning for styling. The investment is worthwhile for the stunning result.
12. Undone Low Ponytail With Dimension

The understated elegance of an intentionally “undone” low ponytail with carefully placed dimension creates a look that feels effortlessly beautiful. This style prioritizes texture over smoothness, movement over control, and appears casual even though it’s actually quite deliberately designed. The low placement works perfectly with veils while the tousled quality prevents the overall look from feeling too formal or stiff.
Why It Works With Veils
The textured, undone quality of this ponytail creates a natural-looking anchor point for your veil that feels organic rather than constructed. Your veil sits gracefully without requiring excessive anchoring because the texture of your hair naturally grips and holds it in place. The intentionally loose, tousled aesthetic pairs beautifully with softer, more romantic veil styles, creating a cohesive look that photographs naturally rather than appearing overly styled. This approach is perfect if you want to look like a polished, beautiful version of yourself rather than a dramatically transformed version.
How to Create It
- Start with textured or wavy hair; apply sea salt spray or texturizing spray to enhance natural texture
- Create a low ponytail at the nape of your neck, but don’t aim for perfection—allow a few wisps and pieces to frame your face
- Secure with a clear elastic, then gently pancake or pull at sections of the ponytail to create fullness without making it look unkempt
- Leave a few small pieces loose near your face and neck for a soft, romantic quality
- Wrap a very thin section of hair around the base, tucking the end underneath so it’s barely visible
- Use bobby pins to secure any loose pieces and create the intentional “undone” effect—the goal is for your hair to look effortlessly beautiful, not perfectly smooth
- Apply a lightweight hairspray that allows movement and doesn’t create a helmet effect
- Position your veil at the crown or slightly to one side, securing it with pins hidden in your textured hair
Best For
This style works beautifully for brides who prefer a natural, understated aesthetic and want to look like an enhanced version of themselves rather than dramatically transformed. It’s perfect for outdoor celebrations, casual weddings, or any event where you want your hairstyle to feel relaxed and approachable. The undone-looking style also photographs beautifully in candid moments—those natural, in-between shots often show off the intentional styling better than formal posed portraits.
Worth knowing: This style requires a skilled stylist who understands the difference between “undone” and “messy.” The goal is carefully controlled texture and movement that appears effortless, not actually haphazard. Discuss your vision clearly at your trial appointment to ensure you and your stylist are on the same page about what “undone” means for your aesthetic.
Final Thoughts
Choosing the right ponytail style for your wedding with a veil comes down to understanding how different heights, textures, and structures work with veil placement and weight distribution. The most important factor isn’t selecting the trendiest or most complex option—it’s choosing a style that genuinely flatters your face, coordinates beautifully with your veil, and feels like an authentic extension of your personal aesthetic.
The physical comfort of your styling matters more than you might realize. A style that pulls uncomfortably at your scalp or requires constant adjustment will distract you from enjoying your ceremony, reception, and time with your loved ones. That’s why working with an experienced bridal stylist who understands how veil weight distributes and how different hair textures hold styling is genuinely valuable. They’ll ensure your final look is both beautiful and genuinely comfortable.
Remember that your ponytail-and-veil combination should feel like a cohesive bridal design rather than two separate elements. The best results happen when both pieces work together intentionally—your ponytail base anchors your veil securely while your veil complements your hairstyle’s overall aesthetic. Take time during your trial appointment to practice different veil placements, attachment methods, and styling details. Small adjustments in height, texture, or embellishment can completely transform how the final look photographs and feels throughout your day.