Bantu knots represent one of the most transformative styling techniques for natural hair—and when you combine them with ponytail configurations, you unlock a whole new dimension of protective, versatile, and genuinely beautiful looks. Whether you’re seeking a low-maintenance style that lasts for days, a protective technique that shields your hair while you sleep, or simply a fresh aesthetic that showcases your natural texture, Bantu knot ponytails deliver on all fronts. The beauty of this approach lies in its flexibility: you can wear the knots down for an intricate, sculptural style, pin them up into a crown, blend them into a high pony, or unravel them to reveal defined curls that last far longer than you’d expect. What makes Bantu knots particularly genius for natural hair is that they work with your texture rather than against it—they’re rooted in traditional African hair culture and have been perfected over generations. This styling technique respects your hair’s natural moisture needs, creates minimal manipulation, and produces results that range from playful and casual to absolutely show-stopping.
Why Bantu Knots Work So Well for Natural Hair
Bantu knots achieve something many other styling methods don’t: they manage natural hair with intention rather than forcing it into submission. When you create these knots, you’re actually massaging your scalp, distributing natural oils, and allowing moisture to lock in throughout your hair shaft. The knots themselves create a protective seal around each section, which means your ends spend less time exposed to dryness, friction, and environmental damage. This is especially crucial for natural hair, which tends to be drier than other hair types because the natural curl pattern makes it harder for sebum to travel from your scalp down the hair shaft.
Beyond the protective benefits, Bantu knots create a platform for virtually any styling direction you want to take. Once they set overnight or over the course of a day, you have the foundation for curls, coils, waves, or the twisted texture the knots themselves create. This versatility means one styling session can last you anywhere from three days to two weeks depending on your hair’s texture, how tightly you formed the knots, and what you do with them afterward.
The technique also dramatically reduces daily styling stress. Natural hair thrives when you minimize manipulation, and Bantu knots allow you to essentially “set it and forget it” for days at a time, whether you’re wearing them as finished knots or unraveling them for a different look.
Understanding the Different Textures That Work Best
Fine natural hair responds beautifully to Bantu knots because the smaller sections allow for quicker drying and crisper definition. If you have fine-textured natural hair, you might find that looser knots work best—wrapping your hair around your fingers rather than around additional tools helps prevent tension breakage while still creating that sculptural shape that makes Bantu knots visually stunning.
Coily and kinky textures excel with Bantu knots because your natural curl pattern actually enhances the knot’s definition and helps them hold their shape longer without any additional setting time. The texture itself provides grip, so your knots stay secure throughout the day and night without needing tight anchoring. This is why Bantu knots feel so natural for people with highly textured hair—the technique was literally developed for these curl patterns.
Wavy natural hair sits in an interesting middle ground. Bantu knots still work beautifully, but you might find that you need slightly tighter knots or additional moisture to prevent frizz, and you may want to consider using a light holding gel or styling cream to help your waves maintain definition throughout the duration of your style.
Essential Tools and Products You’ll Actually Use
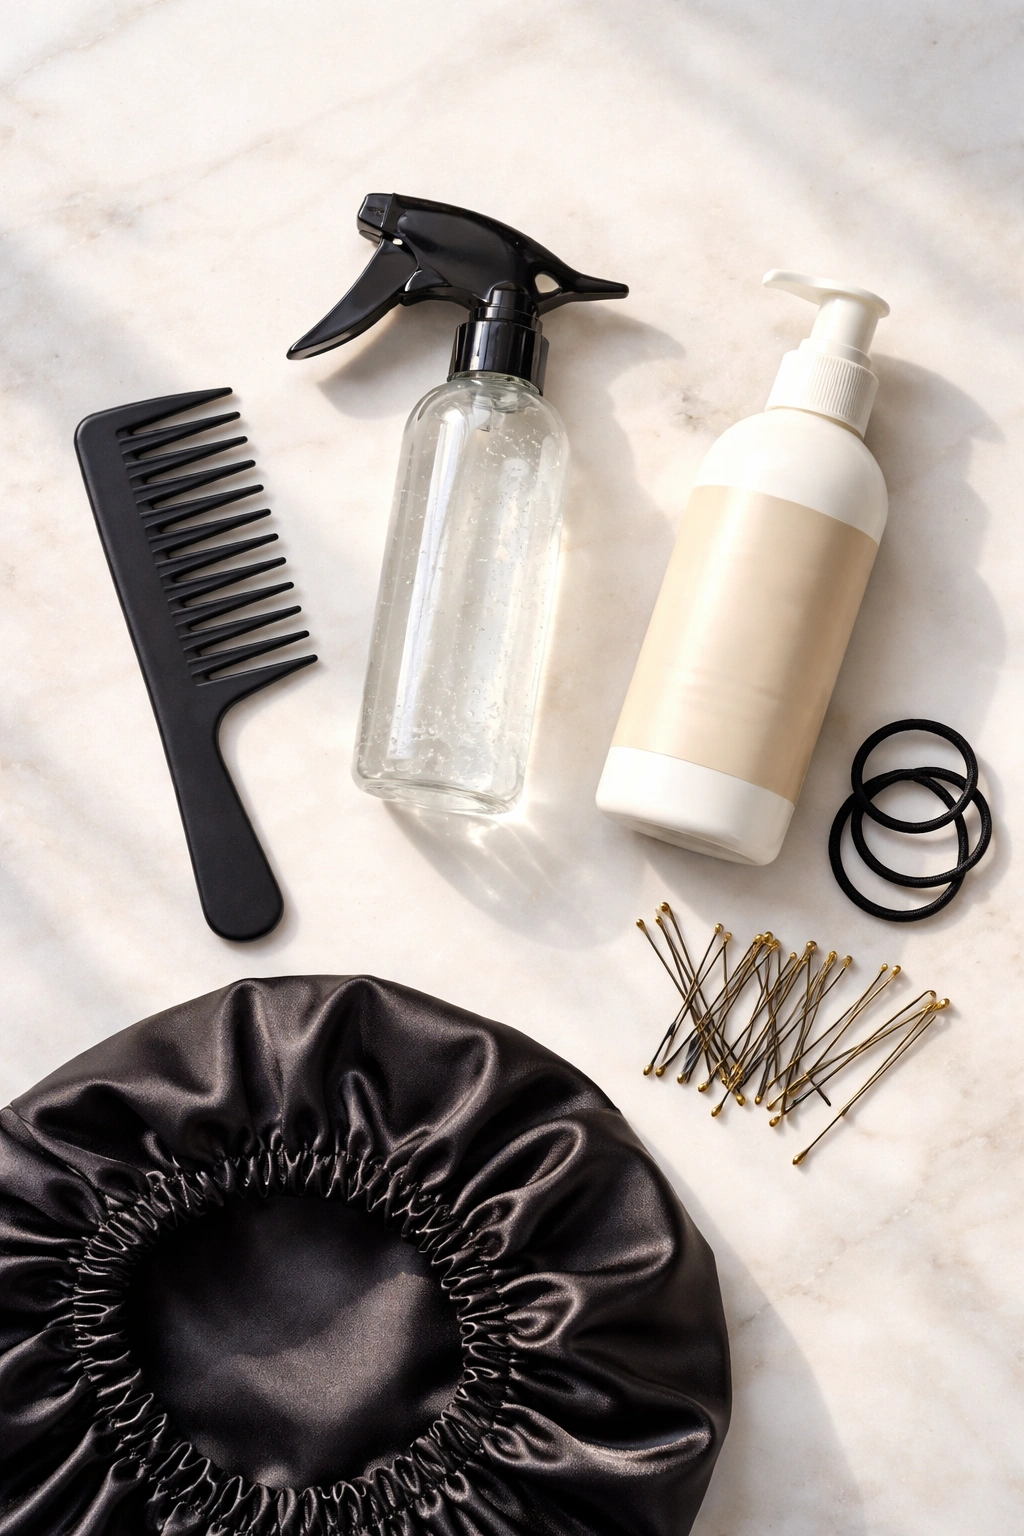
You don’t need fancy equipment to create Bantu knots, which is part of their genius appeal. Your fingers are genuinely your most important tool—they provide the sensitivity you need to feel when you’re creating appropriate tension and the dexterity required to twist sections into secure knots. Beyond that, a fine-tooth comb or detangling brush helps you section cleanly and work through any tangles before you start knotting. A spray bottle filled with water or a light leave-in conditioner keeps your sections moisturized and workable, especially if you have drier hair that gets sticky when you’re trying to manipulate it.
A lightweight leave-in conditioner or styling cream provides slip—that essential quality that lets you manipulate your hair smoothly without it sticking to itself or becoming matted. Look for products that aren’t heavy enough to weigh down curls but provide enough grip that your knots stay locked in place.
Optional but genuinely helpful: bobby pins or small claw clips secure the tail end of each knot so it doesn’t unravel as you work, and a bonnet or silk scarf to wear while your knots set helps them dry evenly and protects them while you sleep.
Sectioning Your Hair for Success
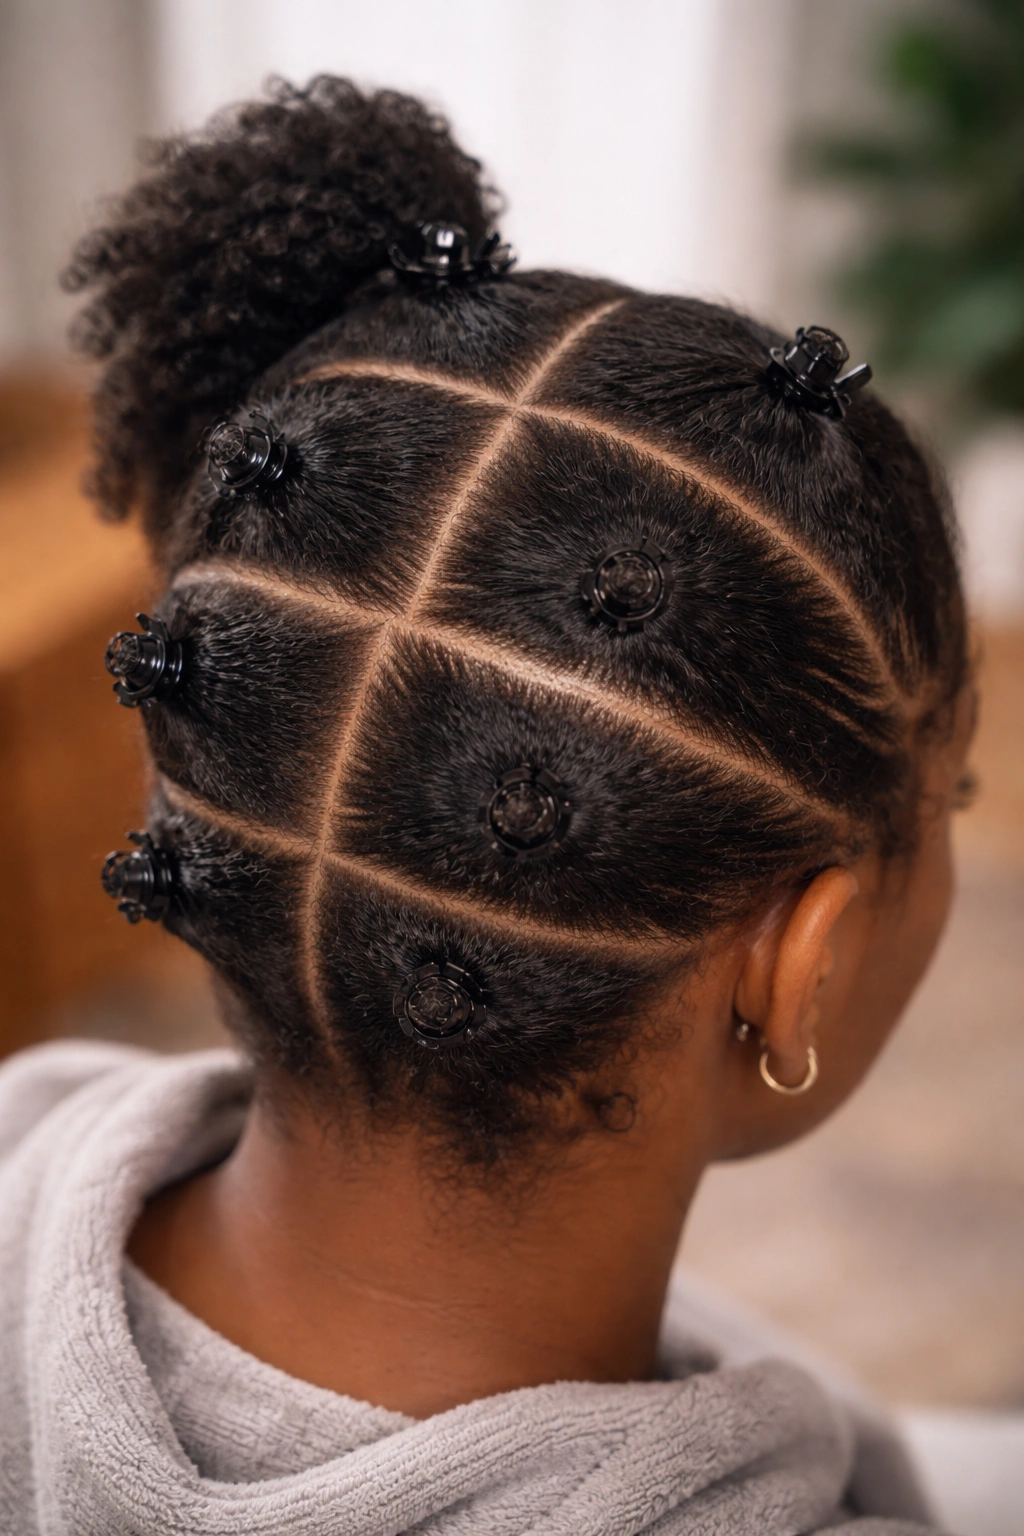
The section size you choose determines both how quickly you can style your entire head and what the final look will be. Larger sections—roughly the size of a quarter to a half-dollar—create a bolder, more sculptural look with fewer knots overall, and they dry faster because there’s less hair to fully set. This approach works beautifully if you’re planning to wear the knots themselves as your finished style or if you want a statement look.
Medium sections—think postage stamp to small quarter size—strike a balance. They create visual interest without taking forever to style, they hold their shape well, and they provide enough coverage that smaller flyaways blend into the overall aesthetic. This is often the sweet spot for most people.
Smaller sections—smaller than a postage stamp—create an intricate, detailed look that’s absolutely stunning when worn as finished knots, especially in protective ponytail configurations. The trade-off is that they take longer to style and require more knots total to cover your head, which also means they take longer to dry.
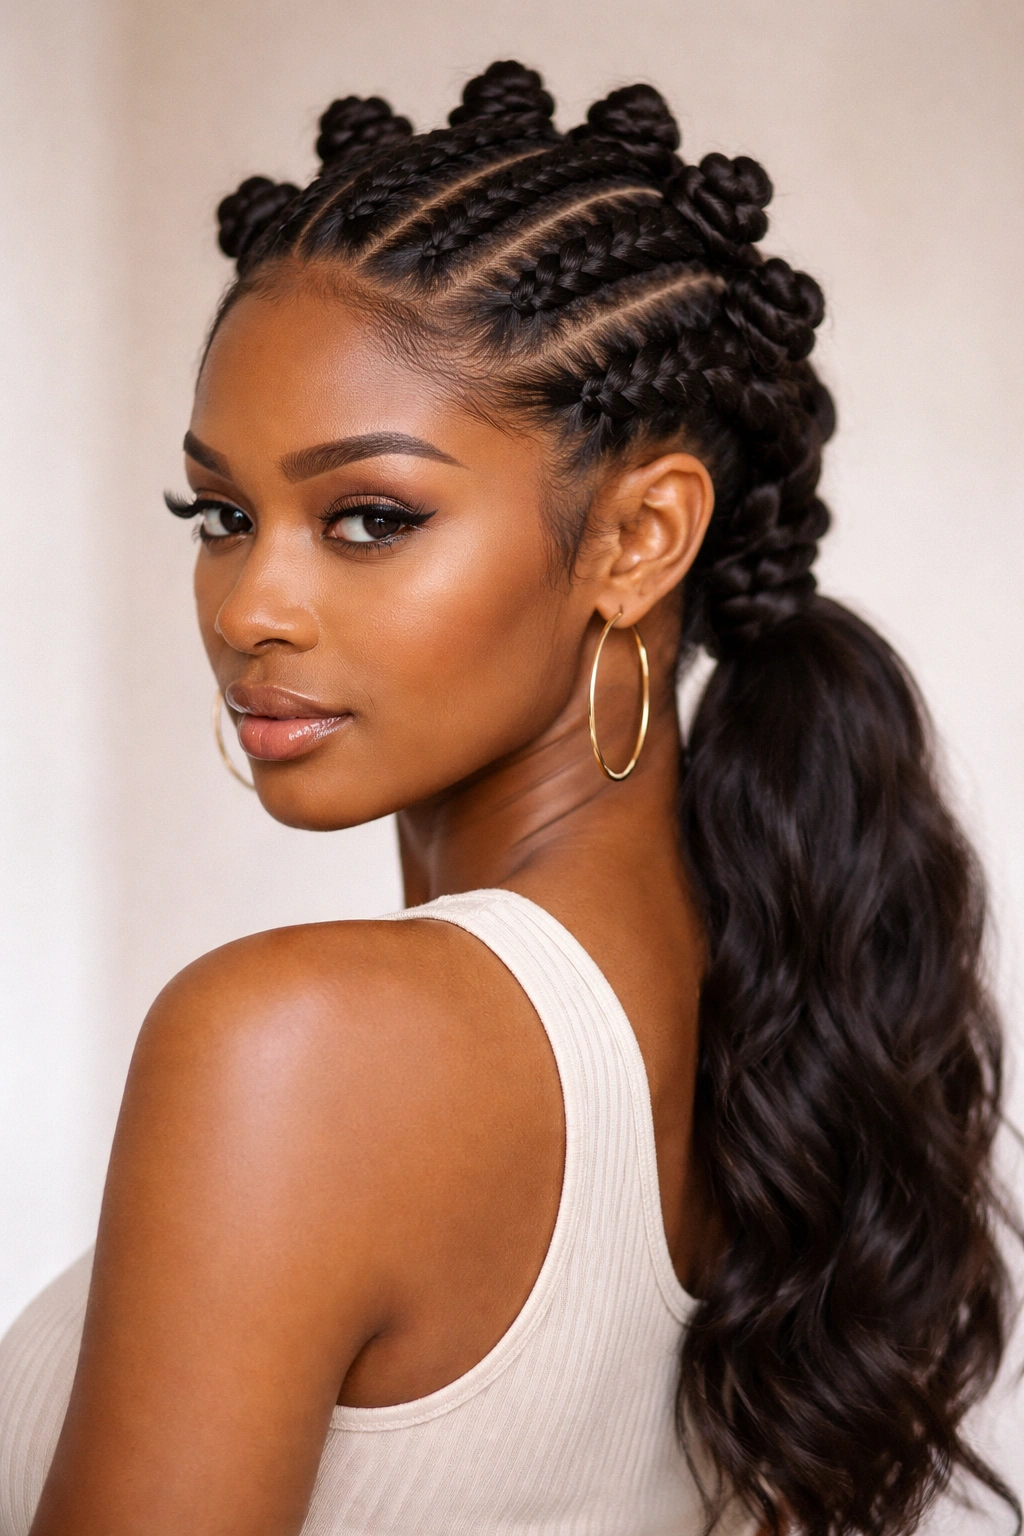
Your sectioning pattern matters too. Horizontal sections (parting across from ear to ear) create a structured appearance that works especially well for slicked-back or crown ponytail styles. Vertical sections (creating columns from your hairline back) create a more flowing aesthetic, particularly when you’re going for a high pony or leaving some knots down around your face. Diagonal sections split the difference, creating a dynamic look that works for almost any ponytail configuration.
Mastering the Basic Knot Technique
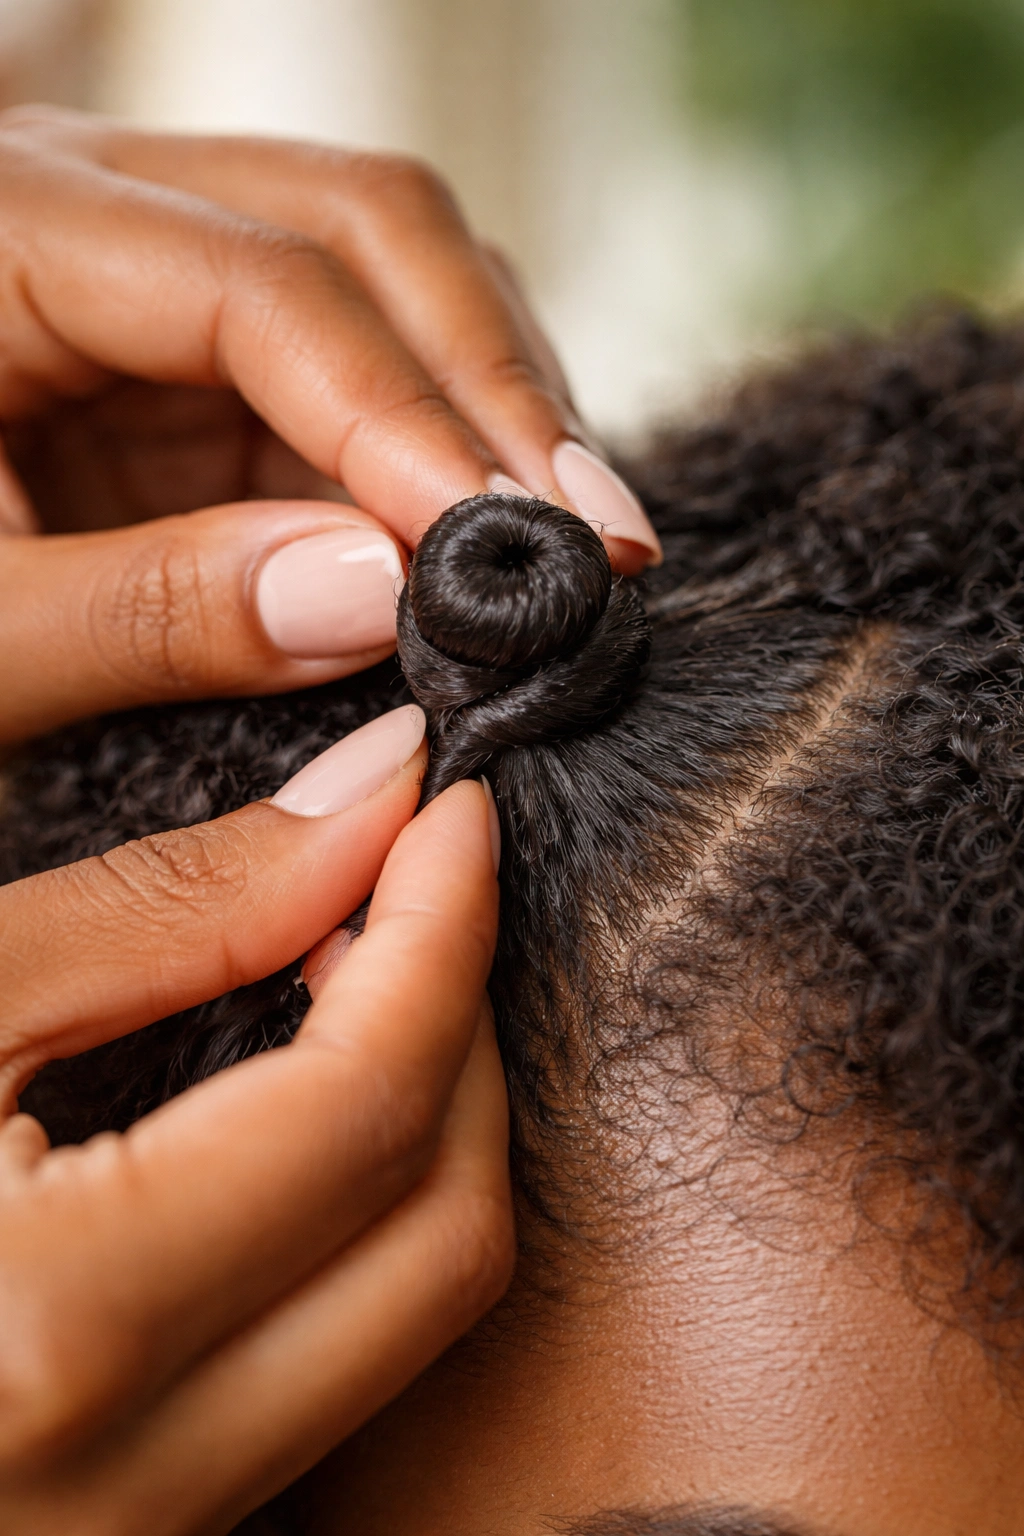
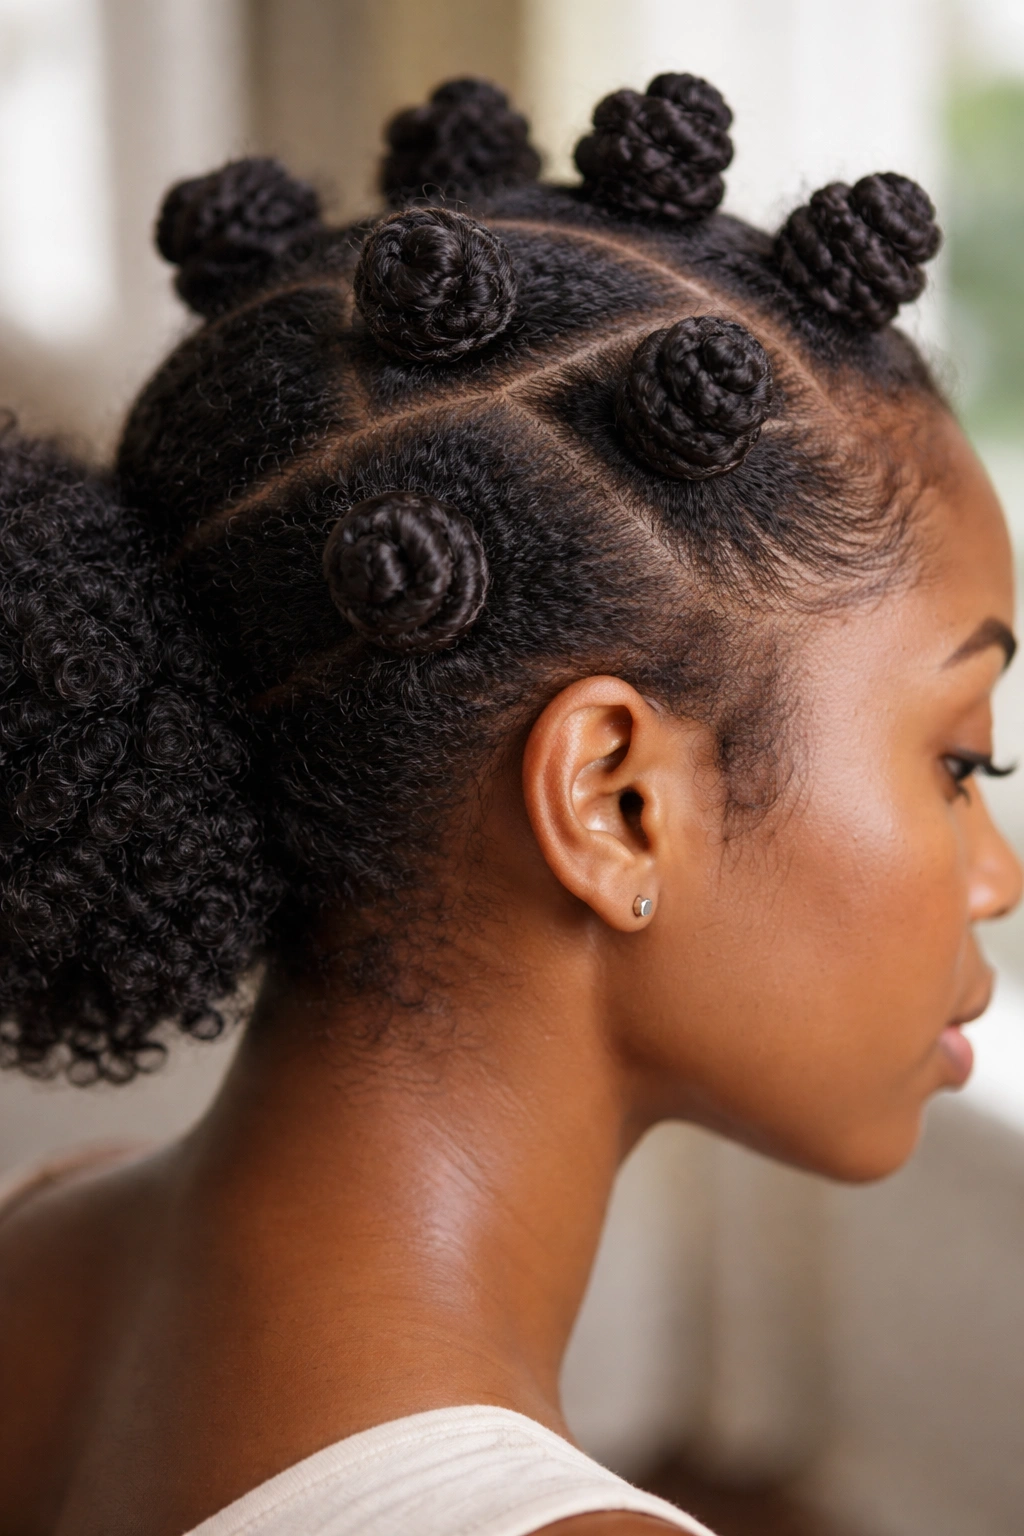
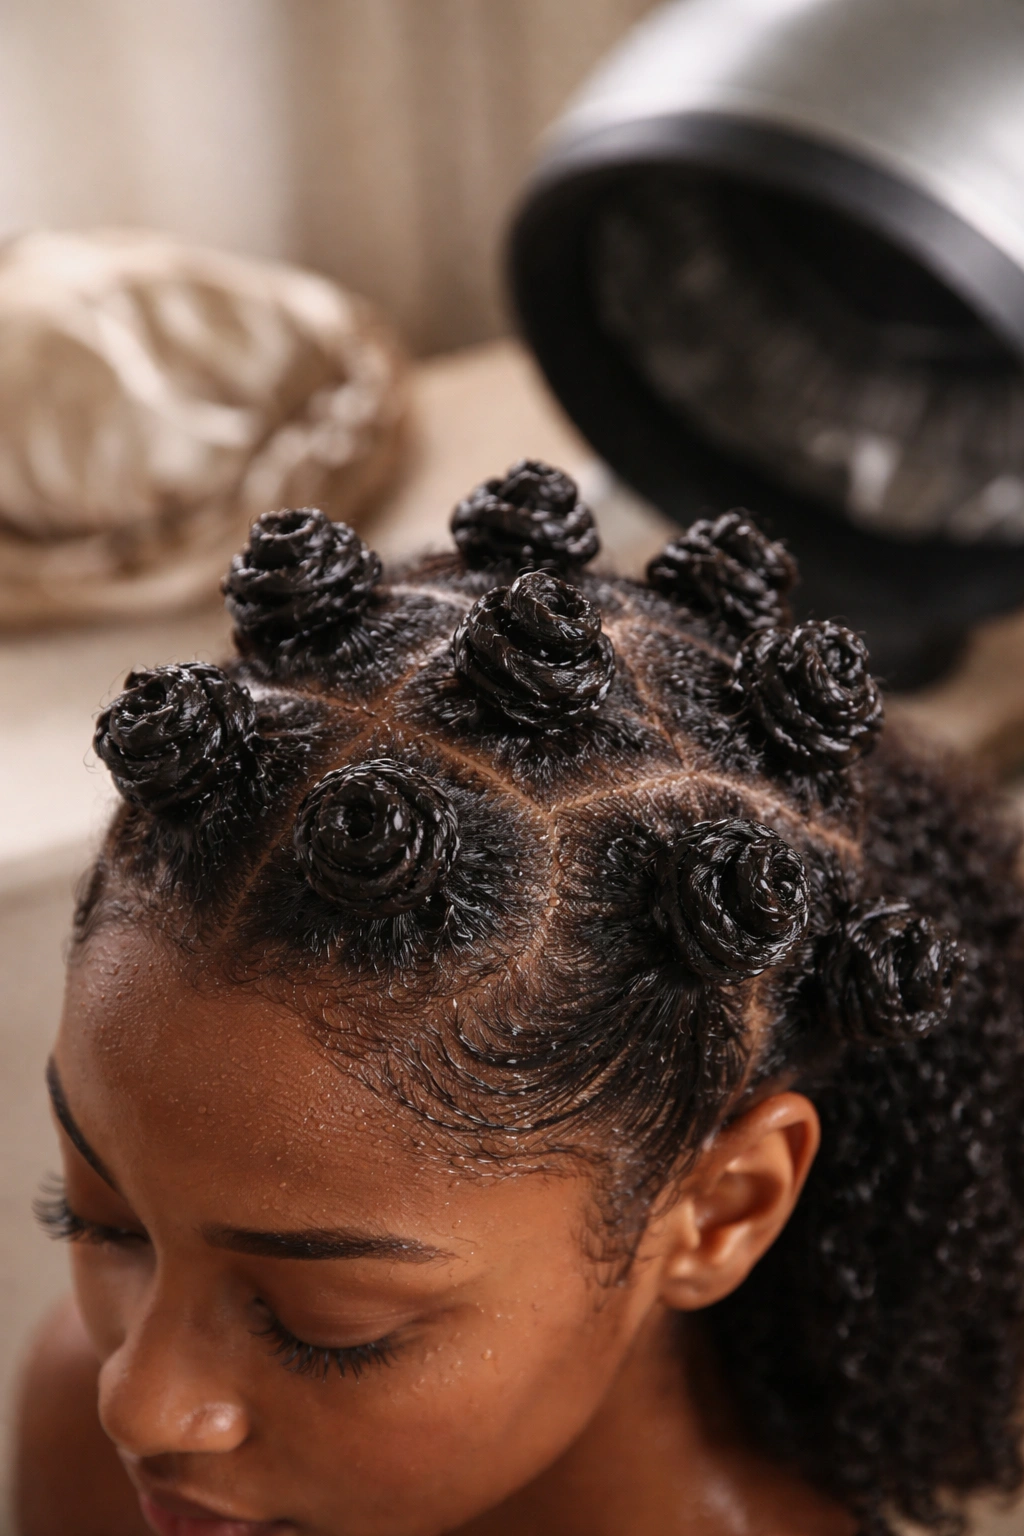
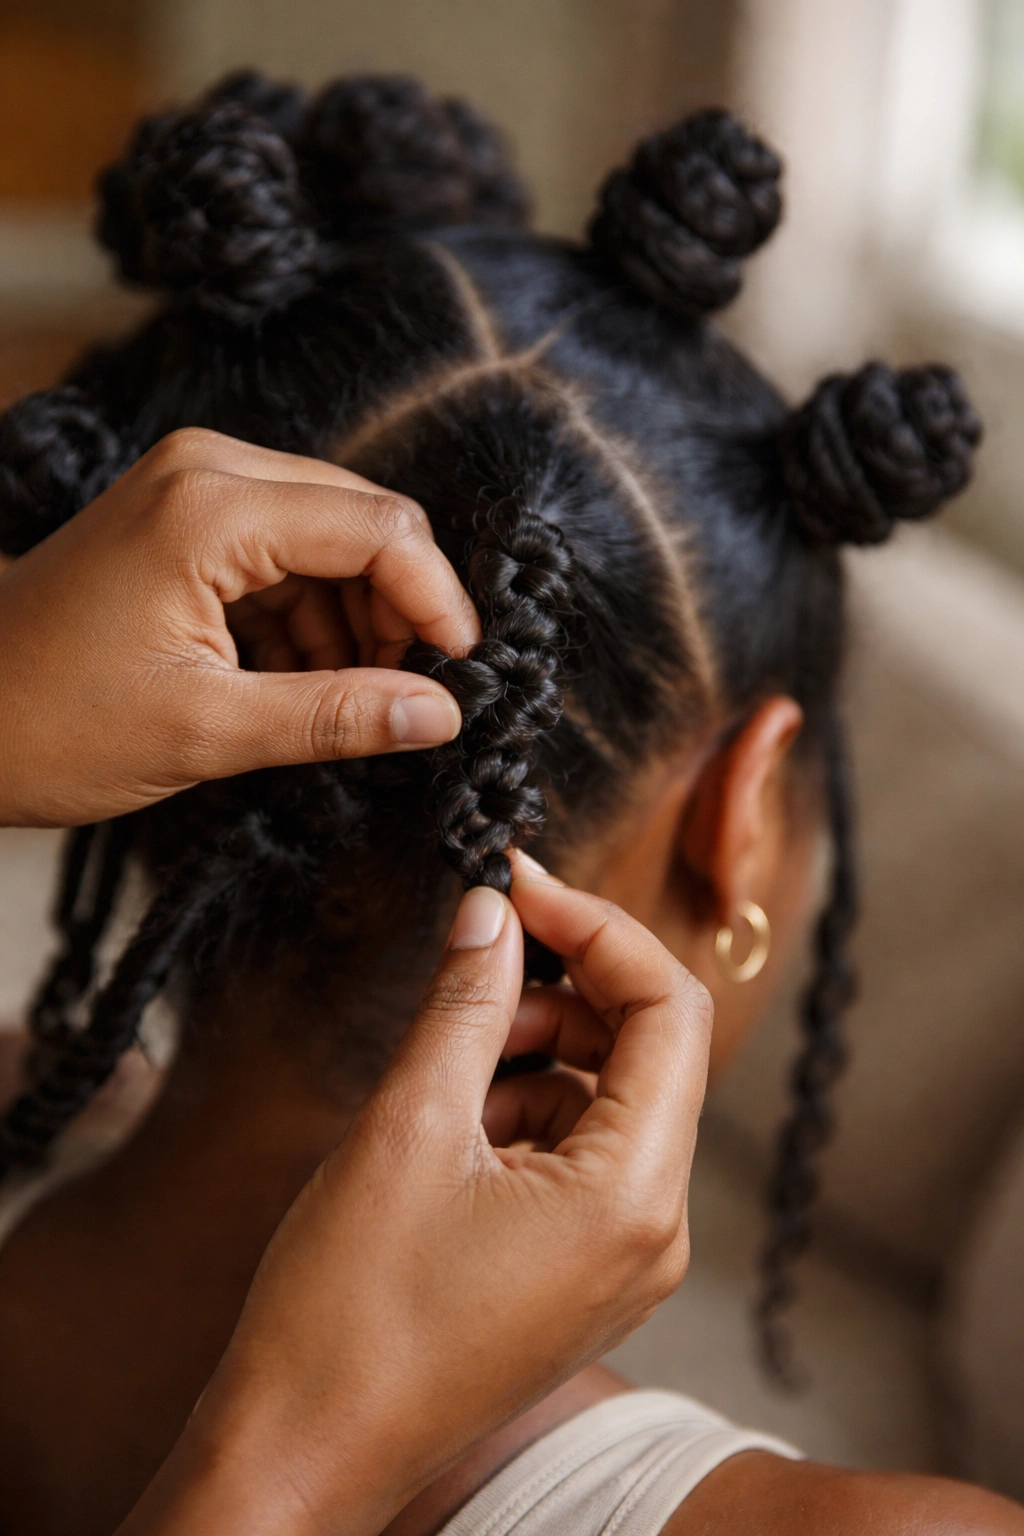
The foundation of any Bantu knot style is understanding how to create a knot that’s secure without being overly tight. Start with a clean, detangled section of damp (not soaking wet) hair. Apply your styling cream or leave-in conditioner to coat the section evenly. Using your thumb and forefinger, twist the section tightly from root to tip, creating even tension throughout.
Once you’ve twisted the entire section, wrap it around the base at your scalp to form a coil shape. Think of it like wrapping ribbon around your finger—you’re creating a circular, spiral formation. Tuck the end under the wrapped sections so it’s hidden and locked in place. A small bobby pin inserted through the knot itself provides extra security if needed, especially for the first day before your knot has fully set.
The tension matters—tight enough that the knot holds its shape but not so tight that you’re creating discomfort or tension on your scalp and edges. If you feel pulling or pain, loosen it immediately. Tension alopecia is real, and no style is worth potential hair loss.
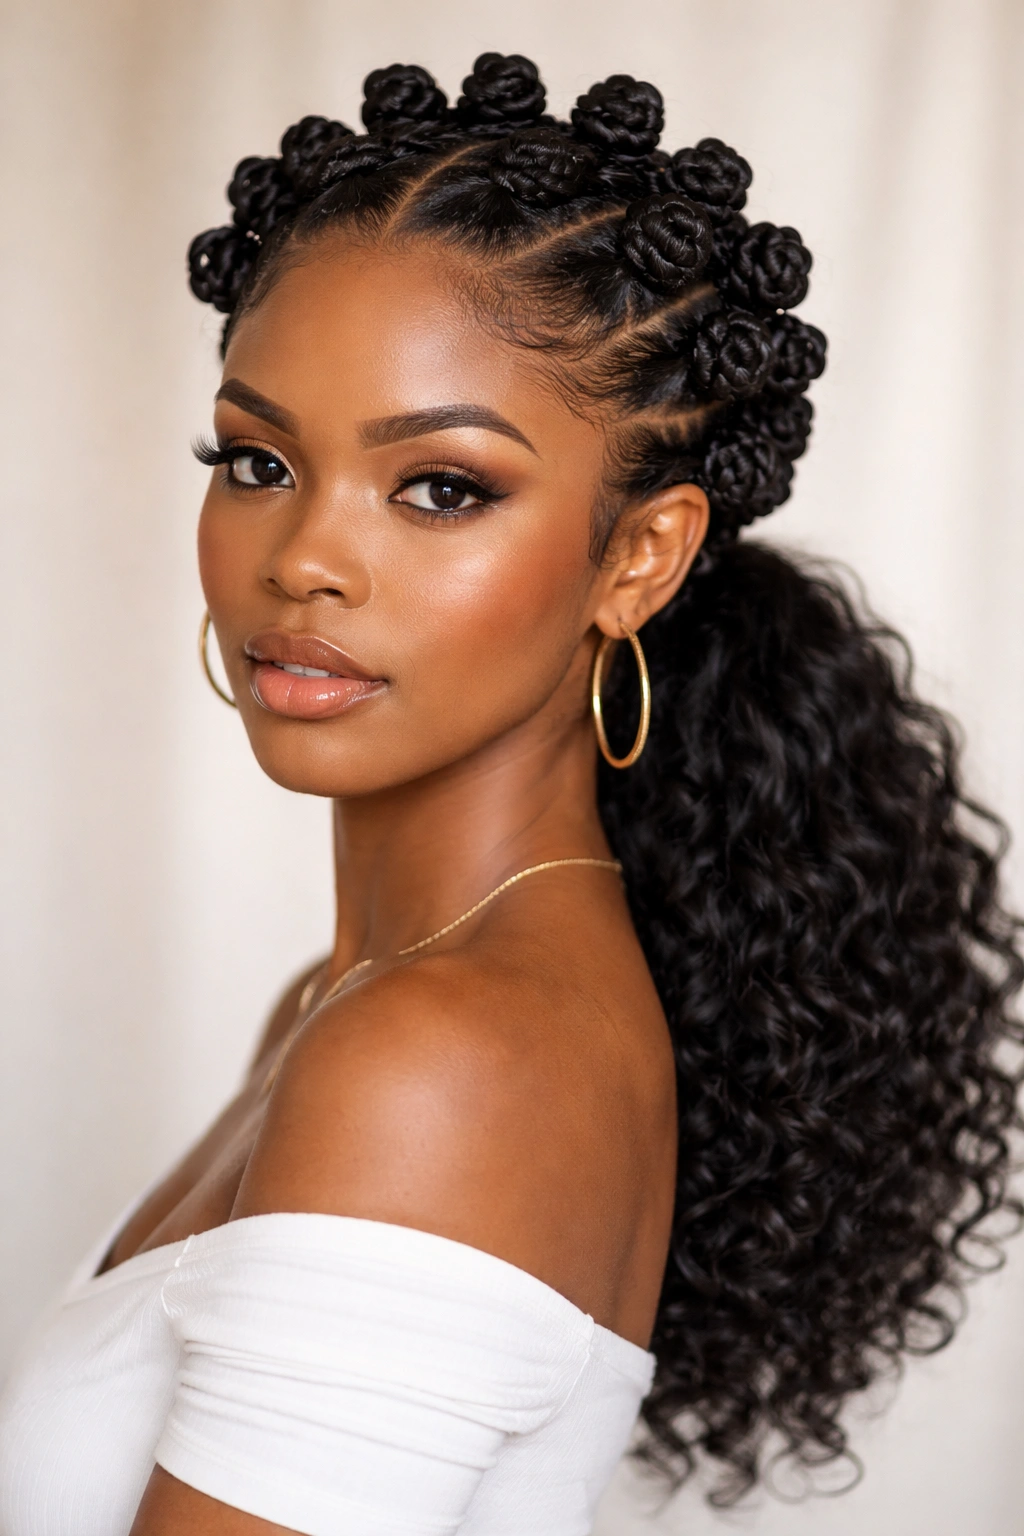
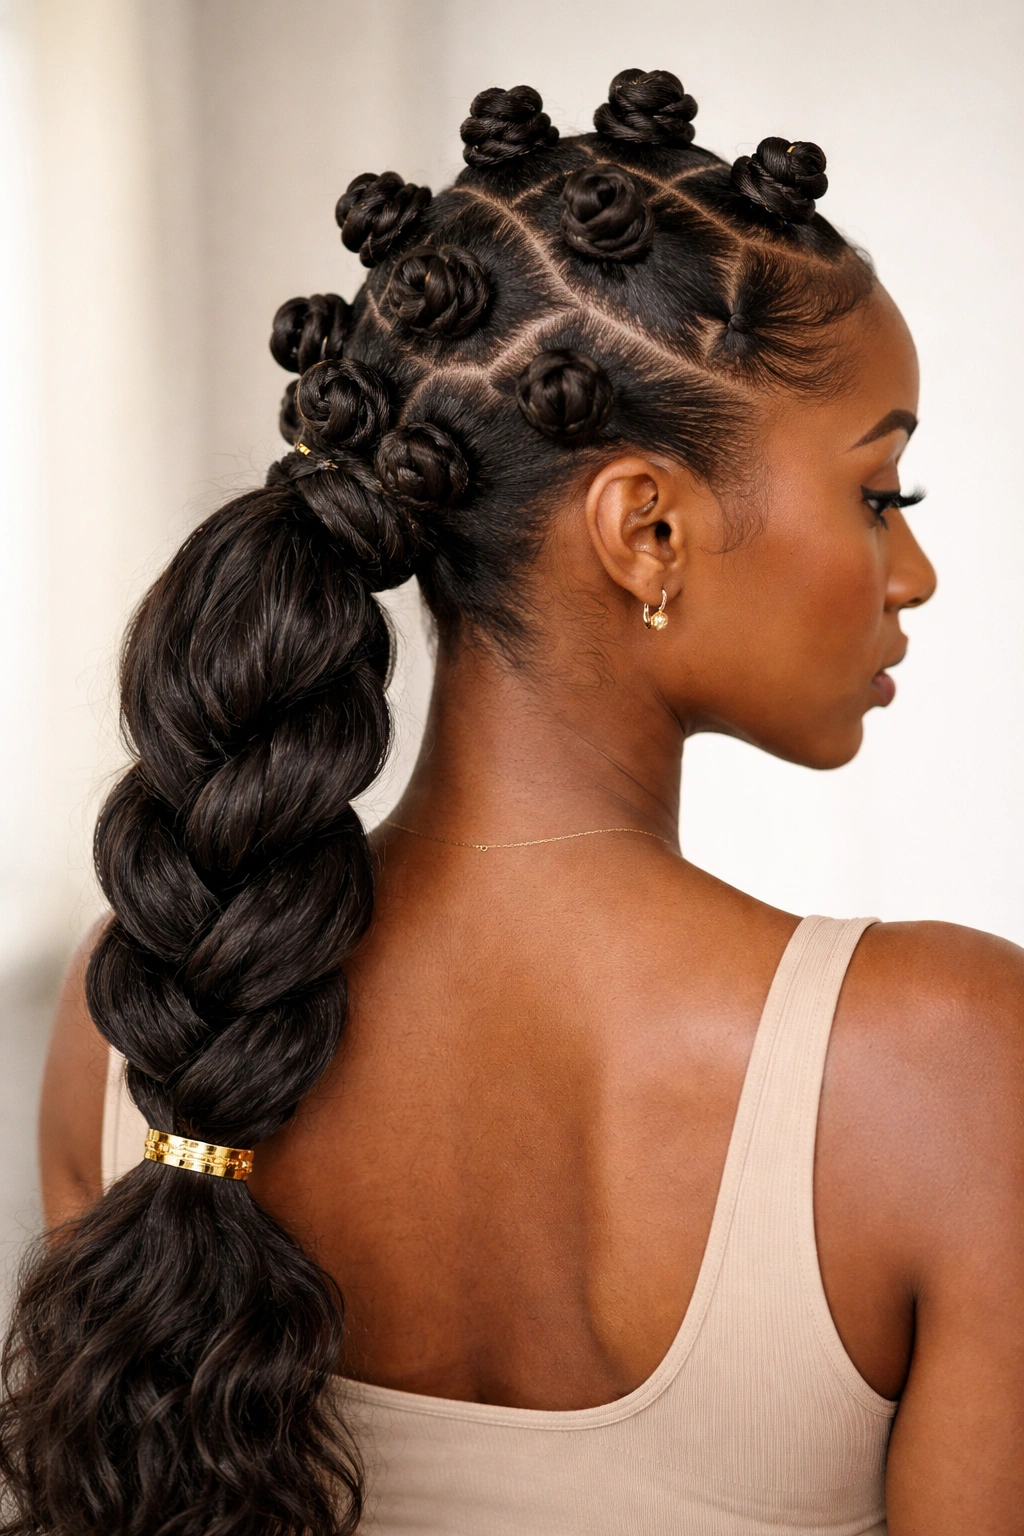
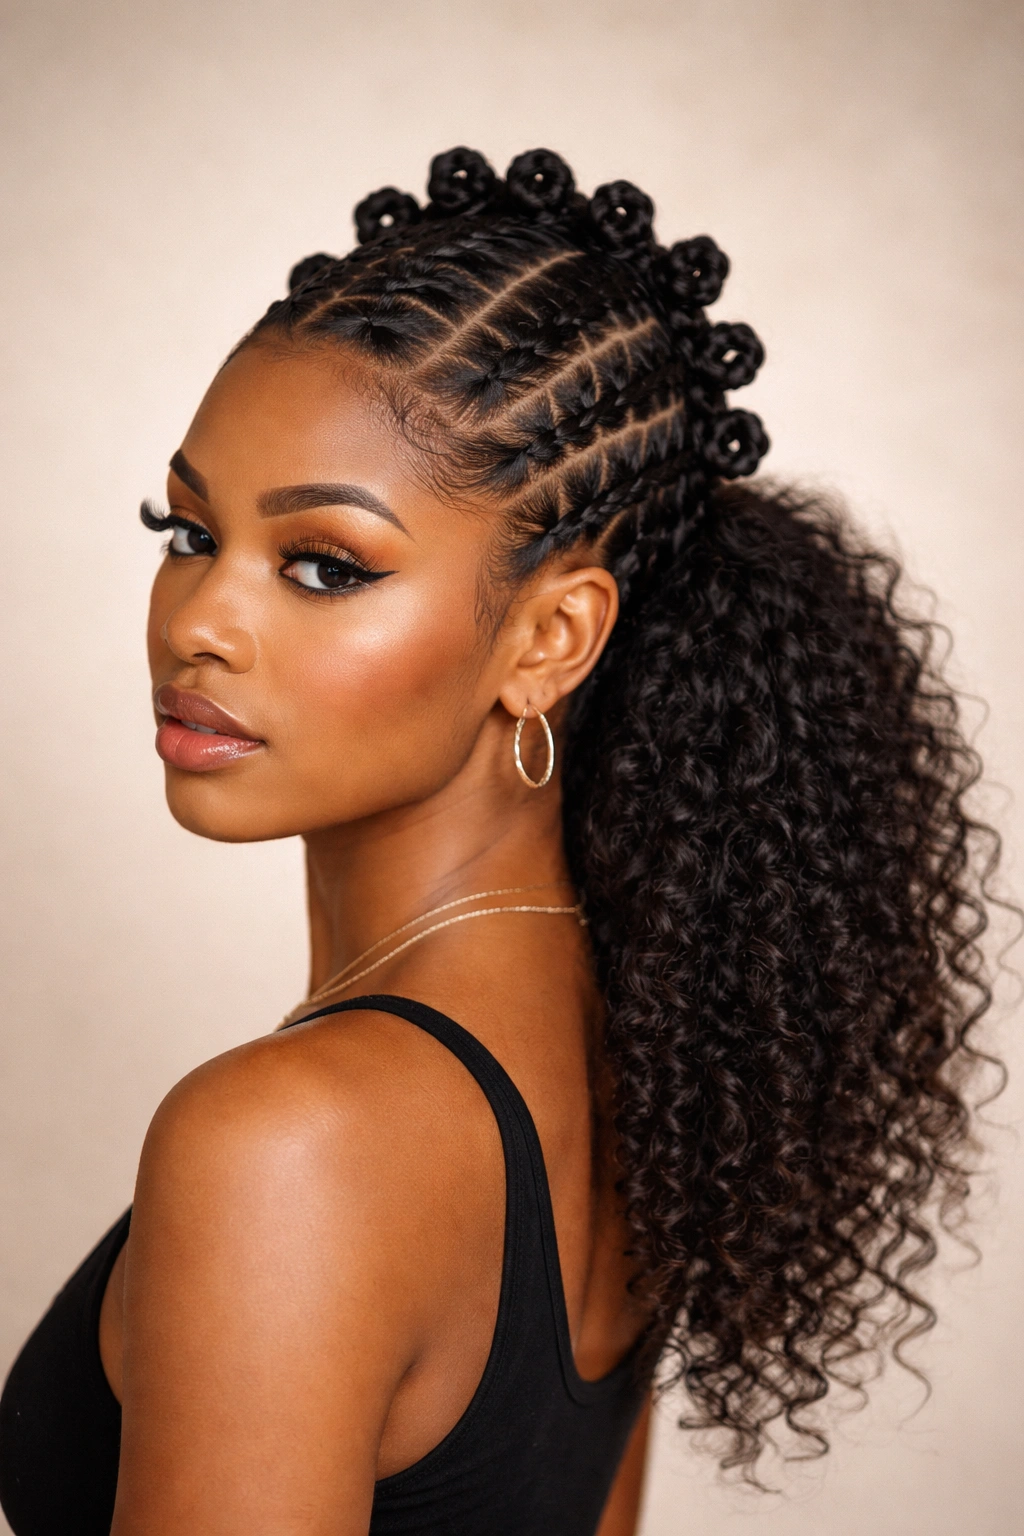
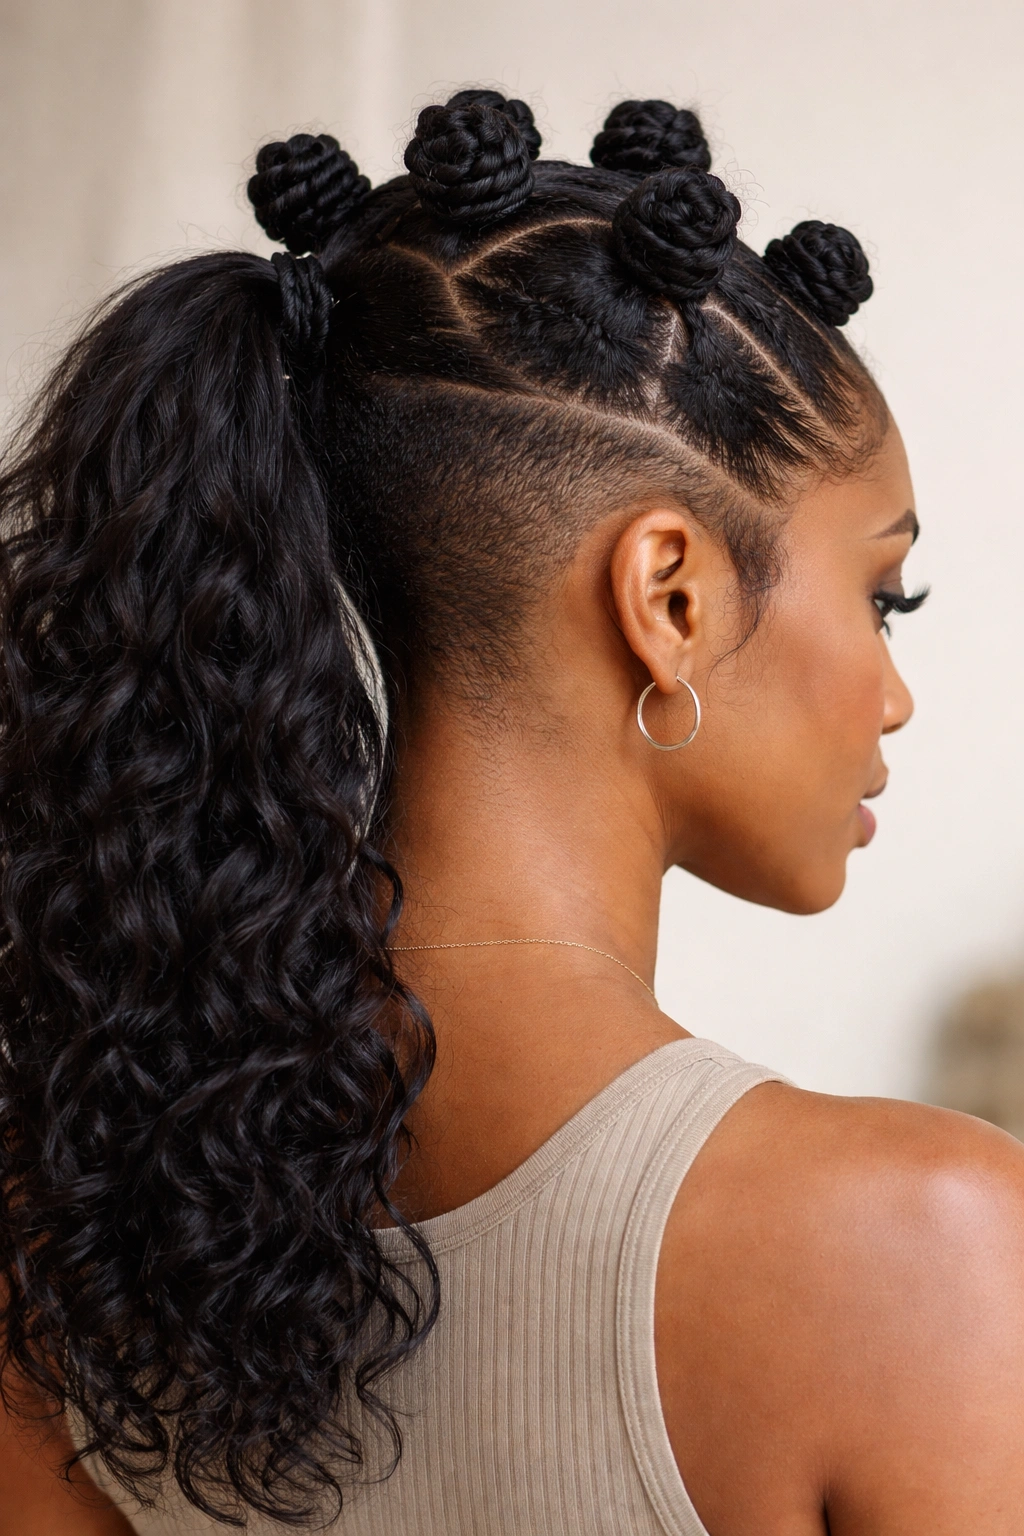
1. The High Pony Bantu Knot Mane
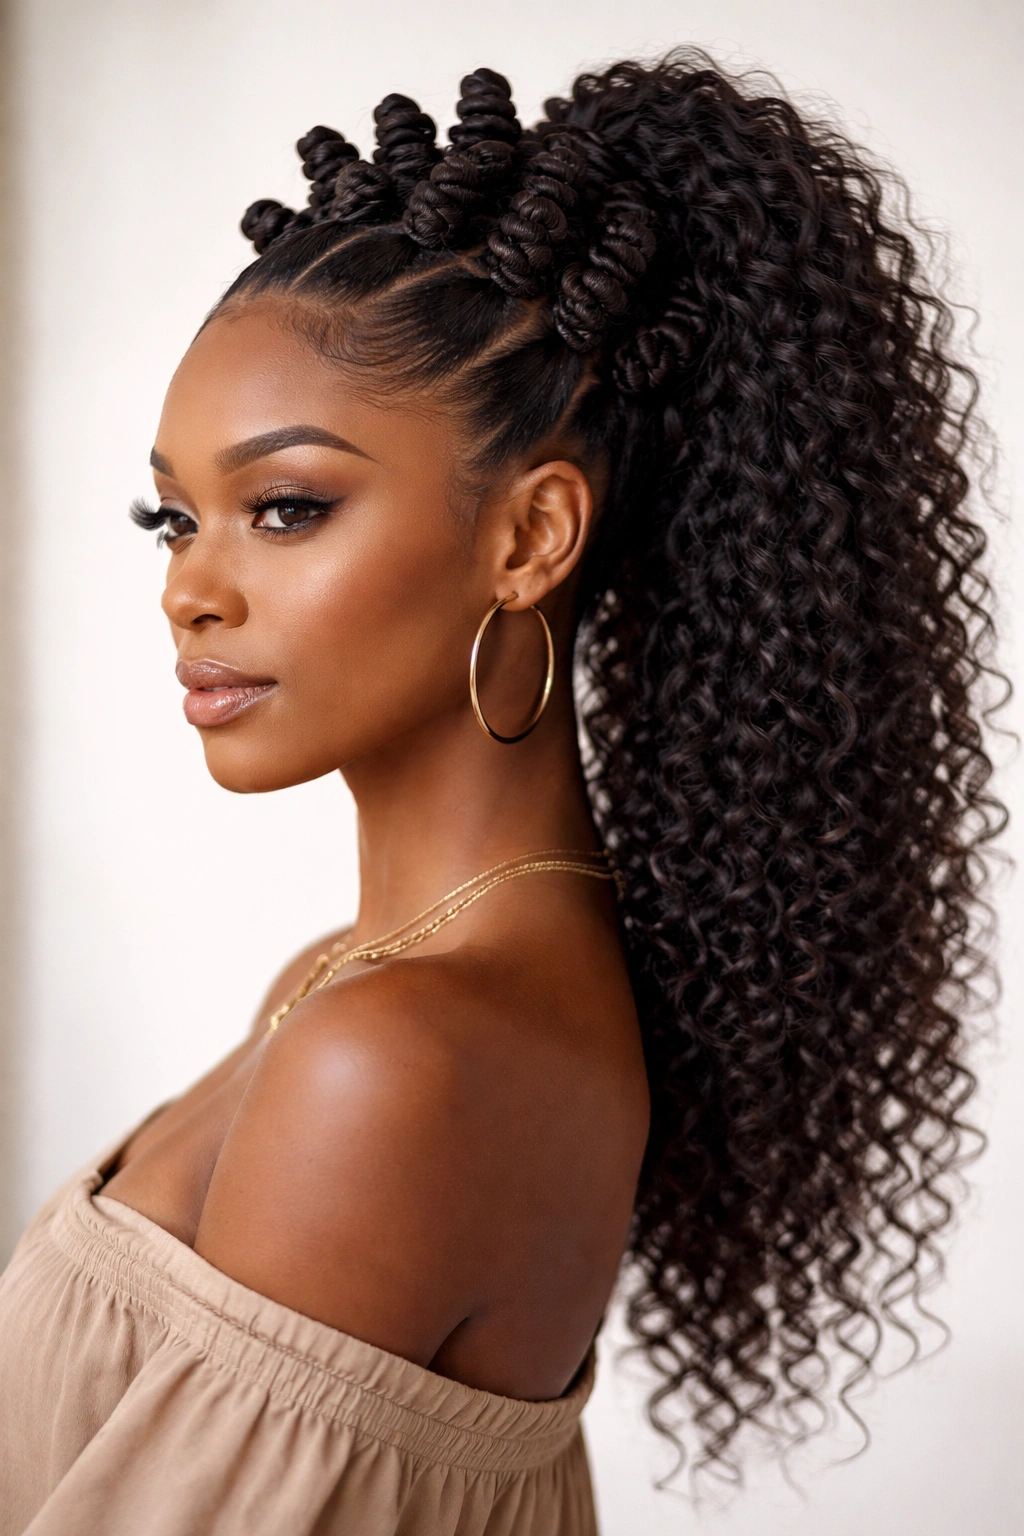
This is the style that makes people stop and ask what you’re wearing because it reads as both polished and artistic. You’ll create Bantu knots throughout your head, focusing on smaller to medium sections for visual density, then gather all the knots toward the crown and secure them into a high, centered ponytail base.
Why This Style Commands Attention
The visual impact of seeing dozens of perfectly formed knots cascading from the crown down is genuinely striking. This isn’t a subtle style—it’s a statement that says you know your hair, you know your culture, and you’re owning both confidently. The height adds dimension to your face, creates the illusion of fuller hair, and frames your features beautifully. It also serves as a genuine conversation starter, often leading to discussions about natural hair care, protective styling, and Black hair culture.
Styling Steps and Finishing Details
- Part your hair into medium sections (approximately 15-20 sections depending on hair density)
- Twist and knot each section starting from the nape and working upward toward your crown
- As you complete each knot, loosely gather them toward where your high pony will be, securing them with a clear elastic or covered hair band
- The knots themselves become your ponytail—you’re not hiding them or smoothing them down, but rather celebrating their texture and shape
- Style the crown area with a slicked-down edge control if desired for a polished appearance
Pro tip: Create your knots slightly looser than you would for other styles, since you want them to hold their individual shape while sitting together in the ponytail rather than compressing too tightly.
2. The Undercut Ponytail with Bantu Details
This modern approach leaves the underneath sections of your hair unraveled while creating Bantu knots only on the crown and top portions, which you then gather into a pony. The undercut sections catch light beautifully and create a dimensional effect that’s surprisingly wearable for both casual and more polished occasions.
The Asymmetrical Appeal
The undercut ponytail approach works because it breaks the visual expectation of “all knots all over”—instead creating a hybrid style that’s protective without being as visually complex as a full Bantu knot style. The unraveled sections underneath give you curls or coils that have a different texture from the knots above, creating visual interest and depth. This approach also tends to work beautifully for people with multiple curl patterns or texture variations within their hair.
How to Create This Look
- Create Bantu knots only in the top half of your head, using sections from your hairline back to about mid-crown
- Leave the bottom half of your hair unraveled but moisturized and styled
- Gather only your knotted sections into your ponytail base, allowing the unraveled sections underneath to flow freely or curve into the undercut
- The result is that your ponytail appears to have dimension, with the knots on top and textured curls or coils visible beneath
Worth knowing: This style particularly suits people with medium to high density hair, since you need enough unraveled sections to create visual balance with the knotted crown.
3. The Side Sweep Bantu Pony
Taking your Bantu knots at an angle across one side of your head, you gather them into a low, off-center ponytail that drapes gracefully across your shoulder. This style works especially well if you have a longer length and want something with an unexpected, almost romantic quality.
Why the Side Placement Changes Everything
A side sweep immediately feels different from a centered ponytail, even if you’re using the exact same knot technique. The asymmetry flatters many face shapes because it draws the eye along a curve rather than vertically, and it allows your ponytail to drape in a way that looks effortlessly elegant. The side placement also protects the hair on one side of your head differently than a centered style would, which can be strategic if you’re trying to protect certain sections while giving others breathing room.
Creating the Sweep Effect
- Create your Bantu knots across the back and one side of your head, creating an angled section pattern rather than straight rows
- Smooth your hair with your comb or with a slicked-down technique on the opposite side if desired
- Gather all knots toward your preferred side—typically lower, around ear level—and secure with a covered elastic
- Let the tail of the ponytail sweep across your shoulder; you can smooth it, leave it textured, or even braid the gathered knots before securing
Insider note: This style can be worn for 5-7 days if you’re careful to re-moisturize the knots and sleep with a silk scarf protecting them.
4. The Crown Halo Bantu Knots
This is pure elegance: Bantu knots arranged in a circular halo around your crown, then gathered into a low center ponytail so the knots frame your face from every angle. It feels special without looking like you’re wearing costume jewelry or trying too hard.
The Symbolism and Visual Impact
A crown halo arrangement speaks to the crown knot and natural hair movement—acknowledging that Black hair, in all its forms, is literally a crown. This arrangement is one of the few Bantu knot ponytail styles that works beautifully from every angle: front, back, and sides all have visual interest. The knots literally frame your face like a crown would, which is why this particular arrangement resonates so strongly.
The Technical Execution
- Section your hair so that the outer sections (from your temples around to both sides of your nape) are reserved for knots
- Create medium-sized Bantu knots in these outer sections, arranging them so they form a visible, continuous band around your head
- Leave your underneath hair unraveled or create small knots there that will be hidden
- Gather all hair at the nape into a low ponytail, allowing the crown knots to arc above and around it
Real talk: This style requires a bit more planning in your sectioning, but once you’ve created it once, the pattern becomes intuitive for future applications.
5. The Twisted Rope Ponytail with Bantu Accents
Create your Bantu knots throughout your head, then rather than gathering them all into a simple elastic ponytail, twist the entire gathered section into a rope, creating an intricate, textured pony base. This approach takes visual interest to another level entirely.
Adding Dimension Through Technique
The twisted rope element adds a spiral visual element that draws the eye, creating the illusion of more movement and dimension than a simple gathered knot pony would provide. Because you’re twisting the already-textured knots, you get this incredible interplay between the knot texture and the rope twist. It’s a style that shows genuine effort and technical skill, which is precisely why people respond so strongly to it.
How to Twist Successfully
- Gather your Bantu knots loosely at first; don’t secure with an elastic yet
- Divide the gathered knots into two sections
- Twist each section separately, keeping moderate tension
- Wrap the two twisted sections around each other, creating a rope effect
- Secure at the base with a covered elastic, tucking the ends under the rope
Key detail: Make sure your knots are completely dry or nearly dry before twisting, as damp knots won’t hold the rope twist structure.
6. The Braided Crown Bantu Pony
Create your Bantu knots, then instead of leaving them as individual sculptures, braid them together in a crown formation that wraps around your head, with a ponytail emerging from the back. This approach merges Bantu knot styling with traditional braiding for something genuinely one-of-a-kind.
The Fusion Aesthetic
Braiding Bantu knots together is a genuinely creative approach that acknowledges multiple techniques in a single style. The braid structure provides additional security for the knots while creating a visual element that’s more intricate than knots alone. This style reads as intentional and artistic, perfect for someone who wants to showcase their understanding of multiple natural hair techniques.
Creating the Braid Integration
- Create Bantu knots around your crown area and the sides of your head
- Once knots have set for several hours or overnight, gently handle them and create a three-strand braid using the knot “tails” or working the knots into a braid pattern
- Maintain the braid around your crown, and allow it to feed into a low-center ponytail
- The effect is that your crown features an elaborate braid made from Bantu knots, with ponytail extensions flowing below
Technical note: This approach works best if your knots are very secure and well-set, as the braiding can cause them to slightly unravel if they’re too fresh or loosely formed.
7. The Double-Pony Bantu Split
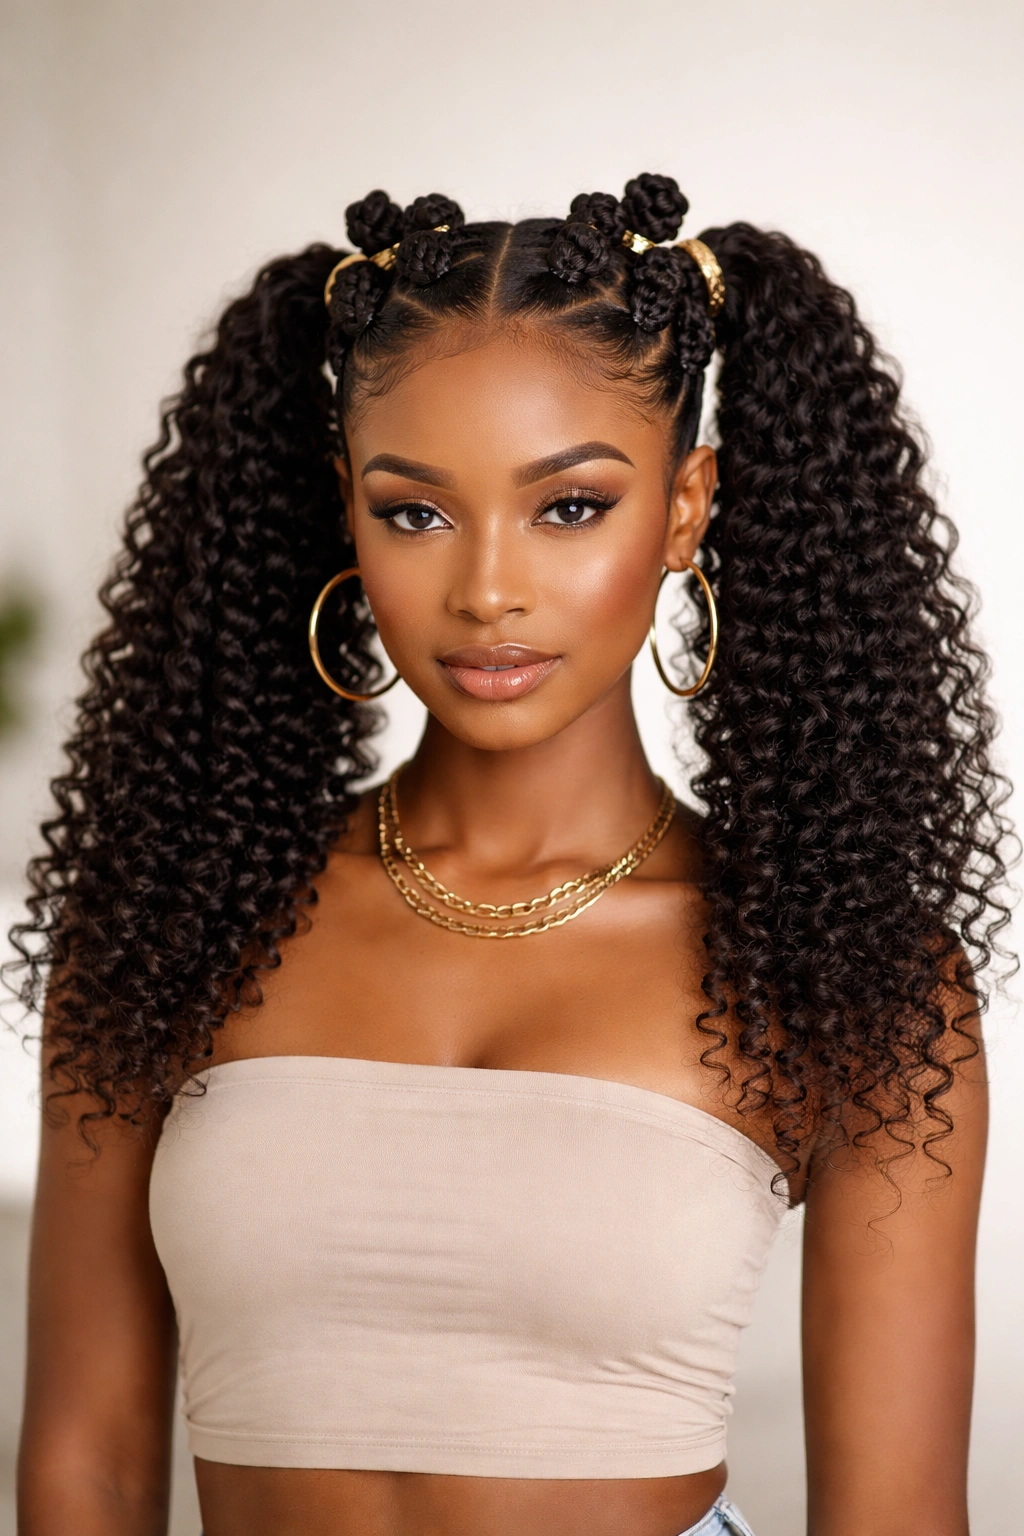
Create Bantu knots throughout your head, then divide them down the middle and create two ponytails instead of one—either sitting high and off-center or low and symmetrical. This playful approach splits what could be a statement single pony into two softer, more whimsical styles.
When to Choose Two Over One
The double-pony approach is perfect if you want visual balance without the height of a single high pony, or if you’re going for a deliberately playful aesthetic. It also serves a protective purpose: dividing your gathered hair into two sections rather than one reduces tension on your center scalp line, which is genuinely important for long-term scalp health, especially if you wear pony styles frequently. The two-pony arrangement also works beautifully if you have a longer hair length, as each ponytail becomes more manageable and frames your neck differently than a single center pony would.
Setting Up Your Sections
- Create Bantu knots across your entire head using a center part as your dividing line
- All knots on the left side gather into a left-side ponytail, all knots on the right side gather into a right-side ponytail
- You can position these symmetrically (both high, both low, both off-center on the same side) or asymmetrically for visual interest
Pro tip: This style genuinely extends the wear time of your knots because reduced tension means less stress, which helps them stay fresh longer.
8. The Sleek Edge Bantu Pony
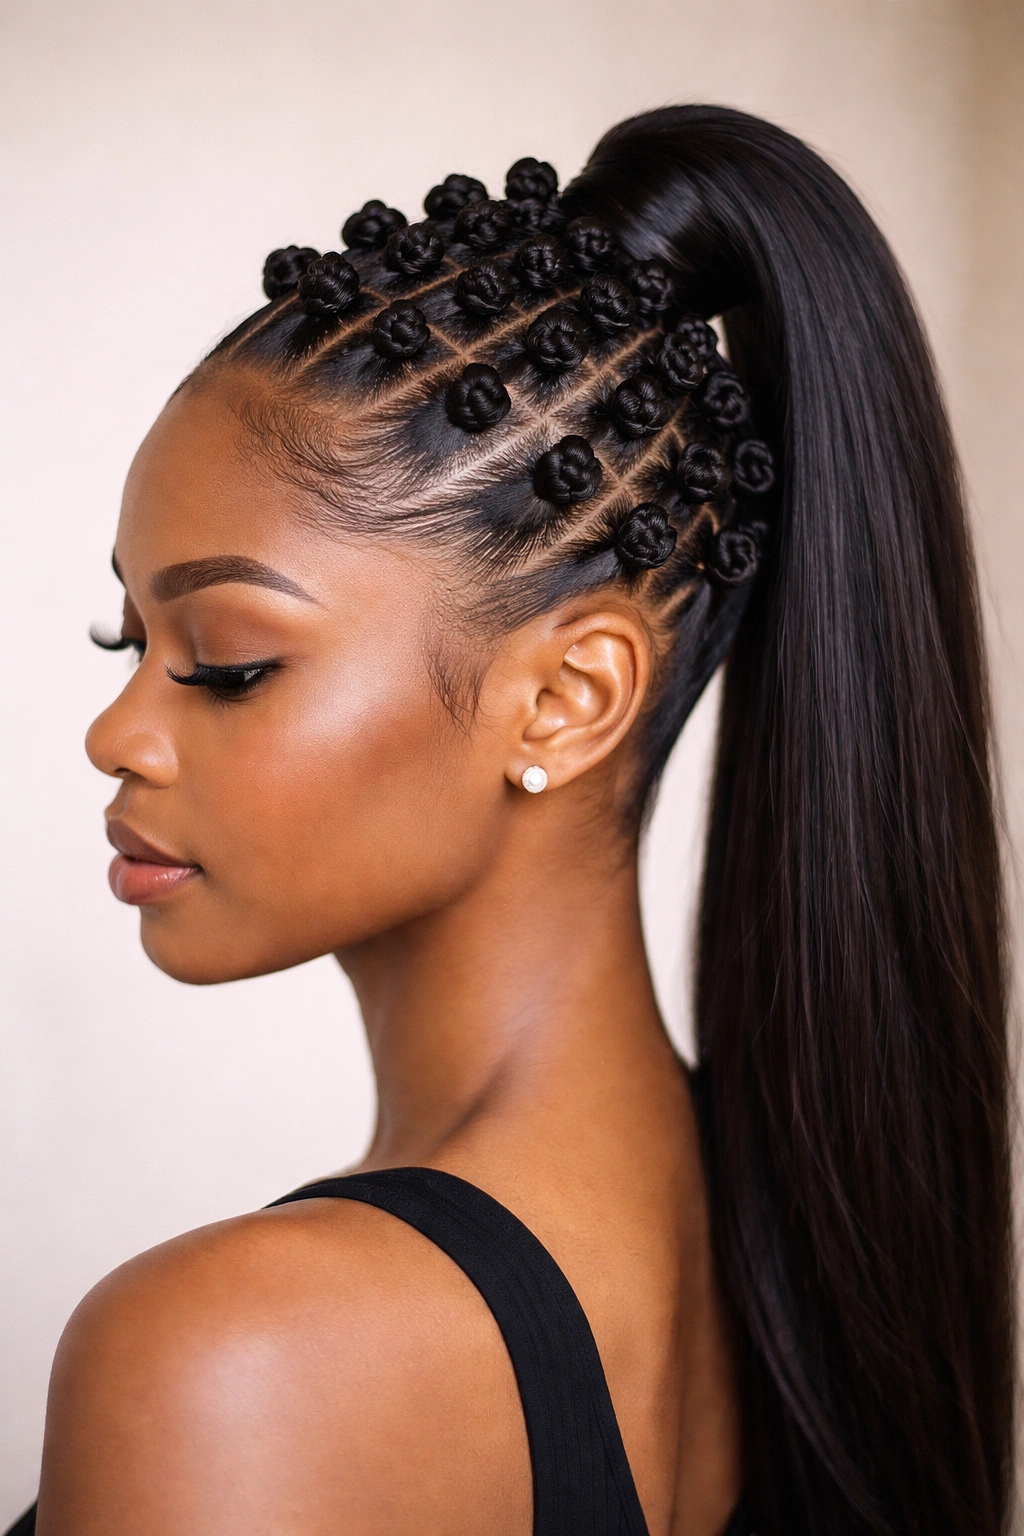
Create smaller, tighter Bantu knots throughout, focusing on very precise placement, then gather them into a high or mid-height pony with dramatically slicked-down edges. This is the style that reads as intentional grooming meets natural texture.
The Polished Edge Factor
The sleek edges elevate what could be a casual natural hair style into something that works for professional settings, special occasions, or simply when you want to look put-together. The contrast between the textured knots and the smooth, defined edges creates visual sophistication. This style works particularly well for people who love the sculptural beauty of Bantu knots but want to position them in a more formal context.
Creating the Sleek Finish
- Create smaller Bantu knots (roughly postage-stamp sized) throughout your head for defined visual detail
- Focus on clean, straight sections when creating your knots so your base pattern is visually organized
- Gather knots into a sleek, high pony at your crown
- Use edge control or a smoothing cream along your hairline, creating a defined line that frames your face and emphasizes the polish of the style
- Smooth your parting line if desired, creating a sharp division that guides the eye
Worth knowing: Edge control should be applied lightly; heavy application can flake or look cakey, which defeats the polished aesthetic you’re going for.
9. The Mohawk Bantu Knot Stripe
Create a stripe of Bantu knots down the center of your head, leaving the sides unraveled, unbraided, or lightly twisted. Gather the center stripe into a center-back ponytail, allowing the side sections to frame your face.
The Bold Statement Quality
This style gives off genuine confidence and artistic flair. The Bantu knot stripe reads as intentional and deliberate—you’re not trying to cover your entire head with knots, but rather making a clear statement about texture and style. The side sections can be curls from undoing loose twists, coils from being unraveled, or simply smooth sections if you’ve slicked them down, creating a striking contrast.
Building Your Stripe
- Create a clear center part from your hairline all the way to your nape
- Create Bantu knots only in the center section, making them medium to large-sized so the visual impact is clear
- Style the side sections according to your preference—they can remain loosely curled, can be twisted, or can be smoothed
- Gather only your center knots into a ponytail, allowing them to extend down your back
Creative variation: You can also create this stripe off-center for an asymmetrical aesthetic that feels even more artistic.
10. The Cascading Knot Fall Pony
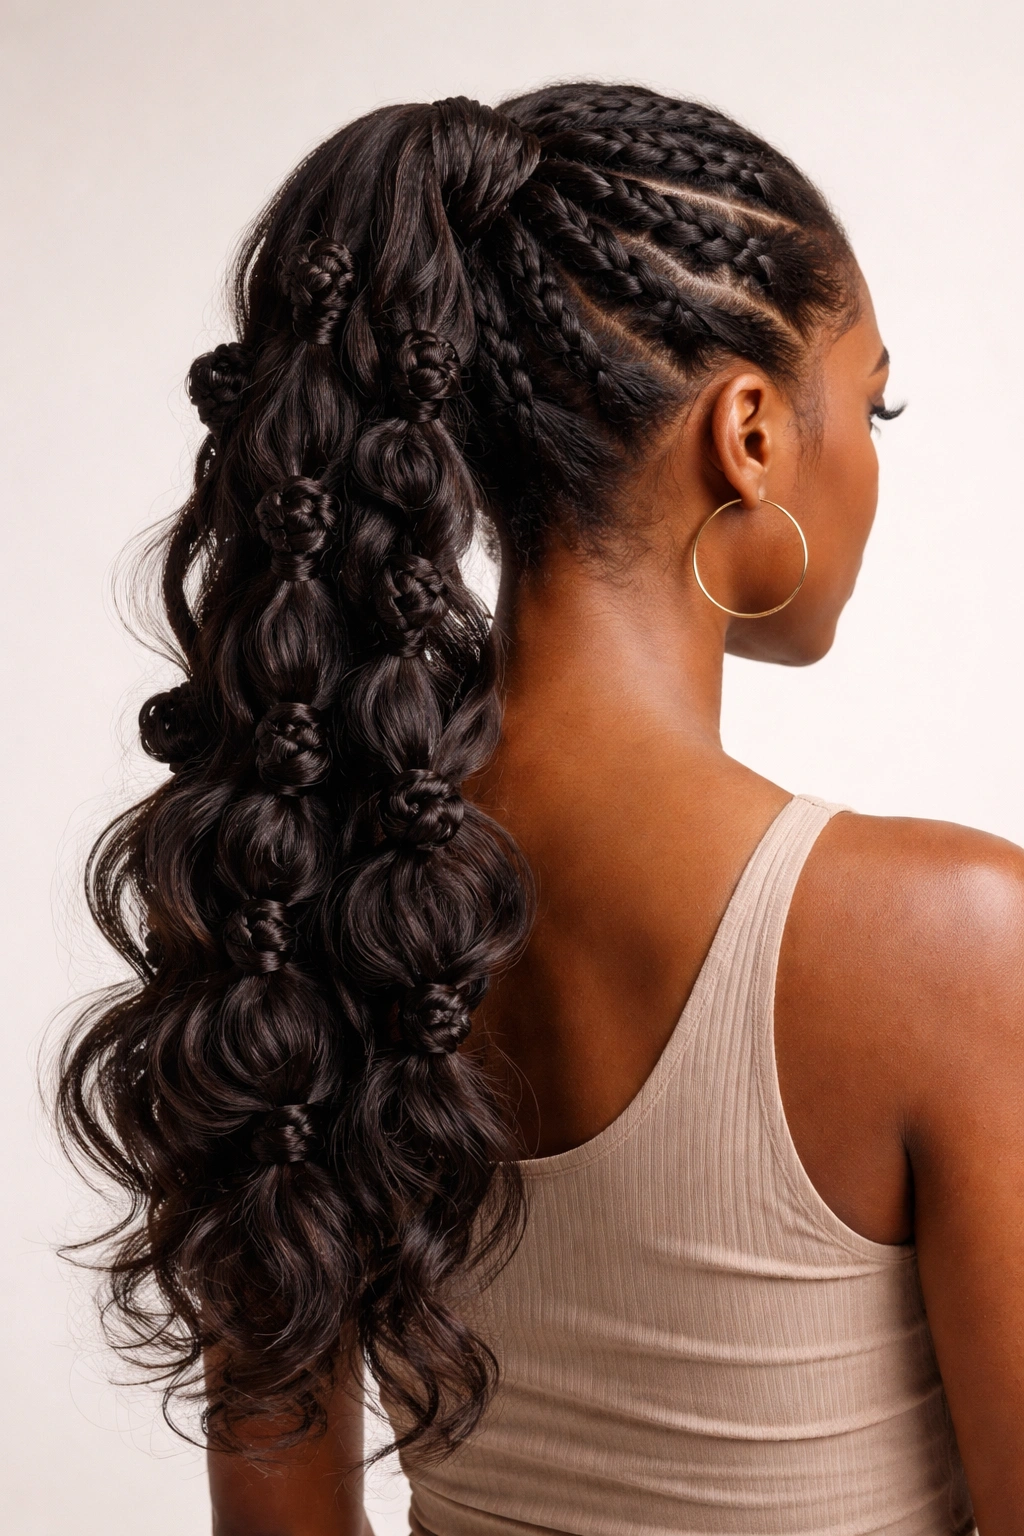
Rather than gathering all your Bantu knots tightly at the base, secure them loosely so they fall and cascade down your back, with the structured knots creating visual texture against your body.
The Romantic Texture Element
The cascading knot approach embraces the romantic, flowing potential of a pony while keeping the protective, structural elements of Bantu knots. The knots don’t all hit at exactly the same length—some fall longer, some are slightly shorter—which creates a dimensional, lived-in quality that’s genuinely beautiful. This is the approach to choose if you want your ponytail to look intentional but not overly geometric or structured.
Loose Gathering Technique
- Create your Bantu knots with slightly softer tension than you would for a tightly secured pony—you want them secure at the root but not aggressively compressed
- Gather all knots at your preferred height (high, mid, or low depending on your aesthetic)
- Secure with an elastic, but don’t pull the gathered section tight; instead, allow it to sit loosely so knots maintain their individual dimensionality
- The knots fall and flow naturally from this loose gathering point
Insider tip: This style works particularly well if you sleep in a silk or satin bonnet, as the fabric helps your knots maintain their shape and cascading quality.
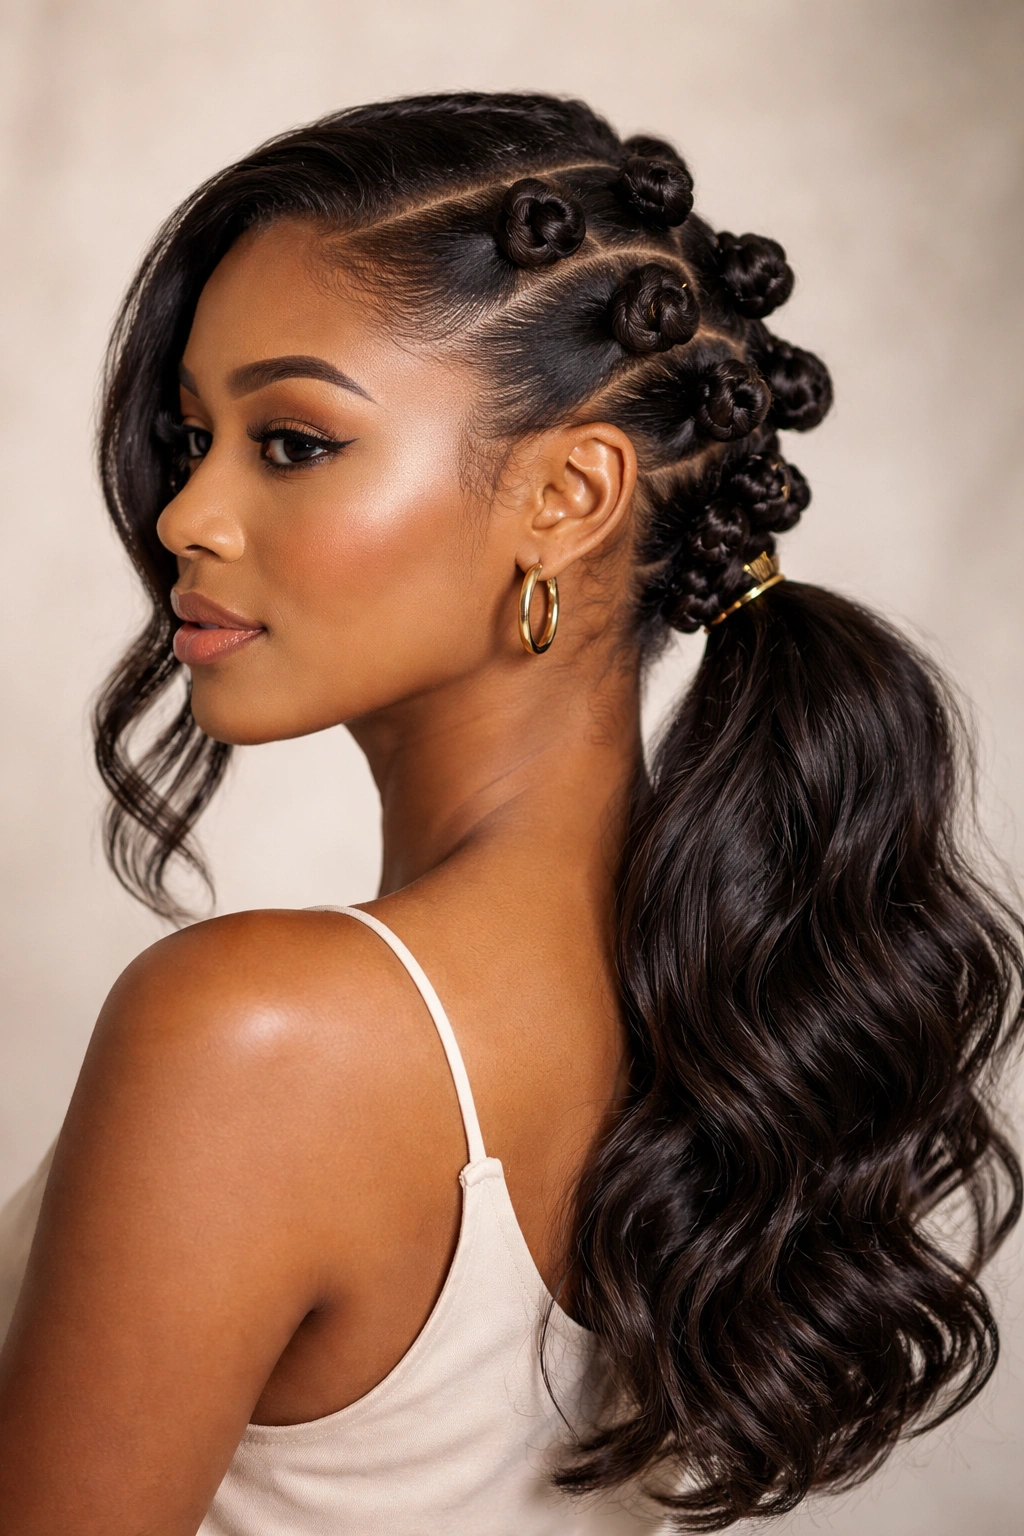
11. The Half-Up Bantu Knot Hybrid
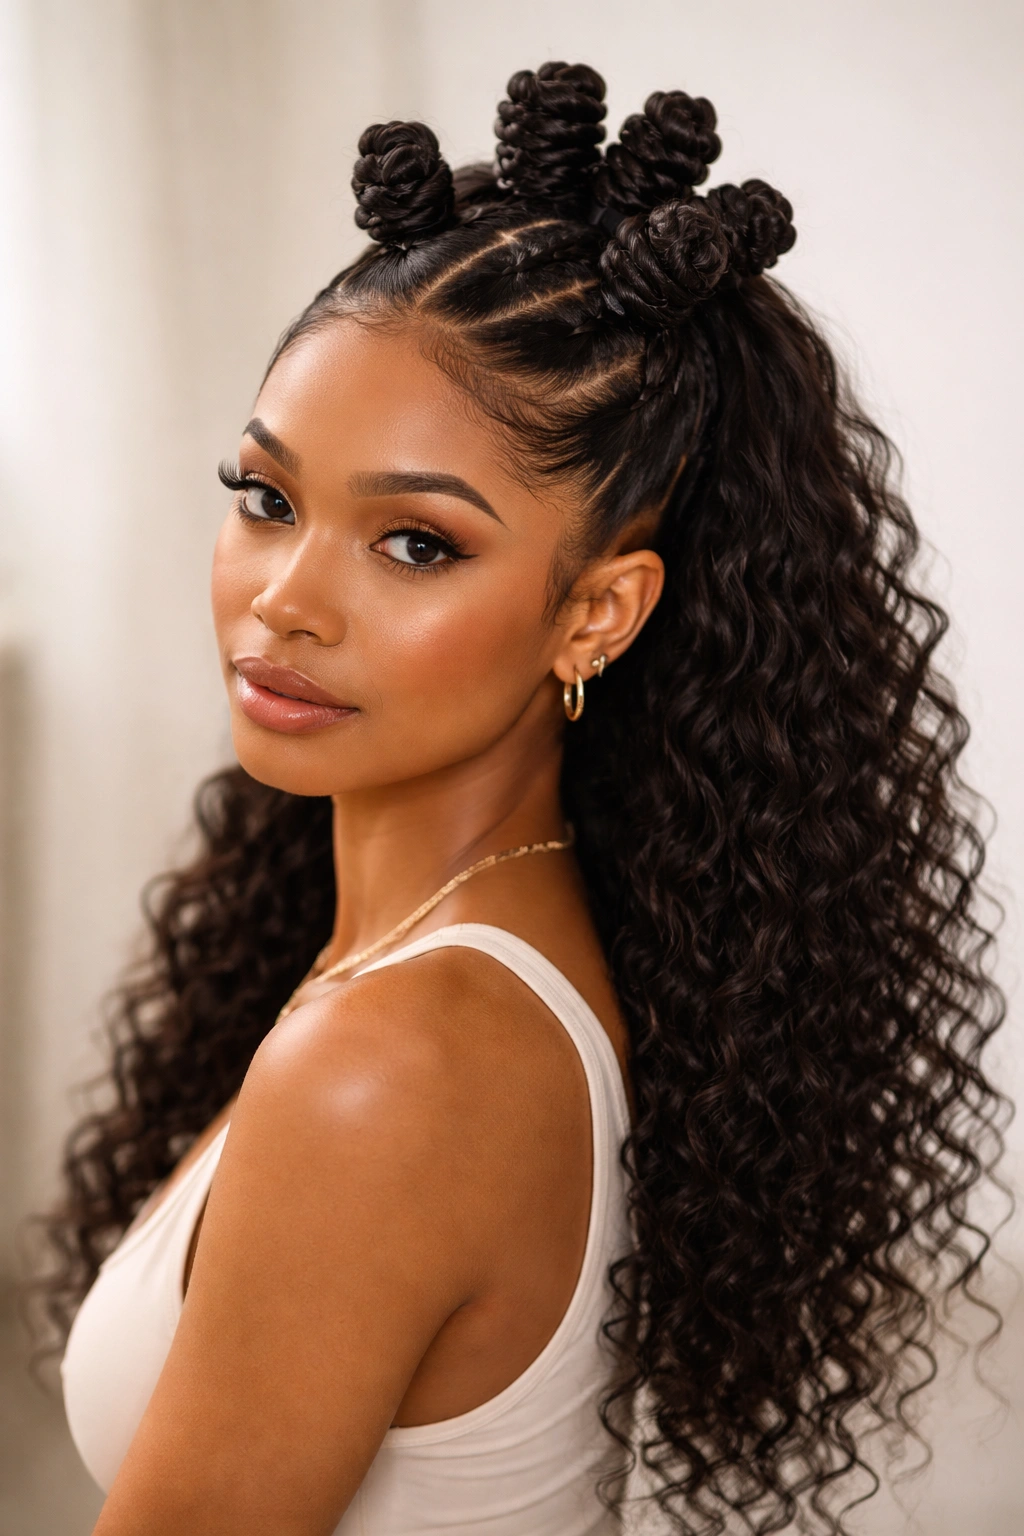
Create Bantu knots only in your top half, leaving the bottom half as unraveled, loose texture, and then gather only the top knots into a half-up ponytail. This approach is genuinely versatile—you can wear it as is, or unravel the top knots for a different look later.
The Versatility Factor
The half-up style is perfect for people who want the protective benefits of Bantu knots without committing to the full style. You get the protected, knotted sections in a higher-manipulation area of your head (crown, where you might tend to touch and manipulate), while your lower sections remain free and curly. This approach also creates legitimate style variety: wear it as a half-up pony one day, then unravel the knots the next day for a completely different texture.
Strategic Sectioning
- Create Bantu knots starting from your hairline and going back to approximately mid-crown
- Leave the bottom half of your hair completely alone—or lightly moisturize and define any existing curl pattern
- Gather only your knotted sections into a half-up pony at the crown, securing with an elastic
- The unraveled sections flow freely below
Technical benefit: This approach is genuinely easier to maintain overnight, as you’re protecting fewer total knots and don’t need to sleep with your entire head bound in a bonnet.
12. The Pendant Pony with Bantu Base
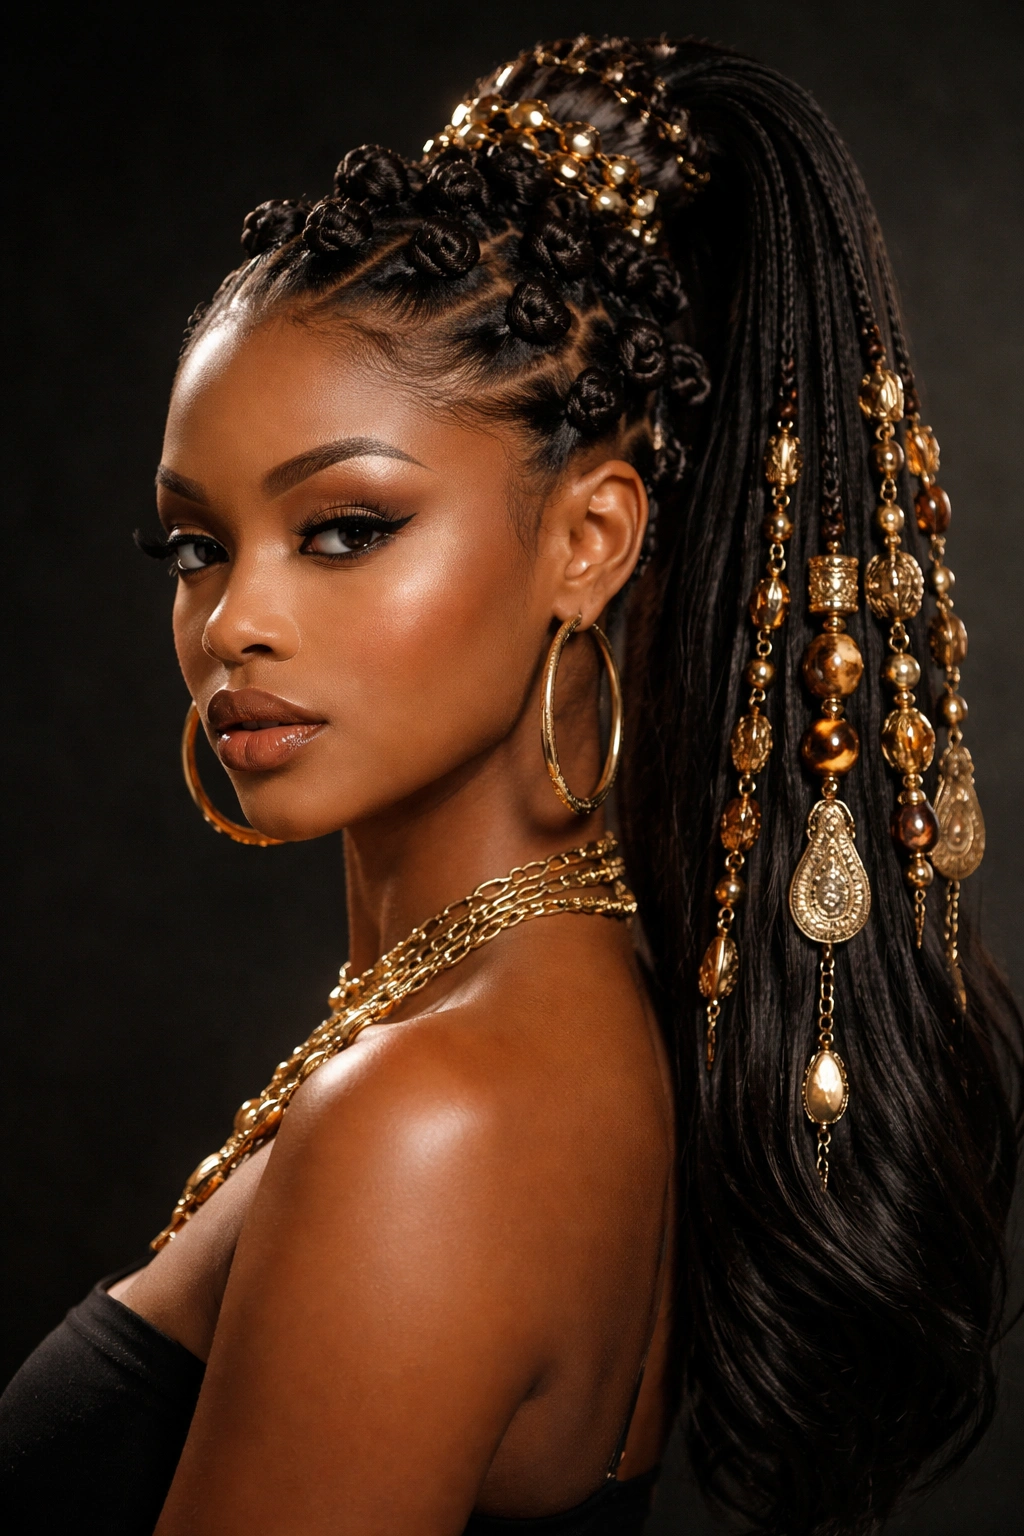
Create small, detailed Bantu knots, gather them into a secure base, then layer additional hair or add hair jewelry, beads, or decorative elements that dangle from the ponytail. This turns your knot pony into a genuine accessory statement piece.
Elevating Through Ornamentation
Bantu knots are already visually significant, but adding layered elements—whether that’s sleek unraveled curls underneath the knots, cascading braids, golden hair cuffs, cowrie shells, or beaded extensions—transforms them into something truly special. This is the style for occasions where you want your hair to be a focal point, or for creative self-expression through styling.
Layering Your Elements
- Create your Bantu knot base using small sections for maximum visual detail and density
- Gather knots securely into your preferred ponytail height
- Layer additional elements beneath or around the knot base: smooth curls can flow from underneath, decorative cuffs can accent the knots, or you can add temporary hair extensions that flow from the ponytail
- The effect is that your knots serve as the structural, sculptural element while additional details add movement and dimension
Important note: If adding beads or jewelry, ensure everything is secure before wearing, and avoid anything that pulls excessively on your knots or creates uncomfortable tension.
Setting Your Bantu Knots for Maximum Longevity
The way you allow your knots to dry fundamentally affects how long they’ll hold their shape and how defined they’ll appear. Damp knots that dry naturally last longer than completely dry knots that are created fresh, because the setting process allows the knots to lock into their shape as moisture evaporates. If you create your knots in the evening and sleep in a silk bonnet, by morning they’ll have partially set and will maintain shape much longer throughout your day. Complete drying takes 8-12 hours depending on your hair thickness and knot size, but partial setting (3-4 hours) is enough to provide decent hold for 2-3 days.
Air drying is genuinely the ideal method if you have time, but a hooded dryer on a low to medium setting works beautifully too. The heat helps lock in the twist, and the enclosed space keeps everything moving toward uniform dryness. Avoid high heat, which can damage your hair and cause knots to frizz rather than set smoothly.
Once your knots are completely dry, they’ve achieved maximum hold. This is when they look their absolute best and are most resistant to unraveling, making it the ideal time to photograph them or wear them in situations where they’ll receive a lot of handling or movement.
Maintaining Your Knots Throughout the Week

Bantu knots are genuinely low-maintenance once they’re created, but a few strategic actions extend their life significantly. Nightly moisturizing is crucial—use a light water-based spray to lightly mist your knots before bed, which keeps your hair from drying out and maintains the knot structure. A silk or satin bonnet is your best friend here; it reduces friction, prevents frizz, and keeps everything protected while you sleep.
Every 2-3 days, gently smooth your knots with a light oil or moisturizing cream, working from root to tip. This prevents dryness, reduces frizz, and reinforces the knot structure. Avoid heavy oils that accumulate and weigh knots down; instead choose lightweight options like jojoba oil, argan oil, or almond oil. A light leave-in conditioner mixed with water in a spray bottle works beautifully too.
Refresh your edges if needed by reapplying edge control around your hairline. Even if the rest of your knots are holding strong, edges can occasionally shift or frizz, and a quick touch-up with edge control keeps your overall style looking intentional.
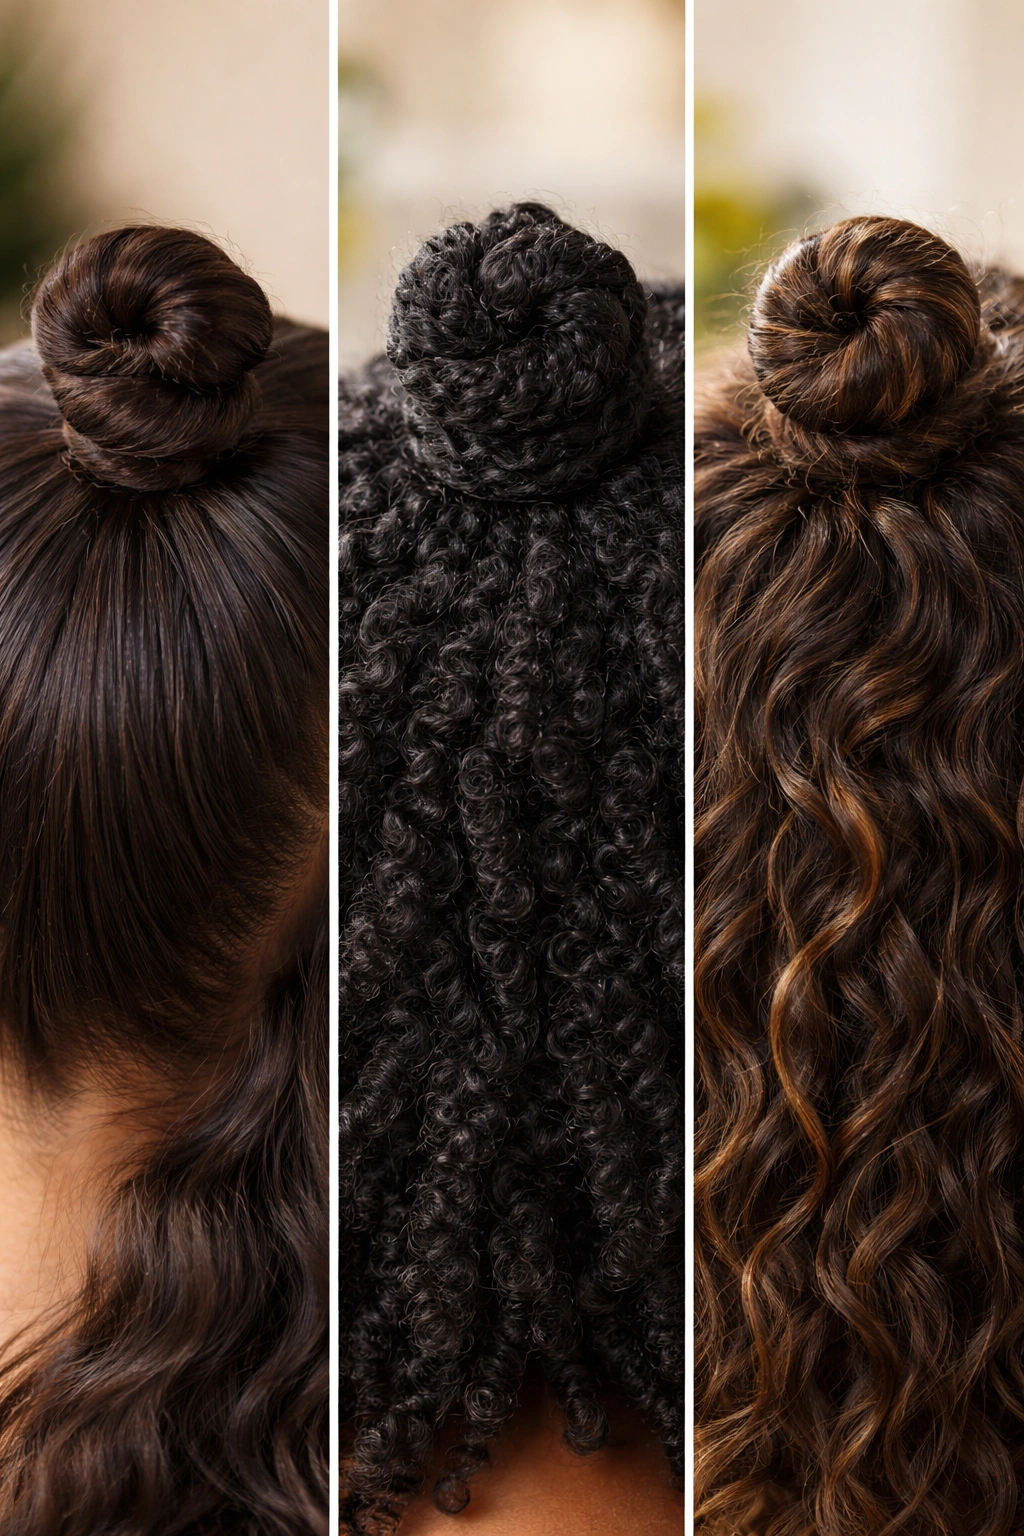
When to Unravel and What to Expect
The moment you decide to unravel your Bantu knots, you’re unveiling what’s essentially weeks of hair growth and texture development. If your knots were small and tight, unraveling creates the most dramatically defined, long-lasting curls. If your knots were larger and looser, unraveling reveals softer, more flowing waves. Either way, you’re getting extended curl definition that will last 5-7 days or longer, depending on your hair texture and how much moisture you maintain throughout.
Unraveling slowly and deliberately helps prevent breakage and preserves the curl definition. Starting at the end of each knot, gently unwind rather than pulling. If a knot feels stuck, apply a bit of leave-in conditioner to create slip and try again—never force an unraveling, as this can snap your hair.
Once fully unraveled, don’t be surprised if your curls look slightly tighter or wavier than you remember. This is literally the texture your hair naturally wants to form when given the space to do so. You can separate curls with your fingers if you prefer a more defined, individual-curl appearance, or you can leave them combined for a more voluminous, wavy aesthetic.
Final Thoughts
Bantu knot ponytails represent the perfect convergence of protective styling, cultural celebration, and genuine beauty. Whether you choose the bold statement of a high-pony approach, the elegant simplicity of a side sweep, or the artistic complexity of braided and twisted variations, you’re engaging with a styling technique that’s rooted in your hair’s natural pattern and needs. These styles protect while you sleep, wear comfortably throughout your day, and deliver results that genuinely improve over time as your knots set and your curls develop definition.
The best Bantu knot pony style for you depends on your hair texture, your lifestyle, and honestly what draws you aesthetically. Start with whichever variation speaks to you most strongly, and then experiment with variations once you’ve found your rhythm. Your hands will learn the technique, your timing will improve, and each styling session will take less time and deliver better results. That’s not just the promise of Bantu knots—it’s the actual lived experience of people who’ve embraced them as part of their regular styling rotation. This is a technique worth investing in, both for the immediate beauty and for the long-term health and strength of your natural hair.