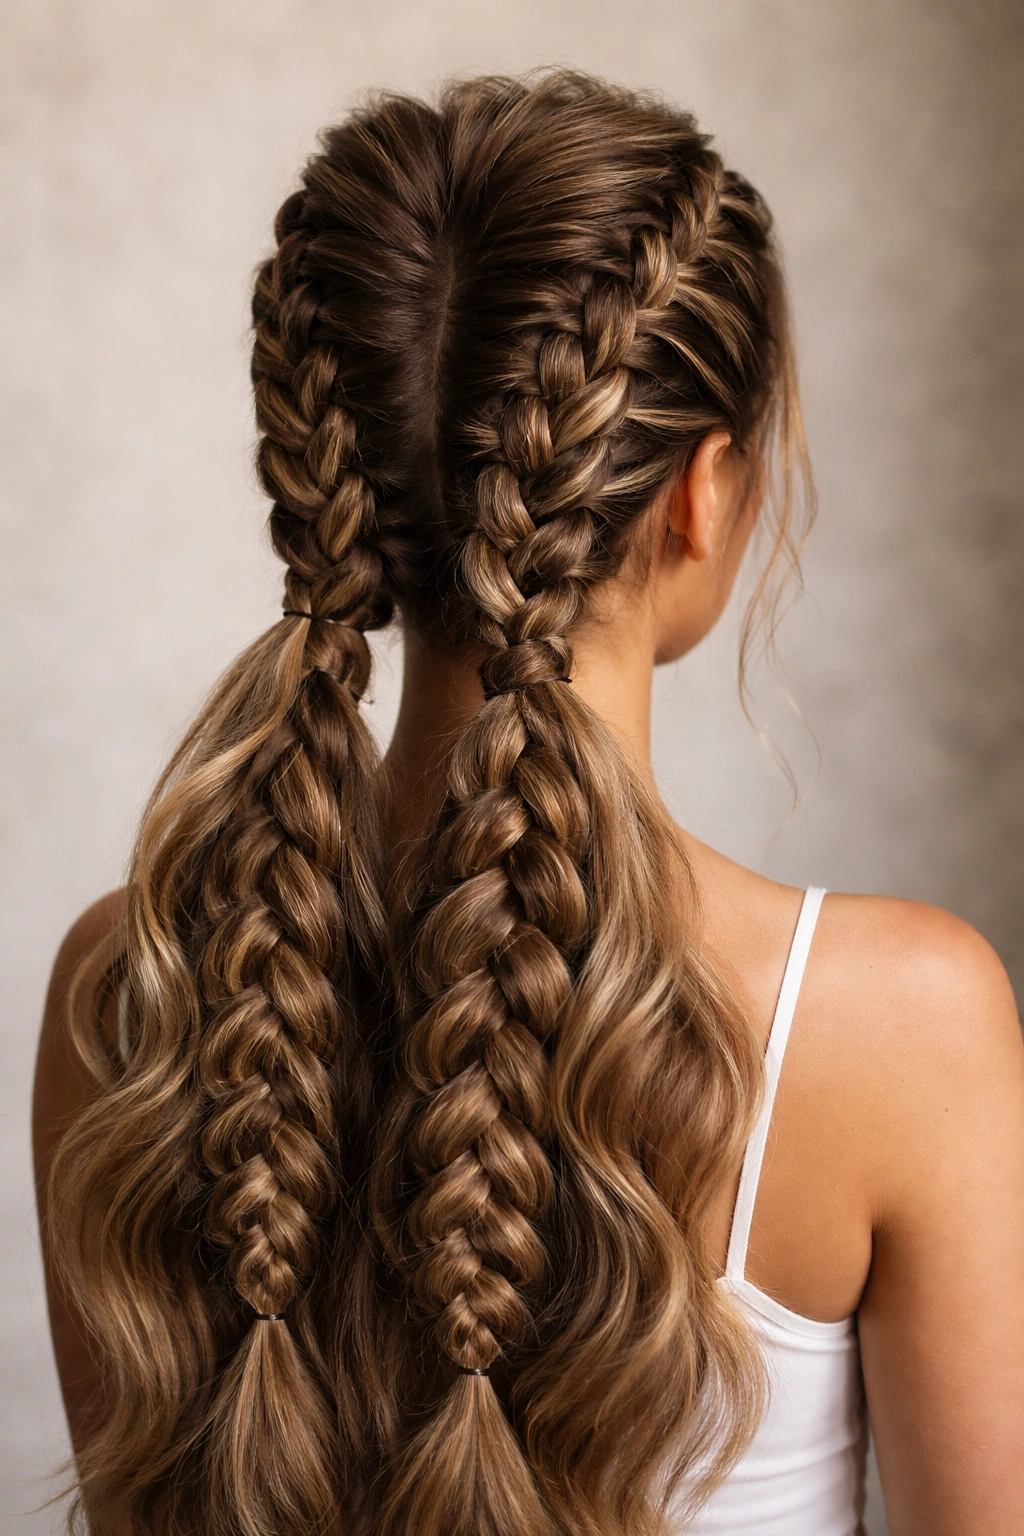
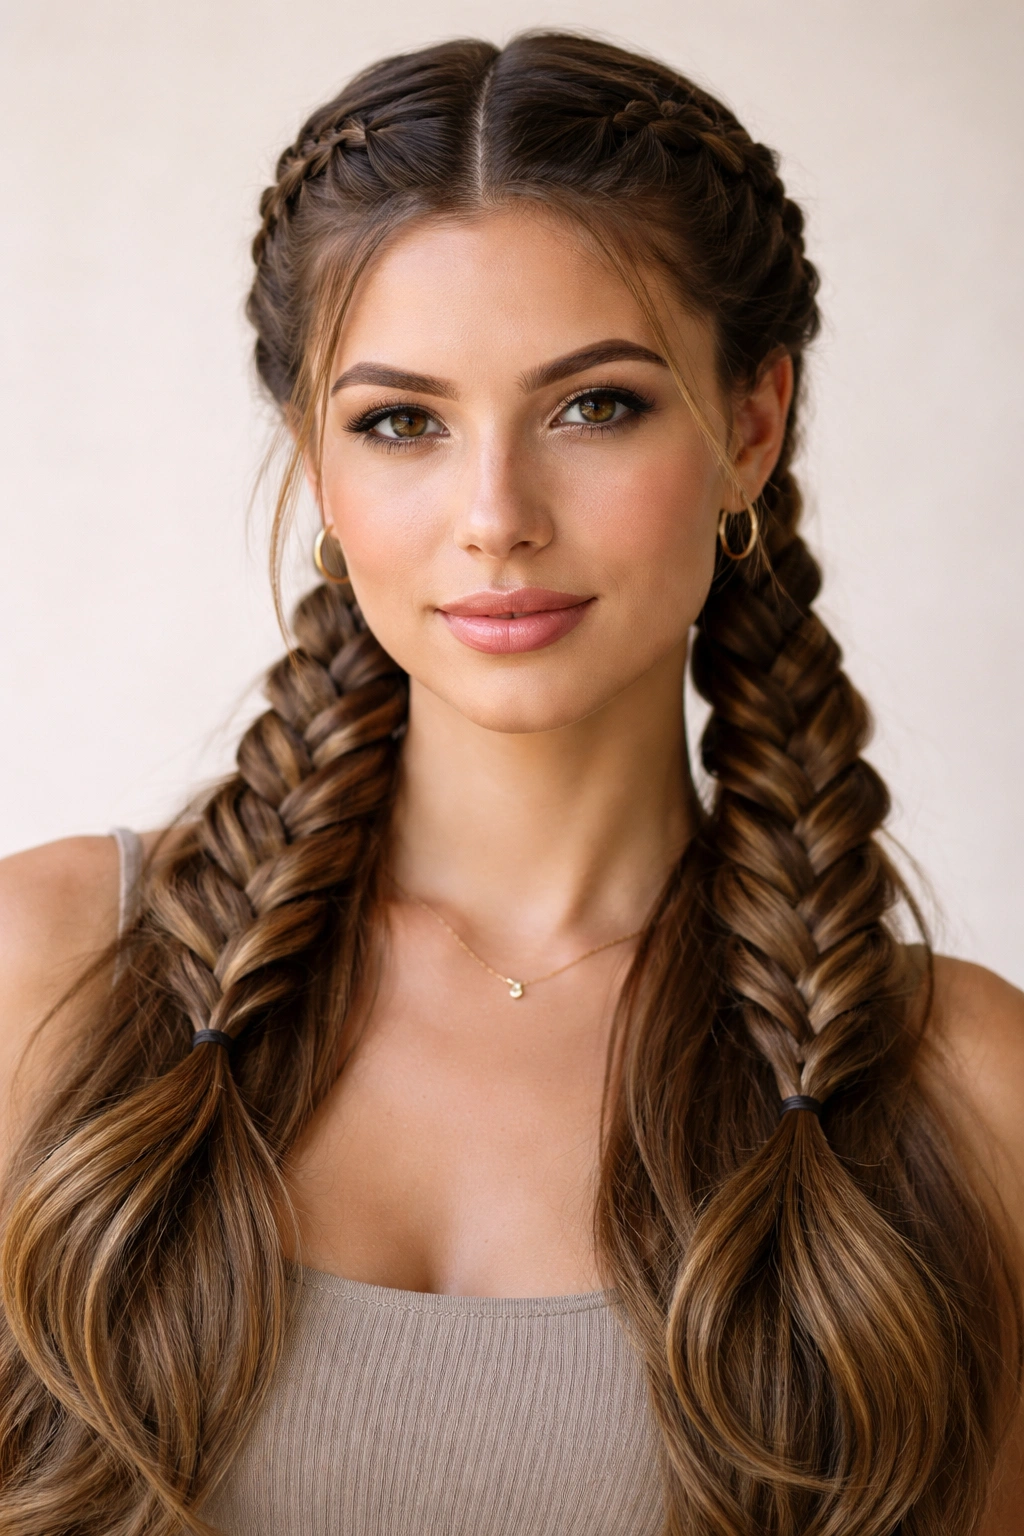
Double dutch braids aren’t just for little kids anymore—they’re one of the most flattering and practical hairstyles for thick hair, and honestly, they might be the solution you’ve been searching for if you’re tired of fighting with your volume. When you have thick hair, styling options can feel limited because regular ponytails get too heavy, regular braids feel bulky, and trying to wrangle everything into a sleek style takes forever. Double dutch braids solve that problem beautifully: they distribute your hair’s weight across two sections instead of cramming it all into one, they look polished enough for work or events, and they actually stay put all day without slipping or coming loose.
The real magic of double dutch braids is that they work with your hair’s natural thickness instead of against it. Because thick hair has more volume and density, those braids actually look fuller, more textured, and more intentional than they would on finer hair types. The braids add visual interest and structure while keeping everything off your face and neck—especially valuable during warmer months or if you’re dealing with flyaways. Plus, there’s something deeply satisfying about having a hairstyle that’s both effortlessly cool and genuinely functional.
What makes double dutch braids work so well in a ponytail is the versatility. You can dress them up or down, adjust the tightness based on your plans for the day, and combine them with other elements like texture, ribbons, or creative finishes to make them completely your own. Whether you’re heading to the gym, the office, a dinner date, or just want something that looks intentional without looking like you spent three hours styling, double dutch braid ponytails deliver. Let’s explore twelve distinct versions that showcase exactly why this style has become such a favorite for people with thick, voluminous hair.
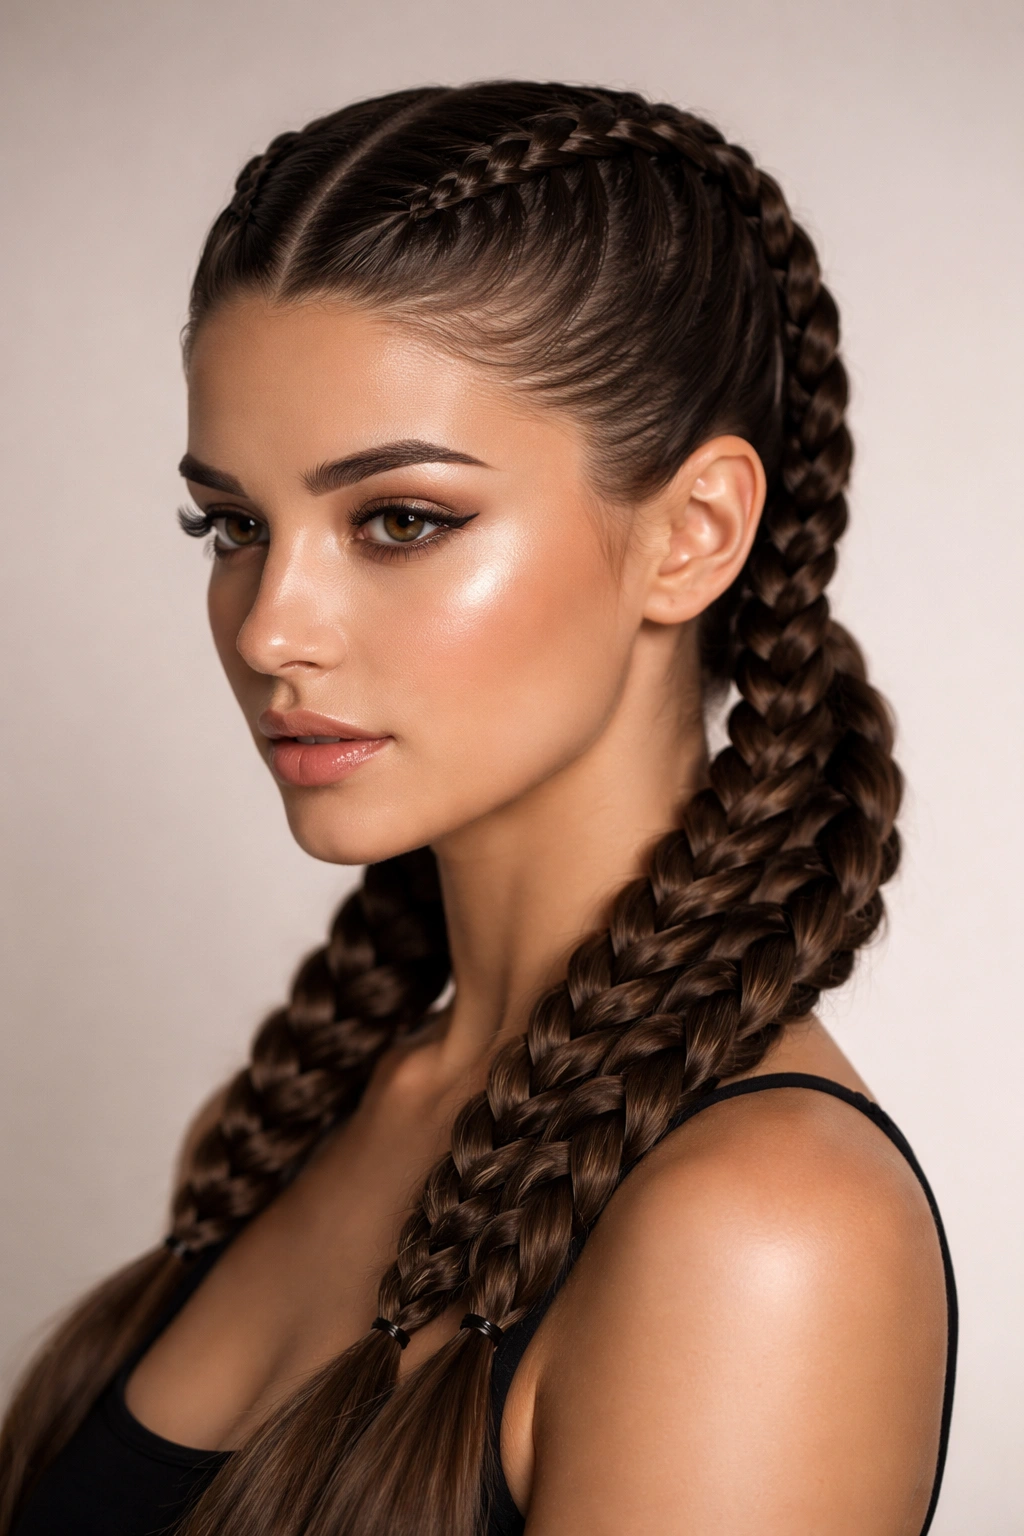
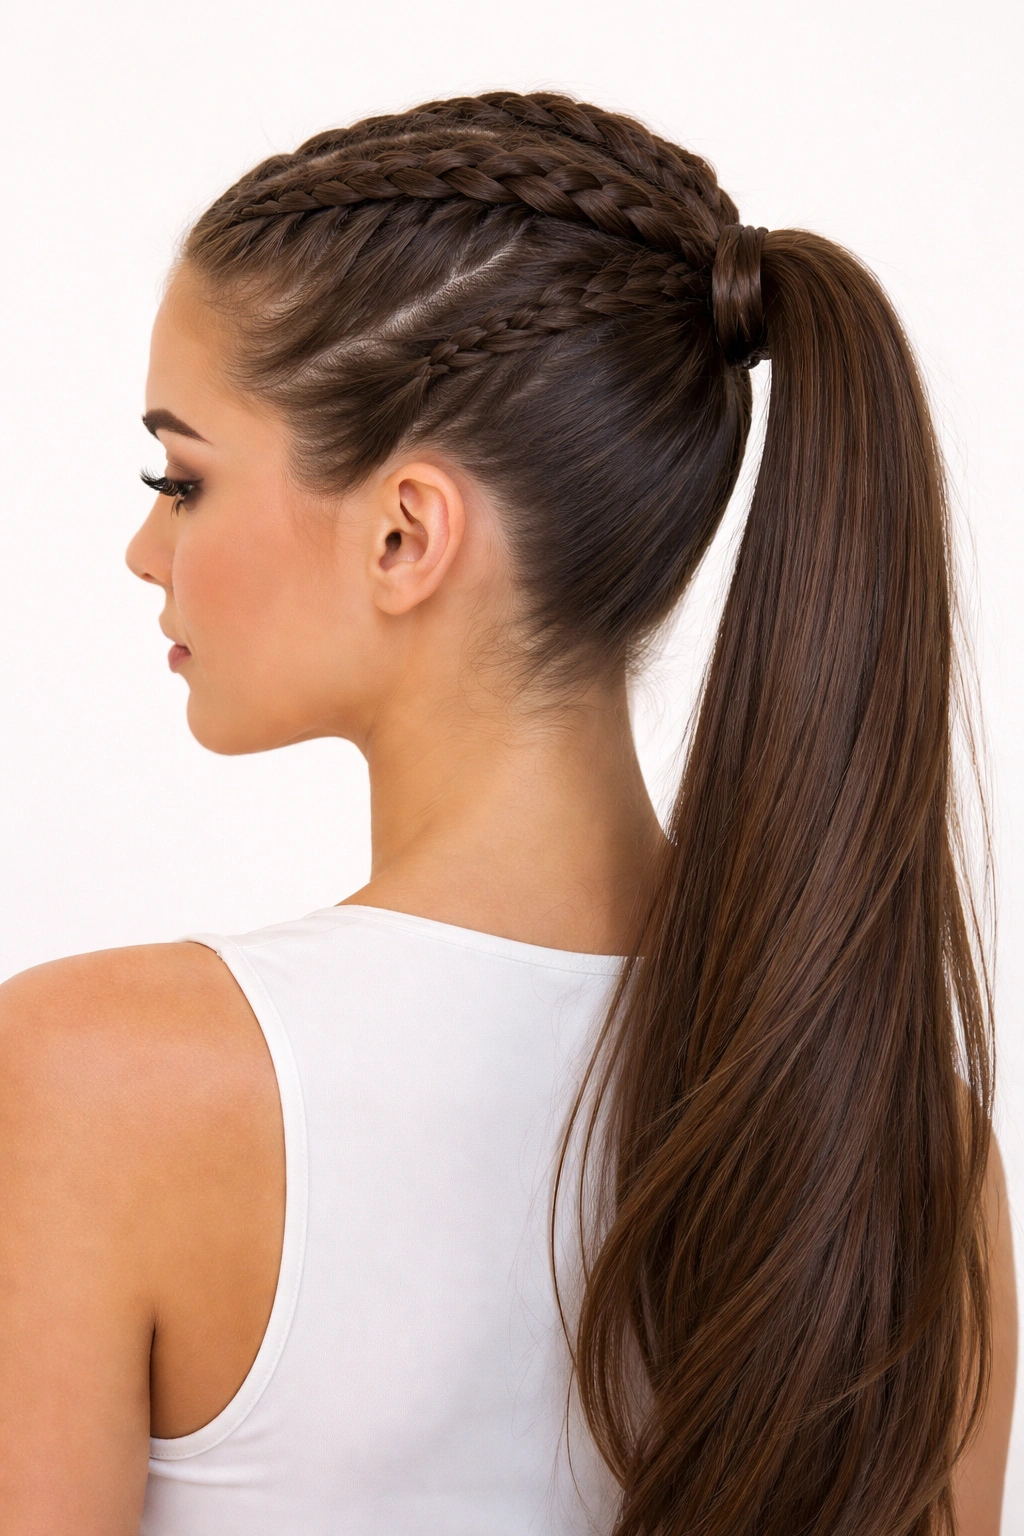
1. Classic Center-Parted Double Dutch Braids
This is the foundational version that works for virtually any occasion, and it’s the perfect starting point if you’re new to double dutch braids. You’ll part your hair down the middle from your forehead to the nape of your neck, creating two equal sections, then braid each side using the Dutch braiding technique (where you cross sections under instead of over) and secure both braids into a low ponytail at the base of your neck. With thick hair, this style gets immediate texture and presence—the braids automatically look voluminous and defined without any extra work.
Why This Foundation Style Matters
The center part is intentionally balanced and classic, which means it suits almost every face shape and every setting. Because you’re working with two separate braids coming down from the crown, the style feels structured and put-together, yet the Dutch braid technique creates visual movement and softness that keeps it from looking too formal or rigid. For thick hair specifically, the dual-braid approach prevents that weighted-down feeling you’d get from a single thick braid.
How to Perfect Your Technique
- Start your braids at the hairline on each side, pulling the Dutch braiding technique tight enough to feel secure but loose enough that the braid sits beautifully against your head
- Angle your braids slightly inward as you work down—this naturally guides them toward your center ponytail point and looks more intentional
- Use a fine-tooth comb to smooth any loose pieces or flyaways before you secure the ponytail, especially important with thick hair
- Gather both braids into a ponytail roughly 2 inches above your nape for a low, professional look
Pro tip: If your hair is particularly thick, use a medium-sized elastic for the ponytail rather than a tiny one—it distributes pressure more evenly and prevents breakage.
2. Sleek Pulled-Back Double Dutch Braids with Slicked Crown
This version prioritizes a smooth, polished appearance by slicking back your crown and hairline before you start braiding, giving you that high-fashion editorial look that photographs beautifully and looks sharp enough for any professional setting. You’ll apply a smoothing gel or light pomade to your hairline and the crown area, comb everything back tightly, then create your double dutch braids and secure them into a ponytail. The smoothed-back effect contrasts dramatically with the texture of the braids, creating visual interest and dimension.
Why Slicked Styles Suit Thick Hair
Slicking back thick hair actually works better than on finer hair types because the gel holds more securely against the volume and weight of your strands, and the defined, geometric appearance of the braids pops more against the smooth crown. This version feels intentional and fashion-forward—it’s the kind of style that says you have your life together, even if you threw it together in fifteen minutes on a Tuesday morning.
The Slicking Technique That Actually Works
- Apply a lightweight smoothing gel or water-based pomade to damp hair, starting at your hairline and working back toward your crown
- Use a fine-tooth comb or boar-bristle brush to distribute the product evenly and smooth everything back against your head
- Blow-dry this area with your comb to lock the smooth finish in place before you begin braiding
- Keep braids looser than usual when you’re working with a slicked crown—the contrast between smooth and textured is what makes this version visually compelling
Worth knowing: This style holds best on day-two hair or when you apply the gel to slightly damp hair rather than soaking wet hair, which gives the product better grip.
3. High Ponytail Double Dutch Braids
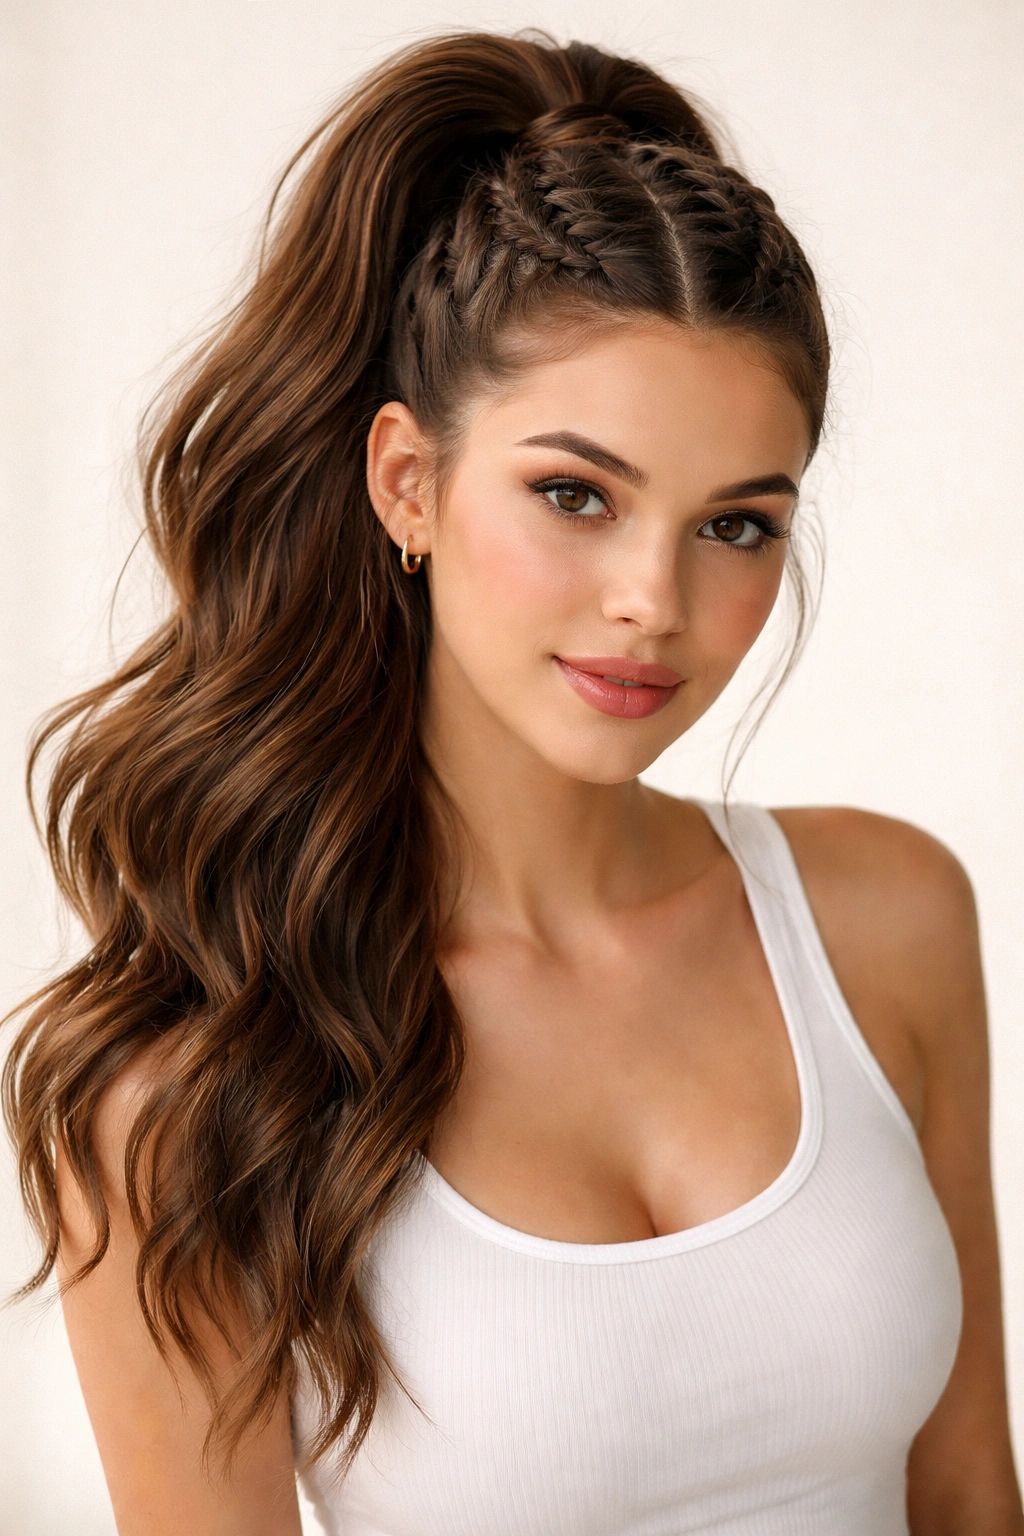
Instead of gathering your braids at the nape of your neck, this version brings them together at the crown or just above, creating a youthful, energetic silhouette that’s perfect for active days, gym sessions, or when you want to show off your face fully. You’ll create your double dutch braids with more volume and let them sit higher on your head, then secure everything into a high ponytail that’s statement-making and confident. The high position automatically makes you look taller and more poised, and with thick hair, those braids have serious visual impact from every angle.
Where the Height Actually Matters
High ponytails with double dutch braids work especially well for thick hair because you’re using the weight of your hair to create that pulled-back effect, and the height actually makes the whole style feel lighter and more intentional. This version is ideal if you have a longer face shape because the height balances proportions beautifully, and it’s undeniably practical for any activity where you want your hair completely secured and off your shoulders and neck.
Creating Height and Movement
- Start your braids at the crown rather than the hairline, using the Dutch technique with slightly looser sections to create texture and visual volume
- Angle the braids back and upward as you work, braiding toward the crown where you’ll eventually secure the ponytail
- Don’t pull the braids too tightly—with thick hair, a little looseness makes them look fuller and more intentional
- Secure your ponytail higher than you might normally, closer to the crown of your head rather than behind your ears
Pro tip: Use a decorative hair elastic in a color that matches your hair rather than a clear one—it creates a more intentional, styled appearance in your high ponytail.
4. Double Dutch Braids with Wrap-Around Finish

This refined version takes your double dutch braids and wraps a section of hair from the ponytail around the elastic, completely hiding it and creating a seamless, polished finish that elevates the entire look. You’ll create your braids as usual, secure them into a ponytail, then pull out a small section of hair from the ponytail and wrap it around the elastic, pinning it in place underneath. It’s an extra thirty seconds of work that transforms the style from casual to intentionally elegant.
Why the Wrap-Around Details Matter
The wrapped elastic technique removes the visual interruption of the rubber band, which makes the whole style feel more refined and complete. For thick hair, this detail actually helps anchor the ponytail and prevents it from shifting throughout the day—the wrapped section acts like an additional securing mechanism while looking completely intentional and styled. This is the version you reach for when you want a style that looks like you spent real effort, even if you didn’t.
Executing the Wrap-Around Perfectly
- Before securing your ponytail elastic, pull out a thin section of hair from one side of your braids (roughly 1 inch wide)
- Secure your main ponytail with the elastic, leaving that thin section out
- Wrap the thin section around the base of the ponytail, covering the elastic completely
- Use a bobby pin to secure the wrapped section underneath the ponytail, hidden from view
- Make sure the pin sits in the center so it’s completely invisible
Worth knowing: This technique works best when you leave out your wrap section before securing the main ponytail, rather than trying to pull out a section afterward—it gives you better control and a more polished result.
5. Textured Double Dutch Braids with Intentional Looseness
Instead of pulling your braids tight, this version celebrates looseness and lived-in texture by creating a more relaxed braid pattern, then gently pulling at the sides of each braid to increase volume and create that effortlessly beautiful, undone appearance. You’ll braid each side with looser, more generous sections, then massage the braids outward to create dimension, resulting in a style that looks romantic, textured, and intentionally undone. This is the hairstyle version of that perfect messy bun aesthetic.
Why Loose Braids Flatter Thick Hair
Loose, textured braids are actually easier to create with thick hair because your volume naturally makes them look fuller and more intentional—you can’t accidentally make them look too thin or stringy the way you might with finer hair. The textured version feels modern, effortless, and appropriate for both casual settings and surprisingly sophisticated occasions. It’s the kind of style that photographs beautifully and genuinely looks like you didn’t try too hard, even though you absolutely did.
Mastering the Textured Braid Technique
- Create your Dutch braids with looser, wider sections than you’d use for a sleek version
- As you braid, deliberately keep the tension light—aim for braids that feel secure but not tight
- Once both braids are complete and secured into your ponytail, gently pull each braid outward on both sides, starting at the crown and working down
- Pull gradually and adjust as you go, checking that the braids are expanding evenly and look intentionally textured rather than messy
- Stop when the braids have roughly doubled in width and create that soft, romantic texture
Pro tip: Work the texture into your braids while your hair is still slightly damp or after applying a light texturizing spray—this helps the braids hold their textured shape throughout the day.
6. Thick Double Dutch Braids with Contrasting Hair Clips or Cuffs
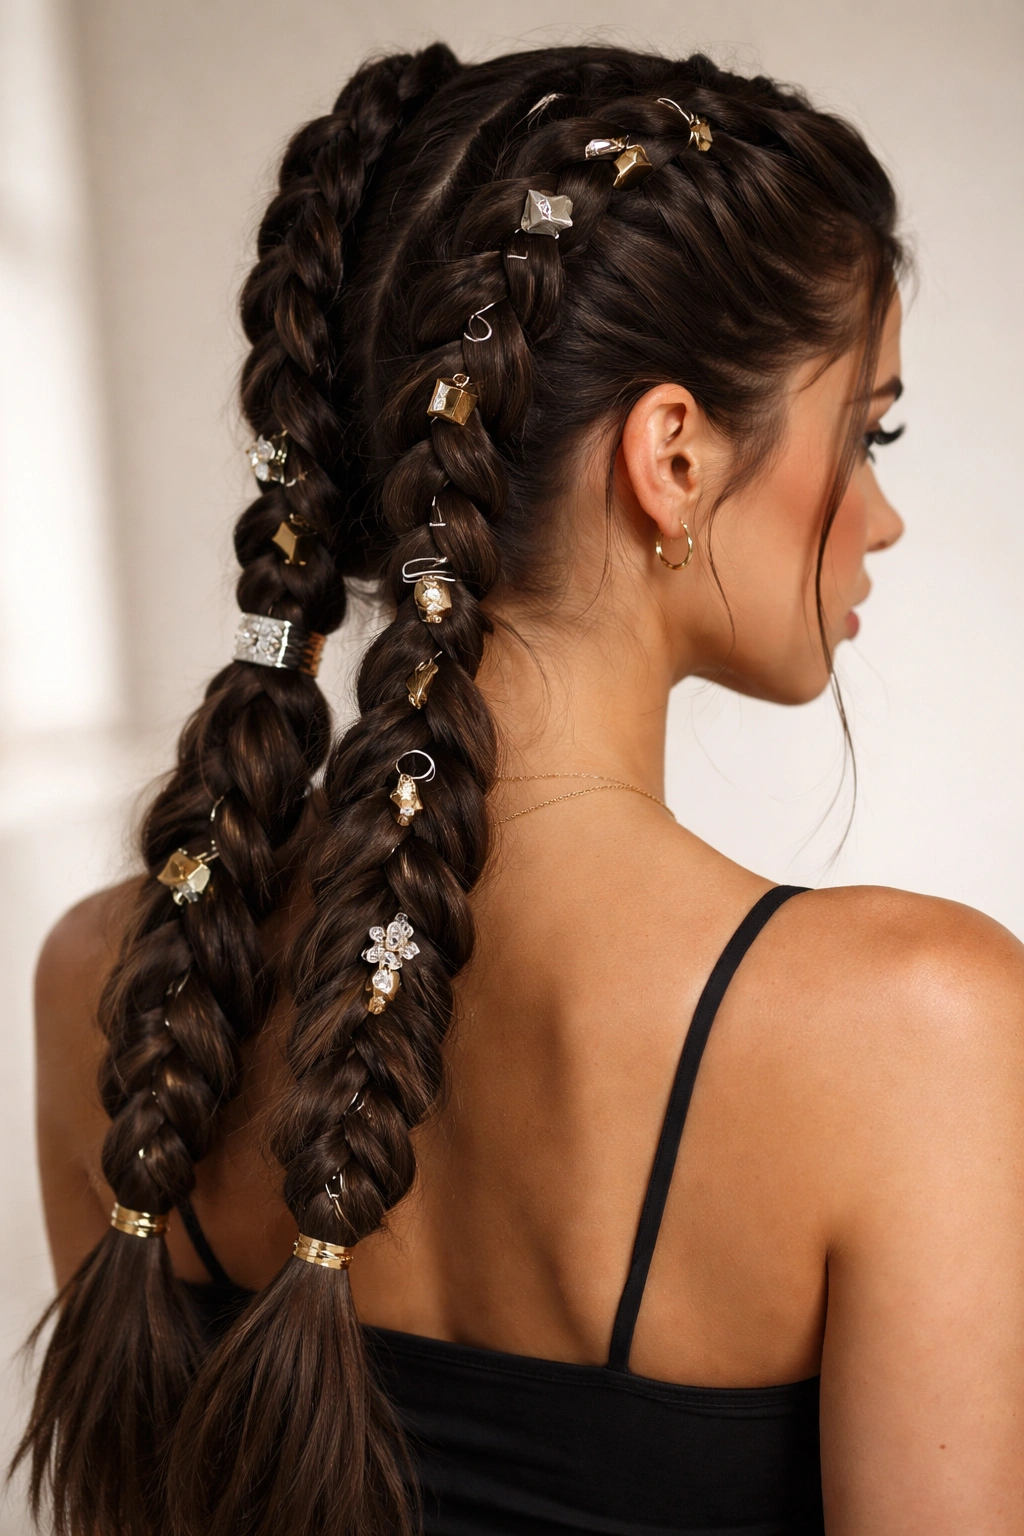
This version adds visual interest and personalization by incorporating decorative hair clips, metallic cuffs, or colored bands woven into or secured around your braids at intervals, creating a styled, intentional appearance that feels modern and fashion-forward. You can weave thin ribbons or decorative thread through your braids as you create them, or wrap metallic hair cuffs around the finished braids at your wrist height. Either approach adds dimension, color, and personality while working beautifully with thick hair’s natural texture.
Making Accessories Work with Your Braids
Thick hair actually provides the perfect canvas for hair accessories because the accessories sit visibly against your braid texture and don’t disappear into your hair the way they might with finer hair. This version is ideal for anyone who likes to express personality through style details, and it’s surprisingly versatile—metallic cuffs feel modern and edgy, ribbons feel romantic or playful depending on the color, and bands can coordinate with your outfit perfectly. It’s one of the easiest ways to transform a basic braid into something that feels completely personalized.
Incorporating Accessories Seamlessly
- If you’re weaving ribbon or thread through your braids, clip it to the starting point of each braid before you begin braiding, then weave it through as you work
- For hair cuffs or bands, apply them to finished braids by carefully opening the cuff, sliding it over your braid, and positioning it where you want it
- Space multiple accessories evenly—roughly every 2-3 inches of braid creates a balanced, intentional look
- Choose accessories that coordinate with your skin tone or outfit for a cohesive, polished appearance
Worth knowing: Hair cuffs, metal rings, and decorative bands all work beautifully with thick hair because they have something substantial to grip and look intentional rather than like they’re just sitting on top of your hair.
7. Dutch Braids with Braided Ponytail Extension
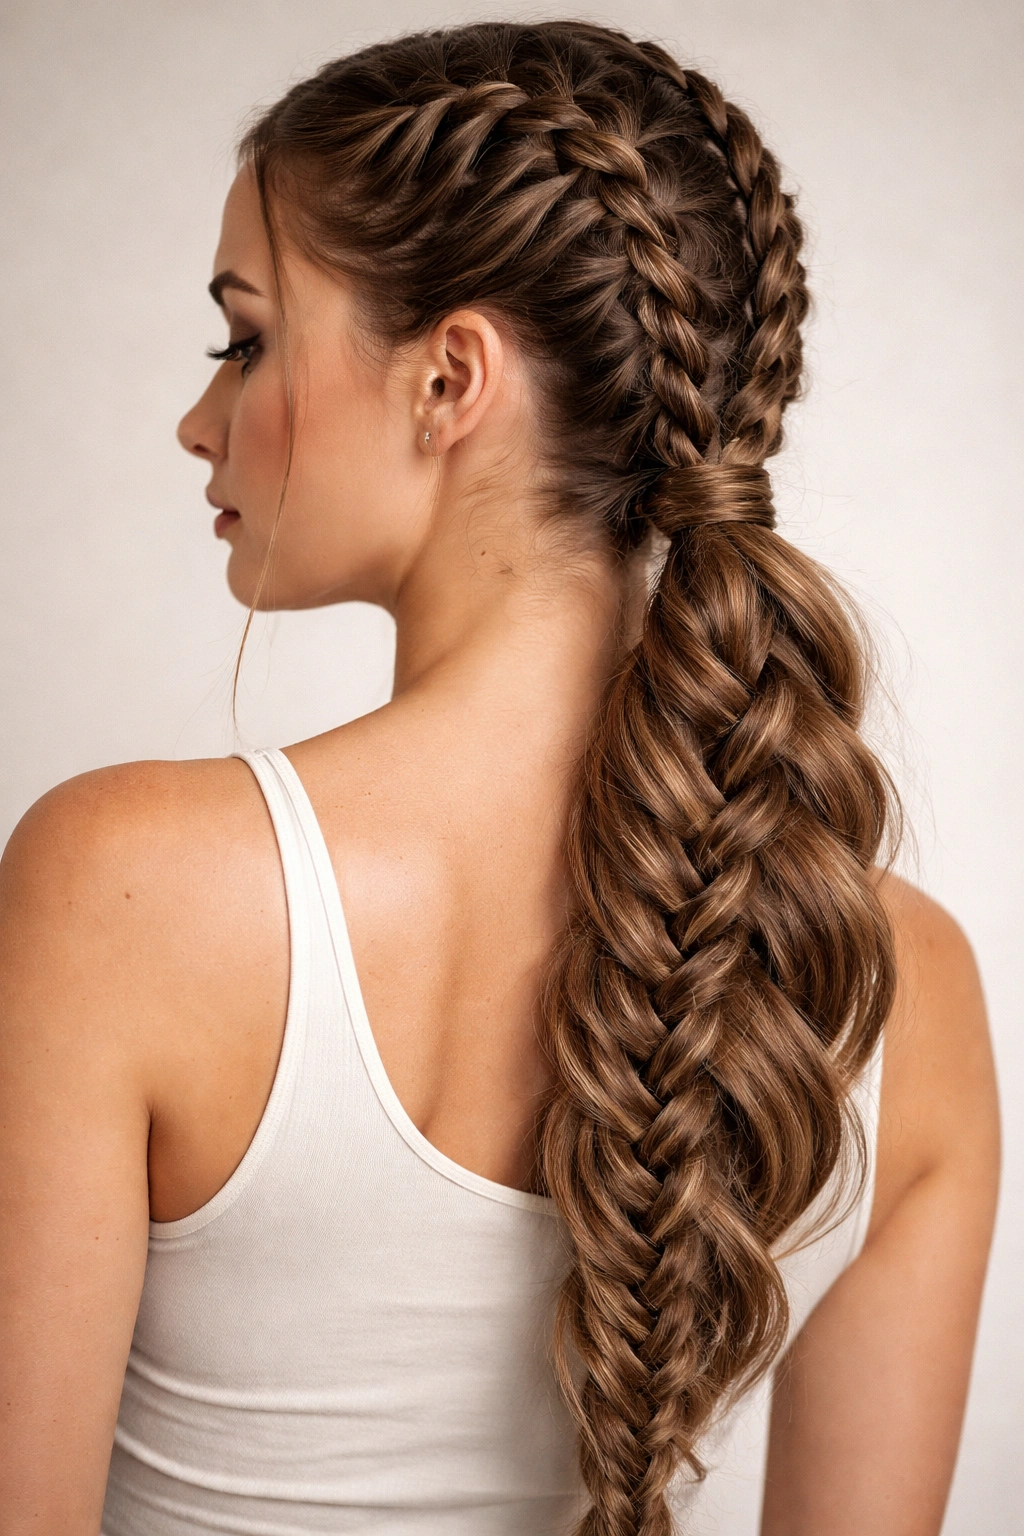
This elevated version takes your double dutch braids and continues the braiding pattern into your ponytail itself, creating a completely braided look from crown to tips that feels intricate, intentional, and absolutely stunning when you have thick hair to work with. After you secure your ponytail, you’ll take that gathered hair and divide it into three sections, then continue Dutch braiding until you reach the end. It’s more work than a standard braid ponytail, but the impact is completely worth the effort.
Why Extended Braids Maximize Thick Hair
Creating braids all the way through your length gives you maximum visual texture and movement—especially important with thick hair, which can sometimes feel heavy or monolithic in standard ponytails. The extended braiding also distributes your hair’s weight more effectively, making the whole style feel lighter and more dynamic. This version reads as polished and sophisticated while still being completely wearable for regular activities.
Executing the Full-Length Braided Look
- Create your double dutch braids as usual and secure them into a ponytail
- Divide your ponytail into three sections of equal thickness
- Continue using the Dutch braiding technique on those three sections, working down to the ends of your hair
- The ponytail braid might feel awkward at first, but work slowly and you’ll find your rhythm
- Secure the end of your ponytail braid with a small elastic that matches your hair color
- If you want extra security, weave a thin ribbon through your ponytail braid as you create it
Pro tip: This style holds best when you create it on day-two or day-three hair with some natural texture—freshly shampooed hair can be too slippery to braid smoothly all the way through.
8. Voluminous Double Dutch Braids with Teased Crown
This glamorous version starts by teasing and volumizing your crown before you create your braids, building in height and fullness from the very beginning, then creating your double dutch braids with that voluminous foundation. You’ll use a teasing brush to backcomb your crown area, smooth the top layer, and create an intentional height, then braid from that lifted starting point. The combination of height, texture, and braided detail feels genuinely sophisticated and photo-worthy.
Why Teasing Works Beautifully with Thick Hair
Thick hair takes teasing incredibly well because you have the volume to work with—you’re not trying to create fullness that isn’t there, you’re just amplifying what you already have. The teased crown creates a flattering lifted effect that works for almost any face shape, and when combined with braids, it creates visual dimension and movement that single hairstyles rarely achieve. This is the version that makes you look like you’ve gotten professional styling done, even if you’re doing it yourself in your bathroom.
Building in Height Correctly
- Use a fine-tooth teasing brush or backcomb to gently backcomb the hair at your crown, working from the hairline back to roughly 2 inches deep
- Smooth the top layer gently with your brush, leaving the teased texture underneath to provide lift
- Use a light hairspray to set the volume in place
- Create your braids starting from this teased crown area, working down and back
- The height gives your braids a starting point that makes them look fuller and more intentional
Worth knowing: You don’t need extreme height to get the flattering effect—even modest teasing at the crown makes a noticeable difference and creates that intentional, styled appearance.
9. Side-Swept Double Dutch Braids
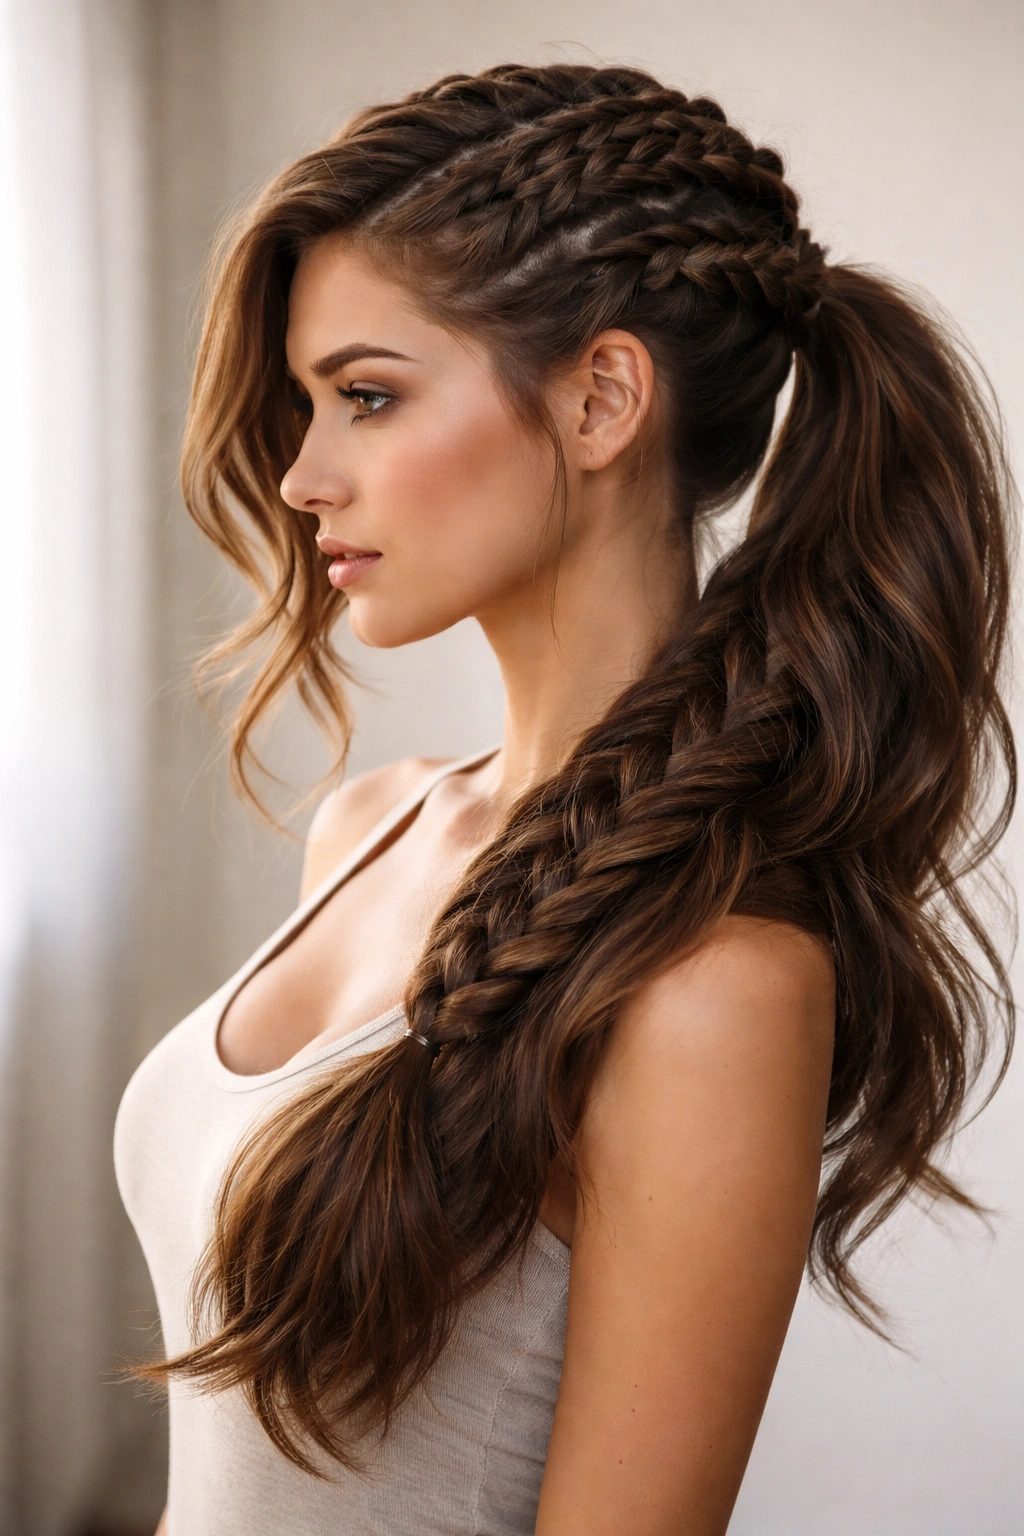
Instead of braiding straight back from both sides, this version angles both braids toward one side of your head, gathering them into a single side ponytail for an asymmetrical, romantic look that feels fresh and modern. You’ll create your braids with a slight outward angle as you work down, so they naturally converge toward the side of your head where you want your ponytail, creating visual movement and interest. It’s a subtle directional shift that completely changes the style’s vibe.
The Magic of Asymmetry
Side-swept styles automatically feel more interesting and modern than center-parted versions, and they work beautifully with thick hair because the asymmetry gives your volume direction and purpose. This version is ideal if you have a side part you prefer naturally, or if you want to draw attention to one side of your face (like if you want to showcase one ear or draw attention to your better side in photographs). It’s also surprisingly flattering for people who find center parts overwhelming on their face shape.
Creating the Side-Swept Effect
- Create a slight side part that’s more pronounced than your natural part, positioning it toward the side where you want your ponytail to end up
- Begin your Dutch braids at the hairline, but angle them inward and toward your chosen side as you work down
- The braids should naturally flow toward that side, creating a diagonal line down the back of your head
- Gather both braids into a ponytail on the side of your head, roughly 3-4 inches behind and above your ear
- The side positioning creates visual interest and movement even though you’re still using the same basic braiding technique
Pro tip: This style is particularly beautiful if you add some looseness and texture to your braids (like in Style #5), which enhances the romantic, flowing quality of the side-swept direction.
10. Double Dutch Braids with Incorporated Accessories During the Braid
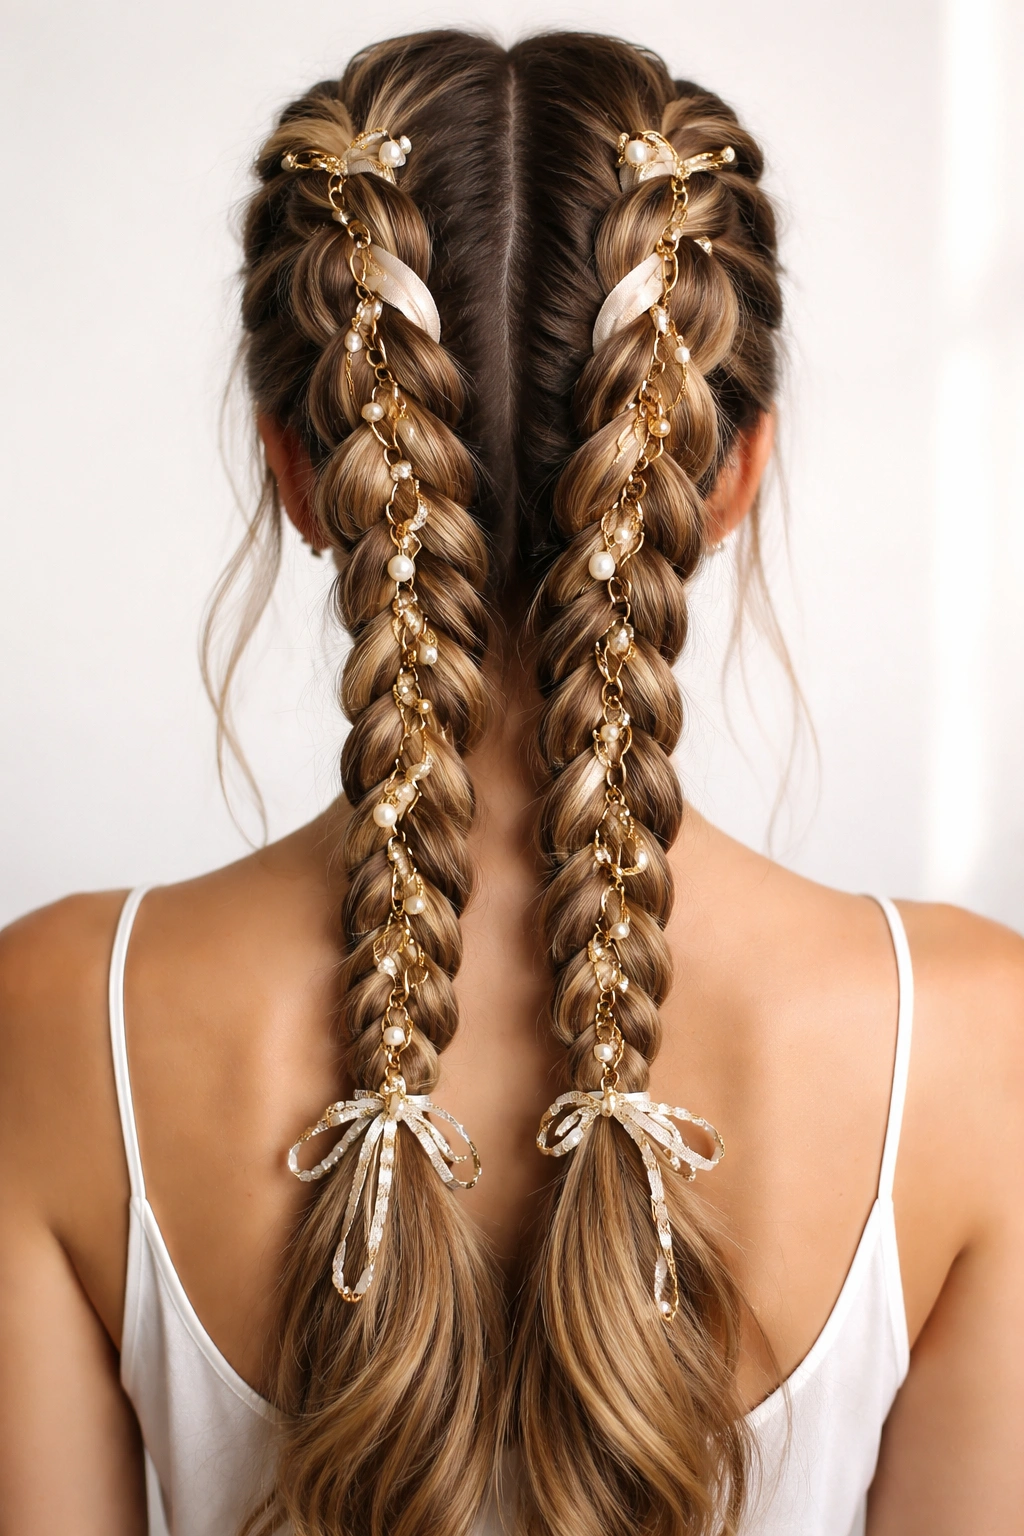
This version weaves decorative elements directly into your braids as you create them, not after. You can use thin scarves, ribbon, decorative thread, or even faux locs temporarily woven through your braid sections, creating a completely personalized, one-of-a-kind look that feels artful and intentional. The key is incorporating the accessories as part of your braiding pattern, which creates a seamless, integrated appearance rather than an add-on feeling.
Making Accessories Part of Your Braid Structure
When you incorporate accessories during the braiding process, they become integrated into your style’s structure rather than sitting on top—this makes them feel intentional and creates visual impact that’s impossible to achieve by adding them afterward. With thick hair, you have plenty of substance for accessories to grip and sit visibly on, so your incorporated elements really stand out. This is the version for anyone who loves customization and wants to make a statement.
Weaving Accessories Into Your Braid
- Before you start your braid, clip or tie your accessory to the starting point at your hairline
- As you create your Dutch braid, incorporate the accessory as if it were a fourth strand, crossing it under with your other sections
- Keep the accessory positioned so it weaves visibly through your braid rather than disappearing underneath
- The accessory should create a visible thread of color or texture running through your braid
- Secure both the braids and the accessories together into your ponytail
Worth knowing: Thinner accessories work better than thick ones—thin scarves, ribbon, and lightweight decorative thread all integrate smoothly, while chunky accessories can make braids feel too bulky or uncomfortable.
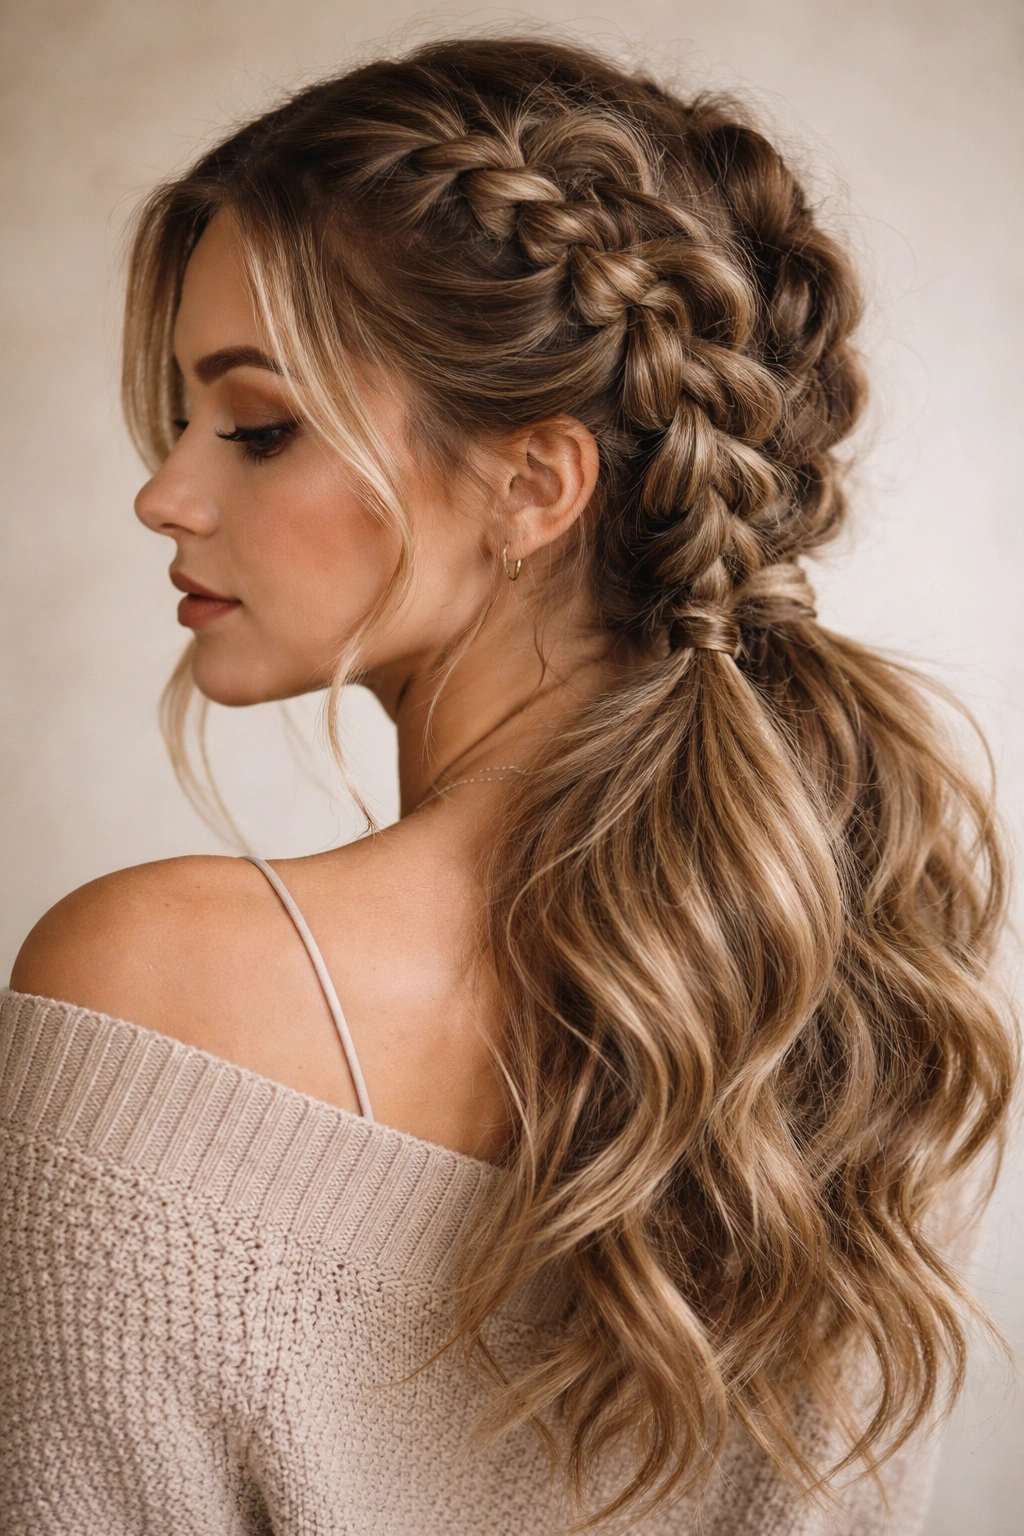
11. Braided Crown With Soft Ponytail Drop

This romantic, hybrid version creates the appearance of a braided crown circling your head by bringing your double dutch braids around the sides and pinning them at the back of your head, then letting your remaining hair drop down in loose waves or curls from that braided framework. It’s more complex than a standard braid ponytail, but the result is genuinely stunning—you get the structure and polish of braids combined with the softness and femininity of long, loose hair.
Why This Hybrid Approach Works
By combining braided structure with loose length, you get visual interest, dimension, and movement all at once—the braids provide the sophisticated element while the dropped hair provides softness. This version feels particularly romantic and works beautifully for events where you want to look special but not overly styled. With thick hair, the dropped section has immediate volume and texture, making the overall style feel fuller and more lush.
Creating the Braided Crown Effect
- Create your double dutch braids as usual, but don’t secure them into a tight ponytail
- Instead, bring both braids around toward the back of your head and cross them at the nape of your neck
- Pin the braids in place at the back using bobby pins, creating a crown-like effect
- Leave all your remaining hair loose below the braided section
- Lightly curl or wave your loose hair to enhance the romantic effect—or leave it straight if you prefer
Pro tip: This style holds best if you use bobby pins with grips rather than smooth pins, and if you secure your braids at multiple points rather than trying to hold everything with one pin.
12. Polished Double Dutch Braids With Sleek Ponytail Finish
This professional, streamlined version brings together everything polished—tight, clean braids combined with a perfectly sleek ponytail with no flyaways, creating the kind of put-together aesthetic that works for boardrooms, events, or anywhere you want to look absolutely intentional and professional. You’ll create your braids tightly, smooth your crown and any baby hairs with a smoothing gel, and secure your ponytail with maximum polish and zero texture. It’s the “I have my entire life together” version of double dutch braids.
When Maximum Polish Is the Goal
This version is your go-to for professional environments, important events, or any situation where you want to communicate competence and sophistication through your appearance. The tight braids and sleek finish eliminate any chance of a hair being out of place, and the clean aesthetic pairs beautifully with any outfit. With thick hair, this version is actually easier to achieve than on finer hair because your volume naturally fills out the braids without requiring looseness or texture tricks.
Achieving Maximum Polishness
- Apply a lightweight smoothing serum or anti-frizz product to your damp hair before you start
- Create your braids tightly, with neat, even sections and consistent tension throughout
- Use a fine-tooth comb to smooth your crown and hairline, applying a light gel or pomade to keep everything perfectly in place
- Smooth any baby hairs or flyaways at your hairline with a small, precise brush and a touch of gel
- Secure your ponytail with a high-quality elastic that won’t slip, and consider using the wrap-around technique (Style #4) for maximum finish
Worth knowing: The tighter you pull your braids, the more polished the overall effect—but if you have a sensitive scalp, create them as tight as you can comfortably manage rather than sacrificing comfort for appearance.
Final Thoughts
Double dutch braid ponytails have earned their place as one of the most versatile, flattering styles specifically because they work with thick hair rather than fighting against it. Whether you’re drawn to polished professional versions, romantic loose braids, or decorated variations, the foundation is the same: two braids that distribute your hair’s natural weight, create visual interest, and stay secure all day long. The variations you’ve just explored prove that this one basic technique can transform into a dozen completely different looks depending on your occasion, mood, and styling preferences.
The real beauty of mastering these styles is that once you understand the double dutch braid technique, you can adapt it infinitely. You can tighten or loosen your braids, add accessories, adjust your parting, change your ponytail height, incorporate texture, or combine techniques to create something entirely your own. With thick hair, you have the advantage of volume automatically making every version of this style look full, intentional, and effortlessly beautiful—which means you can focus purely on what version feels right for your day rather than worrying about whether your hair will cooperate.
Start with whichever version calls to you most, whether it’s the classic center-parted foundation or the braided crown with dropped hair. Practice the technique a few times, and you’ll find that these styles become faster and easier each time you create them. More importantly, you’ll discover that having a go-to style—or twelve of them—that you genuinely love wearing changes how you feel about your hair entirely. Thick hair is a gift, and double dutch braids are one of the best ways to make that gift shine.